Toddler Bed with Built-In Shelves
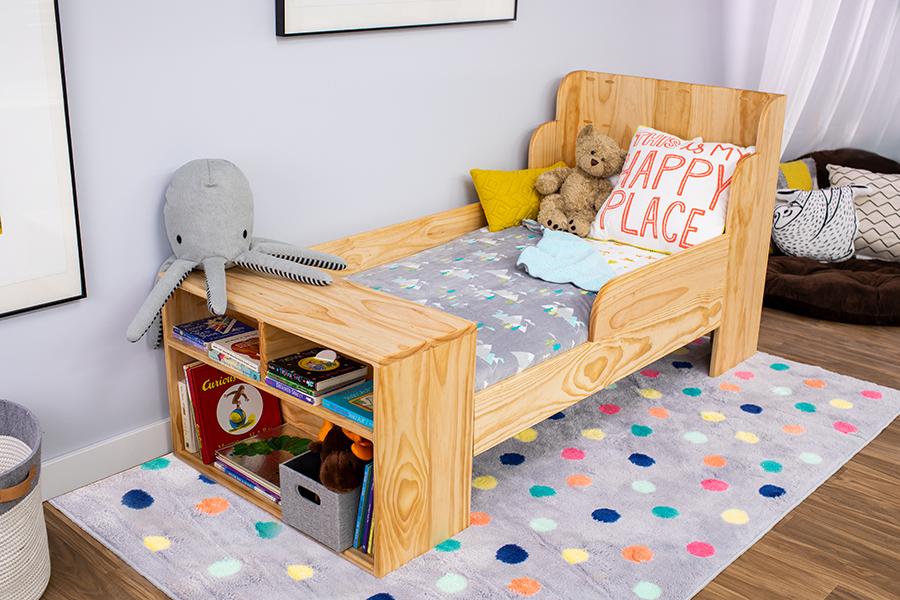
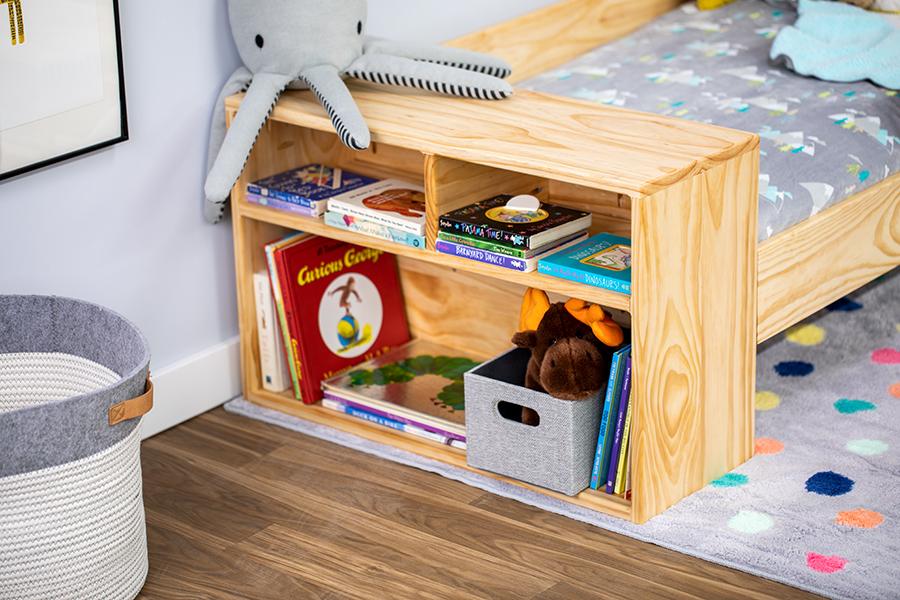
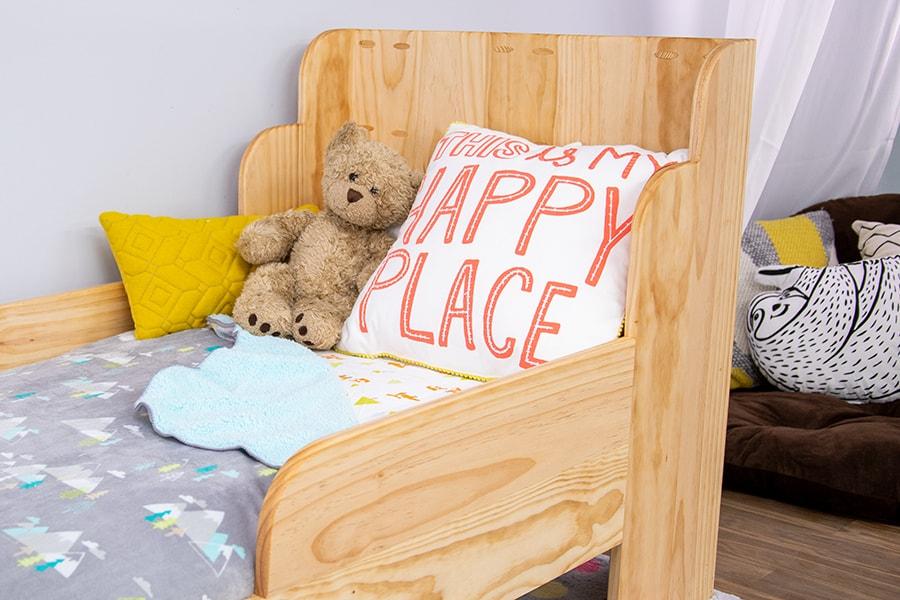
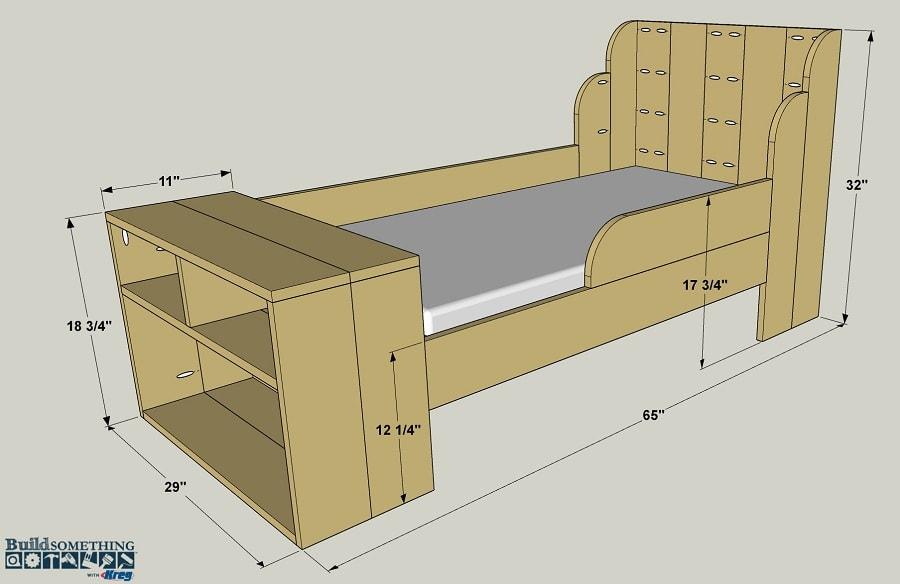
By Kreg ToolCreate an amazing space for your little one by building them this cool toddler bed. It offers great style, plus built-in shelves where they can keep their favorite books and toys. The bed is built from just nine 1×6 boards and a piece of plywood, and it all goes together with pocket-hole screws.
Directions
-
Make the Short Headboards
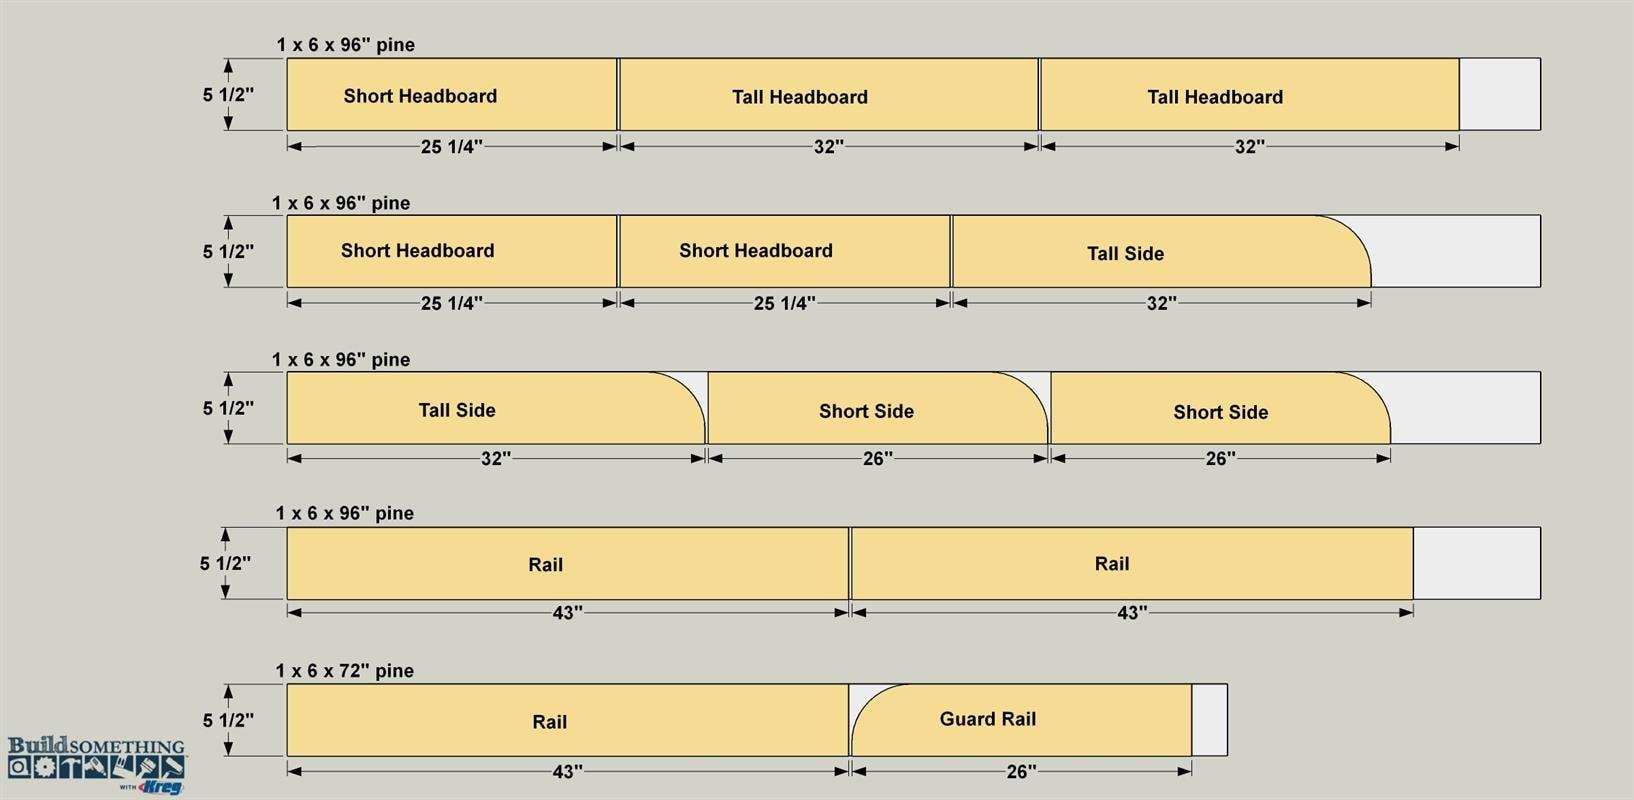
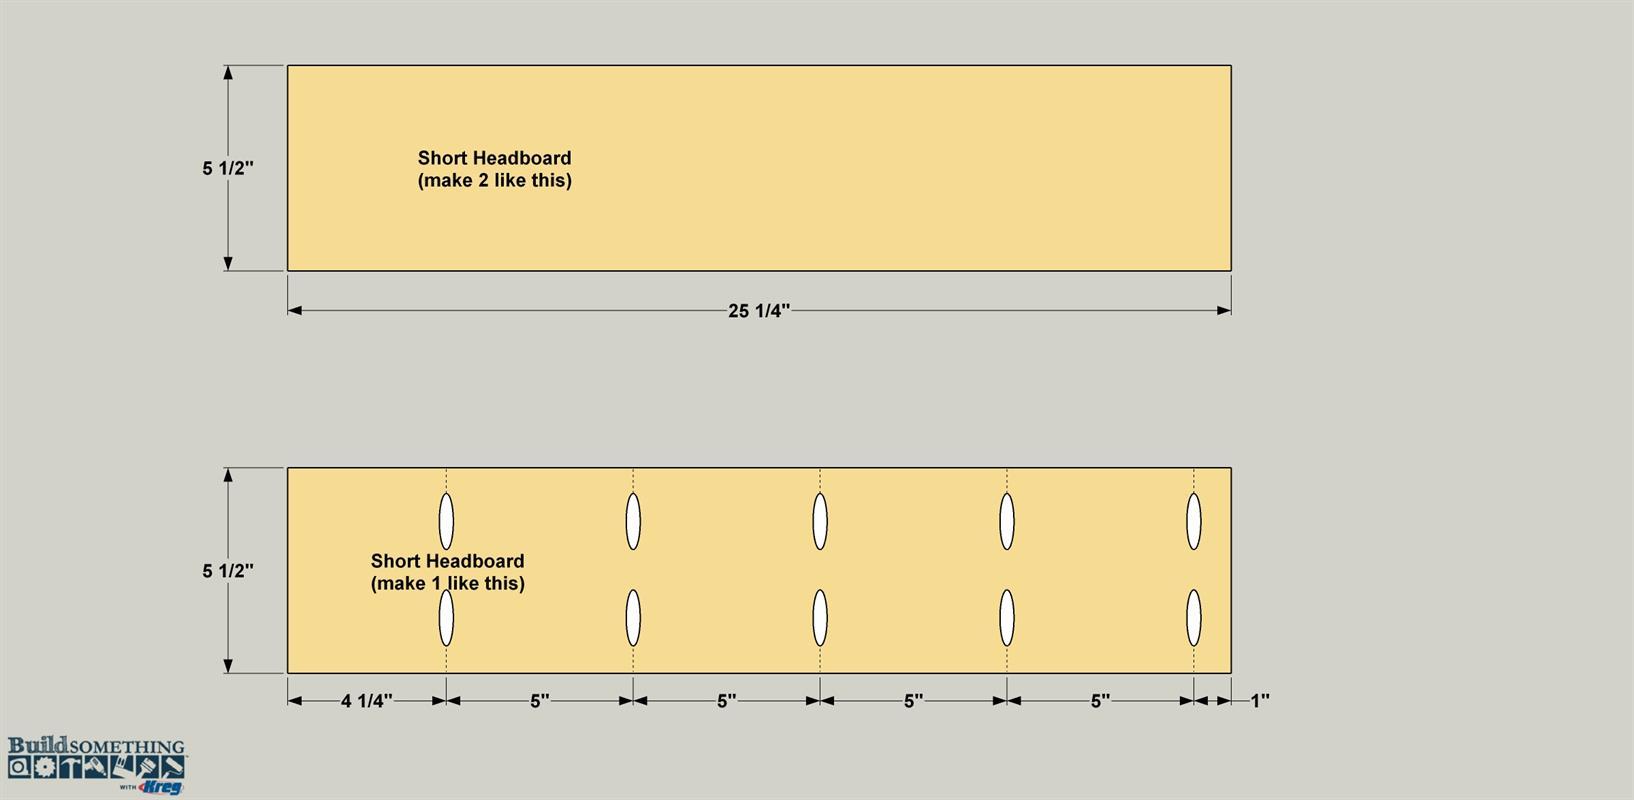
Start by cutting three Short Headboard boards to size from a 1x6, as shown in the cutting diagram. To drill the pocket holes, set your Kreg Jig for 3/4" material (you’ll leave it on this setting for the entire project). Now drill pocket holes in just one of the three boards at the locations shown.
-
Assemble the Short Headboards
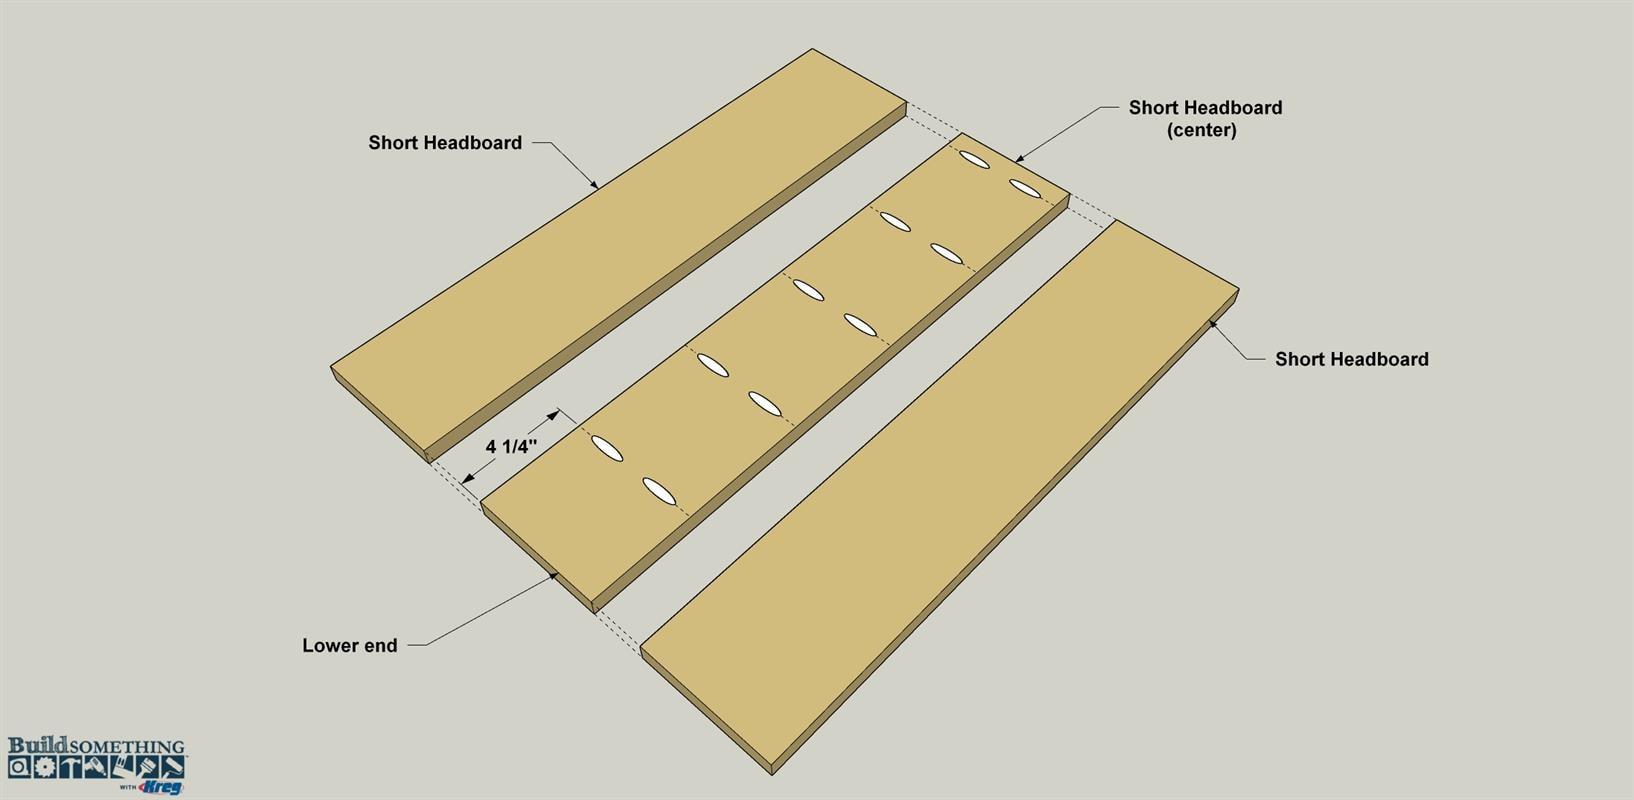
Place the Short Headboard with the pocket holes in between the other two. Apply wood glue to the edges of the center board. Make sure the faces, as well as the top and bottom edges are flush with one another. Secure the boards together with 1 1/4" Kreg Screws. If you’re using pine for this project, as we did, you’ll use coarse-thread screws throughout. If you choose to build your bed from a hardwood, such as oak or maple, use fine-thread screws instead.
-
Make the Tall Headboards
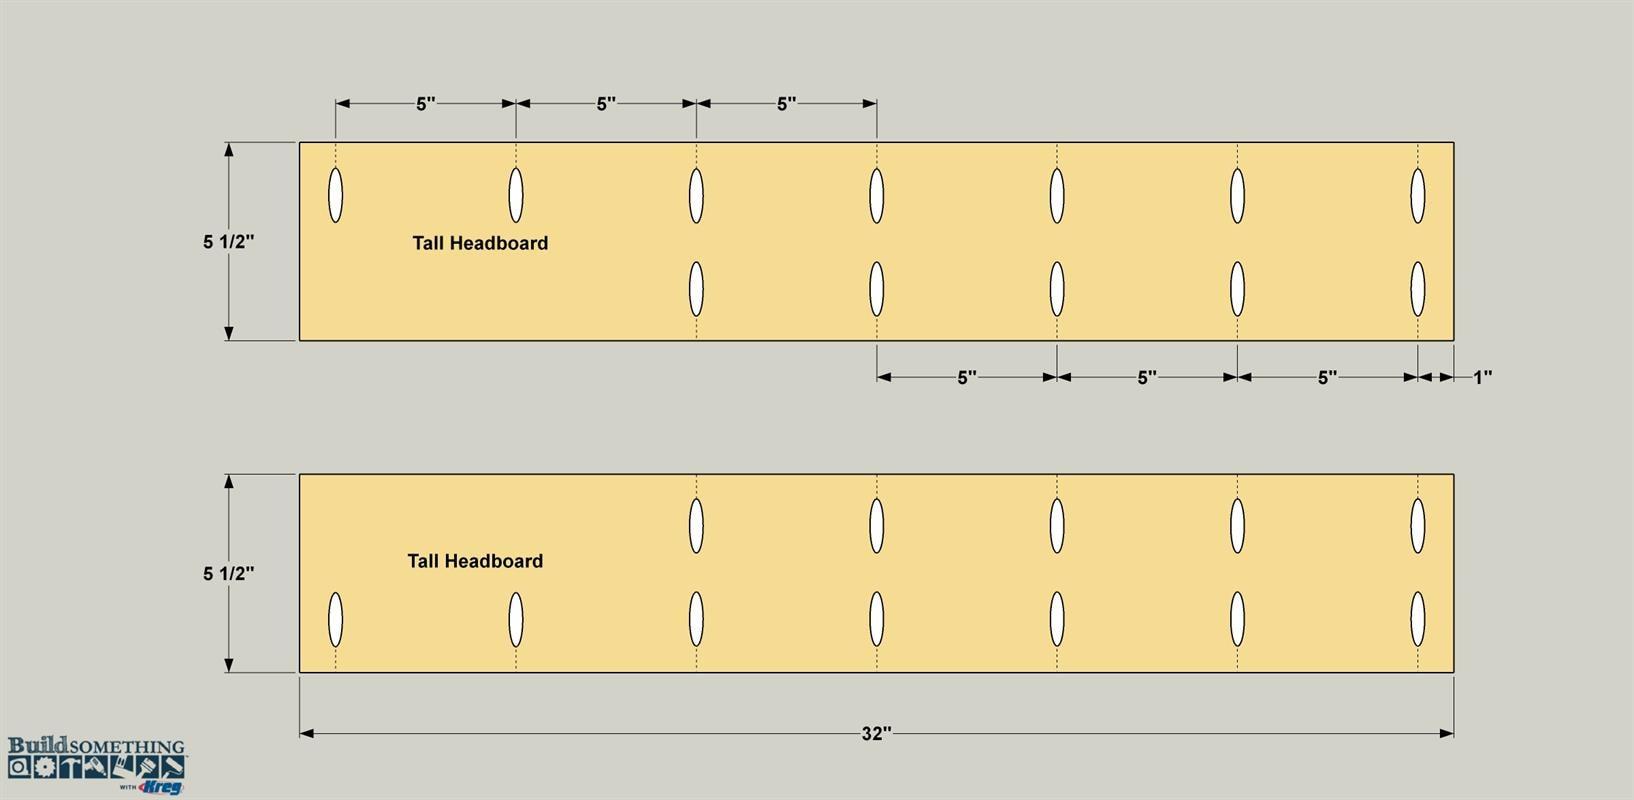
Cut two Tall Headboard boards to length from a 1x6, as shown in the cutting diagram. Then you can drill pocket holes in both pieces. Notice as you do this that the two boards mirror one another to create a left and a right piece.
-
Attach the Tall Headboards
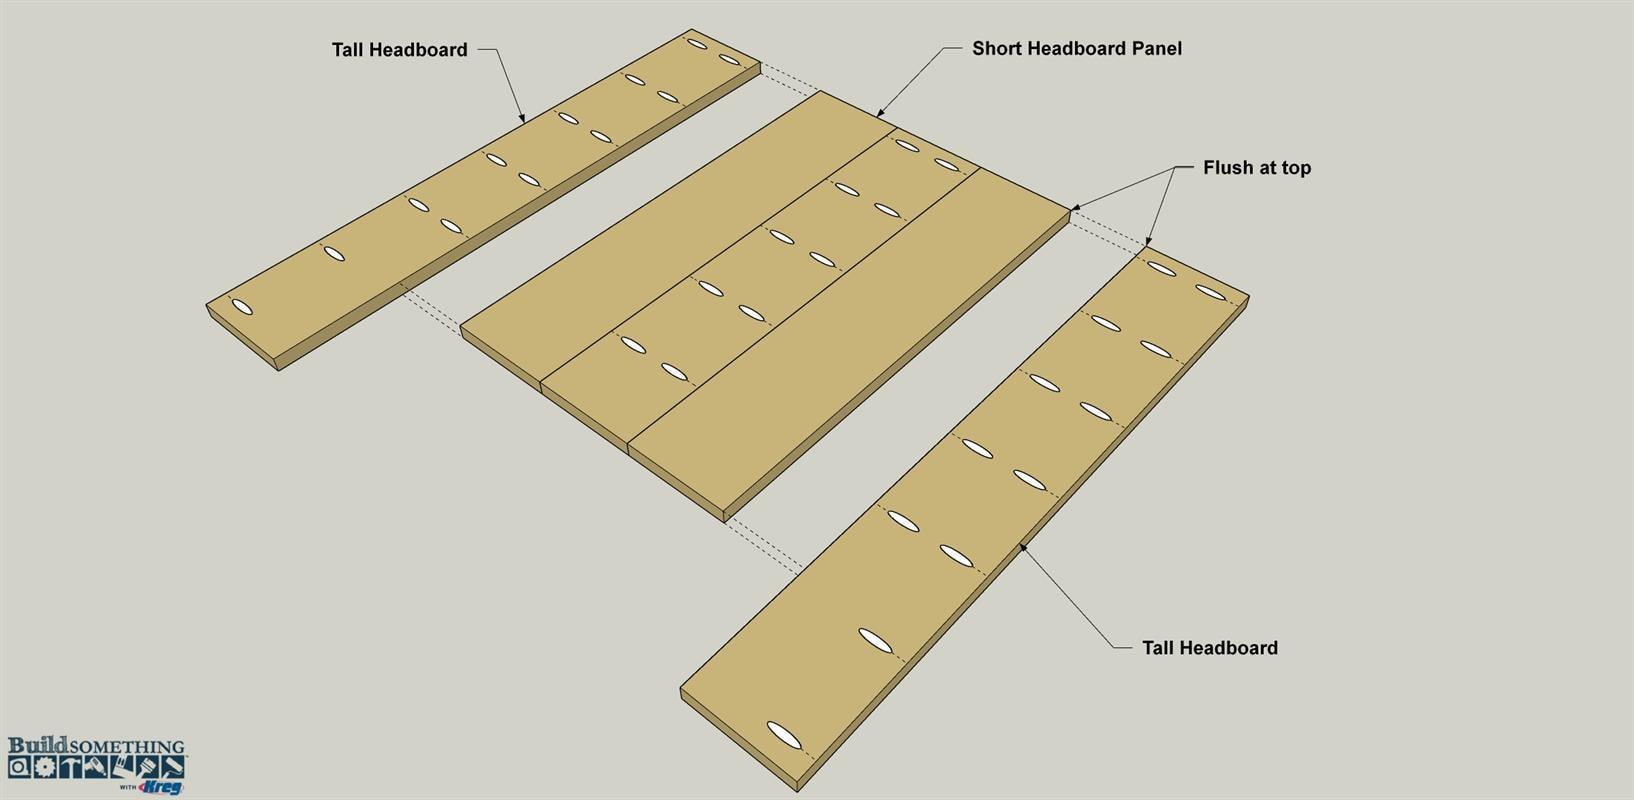
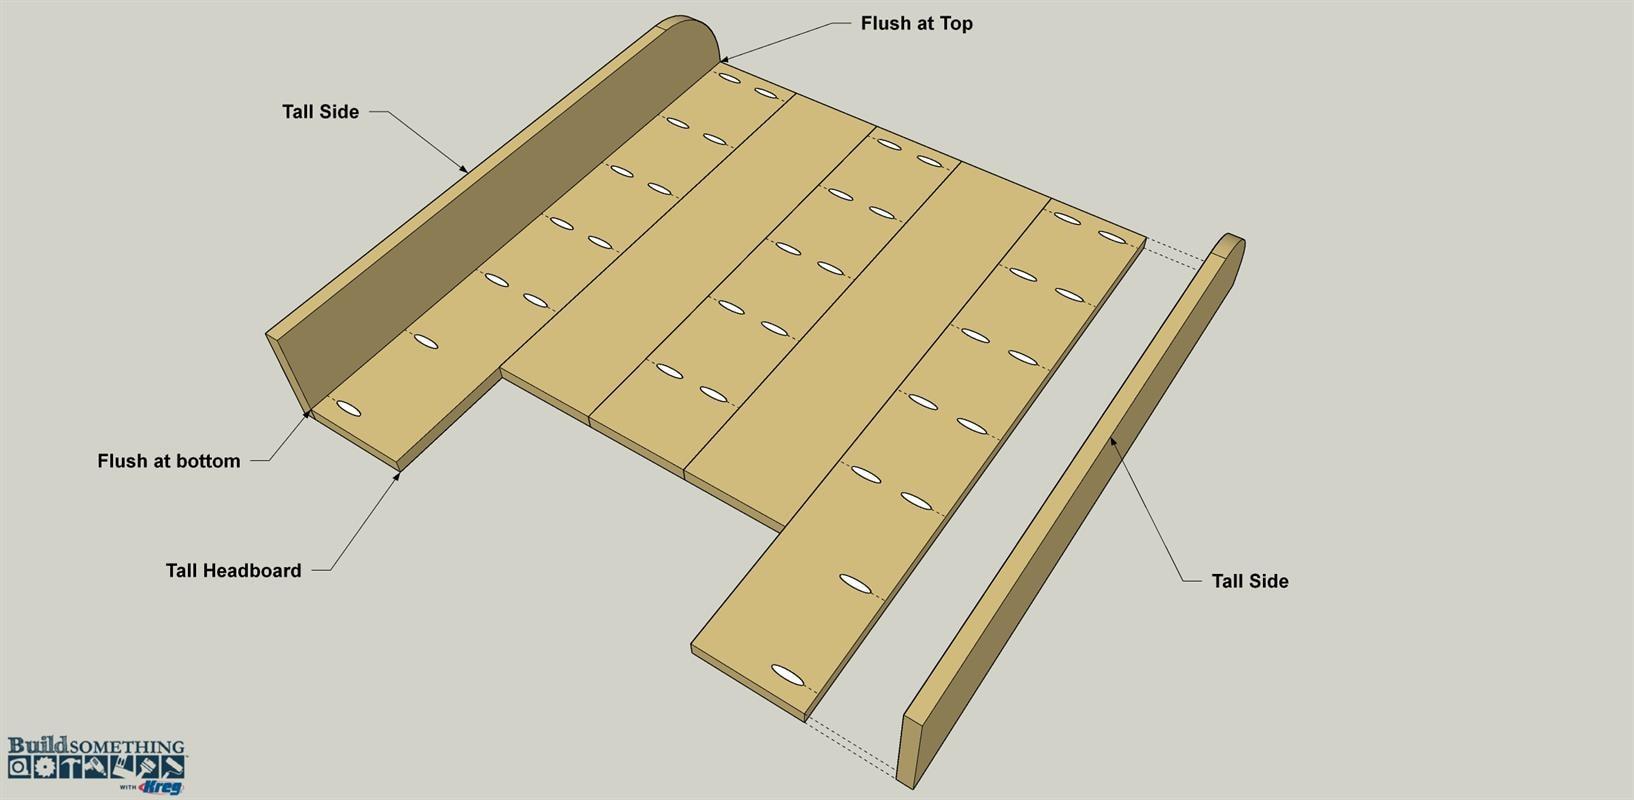
To complete the headboard panel, position the two Tall Headboard pieces, as shown, so the upper ends are flush with upper ends of the Short Headboards. Apply glue to the outer edges of the Short Headboards, and then attach the Tall Headboards using 1 1/4" Kreg Screws. Once the glue dries, sand both faces of the headboard assembly smooth
-
Make the Tall Sides
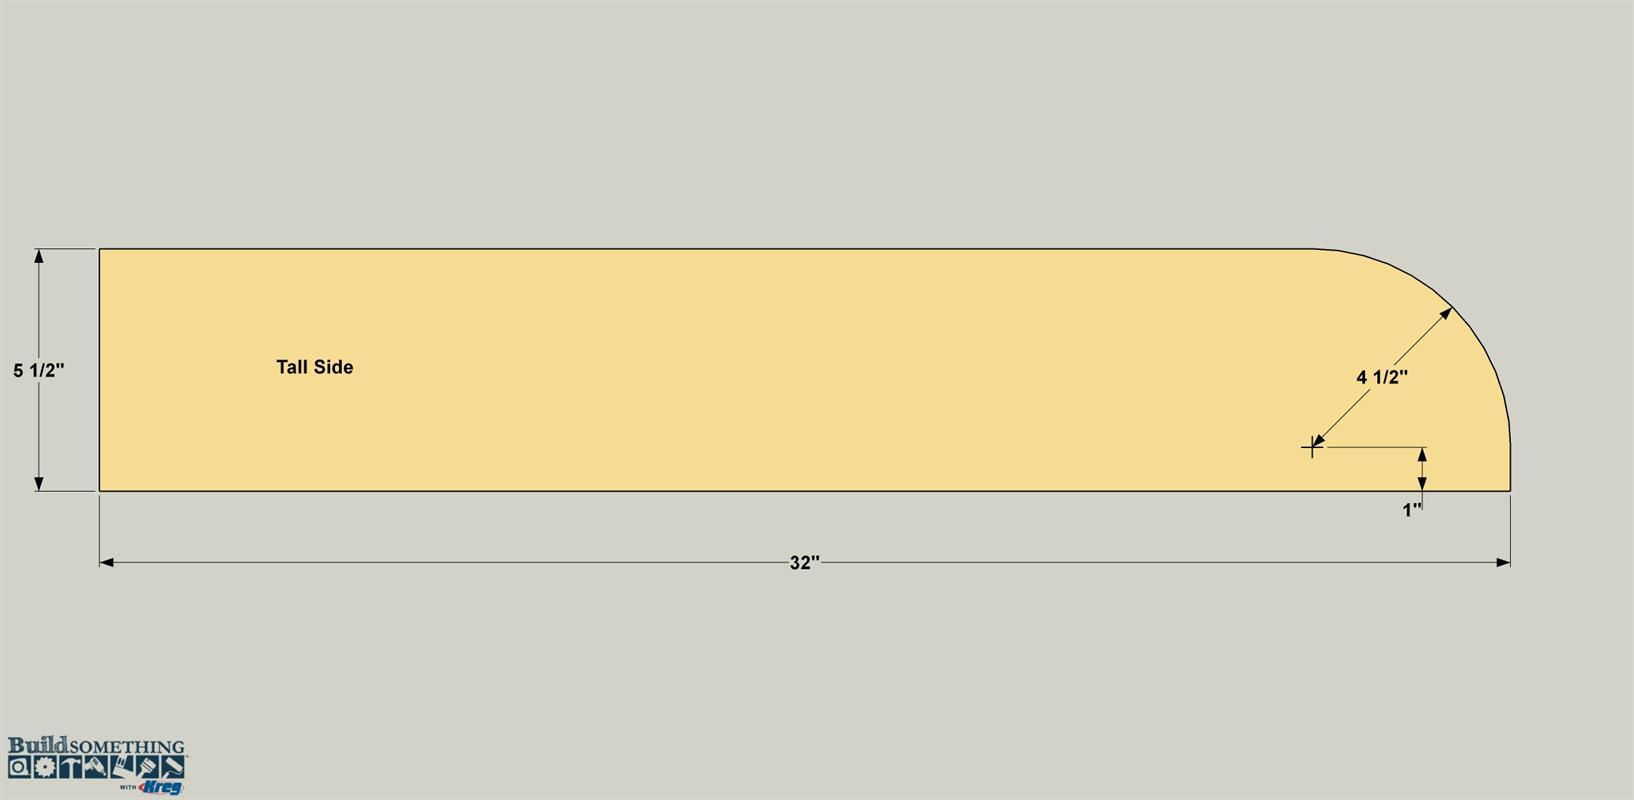
Cut two Tall Side boards, as shown in the cutting diagram. Then, on one of the boards, lay out the curved shape of the upper end. You can do this in a couple of ways. One is to lay out and draw the arc with a compass, as shown. The other way is to trace around a one-gallon paint can. After you’ve laid out the curve, cut the shape with a jigsaw and sand it smooth. Trace this board to mark the second Tall Side, and then cut and sand it to shape. Also sand the faces of both pieces smooth.
-
Make the Short Sides
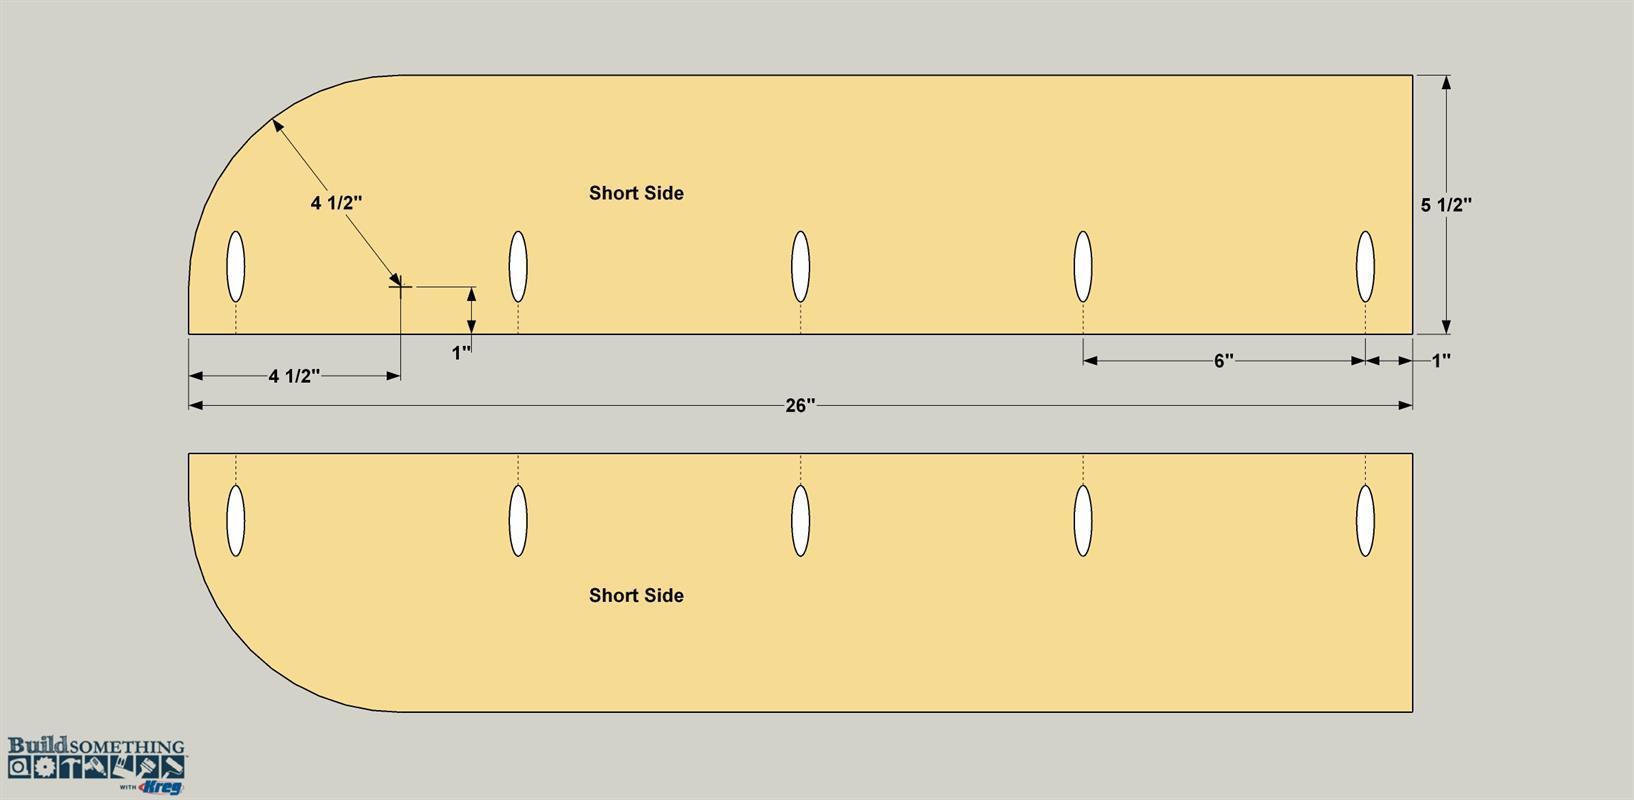
Cut the Short Sides to length from 1x6 pine as well. You can trace the curve from a Tall Side, once again. Then drill pocket holes in each board at the locations shown. Note that the pocket holes are placed so the pieces mirror one another. Sand the parts smooth after you drill the pocket holes.
-
Attach the Tall Sides
Now attach the Tall Sides to the headboard assembly using glue and 1 1/4" Kreg Screws. Note that the bottom and top edges of the Sides should be flush with the Headboard bottom and top.
-
Attach the Short Sides
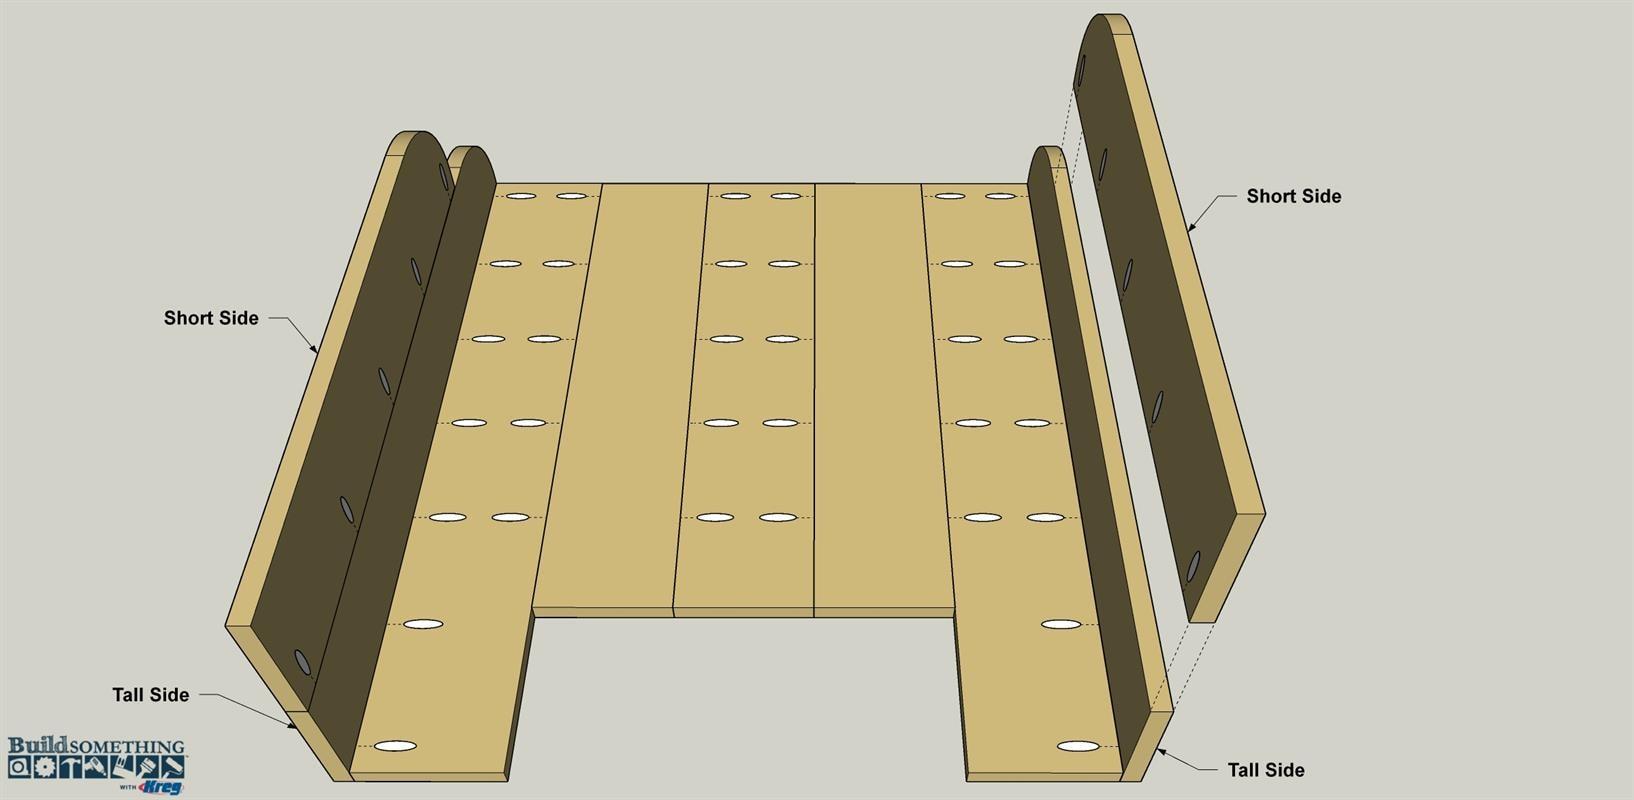
The Short Sides get attached next, positioned so they are flush with the lower end of the Tall Sides, as shown. Apply glue to the mating edge of each Short Side, and then attach them using 1 1/4" Kreg Screws.
-
Make the Rails
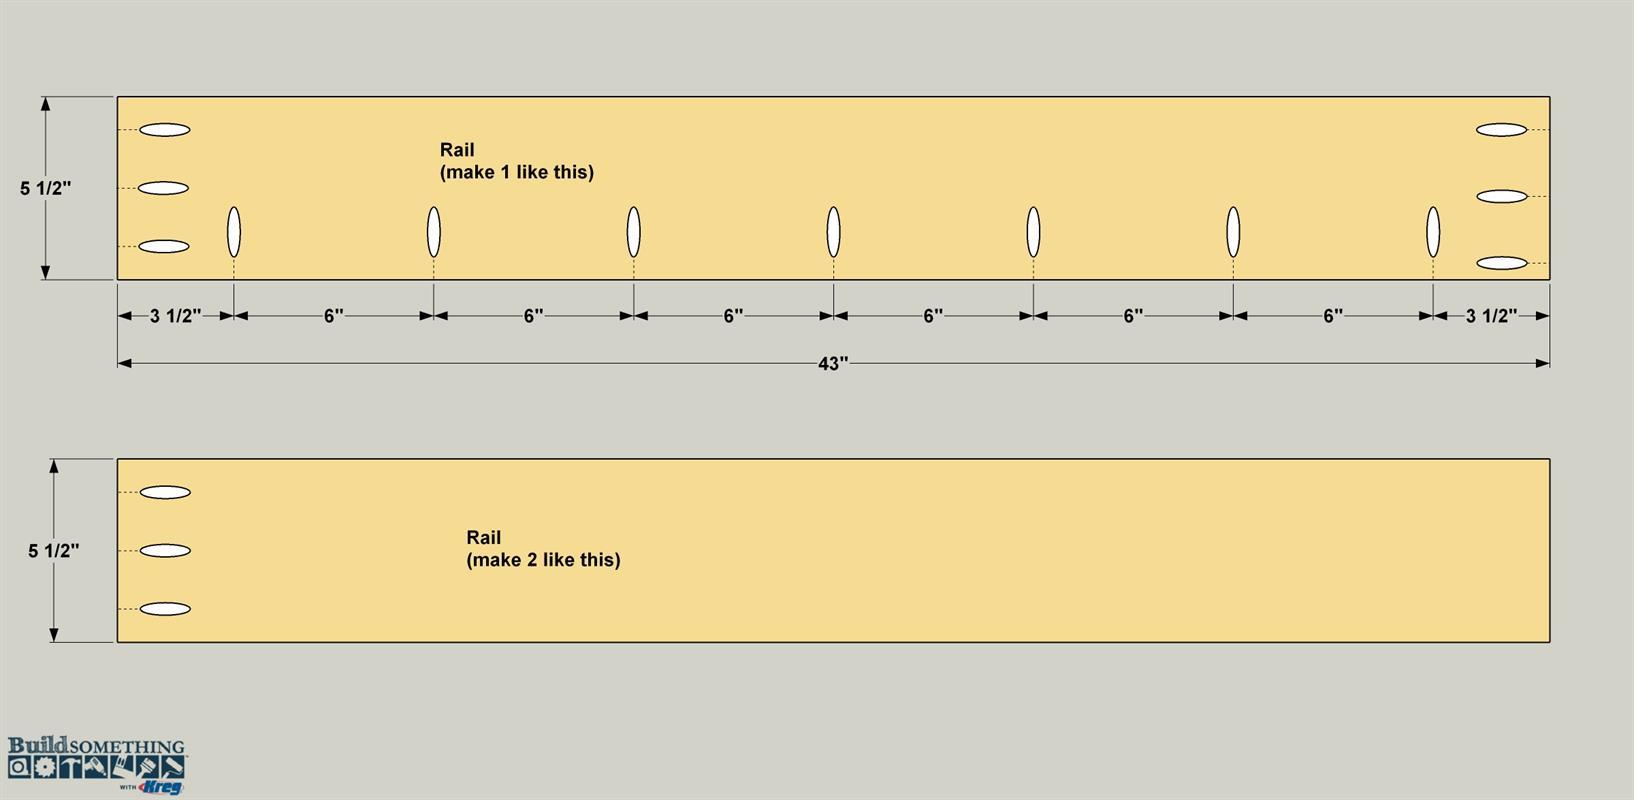
From 1x6 boards, cut three Rails to length, as shown in the cutting diagram. In two of the Rails, drill pocket holes only at one end, as shown. The third Rail, which will become the rear guard rail for the bed, gets pocket holes in both ends, as well as along one edge. Sand the Rails smooth.
-
Attach the Rails to the Headboard
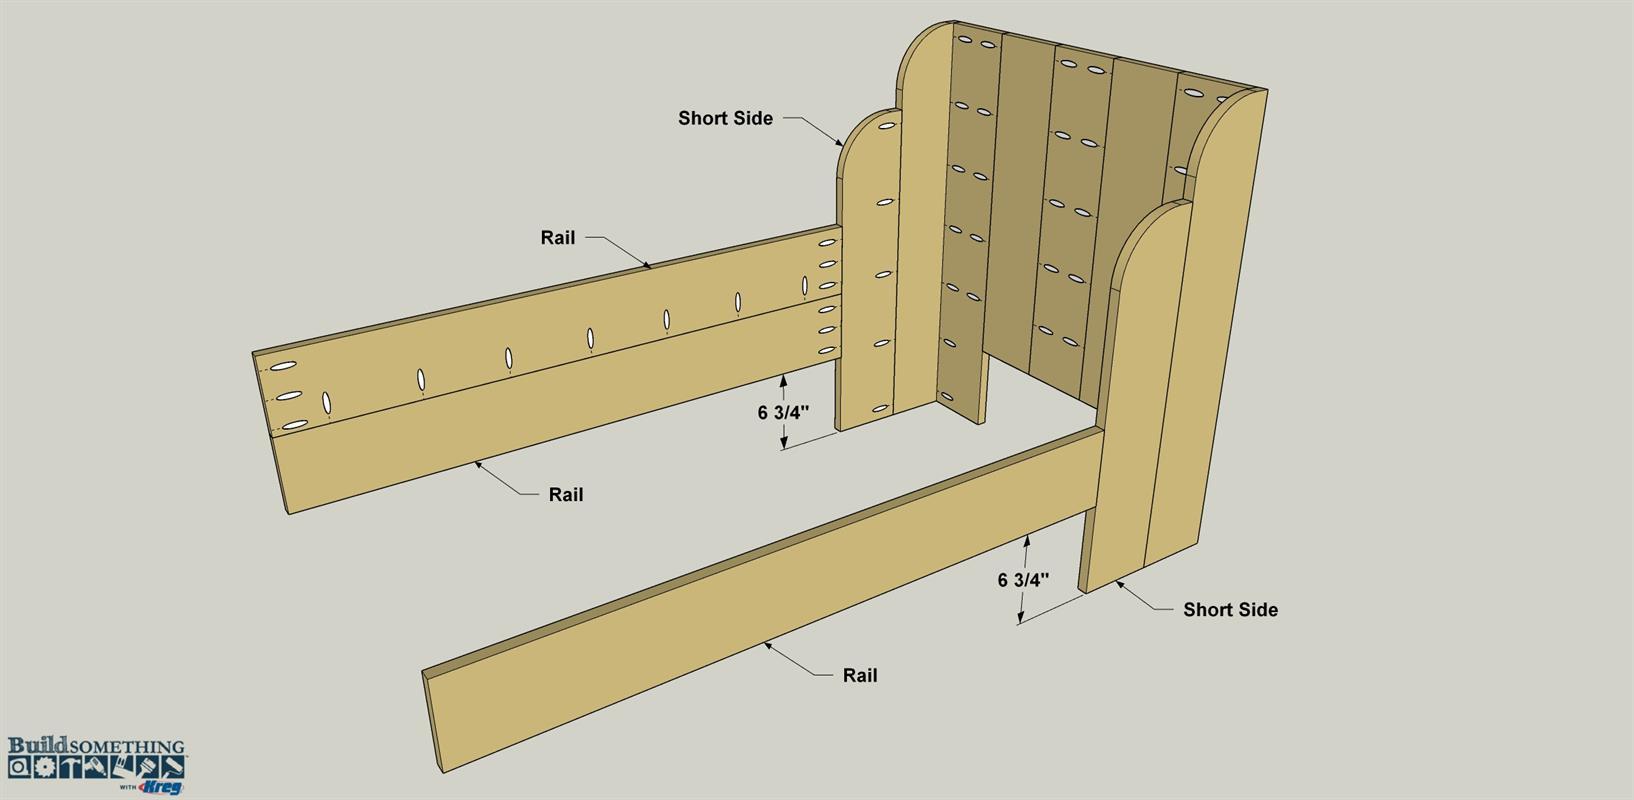
Mark the location of the Rails on the Short Sides, as shown. Spread glue on pocket-holed end of the two Rails that only have those pocket holes. Attach those two Rails to the Short Sides using 1 1/4" Kreg Screws. Next, spread glue along the lower edge of the third Rail (the edge with pocket holes), and screw it to the rear Rail, as shown.
-
Make the Guard Rail
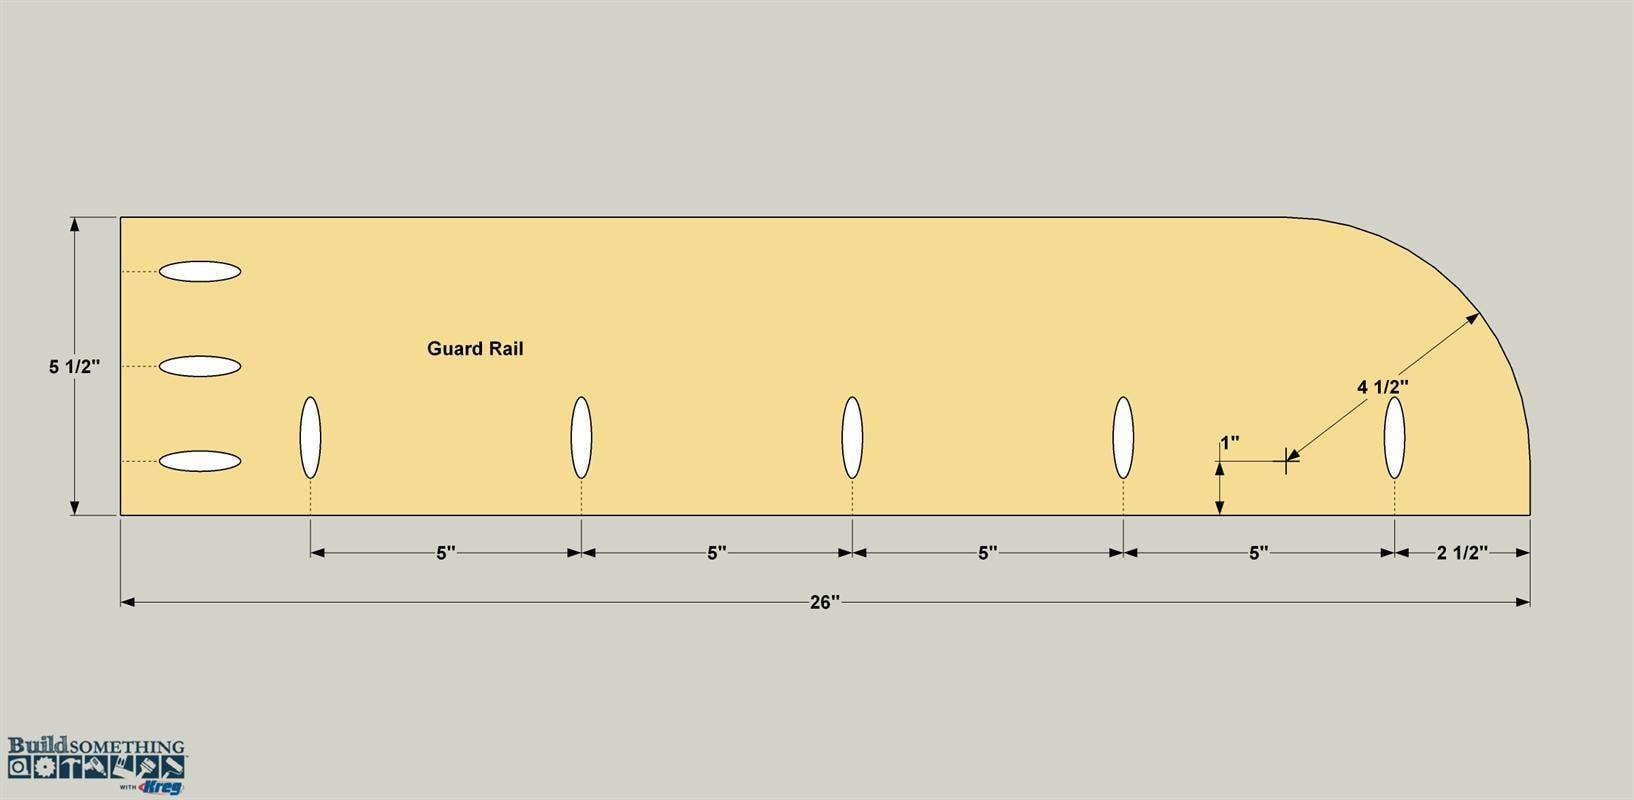
Cut the Guard Rail to length, as shown in the cutting diagram. Cut the curve at one end using the same techniques you used to make the other curves. Drill pocket holes at the locations shown, and then sand the Guard Rail smooth.
-
Attach the Guard Rail
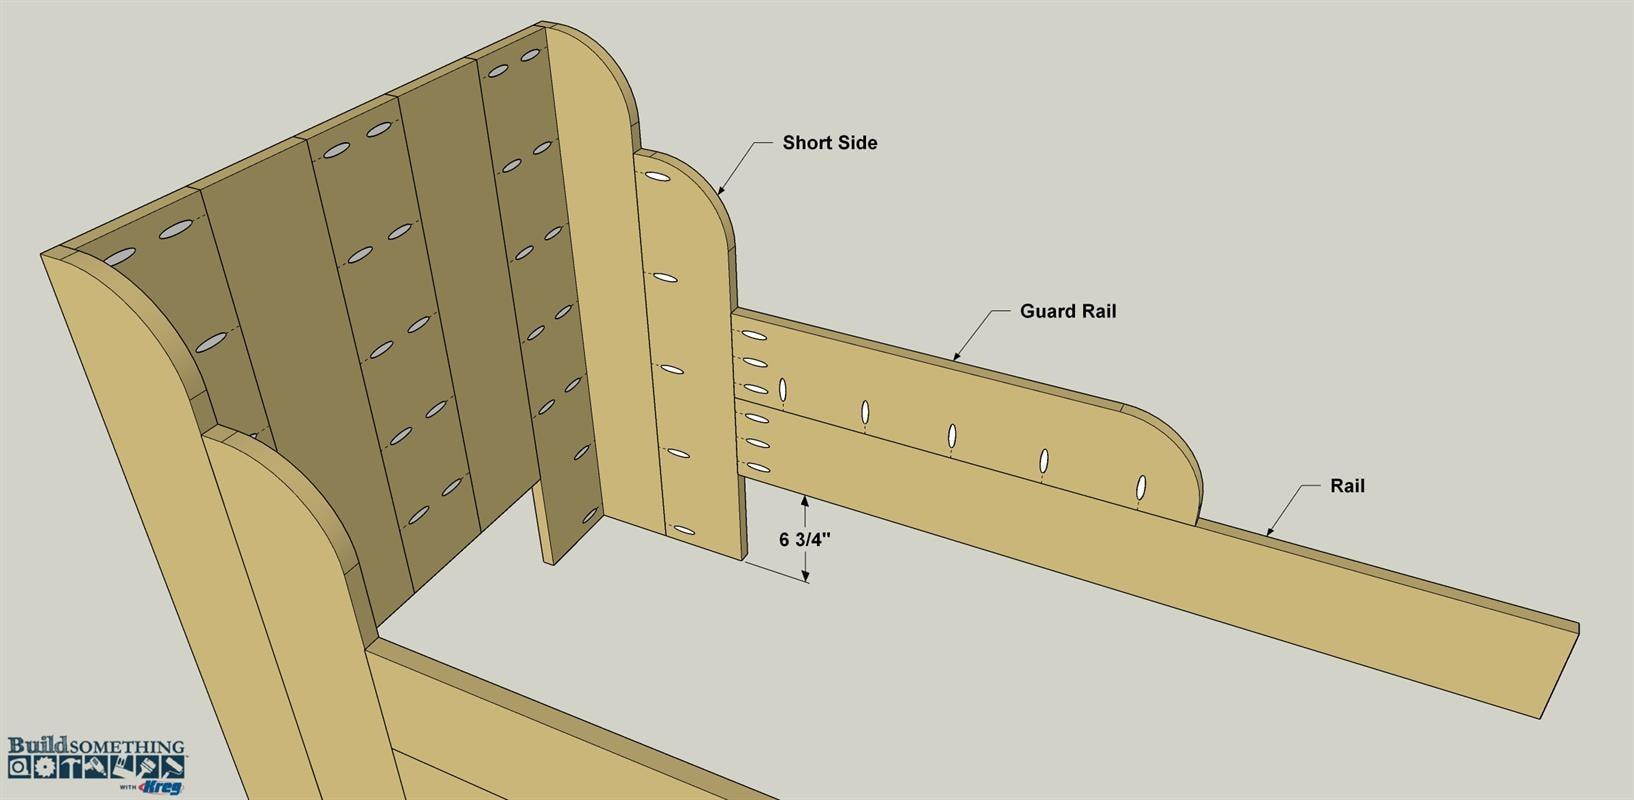
Position the guard Rail on the other Rail so that the pocket holes are facing down, and inward as shown. Spread glue on the lower edge and the end. The secure the Guard Rail with pocket-hole screws.
-
Make the Footboard
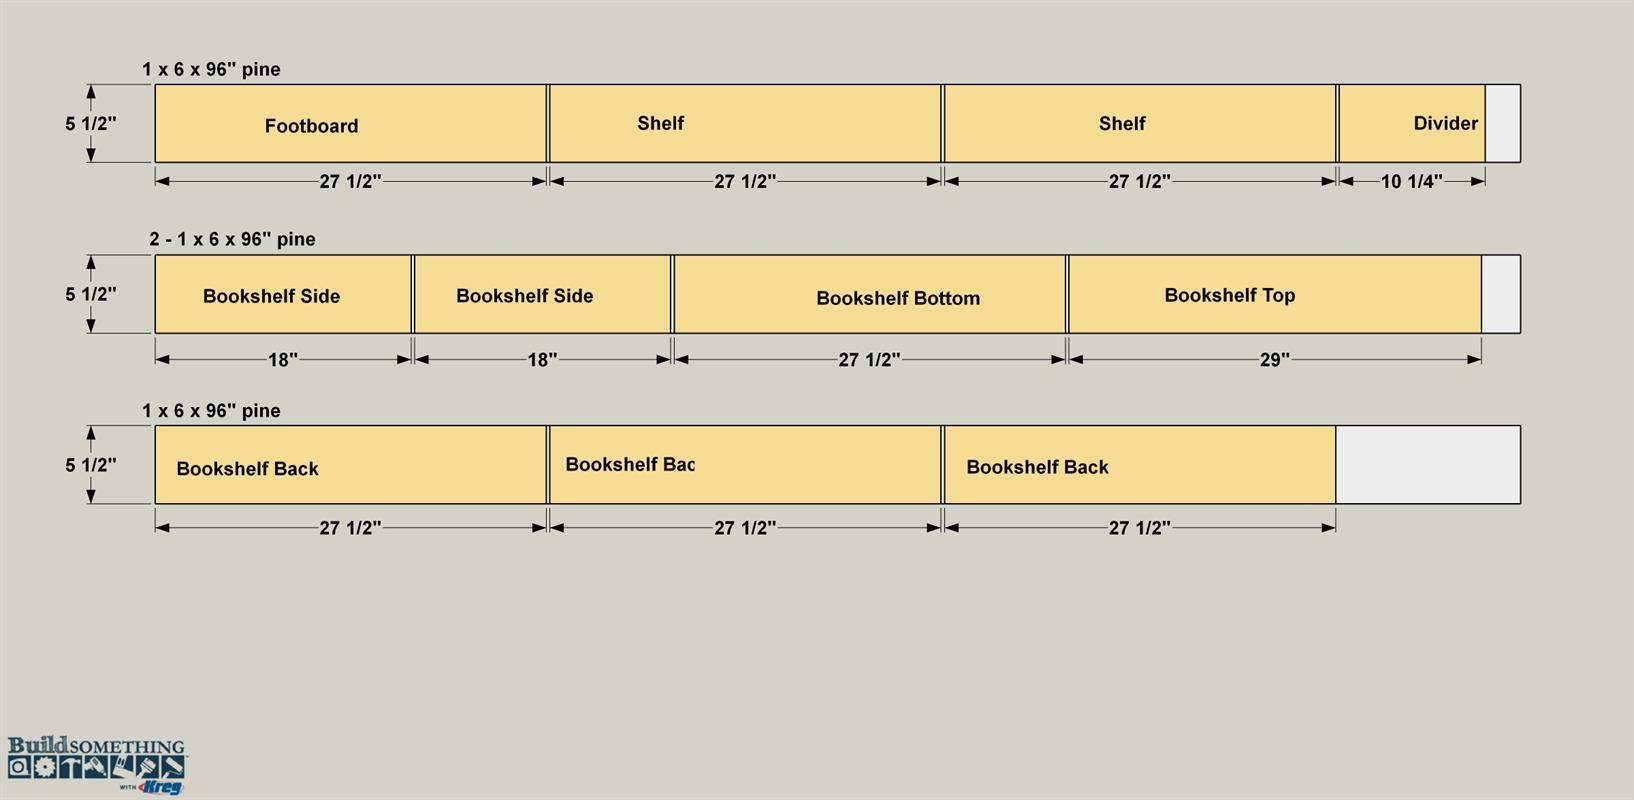
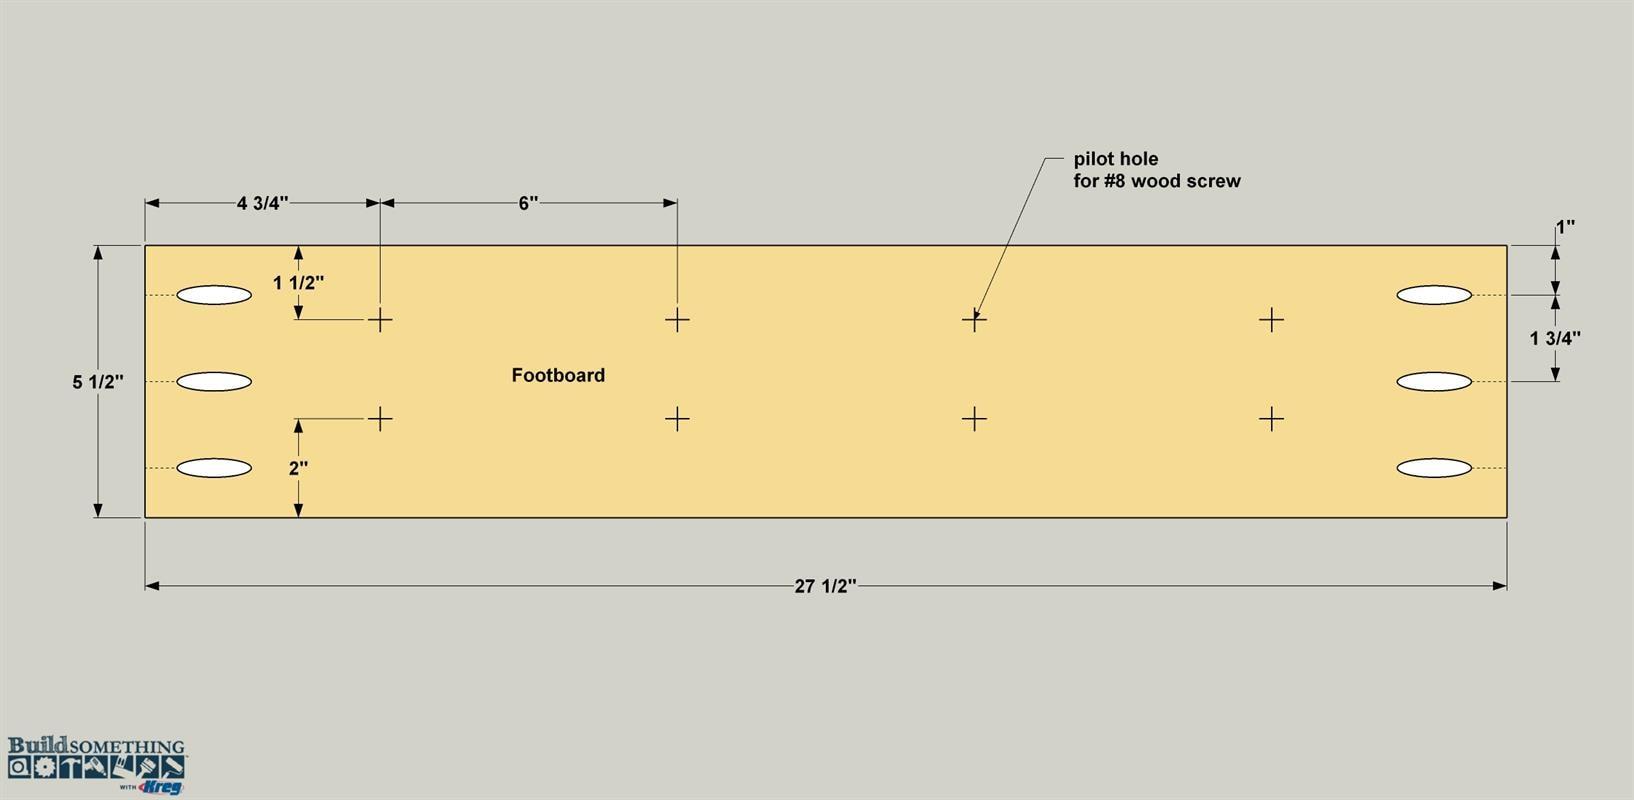
Cut the Footboard to length from a 1x6, as shown in the cutting diagram. Drill pocket holes where shown. Next, mark the locations for eight pilot holes. These will be for securing the Bed and the Bookshelf later. Drill the pilot holes with a 1/8" drill bit.
-
Attach the Footboard
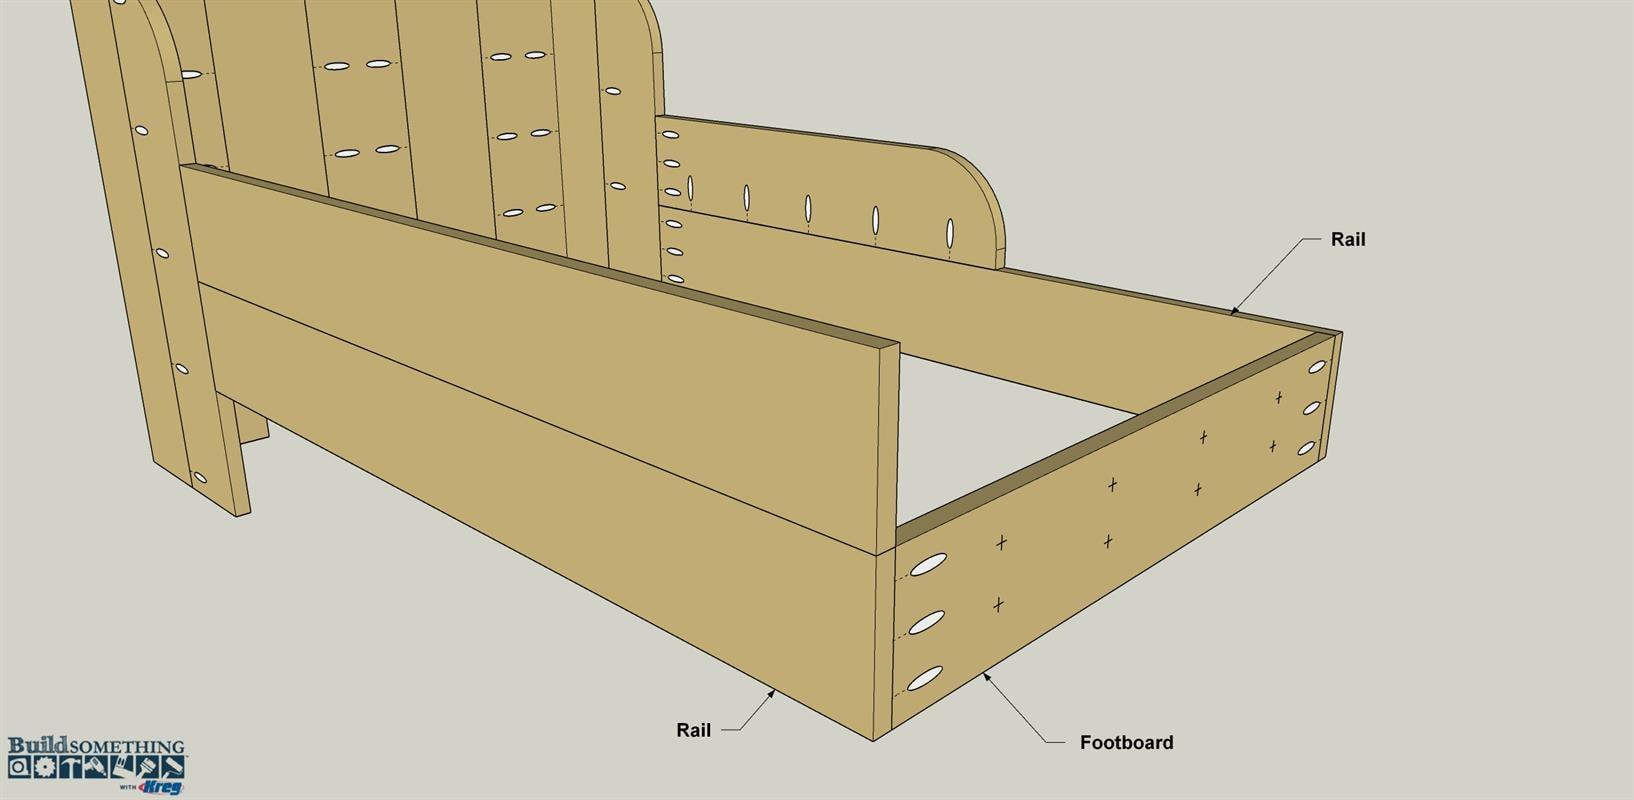
Now attach the Footboard to the Rails, as shown, using glue and 1 1/4" Kreg Screws.
-
Make the Plywood Bottom
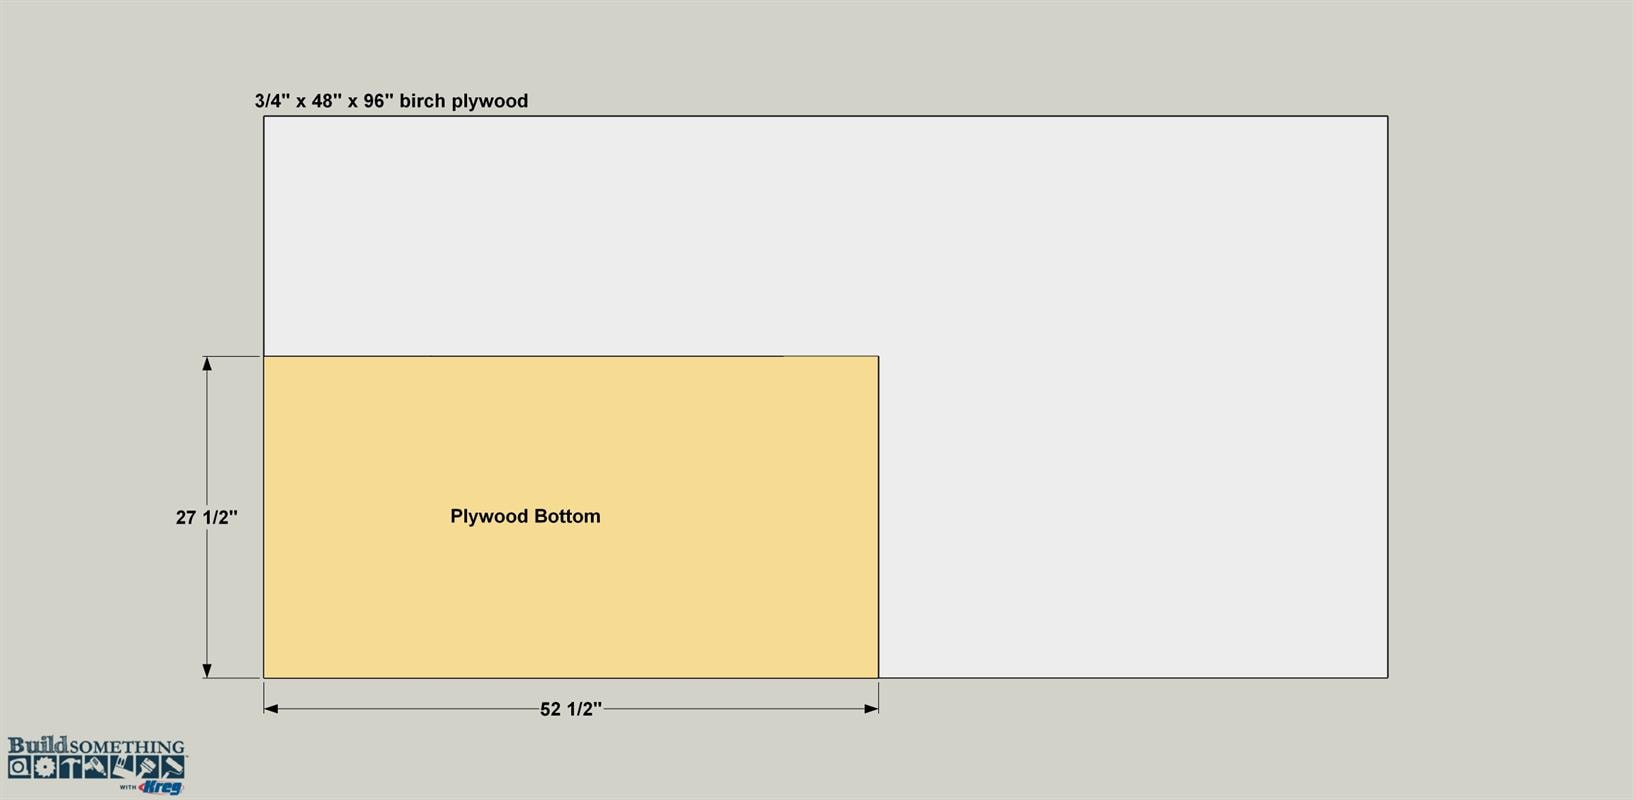
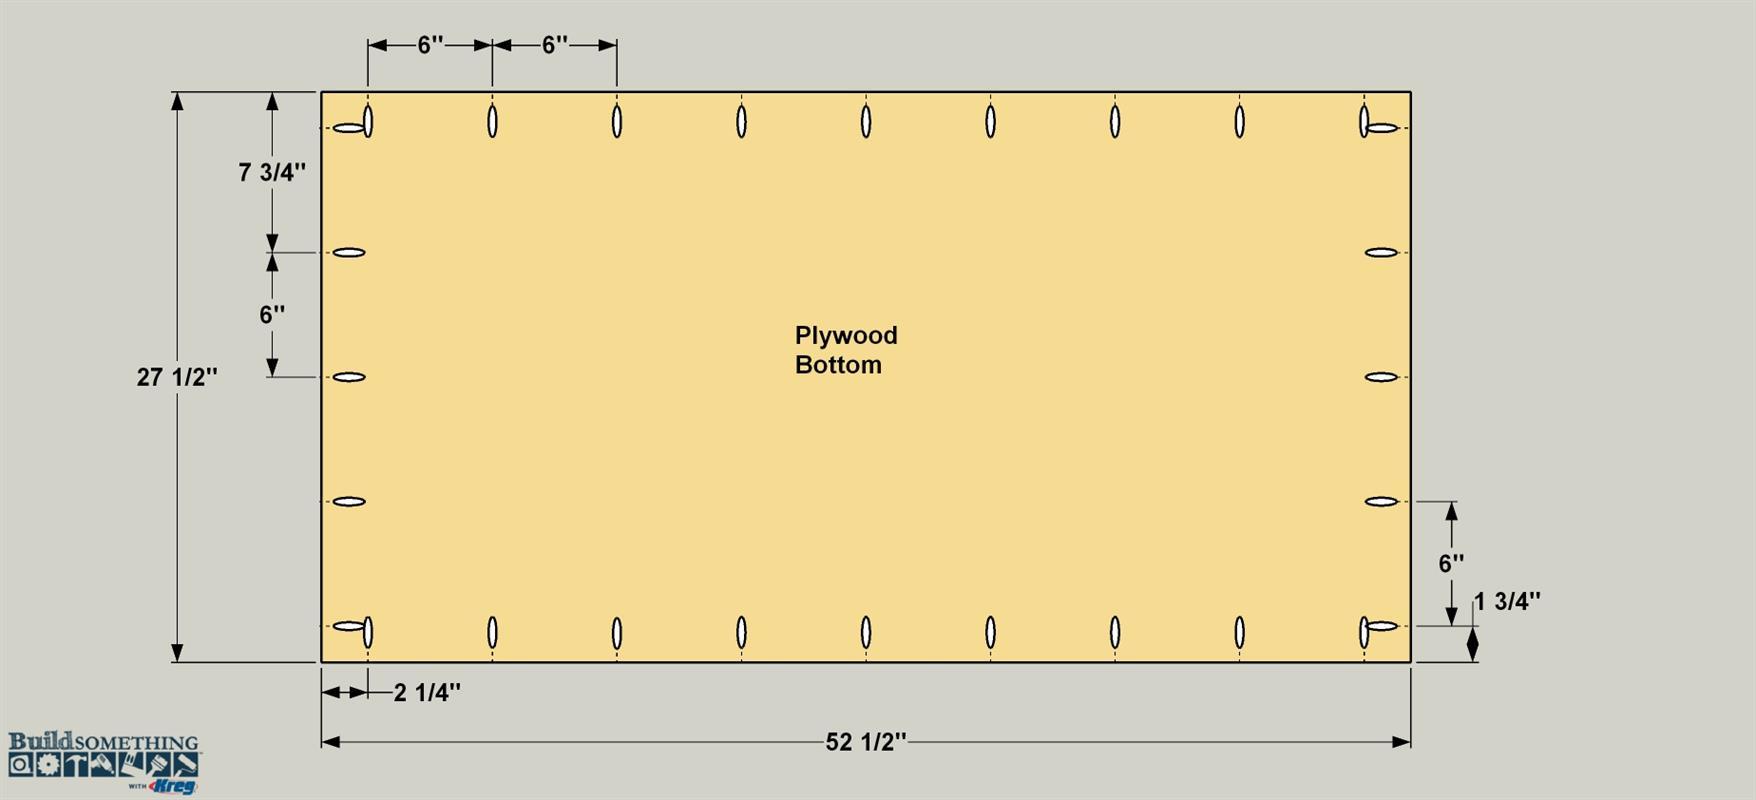
From 3/4" birch plywood, cut the Plywood Bottom to size. Then drill pocket holes where shown.
-
Install the Plywood Bottom
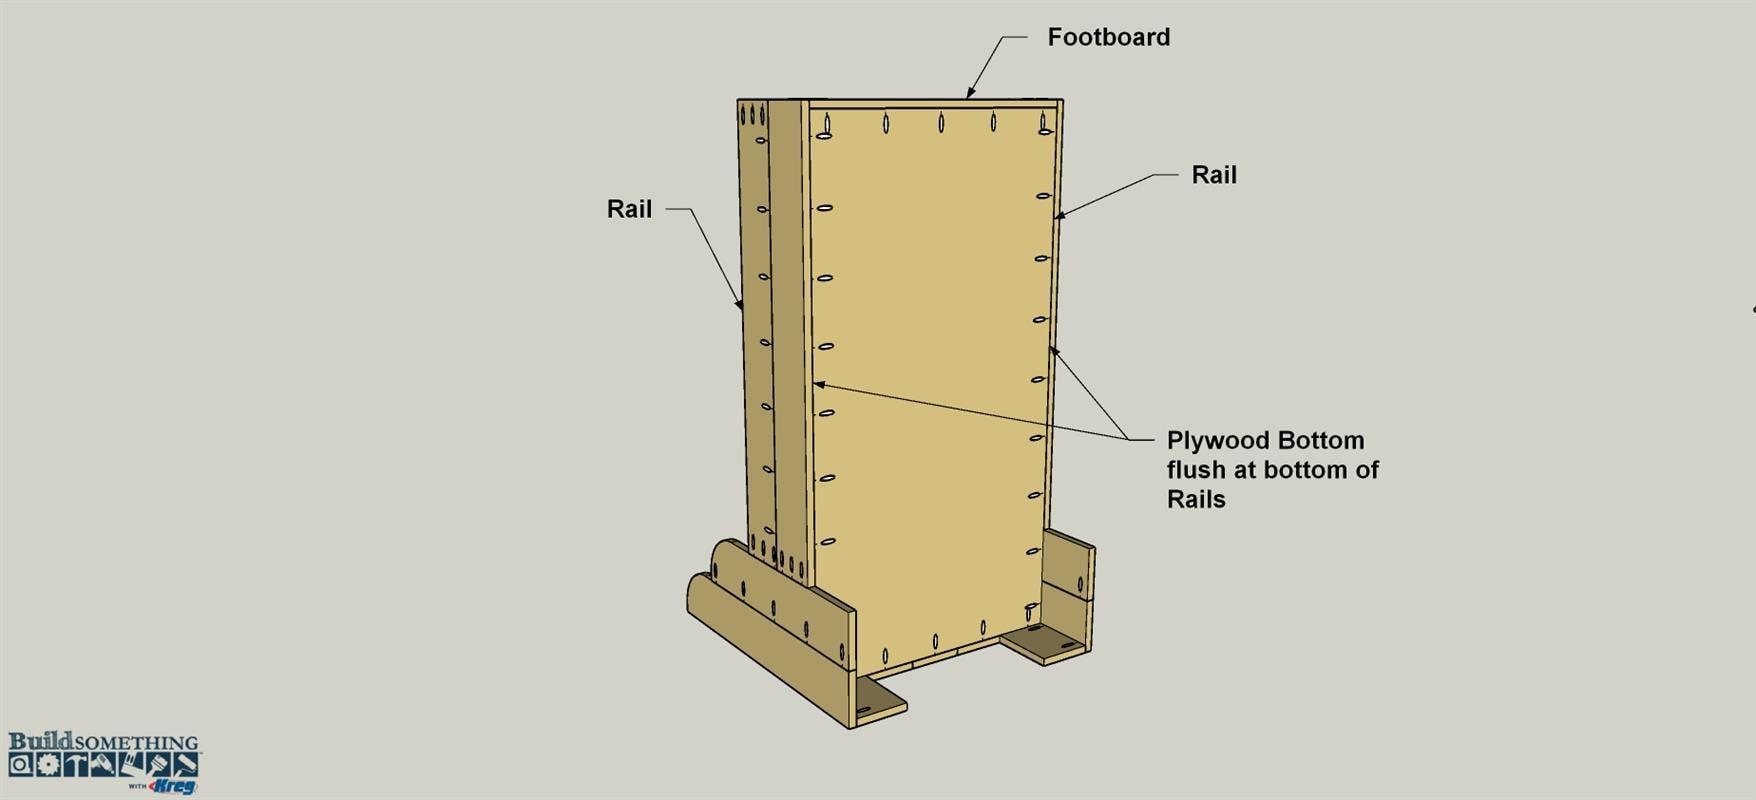
Position the Plywood Bottom between the Rails and the Headboard and Footboard so it is flush with the lower edges of the Rails, Footboard, and Short Headboard. Secure the Bottom to the other parts using 1 1/4" Kreg Screws. Before moving on to the bookshelf, it’s a good time to plug the exposed pocket holes in the bed area (except on the underside of the Plywood Bottom). There are a couple of reasons. First, it will the project a more-professional, finished appearance. Second, adding plugs means little fingers can’t be pushed into the pocket holes. We used matching pine plugs and glued them on place. When the glue dries, trim or sand the plugs smooth.
-
Make the Bookshelf Sides
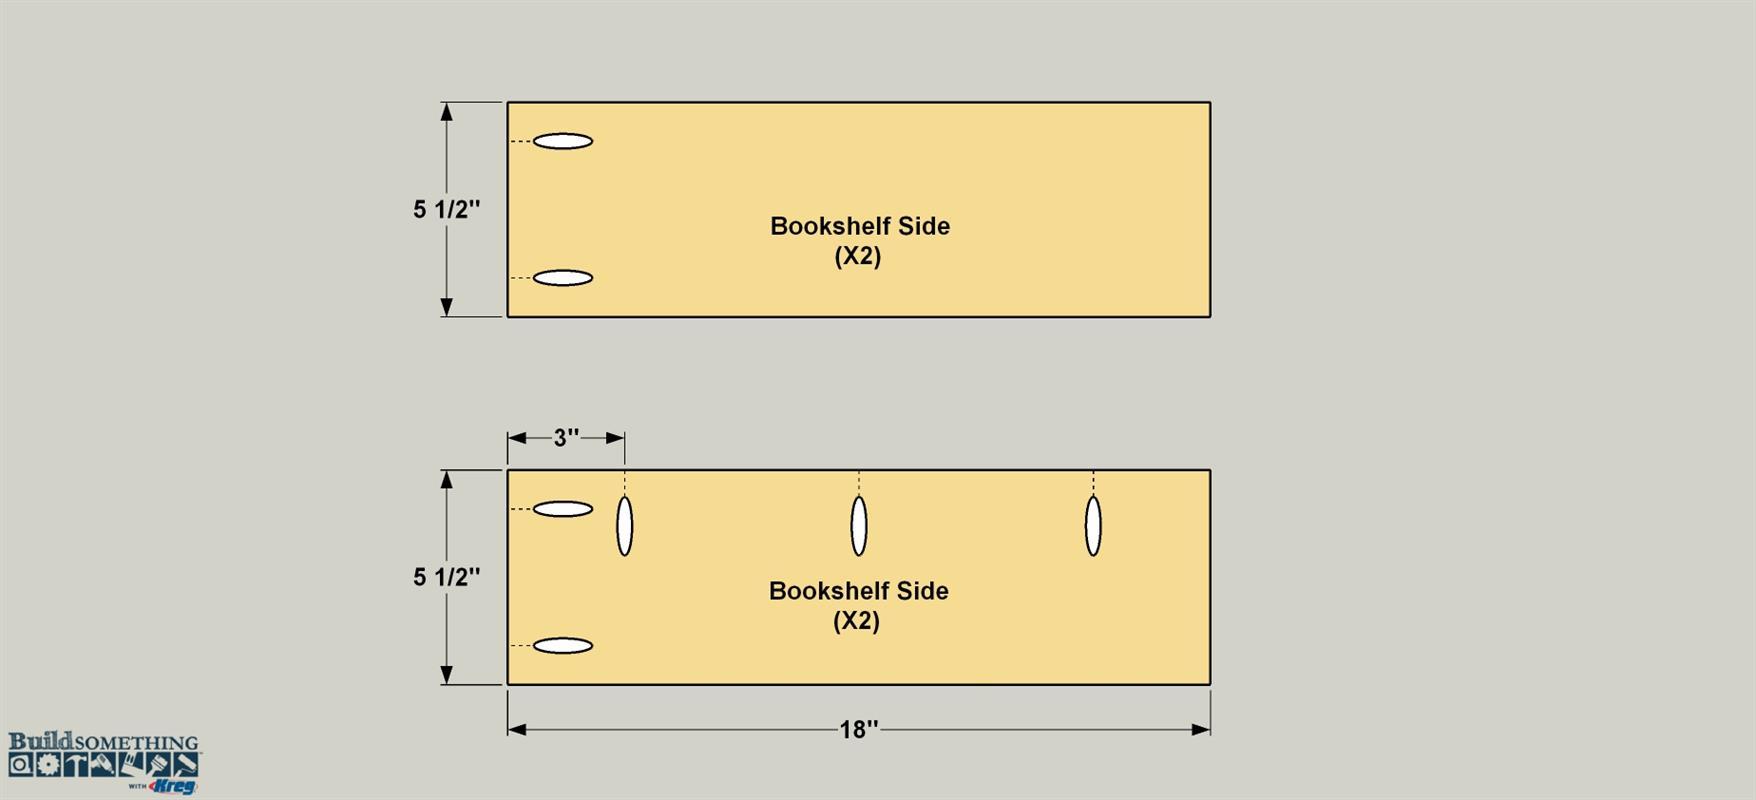
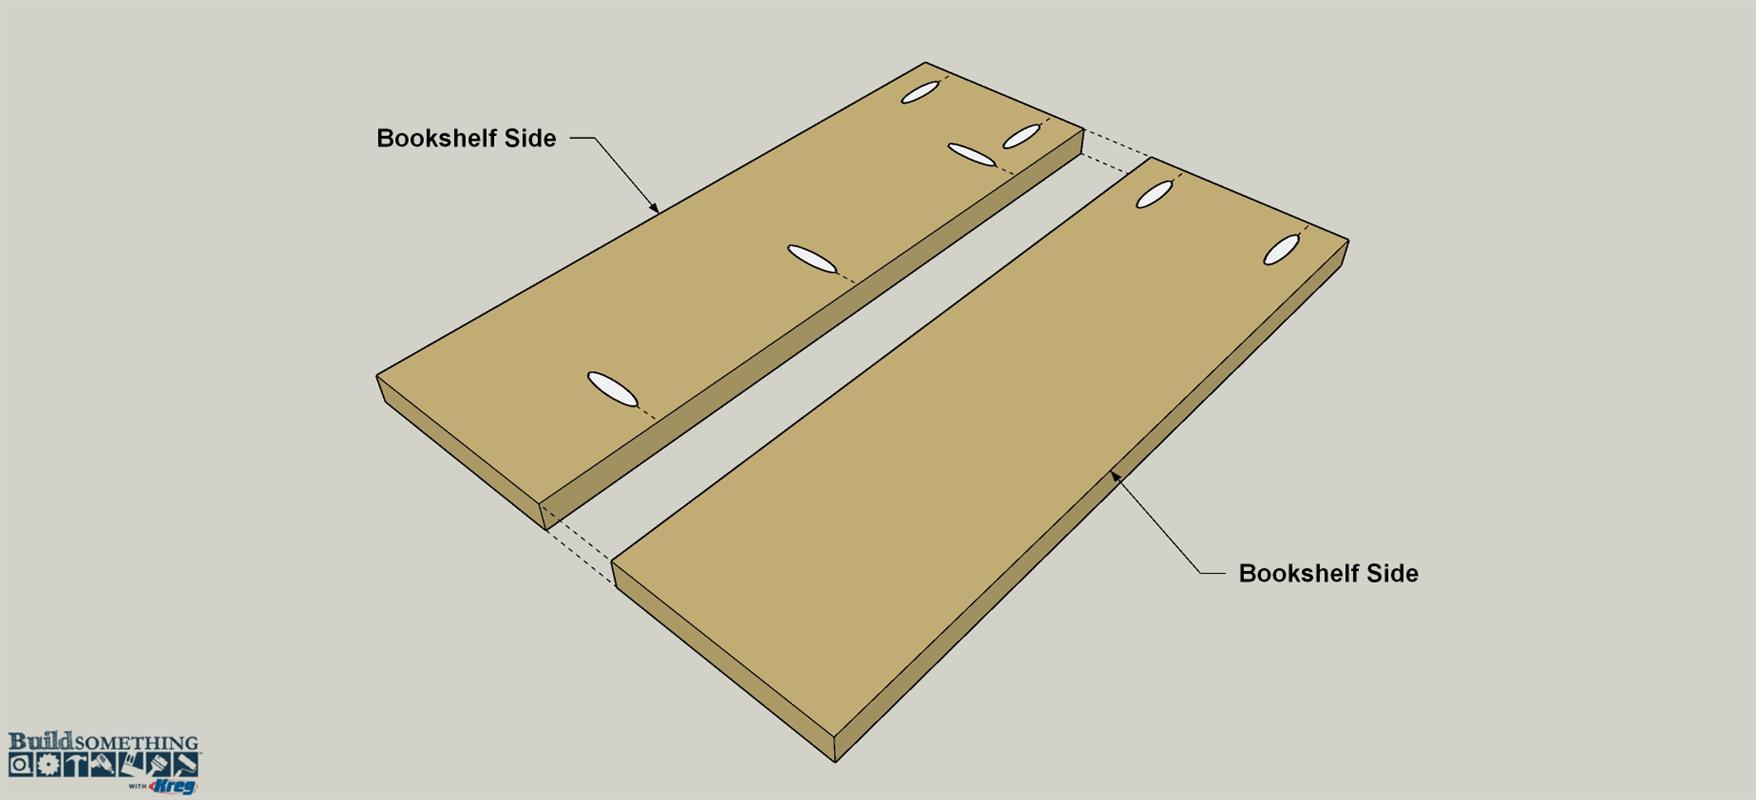
Cut four Bookshelf Sides to length, as shown in the cutting diagram. In two of the Side boards, drill two pocket holes in one end of the board as shown. In the other two, drill holes at one end, and along one edge, as shown.
-
Assemble the Bookshelf Sides
Pair up the Bookshelf Sides, as shown, and then glue and screw them together to create two side panels. Sand the panels smooth after the glue dries.
-
Make the Bookshelf Bottom
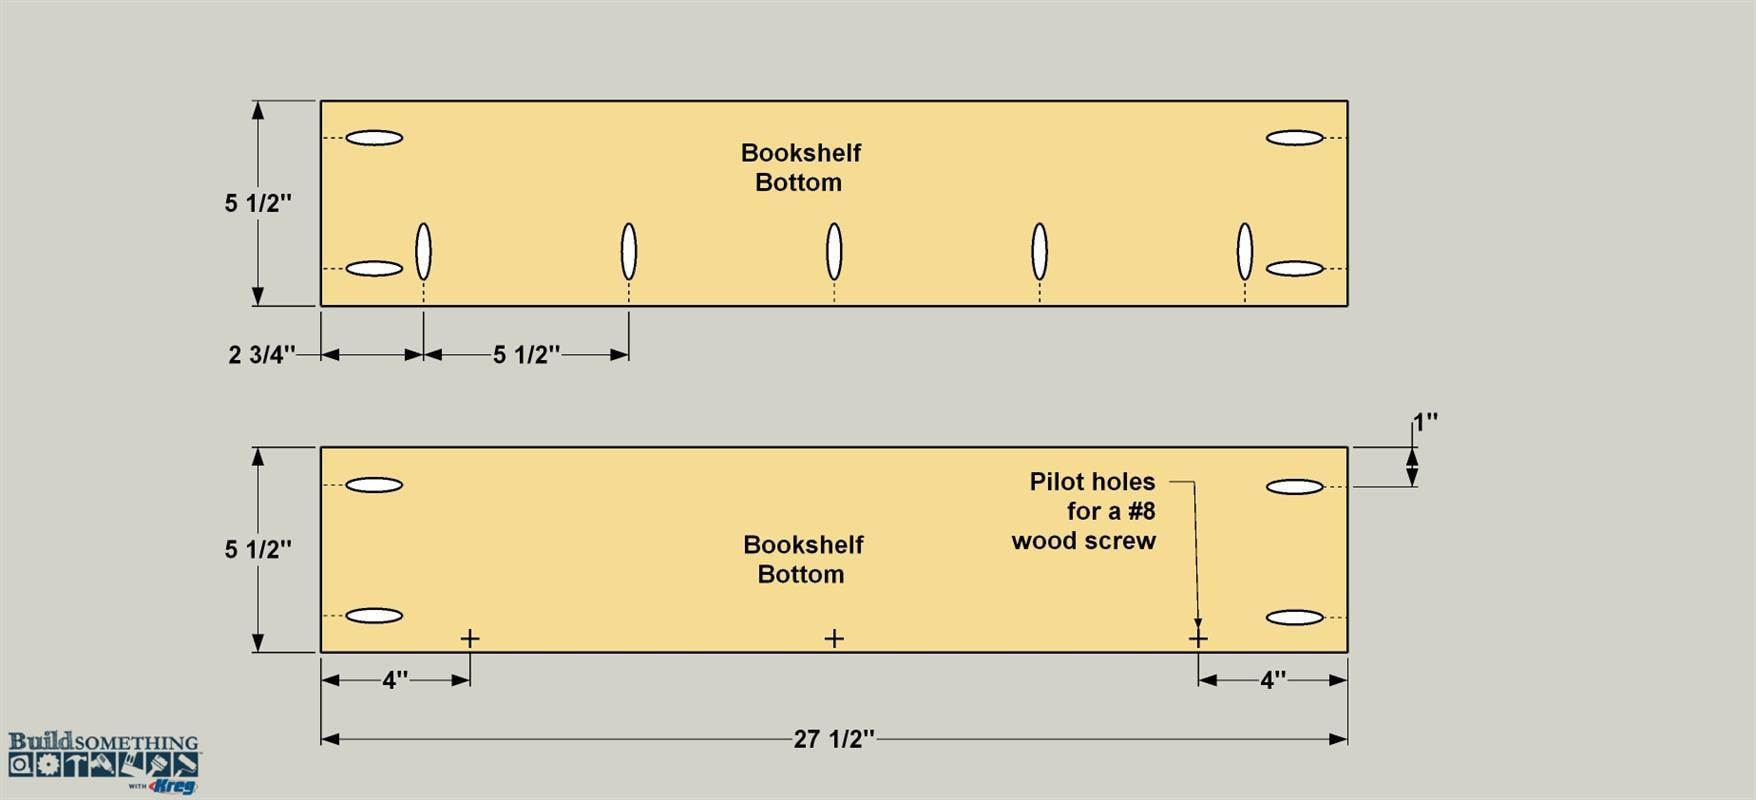
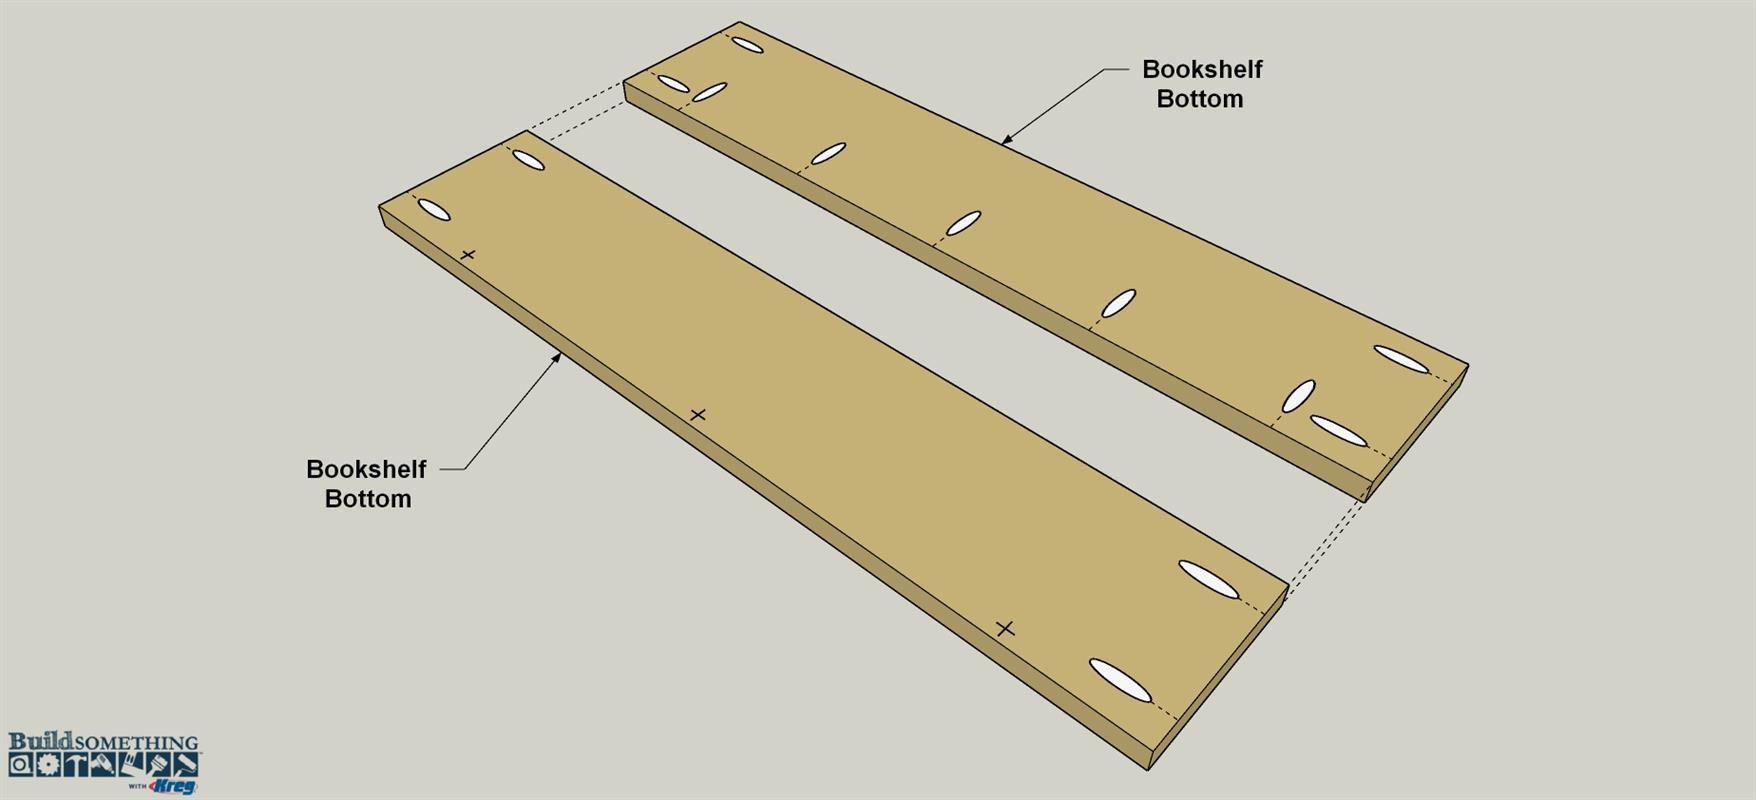
Cut two Bookshelf Bottom boards to length. In one of these, drill pocket holes in the ends and along one edge, as shown. In the other Bookshelf Bottom board, drill three 1/8" pilot holes, as shown. These holes should be 3/8" from the edge o f the board.
-
Assemble the Bottom Panel
Use glue and 1 1/4" Kreg Screws to join the Bookshelf Bottoms together to create a wider bottom panel, as shown. Sand the panel smooth.
-
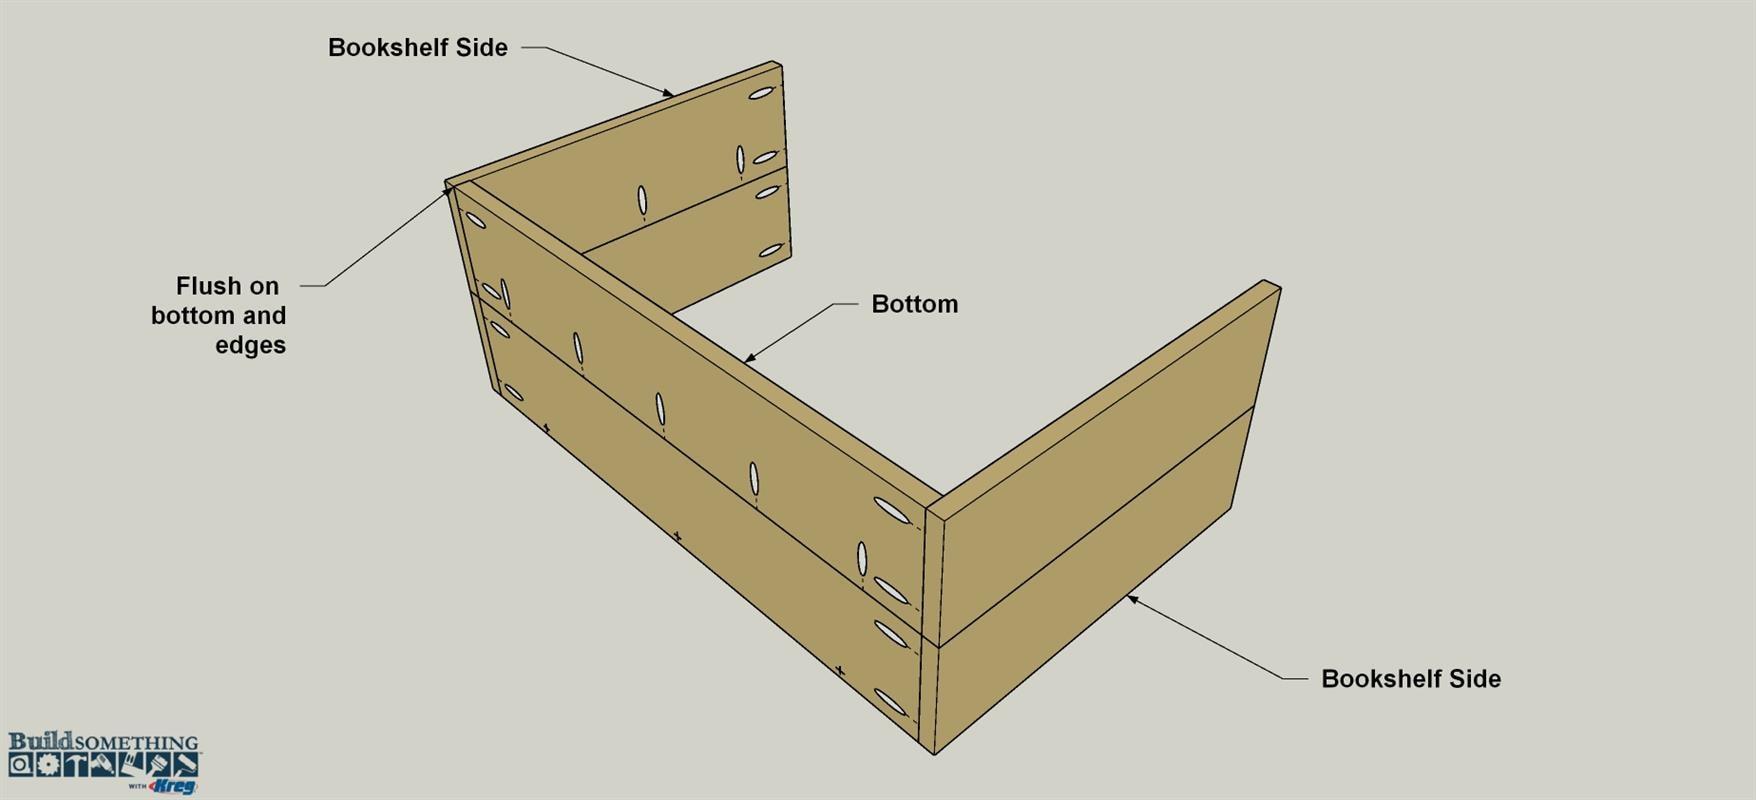
Attach the Sides to the Bottom
Spread glue on the ends of the bottom panel, and then position it between the bookshelf side panels, as shown. Attach bottom to the sides using 1 1/4" Kreg screws.
-
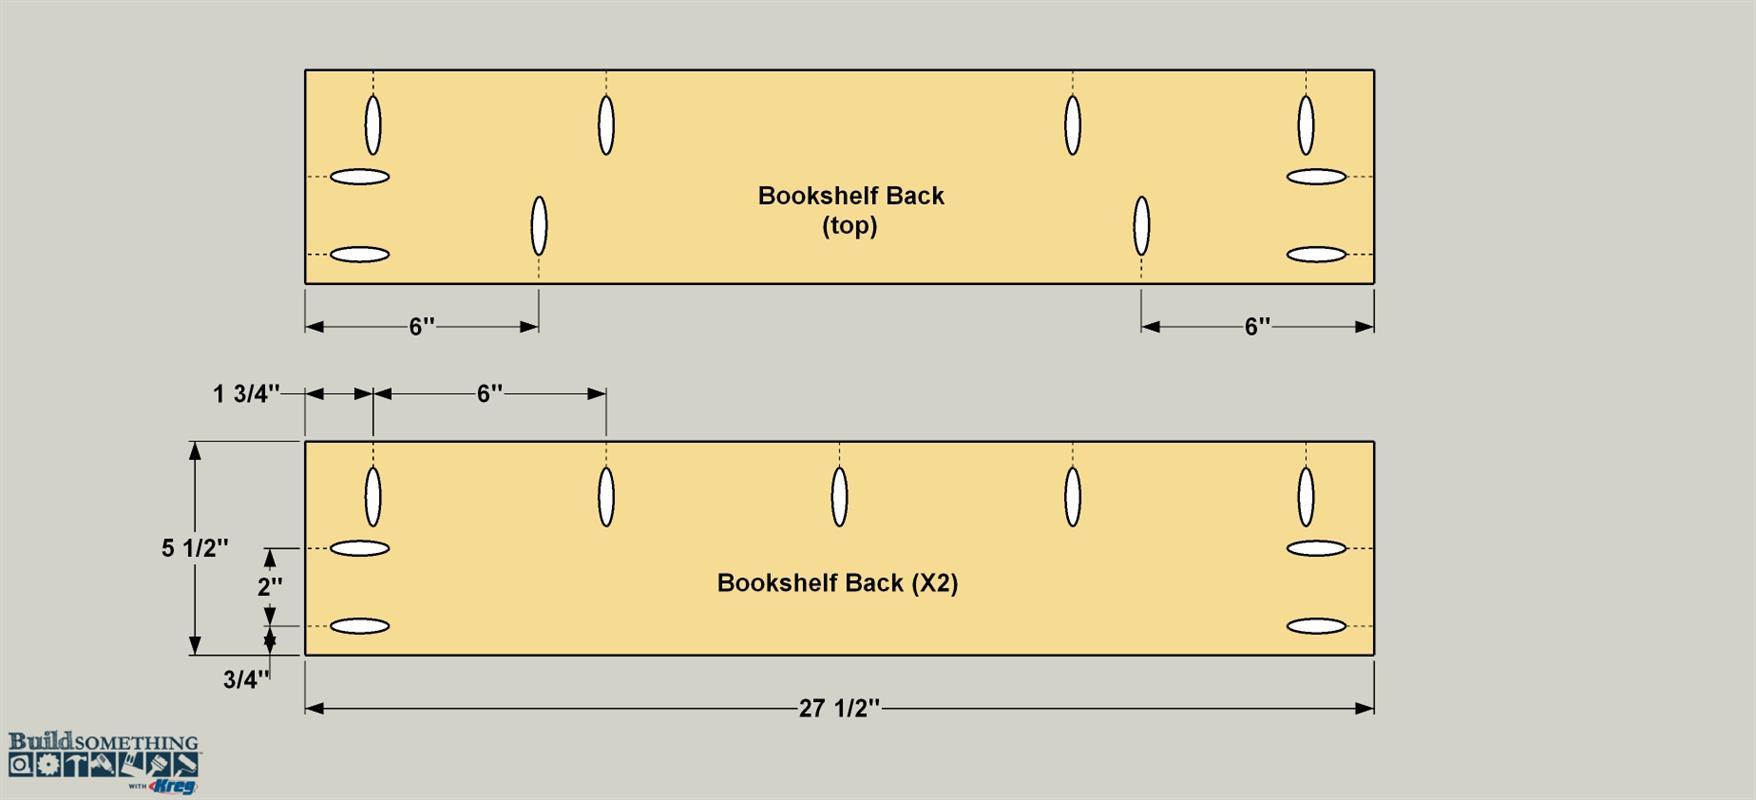
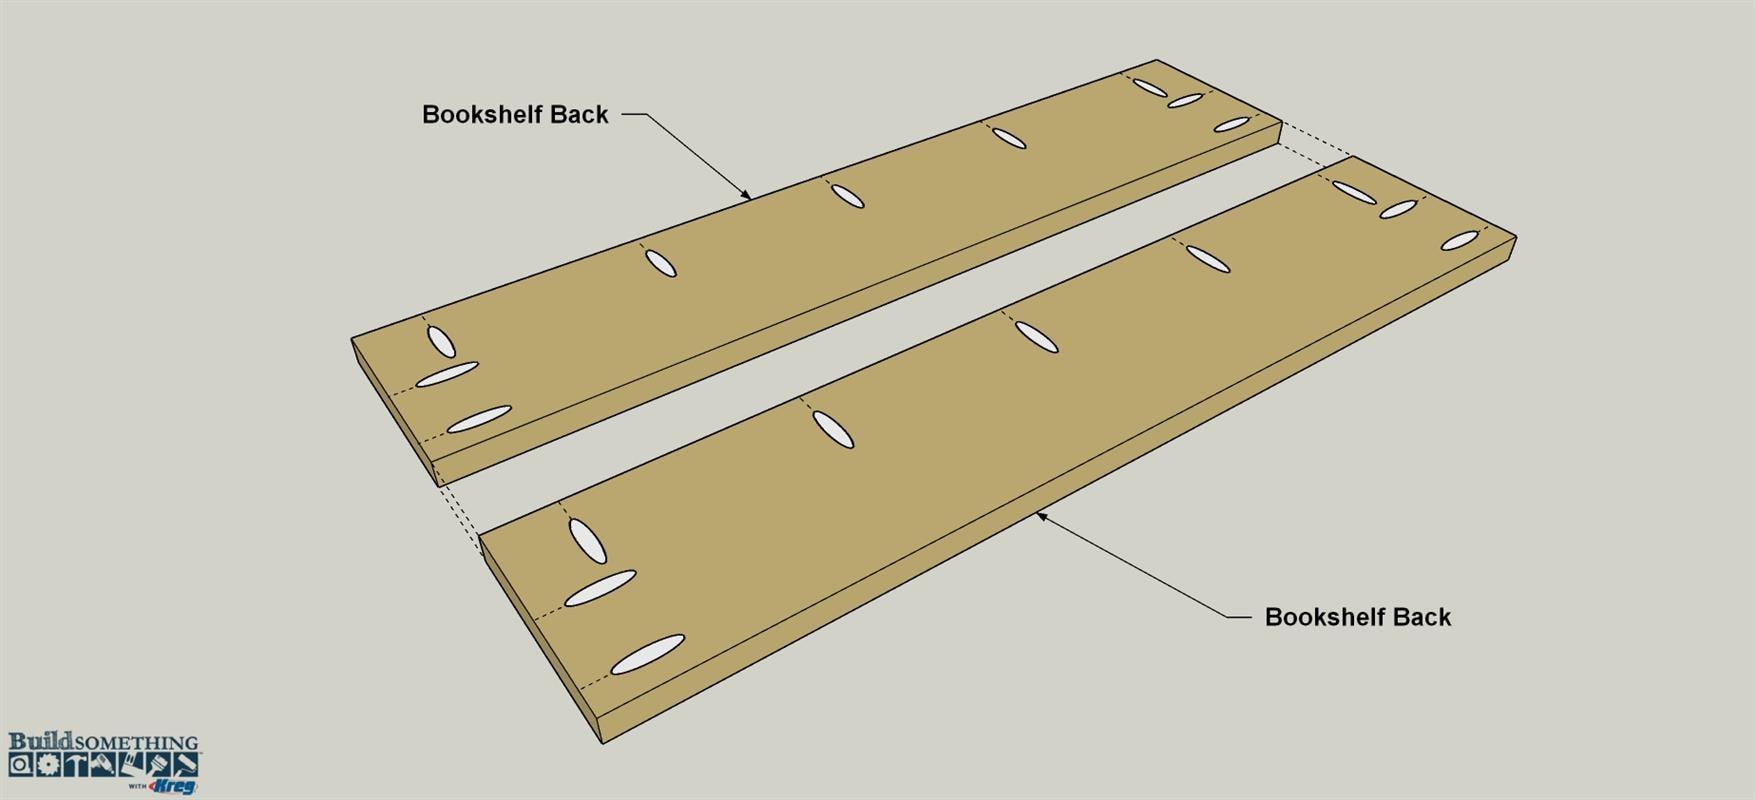
Make the Back Boards
Cut three Bookshelf Back boards to length. In two of the boards, drill pocket holes at the ends, and along one edge, as shown. In the third board, drill pocket holes at the ends, and along both edges, as shown.
-
Assemble the Lower Back
Assemble the two similar Back boards with glue and 1 1/4" Kreg screws as shown. Once the glue dries, sand the faces smooth. Set the last Bookshelf Back board aside for the moment. You’ll install it in a later step.
-
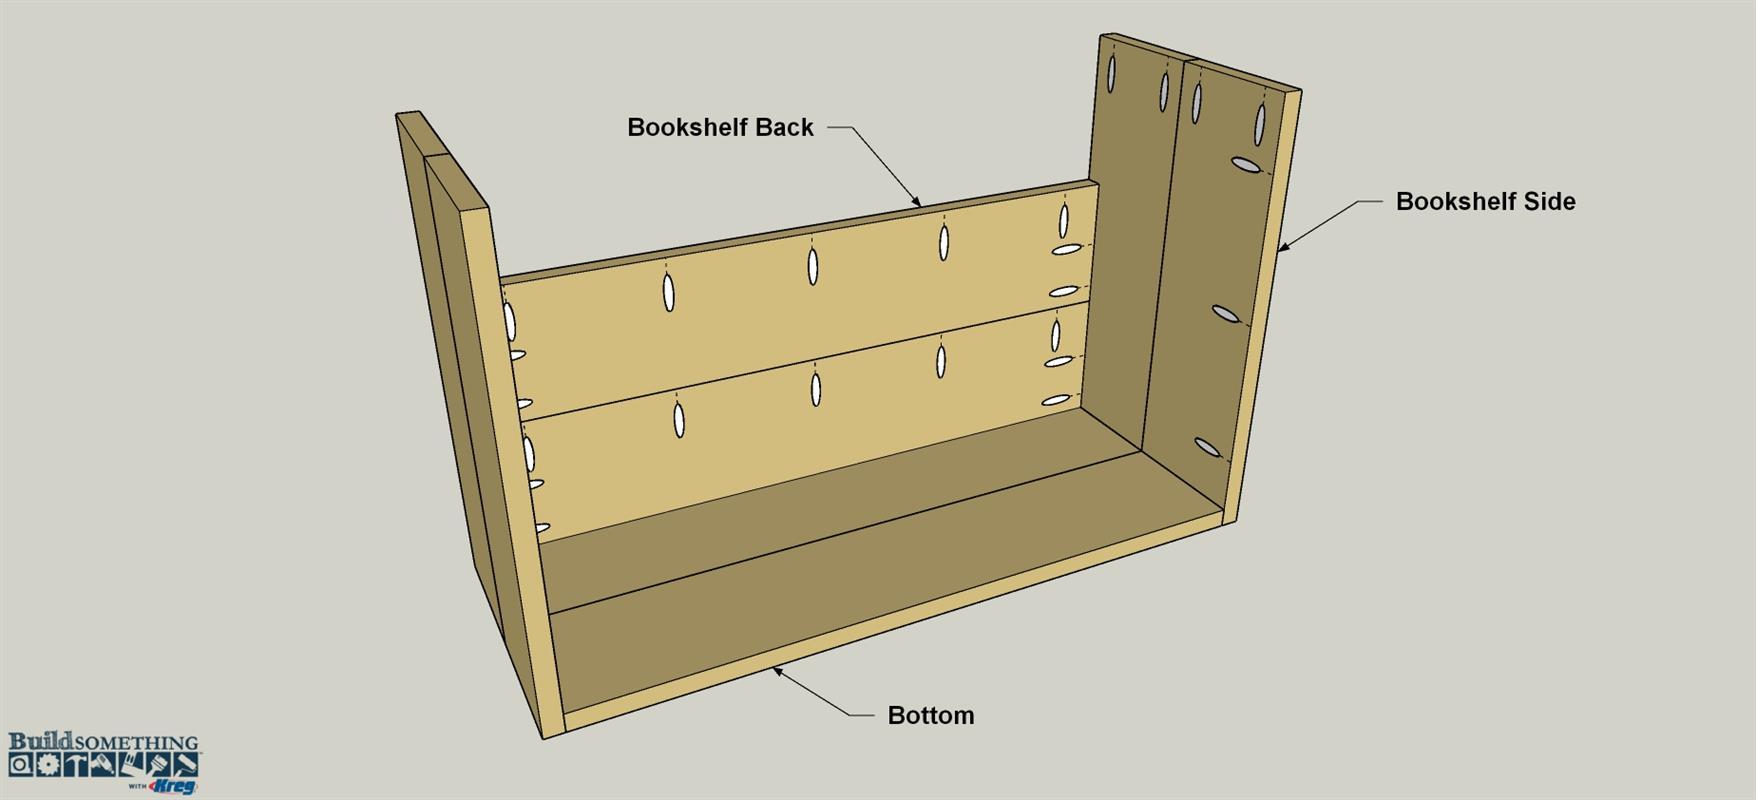
Install the Back Panel
Spread glue along the ends of the lower back panel you just created, as well as along the lowest edge (the one without pocket holes.) position this panel between the side panels, so that it rests on the bottom panel, as shown. Make sure the Back is flush with the edges of the Sides and bottom. Then secure this lower back panel to the side using 1 1/4" Kreg Screws. From the bottom, secure the Bottom to the Back by driving three in 1 1/4" flat-head wood screws through the pilot holes you drilled earlier.
-
Make the Shelf Parts
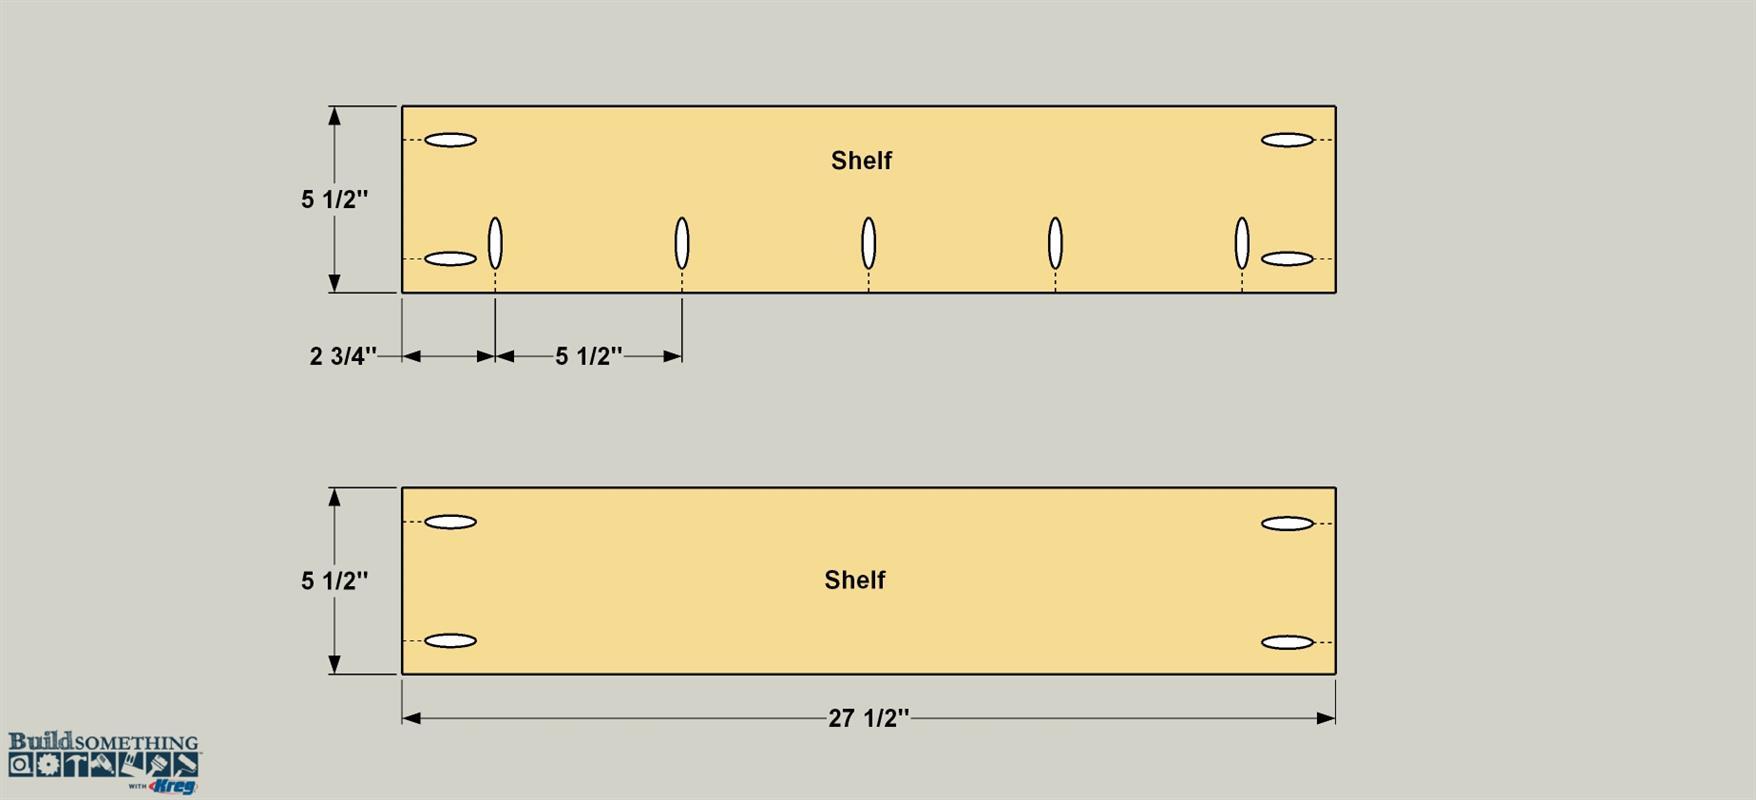
Cut two Shelf boards to length, as shown. Drill pocket holes in each board at the locations shown.
-
Assemble the Shelf Panel
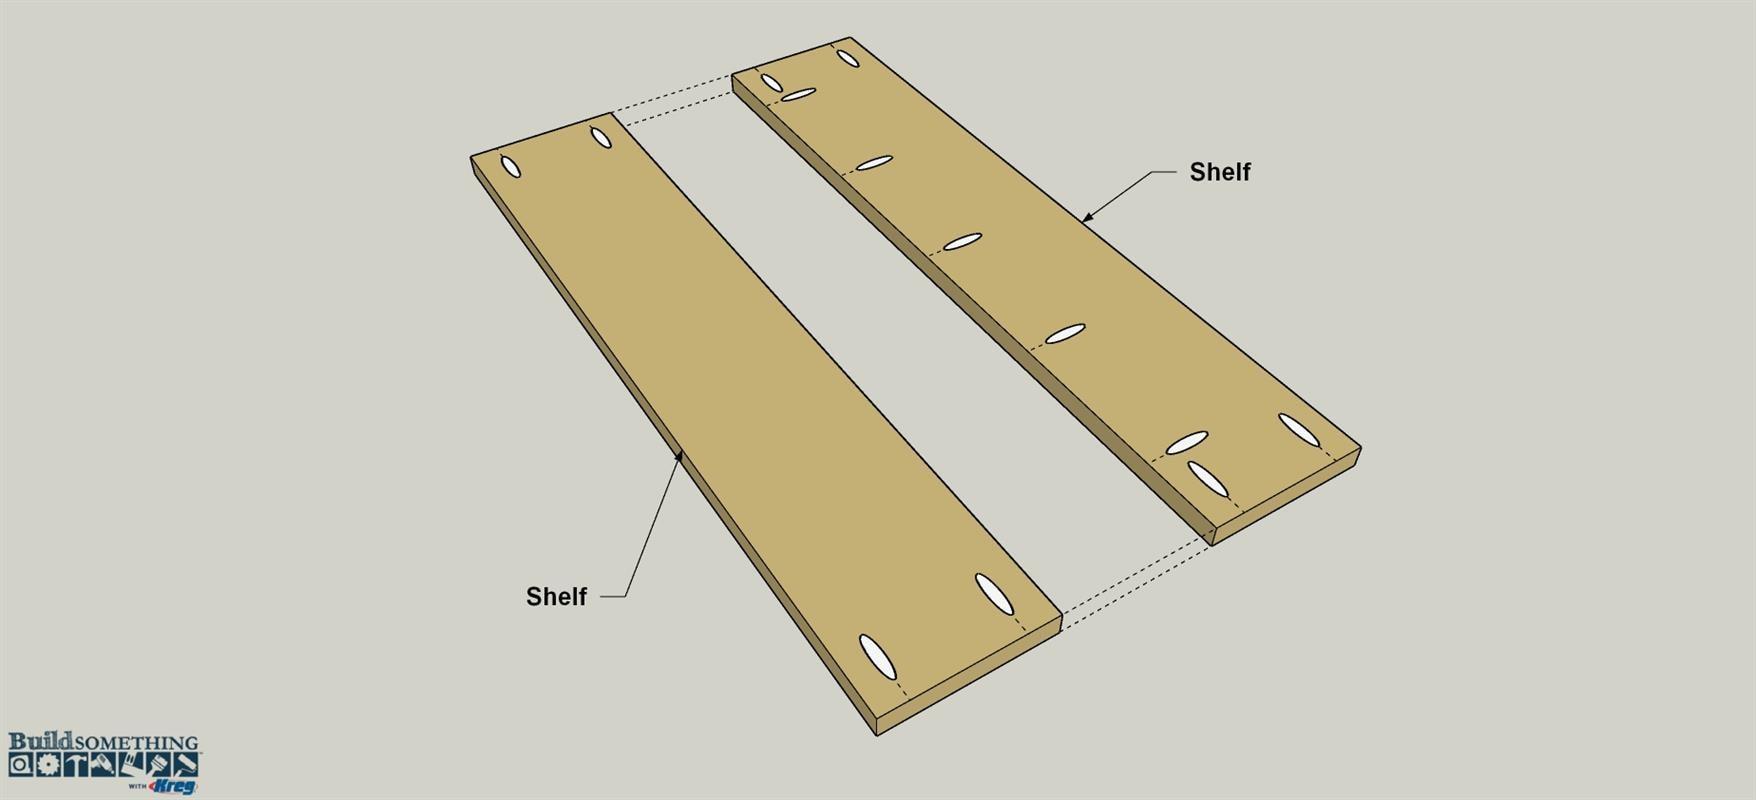
Assemble the two Shelf boards using glue and Kreg Screws, as shown, to create a wider shelf panel. Sand the panel smooth after the glue dries.
-
Install the Shelf
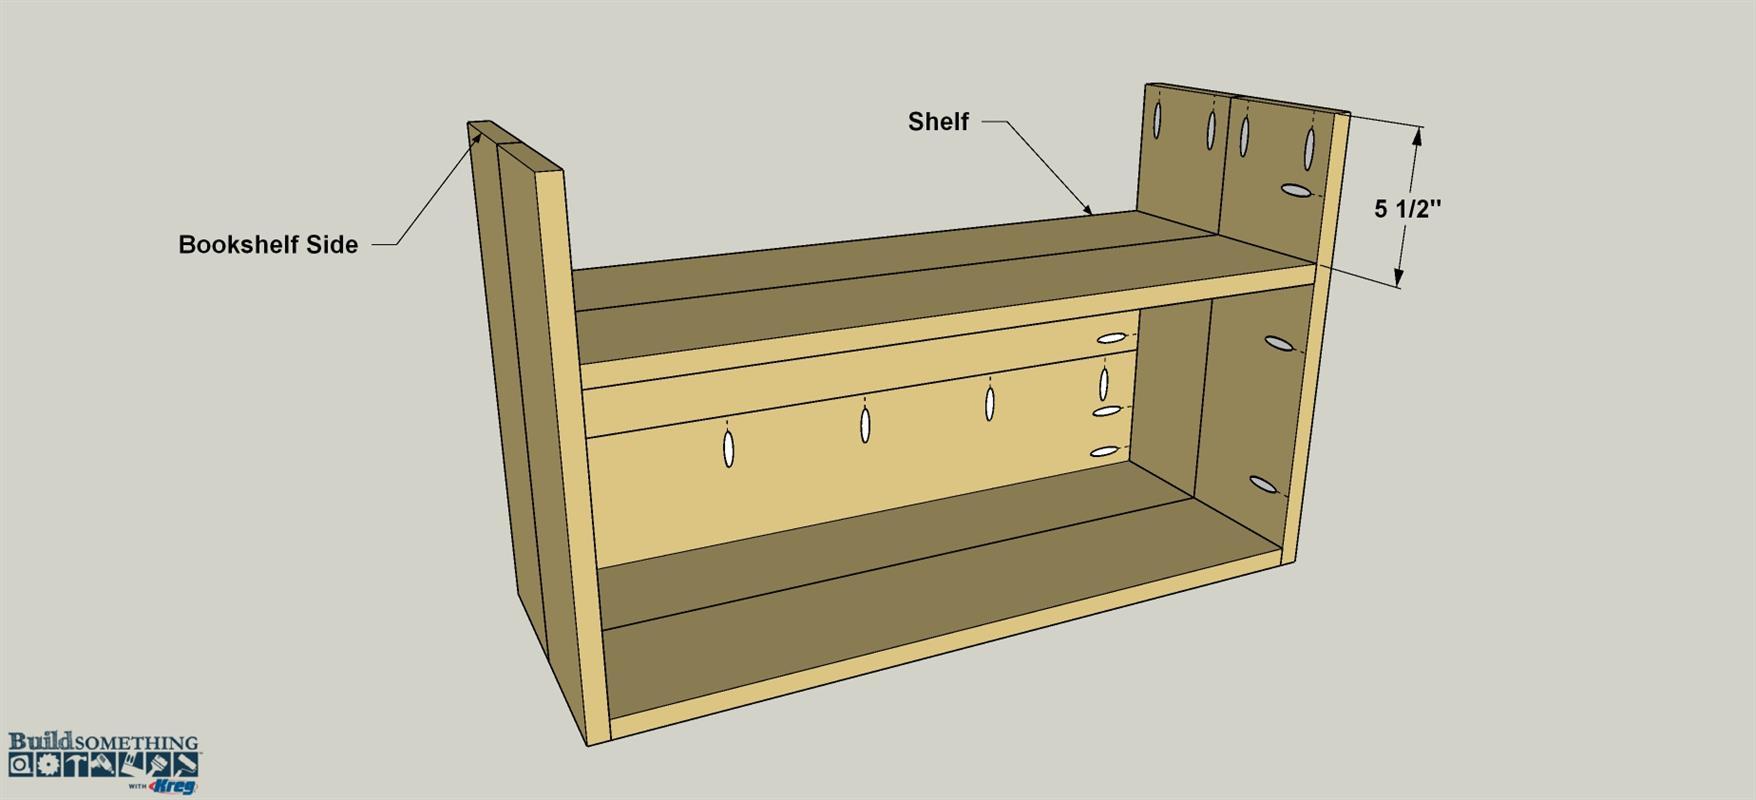
Position the shelf panel you just made so it’s between the side panels and resting on the lower back panel. Secure it using glue and 1 1/4" Kreg Screws.
-
Make the Divider
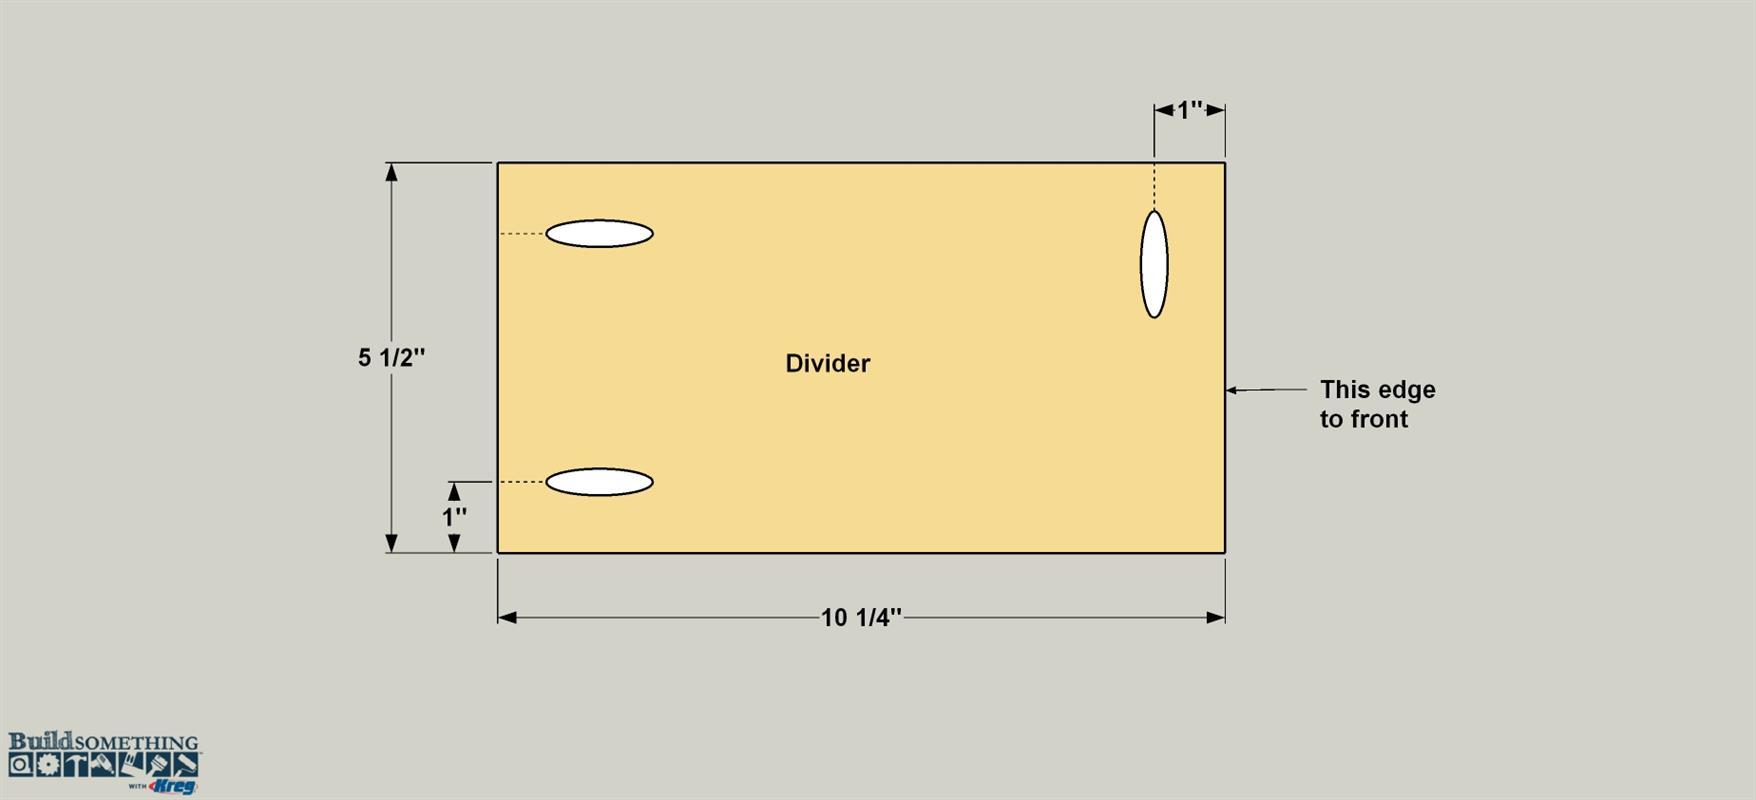
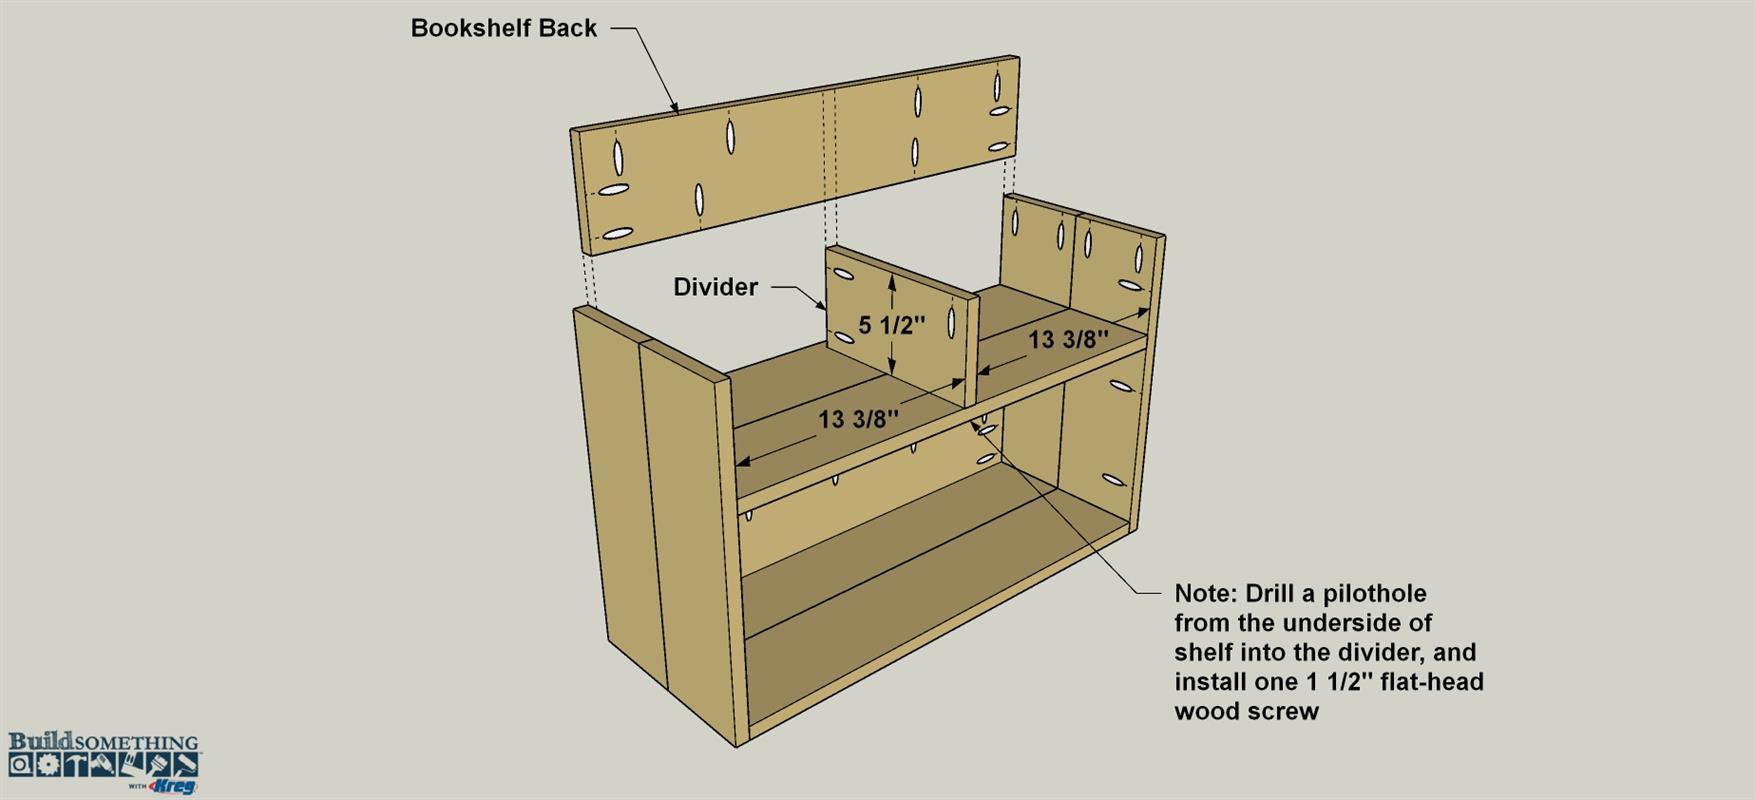
Cut the Divider to length, and then drill pocket screws where shown.
-
Install the Divider and Upper Back
Spread glue on the edges and the rearward end of the Divider. Then center the Divider on the shelf, as shown. Set the remaining Bookshelf Back (made in step 22) in position, and secure it and the divider using glue and 1 1/4" Kreg screws. From the underside of the Shelf, drill a pilot hole and install a 1 1/4" flat-head wood screw.
-
Make Bookshelf Top Boards
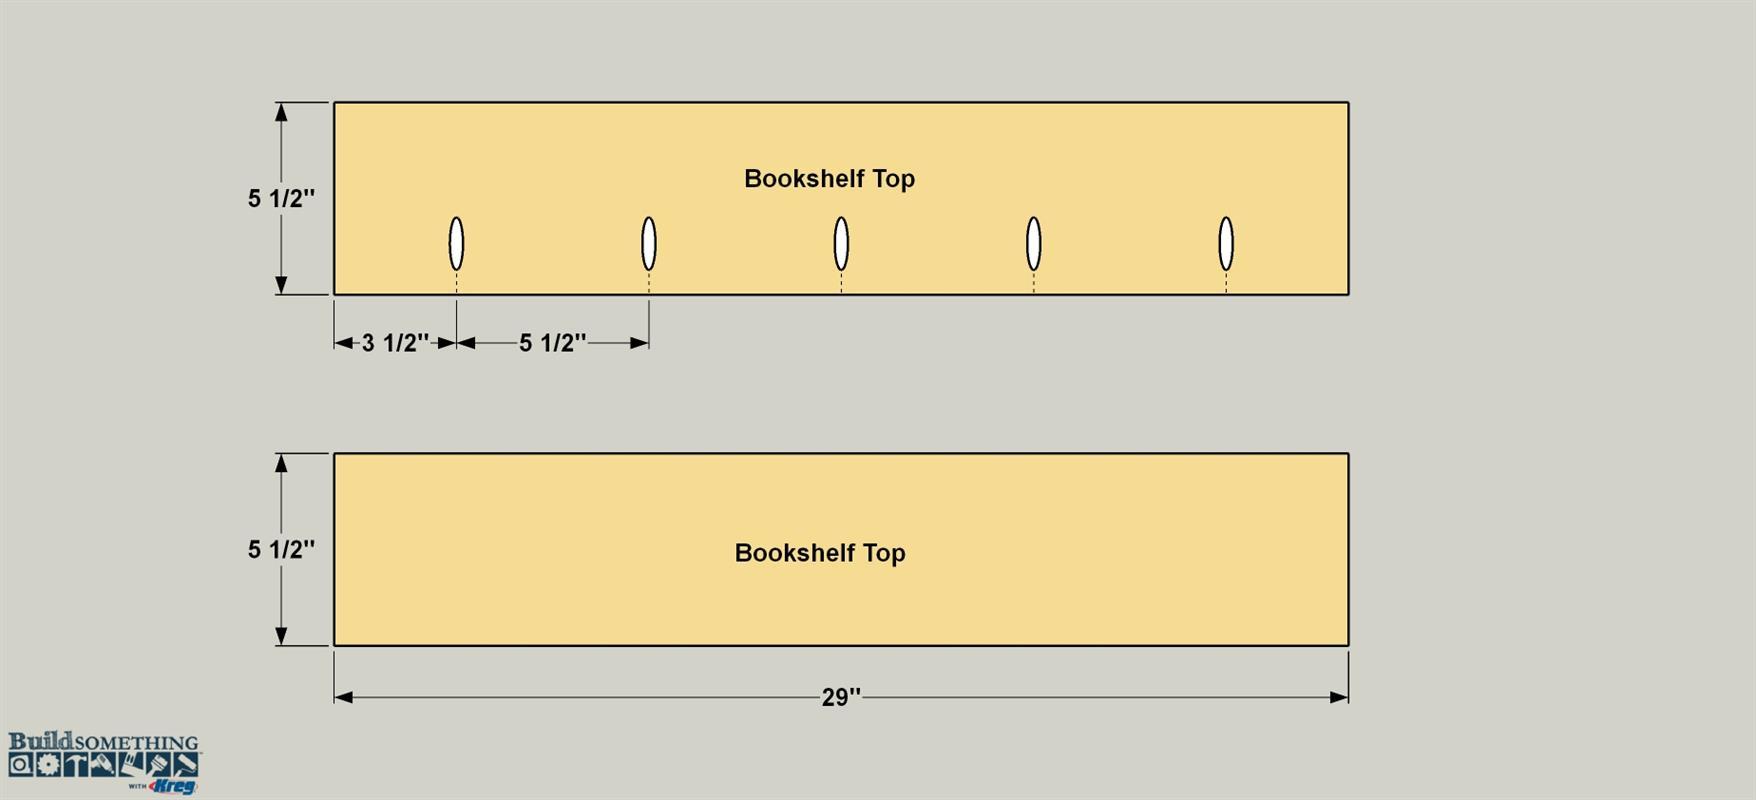
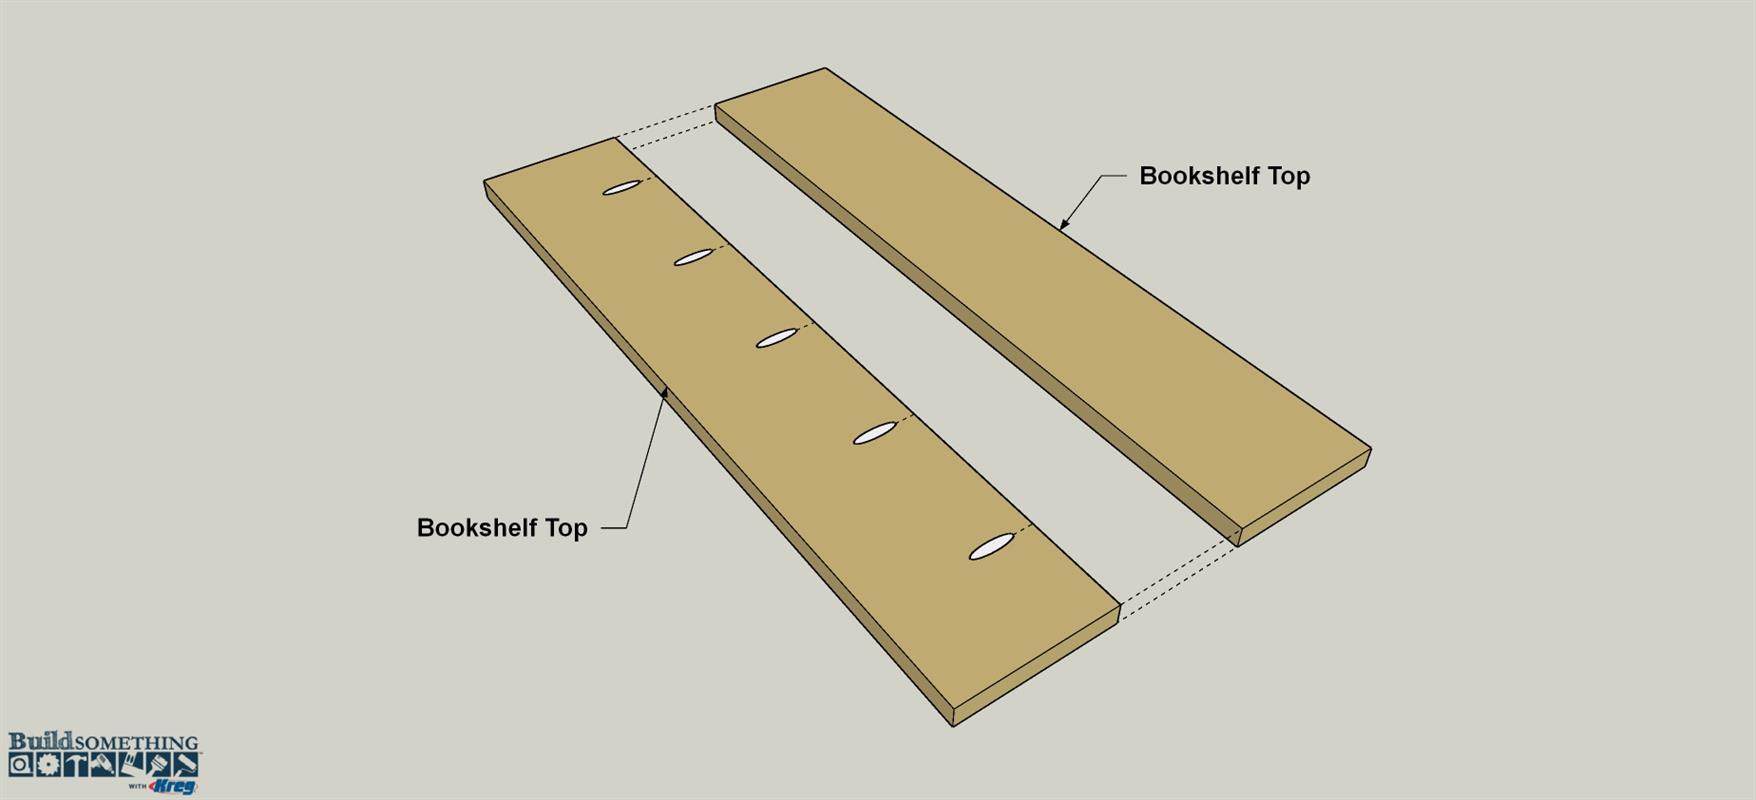
Cut the Bookshelf Top boards to length as shown. Drill pocket holes in only one of the boards at the locations shown.
-
Assemble the Bookshelf Top
Assemble the Top panel using glue and Kreg Screws.
-
Install the Top
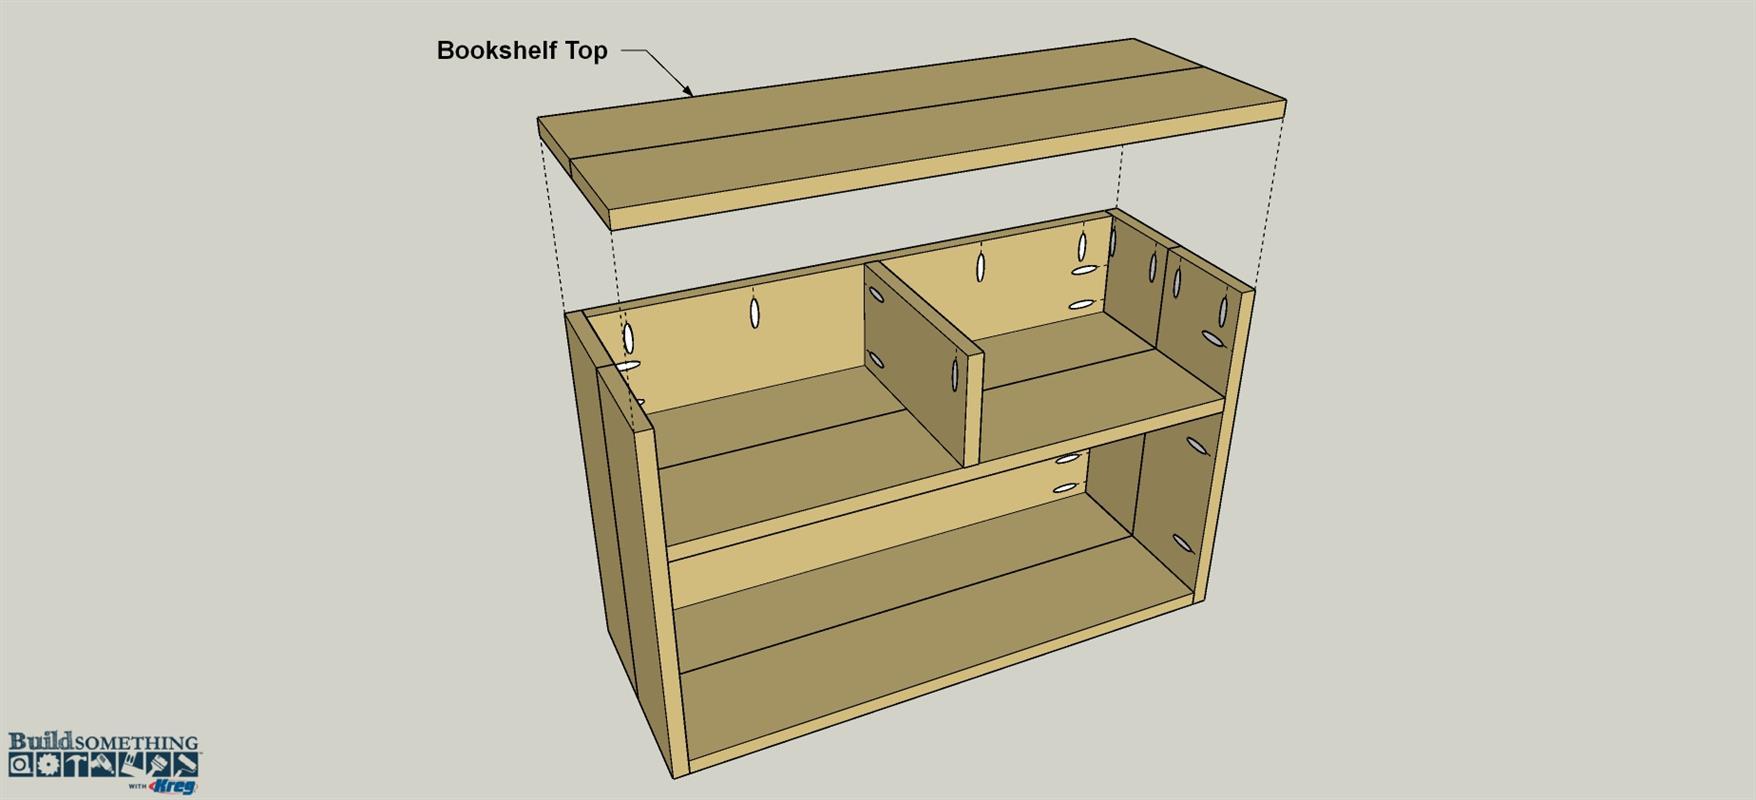
Attach the top panel to the Bookshelf using glue and 1 1/4" Kreg Screws. In this step you will need a right-angle adaptor and a 3"-long driver bit to reach into the tight space. See the How-To video below for more information.
-
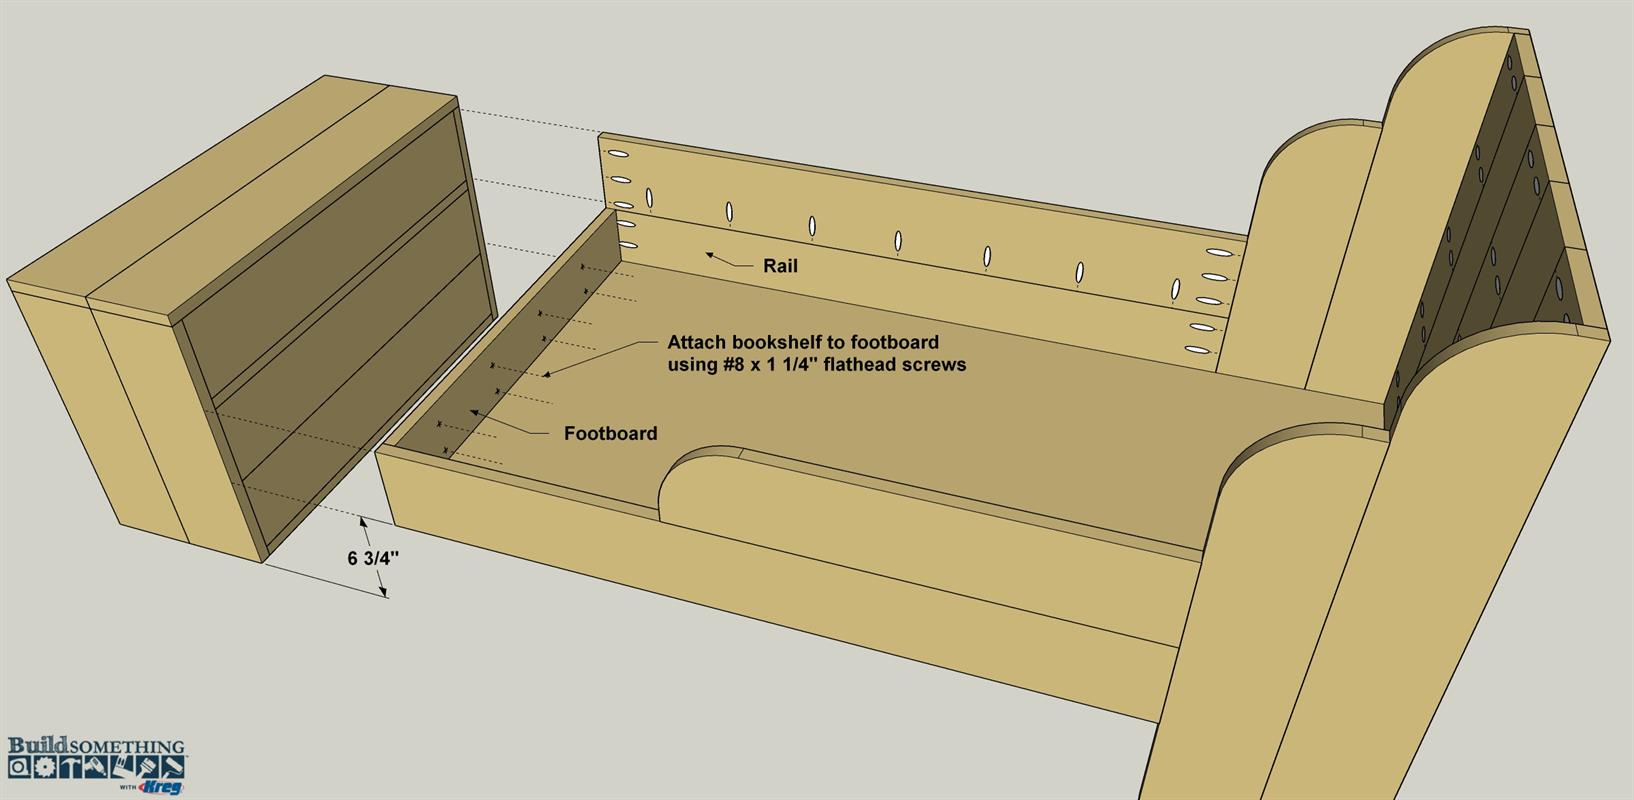
Attach the Bookshelf the Bed
The final assembly step is to attach the Bookshelf to the bed frame. To do this, first spread glue on the exposed face of the Footboard. Then position the bookshelf assembly and clamp it in place Drive #8 x 1 1/4" flat-head wood screws through the footboard and into the bookcase back.
-
Soften Edges and Finish
With assembly complete, it’s a good idea to soften all the exposed edges, especially on the bed area. You can use a router with a 1/4" roundover bit, or use a sanding block and 100-grit sandpaper. Then, add a final finish. We chose a non-toxic finish called Tried and True Danish Oil. There’s a link in the Materials tab.


