

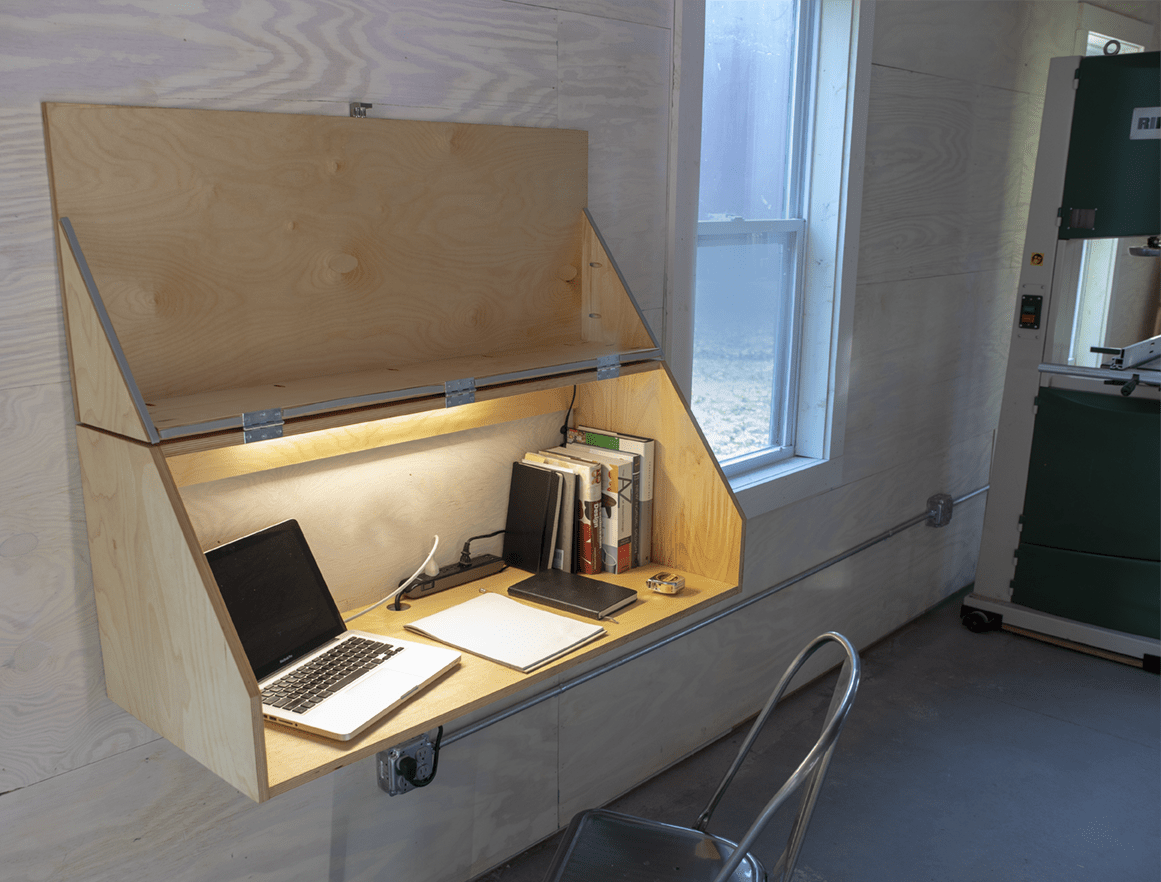
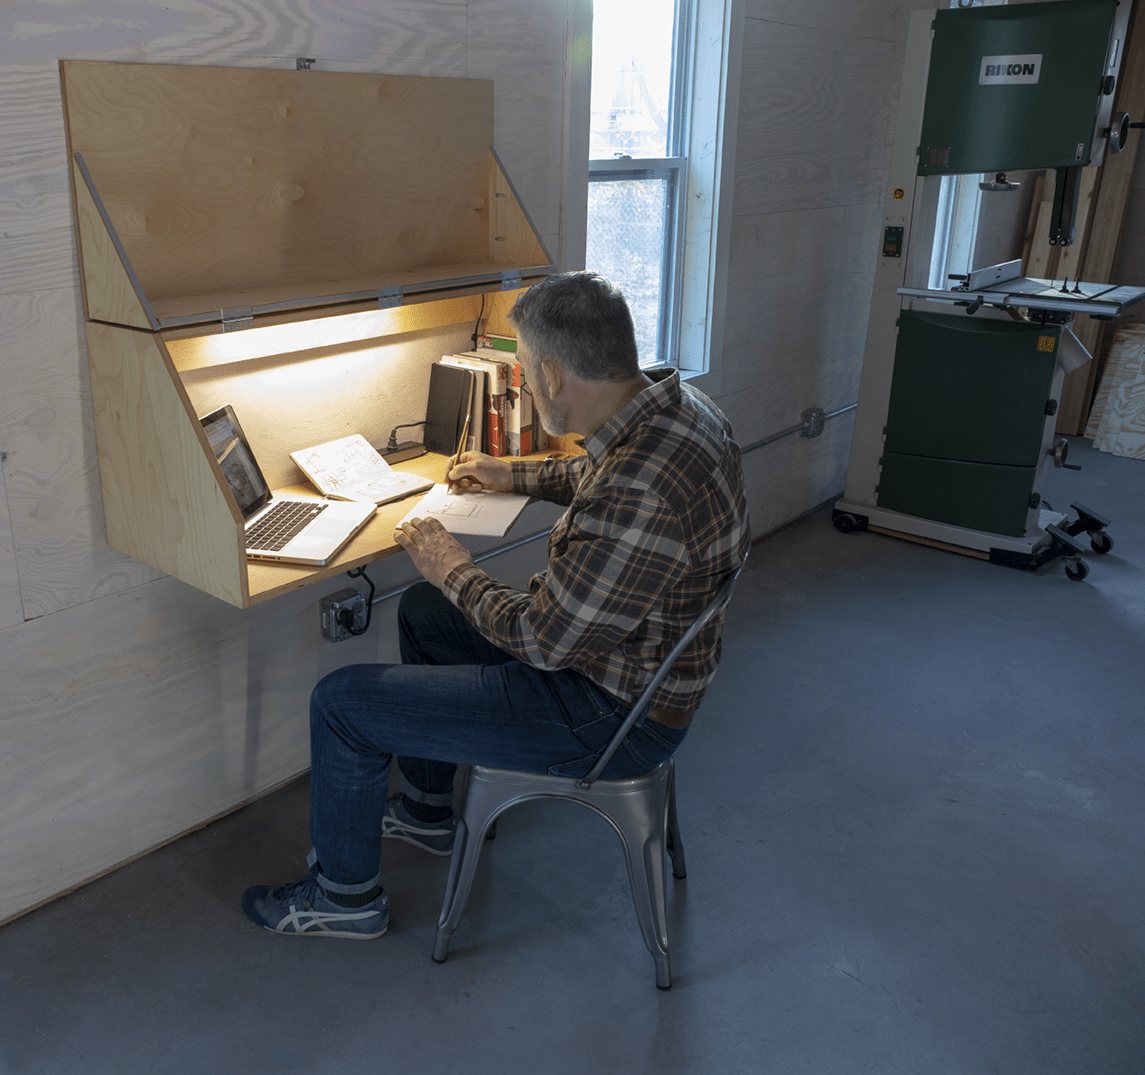
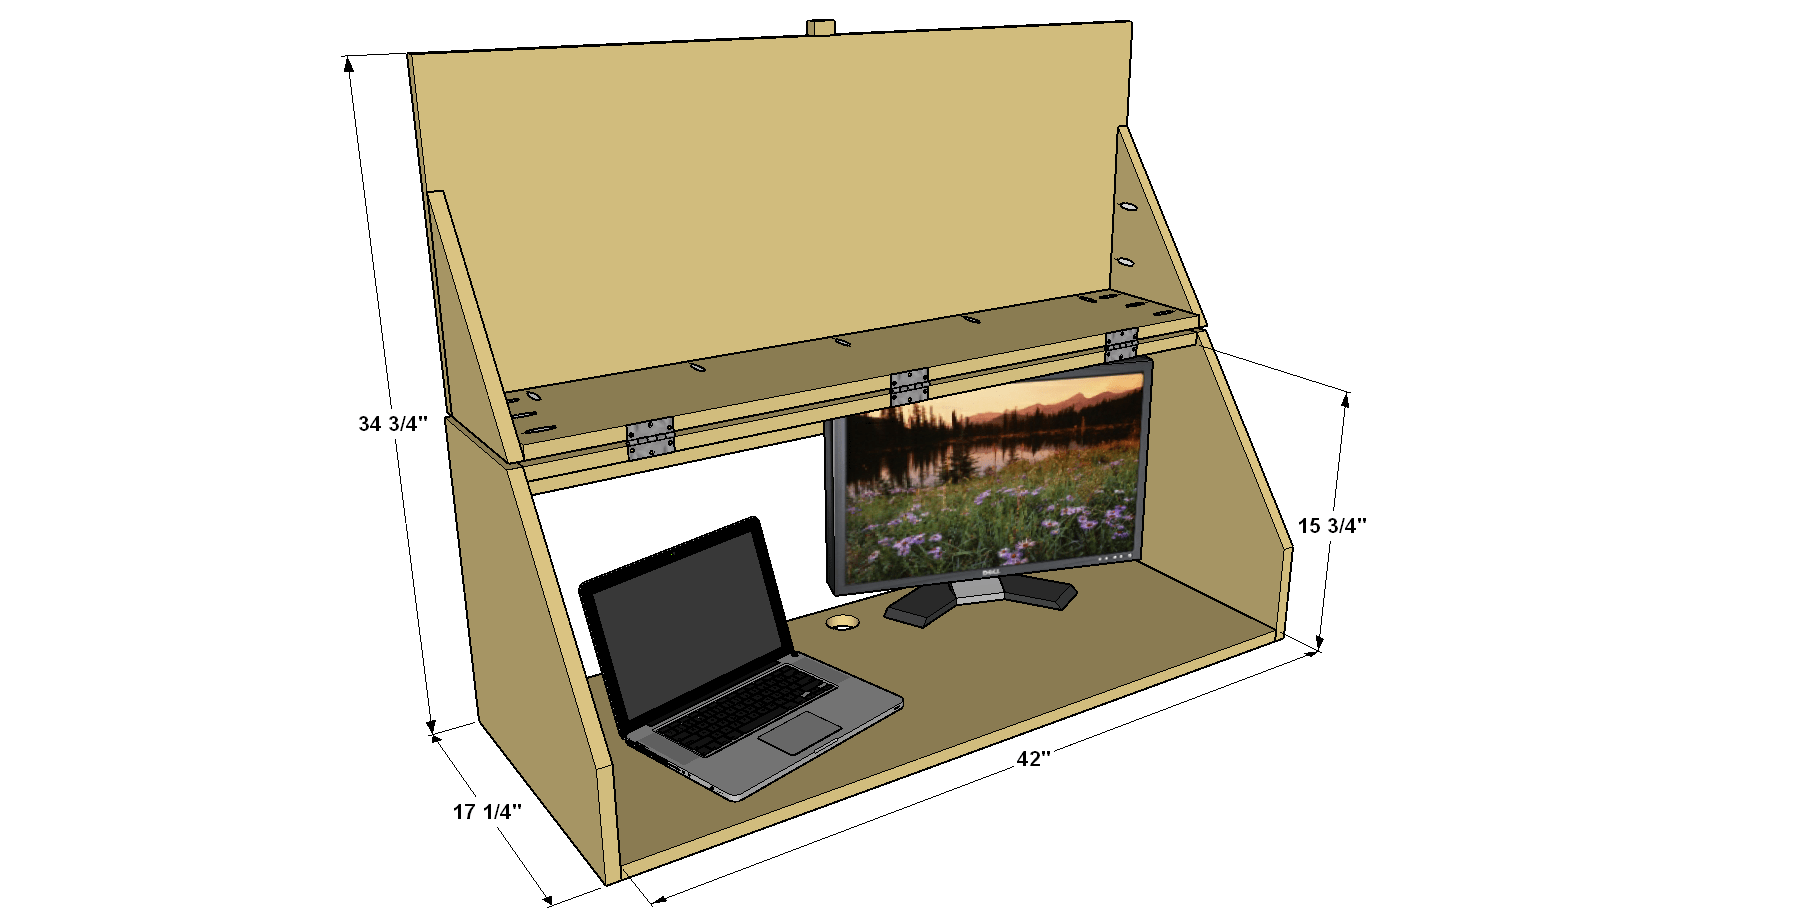


Create a handy workspace anywhere with this wall-mounted desk. The flip-top design allows you to keep everything corralled inside, and it keeps dust and dirt from getting to everything. That makes it perfect for creating a desk in your shop, so you can keep your project information organized.
Tools
Kreg Tools


Other Tools
-
2" hole saw

-
saw guide (if you don't use the Adaptive Cutting System)
-
tape measure
Materials
Wood Products
- 1 Plywood , 3/4" x 48" x 96"
Hardware & Supplies
- 1 100-count box 1 1/4" coarse-thread Kreg Pocket-hole screws
- 1 Wood glue
- 2 Pairs 2 1/2" butt hinges (3 hinges needed)
- 1 Foam weatherstripping
- 6 Cabinet-mounting screws
Cut List & Parts
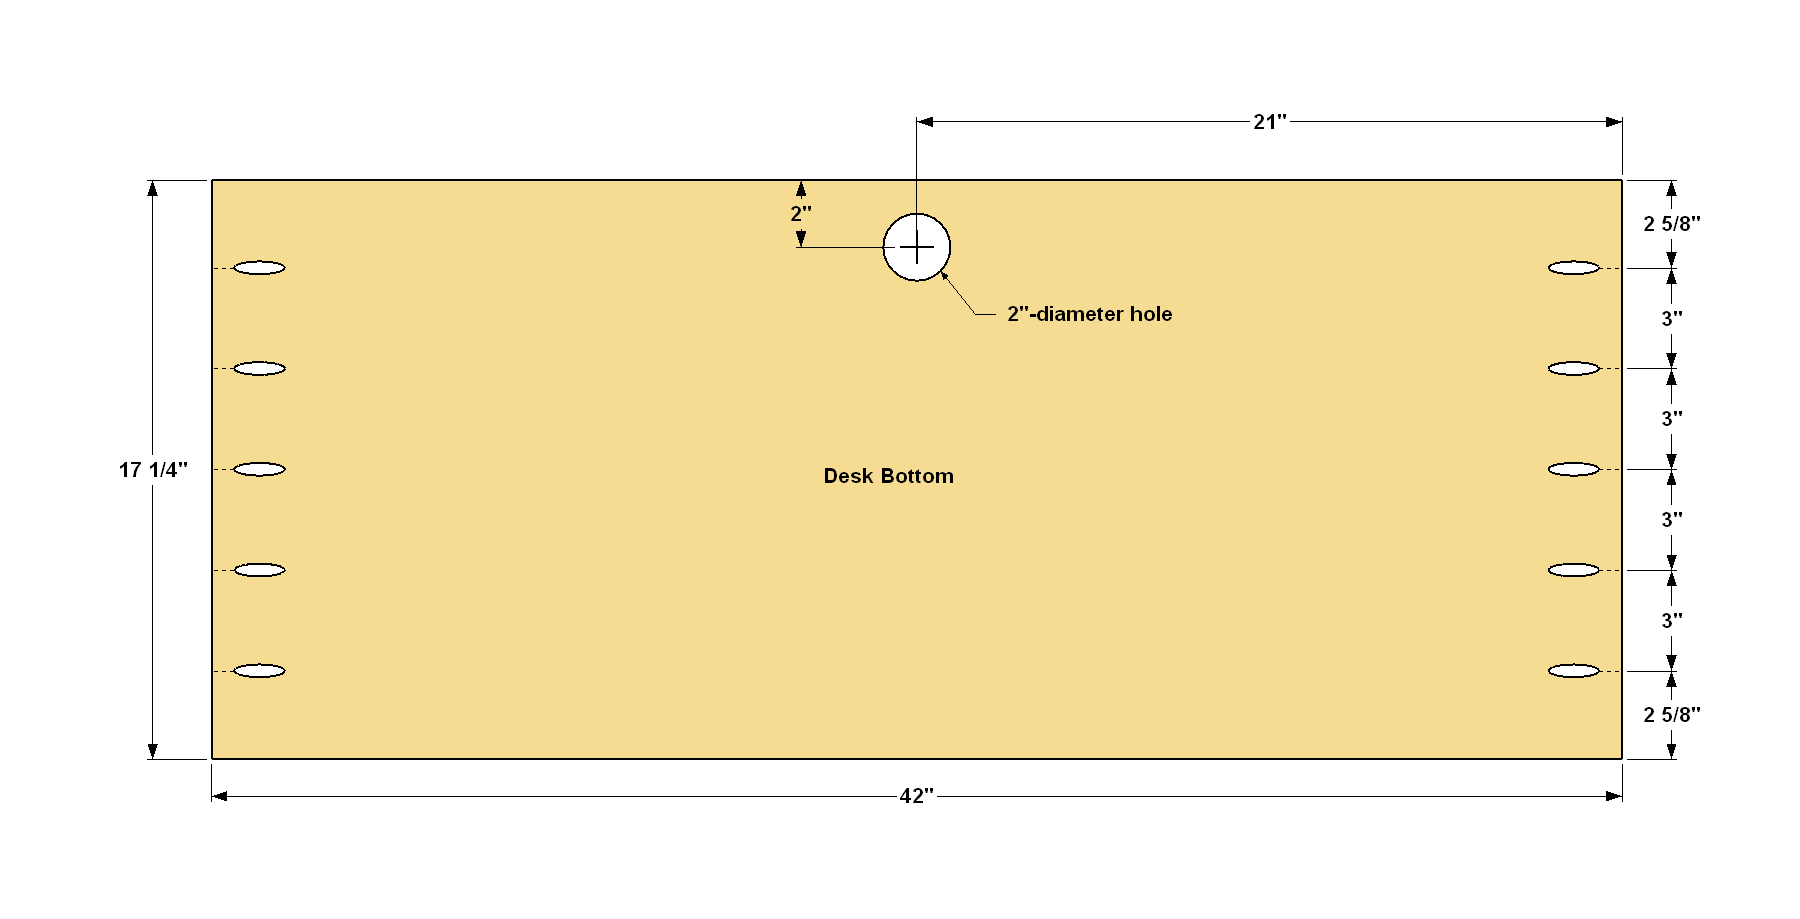
- 1 Desk Bottom , 3/4" x 17 1/4" x 42"
- 1 Desk Top , 3/4" x 9" x 42"
- 2 Desk Side , 3/4" x 17 1/4" x 17 1/4"
- 1 Cleat , 3/4" x 4" x 42"
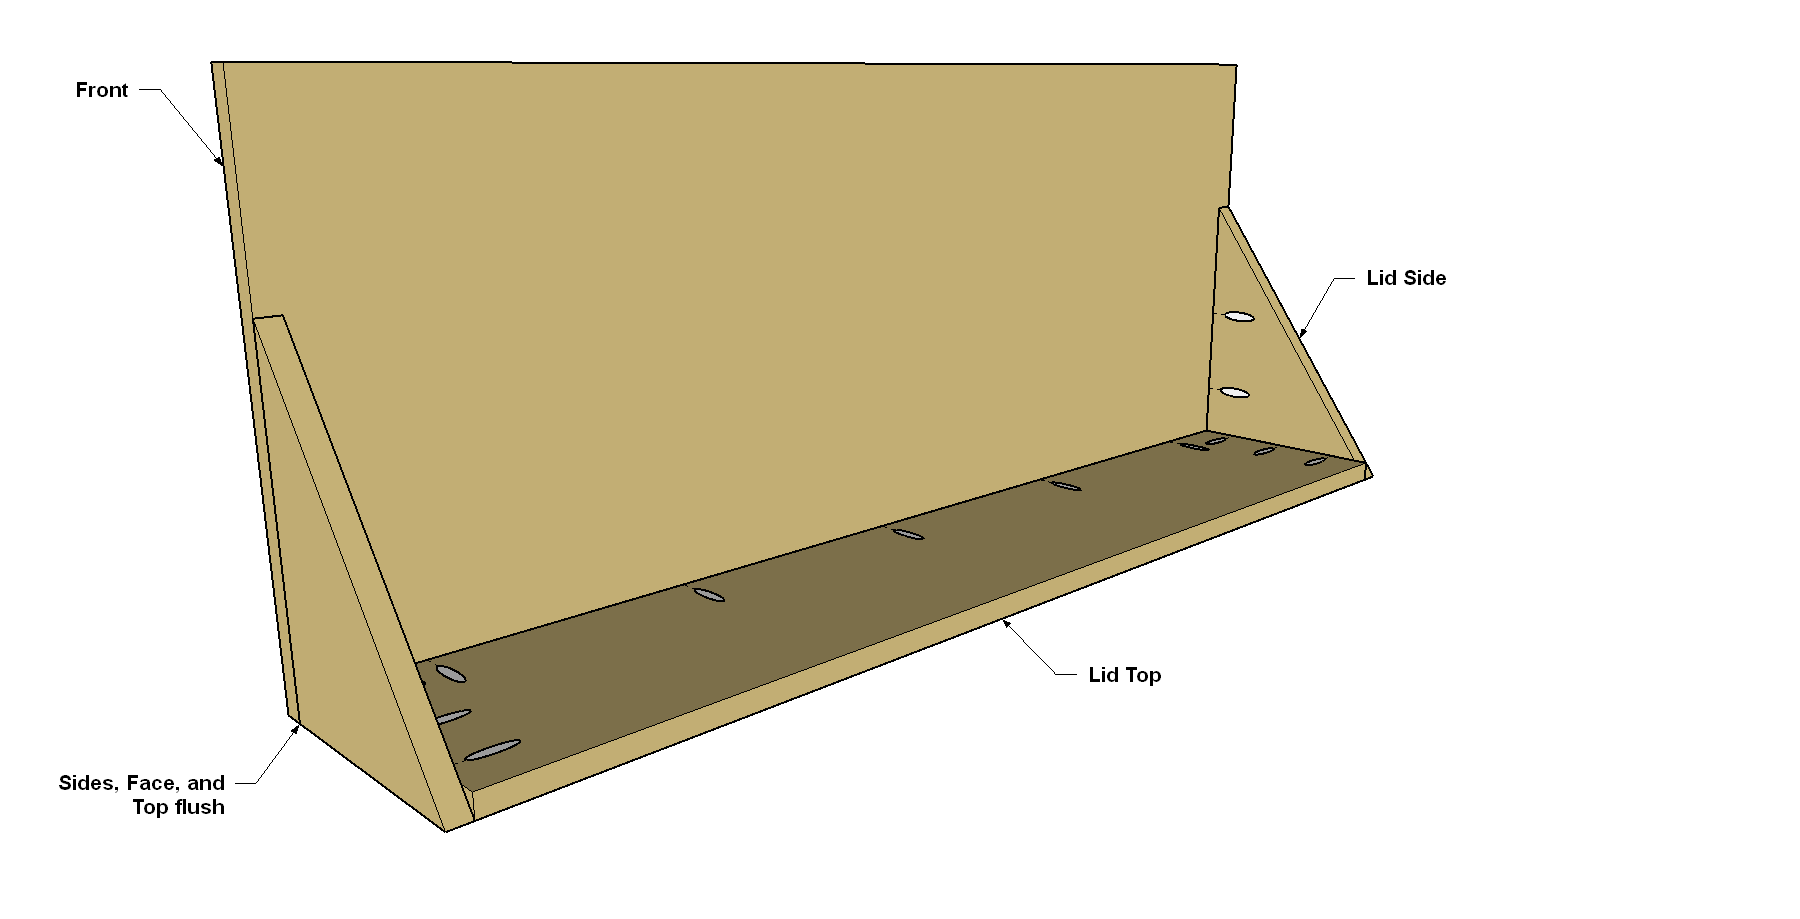
- 1 Lid Top , 3/4" x 8 1/8" x 42"
- 2 Lid Side , 3/4" x 8 1/8" x 11"
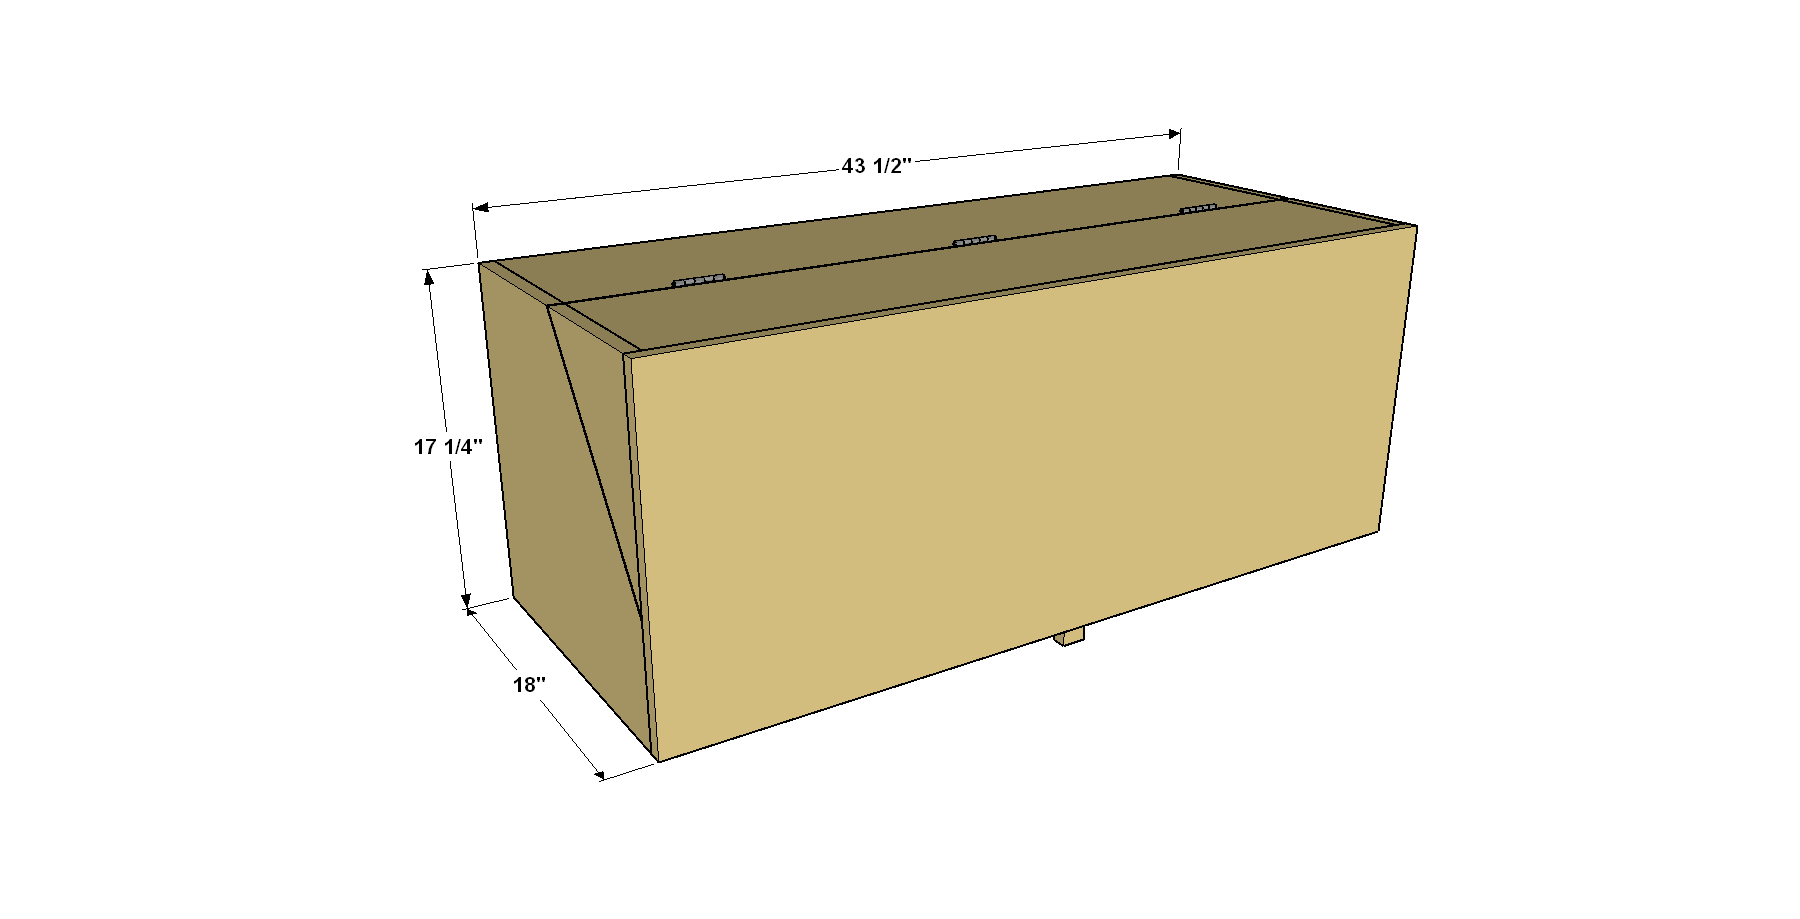
- 1 Front , 3/4" x 17 1/4" x 43 1/2"

Directions
-
Make the Bottom
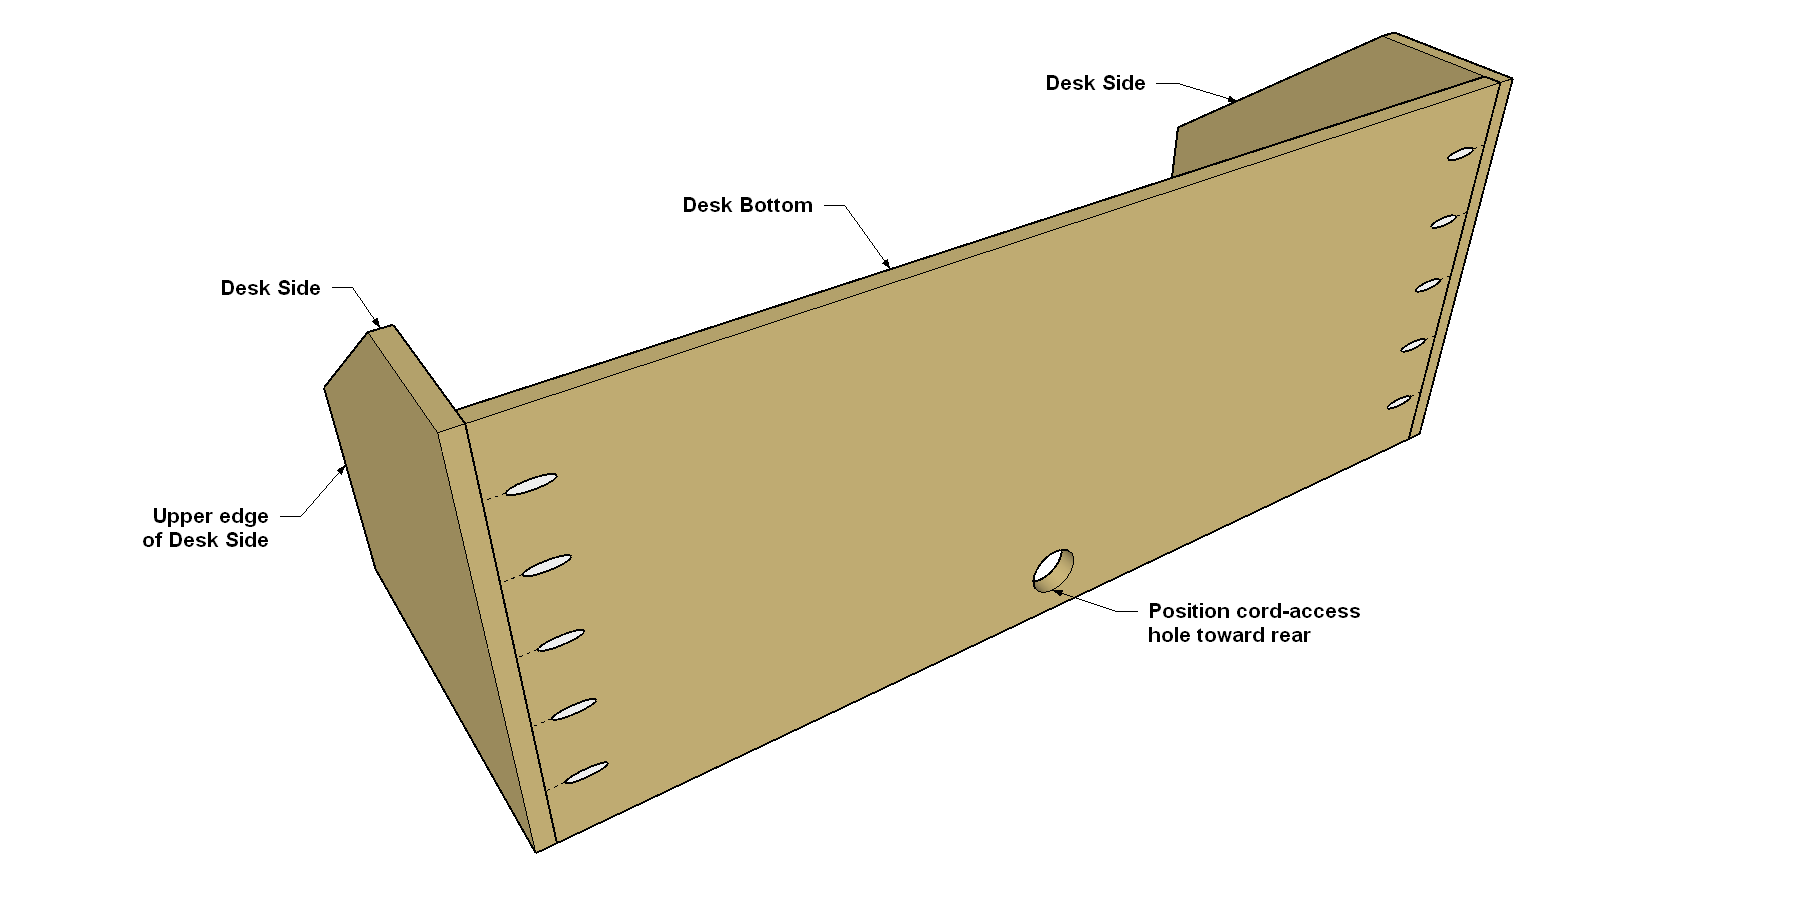
Because the Desk Bottom and two Sides are the same depth, rip all three in a single pass from 3/4" x 48" x 96" plywood, as shown in the cutting diagram. Crosscut the Desk Bottom to final length and set the other parts to the side for the moment. Set your Kreg® Pocket-Hole Jig for 3/4"-thick material, and then drill pocket holes in the underside of the Bottom at the locations shown. Mark the location for the power-cord access hole and drill it using a 2" hole saw. Sand the faces smooth.
-
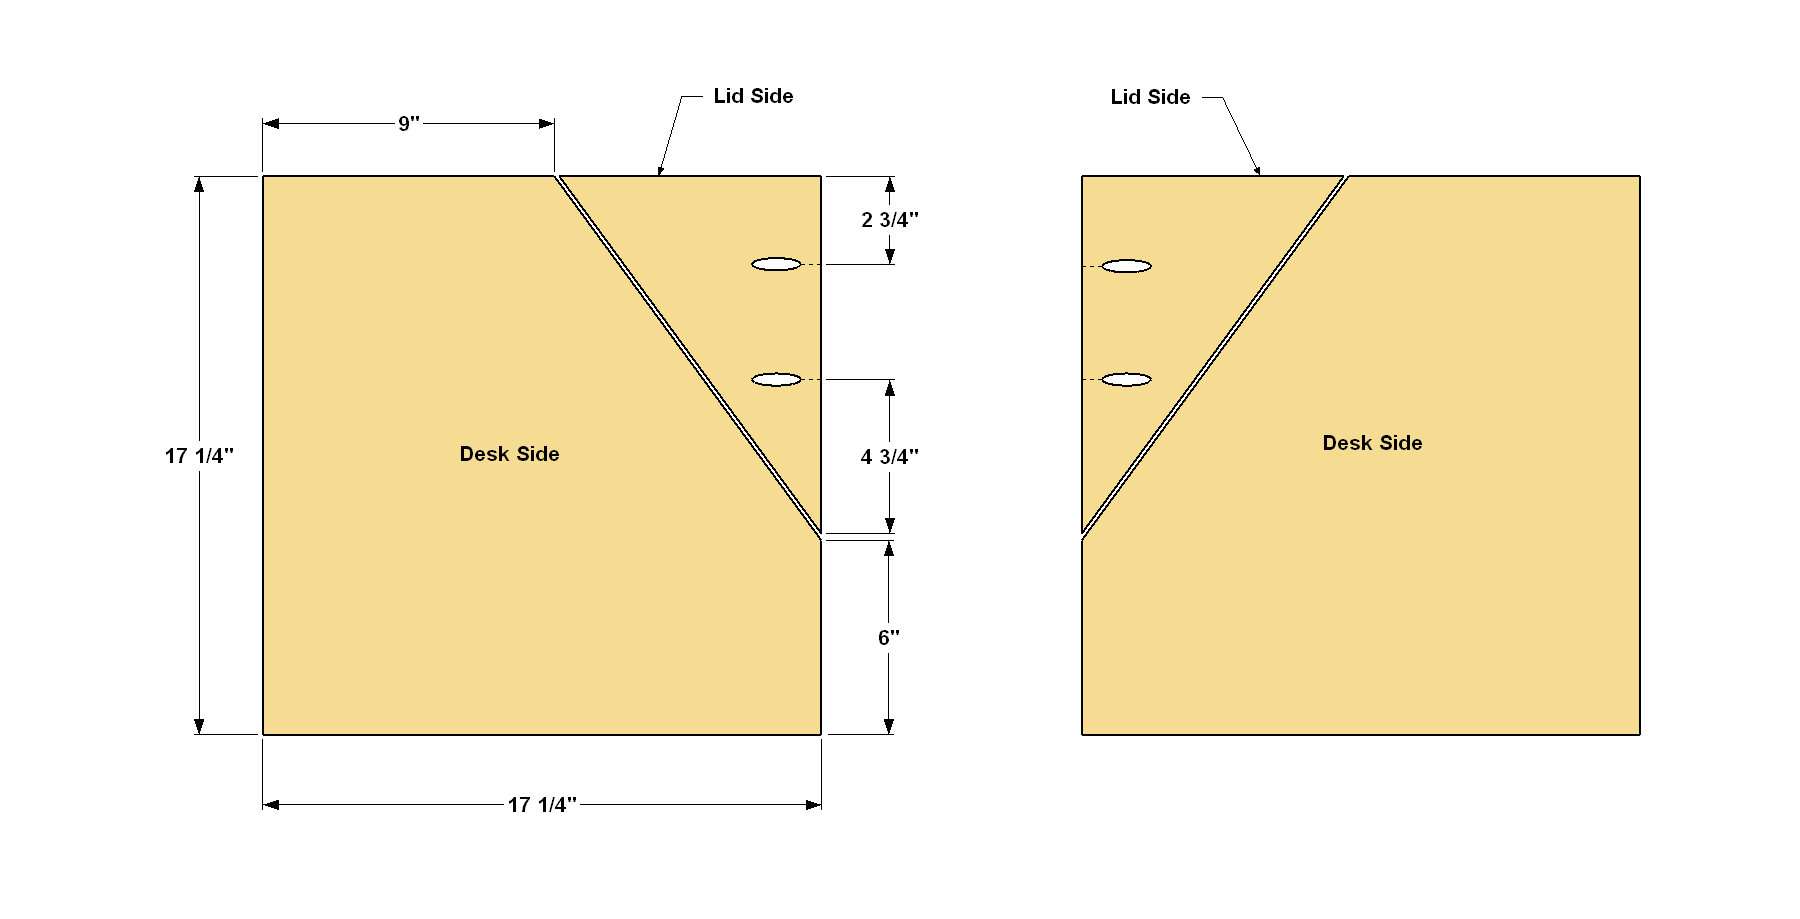
Cut the Sides
Cut squares for the Sides to the final dimension of 17 1/4" x 17 1/4". Next, mark out the location of the angle cuts. Most plywood has one better-looking face, and a face that’s less attractive. Make sure each Side is oriented the correct way, so the good face will be at the outside of the desk. Cut each piece to separate the Side and Lid Side. Drill two pocket holes in each Lid Side—placing them on the less-attractive side—as shown. Sand the faces of all the pieces smooth. Then set the Lid Sides aside for a later step.
-
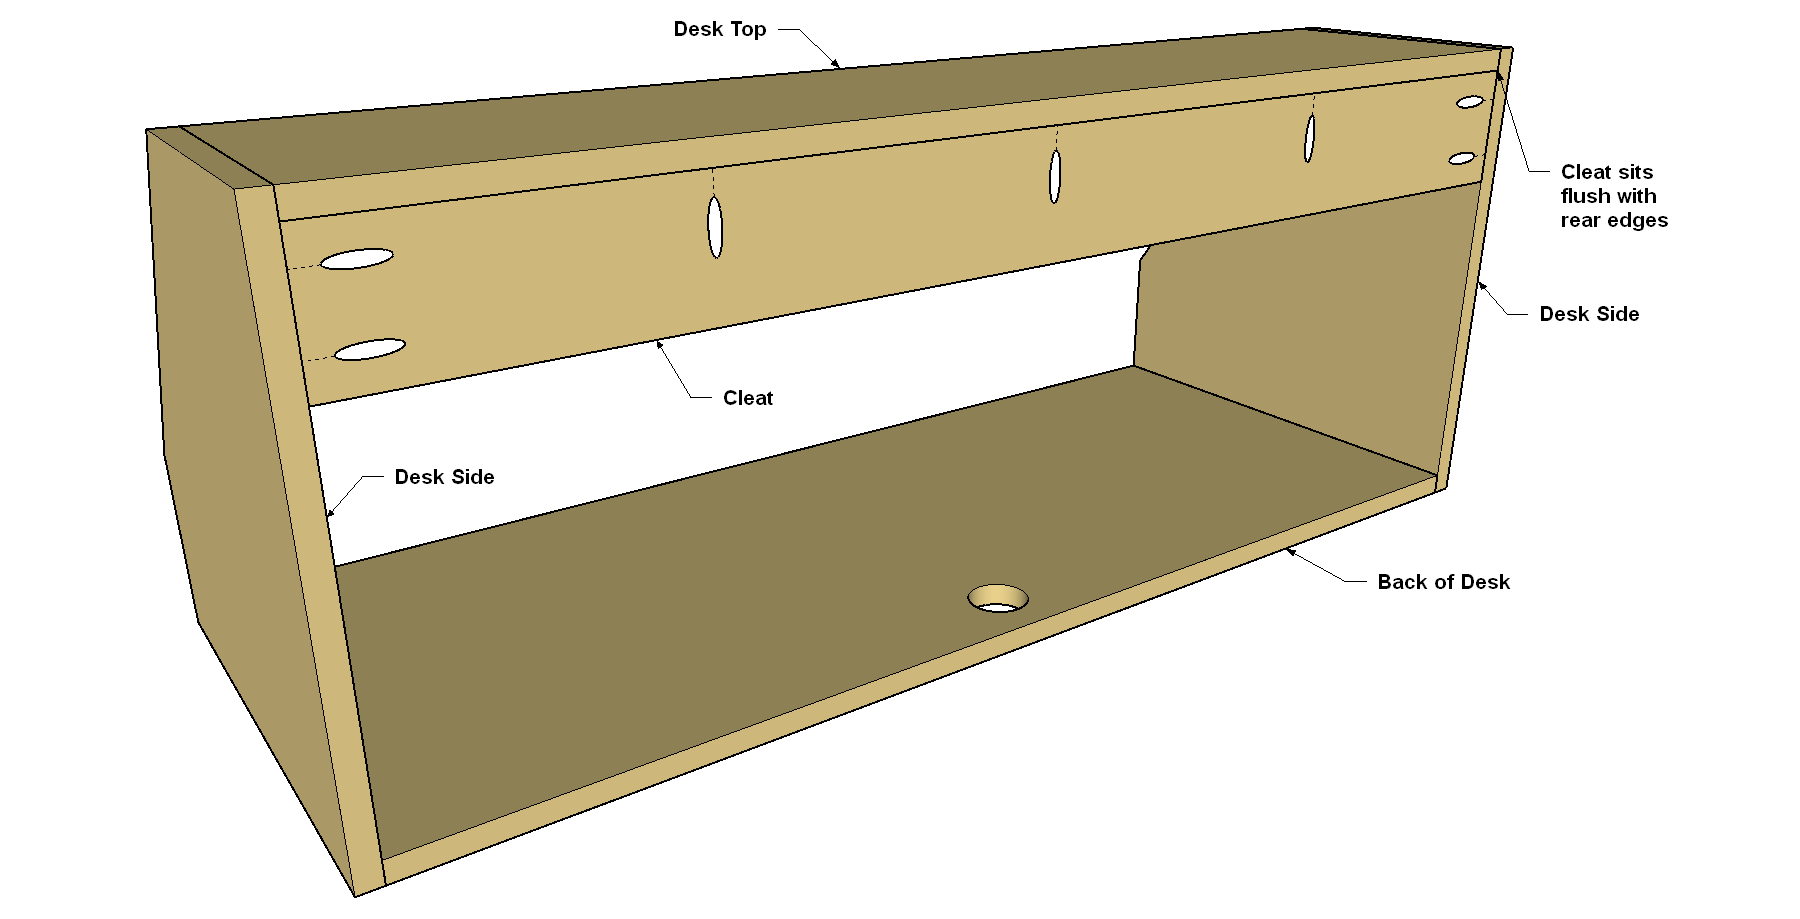
Attach the Sides to the Bottom
Align each Side, good face out, with the Bottom, making sure the pocket holes in the Bottom face downward and the cord hole is at the back. Connect the parts using glue and 1 1/4" coarse-thread Kreg Pocket-Hole Screws, as shown.
-
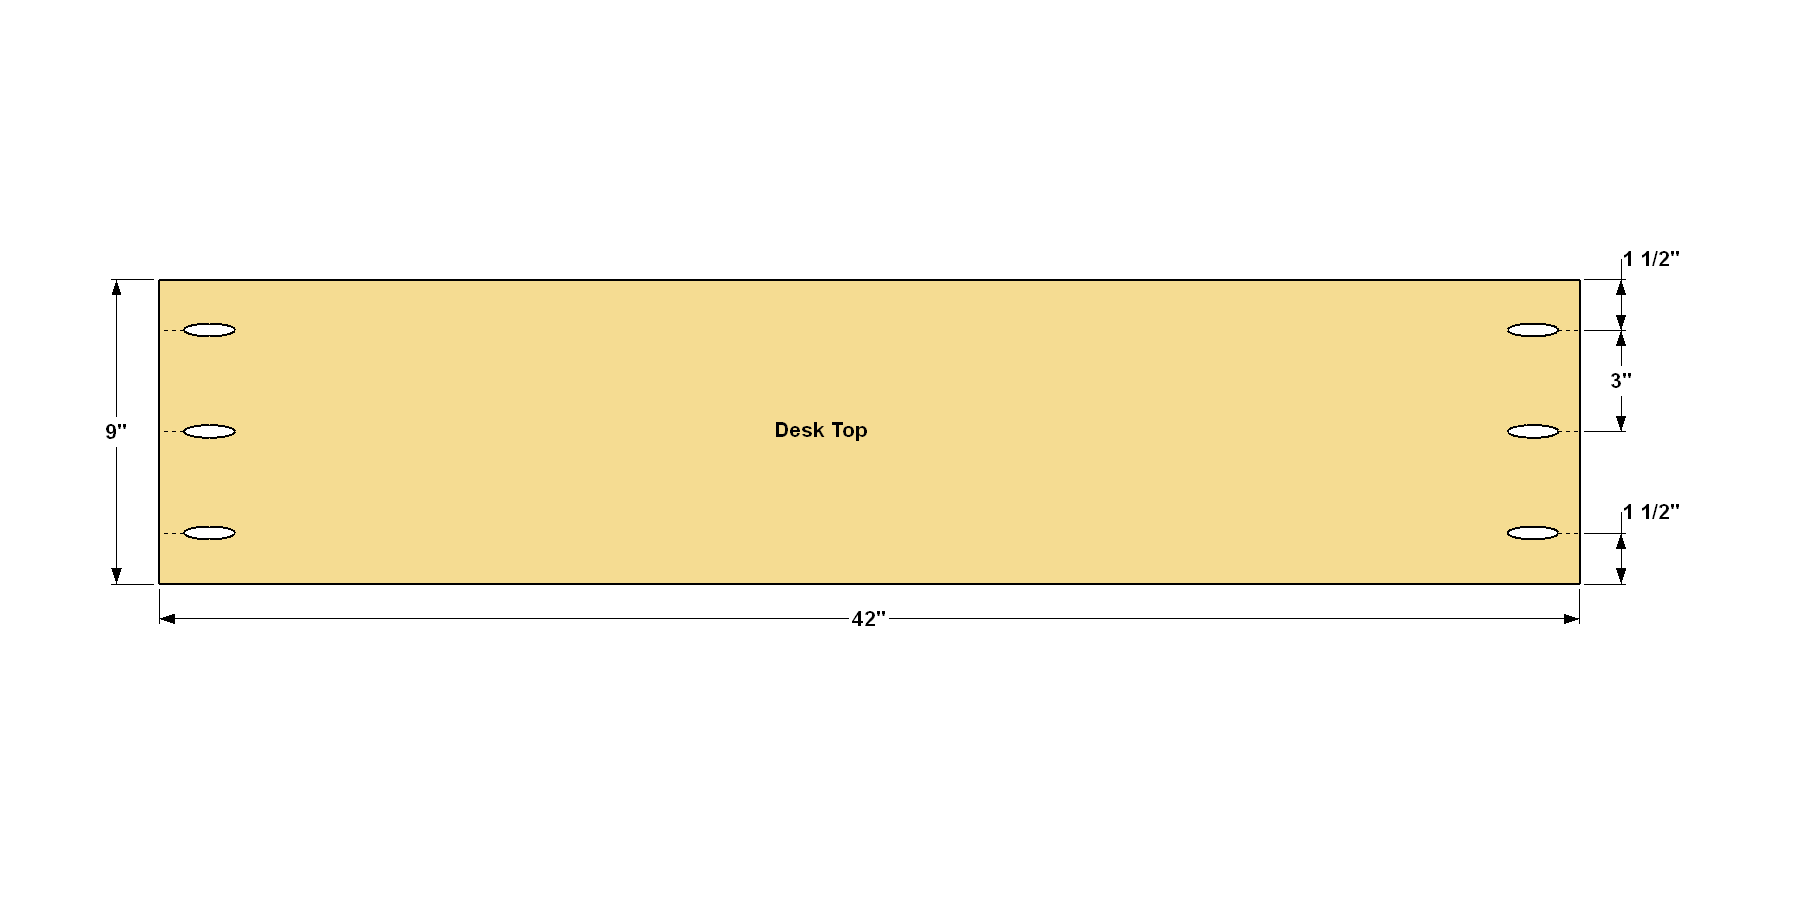
Make the Desk Top
Now you can cut the Desk Top to size, as shown in the cutting diagram. Drill pocket holes at the ends of the Top, as shown. These holes go in the underside (the less-attractive face). Sand the faces smooth.
-
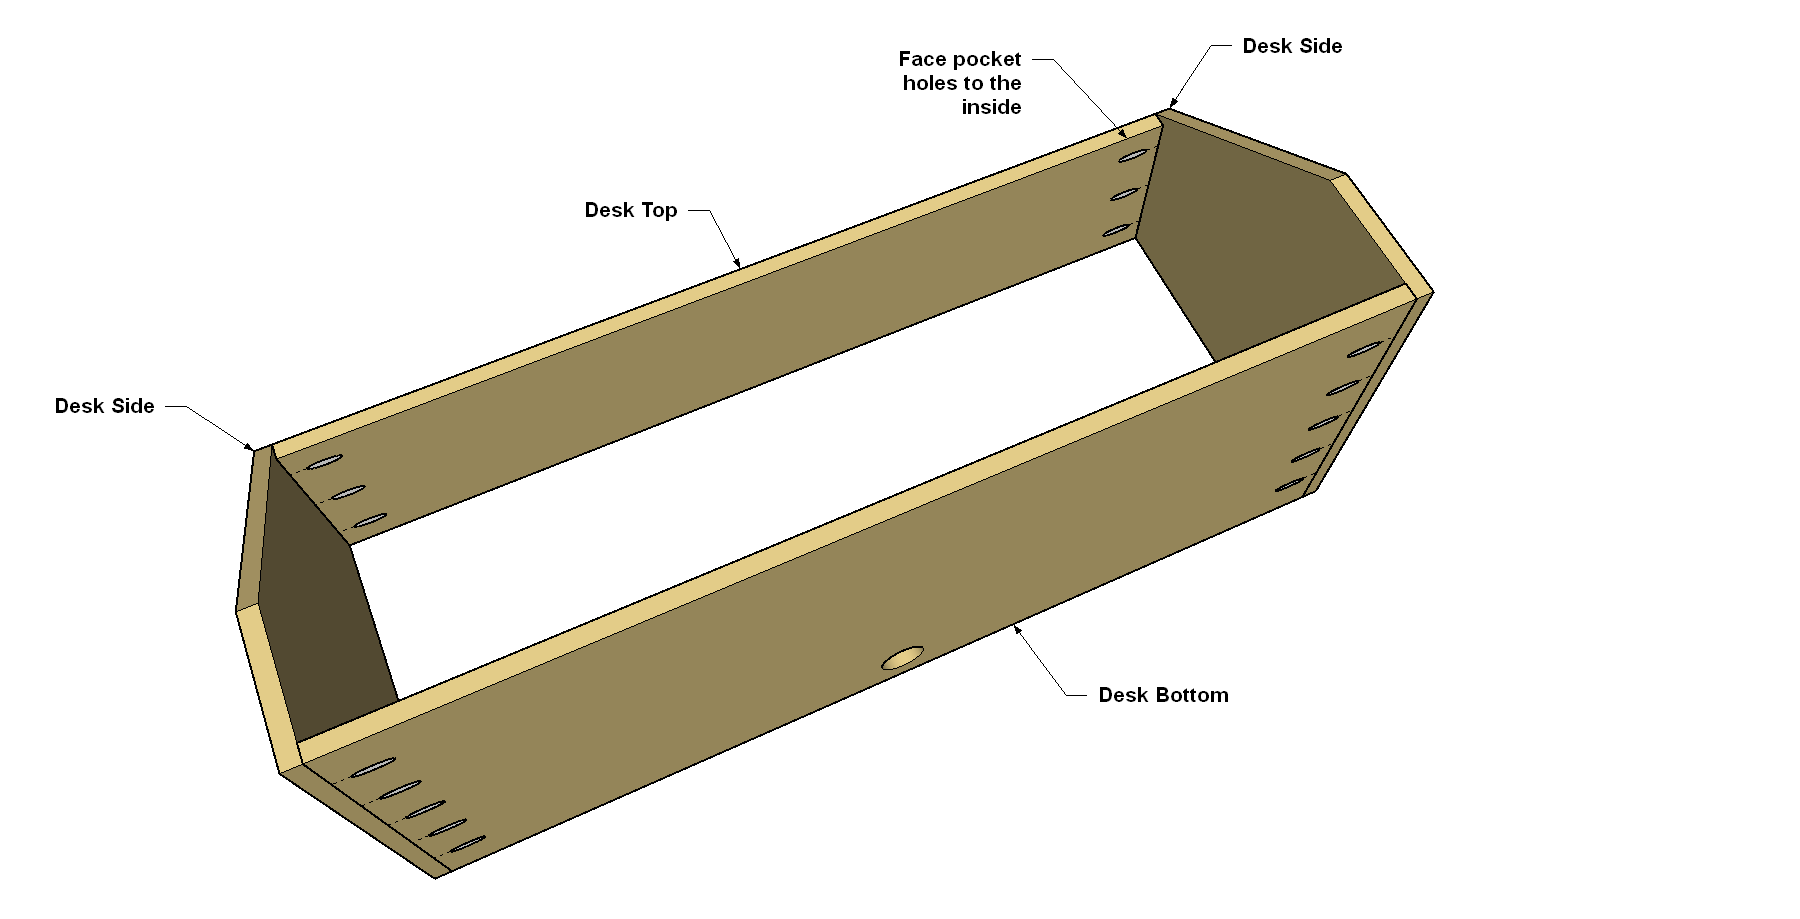
Add the Desk Top
Position the Desk Top between the Sides so that it’s flush at the top and along the rear edges of the Sides as shown. Attach the Desk Top to the Sides using glue and 1 1/4" coarse-thread Kreg Pocket-Hole Screws.
-
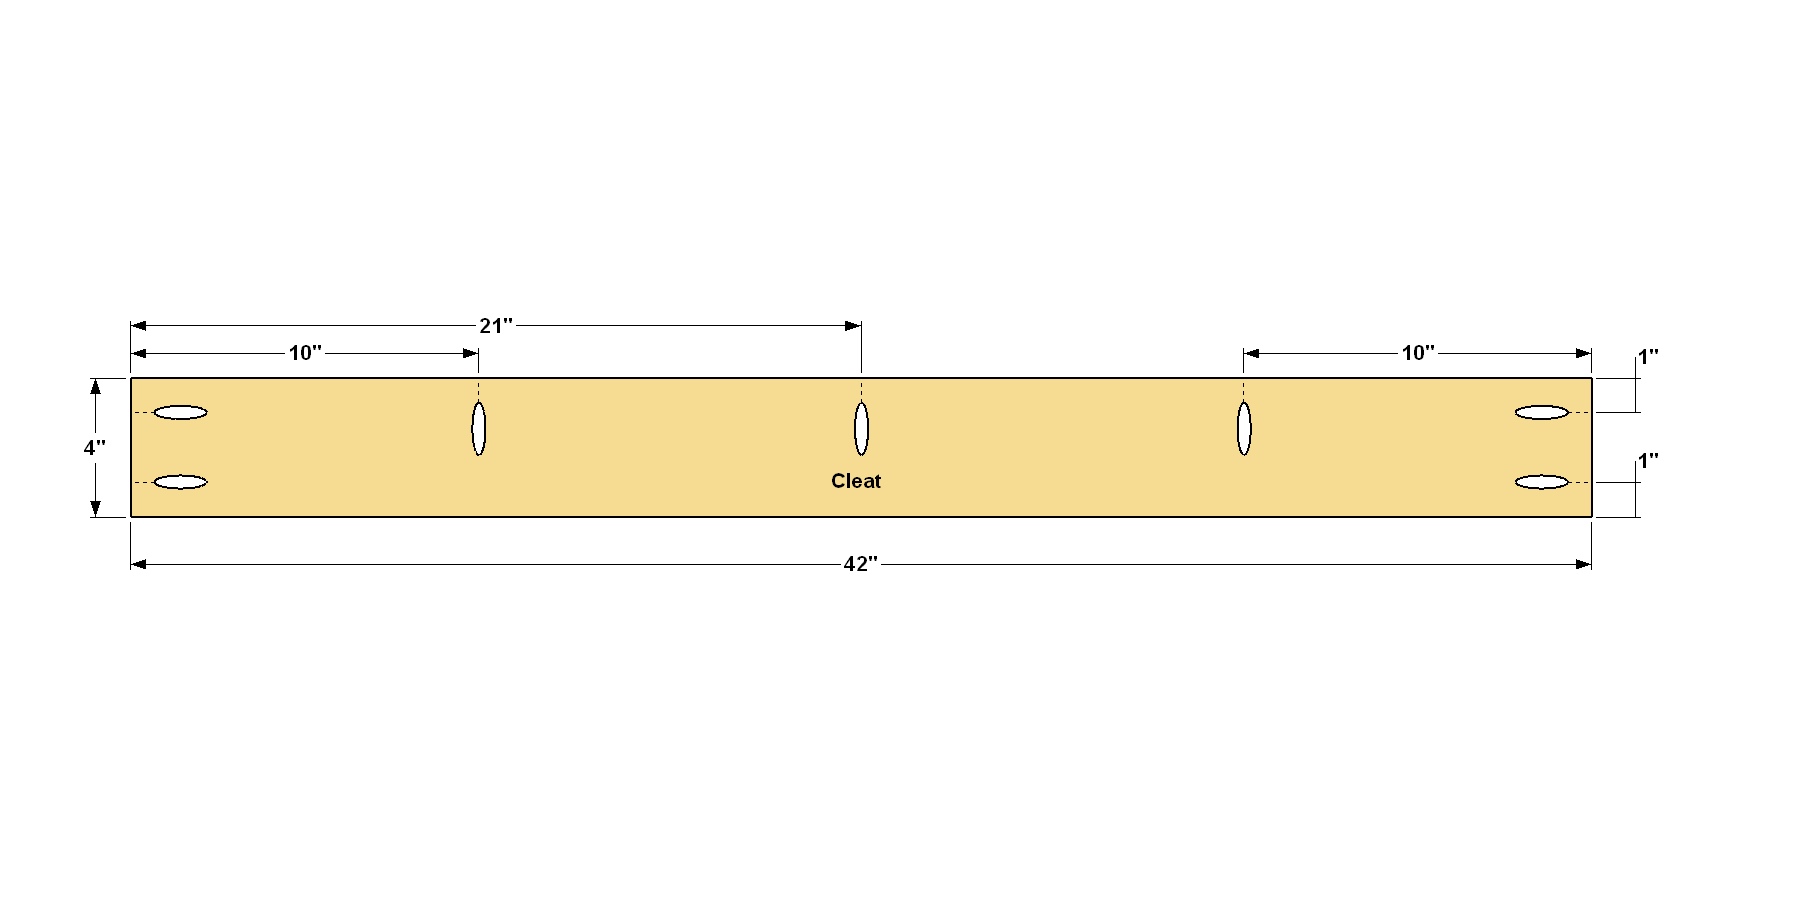
Make the Cleat
Cut the Cleat to width and length as shown in the cutting diagram. Drill pocket holes at the locations shown. Sand the faces smooth.
-
Install the Cleat
The Cleat is what will bear the weight of the desk. Apply glue to all three mating edges of the Cleat, and then position it under the Top and between the Sides. Make sure the pocket holes face toward the outside. Secure the Cleat to the desk using 1 1/4" coarse-thread Kreg Pocket-Hole Screws.
-
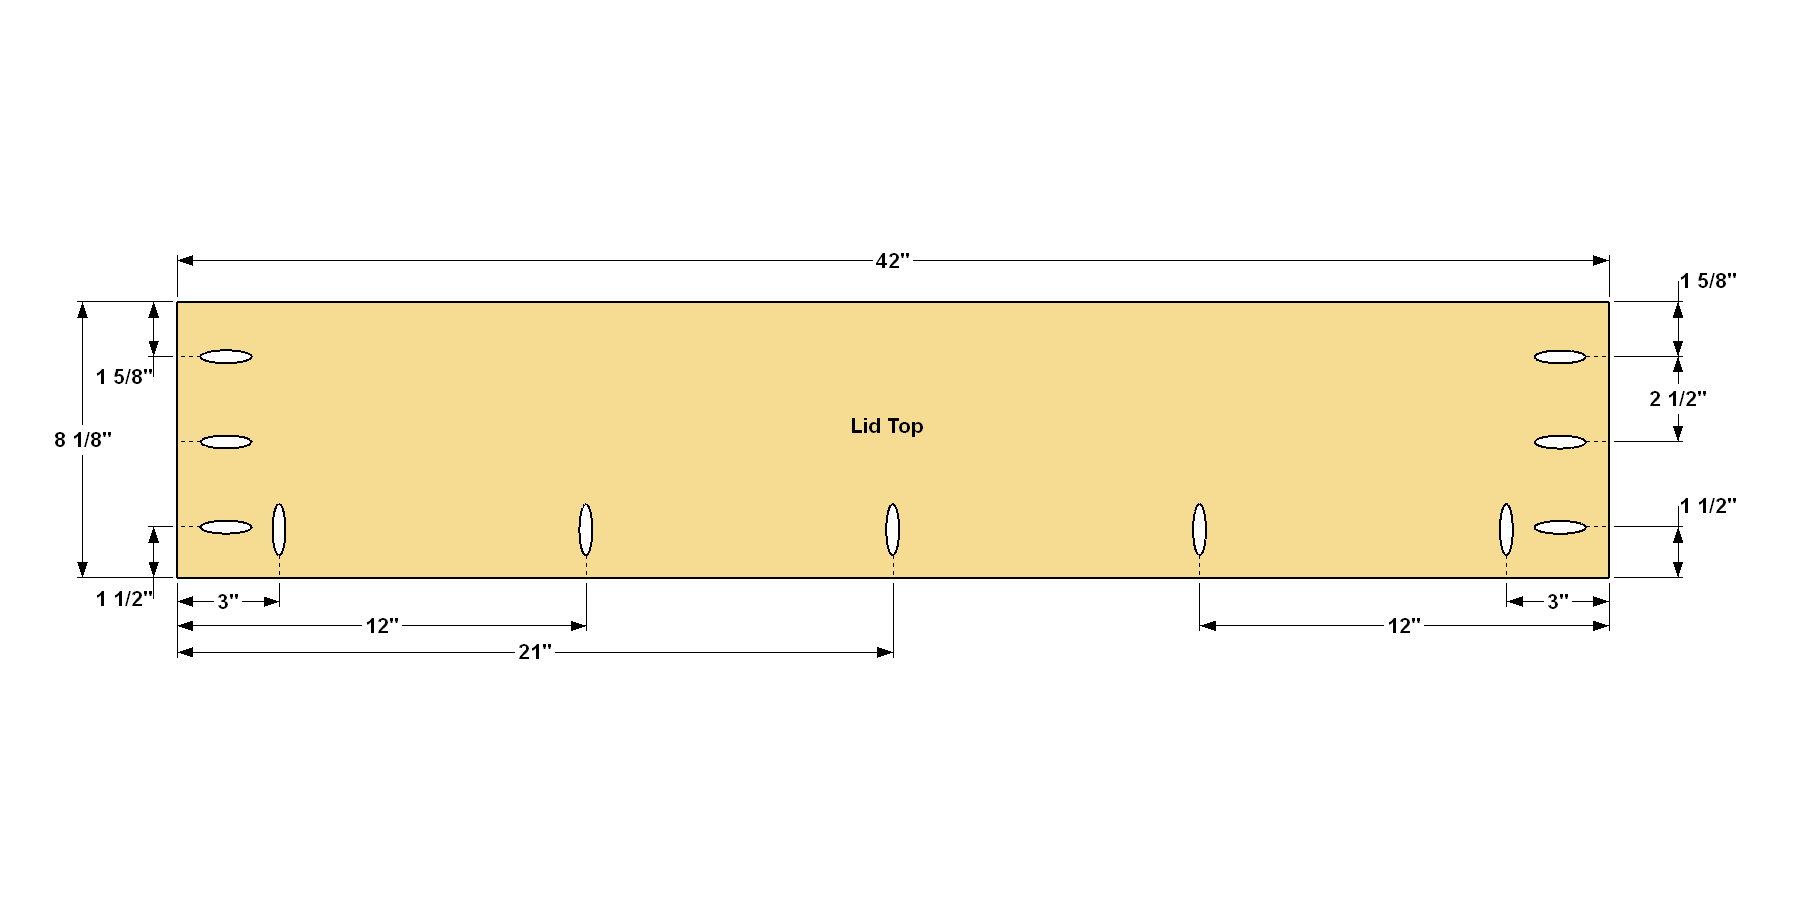
Make the Lid Top
Cut the Lid Top to width and length as shown in the cutting diagram. Drill pocket holes at the locations shown. Sand the faces smooth.
-
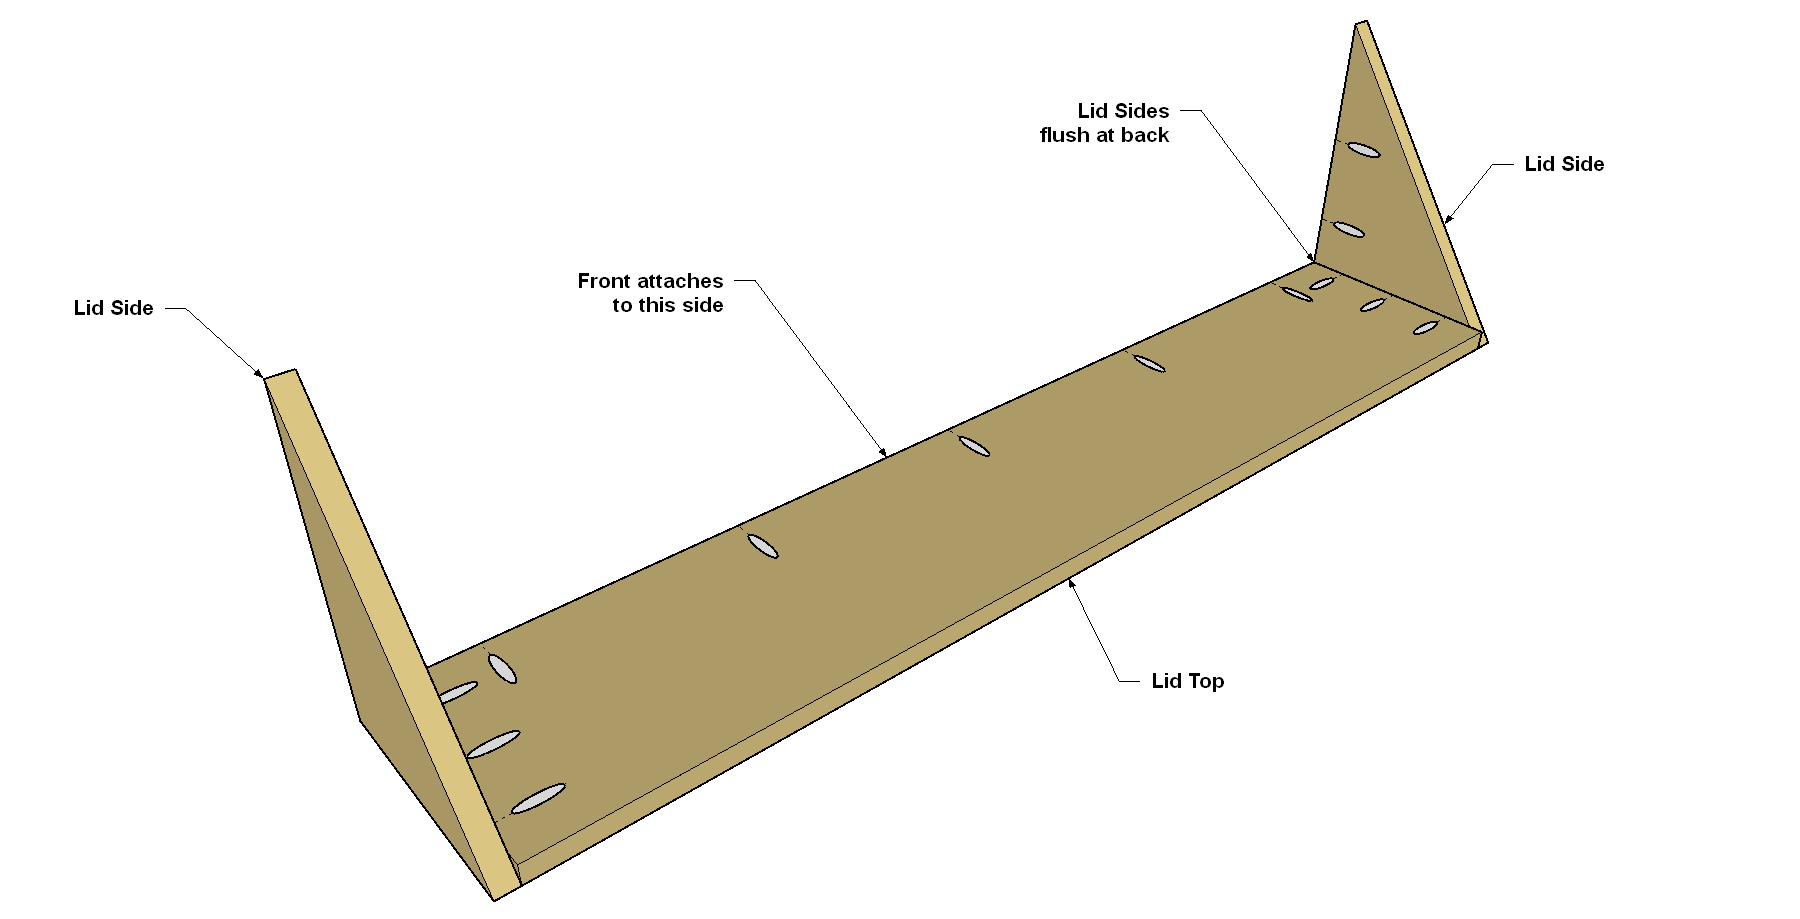
Attach the Lid Top
Now position the Lid Sides (which you cut earlier) where shown, and then secure them to the Lid Top with glue and 1 1/4" coarse-thread Kreg Pocket-Hole Screws.
-
Cut and Attach the Front
Cut the Front to size, as shown in the cutting diagram. Sand the faces smooth. Apply glue to the edges of the Lid Sides and the Top, and secure the Front using 1 1/4" Kreg Screws.
-
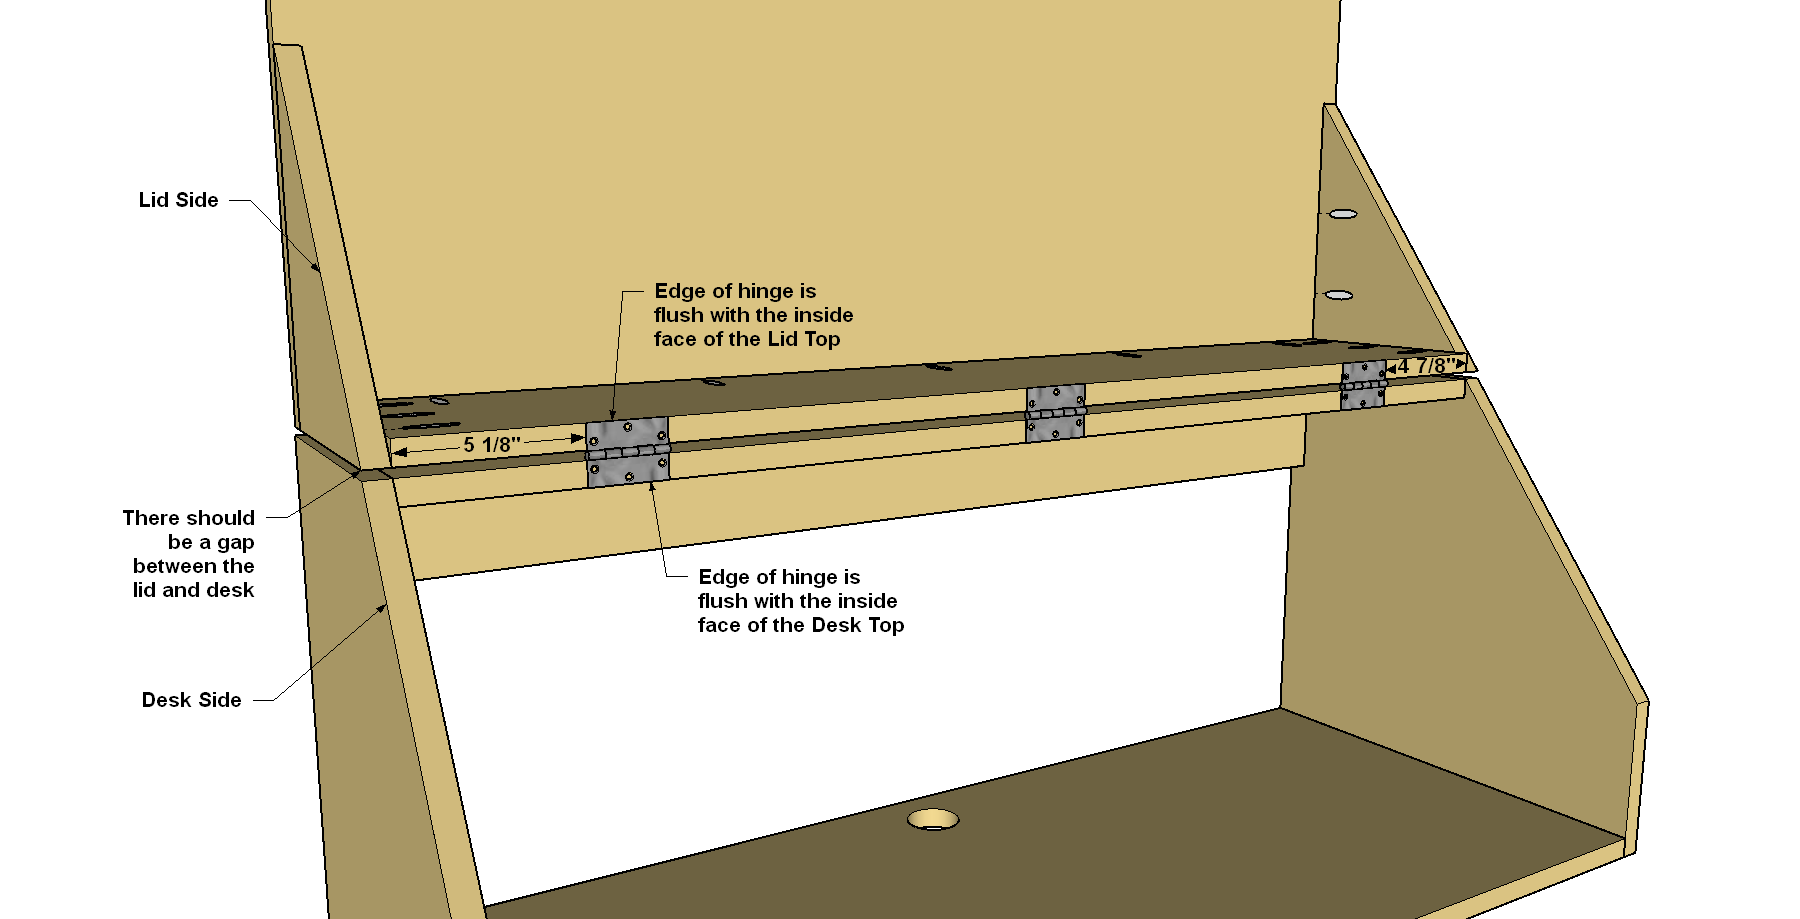
Mount the Lid to the Desk
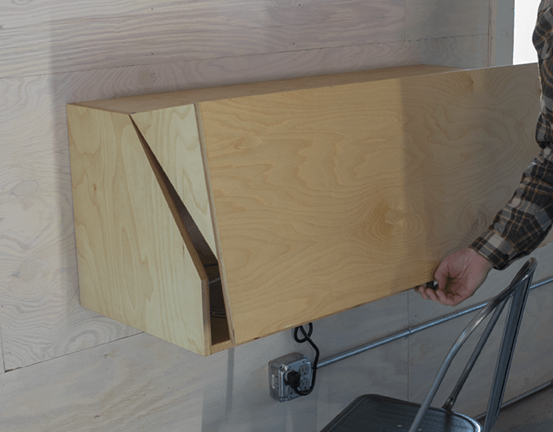
Flip the Lid to the “open” position on top of the Desk Top. Lay out the hinge locations on the Lid so the long edge of the hinge is flush with the inside face of the Lid. Predrill the screw holes on each hinge and mount them to the Lid. Next, align the hinge so the loose side now aligns with the inside face of the Desk Top. This should create a gap between the Lid and the Desk Top. Now predrill mounting holes for the second side of the hinges, and then secure each one to the Desk Top. Once the hinges are secured, open and close the lid to make sure the hinges aren’t binding. Finally, cut a small block of scrap about 3/4" square and 1" long and glue it to the edge of the lid to act as a pull.
-
Sand and Finish
Do any touch-up sanding that’s needed on the desk and wipe away dust, then apply your favorite finish. We used a natural oil to give the plywood a nice warm color. After the oil dried according to the manufacturer’s recommendations, we applied two coats of satin wipe-on polyurethane. This makes it easy to wipe away dust from the outside of the desk.
-
Mount the Desk
To mount the desk to the wall, it’s best to make sure it is secured to at least two wall studs. Once the studs are located and the position is finalized, drill pilot holes through the cleat for two screws at each stud location. Secure the desk to the wall by driving two heavy-duty cabinet-installation screws into each stud. Finally, to help seal the desk from messy shop dust, or to keep unwanted pests from going after your cookies, apply weather stripping to the edges of the Desk Sides, Top, and Bottom to seal the gaps between the lid assembly and the desk.
