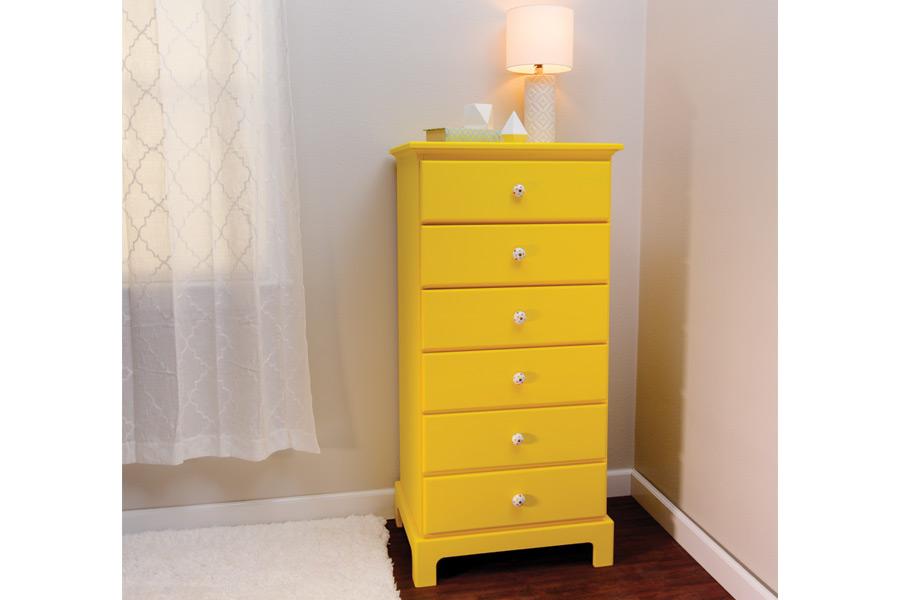
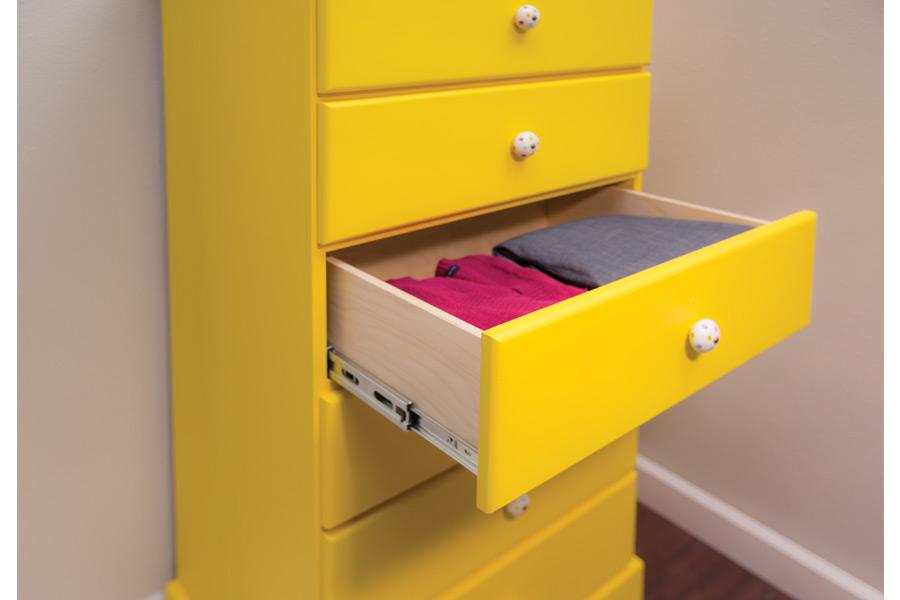
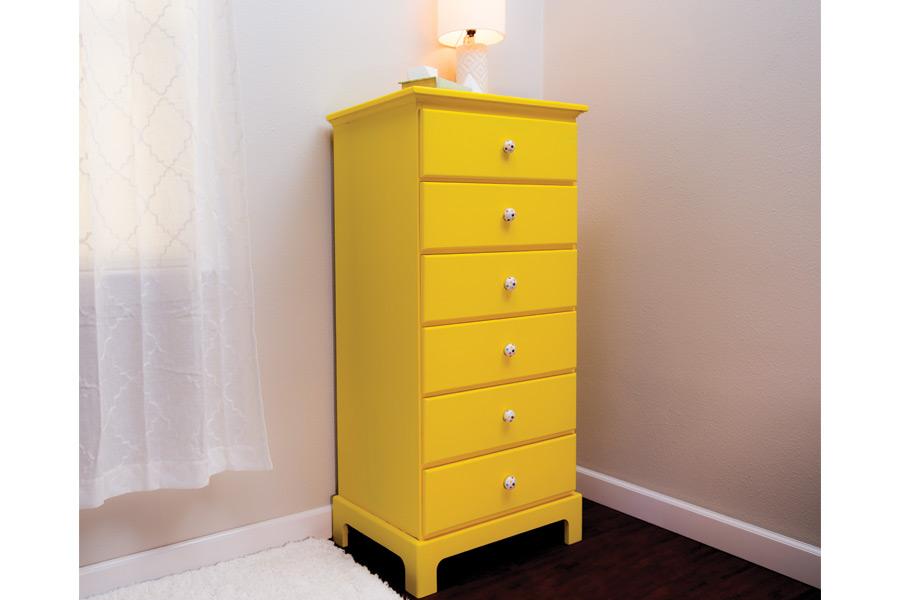
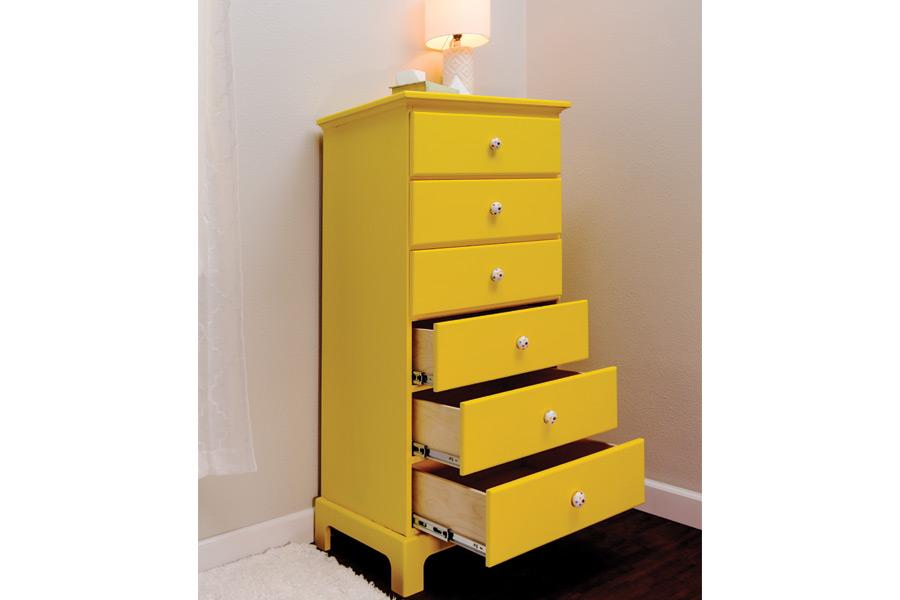
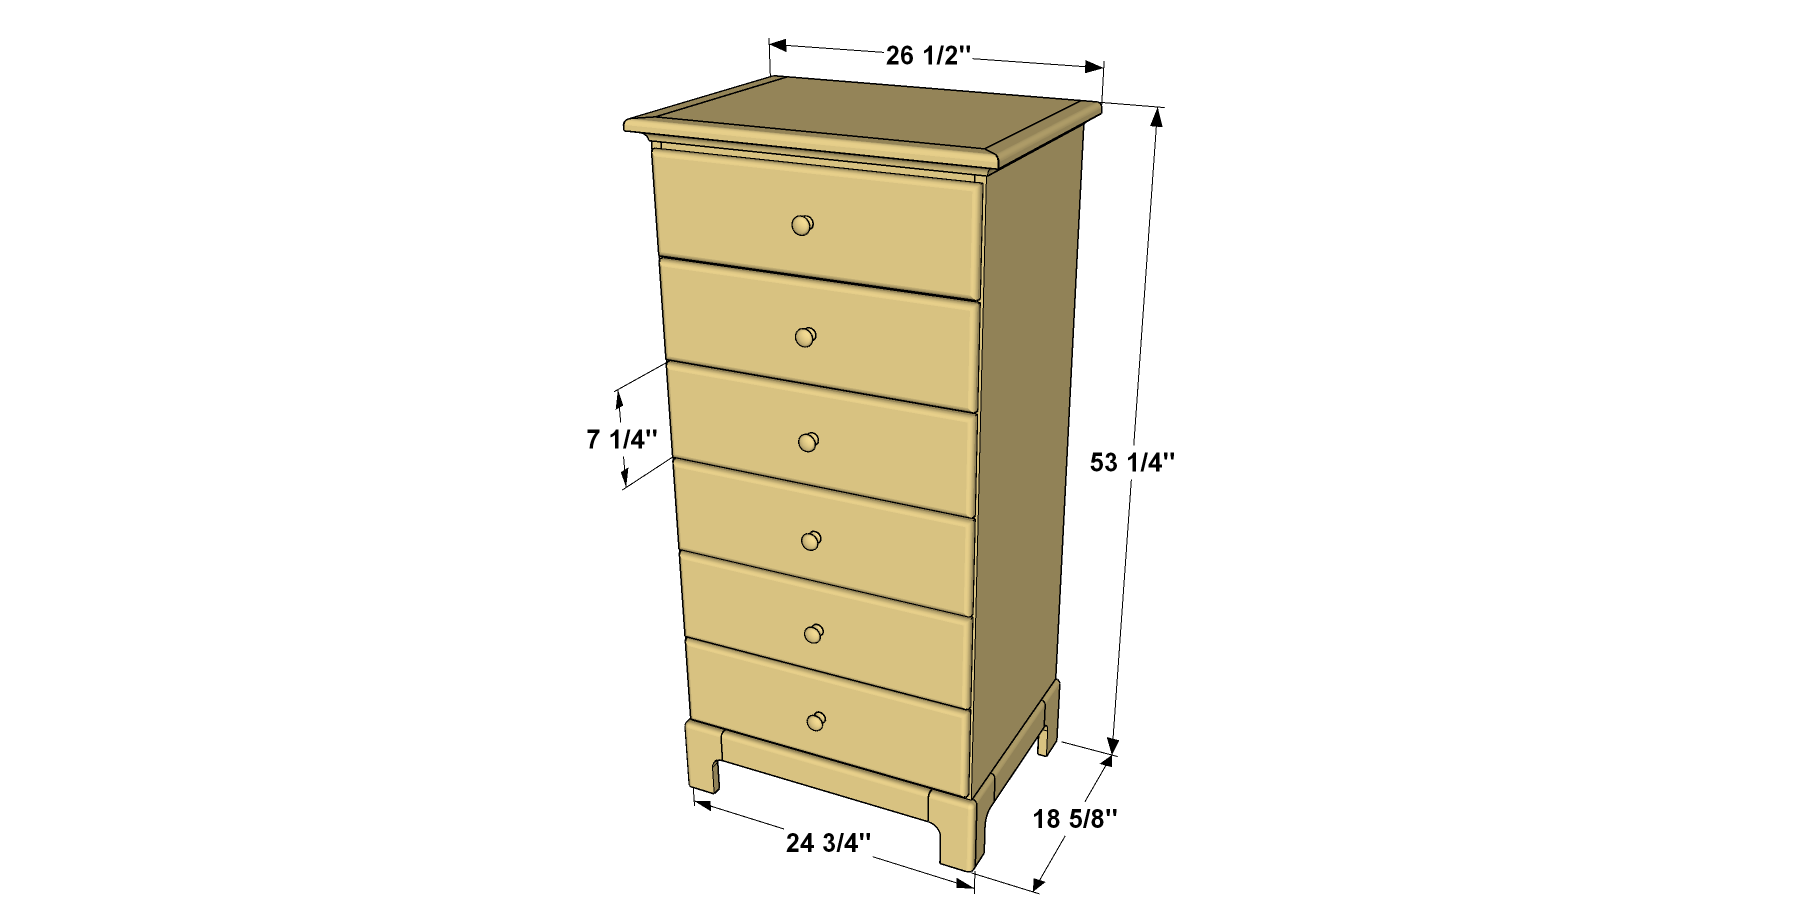


Here’s a great way to pack a lot of clothes storage into a small space. This traditional tall dresser has six generously sized drawers, but the whole piece fits into a space roughly two feet wide and less than two feet deep. The drawers ride on ball bearing slides for easy operation, too.
Tools
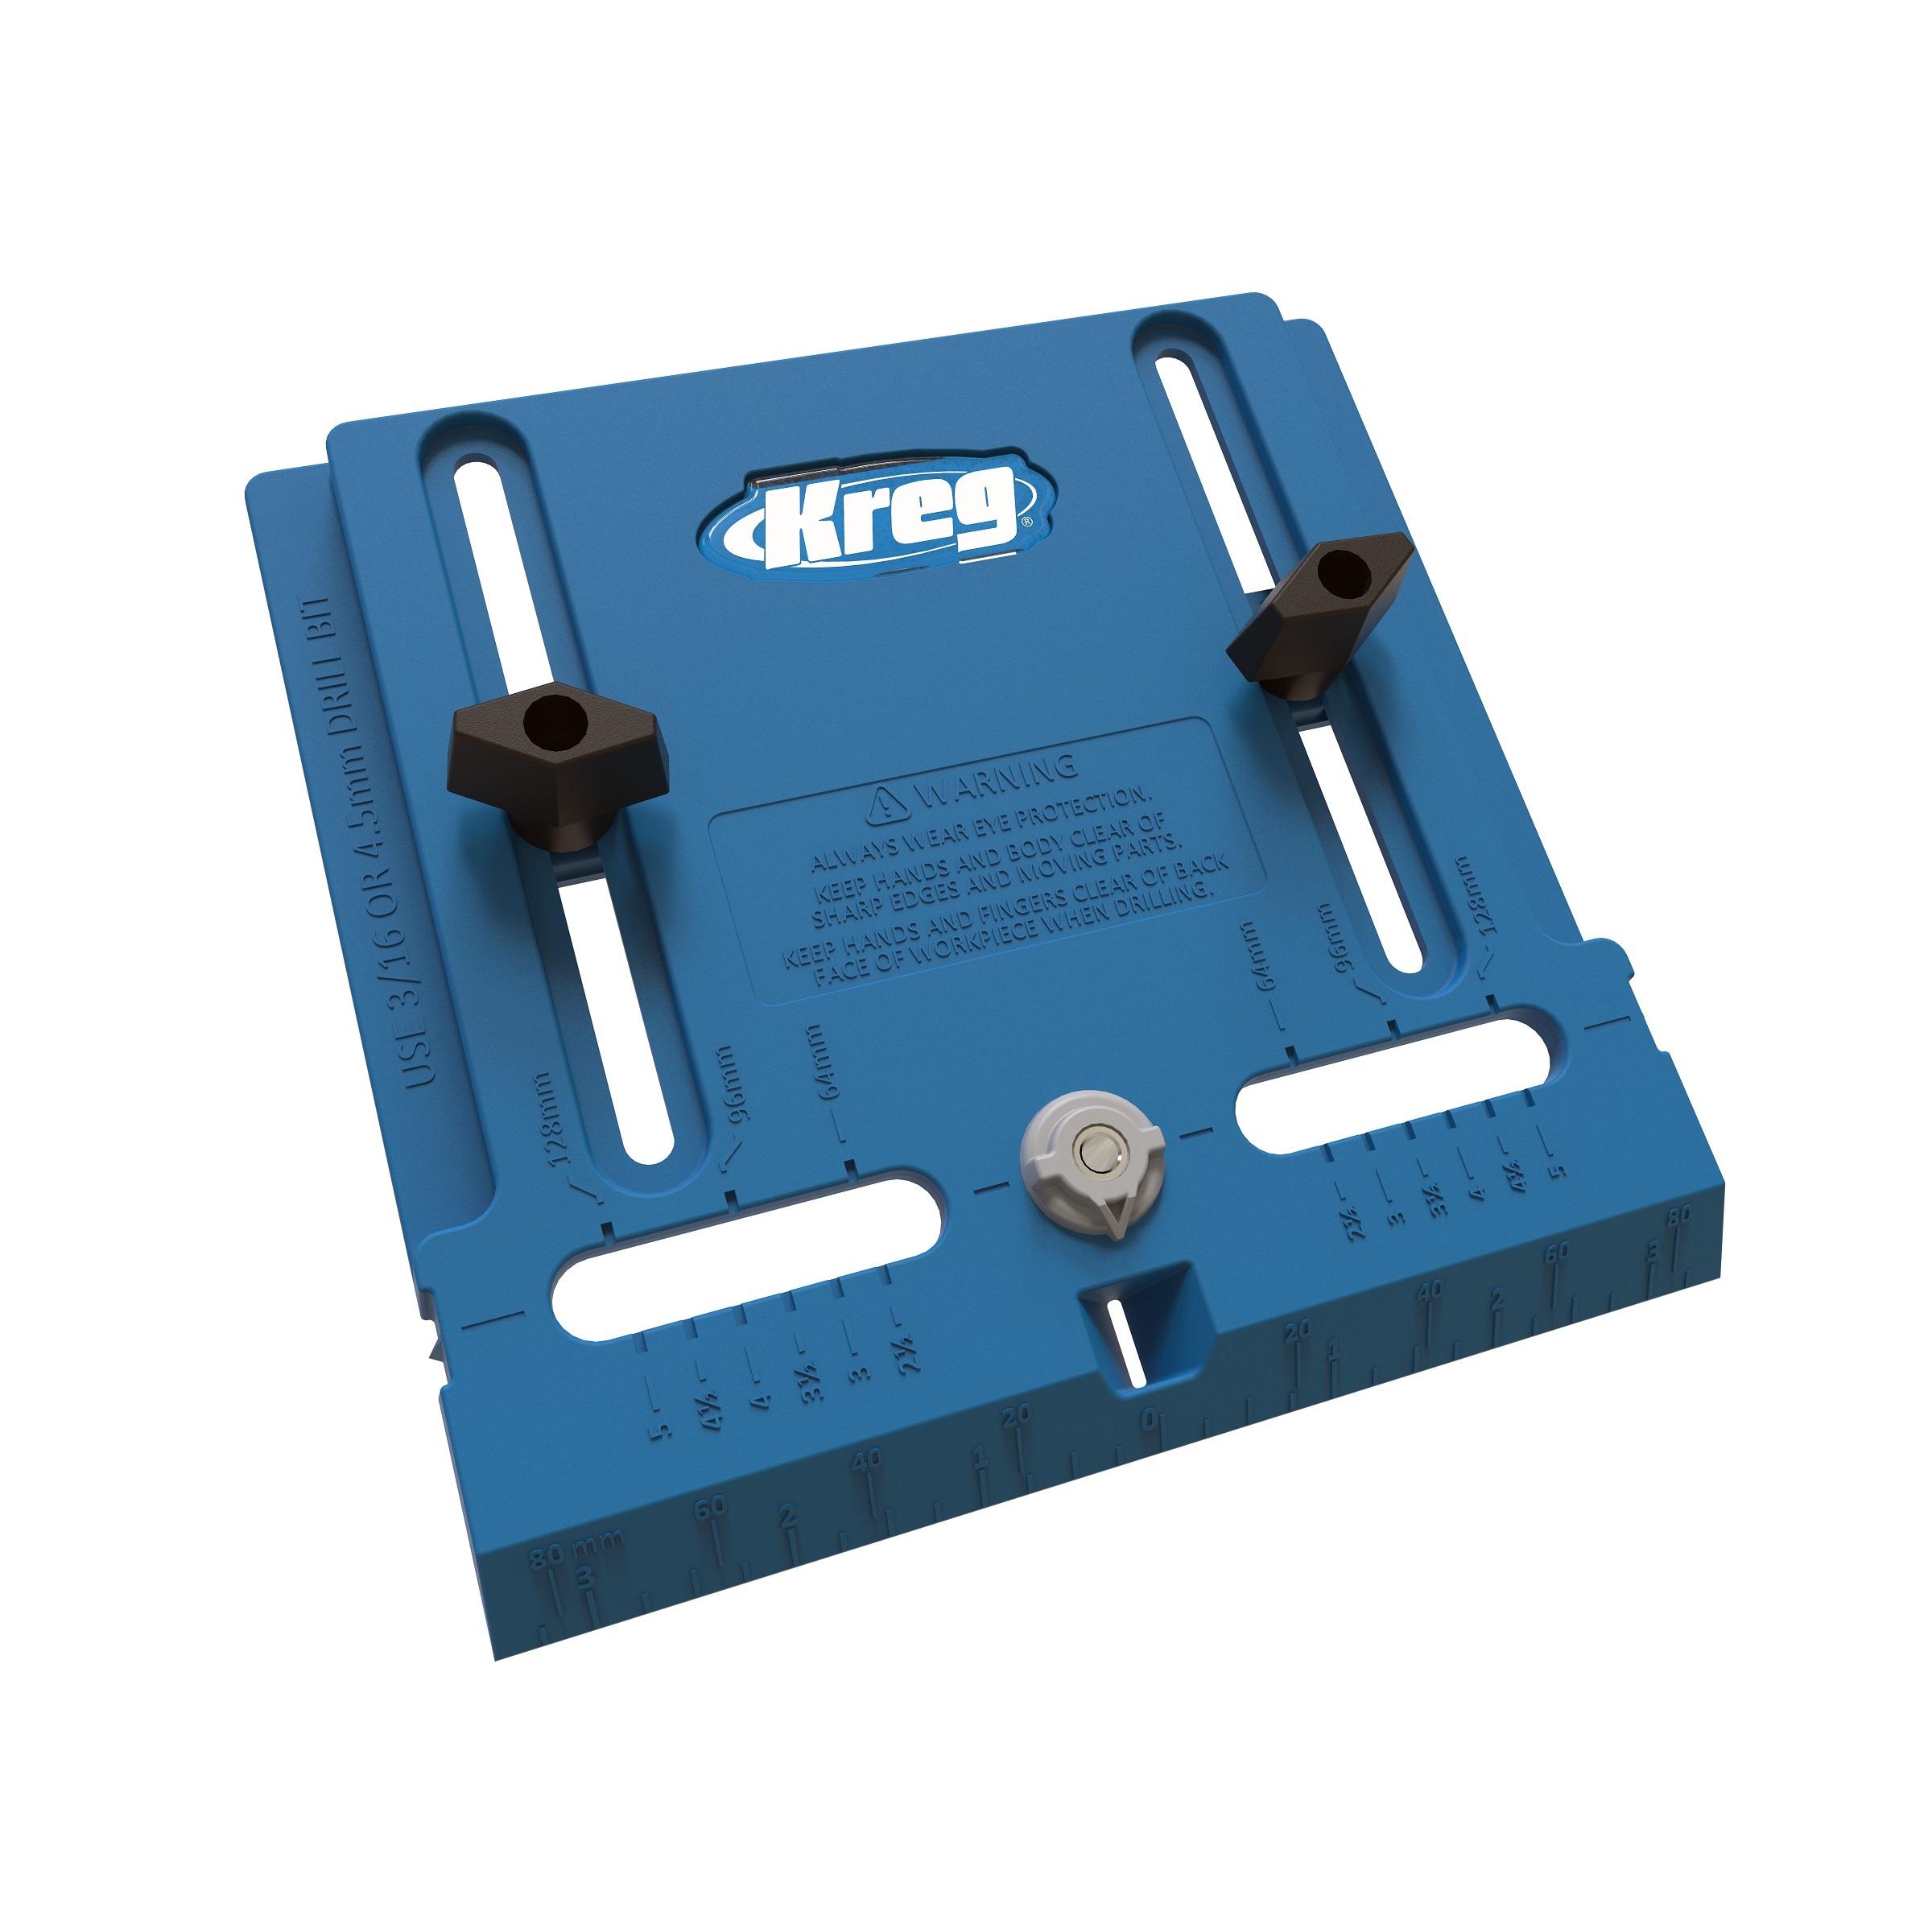
Kreg Tools


Other Tools
-
Miter Saw

-
3/8" Roundover Bit
-
1/4" Rabbeting Bit
-
Brad nailer
-
Tape Measure
Materials
Wood Products
- 2 Board , 1x8 x 96"
- 1 Board , 1x4 x 96"
- 2 Board , 1x3 x 96"
- 1 Board , 1x3 x 48"
- 1 Board , 1x2 x 96"
- 1 Cove molding , 3/4" x 3/4" x 96"
- 1 Plywood , 3/4" x 48" x 96"
- 1 Plywood , 1/2" x 48" x 96"
- 1 Plywood , 1/4" x 24" x 48"
Hardware & Supplies
- 87 1 1/4" coarse-thread Kreg Pocket-Hole Screws
- 6 2" flathead wood screws
- 24 1" flathead wood screws
- 180 1" 18-gauge brad nails
- 6 Pairs 16" full-extension drawer slides
- 6 Drawer pulls
- 1 Wood glue
Cut List & Parts
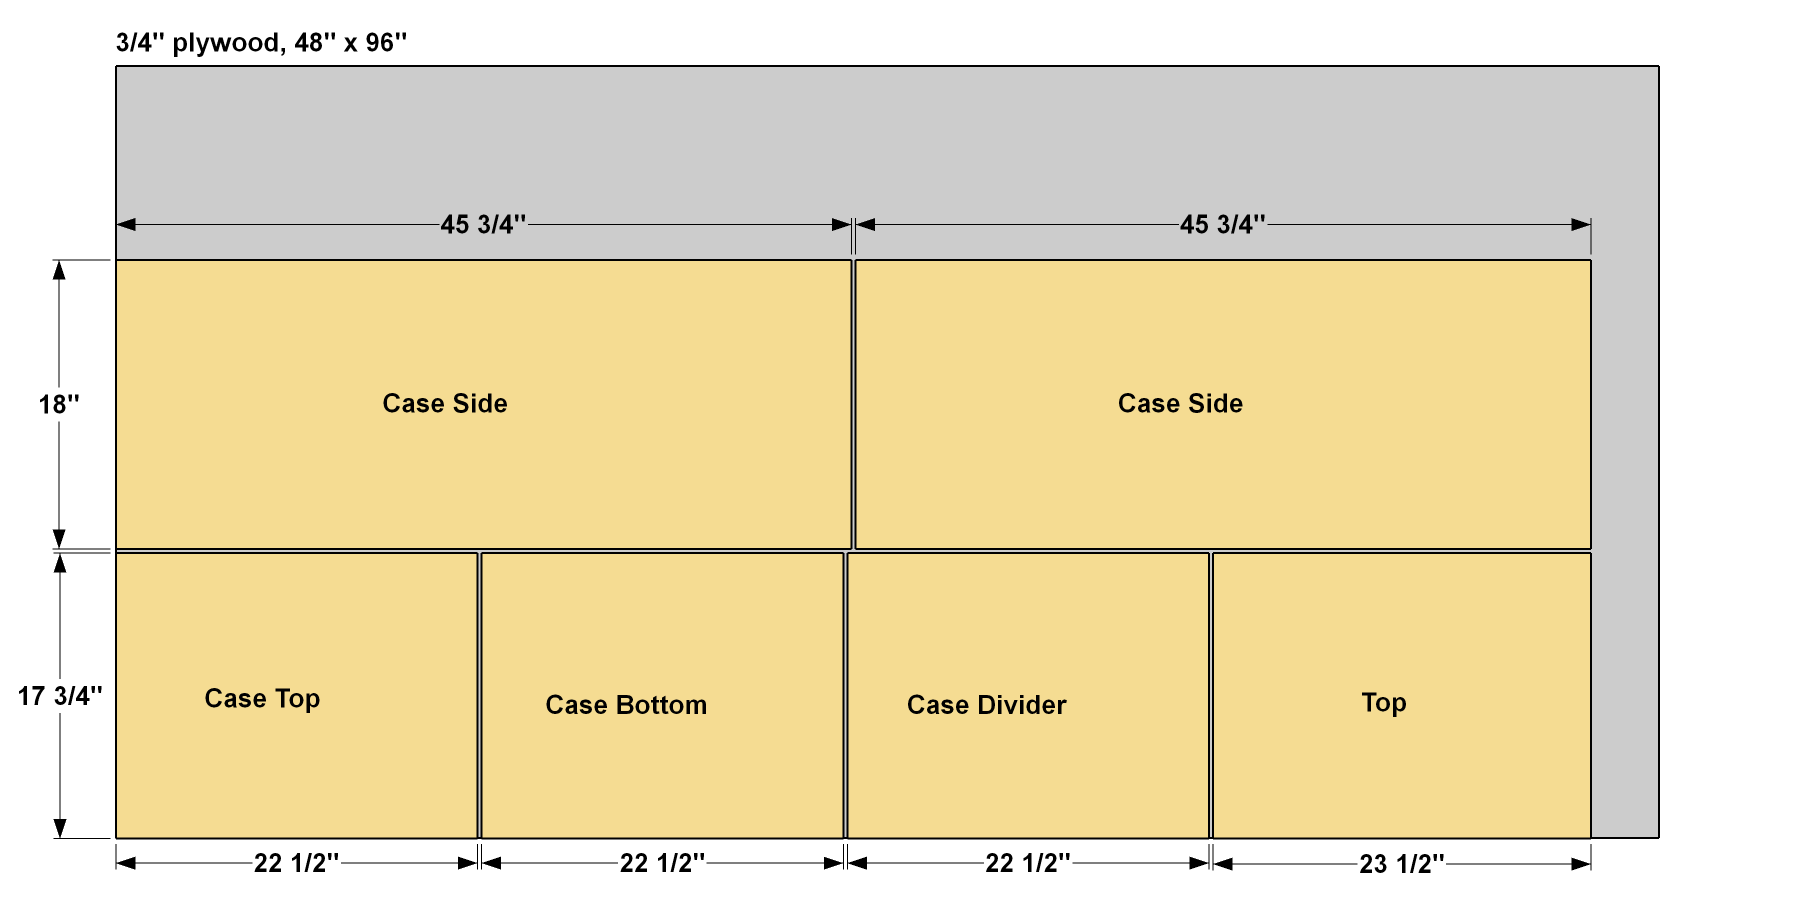
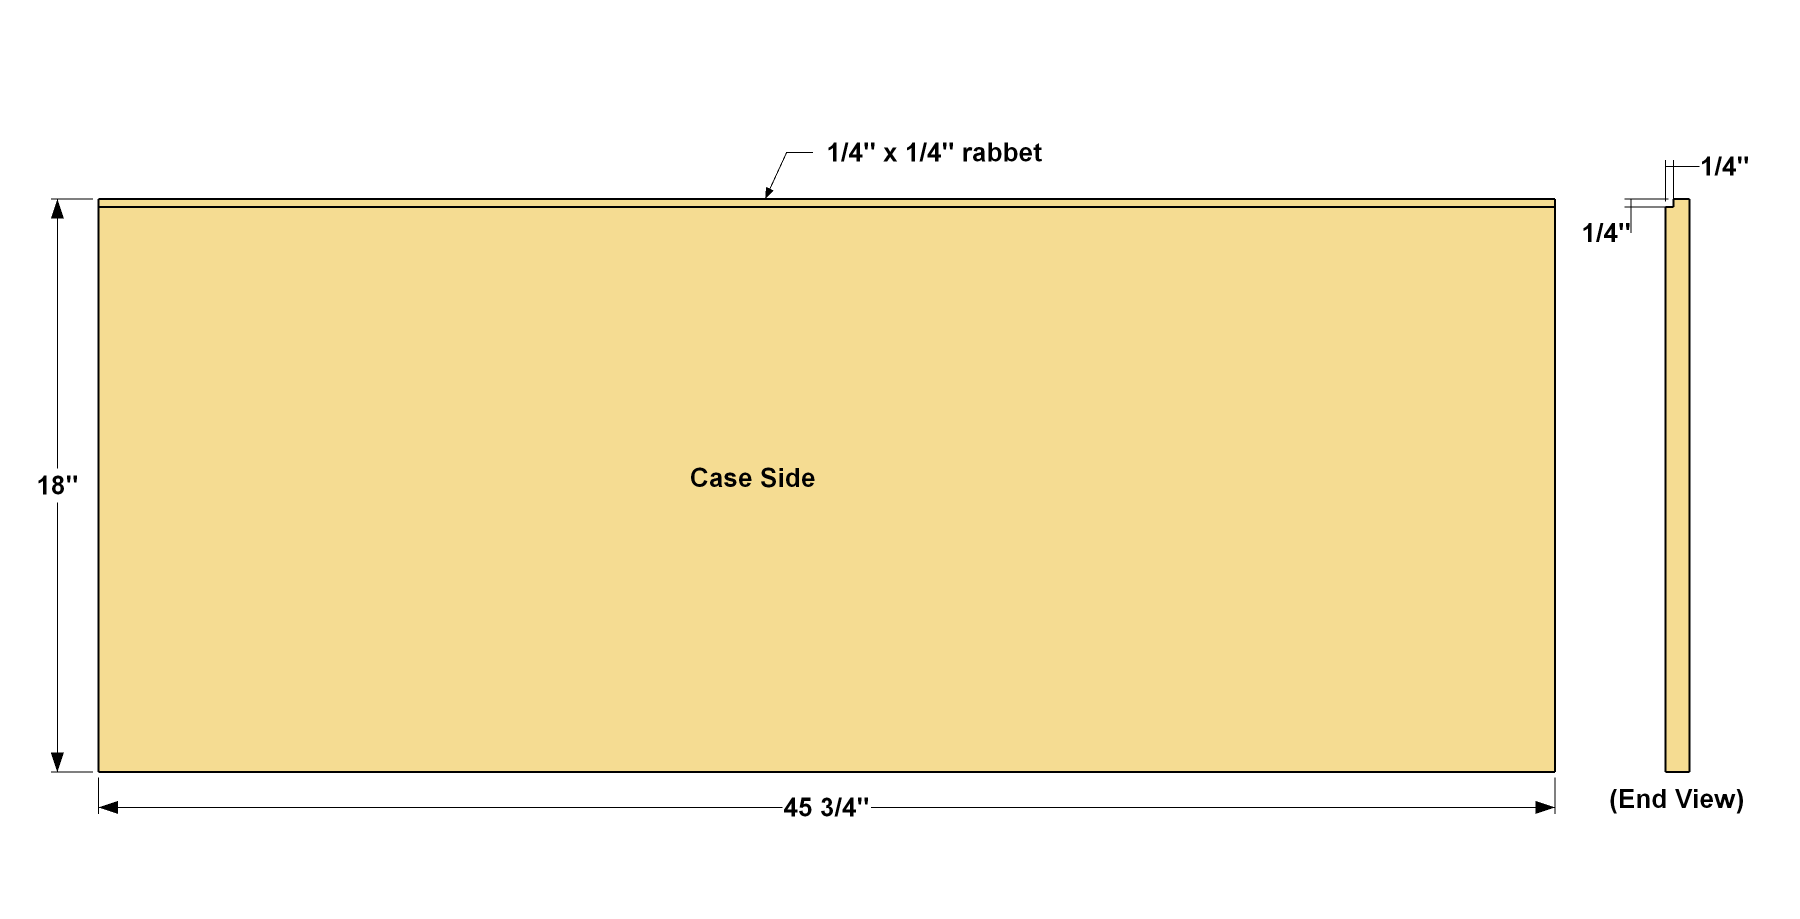
- 2 Case Side , 3/4" ply x 18" x 45 3/4"
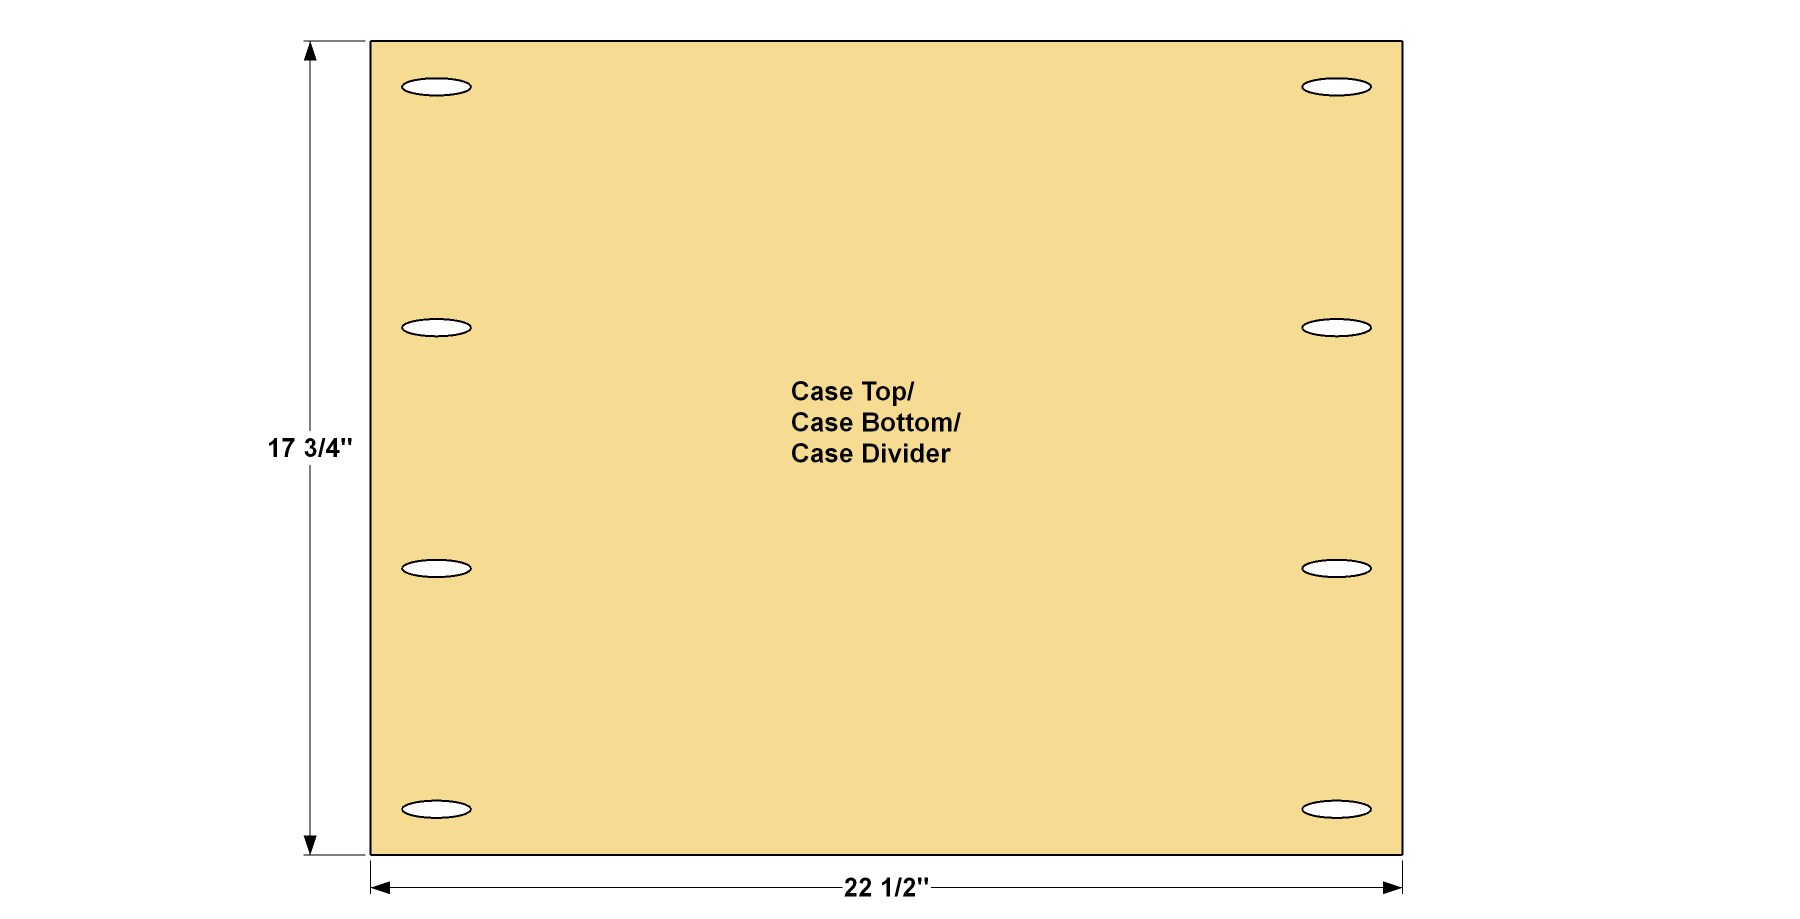
- 1 Case Top , 3/4" ply x 17 3/4" x 22 1/2
- 1 Case Bottom , 3/4" ply x 17 3/4" x 22 1/2
- 1 Case Divider , 3/4" ply x 17 3/4" x 22 1/2
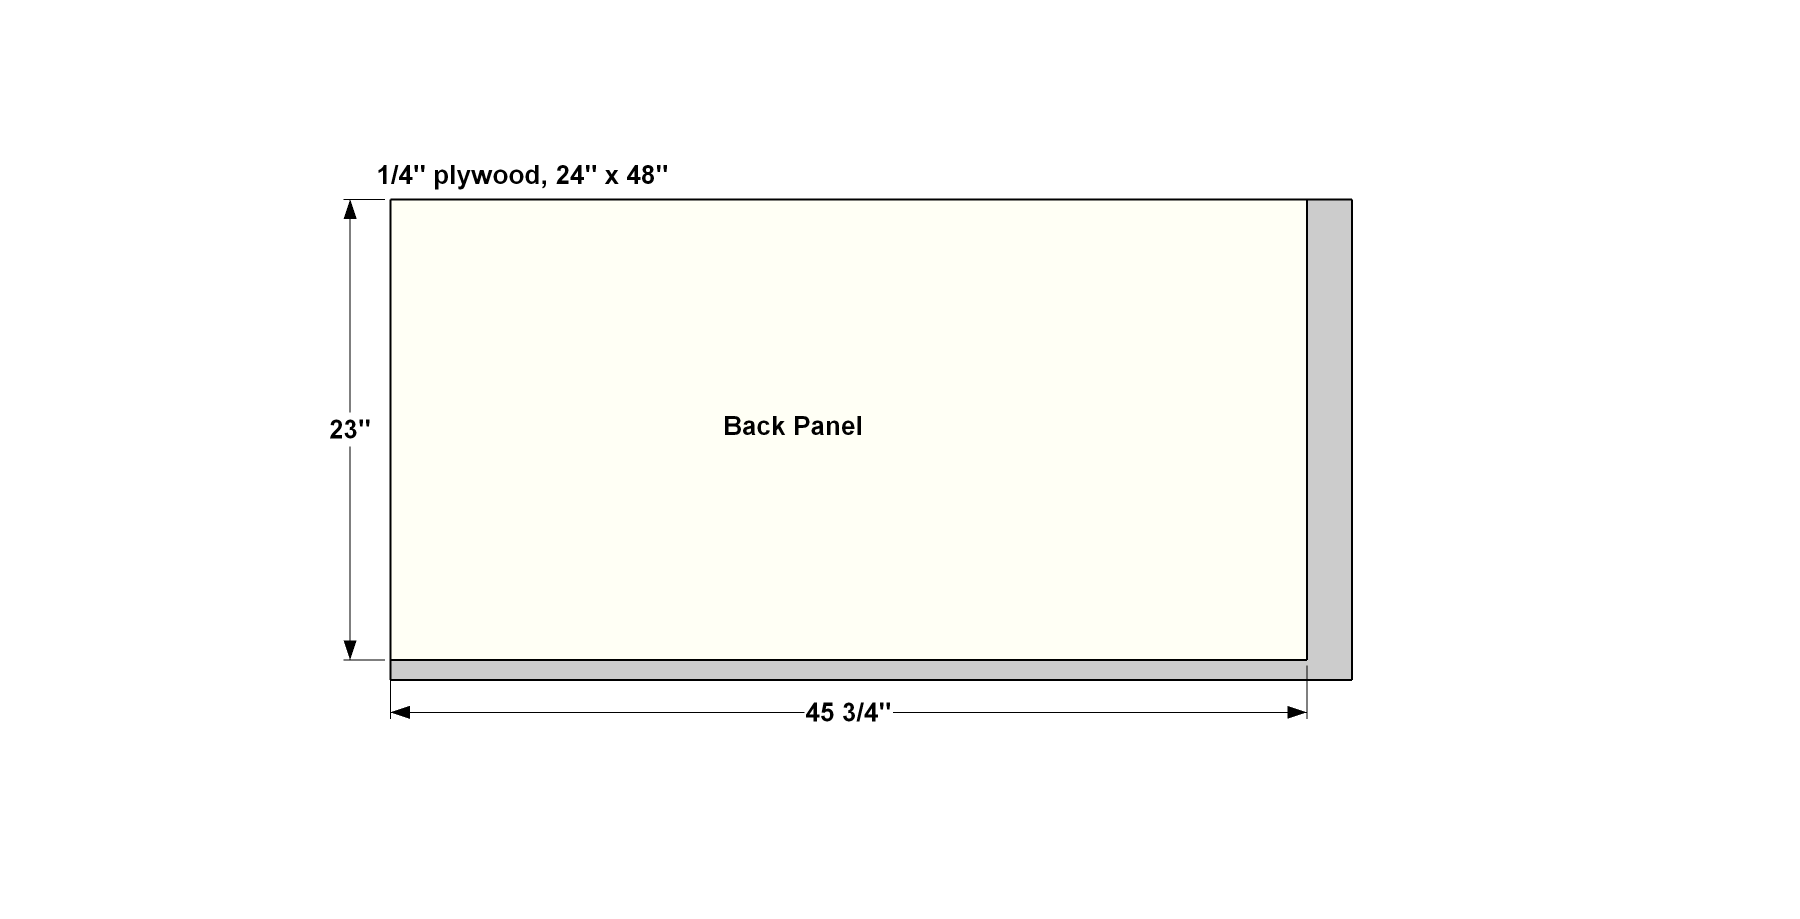
- 1 Back Panel , 1/4" ply x 23" x 45 3/4"
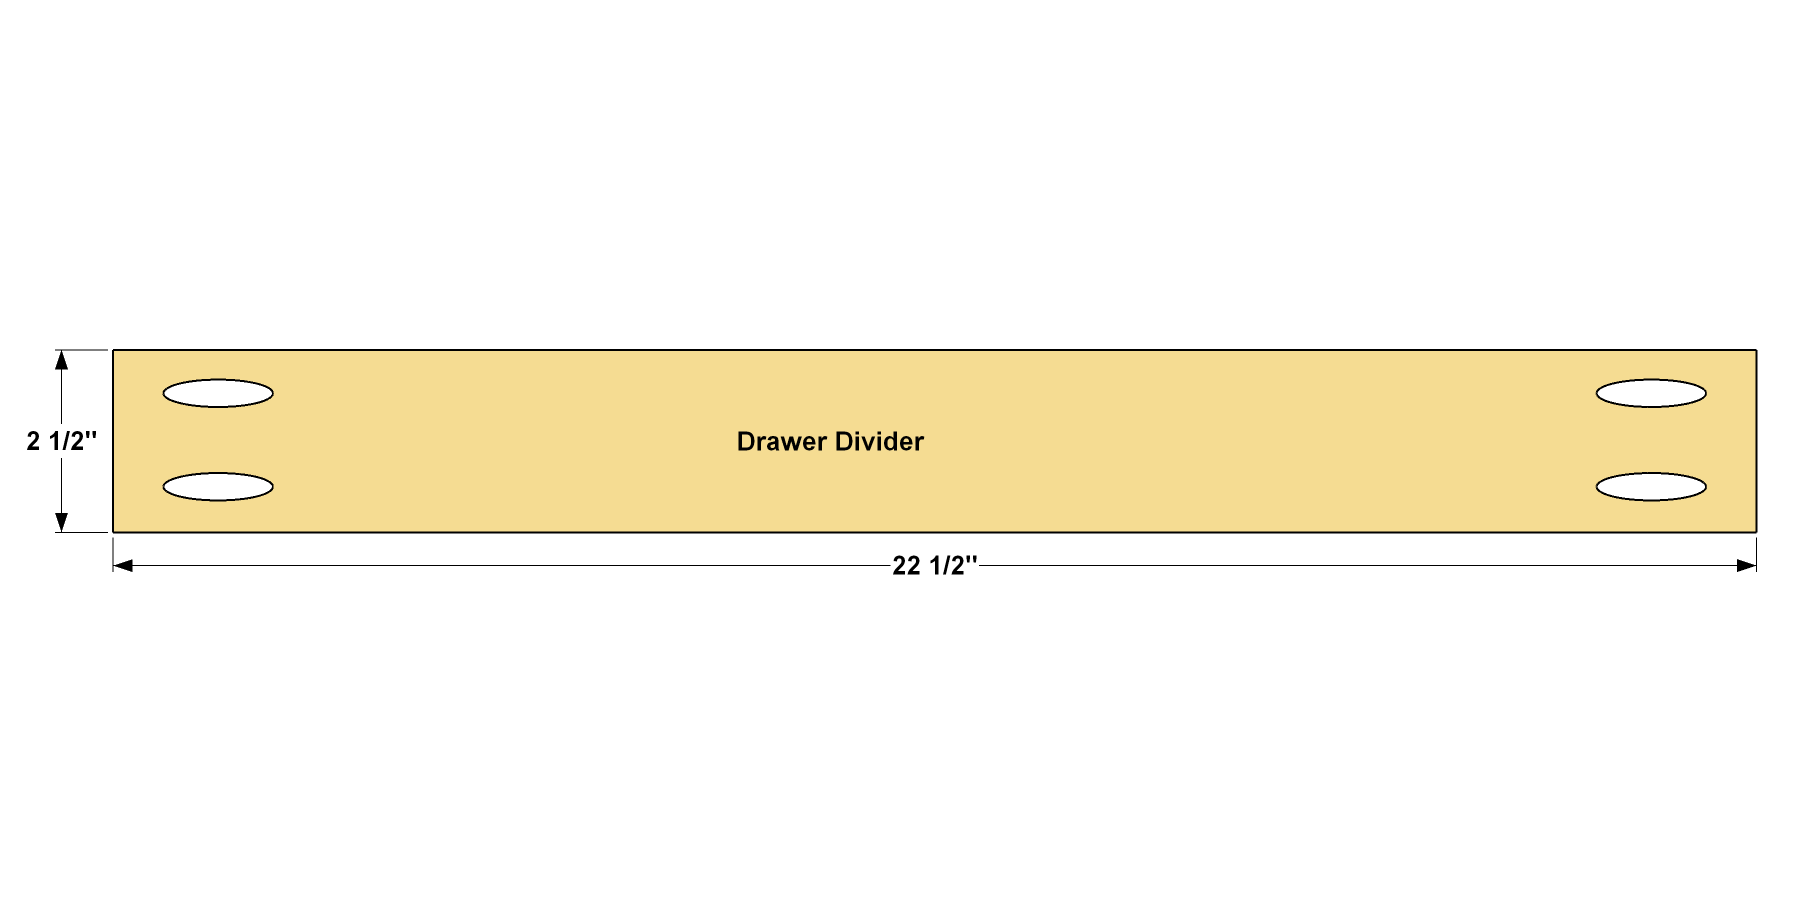
- 4 Drawer Divider , 3/4" x 2 1/2" x 22 1/2"
- 4 Front/Back Leg , 3/4" x 3 1/2" x 6"
- 2 Side Leg , 3/4" x 3 1/2" x 6"
- 1 Front Rail , 3/4" x 2 1/2" x 17 3/4"
- 2 Side Rail , 3/4" x 2 1/2" x 10 7/8"
- 1 Back Rail , 3/4" x 3 1/2" x 23 1/4"
- 2 Top Spacer Front/Back , 3/4" x 2 1/2" x 24"
- 2 Front Spacer Side , 3/4" x 2 1/2" x 18"
- 1 Top , 3/4" ply x 17 3/4" x 23 1/2"
- 1 Top Front Edging , 3/4" x 1 1/2" x 26 1/2"
- 2 Top Side Edging , 3/4" x 1 1/2" x 19 1/4"
- 1 Cove Molding , 3/4" x 3/4" x cut to fit
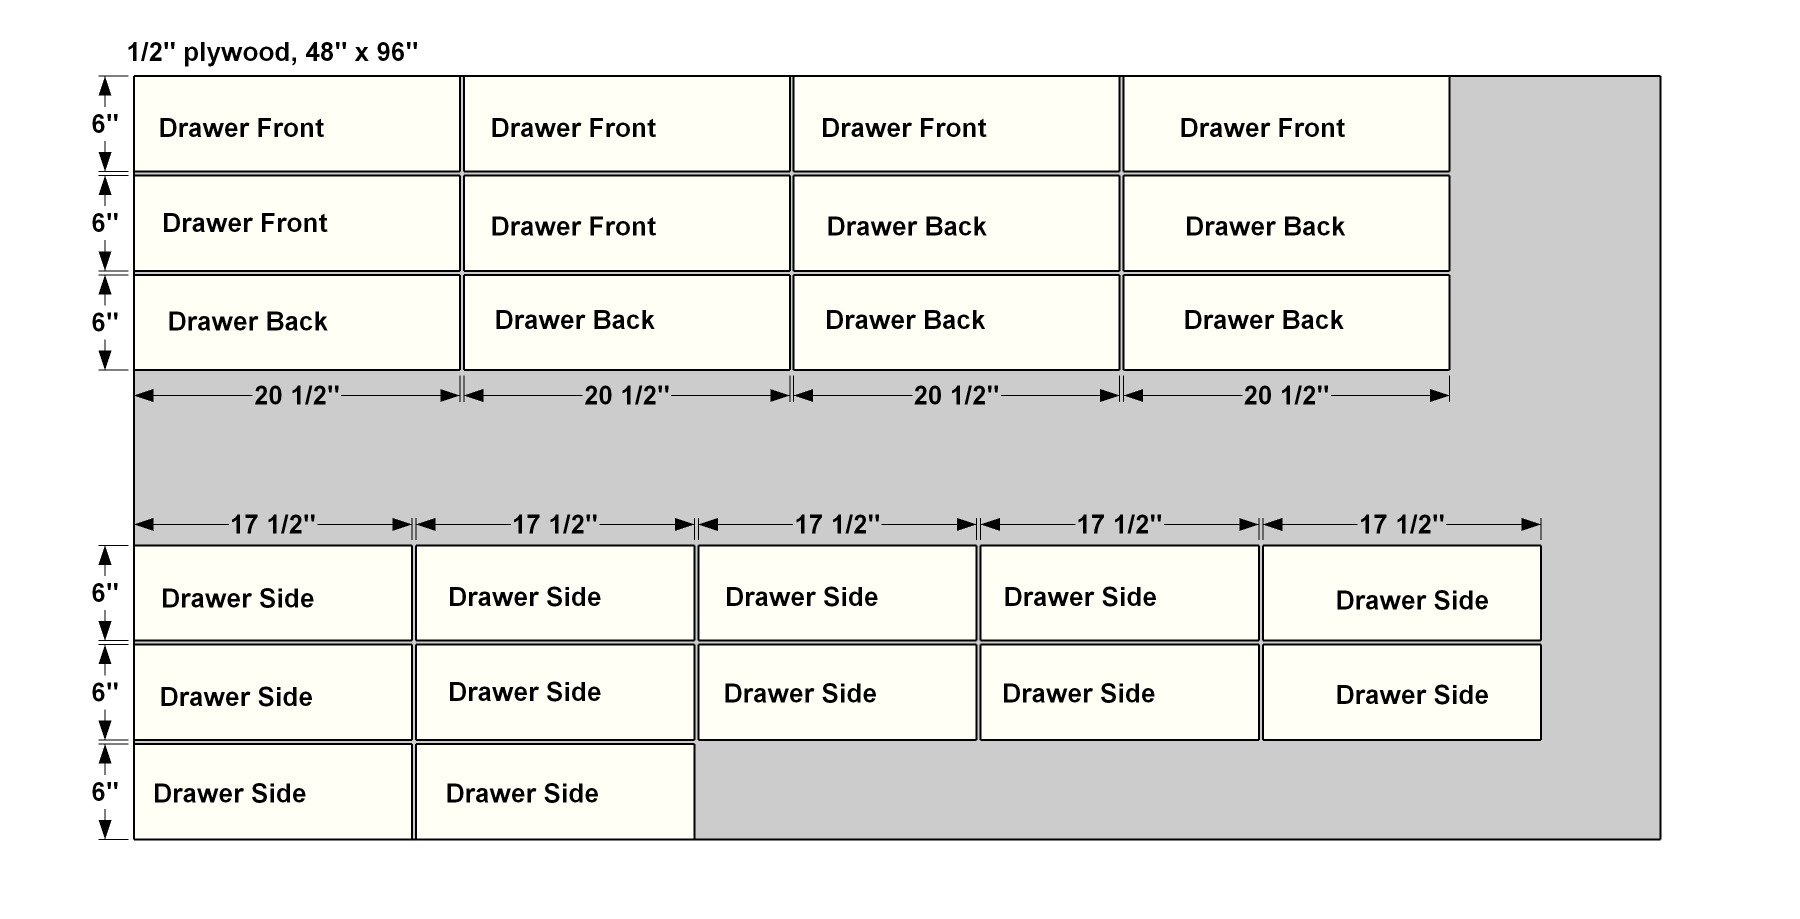
- 12 Drawer Front/Back , 1/2" ply x 6" x 20 1/2"
- 12 Drawer Side , 1/2" ply x 6" x 17 1/2"
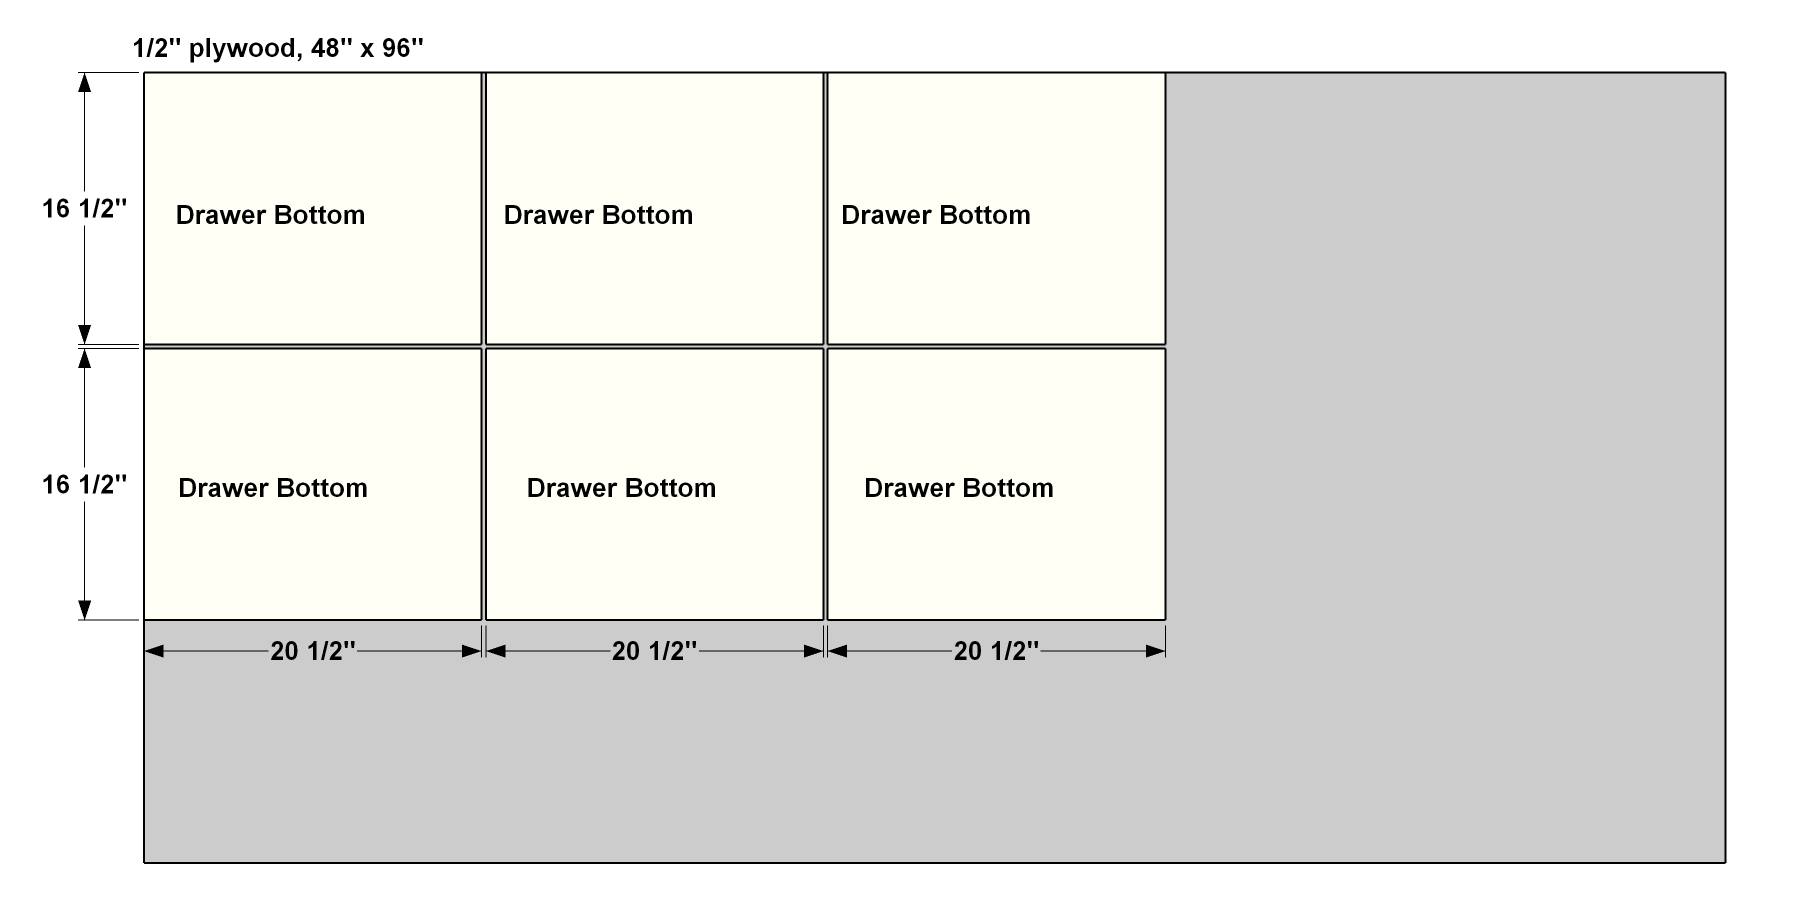
- 6 Drawer Bottom , 1/2" ply x 16 1/2" x 20 1/2"
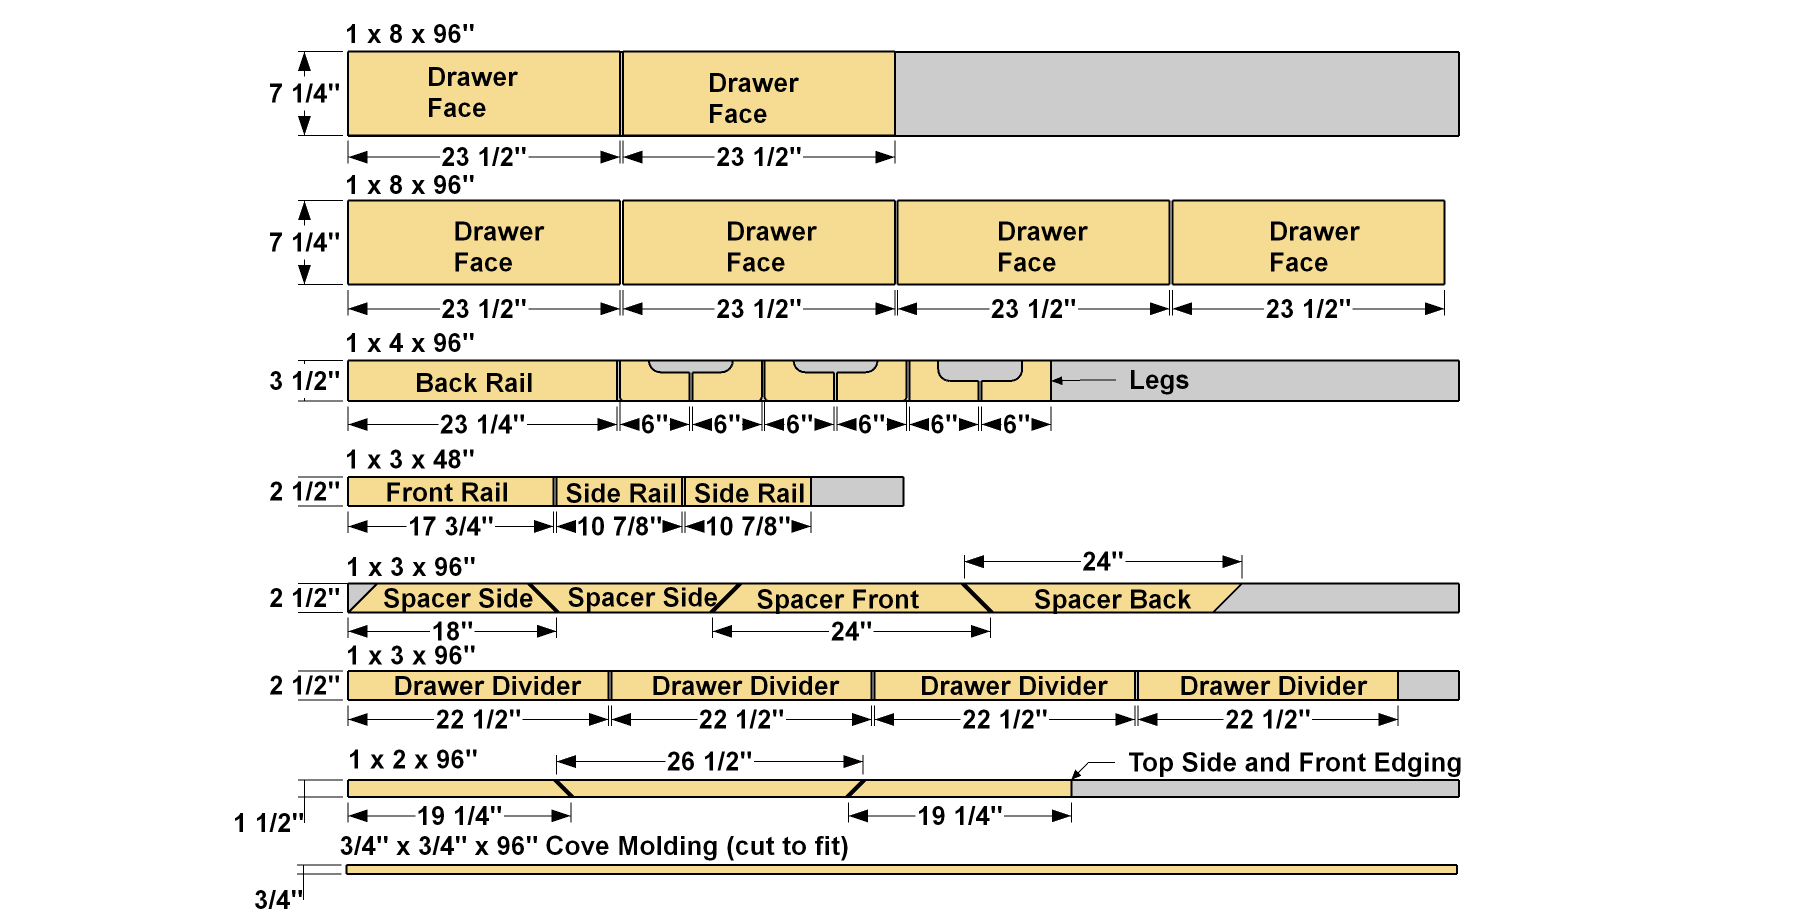
- 6 Drawer Face , 3/4" x 7 1/4" x 23 1/2"
Directions
-
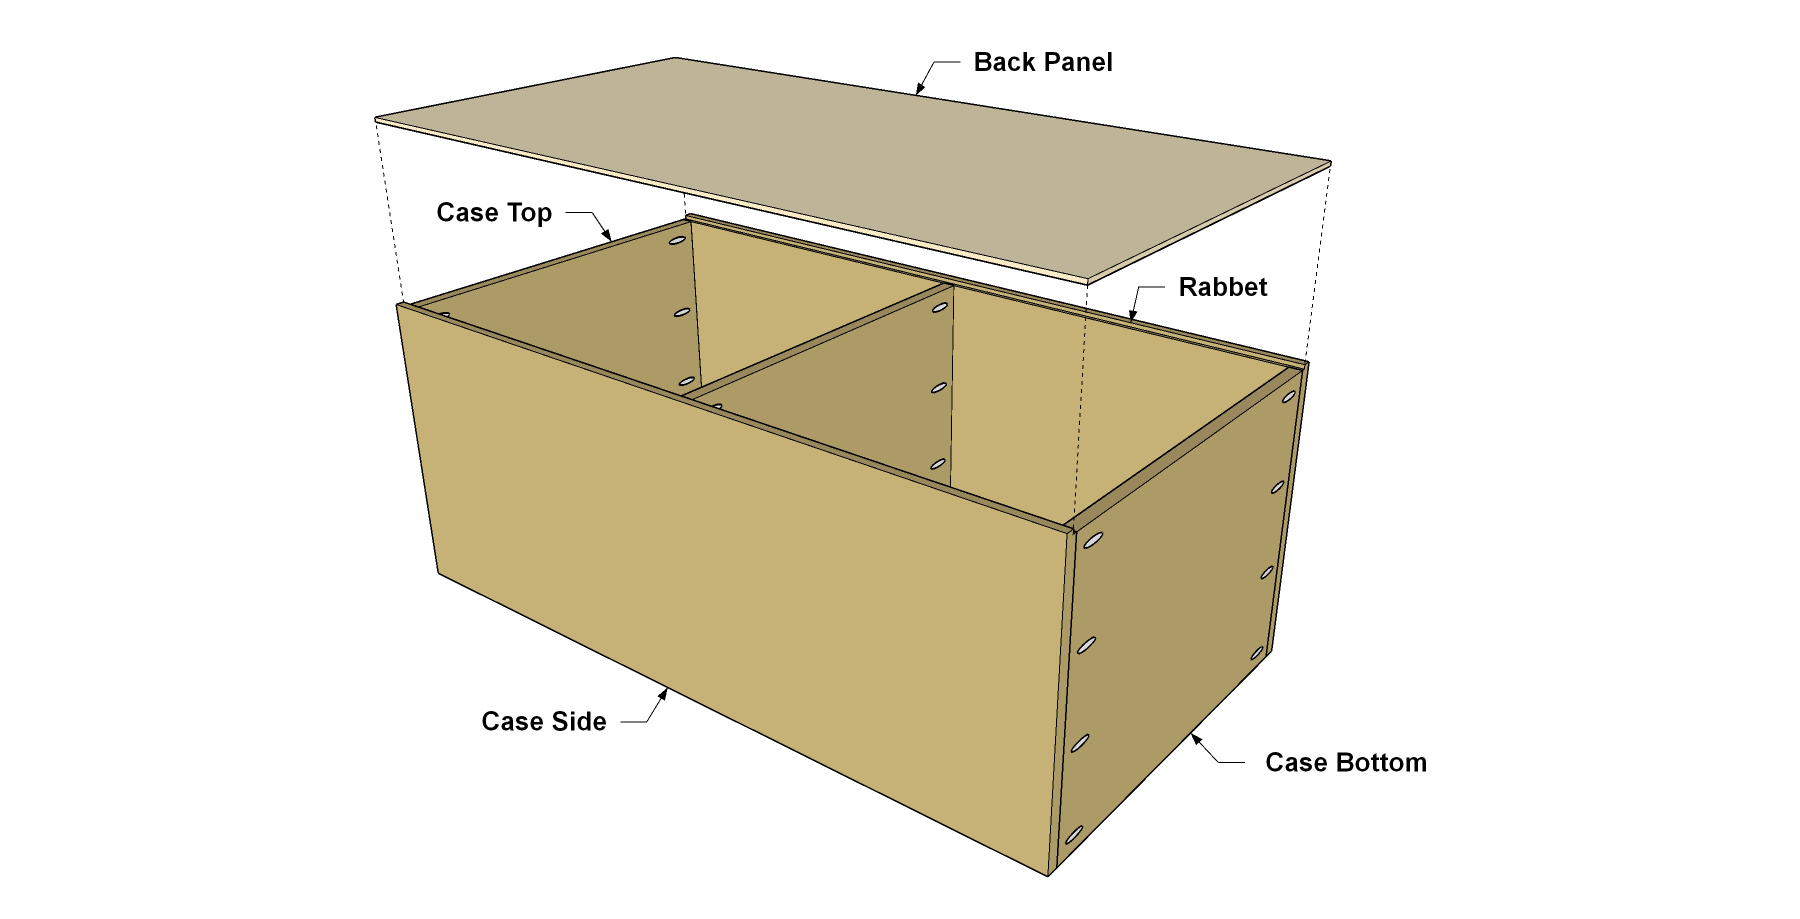
Make the Case Sides
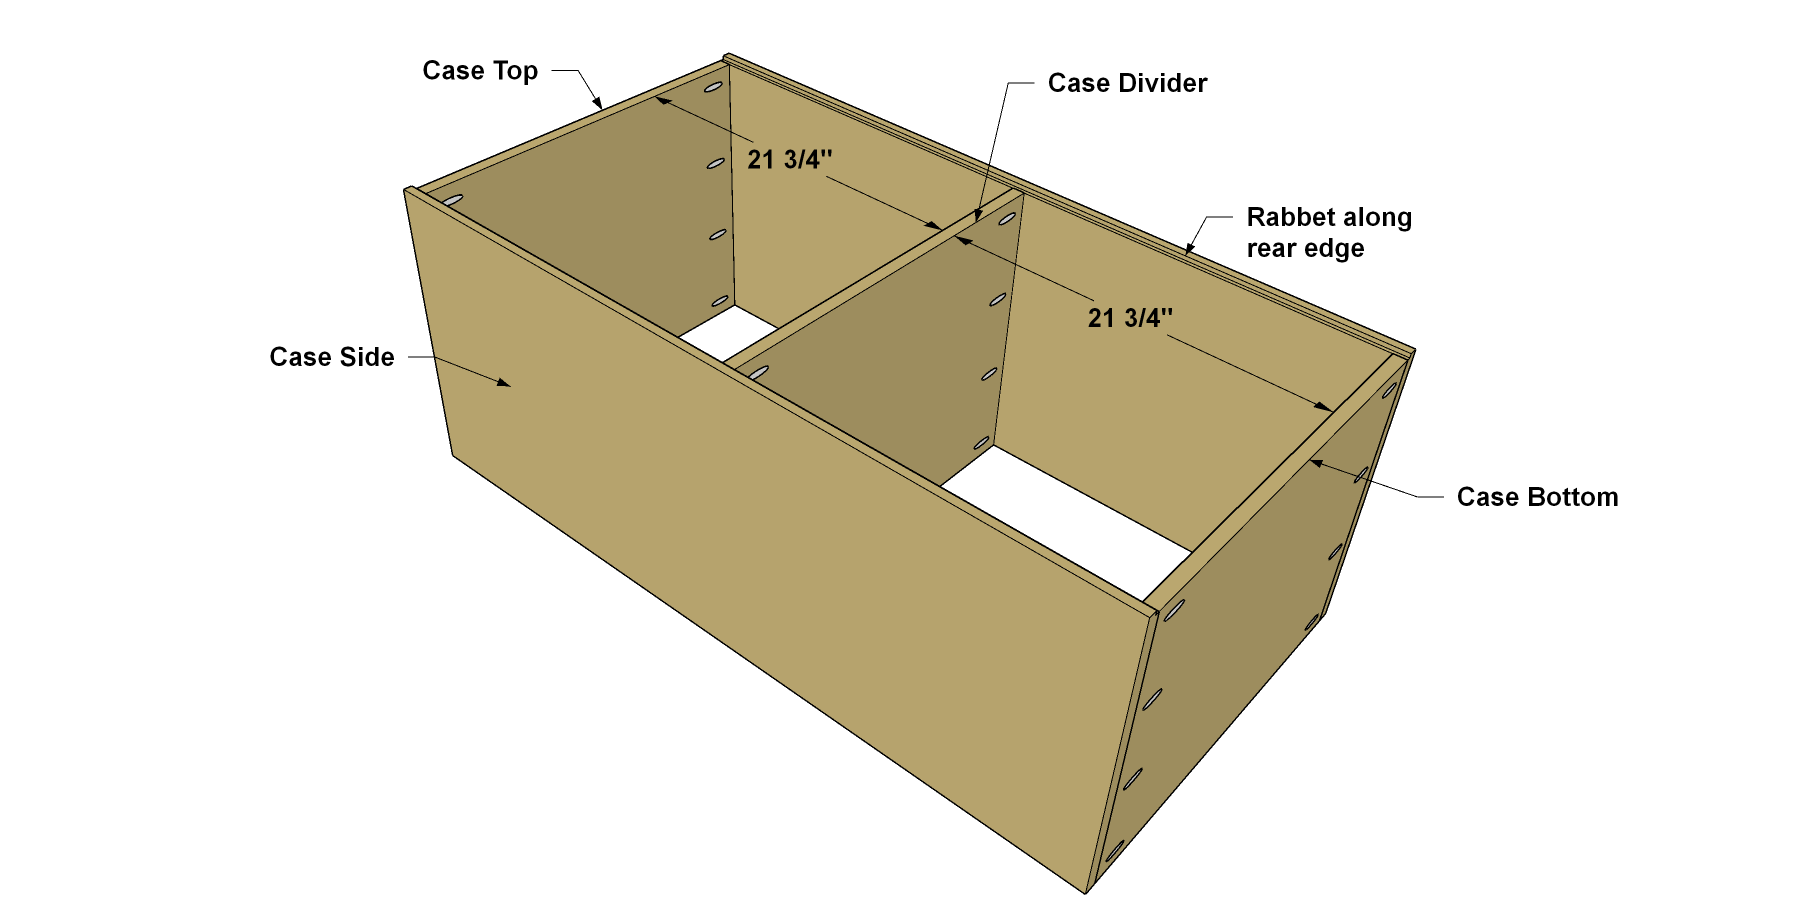
Cut two Case Sides to size from 3/4" plywood, as shown in the cutting diagram. Using a router and a 1/4" rabbeting bit, create rabbet along the inside rear edge of each Case Side, as shown.
When you buy plywood, it usually has one face that looks better than the other. When building this project, place the pocket holes in the less-attractive face. The better-looking face will be the one that shows, so by positioning your pocket holes this way, the best-looking face of each plywood part will be the most visible. ON a painted project, this probably isn’t a big deal. If you plan to stain, though, having the best face always outward can make a big difference.
-
Make the Top, Bottom & Center Divider
Cut one Case Top, one Case Bottom, and one Case Divider to size from 3/4" plywood, as shown in the cutting diagram. Then, with your pocket hole jig set for 3/4" material, drill pocket holes in these pieces where shown.
-
Start Case Assembly
Begin assembling the case by attaching the Case Top, Case Bottom, and Case Divider, as shown, using 1 1/4" coarse-thread Kreg Pocket-Hole Screws.
-
Make Drawer Dividers
Cut four Drawer Dividers from a 1x3 board, as shown in the cutting diagram. With your Kreg Pocket-Hole Jig set for 3/4" material, drill pocket holes in the Drawer Dividers where shown.
-
Install the Drawer Dividers
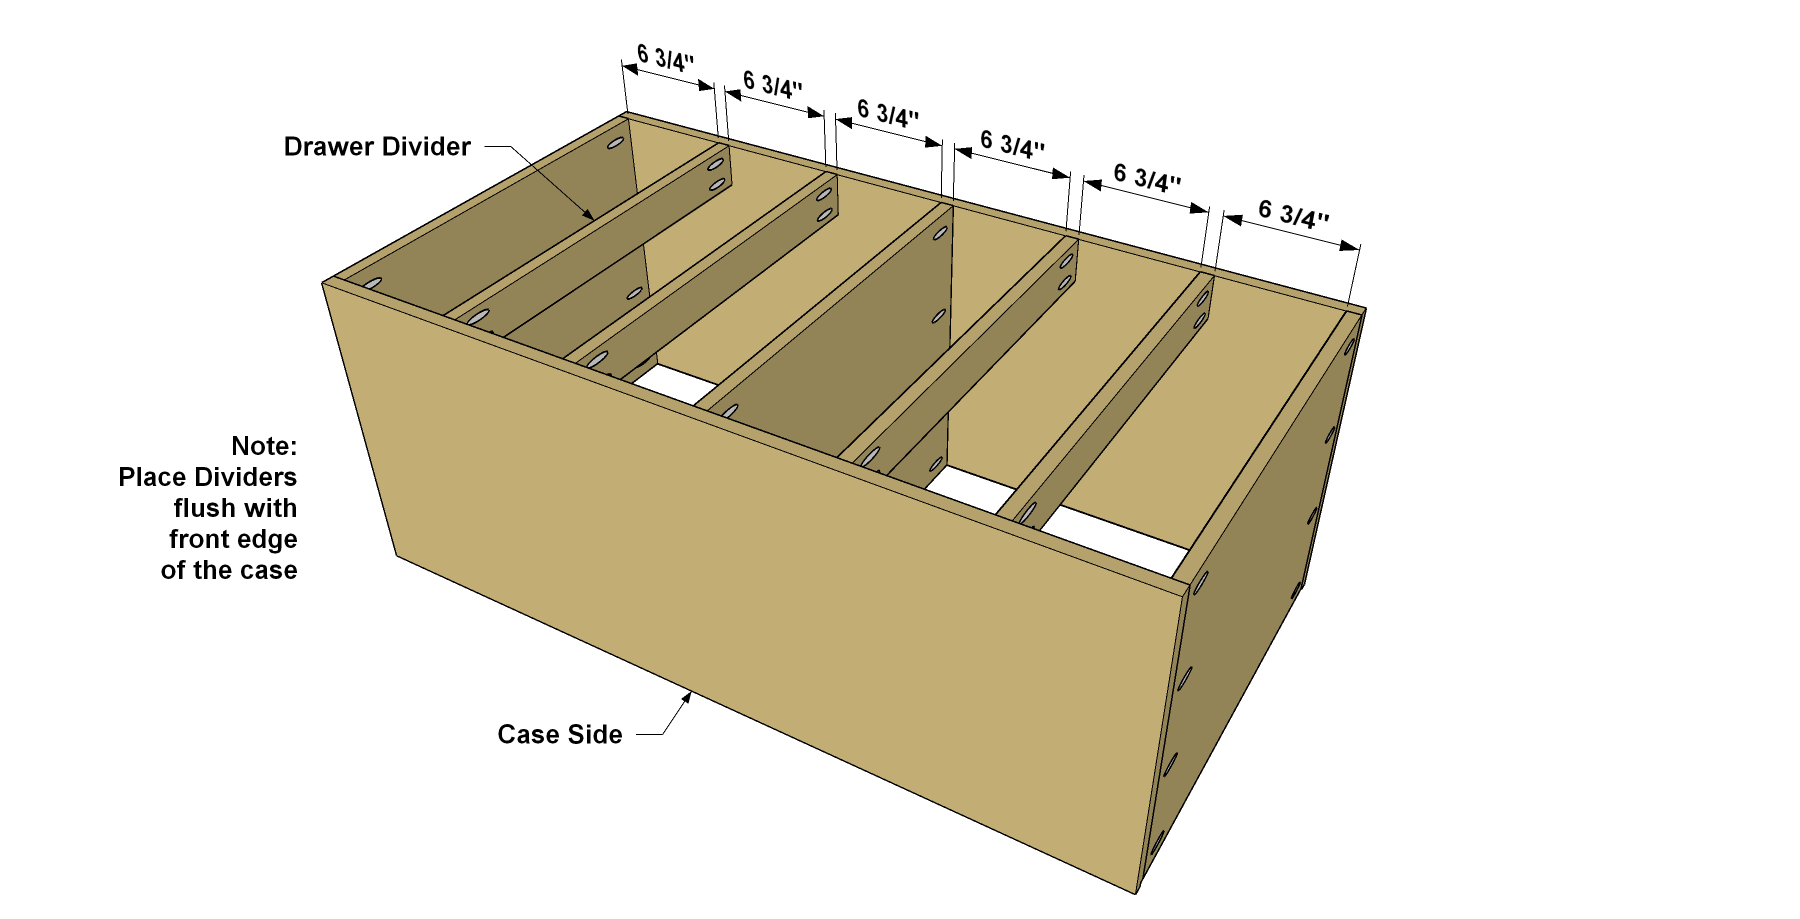
Install the Drawer Dividers in the case where shown using 1 1/4" coarse-thread Kreg Pocket-Hole Screws. Make sure the dividers are flush with the front edge of the case.
-
Add a Back Panel
Cut one Back Panel from 1/4" plywood, as shown in the cutting diagram. Then attach the back using glue and brad nails. An air nailer works great here, but if you don’t have access, you can use a conventional hammer and nails.
-
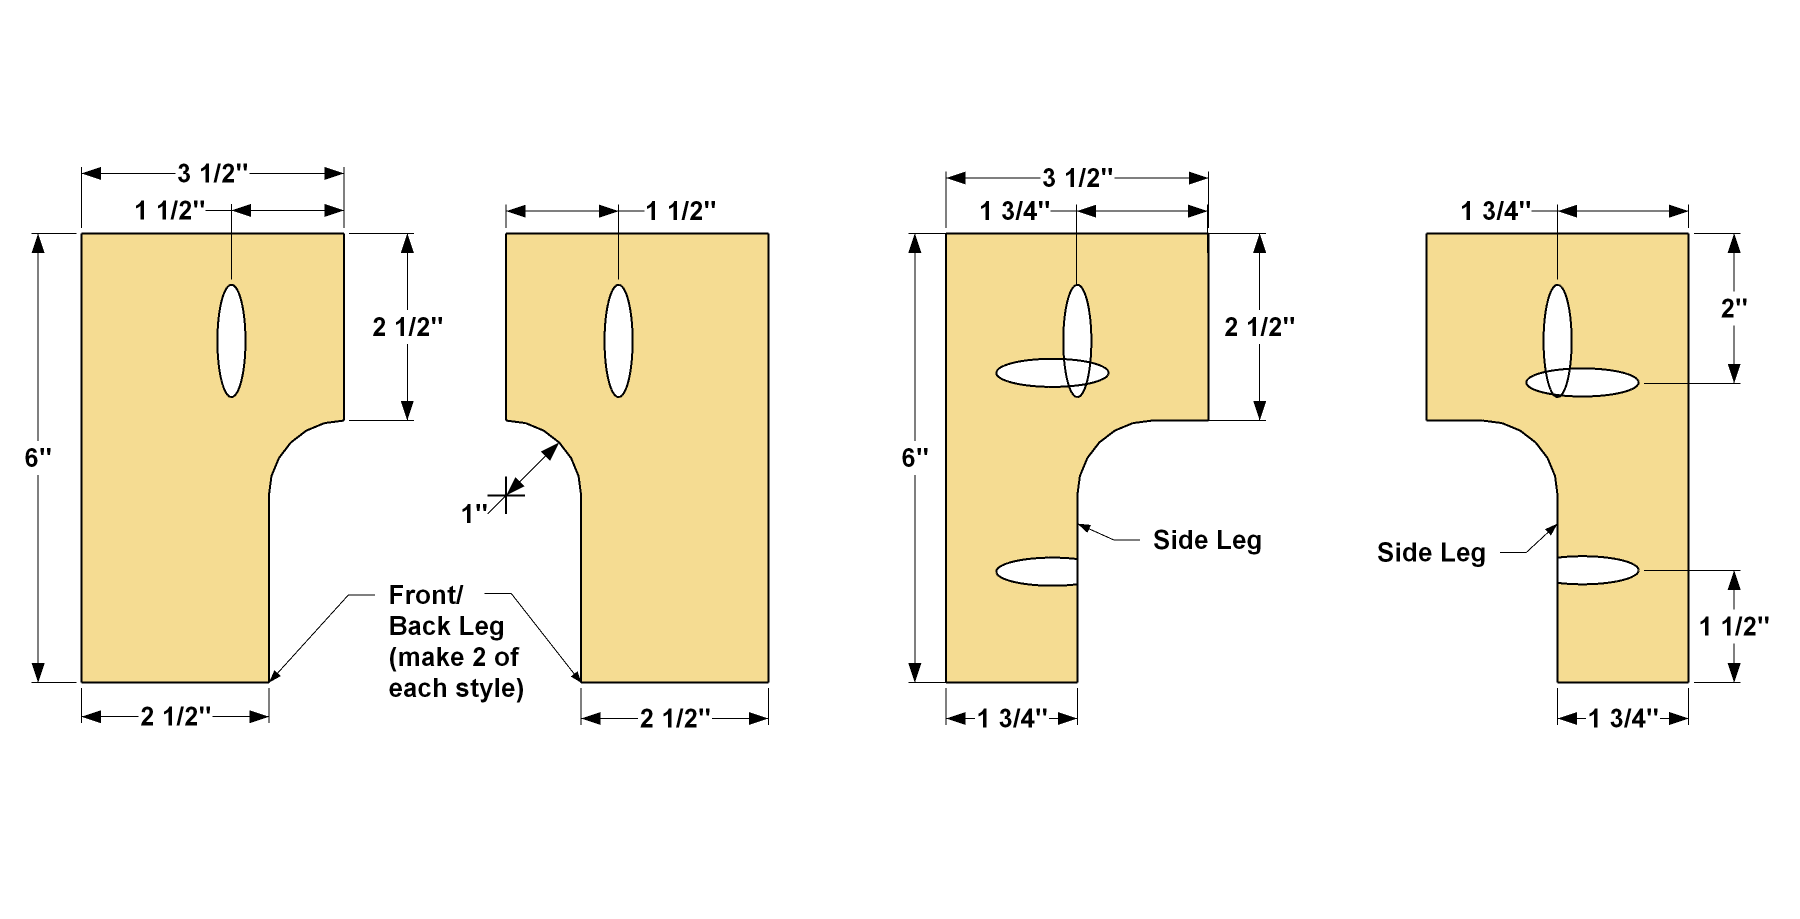
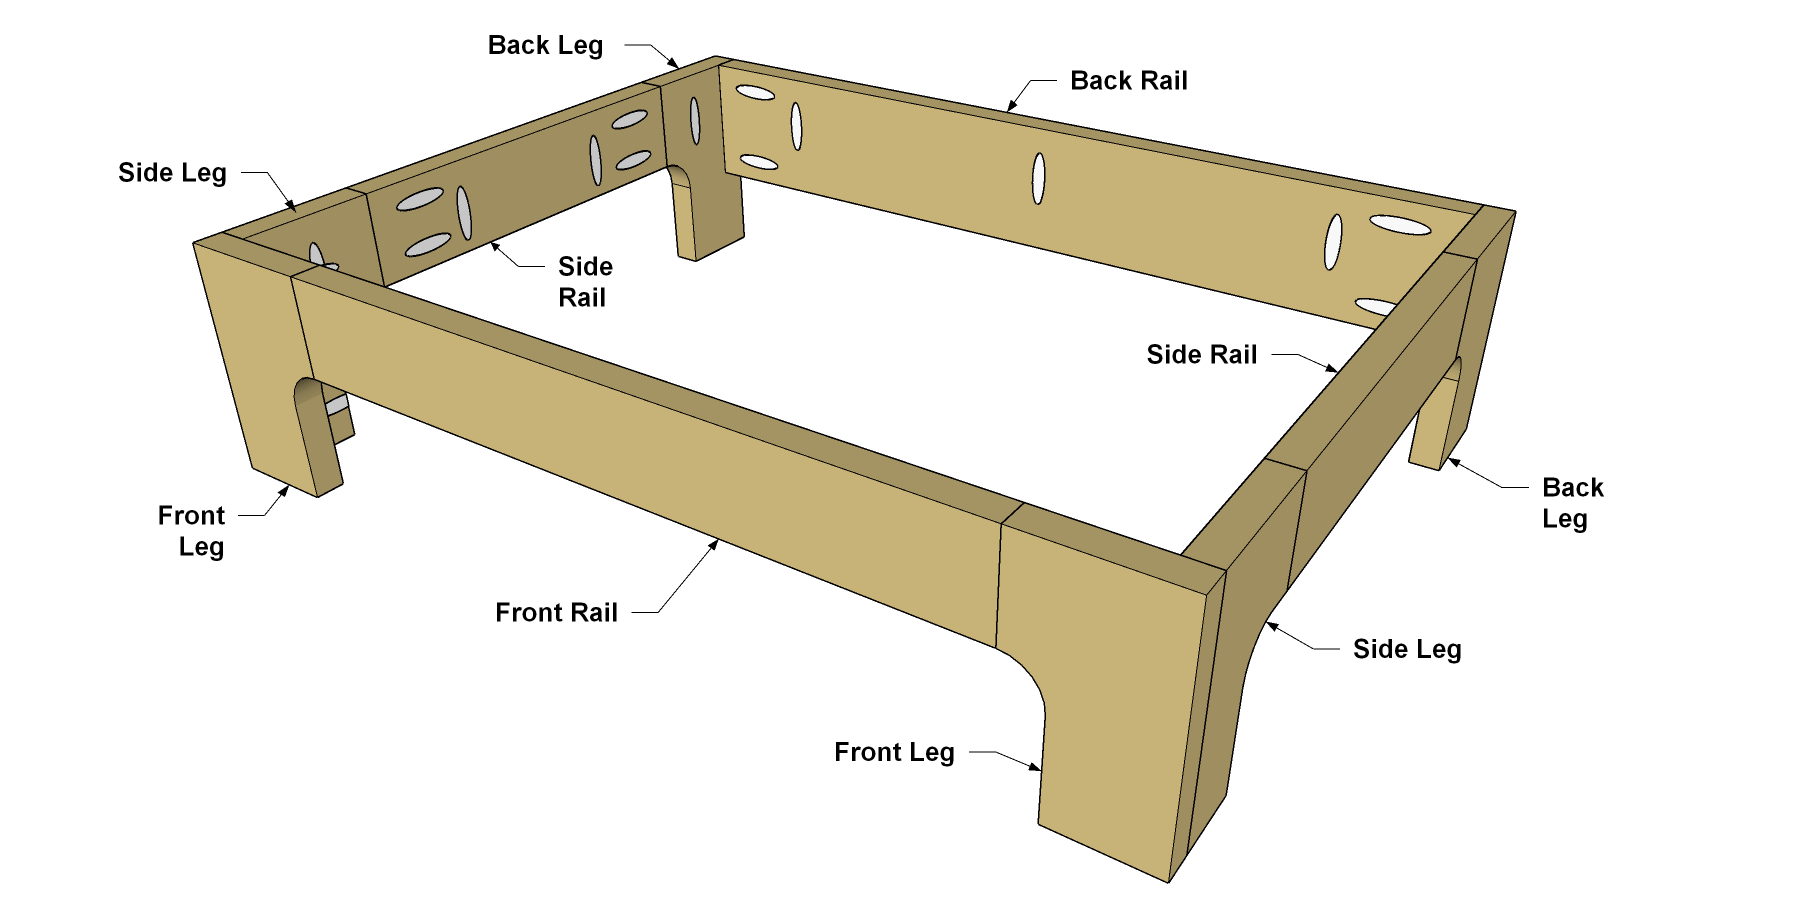
Make the Legs
Cut four Front/Back Legs and two Side Legs to length from a 1x4 board, as shown in the cutting diagram. Lay out curves on the four Front and Back Legs and the curves on the two Side Legs. Then cut the shapes using a jigsaw. Sand the cut edges smooth. After that, drill pocket holes in the Legs where shown.
-
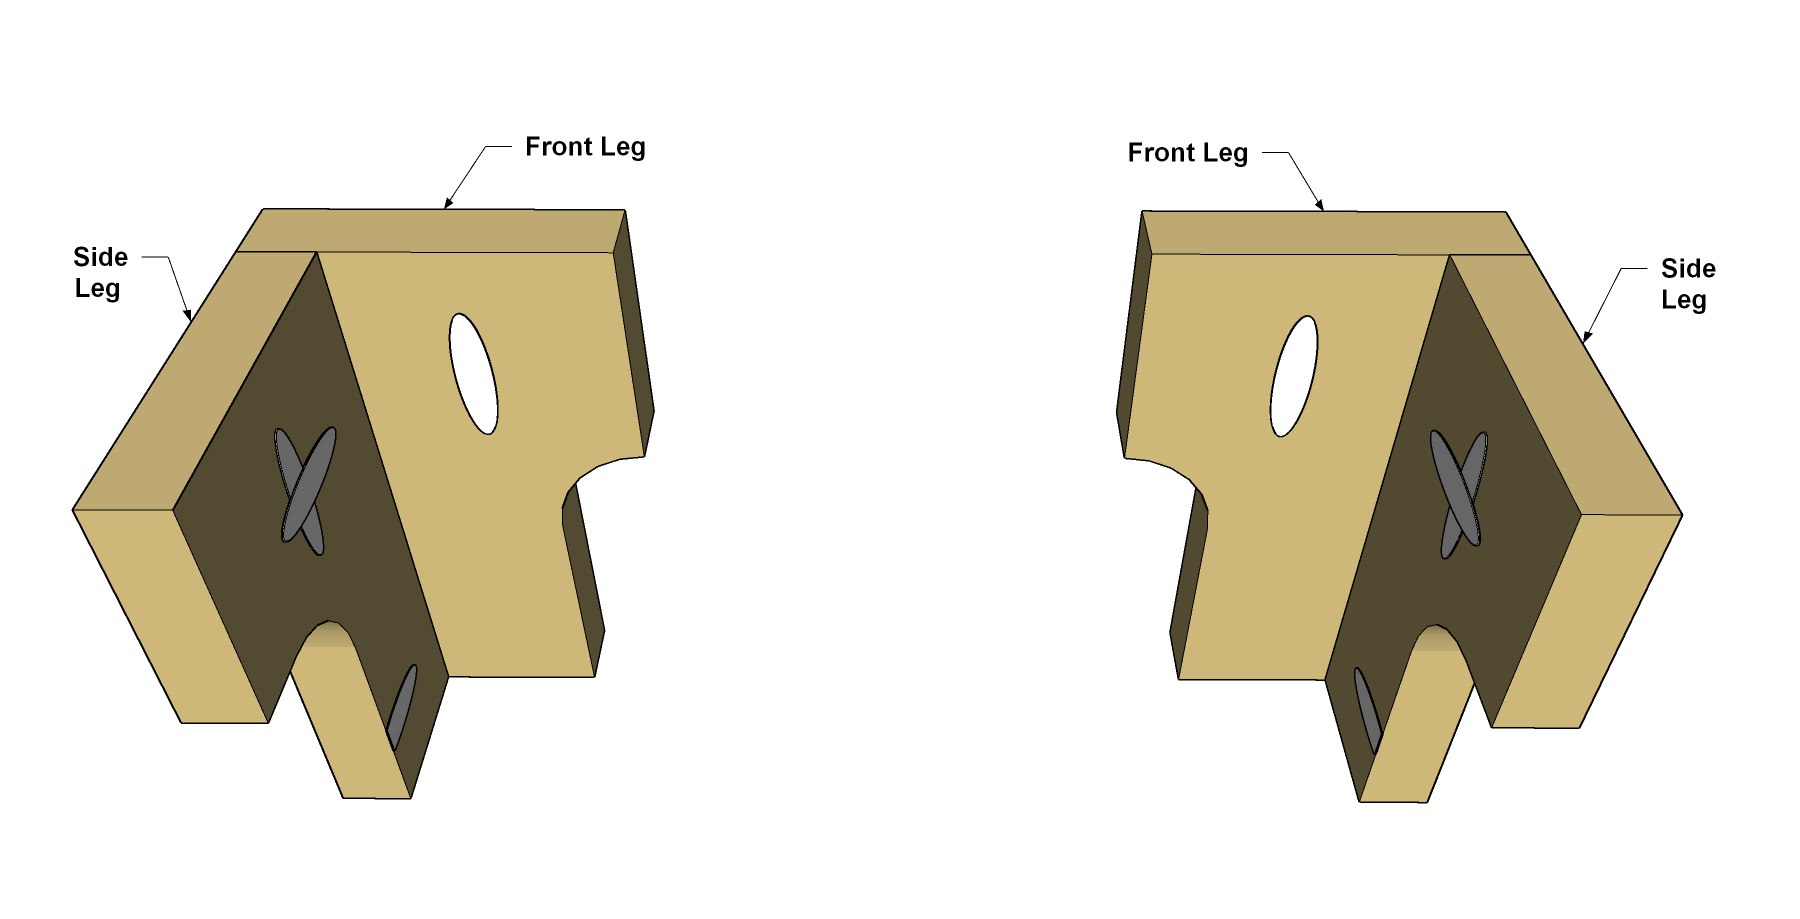
Assemble the Front Legs
Using glue and 1 1/4" coarse-thread Kreg Pocket-Hole Screws, attach two of the Front Legs to the Side Legs, as shown.
-
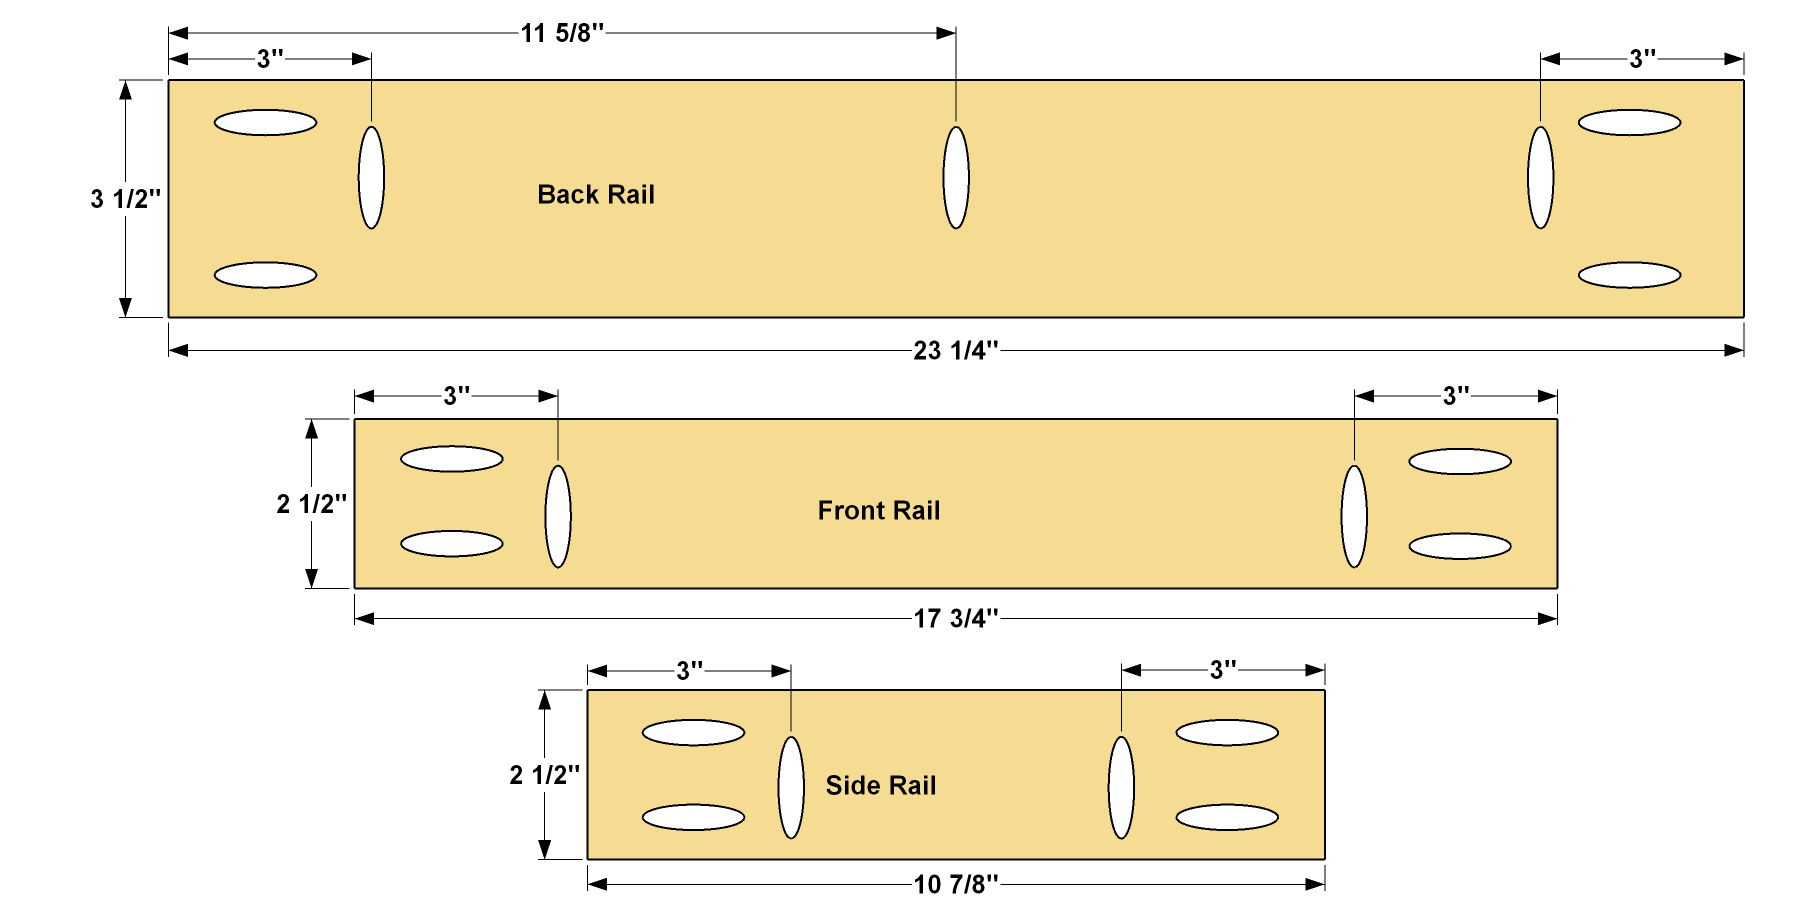
Make the Rails
Cut two Side Rails and one Front Rail to length from a 1x3 board, and then cut one Back Rail from a 1x4 board, as shown in the cutting diagram. Drill pocket holes where shown in the Rails.
-
Assemble the Base
Using 1 1/4" coarse-thread Kreg Pocket-Hole Screws, attach the Side Rails and Front Rails to the leg assemblies you created earlier. Then attach the Back Legs to the Side Rails, as well. Add the Back Rail to complete the base assembly.
-
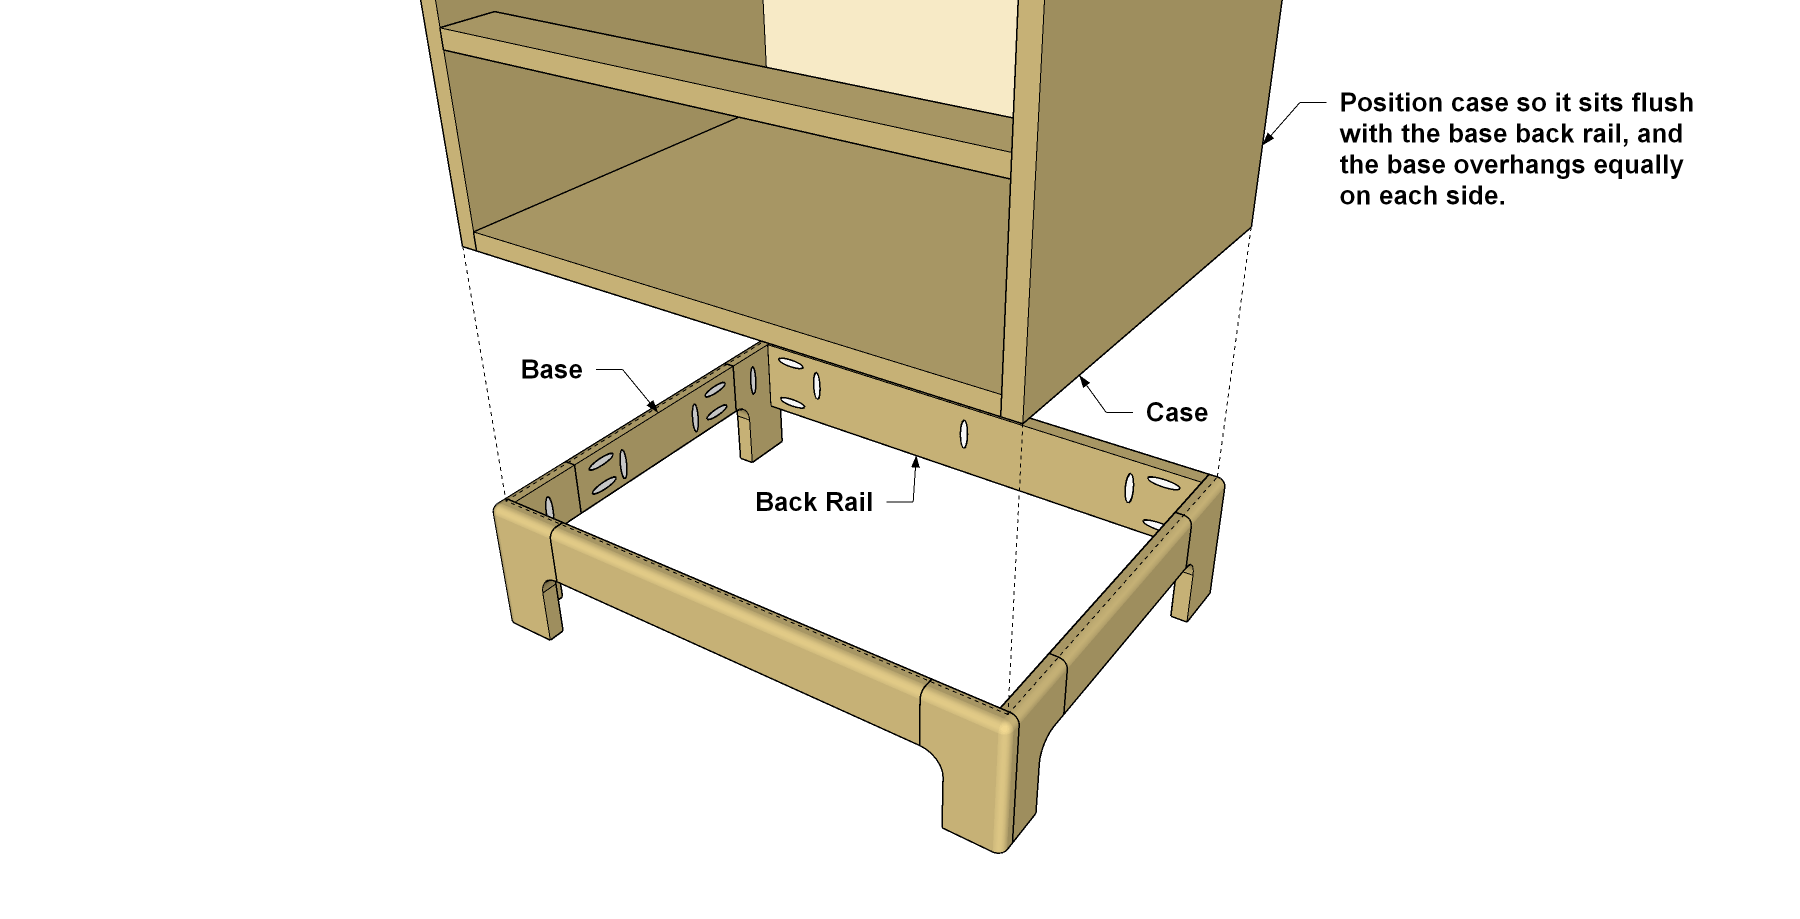
Complete and Attach the Base
Using a router and a 3/8" roundover bit, round over the top edges of the base assembly, as well as the outside corners of the legs. Sand the roundover profile smooth after routing. Then you can attach the base assembly to the case using 1 1/4" coarse-thread Kreg Pocket-Hole Screws. Center the Base side to side and make sure it's sits flush at the back.
-
Create Top Spacers
At the top of the case, you’ll want to add four spacers. They raise the chest top, which you’ll make soon, up a little higher and make space for a decorative cove molding. Cut two Front/Back Spacers and two Side Spacers to length from a 1x3 board, as shown in the cutting diagram. Then attach the Spacers tot the top of the case using glue and nails, as shown. The nails simple hold the pieces in place while the glue sets.

-
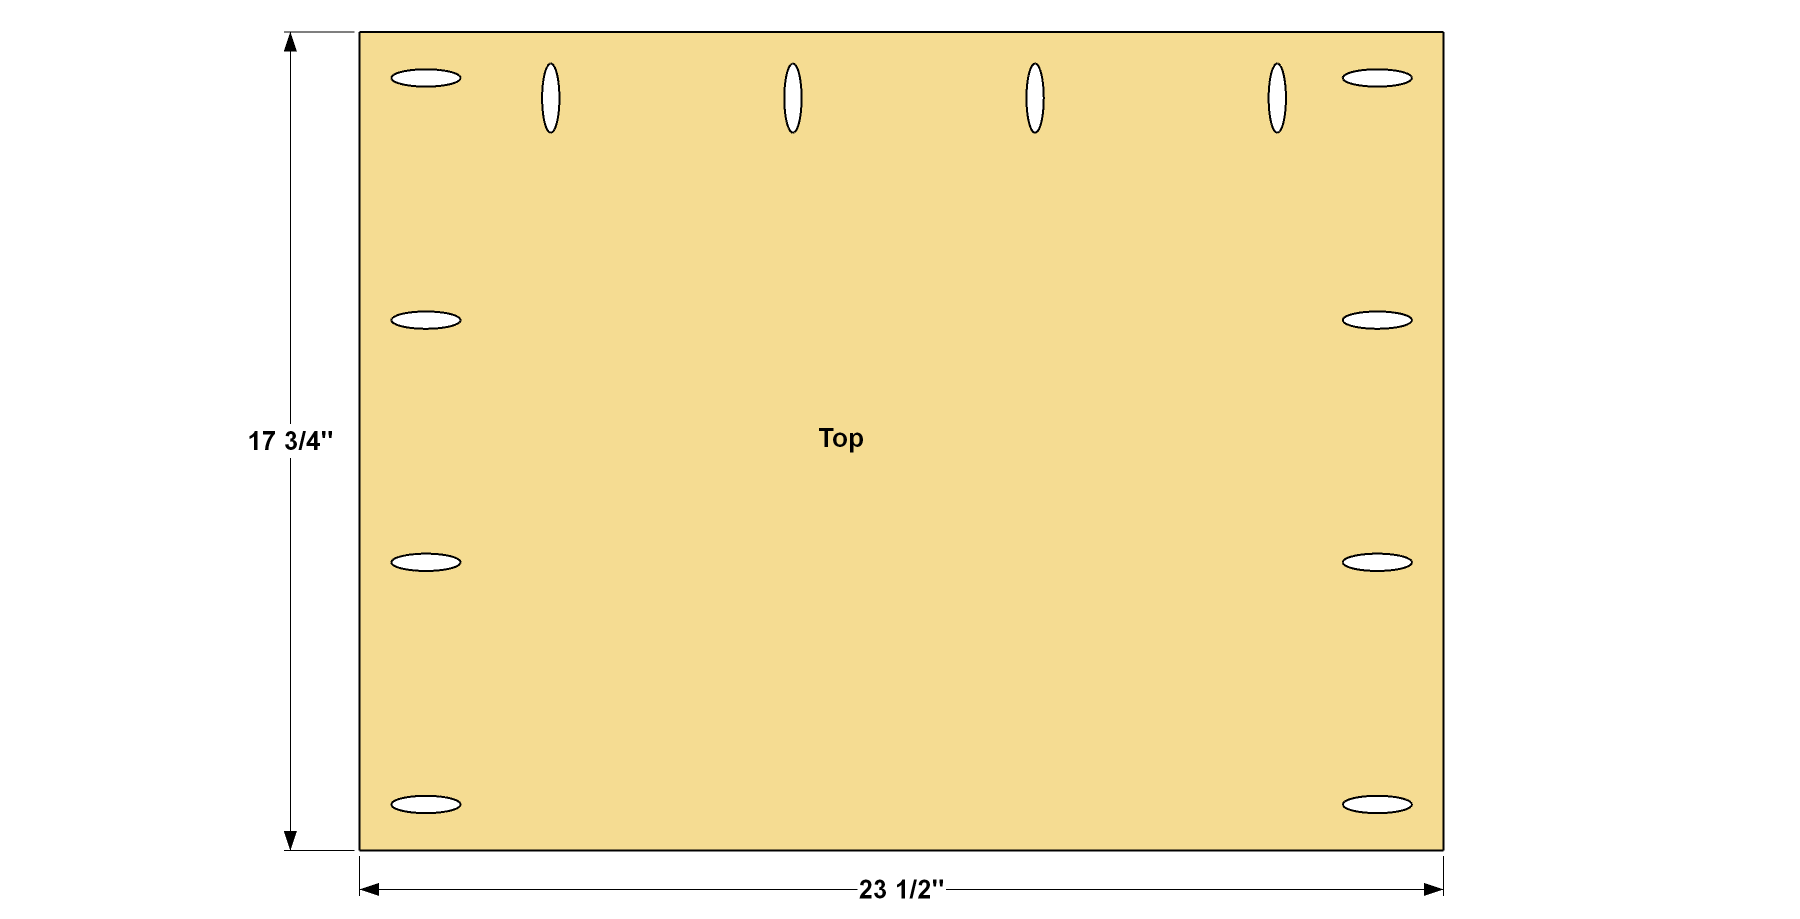
Create the Top
Now you cut the Top to size from 3/4" plywood, as shown in the cutting diagram. Then, with your pocket hole jig set for 3/4" material, drill pocket holes in the Top where shown.
-
Add Top Edging
The Top needs edging to cover up the plywood edges. So, cut twopieces of Top Side Edging and one piece of Top Front Edging to length from a 1x2 board, as shown in the cutting diagram. Note that these pieces are mitered at 45° at the mating corners. After cutting and test fitting the Edging pieces, you can attach them to the Top using glue and 1 1/4" coarse-thread Kreg Pocket-Hole Screws.

-
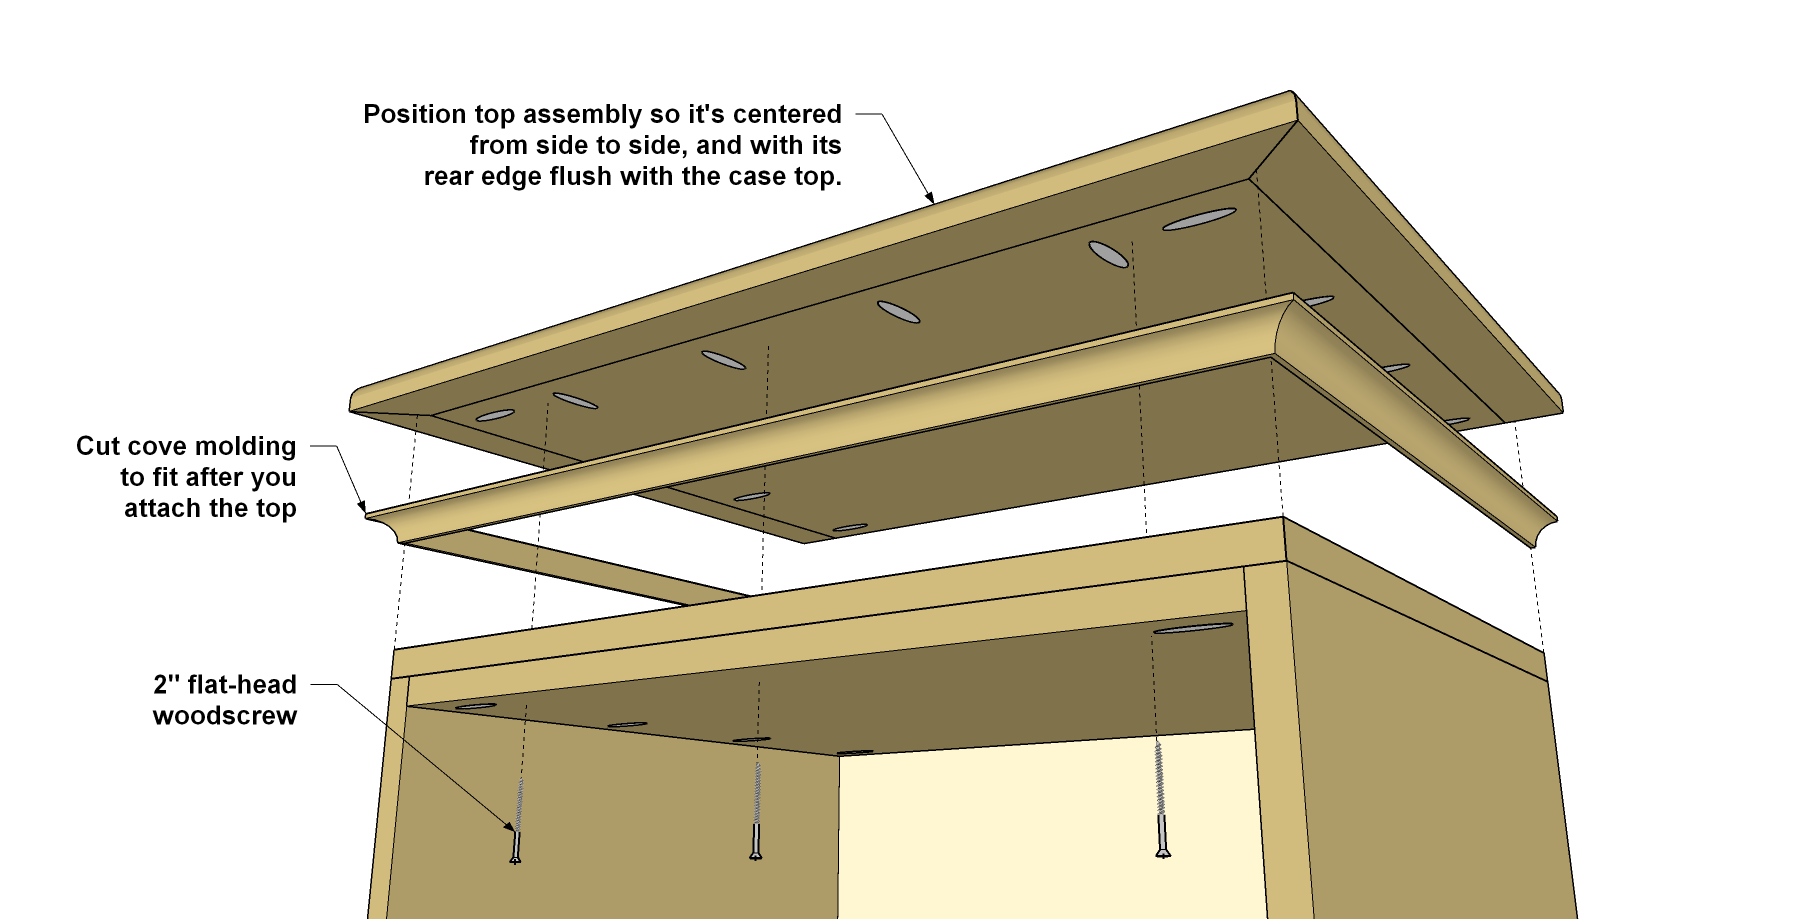
Attach the Top
Use a 1/8" drill bit to drill through the Spacers and Case Top for screws that will be used to attach the top assembly. Drill two holes in each spacer. Position the top assembly on the spacers, and make sure the top assembly is centered from side to side, and that the back edge is flush with the back of the case. The attach the top assembly by driving 2" flat-head wood screws into the Top from inside the case. Using 3/4" x 3/4" cove molding, miter and fit three pieces to wrap around the case immediately under the top. After test fitting, glue and nail the molding in place.
-
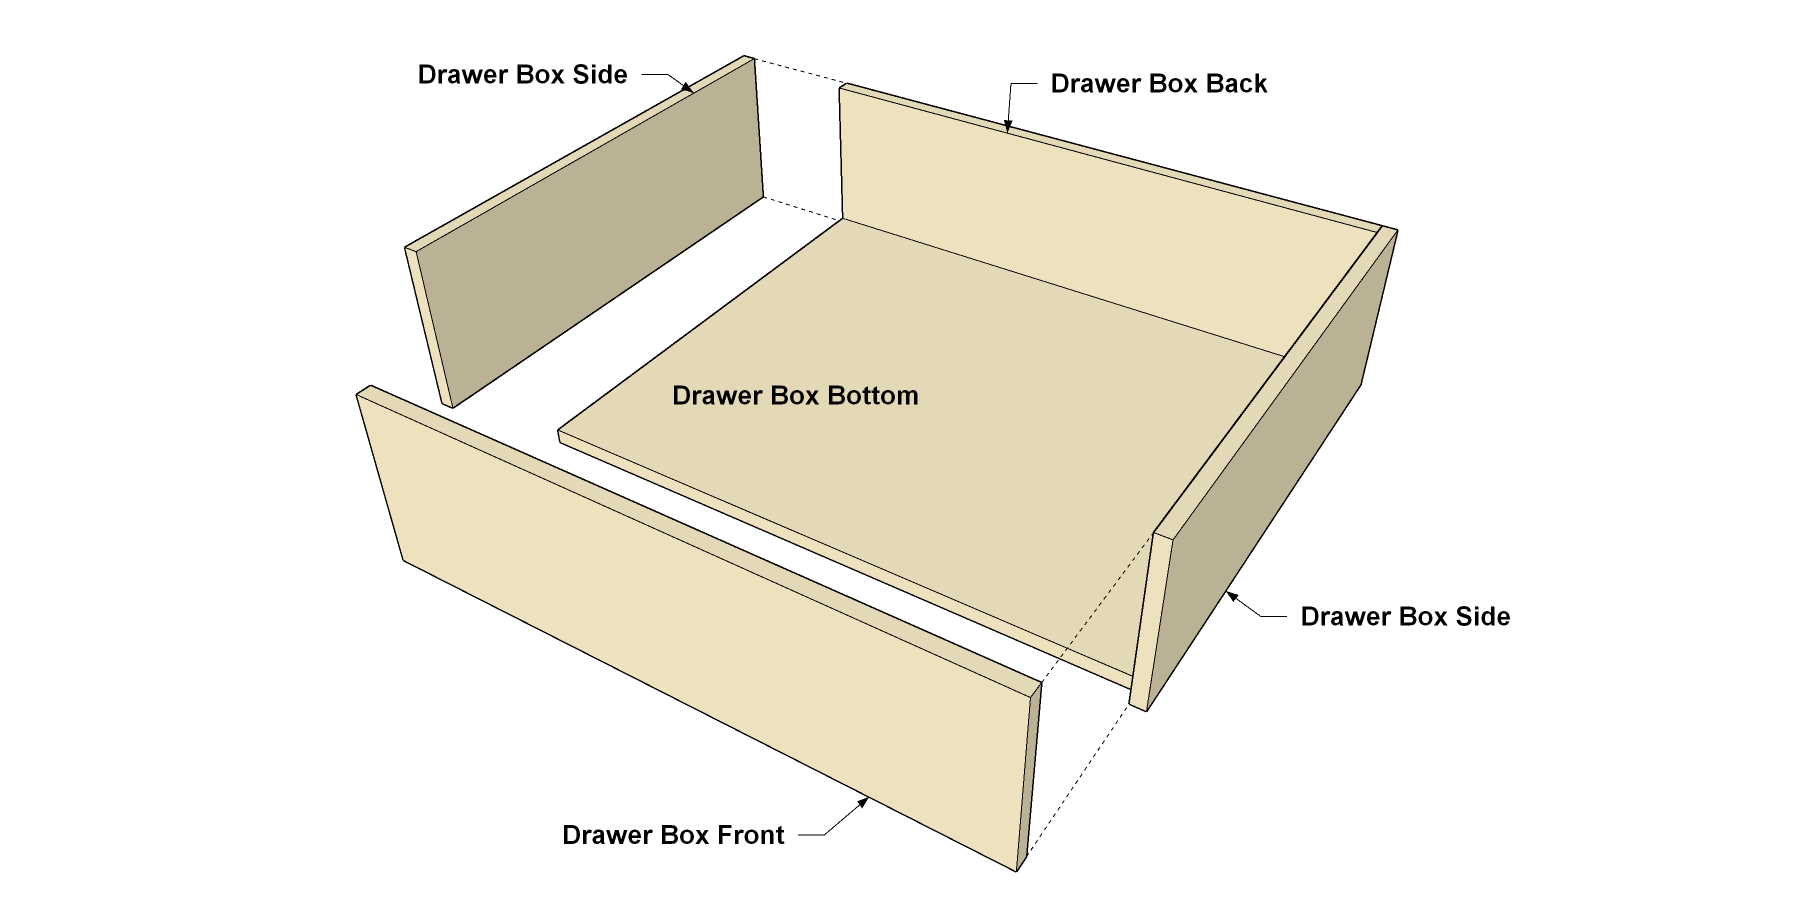
Cut the Drawer Box Parts
Cut six Drawer Fronts, six Drawer Backs, and 12 Drawer Sides to size from a sheet of 1/2" plywood, as shown in the cutting diagram. Also cut six Drawer Bottoms to size from 1/2" plywood, as well.
-
Build the Drawer Boxes
Now you can assemble the drawer boxes, as shown. You’ll want to spread glue on the mating edges, clamp the pieces together, and then drive in nails. Once again, an air nailer is the tool of choice for this, though a hammer and nails will work. Once you have the nails in, you can remove the clamps and move on to the next drawer. The nails will hold everything while the glue dries.
-
Make Drawer Fronts
From 1x8 boards, cut six Drawer Face to Length, as shown in the cutting diagram. Round over the four front edges with a 3/8" round-over bit. Sand the rounded-over edges smooth, if necessary. Then you can smooth.
-
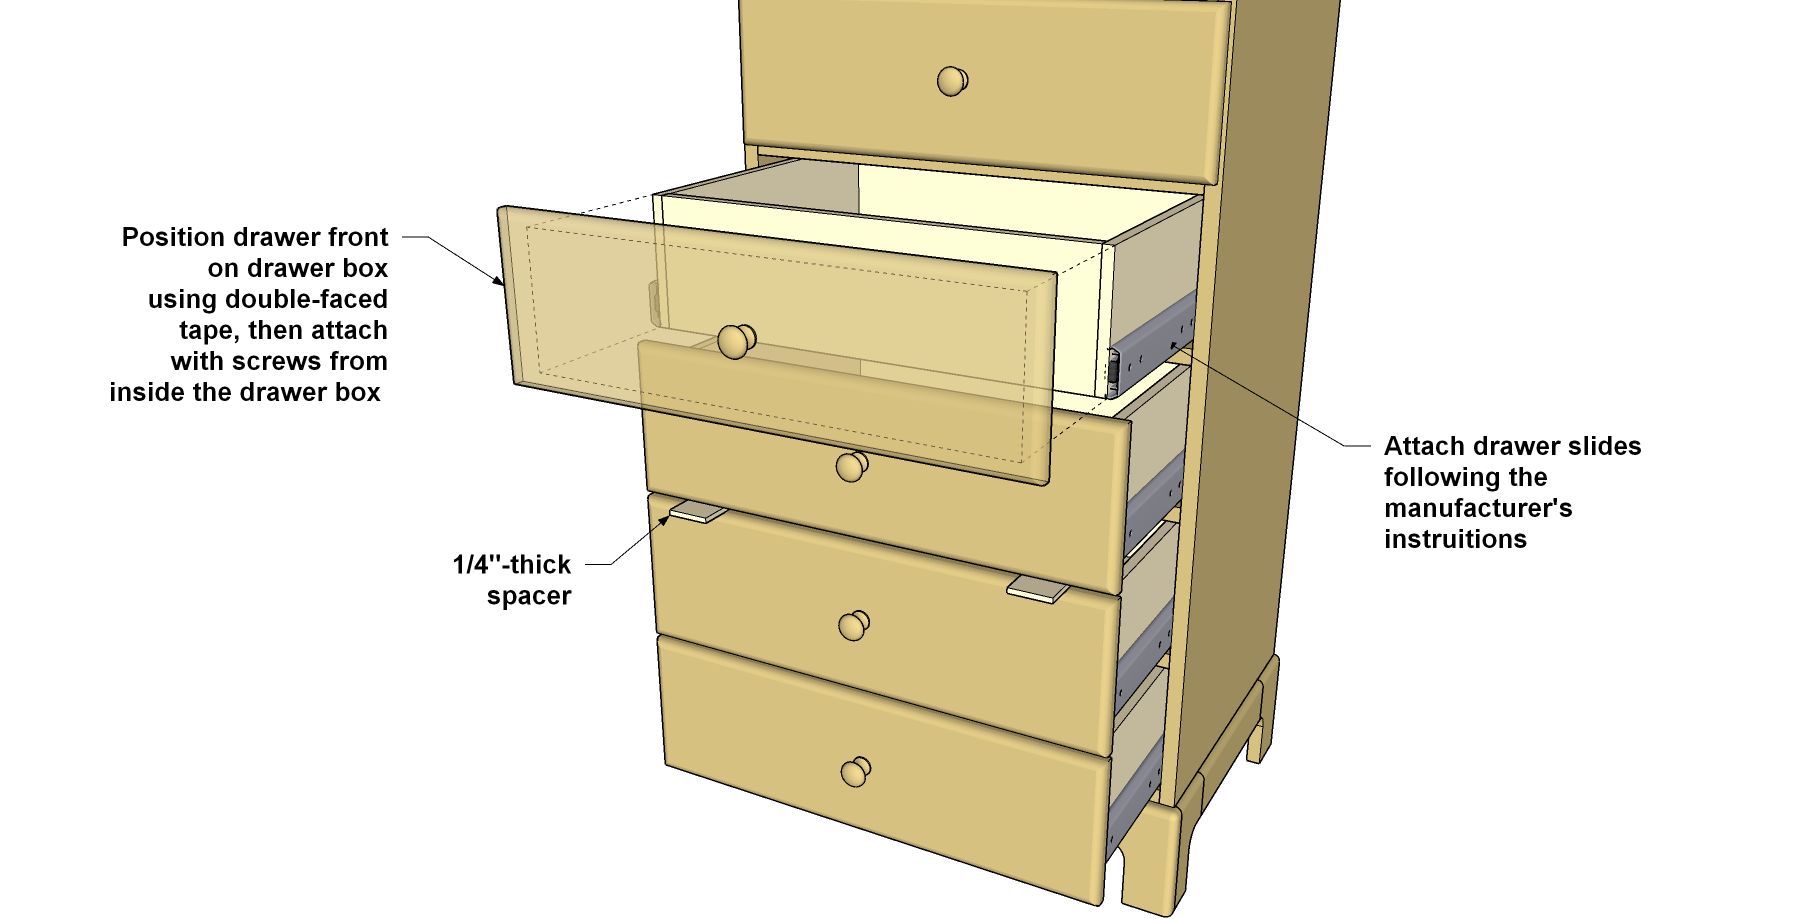
Install the Drawers
With the drawer boxes complete, you can install them in the case using 16" full-extension drawer slides. Follow the manufacturer’s instructions for locating and installing the slides. Starting from the bottom drawer, place a 1/4" spacer on the base and place the first Drawer Front in place. Use double sided carpet tape to hold it while you press the Face against the drawer box. Open the drawer, and then screw the Face on from inside the drawer using four 1" flat-head wood screws. Then repeat the process as you move up, using the 1/4" spacer each time.