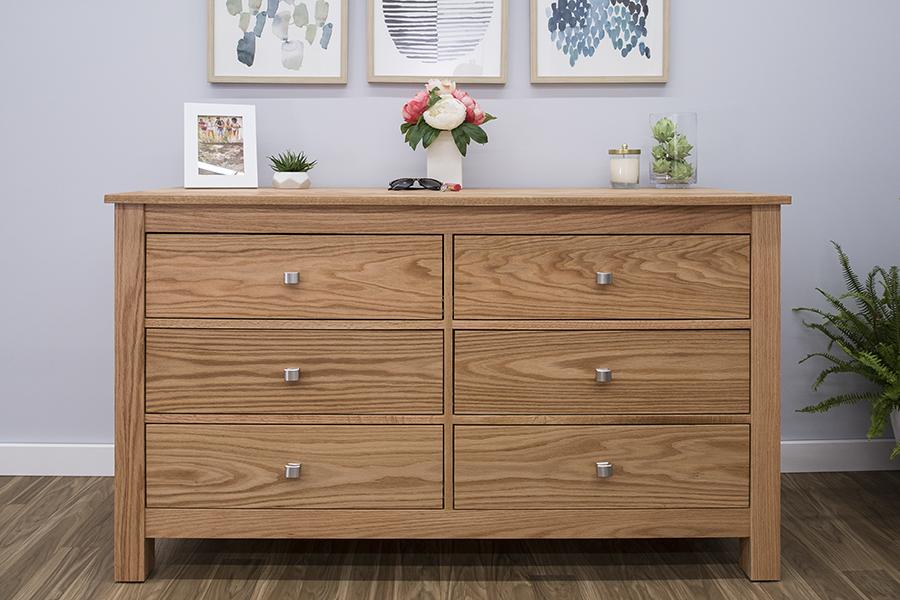
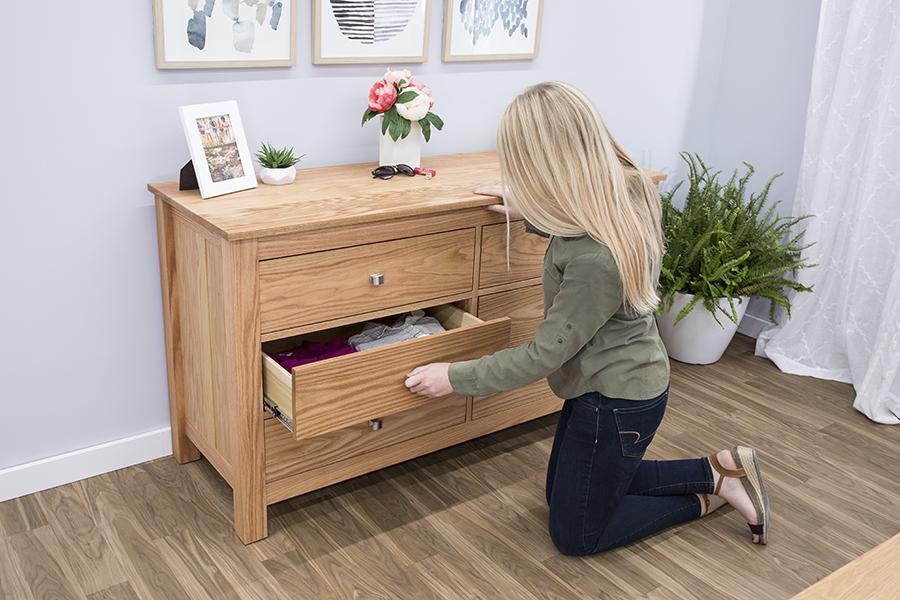
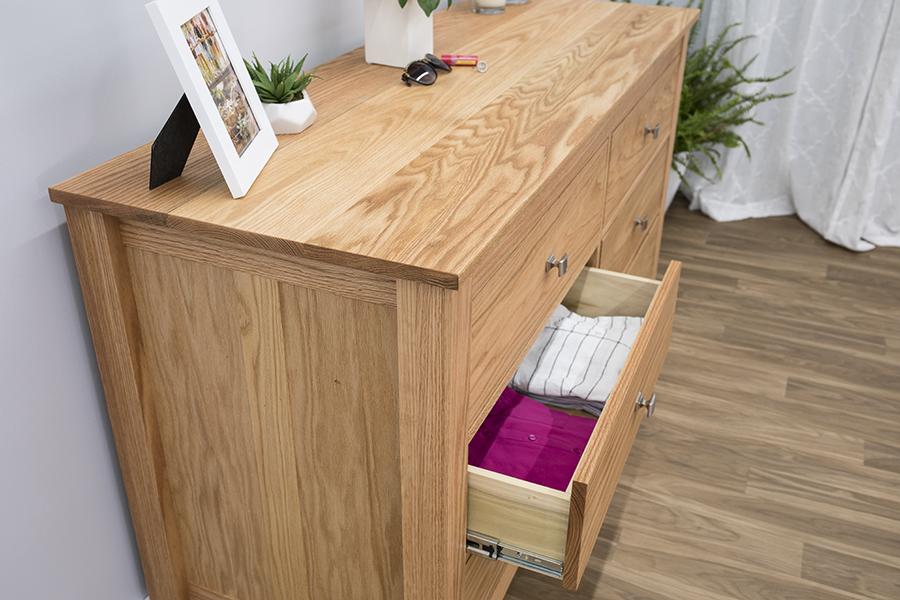
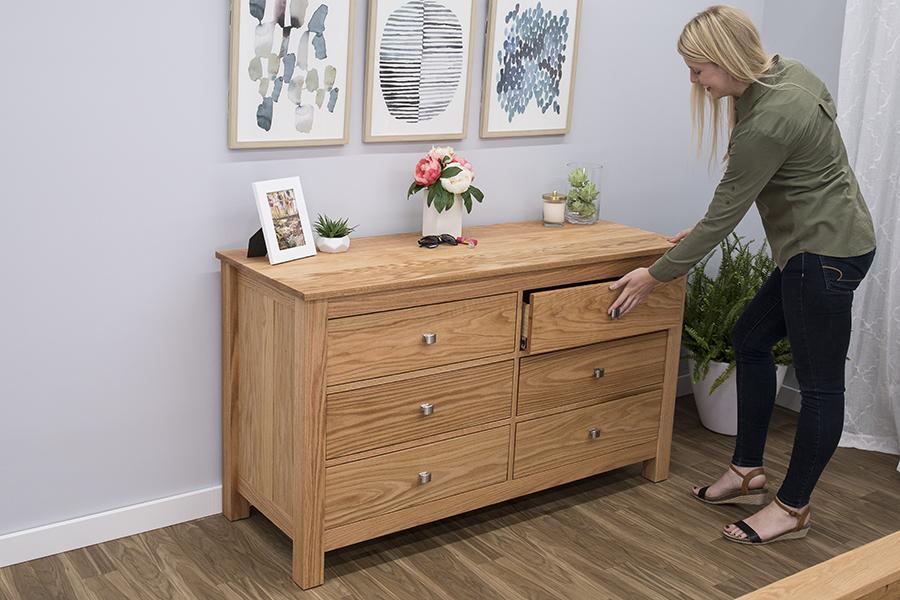


This dresser has a classic style that will dress up any bedroom. Plus, it provides a huge amount of storage space. The design and oak construction make it a perfect companion to our Classic Craftsman Style Bed plan. Or, if you prefer, you can use a different wood and finish to suit your decor.
Tools
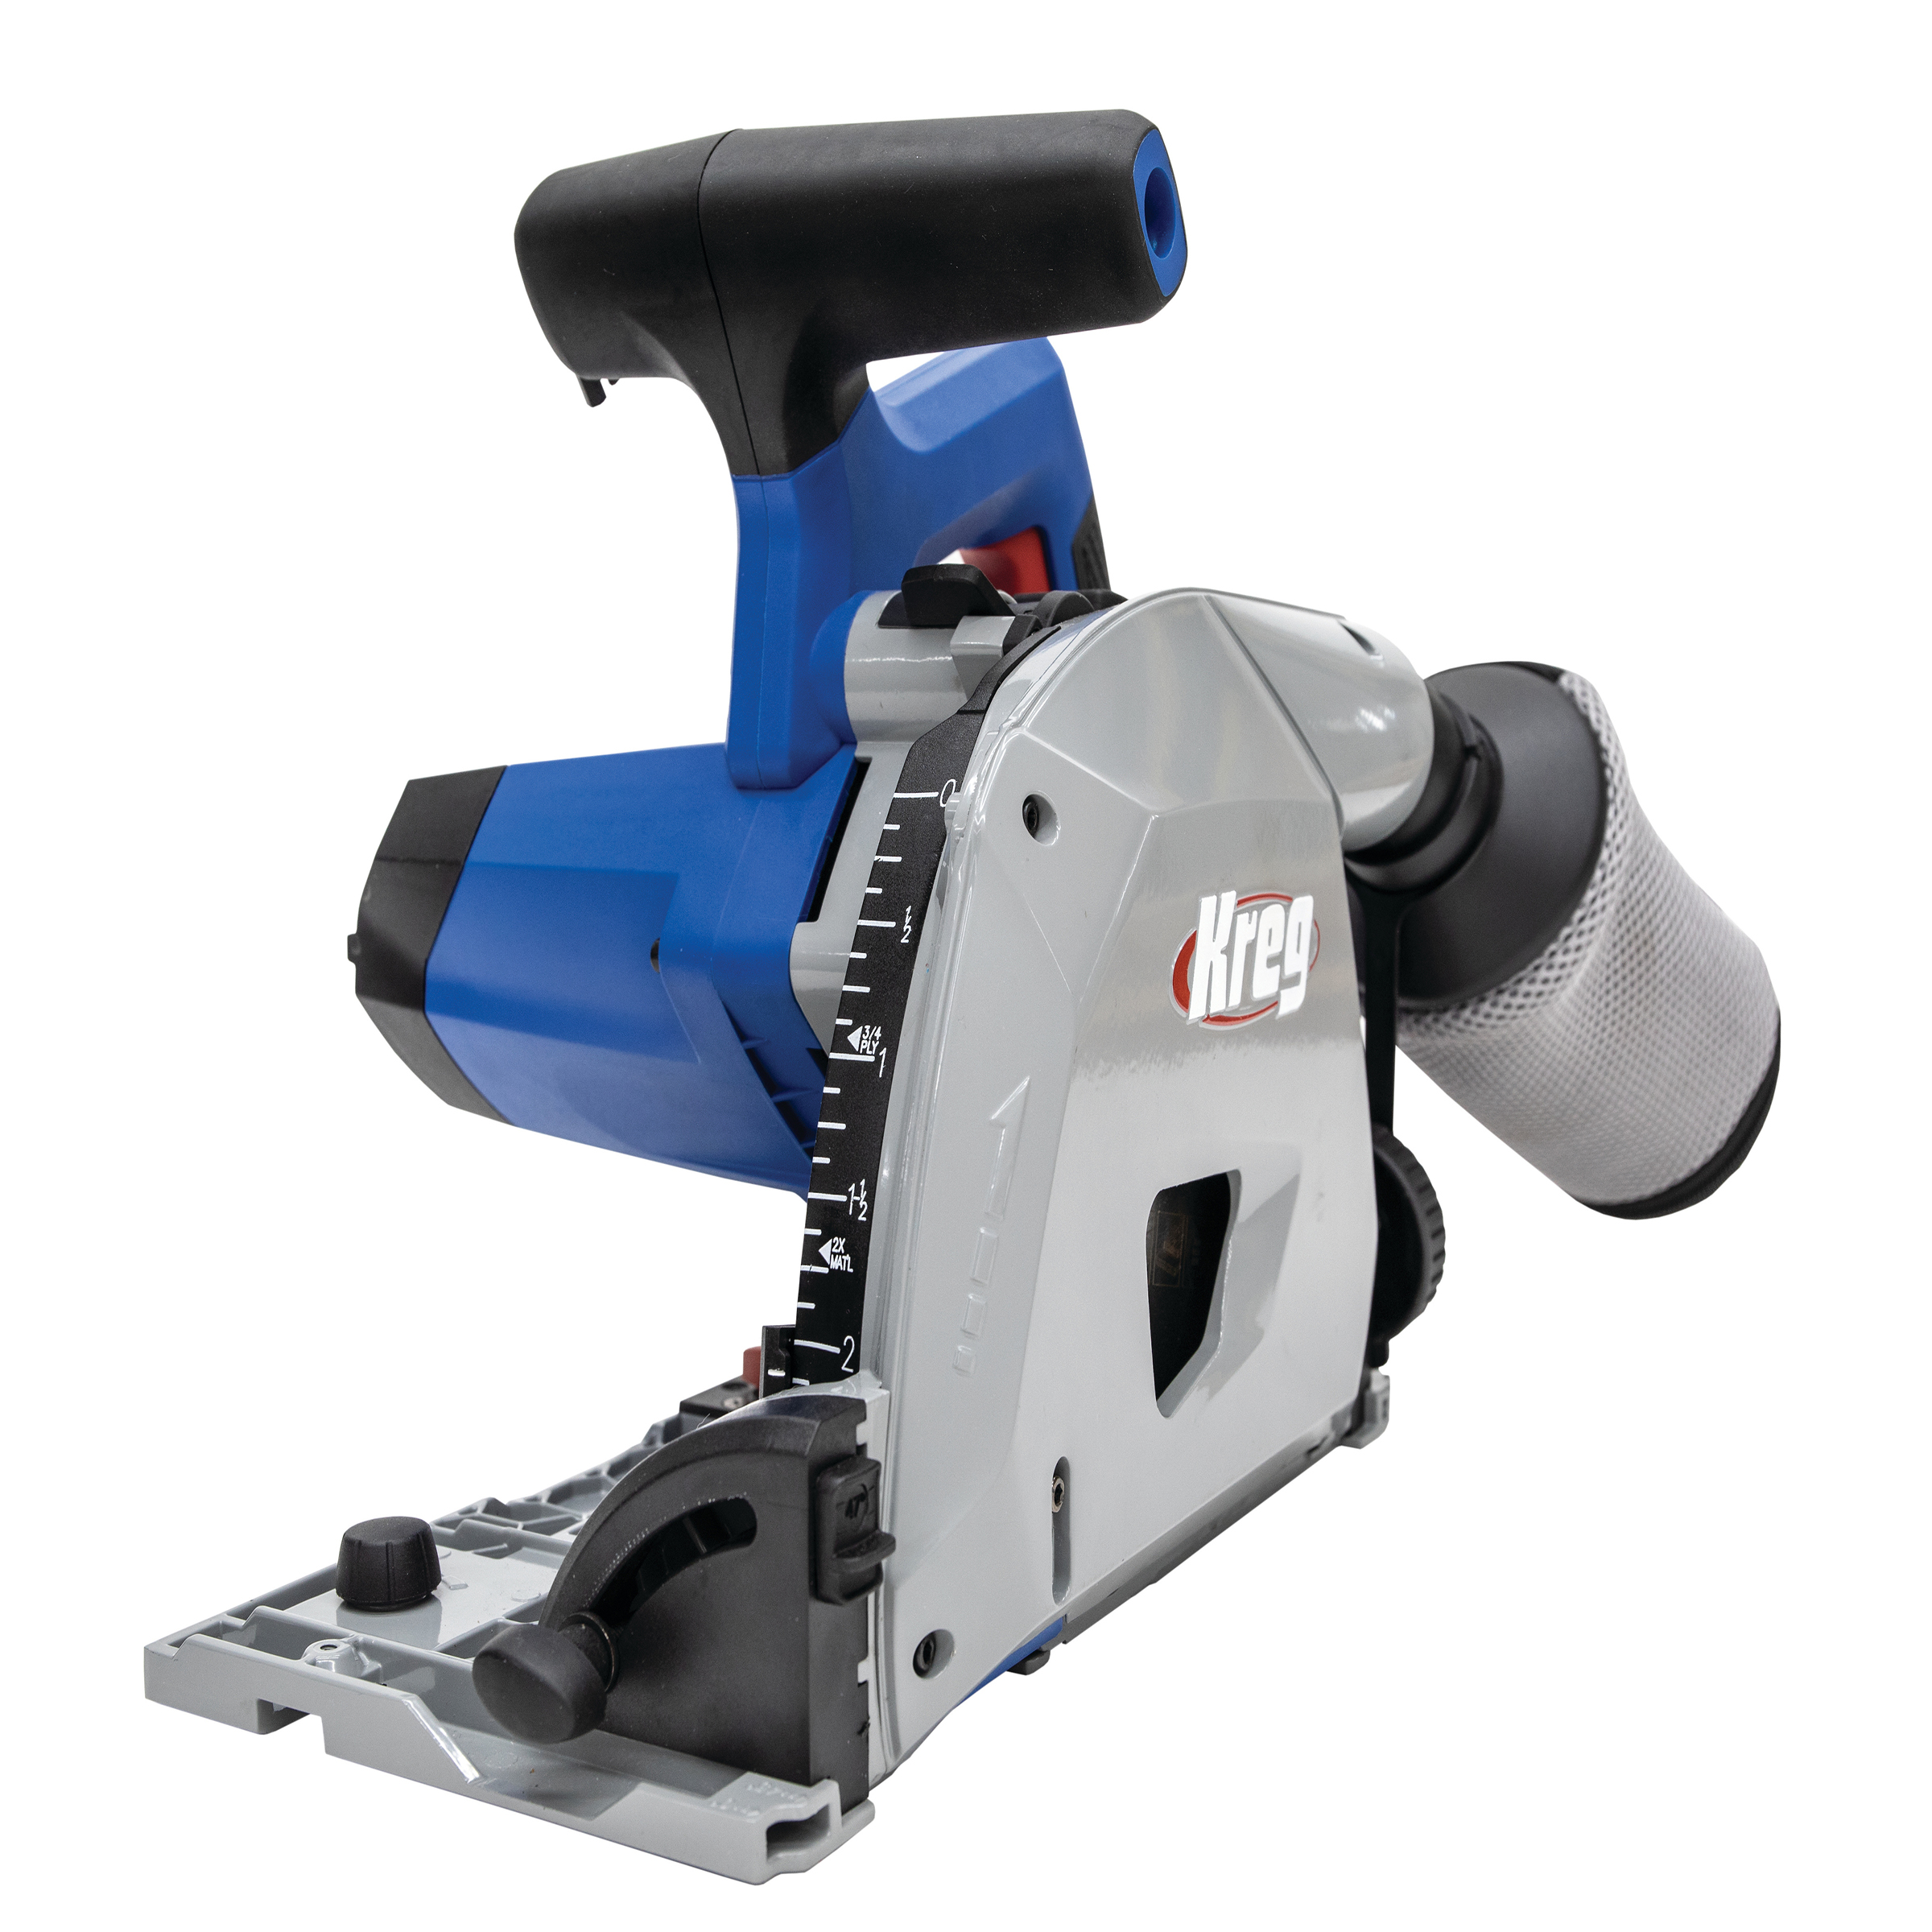
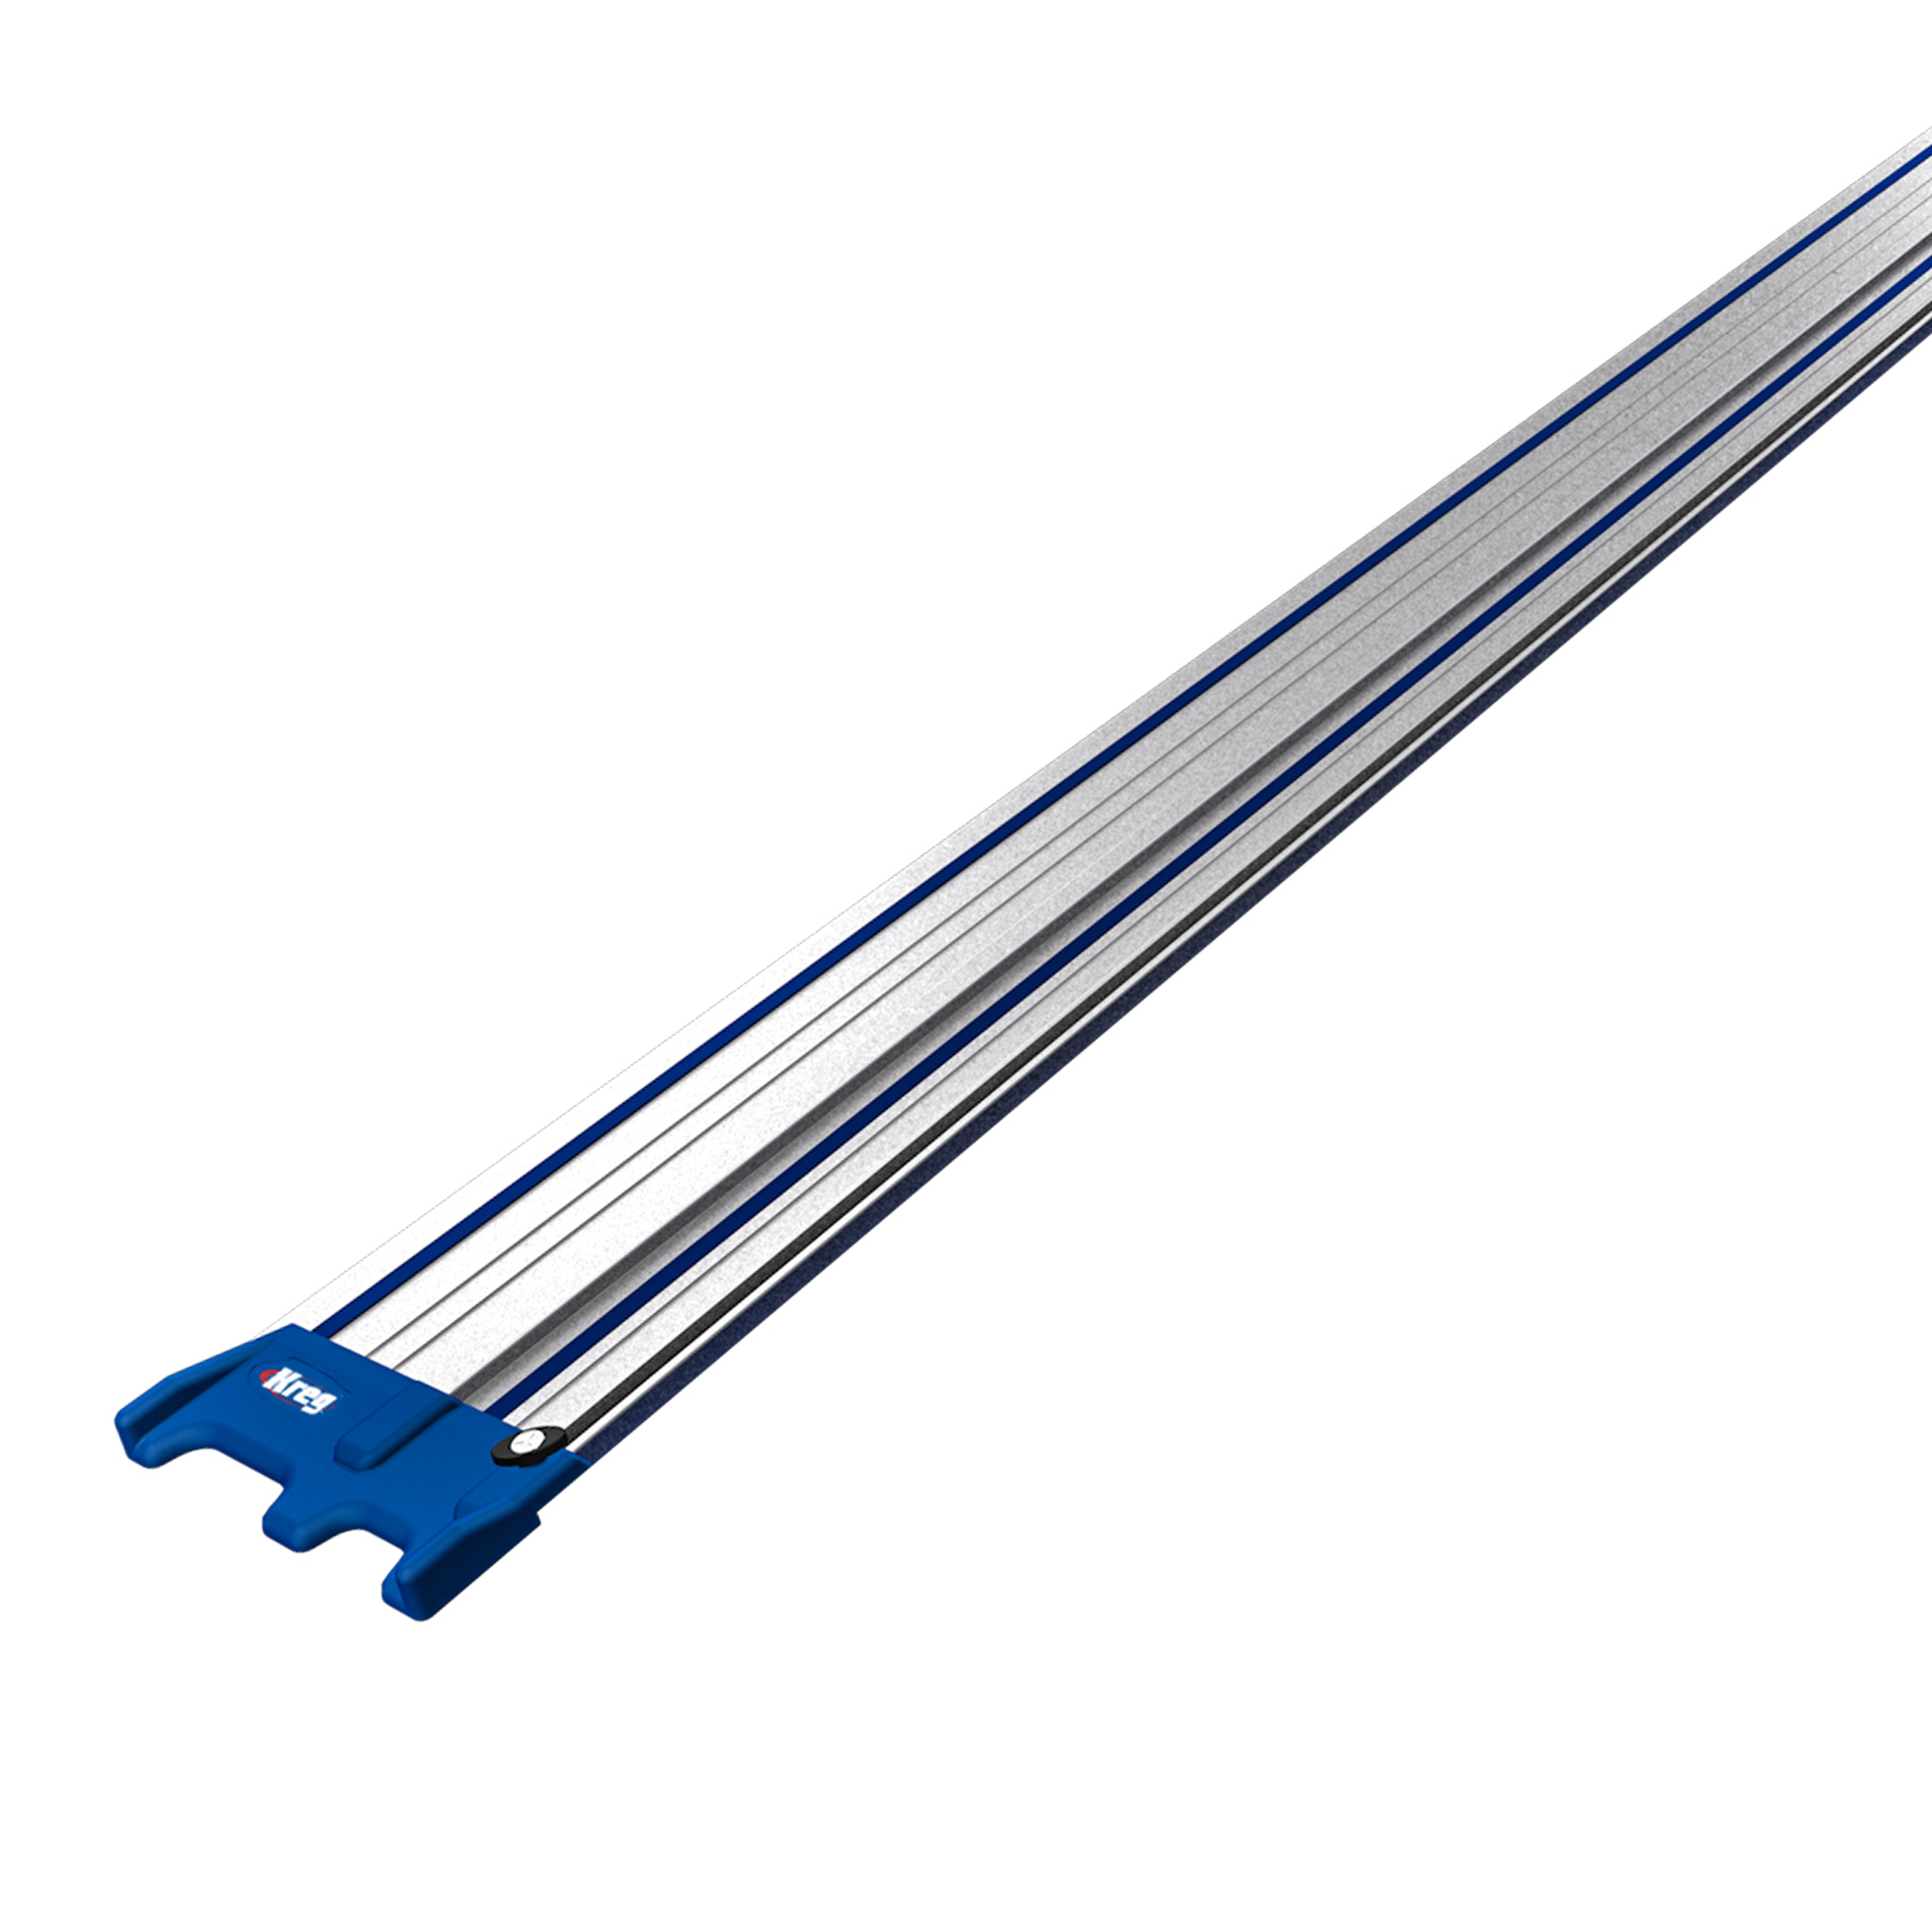
Kreg Tools


Other Tools
-
miter saw

-
Brad nailer or hammer
-
tape measure
Materials
Wood Products
- 1 Oak board , 1x2 x 96"
- 1 Oak board , 1x2 x 72"
- 2 Oak board , 1x3 x 96"
- 1 Oak board , 1x3 x 48"
- 3 Oak board , 1x8 x 72"
- 2 Oak board , 1x8 x 96"
- 4 Oak board , 3x3 x 36"
- 3 Poplar board , 1x2 x 48"
- 4 Poplar board , 1x3 x 72"
- 12 Poplar board , 1/2" x 6 x 48"
- 1 Oak plywood , 3/4" x 48" x 96"
- 1 Birch plywood , 1/2" x 48" x 96"
- 1 Birch plywood , 1/4" x 48" x 96"
Hardware & Supplies
- 2 100-count box 1 1/4" fine-thread Kreg pocket-hole screws
- 6 Pair of 18" full-extension drawer glides
- 6 Drawer knobs
- 1 Pack of 1" 18-gauge brad nails
- 12 1" flat-head wood screws
- 1 Roll double-sided carpet tape
- 1 Quart Danish Oil finish
- 1 Quart shellac
Cut List & Parts
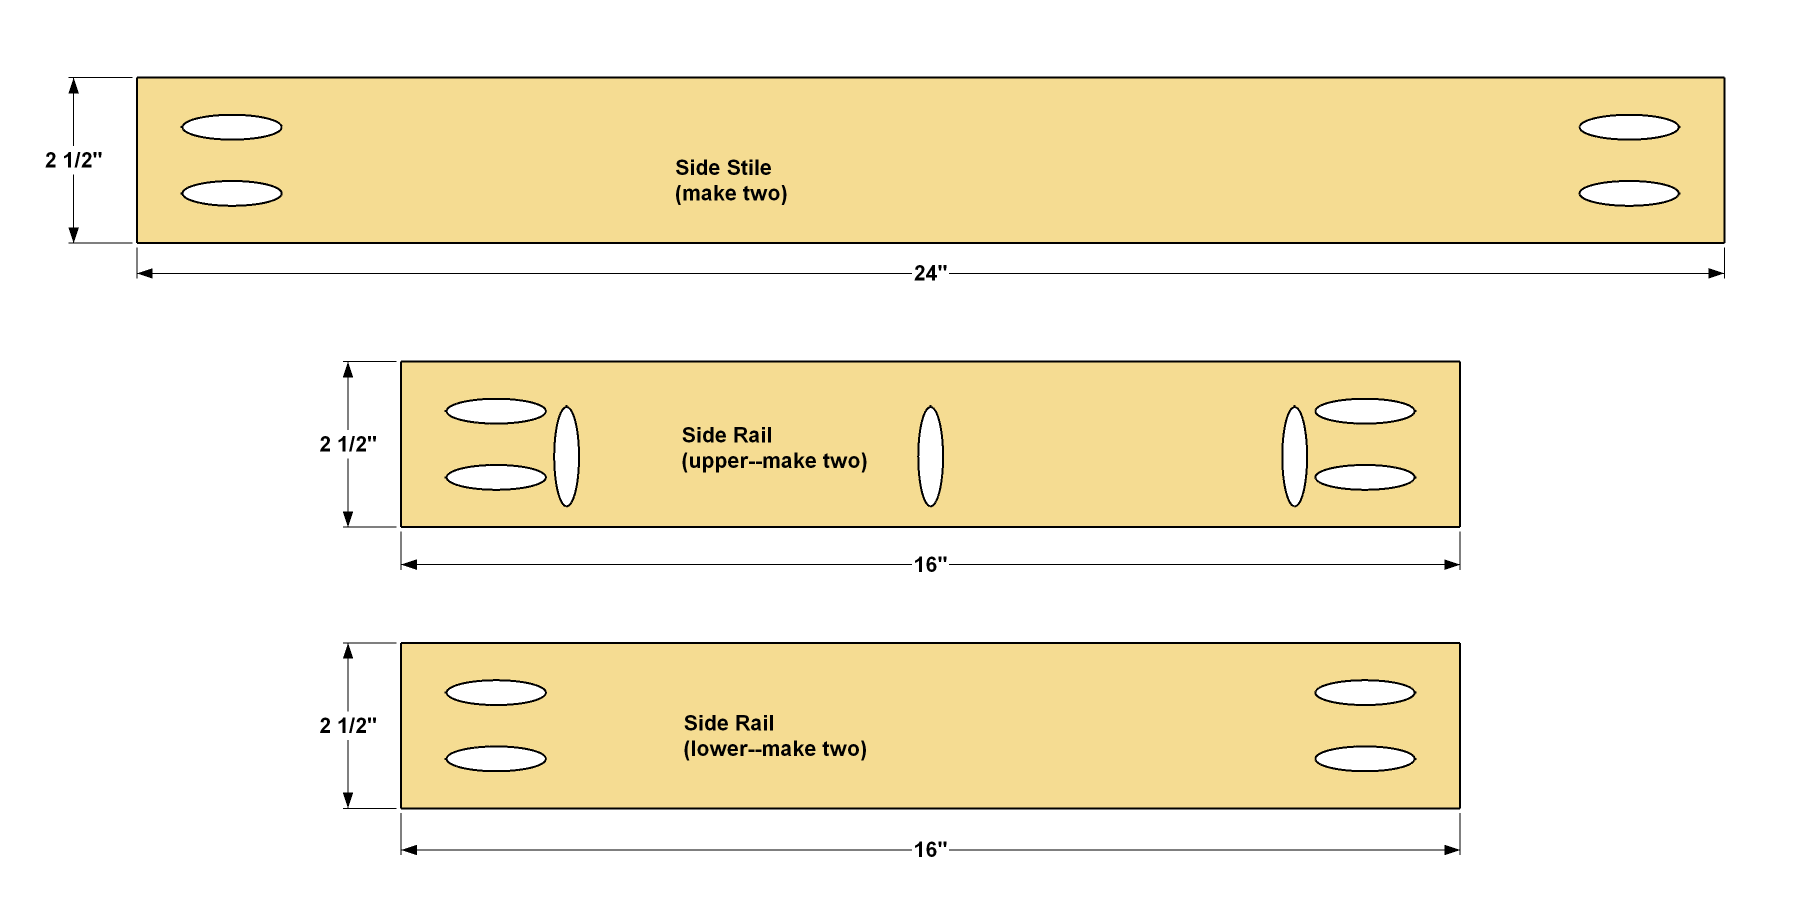
- 4 Side Rail , 3/4" x 2 1/2" x 16"
- 2 Side Stile , 3/4" x 2 1/2" x 24"
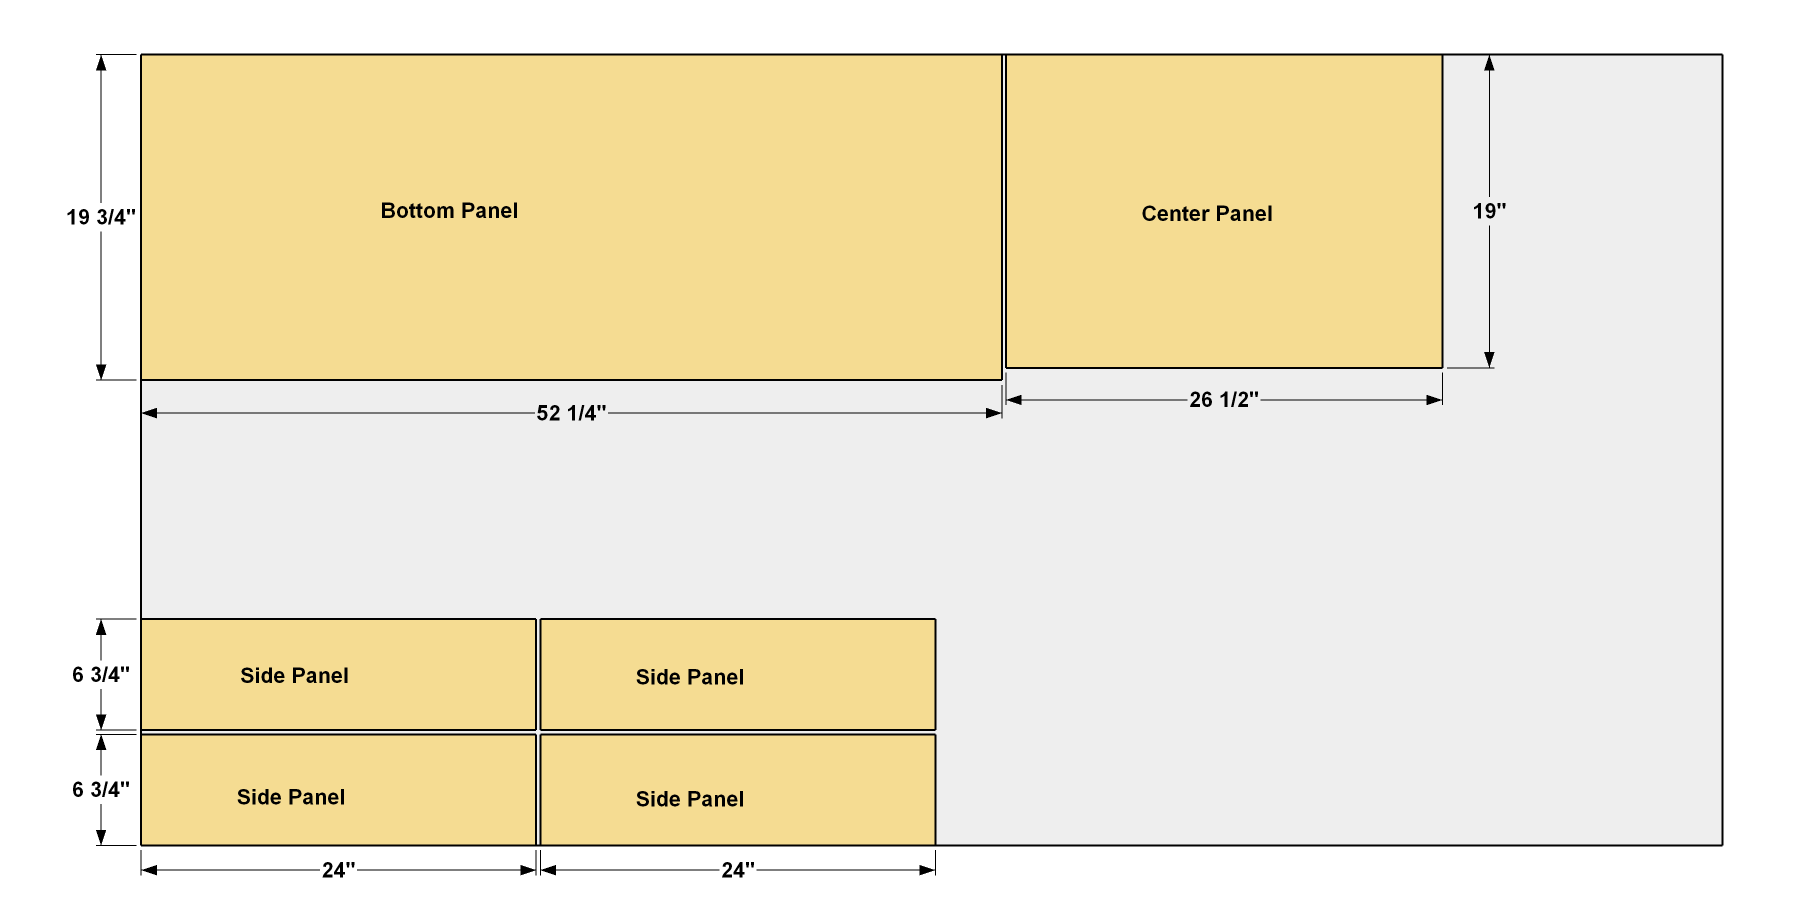
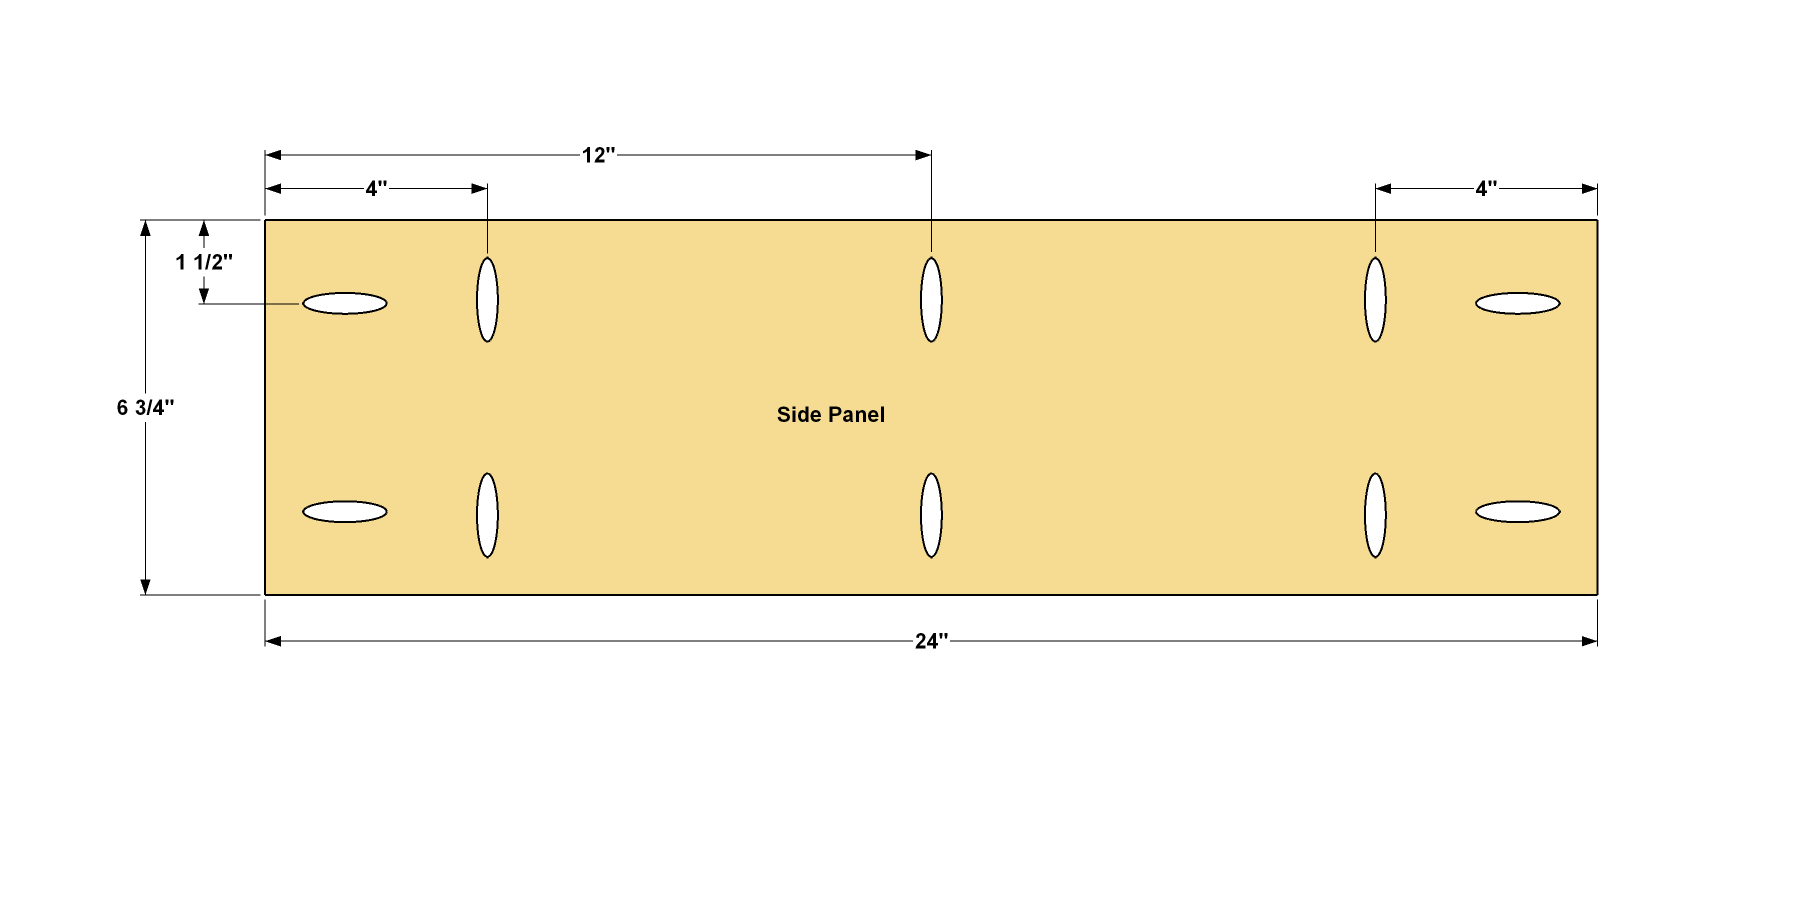
- 4 Side Panel , 3/4" x 6 3/4" x 24"
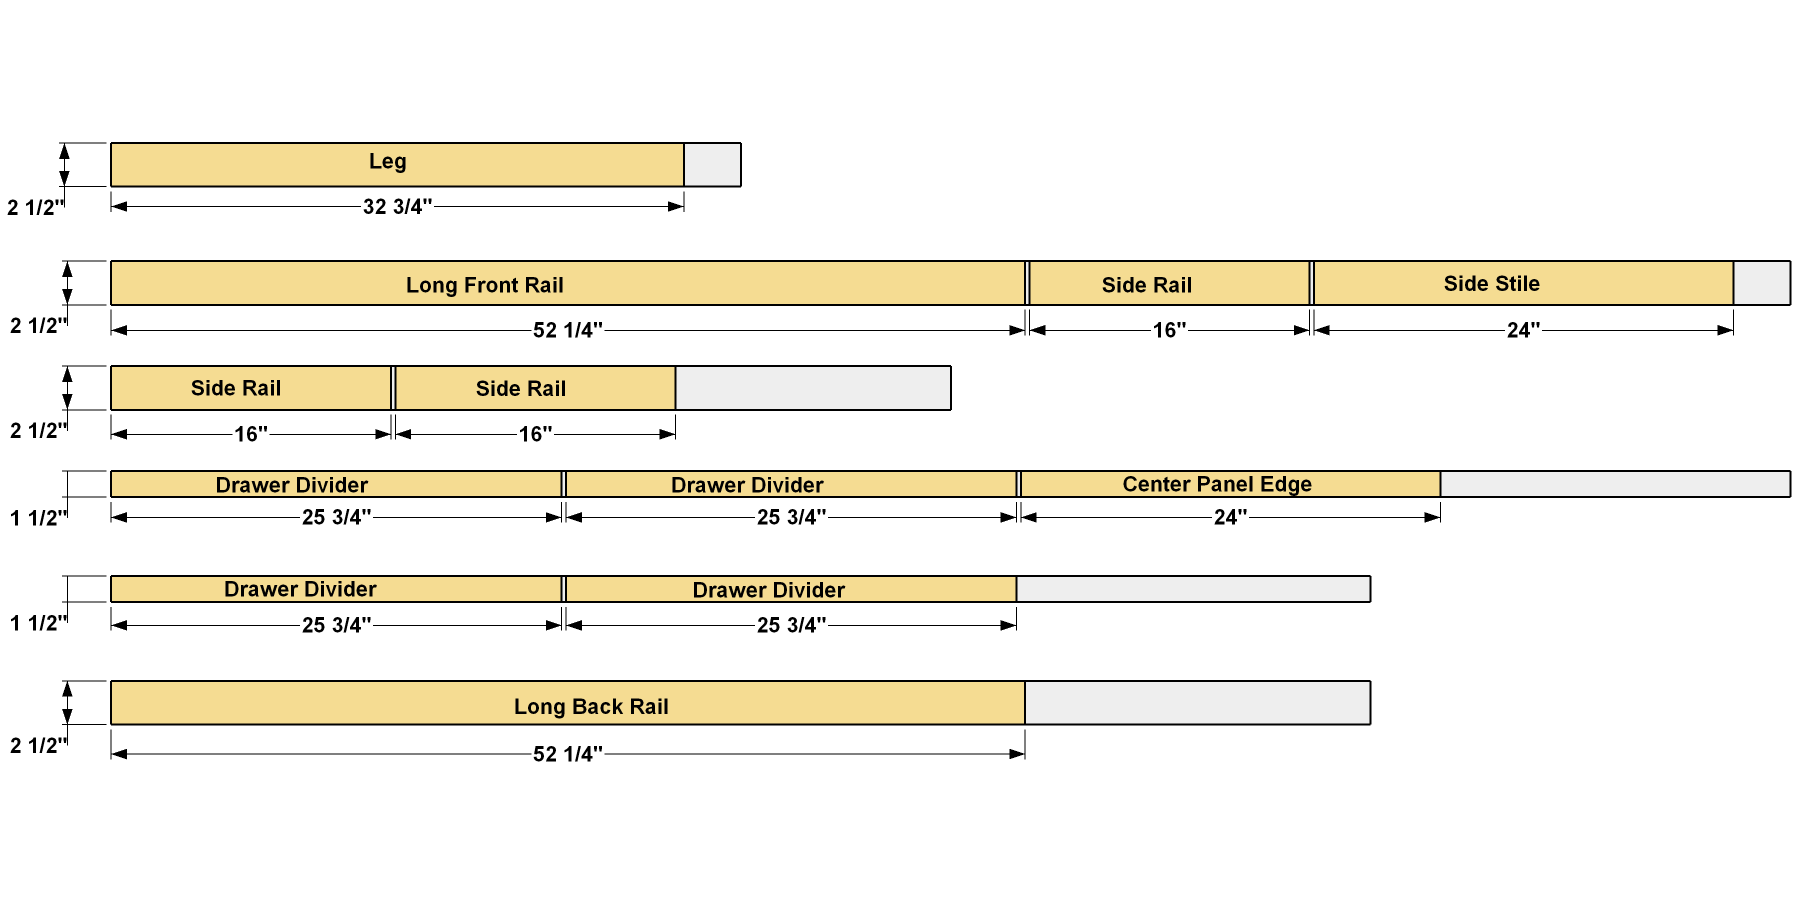
- 4 Leg , 2 1/2" x 2 1/2" x 32 3/4"
- 2 Long Front Rail , 3/4" x 2 1/2" x 52 1/4"
- 1 Long Back Rail , 3/4" x 2 1/2" x 52 1/4"
- 1 Bottom Panel , 3/4" x 19 3/4" x 52 1/4"
- 1 Center Panel , 3/4" x 19" x 26 1/2"
- 1 Center Panel Edging , 3/4" x 1 1/2" x 24"
- 4 Front Drawer Divider , 3/4" x 1 1/2" x 25 3/4"
- 4 Back Drawer Divider , 3/4" x 2 1/2" x 25 3/4"
- 2 Back Short Rail , 3/4" x 2 1/2" x 25 3/4"
- 6 Drawer Slide Filler , 3/4" x 1 1/2" x 16"
- 3 Top Board , 3/4" x 7 1/4" x 58 1/2"
- 12 Drawer Side , 1/2" x 5 1/2" x 19"
- 12 Drawer Front/Back , 1/2" x 5 1/2" x 23 3/4"
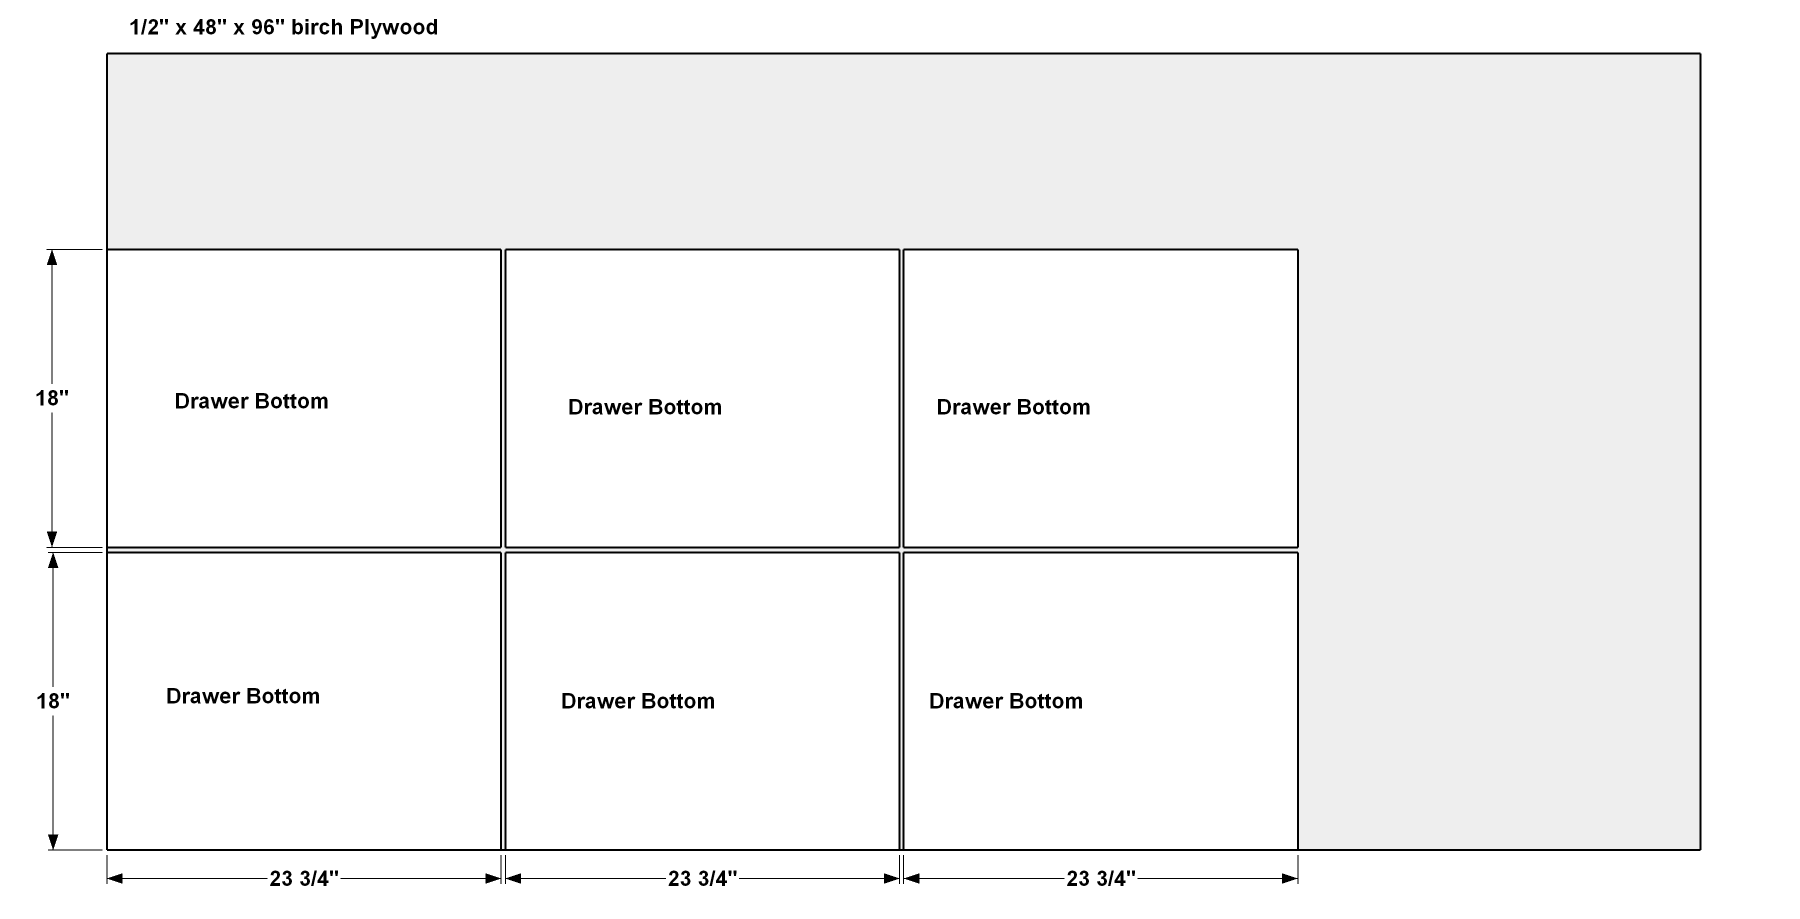
- 6 Drawer Bottom , 1/2" x 18" x 23 3/4"
- 6 Drawer False Front , 3/4" x 7 1/4" x 25 1/2"
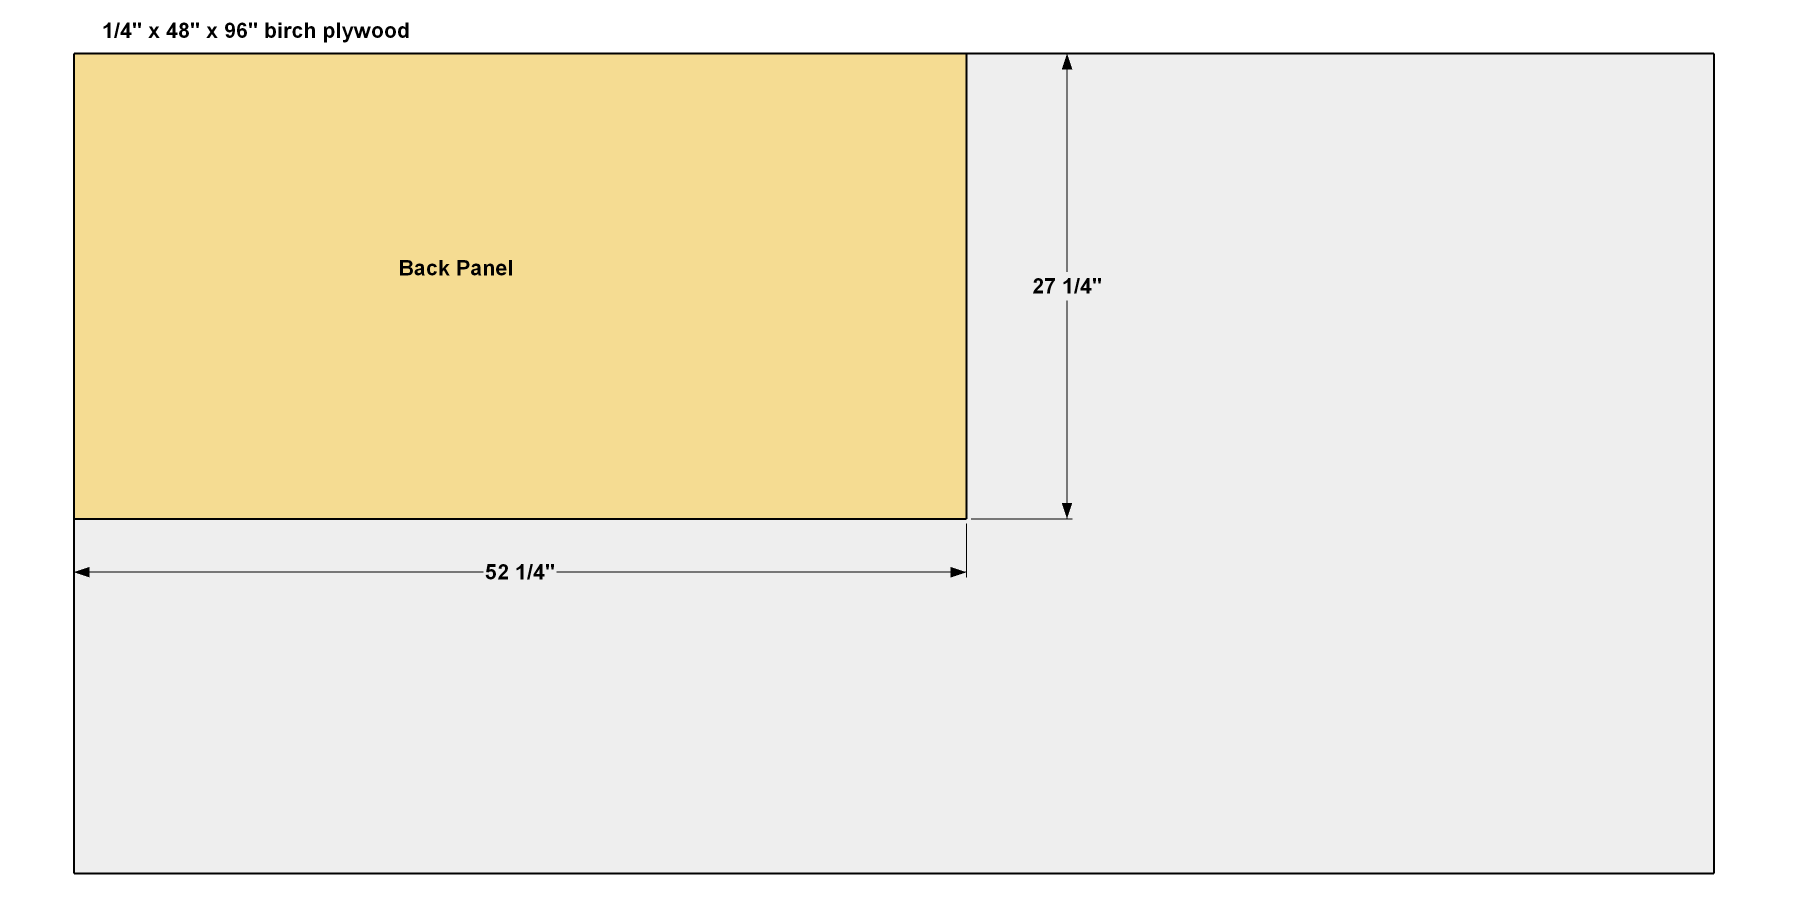
- 1 Back Panel , 1/4" x 27 1/4" x 52 1/2"
Directions
-
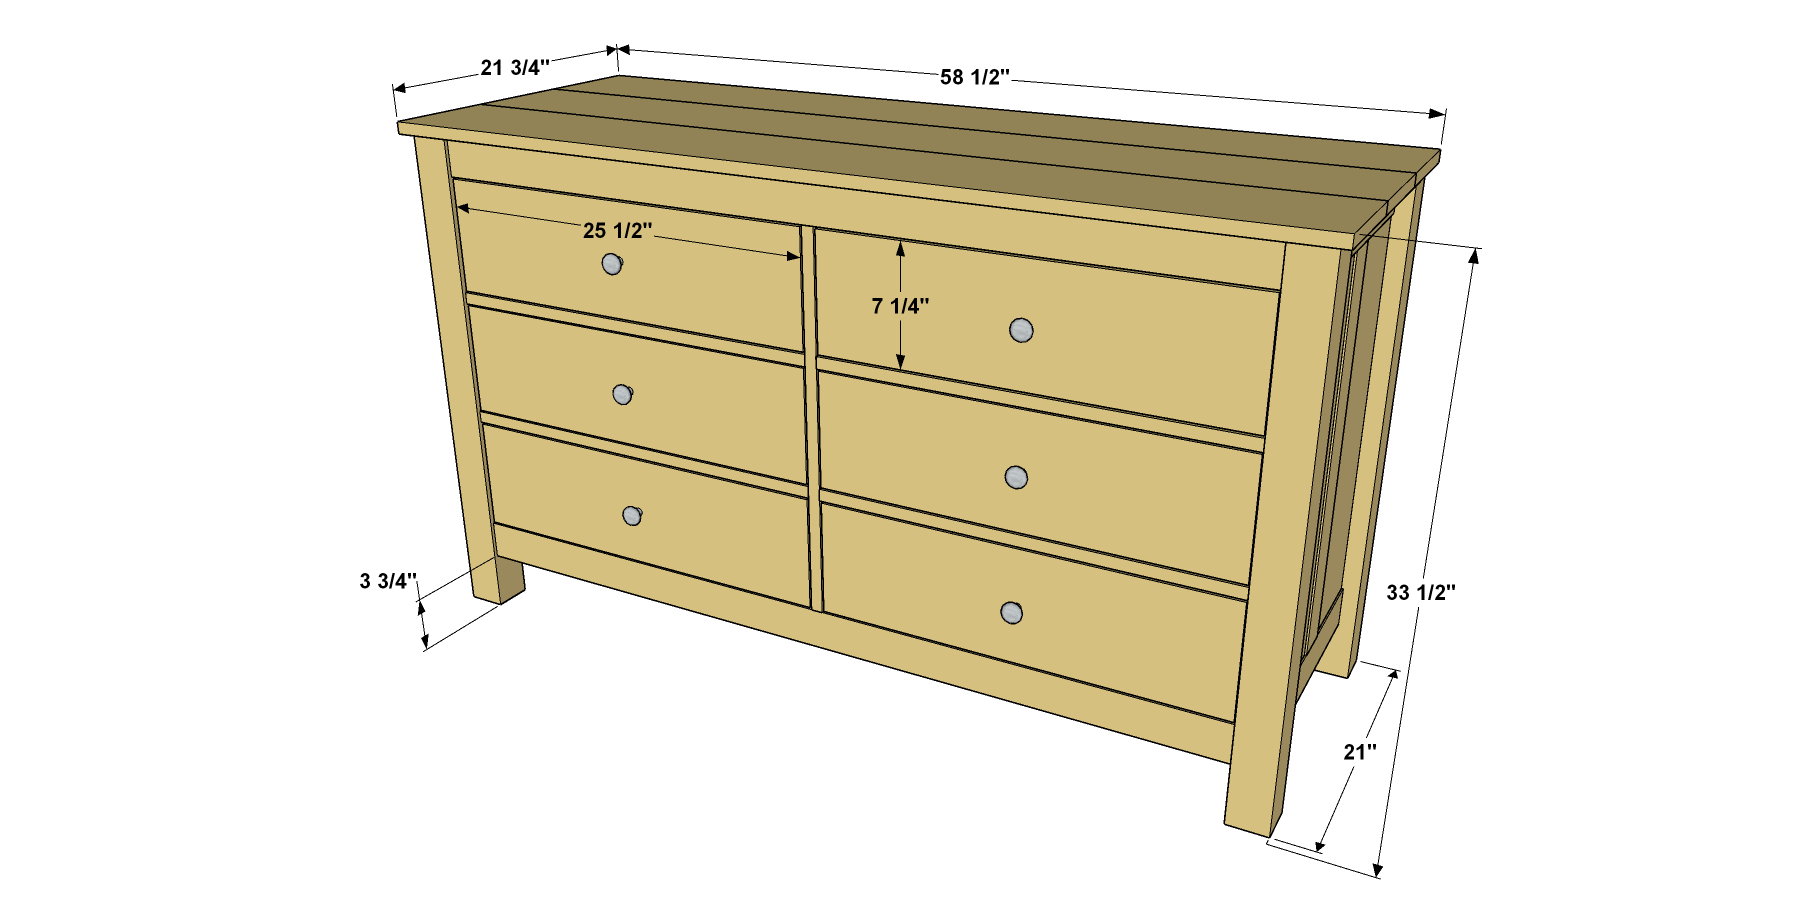
Look Over the Materials and Step
Before you begin, take a good look at the project, as well as the materials list and cutting diagrams. The dresser has quite a few parts, so you’ll want to be sure you’re familiar with them and how they go together. You’ll also be using multiple materials: Oak boards and plywood are used for the parts that show. Poplar boards are used for pieces that won’t show because it’s less expensive than oak. Birch plywood is used for the dresser back and the drawer bottoms. The size and wood species of each piece is shown on the cutting diagrams. By the way, if you plan to paint your dresser instead of stain it, you could use poplar for all of the boards instead of oak.
-
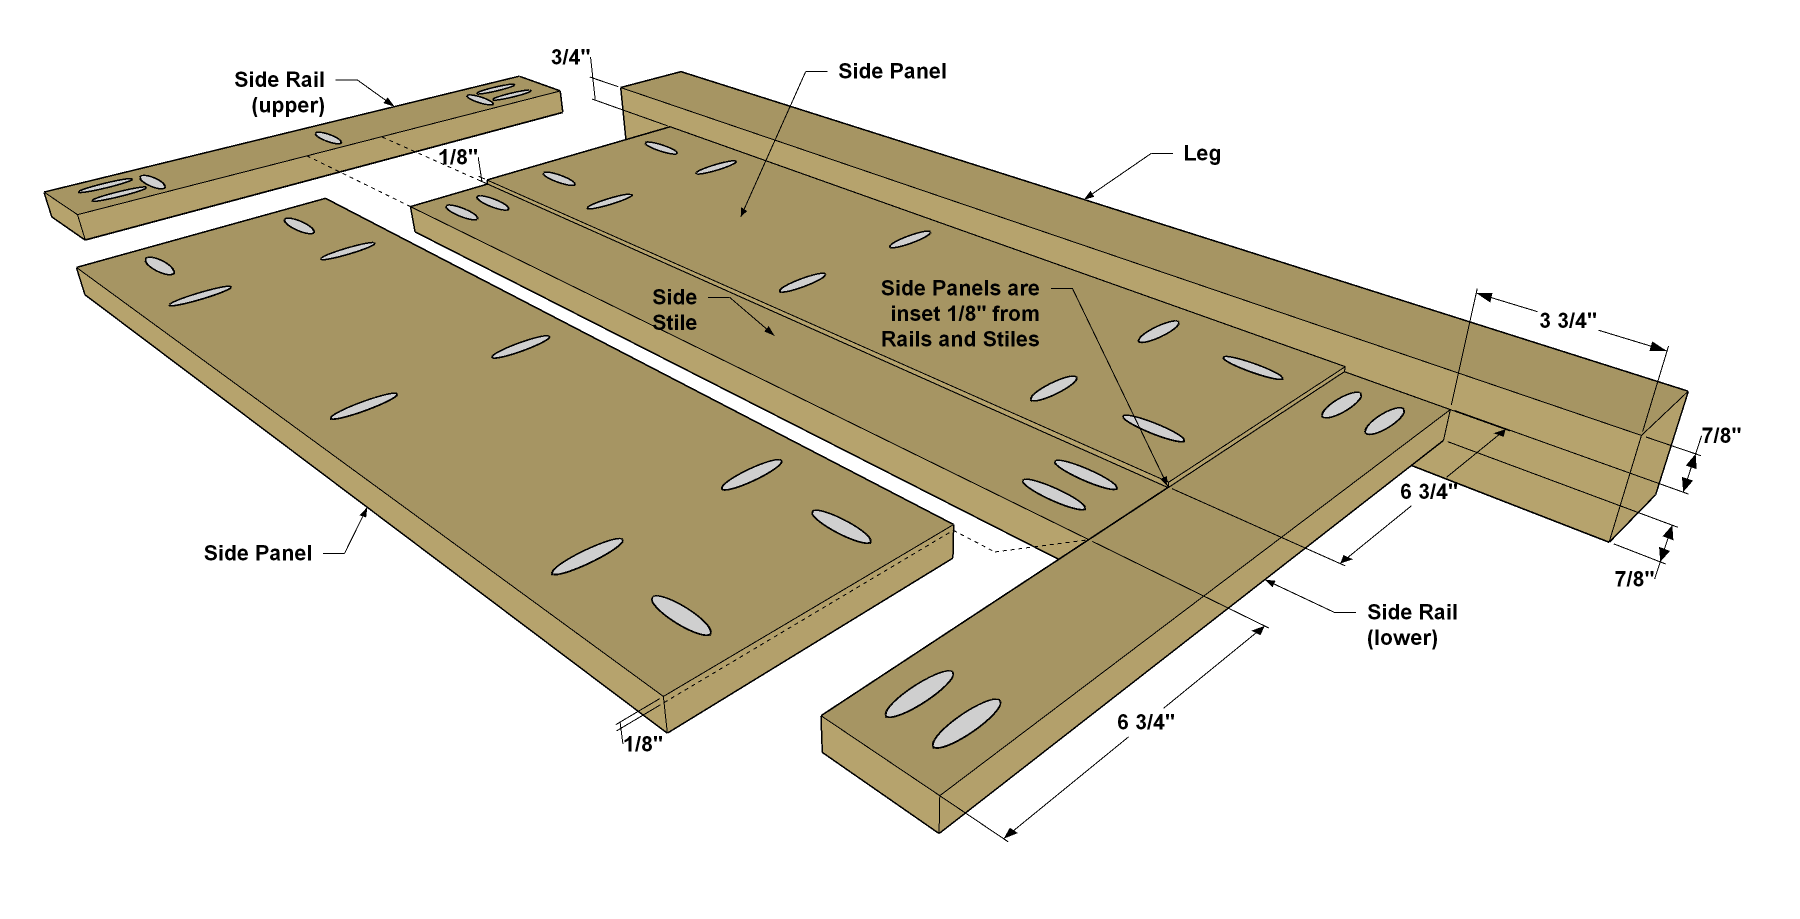
Make Legs, Side Rails, Side Stiles
Cut four Legs to length from 3x3 oak boards, as shown in the cutting diagram. Sand the Legs smooth, and then set them aside for now. From 1x3 oak boards, cut two Side Stiles to length, as shown in the cutting diagram. Set your Kreg Jig for 3/4"-thick material, and then drill pocket holes in each of the parts where shown. Now cut four Side Rails, and then drill pocket holes in them, as well. Note that you’ll make two lower Side Rails and two upper Side Rails that have pocket holes in different locations. Sand the faces smooth.
-
Make the Side Panels
Cut four Side Panels to size from 3/4" thick oak plywood as shown in the cut diagram. Drill pocket holes in each panel (on the inside face) at the locations shown. Sand the faces of the panels, as needed.
-
Assemble the Sides
Center one Side Stile on one lower Side Rail, as shown, and then secure it to the Rail using 1 1/4" fine-thread Kreg Screws. Next, position the first Side Panel. You’ll see that the panel is set 1/8" inboard (toward the inside of the dresser) to create the small reveal on the outer face. So, you need to position the Side Panel so the inside face sits 1/8" above of the Rail and Stile faces. Screw the Side Panel to the Stile and Rail. Repeat the process to attach the second Side Panel, and then attach the upper Side Rail, making sure the pocket holes are oriented correctly for attaching the dresser top later. Finally, attach the Legs to the Rails and Side Panels using 1 1/4" fine-thread Kreg Screws. Repeat to create another side assembly.
-
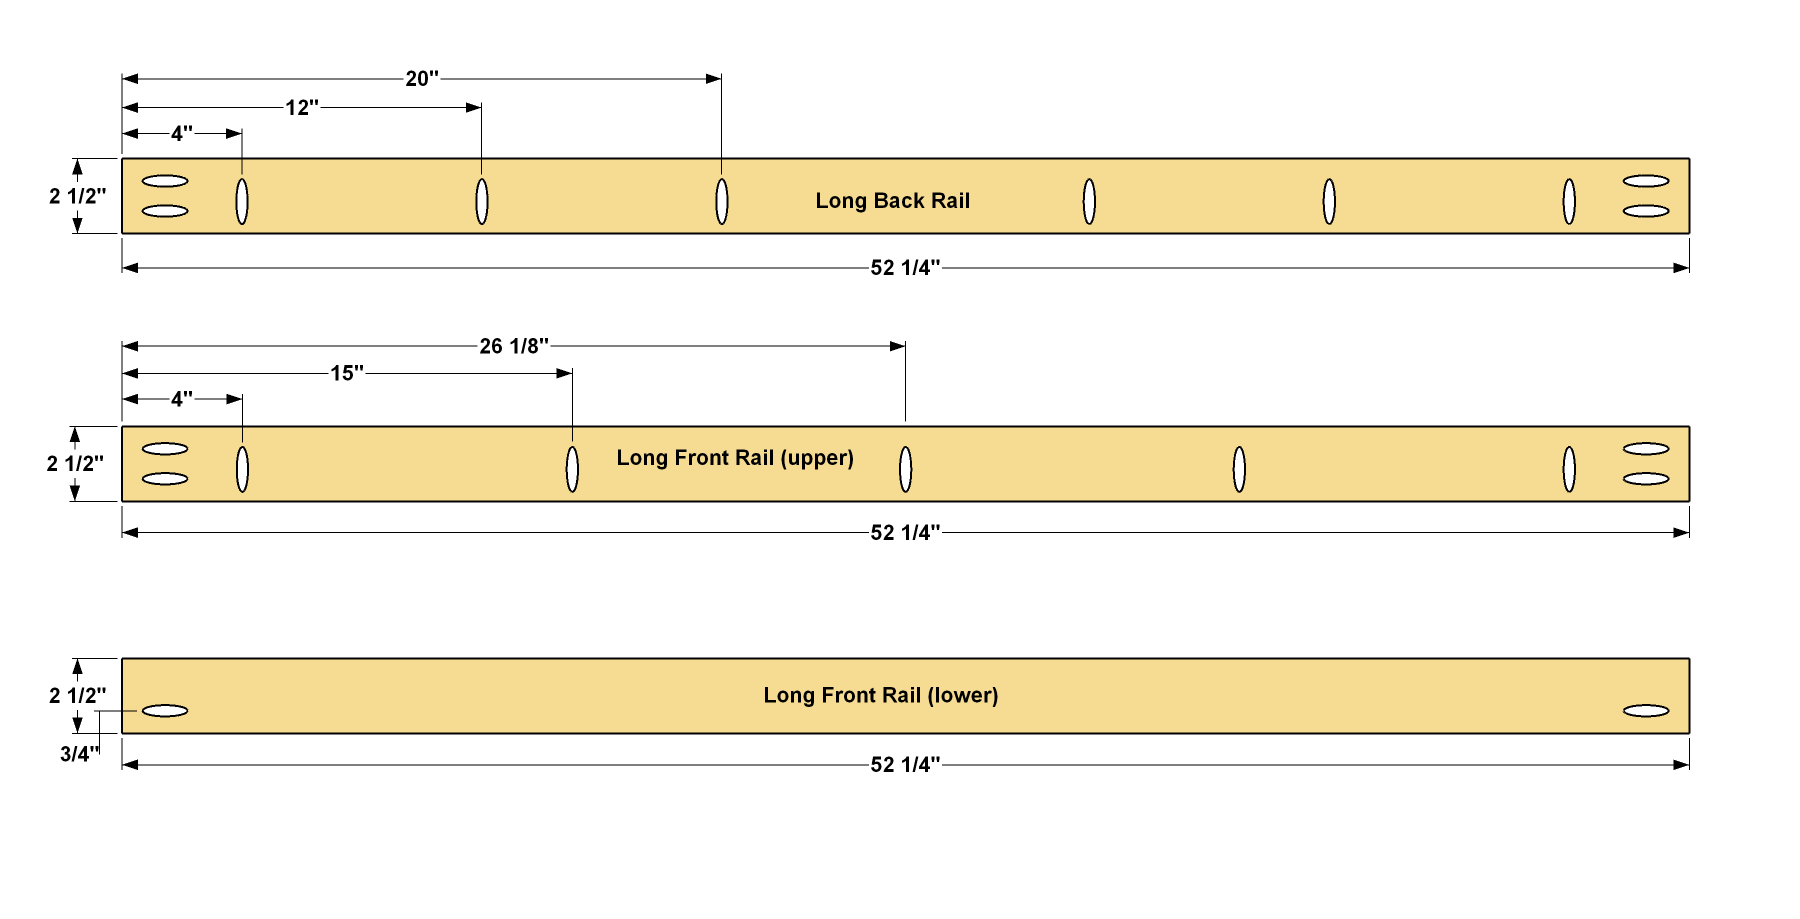
Make the Long Rails
Cut two Long Front Rails to length form 1x3 oak boards, as shown in the cutting diagram. Then drill pocket holes in them, as shown. Note that you’ll me making an upper and a lower Long Front Rail with pocket holes in different positions. Also cut one Long Back Rail to length from a 1x3 poplar board, as shown. This back rail can be made from poplar because it won’t show. Then drill pocket holes in this Long Back Rail, as well. Sand the Rails smooth.
-
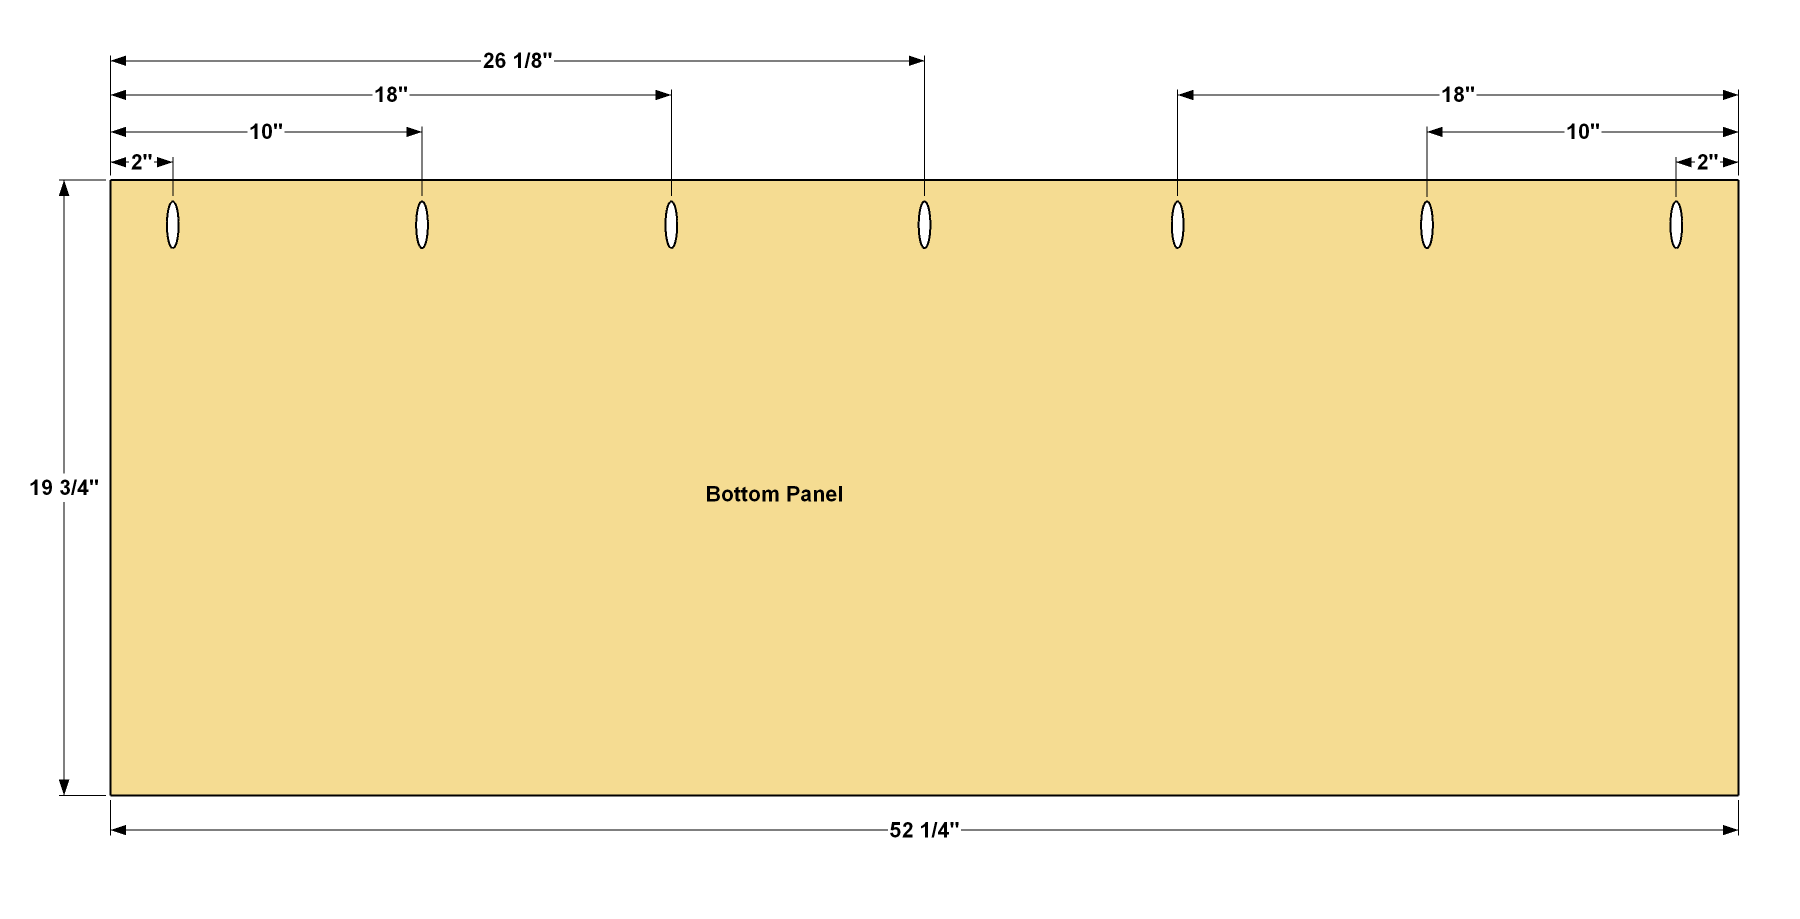
Make the Bottom Panel
Cut the Bottom Panel to size from 3/4" oak plywood, as shown in the cut diagram. Drill pocket holes at the locations shown. Sand the faces smooth, as needed.
-
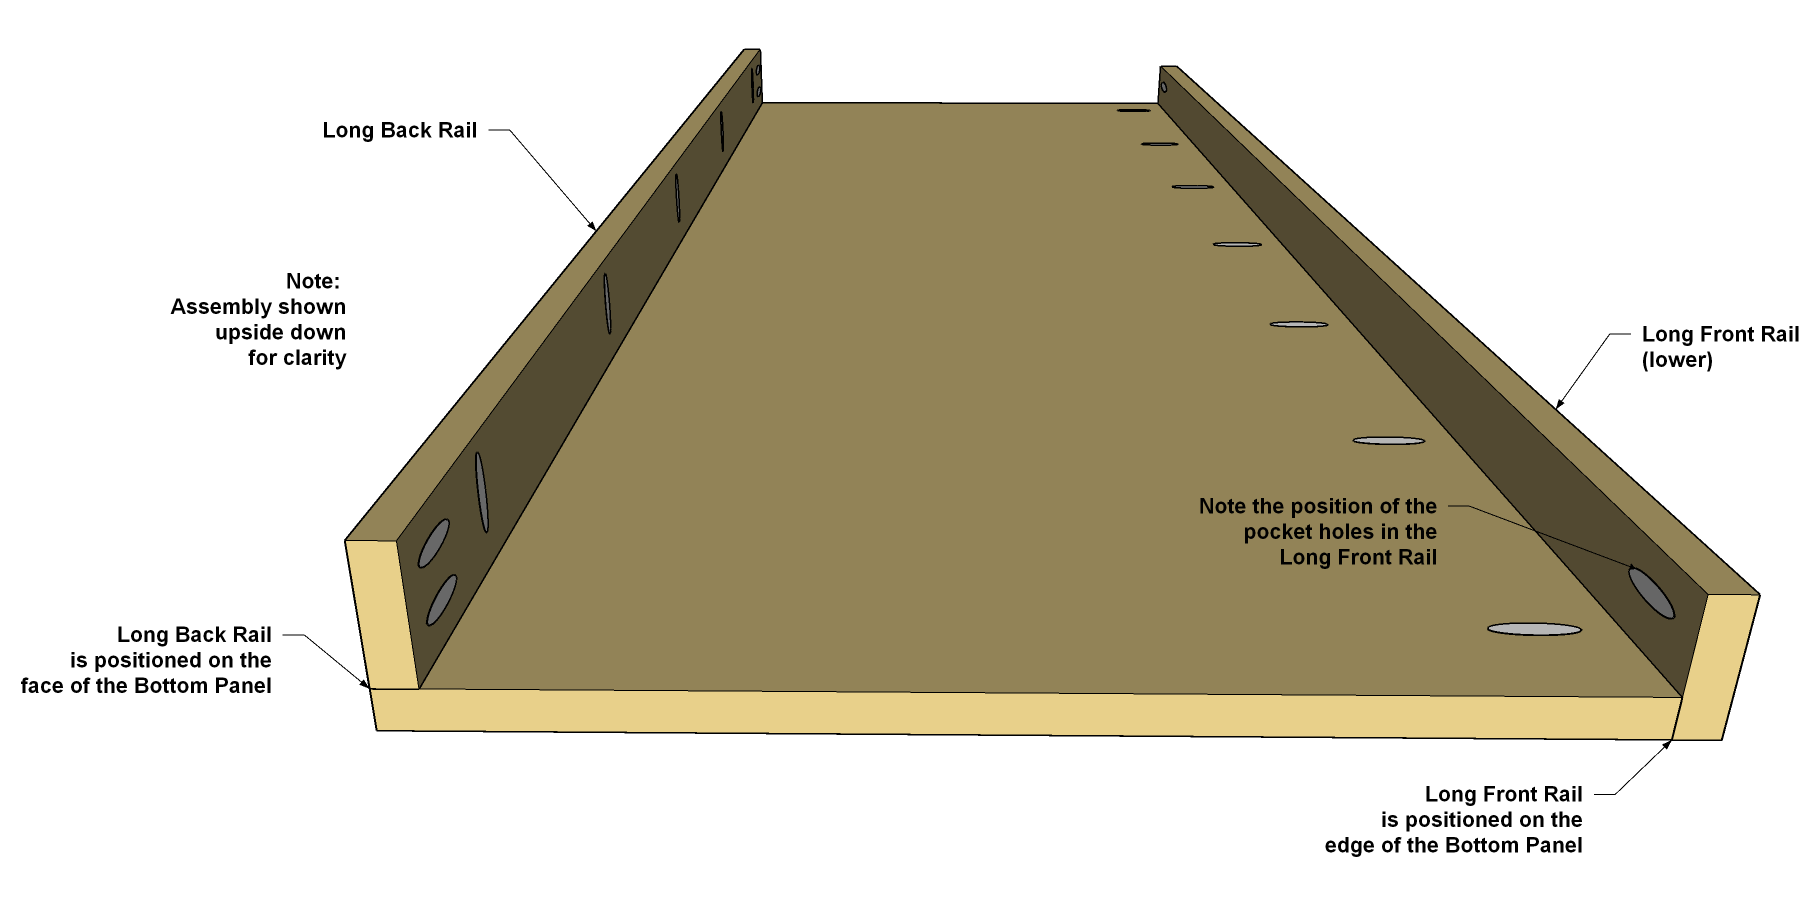
Attach Rails to the Bottom Panel
Attach the lower Long Rail to the front edge of the Bottom Panel, as shown. Secure it with 1 1/4" fine-thread Kreg Screws. Then attach the Long Back Rail (the one made of poplar) to the underside of the Bottom Panel as shown.
-
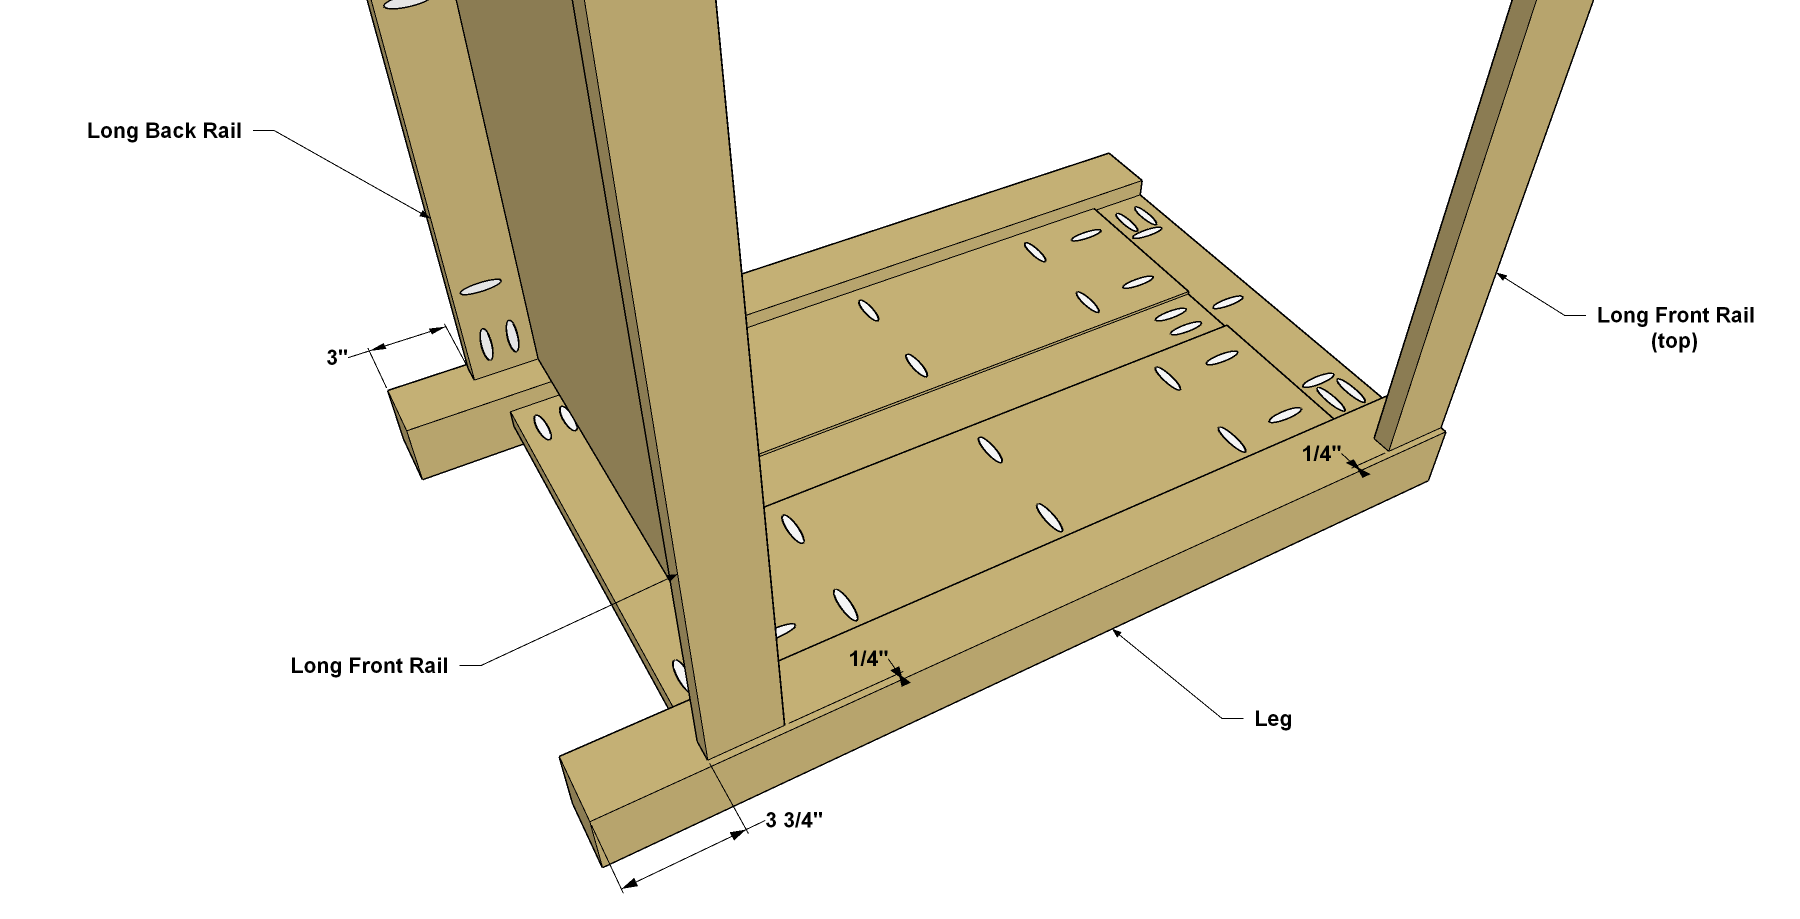
Attach the Bottom to the Sides
Set one Side assembly flat on a work surface with the inside face up. Position the bottom panel assembly as shown. Secure the Long Back Rail and the lower Long Front Rail to the Legs with 1 1/4" fine-thread Kreg Screws. Then place the upper Long Front Rail in position so it’s flush with the top of the Legs, as shown. Secure this Rail using 1 1/4" fine-thread Kreg Screws, as well. Flip the assembly over and repeat the process for the other side.
-
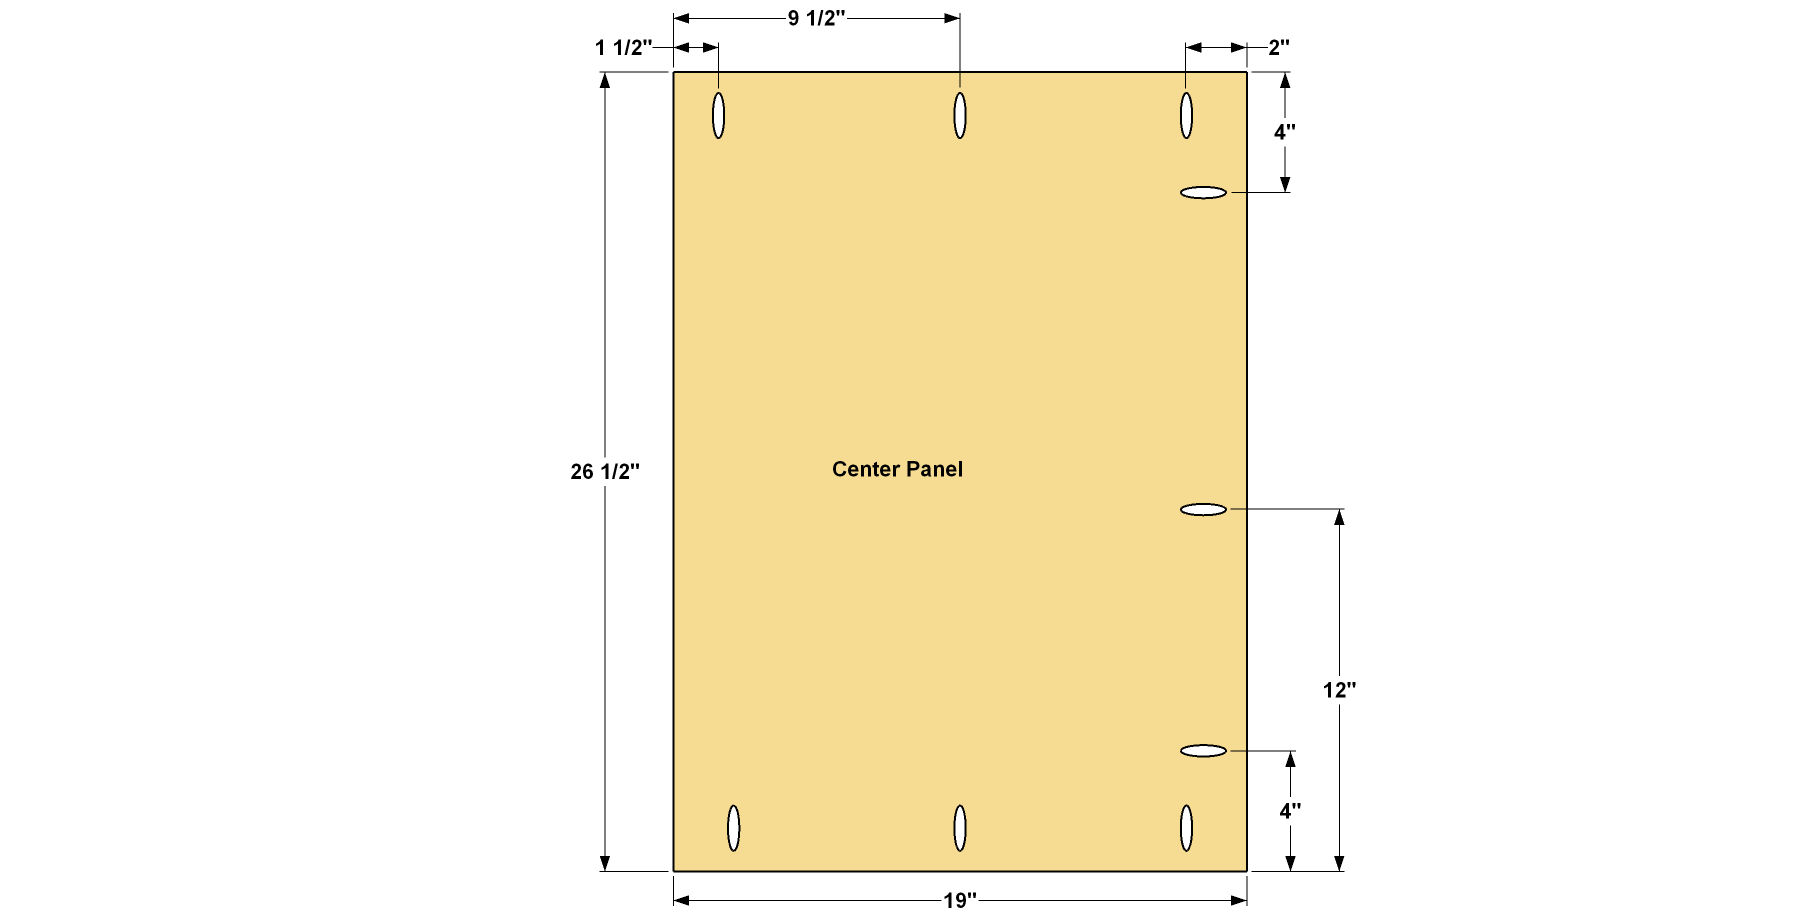
Make the Center Panel
Cut one Center Panel to size from 3/4"-thick oak plywood, as shown in the cutting diagram. Drill pocket holes at the locations shown. Sand the panel faces smooth as needed.
-
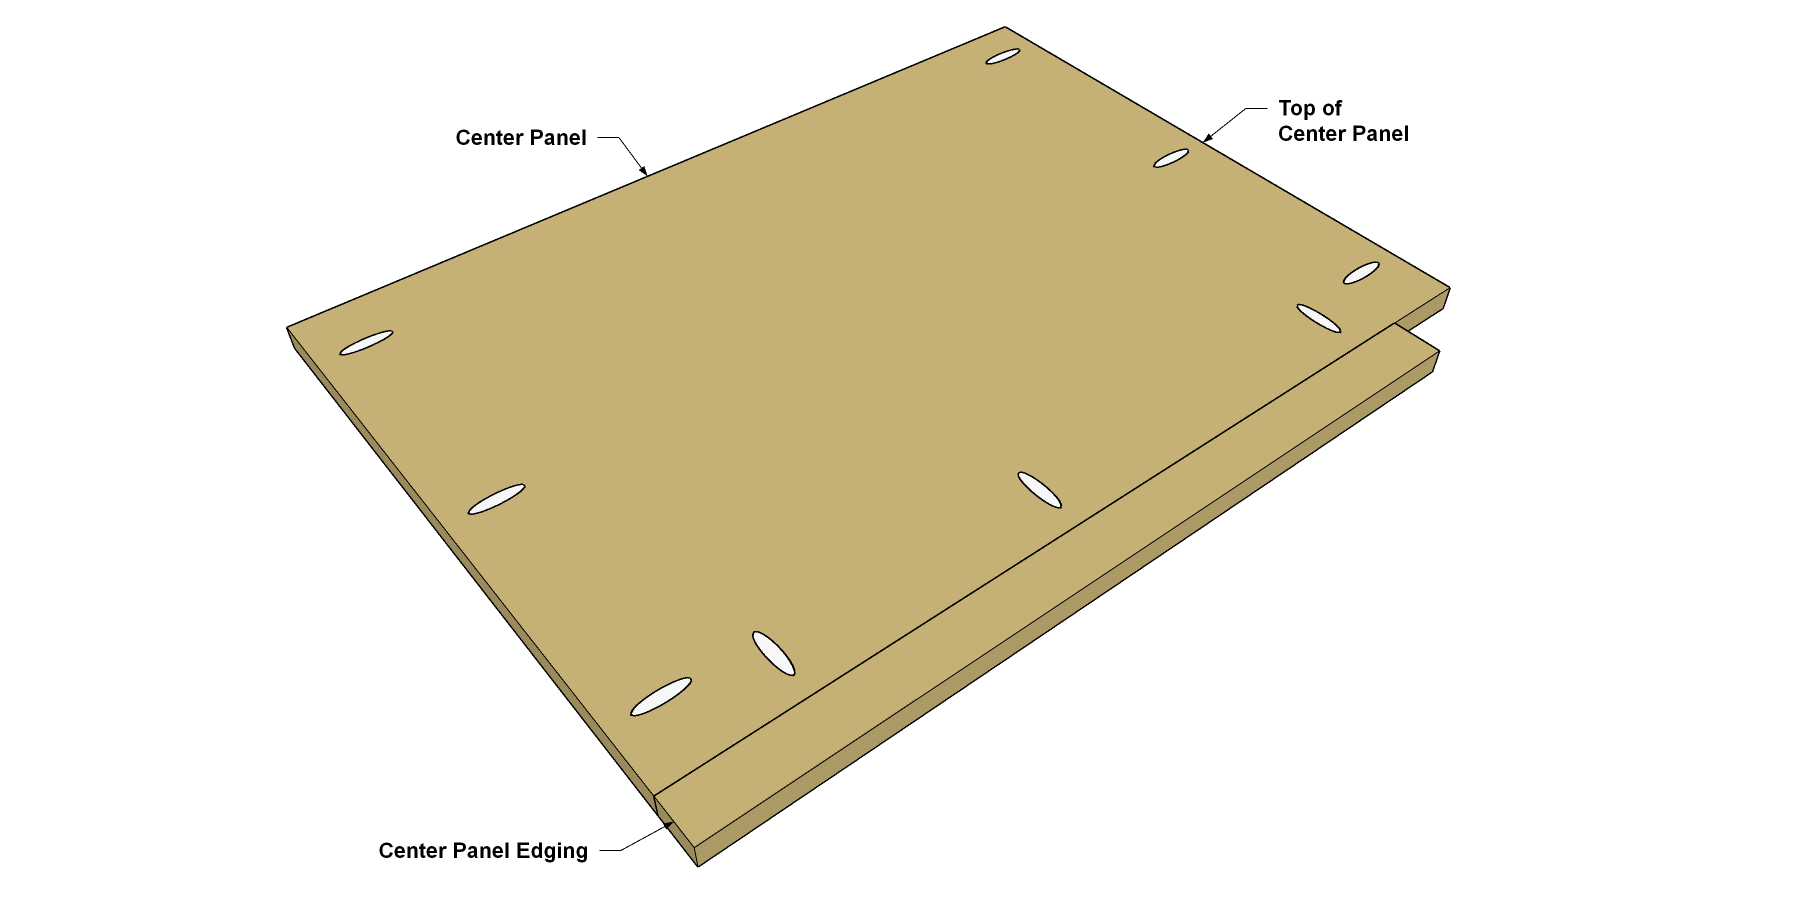
Add Edging to the Center Panel
From a 1x2 oak board, cut the Center Panel Edging to length, as shown in the cutting diagram. Sand the faces smooth. Position the Edging on the Center Panel, as shown, and then secure it with 1 1/4" fine-thread Kreg Screws.
-
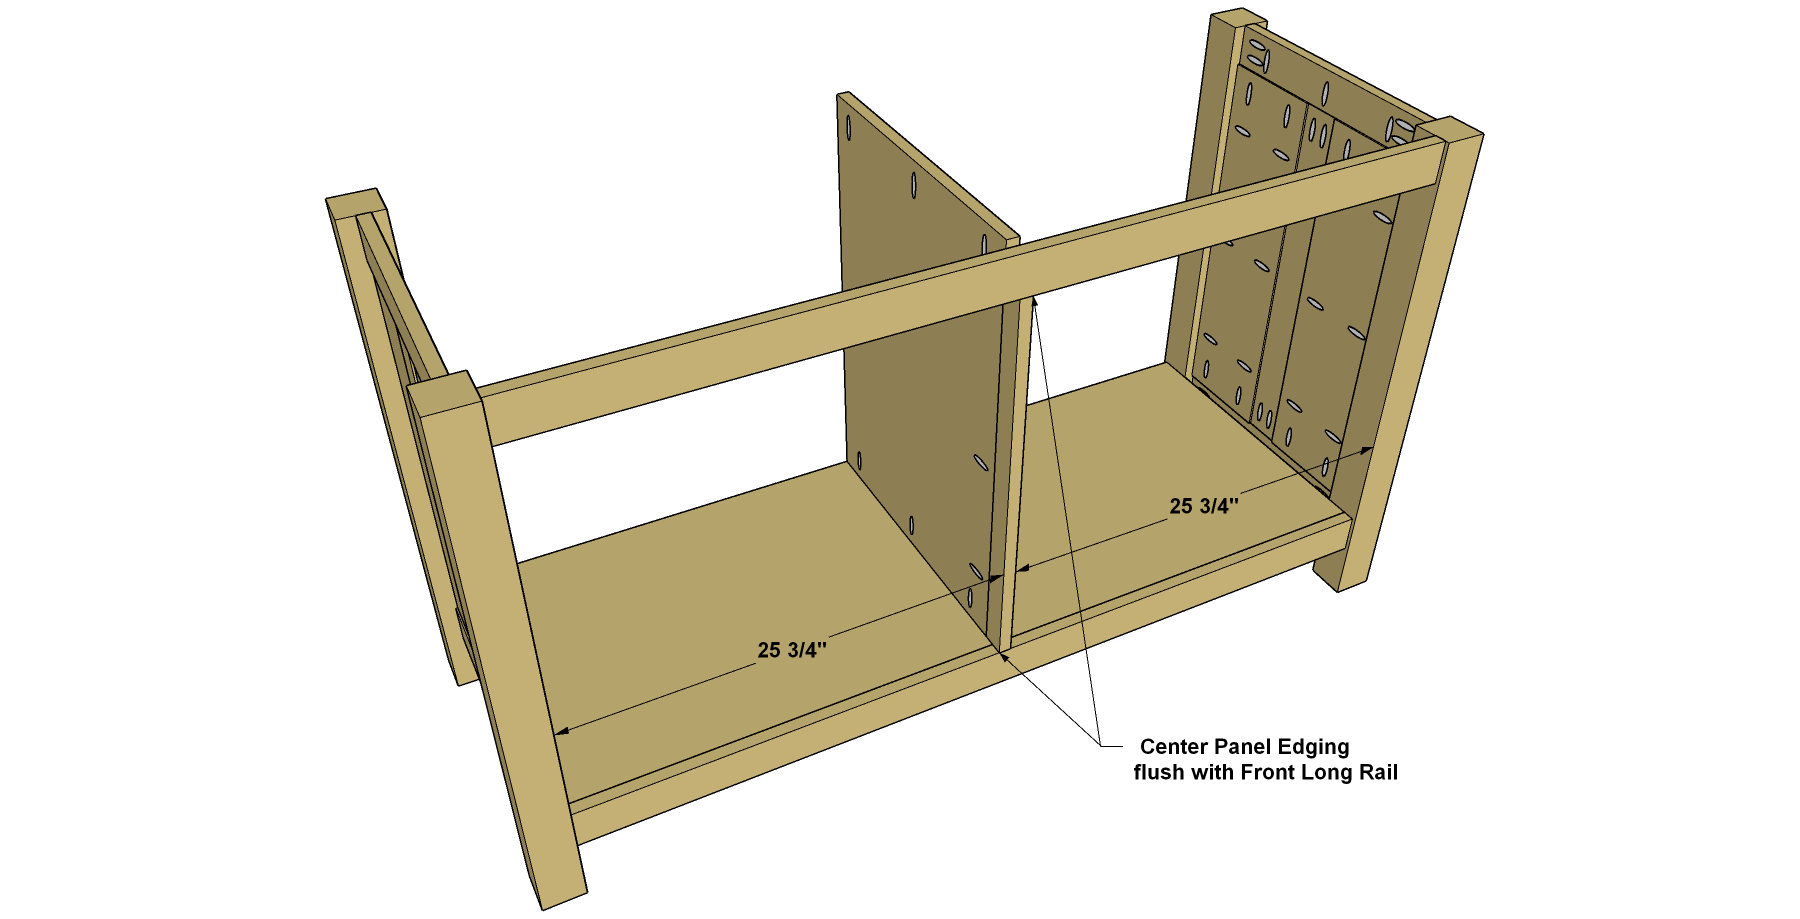
Install the Center Panel
Position the Center Panel in the dresser case you started assembling, making sure that it’s centered, and that it’s standing straight and square to the bottom panel, as shown. Then secure the Center Panel to the Bottom Panel with 1 1/4" fine-thread Kreg Screws. The divider will get fully secured when you add the Drawer Dividers in the next steps.
-
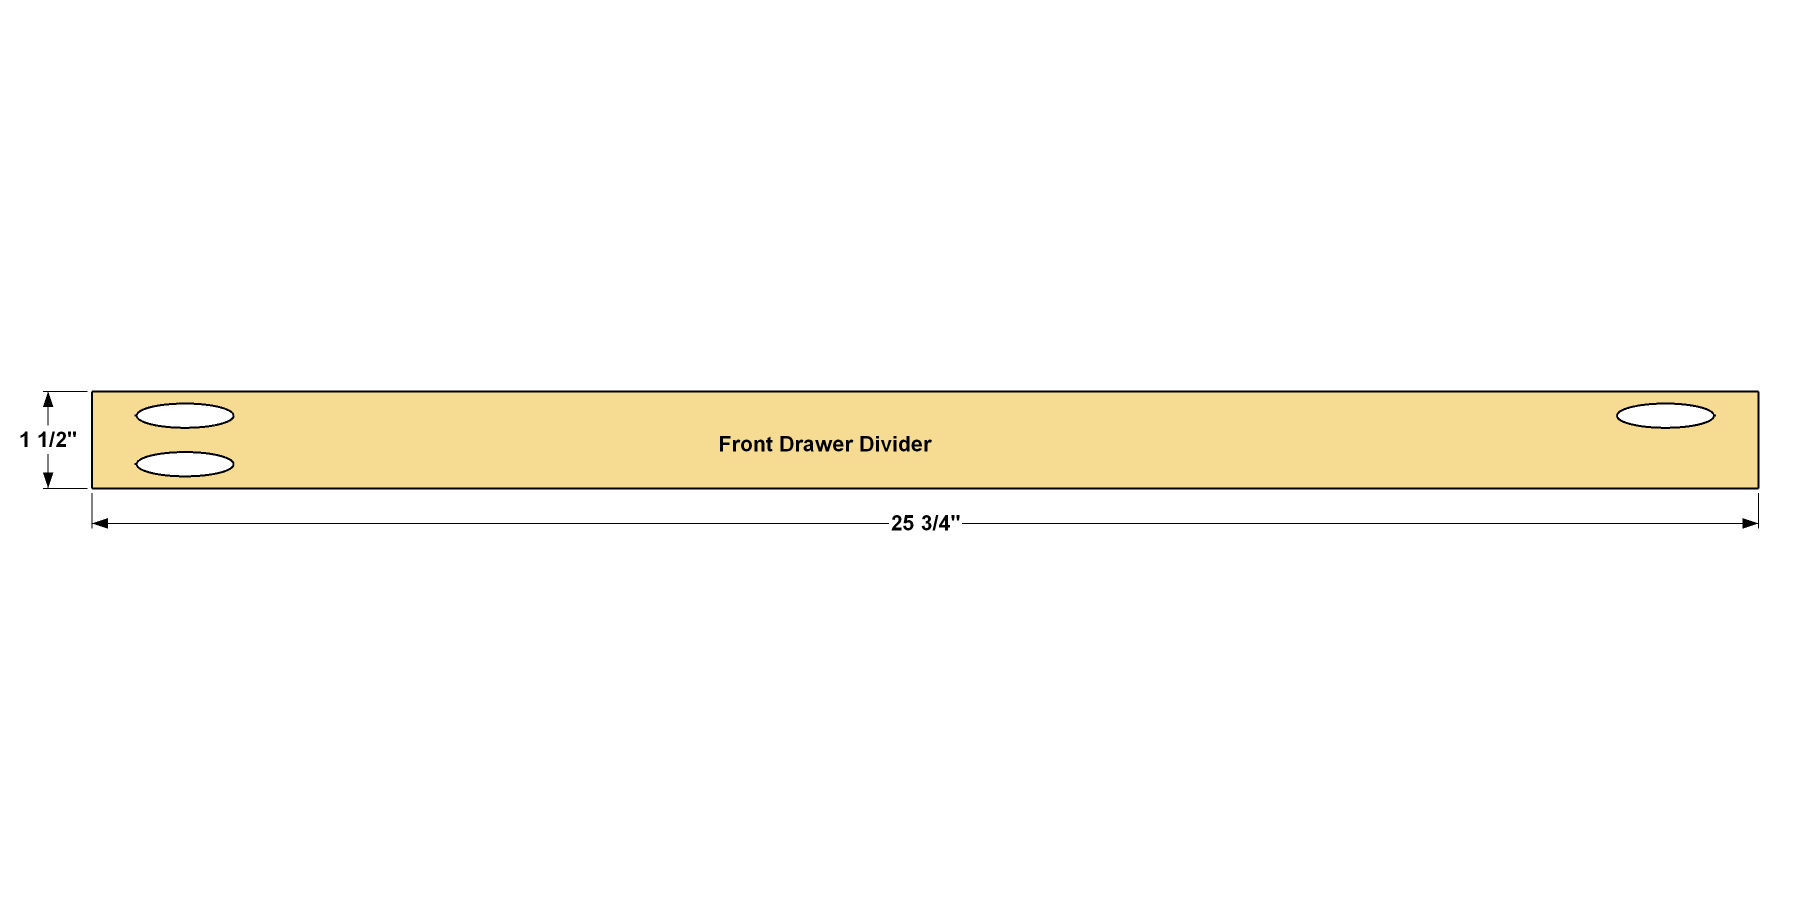
Make the Front Drawer Dividers
Cut four Drawer Dividers to size from a 1x2 oak boards, as shown in the cutting diagram. Drill pocket holes at the locations shown. Note there is single pocket hole on the one end of each Divider, and two pocket holes on the other end. After you drill the pocket holes, sand the parts smooth.
-
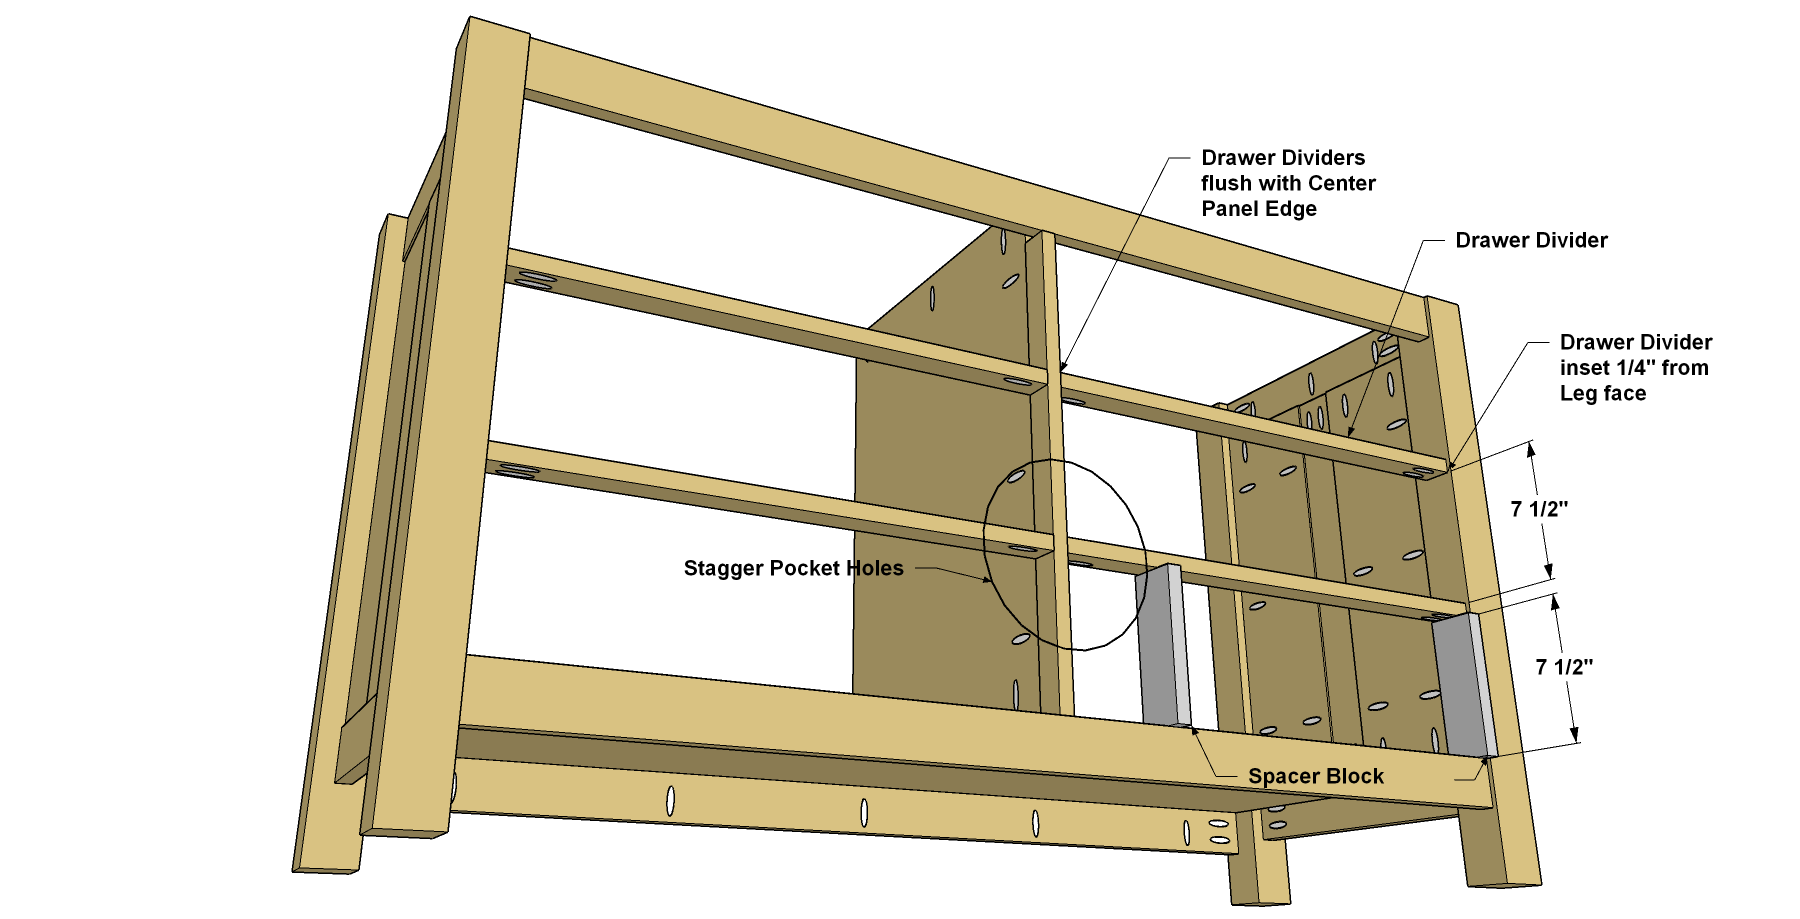
Install the Drawer Dividers
Use scrap wood to make a couple of 7 1/2"-long spacers, as shown, that you can use to hold the Drawer Dividers in place as you attach them. Then, start at the bottom and, working up, attach each divider so that the end with two pocket holes is against the Leg. Then attach the Dividers with 1 1/4" fine-thread Kreg Screws. Because the end that attaches to the Center Edging only has one hole, and those holes are offset, you don’t have to worry about the screws running into one another.
-
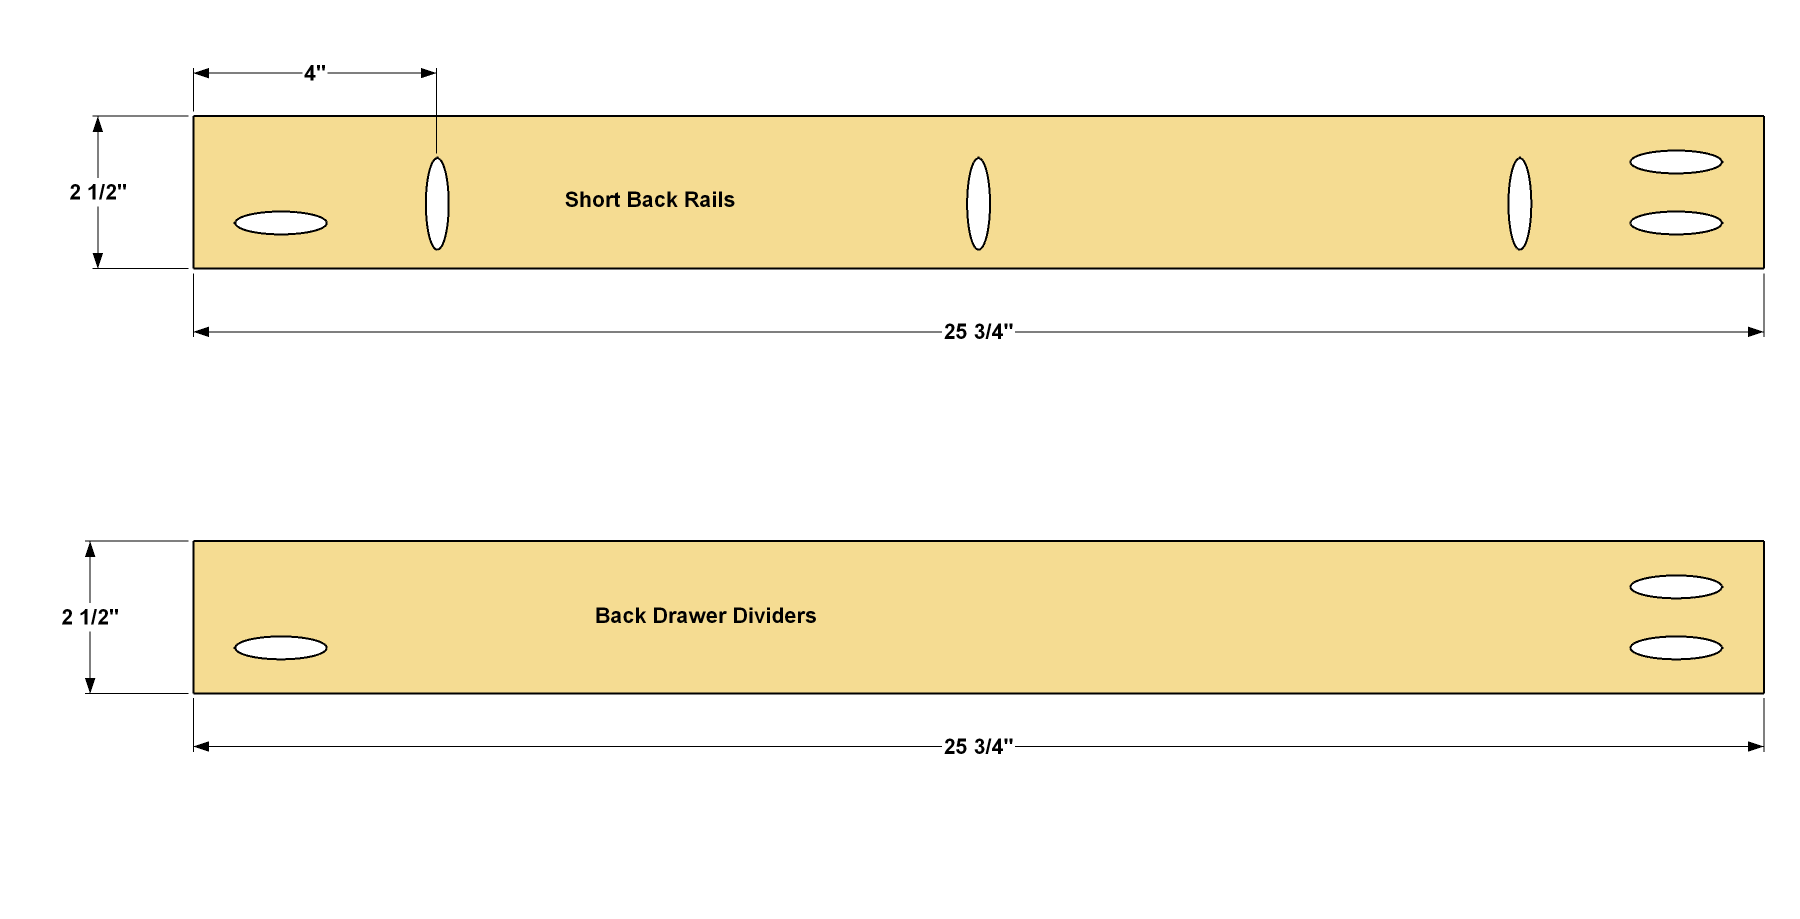
Make Back Dividers and Rails
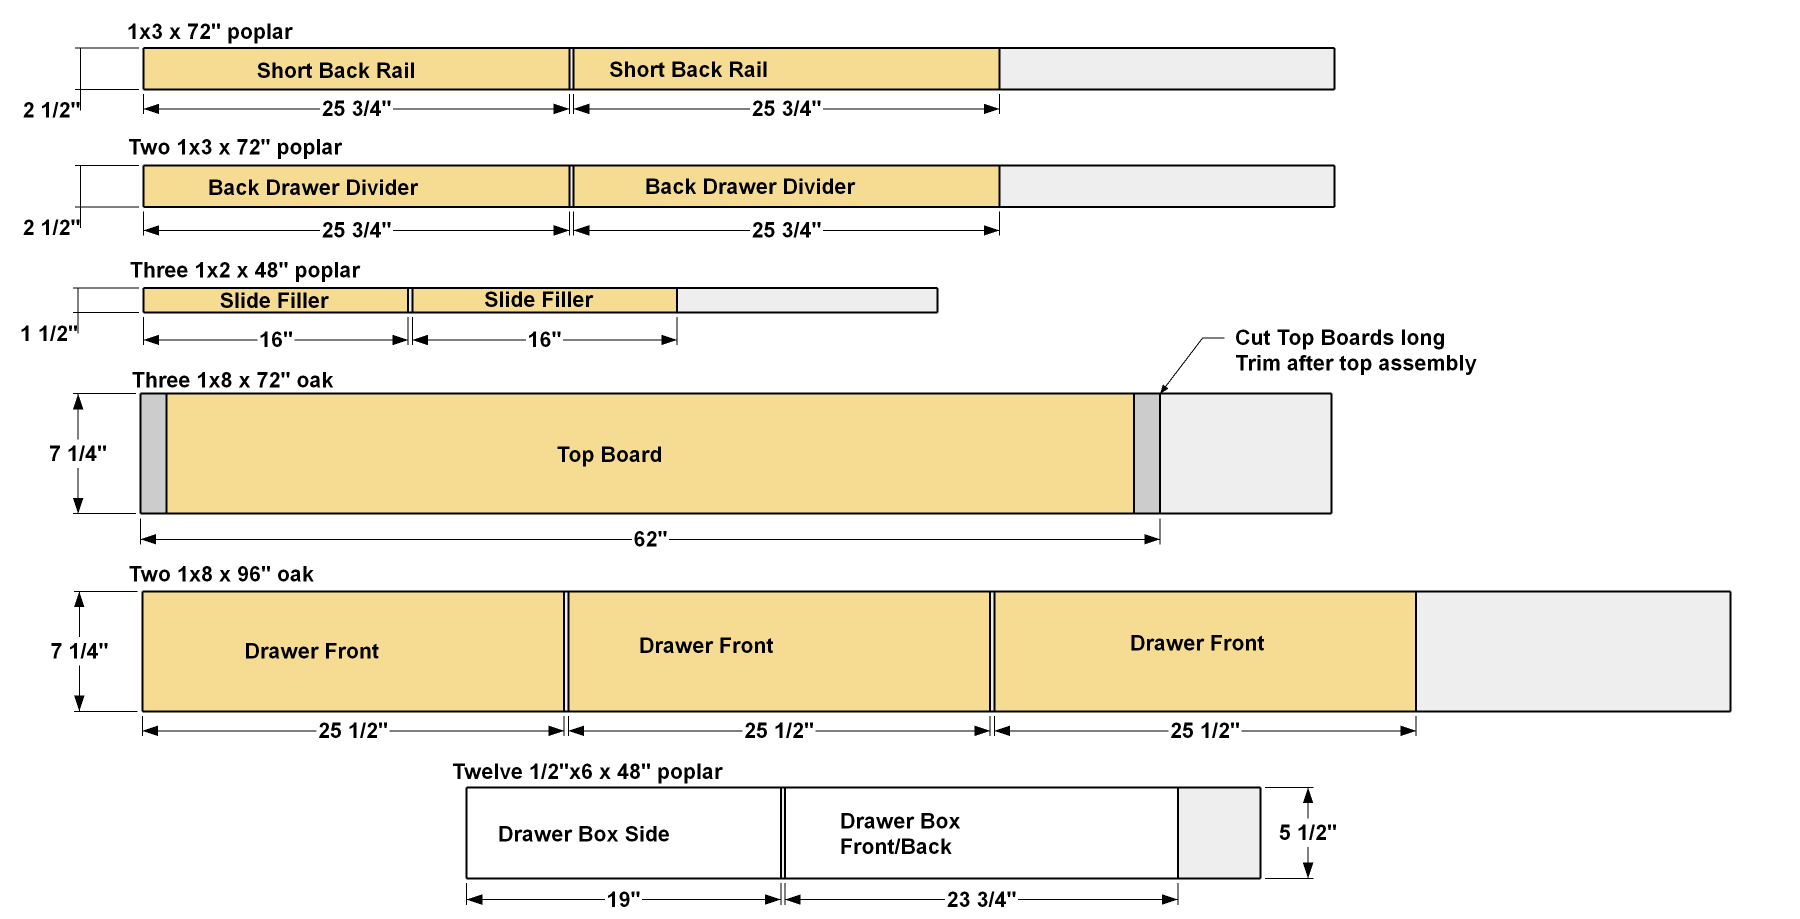
Cut four Back Drawer Dividers and two Short Back Rails to length from 1x3 poplar boards, as shown in the cut diagram. Drill Pocket holes in each of the parts at the locations shown. Once again, these have two holes at one end and one at the other so that the screws won’t hit during installation. After you drill the pocket holes, sand the parts smooth.
-
Install the Back Dividers and Rails
Position the Back Drawer Dividers with the same scrap spacers you used for the front Dividers, and then secure each one with 1 1/4" fine-thread Kreg Screws. Then position the Short Back Rails, making sure that the pocket holes are oriented correctly for attaching the top later, and secure the Rails with Kreg Screws, as well.

-
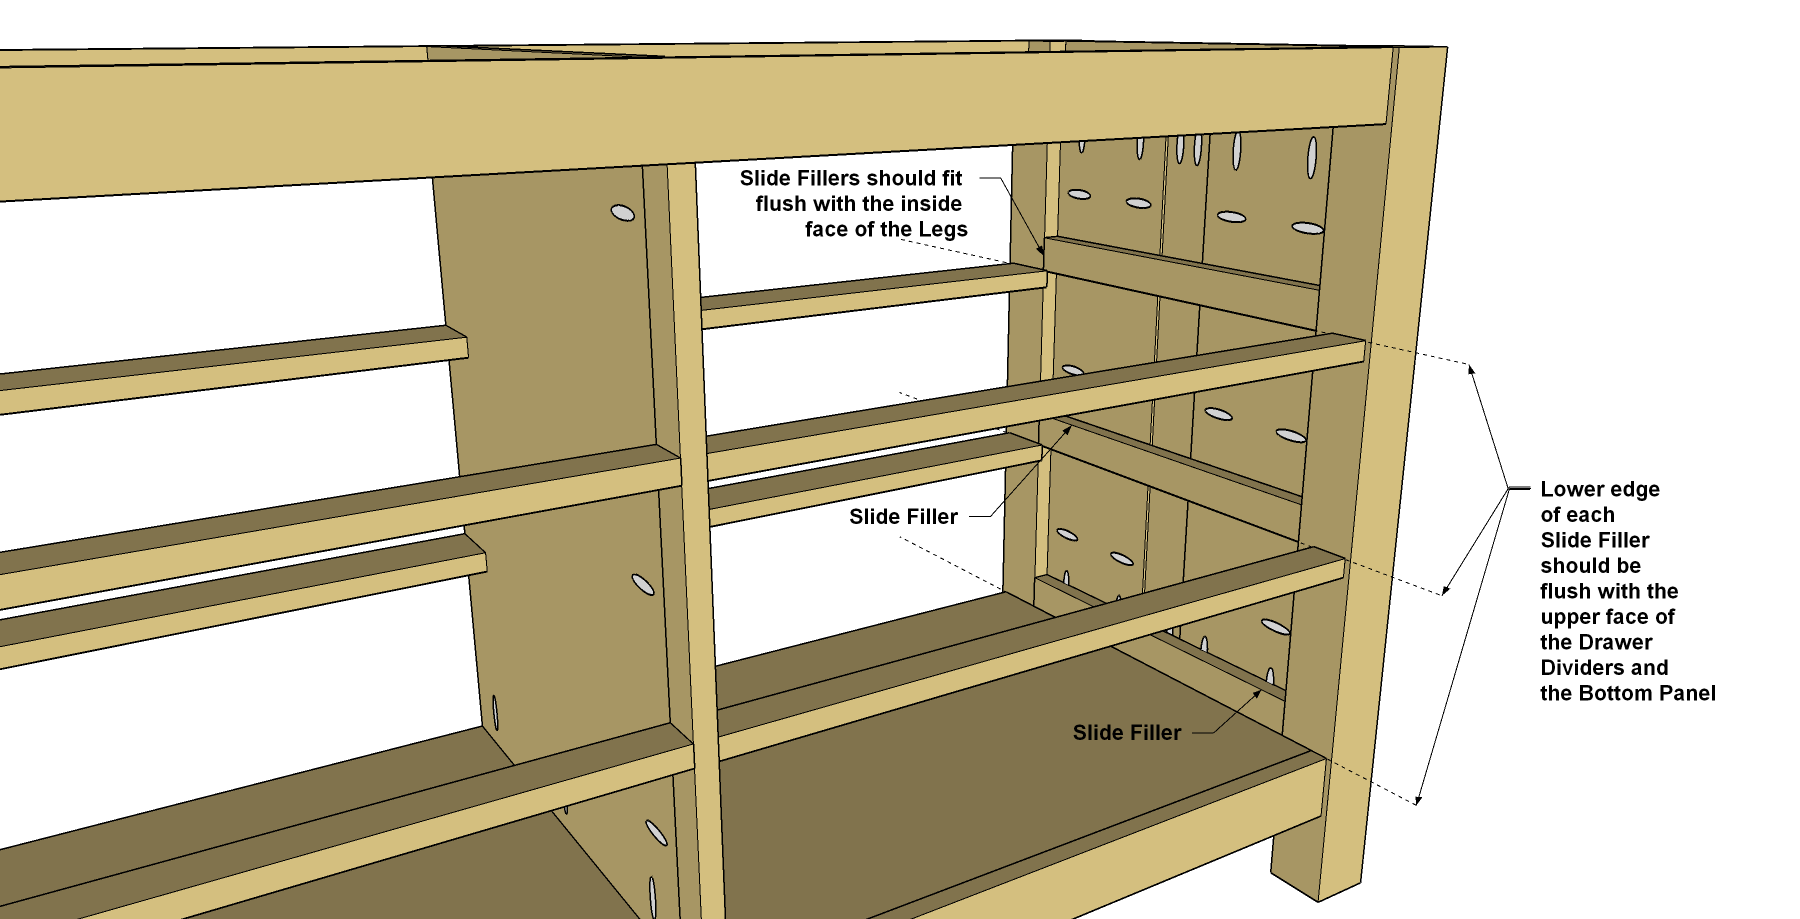
Add Drawer Slide Fillers
Cut six Drawer Slide fillers to length from 1x2 poplar boards, as shown in the cutting diagram. Apply glue to the back of each Slide Filler and set it in place against the Side Panel as shown. Tack the Fillers in place with 1 1/4" brad nails.
-
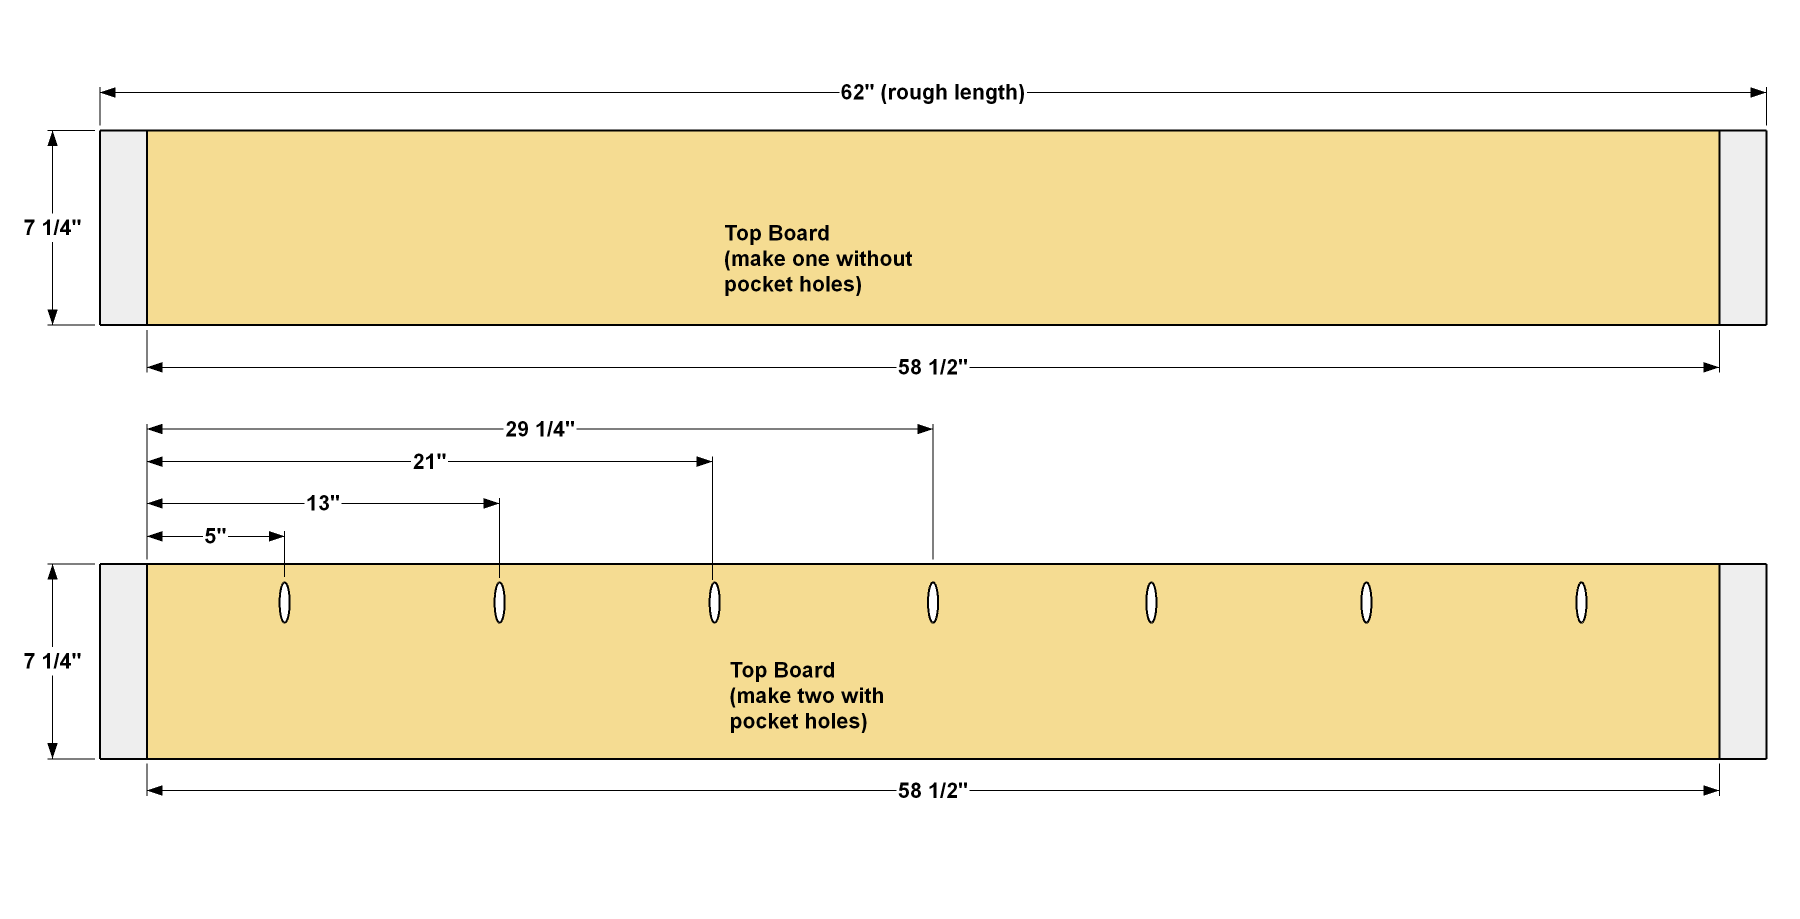
Make the Top Boards
Cut three Top boards to rough length—making them a few inches extra-long—from 1x8 oak boards, as shown in the cutting diagram. Drill pocket holes in two of the boards, and leave the third Top Board without holes.
-
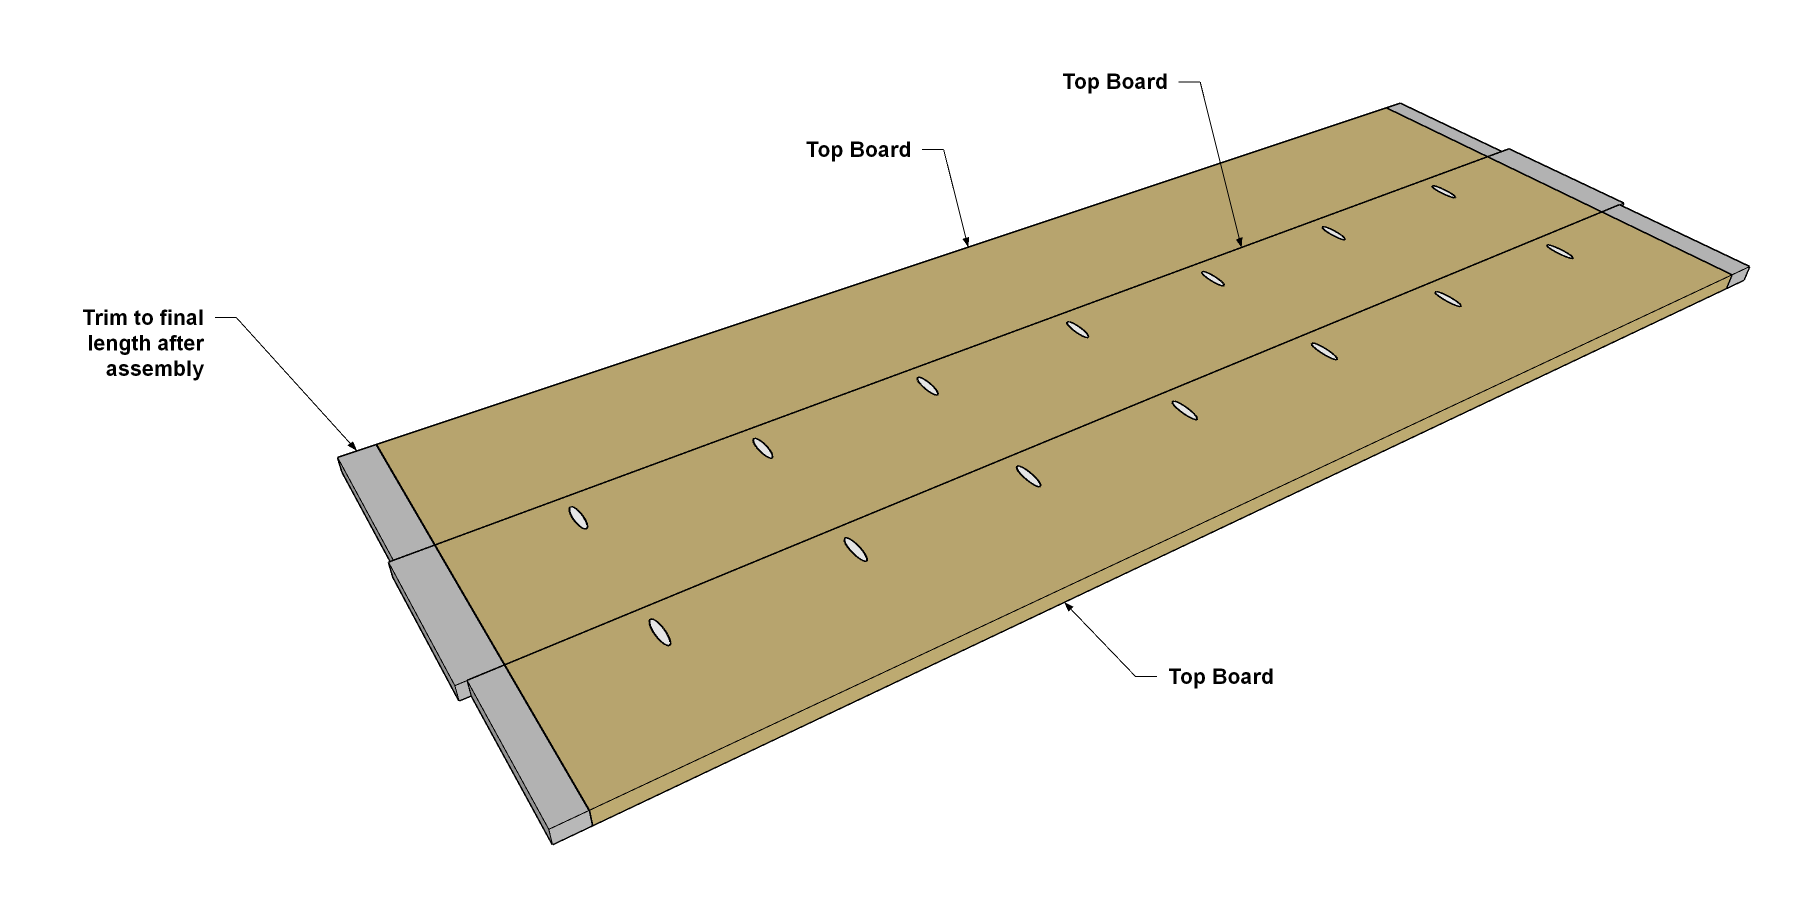
Assemble the Top
Apply glue to the edges of the boards and secure them together with 1 1/4" fine-thread Kreg Screws. Sand the Top flat and then trim each end to final length. To do this, mark a line across one end using a framing square, and then trim that end using a circular saw. Now measure the final length, mark the other end, and trim it.
-
Install the Top
Set the Top on the Case and adjust the position so it overhangs the legs equally on the front and sides of the dresser. Secure the Top to the case with 1 1/4" fine-thread Kreg Screws.

-
Cut the Drawer Parts
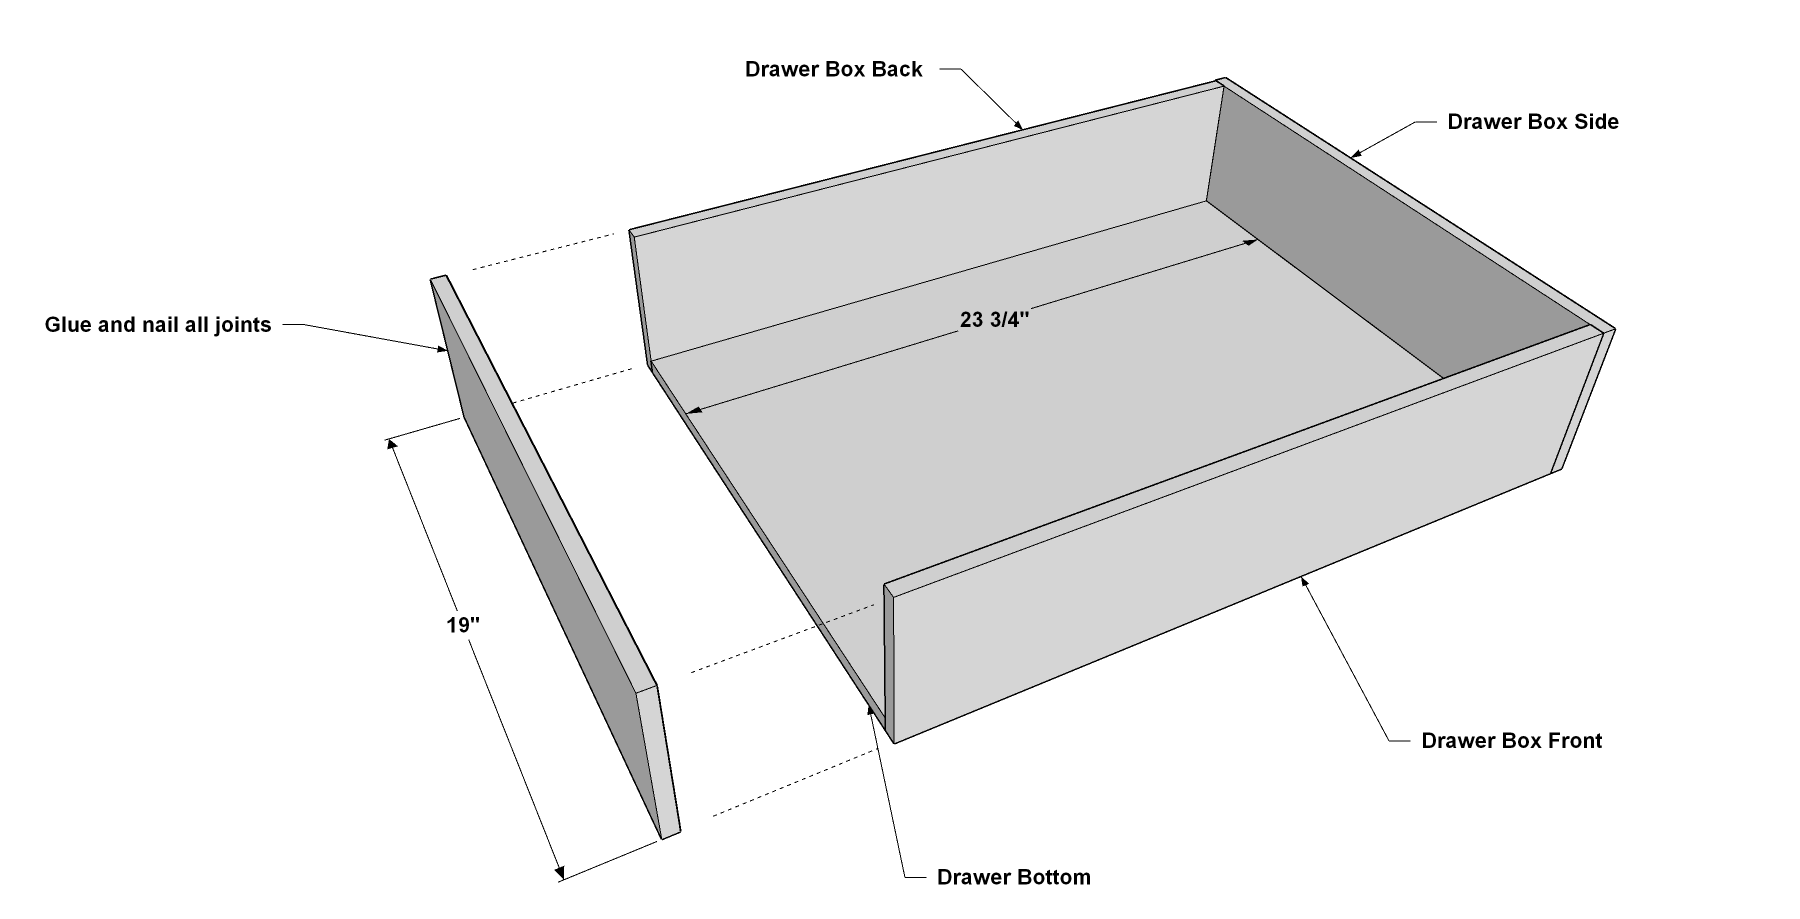
Cut 12 Drawer Sides and 12 Drawer Front/Backs to length from 1/2"x6 poplar boards, as shown in the cutting diagram. Then cut six Drawer Bottoms to size from 1/2" birch plywood, as shown in the cutting diagram. Sand the faces of the parts smooth.
-
Assemble the Drawers
Now you can assemble the drawers using glue and brad nails. A brad nailer works best for this. If you don’t have access to one, you can rent one inexpensively. Apply glue to the ends of the Drawer Front and Drawer Back, and to the edges of the Drawer bottom. Then clamp the drawer box assembly together and drive in 1" brad nails to secure the parts.
-
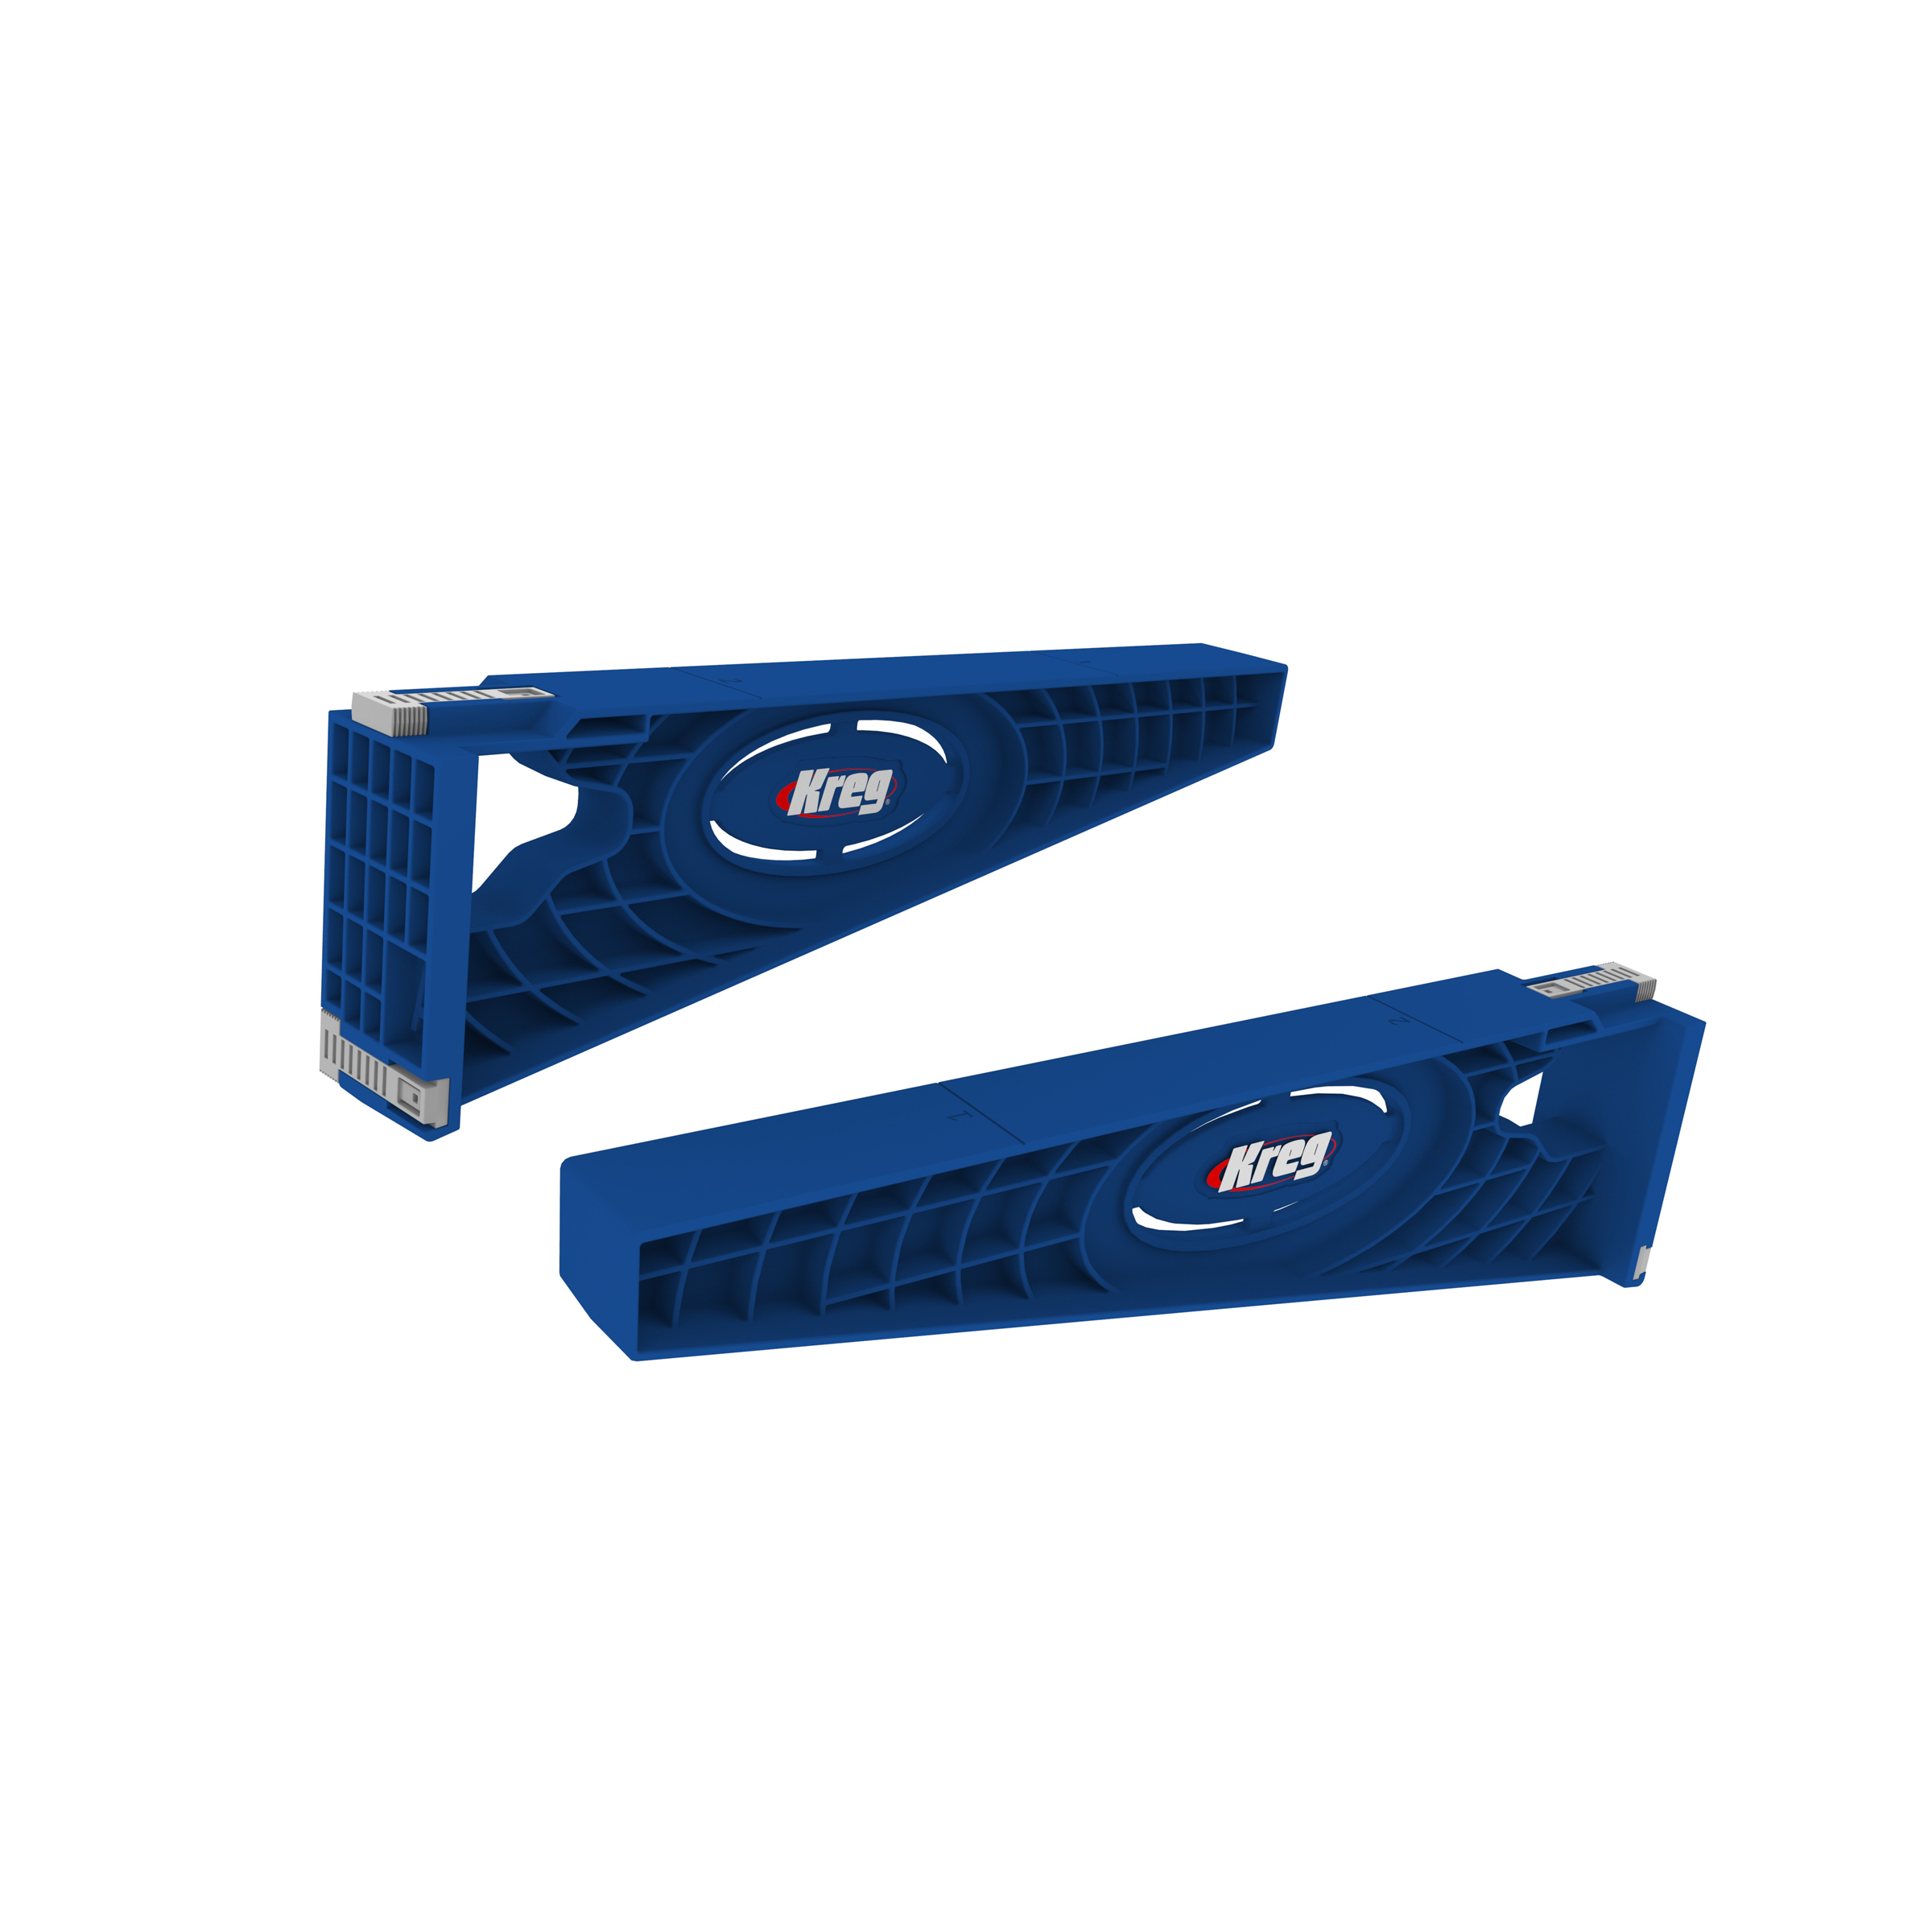
Install the Drawers
Now you can install the drawer boxes. They’re designed to be installed on side-mount drawer slides. We used 18" full-extension slides, as shown in the material list. Follow the manufacturer’s instructions to install the slides. A jig, such as the Kreg Drawer Slide Jig, makes the process easier.
-
Cut the Drawer False Fronts
From 1x8 oak boards, cut six Drawer False Fronts to length, as shown in the cutting diagram.
-
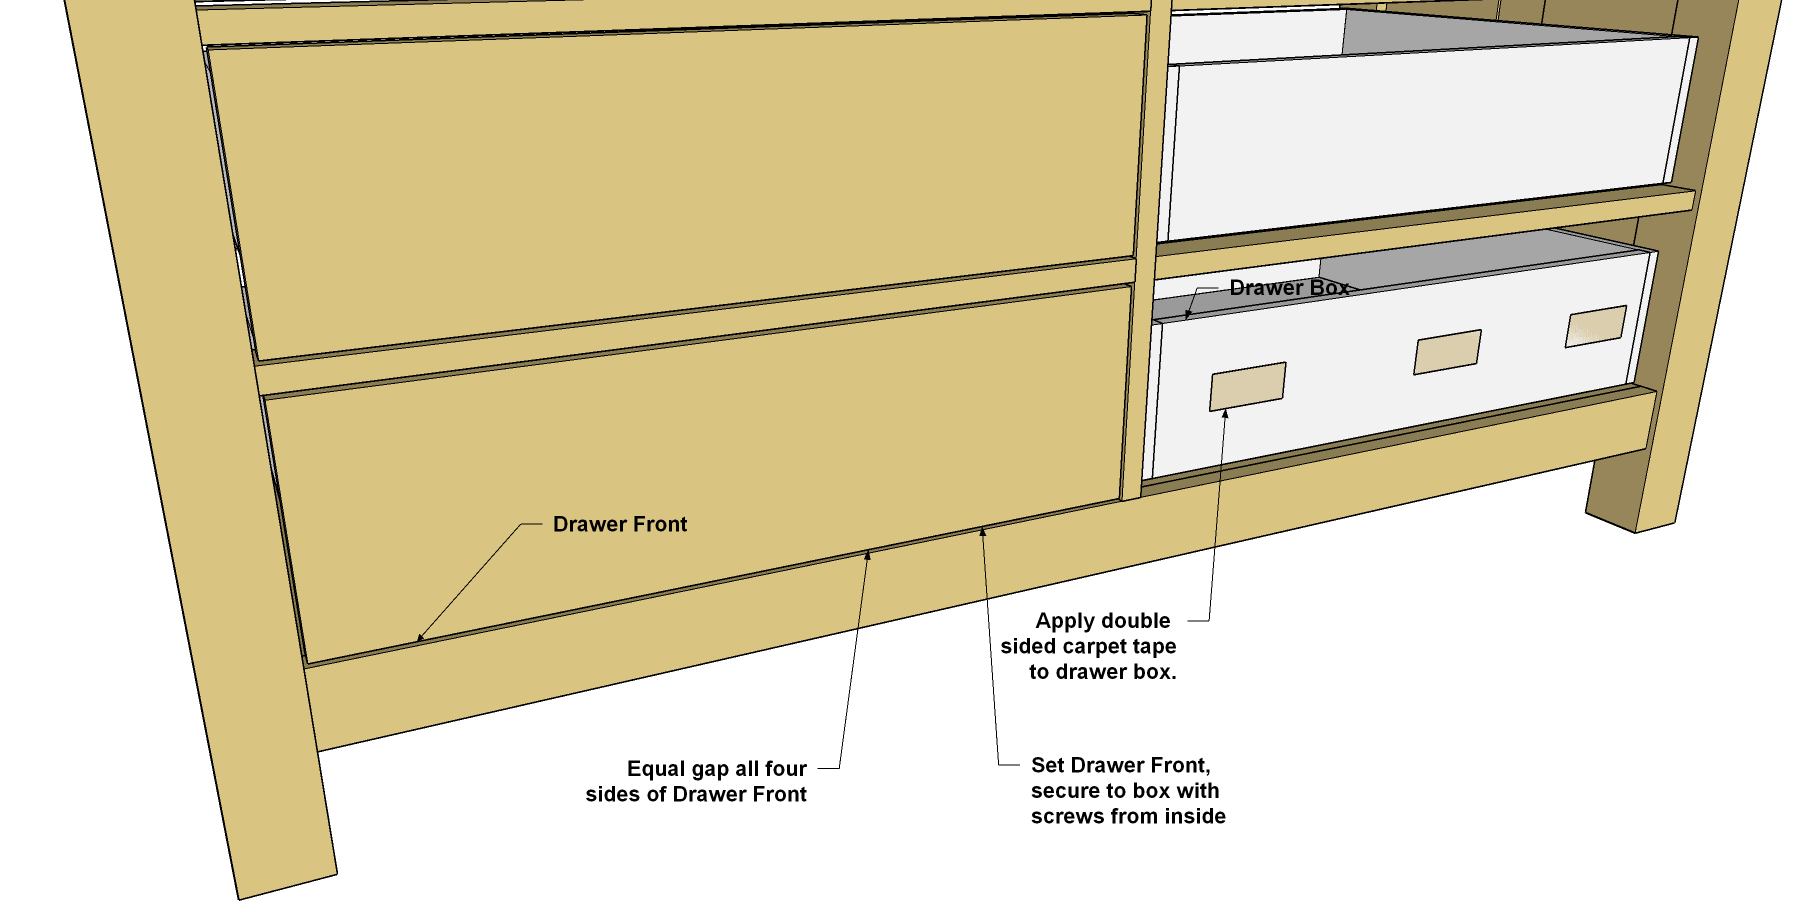
Install the False Fronts
Test fit each False Front by placing it in position on against the installed drawer box. Make sure the spacing is equal on each side of the False Front. You can use pennies or thicker coins, if needed, as spacers to hold the False Fronts in position. Adjust the size of each False Front, if needed, by sanding the edges and ends to create equal gaps. Now remove each Front, and then apply pieces of double-faced carpet tape to the front of the drawer box, as shown. Press the False Front firmly against the Drawer Box to adhere the False Front to the tape. From the back of the case, push the Drawer out. Clamp the False Front to the box, drill two pilot holes, and secure the False Front to the Box with #8 x 1" flat-head wood screws.
-
Add a Back Panel
Cut a Back Panel to size from 1/4" birch plywood, as shown in the cutting diagram. Position the Back Panel as shown, and then pin it in place with 1" brad nails.

-
Finish and Install Knobs
Look over the dresser, and do any final sanding that’s needed. Then you can apply a finish or stain. We left the wood natural, and wiped on two coats of Danish Oil Finish. We also coated the insides of the drawer boxes with shellac. An oil finish isn’t a good choice inside the drawers, because it take a while to cure, and the odor can get on items that are stored in the drawers. Finally, install the drawer knobs or pulls of your choice, and your beautiful new dresser will be ready to use.