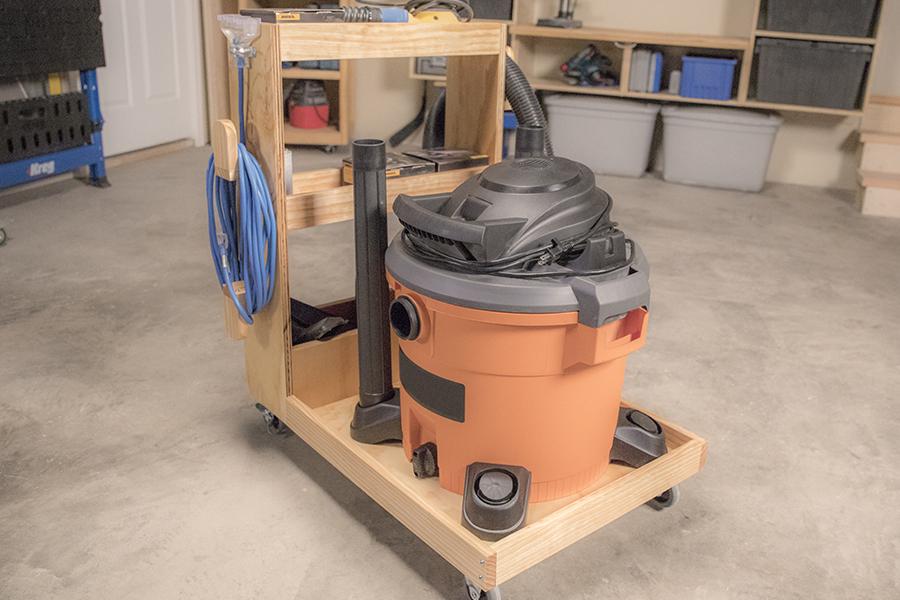
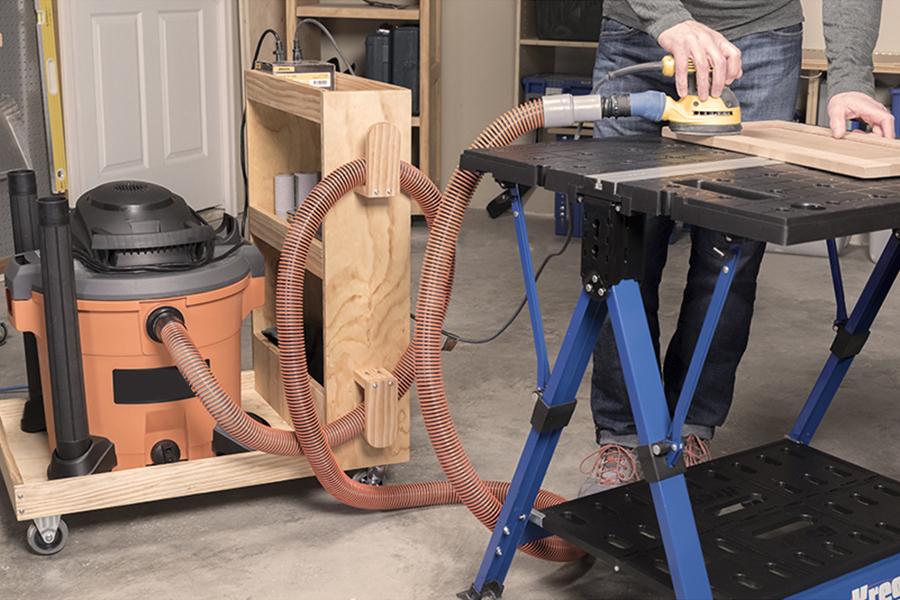
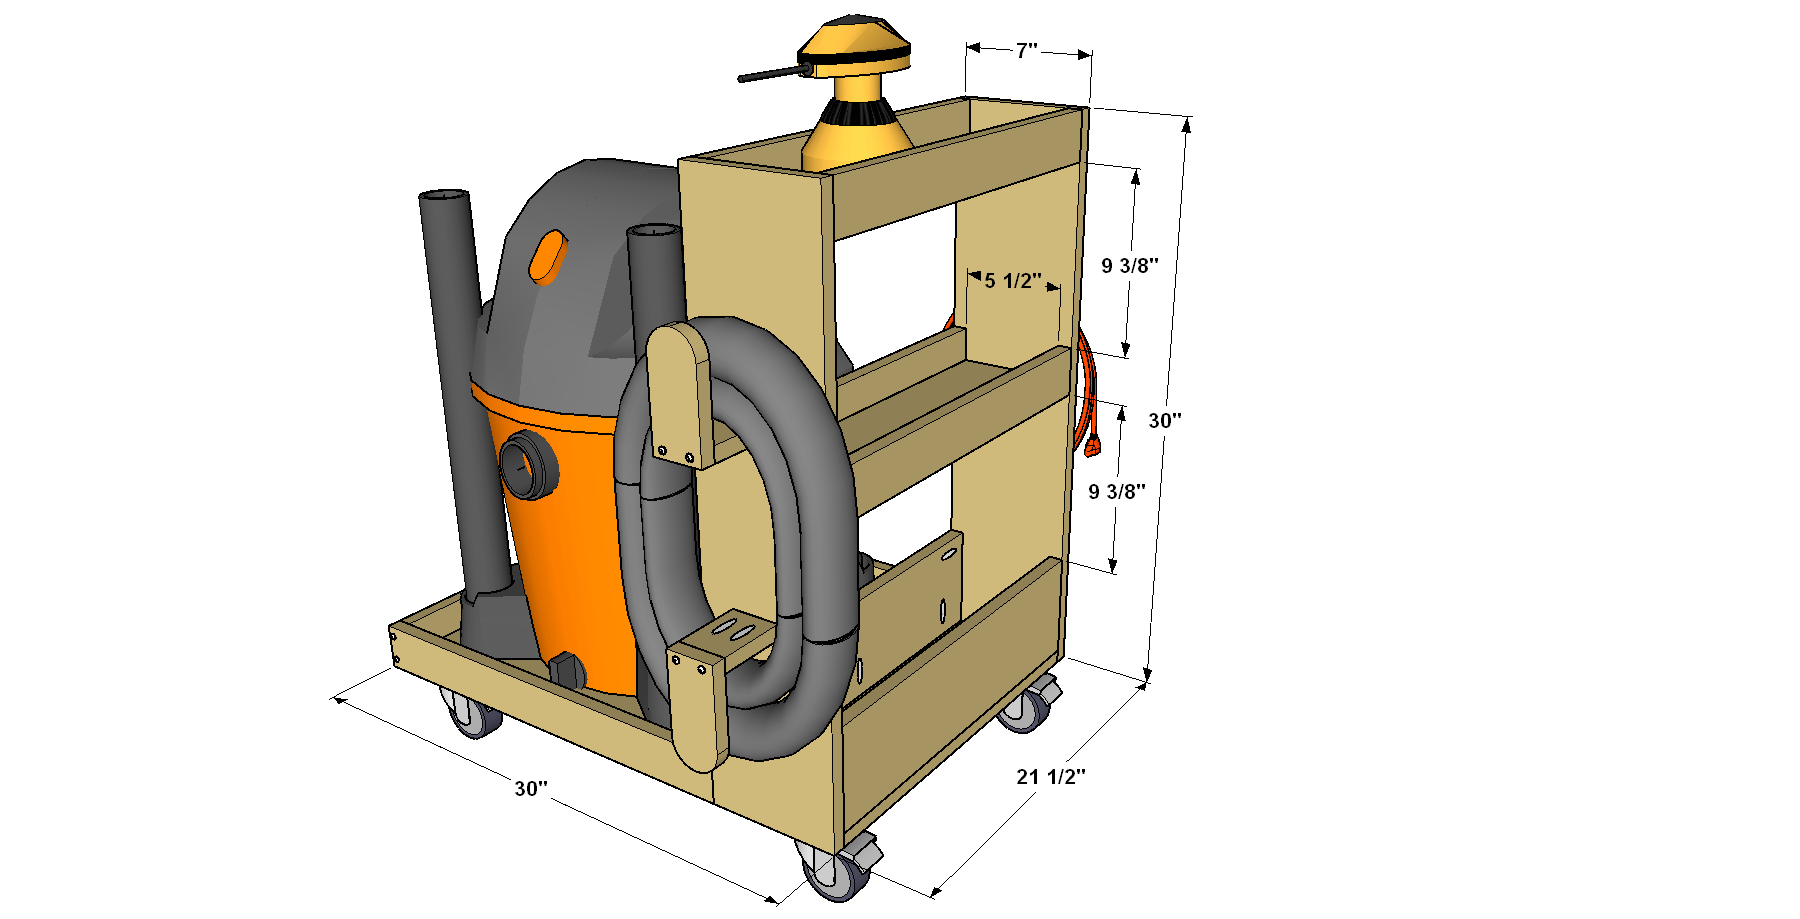


Make your shop vacuum easier to move around, plus create storage for hoses and other accessories, with this handy vacuum cart. It’s sized to hold a 16-gallon shop vacuum, and offers lots of additional storage space. You can build one easily using a couple of 1x3 boards and a half-sheet of plywood.
Tools
Kreg Tools


Other Tools
-
tape measure

Materials
Wood Products
- 2 Board , 1x3 x 96"
- 1 Plywood , 3/4" x 48" x 48"
Hardware & Supplies
- 65 1 1/4" coarse-thread Kreg Pocket-Hole Screws
- 4 3" swivel locking casters
- 16 #12 x 3/4" pan-head wood screws
Cut List & Parts
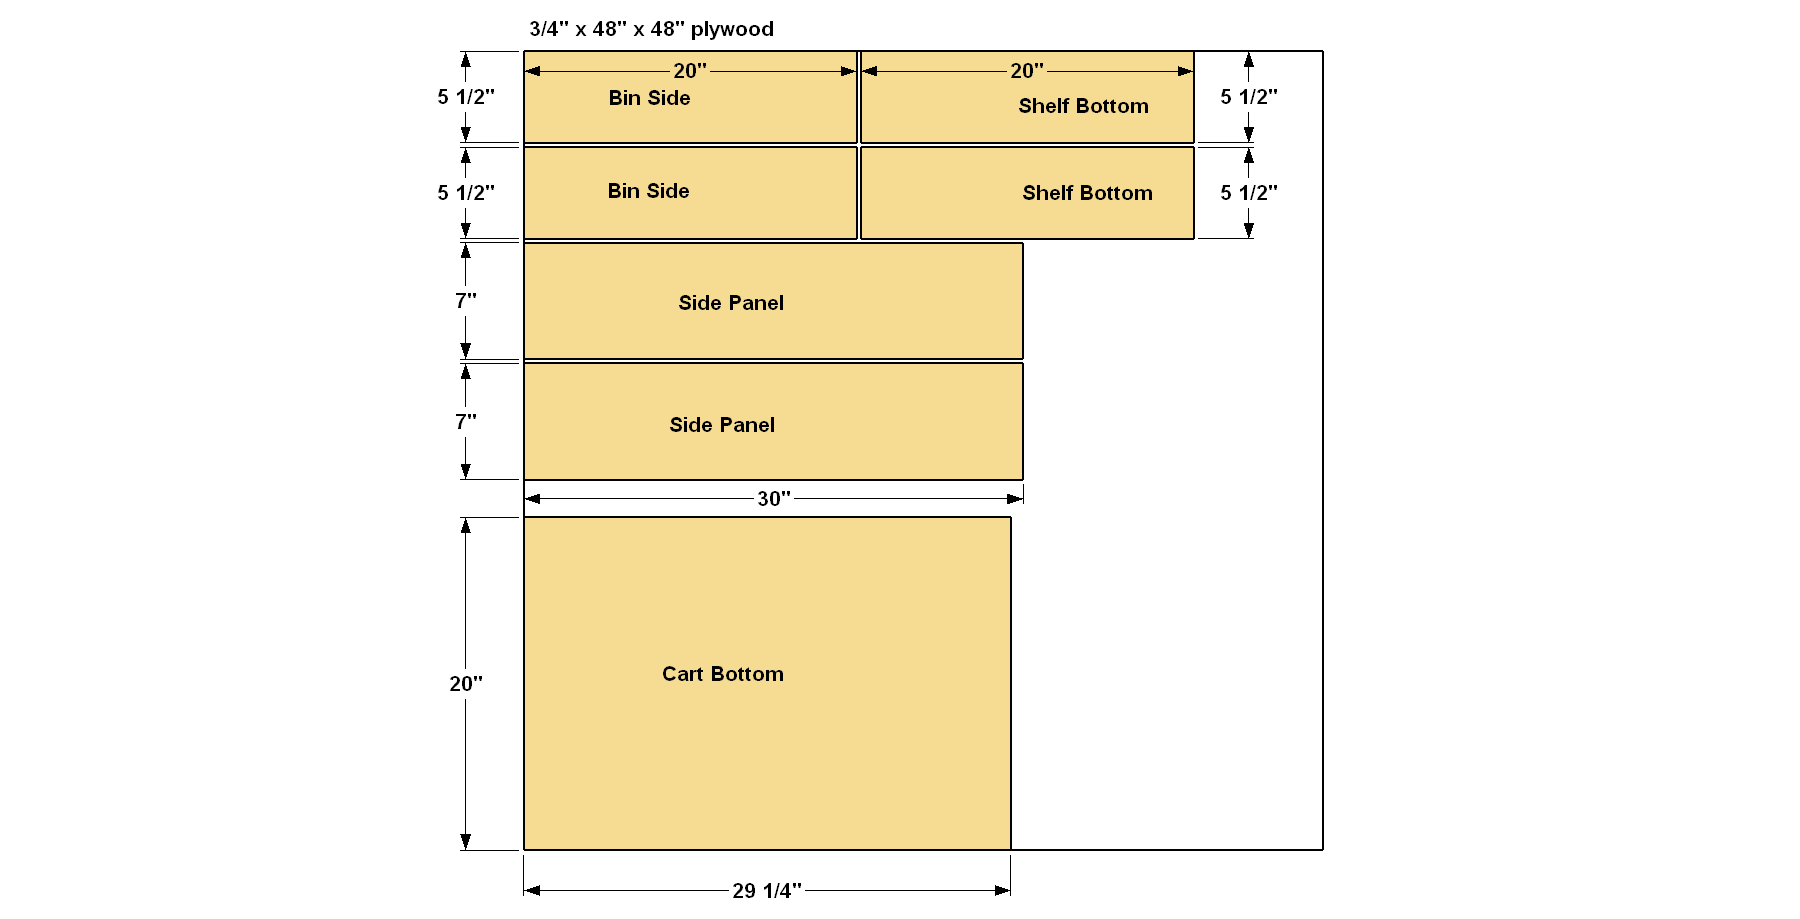
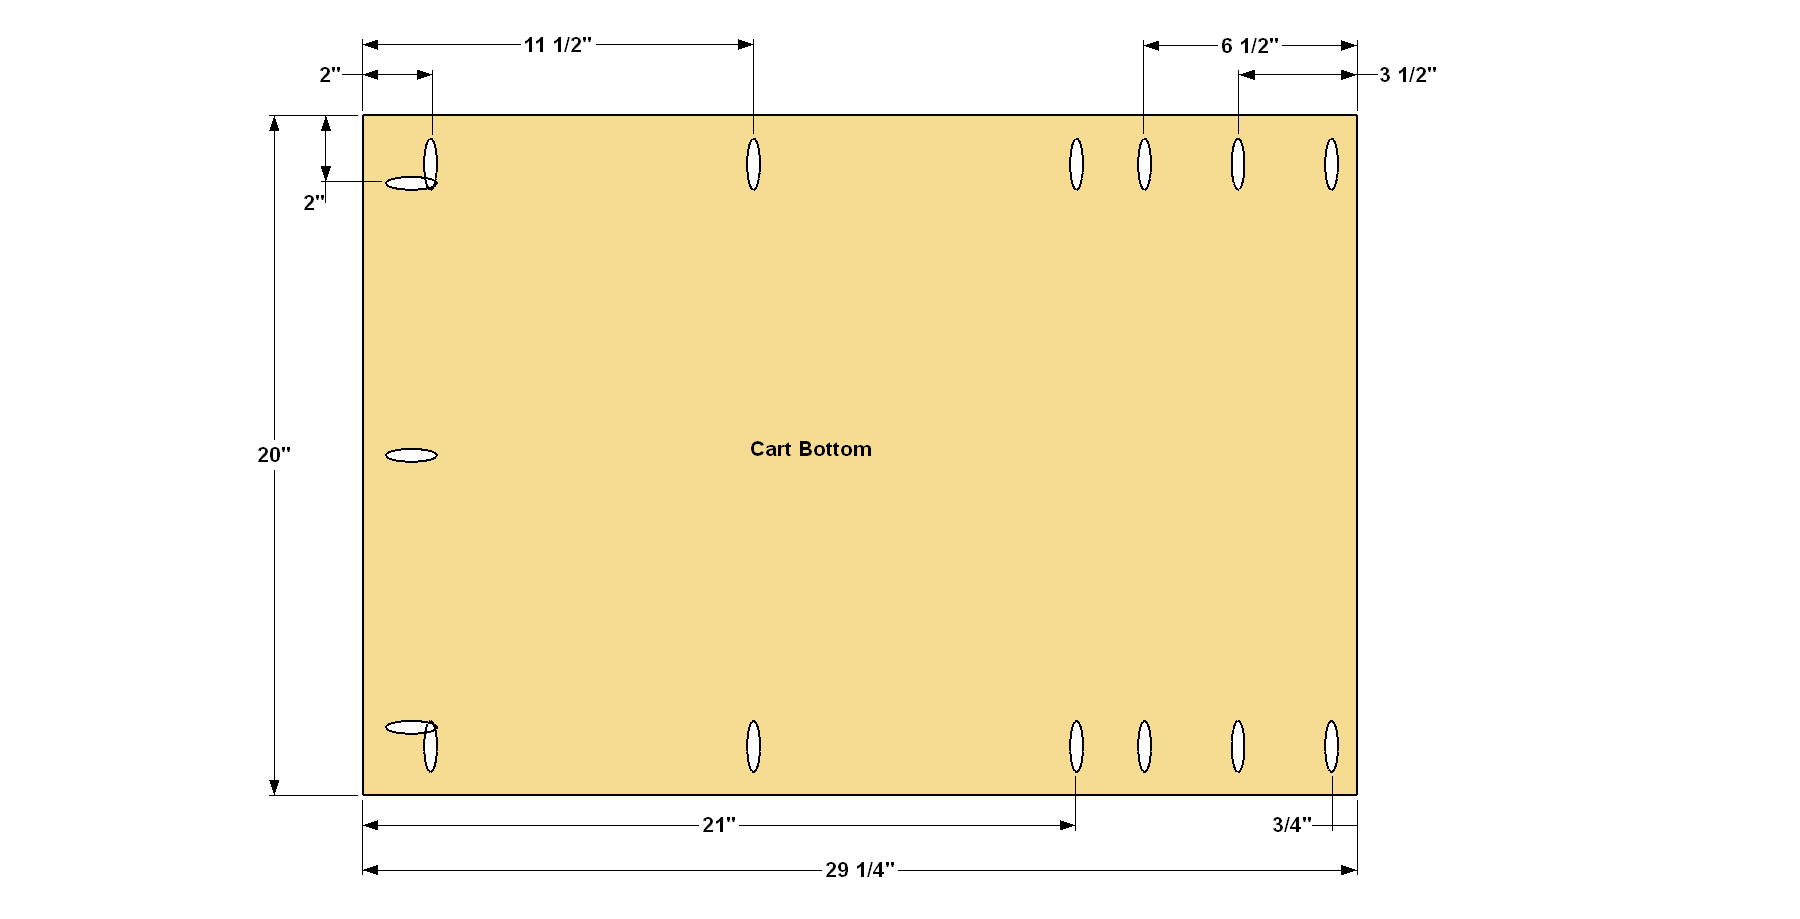
- 1 Cart Bottom , 3/4" x 20" x 29 1/4"
- 2 Side Panel , 3/4" x 20" x 29 1/4"
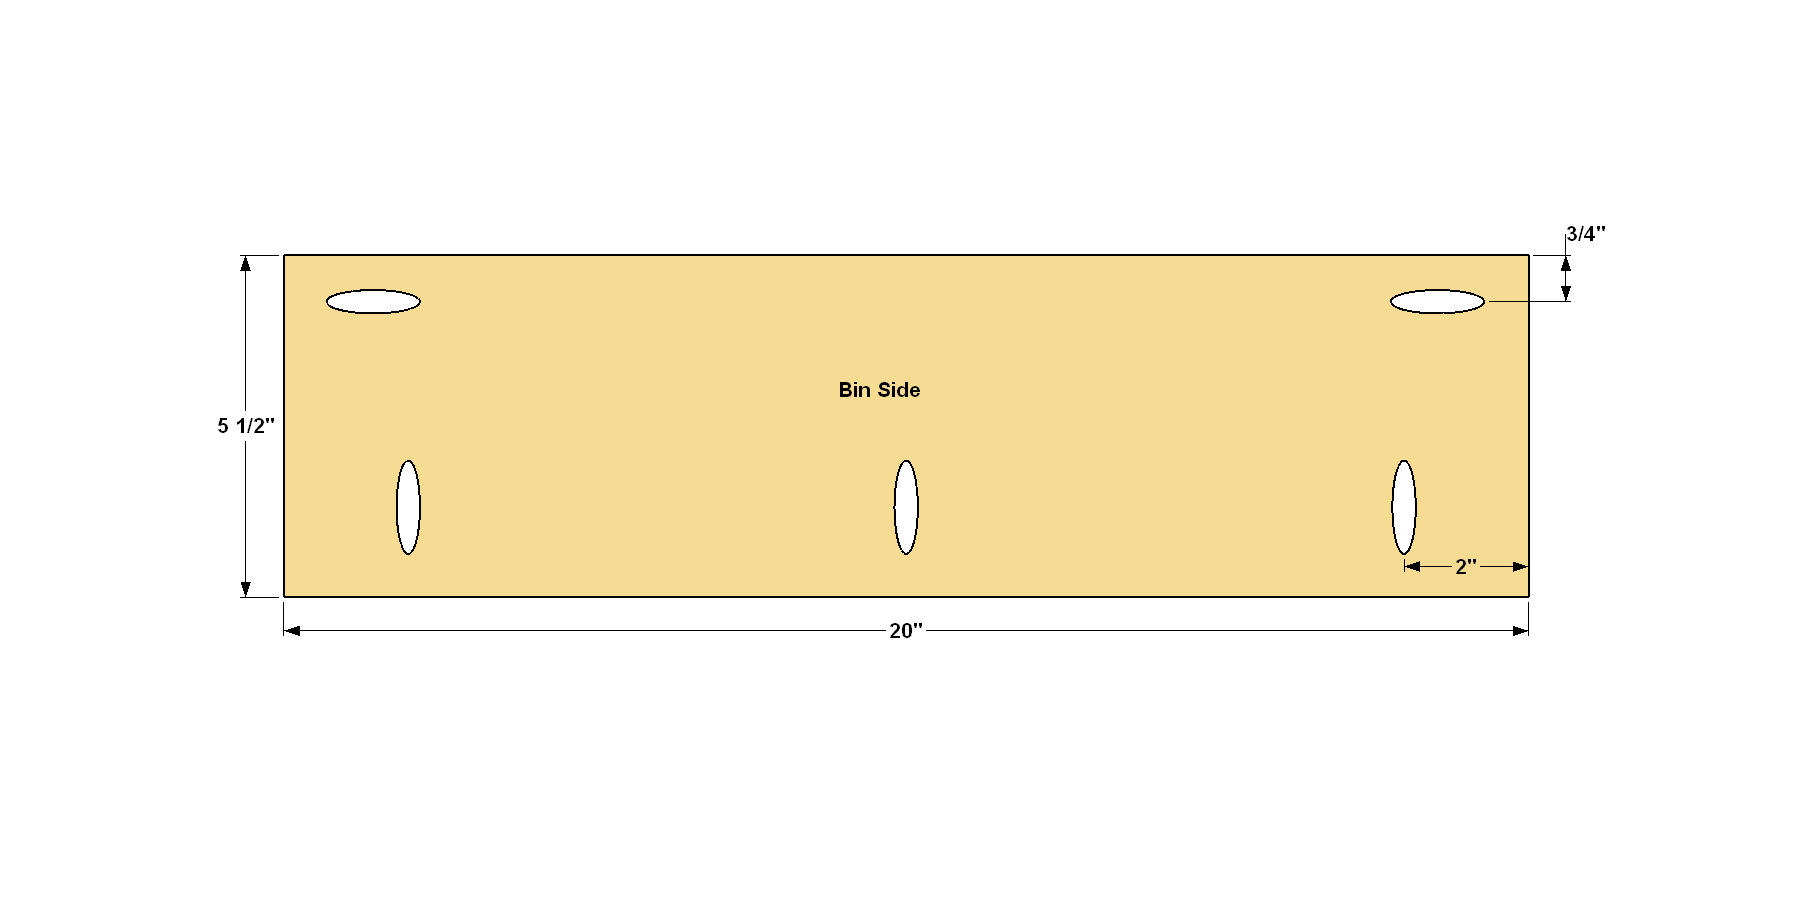
- 2 Bin Side , 3/4" x 5 1/2" x 20"
- 2 Shelf Bottom , 3/4" x 5 1/2" x 20"
- 4 Shelf End , 3/4" x 2 1/2" x 20"
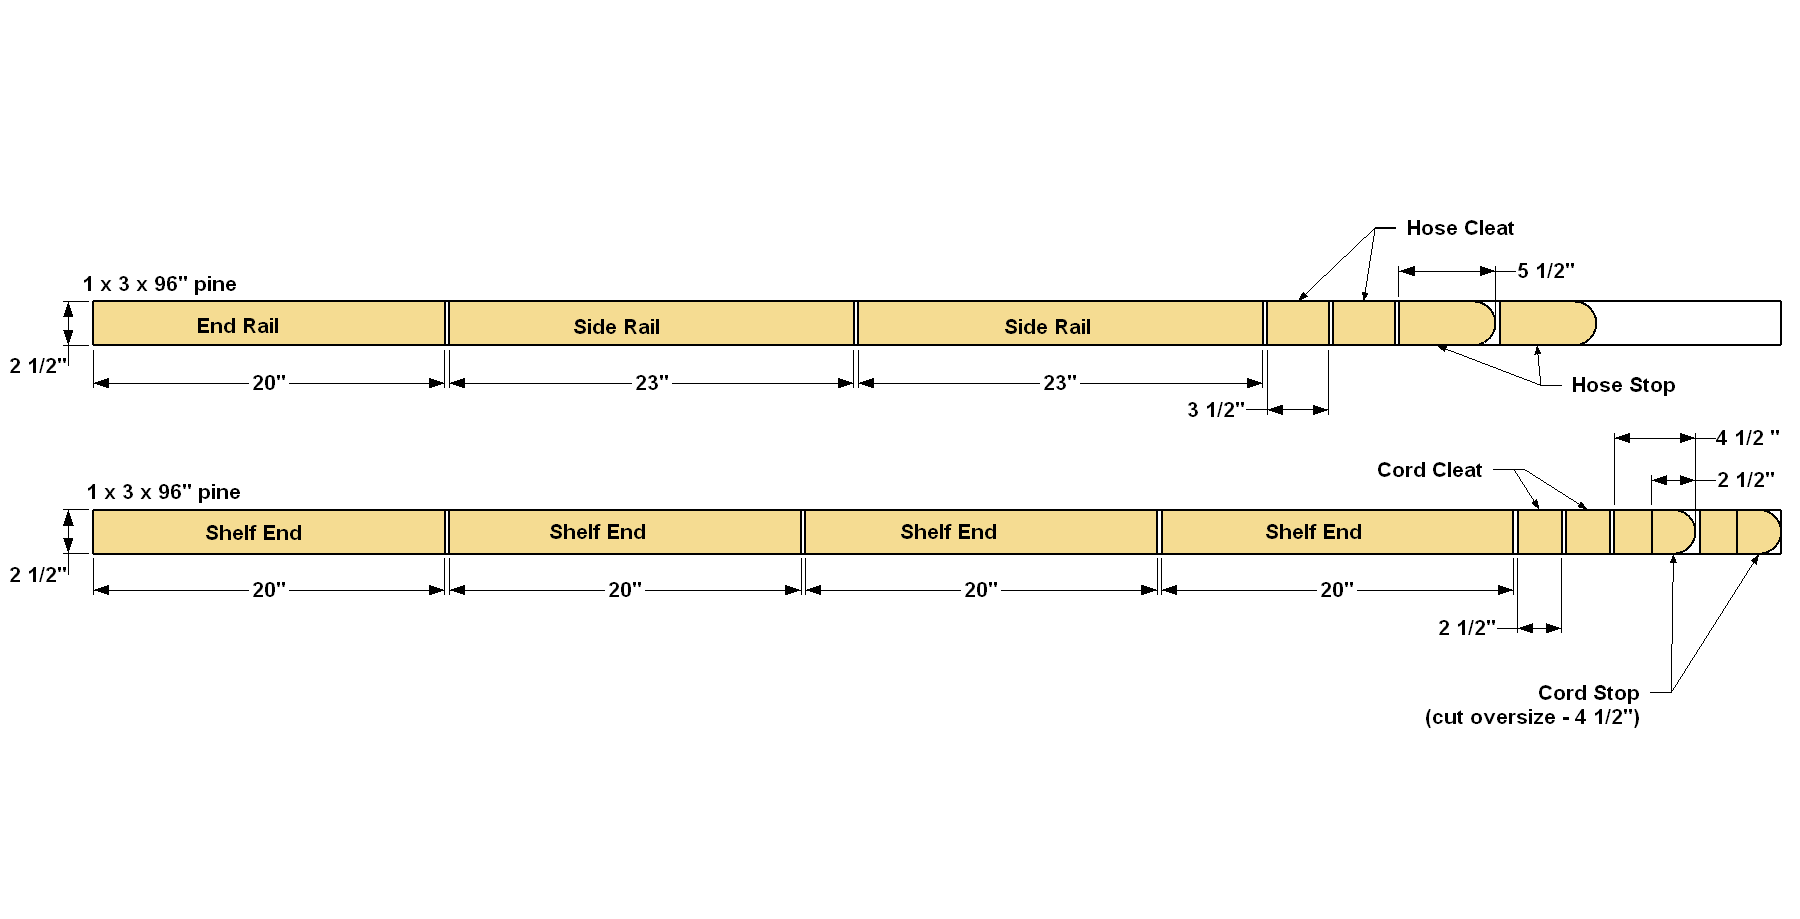
- 1 End Rail , 3/4" x 2 1/2" x 20"
- 2 Side Rail , 3/4" x 2 1/2" x 23"
- 2 Hose Cleat , 3/4" x 2 1/2" x 3 1/2"
- 2 Hose Stop , 3/4" x 2 1/2" x 5 1/2"
- 2 Cord Cleat , 3/4" x 2 1/2" x 2 1/2"
- 2 Cord Stop , 3/4" x 2 1/2" x 2 1/2"
Directions
-
Make the Bottom
Cut the Bottom to size from 3/4 " sanded plywood, as shown in the cutting diagram. Set your Kreg® Pocket-Hole Jig for 3/4"-thick material, and then drill pocket holes at the locations shown. Sand the faces smooth.
-
Add the Side Panels
Cut two Side Panels to size from 3/4" sanded plywood, as shown in the cut diagram. Attach the Side Panels to the Bottom, at the locations shown, using 1 1/4" coarse-thread Kreg Pocket-Hole Screws. Make sure the Sides are flush with the Bottom as noted in the illustration.

-
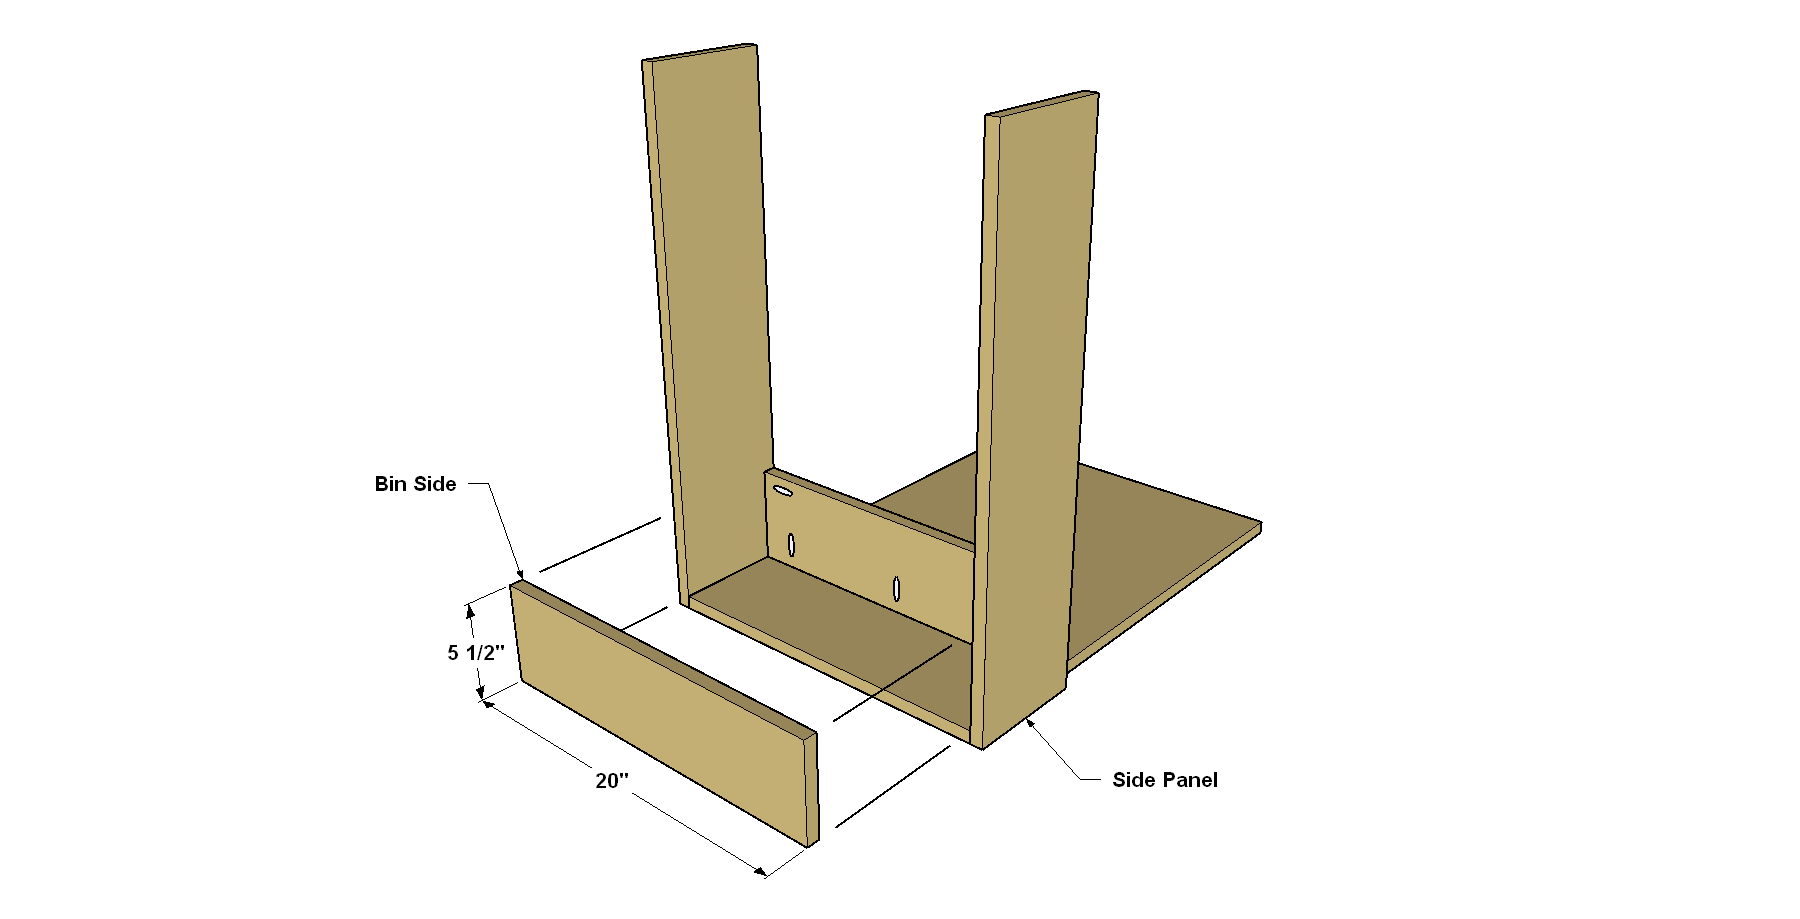
Make Bin Sides
Cut two Bin Sides to size from 3/4 " sanded plywood as shown in the cut diagram. Drill pocket holes at the locations shown. Sand the faces smooth.
-
Attach the Bin Sides
Now you can attach the Bin Sides. They are positioned between the two Side Panels. Secure them to the Side Panels and to the Bottom using 1 1/4" coarse-thread Kreg Pocket-Hole Screws.
-
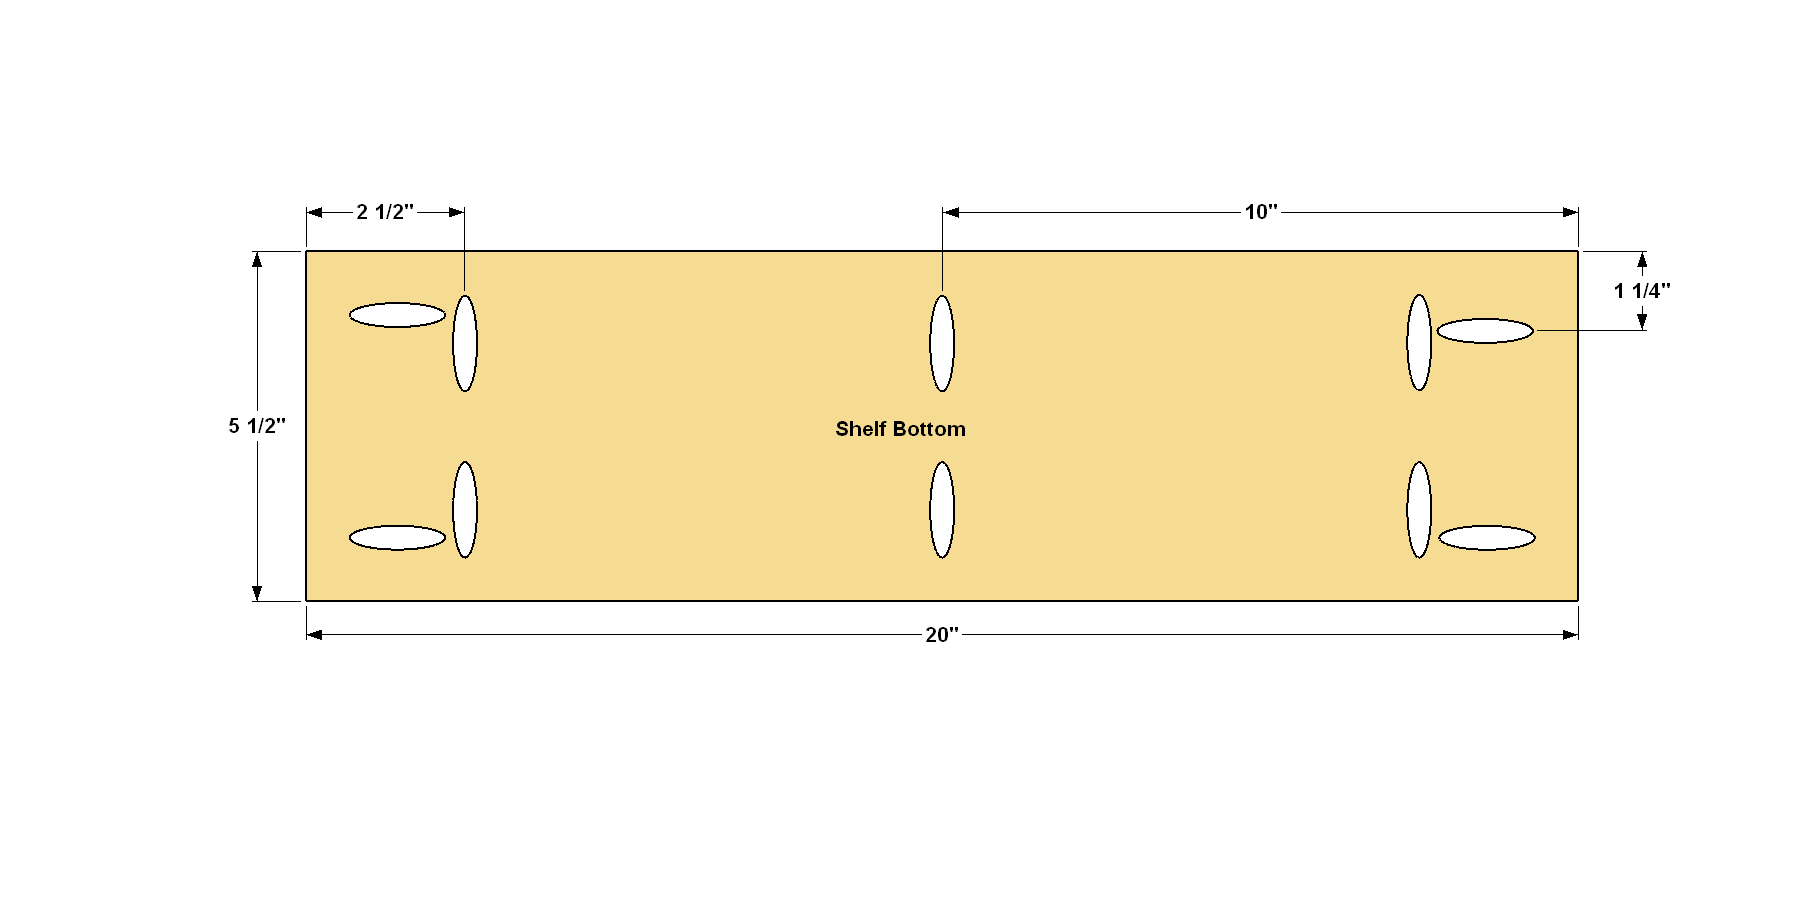
Make the Shelf Bottoms
Cut two Shelf Bottoms to size from 3/4 " sanded plywood, as shown in the cut diagram. Drill pocket holes at the locations shown. Sand the faces smooth
-
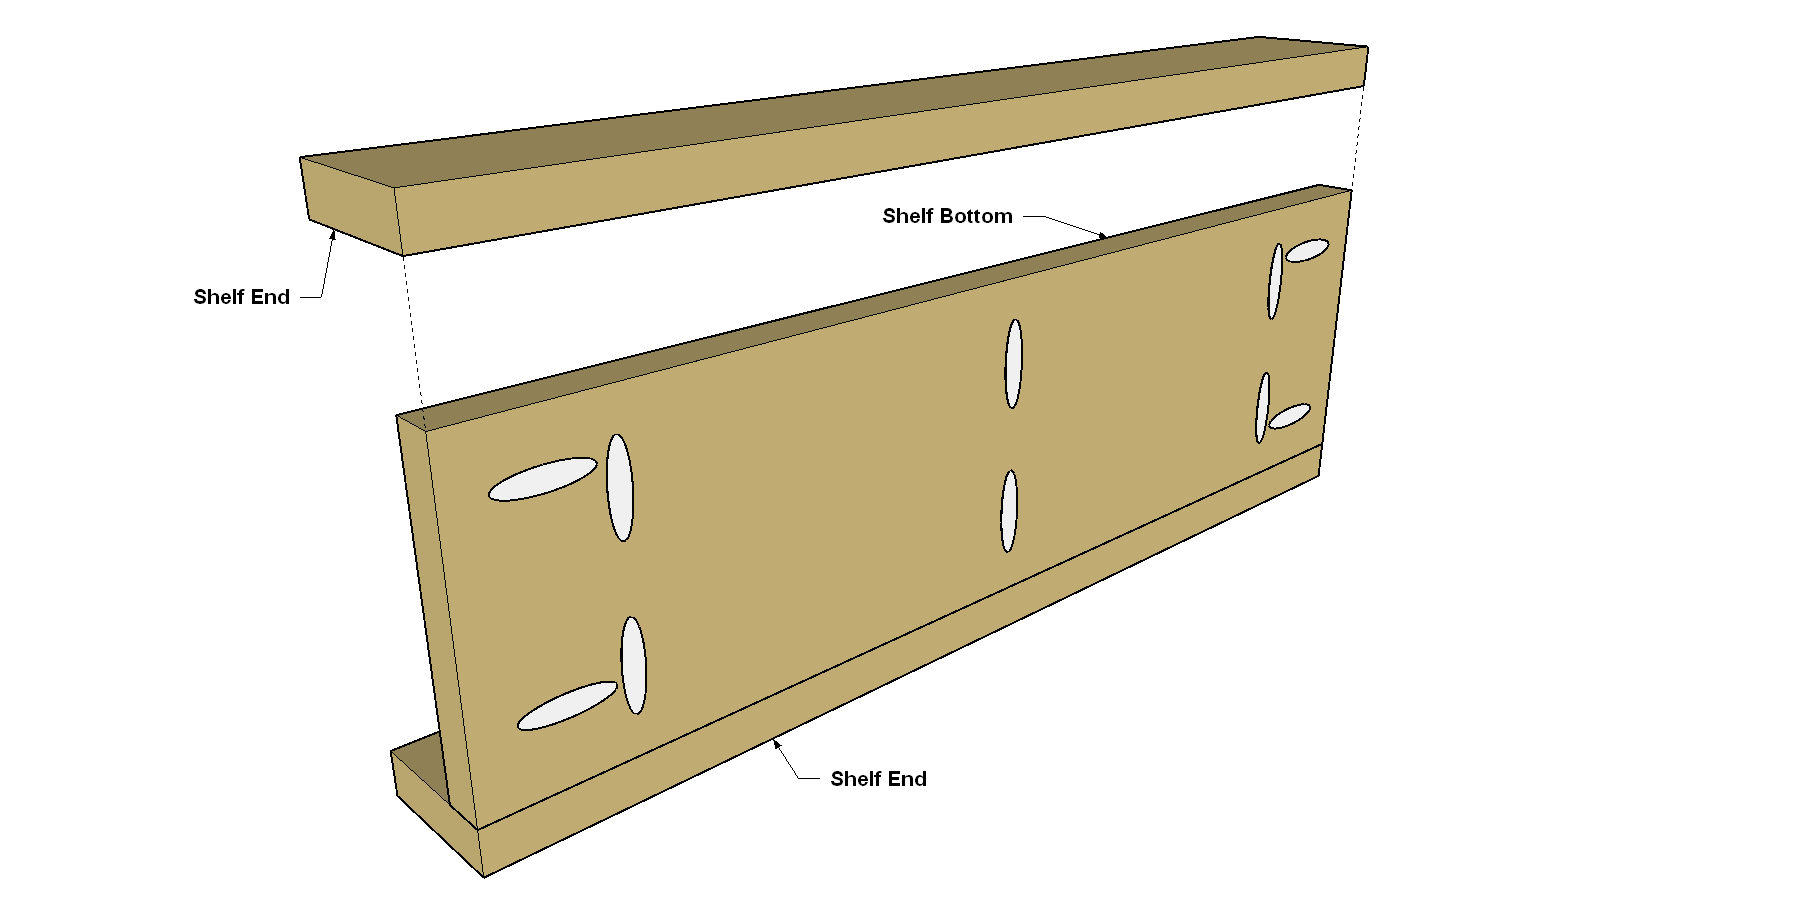
Add the Shelf Ends
Cut four Shelf Ends to size from a 1x3 board, as shown in the cutting diagram. Sand the faces and edges smooth. Secure two Shelf Ends to each Shelf Bottom using 1 1/4" coarse-thread Kreg Pocket-Hole Screws, as shown.
-
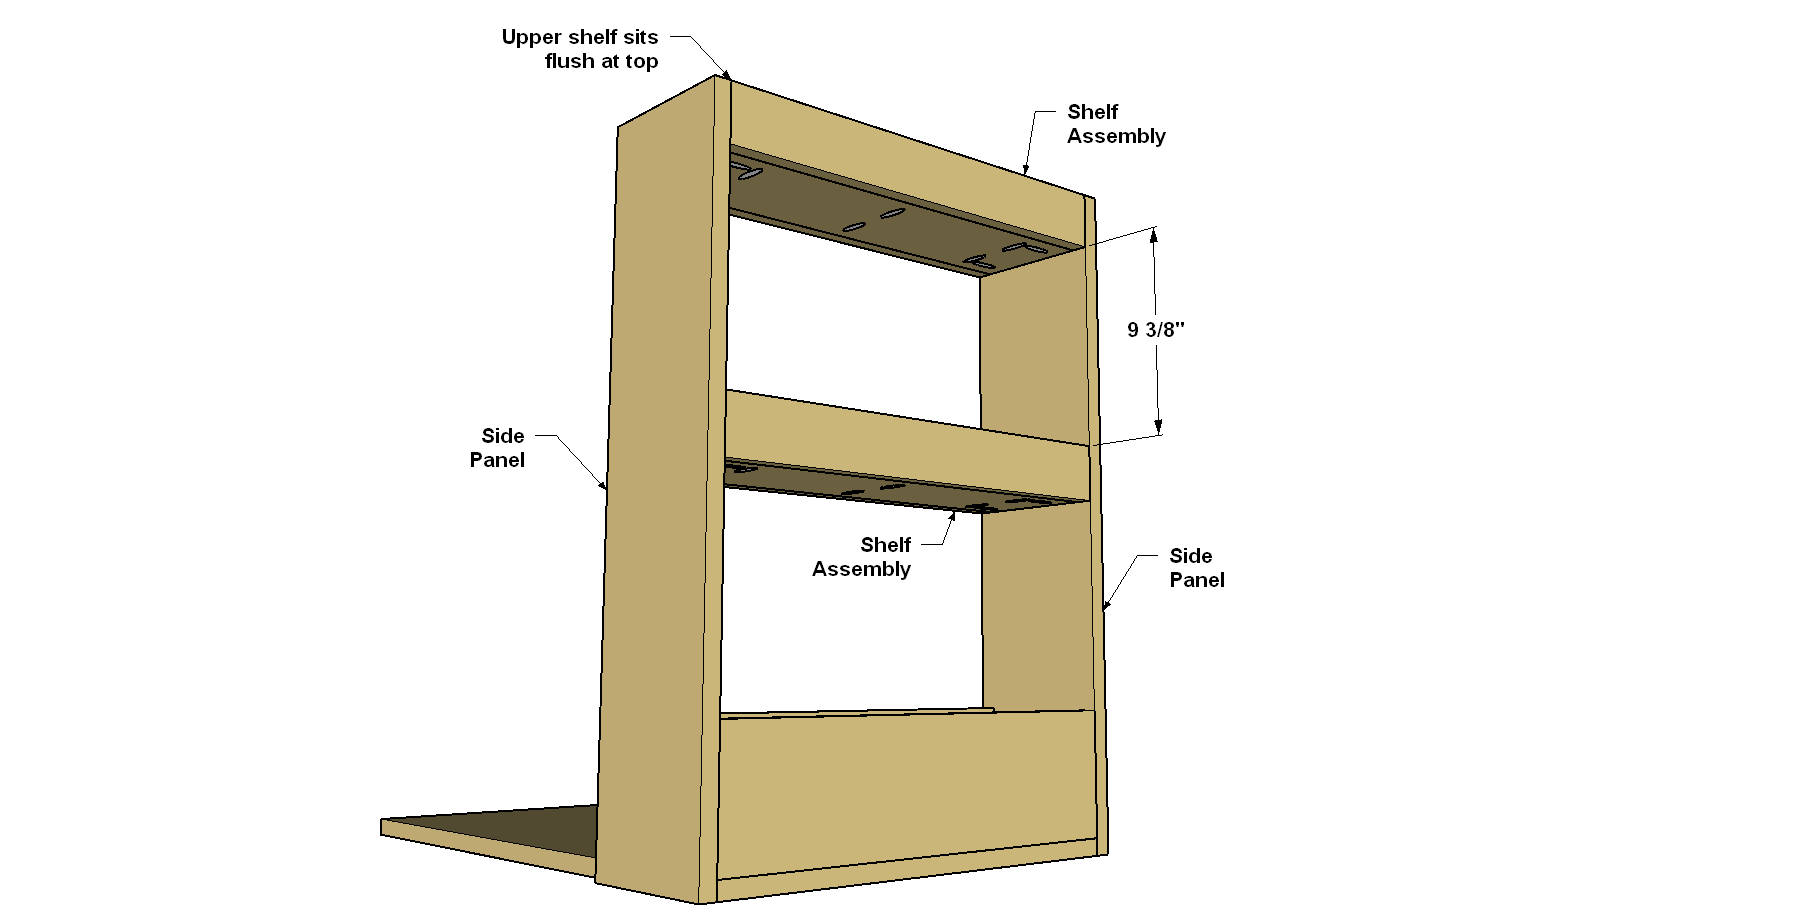
Attach the Shelves
Set the upper shelf assembly in place so it is flush at the top and edges of the Side Panels, as shown, and then secure it using 1 1/4" coarse-thread Kreg Pocket-Hole Screws. Position the second shelf assembly at the location shown, and secure it using 1 1/4" coarse-thread Kreg Pocket-Hole Screws, as well.
-
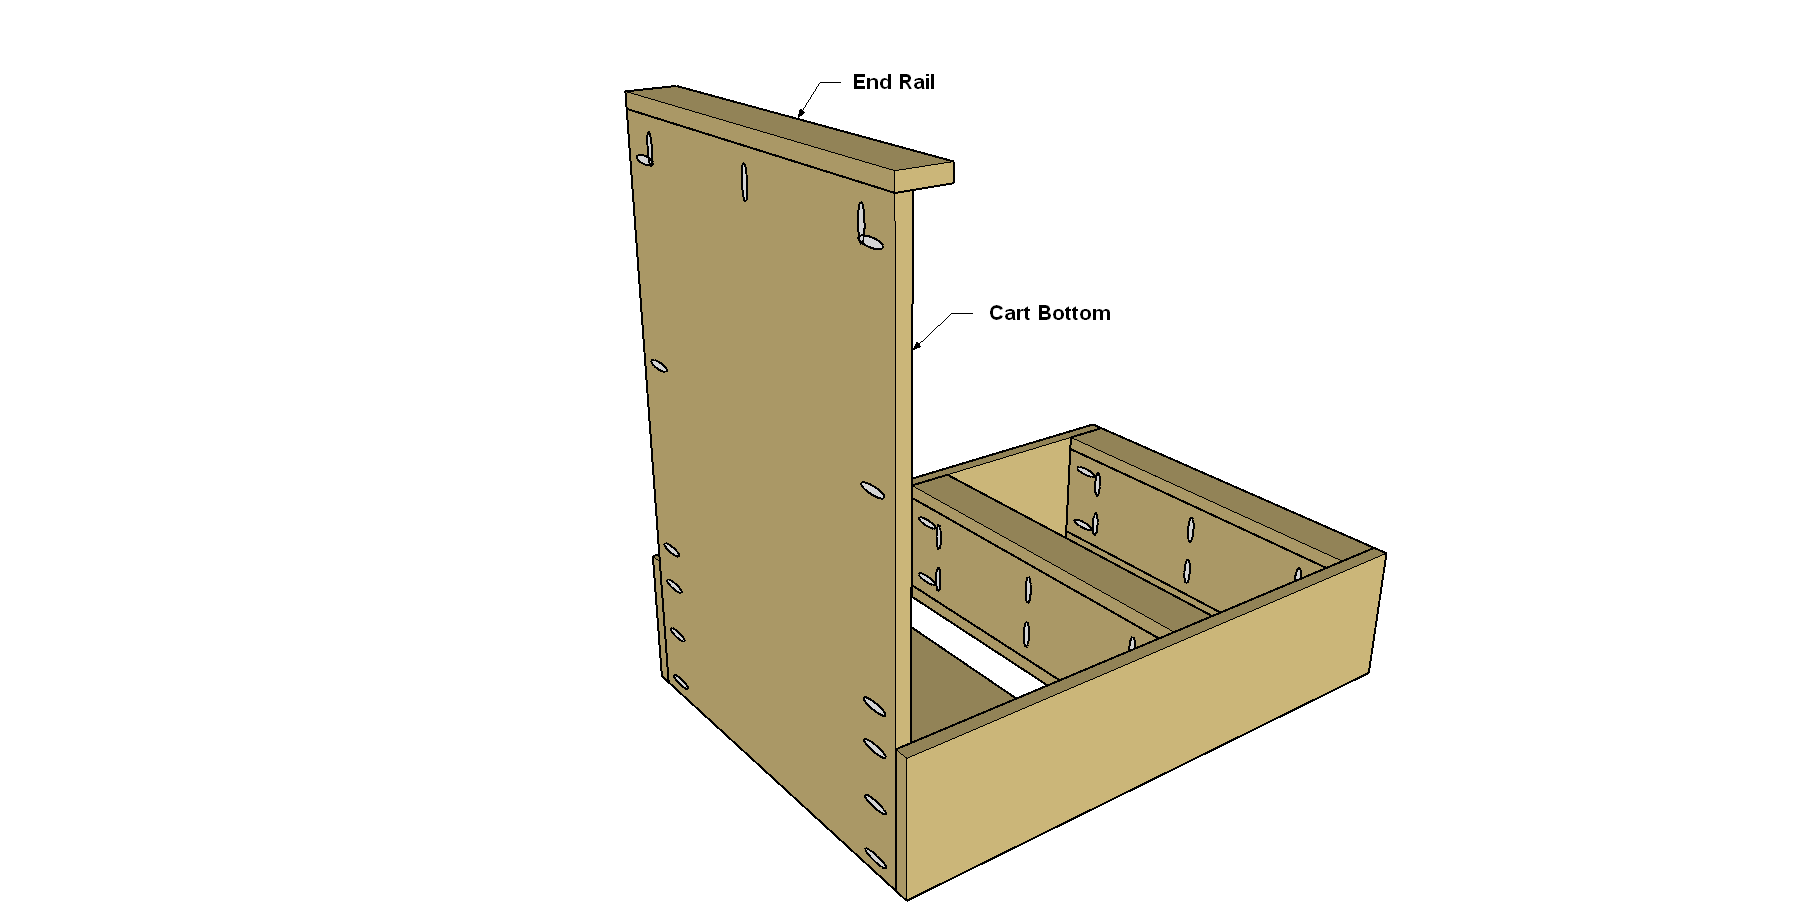
Add an End Rail to the Bottom
Cut the End Rail to size from a 1x3 board as shown in the cutting diagram. Sand the faces and edges smooth. Position the End Rail as shown, and then secure it with 1 1/4" coarse-thread Kreg Pocket-Hole Screws.
-
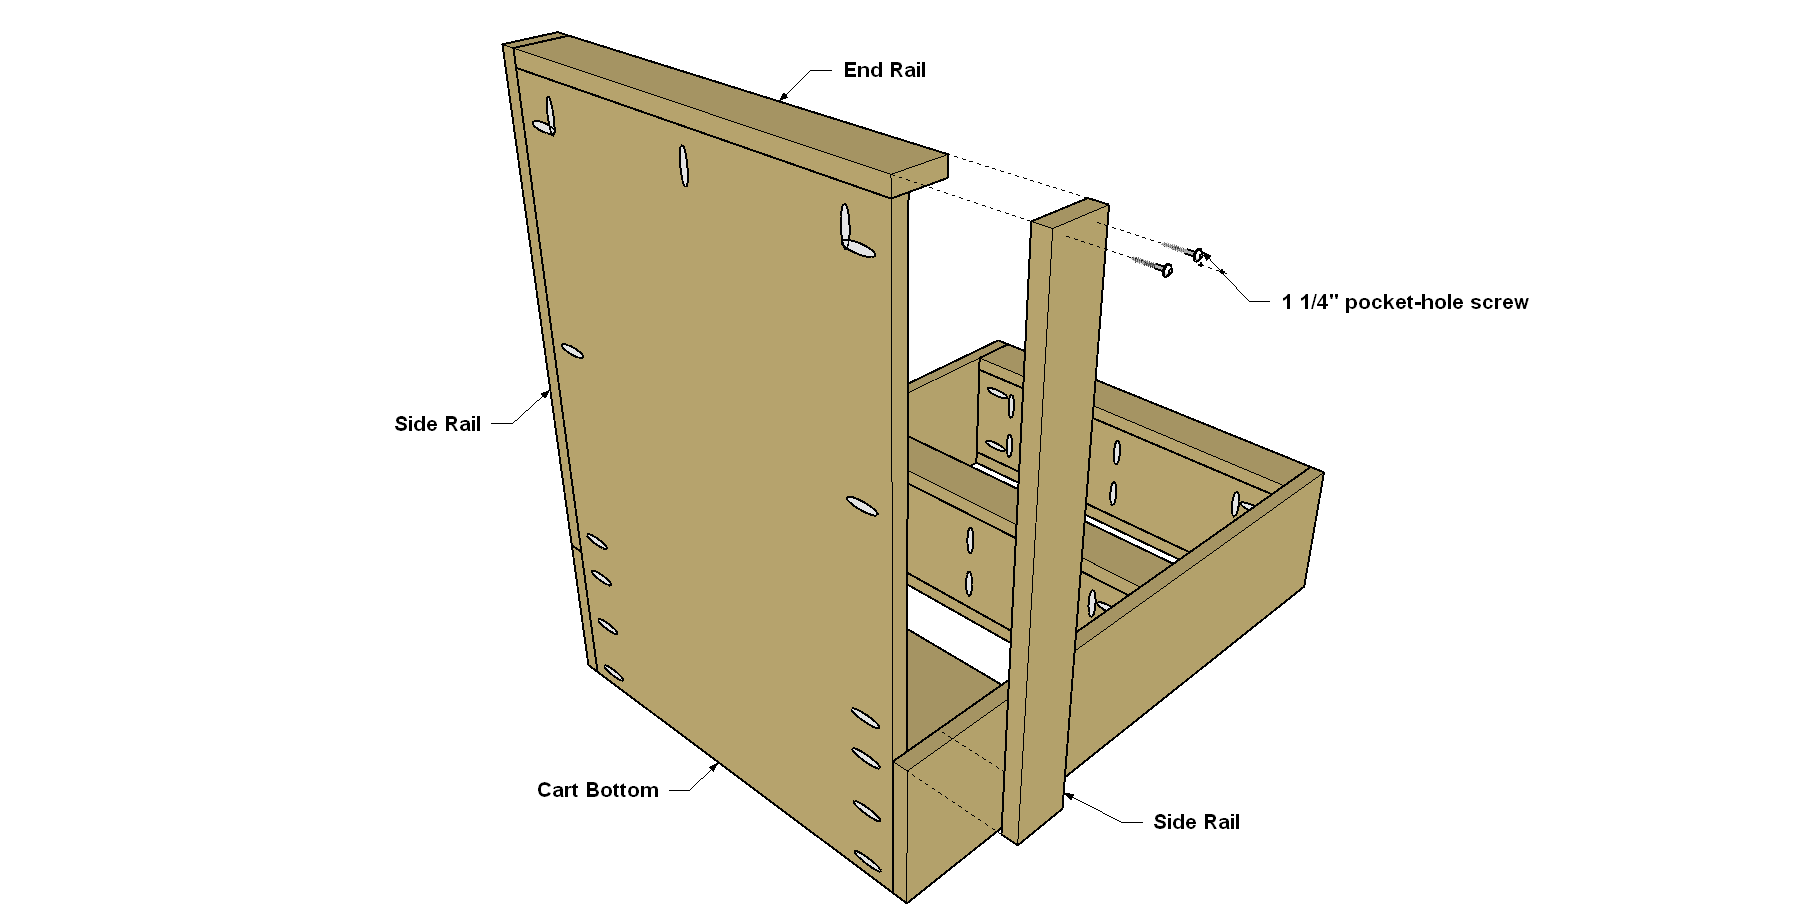
Add Side Rails to the Bottom
Cut two Side Rails to size from a 1x3 board, as shown in the cutting diagram. Sand the faces and edges smooth. Position the Side Rails as shown, and then secure them to the Bottom using 1 1/4" coarse-thread Kreg Pocket-Hole Screws. Drive two 1 1/4" coarse-thread Kreg Pocket-Hole Screws through each Side Rail and into the end of the End Rail, as well, to reinforce this joint.
-
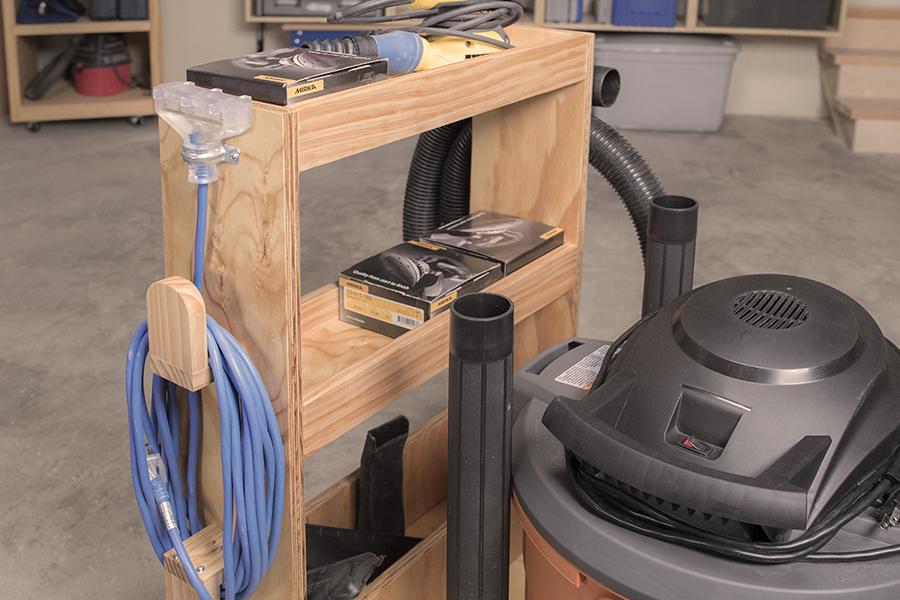
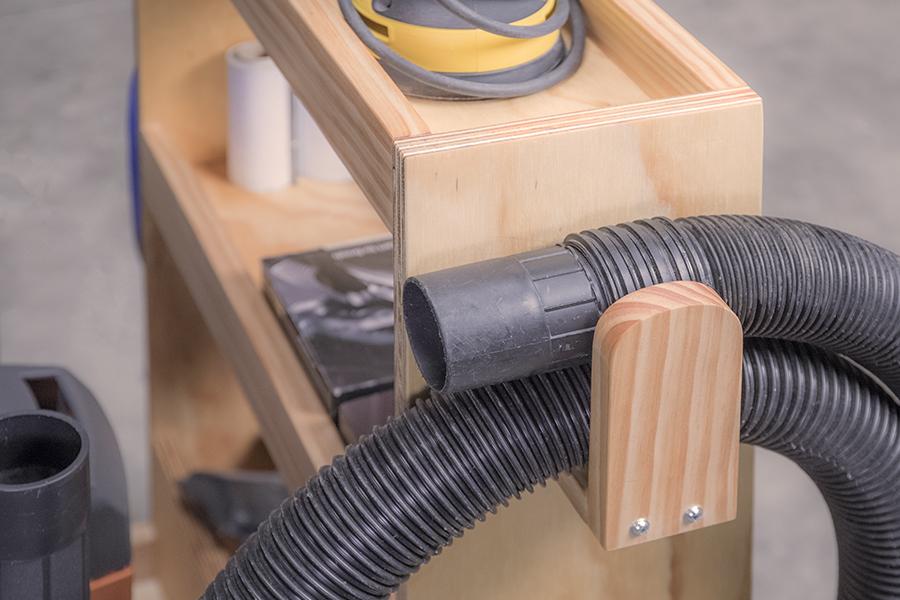
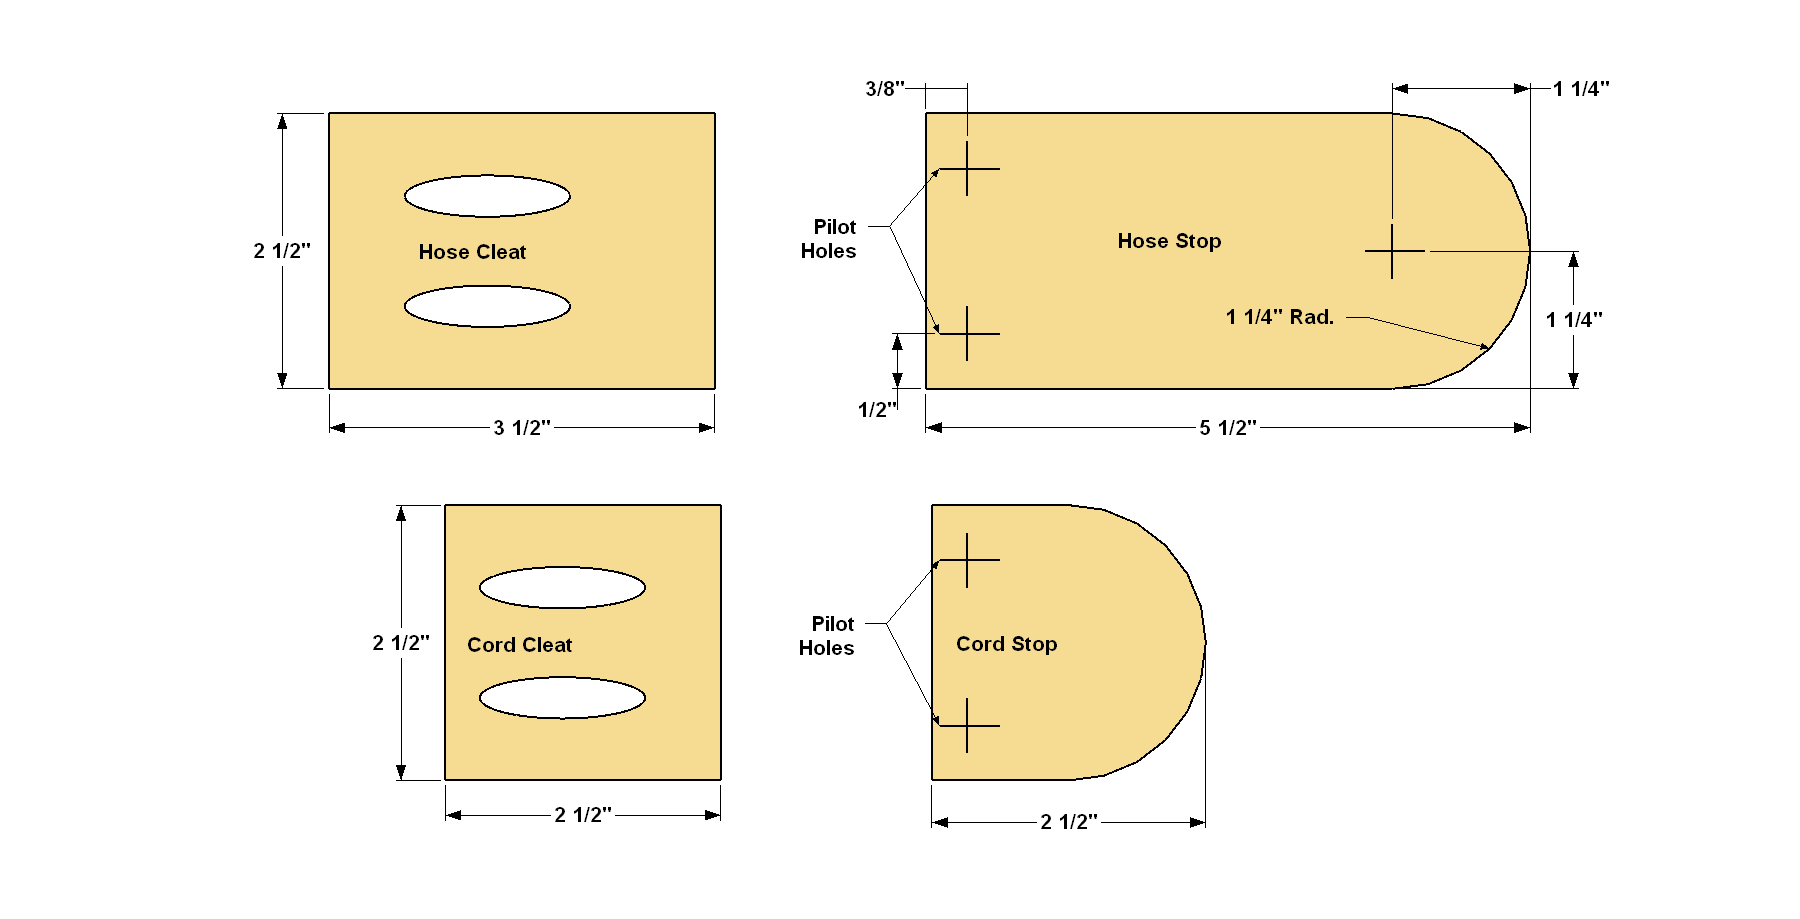
Make the Cord Holders and Hose Holders
Cut two Cord Cleats and two Hose Cleats to length from 1x3 boards, as shown in the cutting diagram. Drill pocket holes in the two Hose Cleats and the two Cord Cleats at the locations shown, and then set them aside for the moment. Cut two Hose Stops to size as shown in the cut diagram. For the two Cord Stops, cut them oversized, as shown in the cutting diagram. Starting with oversize pieces allows you to clamp them to the edge of a work surface while you cut the radius on the end using a jigsaw. Lay out and cut the radius on each Cord Stop and Hose Stop, sand the cut ends smooth, and then cut each Cord Stop to final length. Finally, drill pilot holes in the Hose and Cord Stops at the locations shown. Sand all the faces and edges of all the parts.
-
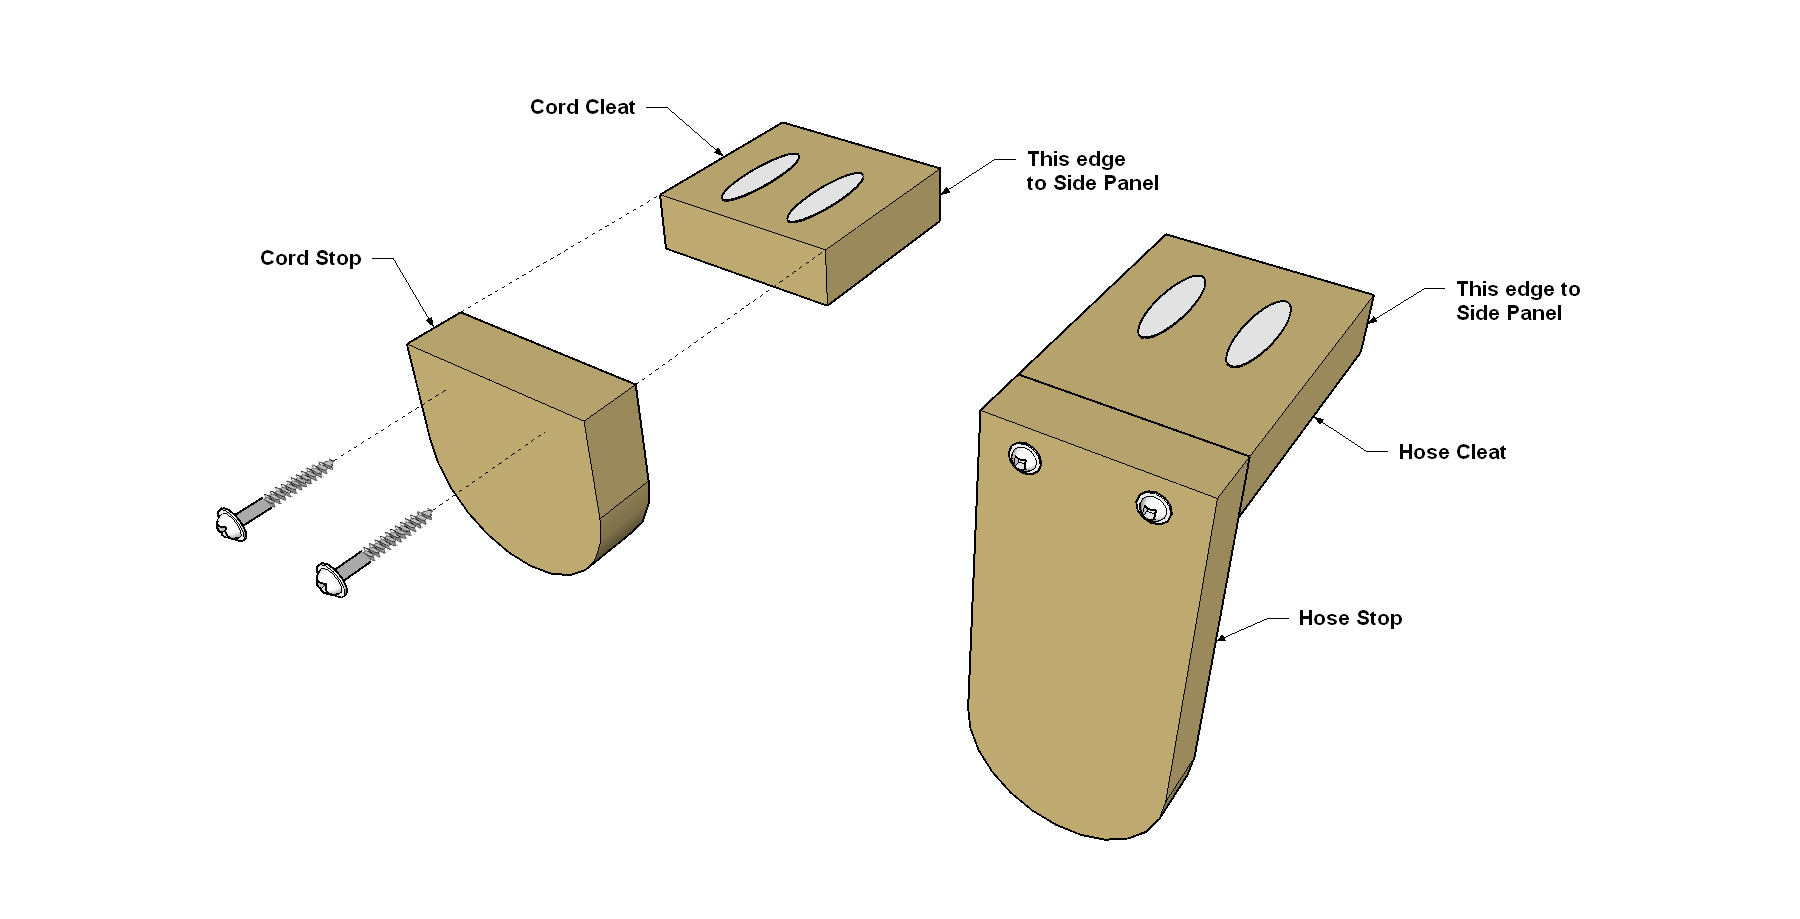
Assemble the Cord and Hose Holders
Secure the Cord Cleats to the Cord Stops, and the Hose Cleats to the Hose Stops, using glue and 1 1/4" coarse-thread Kreg Pocket-Hole Screws, as shown.
-
Attach the Holders
Secure the cord holders and hose holders to each Side Panel at the locations shown using glue and 1 1/4" coarse-thread Kreg Pocket-Hole Screws.

-
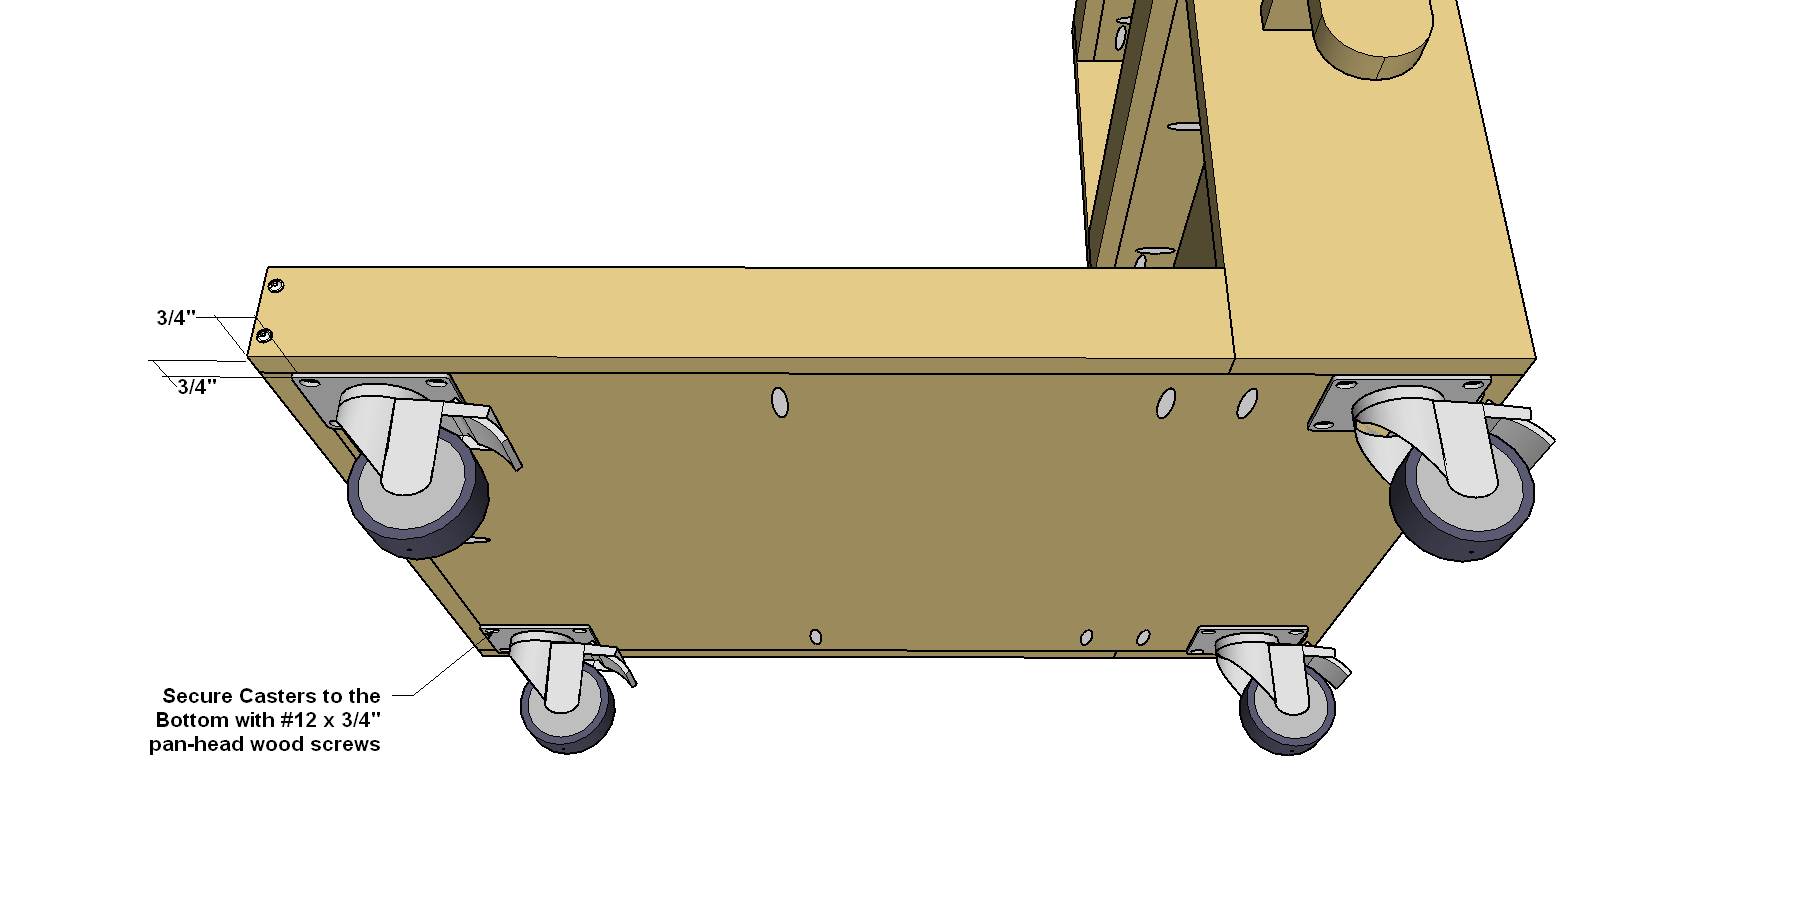
Add the Casters and Finish
Secure the Casters to the Bottom Panel at the locations shown using #12 x 3/4" pan-head wood screws. With those on, you can decide if you want to apply a finish. You certainly don’t need to, but adding a simple coat of oil will help protect the wood and keep it looking better over the long haul. After that, load up you shop vacuum (we removed the casters from the vacuum), and add all of the accessories you want to keep on your cart.