

The classic look of a farmhouse table is as popular today as ever—and not just in farmhouses. The farmhouse table is just as popular in an urban loft or suburban home. That’s because this type of table offers simple styling, solid construction, and versatility that make it useful and beautiful.
Tools
Kreg Tools


Other Tools
-
tape measure

Materials
Wood Products
- 7 Board , 2x6 x 96"
- 6 Board , 2x4 x 96"
- 1 Board , 4x4 x 96"
Hardware & Supplies
- 115 2-1/2" Kreg Pocket-Hole Screws
- 16 3" flathead wood screws
- 40 2 1/2" flathead wood screws
Cut List & Parts
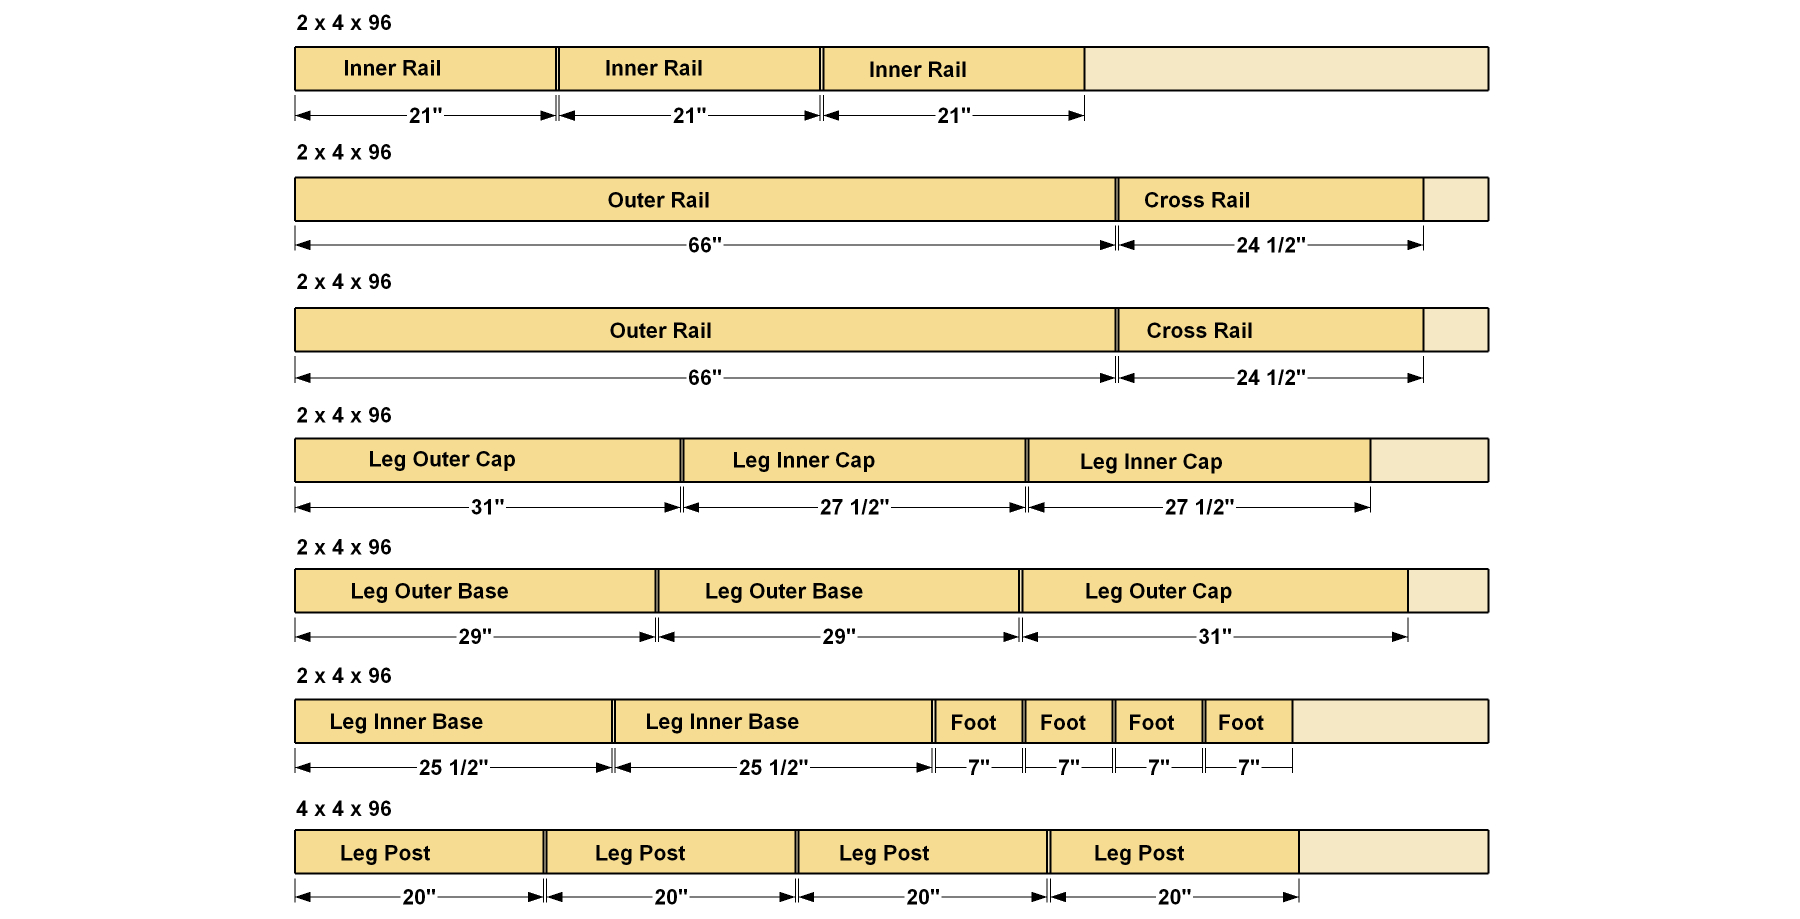
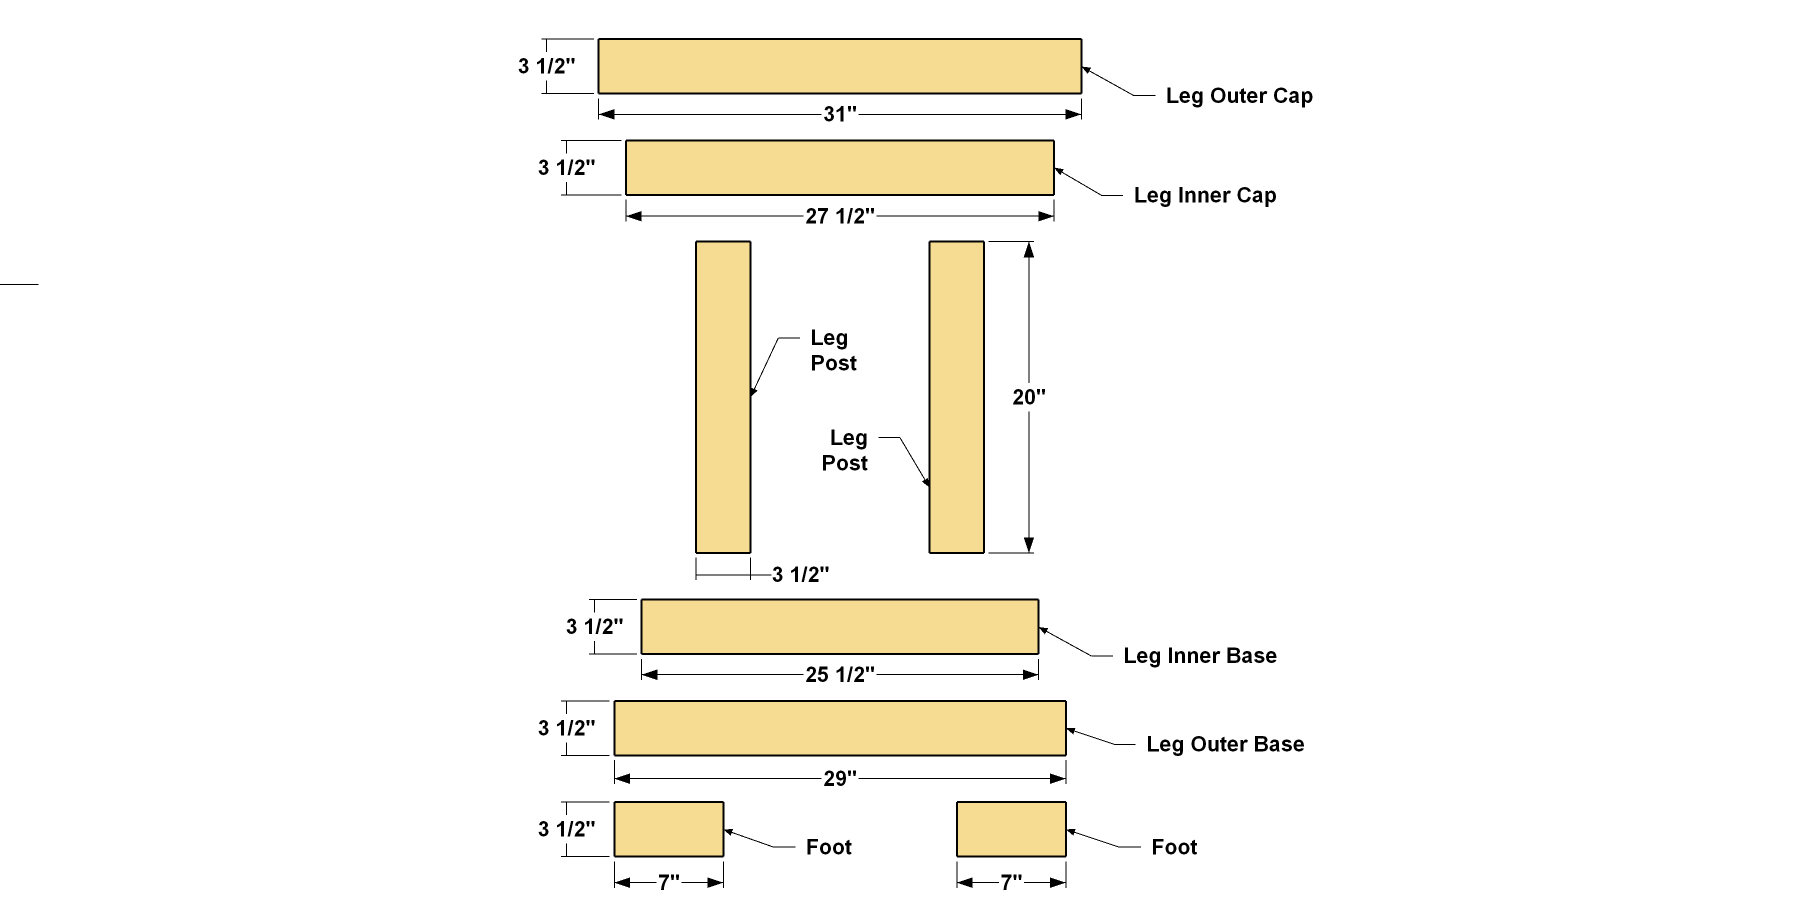
- 4 Leg Post , 3 1/2" x 3 1/2" x 20"
- 2 Leg Inner Base , 1 1/2" x 3 1/2" x 25 1/2"
- 2 Leg Outer Base , 1 1/2" x 3 1/2" x 29"
- 2 Leg Inner Cap , 1 1/2" x 3 1/2" x 27 1/2"
- 2 Leg Outer Cap , 1 1/2" x 3 1/2" x 31"
- 4 Foot , 1 1/2" x 3 1/2" x 7"
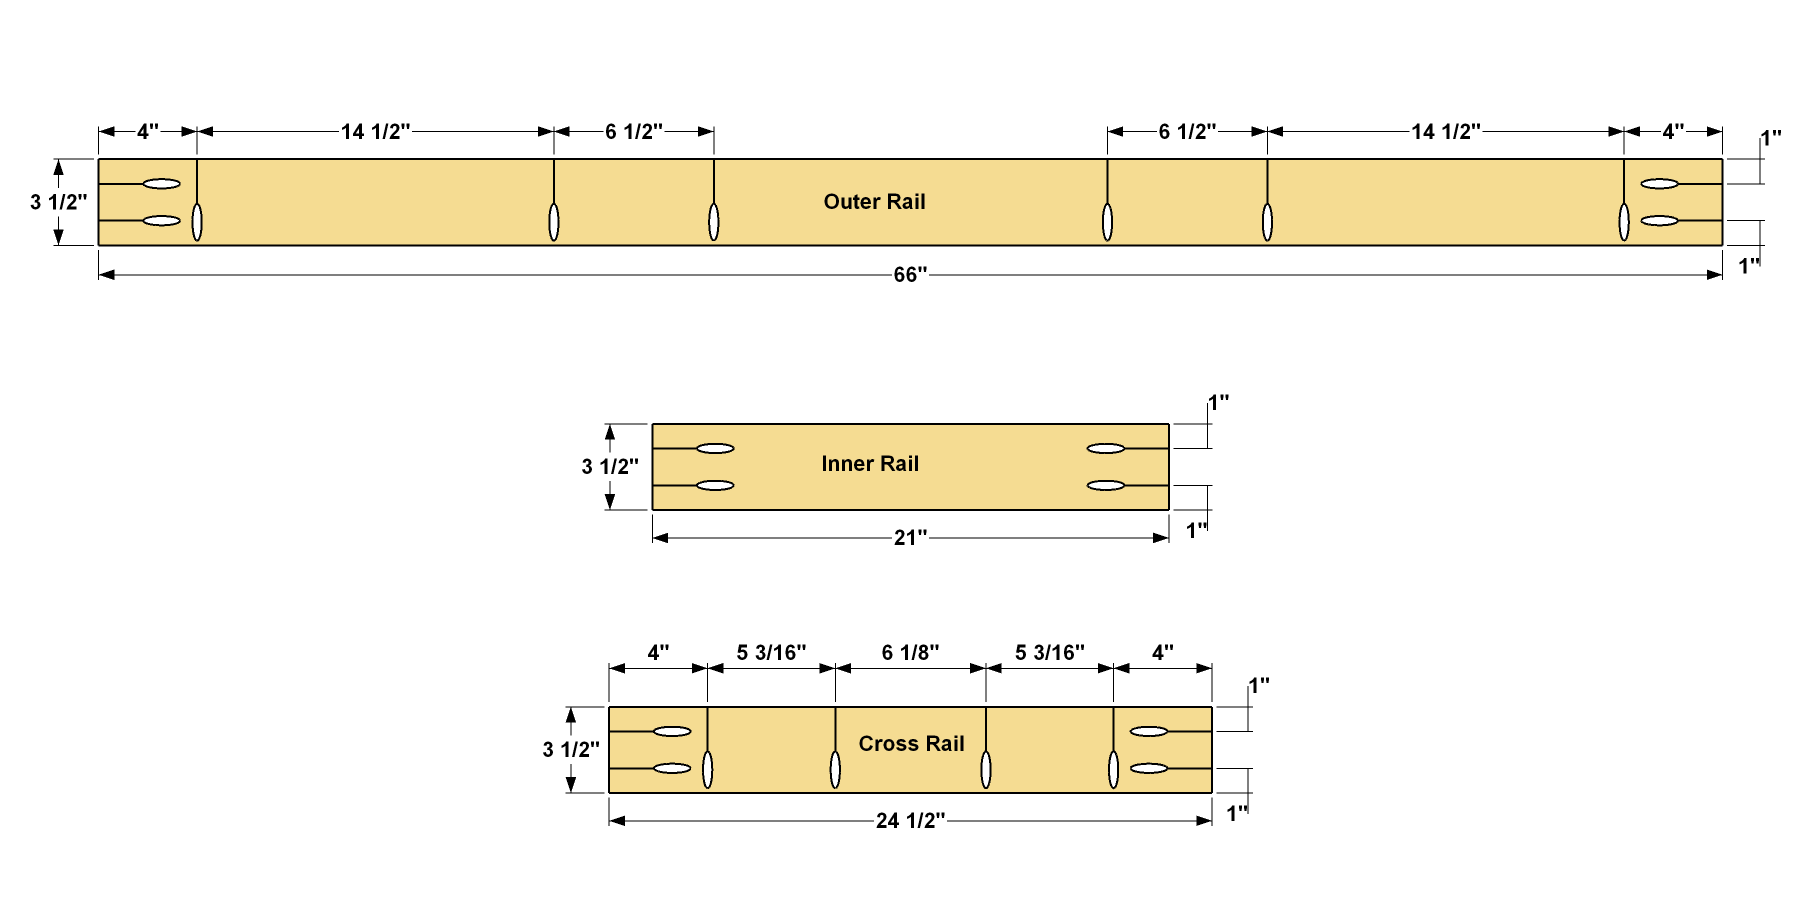
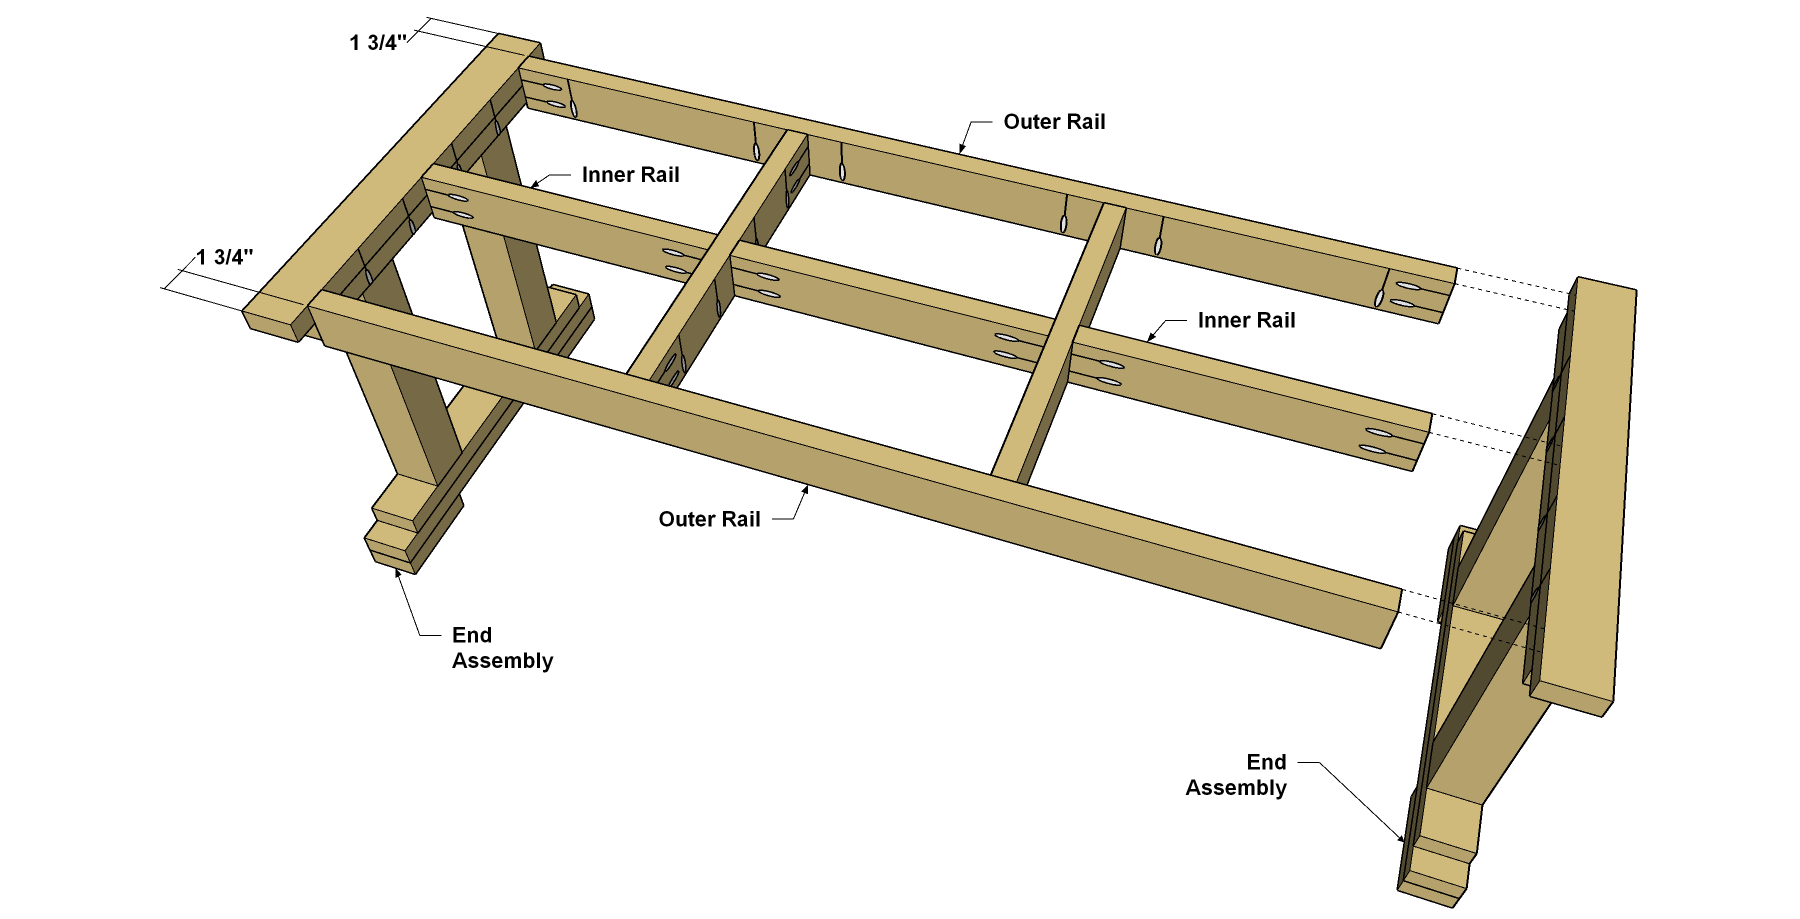
- 2 Outer Rail , 1 1/2" x 3 1/2" x 66"
- 3 Inner Rail , 1 1/2" x 3 1/2" x 21"
- 2 Cross Rail , 1 1/2" x 3 1/2" x 24 1/2"
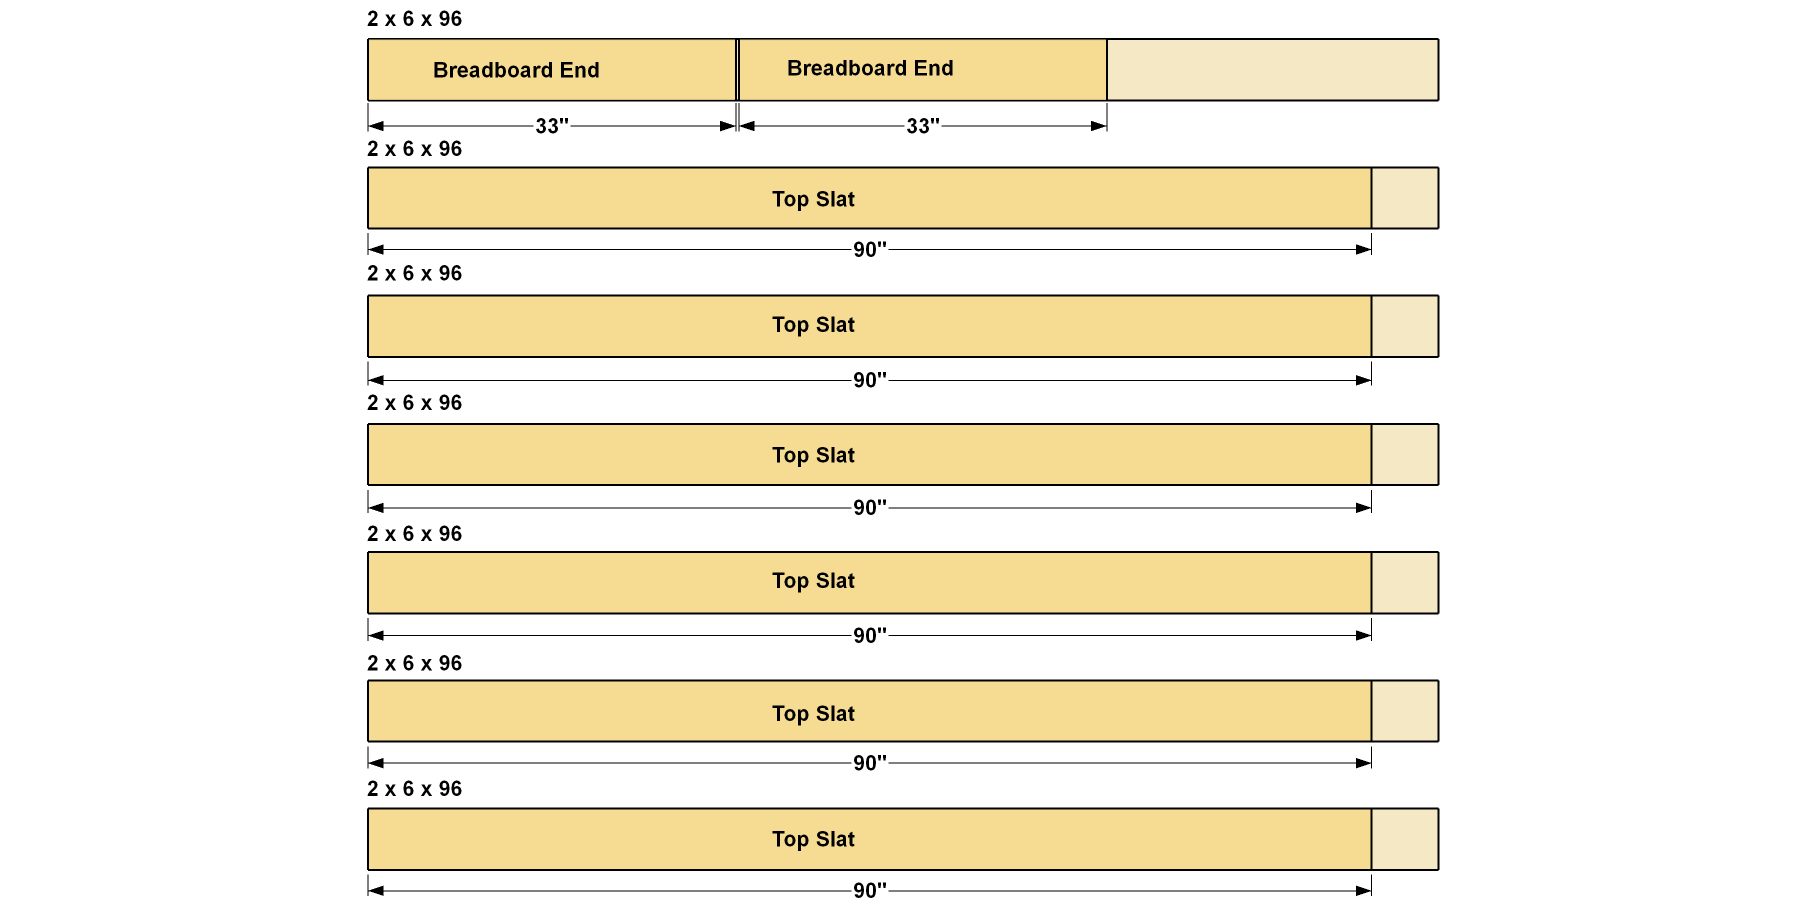
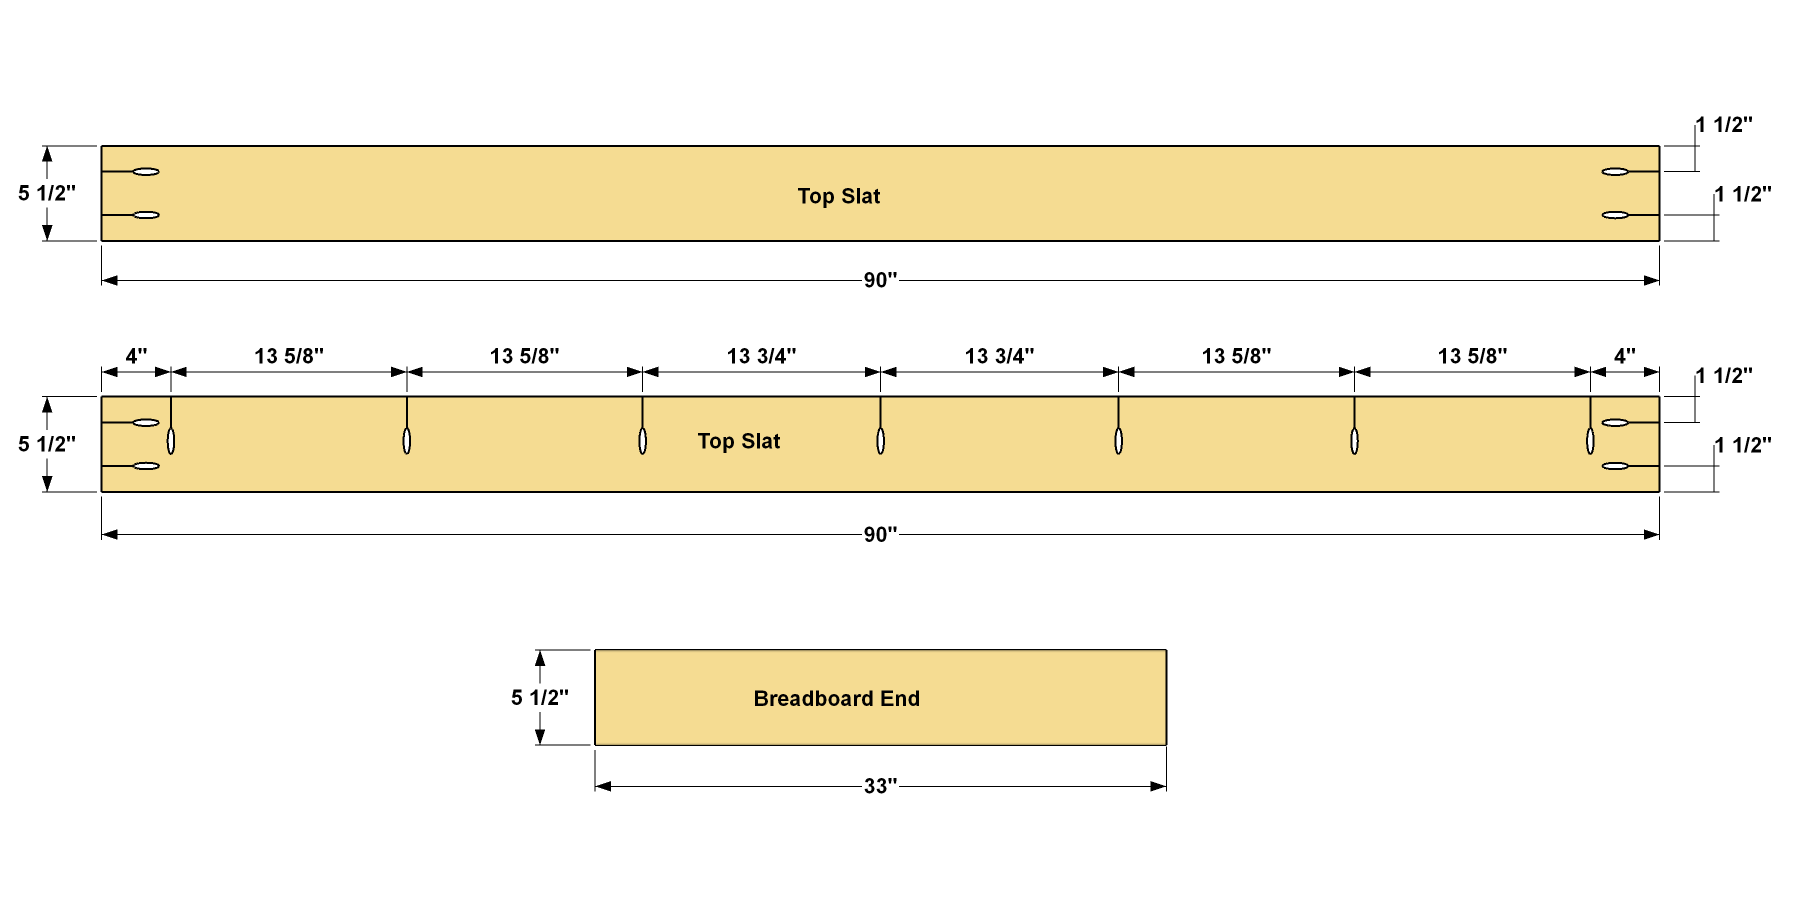
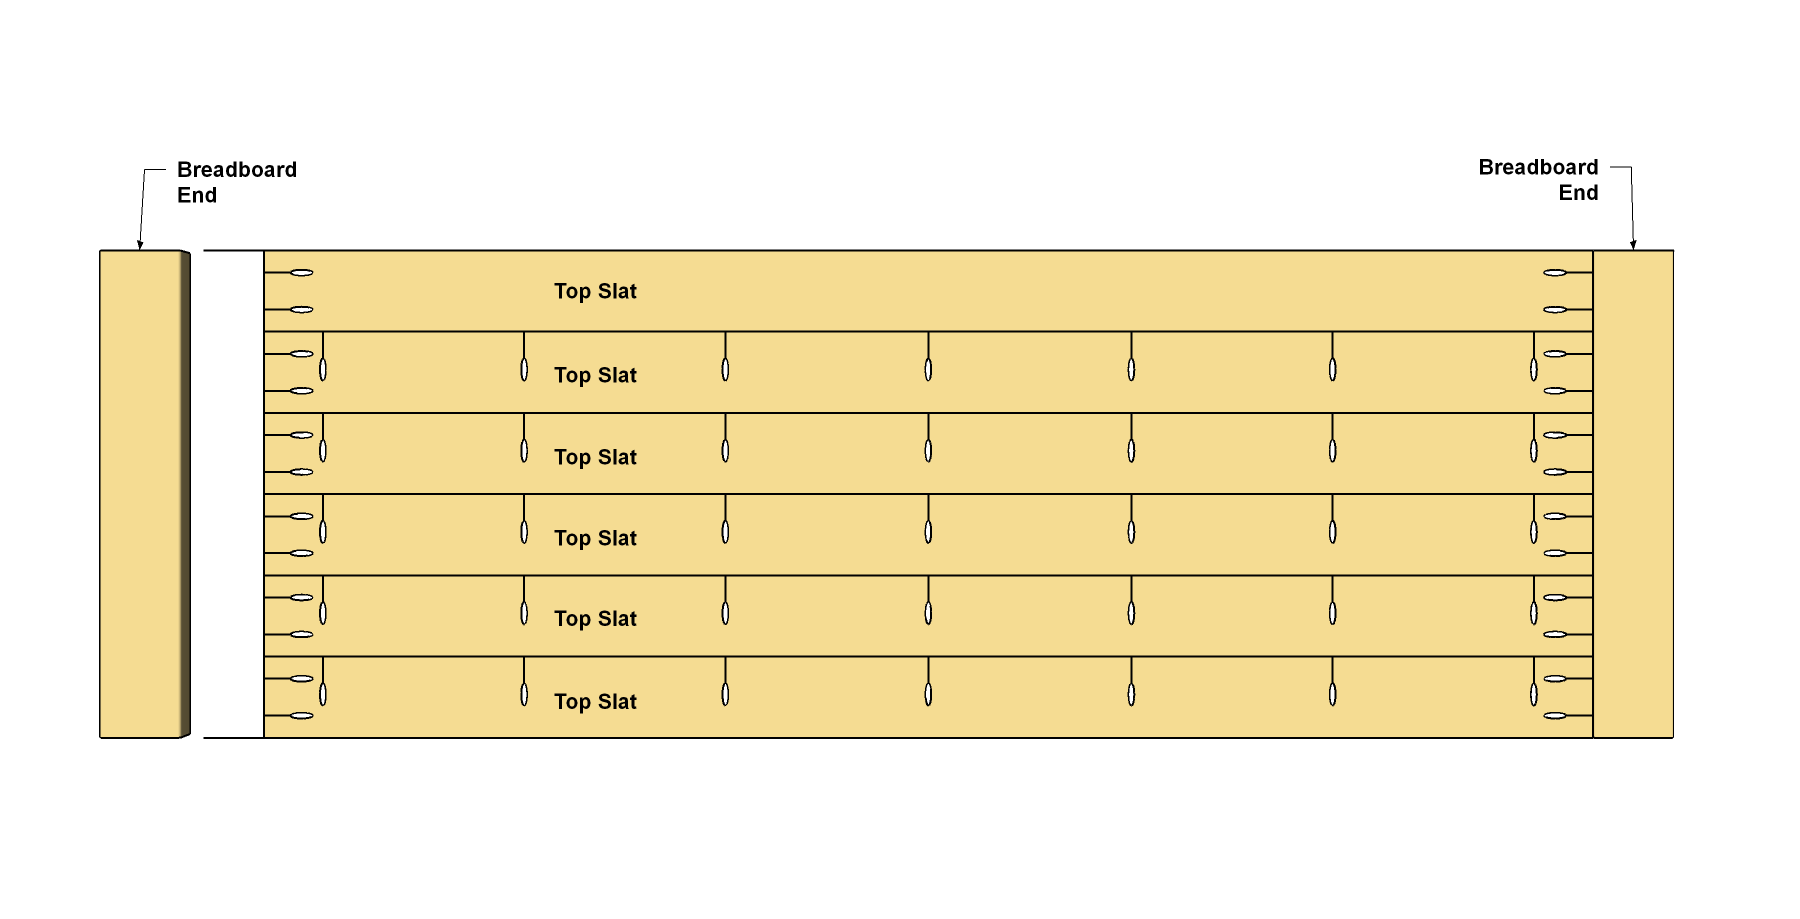
- 6 Top Slat , 1 1/2" x 5 1/2" x 90"
- 2 Breadboard End , 1 1/2" x 5 1/2" x 33"
Directions
-
Make the End Parts
Start by cutting the parts for the end assemblies. Cut four Leg Posts to length from a 4x4 board, as shown in the cutting diagram. Then, from 2x4 boards, cut two Leg Inner Caps, Two Leg Outer Caps, two Leg Inner Bases, two Leg Outer Bases, and four Feet. Sand all of the parts smooth.
-
Assemble the Ends
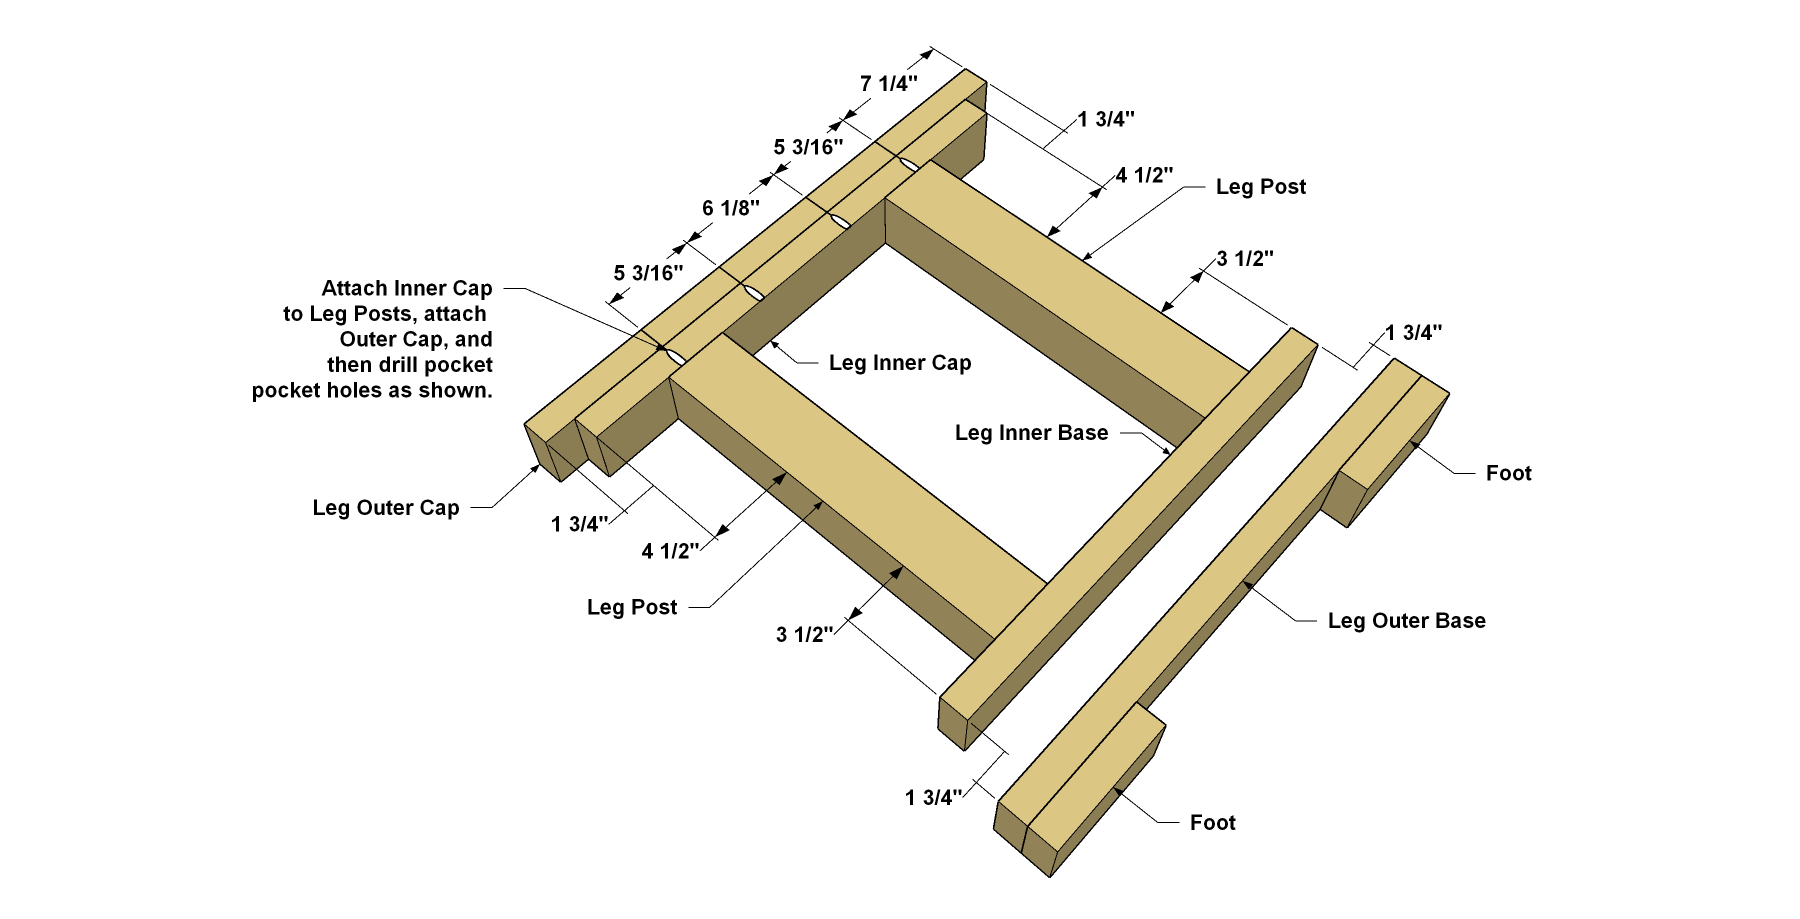
Now you can glue and screw the parts together to create two end assemblies. First, spread glue on the ends of the Leg Posts. Align the Leg Inner Base and Leg Inner Cap with the Leg Posts, as shown, and then clamp everything. Drill two pilot holes through the Cap and Base in to the ends of the Leg Posts at each position. Then drive in 3" woodscrews. Next, position, glue, and clamp the Leg Outer Base and Leg Outer Cap. Drill pilot holes and attach them using 2 1/2" woodscrews. Also attach the Feet using glue and more 2 1/2" woodscrews. Finally, add pocket holes on the inside face of each end assembly, as shown. These will be used to help secure the table top later. To drill these holes, set your Kreg® Pocket-Hole Jig and bit for 1 1/2"-thick material.
-
Make the Table Rails
Now you can make the rail assembly that spans between the table ends. Cut two Outer Rails, three Inner Rails, and two Cross Rails to length from 2x4 boards, as shown in the cutting diagram. Drill pocket holes in these parts, as shown. Sand all of the parts smooth.
-
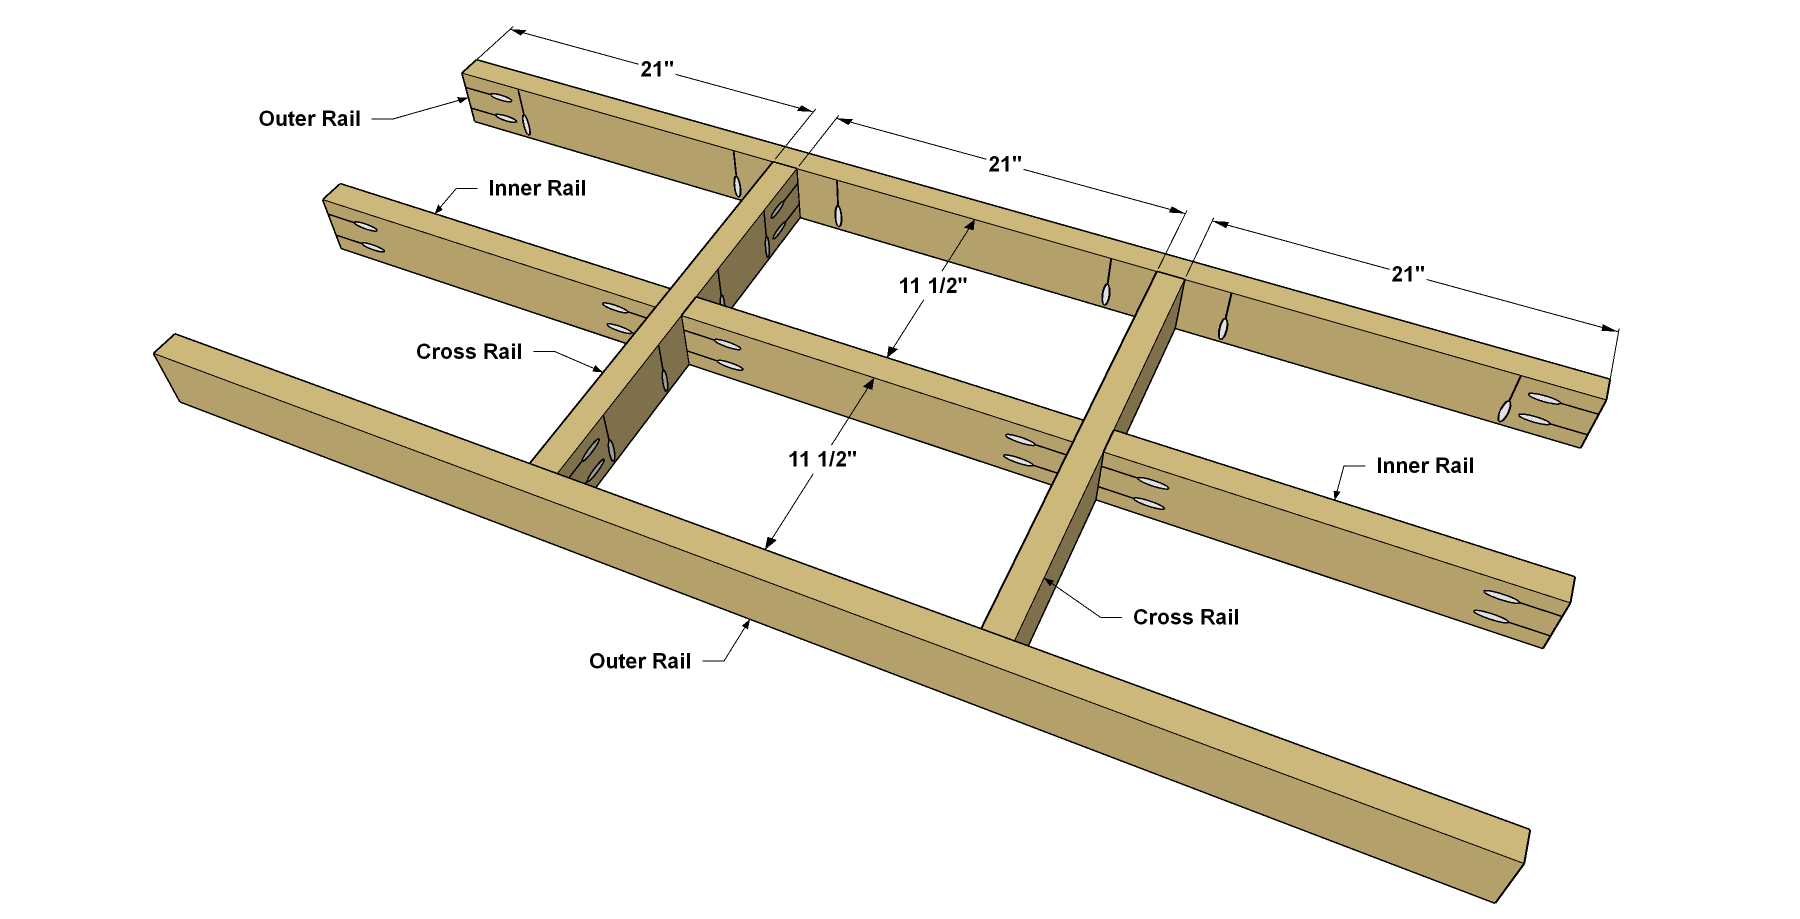
Assemble the Rails
Next, put the rail assembly together. Position the parts where shown, making sure that all of the pocket holes that will attach the top later are pointed in the same direction. Attach all of the rails using 2 1/2" Kreg Pocket-Hole Screws.
-
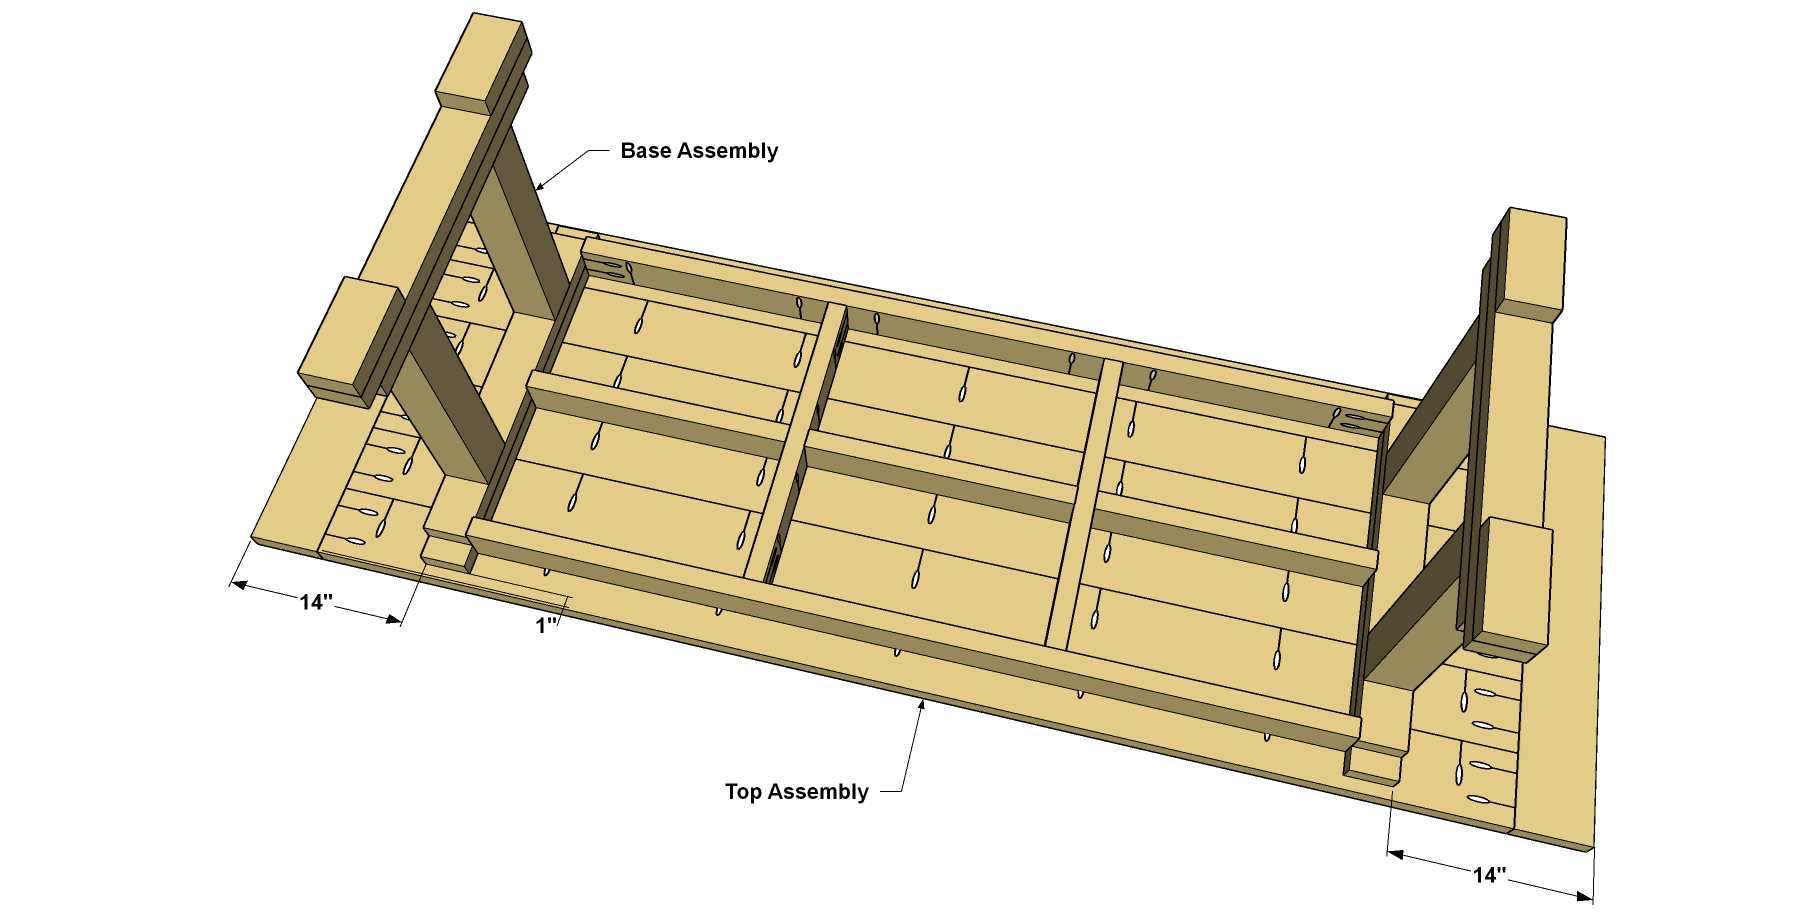
Connect the Rails to the Ends
Attach the rail assembly to the ends. The easiest way to do this is to lay the rail assembly on a flat surface, making sure the pocket holes that will attach the top are oriented correctly. Then position the end assemblies and attach them using 2 1/2" Kreg Pocket-Hole Screws.
-
Cut the Top Parts
Cut six Top Slats to length from 2x6 boards, as shown in the cutting diagram. Also cut two Breadboard Ends. You can set those aside for the moment. Then drill pocket holes in the ends of all six Top Slats, as shown. Set one Top Slat aside, and then drill pocket holes along one edge of the other five Slats, as shown. Sand all of the Slats and the Breadboard Ends.
-
Assemble the Top
With the top parts done, you can assemble them to create the table top. Position the Slats as shown, and spread glue along the mating edges. Clamp them together making sure that all of the ends are flush. Attach the Top Slats to one another using 2 1/2" Kreg Pocket-Hole Screws. Then spread glue along one edge of each Breadboard End, and then attach them to the Top Slats using 2 1/2" Kreg Pocket-Hole Screws.
-
Stain, Paint, and Attach the Top
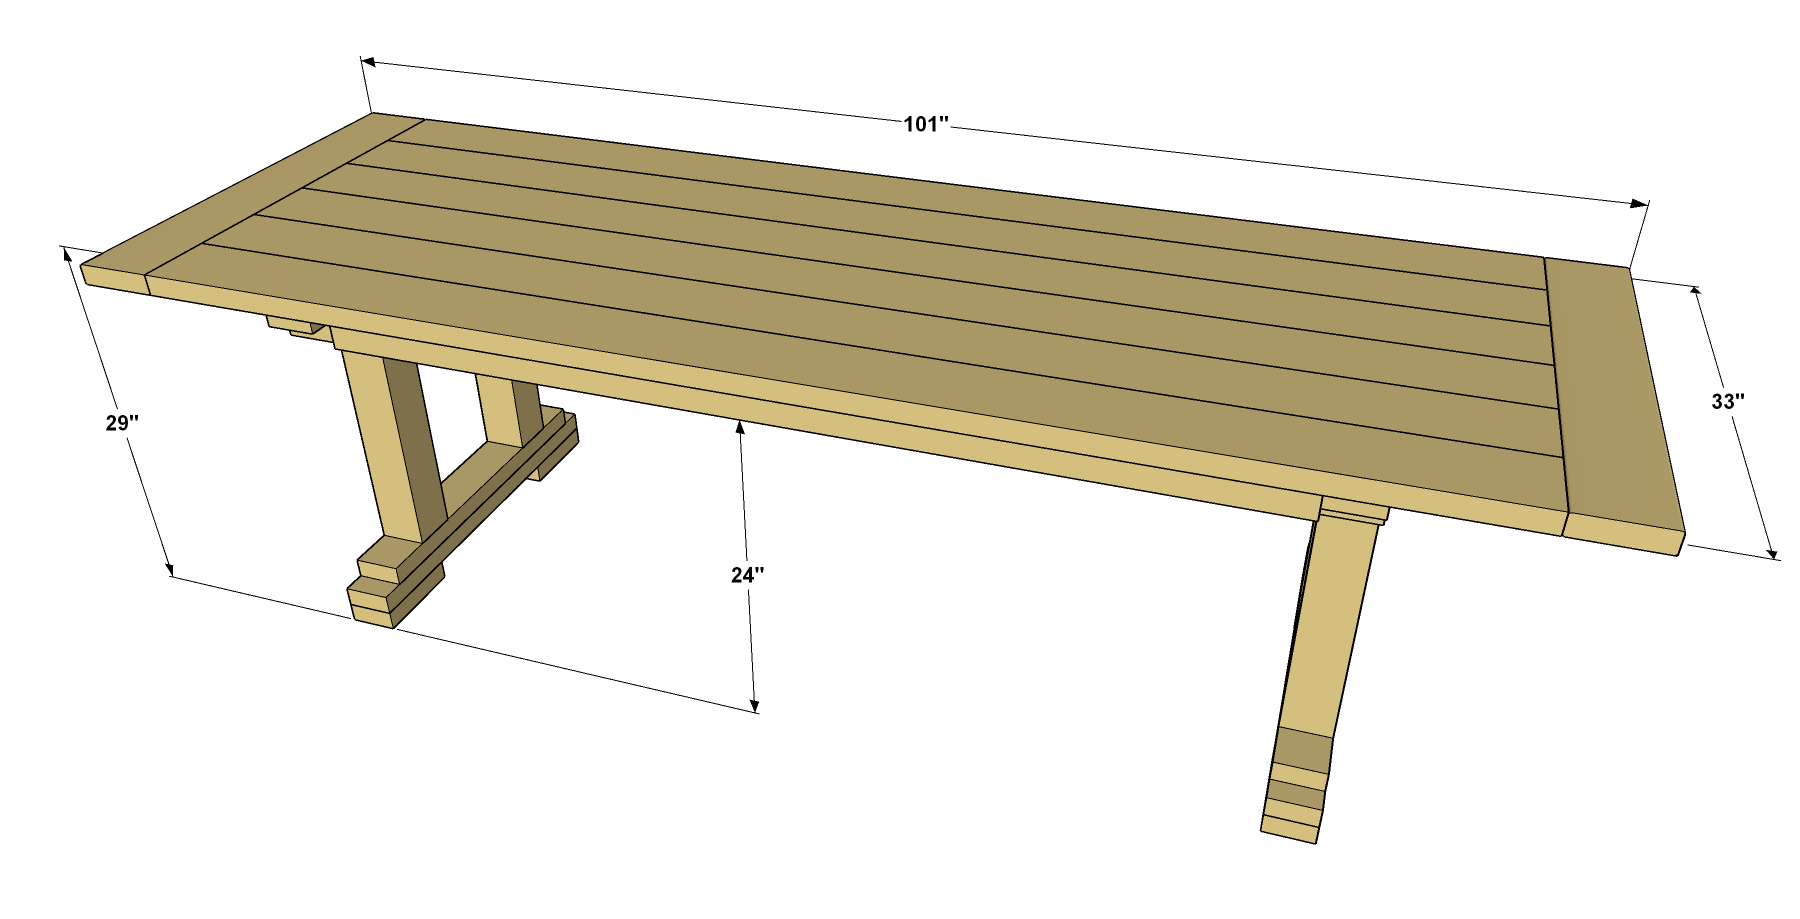
Before you attach the top, it’s a good idea to apply stain, paint, or clear finish. It’s a lot easier to get to the pieces. Plus, if you plan to paint the base and stain the top as we did, you won’t have to worry about masking. Let the paint and stain dry before moving to final assembly. Lay the table top face down on a flat surface, using a blanket to protect the table surface. Then position the table base. Make sure the overhangs are equal on both ends and on both edges. Then secure the top using 2 1/2" Kreg Pocket-Hole Screws, and your rustic farmhouse table is done!