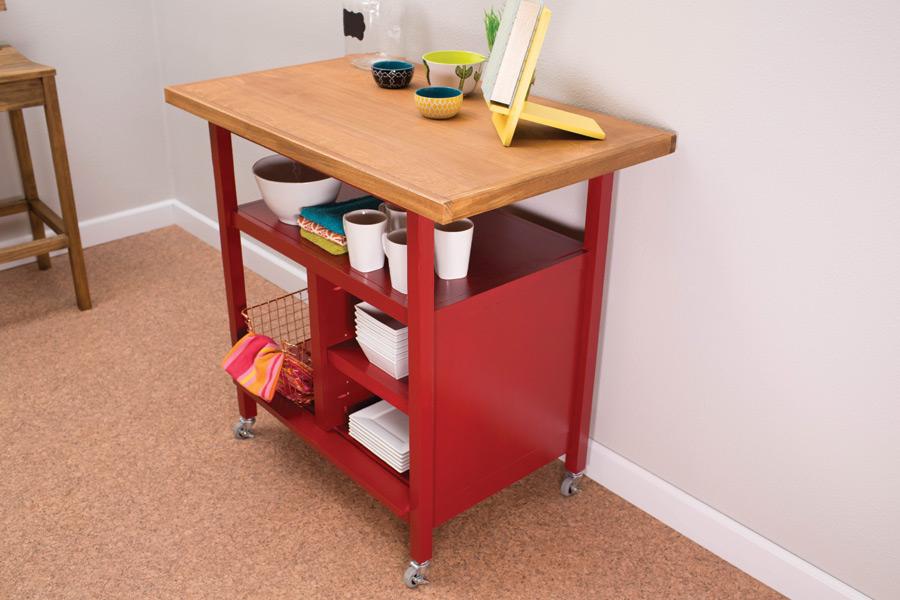

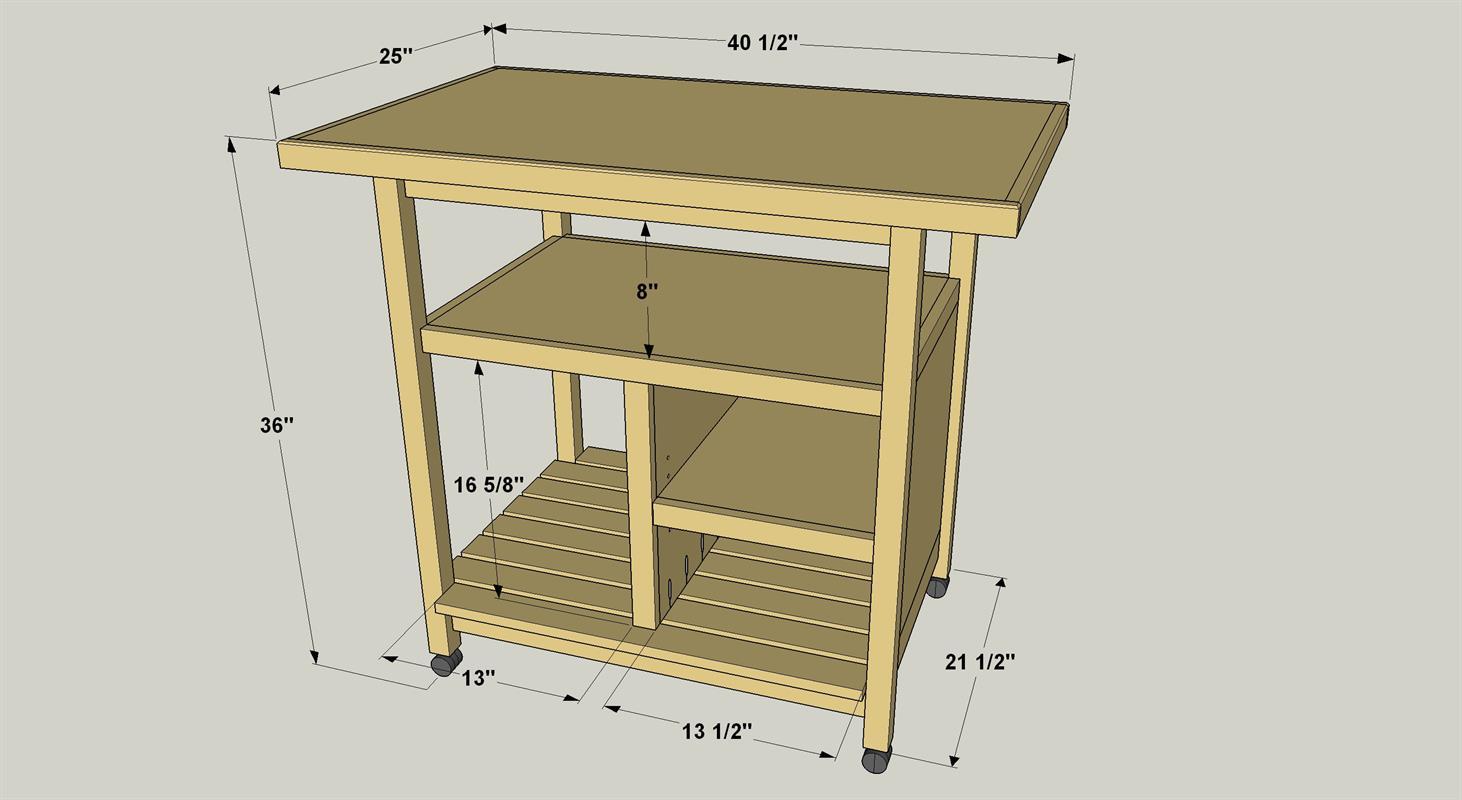


This kitchen cart offers a large work space plus ample storage. Plus, the cart sits on casters, so you can roll it where you want it, and easily move it out of the way. Whether you use it as an island or as a cart that you pull out on occasion, you’ll appreciate everything it has to offer.
Tools
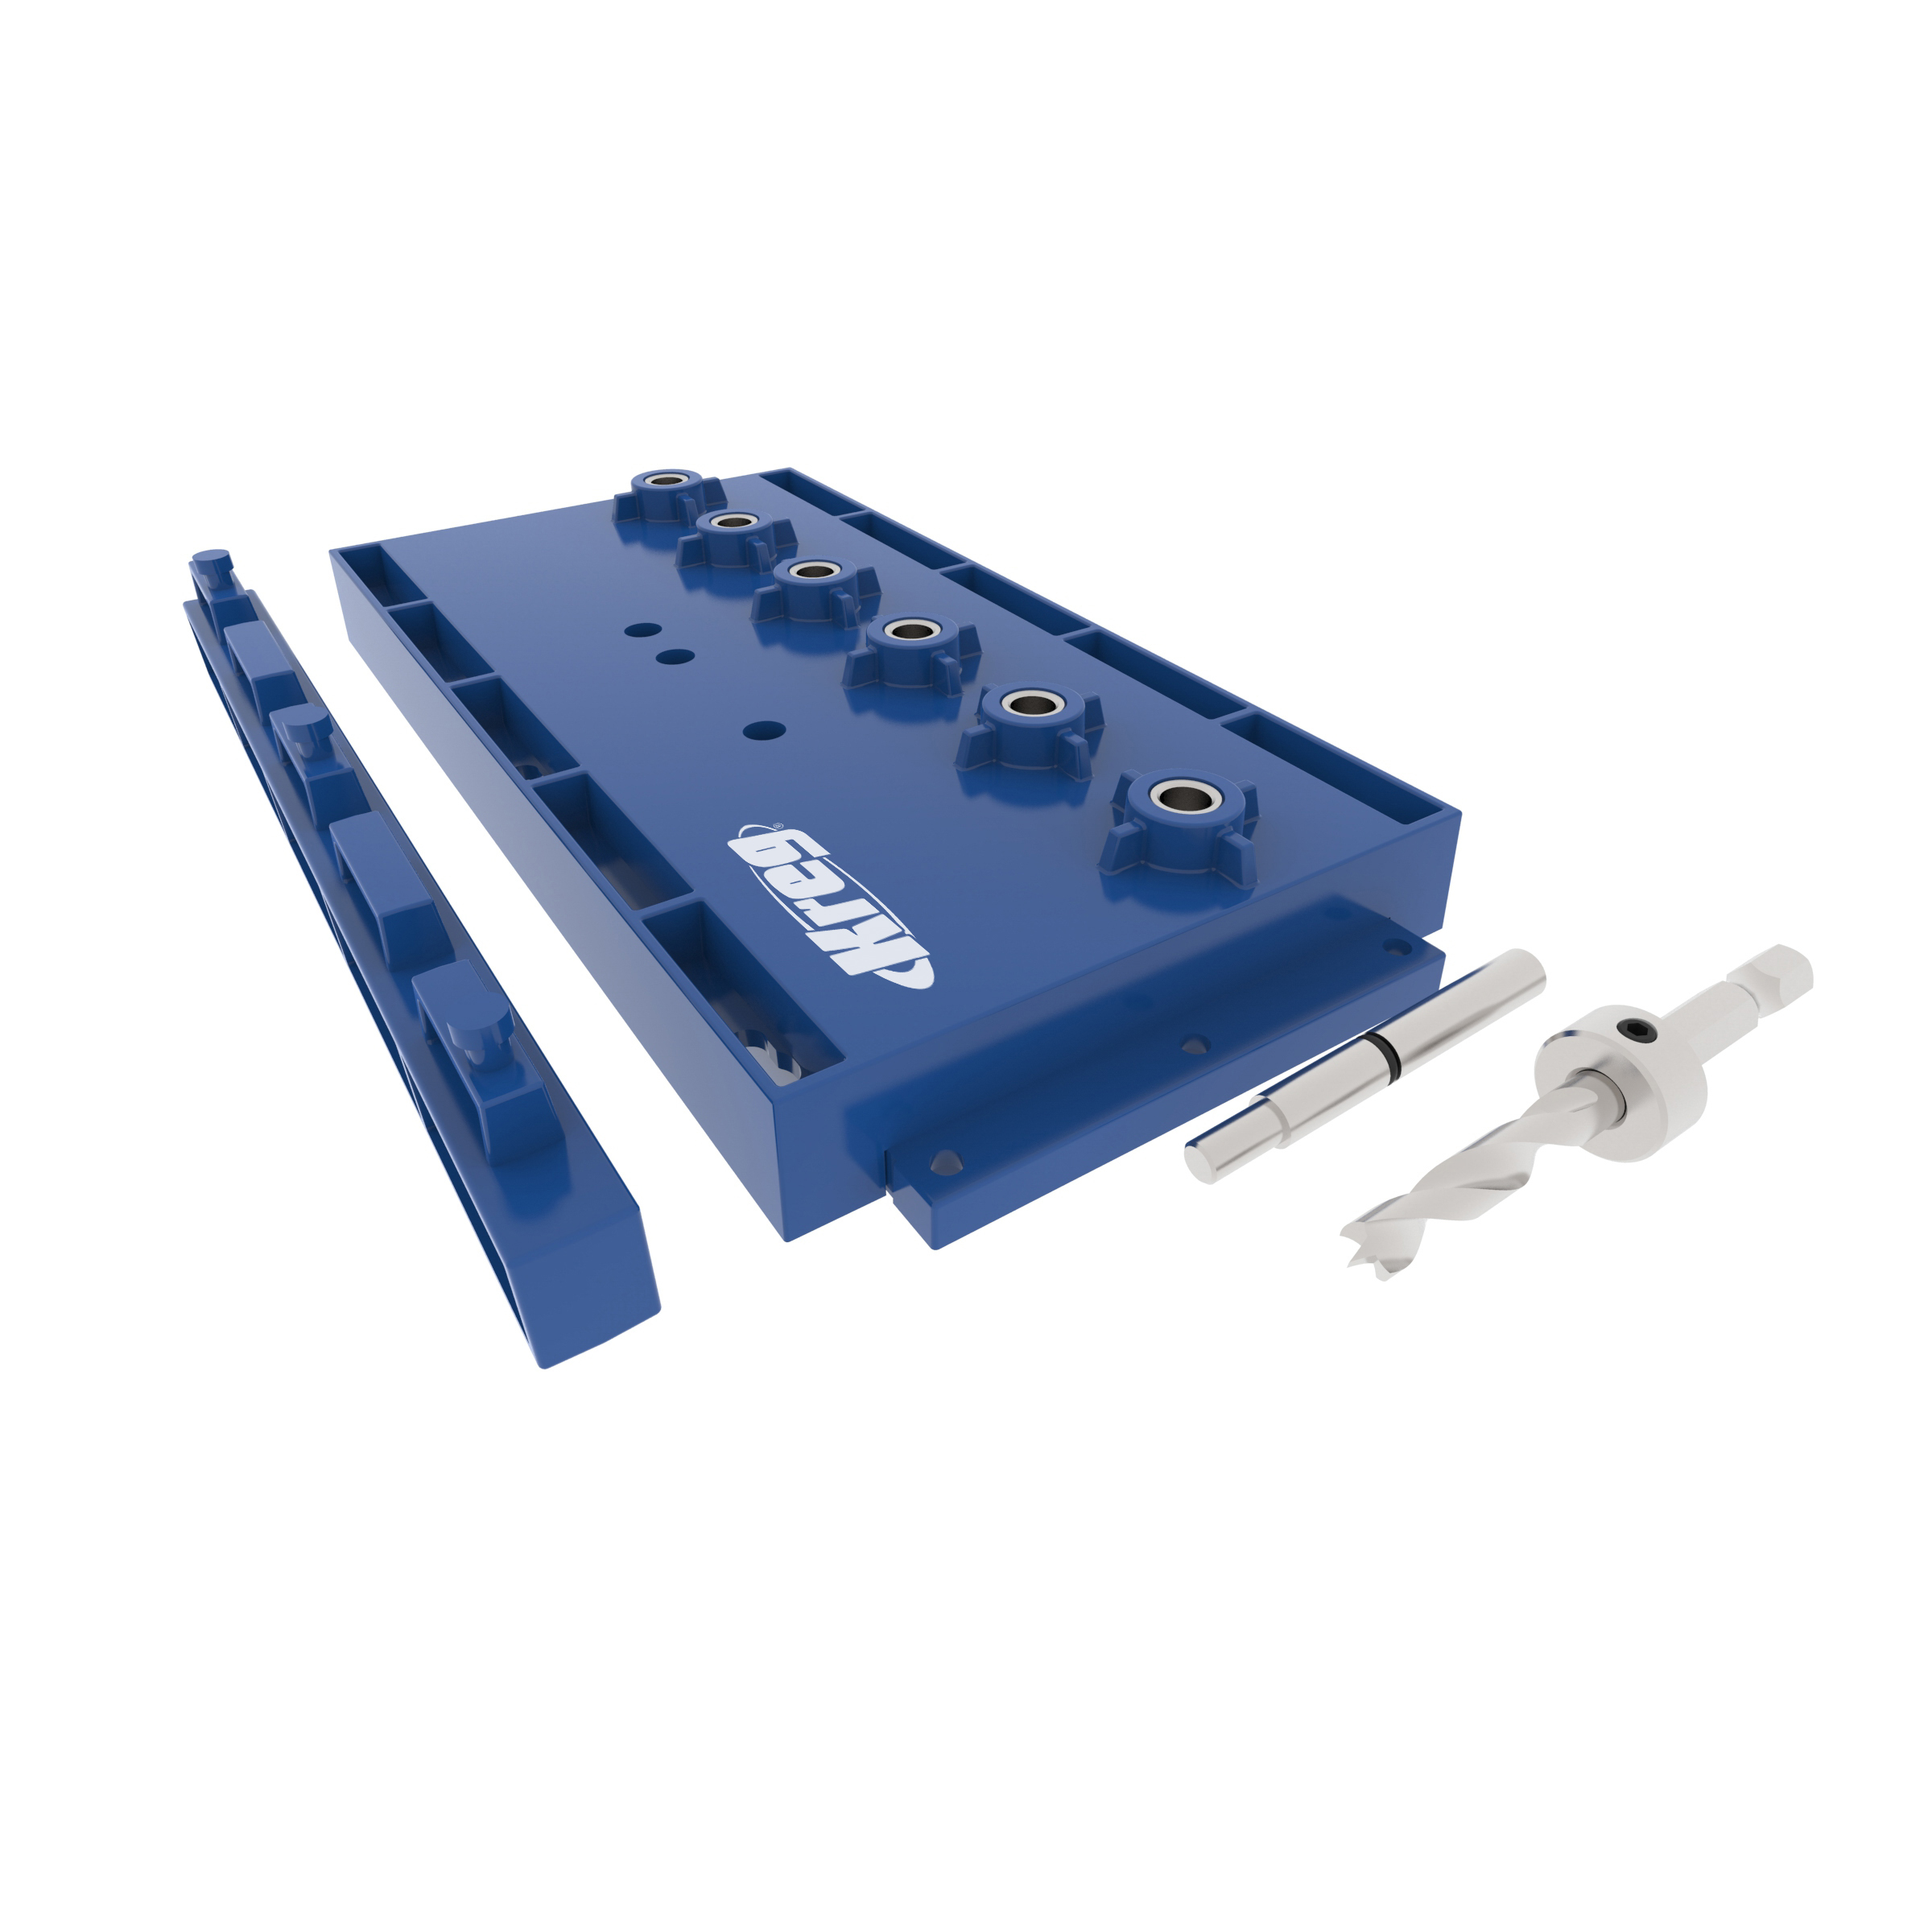
Kreg Tools


Other Tools
-
Miter Saw

-
Tape Measure
Materials
Wood Products
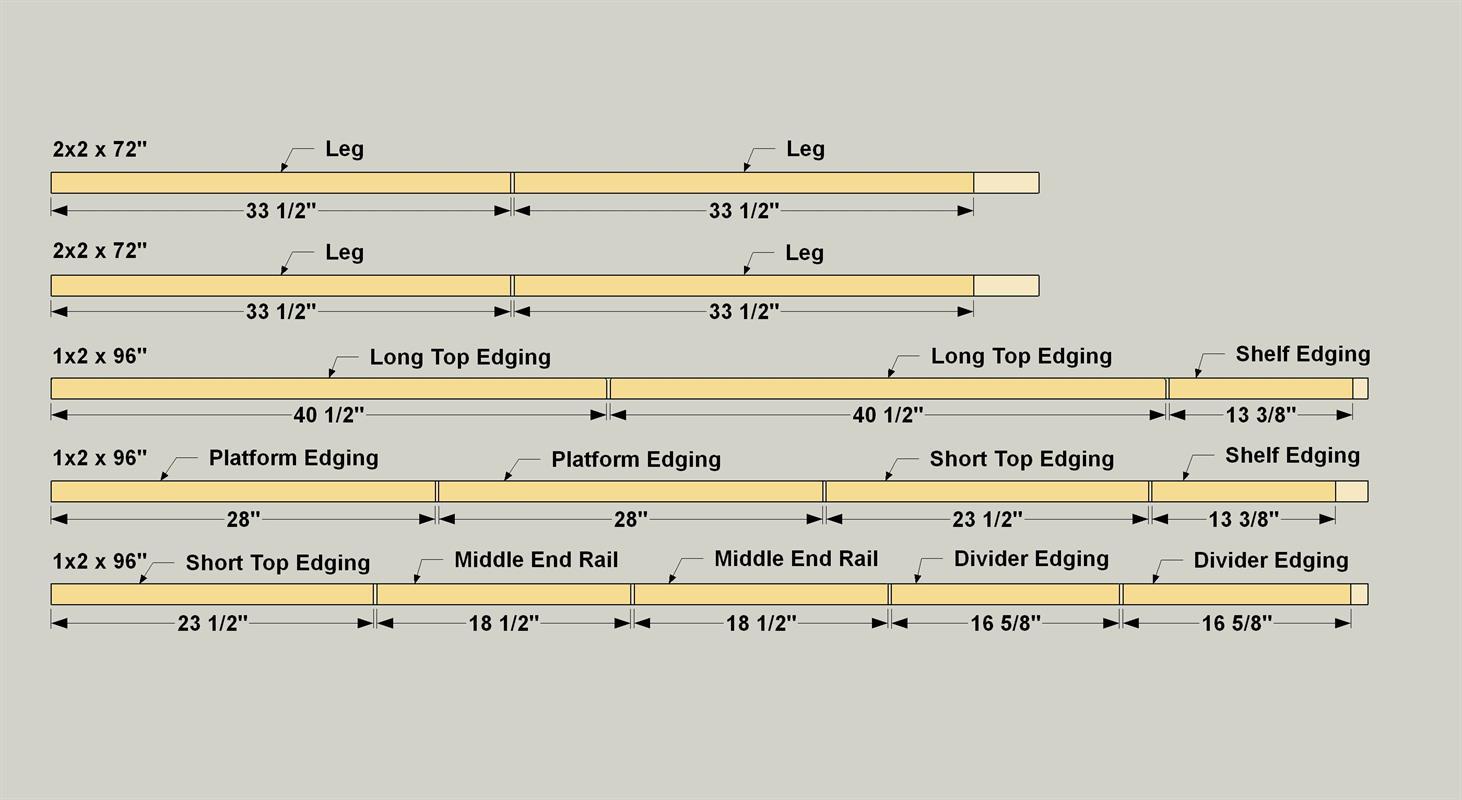
- 2 Board , 2x2 , 72"
- 3 Board , 1x2 , 96"
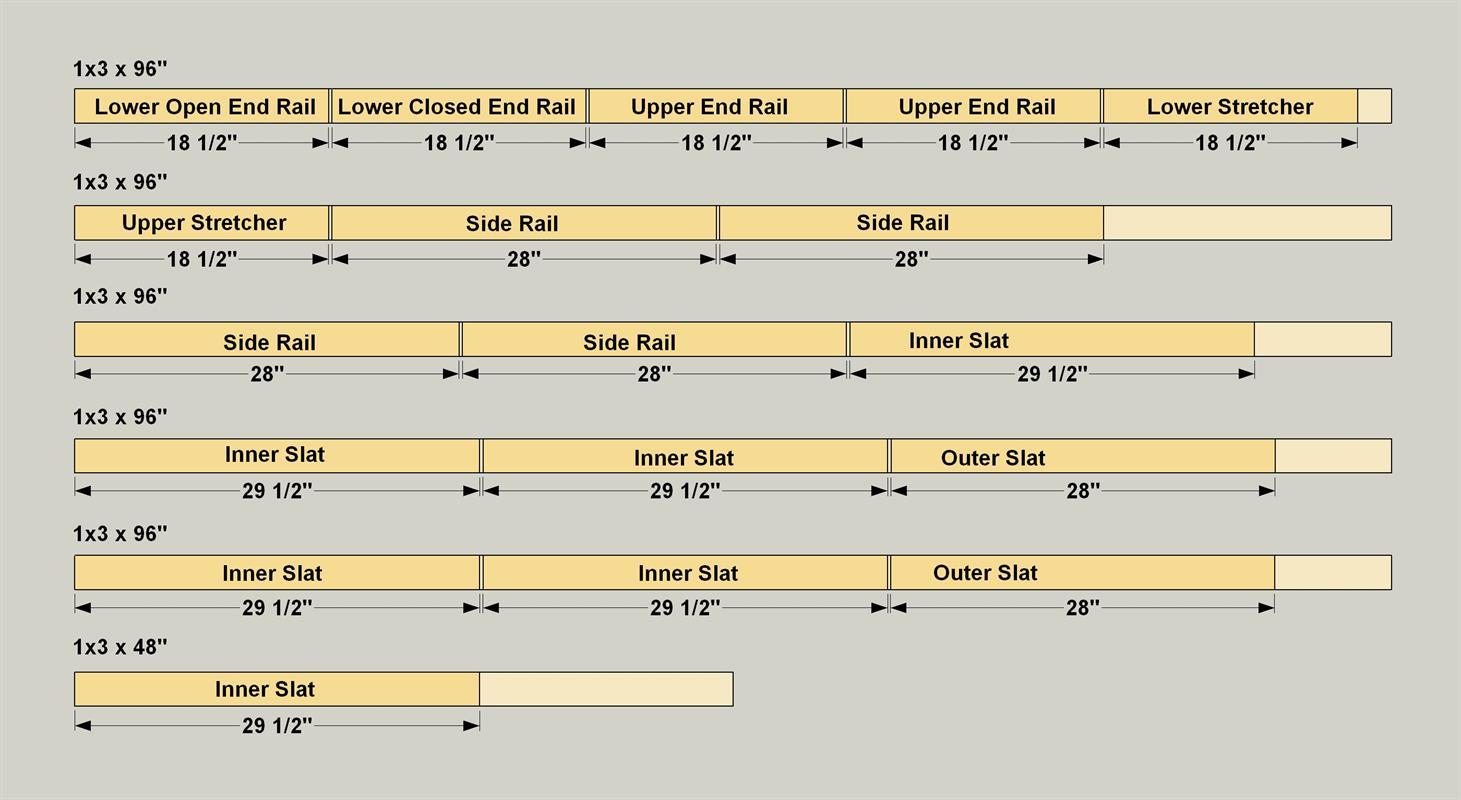
- 5 Board , 1x3 , 96"
- 1 Board , 1x3 , 48"
- 1 Plywood , 3/4" Thick , Full Sheet
Hardware & Supplies
- 180 1 1/4" coarse-thread pocket hole screws
- 4 2" swiveling casters
- 4 1/4" shelf pins
- 1 Wood glue
Cut List & Parts
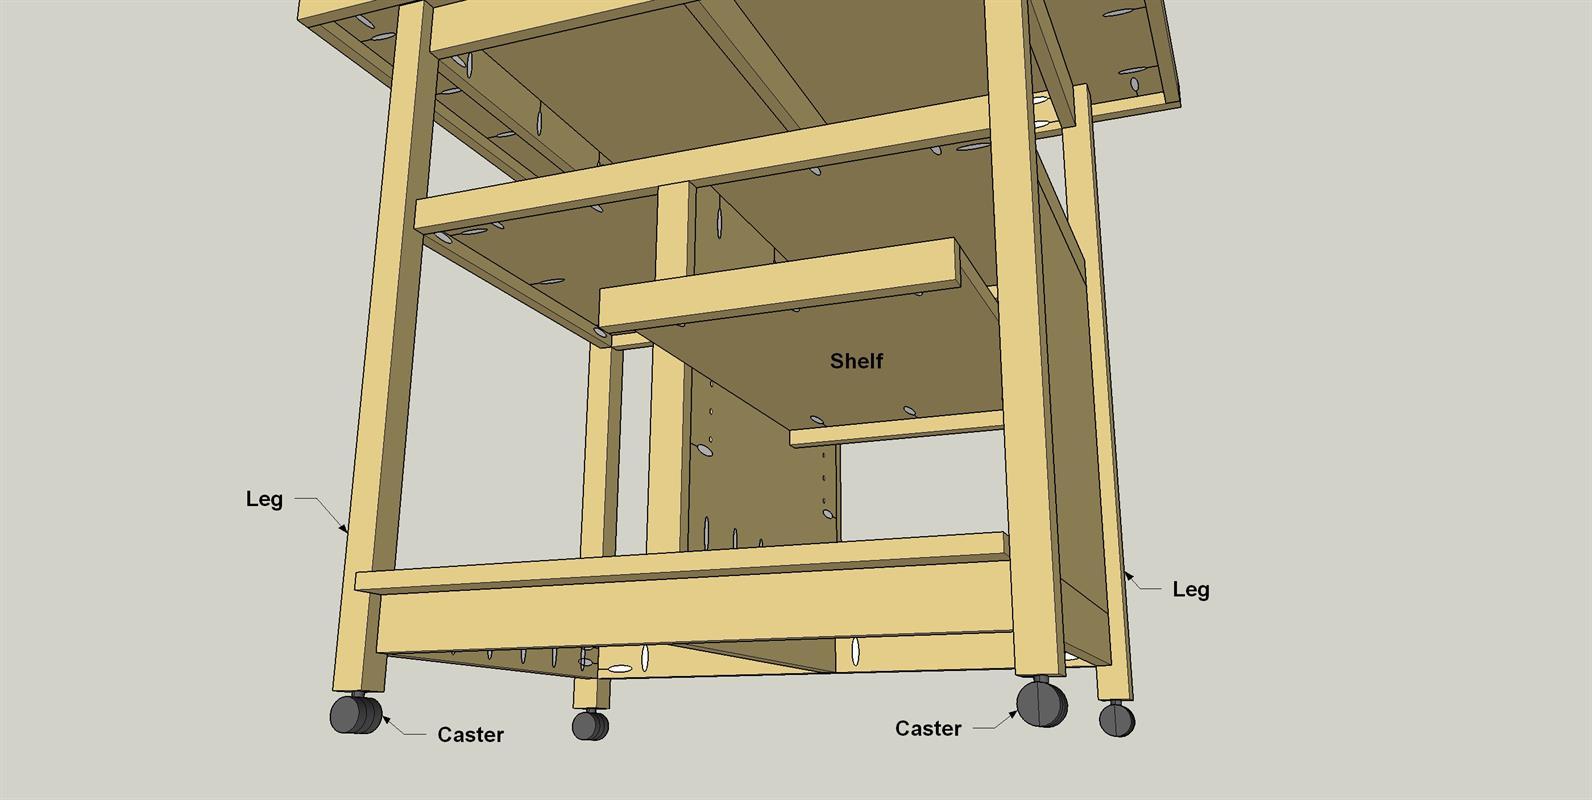
- 4 Leg , 1 1/2" x 1 1/2" x 33 1/2"
- 2 Upper End Rail , 3/4" x 2 1/2" x 18 1/2"
- 2 Middle End Rail , 3/4" x 1 1/2" x 18 1/2"
- 1 Lower Closed End Rail , 3/4" x 2 1/2" x 18 1/2"
- 1 Lower Open End Rail , 3/4" x 2 1/2" x 18 1/2"
- 1 End Panel , 3/4" ply x 17 3/8" x 18 1/2"
- 4 Side Rail , 3/4" x 2 1/2" x 28"
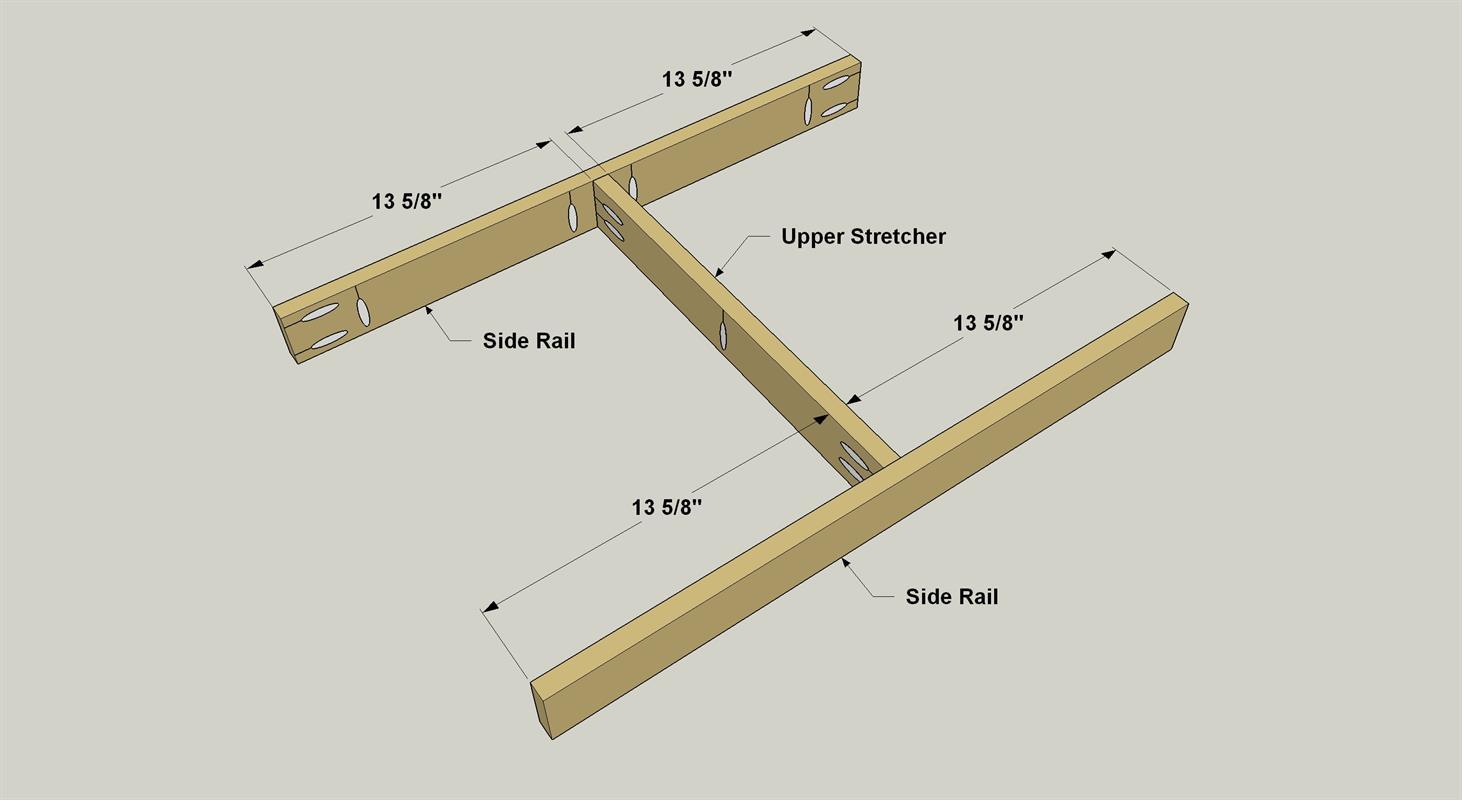
- 1 Upper Stretcher , 3/4" x 2 1/2" x 18 1/2"
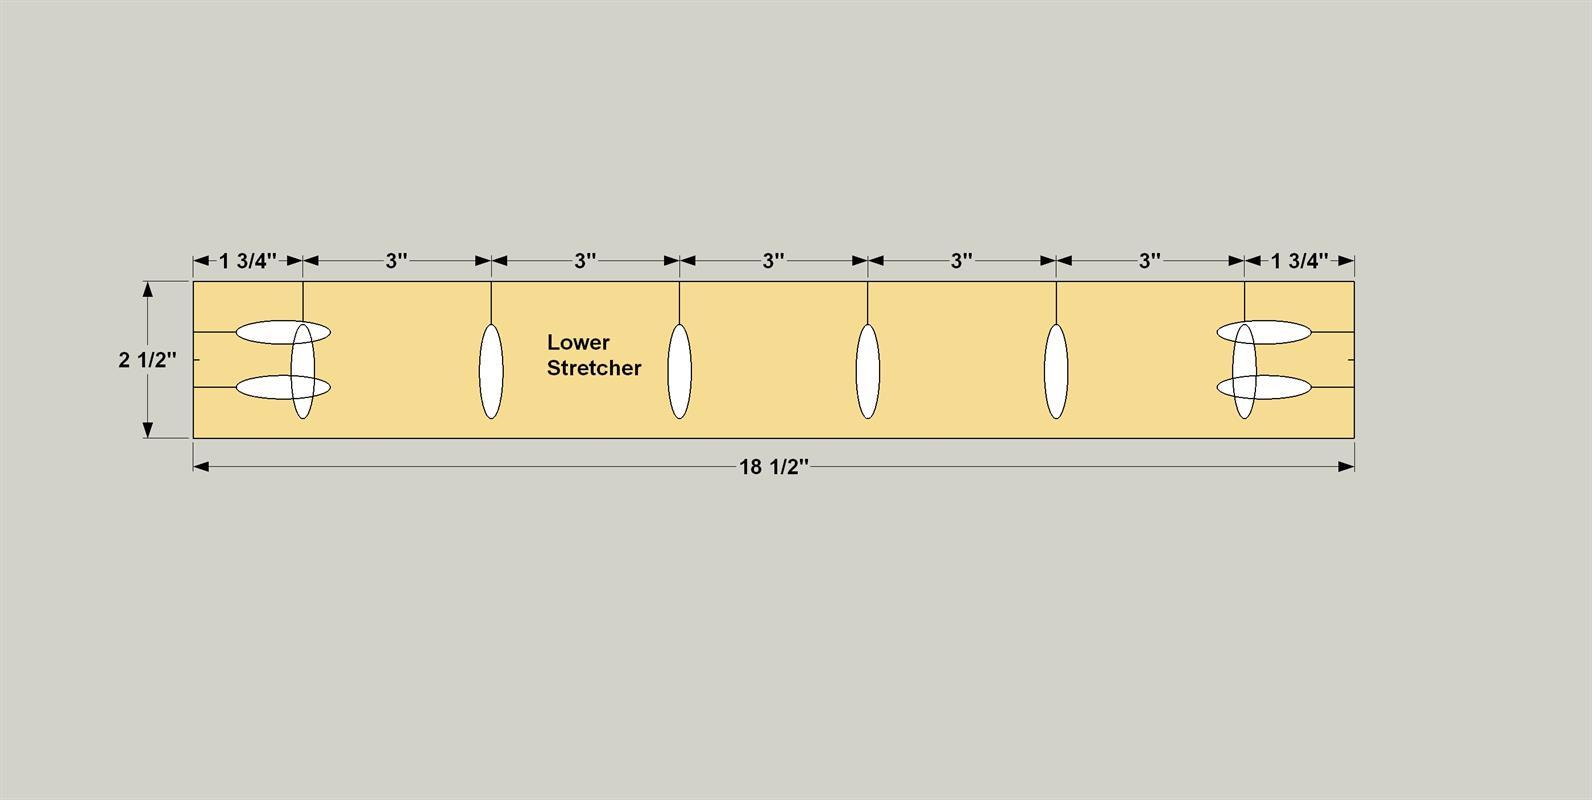
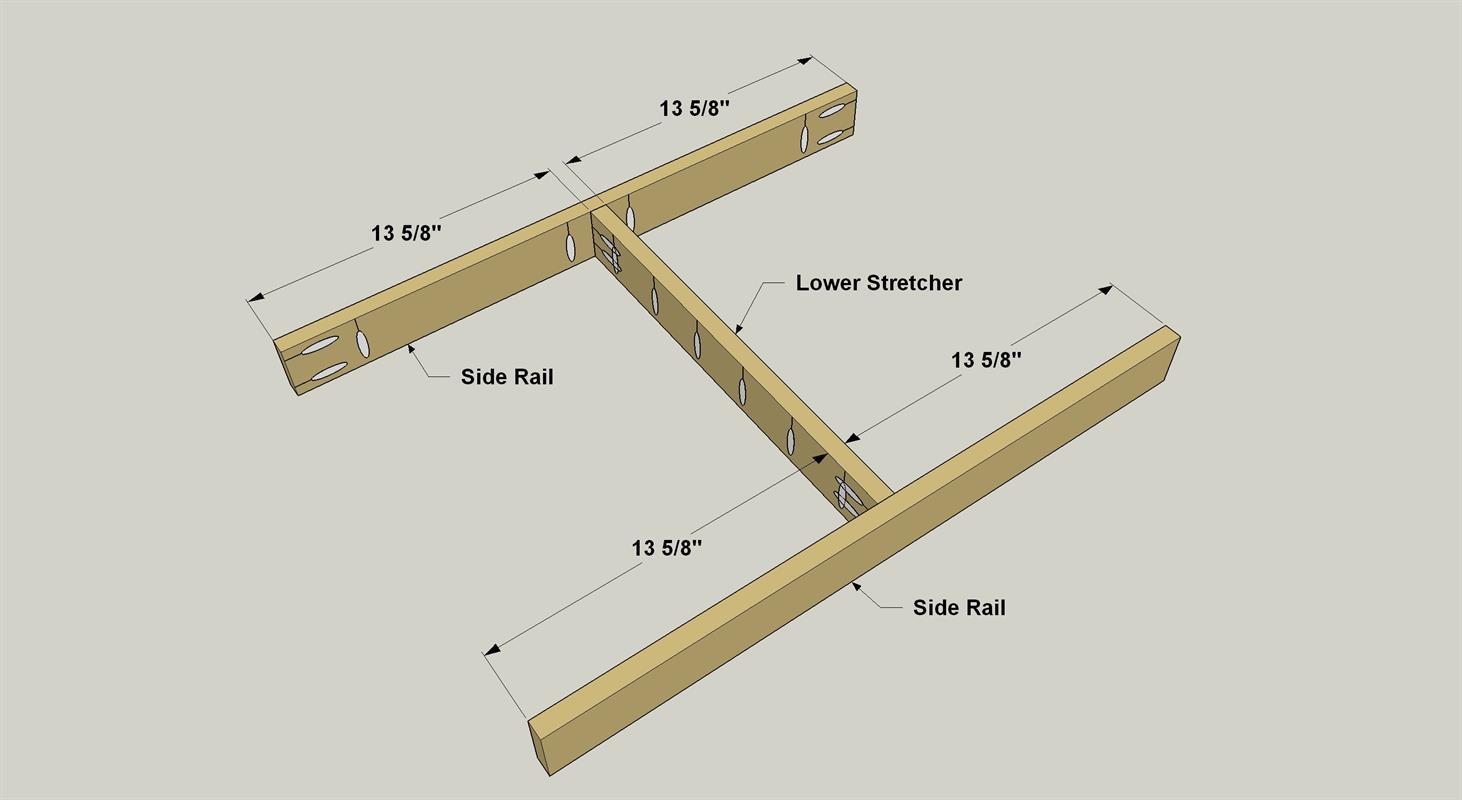
- 1 Lower Stretcher , 3/4" x 2 1/2" x 18 1/2"
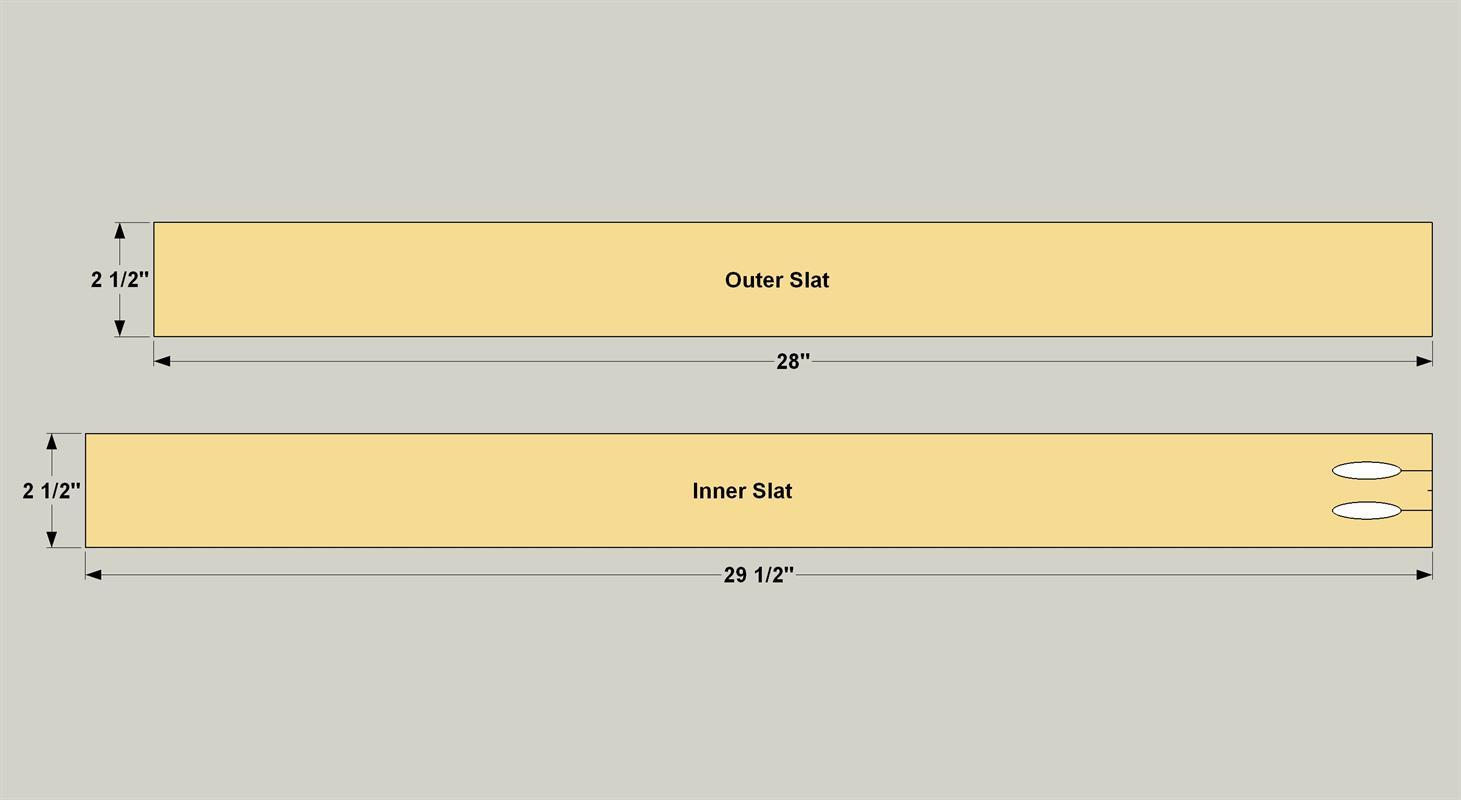
- 2 Outer Slat , 3/4" x 2 1/2" x 28"
- 6 Inner Slat , 3/4" x 2 1/2" x 29 1/2"
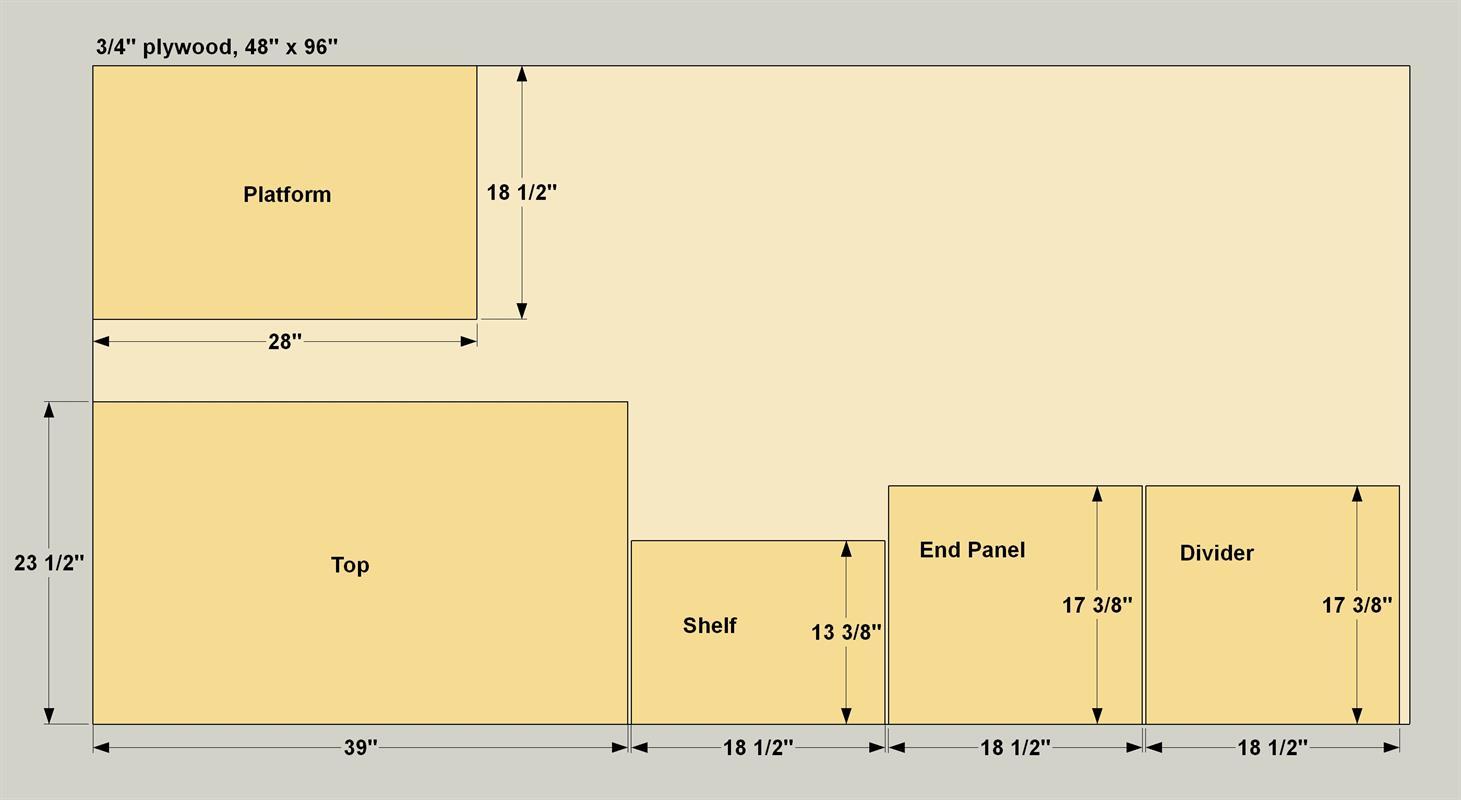
- 1 Top , 3/4" ply x 23 1/2" x 39"
- 2 Long Top Edging , 3/4" x 1 1/2" x 40 1/2"
- 2 Short Top Edging , 3/4" x 1 1/2" x 23 1/2"
- 1 Platform , 3/4" ply x 18 1/2" x 28"
- 2 Platform Edging , 3/4" x 1 1/2" x 28"
- 1 Divider , 3/4" ply x 17 3/8" x 18 1/2"
- 2 Divider Edging , 3/4" x 1 1/2" x 16 5/8"
- 1 Shelf , 3/4" ply x 13 3/8" x 18 1/2"
- 2 Shelf Edging , 3/4" x 1 1/2" x 13 3/8"
Directions
-
Make the Legs
Cut four Legs to size from a 2x2 board, as shown in the cutting diagram.
-
Make the Upper End Rails
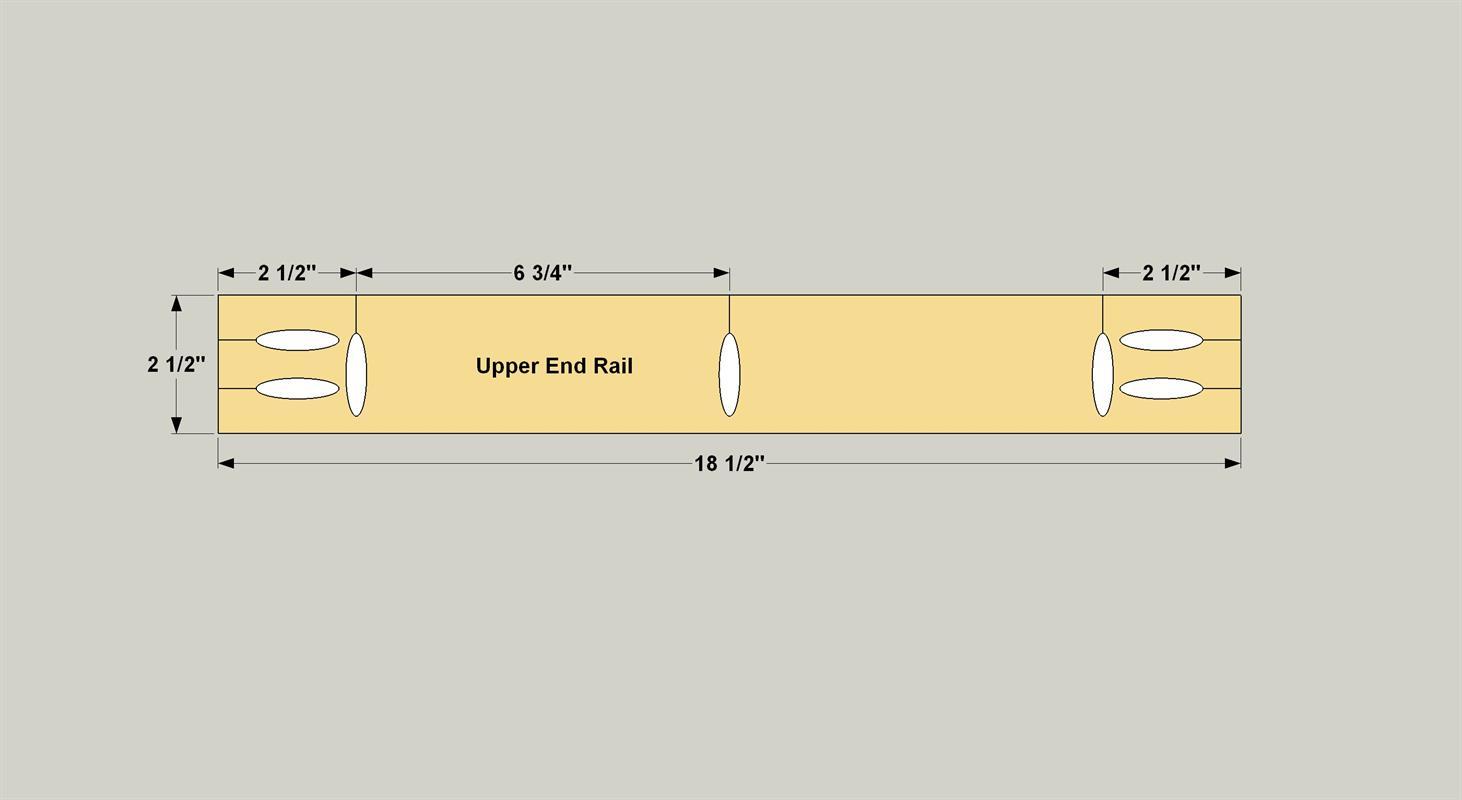
Cut two Upper End Rails to length from 1x3 boards, as shown in the cutting diagram. Then, with your pocket-hole jig set up for 3/4" material, drill pocket holes in the Upper End Rails, as shown.
-
Make the Middle End Rails
Cut two Middle End Rails to length from 1x2 boards, as shown in the cutting diagram. Then, with your pocket-hole jig set up for 3/4" material, drill pocket holes in the Middle End Rails, as shown.

-
Make a Lower Closed End Rail
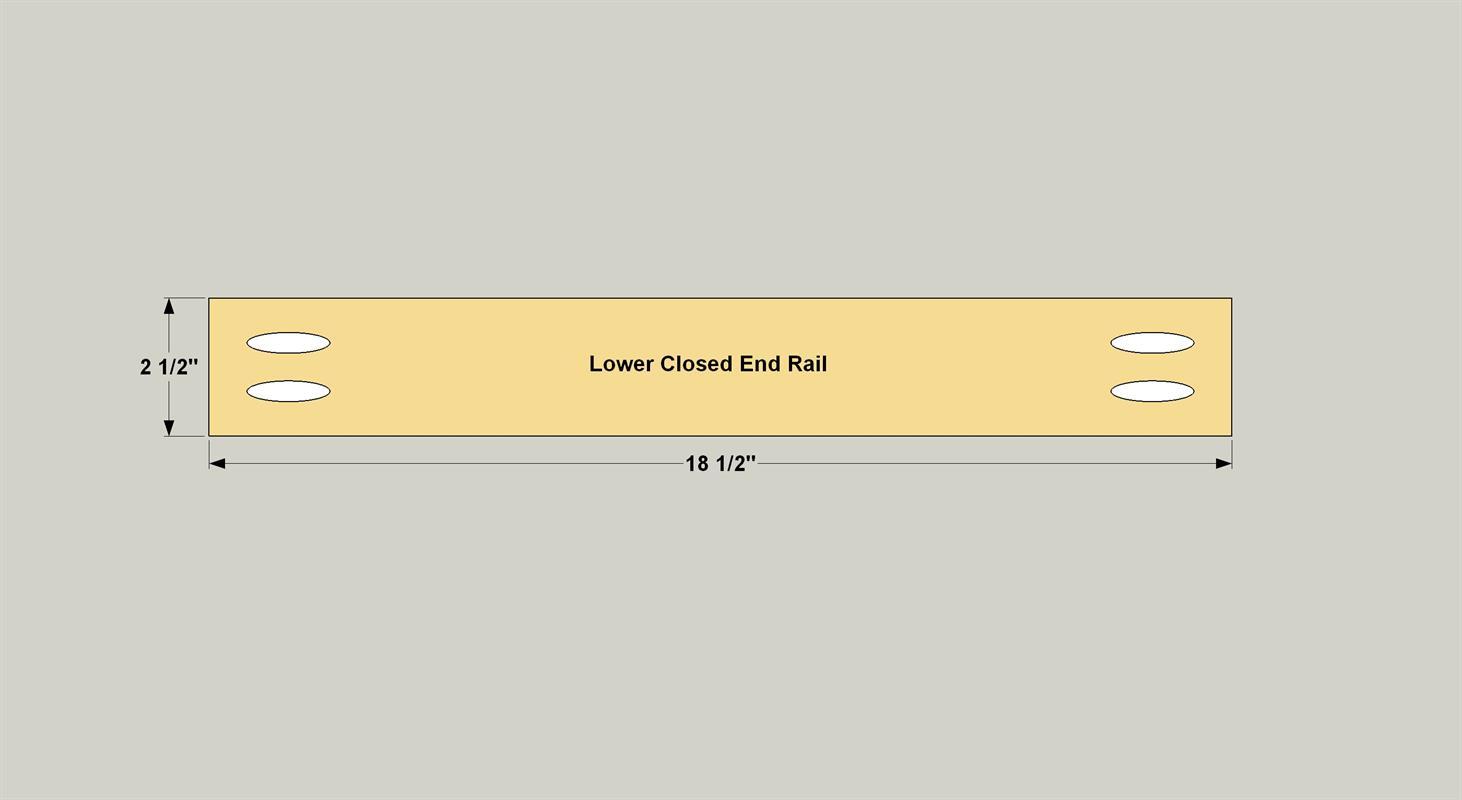
Cut one Lower Closed End Rail to length from a 1x3 board, as shown in the cutting diagram. With your pocket-hole jig set up for 3/4" material, drill pocket holes in the Lower Closed End Rail, as shown.
-
Make an End Panel
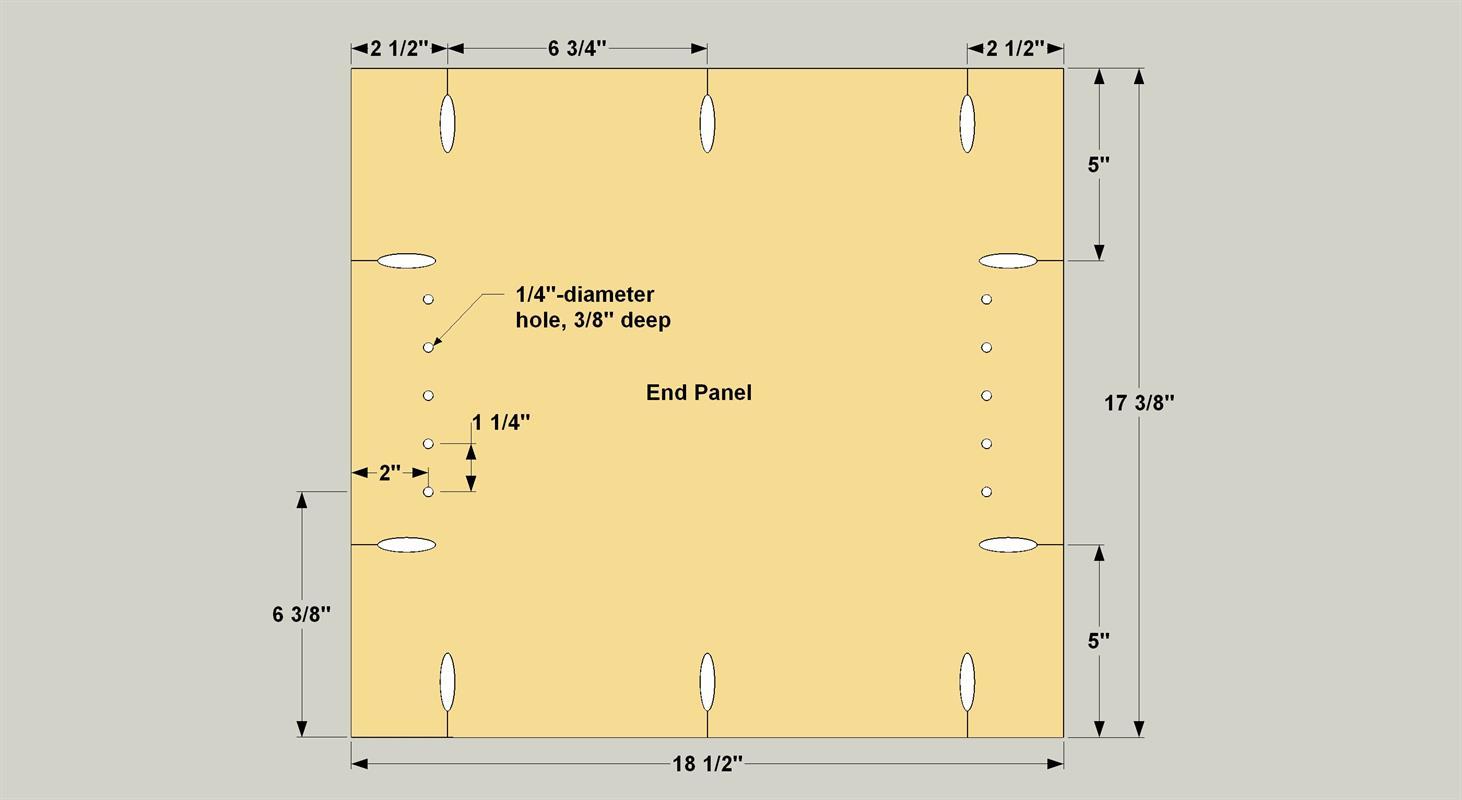
Cut one End Panel to size from 3/4" plywood, as shown in the cutting diagram. With your pocket-hole jig set up for 3/4" material, drill pocket holes in the End Panel, as shown. Next, drill stopped holes where shown to hold shelf pins. The easiest way to do this is with a shelf pin jig (we used one made by Kreg). A shelf pin jig makes it easy to drill consistently spaced holes so your shelf will sit level and not wobble.
-
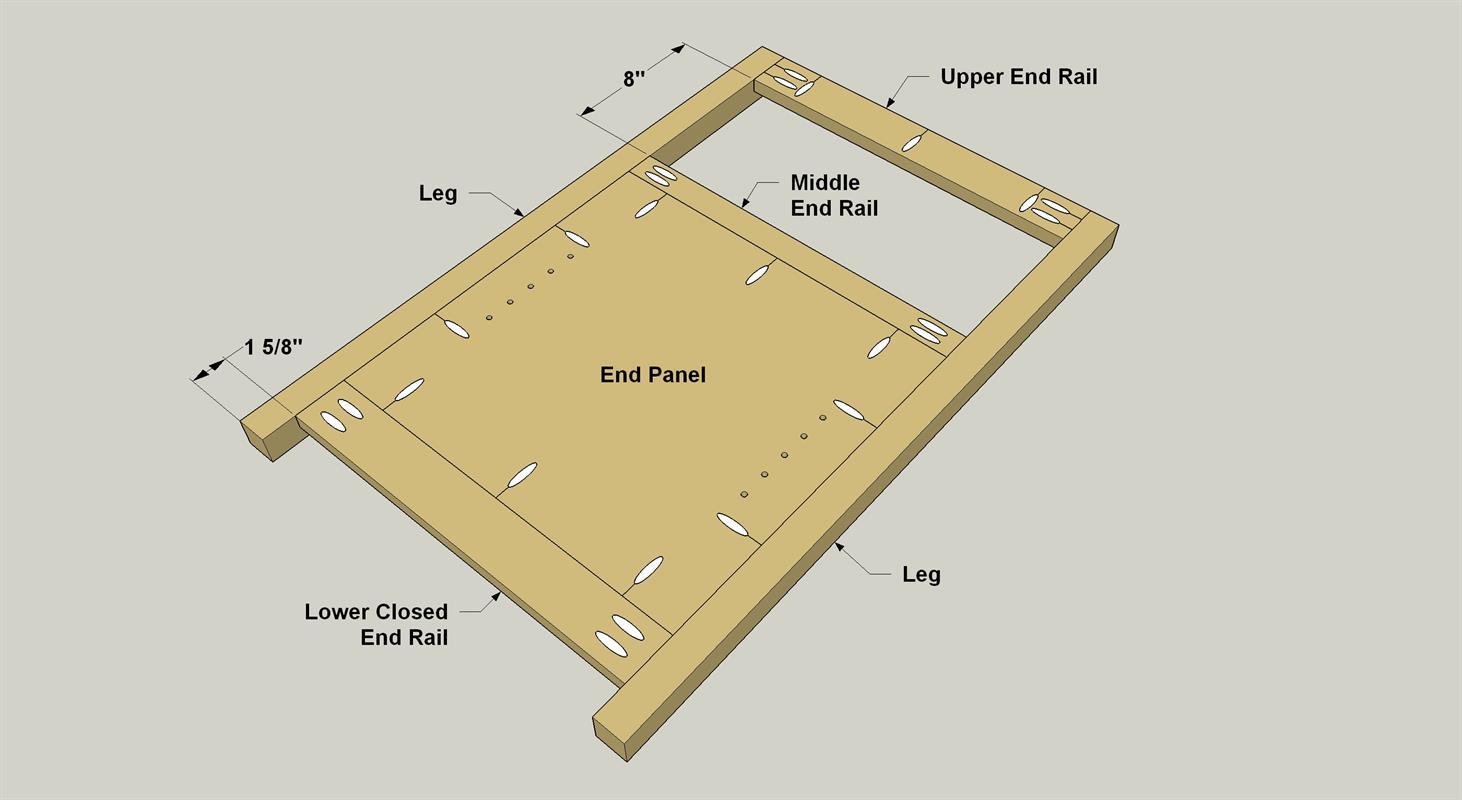
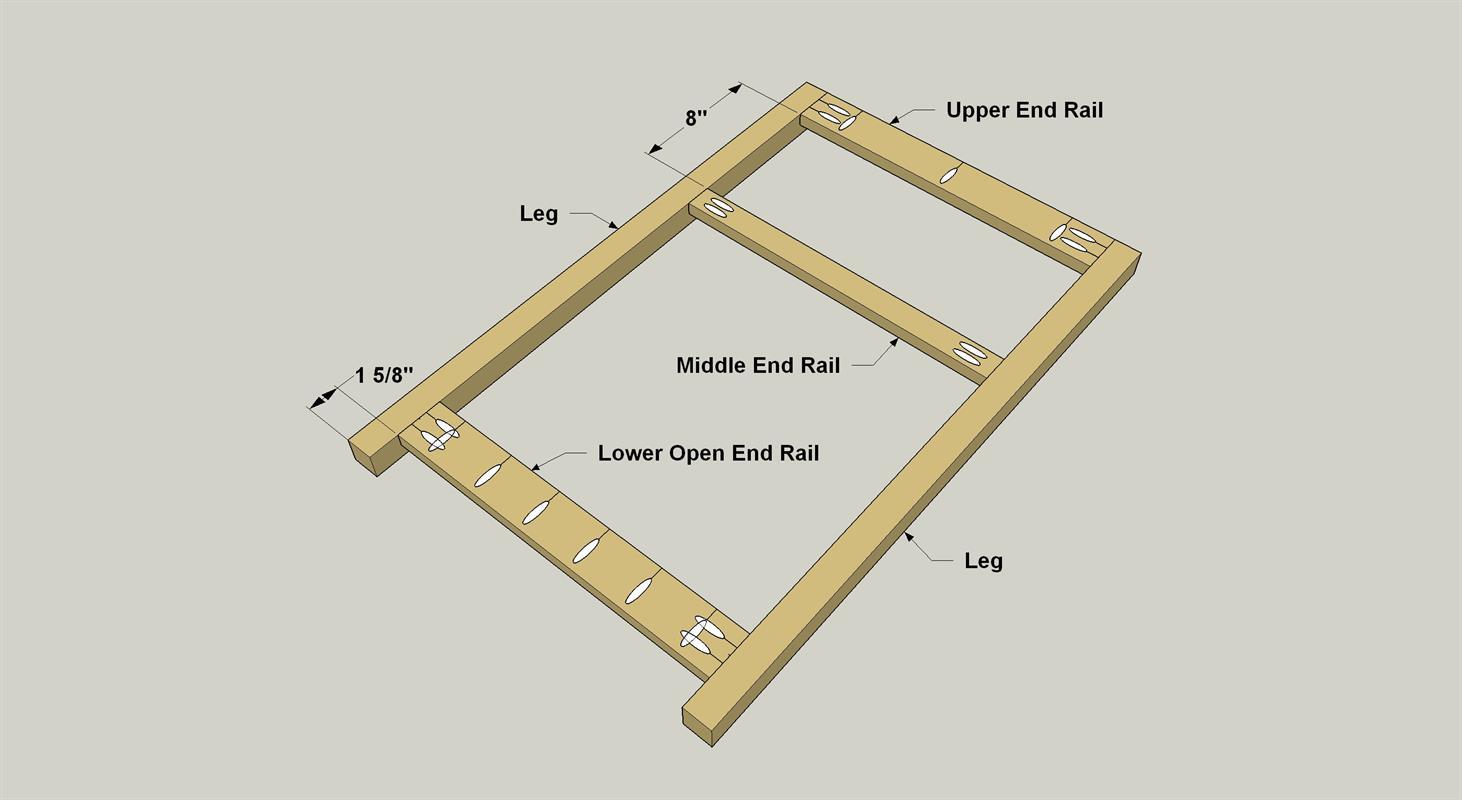
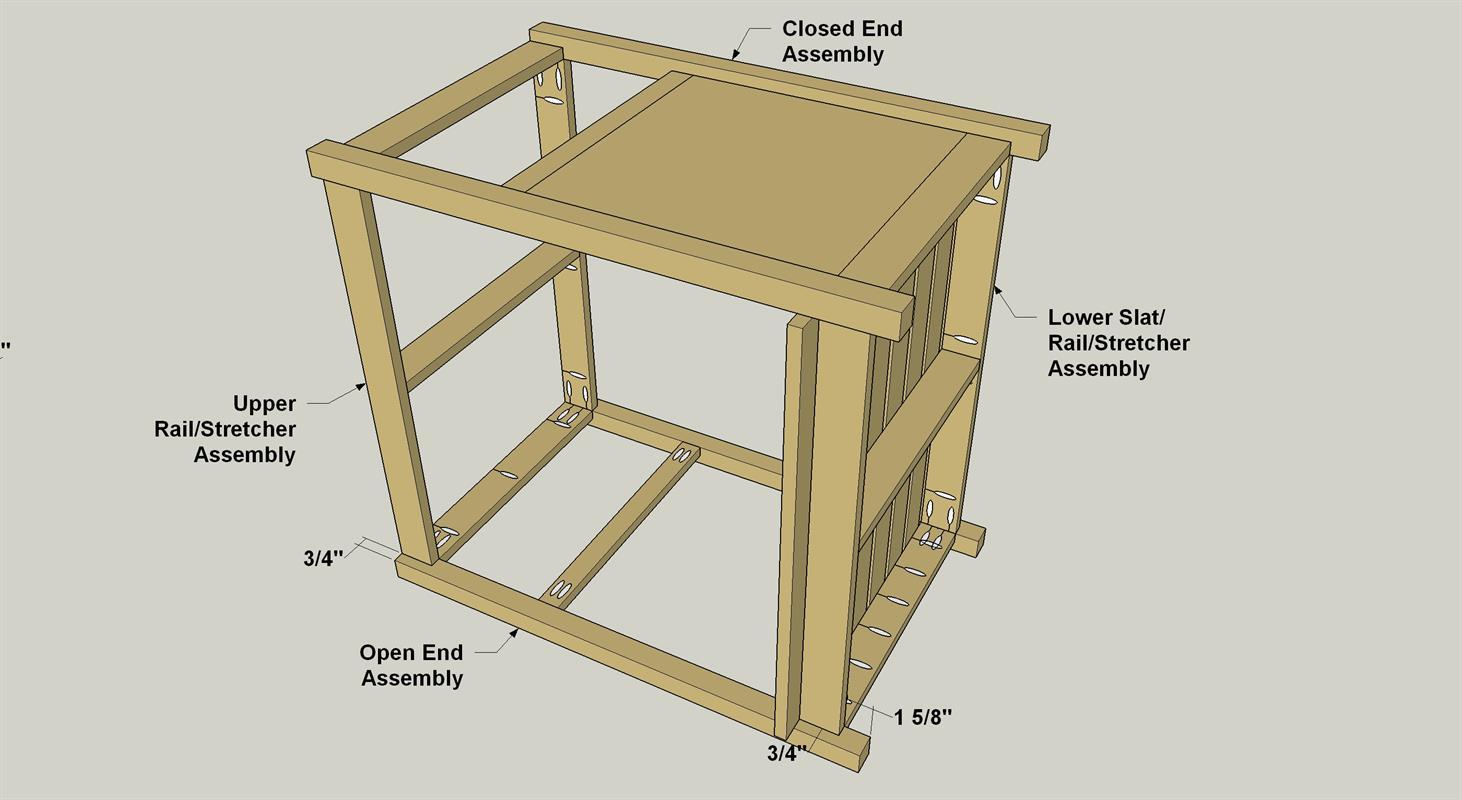
Assemble the Closed End
Now you can assemble the closed end of the cart. To make this easy, start by attaching the Lower Closed End Rail and the Middle End Rail to the End Panel using 1 1/4" coarse-thread pocket hole screws. Then attach this assembly and the Upper End Rail to two of the Legs, as shown. Note that all of these pieces fit flush with the inside faces of the Legs.
-
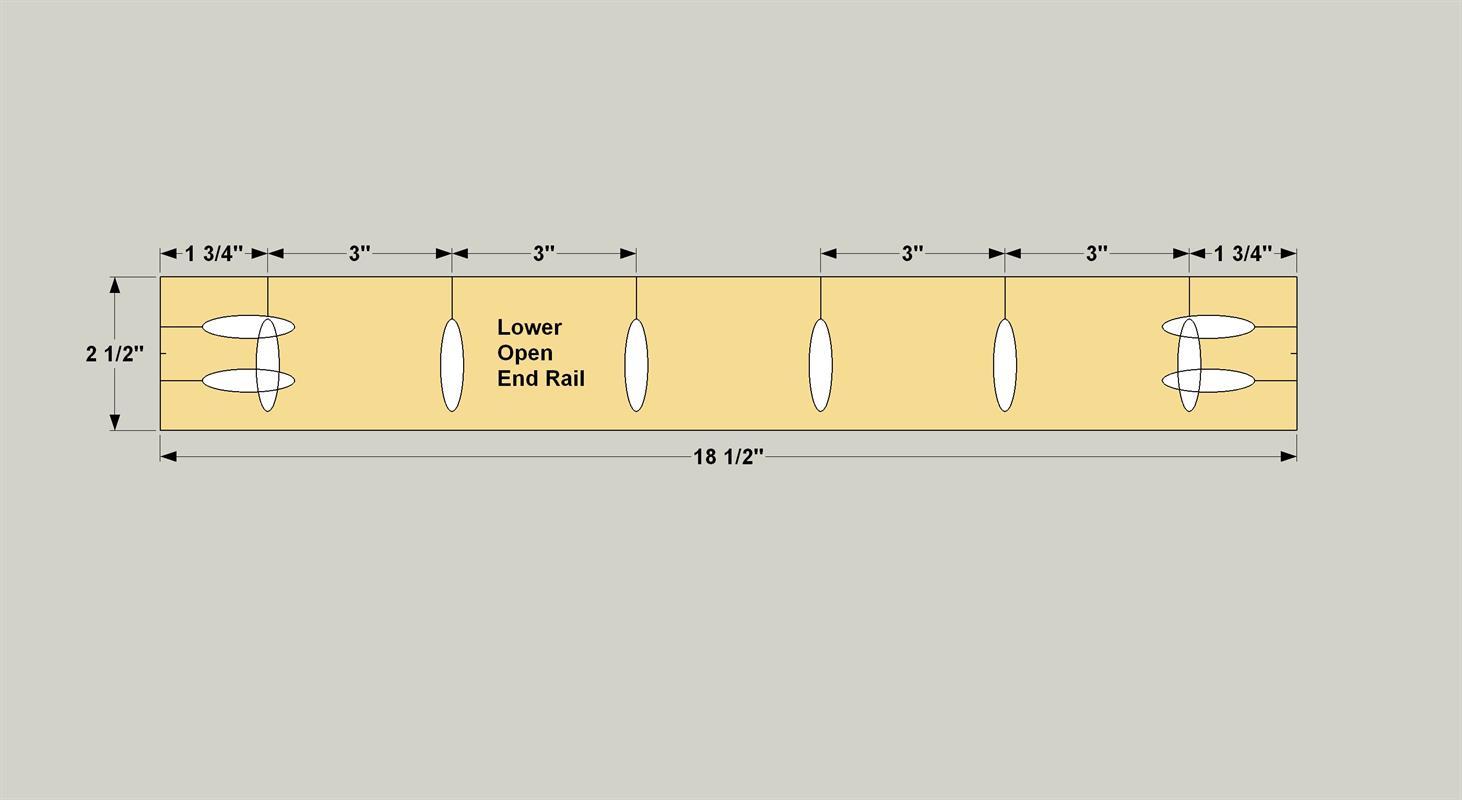
Make a Lower Open End Rail
Cut one Lower Open End Rail to length from a 1x3 board, as shown in the cutting diagram. With your pocket-hole jig set up for 3/4" material, drill pocket holes in the Lower Open End Rail, as shown.
-
Assemble the Open End
Now you can assemble the open end of the cart. To do that, attach the Lower Open End Rail, Middle End Rail, and Upper End Rail to the other two Legs using 1 1/4" coarse-thread pocket hole screws. Note that, once again, all of these pieces fit flush with the inside faces of the Legs.
-
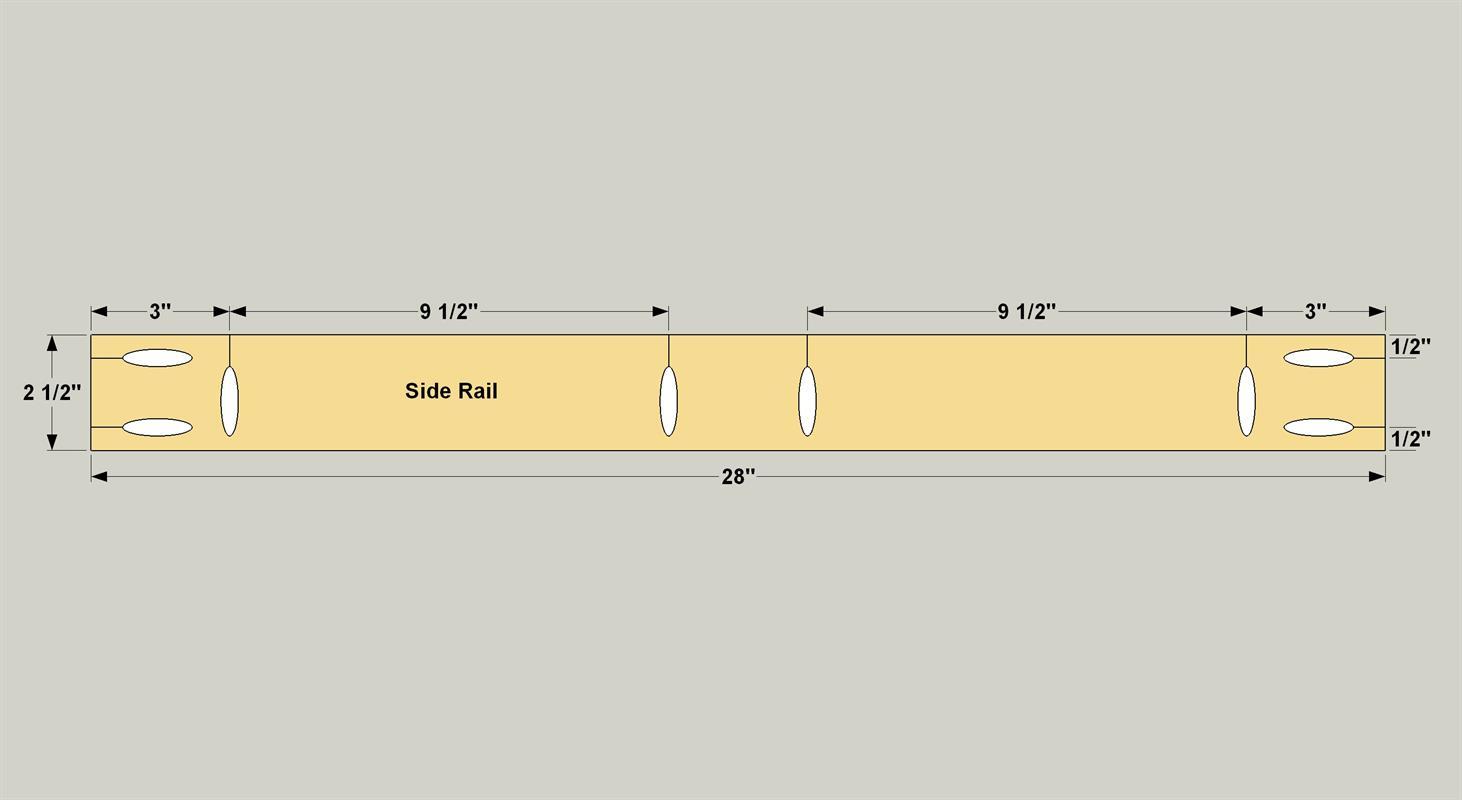
Make the Side Rails
Cut two Side Rails to length from 1x3 boards, as shown in the cutting diagram. Then, with your pocket-hole jig set up for 3/4" material, drill pocket holes in all four Side Rails, as shown.
-
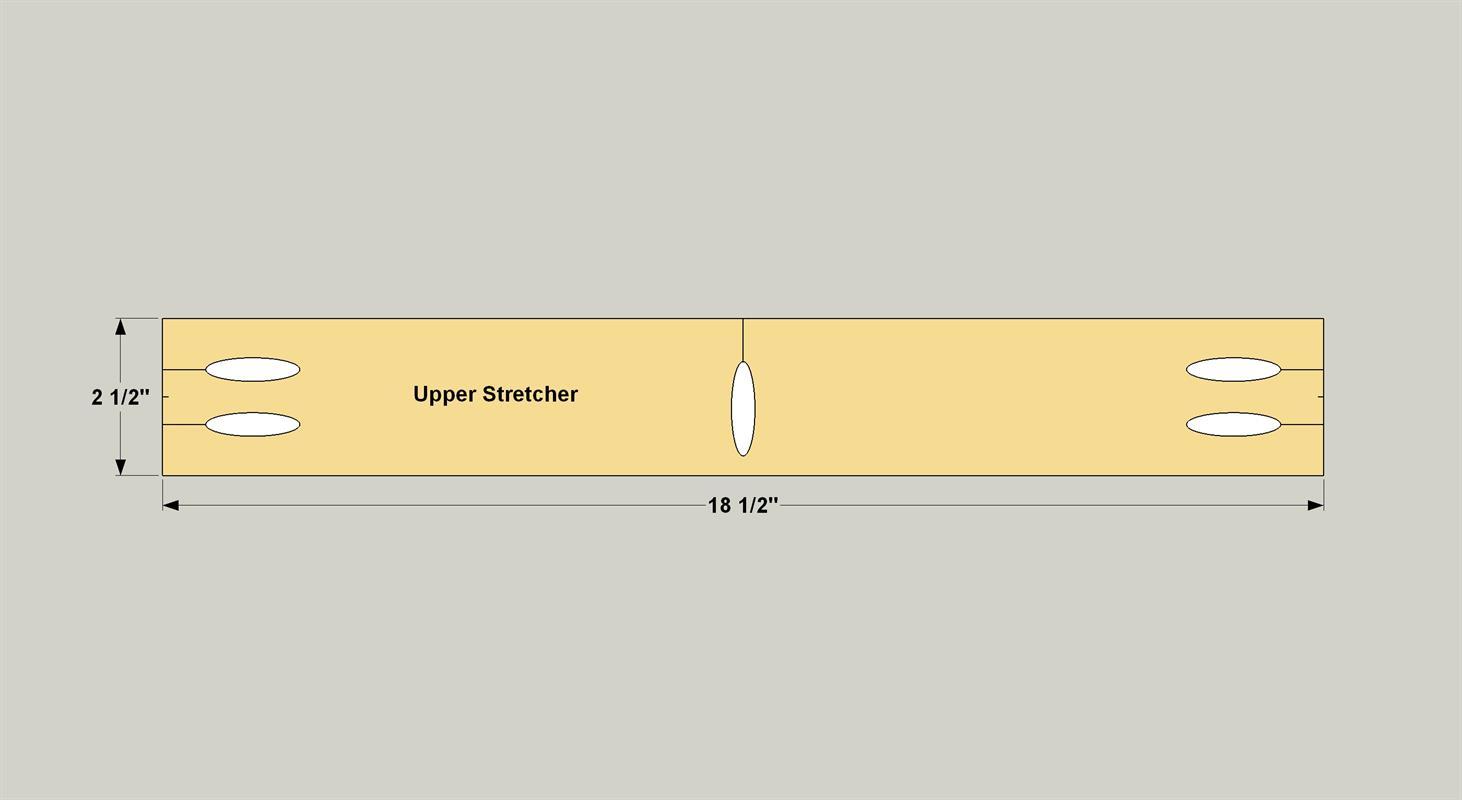
Make an Upper Stretcher
Cut an Upper Stretcher to length from a1x3 board, as shown in the cutting diagram. With your pocket-hole jig set up for 3/4" material, drill pocket holes in the Upper Stretcher, as shown.
-
Make a Lower Stretcher
Cut one Lower Stretcher to length, as well, and then drill pocket holes, as shown. This stretcher gets extra holes that will be used to help secure the Slats later.
-
Create an Upper Assembly
Attach the Upper Stretcher to two of the Side Rails, as shown, using 1 1/4" coarse-thread pocket hole screws. Make sure that all of the pocket holes are oriented in the correct direction.
-
Create a Lower Assembly
Attach the Lower Stretcher to the other two Side Rails, as shown, using 1 1/4" coarse-thread pocket hole screws. Make sure that all of the pocket holes are oriented in the correct direction.
-
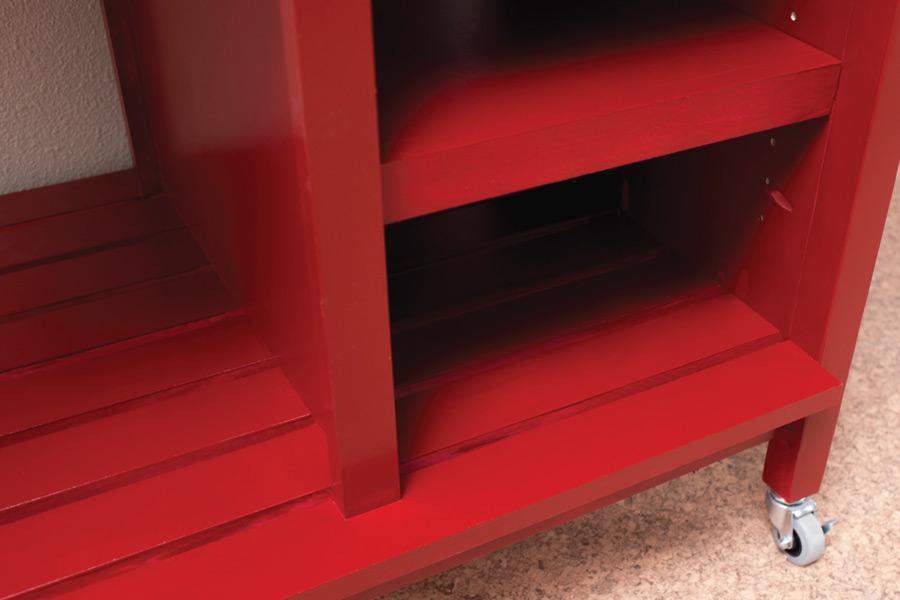
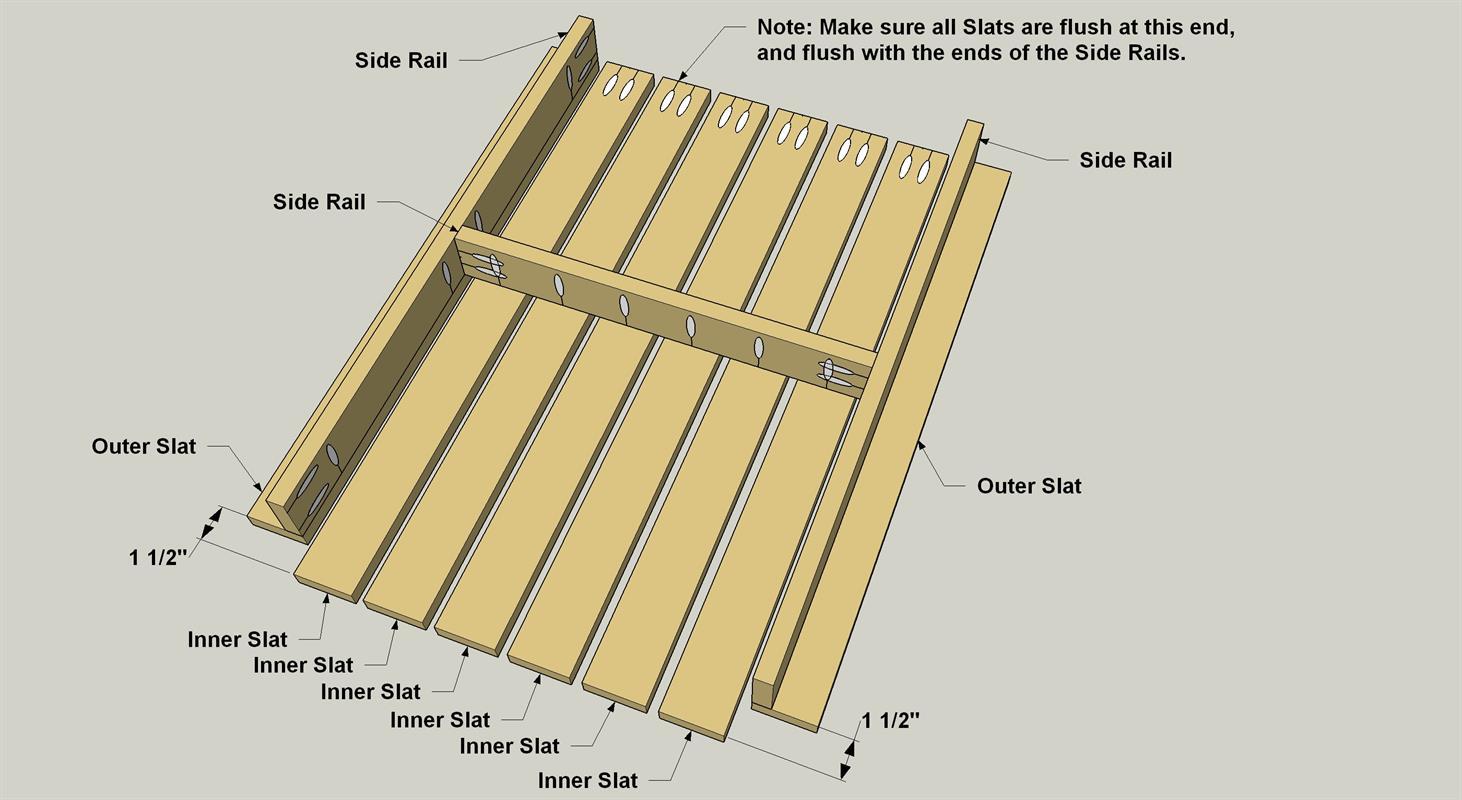
Make the Slats
Cut two Outer Slats to length from 1x3 boards, as shown in the cutting diagram. Then cut six Inner Slats. They’re longer than the Outer Slats. Plus, you’’ll need to drill pocket holes in one end of each Inner Slat, as shown. These will allow the Inner Slats to be attached to the closed end of the cart later.
-
Attach the Slats
Now you can attach the Slats to the lower rail/stretcher assembly using 1 1/4" coarse-thread pocket hole screws, as shown. The best way is to first attach the Outer Slats to the Side Rails, making sure they’re flush at both ends. Then add the Inner Slats, spacing them evenly and attaching them to the Lower Stretcher. They’ll each just be held on with one screw for now, but that’s ok.
-
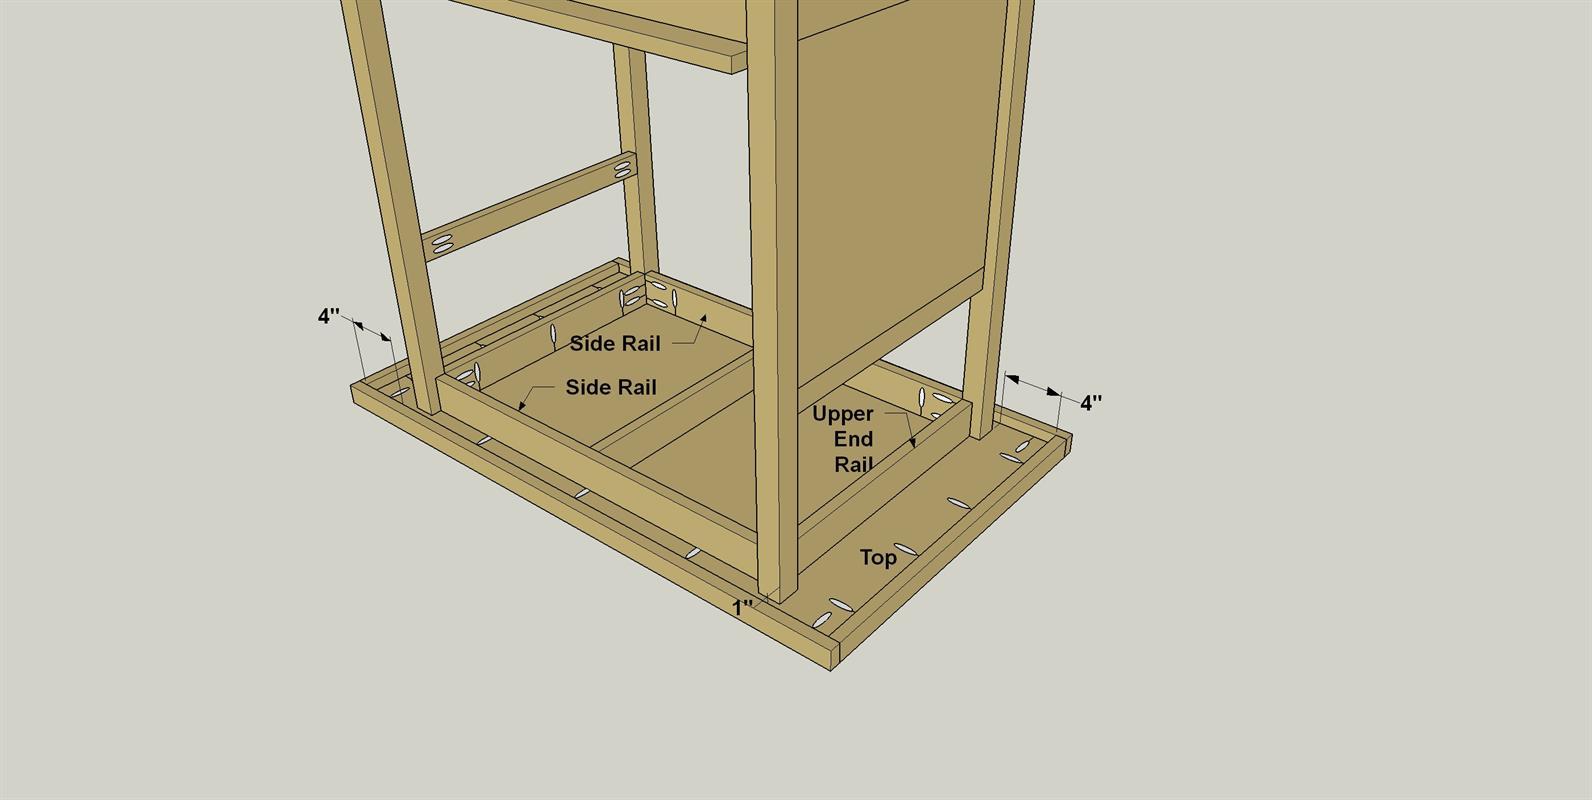
Start Base Assembly
Attach the structure of Slats you just created, as well as the upper rail/stretcher assembly to the closed end of the cart. First attach the Side Rails to the Legs using 1 1/4" coarse-thread pocket hole screws, as shown. Then attach the Slats to the End Panel.

-
Attach the Other End
Now you can attach open end assembly by screwing the Side Rails to the Legs using 1 1/4" coarse-thread pocket hole screws, as shown.
-
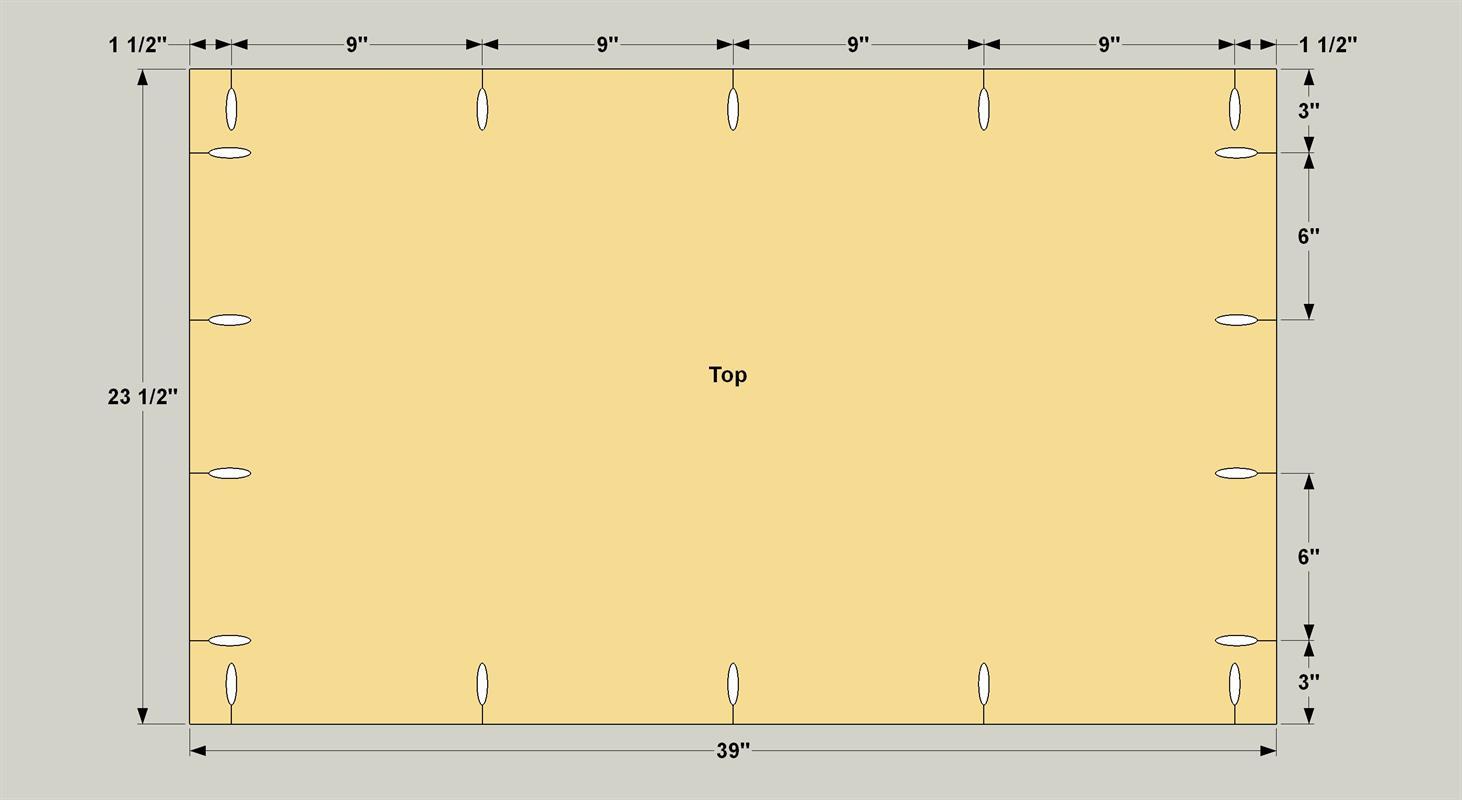
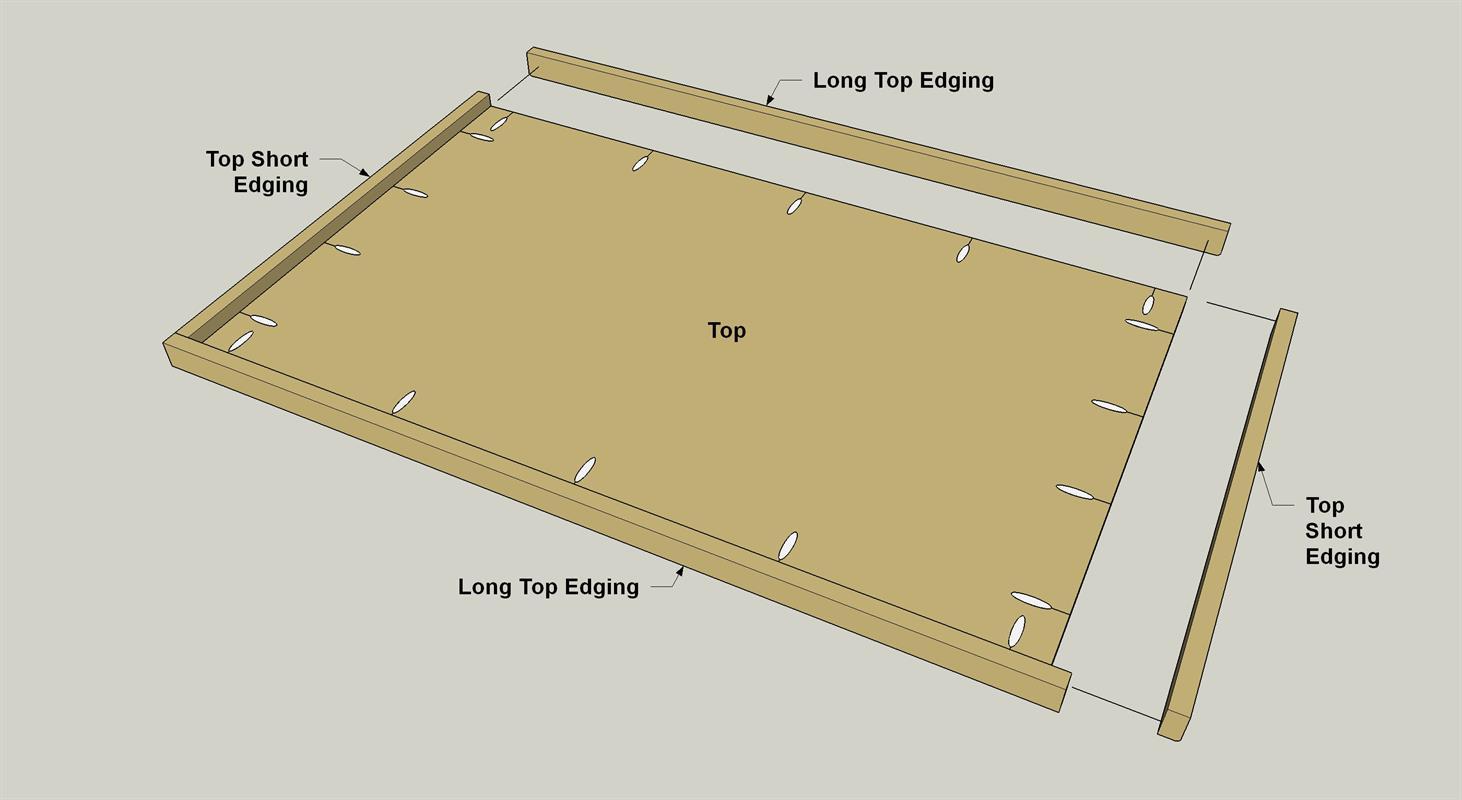
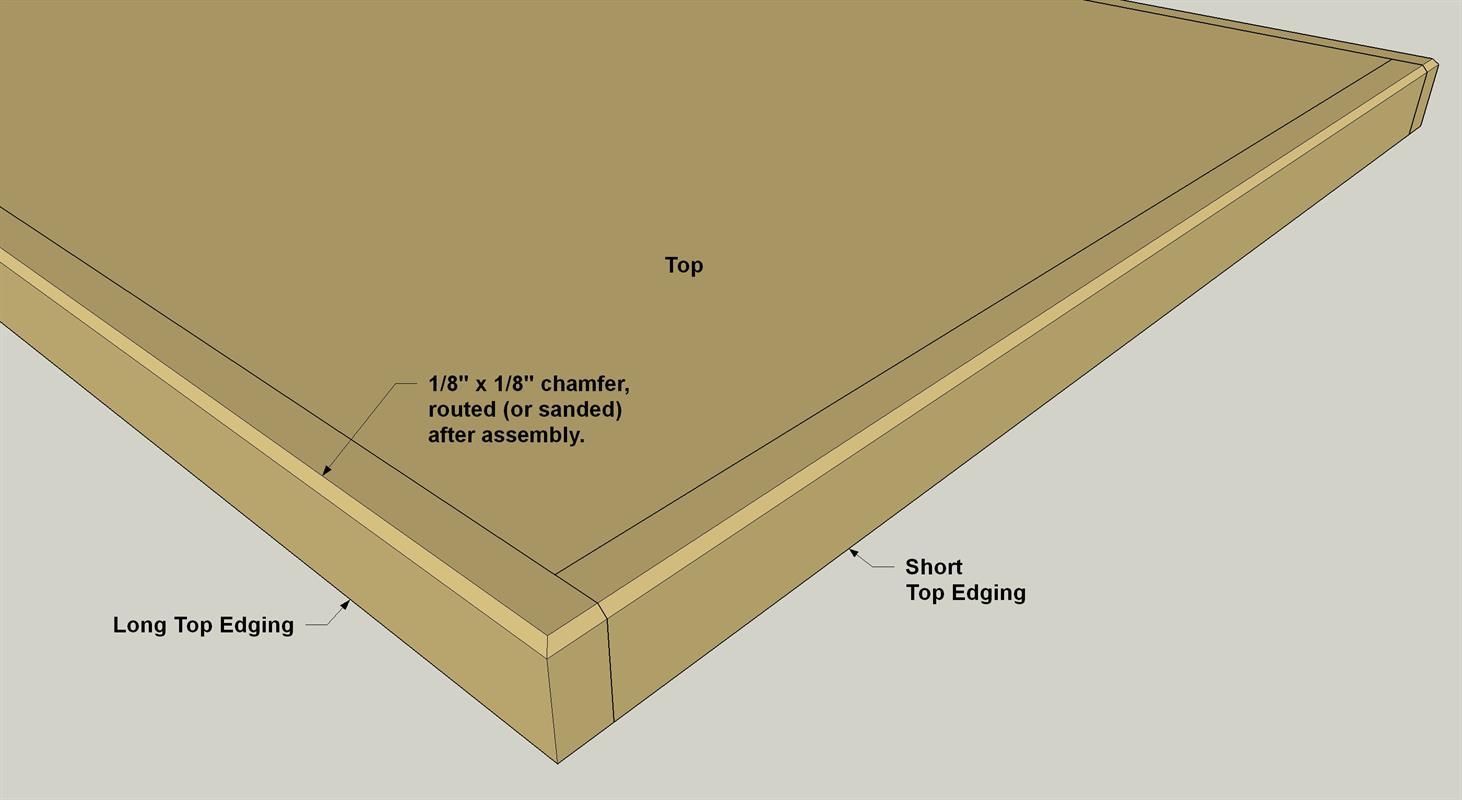
Cut the Top Parts
Cut the Top to size from 3/4" plywood, as shown in the cutting diagram. With your pocket hole jig set up for 3/4" material, drill pocket holes the underside of the Top where shown. Then cut two pieces of Long Top Edging and two pieces of Short Top Edging to length from 1x2 boards, as shown in the cutting diagram.
-
Add the Top Edging
Next, attach the edging to the top using 1 1/4" coarse-thread pocket hole screws, as shown. First, attach the Short Top Edging, making sure the ends fit flush with the edges of the Top. Then attach the Long Top Edging.
-
Dress Up the Top
With the edging installed, the top has sharp corners. So, you can ease those corners around the perimeter of the top. If you have a router, use a 45° chamfer bit and ease the edge, as shown. If you don’t have a router, you can simply use sandpaper on a block.
-
Attach the Top
Lay the top assembly face down, and then place the base assembly on it. Make sure the top overhangs equally on each end, and on each side, and then attach the top using 1 1/4" coarse-thread pocket hole screws, as shown.
-
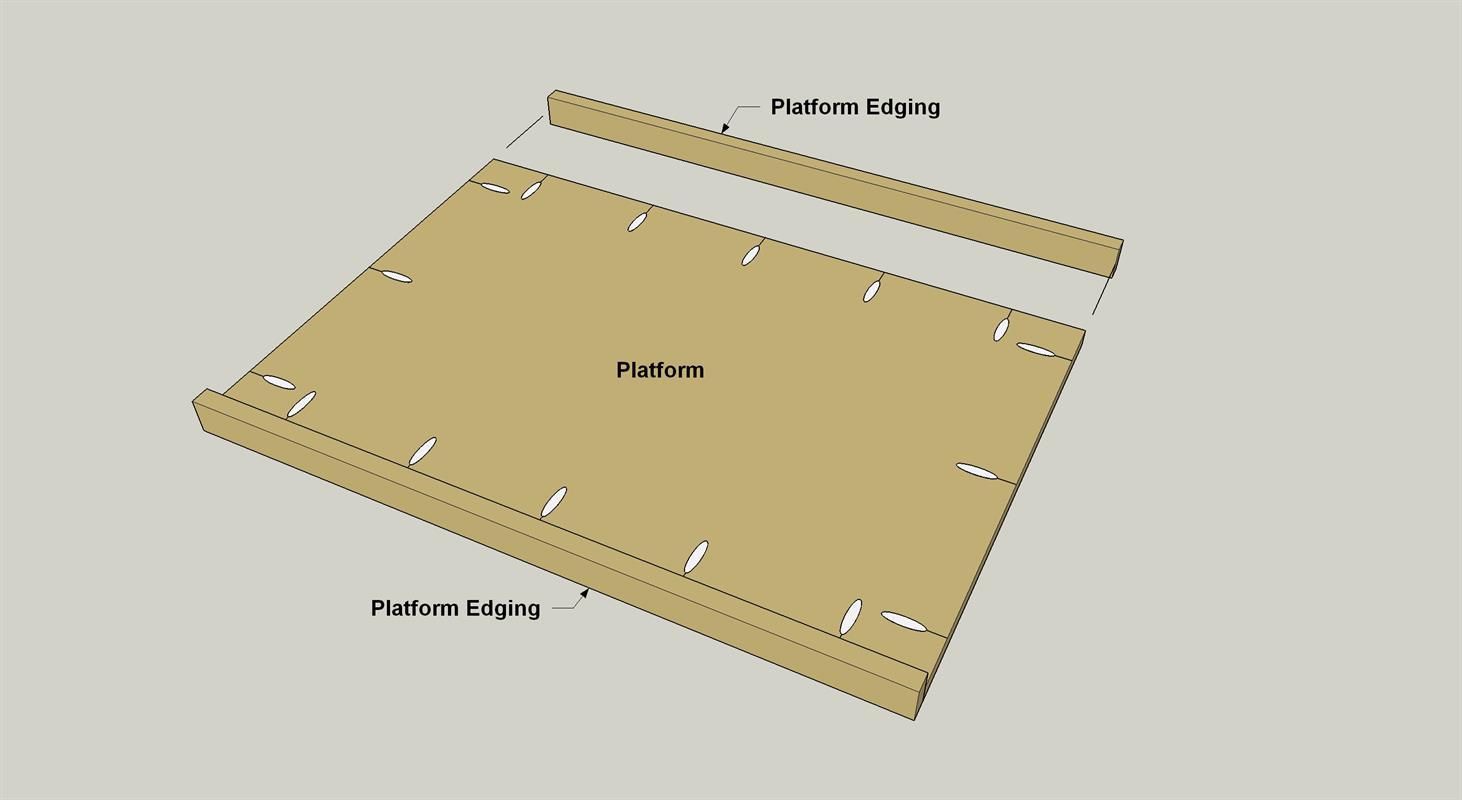
Cut the Platform Parts
Cut a Platform to size from 3/4" plywood, as shown in the cutting diagram. With your pocket hole jig set up for 3/4" material, drill pocket holes the underside of the Platform where shown. Then cut two pieces of Platform Edging to length from 1x2 boards, as shown in the cutting diagram.

-
Add the Platform Edging
Next, attach the edging to the Platform using 1 1/4" coarse-thread pocket hole screws, as shown.
-
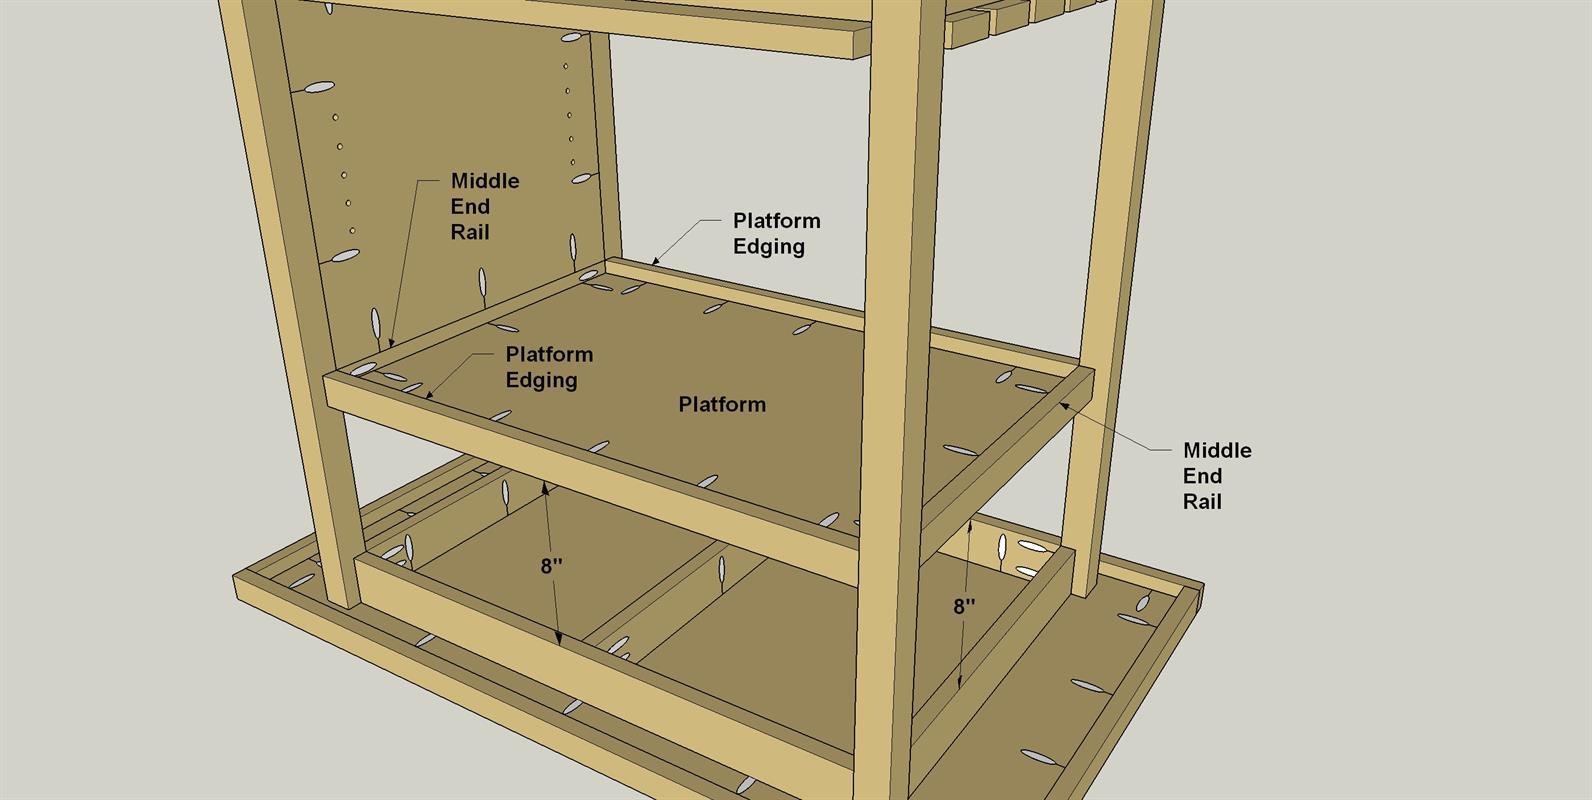
Attach the Platform
Position the Platform in the base assembly, as shown, and then attach it using 1 1/4" coarse-thread pocket hole screws, as shown.
-
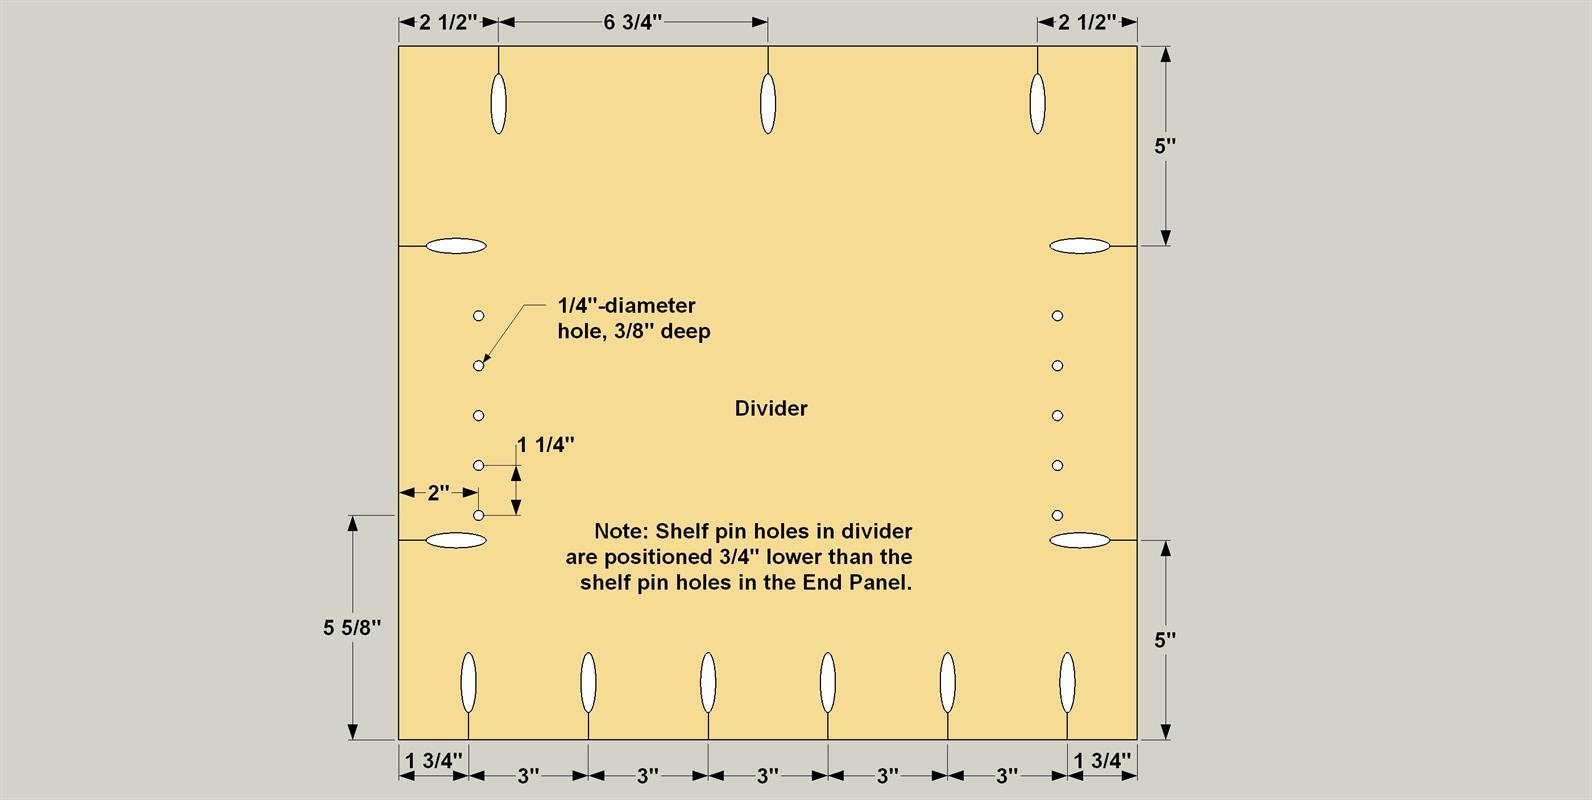
Make a Divider
Cut one Divider to size from 3/4" plywood, as shown in the cutting diagram. With your pocket-hole jig set up for 3/4" material, drill pocket holes in the End Panel, as shown. Next, drill stopped holes where shown to hold shelf pins. Note that the shelf pin holes in the Divider are located 3/4" lower. That’s because the Divider will sit on top of the Slats when installed. Having the shelf pin holes lower makes means they’ll line up with the holes in the End Panel. With the divider done, also cut two pieces of Divider Edging and attach them using 1 1/4" coarse-thread pocket hole screws. Make sure the edging is flush with the lower edge of the Divider.
-
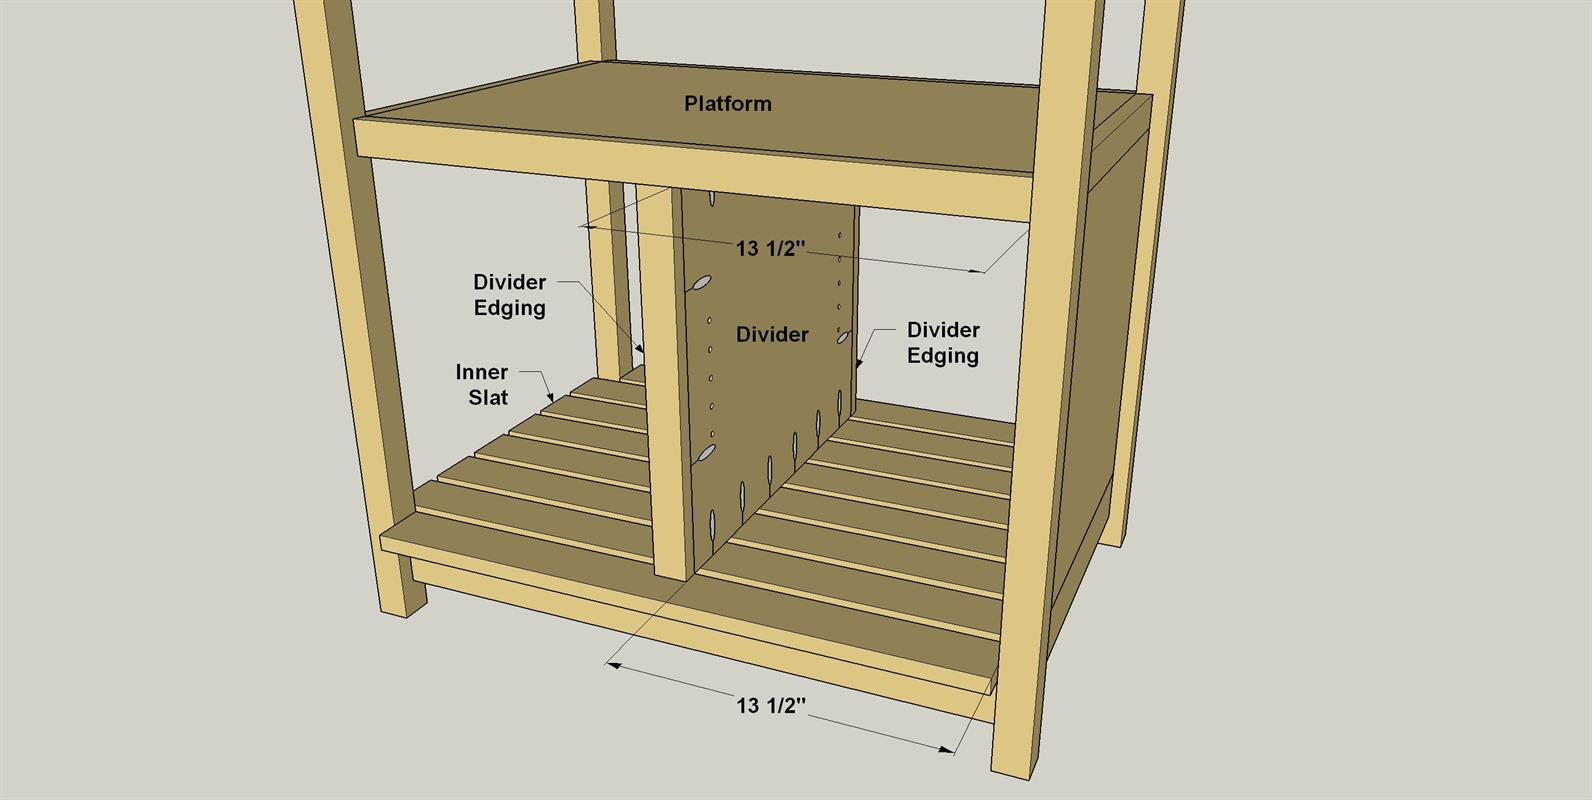
Attach the Divider
Now you can slip the divider assembly into place, and then attach it to the Position the Platform in the base assembly, as shown, and then attach it to the Platform and to the Inner Slats using 1 1/4" coarse-thread pocket hole screws, as shown.
-
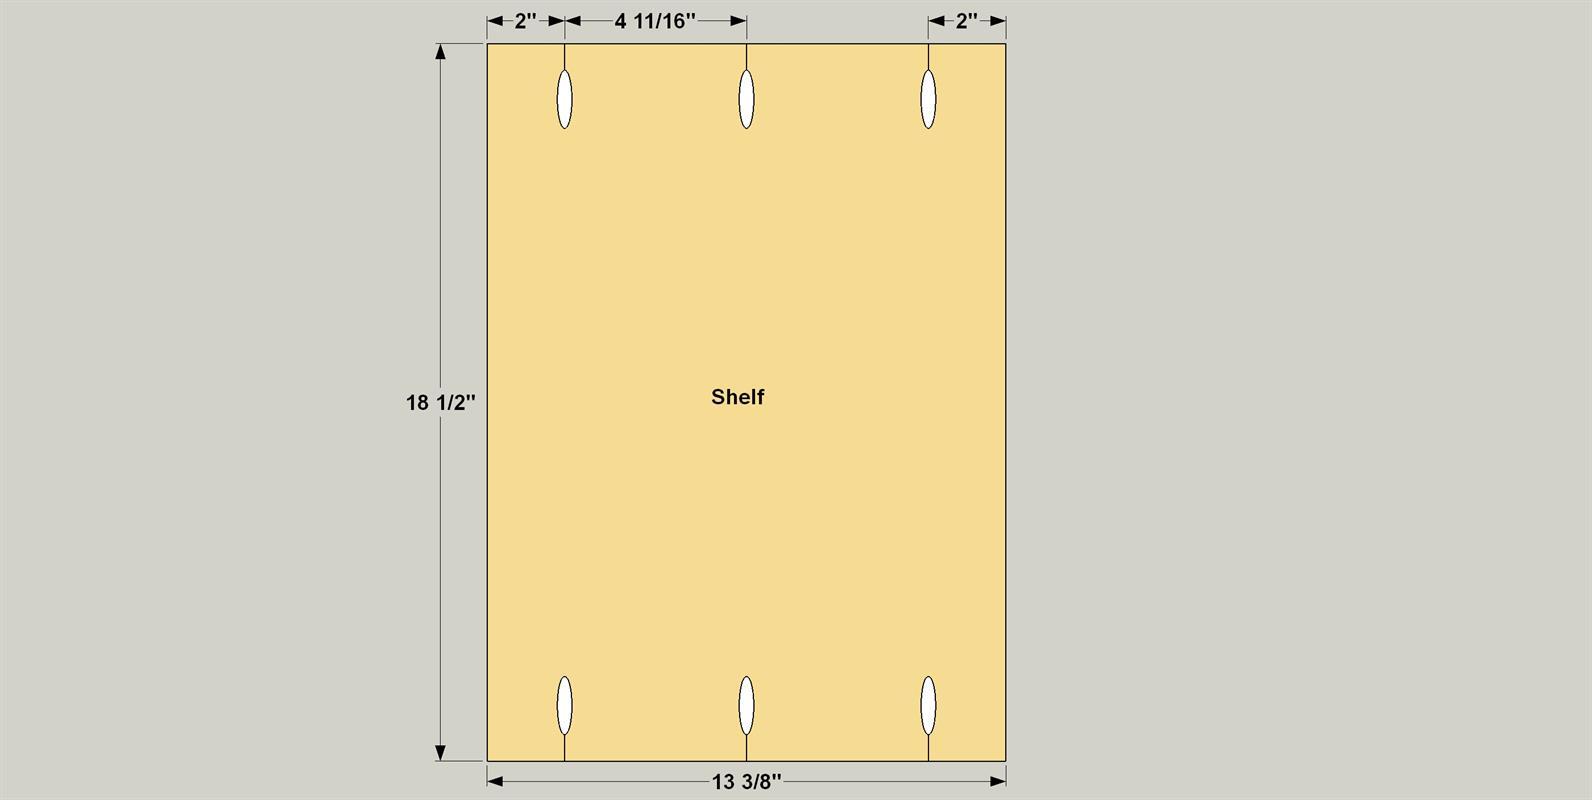
Create the Shelf
Cut a Shelf to size from 3/4" plywood, as shown in the cutting diagram. With your pocket hole jig set up for 3/4" material, drill pocket holes the underside of the Shelf where shown. Then cut two pieces of Shelf Edging to length from 1x2 boards, and attach the edging to the Shelf using 1 1/4" coarse-thread pocket hole screws.
-
Add Casters and Finish
To complete the cart, add swivel casters to the bottom of each Leg. Then slip the shelf into place on shelf pins to check the fit. Sand your cart as needed, and then apply paint or stain—or both, as we did.