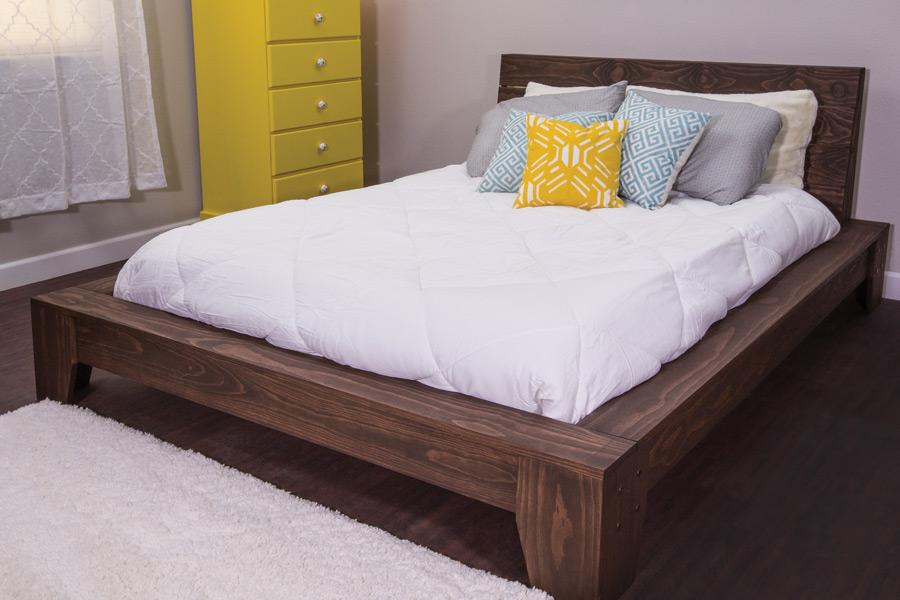
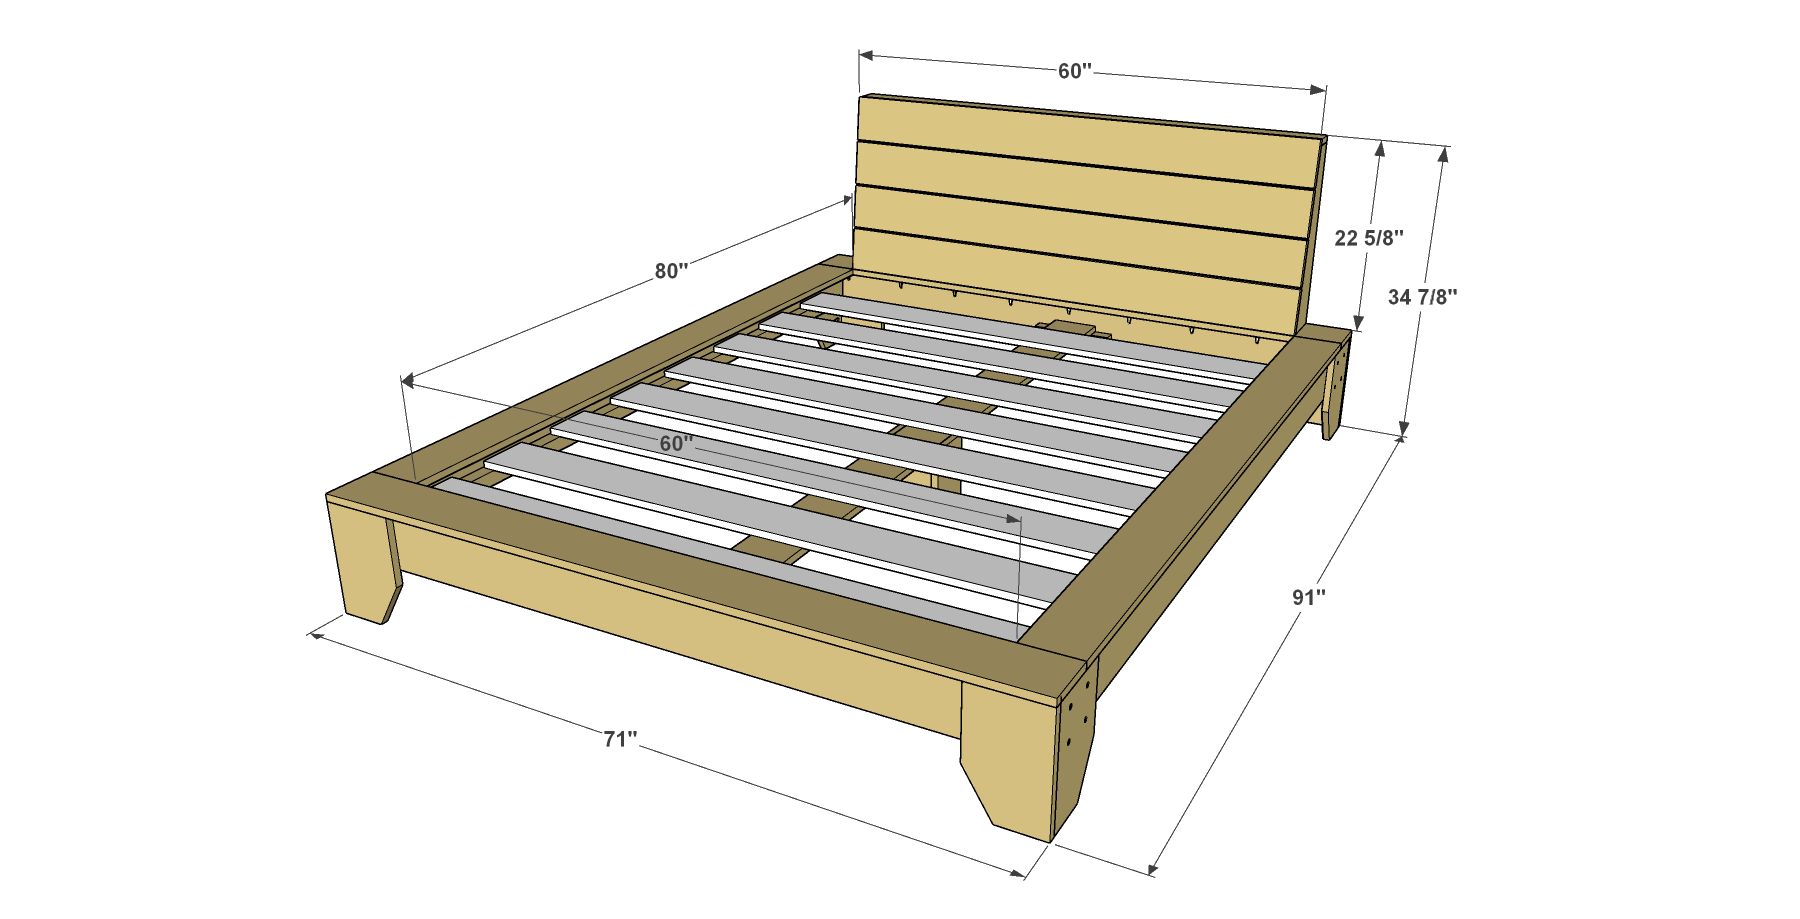


Build yourself this beautiful platform bed and you’re sure to have sweet dreams. It offer a sophisticated style you’d pay big bucks for in a store, but this bed is easy and economical to build. It’s made from pine boards you can get at any home center that can be stained for any look you’d like. It's designed to hold a Queen-size mattress.
Tools
Kreg Tools


Other Tools
-
tape measure

Materials
Wood Products
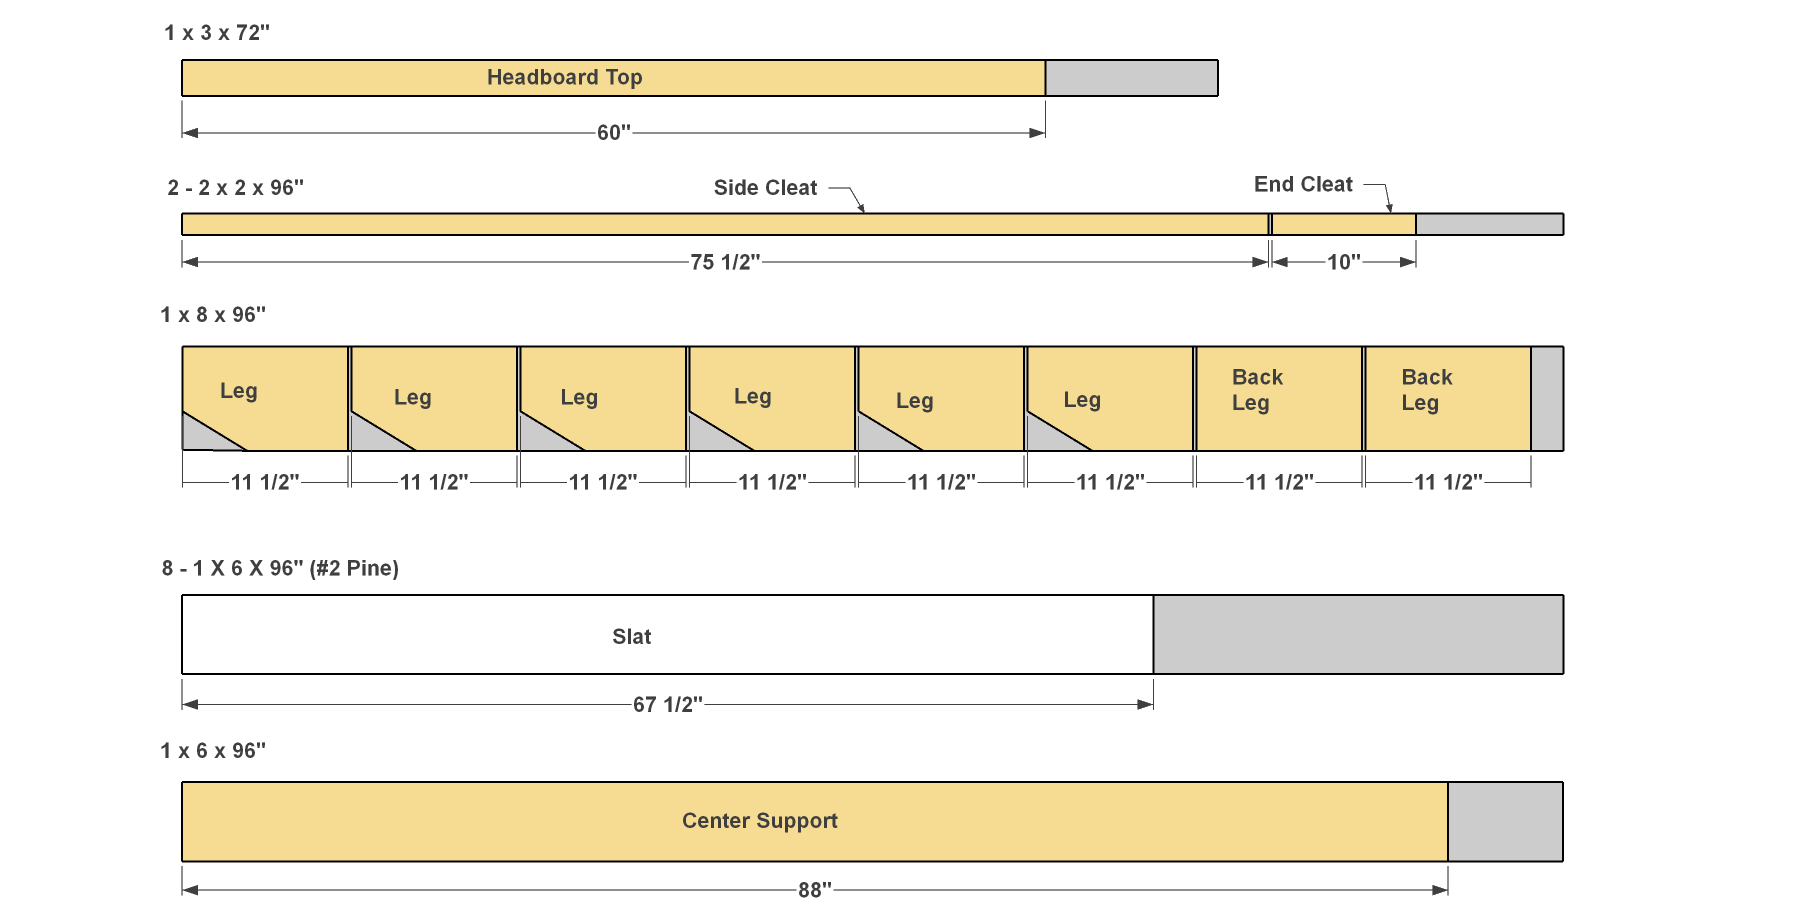
- 1 Pine board , 1x3 x 72"
- 13 Pine board , 1x6 x 96"
- 1 Pine board , 1x8 x 96"
- 8 #2 pine board , 1x6 x 96"
- 2 Pine board , 2x2 x 96"
Hardware & Supplies
- 100 1 1/4" coarse-thread Kreg Pocket-Hole Screws
- 26 2" flat-head wood screws
- 40 1 1/4" flat-head wood screws
- 16 1 1/8" connector bolts
- 16 1 1/8" connector nuts
Cut List & Parts
- 6 Leg , 3/4" x 7 1/4" x 11 1/2"
- 2 Back Leg , 3/4" x 7 1/4" x 11 1/2"
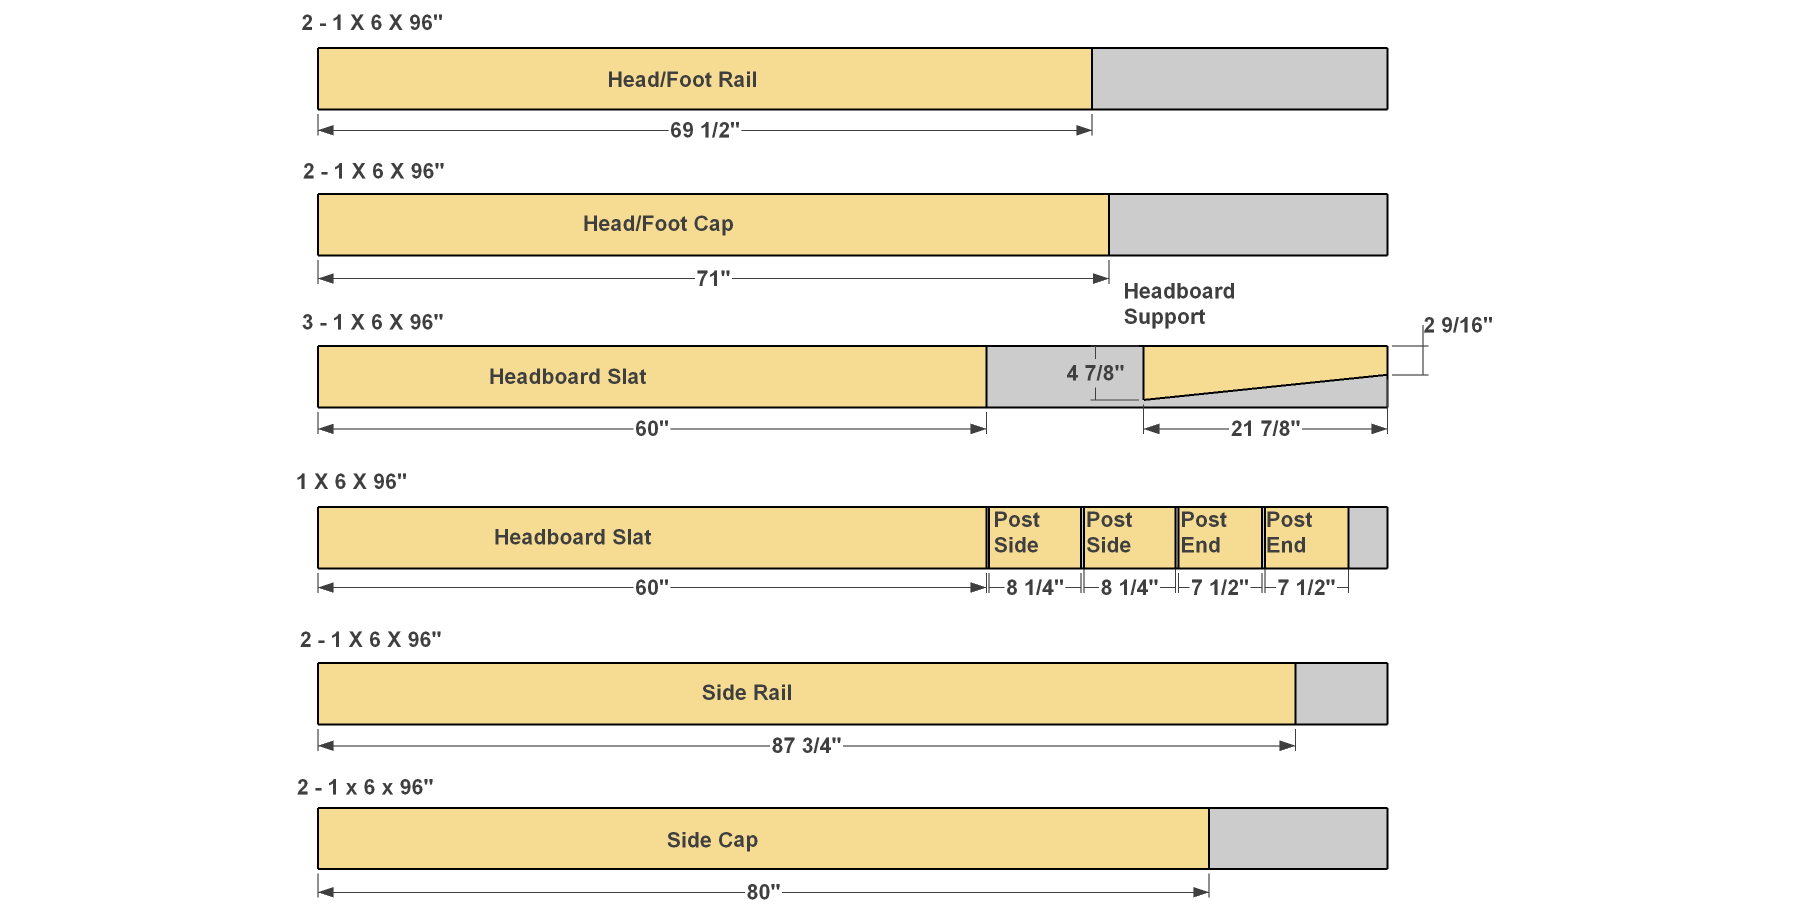
- 2 Head/Foot Cap , 3/4" x 5 1/2" x 71"
- 2 Head/Foot Rail , 3/4" x 5 1/2" x 69 1/2"
- 3 Headboard Support , 3/4" x 5 1/2" x 21 7/8"
- 4 Headboard Slat , 3/4" x 5 1/2" x 60"
- 1 Headboard Top , 3/4" x 2 1/2" x 60"
- 2 Side Rail , 3/4" x 5 1/2" x 87 3/4"
- 2 Side Cap , 3/4" x 5 1/2" x 80"
- 2 Center Post Side , 3/4" x 5 1/2" x 8 1/4"
- 2 Center Post End , 3/4" x 5 1/2" x 7 1/2"
- 1 Center Support , 3/4" x 5 1/2" x 88"
- 2 Rail Cleat , 1 1/2" x 1 1/2" x 75 1/2"
- 2 End Cleat , 1 1/2" x 1 1/2" x 10"
- 8 Slat , 3/4" x 5 1/2" x 67 1/2"
Directions
-
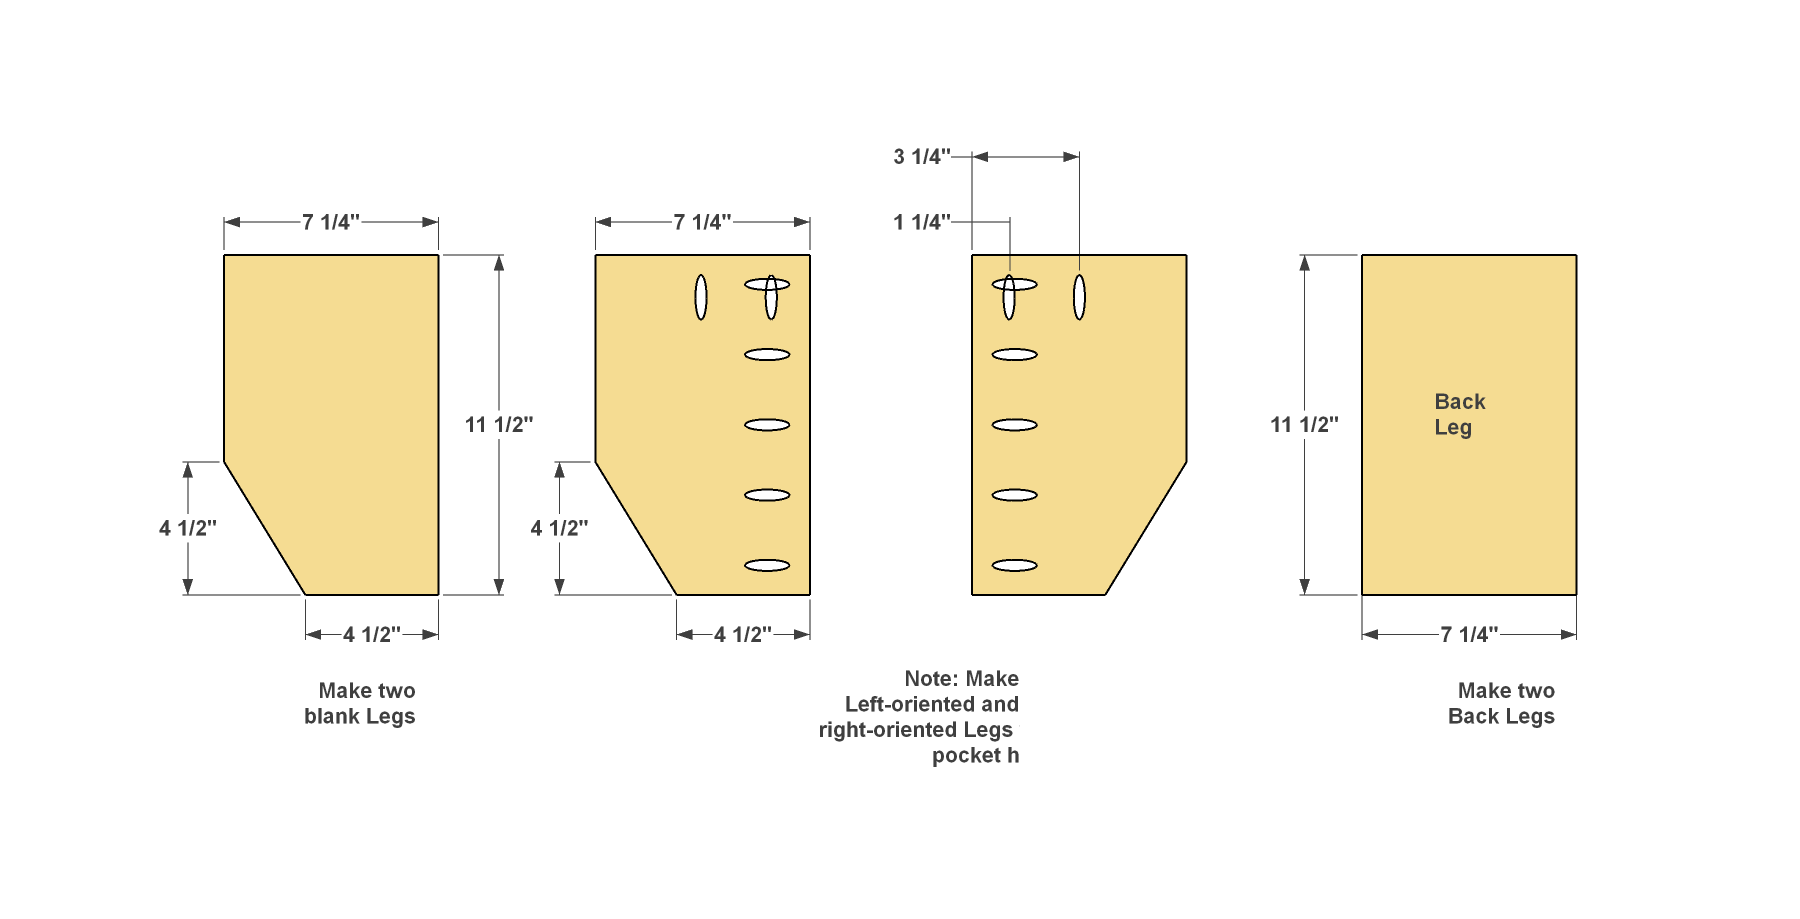
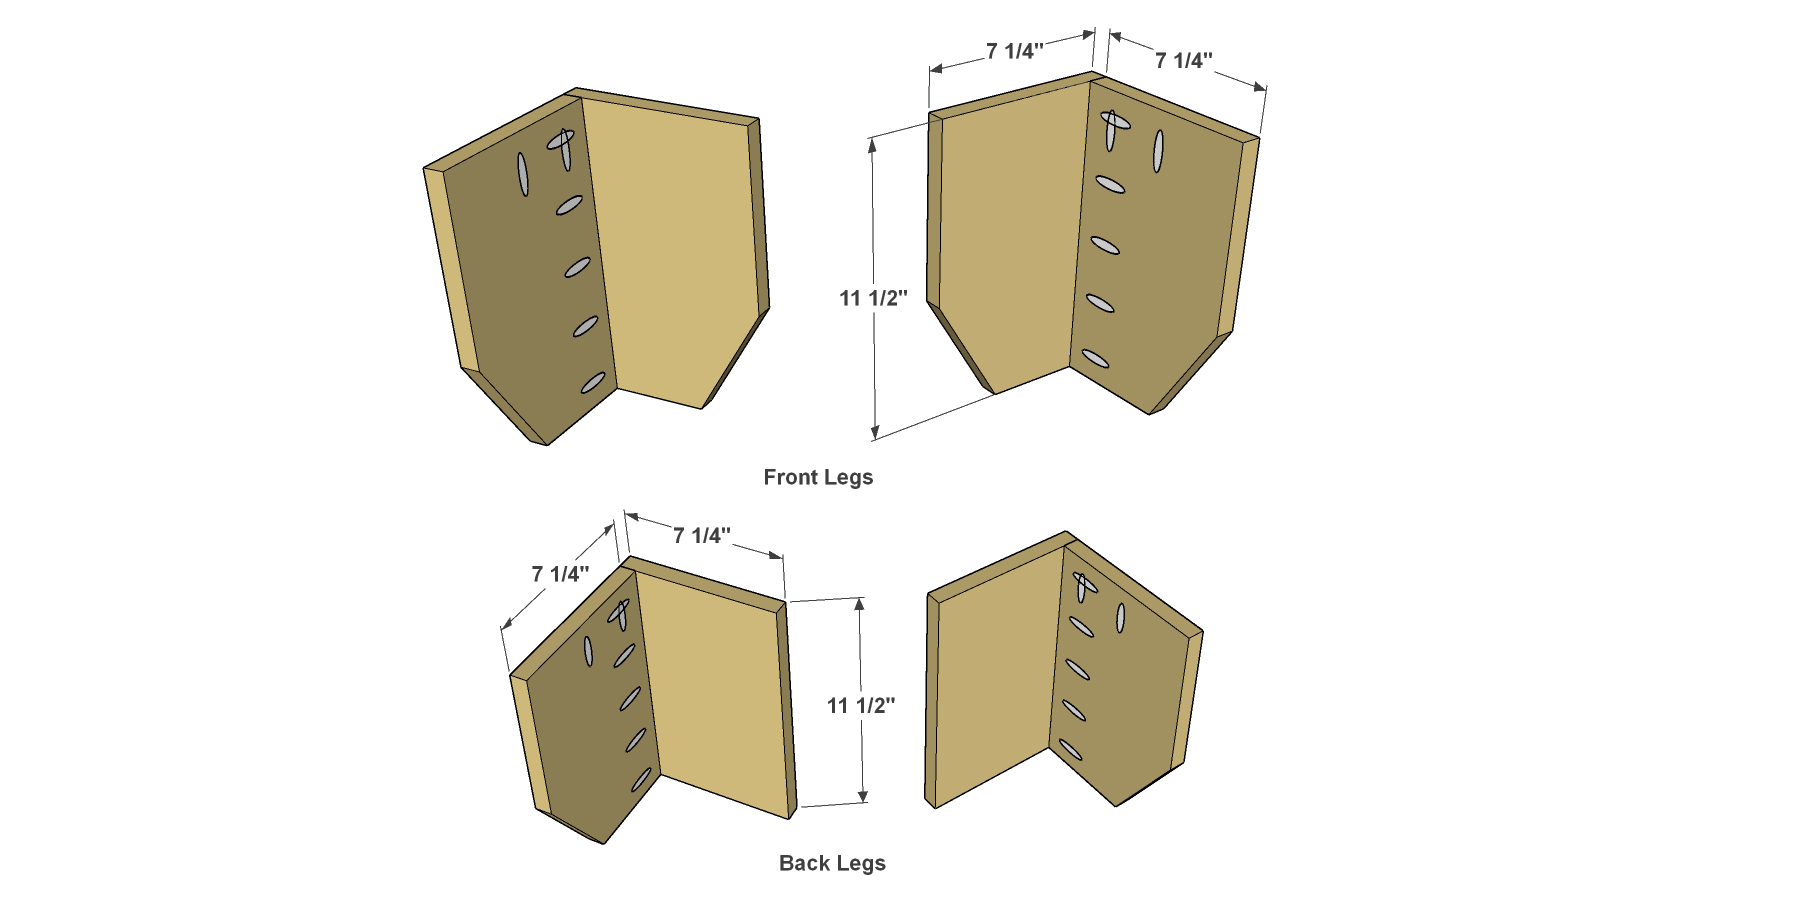
Make the Legs
Cut six Legs and two Back Legs from a 1x8 board, as shown in the cutting diagram. Cut the angle, as shown, on the Legs (but not the Back Legs) using a jigsaw. Then sand the cut edges smooth. With your pocket-hole jig set up for 3/4" material, drill pocket holes on four of the Legs, making sure they mirror one another as shown.
-
Assemble the Legs
Assemble the Legs and Back Legs as shown to create four leg assemblies. Use 1 1/4" coarse-thread pocket-hole screws.
-
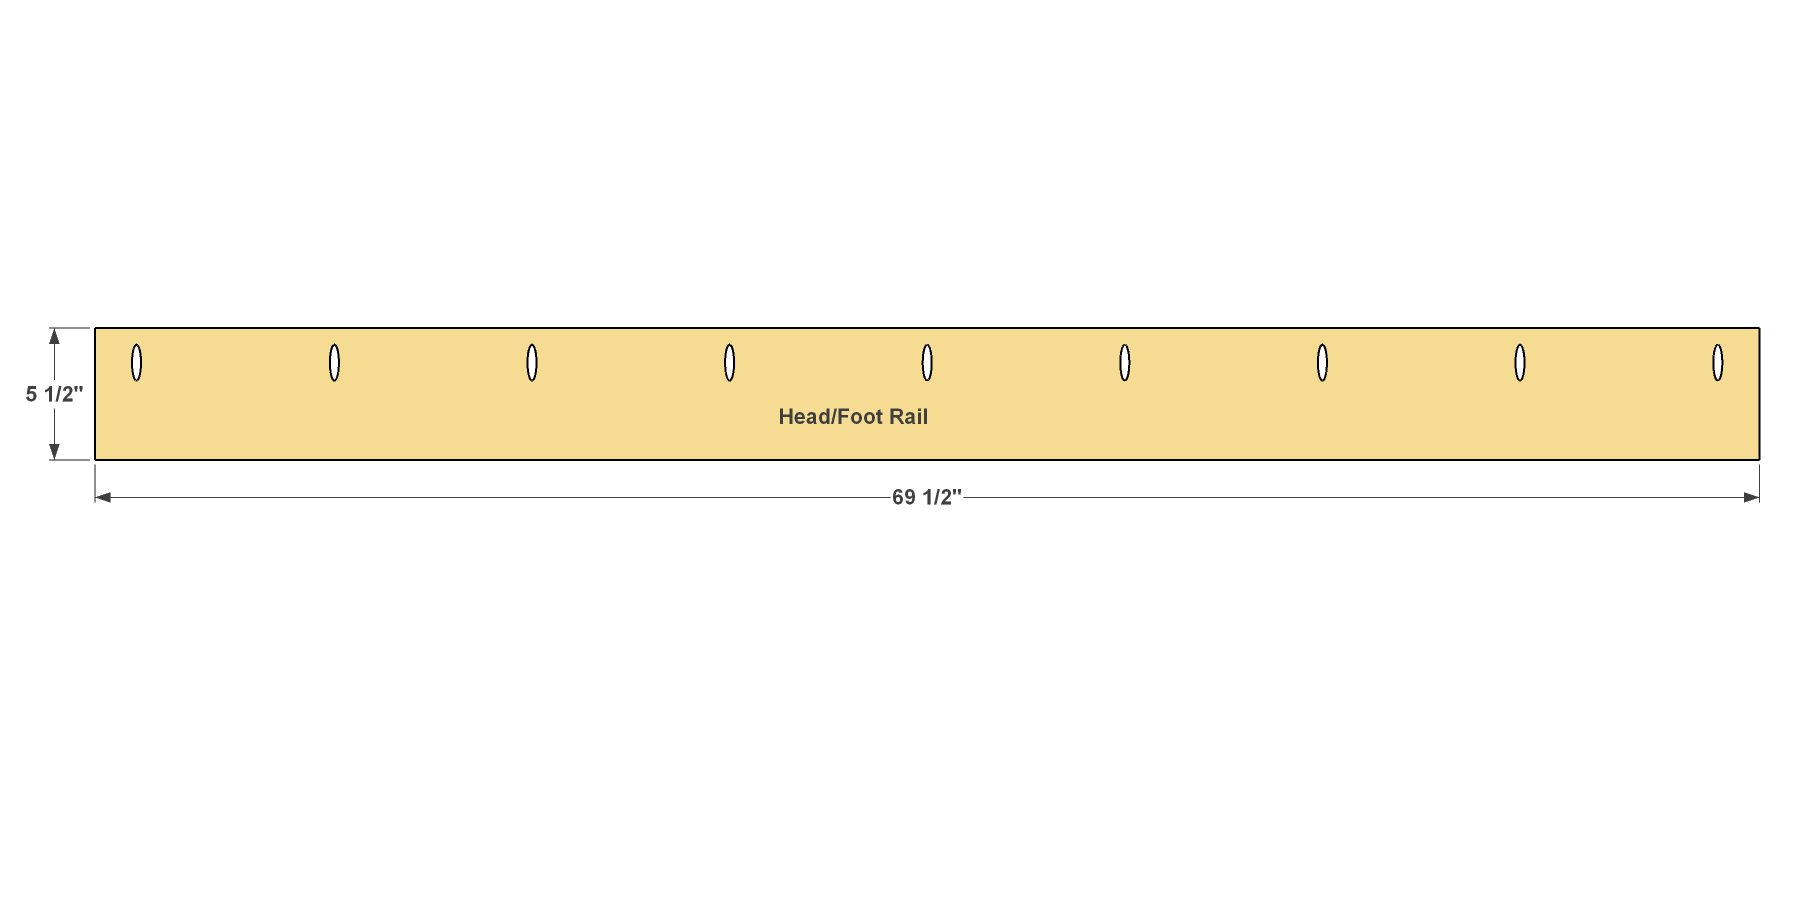
Make Headboard and Footboard Rails
Cut one Head Rail and one Foot Rail to size from 1x6 boards, as shown in the cutting diagram. Then drill pocket holes where shown.
-
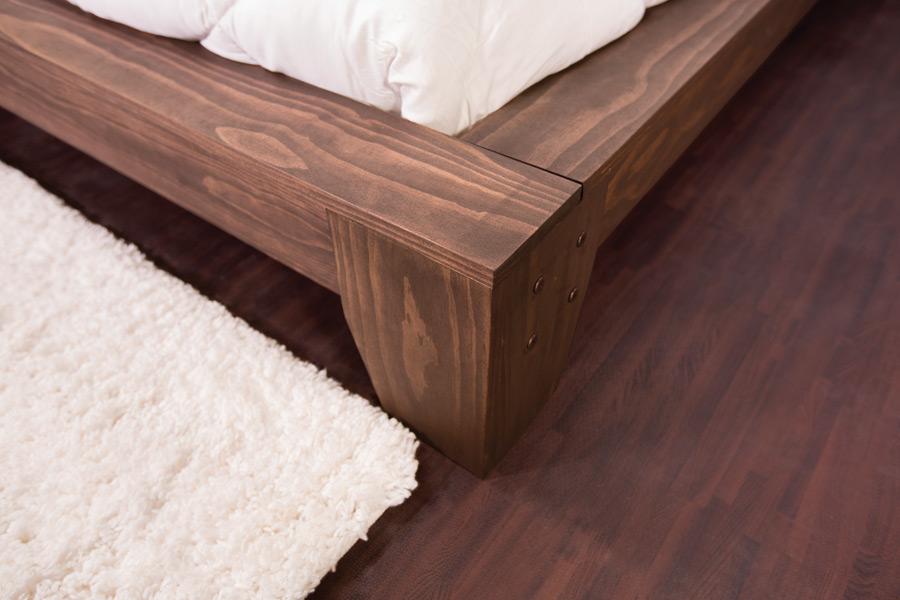
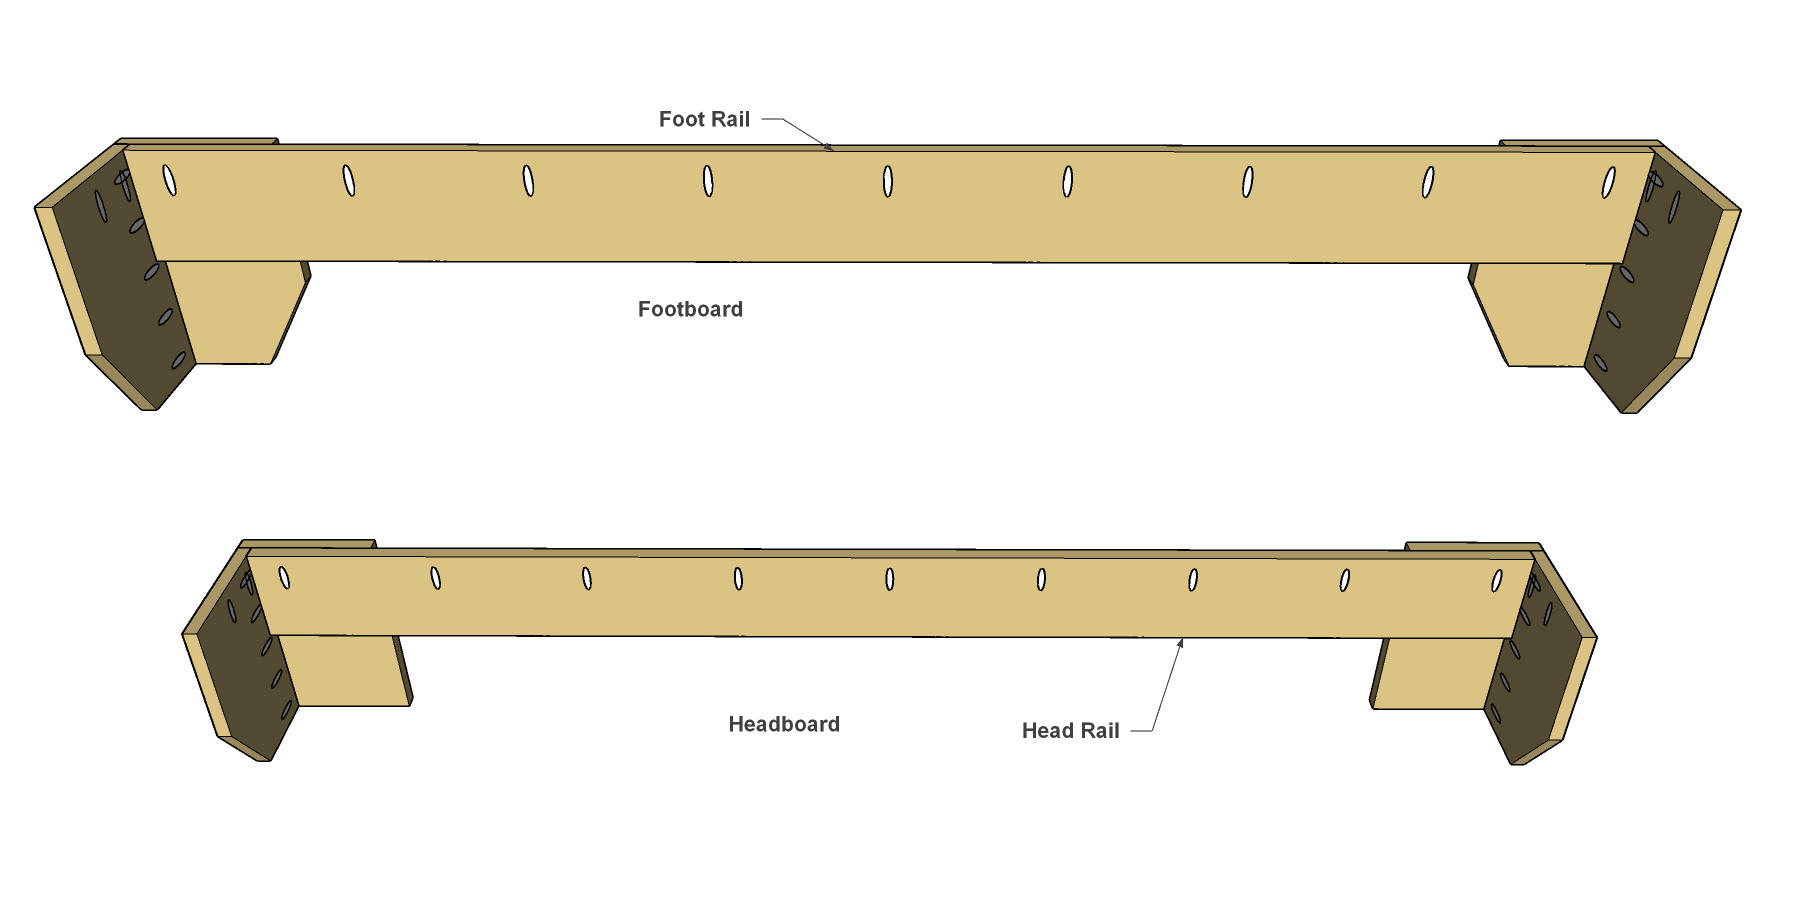
Connect the Legs and Rails
Glue and clamp the Foot Rail to the two leg assemblies that have angled sides, and then secure the parts by driving four 1 1/4" flathead wood screws through the Foot Rail from inside, and into the leg assembly. Attach the other leg assemblies to the Head Rail in the same way.
-
Make Head and Foot Caps
Cut the Headboard and Footboard Caps to length from 1x6 boards, as shown in the cutting diagram. Attach the caps to the Leg and Rail assembly with 1 1/4" coarse-thread pocket-hole screws, as shown.

-
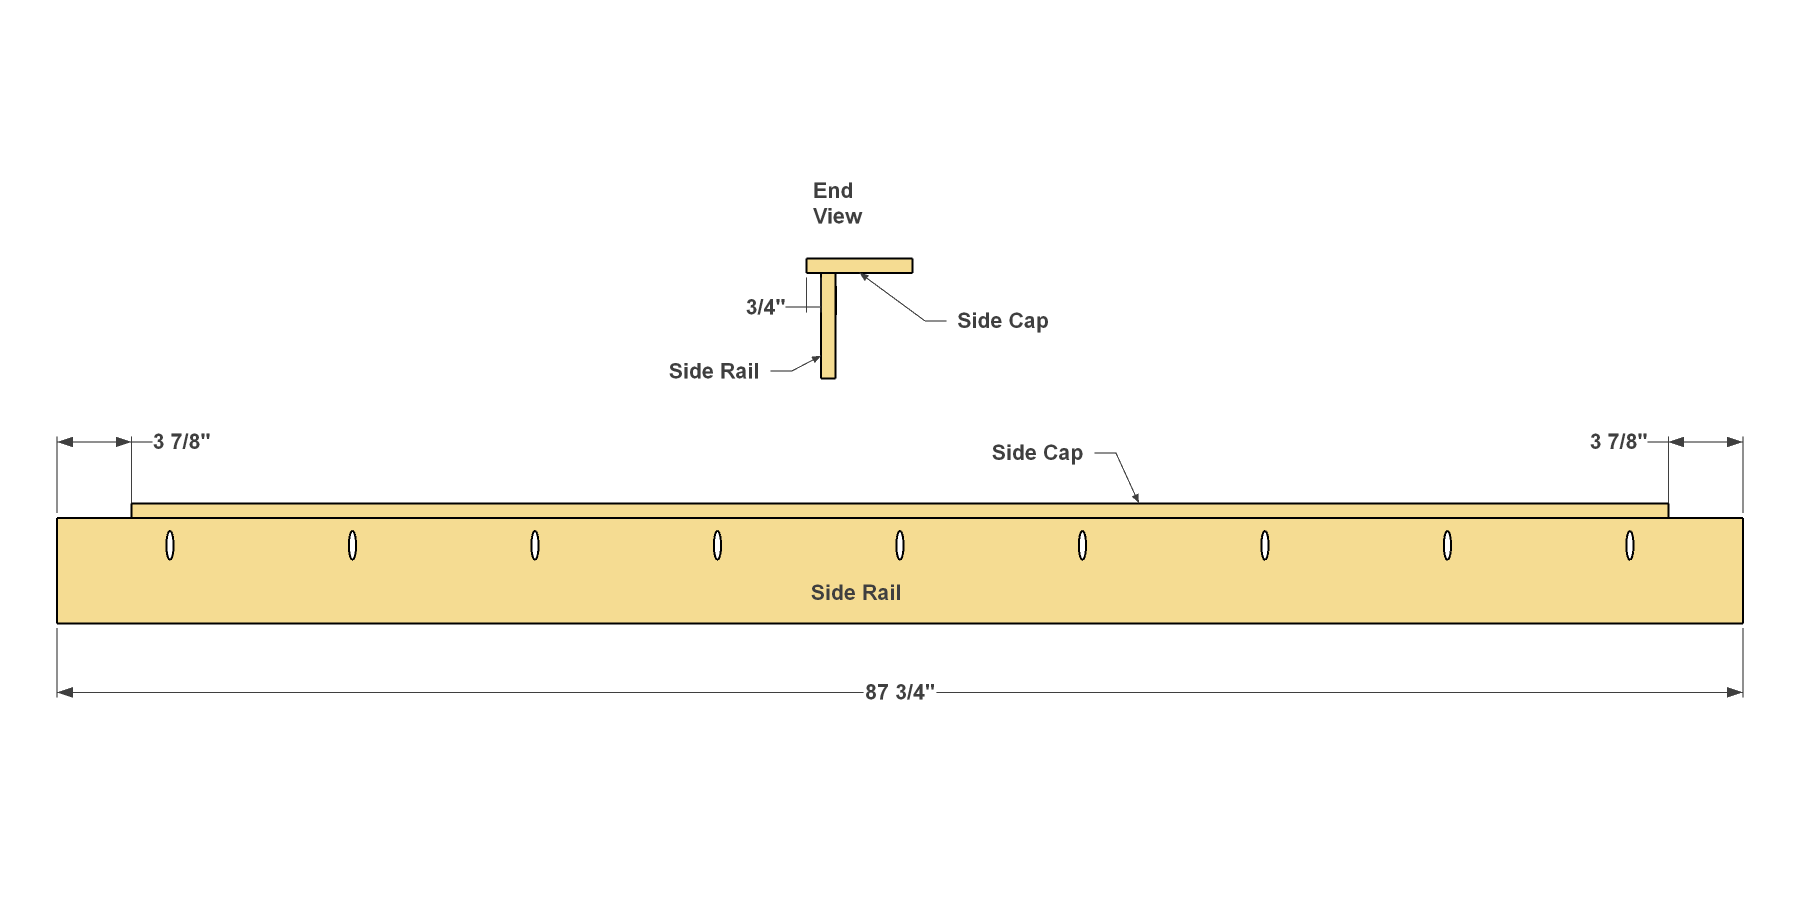
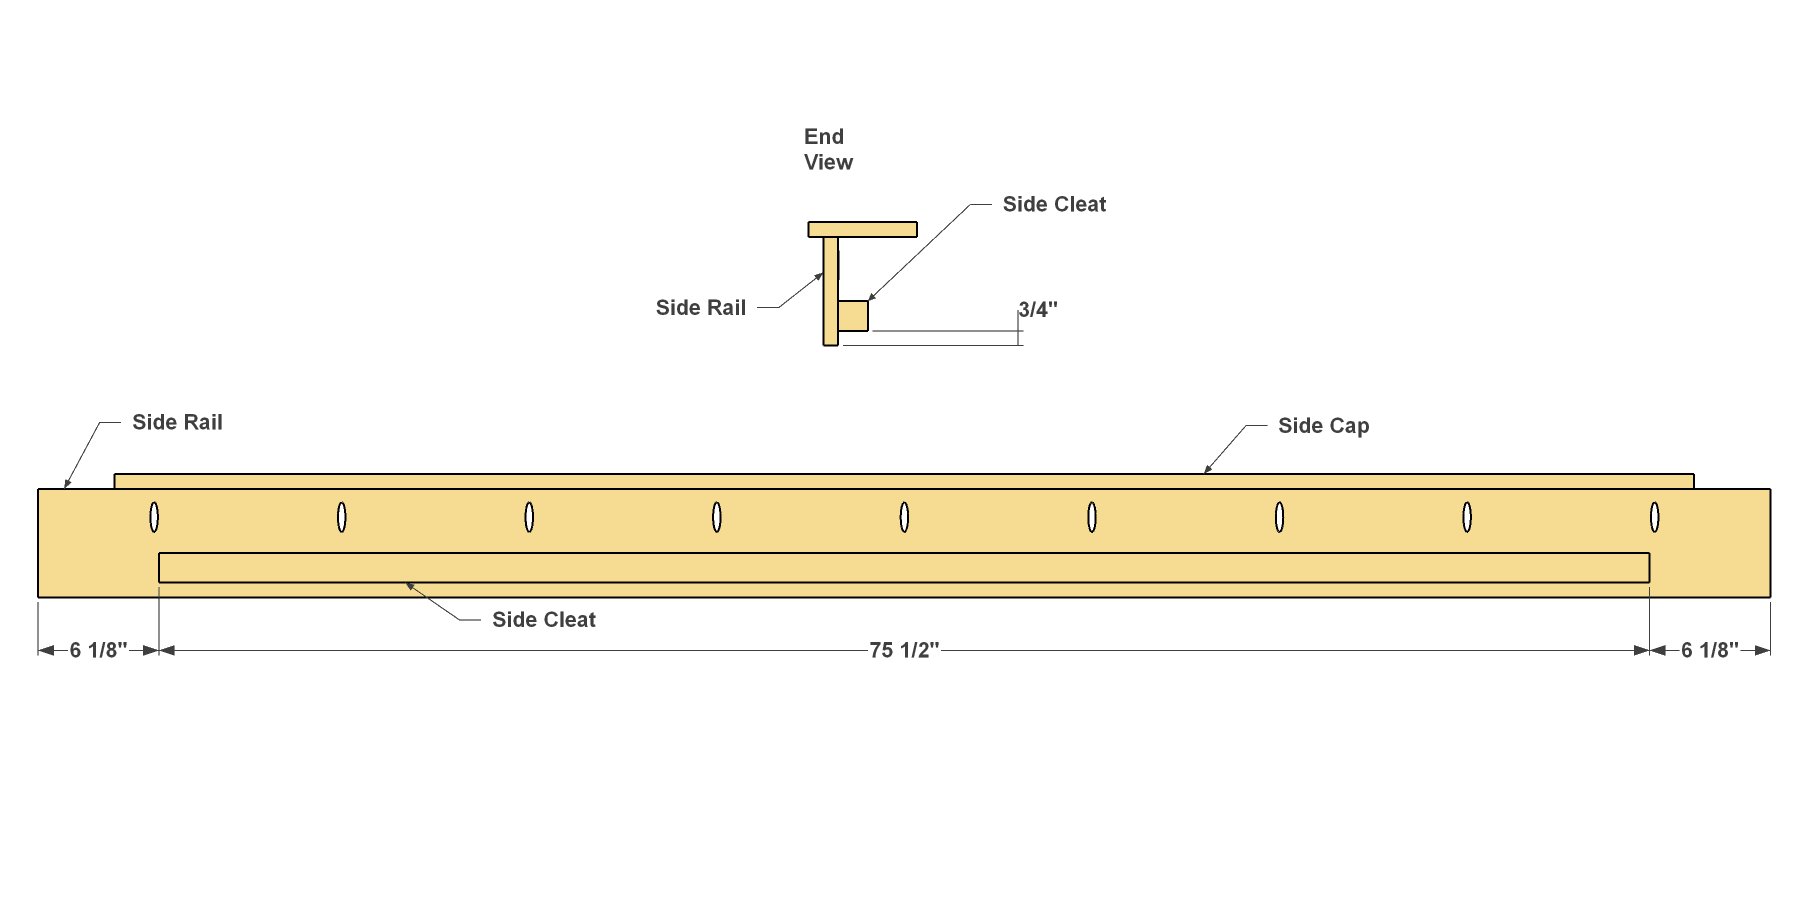
Make Side Rails
Cut two Side Rails to length from 1x6 boards, as shown in the cutting diagram. Then drill pocket holes where shown.

-
Attach the Side Cap to Rails
Cut two Side Caps to length from 1x6 boards, as shown in the cutting diagram. Attach the Side Caps to the Side Rails, as shown, using 1 1/4" coarse-thread pocket-hole screws.
-
Make the Rail Cleats
Cut two Rail Cleats from a 2x2 board, as shown in the cutting diagram. Then Drill 10 evenly spaced pilot holes for #8 flathead screws that will be used to attach the Rail Cleats to the Side Rails.
-
Attach the Rail Cleats
Attach the Rail Cleats to the Side Rails where shown using glue and 2" flat-head wood screws.
-
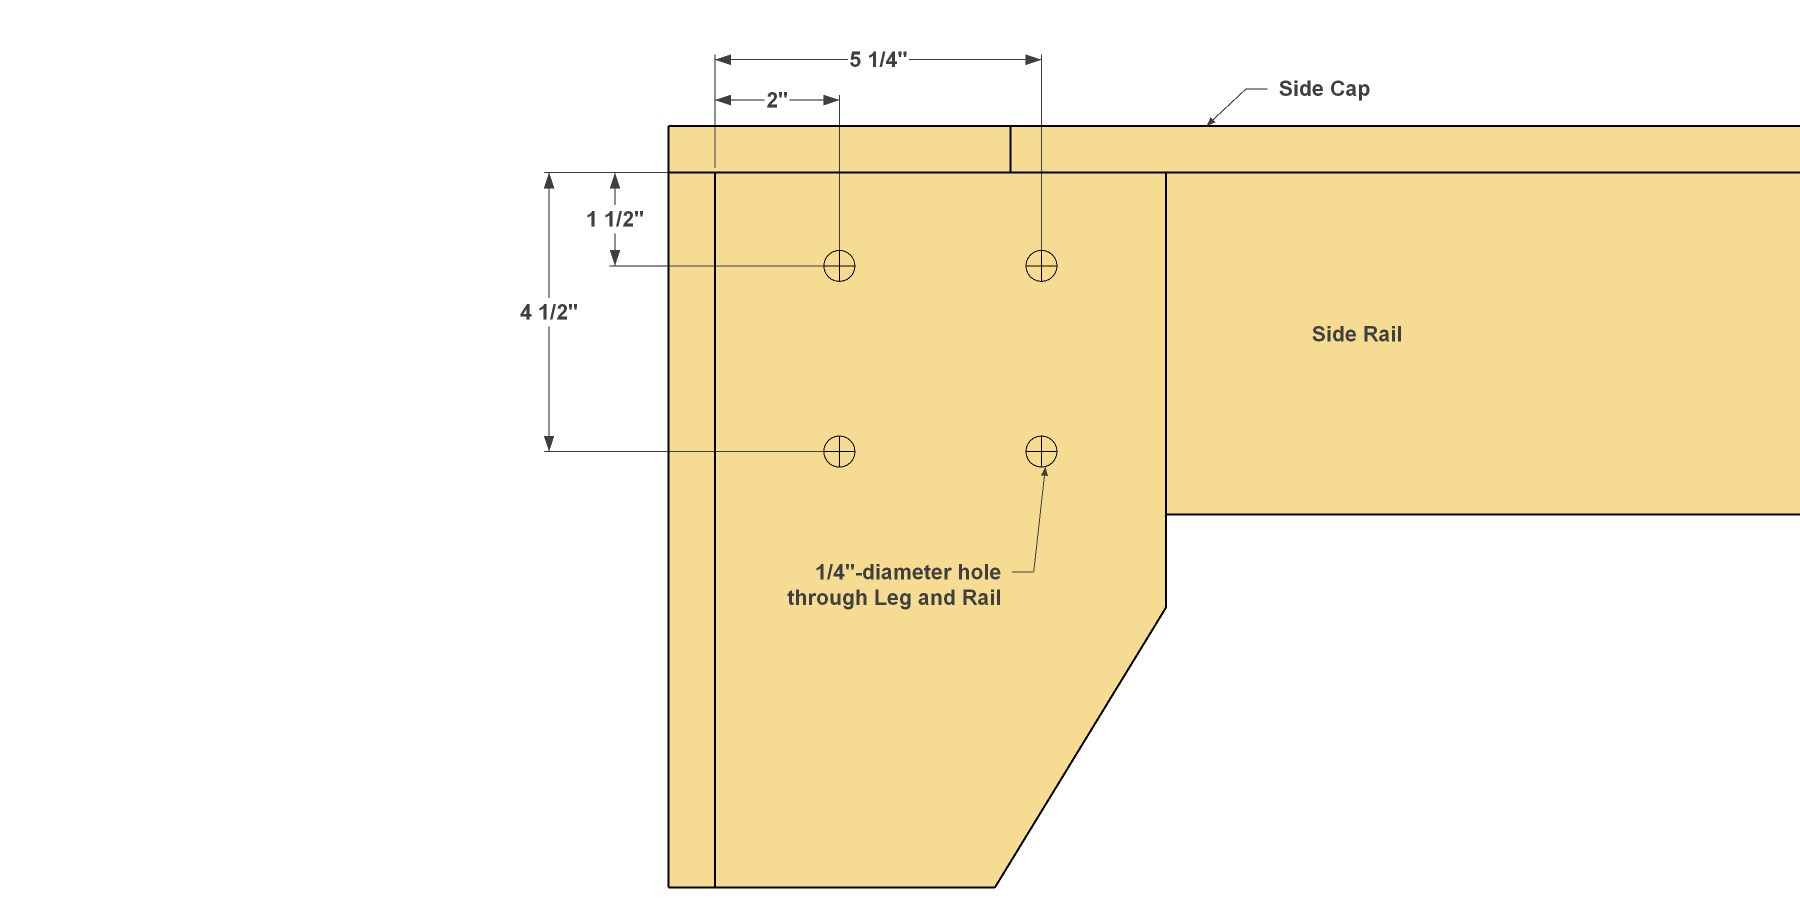
Lay Out and Drill Holes
Now you need to drill holes for the connector bolts that will be used to hold all of the leg/rail assemblies together. To do that, first clamp the head rail assembly and the foot rail assemblies to the side rail assemblies. Now lay out four holes, as shown. Then drill the holes all the way through each Leg and Rail using a 1/4" drill bit. The connector bolts will pass through these holes. Unclamp the assemblies. Next, you need to enlarge the holes in the Rails to 3/8" to accept the connector nuts that the connector screws thread into.
-
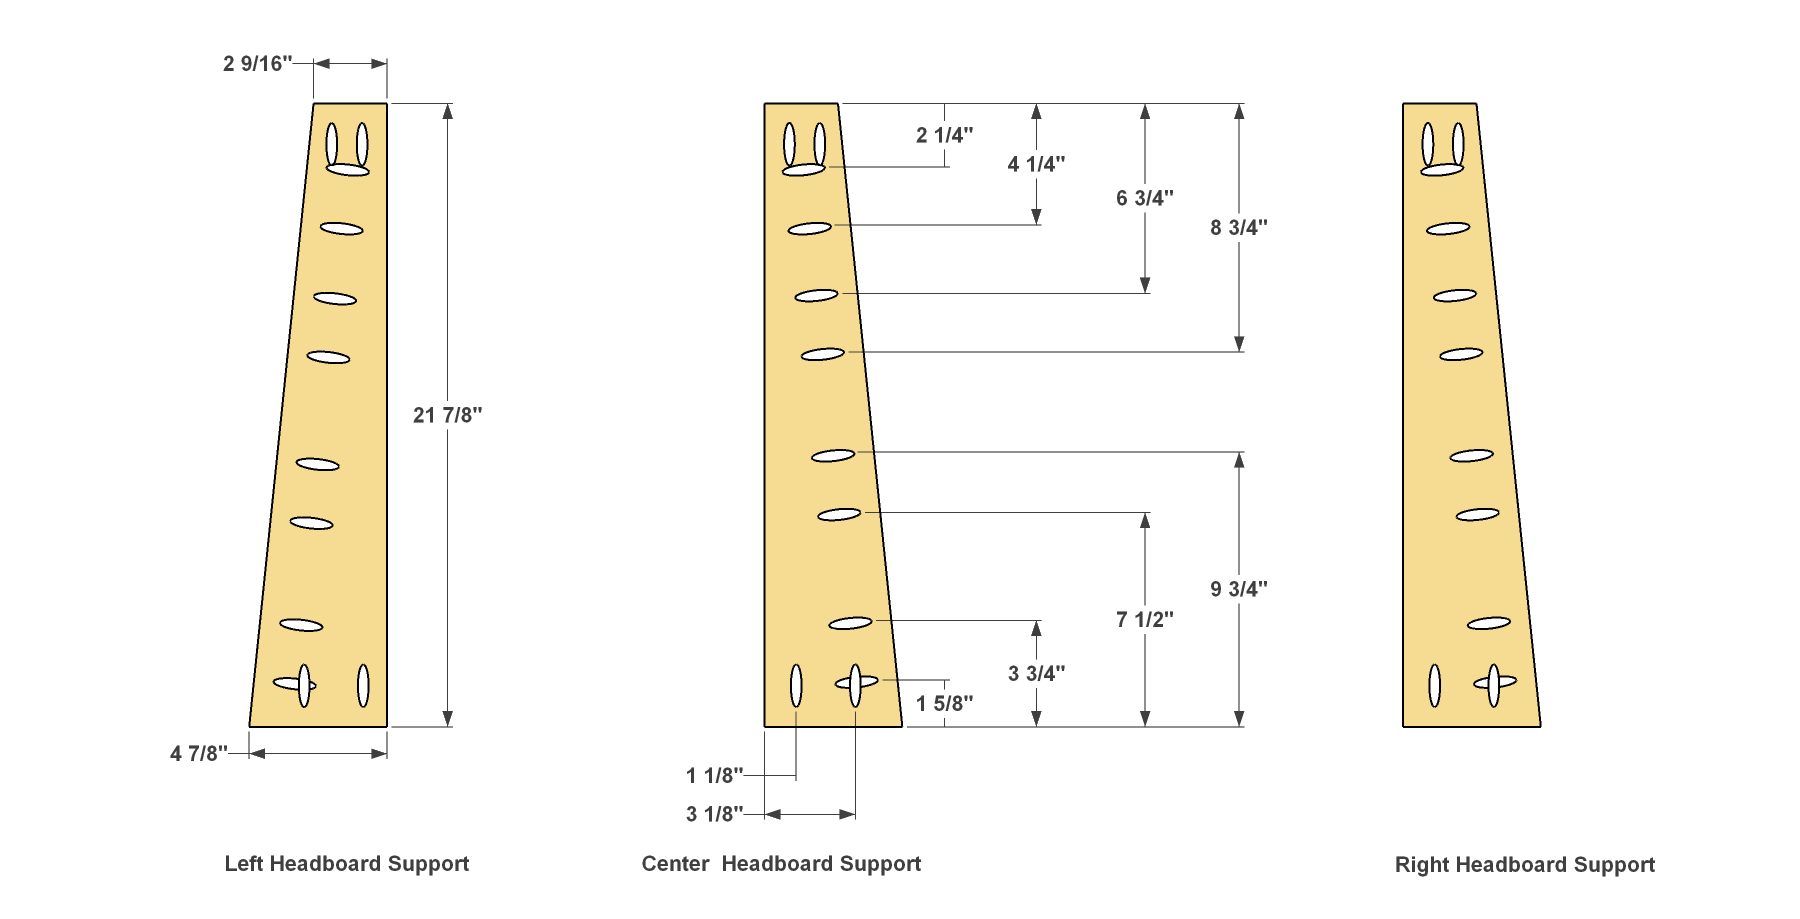
Make the Headboard Supports
Cut three Headboard Supports from 1x6 boards, as shown in the cutting diagram. Then cut the angled shape in each one using a jigsaw. Sand the cut edges smooth. Next, drill pocket holes in the Headboard Supports where shown. Note that you’ll need to make two that are “mirror images.” That way, the pocket holes will be on the inside faces of the outer Headboard supports, and won’t show when everything is assembled.
-
Make Headboard Slats and a Top
Cut four Headboard Slats from 1x6 boards, as shown in the cutting diagram. Then cut one Headboard Top to length from a 1x3 board.
-
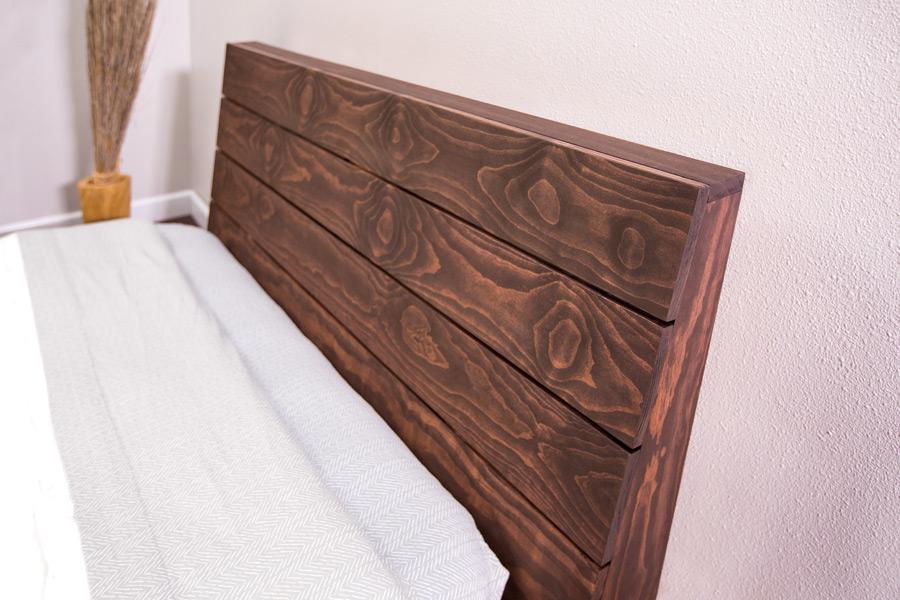
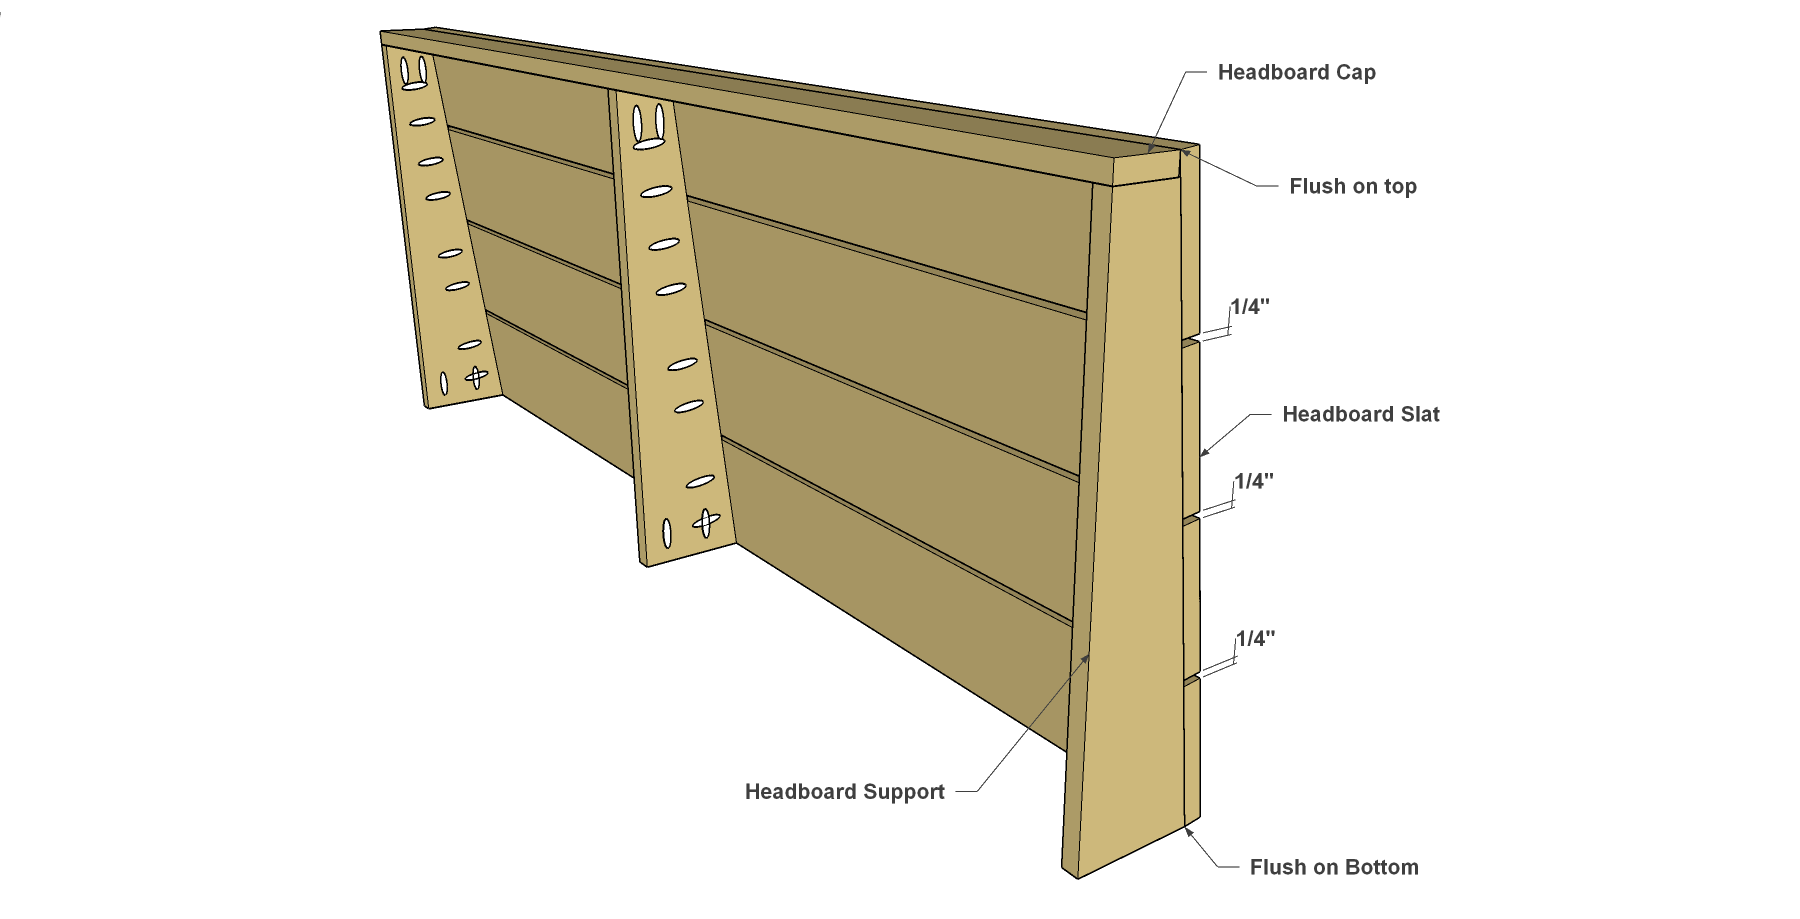
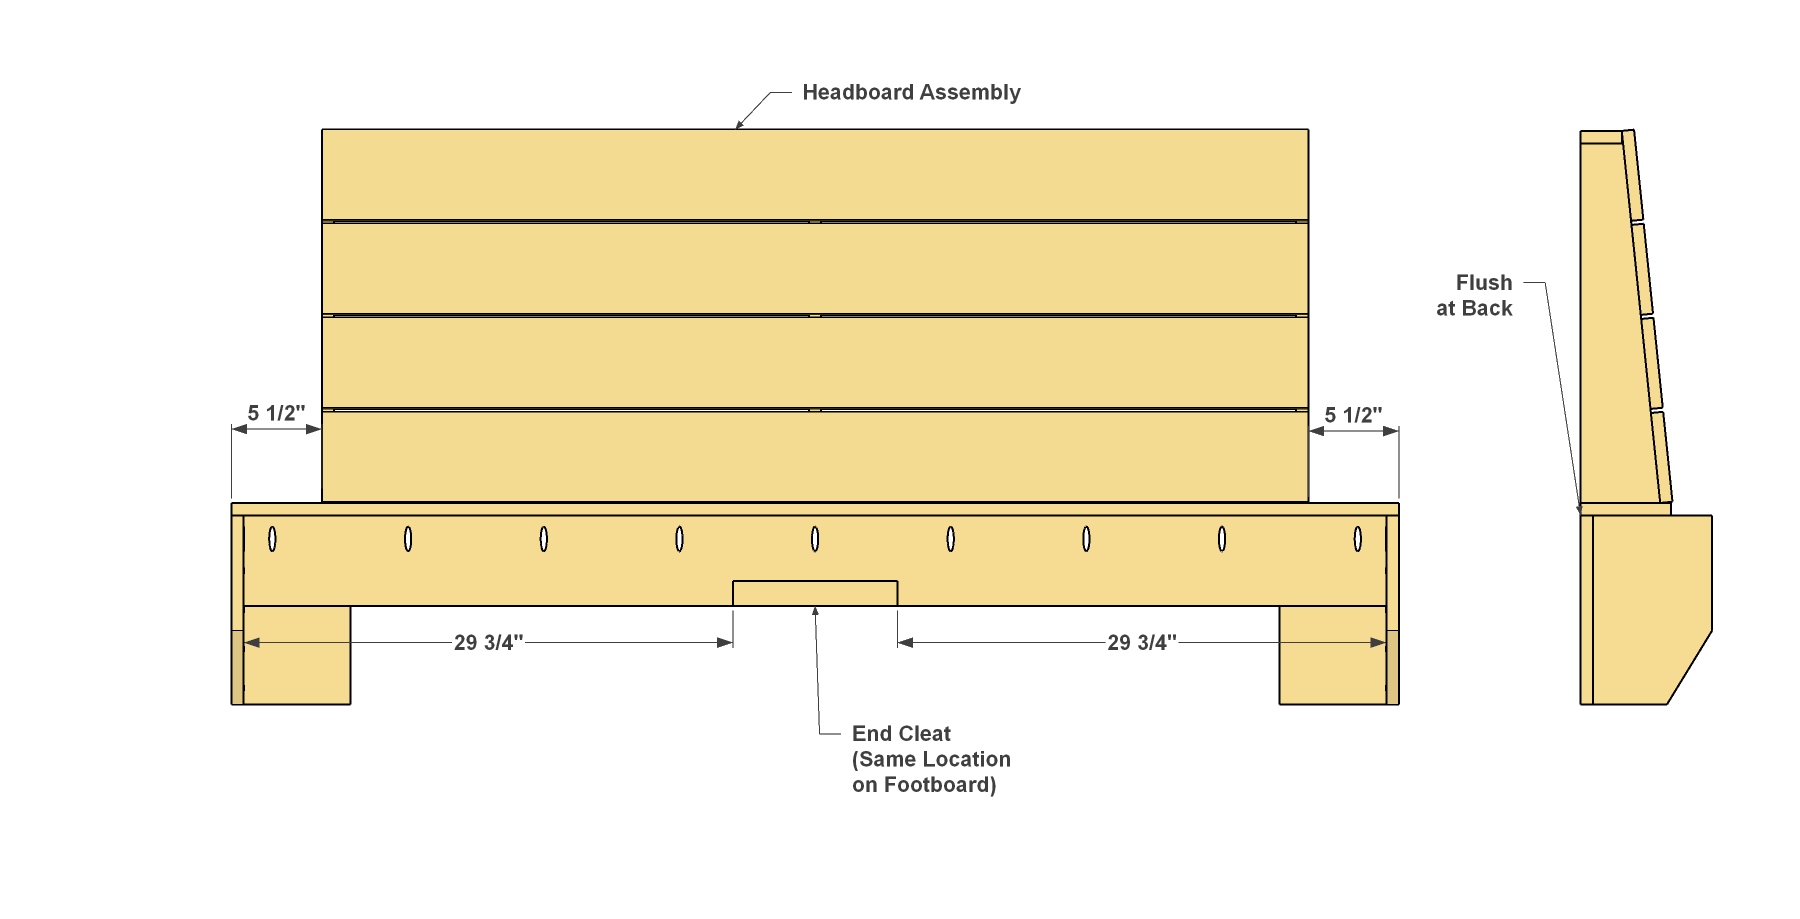
Assemble the Headboard
Now you can attach the Headboard Slats and the Headboard Top to the Headboard Supports. Start by attaching the lowest Headboard Slat using 1 1/4" coarse-thread pocket-hole screws. Then attach the Headboard Top. Now add the uppermost Headboard Slat, making sure the edge is flush with the Headboard Top, as shown. Finally, add the two remaining Headboard Slats. Positioning them so there are equal gaps between all of the Slats.
-
Mount the Headboard and End Cleats
Attach the Headboard assembly to the Headboard Cap where shown using 1 1/4" coarse-thread pocket-hole screws. Cut two End Cleats to length from 2x2 boards, as shown in the cutting diagram. Then attach the End Cleats to the Head Rail and Foot Rail where shown using glue and three evenly-spaced 2" flat-head wood screws.
-
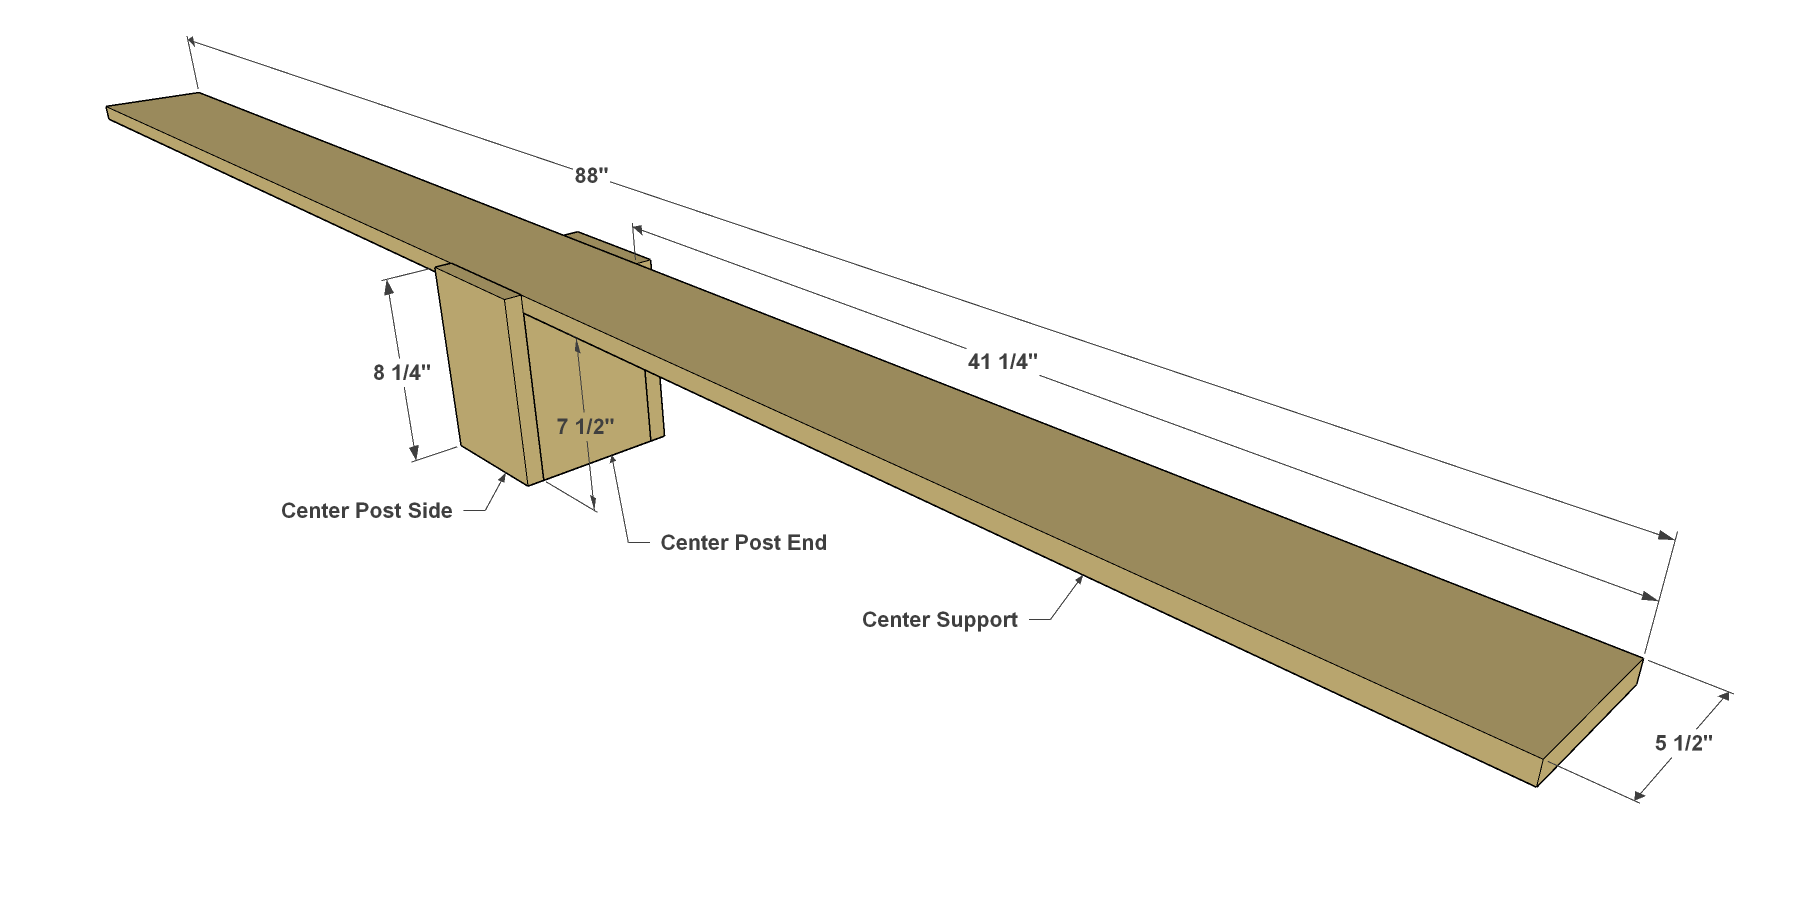
Make the Center Support
Cut one Center Support, two Center Post Sides, and two Center Post Ends from 1x6 boards, as shown in the cutting diagram.
-
Assemble the Center Support
Attach the Center Post Ends and Sides one another, and to the Center Support, as shown, using 1 1/4" flat-head wood screws.
-
Assemble the Bed
With 16 connector nuts and bolts, attach the rail assemblies to the headboard and footboard assemblies. Set the Center Support assembly in place and screw the ends to the End Cleats using two 1 1/4" flat-head wood screws at each end. With that done, you can give the bed a final sanding, and paint or stain it to your tastes.
-
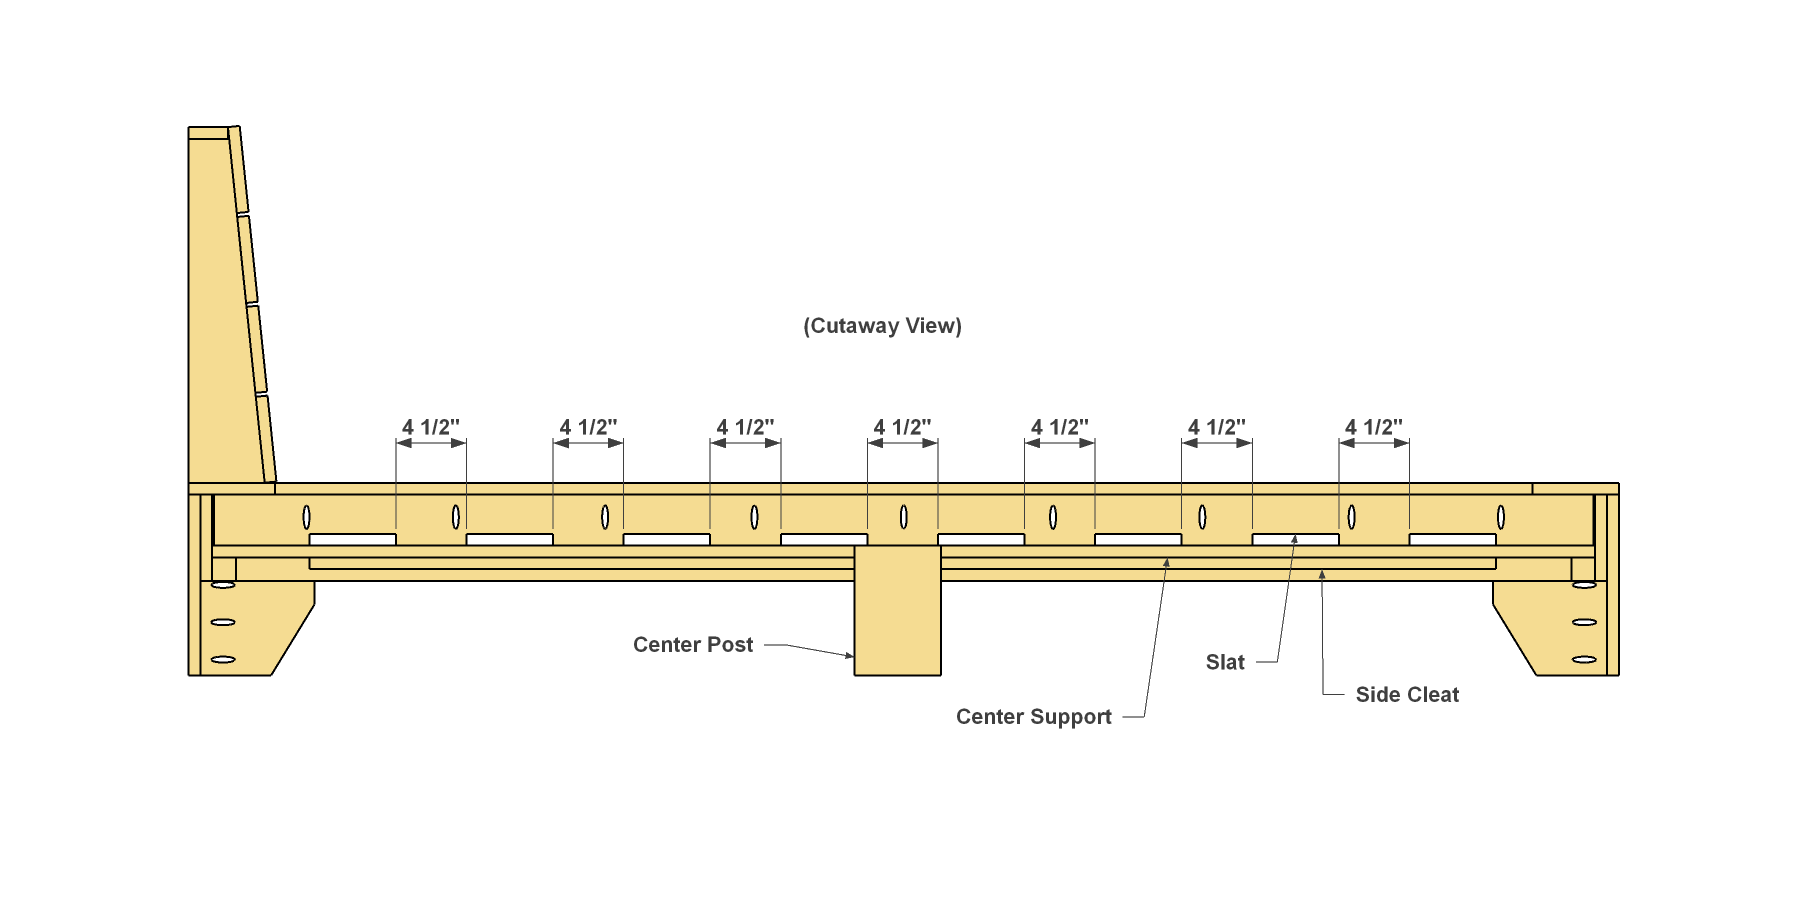
Add the Slats
Cut eight Slats to length from 1x6 boards, as shown in the cutting diagram. For these, you can use lower-grade pine boards. Once you have the platform bed set up where you want it, lay the Slats on the Rail Cleats and Center Support, spacing them evenly. The Slats don’t have to be screwed in place. The weight of your mattress will hold them in position. Once you set your mattress in place, your bed is ready.