

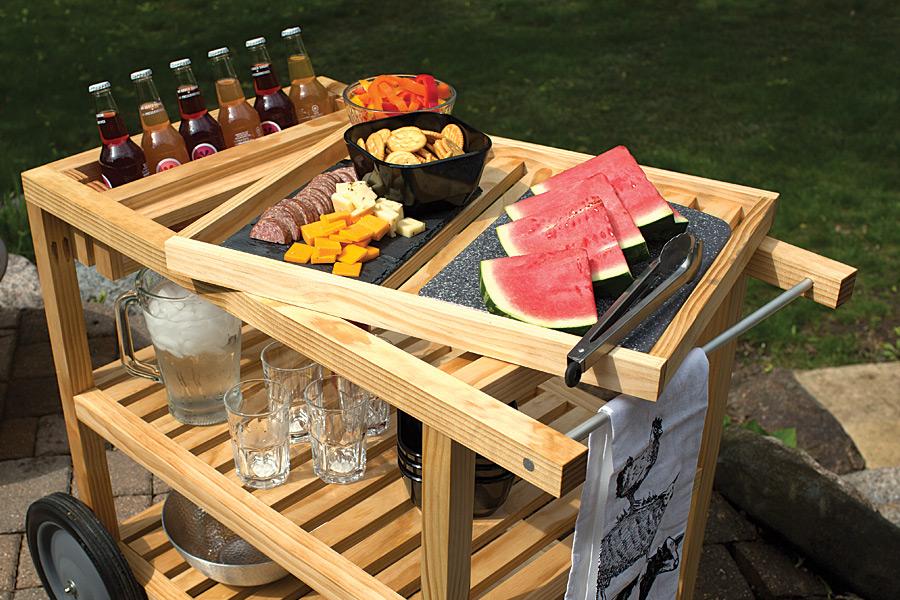
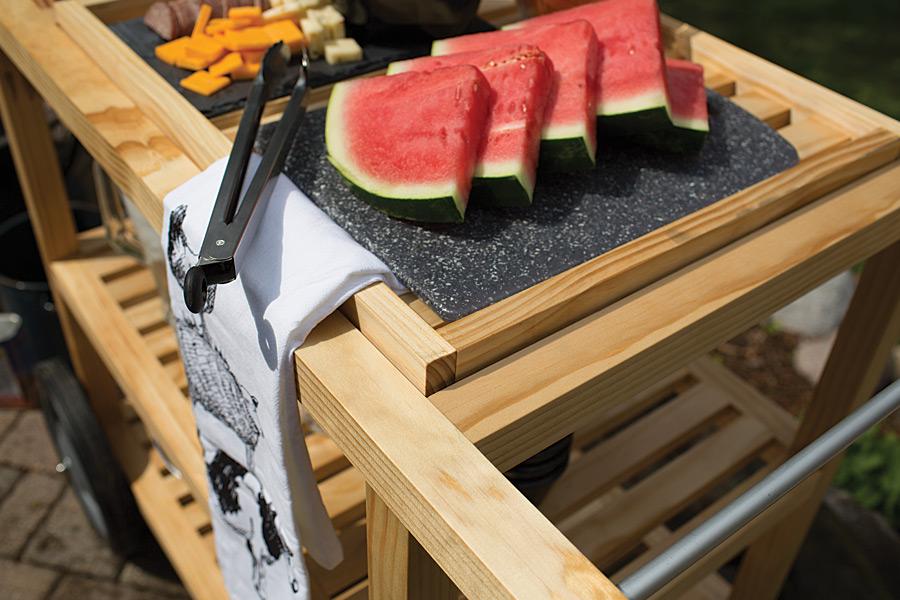
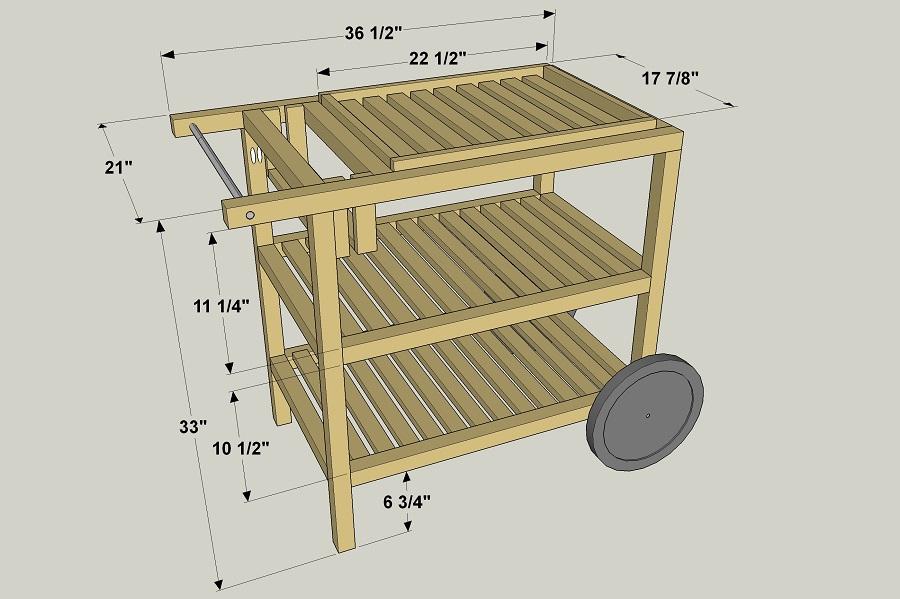


Make outdoor entertaining easy with this serving cart. It offers lots of space for storing food, tableware, and outdoor supplies, plus it cradles bottles where they’re easy to reach but protected from spills. The top “shelf” is a lift-off tray, so you can carry supplies from the cart to your table.
Tools
Kreg Tools


Other Tools
-
Miter Saw

-
Square
-
Tape Measure
-
Hacksaw
-
Ultra-fine synthetic steel wool pad
Materials
Wood Products
- 8 Board , 1x2 , 96"
- 1 Board , 1x2 , 48"
- 4 Board , 2x2 , 96"
- 1 Board , 2x2 , 72"
Hardware & Supplies
- 140 1 1/4" exterior pocket hole screws
- 76 2 1/2" exterior pocket hole screws
- 1 1/2" x 36" Aluminum Tubing (3/8" or larger inside diameter)
- 1 1/2" x 36" Aluminum Round Rod
- 1 3/8"-16 x 36" Threaded Rod
- 1 3/8"-16 Standard Hex Nut (Optional)
- 2 3/8"-16 Acorn Cap Nut
- 4 1/2" Fender Washer
- 2 12" Steel Wheel
Cut List & Parts
- 24 Shelf Slat , 3/4" x 1 1/2" x 18" pine
- 9 Tray Slat , 3/4" x 1 1/2" x 16 3/8" pine
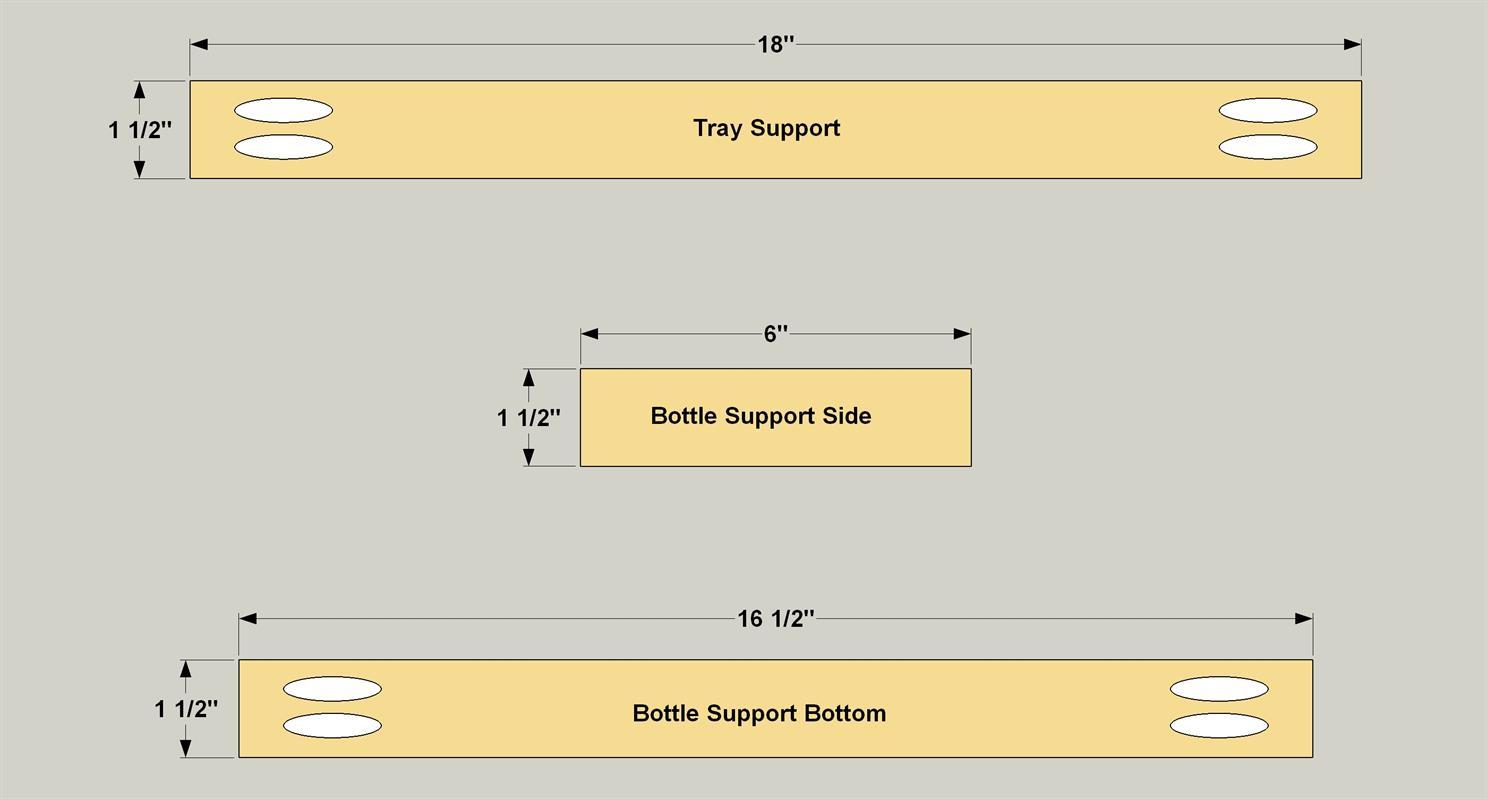
- 2 Tray Support , 3/4" x 1 1/2" x 18" pine
- 2 Tray Side , 3/4" x 1 1/2" x 22 3/8" pine
- 2 Tray End , 3/4" x 1 1/2" x 16 3/8" pine
- 4 Side Rail , 1 1/2" x 1 1/2" x 27 3/4" pine
- 7 End Rail , 1 1/2" x 1 1/2" x 18" pine
- 2 Hand Rail , 1 1/2" x 1 1/2" x 36" pine
- 2 Front Leg , 1 1/2" x 1 1/2" x 31 1/2" pine
- 2 Back Leg , 1 1/2" x 1 1/2" x 26 1/4" pine
- 4 Bottle Support Side , 3/4" x 1 1/2" x 6" pine
- 2 Bottle Support Bottom , 3/4" x 1 1/2" x 16 1/2" pine
- 1 Cart Handle , 1/2" x 21" aluminum round rod
- 1 Aluminum Axle , 1/2" x 24 5/8" aluminum tubing
- 1 Threaded Axle , 3/8" x 25 1/2" threaded rod

Directions
-
Make the Shelf Slats
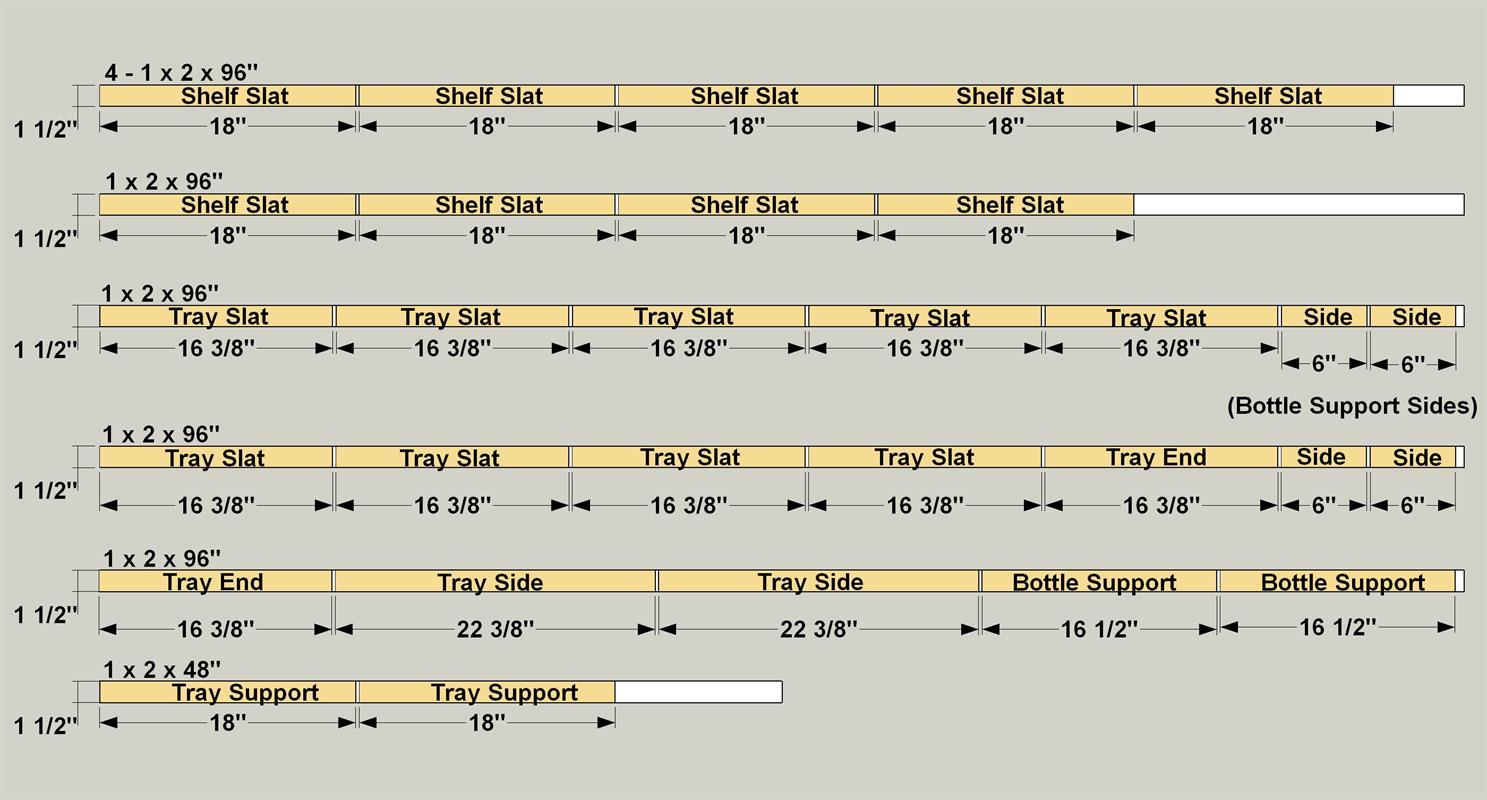
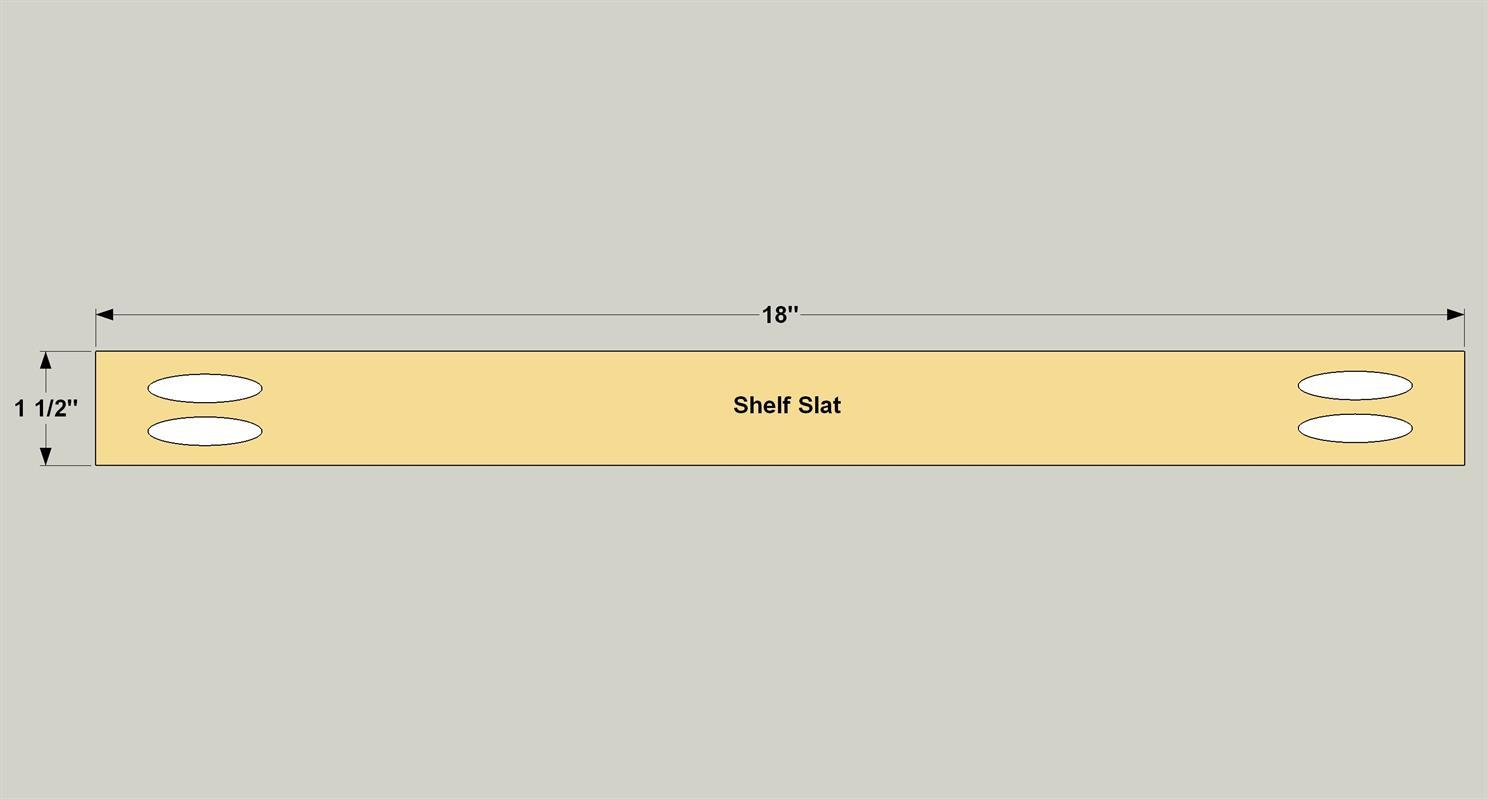
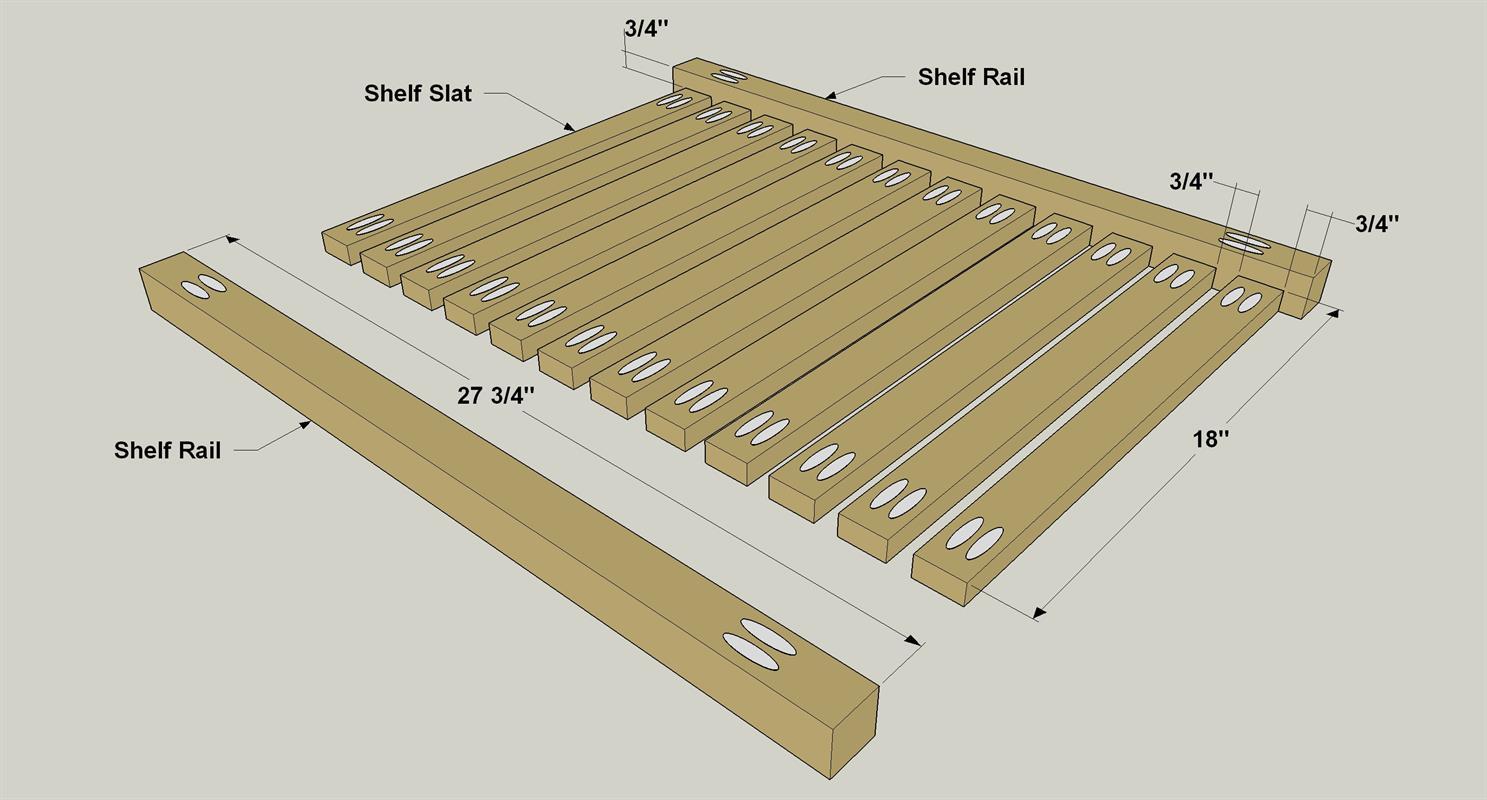
Cut 24 Shelf Slats from 1x2 pine boards as shown in the cutting diagram. Set your pocket hole jig for 3/4" thick material, and then drill pocket holes in all of the Slats where shown.
-
Make the Side Rails
Cut 4 Side Rails from 2x2 pine, as shown in the cutting diagram. Set your pocket hole jig for 1 1/2" thick material and drill pocket holes on the Side Rails where shown.
-
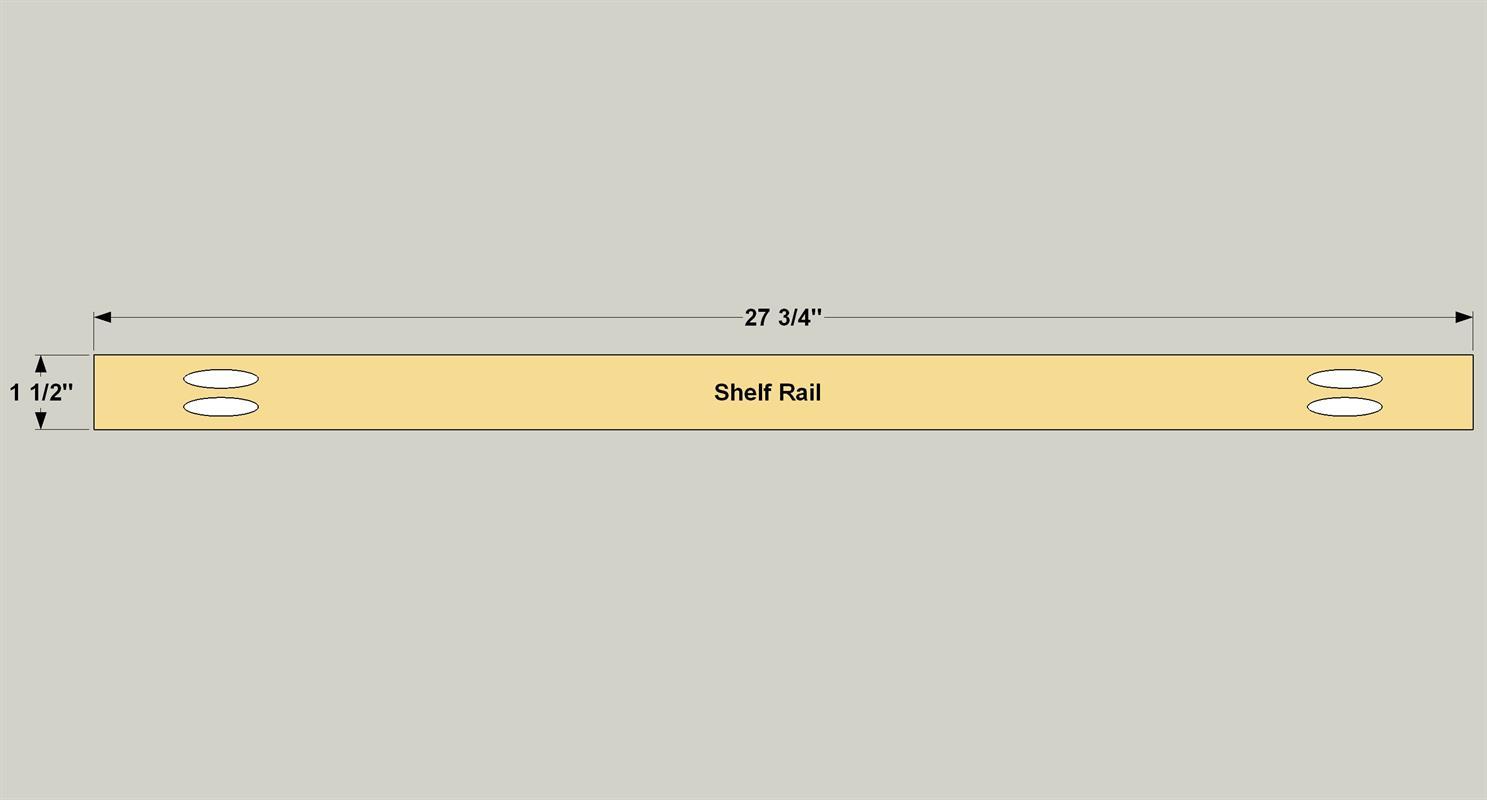
Build the Shelves
On a flat work surface, lay two Shelf Rails parallel to one another with the pocket holes facing up. Position the first Shelf Slats perpendicular to the Shelf Rail and inset 3/4" from the edge (here you can use one of the slats set on edge as a spacer). Secure the Slat to the Rail with 1 1/4" coarse-thread pocket hole screws (make sure the Slat is flush to the top of the Shelf Rail). Space the next Slat 3/4" away and screw it in place. Secure the rest of the slats to one rail the same way. Use the same process for the second Rail as well as the second Shelf.
-
Make the Legs
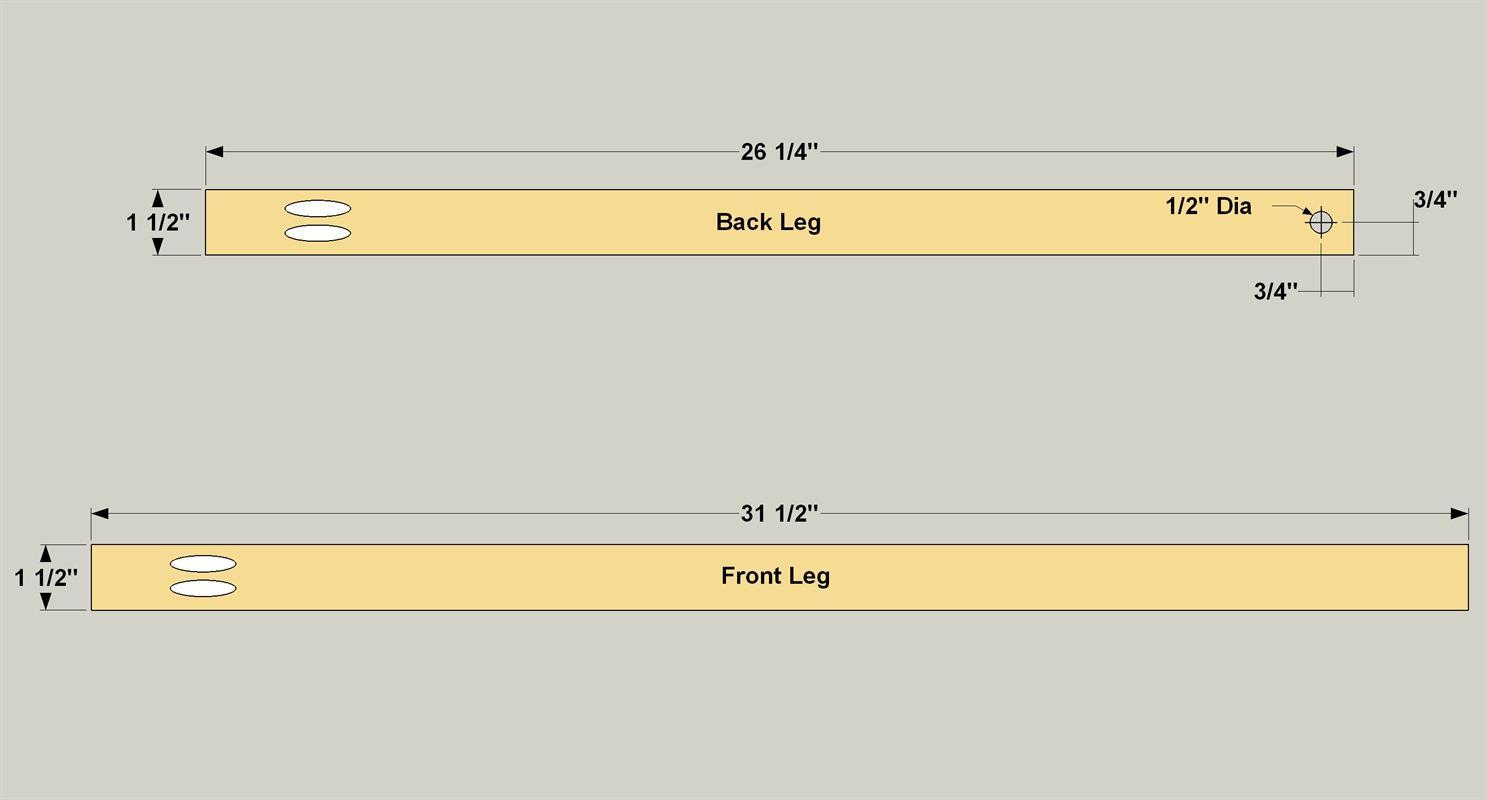
Cut two Front Legs and two Back Legs to length from 2x2 boards, as shown in the cutting diagram. Set your pocket hole jig for 1 1/2" thick material and drill a single set of pocket holes on one end of the Front and Back Legs as shown. Place the two Back Legs together with the pocket holes face to face and temporarily tape the Back Legs together with painters tape. Mark the location of the 1/2" hole, and then drill through both Back Legs as shown.
-
Create the Hand Rails
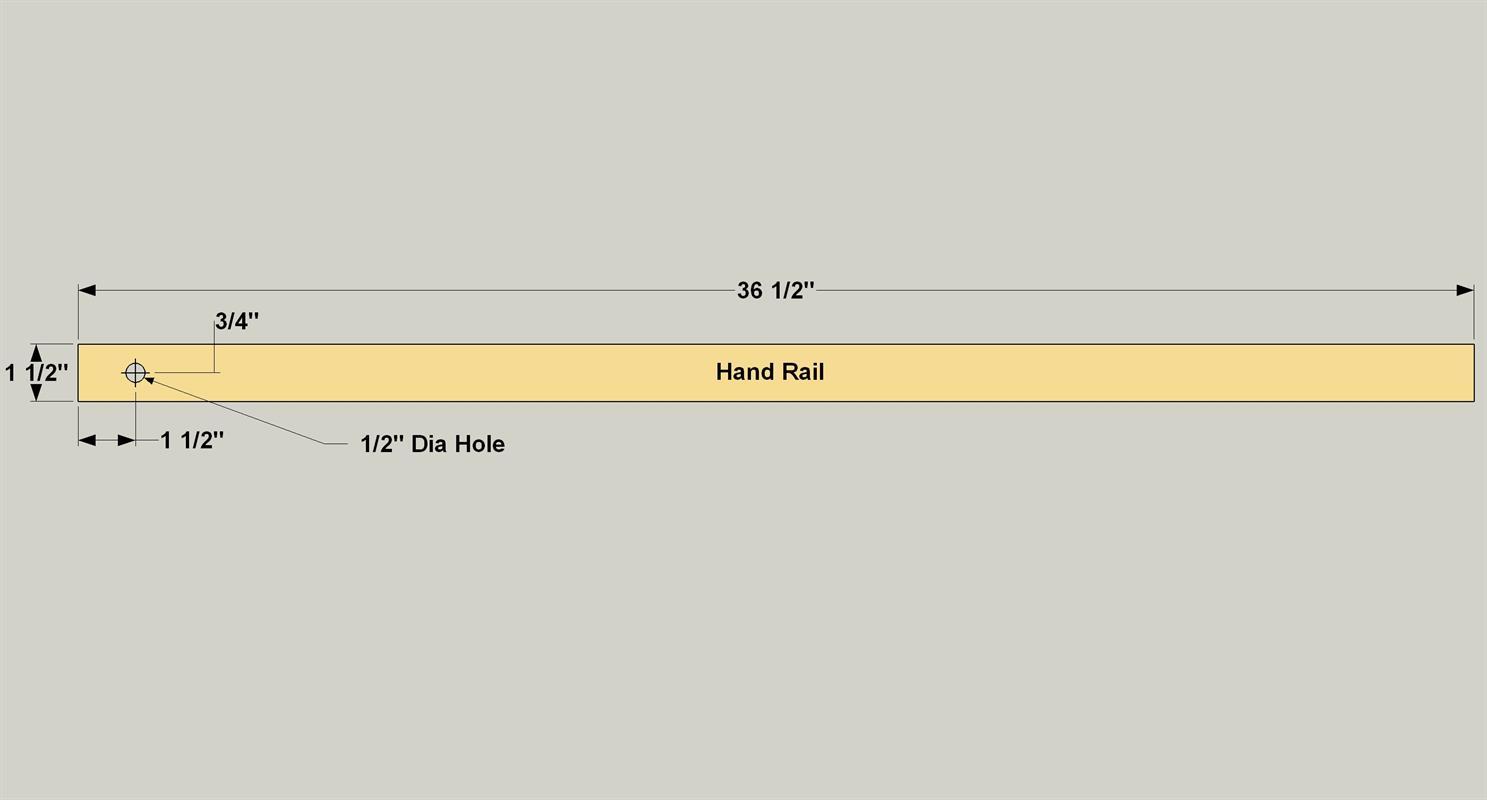
Cut two Hand Rails to length form 2x2 pine boards, as shown in the cutting diagram. Tape the two Hand Rails together with painters tape, mark the location of the 1/2" hole, then drill through both Rails as shown.
-
Assemble the Legs and Hand Rail
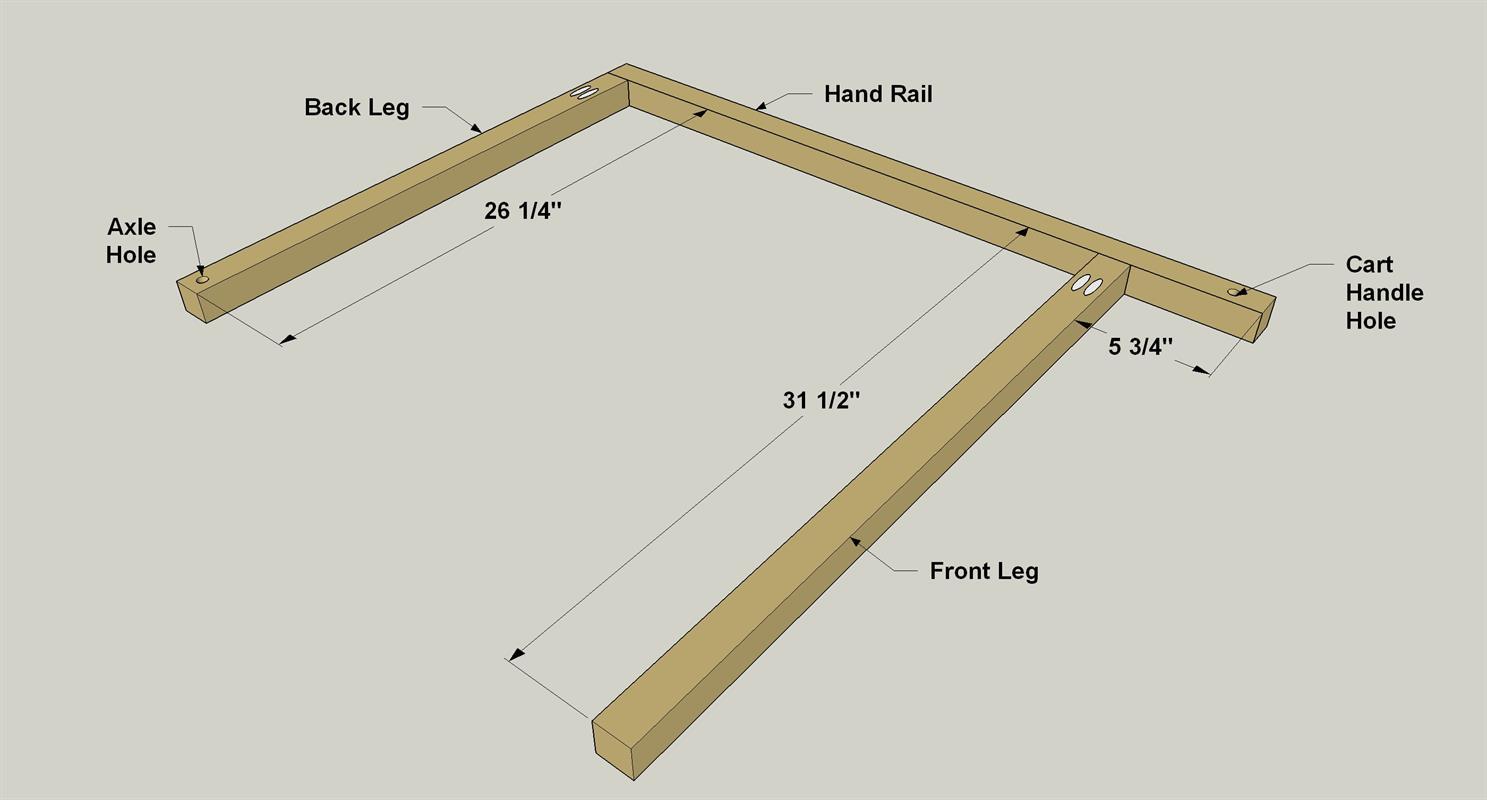
Attach the Front and Back Legs to one Hand Rail with 2 1/2" coarse-thread pocket hole screws at the location shown. Complete the same operation for the other Legs and Hand Rail to create two leg assemblies.
-
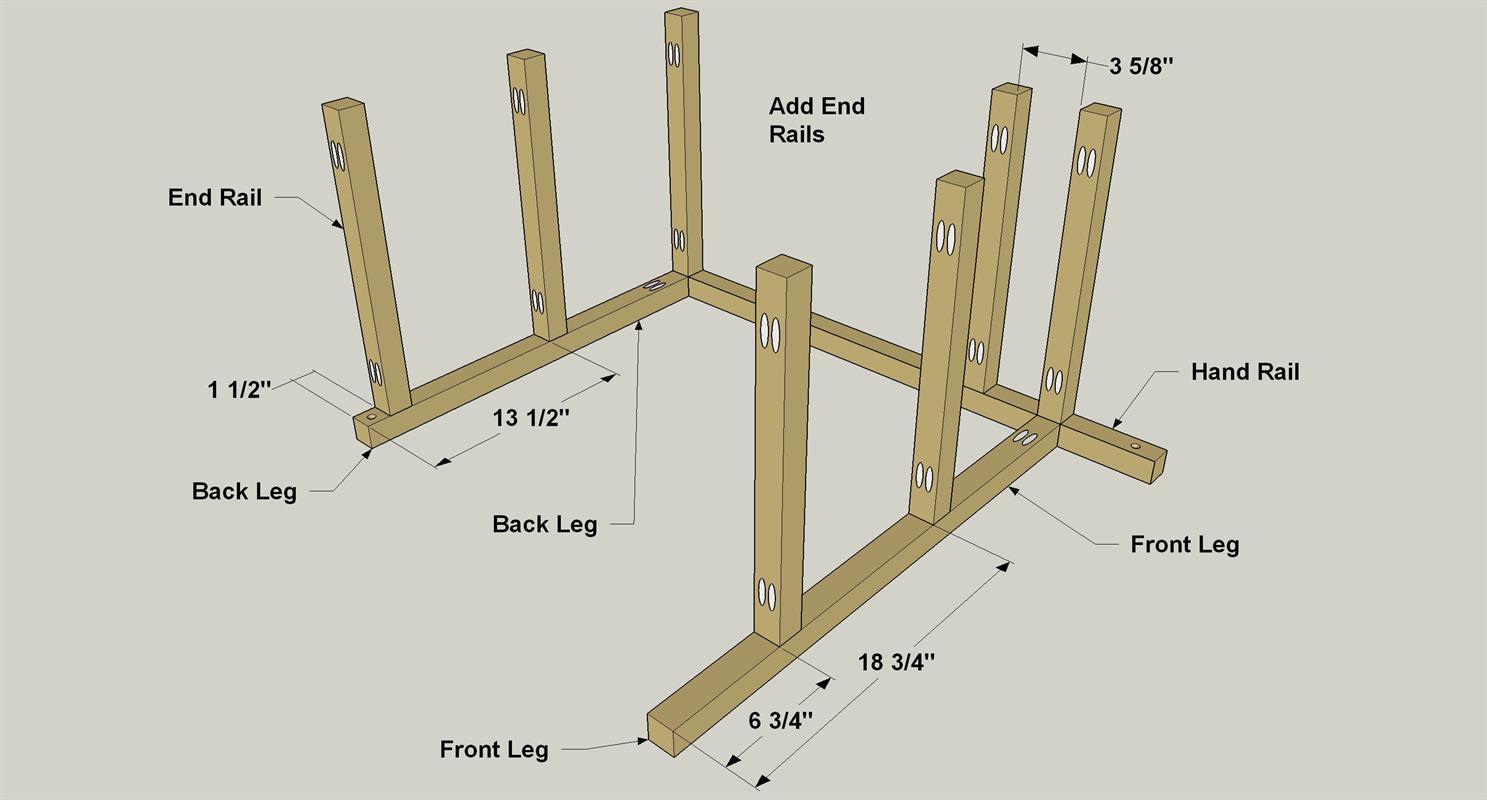
Make End Rails
Cut seven End Rails to length form 2x2 pine boards as shown in the cutting diagram. Set your pocket hole jig for 1 1/2" material, and then drill pocket holes in both ends of each Rail.

-
Attach the End Rails to the Legs
Secure the seven End Rails to one Leg Assembly with 2 1/2" coarse-thread pocket hole screws at the locations shown.
-
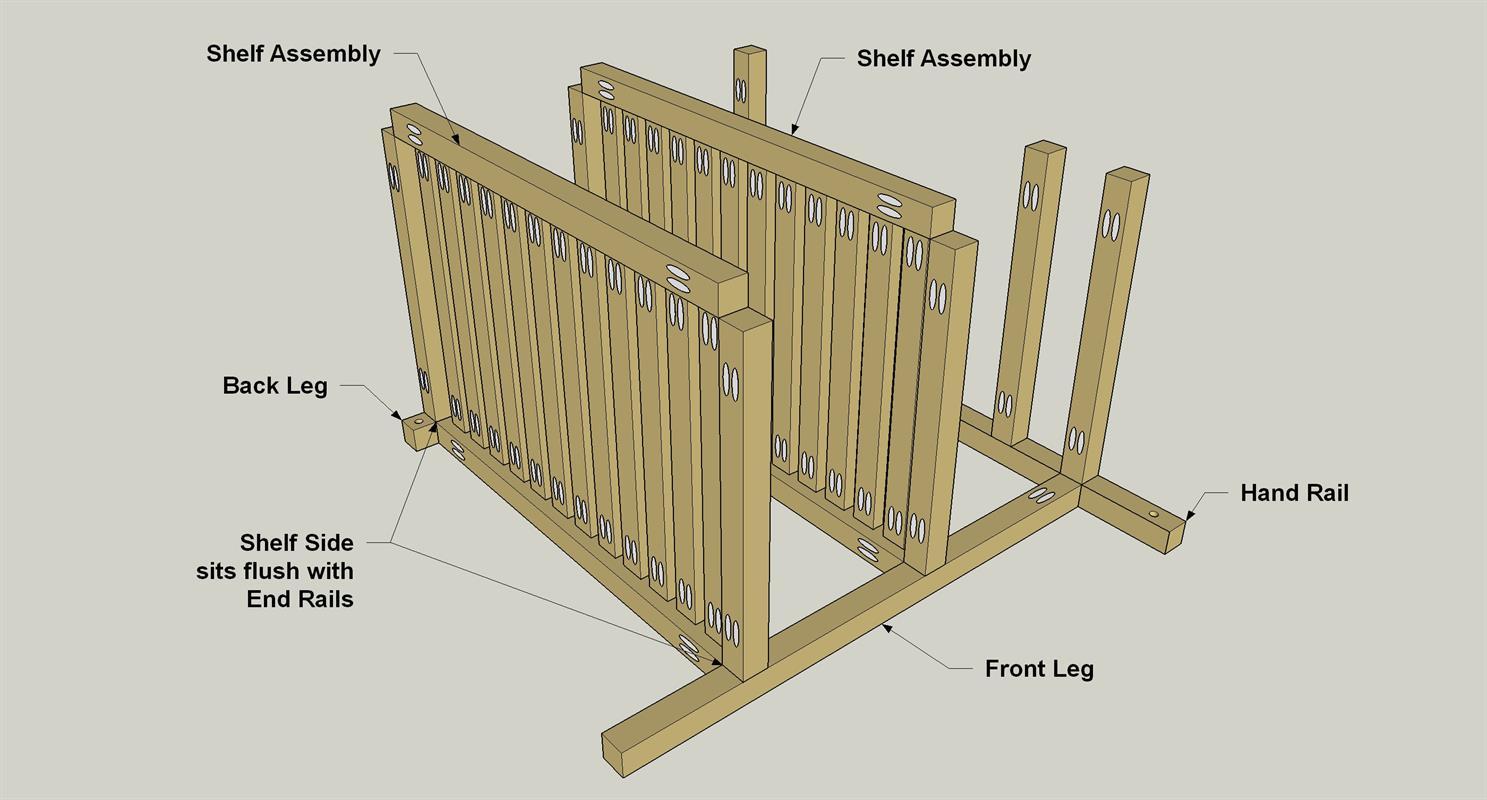
Add the Shelves to the Leg Assembly
Add the upper shelf assembly, and then the lower shelf assembly, to the leg assembly using 2 1/2" coarse-thread pocket hole screws as shown.
-
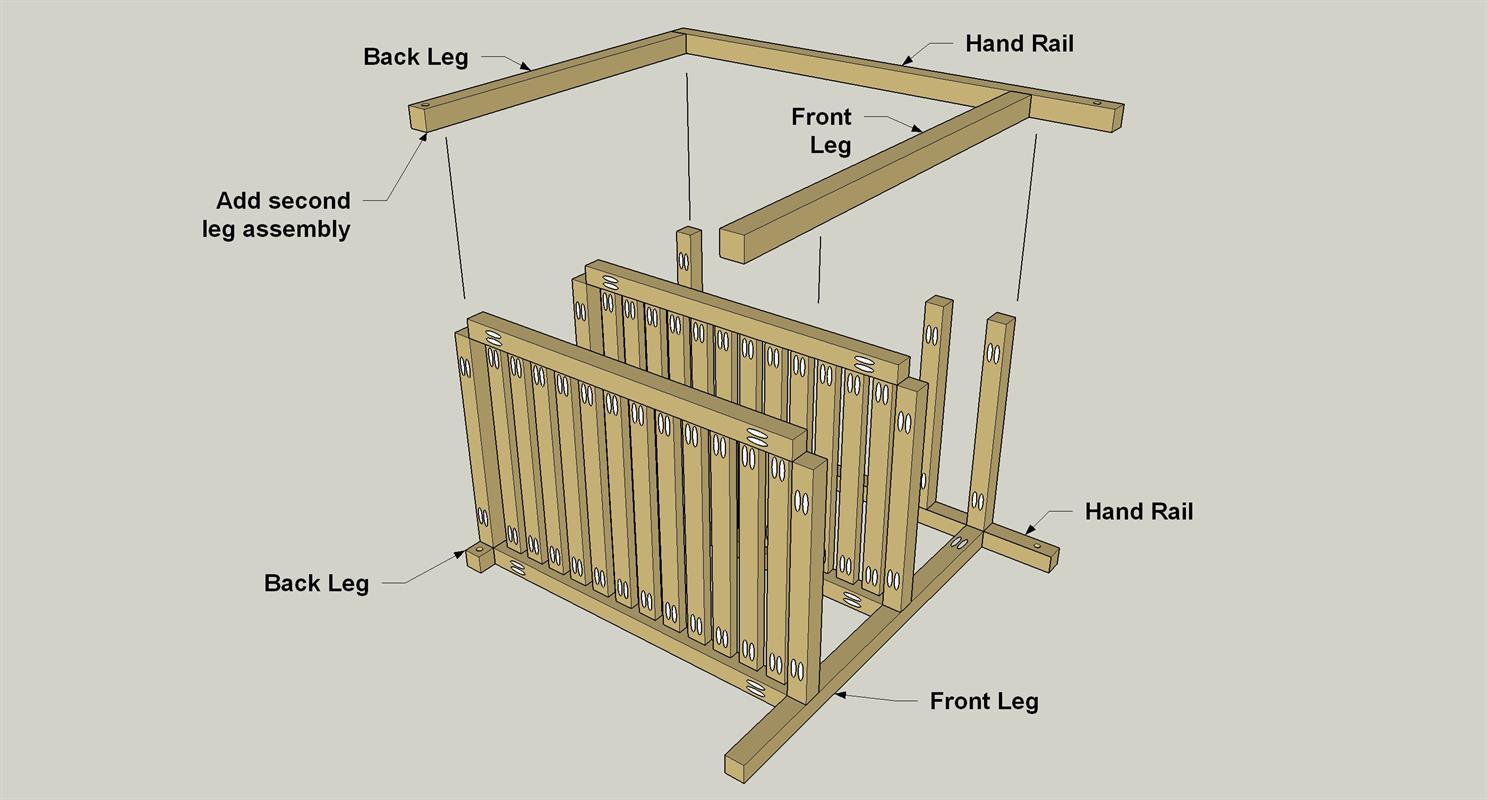
Add the Second Leg Assembly
Now add the second leg assembly and secure it with 2 1/2" coarse-thread pocket hole screws to complete the cart frame.
-
Make the Tray and Bottle Supports
Cut two Tray Supports, Two Bottle Support Bottoms and four Bottle Support Sides from 1x2 boards. Set your jig for 3/4" material and drill pocket holes in the Bottle Support Bottoms and the Tray Supports as shown.
-
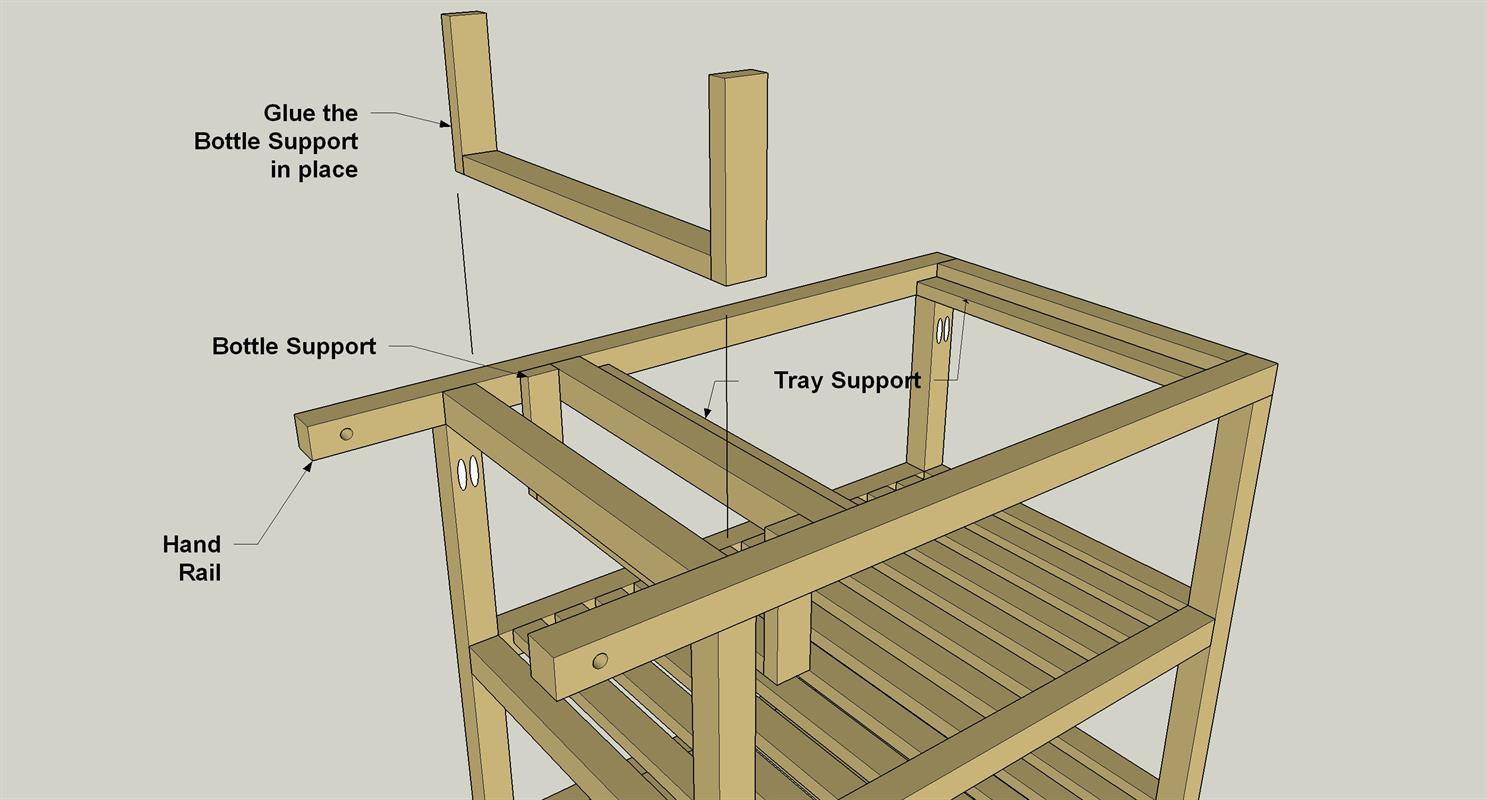
Assemble the Bottle Supports
Secure the Bottle Support Sides to the Bottle Support Bottoms with 1 1/4" coarse-thread pocket hole screws as shown.

-
Add the Bottle and Tray Supports
Install the bottle support assemblies where shown and secure them with glue. Clamp these assemblies in place while the glue sets. Install the Tray supports where shown using 1 1/4" coarse-thread pocket hole screws and glue.
-
Make the Tray Parts
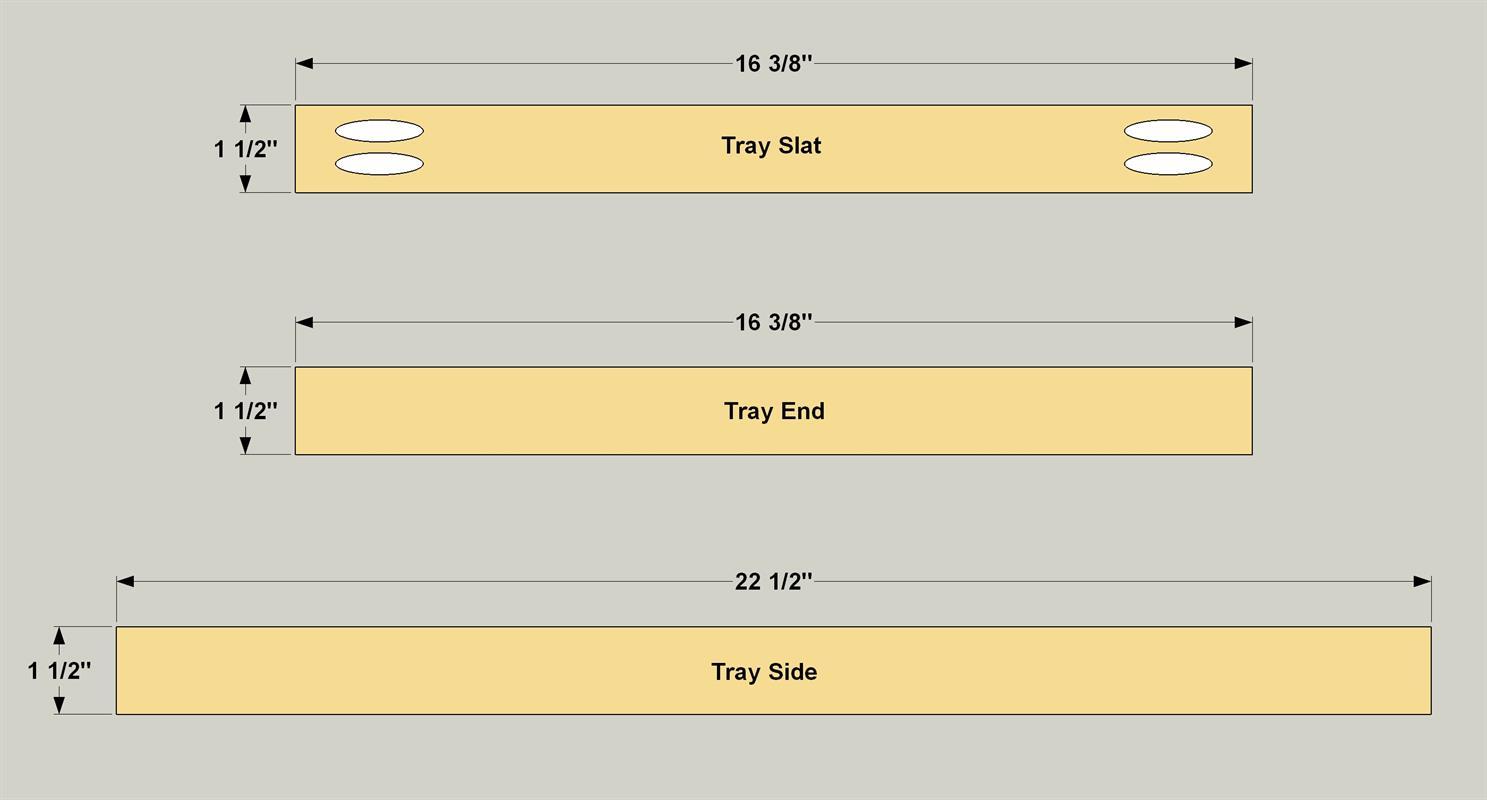
From 1x2 boards, cut two Tray Ends, Two Tray Sides and nine Tray Slats, as shown in the cutting diagram. Drill Pocket holes in both ends in all of the Tray Slats.
-
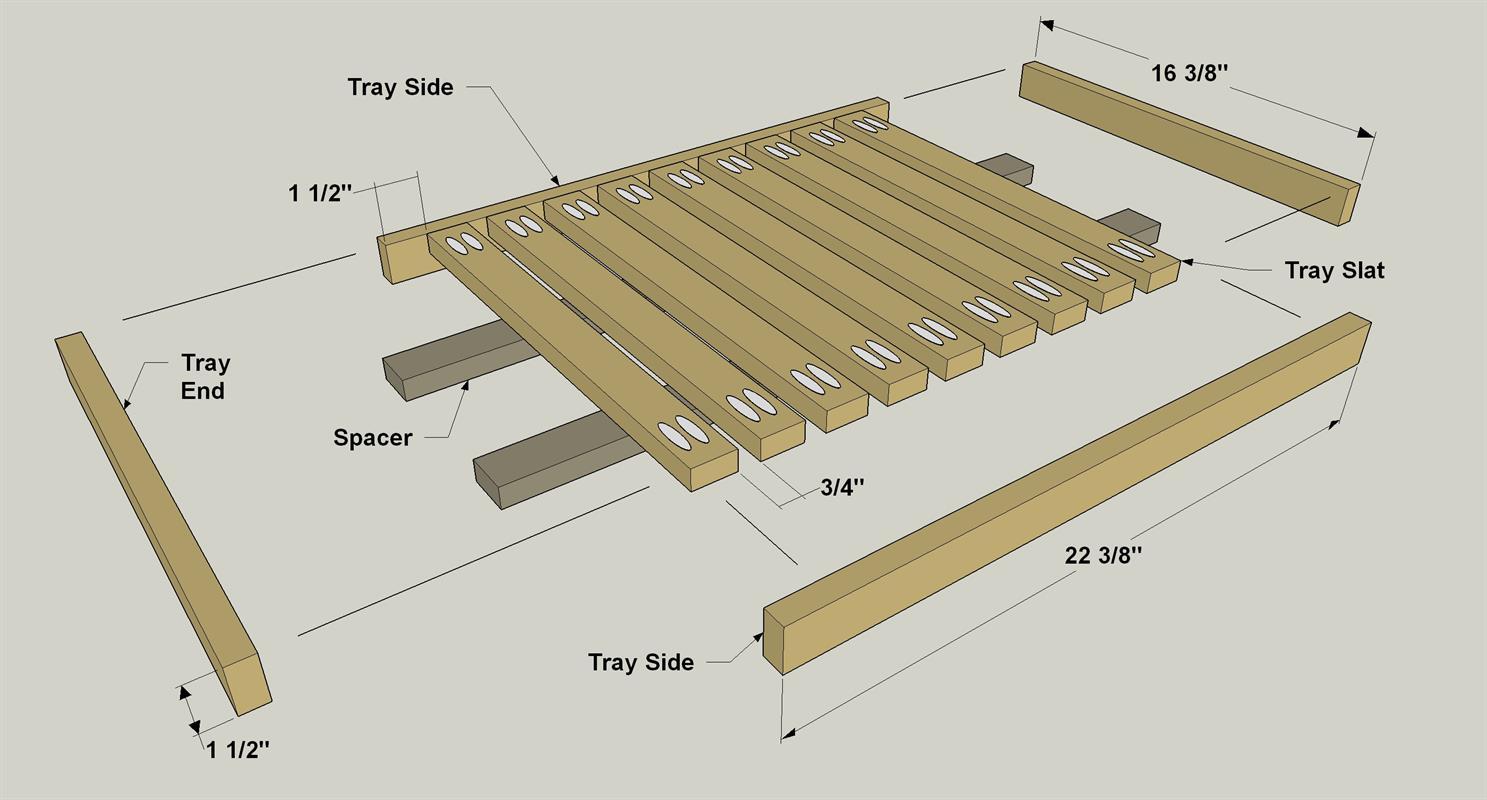
Build the Tray
On top of two pieces of 1 x 2 scrap about 24" long, lay out the nine Tray Slats loosely spaced with the pocket holes facing up. Place one Tray Side along the ends of the Slats. Measure 1 1/2" in from the end of the Tray Side (you can use one of the Slats as a spacer here) and place the first Slat. Screw the Tray Slat to the Tray Side with 1 1/4" coarse-thread pocket hole screws. Space the next Slat 3/4" over from the first and screw it to the Tray Side. Continue this with all of the Slats. Then attach the second Tray side the same way. When the Sides and Slats are assembled, dab a little glue on the ends of the Tray Ends, place them in position, and clamp them in place until the glue sets.
-
Make the Axle and Handle Parts
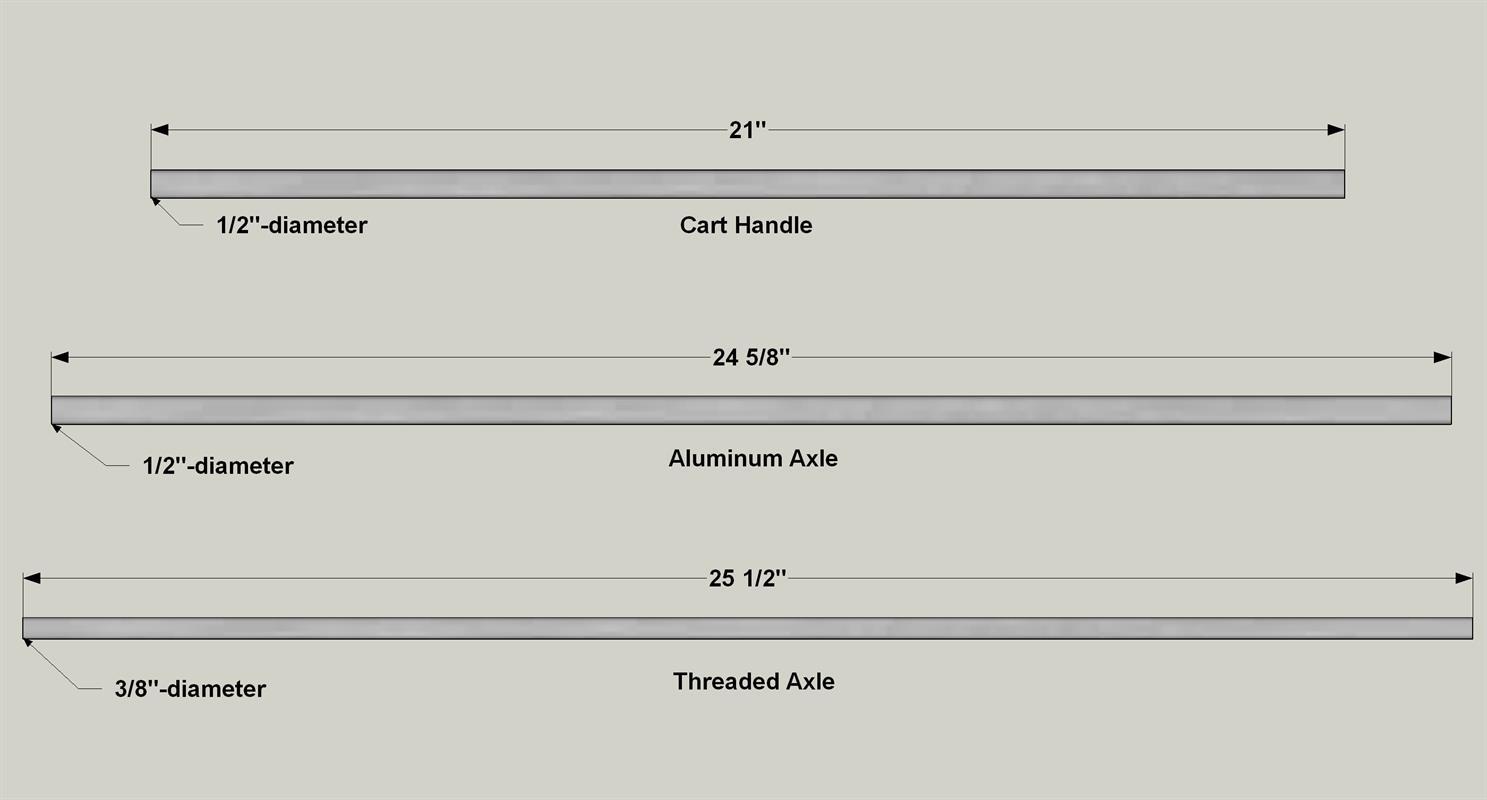
Use a hacksaw to cut the Cart Handle from 1/2" aluminum round bar Stock, the Aluminum Axle from 1/2" aluminum tubing, and the Treaded Axle form 3/8" threaded rod, as shown in the cutting diagram. Sand off any burs and polish the Handle and the Aluminum Axle with a Scotch Brite pad.
-
Add the Handle
Install the Handle by sliding it through the holes in Hand Rails. If needed, use a little epoxy to secure the Handle in place.
-
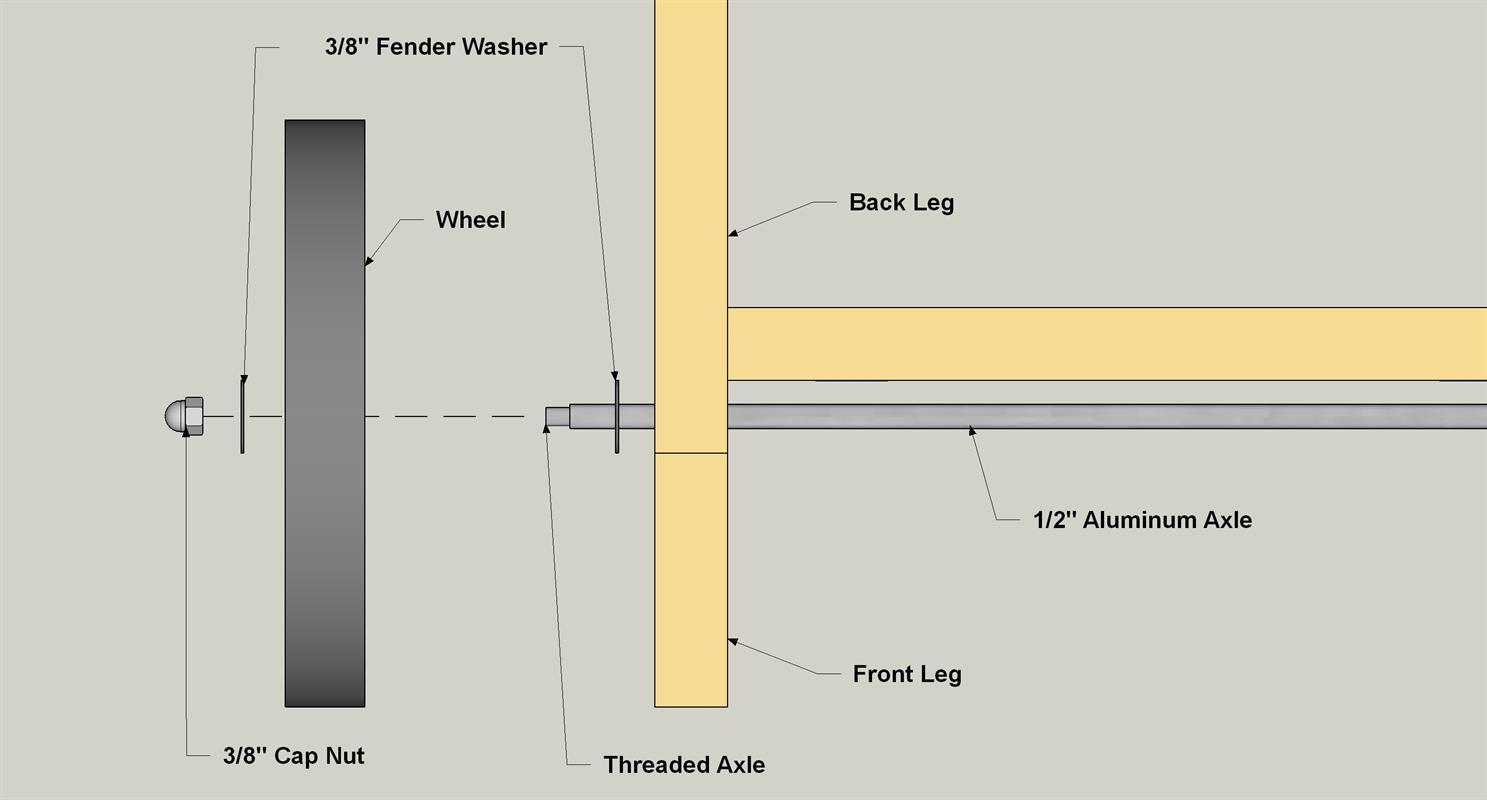
Install the Axle and Wheels
Slide the Aluminum Axle tube into the holes in the bottom of the Back Legs so they protrude past the Back Legs equally. Slide a fender washer over the each side of the tube, then add the wheels. Now, slide the Threaded Axle through the Aluminum Axle, and then add the other two fender washers. Finally, add the Cap Screw on each end of the Threaded Axle and tighten them so they are snug but the wheels can still rotate freely.
Clean Cuts in Threaded Rod
When you cut threaded rod with a hacksaw, the threading on the cut end can get damaged. A trick to restoring the threading is to screw a nut on to the rod before cutting the rod. Spin the nut out of the way of the cut, cut the rod to length, and then screw the nut off the cut end. This should restore the threading enough to get a nut back on the Cut end of the rod.
-
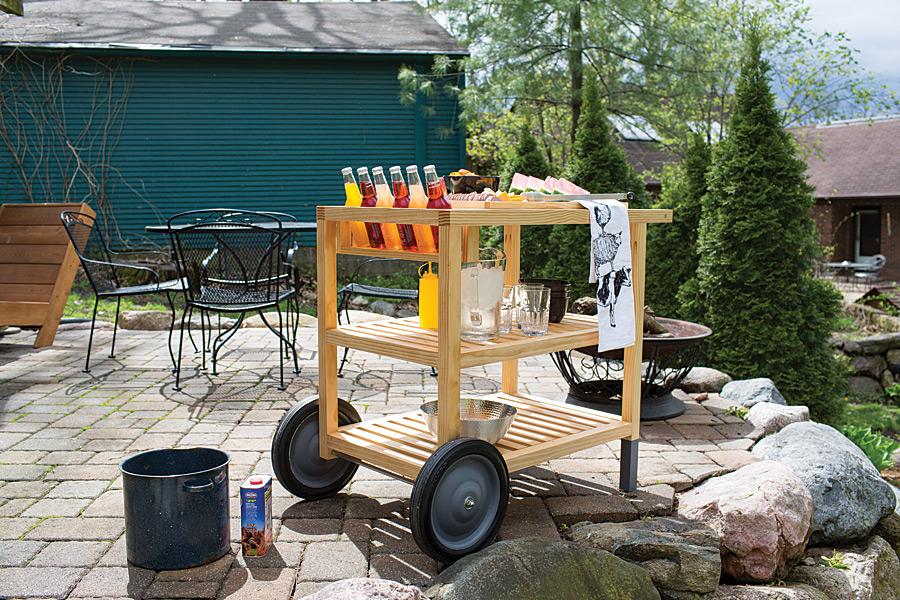
Sand and Apply Finish
Sand the cart smooth and soften any sharp edges with sandpaper. Then apply a finish. We used a natural oil to enhance the grain and color of the pine. Because the cart is made of pine, you probably want to park it indoors, or at least under an overhang, during bad weather. That will help it last longer. We also spray painted our wheels (which come painted white), and sprayed on some of the same color on the lower end of each Front Leg.