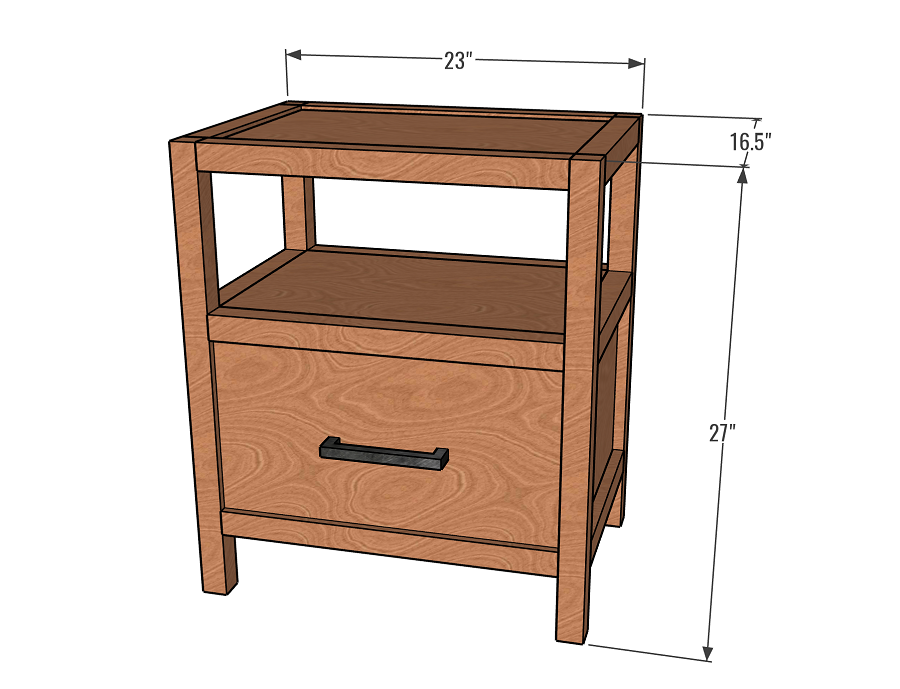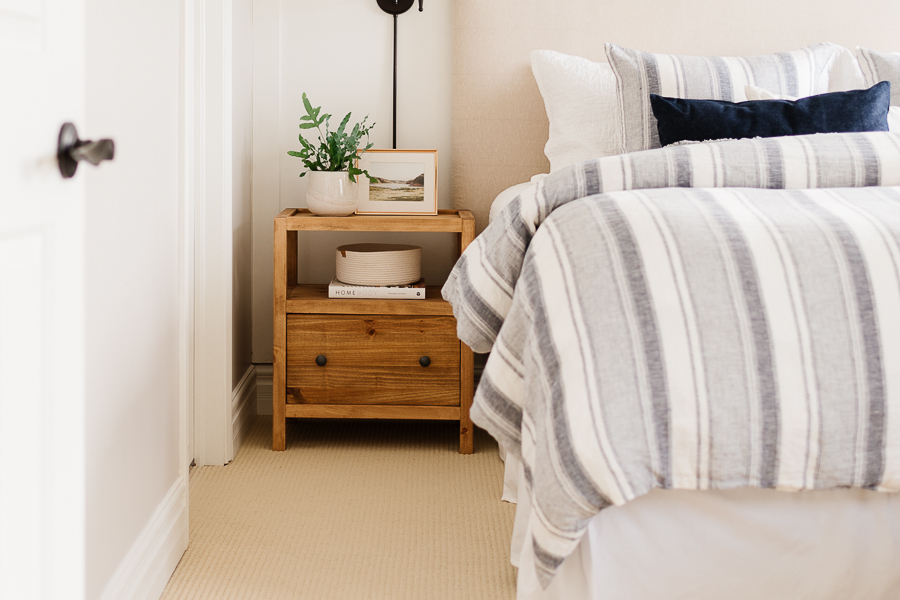
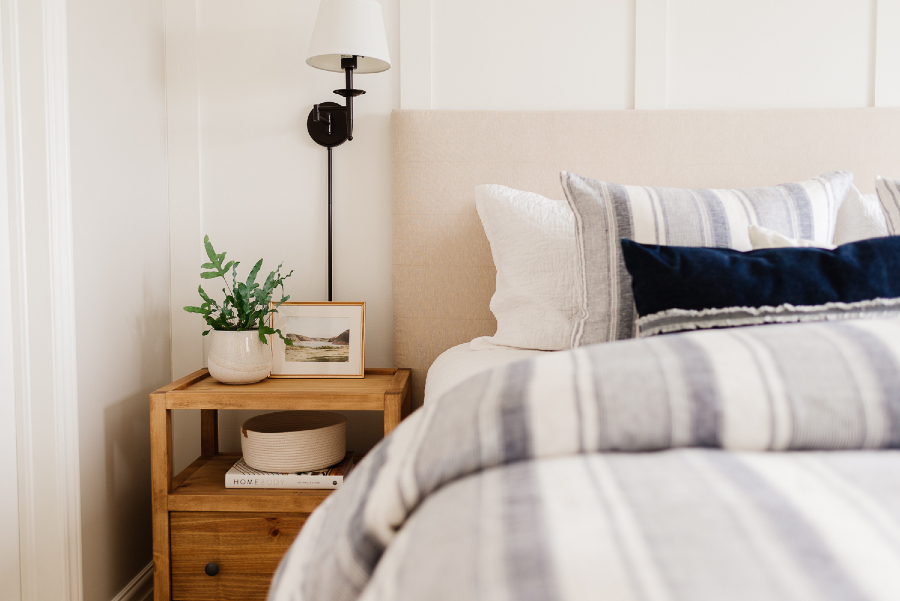
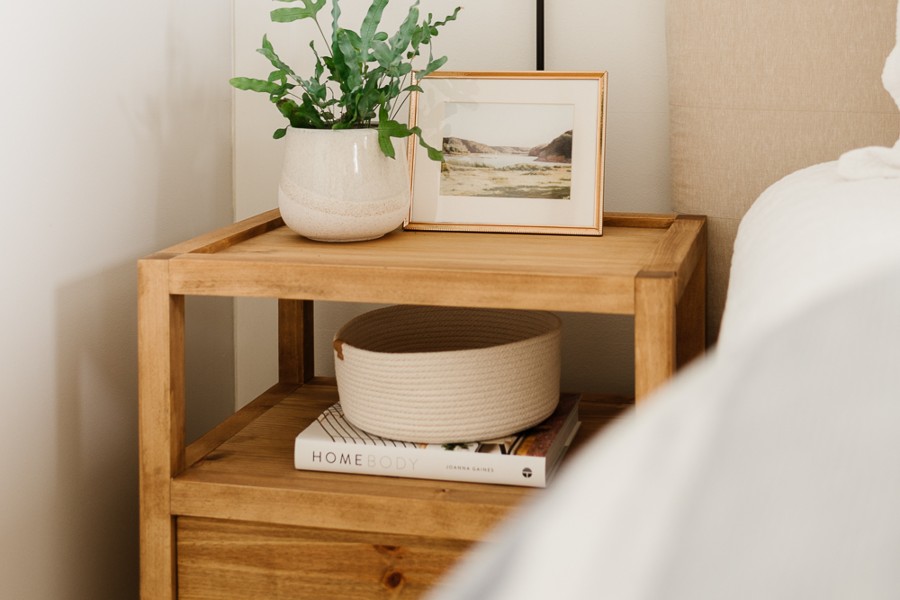
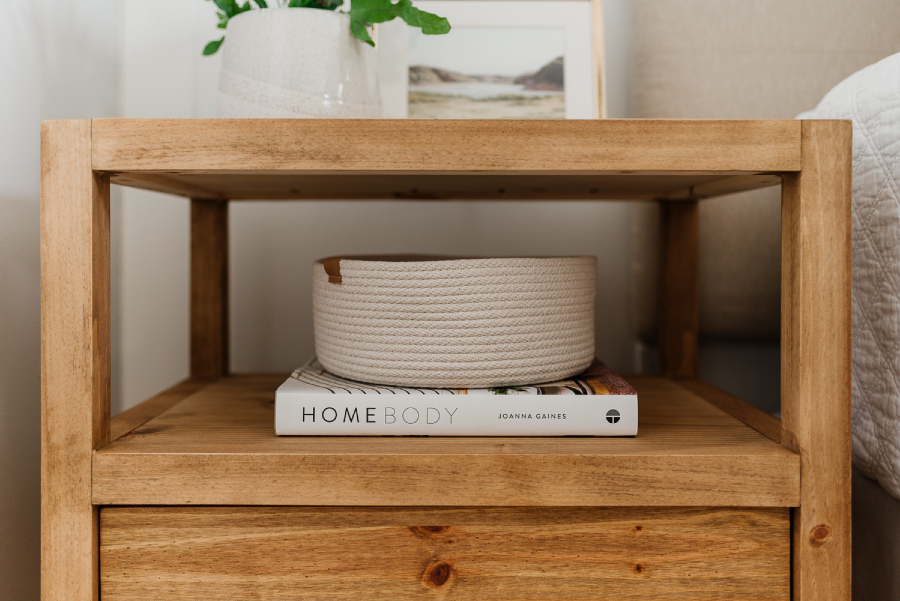


This modern nightstand has clean architectural lines with a linear look. It has a single drawer and features inset panels on the top, sides, and drawer front. These plans will build two complete nightstands.
Tools
Kreg Tools


Other Tools
-
Miter Saw

-
Table Saw
-
Brad Nailer
-
Measuring Tape
Materials
Wood Products
- 7 Boards , 2”x2”x8’
- 1 Sheet of plywood , 3/4" x 4’ x 8’
- 1 Sheet of plywood , 1/4" x 2’ x 4’
Hardware & Supplies
- 2 12" drawer slides (purchase ones that require 0.5” clearance on each sides)
- 96 2-1/2” Pocket Hole Screws (see tool list)
- 132 1-1/4” Pocket Hole Screws
- 1 Box 1-1/4” Brad Nails
- 1 120 and 220 grit sandpaper
- 1 Wood glue
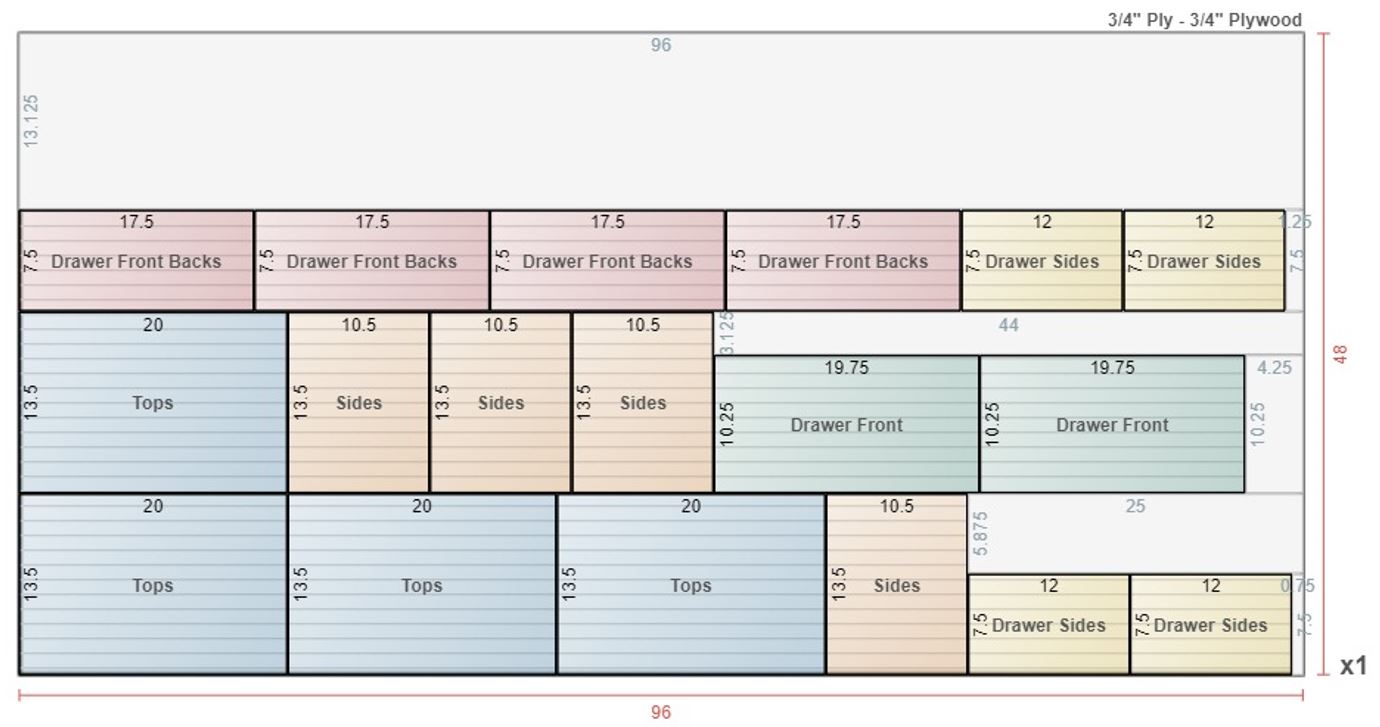
Cut List & Parts
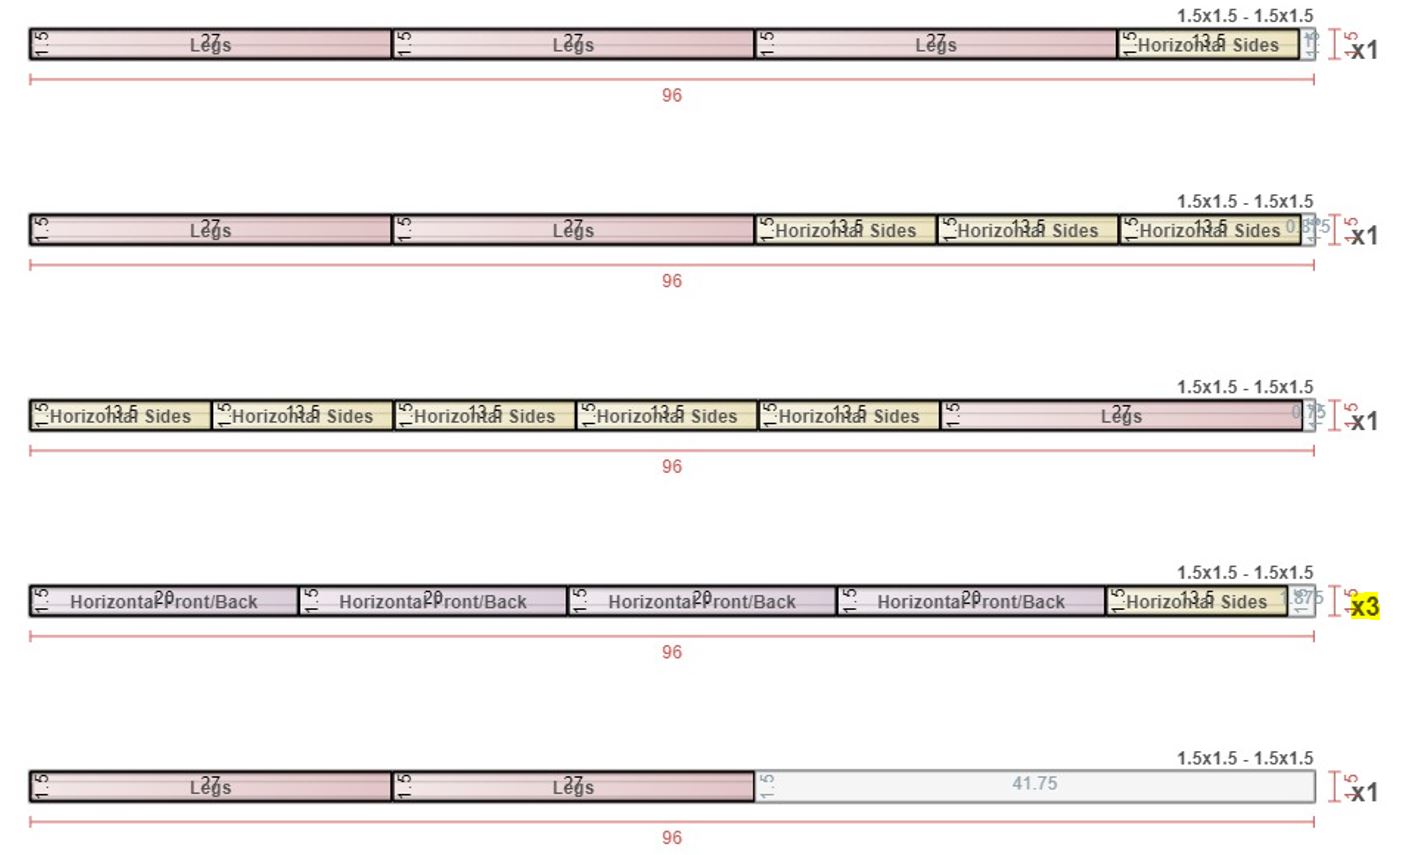
- 8 Legs , 1.5x1.5x27”
- 12 Horizontal side spans , 1.5x1.5x13.5”
- 12 Horizontal front/back spans , 1.5x1.5x20”
- 4 Lower sides , 3/4" x 10.5x13.5”
- 4 Shelf/tops , 3/4" x 20x13.5”
- 4 Drawer box front/backs , 3/4" x 17.5x7.5”
- 4 Drawer box sides , 3/4" x 12x7.5”
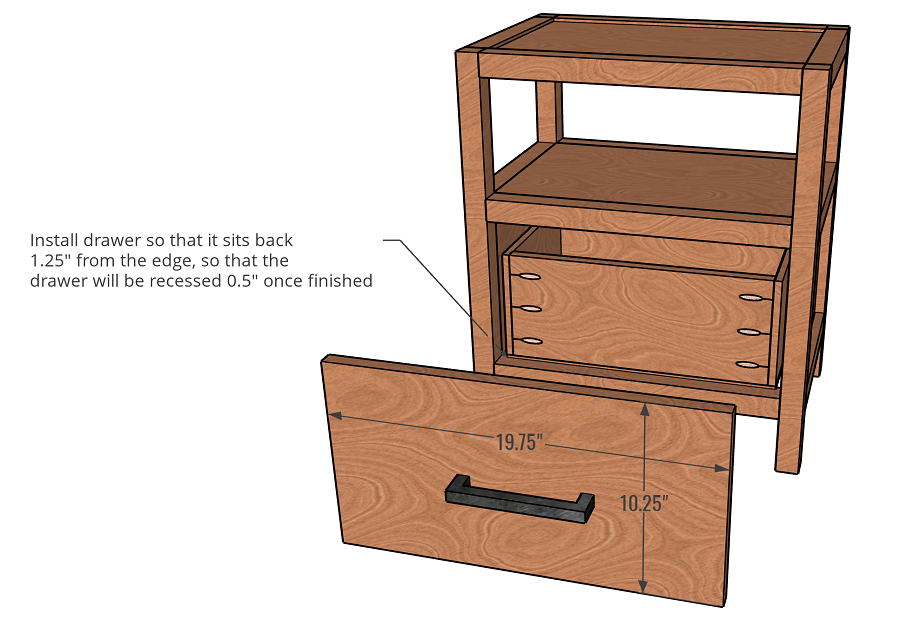
- 2 Drawer fronts , 3/4" x 19.75x10.25”
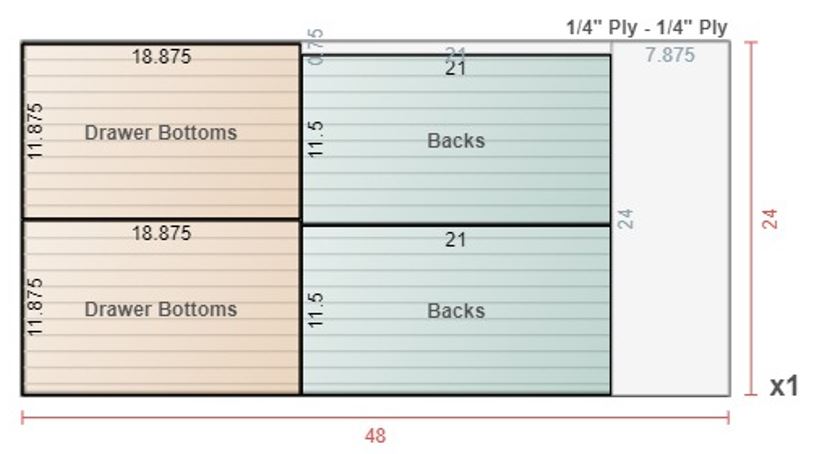
- 2 Drawer bottoms , 1/4" x 11.875x18.875”
- 2 Backs , 1/4" x 11.5x21”
Directions
-
NOTE:
Repeat each of these steps to build two nightstands. Cut list provides measurements for two nightstands.
-
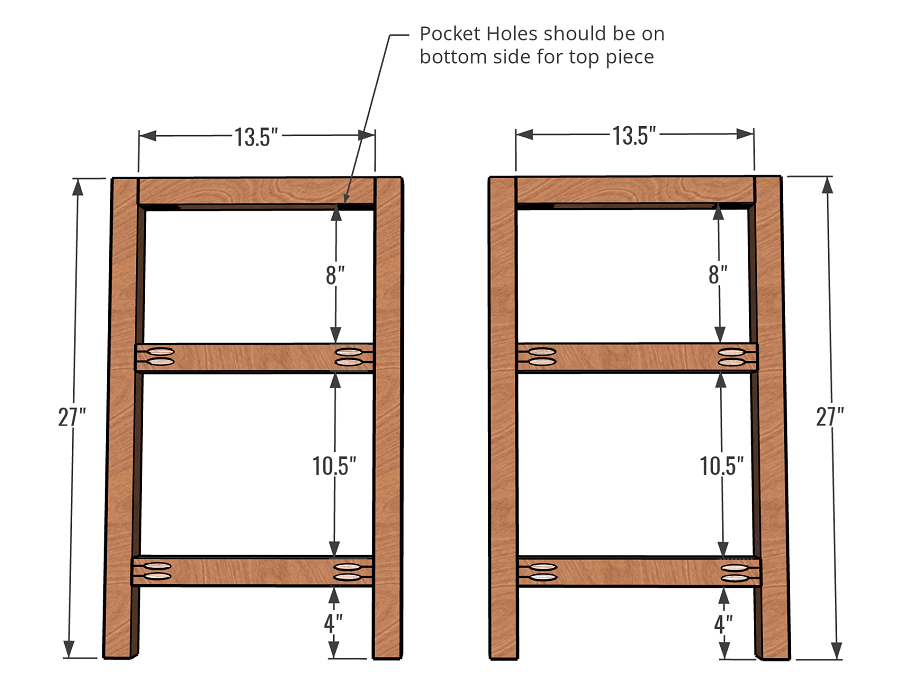
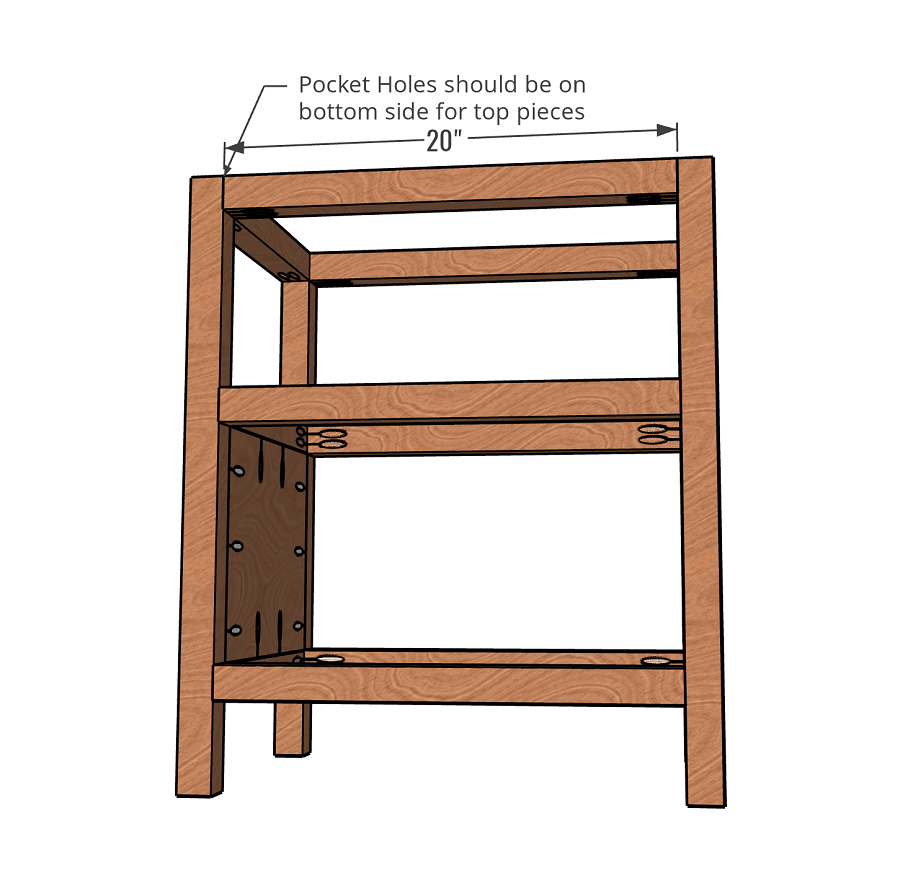
BUILD SIDE FRAMES
Drill pocket holes on each end of the HORIZONTAL SIDE SPANS using the 1-1/2” jig setting. Attach HORIZONTAL SIDE SPANS to legs at the locations shown on the diagram with wood glue and 2-1/2” pocket-hole screws. The pocket holes for the top piece should face downward as indicated on the diagram.
-
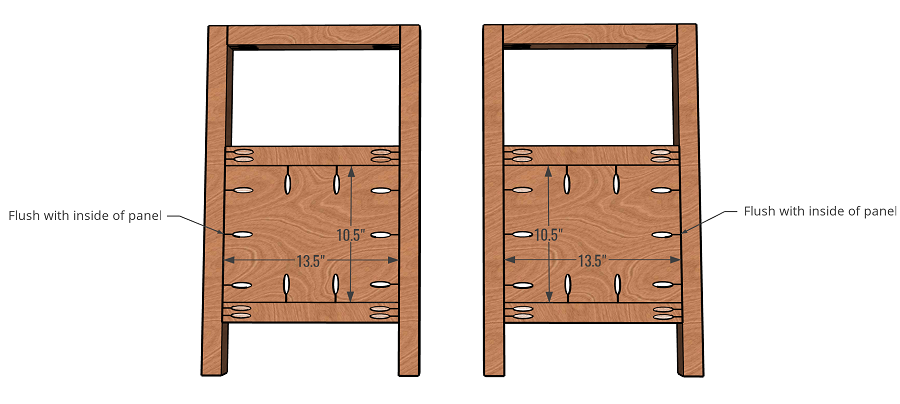
ATTACH SIDE INSERTS
Drill pocket holes around the sides of the LOWER SIDE pieces as shown on the diagram using the 3/4" jig setting. Attach the LOWER SIDE pieces flush to the inside of the side frames using 1-1/4” pocket hole screws.
-
ATTACH HORIZONTAL SPANS
Drill pocket holes on the HORIZONTAL FRONT/BACK SPANS using the 1-1/2” jig setting. Attach in the same location as the SIDE SPANS using wood glue and 2-1/2” pocket-hole screws. The pocket holes for the top piece should face downward as indicated on the diagram.
-
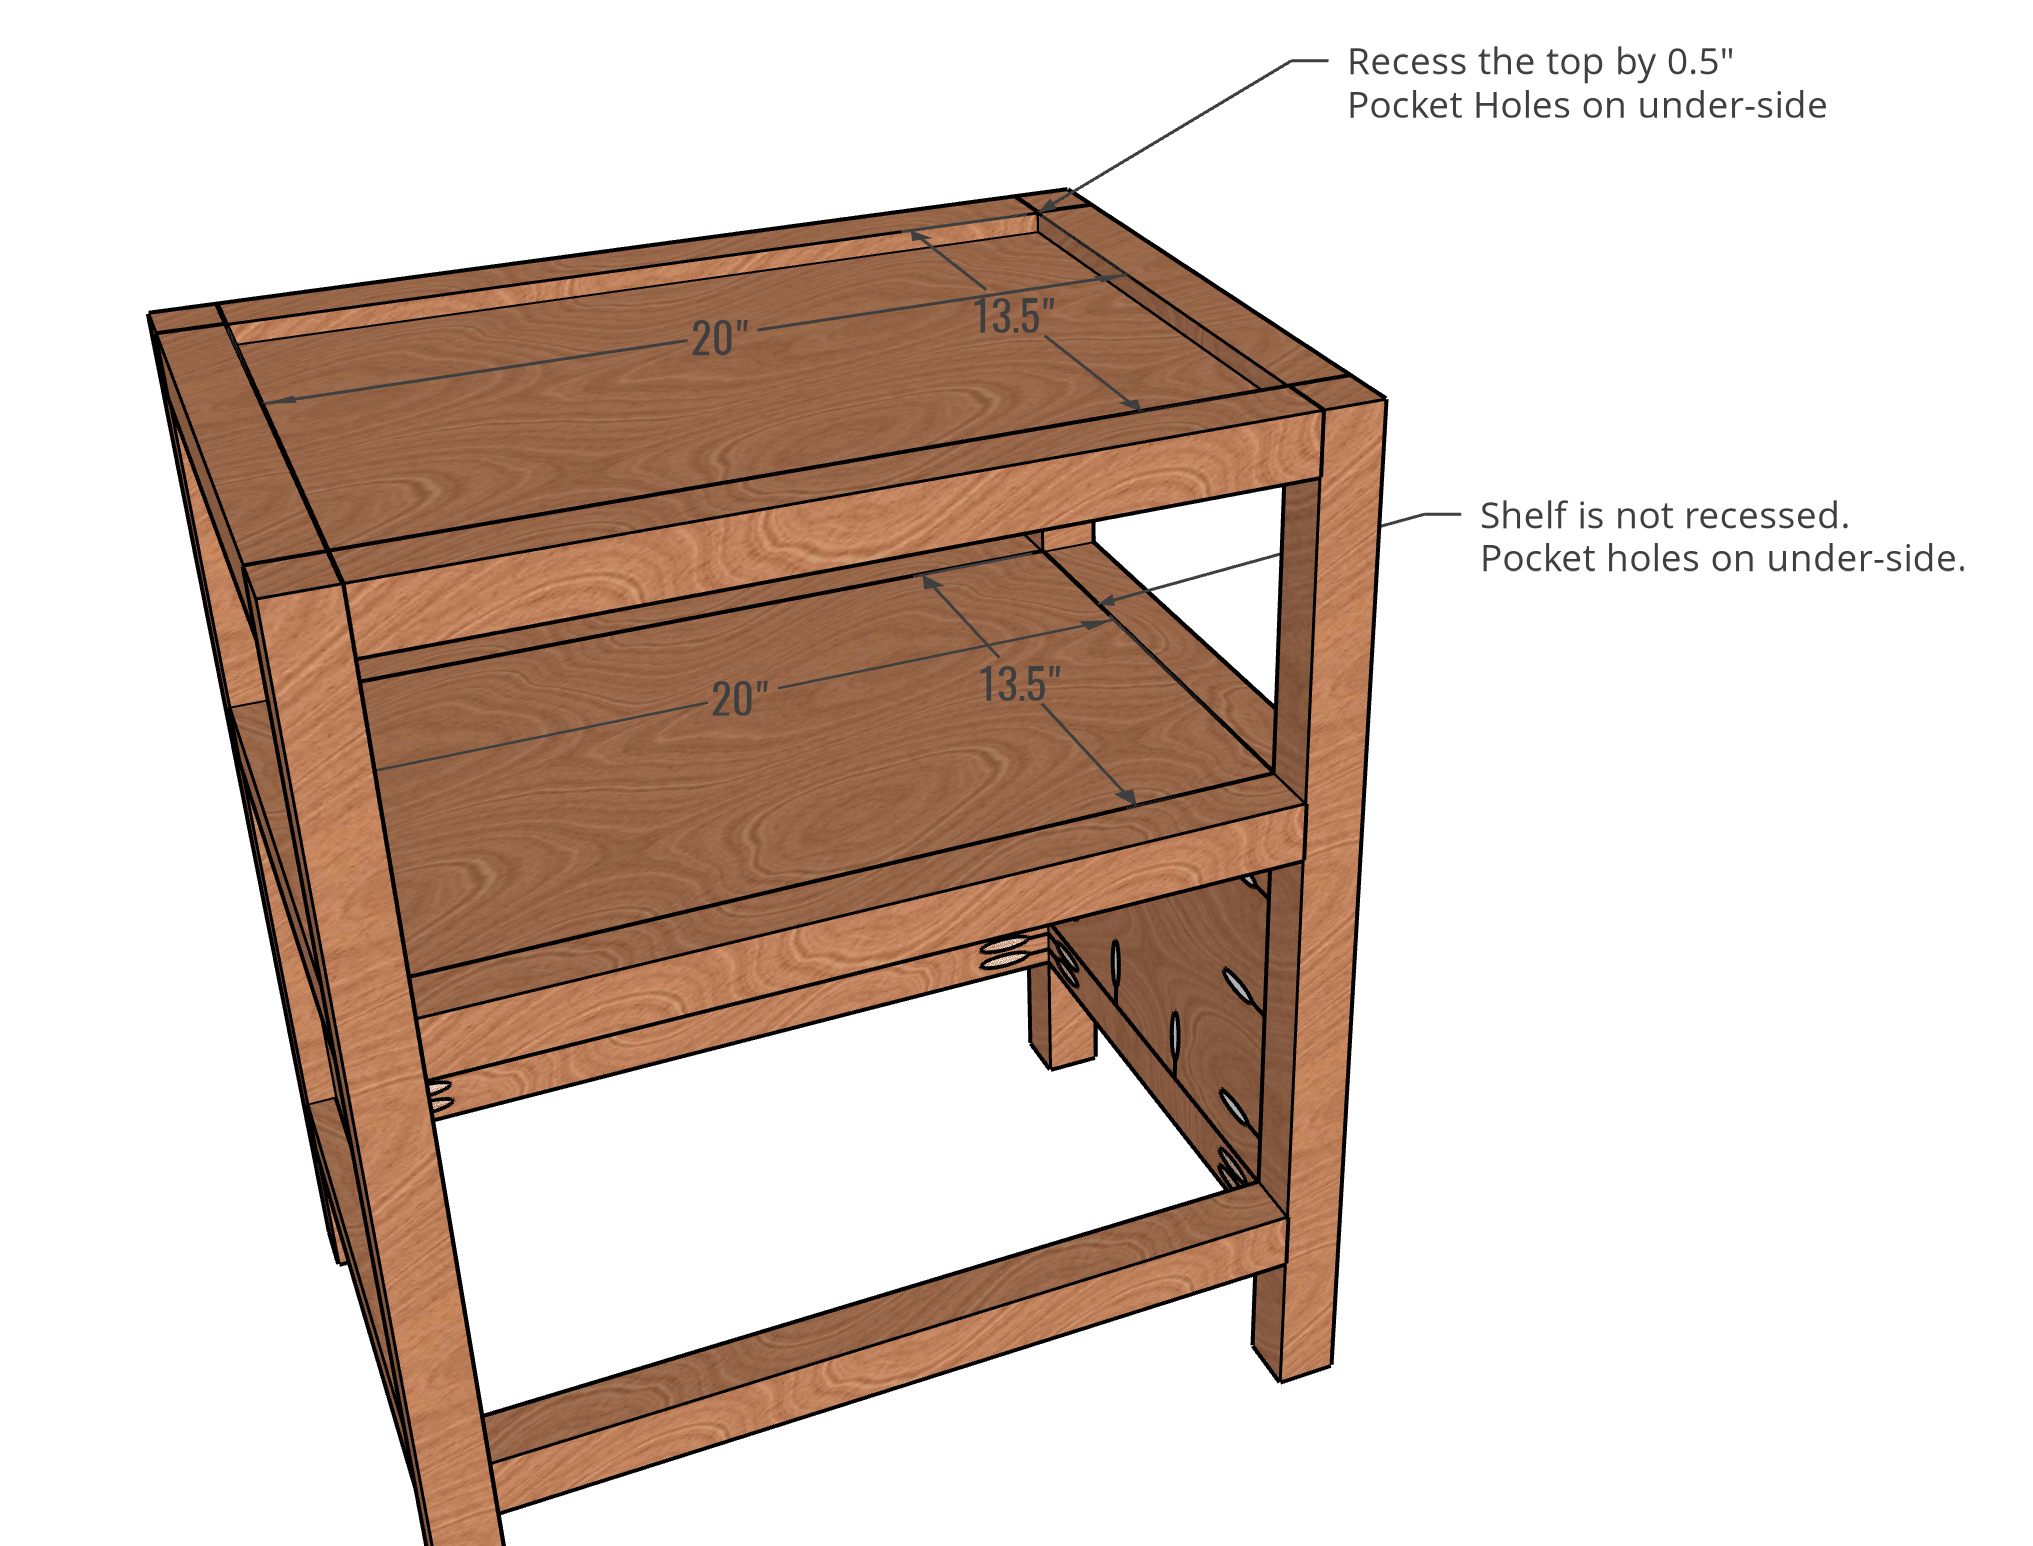
ATTACH SHELF/TOPS
Drill pocket holes on the underside of each SHELF/TOP piece, using the 3/4" jig setting, approximately 6” apart around the perimeter. Attach shelf flush with the surrounding spans using 1-1/4” pocket-hole screws. Attach the tops in the same fashion, however, recess the top by 1/2" all the way around.
-
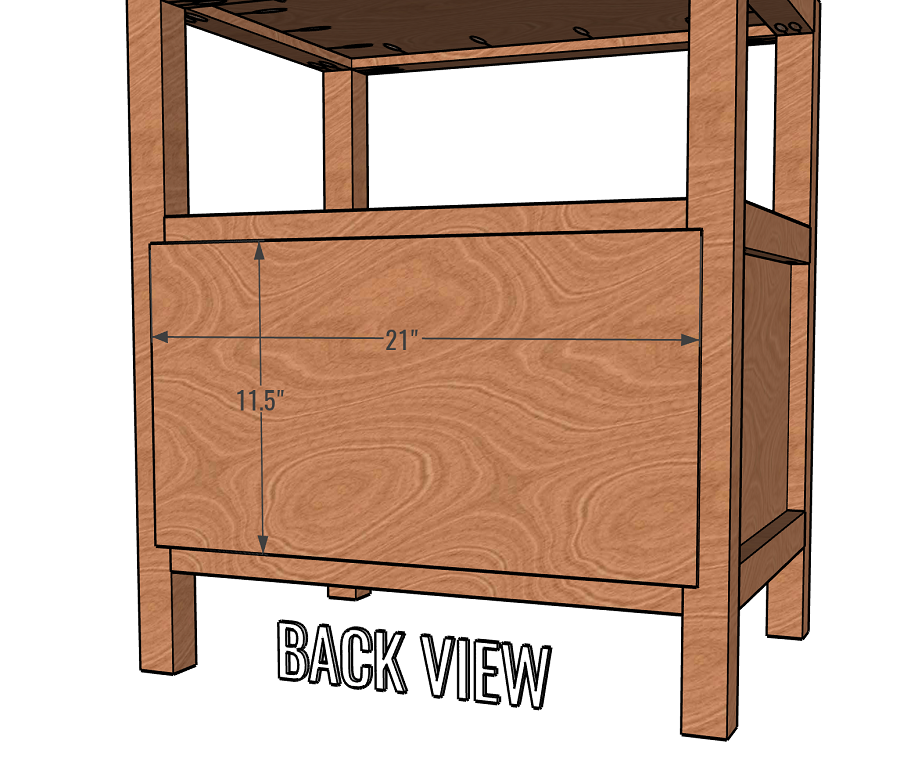
ATTACH BACK
Attach the BACK to the nightstand using a brad nailer and 1-1/4” nails around the perimeter of the board.
-
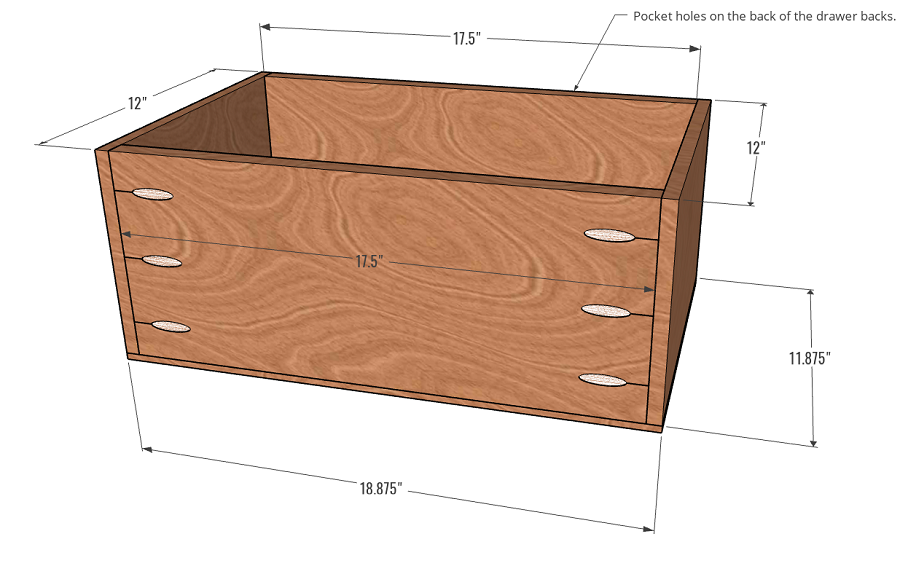
BUILD DRAWER BOXES
Drill pocket holes on the DRAWER FRONT/BACKS as shown (note that the pocket holes are on the back side of the back board). Attach the DRAWER BOX SIDES to the DRAWER BOX FRONT/BACKS as shown in the diagram using wood glue and 1-1/4” pocket hole screws. Once the box frame is complete, attach the DRAWER BOTTOM using wood glue and 1-1/4” brad nails.
-
INSTALL DRAWER SLIDES, BOX AND DRAWER FRONT
Install the drawer slides so that they sit back 1.25” from the face edge of the nightstand. This will give a recessed inset panel look to the drawer. Drill two holes in the front of the drawer box about 6” from each side, centered top to bottom. You will use these holes to attach the drawer face from the inside of the box.
-
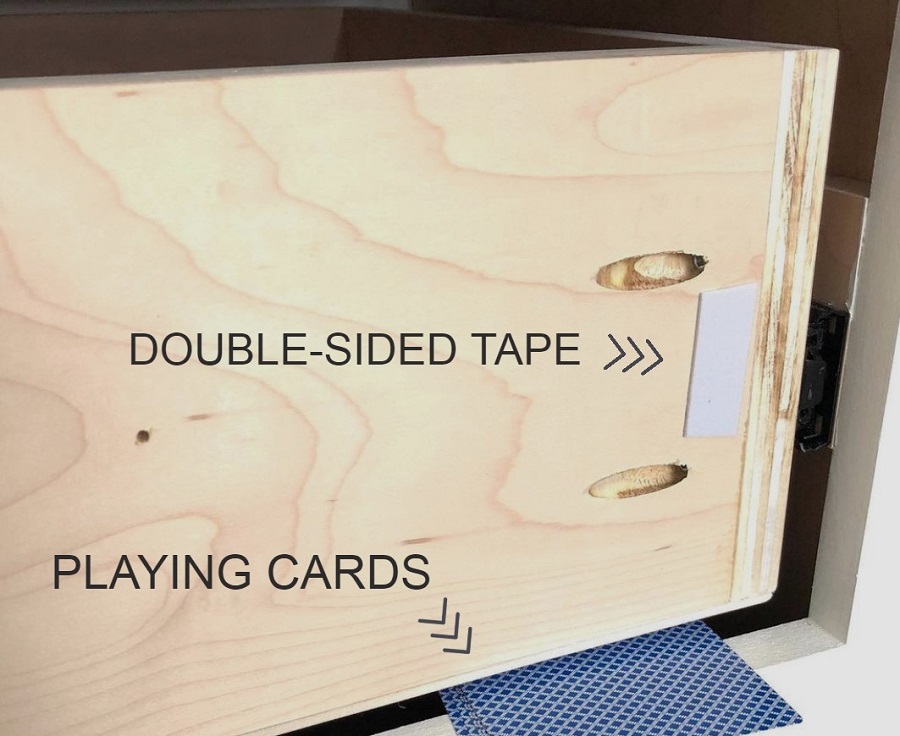
INSTALL DRAWER FACE
When installing a drawer face, it is a great idea to have some double-sided tape and playing cards on hand. You can space the drawer appropriately in the opening using the playing cards, and the double-sided tape will hold it in place until your ready to attach with screws from the back. When you have it exactly where you want it, use 1-1/4” pocket-hole screws to attach from the inside of the drawer into the drawer face.
-
FINISHING
Sand with 120 grit sandpaper, followed by 220 grit. Finish as desired with paint or stain.