

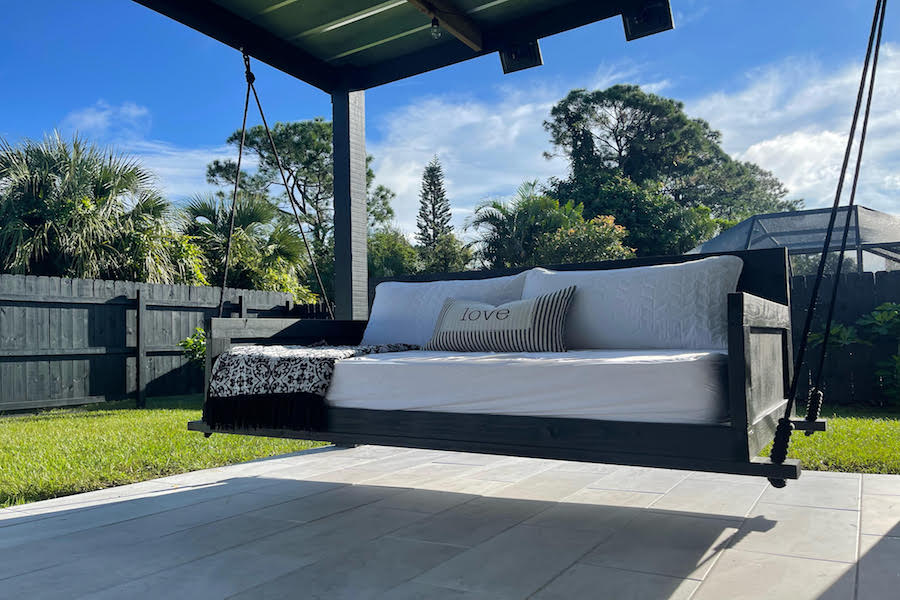


This simple, yet modern swing bed design will become your new favorite spot. Whether you are watching the sunrise, or simply relaxing for the day, this swing bed is perfect for any occasion. This design is set to hold a twin mattress and will give a new meaning to relaxation.
Tools
Kreg Tools


Other Tools
-
Table saw

-
Measuring tape
-
Nail Gun
-
Compressor
-
Chisel
Materials
Wood Products
- 14 Prime Wood , 2” X 4” X 96”
- 1 Sanded Plywood , 1/2” X 4 X 8
Hardware & Supplies
- 1 Box of 2 1/2" Pocket Hole Screws (See tools list)
- 1 Box of 2" Pocket Hole Screws (See tools list)
- 1 Box of 1 1⁄2” Brad Nails
- 2 Hangers
- 1 5/7" Rope (length varies on location of swing)
- 1 Wood glue
- 1 Twin size mattress
- 1 Paint or stain of your choice
- 1 Pair of safety glasses
- 1 Pair of gloves
Directions
-
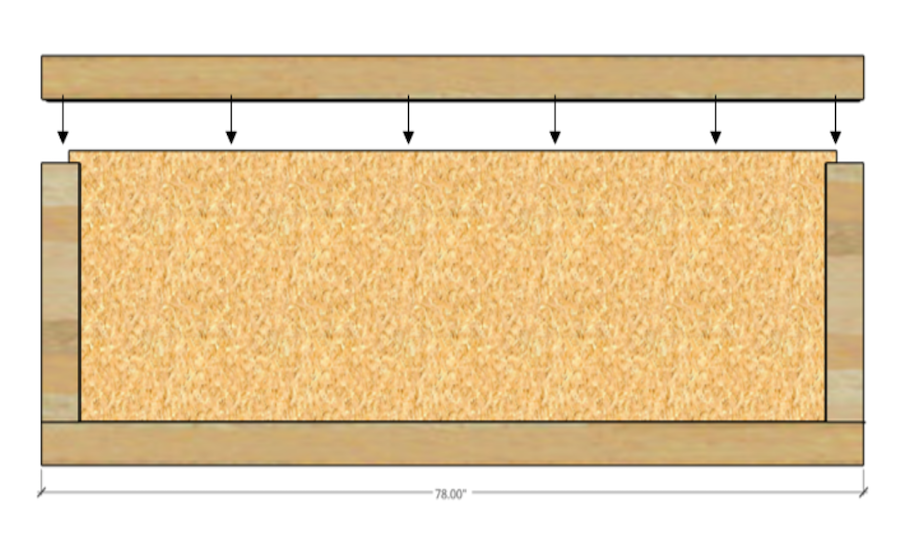
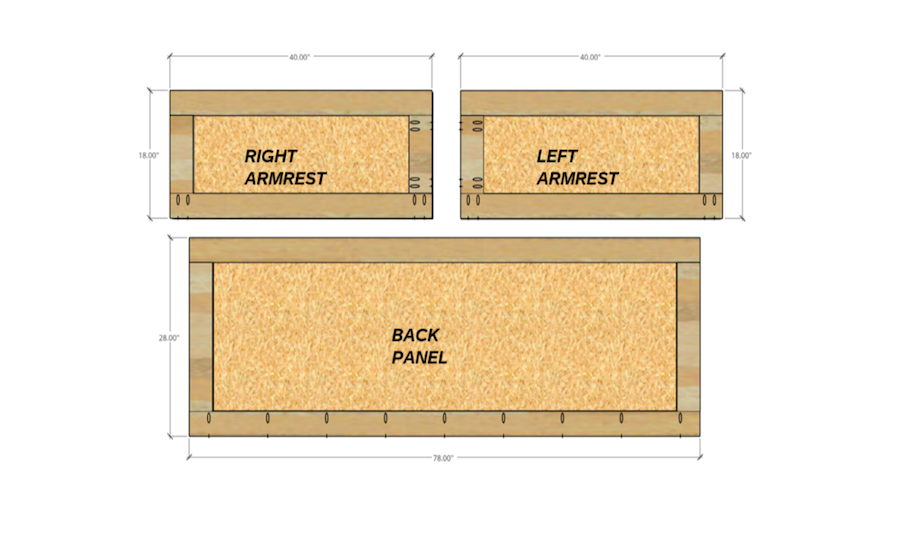
Back Panel Assembly (Part 1)
Add wood glue along the groove on both corners of
the horizontal (78”) wood where the vertical (21”)
wood will be placed. Line up the vertical pieces and
clamp them into place using a 24” bar clamp. This
will allow the wood glue to dry.Tip:
NOTE: Before beginning the assembly, all back panel and armrest panel 2” X 4”s must have a groove created that is 1⁄2” wide, and 1” deep. To do this - Mark the cut on the 2” X 4” and run the wood down a table saw until the desired groove is achieved. Remove any excess wood with
a chisel.
-
Back Panel Assembly (Part 2)
Add wood glue along the inside of the groove for
both the horizontal and vertical pieces. Slide the 73
¼” plywood into place and gently tap with a rubber
mallet until it is fully in place.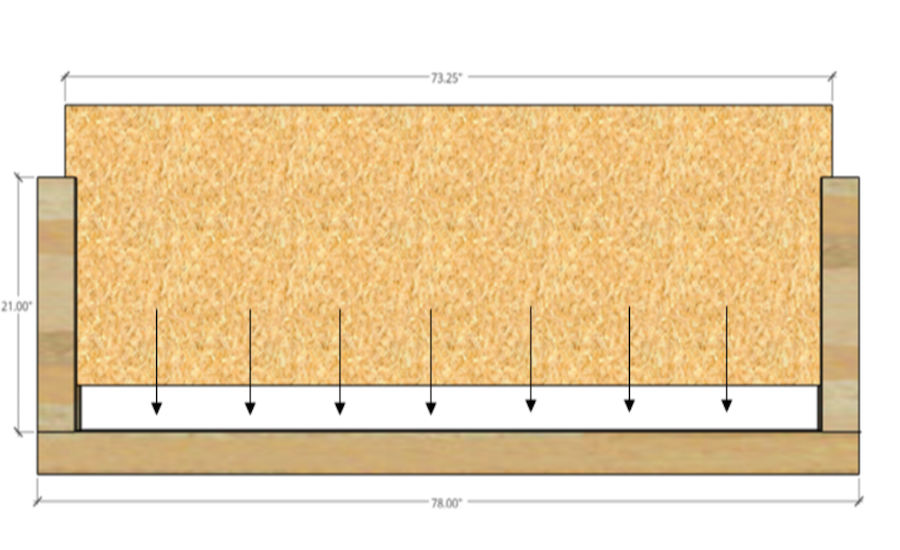
-
Back Panel Assembly (Part 3)
Add wood glue to the exposed vertical corners and on the top of the plywood. Place the top 78” horizontal piece and gently tap with a mallet until all corners are flush.
-
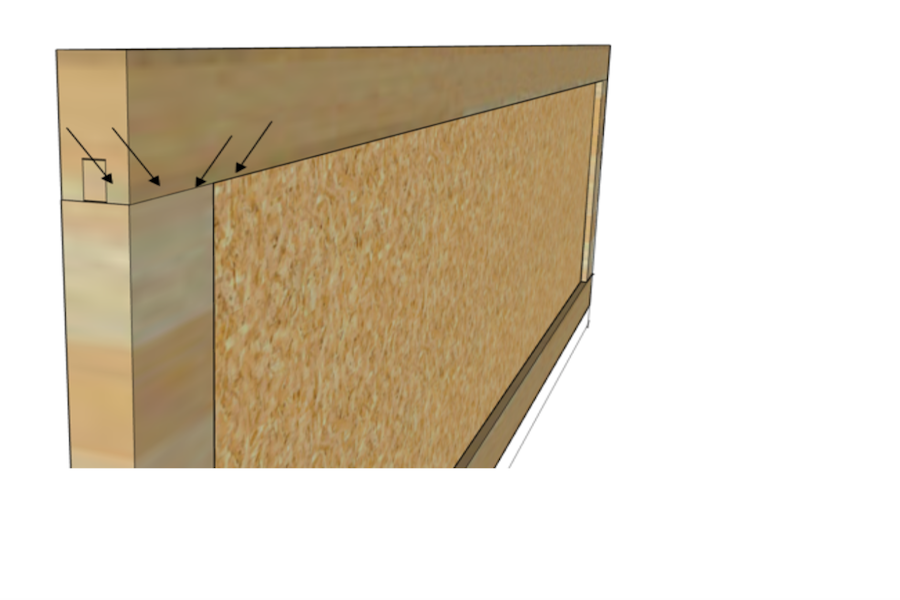
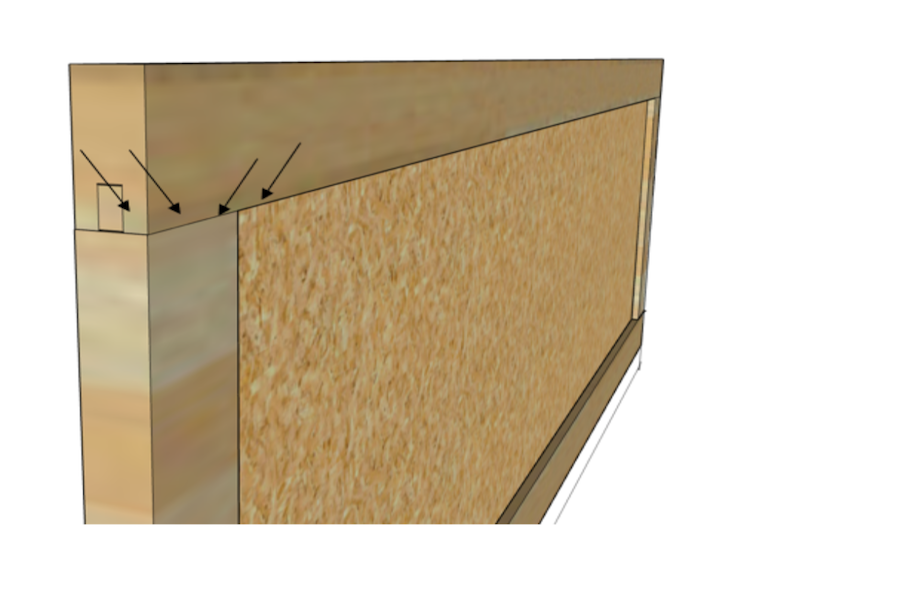
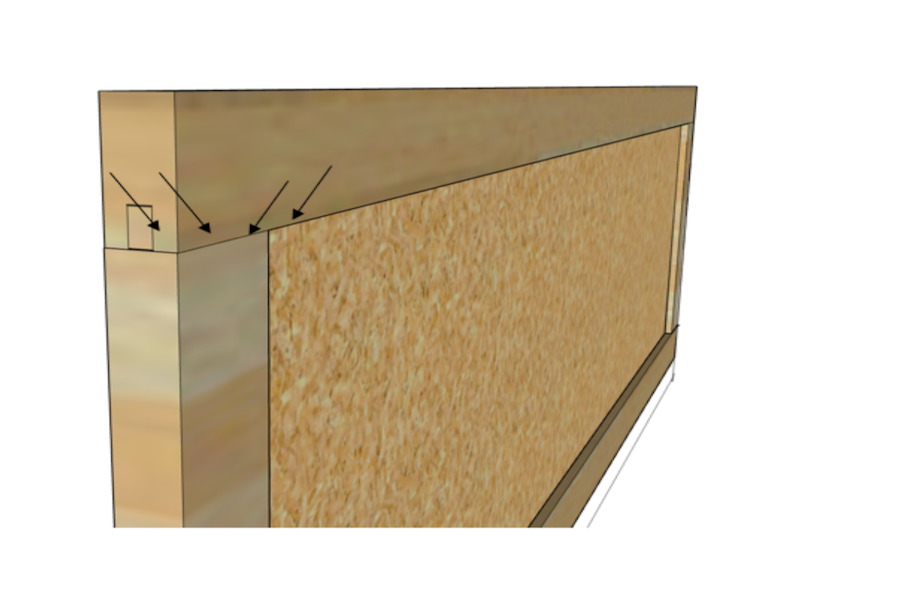
Back Panel Assembly (Part 4)
To cover these small openings on the four corners of the panel, cut a small piece from the scrap wood that measures 2.0” L X 0.5” W X 1.0” H. Add wood glue and insert into place. Then, add brad nails at an angle, to secure all the pieces. Repeat the process on all four connections of the panel.
-
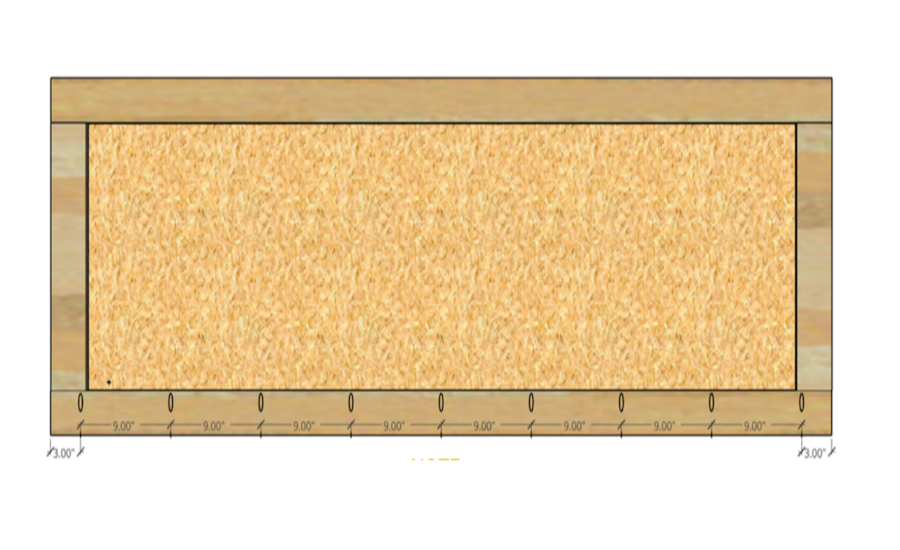
Back Panel Assembly (Part 5)
Create pocket holes that are 9” apart along the bottom of the panel. Create pocket holes that are 9” apart along the bottom of the panel.
-
Left Armrest Assembly (Part 1)
Add wood glue along the groove on both corners of
the horizontal (40”) wood where the vertical (11”)
wood will be placed. Line up the vertical pieces and
clamp them into place using a 24” bar clamp. This
will allow the wood glue to dry.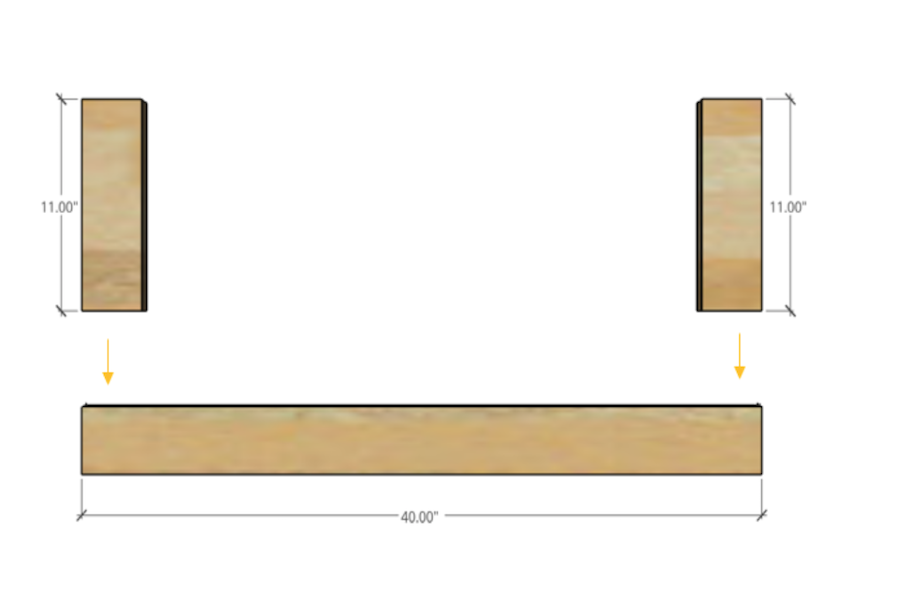
-
Left Armrest Assembly (Part 2)
Add wood glue along the inside of the groove for
both the horizontal and vertical pieces. Slide the 37
½” plywood into place and gently tap with a rubber
mallet until it is fully in place.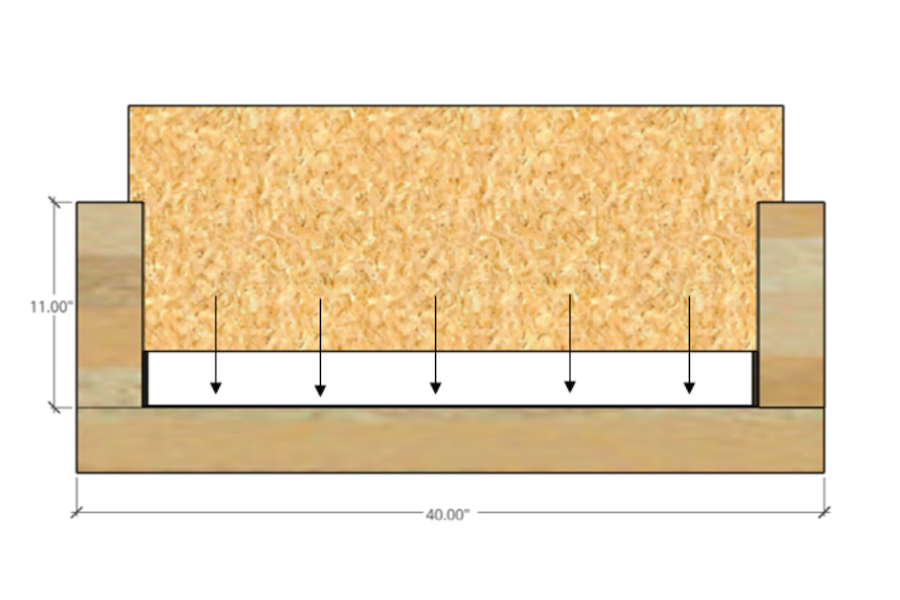
-
Left Armrest Assembly (Part 3)
Add wood glue to the exposed vertical corners and on the top of the plywood. Place the top 40” horizontal piece and gently tap with a mallet until all corners are flush.
-
Left Armrest Assembly (Part 4)
To cover these small openings on the four corners of the panel, cut a small piece from the scrap wood that measures 2.0” L X 0.5” W X 1.0” H. Add wood glue and insert into place. Then, add brad nails at an angle, to secure all pieces. Repeat the process on all four connections of the panel.
-
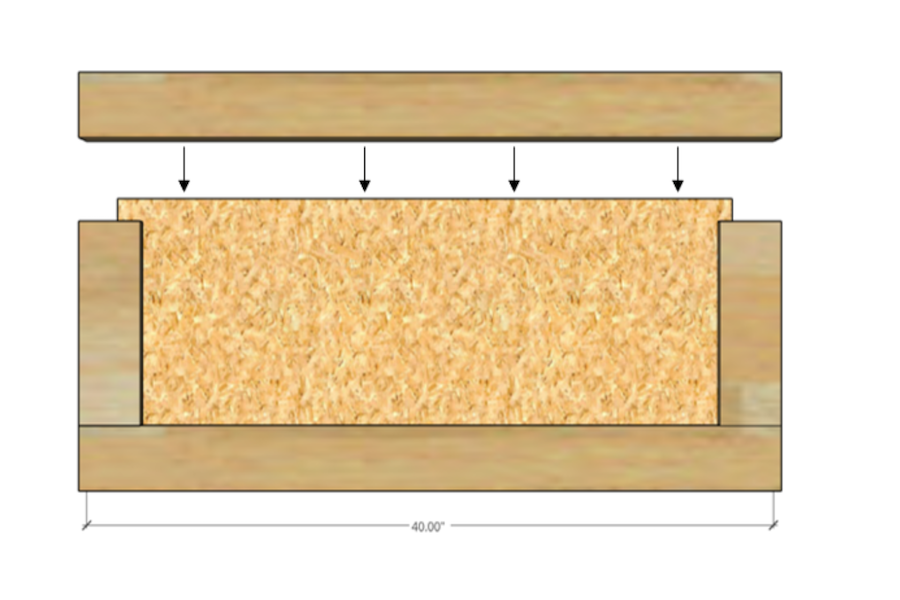
Left Armrest Assembly (Part 5)
Create pocket holes on the 40” X 18” armrest, as
shown.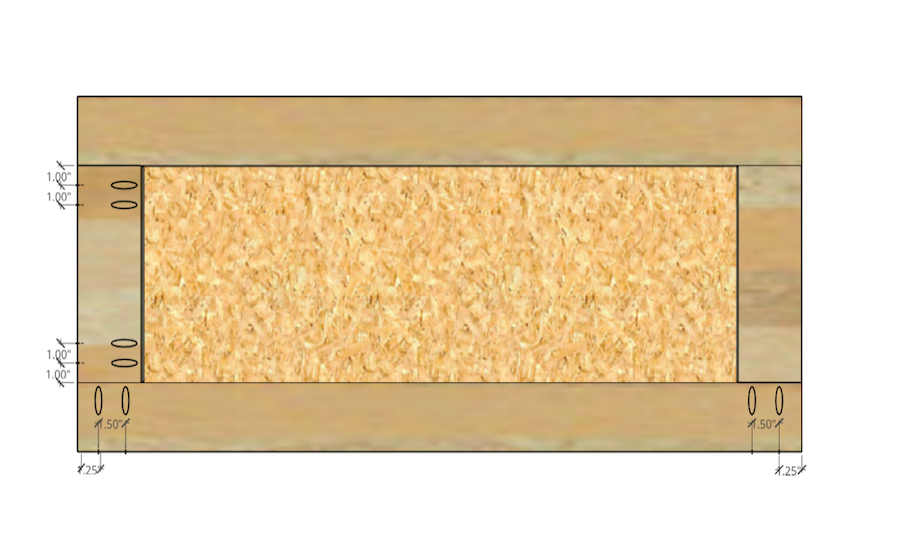
-
Right Armrest Assembly (Part 1)
Add wood glue along the groove on both corners of
the horizontal (40”) wood where the vertical (11”)
wood will be placed. Line up the vertical pieces and
clamp them into place using a 24” bar clamp. This
will allow the wood glue to dry.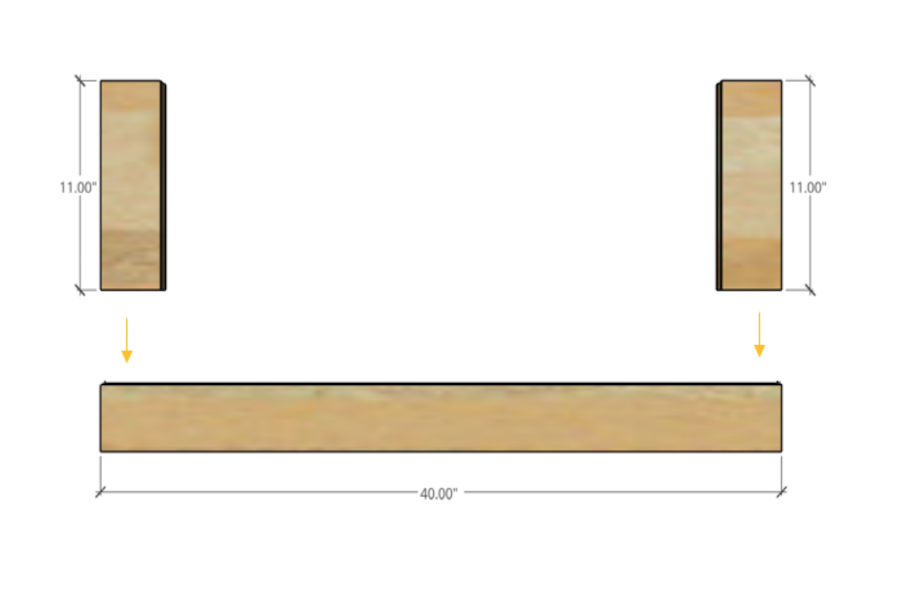
-
Right Armrest Assembly (Part 2)
Add wood glue along the inside of the groove for
both the horizontal and vertical pieces. Slide the 37
½” plywood into place and gently tap with a rubber
mallet until it is fully in place.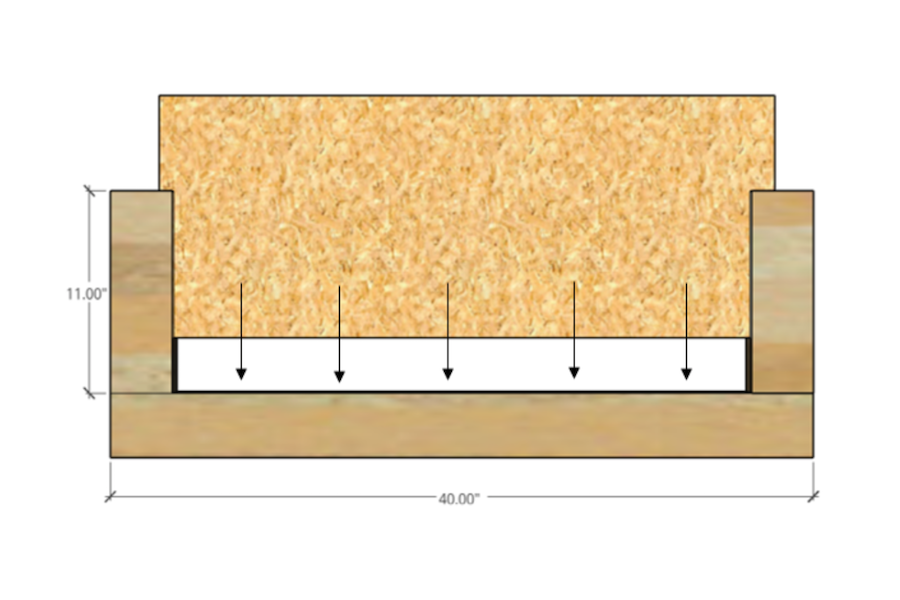
-
Right Armrest Assembly (Part 3)
Add wood glue to the exposed vertical corners and on the top of the plywood. Place the top 40” horizontal piece and gently tap with a mallet until all corners are flush.
-
Right Armrest Assembly (Part 4)
To cover these small openings on the four corners of the panel, cut a small piece from the scrap wood that measures 2.0” L X 0.5” W X 1.0” H. Add wood glue and insert into place. Then, add brad nails at an angle, to secure all pieces. Repeat the process on all four connections of the panel.
-
Right Armrest Assembly (Part 5)
Create pocket holes on the 40” X 18” armrest, as
shown.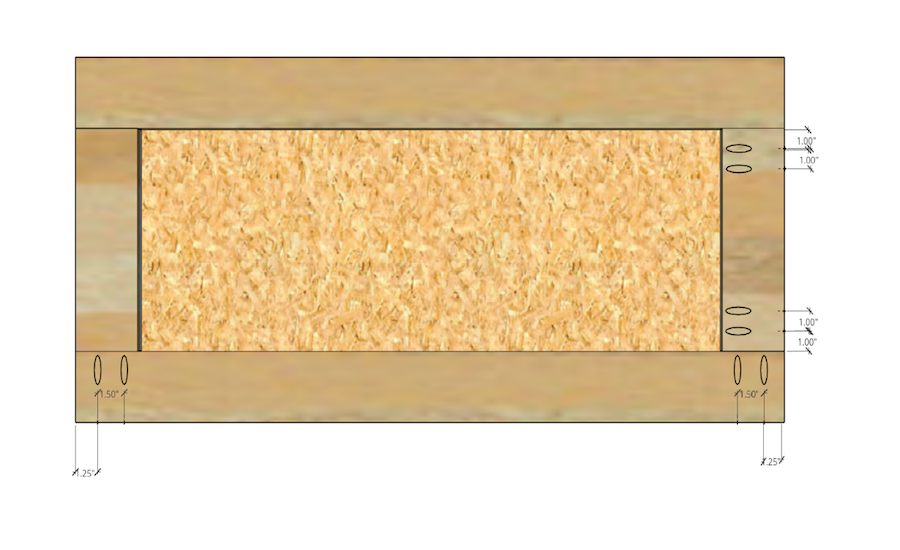
-
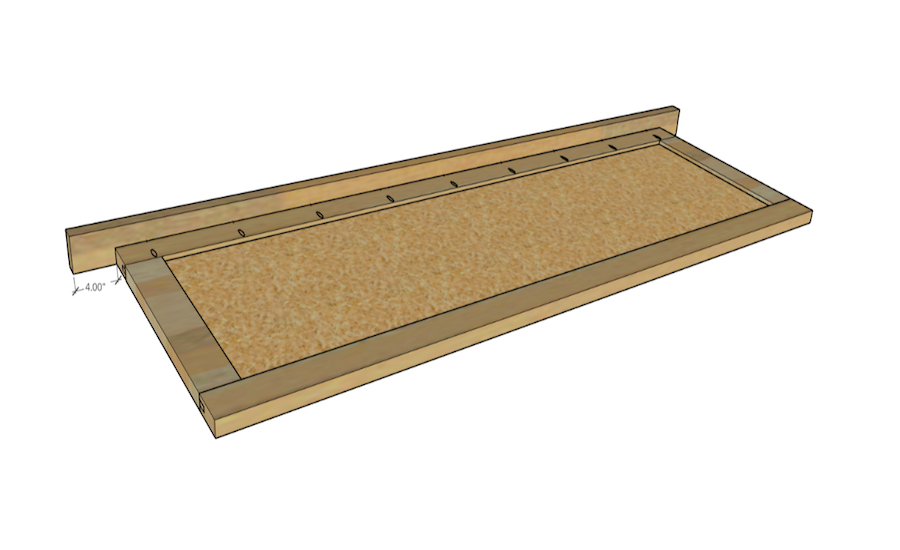
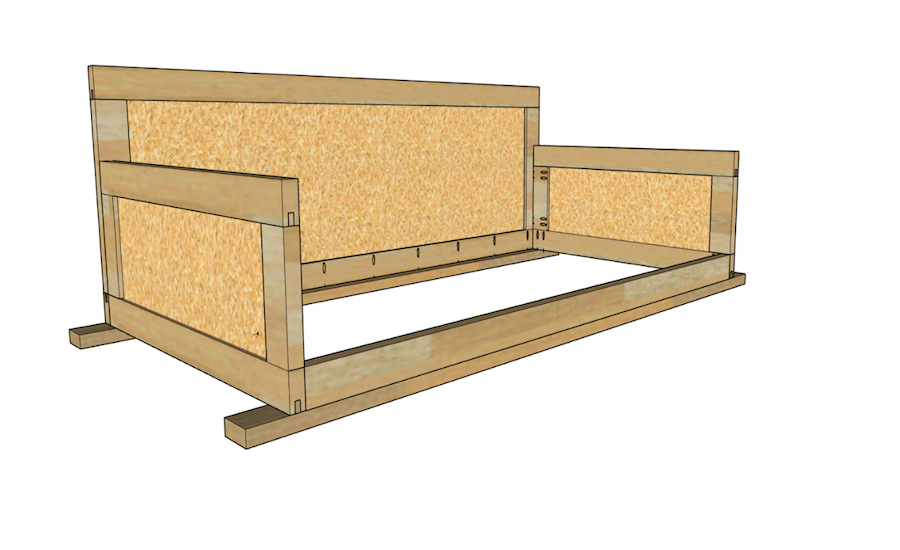
Assembly (Part 1)
This is what your panels should look like.
-
Assembly (Part 2)
Lay the back panel on the floor with the pocket holes facing up. Attach the 86” back hanging brace using 2 ½” pocket hole screws. Make sure to leave 4” of the 86” hanging brace on both sides of the back panel. Make sure the back panel and 86” hanging brace line up on the back.
-
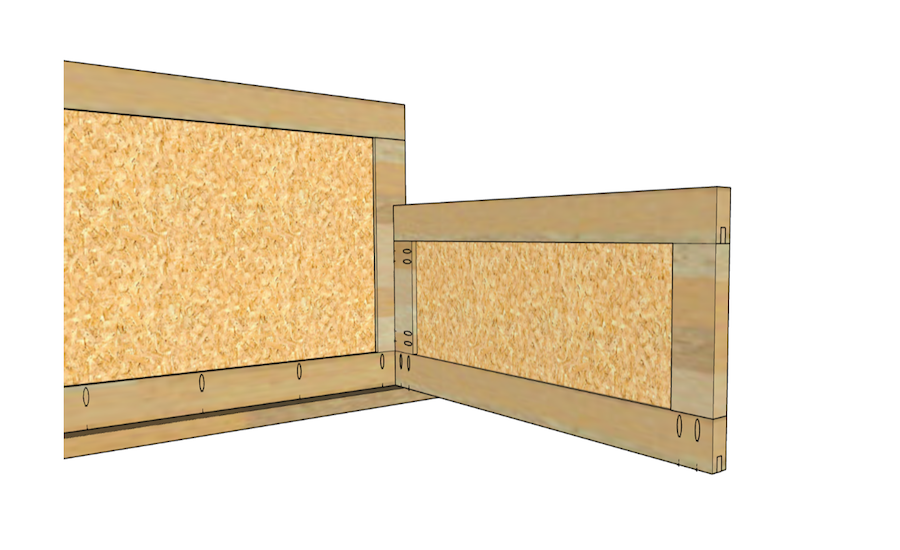
Assembly (Part 3)
Place the right armrest on the inside of the back
panel. Attach it to the back panel and hanging brace using 2 ½” pocket hole screws. Make sure the right armrest and back panel line up on the outside.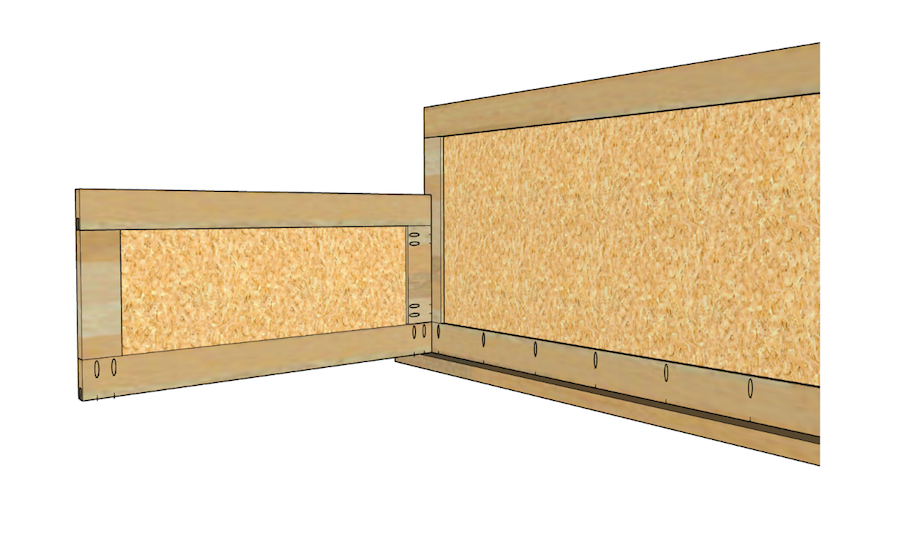
-
Assembly (Part 4)
Place the left armrest on the inside of the back panel. Attach it to the back panel and hanging brace using 2 ½” pocket hole screws. Make sure the right armrest and back panel line up on the outside.
-
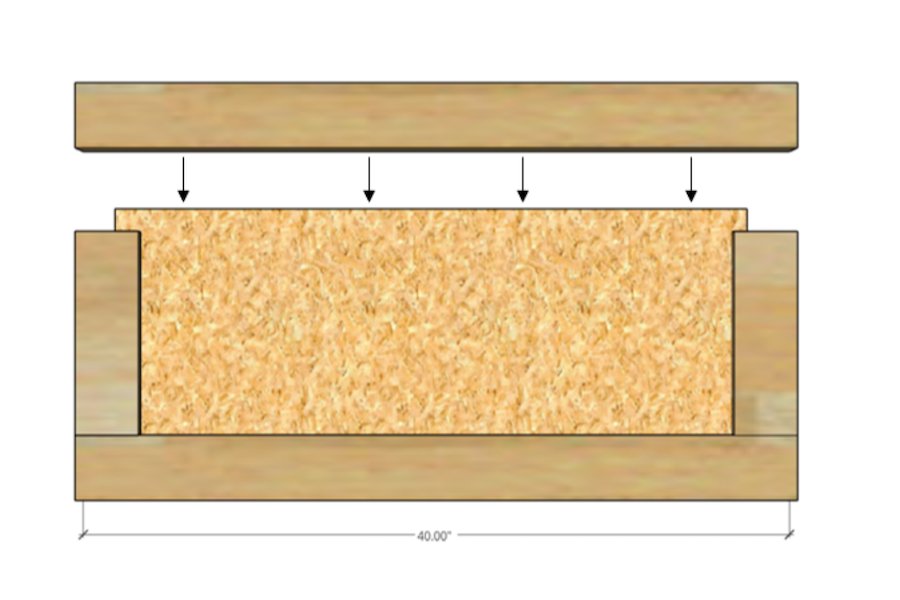
Assembly (Part 5)
Add the 86” front hanging brace and secure the
armrests using 2 ½” pocket hole screws. Make sure
the 86” front hanging brace and the armrests line up on the front end.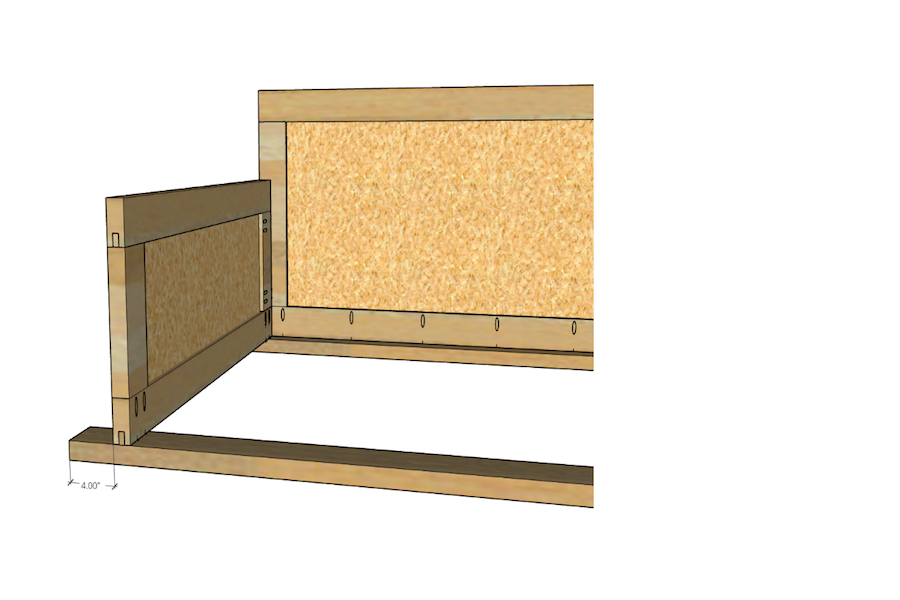
-
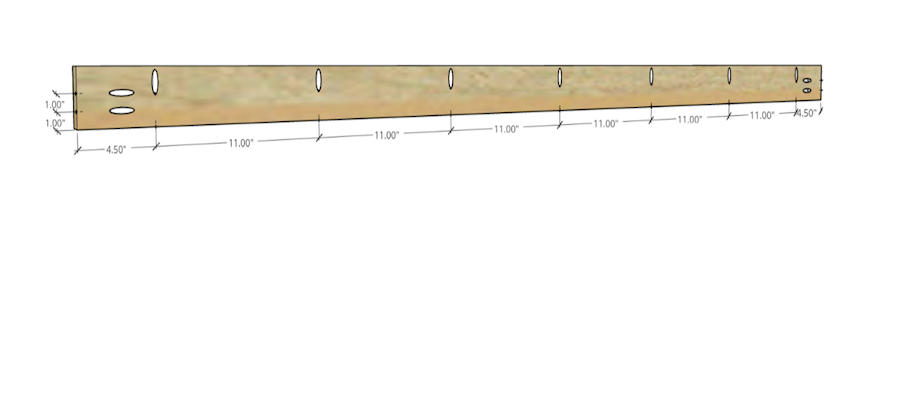
Assembly (Part 6)
On the 75” front brace, add two vertical pocket holes that are 1” apart. Then, add six horizontal pocket holes that are 11” apart.
-
Assembly (Part 7)
Place the 75” front brace in between the armrests and secure it into place using 2 ½” pocket hole screws. Add screws to both armrests and the 86” front hanging brace. Make sure the 75” front brace lines up with the armrests and the front hanging brace.
-
Assembly (Part 8)
For all the 37 ½” mattress support braces, open two
pocket holes on each side.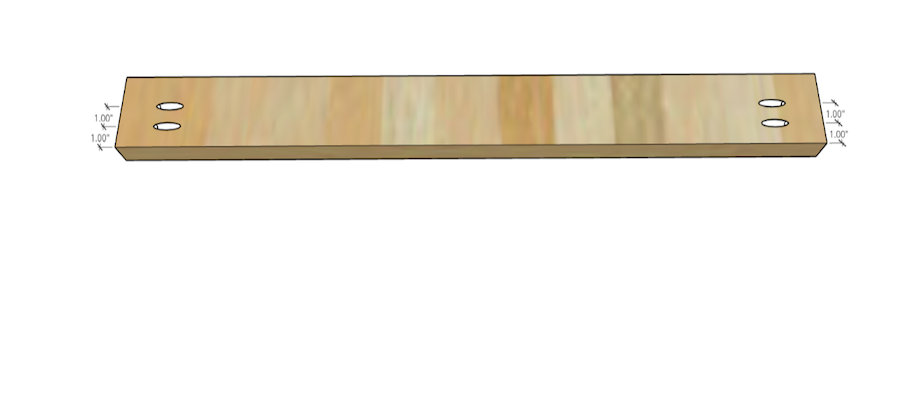
-
Assembly (Part 9)
Using 2” pocket hole screws, secure the 37 ½”
mattress support braces to the back panel and the
front brace. The mattress support braces must be
installed 2” apart.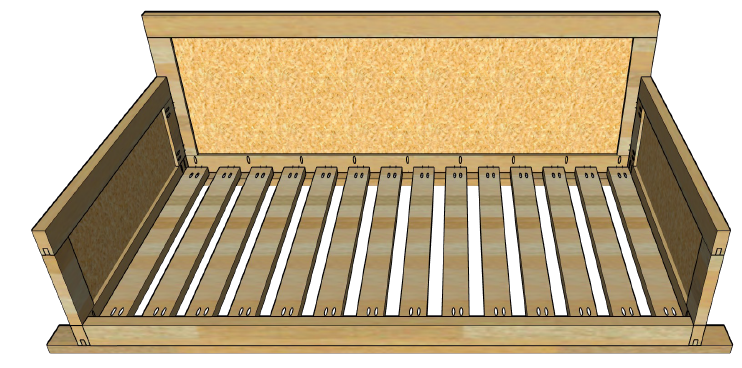
-
Assembly (Part 10)
Paint or stain the swing bed whatever color you
would like. Make sure that you are applying a sealer,
since the wood used was not pressure treated.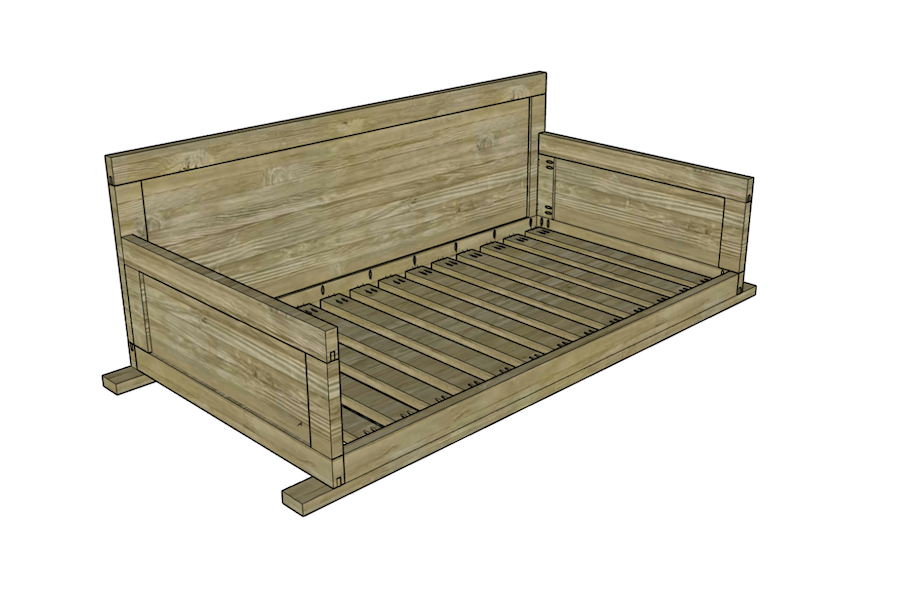
-
Assembly (Part 11)
Measure the halfway point of the piece of the
hanging brace that is sticking out to open hole for the rope. Using a ¾” drill bit, open a hole to hang the swing bed. Repeat this process on all four corners.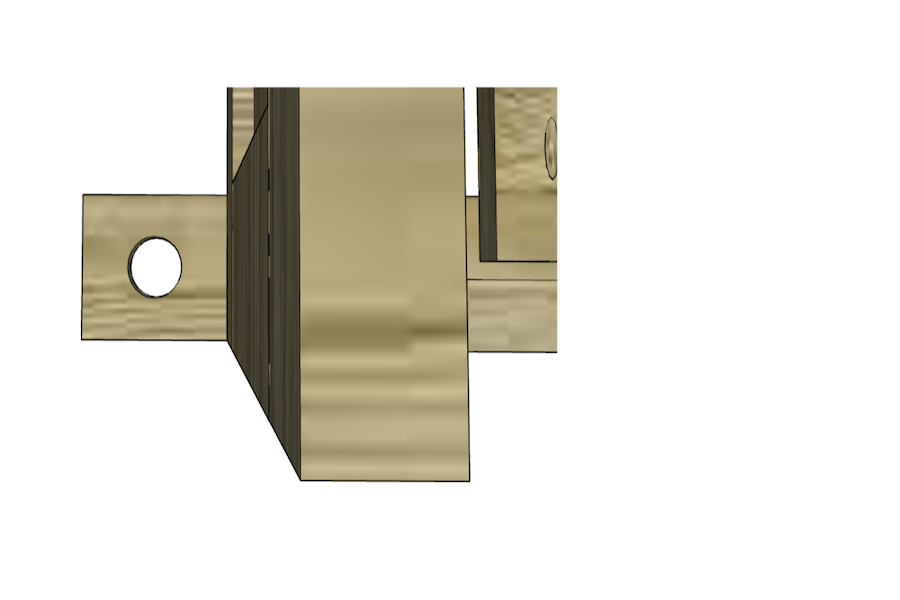
-
Assembly (Part 12)
Reference video for knot tying and hanging
instructions. Add twin size mattress, and pillows, if
preferred, and swing bed is complete.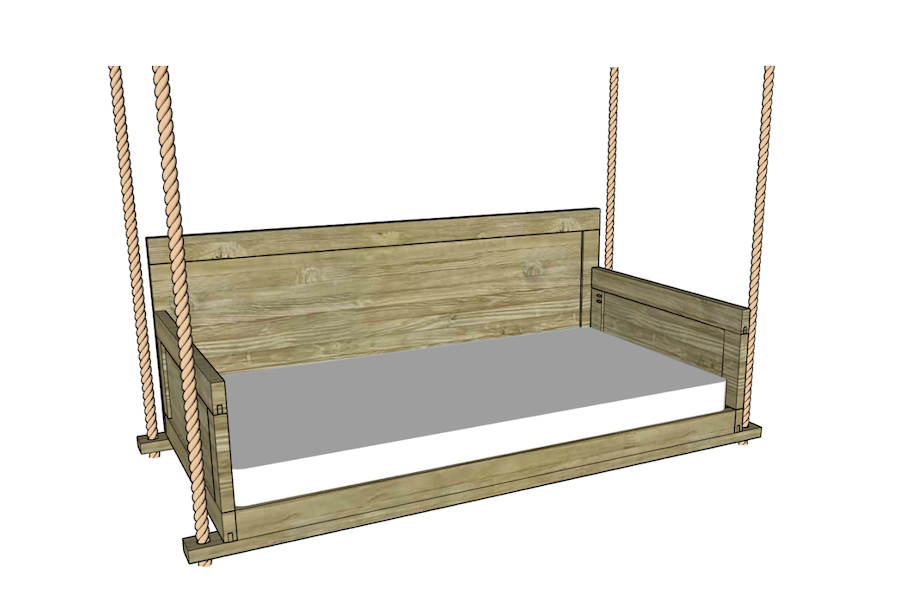
Video for this plan: https://www.youtube.com/watch?v=utjYmq_TOjA