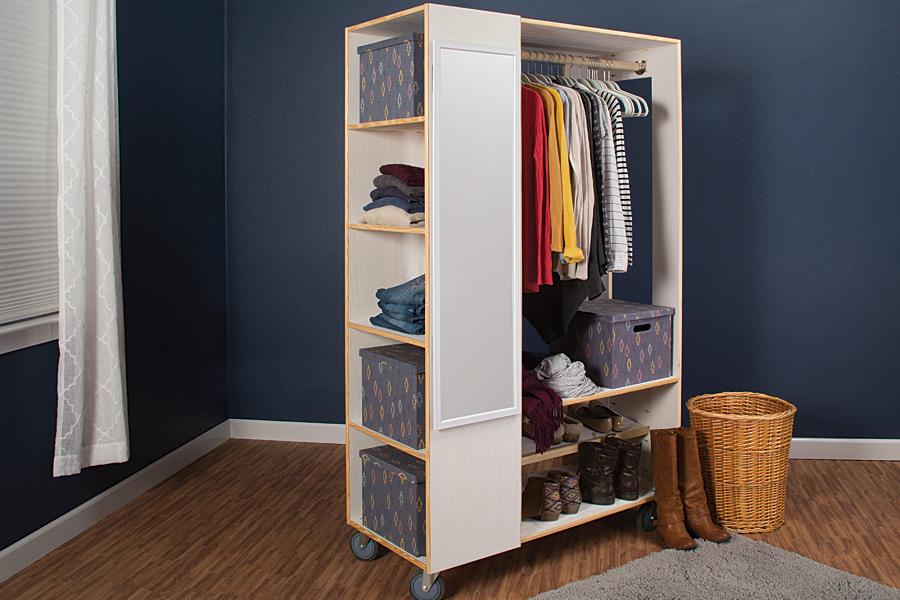
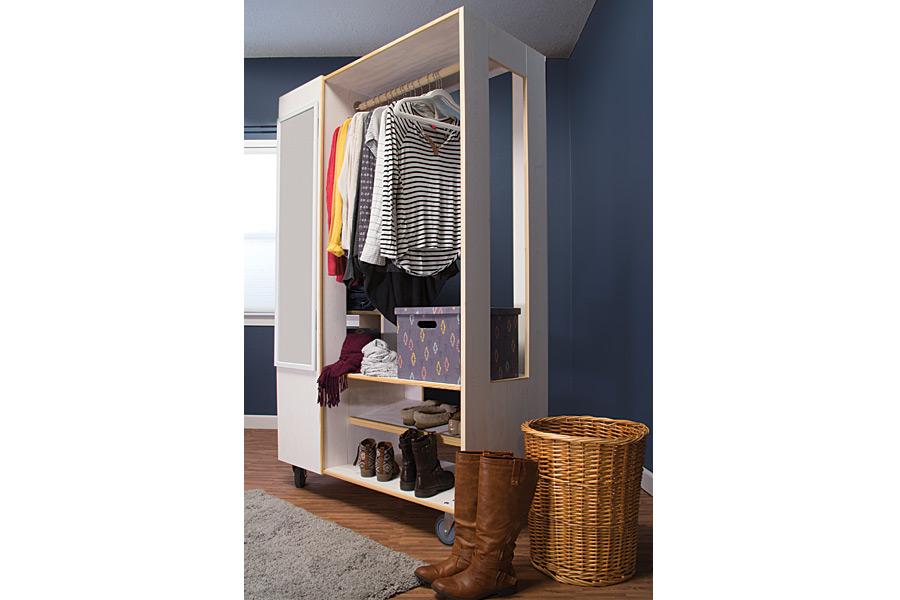
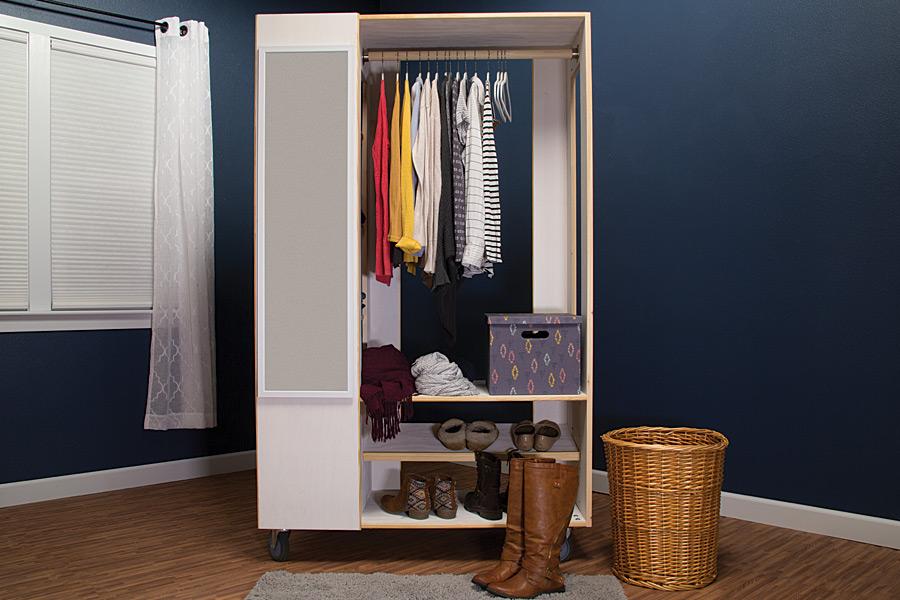


Closets are kind of like potato chips. No matter how many you have, it would always be great to have just one more. Of course, finding space for another closet is challenging, if not impossible. That’s why this freestanding closet is great. It provides an extra closet anywhere you need one.
Tools
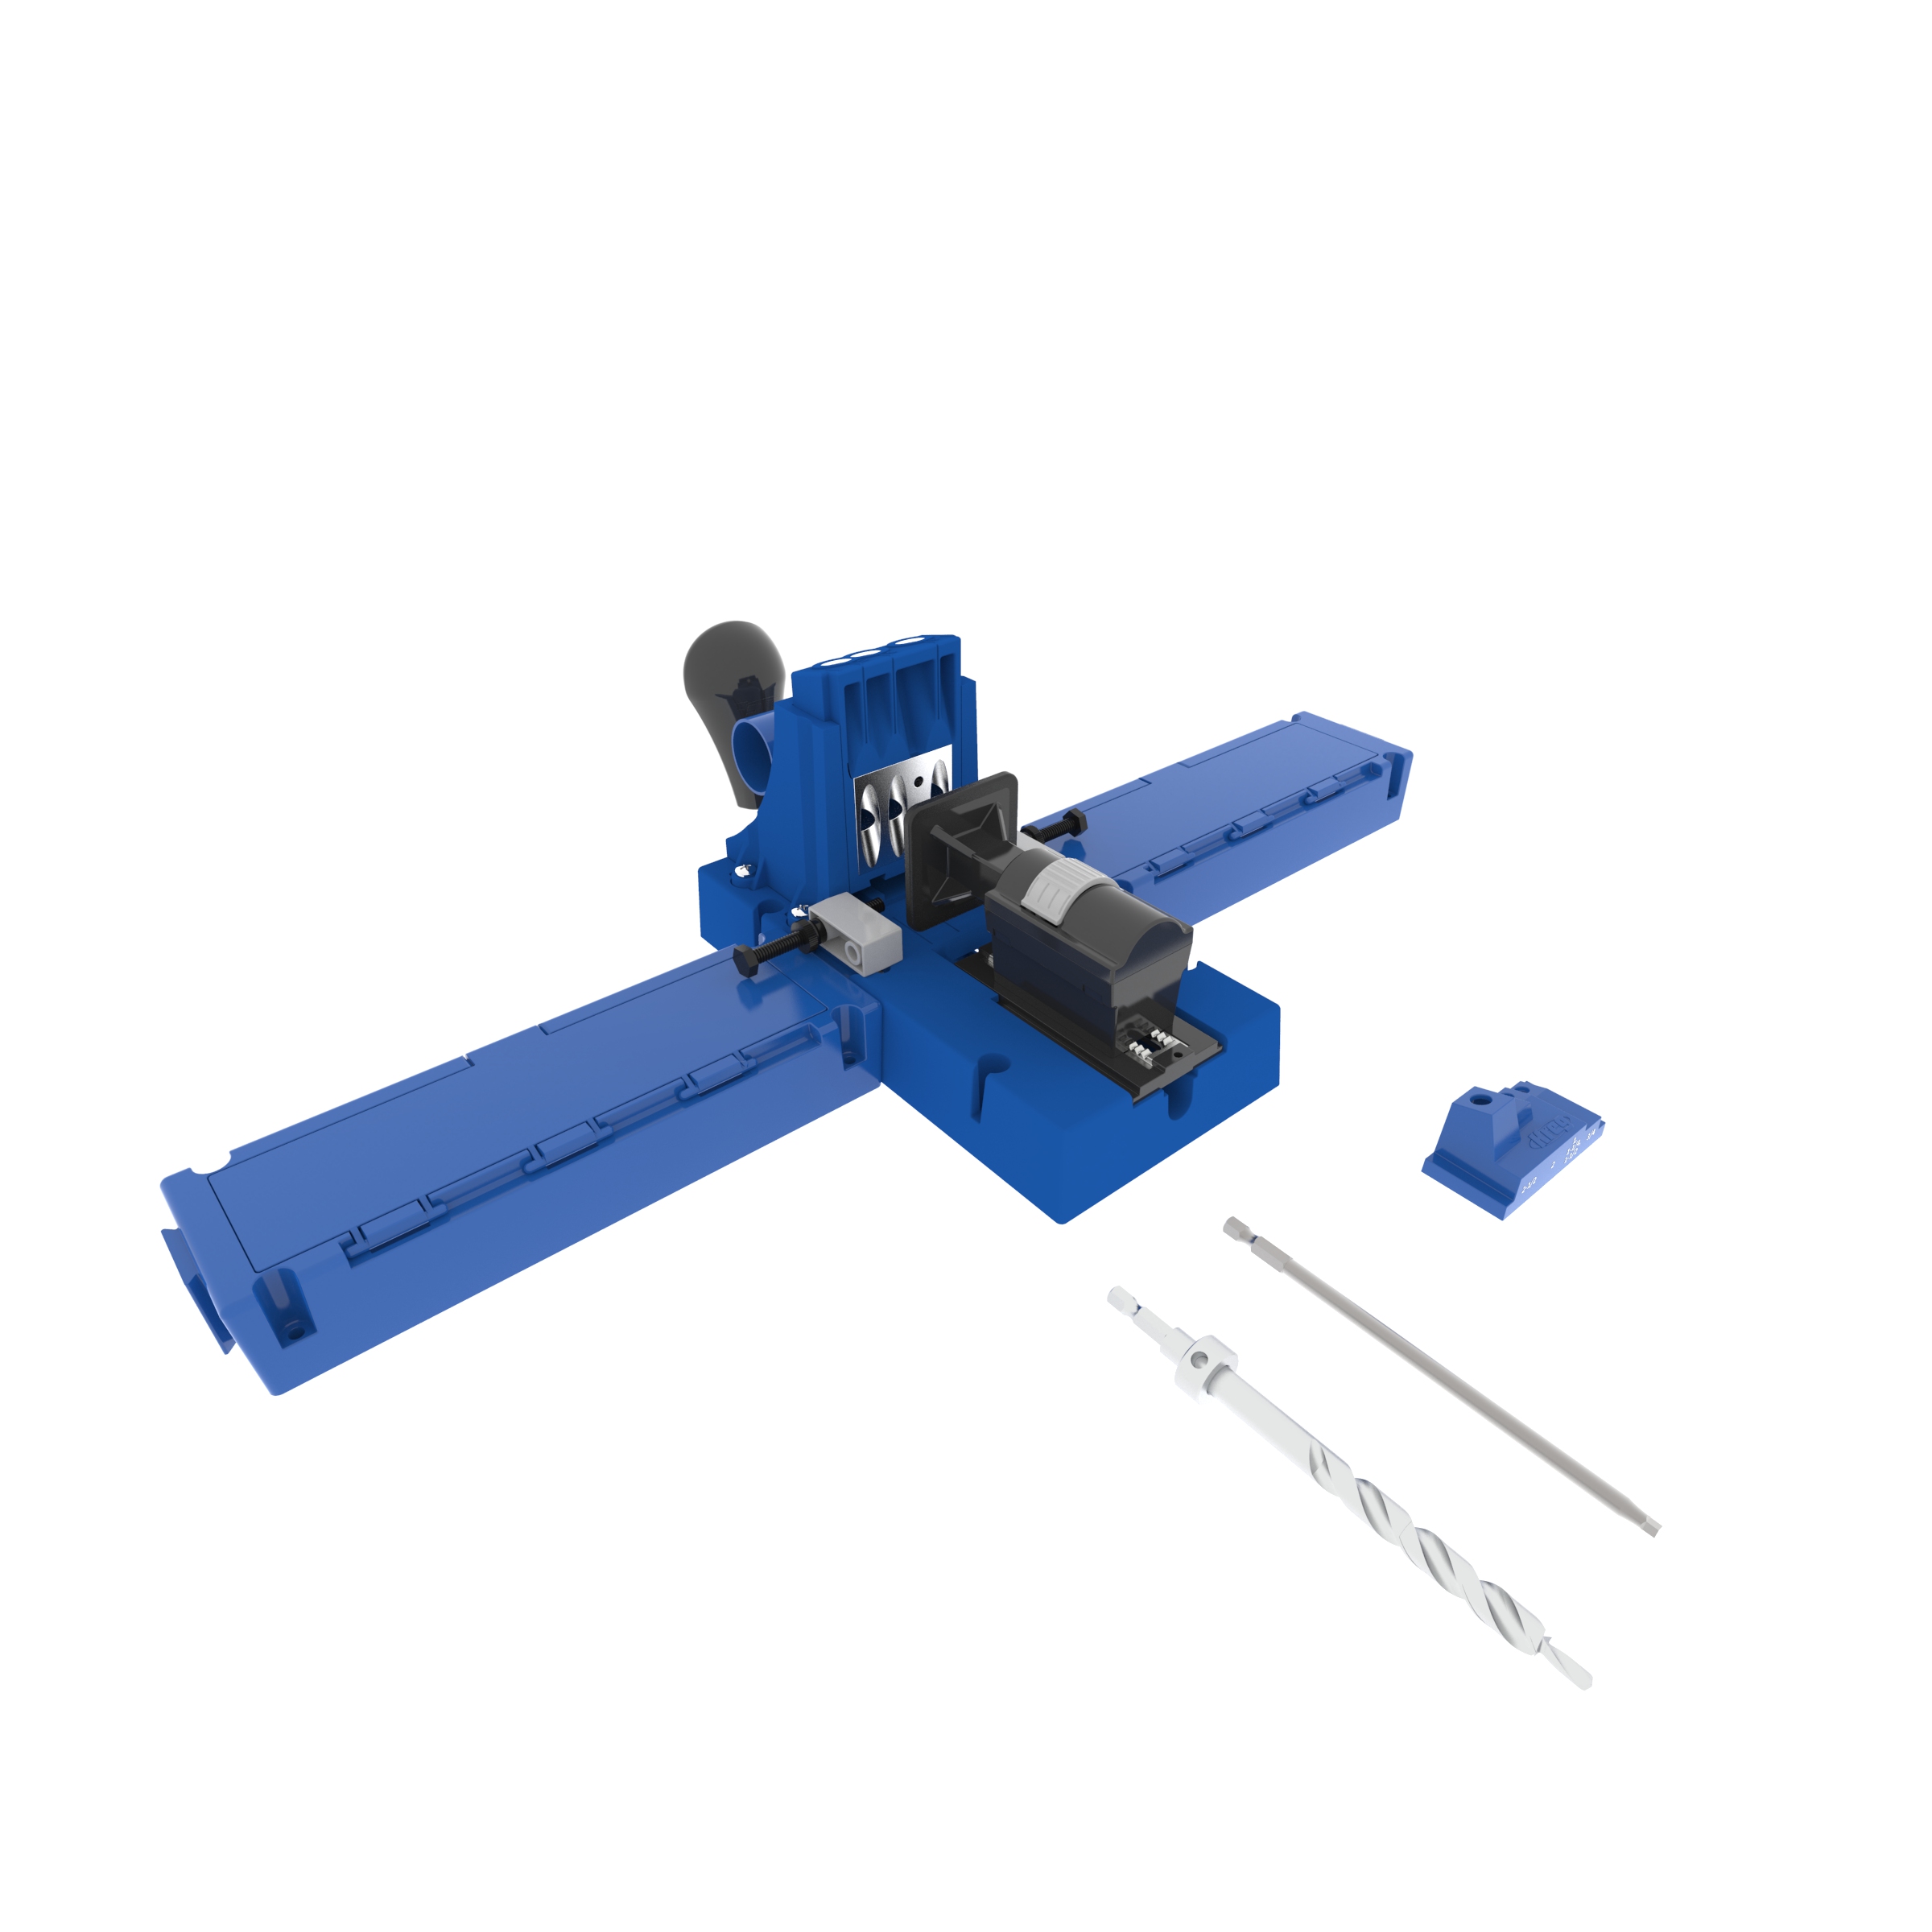
Kreg Tools


Other Tools
-
Miter Saw

-
Brad Nailer or Hammer
-
Tape Measure
Materials
Wood Products
- 2 Sanded plywood , 3/4" x 48" x 96"
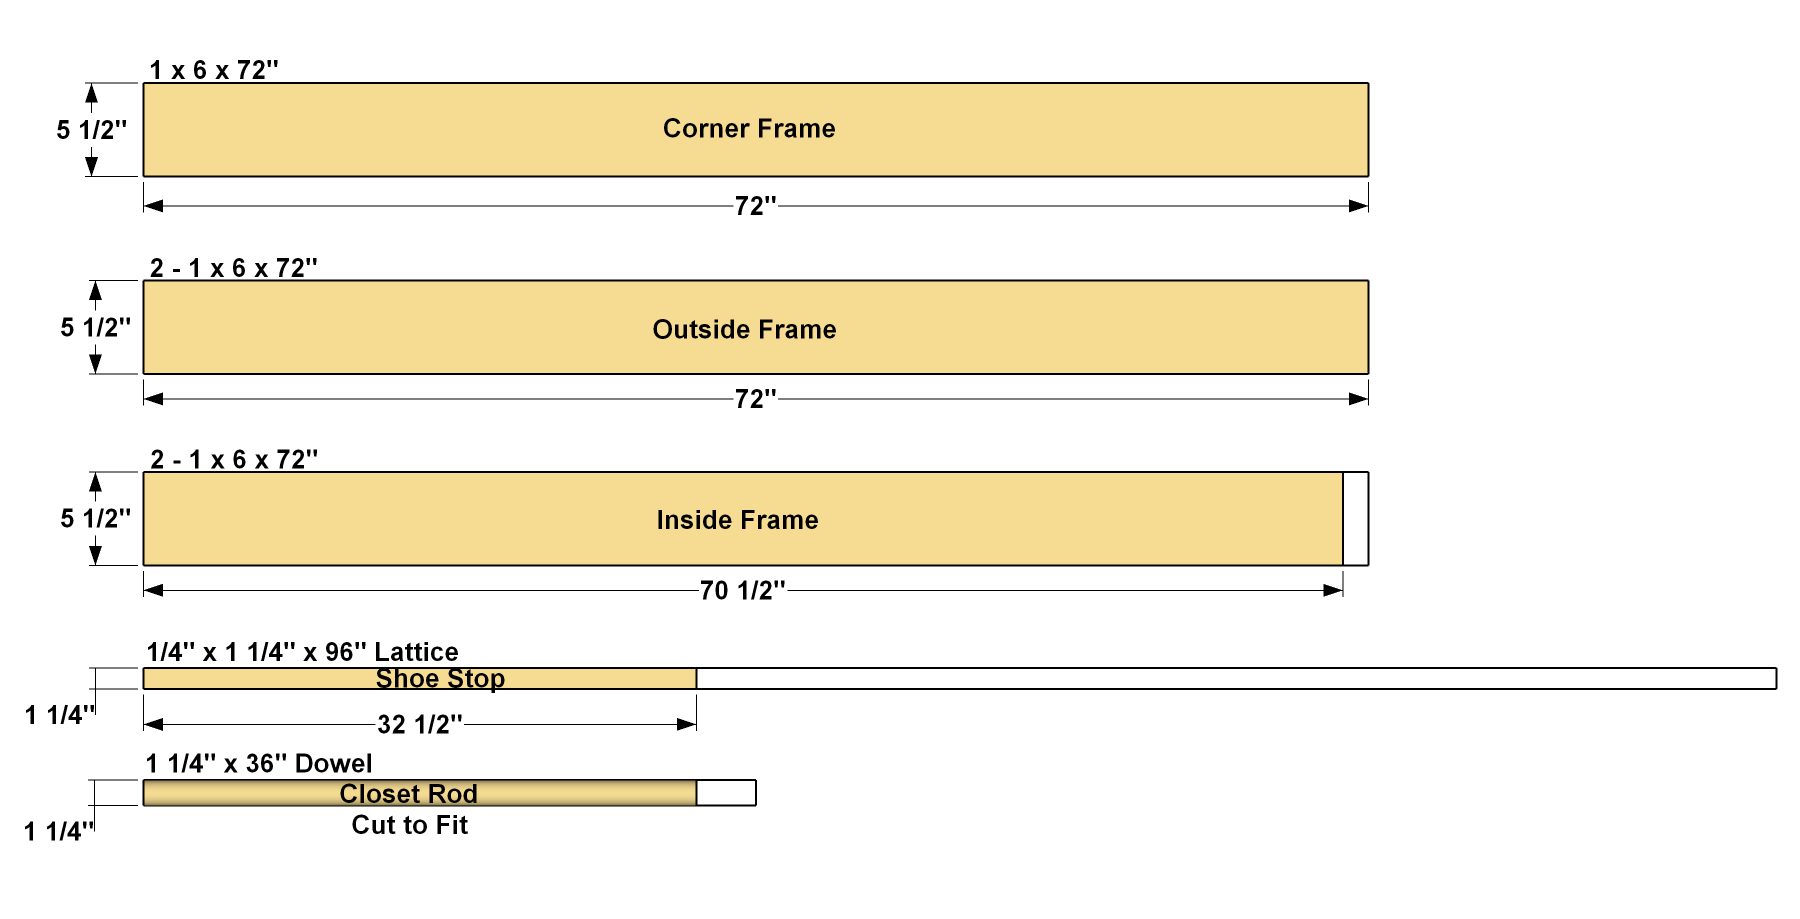
- 5 Board , 1x6 x 72"
- 1 Dowel , 1 1/4" x 36"
- 1 Pine lath , 1/4" x 1 1/4" x 96"
- 1 Screen molding , 1/4" x 3/4" x 96"
Hardware & Supplies
- 149 1 1/4" coarse-thread Kreg Pocket-Hole Screws
- 4 5" Locking Casters
- 1 Closet Rod Bracket Set
- 1 Hanging Mirror
- 50 1" Brad Nails
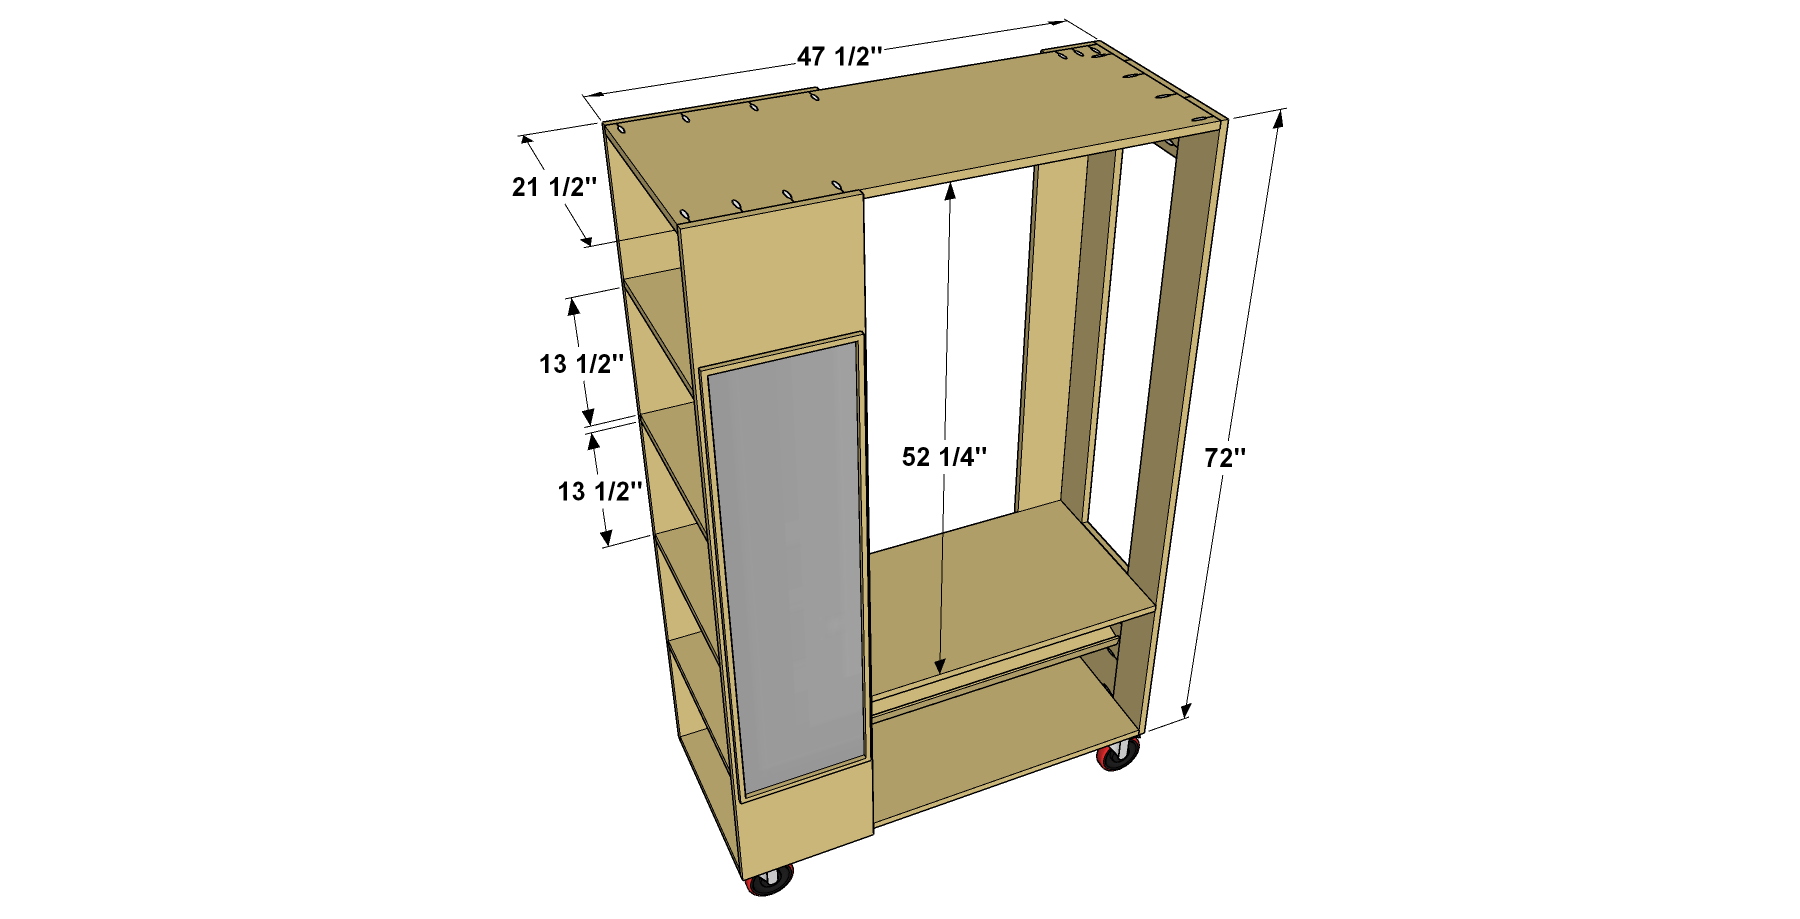
Cut List & Parts
- 1 Upper Outside Filler , 3/4" x 5 1/2" x 9 3/4"
- 1 Lower Outside Filler , 3/4" x 9 3/4" x 19"
- 2 Outside Frame , 3/4" x 5 1/2" x 72"
- 1 Corner Frame , 3/4" x 5 1/2" x 72"
- 1 Back Panel , 3/4" x 19" x 72"
- 1 Bottom Panel , 3/4" x 20" x 47 1/2"
- 1 Top Panel , 3/4" x 20" x 47 1/2"
- 1 Front Panel , 3/4" x 14 1/2" x 72"
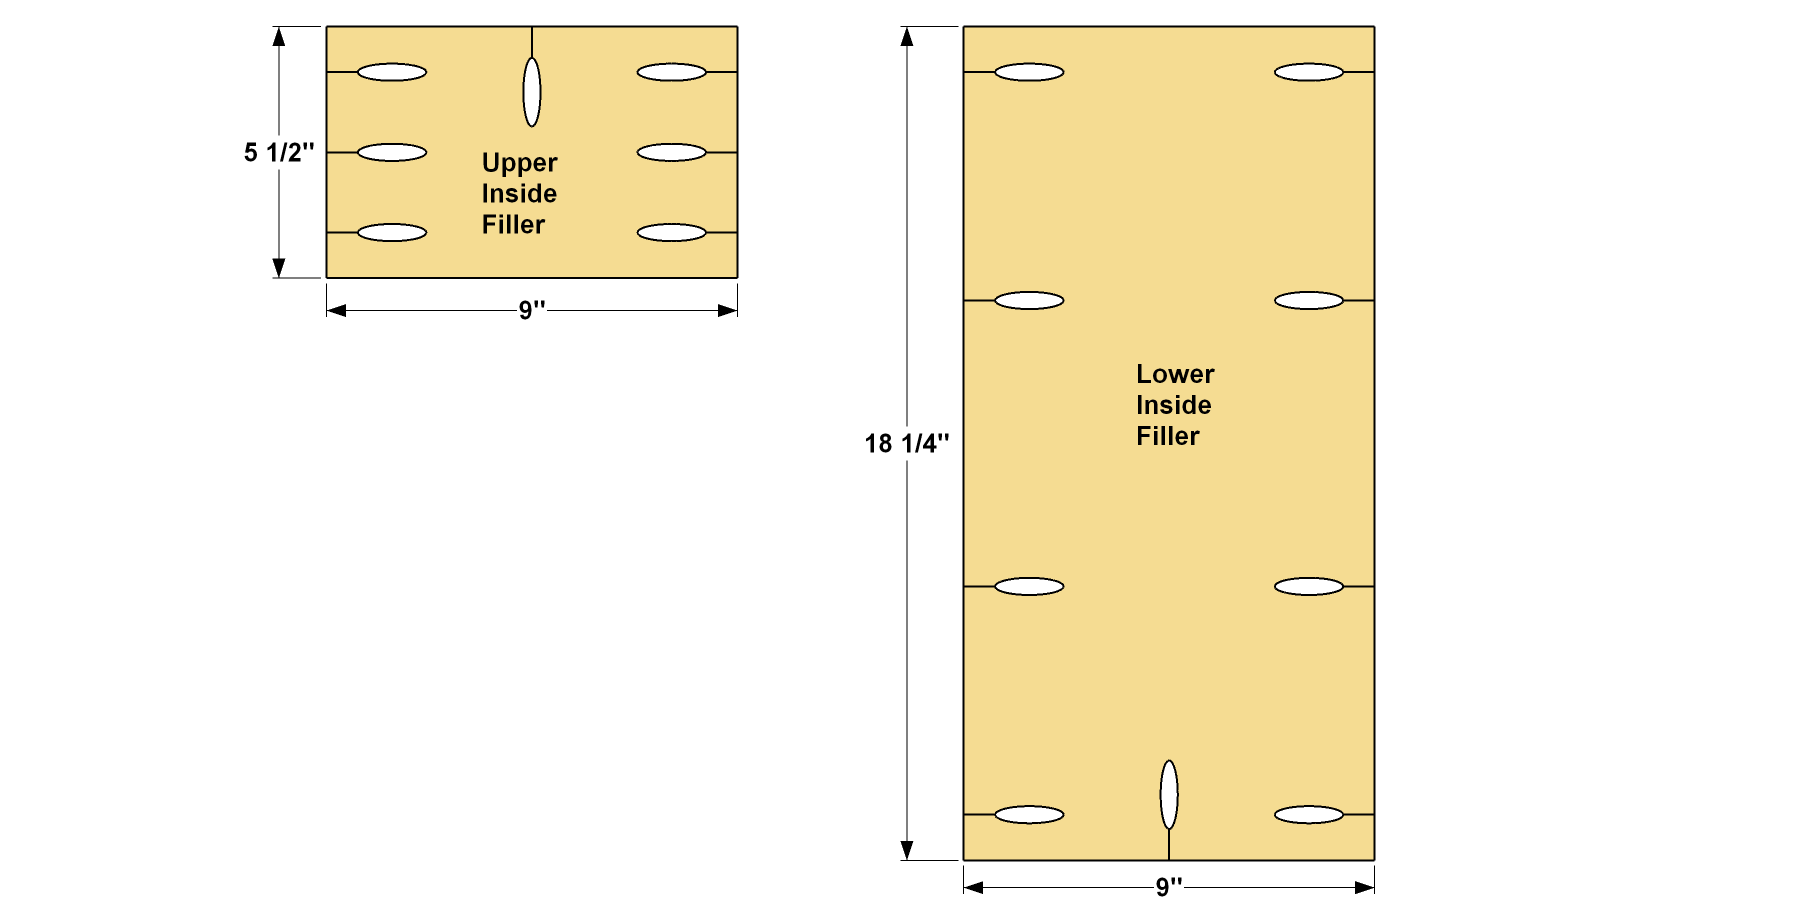
- 1 Lower Inside Filler , 3/4" x 9" x 18 1/4"
- 1 Upper Inside Filler , 3/4" x 5 1/2" x 9"
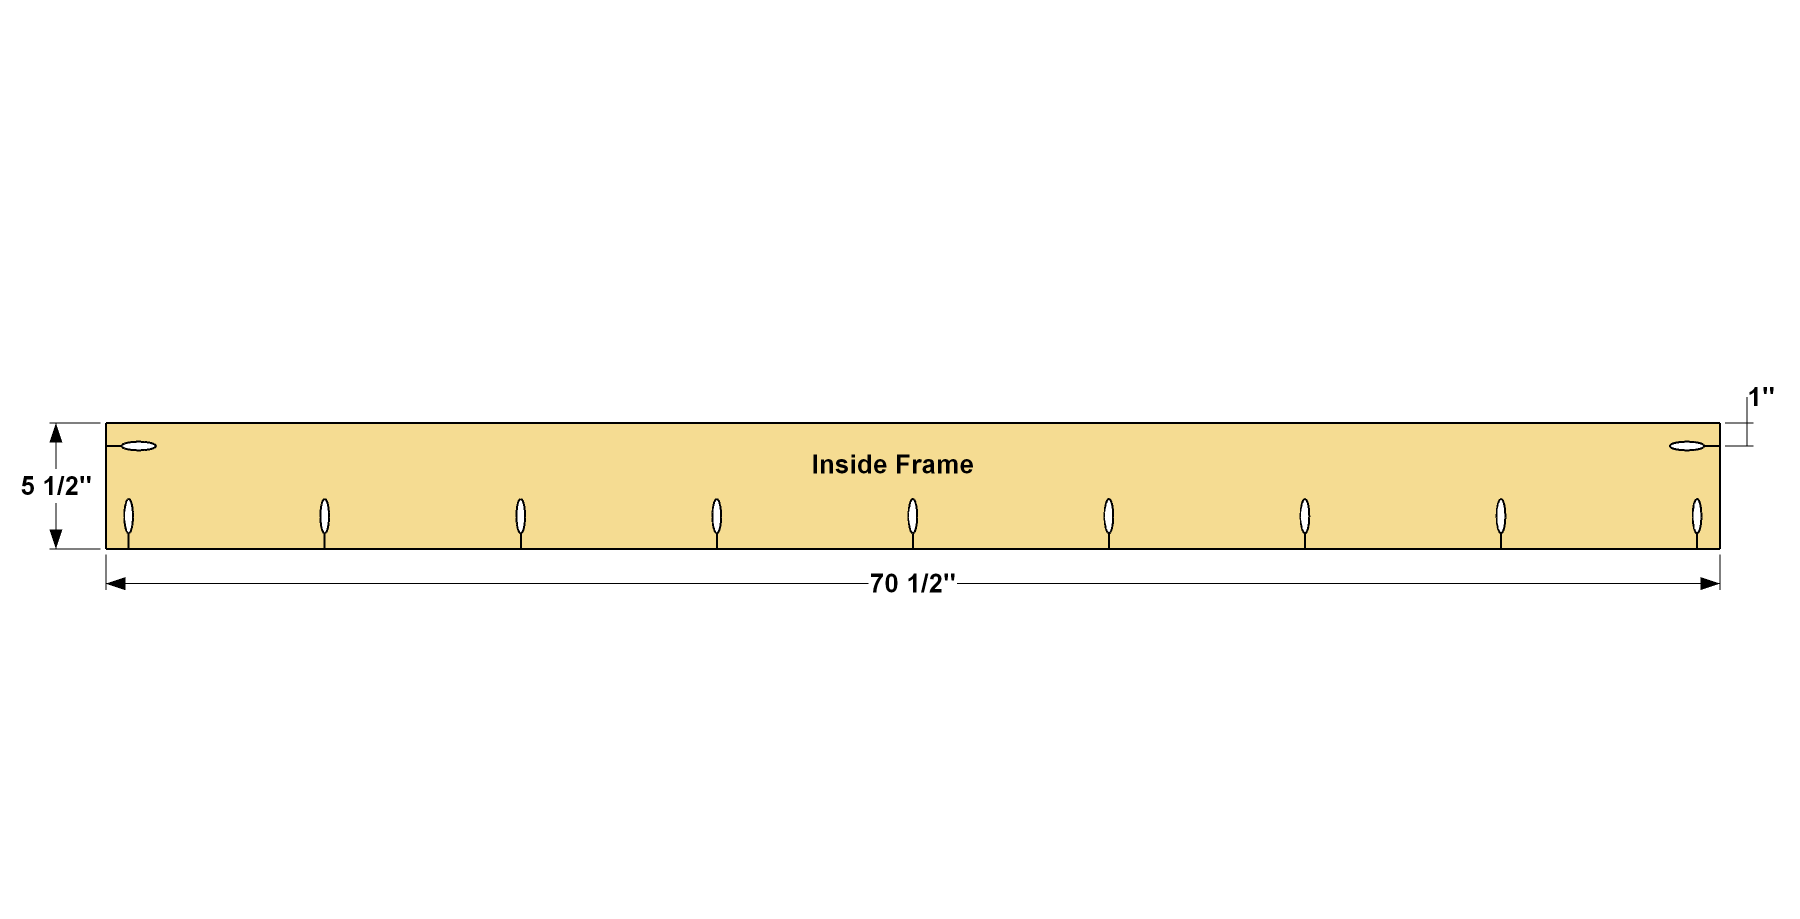
- 2 Inside Frame , 3/4" x 5 1/2" x 70 1/2"
- 4 Shelf , 3/4" x 13 1/2" x 20"
- 1 Middle Shelf , 3/4" x 20" x 32 1/2"
- 1 Shoe Shelf , 3/4" x 14" x 32 1/2"
- 1 Shoe Stop , 1/4" x 1 1/4" x 32 1/2"
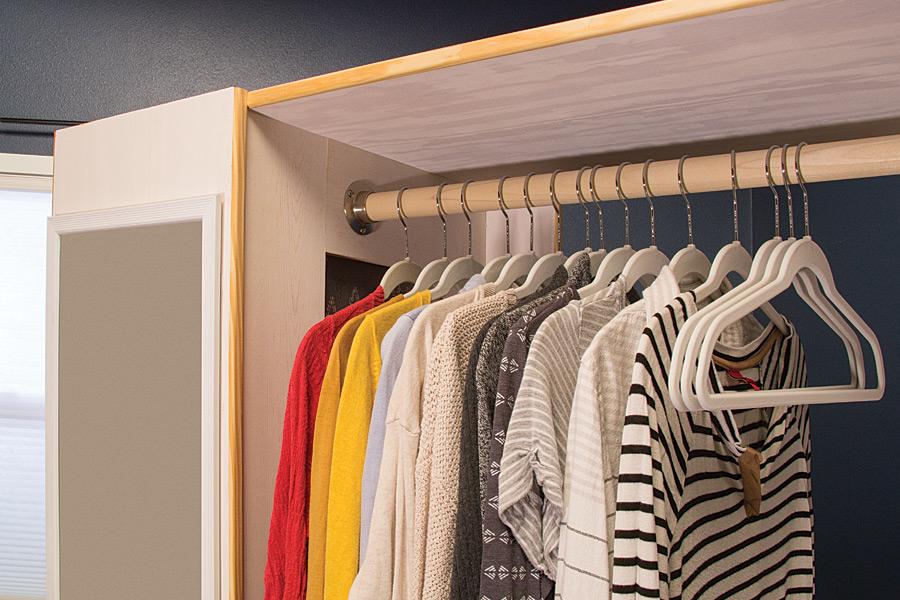
- 1 Closet Rod , 1 1/4"-dia. x 32 1/4"
- 1 Edging , Cut to fit
Directions
-
Create Outside Frame Fillers
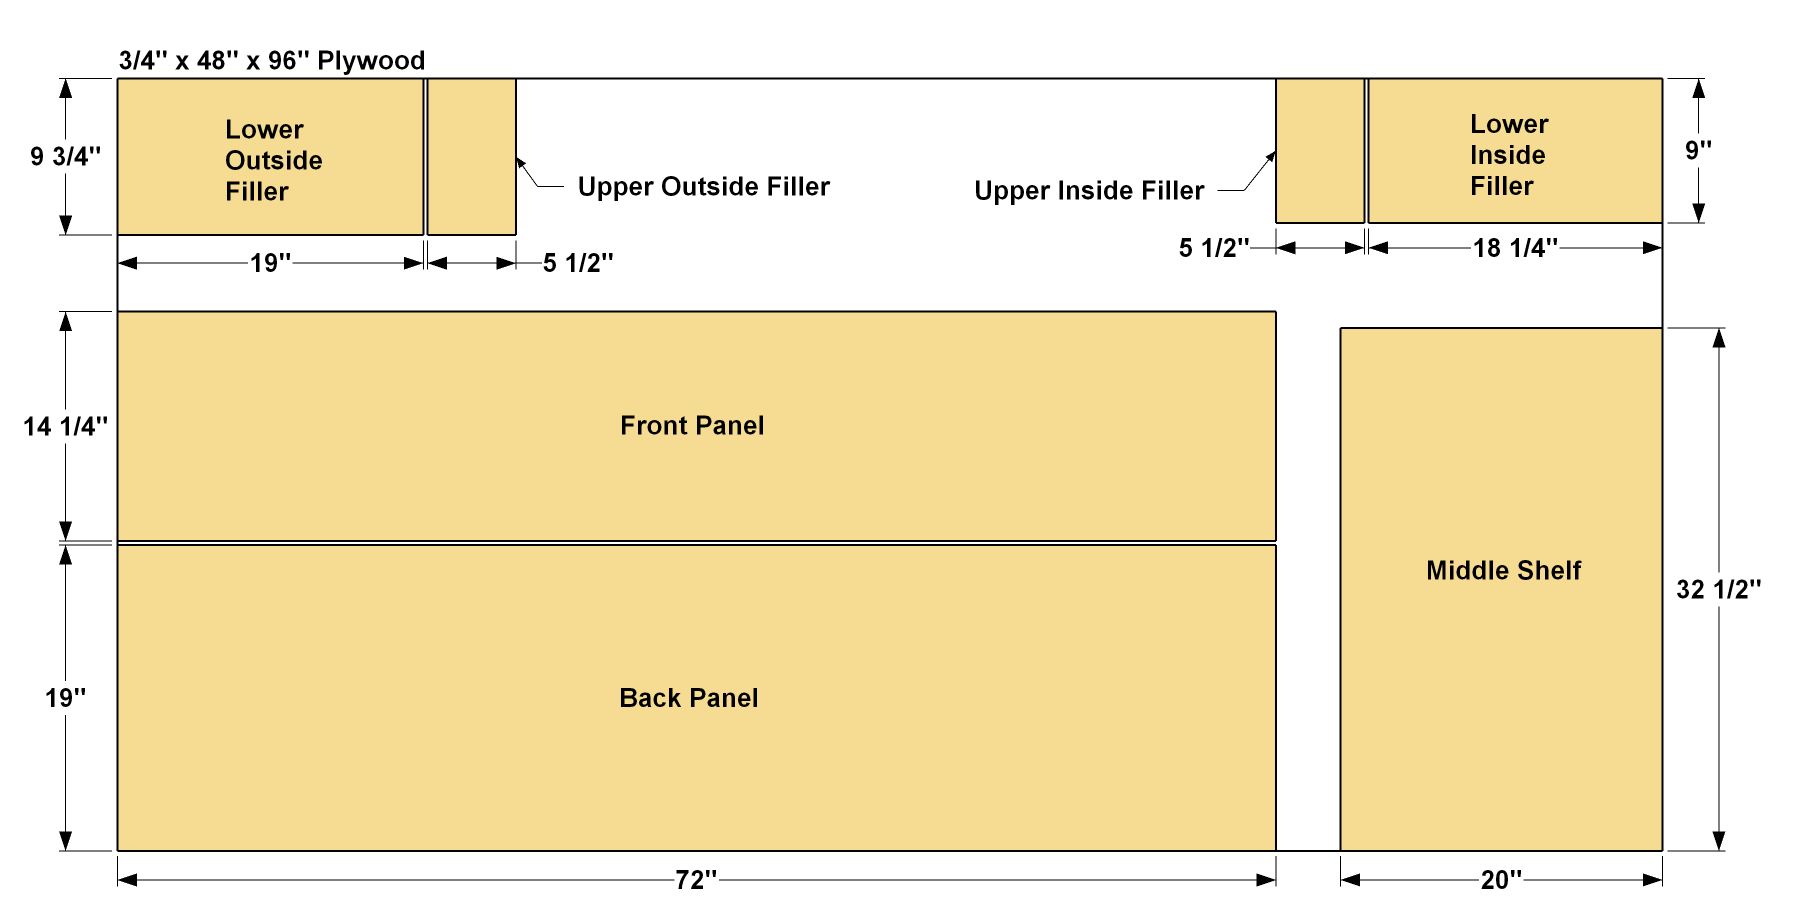
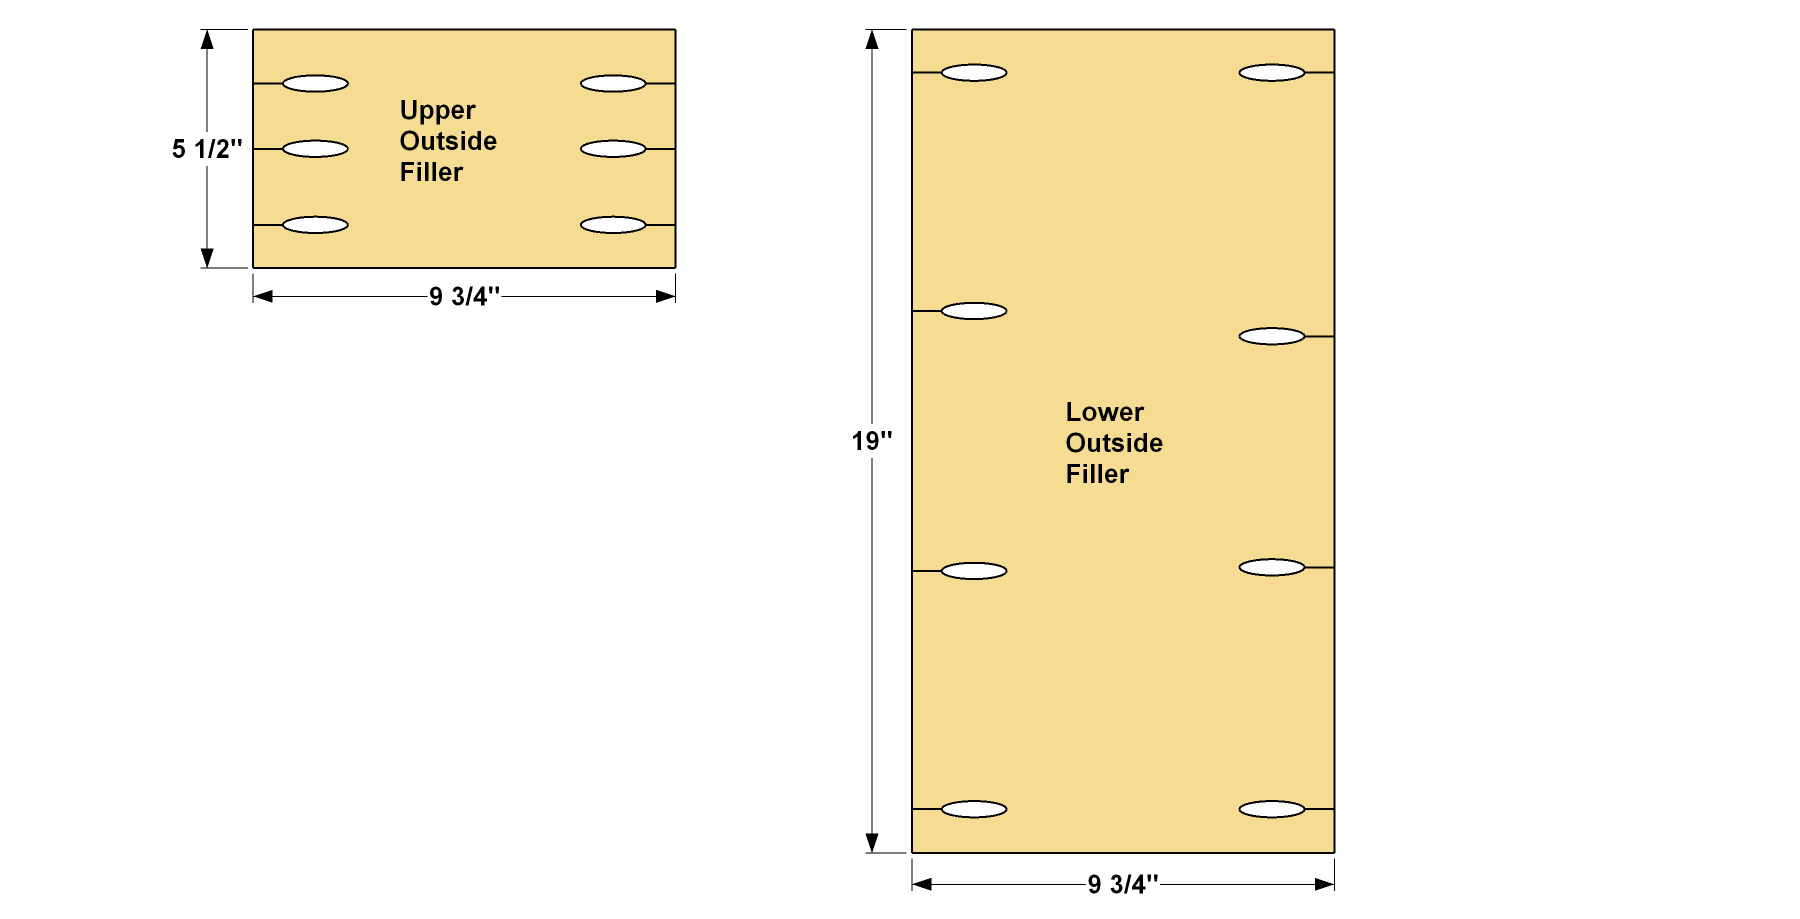
Cut one Lower Outside Filler and one Upper Outside Filler to size from 3/4" plywood, as shown in the cutting diagram. Set your Kreg Pocket-Hole Jig for 3/4"-thick material, and then drill pocket holes in in the Fillers. The exact location of these pocket holes isn’t critical, just space them approximately as shown.
-
Assemble the Outside Frame
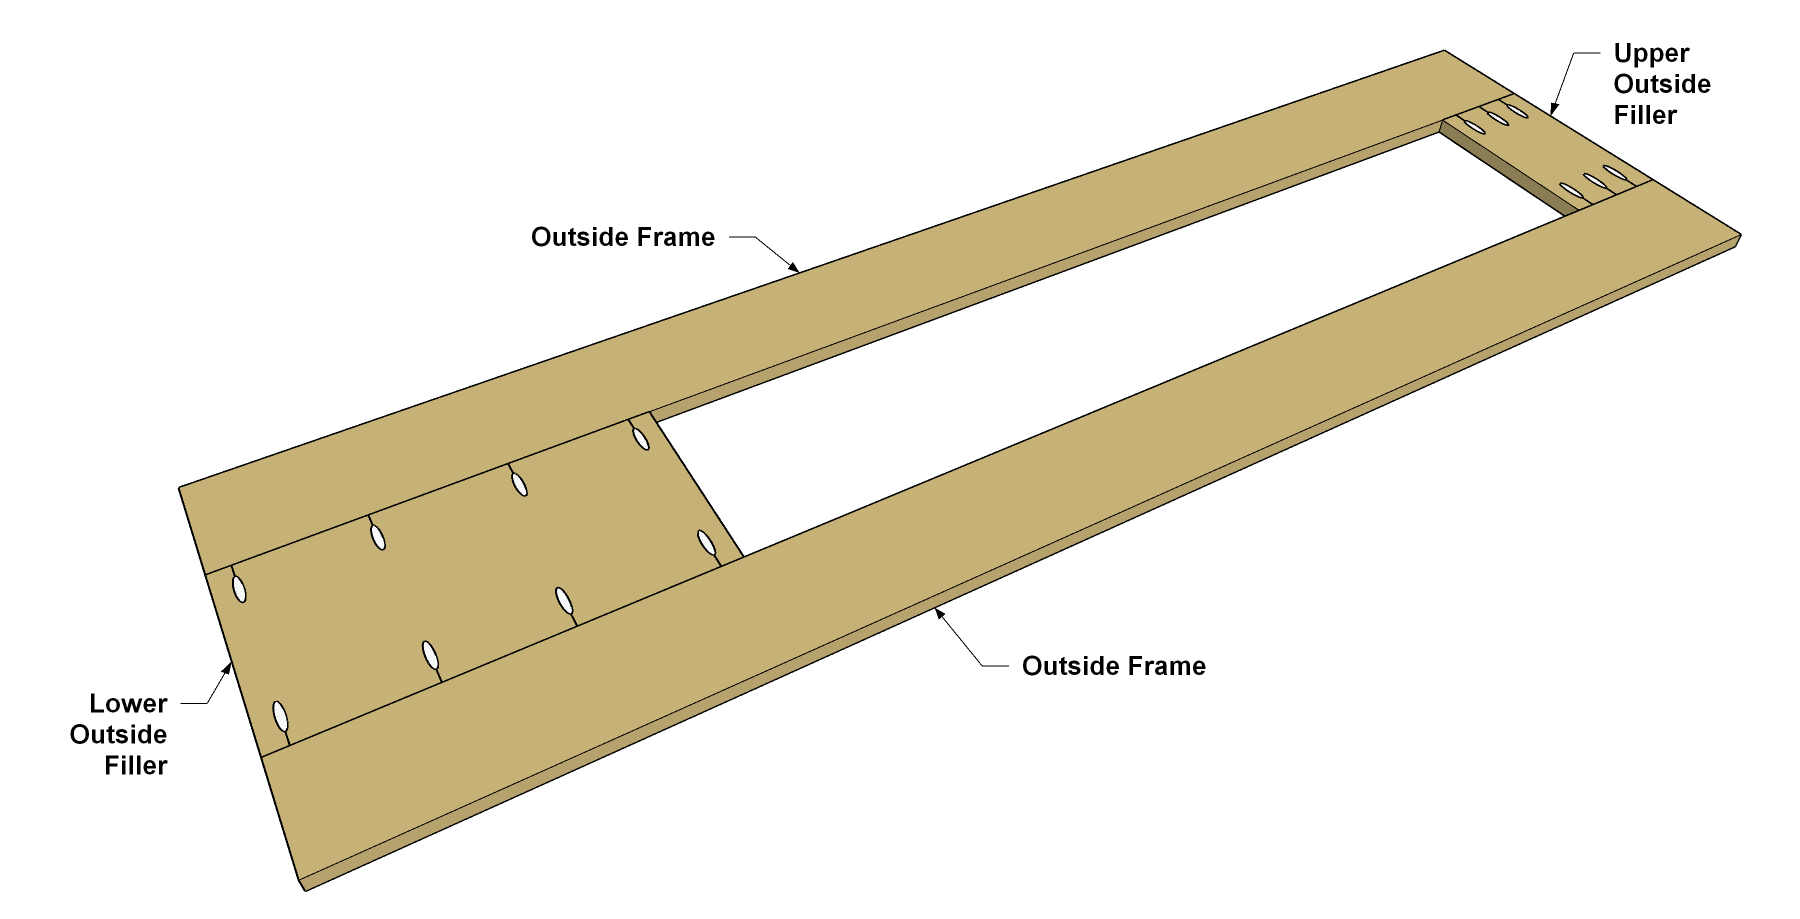
Next, select two 72"-long 1x6 boards to be the Outside Frames. Double check the length of the boards. Sometimes dimensional boards may be slightly over the stated length, and that may vary from board to board. If necessary, trim the boards so they are 72" long. Then join the Outside Frames to the Upper Outside Filler and the Lower Outside filler using 1 1/4" coarse-thread Kreg Pocket-Hole Screws to create an outside assembly. Sand the assembly smooth, as needed, using 120-grit sandpaper.
-
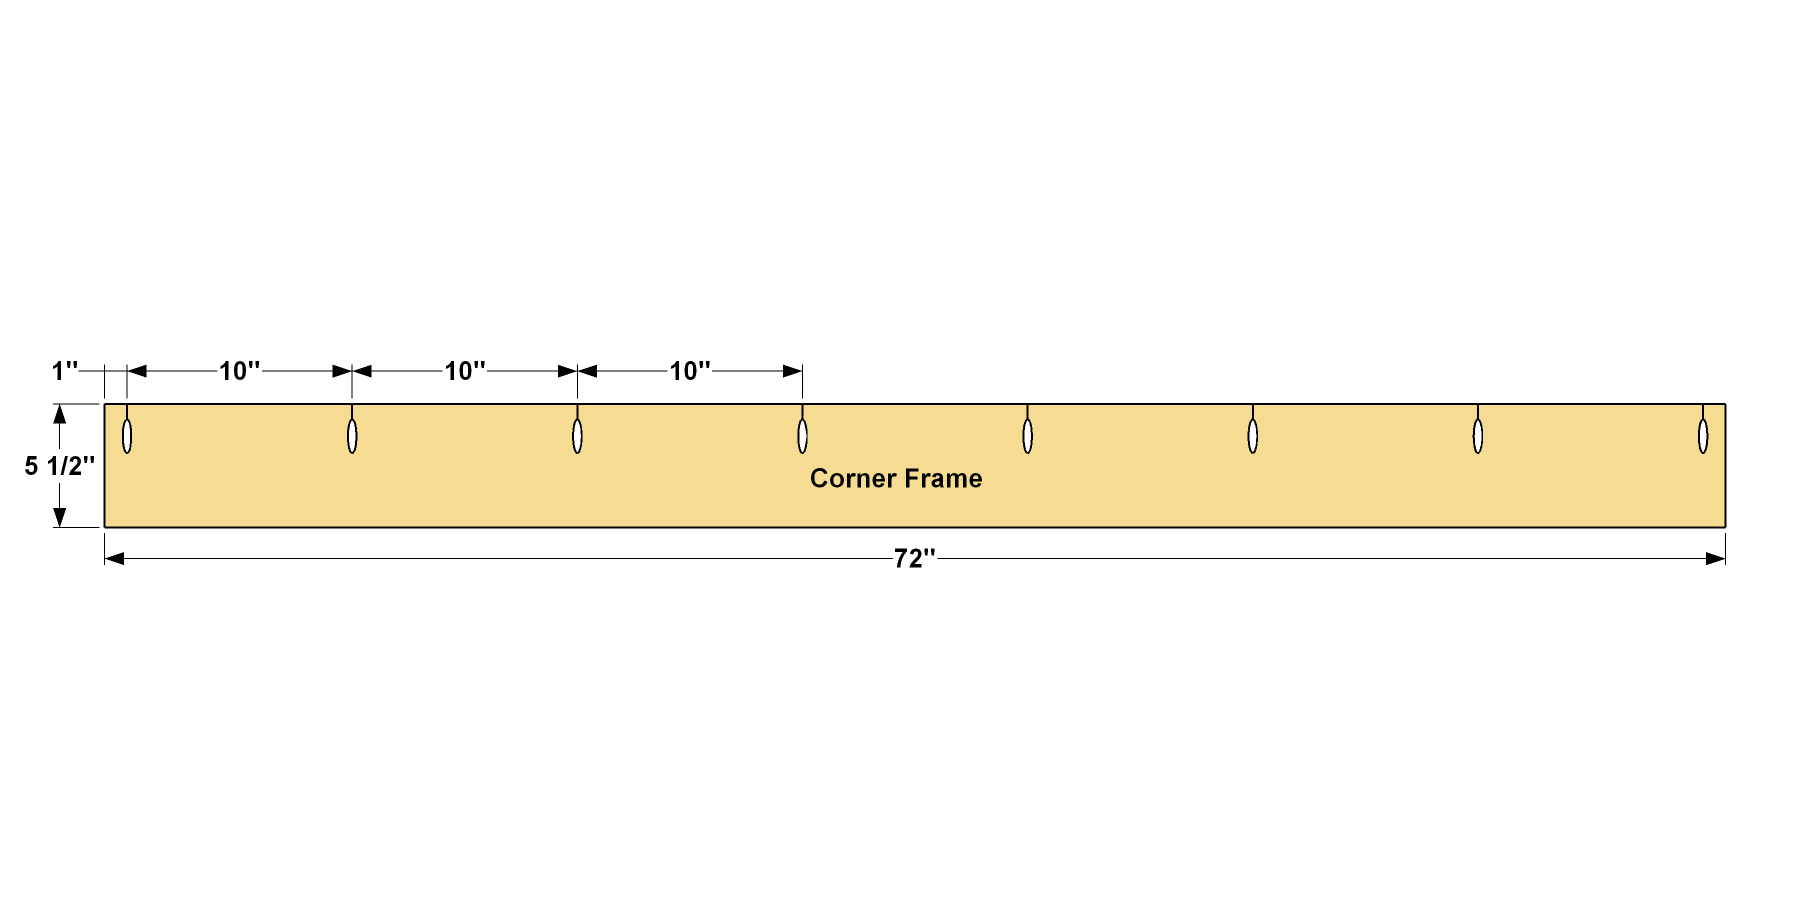
Create a Corner Frame
Select another 72"-long 1x6 to use as a Corner Frame, check the length, and then drill pocket holes in the Corner Frame, as shown. Sand this piece as needed.
-
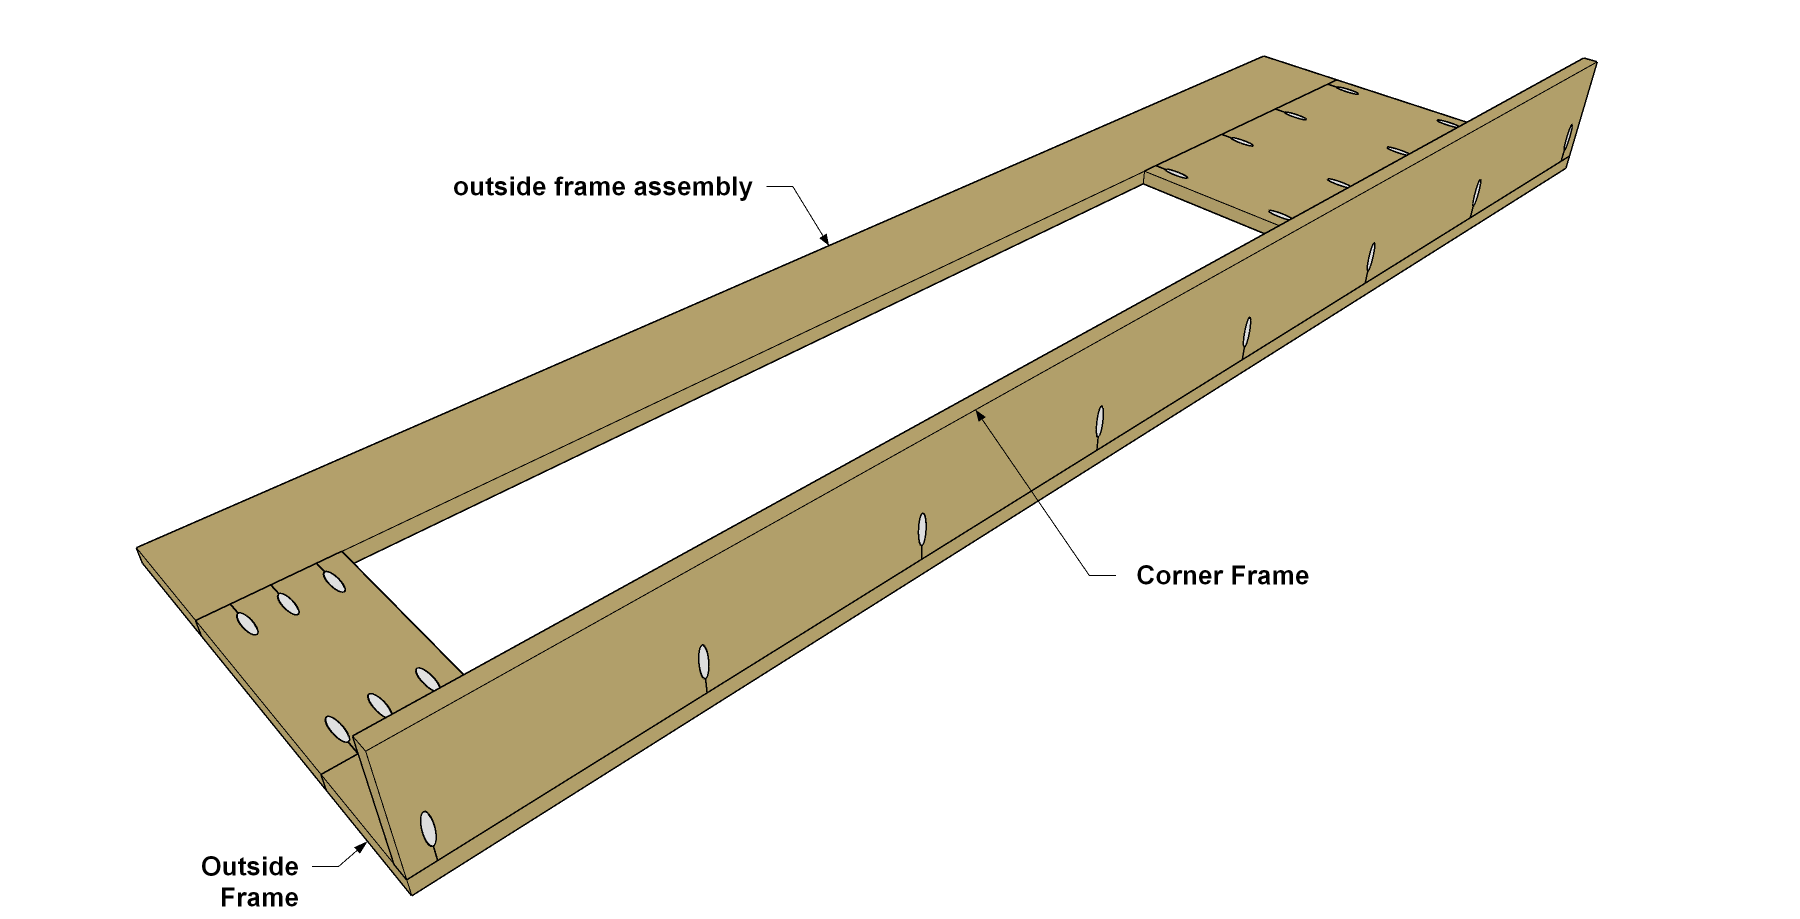
Attach the Corner Frame
Now attach the Corner Frame to the outside frame assembly using 1 1/4" coarse-thread Kreg Pocket-Hole Screws, as shown.
-
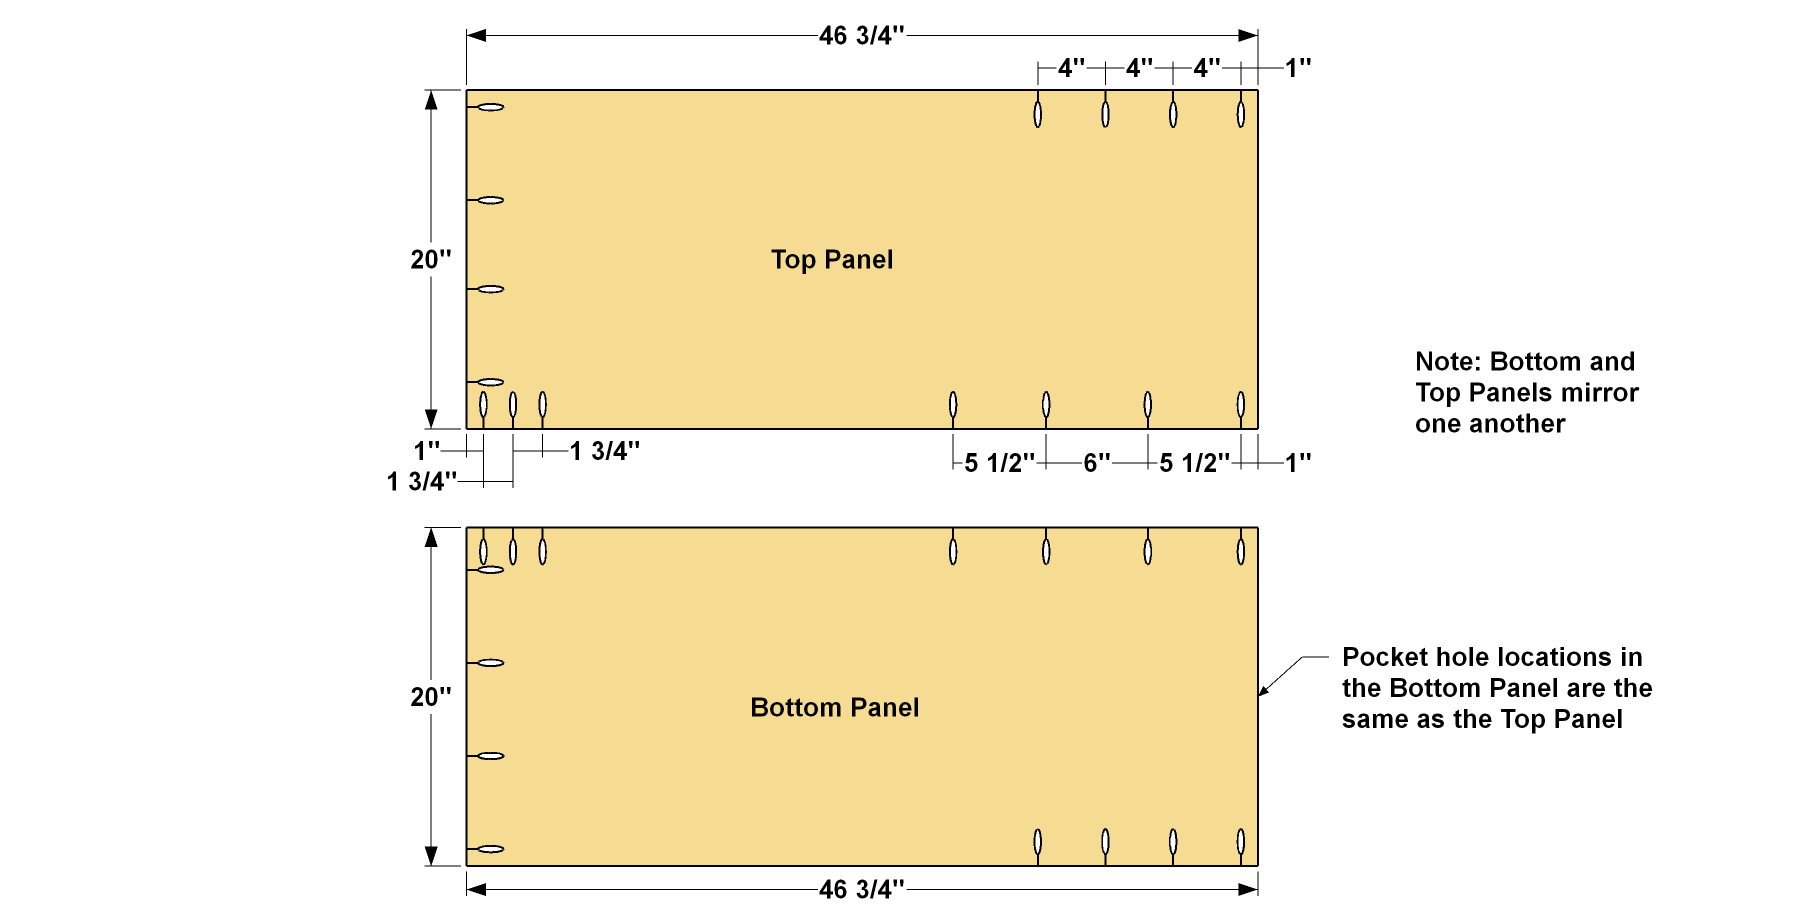
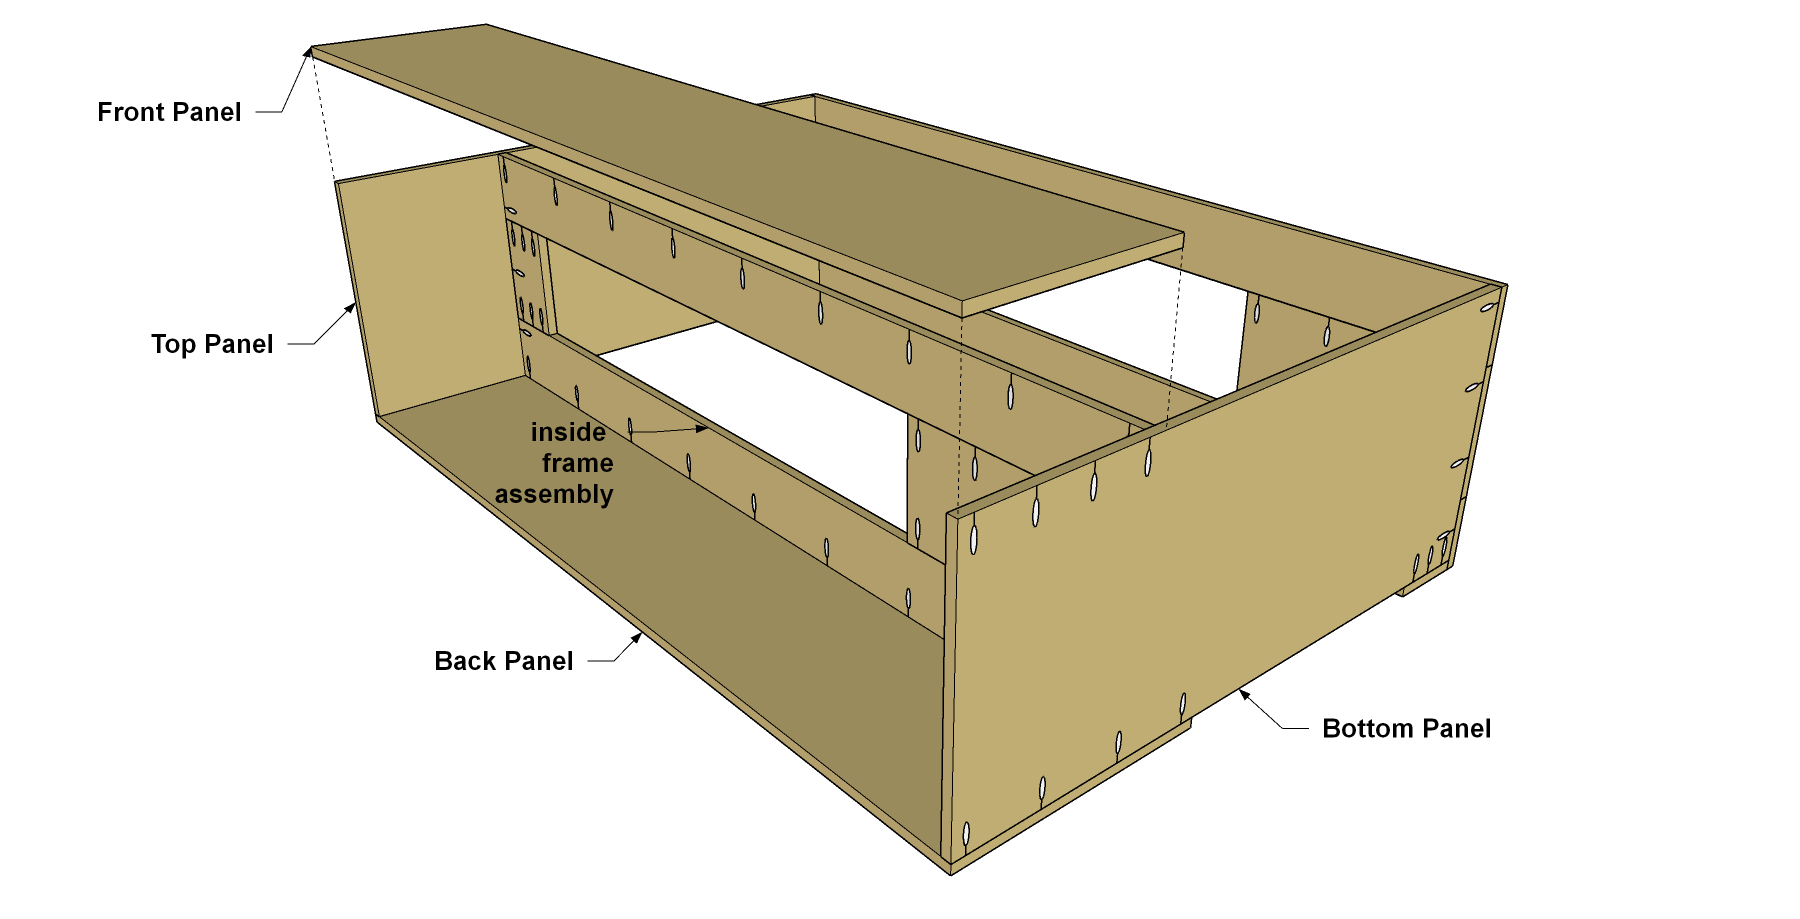
Make the Top, Bottom, Front and Back
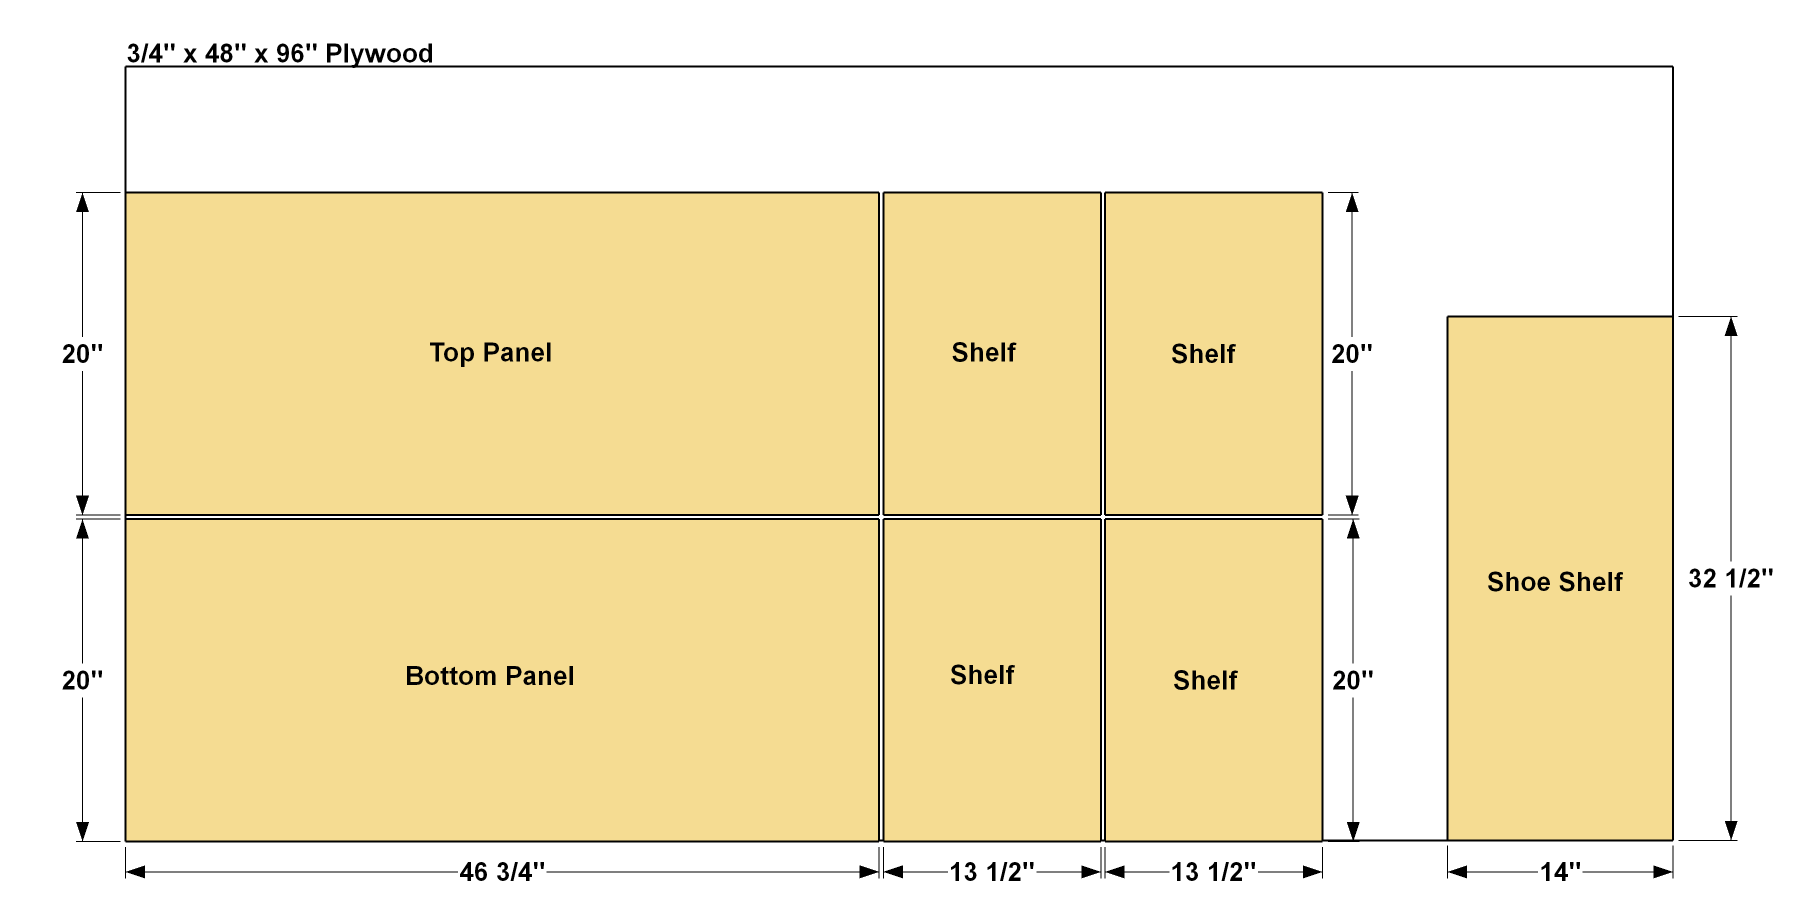
Cut one Top Panel and One Bottom Panel to size from 3/4" plywood, as shown in the cutting diagram. While you’re at it, you can cut the Back Panel and Front Panel, as well. For the moment, set the Back Panel and Front Panel aside. Next, lay out the location of the pocket holes in these panels, as shown. You’ll notice that these panels are “mirror images” of one another. For these panels, it’s more important to position the pocket holes at defined locations. So, take your time to lay them out. Then, drill all of the holes. Sand the pieces as needed.
-
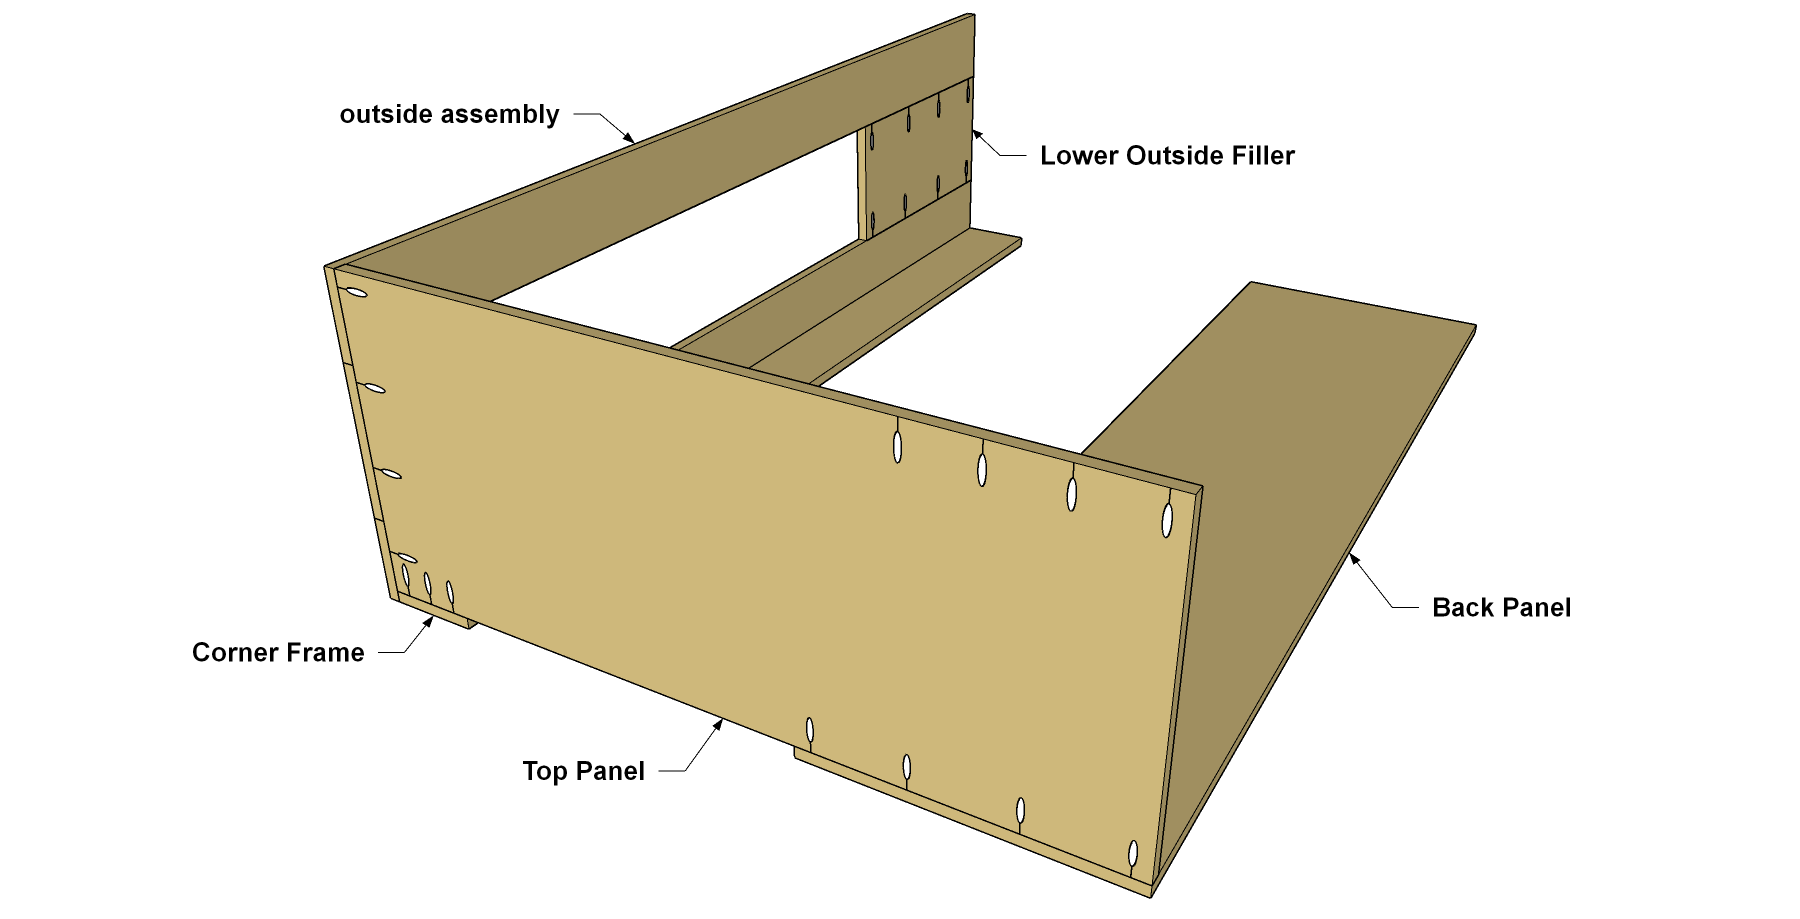
Start Case Assembly
Lay the Back Panel and the outside/corner assembly on a flat work surface, and then position the Top Panel as shown, and attach it to the Back and corner assembly using 1 1/4" coarse-thread Kreg Pocket-Hole Screws.
-
Create Inside Frame Fillers
Cut one Lower Inside Filler and one Upper Inside Filler to size from 3/4" plywood, as shown in the cutting diagram. With your pocket-hole jig still set for 3/4" thick material, drill pocket holes in the Fillers, as shown. Once again, the exact location of these pocket holes isn’t critical. Sand the pieces as needed.
-
Create the Inside Frames
Cut two Inside Frames to length for 1x6 boards, as shown in the cutting diagram. Drill pocket holes in each board at the locations shown. Sand the pieces as needed.
-
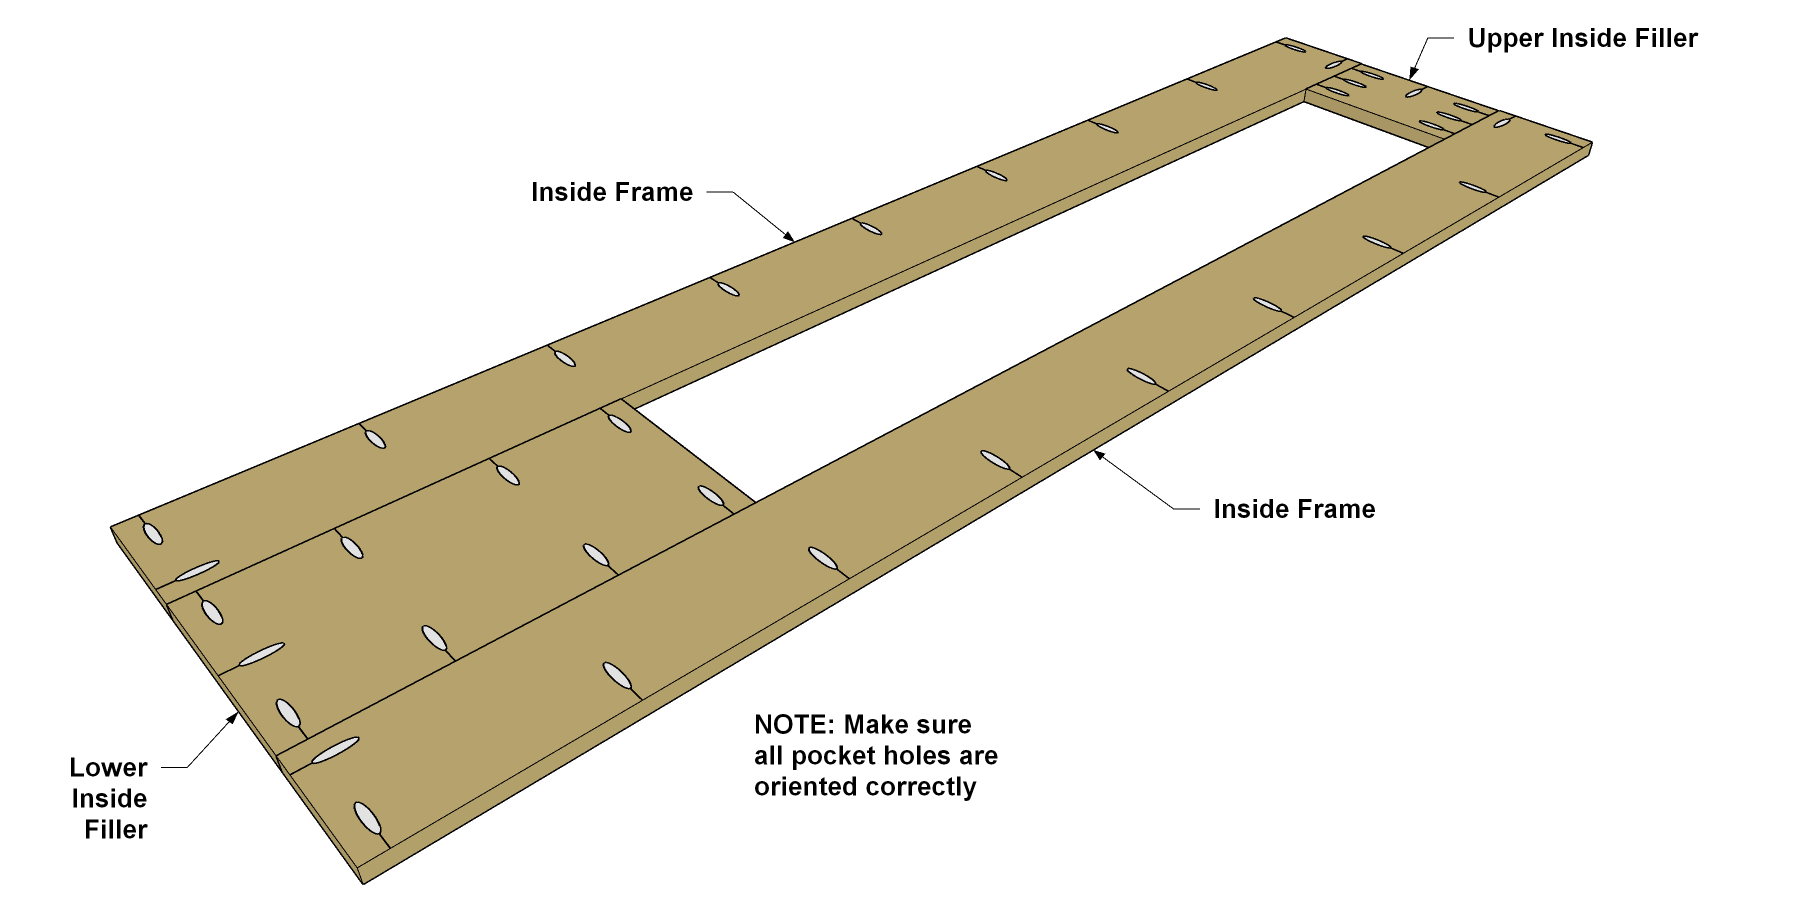
Assemble the Inside Frame
Now you can attach the Upper Inside Filler and Lower Inside Filler to the Inside Frames as shown using 1 1/4" coarse-thread Kreg Pocket-Hole Screws. Make sure that all of the pocket holes are oriented correctly before you screw everything together.
-
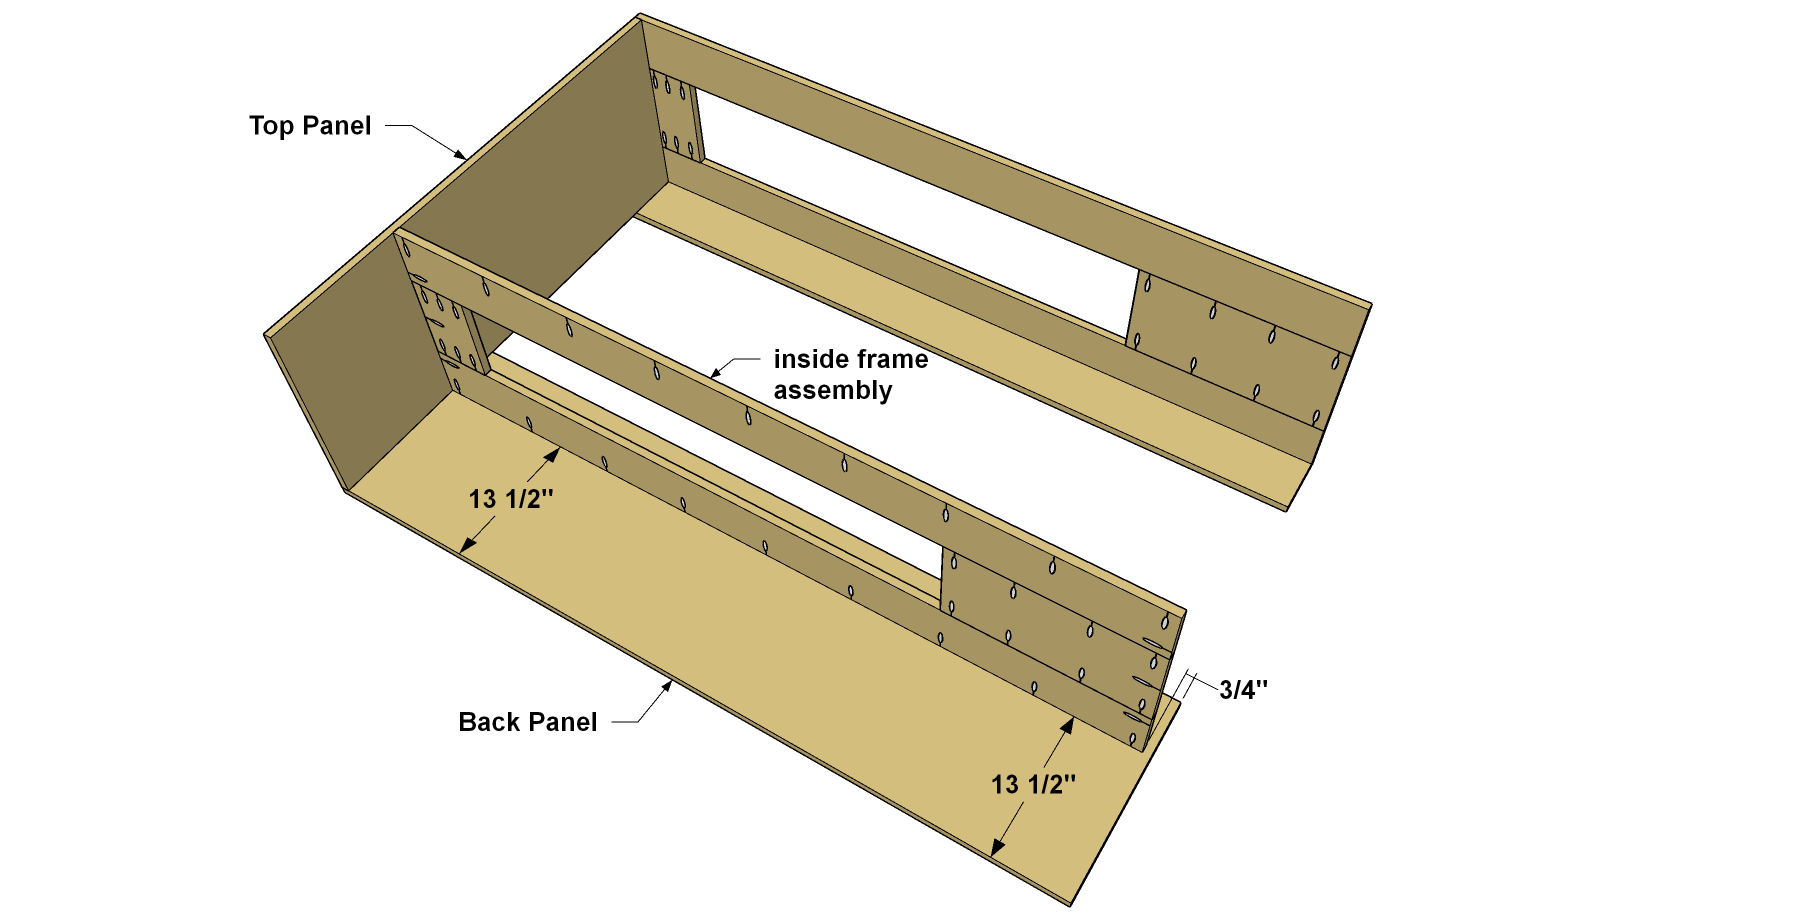
Attach the Inside Frame
Attach the inside frame assembly to the Top Panel and the Back Panel, as shown. Make sure that the frame is straight. You’ll see that this assembly stops 3/4" short of the lower end of the Back Panel. This is correct. The Bottom Panel will fit into this gap.
-
Attach the Bottom and Front
To complete the main case, you just need to attach the Bottom Panel and the Front Panel 1 1/4" coarse-thread Kreg Pocket-Hole Screws. Attach the Bottom first, then add the Front, as shown.
-
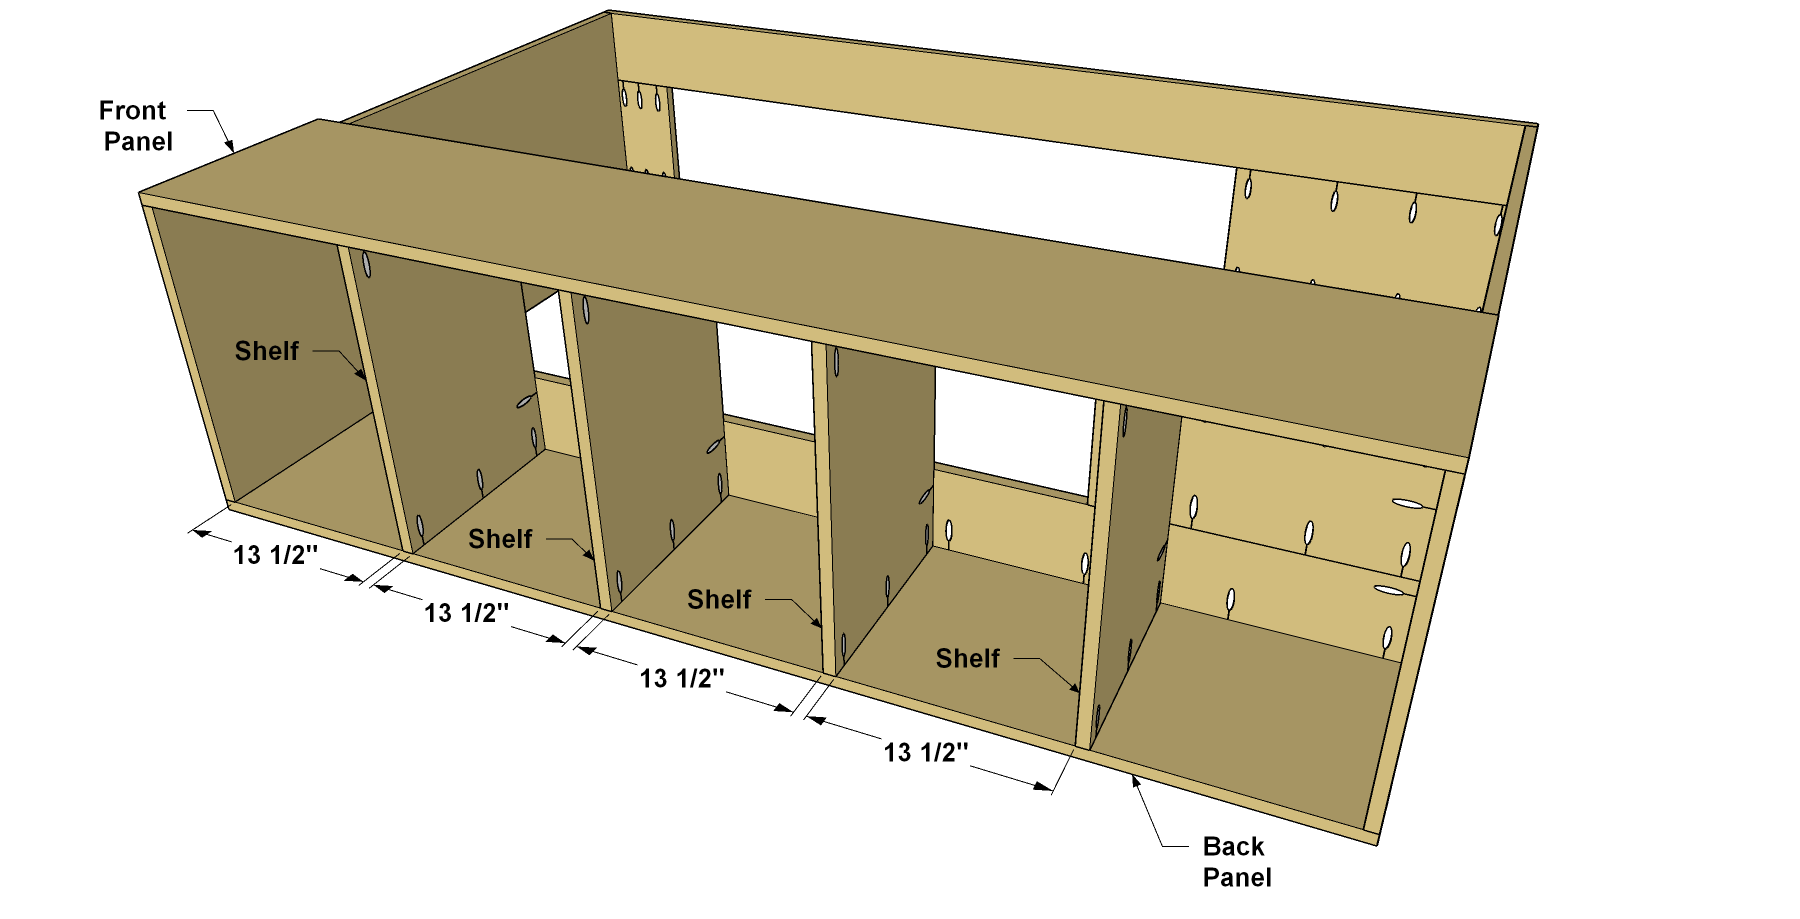
Make the Shelves
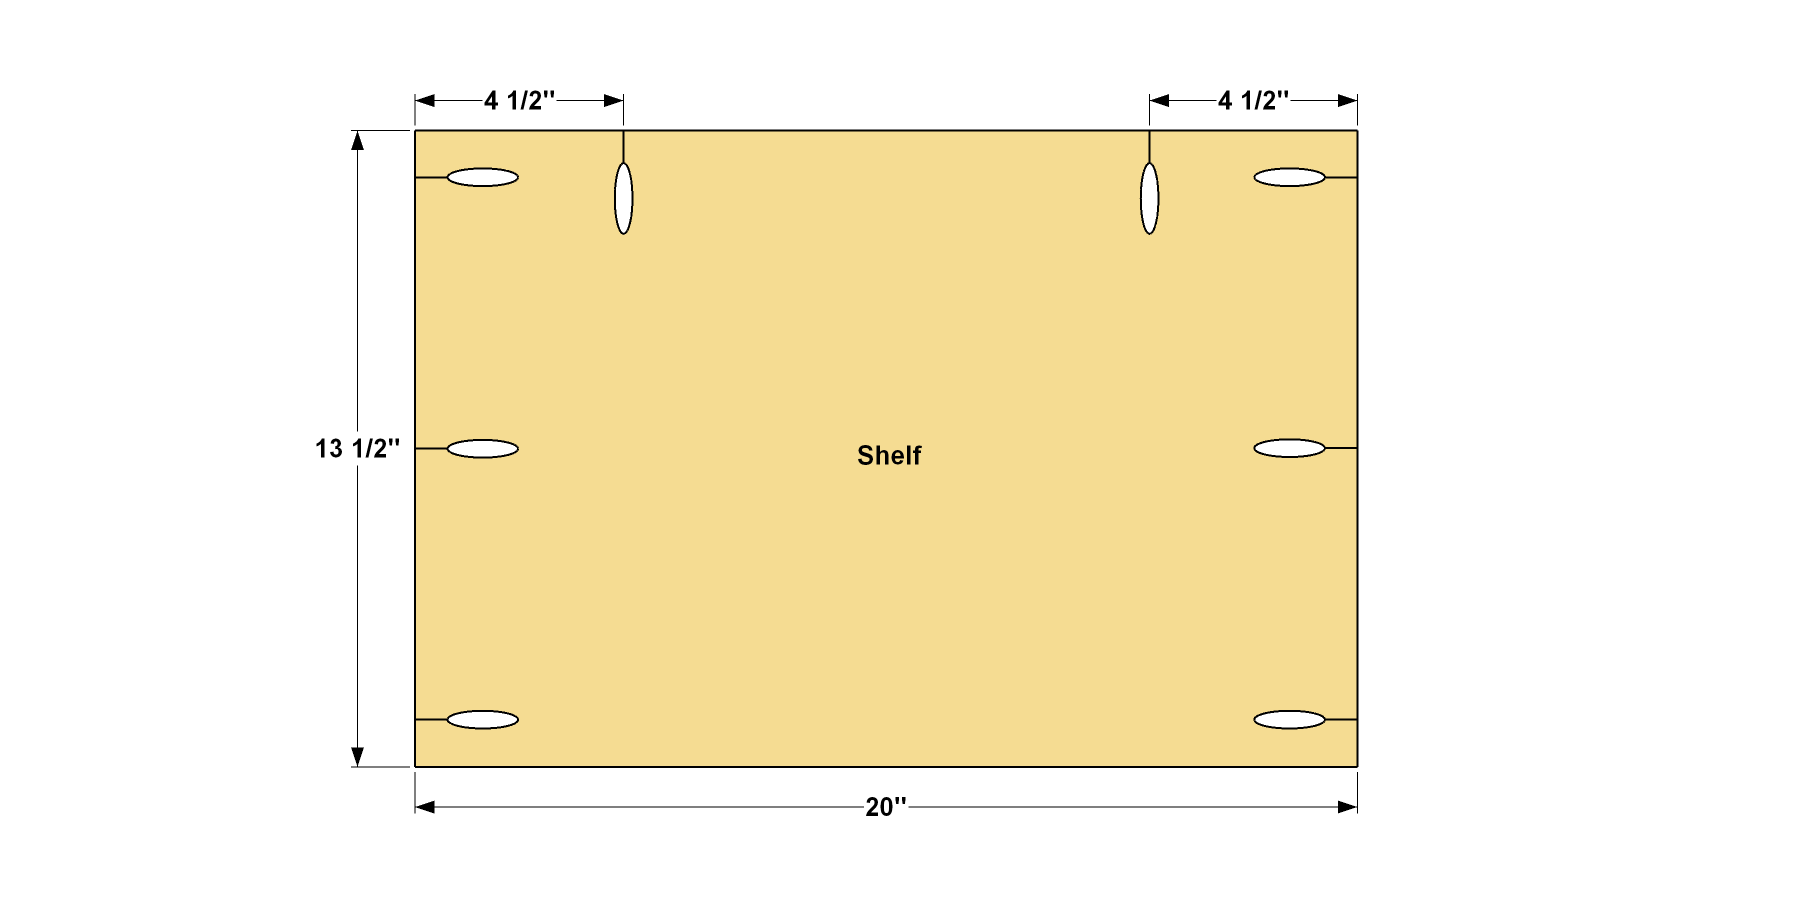
Next, it’s time to add a set of shelves that fit between the Front Panel and Back Panel. Cut four Shelves to size from 3/4" plywood, as shown in the cutting diagram. Then drill pocket holes on all four Shelves as shown. Pay attention to the two pocket holes along the back edge. They need to be within 4 1/2" of the Shelf ends so that the screws will hit the Inside Frames when you install the Shelves. Sand the pieces as needed.
-
Install the Shelves
Position the Shelves at the locations shown, and then secure them to the Front, Back, and Inside Frames using 1 1/4" coarse-thread Kreg Pocket-Hole Screws.
-
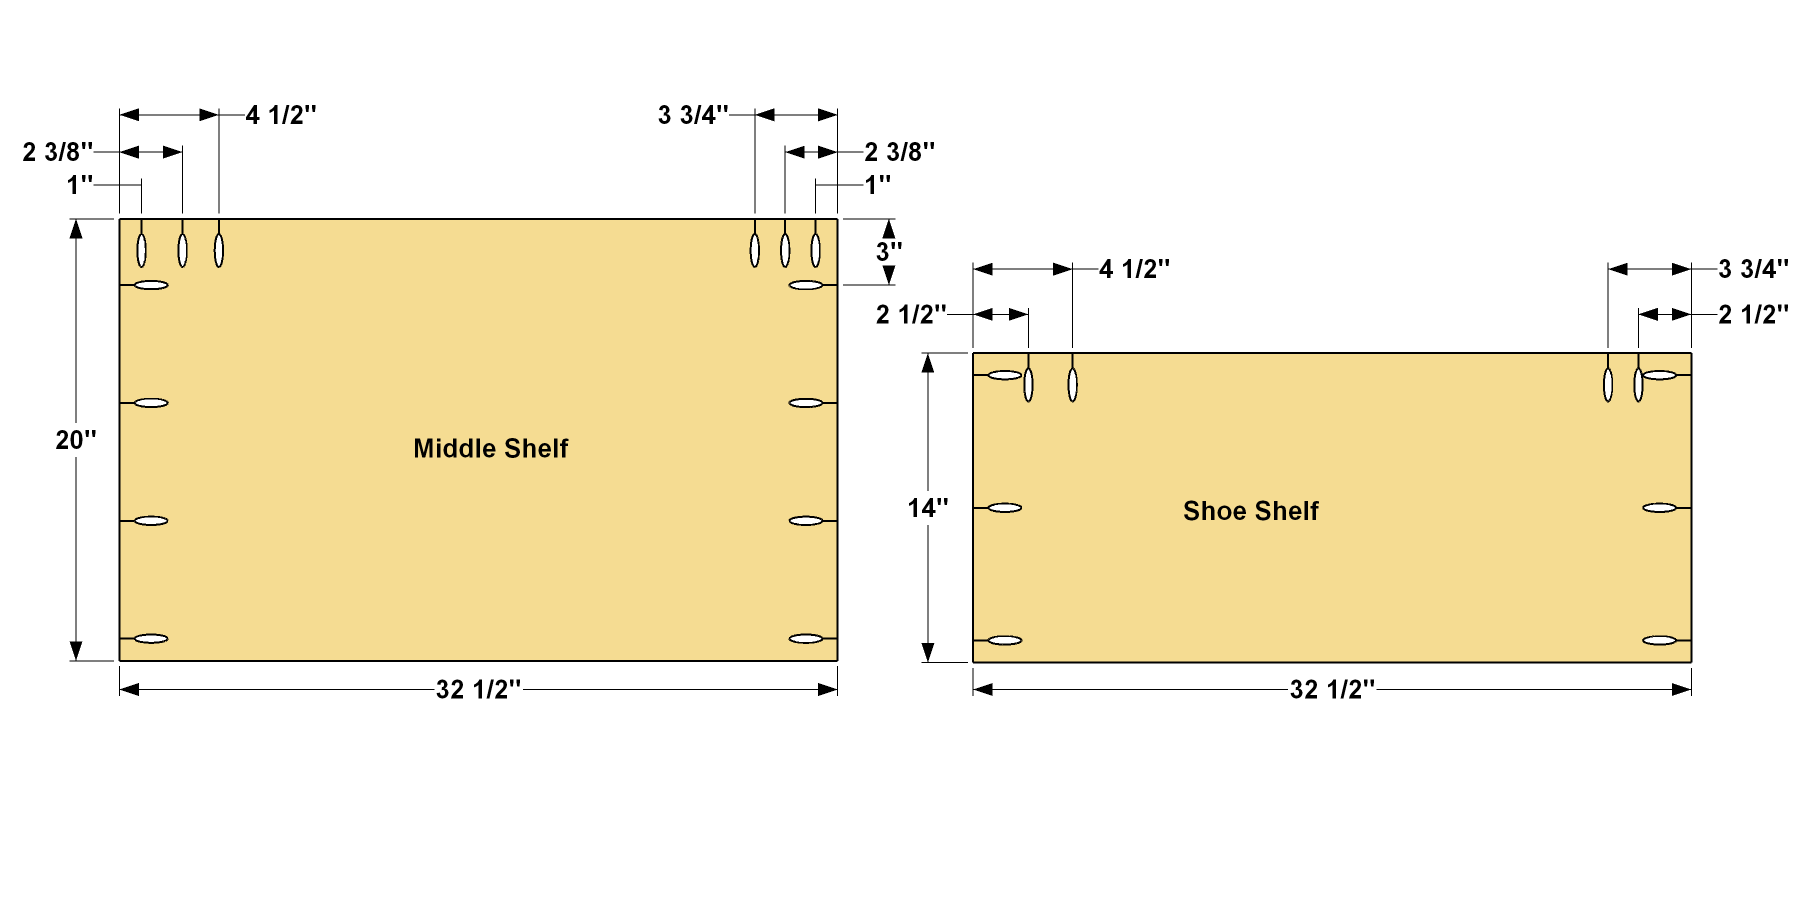
Make the Remaining Shelves
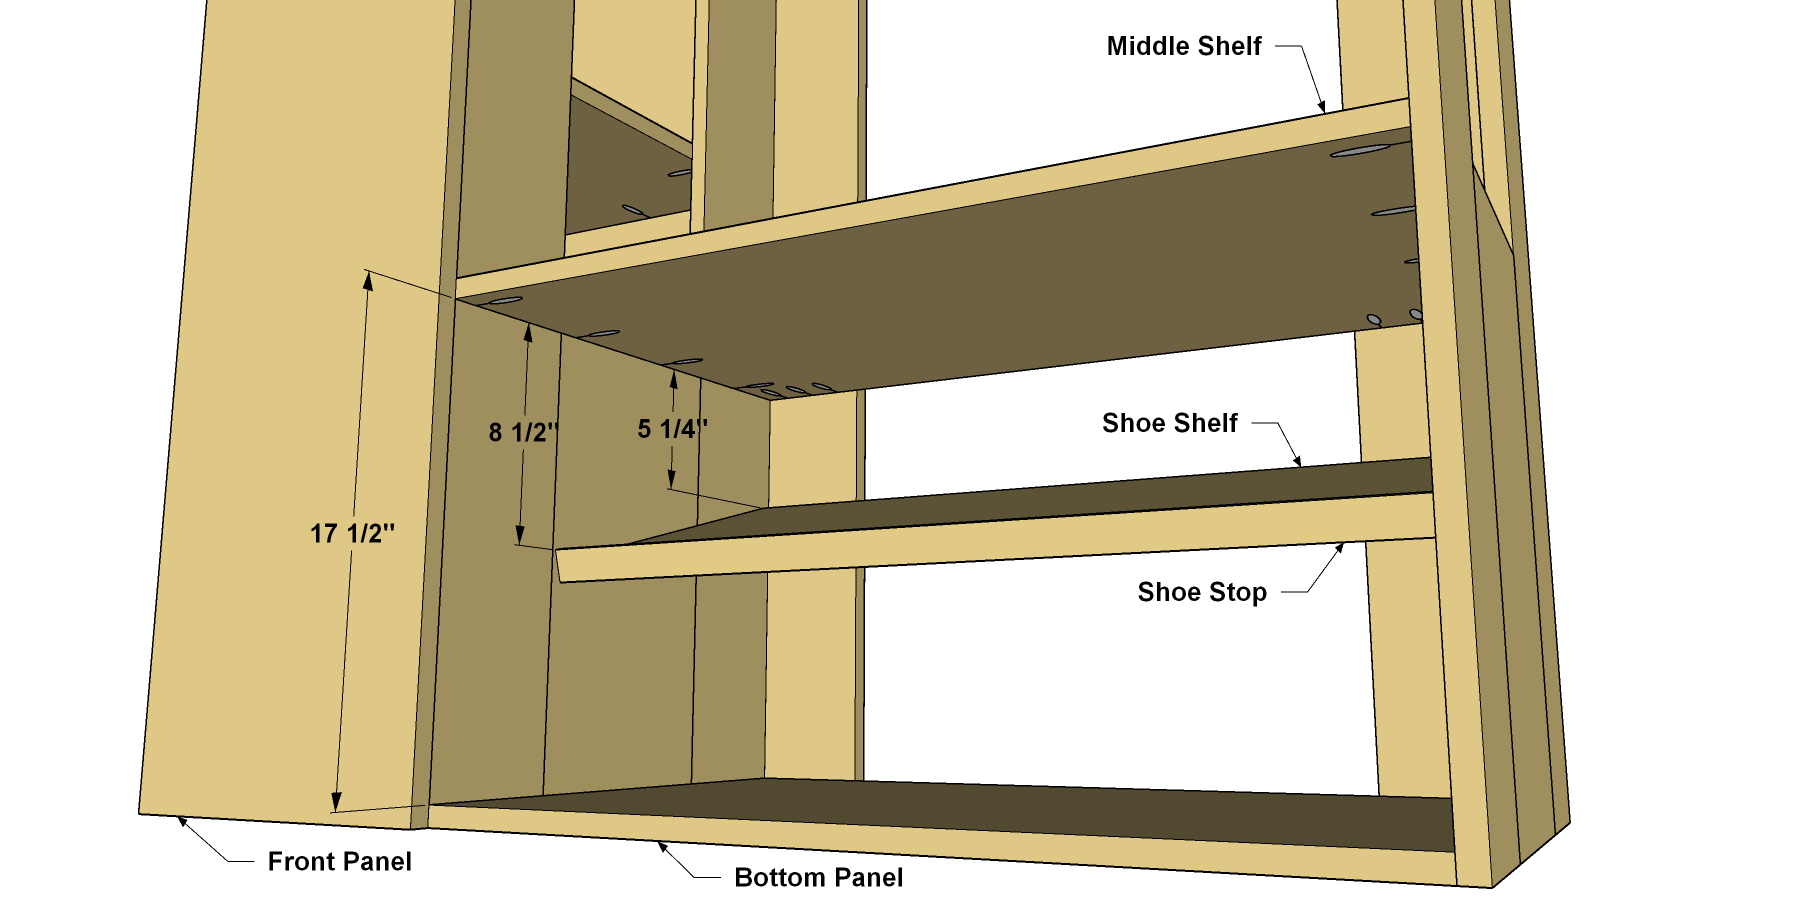
The last additions to the freestanding closet are another set of Shelves: The Middle Shelf and Shoe Shelf. Cut these Shelves to size from 3/4" plywood, as shown in the cutting diagram. Drill pocket holes in the Shelves where shown. Pay attention to the location of the pocket holes along the rear edge of each shelf. Also cut one Shoe Stop from 1/4" x 1 1/4" Pine lattice, as shown in the cutting diagram. Glue and nail the Shoe Stop to the front edge of the Shoe Shelf so it sticks up above the surface. This will prevent shoes from sliding off the shelf, which gets installed at an angle. Sand the pieces as needed.
-
Install the Remaining Shelves
Attach the Middle Shelf at the location shown using 1 1/4" coarse-thread Kreg Pocket-Hole Screws. Then position the Shoe shelf (with the Short Stop pointing upward) and attach it as well.
-
Paint and Add Optional Edging
With the assembly complete, you can decide how you want to finish your freestanding closet. We chose to paint the flat surfaces, and leave the edges natural. This provides a cool look, but the exposed plywood edges don’t look as good as the solid-wood edges. If you want to cover them up, just cut pieces of screen molding, and then glue and nail them to these plywood edges. We applied it to the edges of the Front and Back Panel, the Top and Bottom, the four Shelves, and the exposed edges of the Middle and Shoe Shelves. Cut a piece of Pine Screen Molding to fit the exposed edge of each plywood piece.