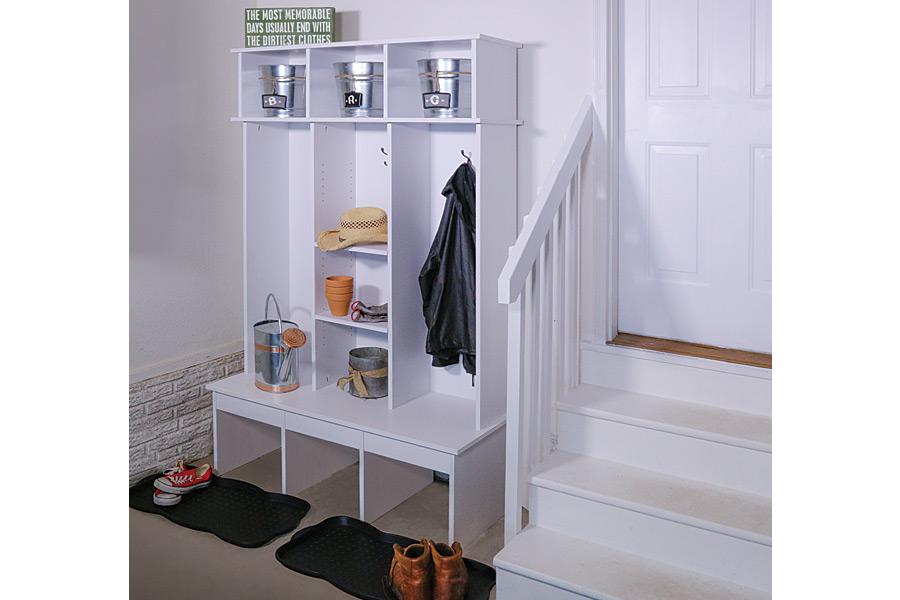
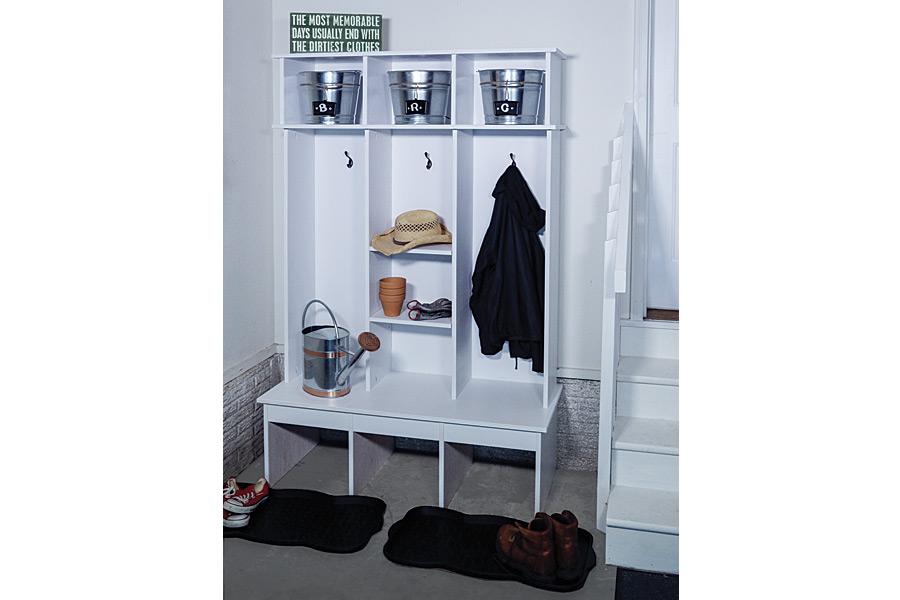


This entryway organizer hold coats, hats, gloves, and more to keep clutter under control, and looks great doing it. You can build one yourself using several basic tools, a few pieces of plywood, one board and some inexpensive molding. With a shelf-pin jig, and you can add adjustable shelves, too.
Tools
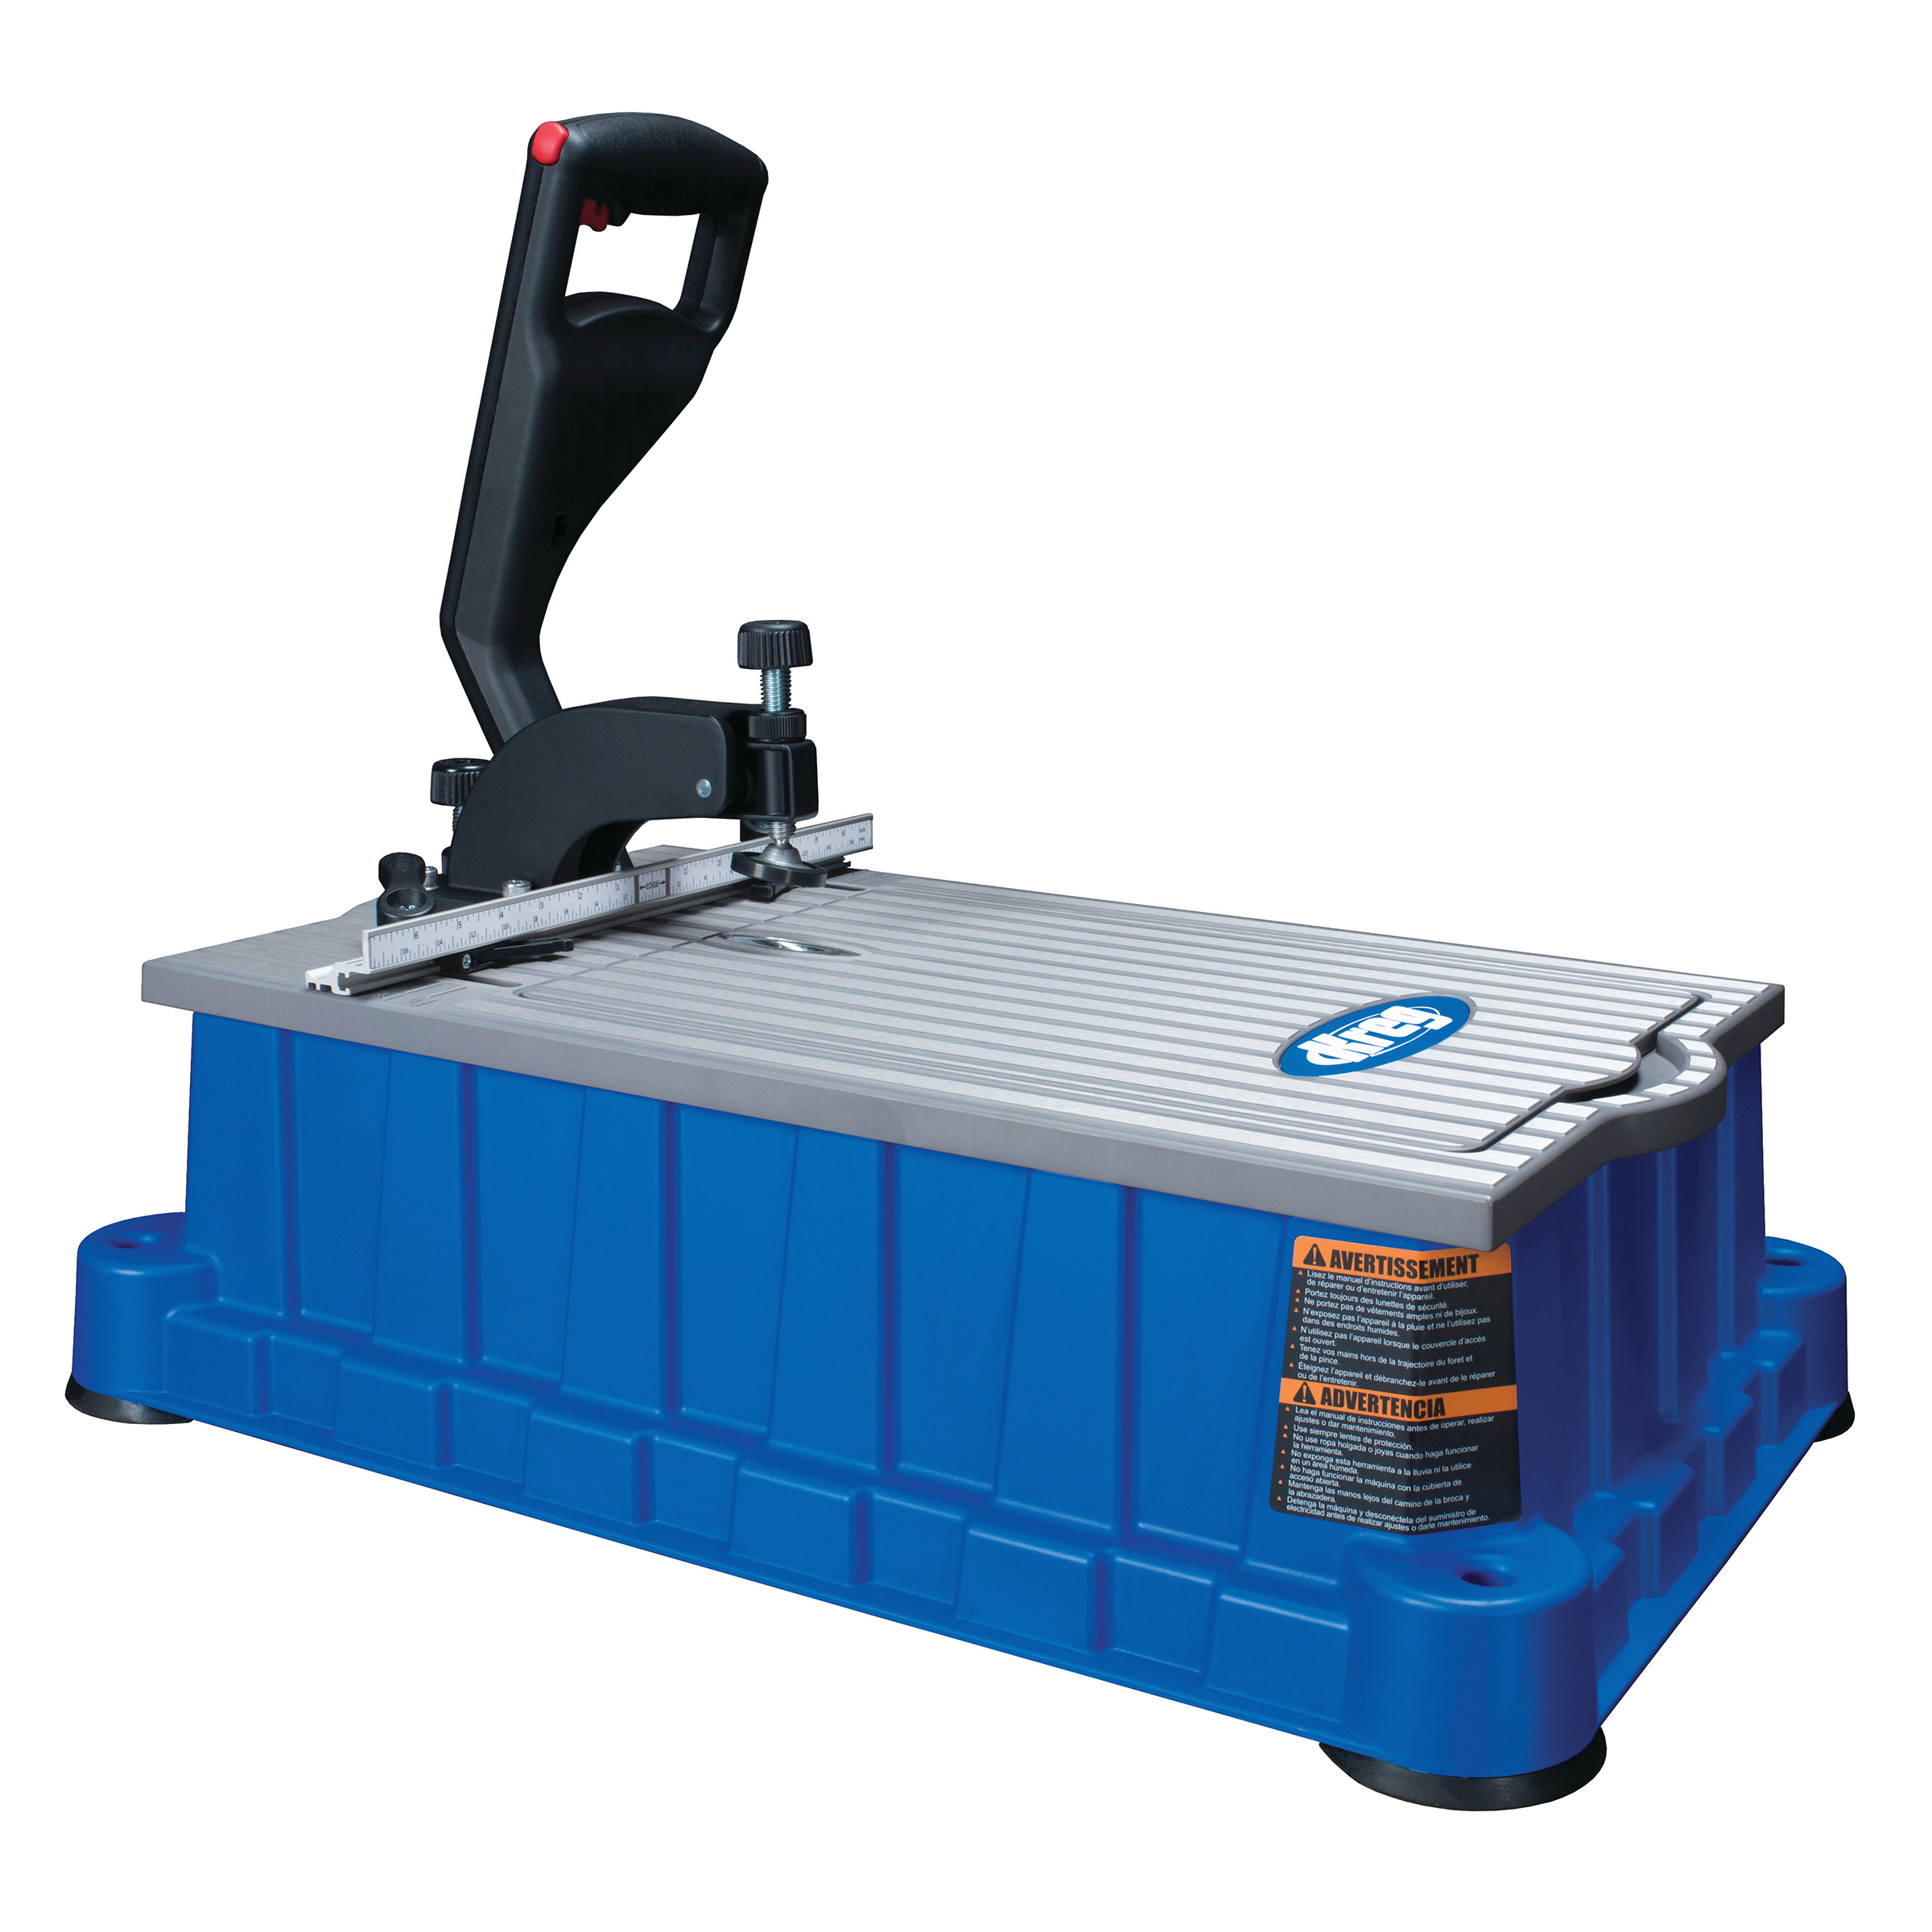
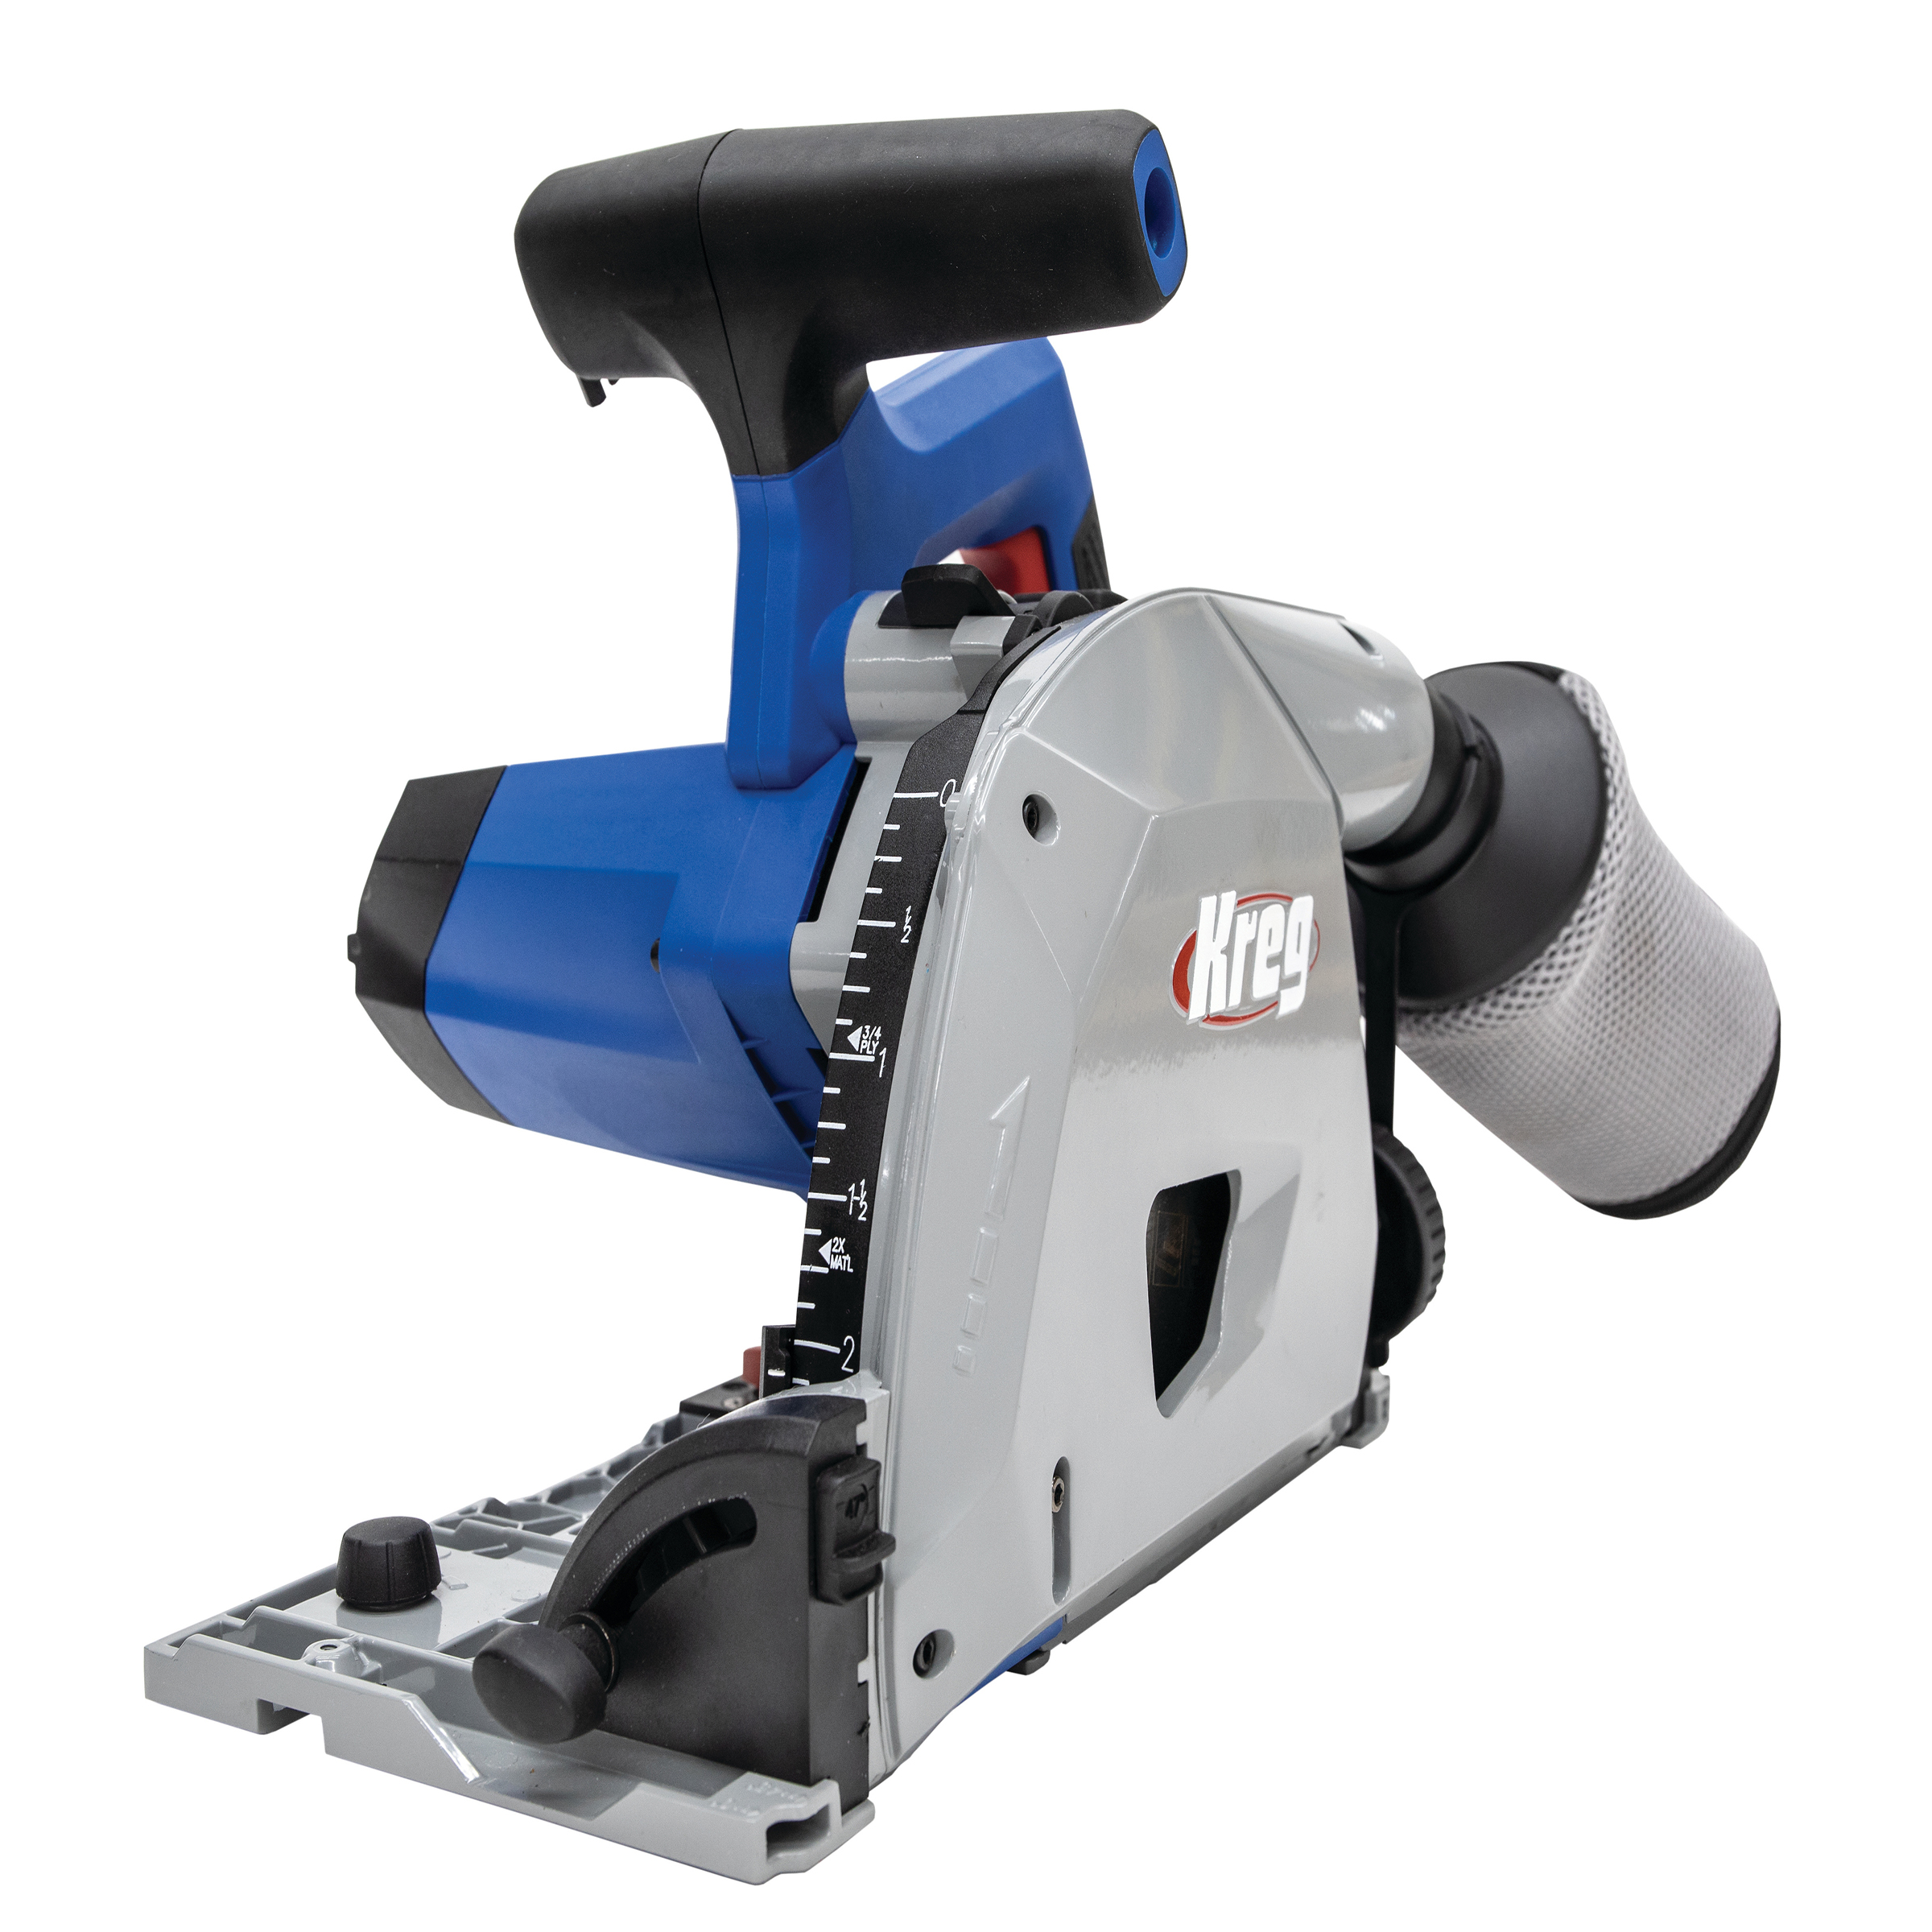
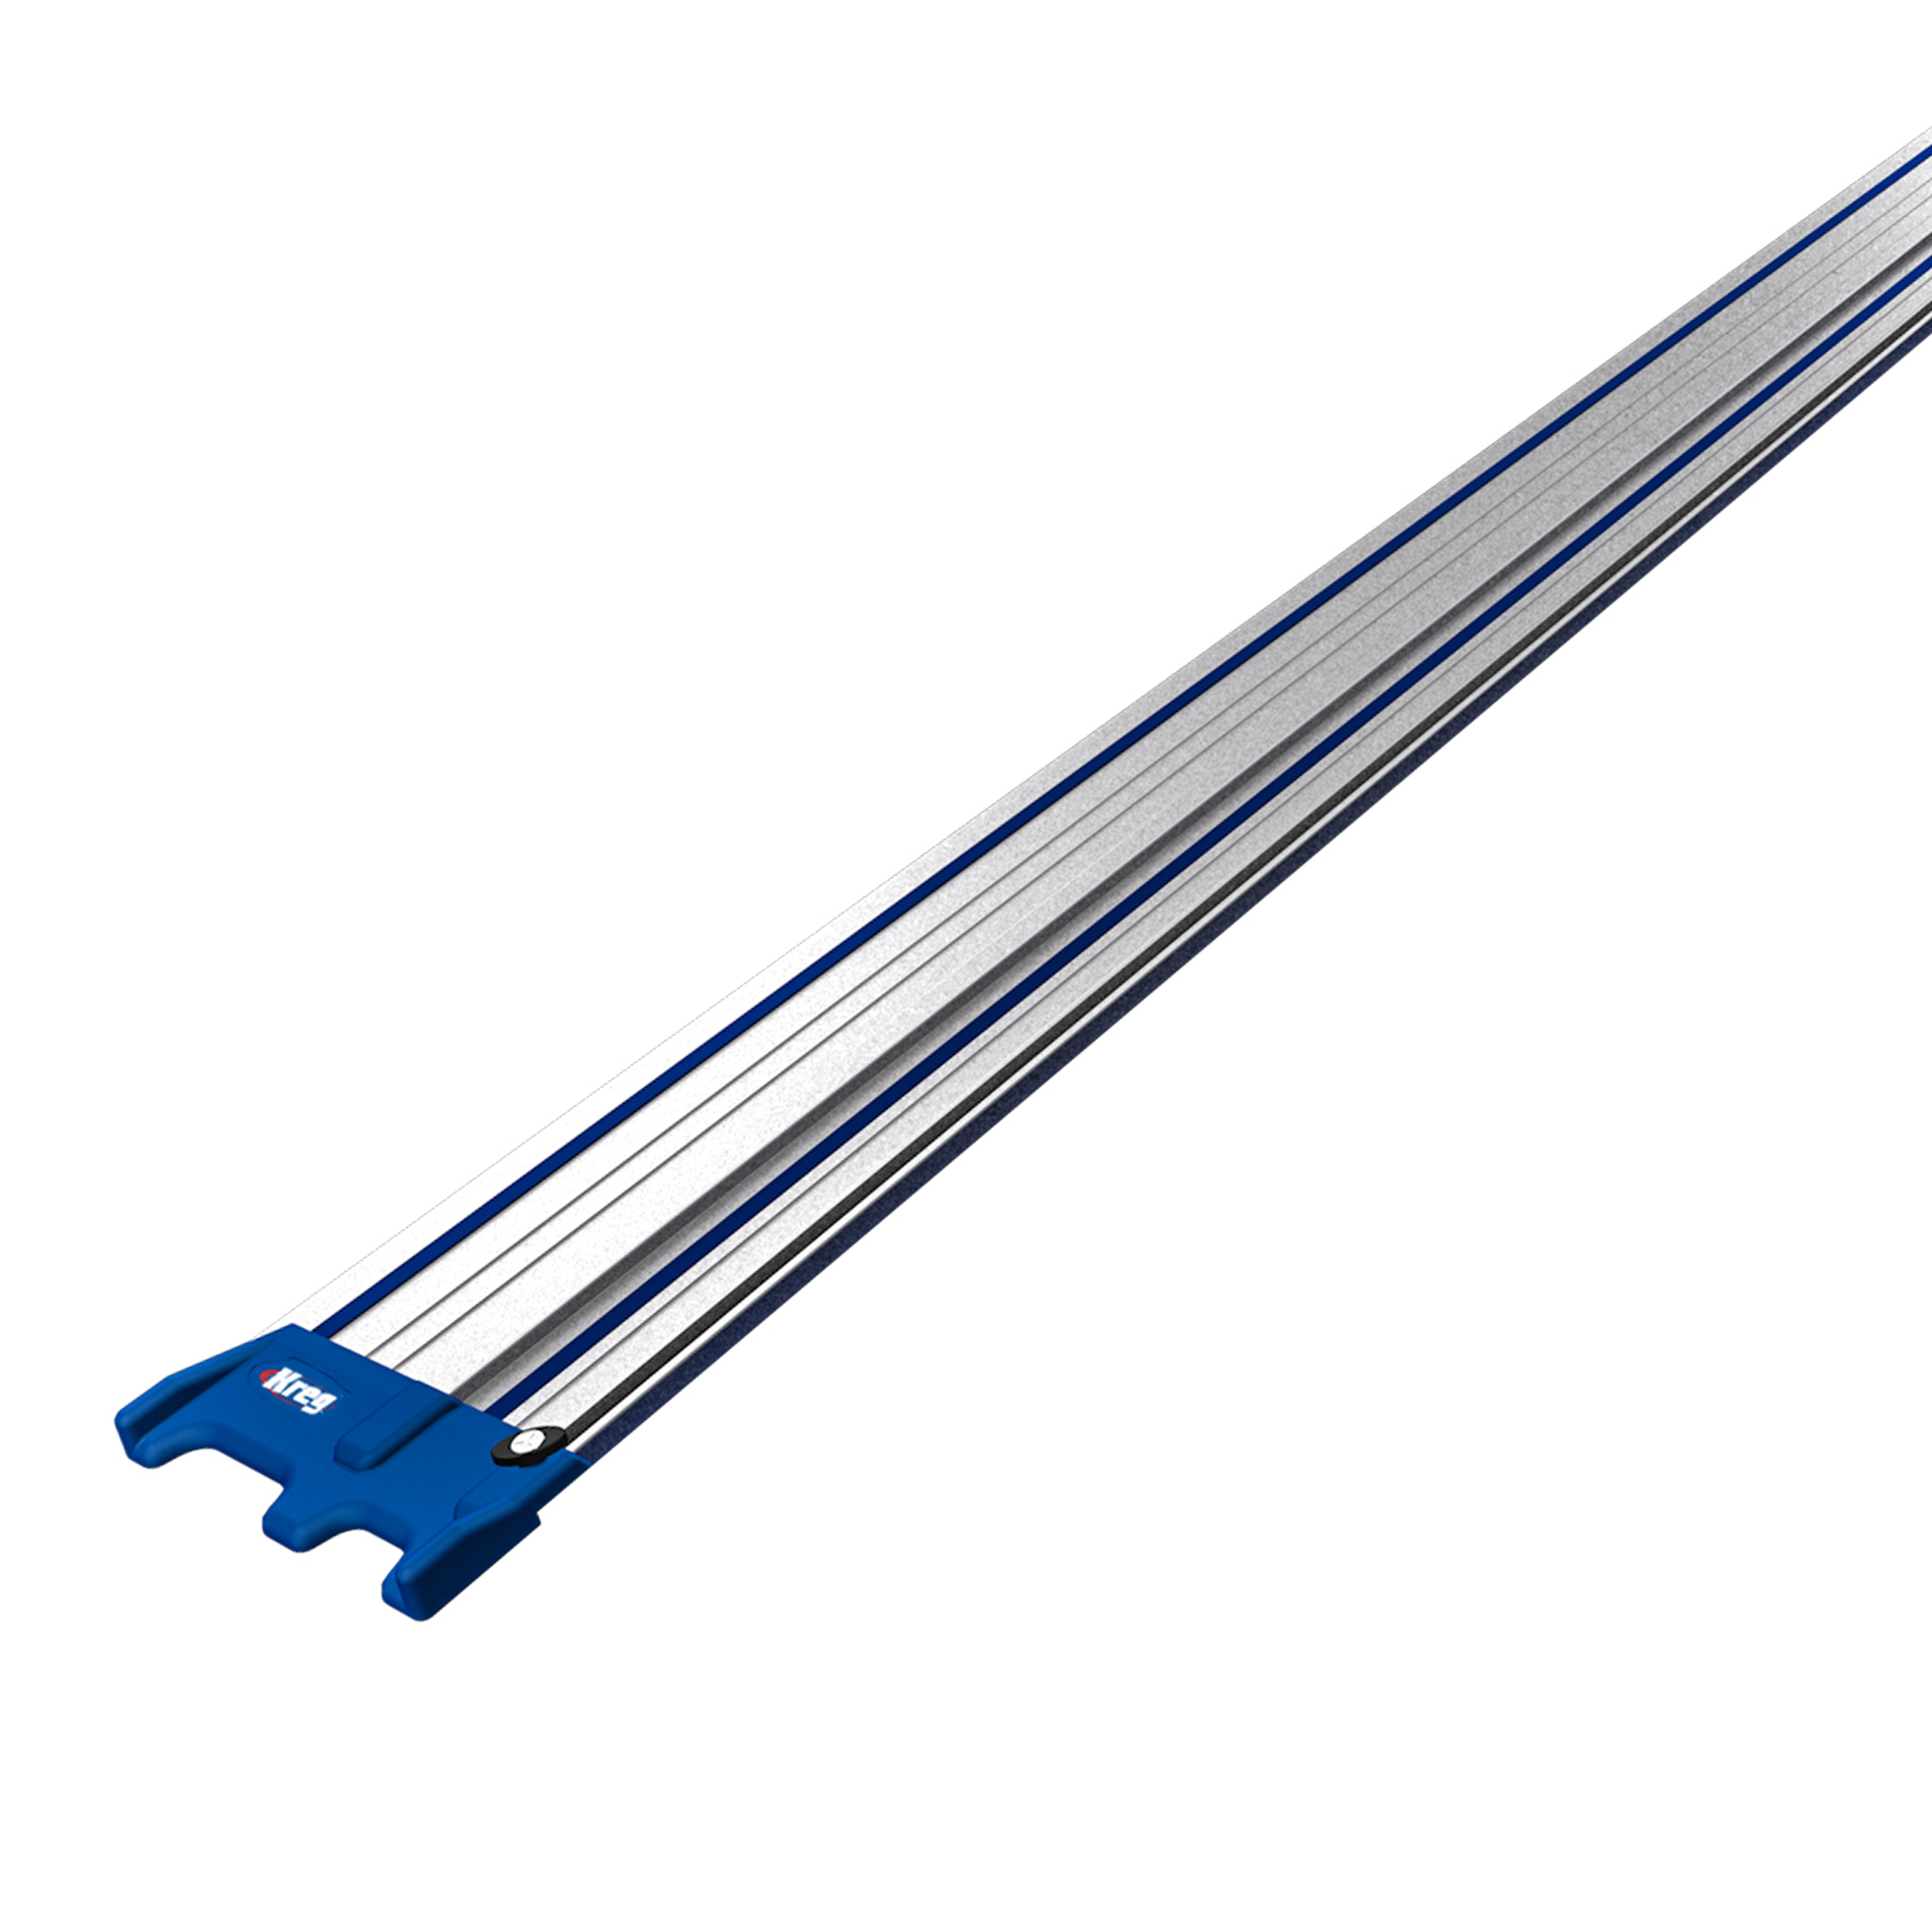
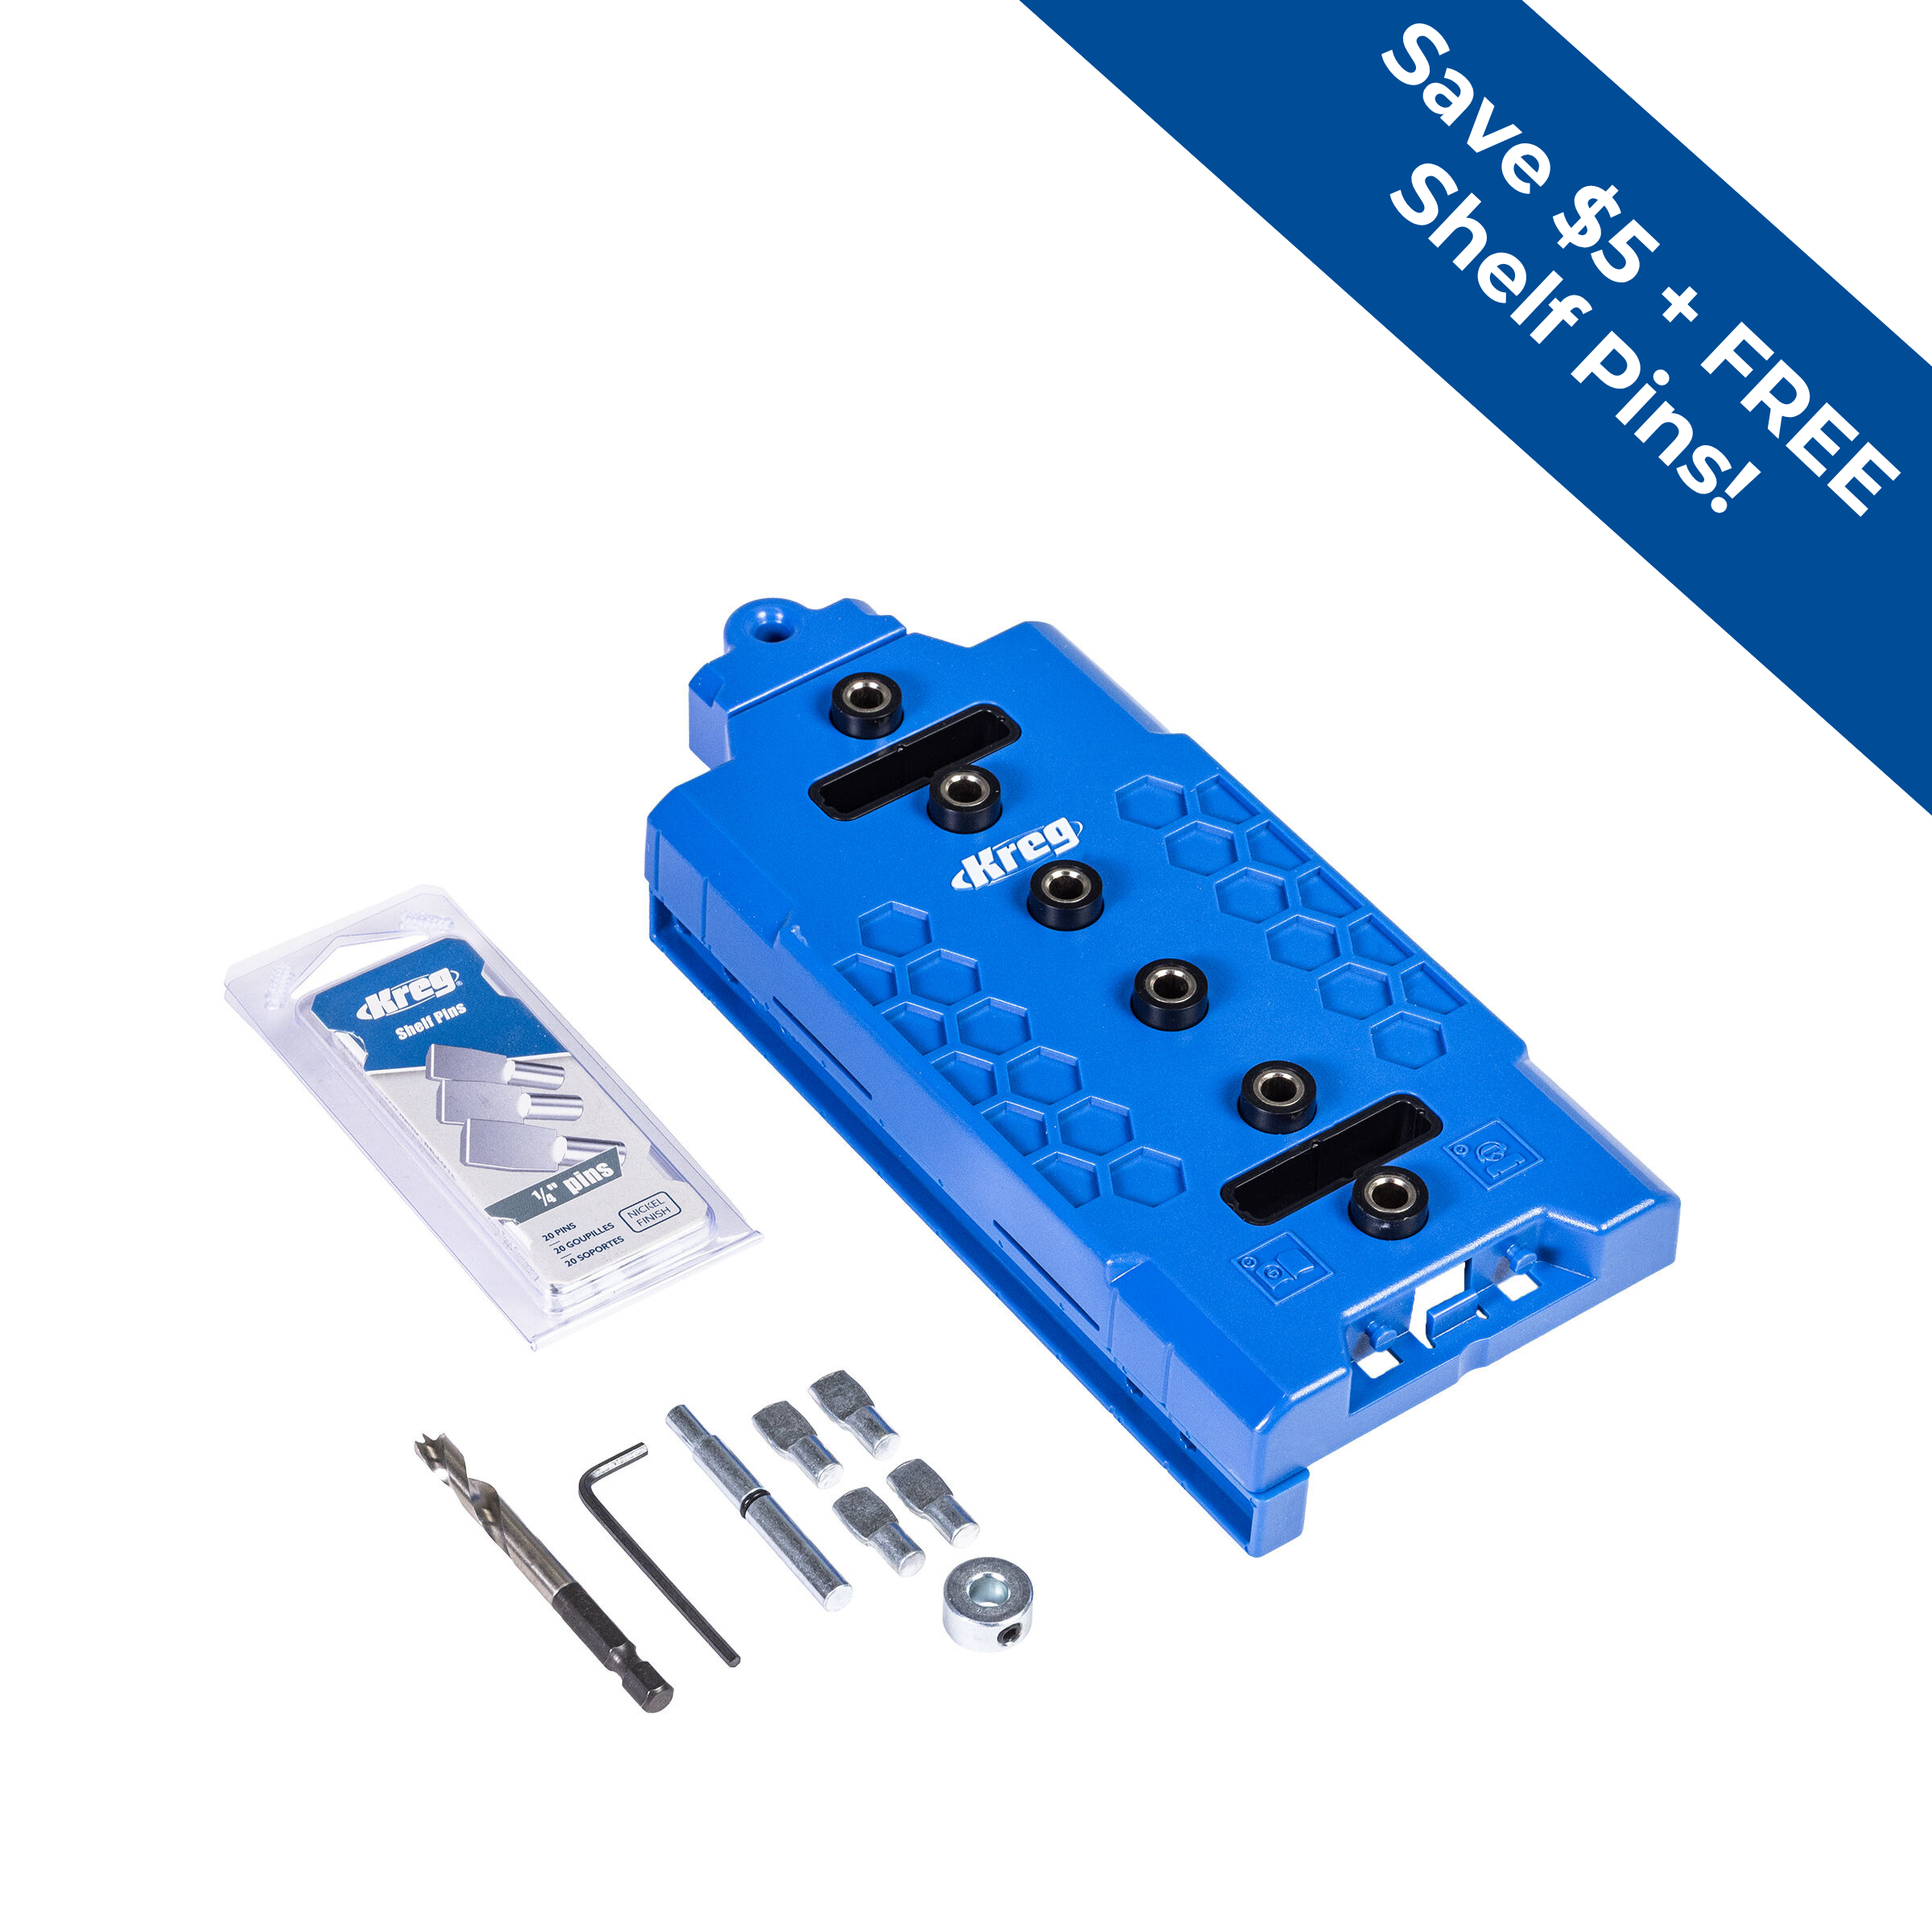
Kreg Tools


Other Tools
-
tape measure

-
hammer or brad nailer
Materials
Wood Products
- 2 Plywood , 3/4" x 48" x 96"
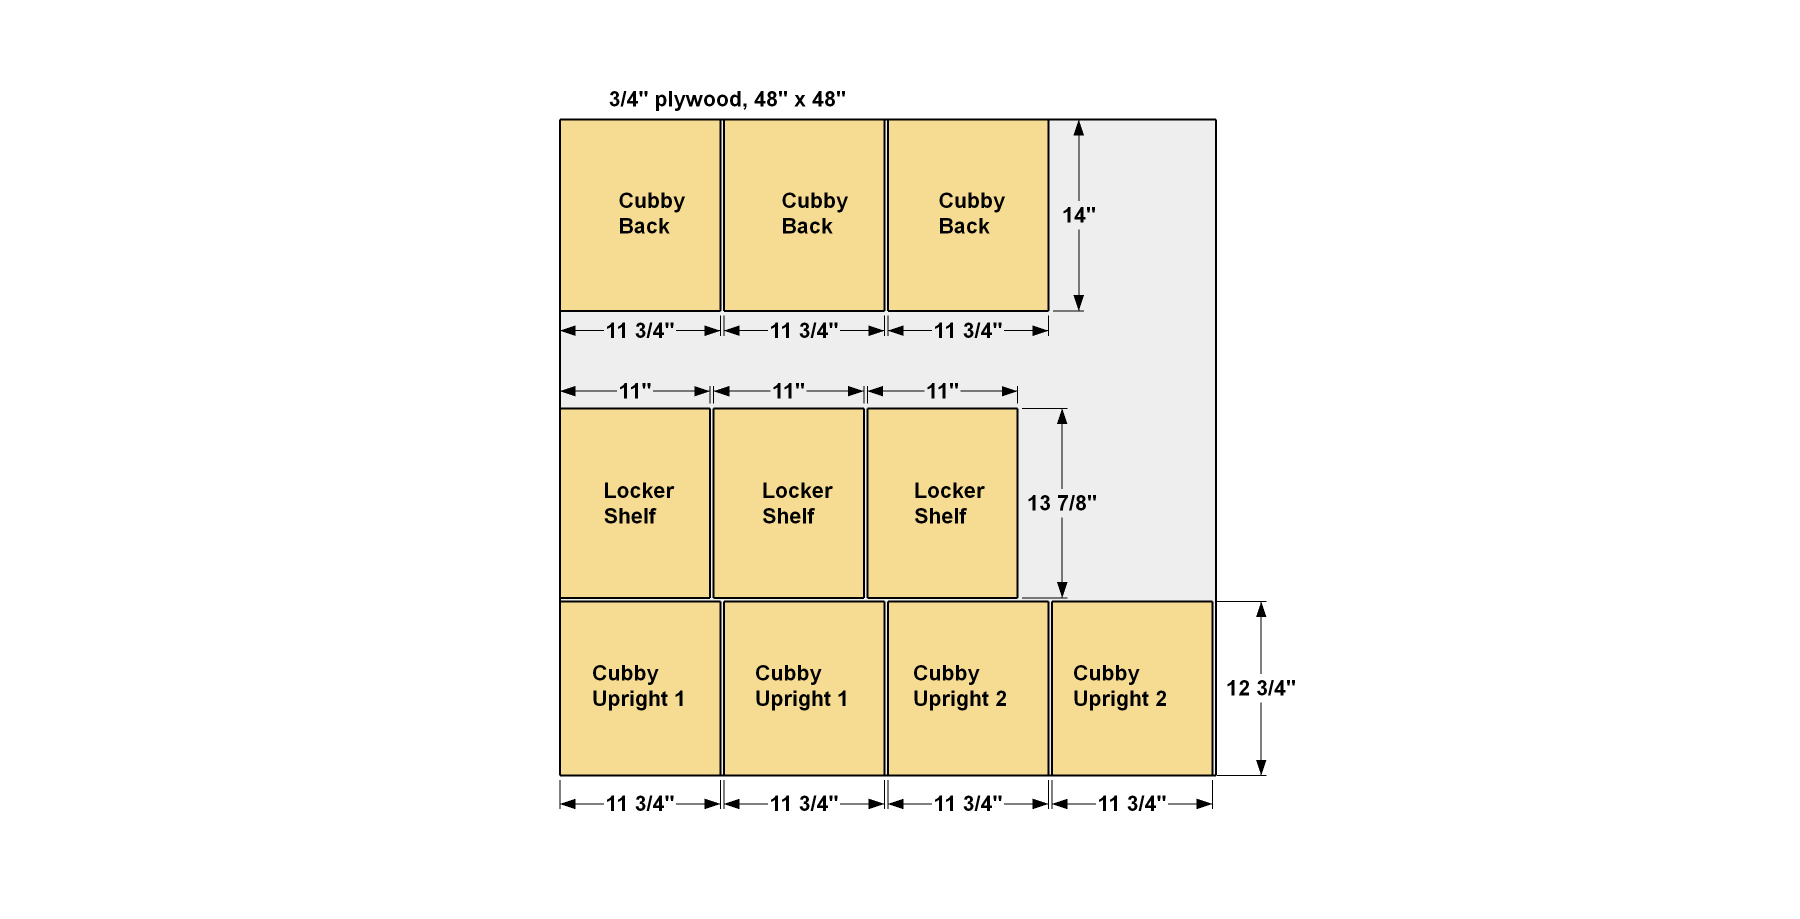
- 1 Plywood , 3/4" x 48" x 48"
- 1 Board , 1x4 x 48"
- 6 Screen molding , 1/4" x 3/4" x 96"
Hardware & Supplies
- 124 1 1/4" coarse-thread Kreg Pocket-Hole Screws
- 4 2" flat-head wood screws
- 50 1" 18-gauge brad nails
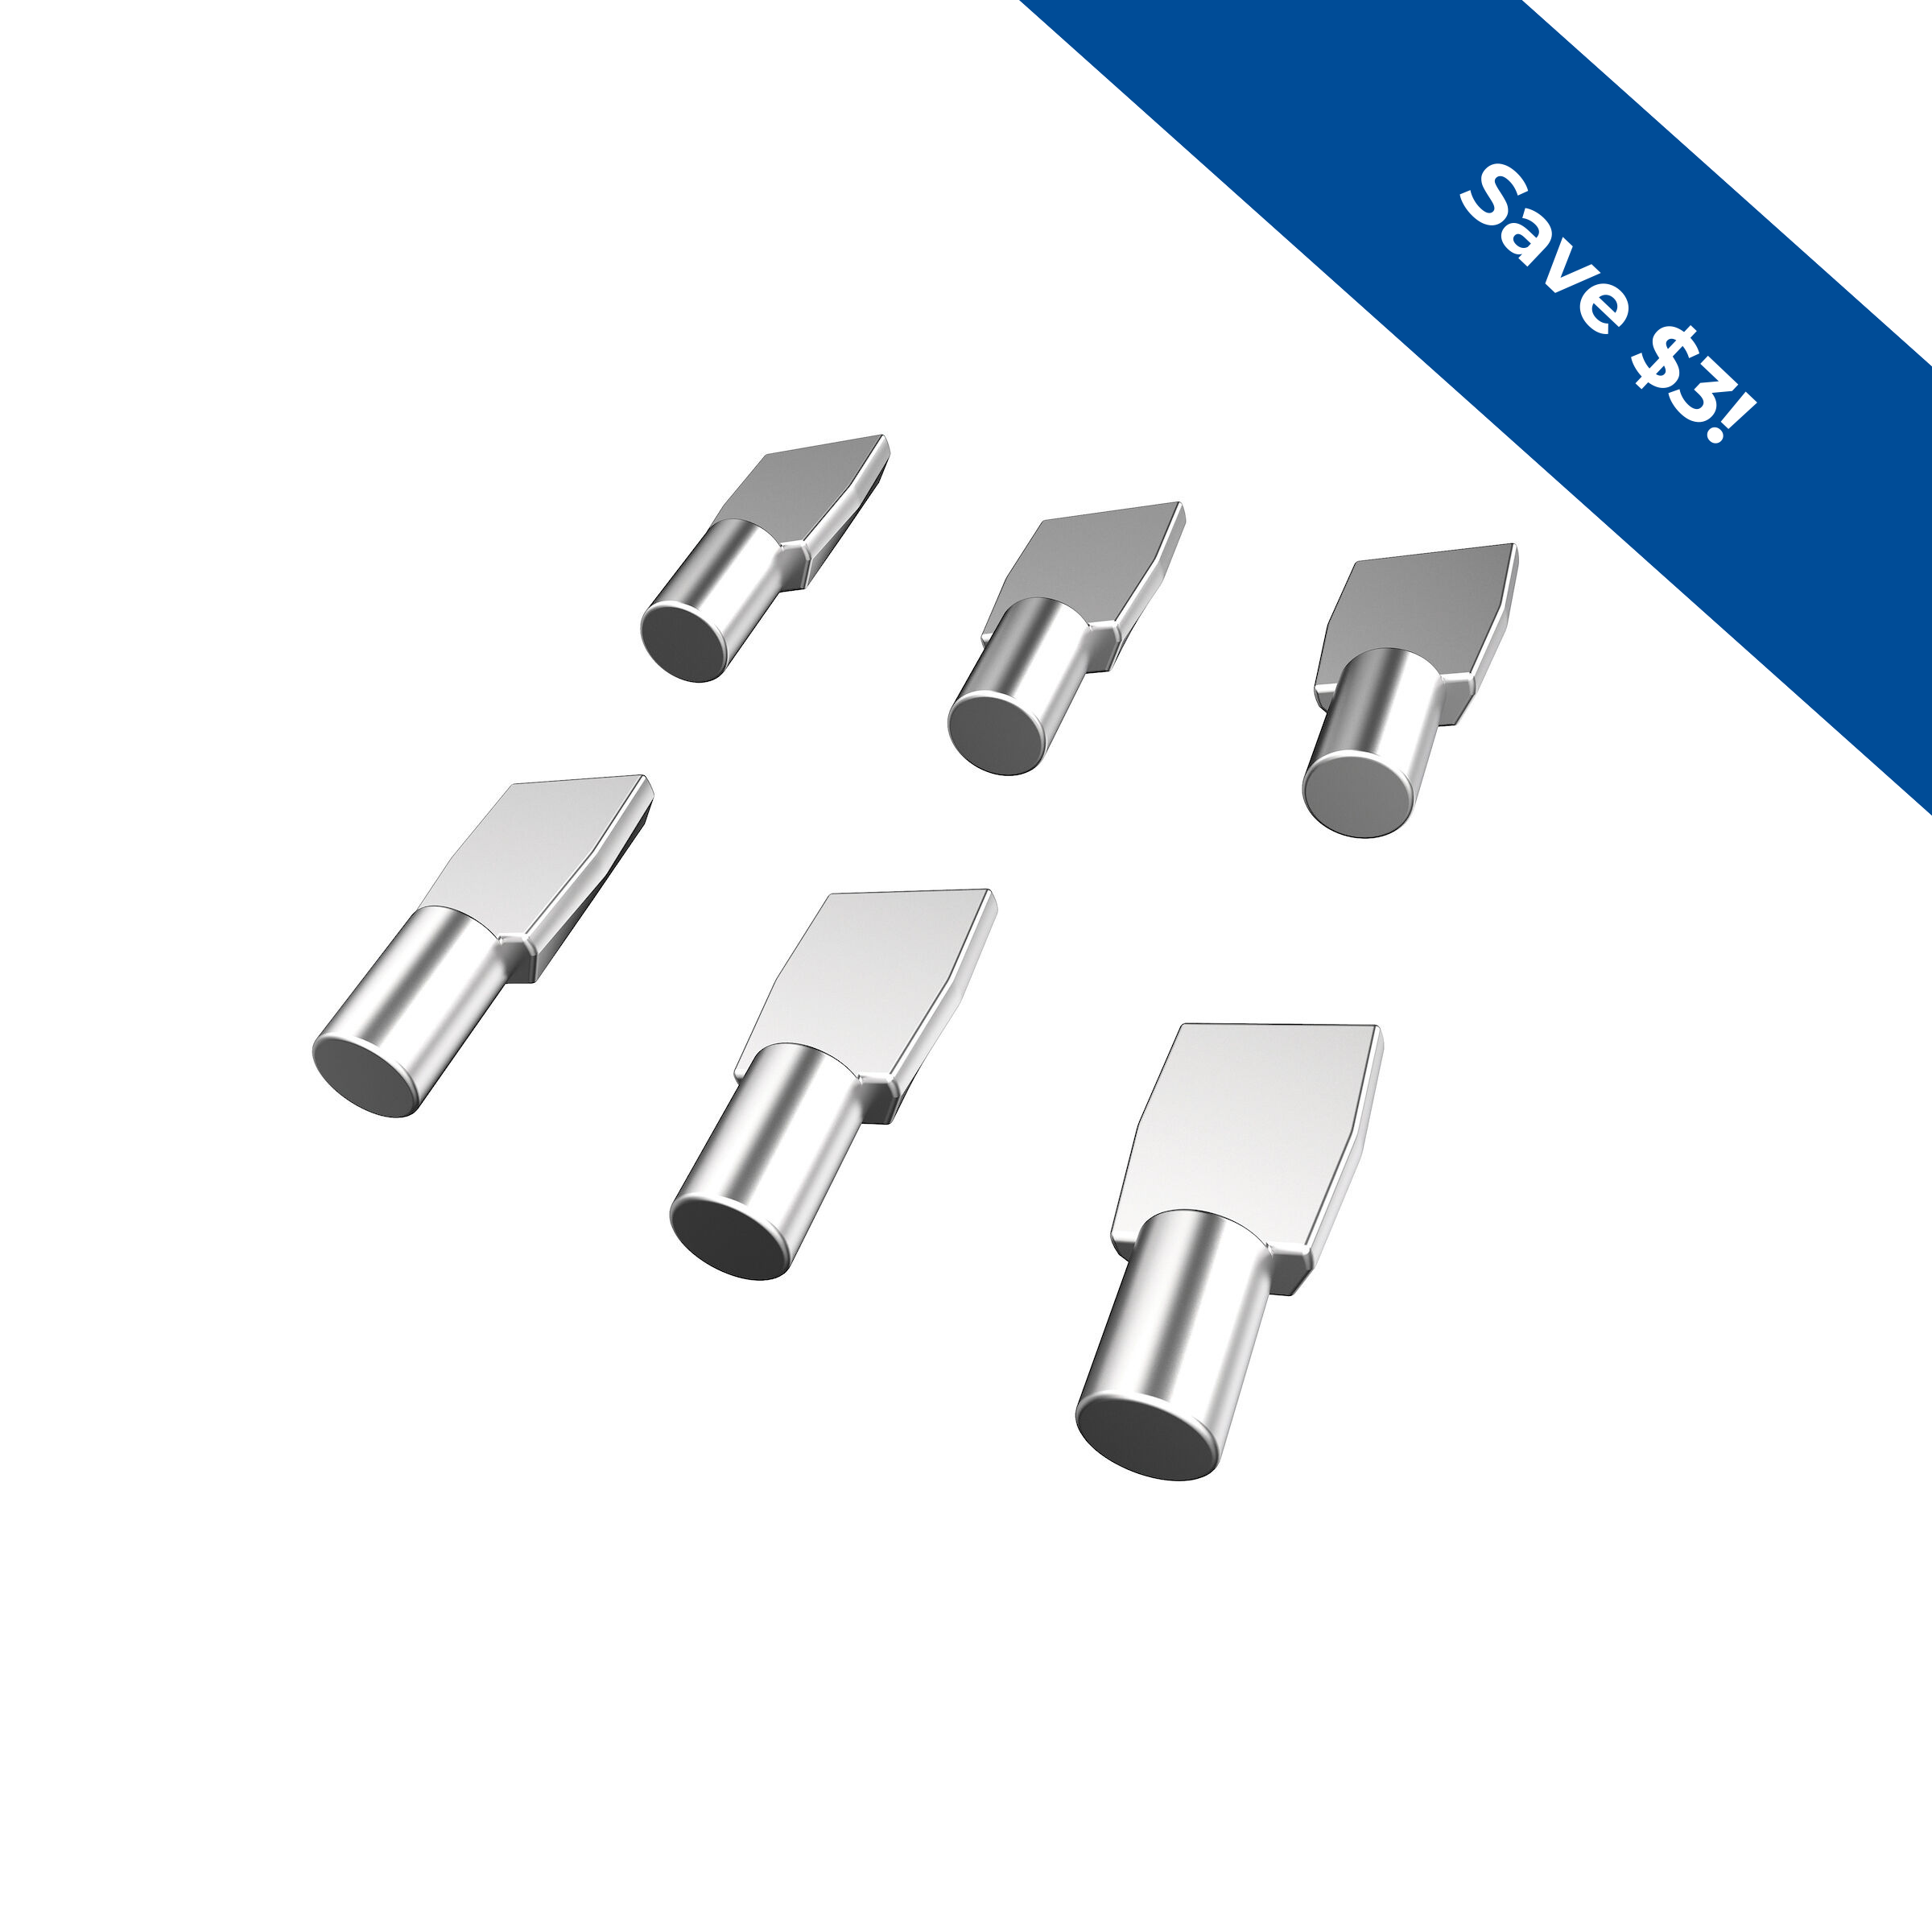
- 12 1/4" shelf pins
- 3 Coat hooks
- 1 Wood glue
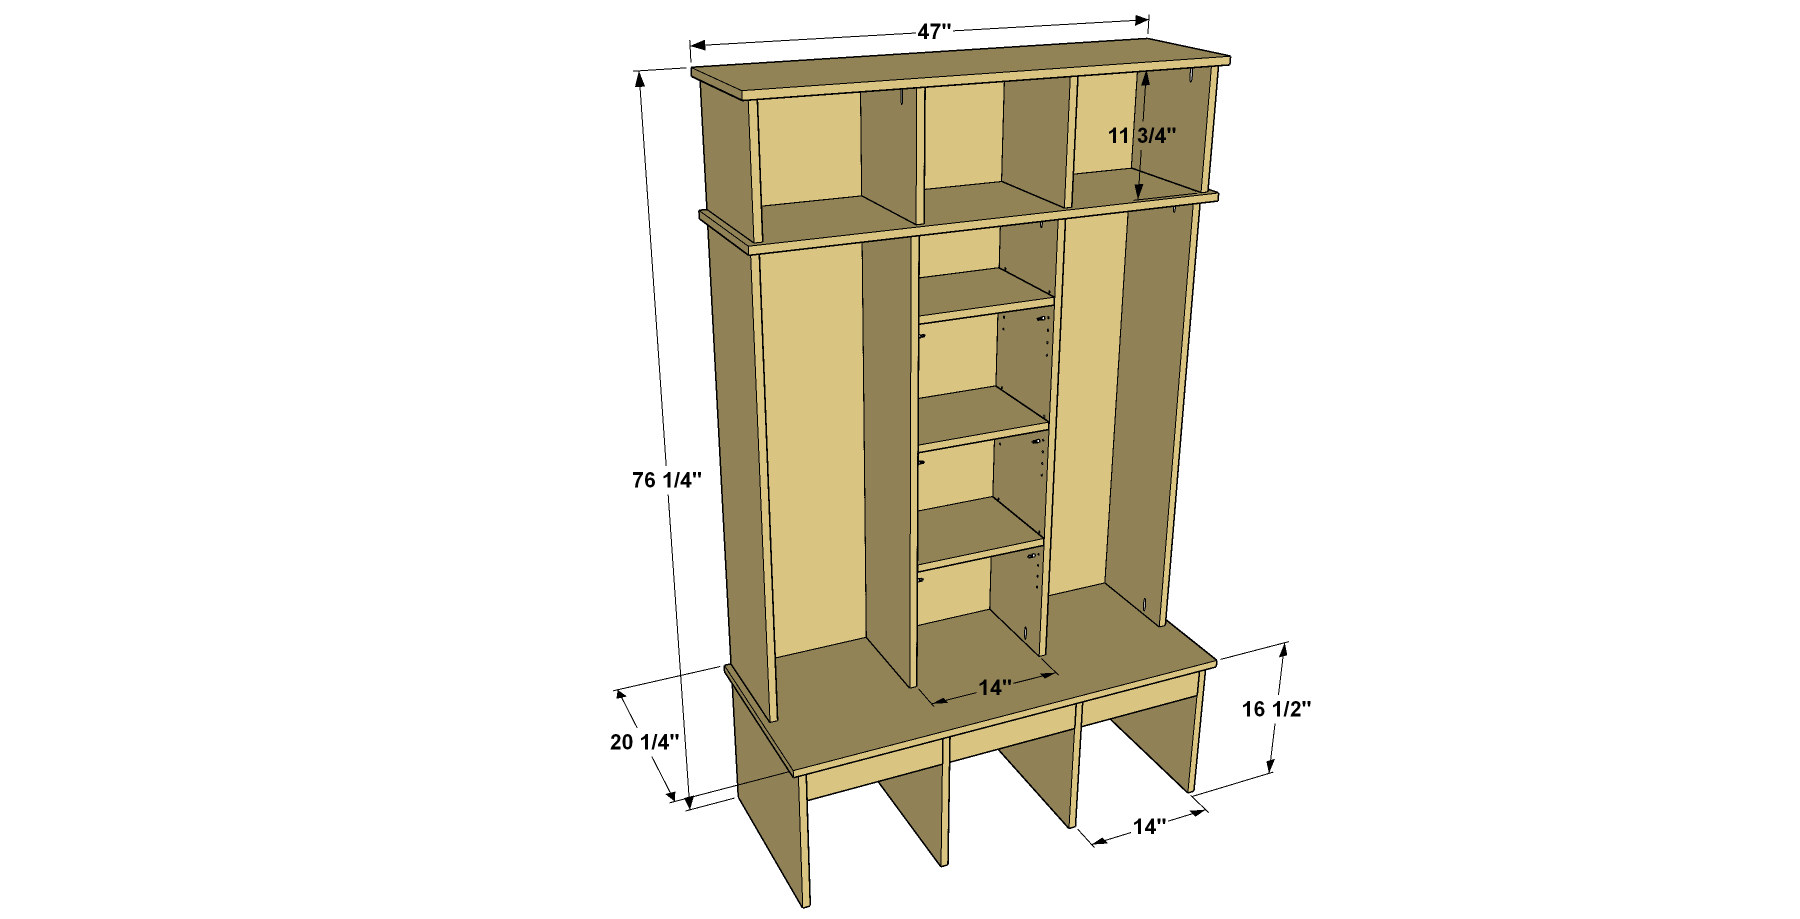
Cut List & Parts
- 4 Bench Upright , 3/4" x 19 1/4" x 15 3/4"
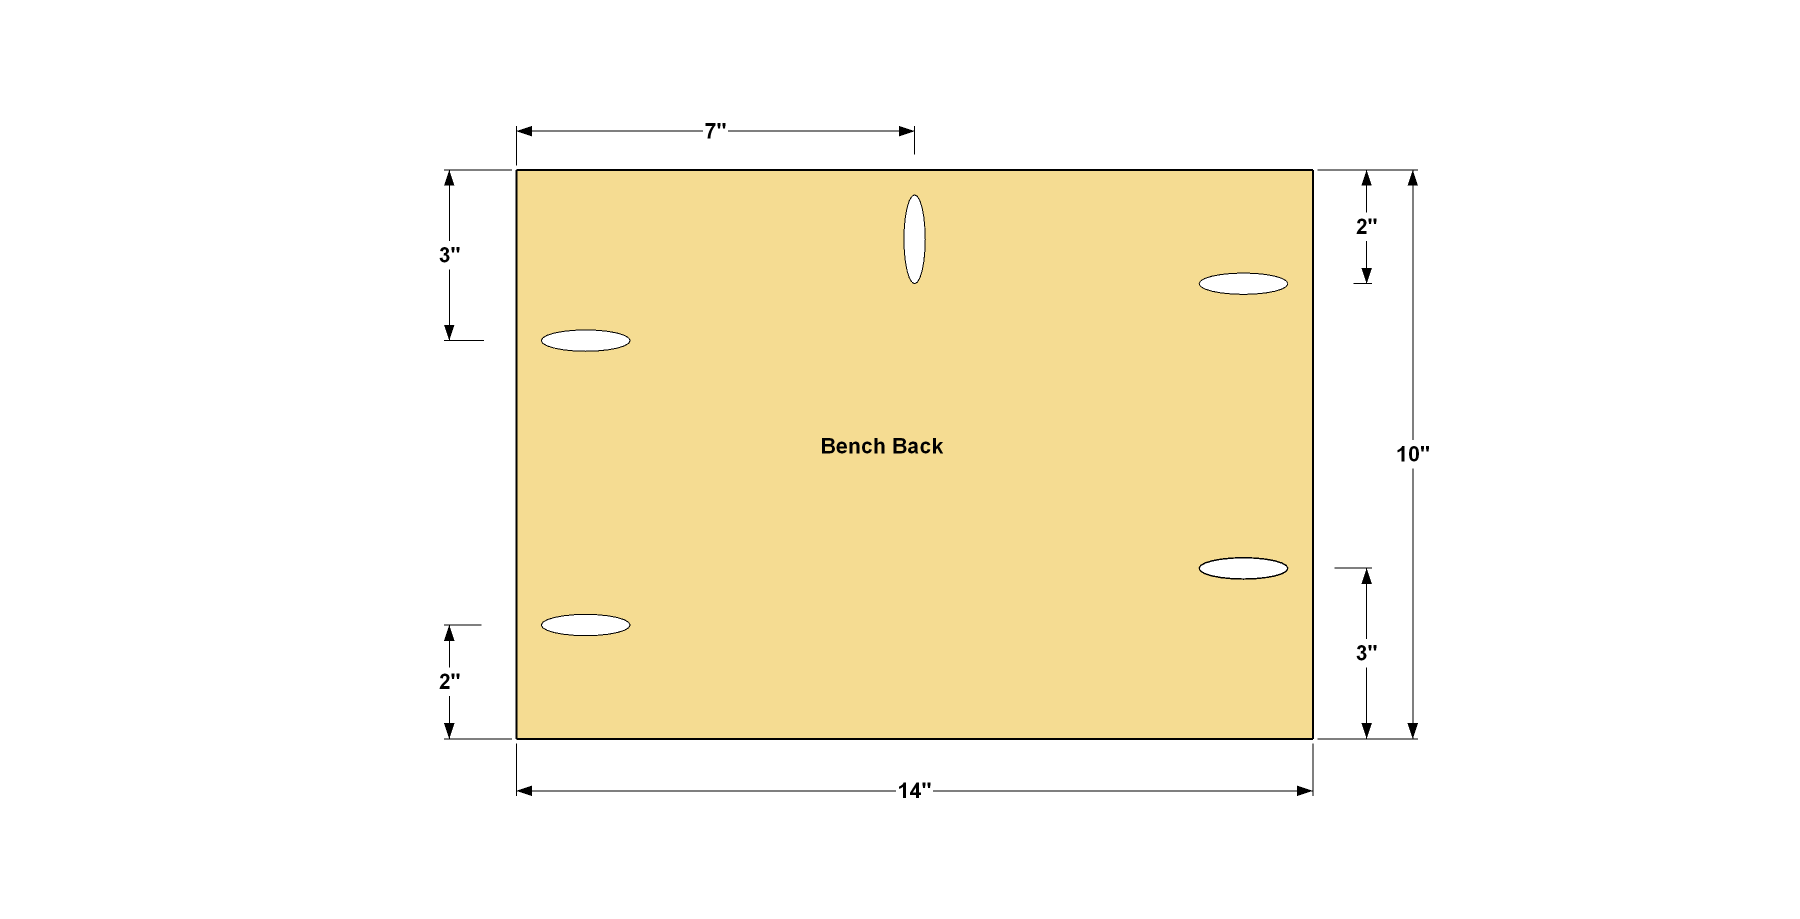
- 3 Bench Back , 3/4" x 14" x 10"
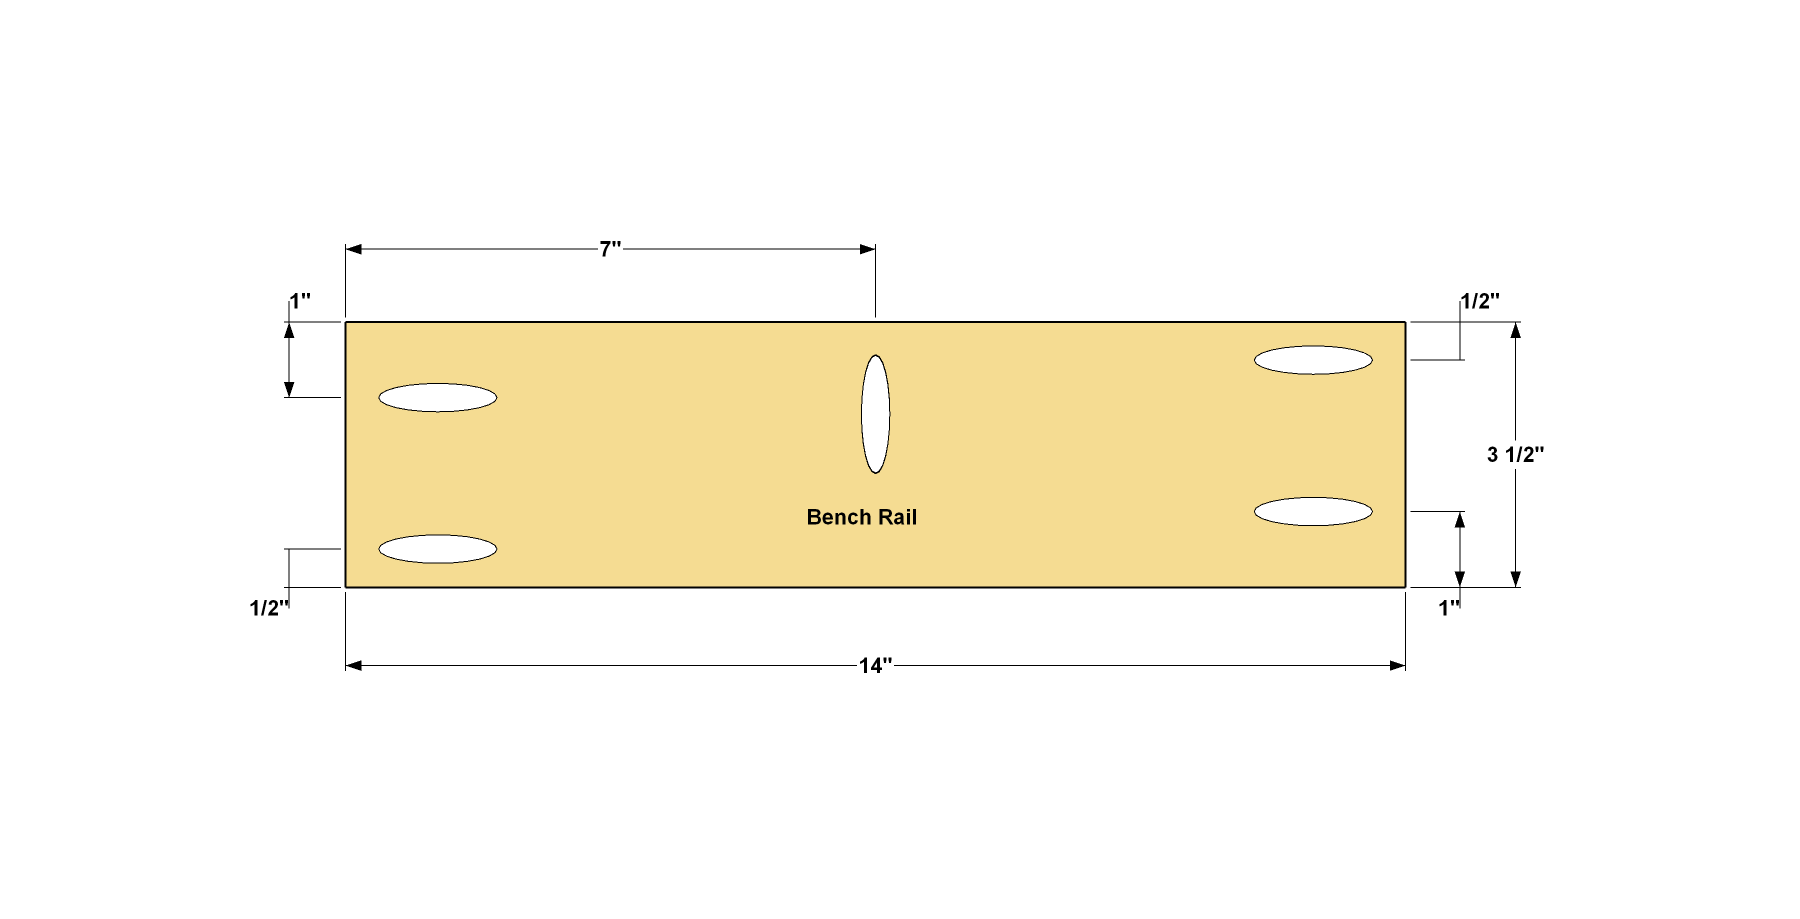
- 3 Bench Rail , 3/4" x 3 1/2" x 14"
- 1 Bench Seat , 3/4" x 20" x 46 1/2"
- 4 Locker Upright , 3/4" x 11 3/4" x 46 1/2"
- 3 Locker Back , 3/4" x 14" x 46 1/2"
- 1 Locker Top , 3/4" x 13 1/2" x 46 1/2"
- 3 Locker Shelf , 3/4" x 11" x 13 7/8"
- 4 Cubby Upright , 3/4" x 12 3/4" x 11 3/4"
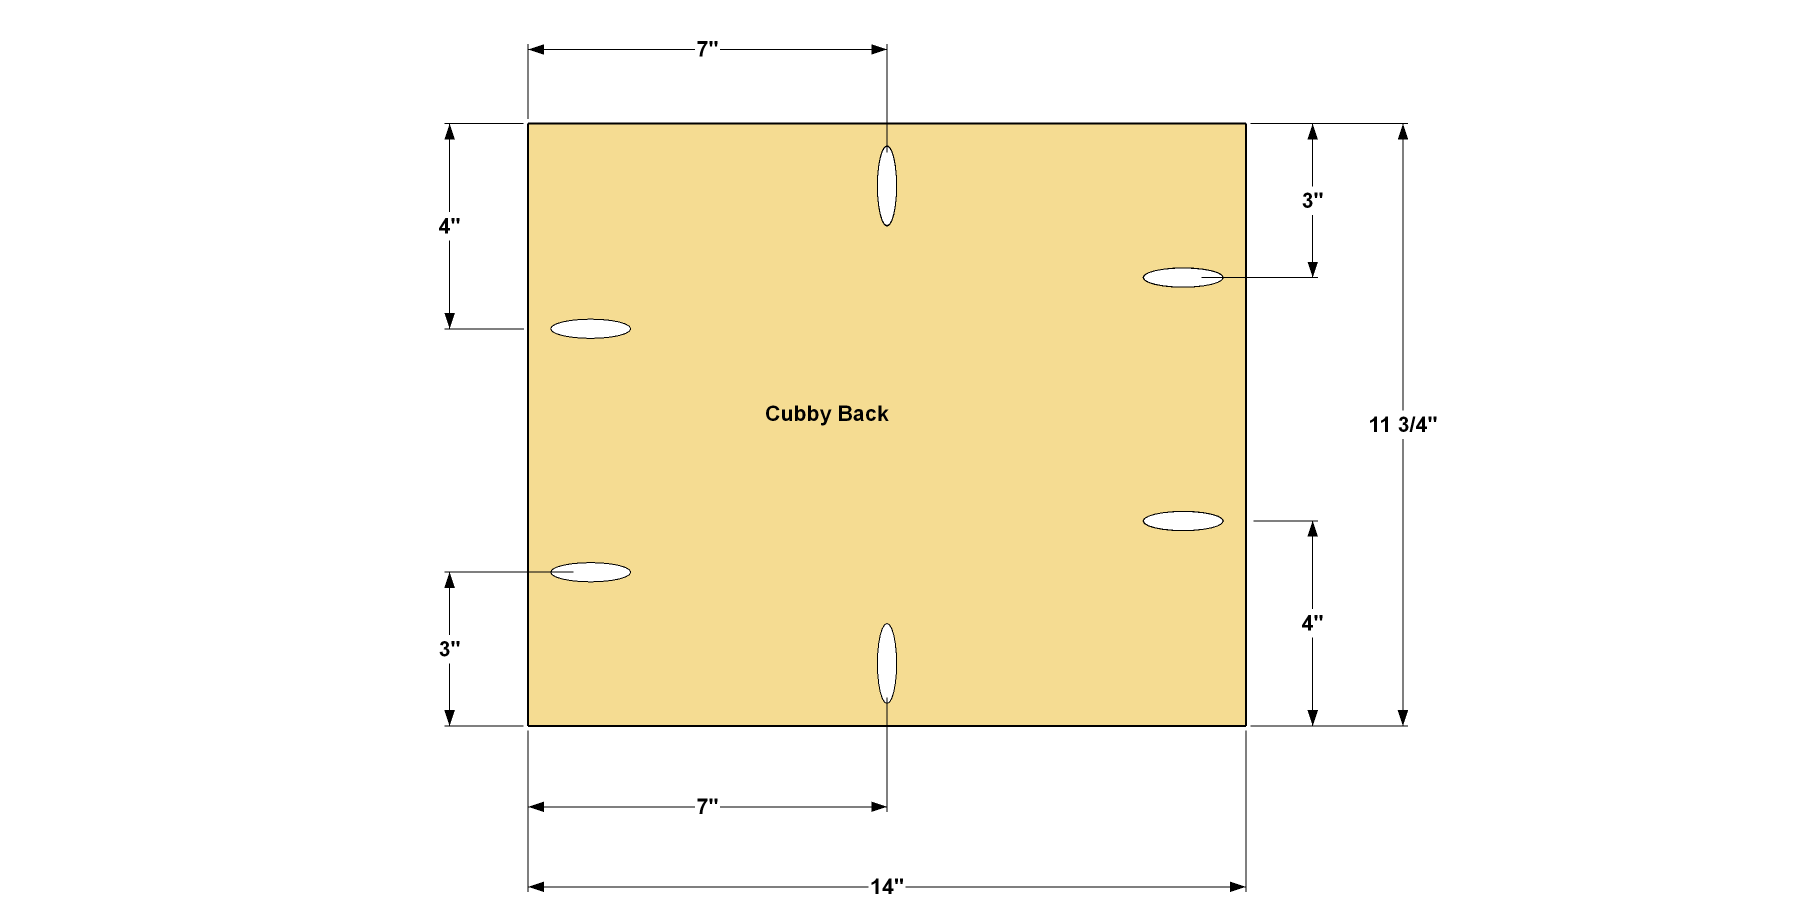
- 3 Cubby Back , 3/4" x 14" x 11 3/4"
- 1 Cubby Top , 3/4" x 13 1/2" x 46 1/2"
- 24 Front Edging , 1/4" x 3/4" x cut to fit
Directions
-
Make the Bench Uprights
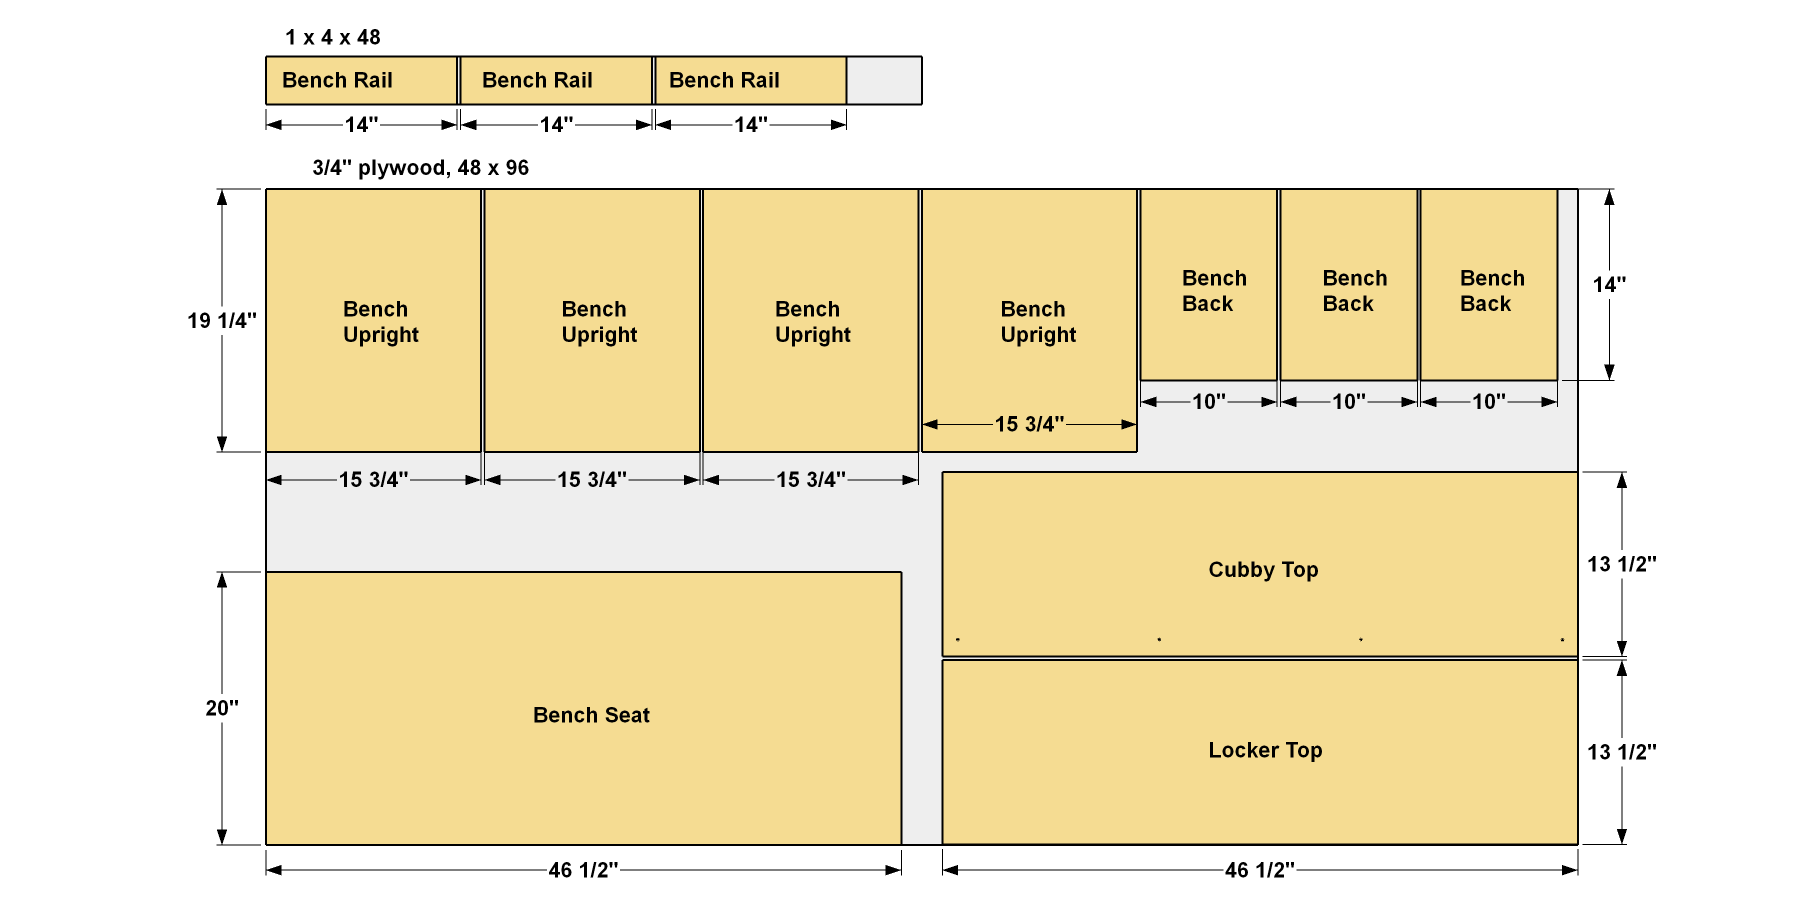
Cut four Bench Uprights to size from 3/4" plywood, as shown in the cutting diagram. With your Kreg® Pocket-Hole Jig set up for 3/4"-thick material, drill pocket holes where shown. Note that you’ll be creating two “pairs” of uprights.
Tip: Put the Best Face Outward
When you buy plywood, it usually has one face that looks better than the other. When building this project, place the pocket holes in the less-attractive face. The better-looking face will be the one that shows, so by positioning your pocket holes this way, the best-looking face of each plywood part will be the most visible.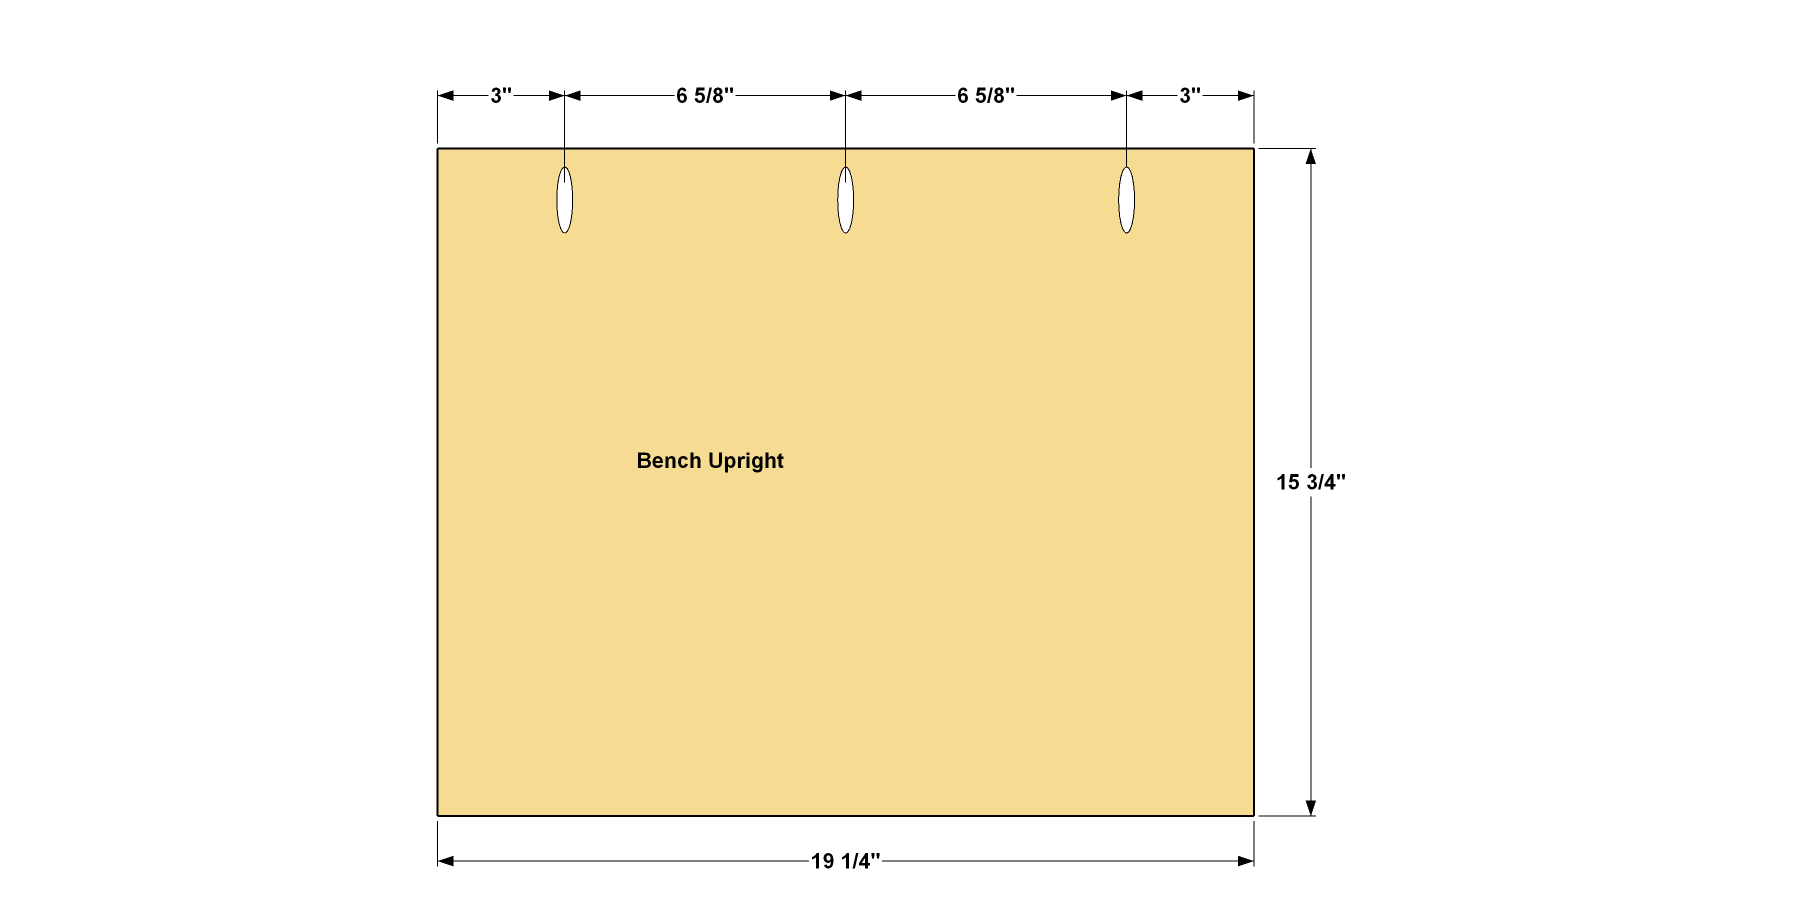
-
Make the Bench Backs
Cut three Bench Backs to size from 3/4" plywood, as shown in the cutting diagram. Drill pocket holes where shown. When drilling these pocket holes, note that along the side edges, the pocket holes are offset. That’s so when you assemble the bench later, the screws won’t run into each other.
-
Make the Bench Rails
Cut three Bench Rails to length from a 1x4 board, as shown in the cutting diagram. Drill pocket holes where shown. These three Rails are all identical.
-
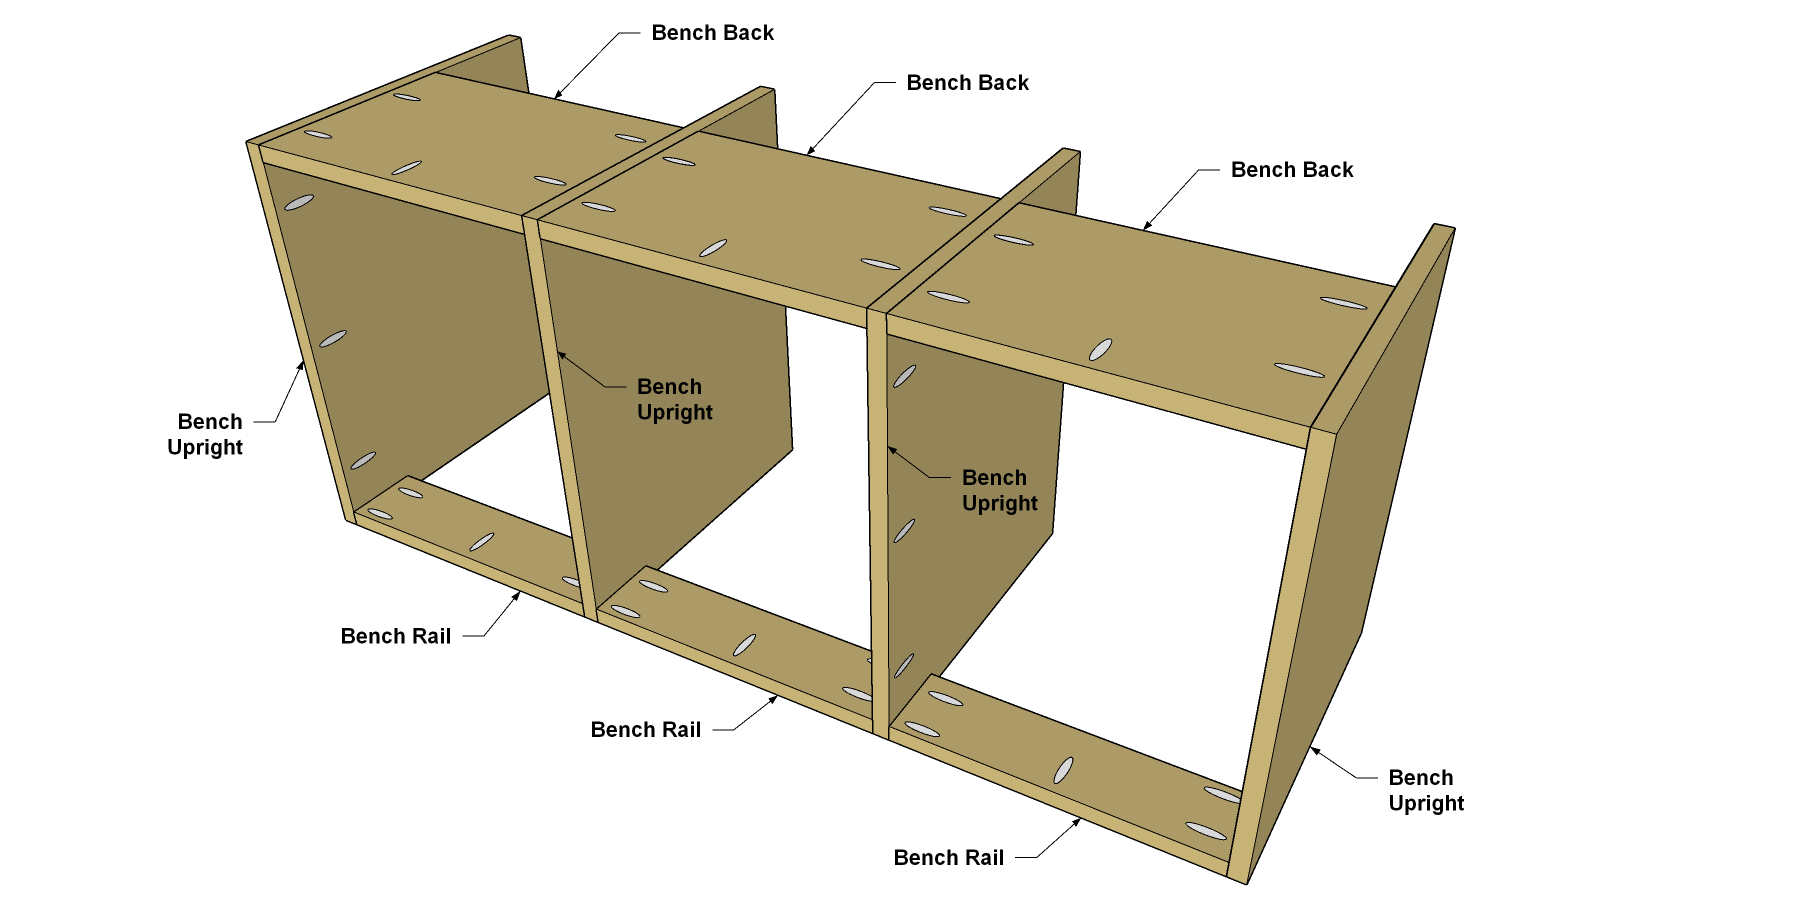
Assemble the Bench Base
Sand the parts smooth, and then assemble the bench base, as shown. To do that, you’ll attach the Bench Rails and Bench Backs to the Bench Uprights using 1 1/4" coarse-thread Kreg Pocket-Hole Screws. Make sure all of the parts are oriented properly before you drive in the screws.
-
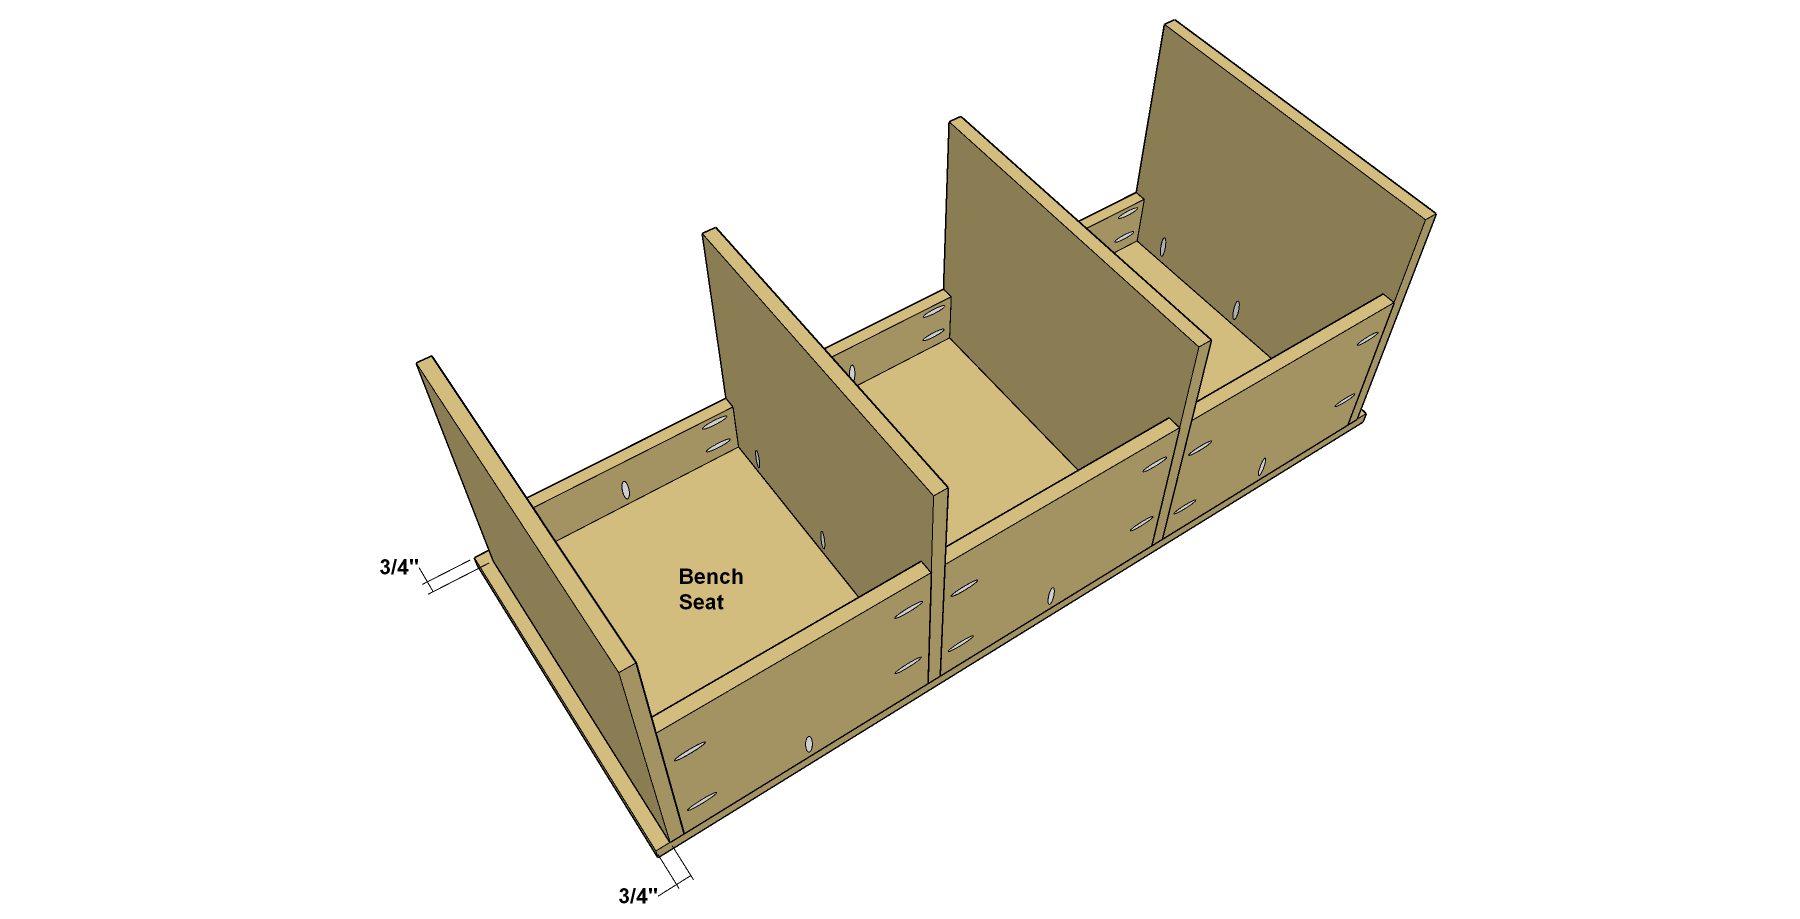
Make the Bench Seat
Cut a Bench Top to size from 3/4" plywood, as shown in the cutting diagram. Then sand the Bench Seat Smooth. Now you can attach the Bench Seat, as shown. Align the Seat so that it overhangs the base by 3/4" at the front and ends. Then attach the Seat using 1 1/4" coarse-thread Kreg Pocket-Hole Screws.
-
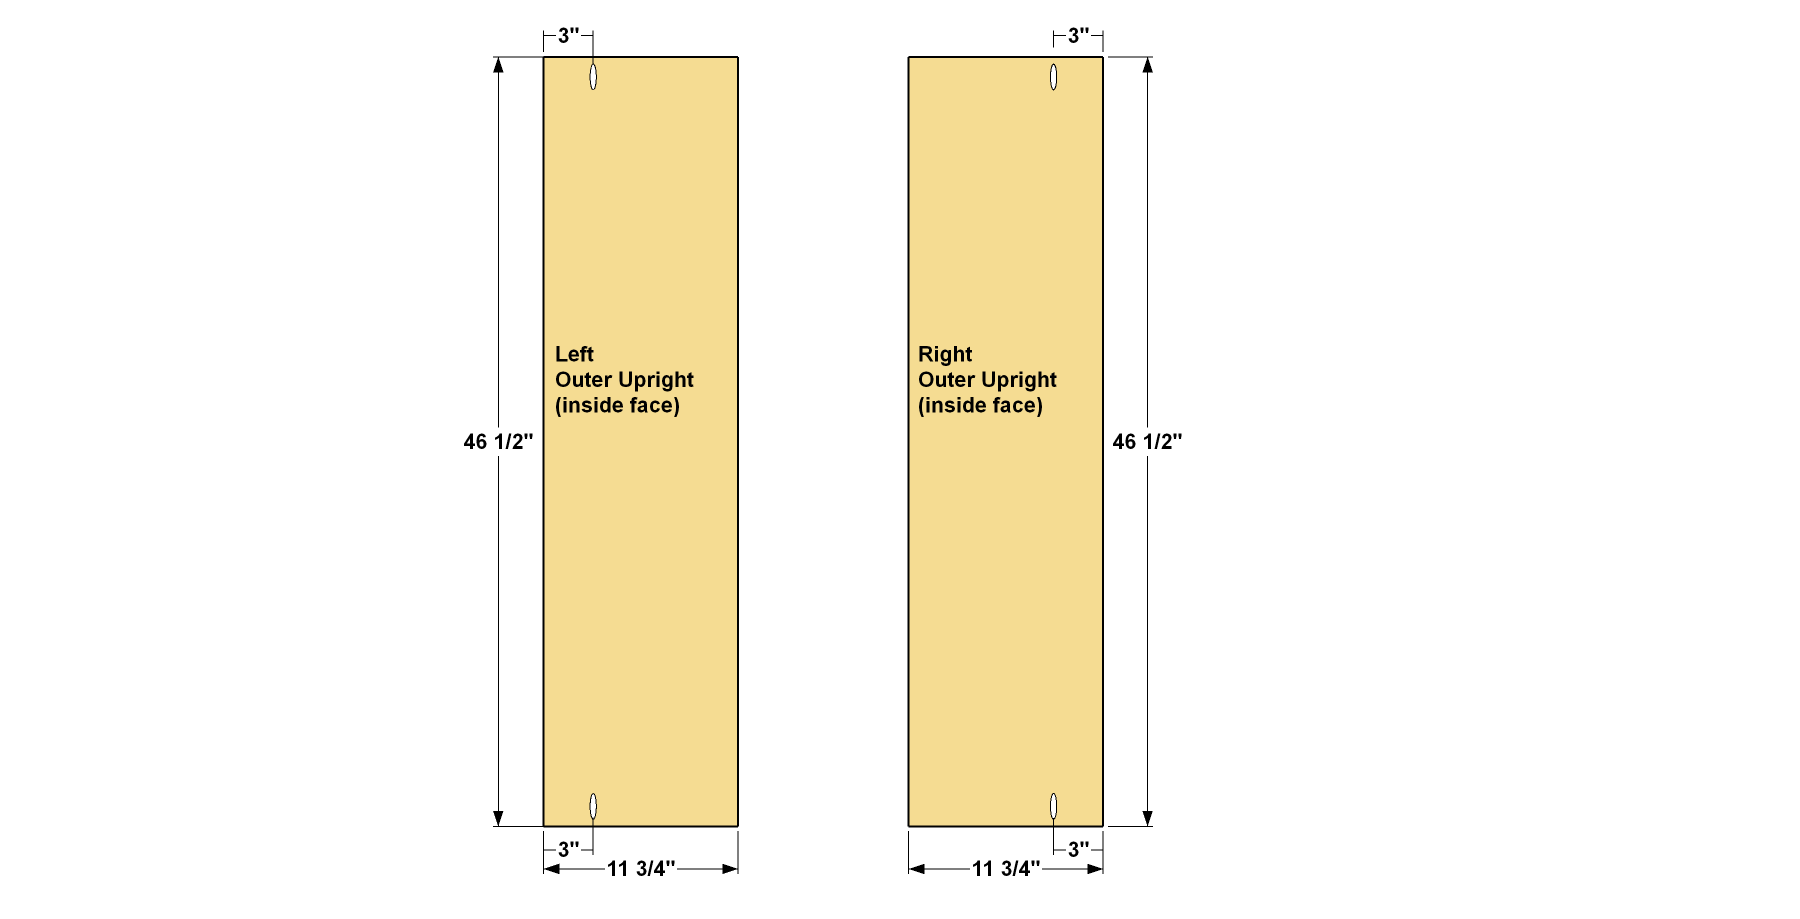
Make the Locker Uprights
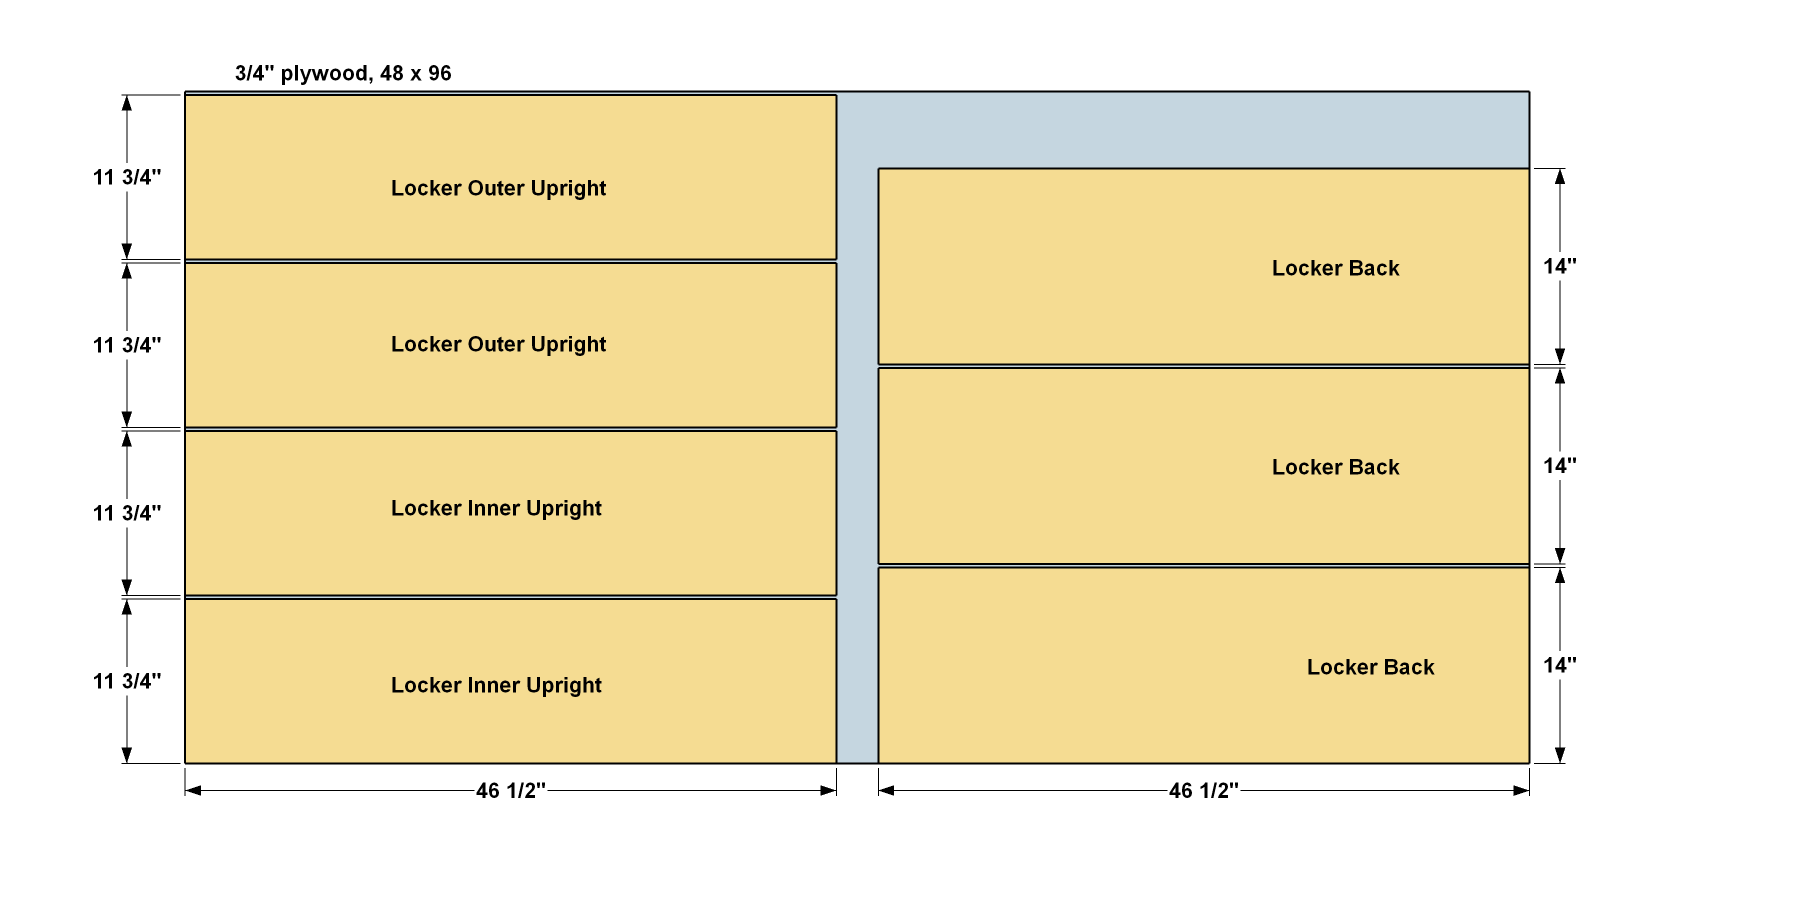
Cut four Locker Uprights to size from 3/4" plywood, as shown in the cutting diagram. Select two to be the left and right “outer” Uprights. Drill pocket holes where shown.
-
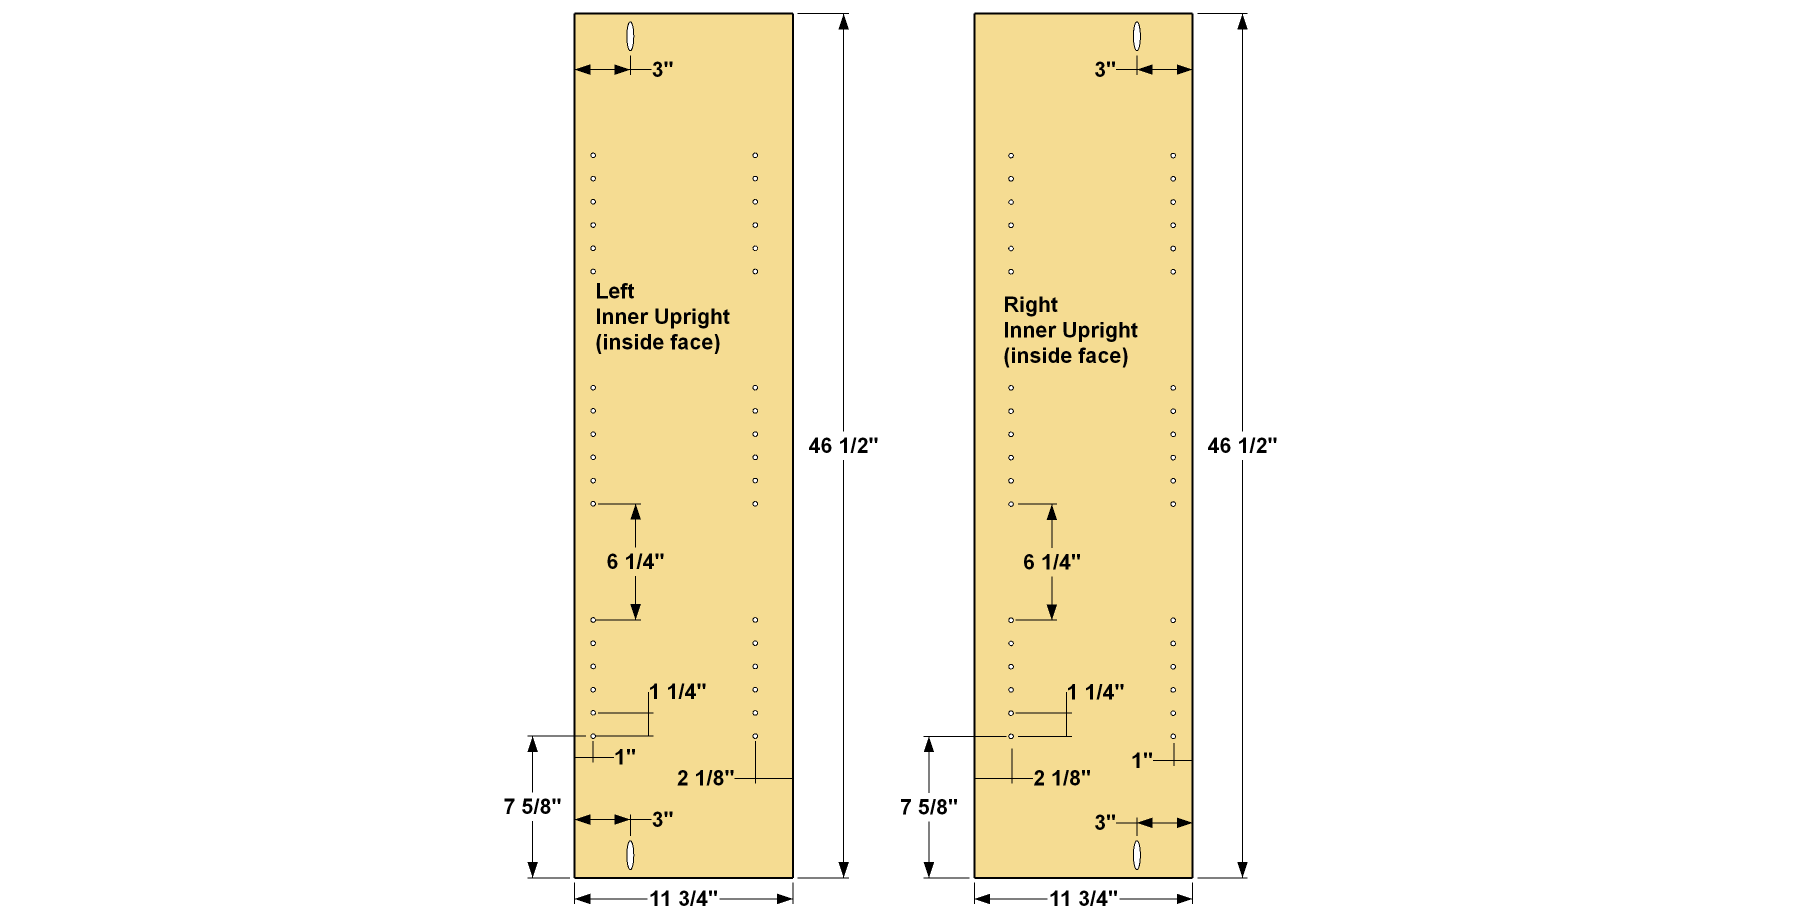
Complete the Locker Uprights
The other two Locker Uprights will be the “inner” Uprights. Drill the same pocket holes in these inner uprights. To add adjustable shelves, use a Kreg Shelf Pin Jig to drill shelf pin holes, as shown. The advantage of the Shelf Pin Jig is that it makes it easy to get consistent shelf spacing so that you’ll have level, wobble-free shelves.
NOTE: The setback spacing (distance from the edge to the shelf-pin holes) shown matches the first-generation Kreg Shelf Pin Jig. The second generation model, released in March 2022, has different setback spacing. The vertical distance between the pin holes, though, matches the dimensions shown here—1 1/4". You can create the shelf-pin holes accurately using either the first- or second-generation jig.
-
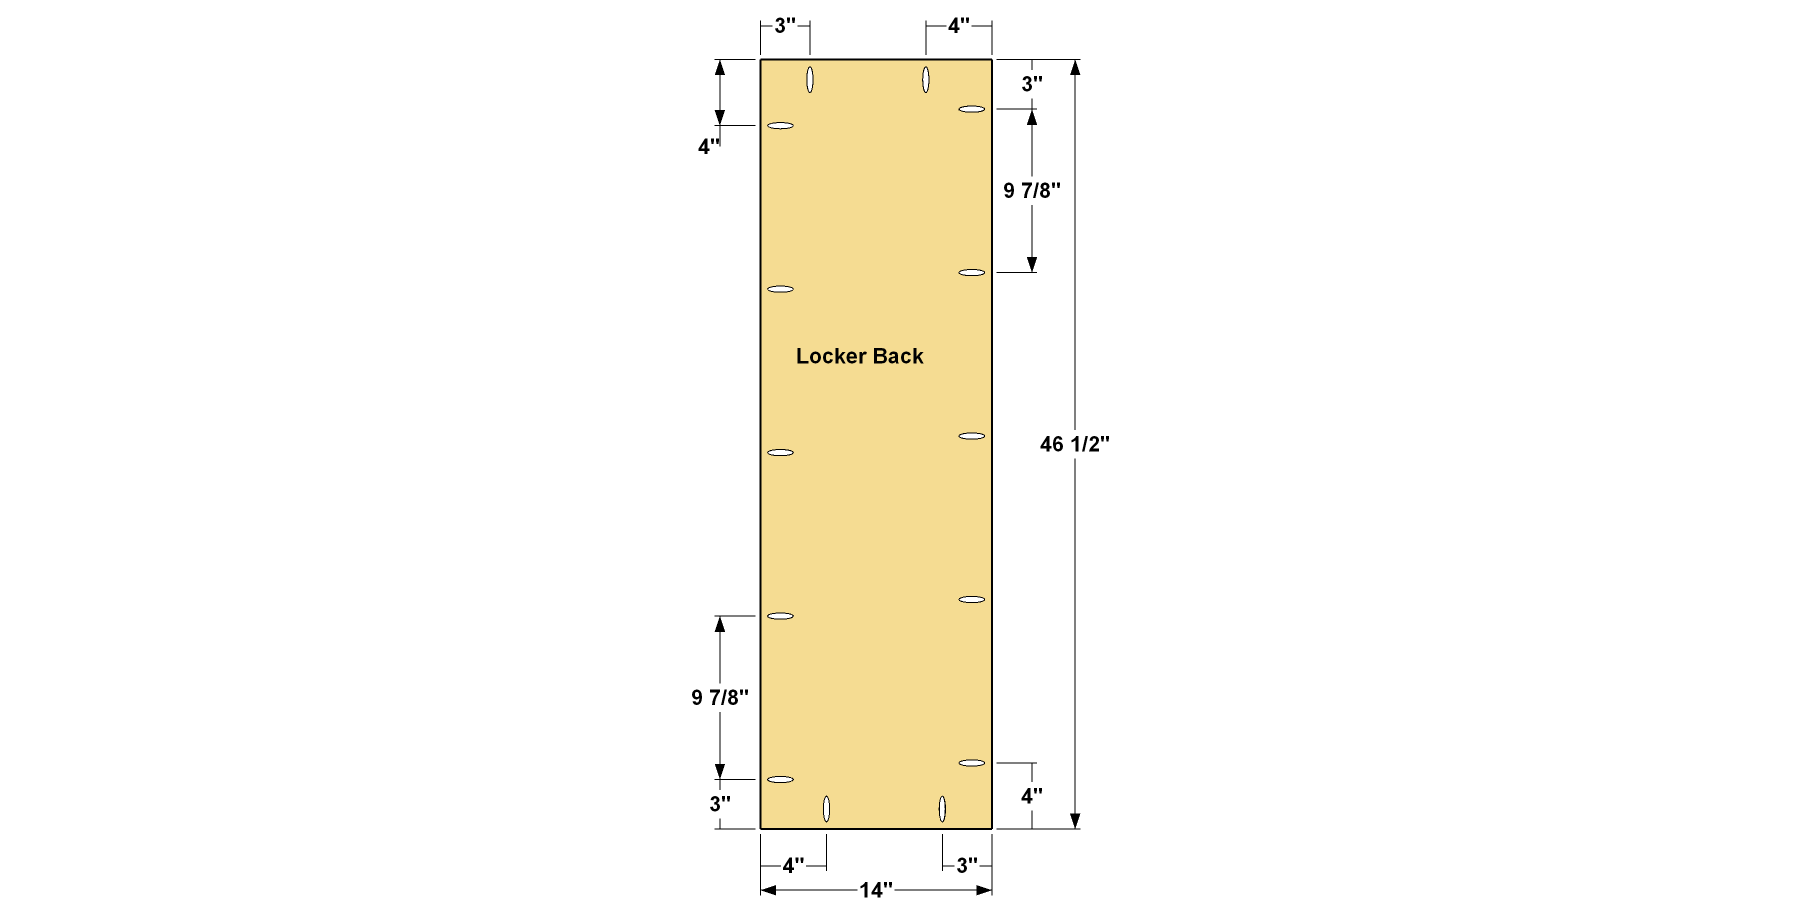
Make the Locker Backs
Cut three Locker Backs to size from 3/4" plywood, as shown in the cutting diagram. Drill pocket holes where shown. Note that, once again, the pocket holes along the side edges are offset.
-
Make the Locker Top
Cut a Locker Top to size from 3/4" plywood, as shown in the cutting diagram. Then drill four holes through the Locker Top, near the front edge, as shown. These holes will be used later to screw the upper cubby section of the organizer to the lockers. You can also go ahead and cut four Locker Shelves to size now, too. Sand the Locker Top and Shelves smooth.

-
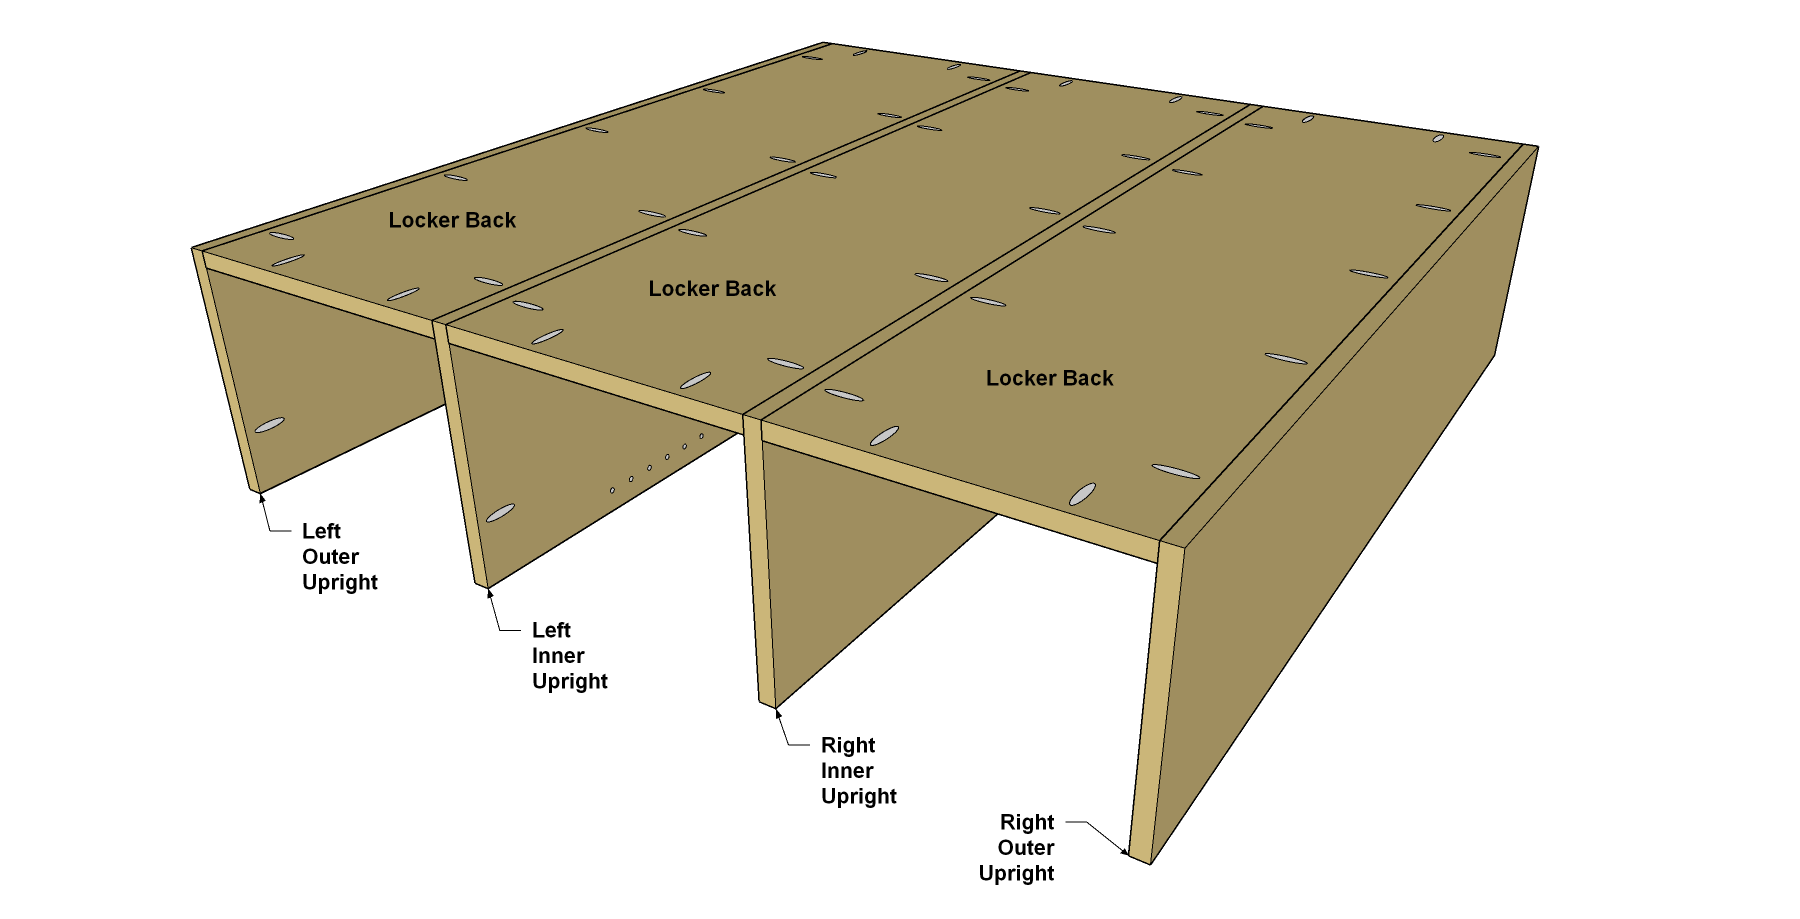
Assemble the Locker Base
Next, assemble the locker base, as shown. To do that, you’ll attach the Locker Backs to the Locker Uprights using 1 1/4" coarse-thread Kreg Pocket-Hole Screws. Make sure all of the parts are oriented properly before you drive in the screws.
-
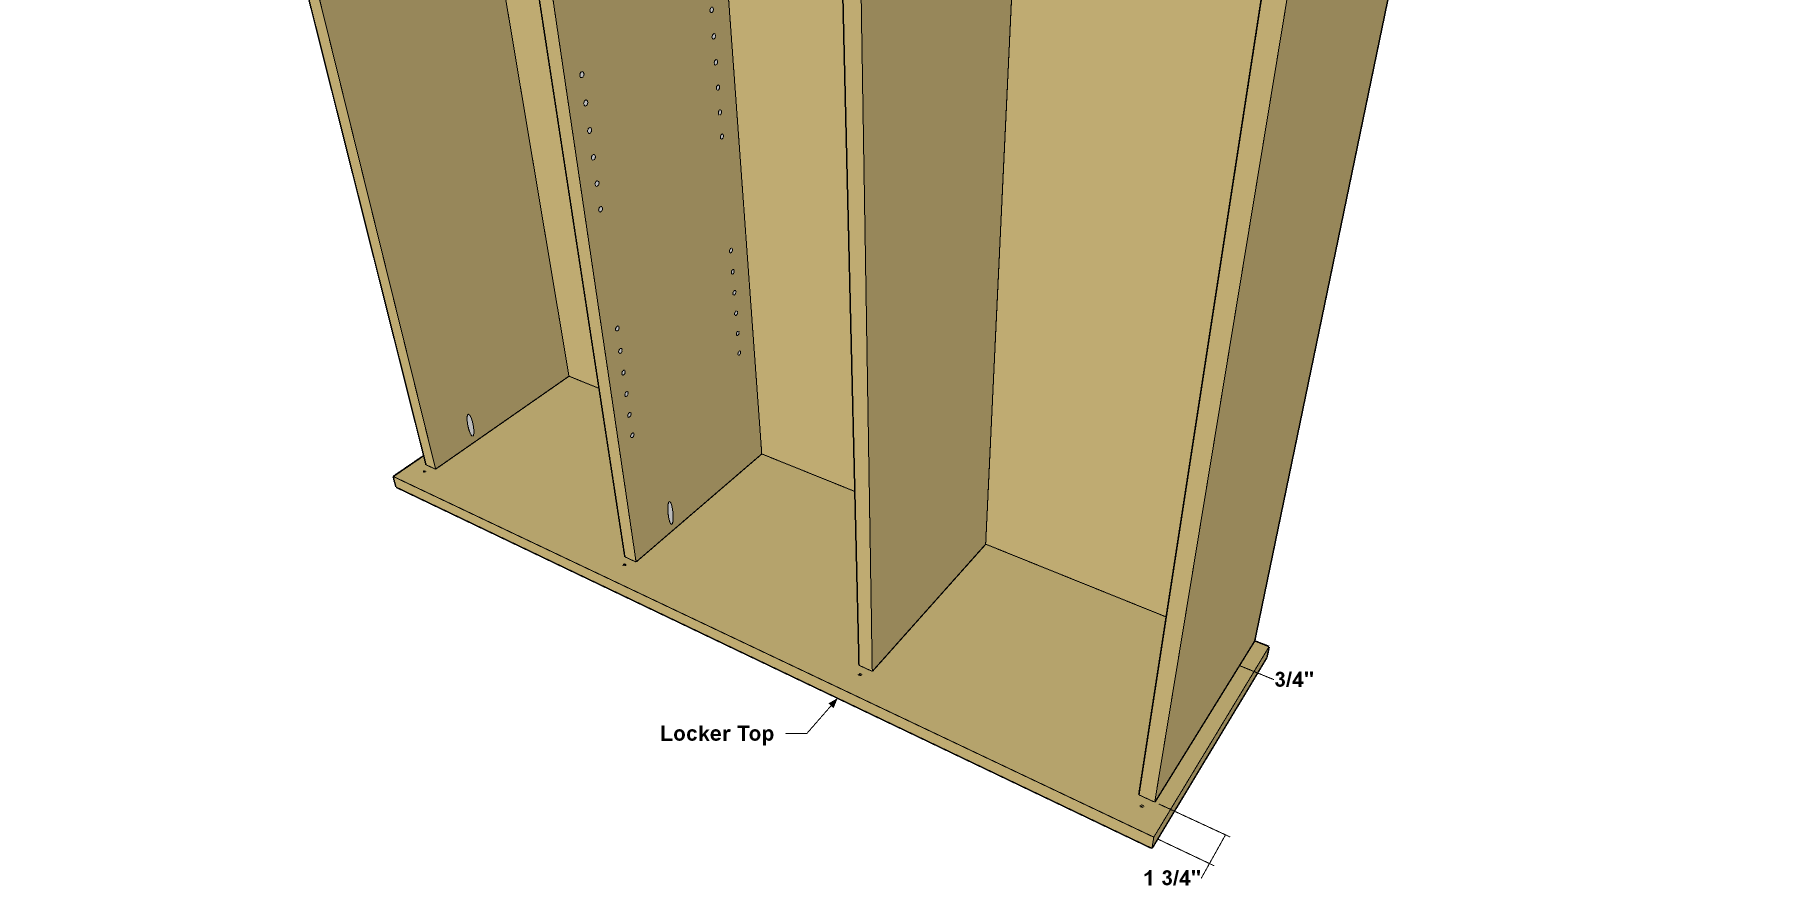
Attach the Locker Top
Now you can attach the Locker Top, as shown. Make sure that the four holes you drilled in the Locker Top are positioned at the front, and that the Top overhangs the base by 3/4" at the front and ends, and. Then attach the Top using 1 1/4" coarse-thread Kreg Pocket-Hole Screws.
-
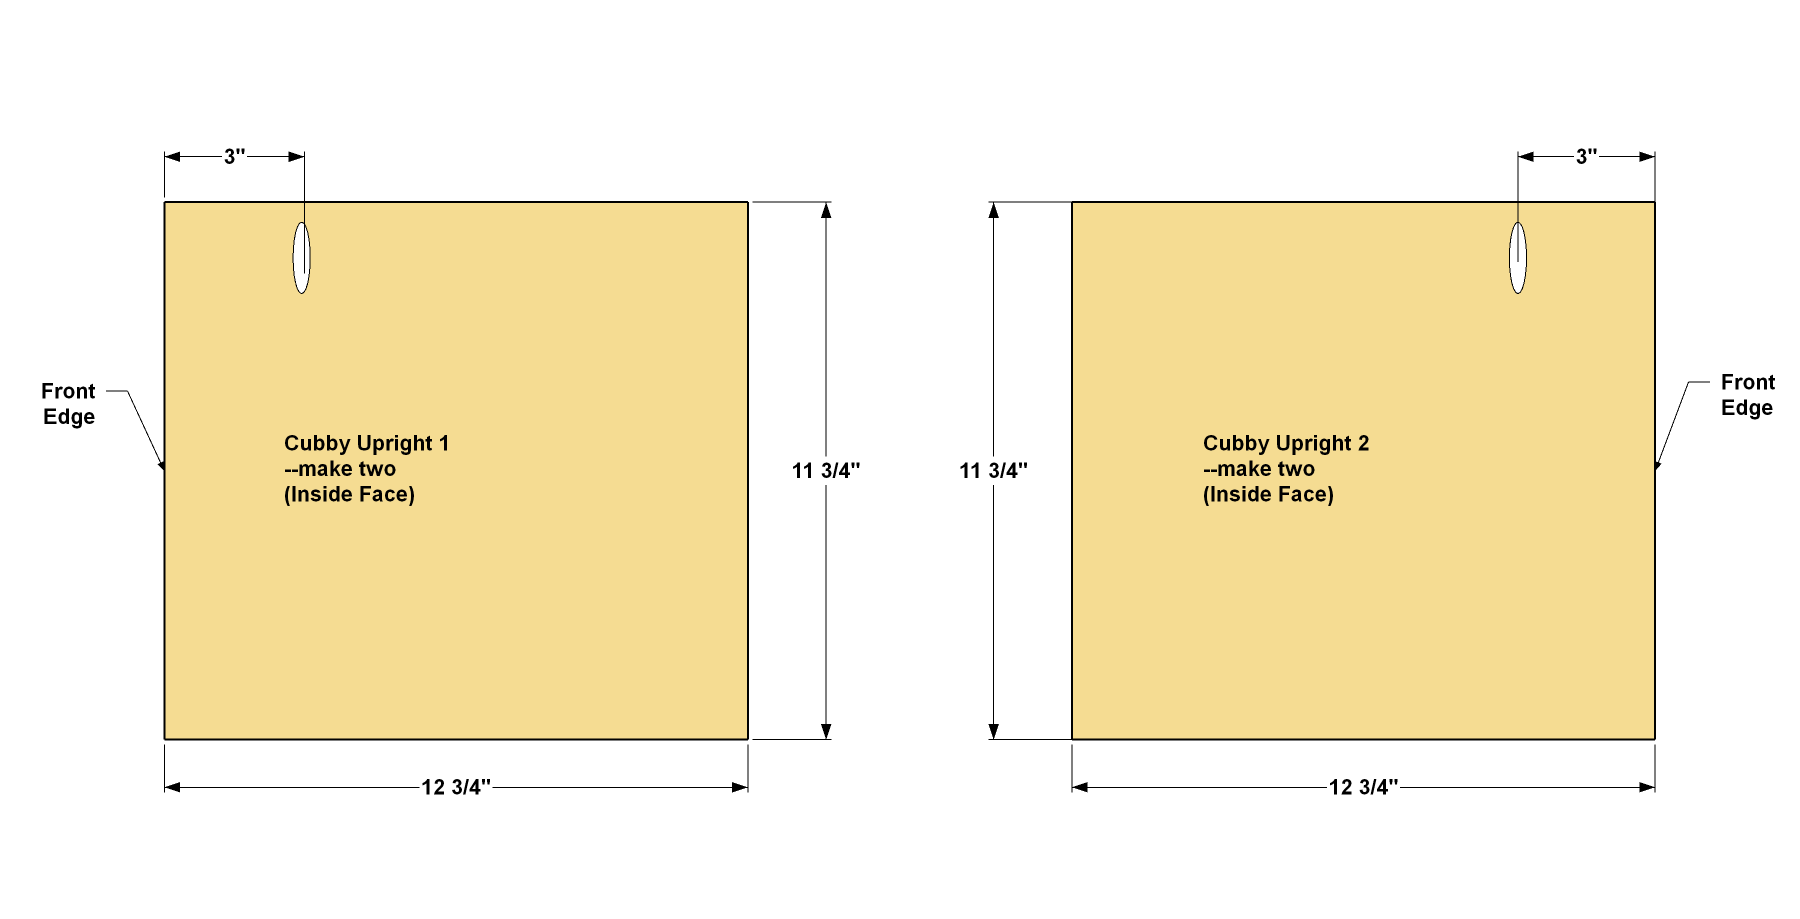
Make the Cubby Uprights
Cut four Cubby Uprights to size from 3/4" plywood, as shown in the cutting diagram. Drill pocket holes where shown Again, you’ll make two “pairs” of Cubby Uprights.
-
Make the Cubby Backs
Cut three Cubby Backs to size from 3/4" plywood, as shown in the cutting diagram. Then, with your pocket-hole jig set up for 3/4" material, drill pocket holes where shown. Note that, once again, the pocket holes along the side edges are offset.
-
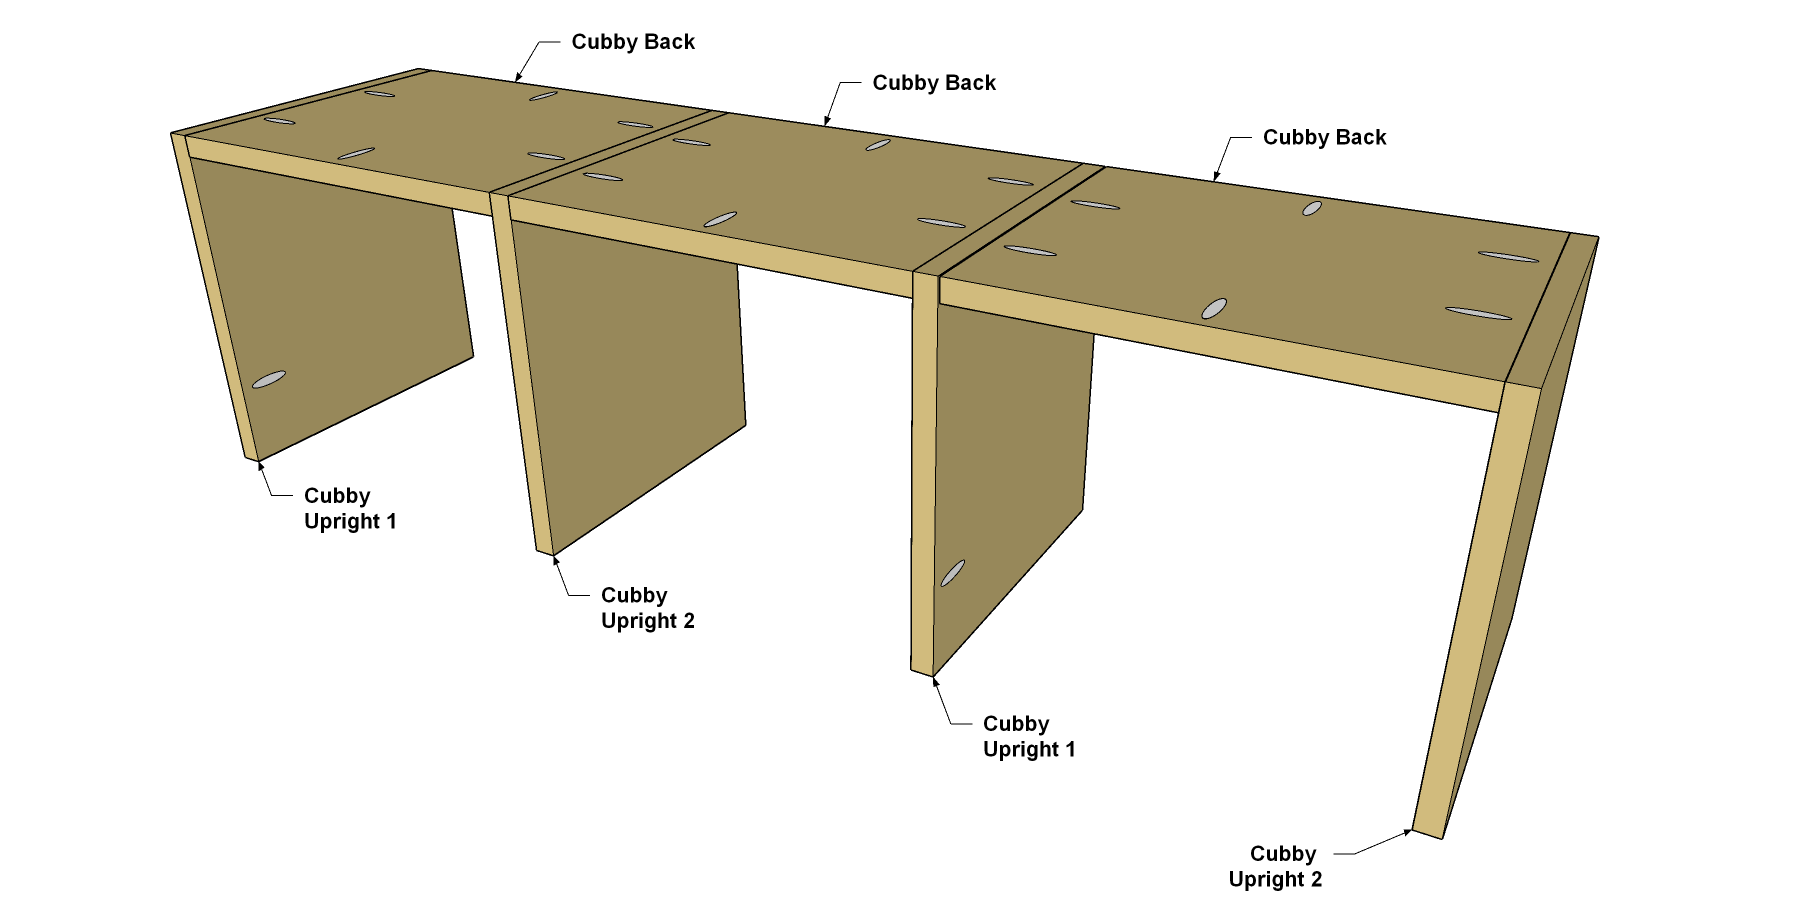
Assemble the Cubby Base
Sand the Cubby Top Smooth. Then assemble the cubby base, as shown. To do that, you’ll attach the Cubby Backs to the Cubby Uprights using 1 1/4" coarse-thread Kreg Pocket-Hole Screws. Make sure all of the parts are oriented properly before you drive in the screws.
-
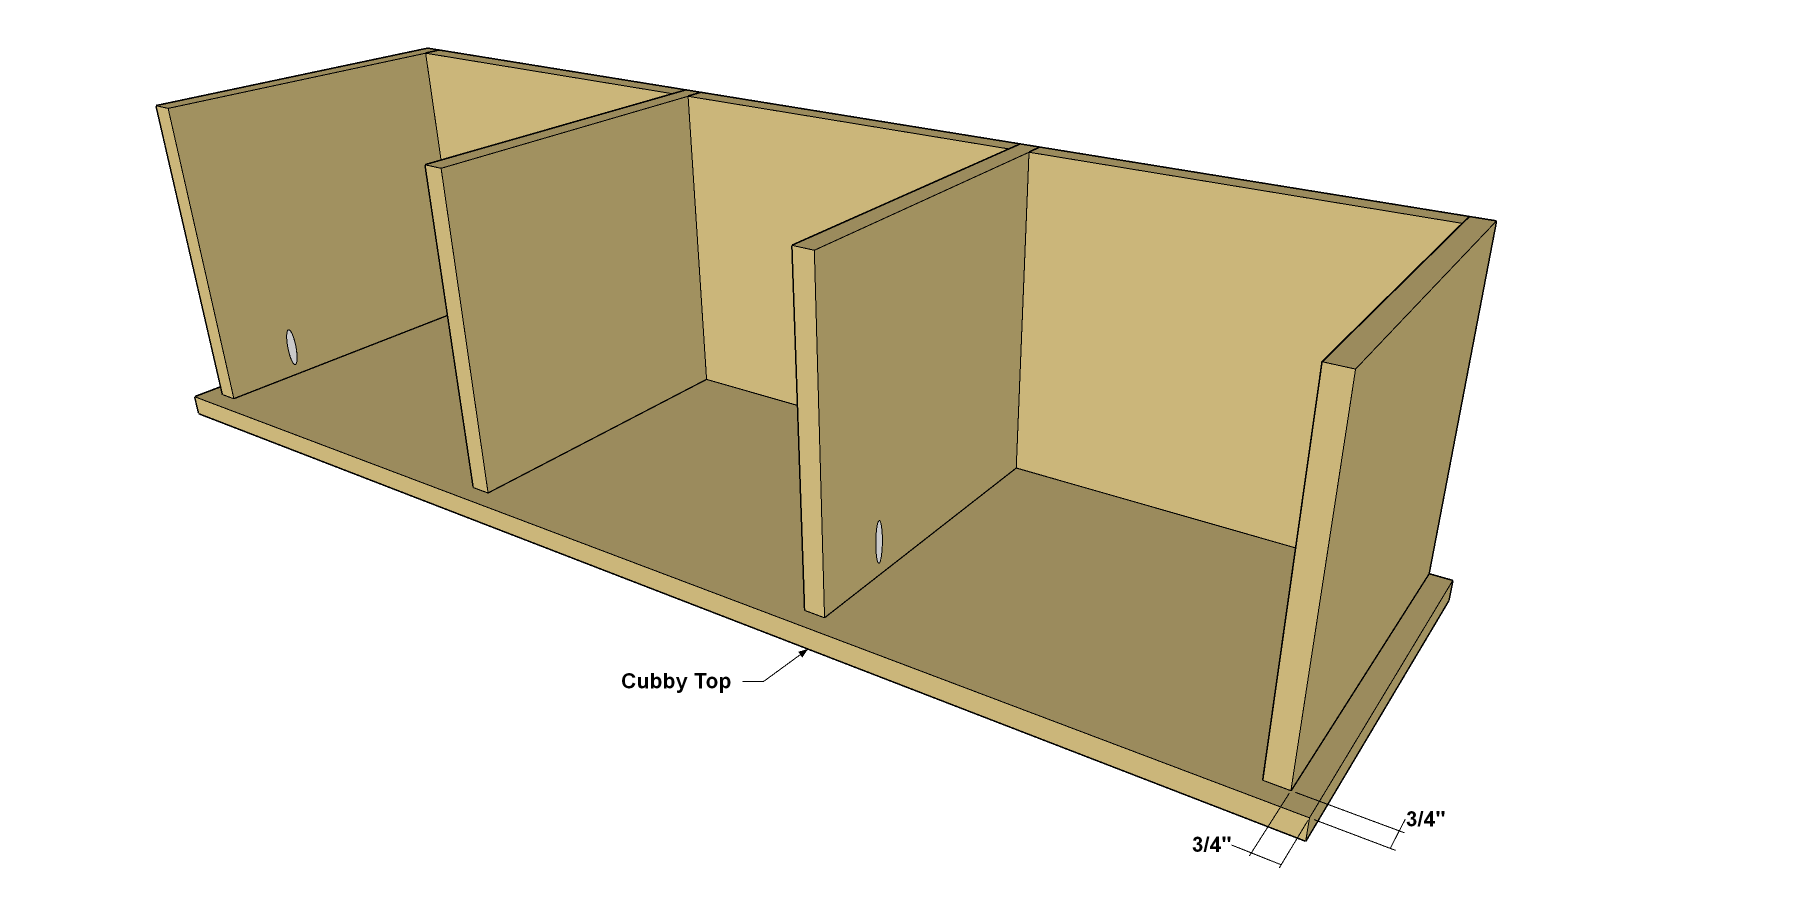
Add the Cubby Top
Cut a Cubby Top to size from 3/4" plywood, as shown in the cutting diagram. Now you can attach the Cubby Top, as shown. Make sure that Top overhangs the base by 3/4" at the front and ends, and. Then attach the Top using 1 1/4" coarse-thread Kreg Pocket-Hole Screws.
-
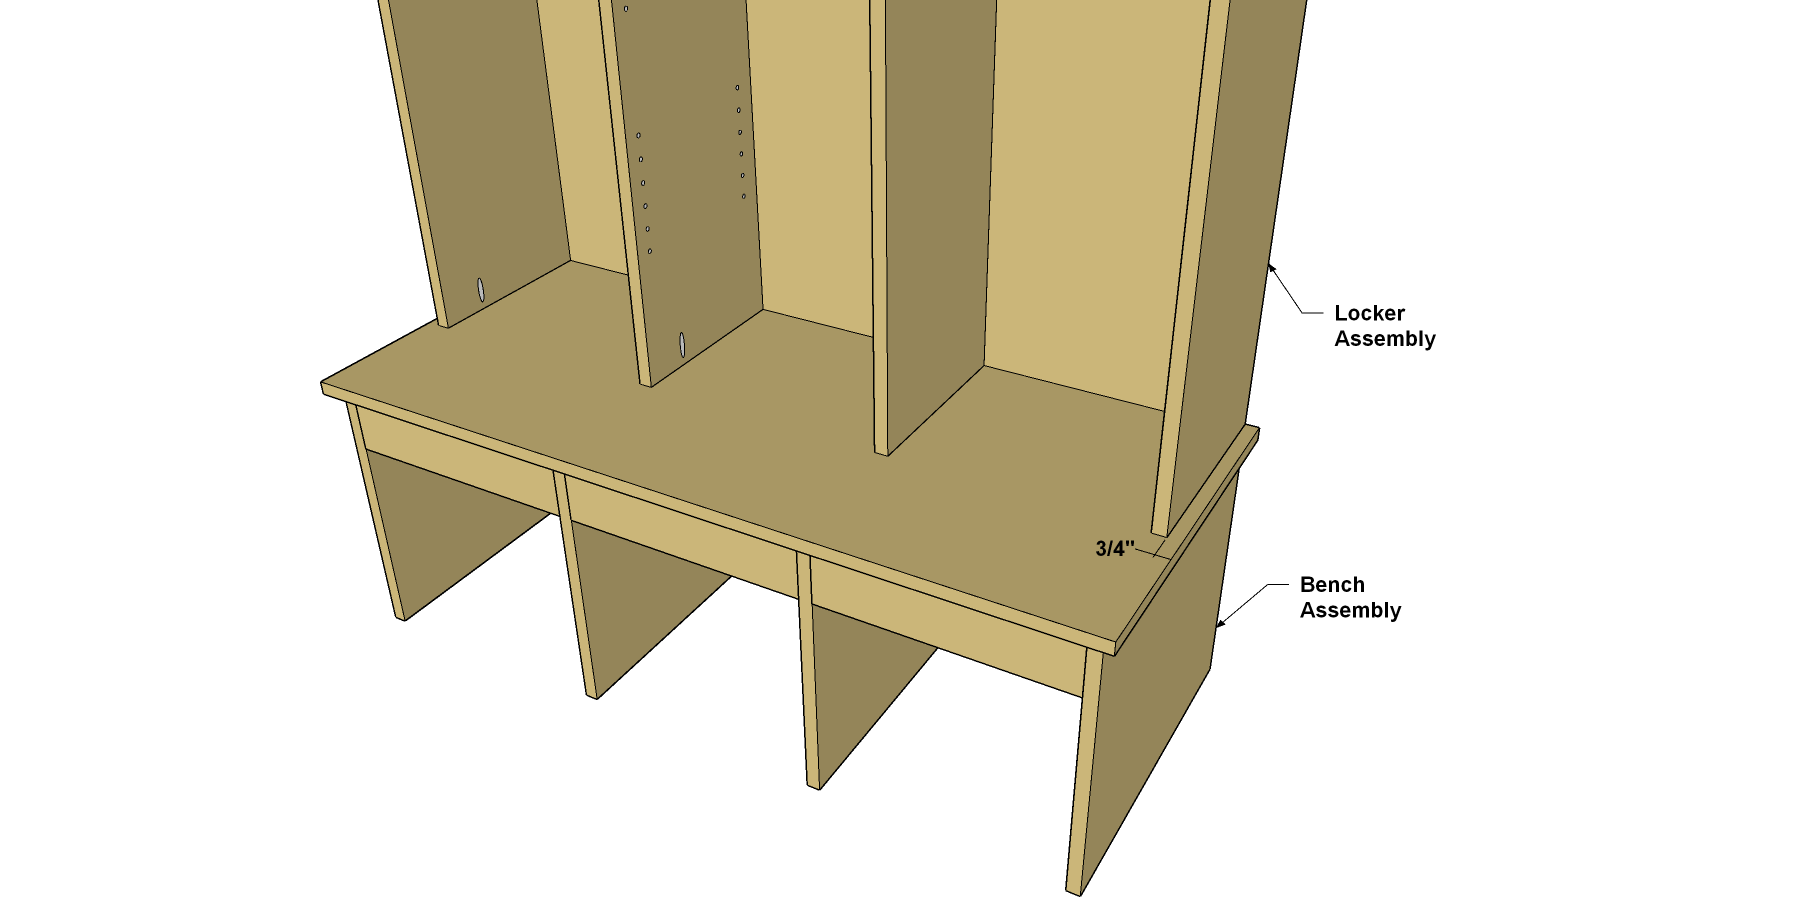
Attach the Lockers to the Bench
Now you can begin final assembly. Start by positioning the Locker assembly on top of the bench. Make sure that lockers are positioned evenly from side to side, and that the Locker backs are flush with the rear edge of the Bench Seat. Then secure the Lockers using 1 1/4" coarse-thread Kreg Pocket-Hole Screws.
-
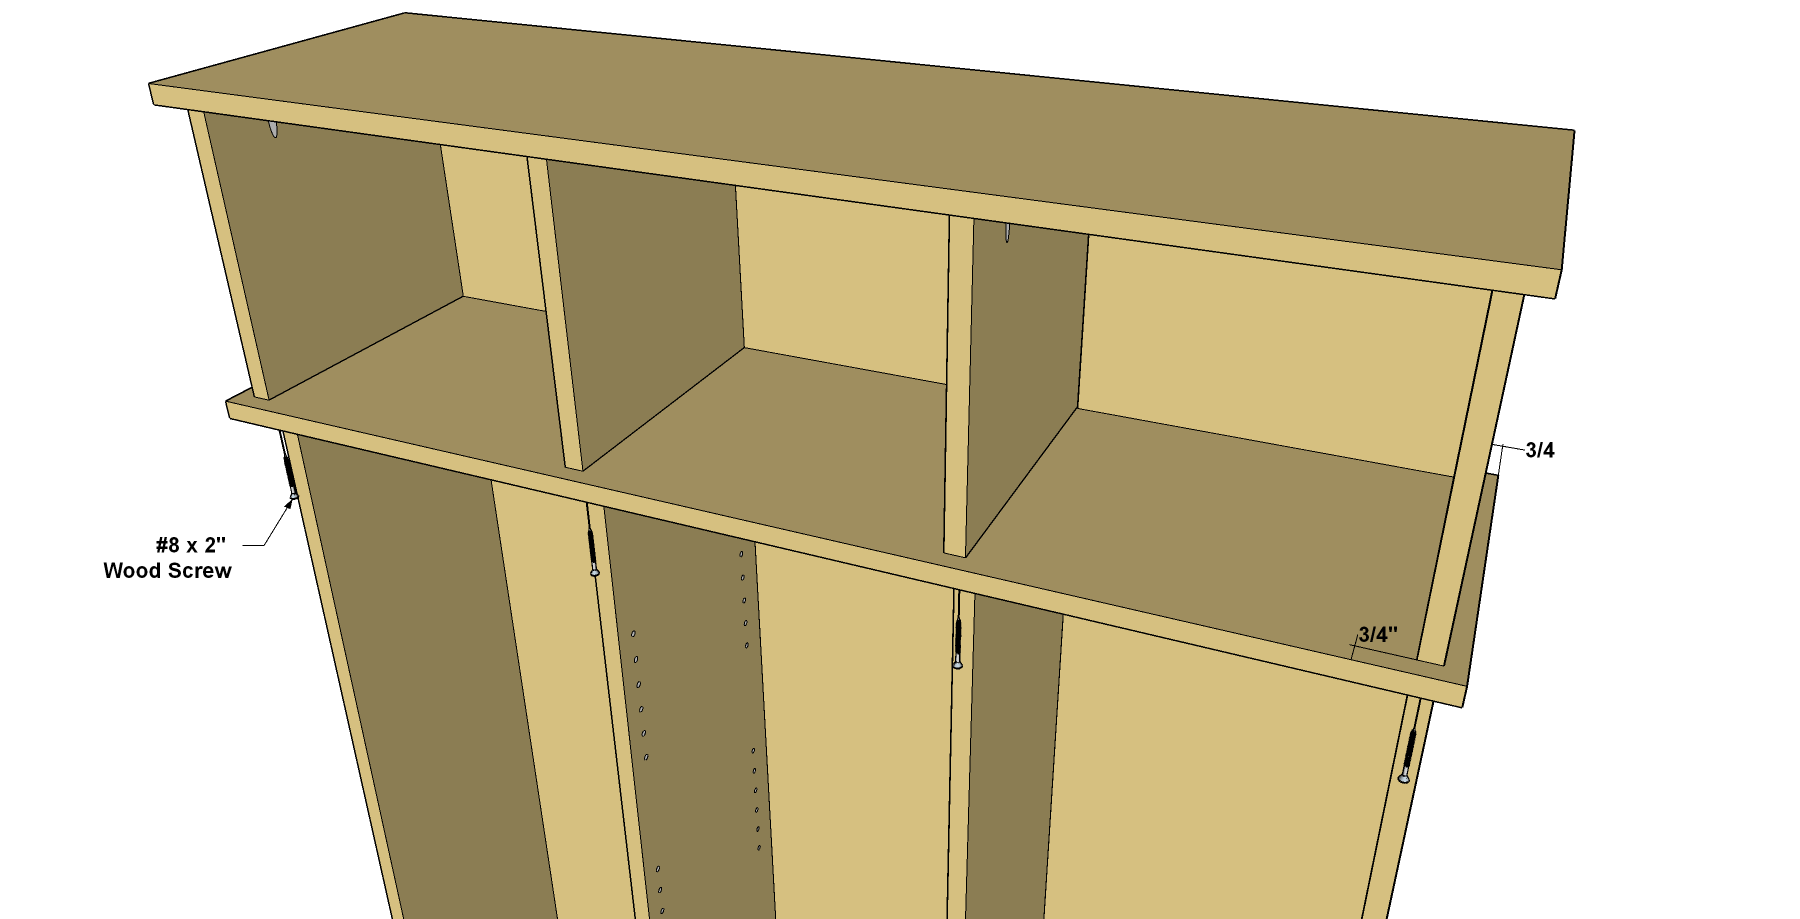
Attach the Cubbies to the Lockers
Next, position the Cubby assembly on top of the Lockers. Make sure that cubbies are positioned evenly from side to side, and that the Cubby backs are flush with the rear edge of the Locker. Now insert a drill bit into holes in the Locker Top from underneath and press to mark locations of holes in cubby uprights. Remove cubby assembly and drill pilot holes about 3/4" deep in the Cubby Uprights. Then, reposition the cubby assembly. Secure the Cubby Backs using 1 1/4" coarse-thread Kreg Pocket-Hole Screws. Secure the Cubby Uprights by driving 2" screws through the Locker Top and into the Cubby Uprights, as shown.
-
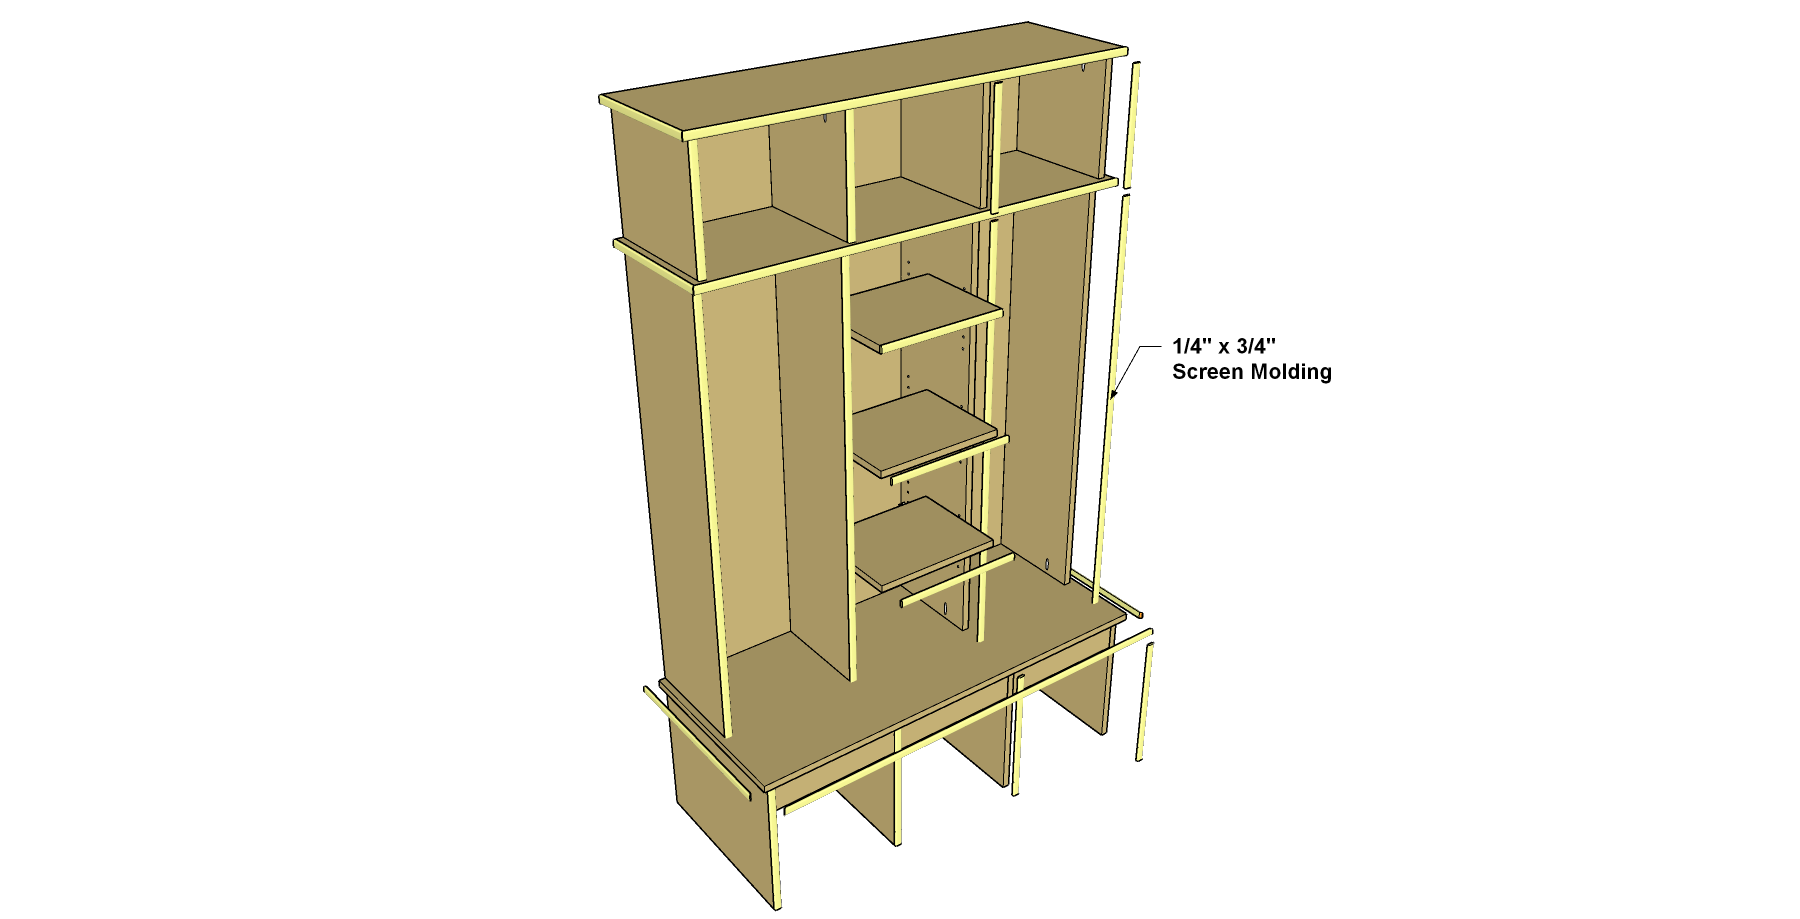
Dress It Up with Screen Molding
With everything assembled, you’ll want to cover the exposed plywood edges. Simple screen molding works great. Cut the screen molding pieces to fit. Where pieces meet at the corners of the Seat and Tops, you can miter the ends at 45°, or simply make straight cuts, overlap the pieces, and then sand the corners smooth. Then attach the Molding using glue and brad nails. If you have a brad nailer, the process goes much faster. Once the glue dries, sand your organizer as necessary, and then apply paint or stain. Install coat hooks in the outer lockers, slip in the shelves, and you can put your organizer to work.