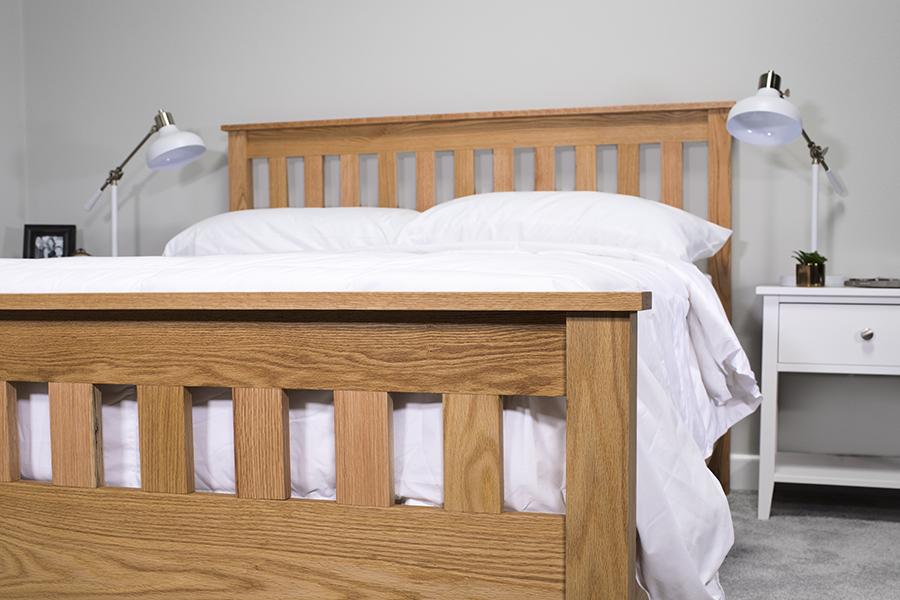
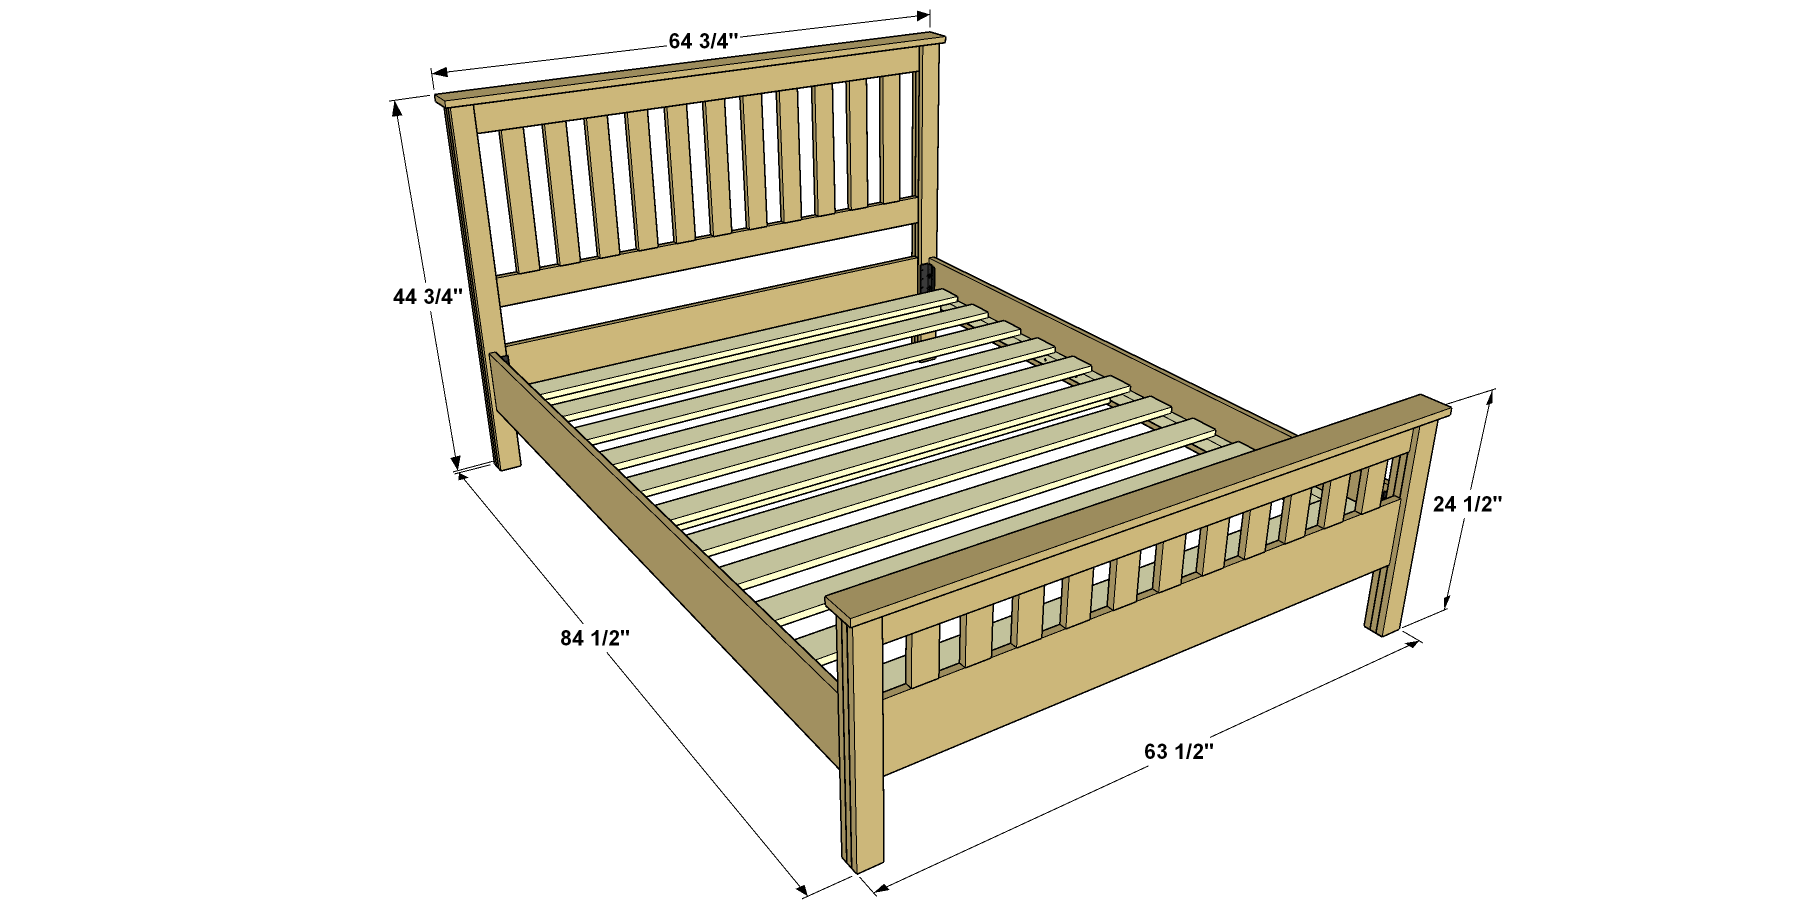


Furniture from the Craftsman/Arts and Crafts Style remains incredibly popular today thanks to timeless styling and simple lines. Those are both present in this queen-size bed. You can build one more easily than you thought, too. The cuts are all straight, and it’s assembled with pocket-hole joinery.
Tools
Kreg Tools


Other Tools
-
miter saw

-
flush-trim saw
-
tape measure
Materials
Wood Products
- 8 Oak board , 1x3 x 96"
- 5 Oak board , 1x4 x 72"
- 2 Oak board , 1x8 x 72"
- 2 Oak board , 1x8 x 96"
- 3 Pine board , 1x2 x 72"
- 2 Pine board , 2x2 x 96"
- 12 #2 pine board , 1x4 x 72"
Hardware & Supplies
- 140 1 1/4" fine-thread Kreg Pocket-Hole Screws
- 67 Oak Kreg Pocket-Hole Plugs (or 140 to fill ALL pocket holes)
- 44 2" flat-head wood screws
- 44 1 1/2" flat-head wood screws
- 1 Set of no-mortise (surface-mounted) keyhole bed rail brackets with mounting screws
- 1 Wood glue
Cut List & Parts
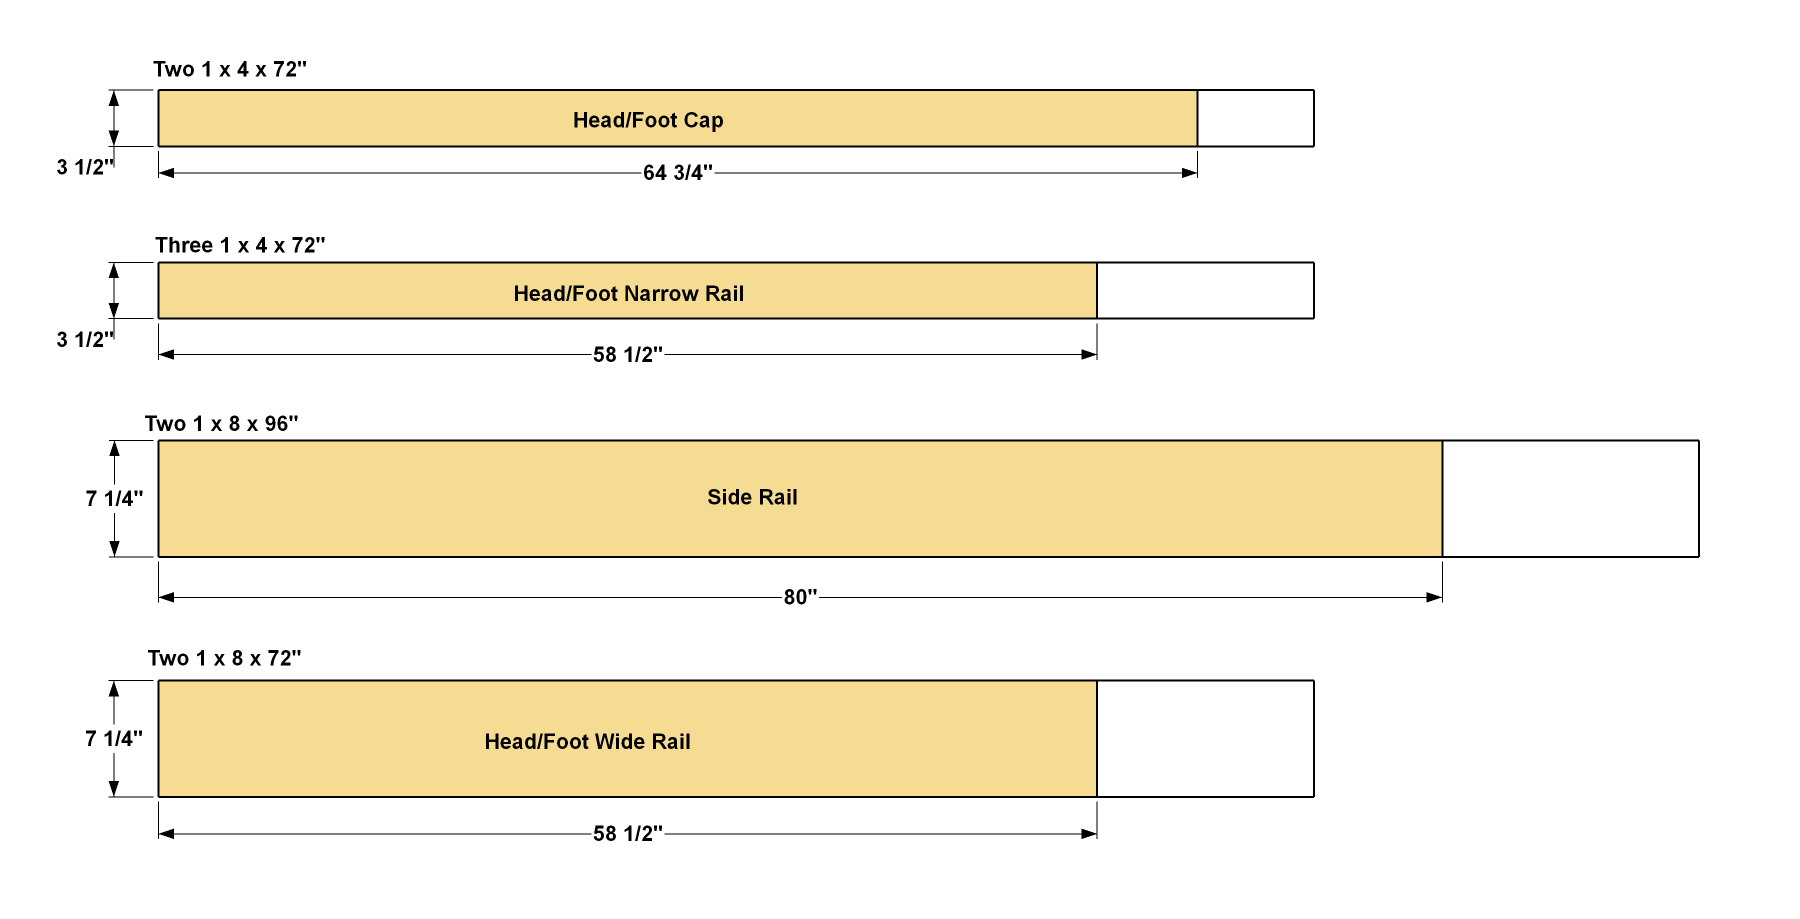
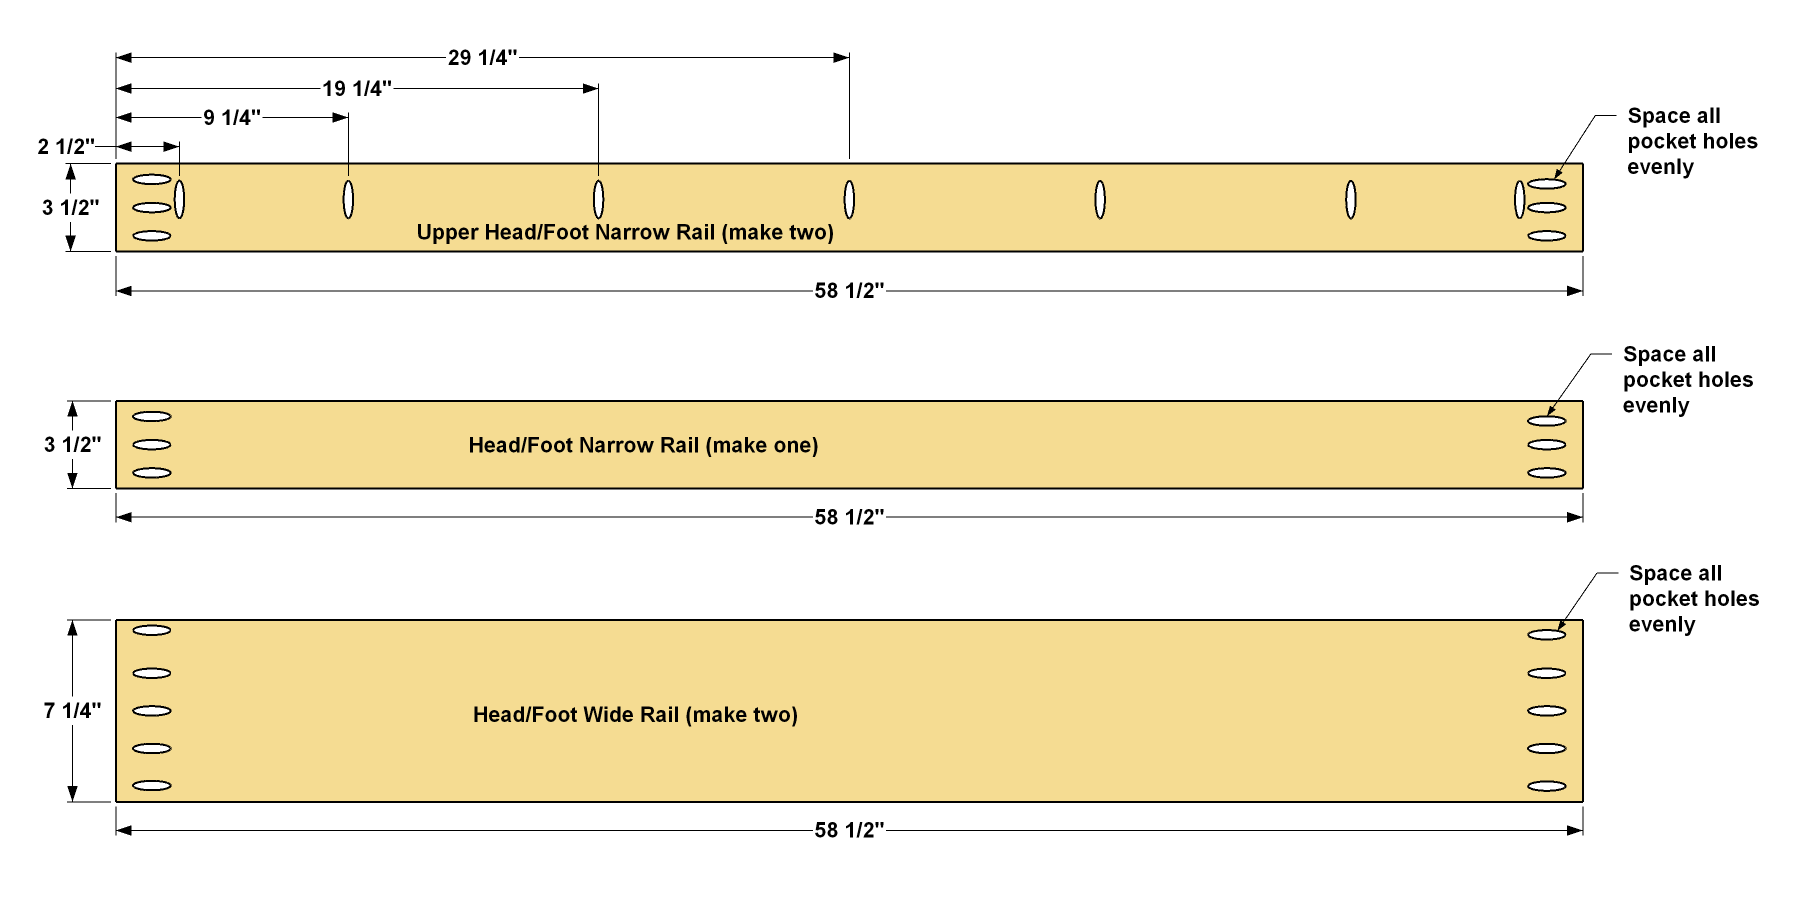
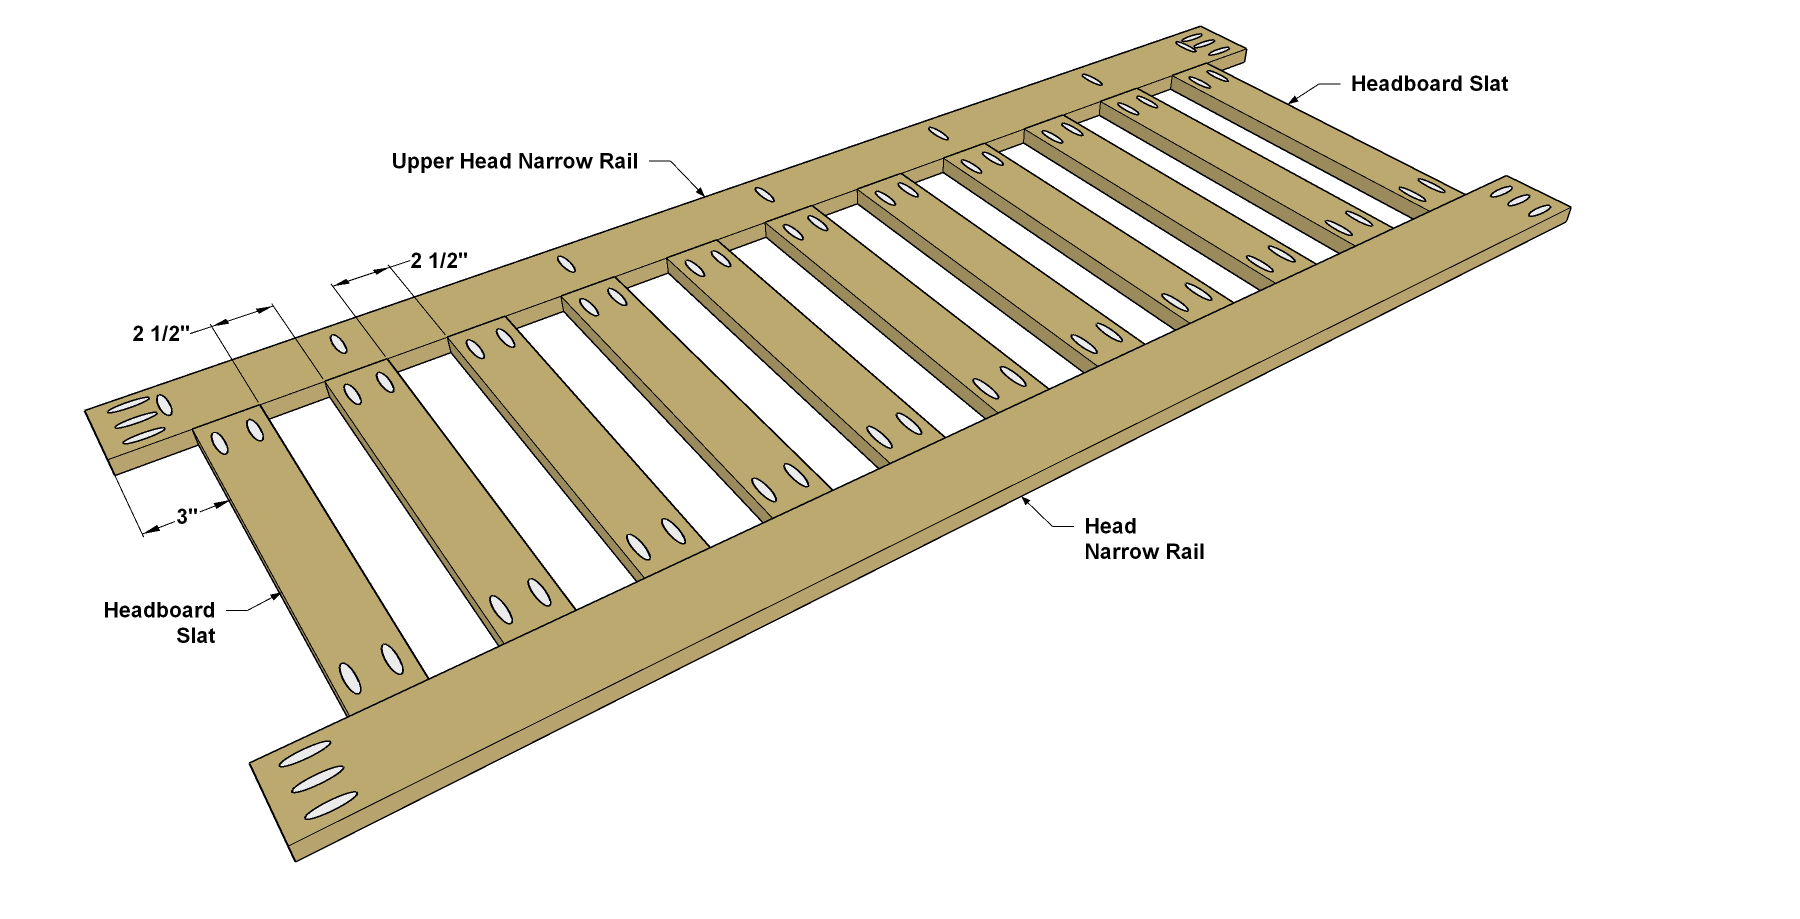
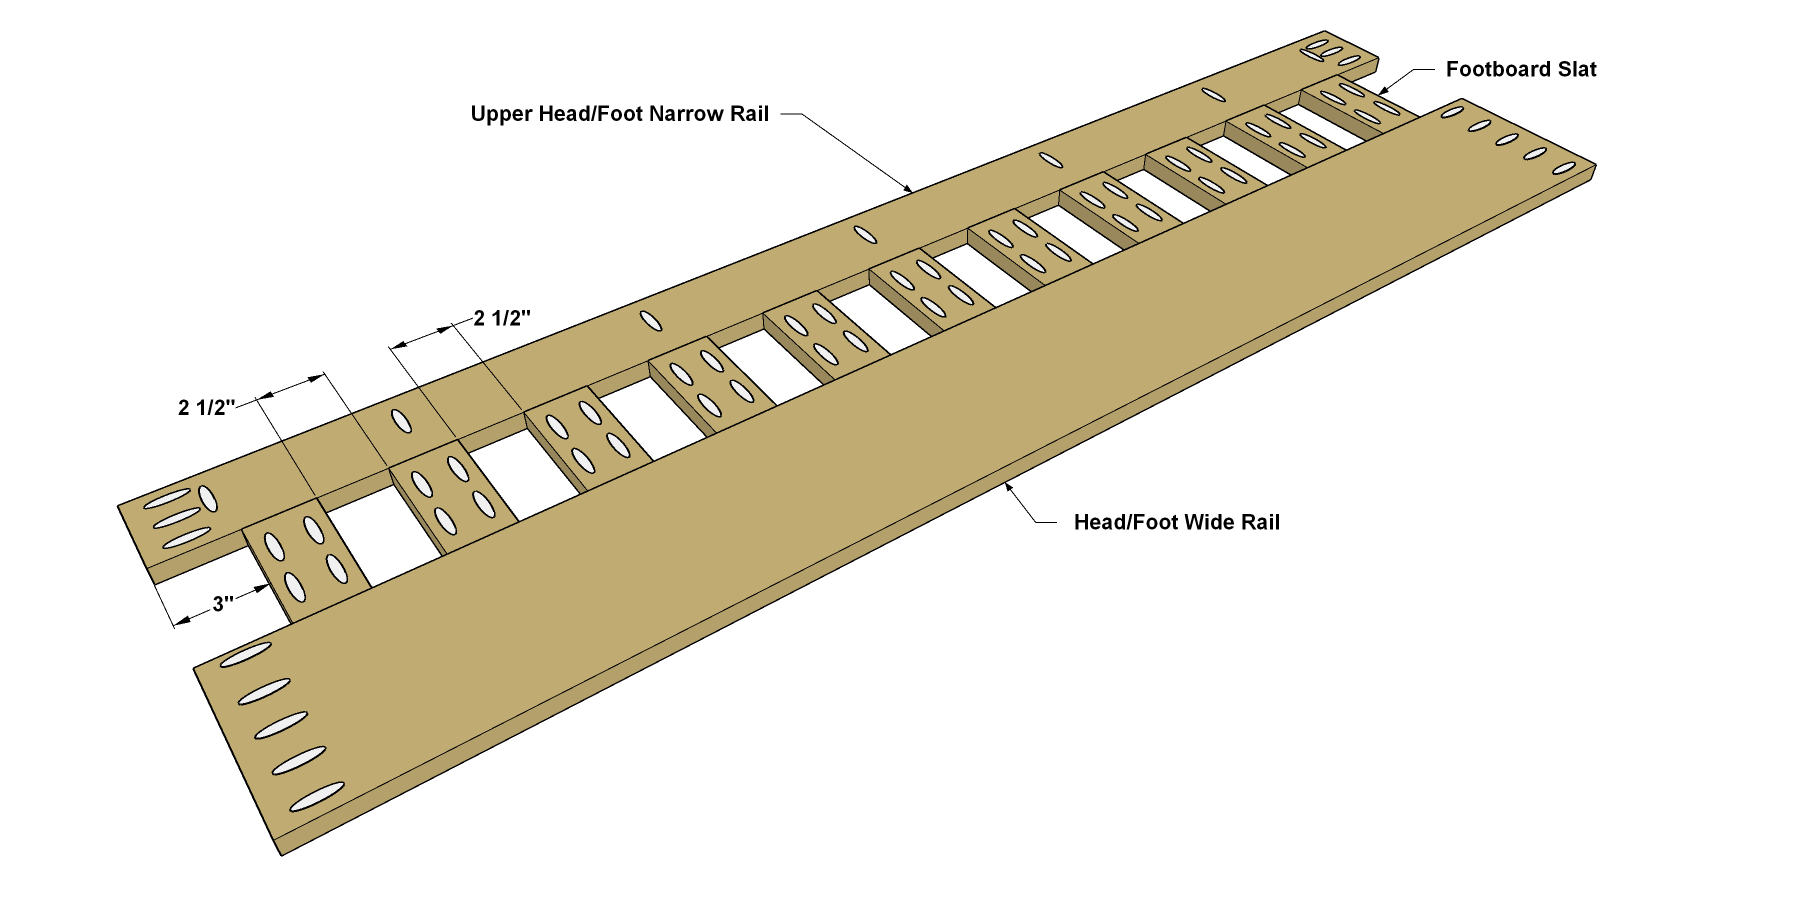
- 6 Head/Foot Narrow Rail , 3/4" x 3 1/2" x 58 1/2"
- 2 Head/Foot Wide Rail , 3/4" x 7 1/4" x 58 1/2"
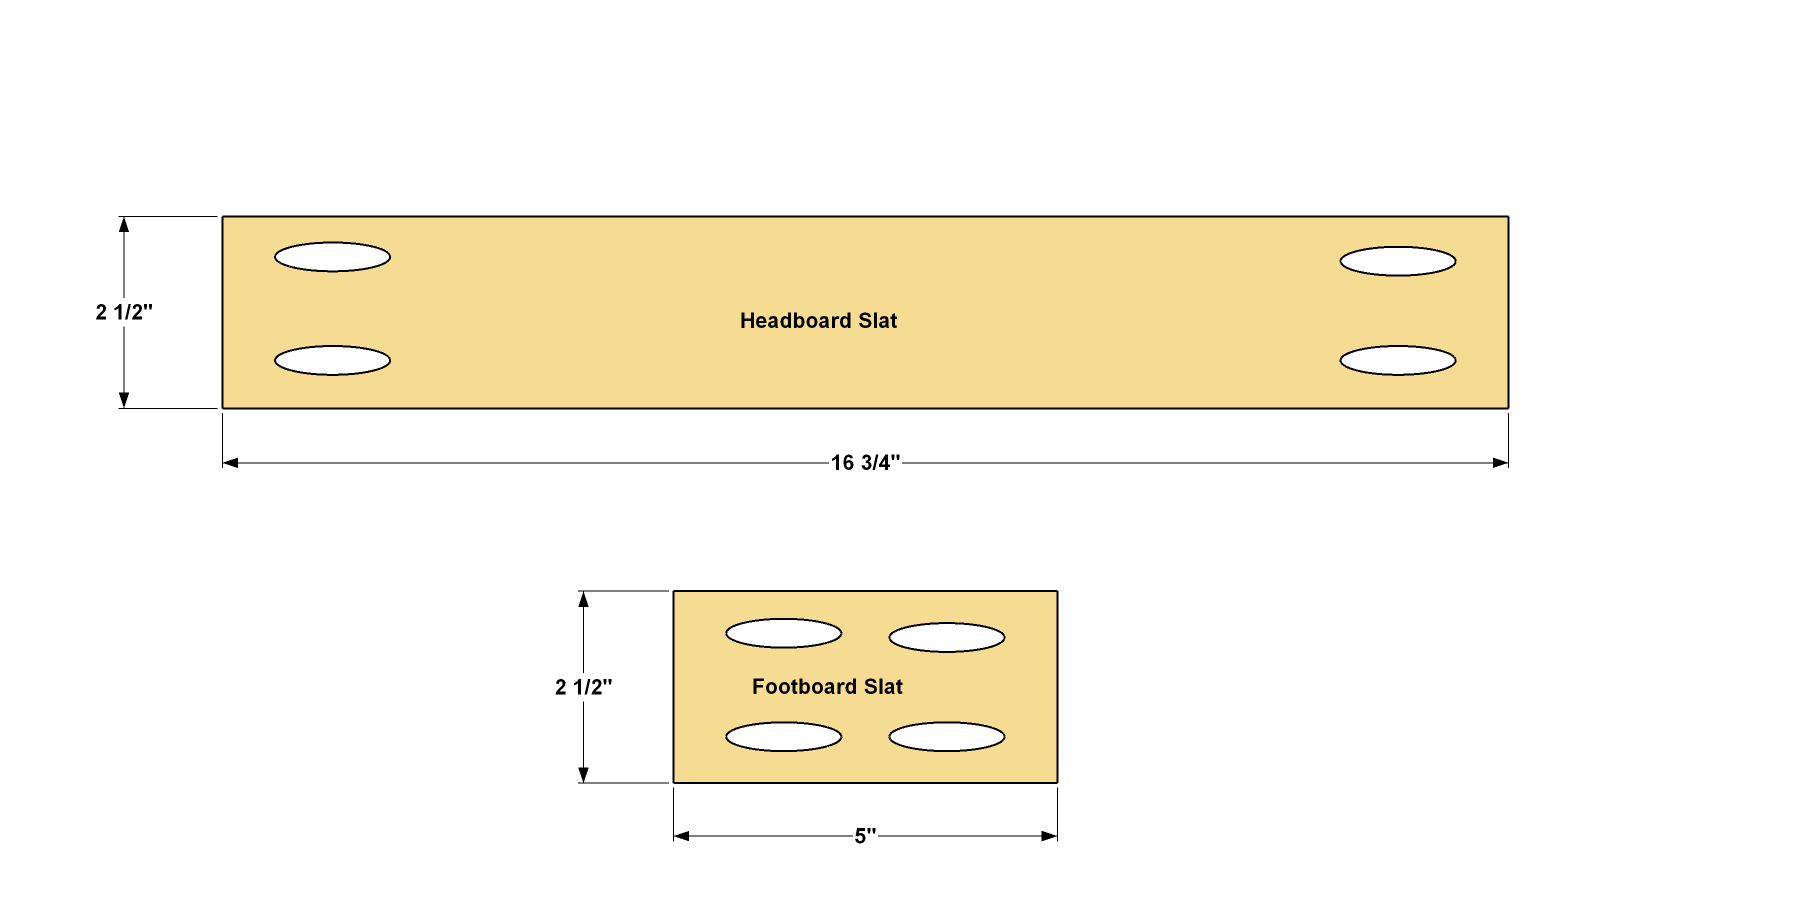
- 11 Headbaord Slat , 3/4" x 2 1/2" x 16 3/4"
- 11 Footboard Slat , 3/4" x 2 1/2" x 5"
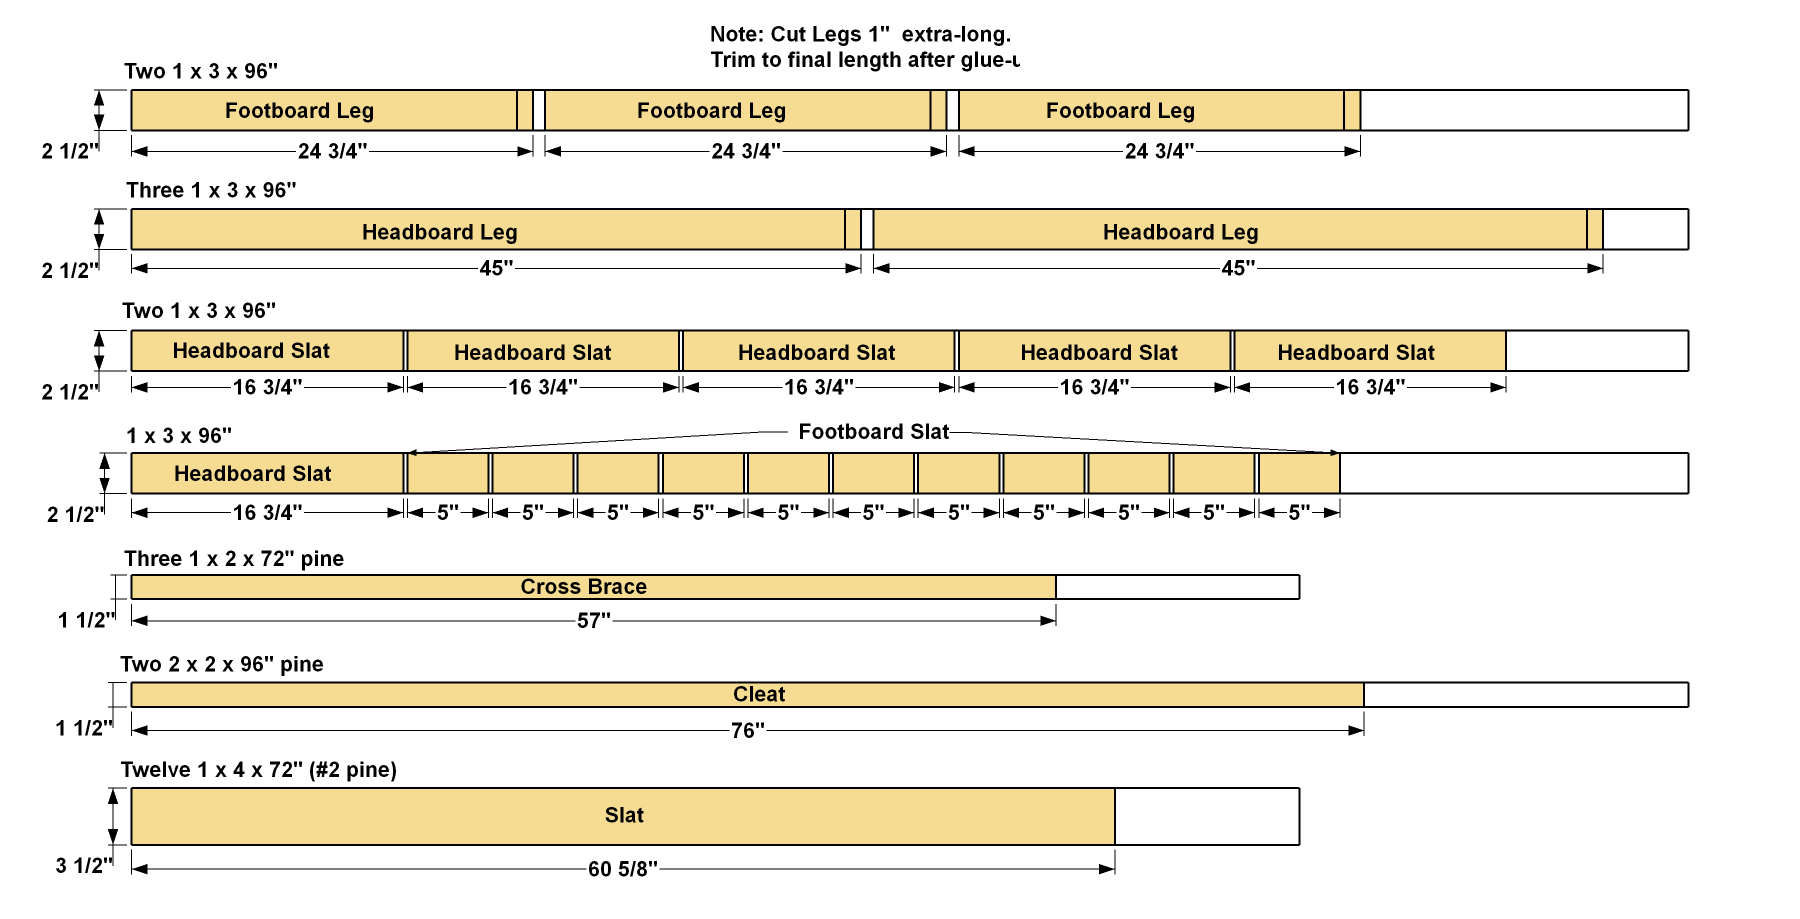
- 6 Headboard Leg , 3/4" x 2 1/2" x 44" oak (initially cut at 45")
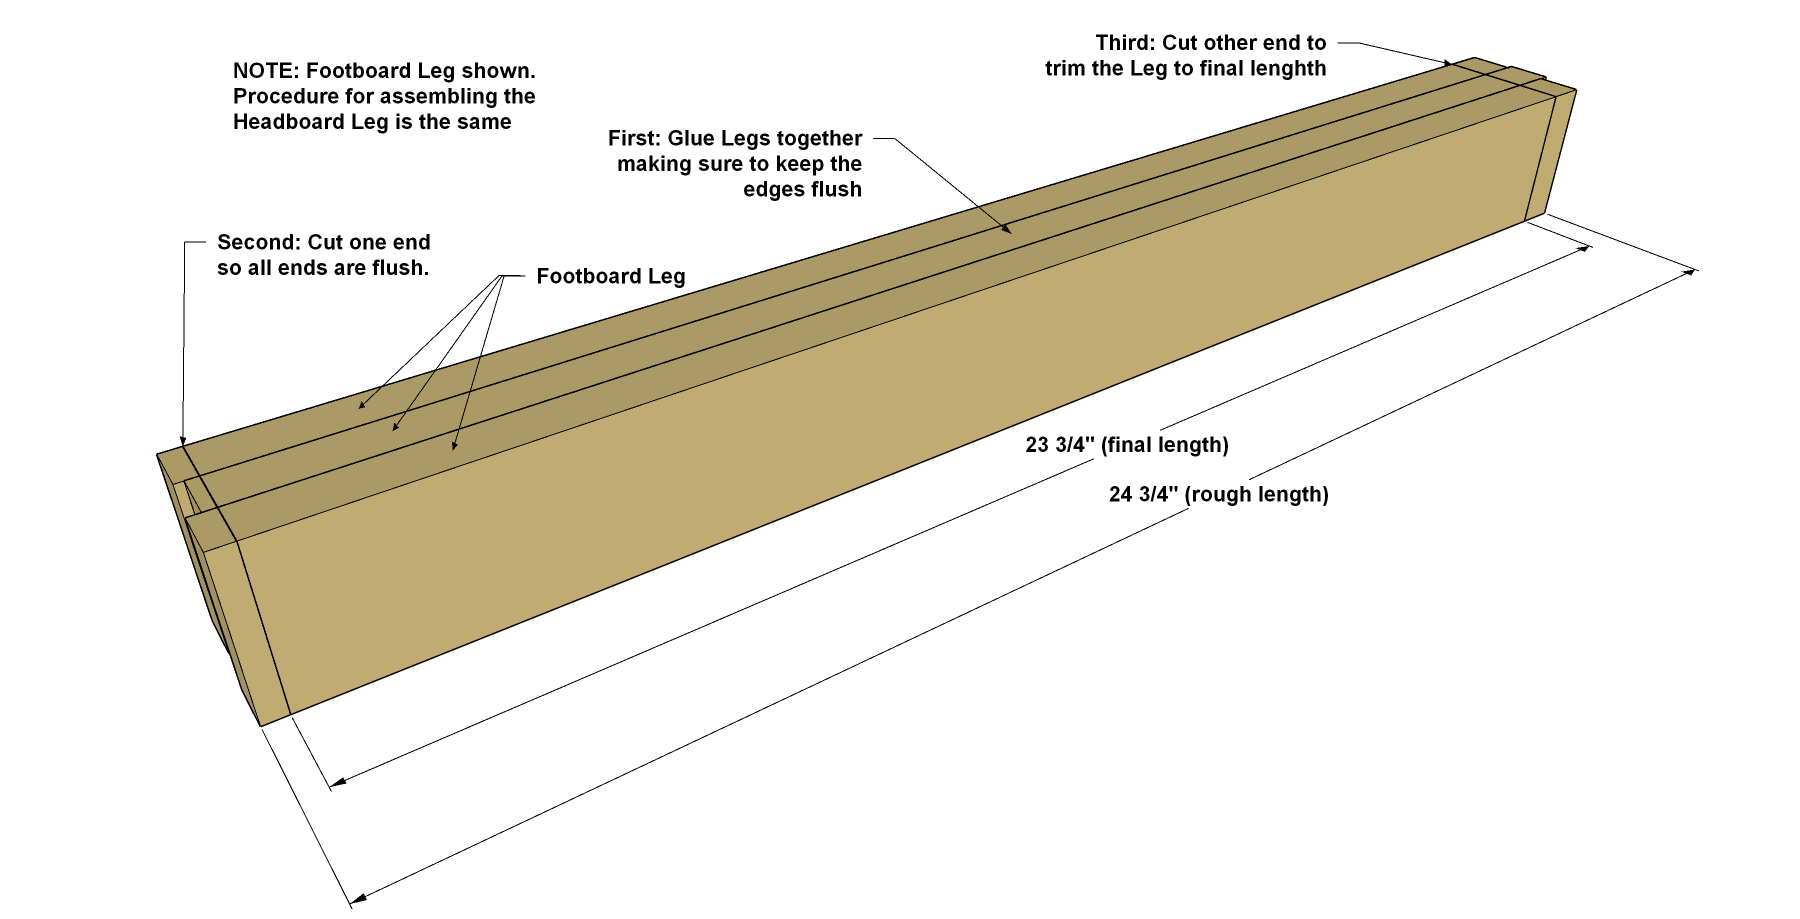
- 6 Footboard Leg , 3/4" x 2 1/2" x 23 3/4" oak (initially cut at 24 3/4")
- 2 Head/Foot Cap , 3/4" x 3 1/2" x 64 3/4"
- 2 Side Rail , 3/4" x 7 1/4" x 80"
- 2 Cleat , 1 1/2" x 1 1/2" x 76"
- 12 Slat , 3/4" x 3 1/2" x 60 5/8" #2 pine
- 3 Cross Brace , 3/4" x 1 1/2" x 57"
Directions
-
Make the Head/Foot Rails
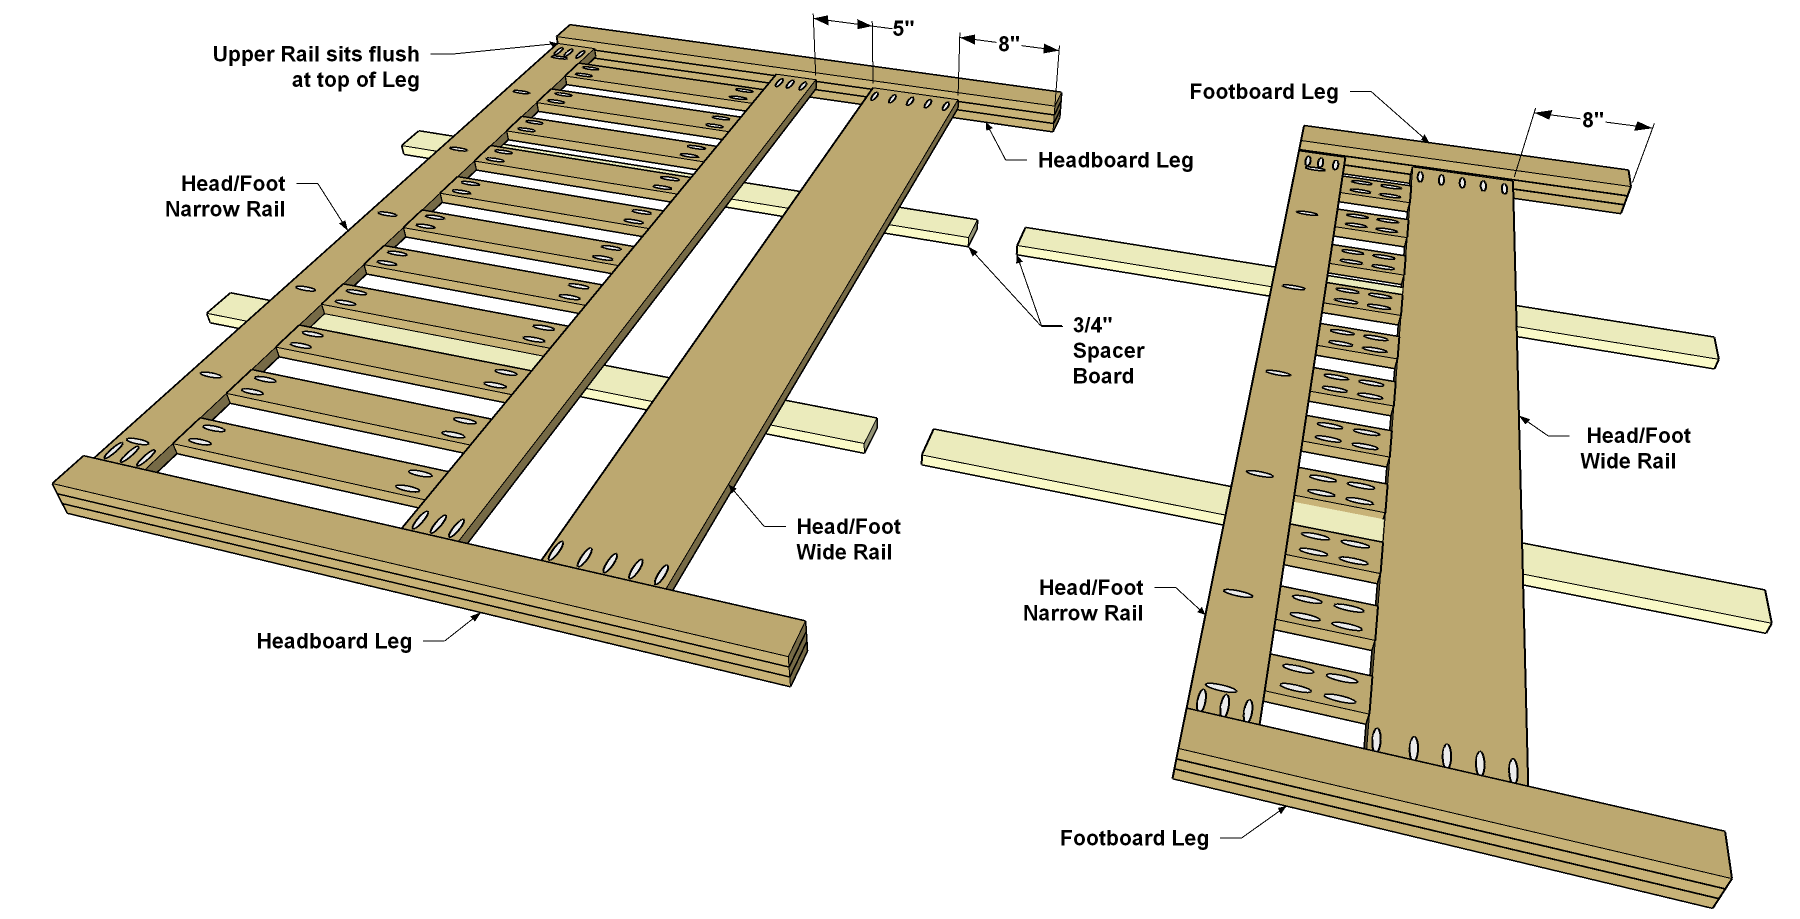
Cut three Head/Foot Narrow Rails to final length from 1x4 boards and two Head/Foot Wide Rails from 1x8 boards, as shown in the cutting diagram. Set your Kreg® Pocket-Hole Jig for 3/4"-thick material, and then drill pocket holes in the ends of all of the Rails, as shown. Then, drill pocket holes along one edge of two of the Narrow Rails. These will be positioned at the upper end of the headboard and footboard, and used to attach the Caps in a later step. Sand the faces and edges of all of the parts. Don’t sand the ends.
-
Make the Slats
Cut 11 Headboard Slats and 11 Footboard Slats to length from 1x3 boards, as shown in the cutting diagram. Drill pocket holes where shown. Sand the faces and edges of all of the parts.
-
Attach the Headboard Slats
For the Headboard, lay out the Slats between two Narrow Rails with the spacing shown. Make sure one of the Narrow Rails has the pocket holes along one edge facing out, and then secure all of the pieces together using 1 1/4" Kreg Pocket-Hole Screws. We built our bed from oak, which is a hardwood, so we used fine-thread screws. If you choose poplar or a softwood, use coarse-thread screws, instead.
-
Attach the Footboard Slats
For the Footboard, repeat the process, but secure the Slats between one Narrow Rail and one Wide Rail as shown. Again, make sure the pocket holes in the edge of the Narrow Rail face out.
-
Make the Legs
Cut six Footboard Legs and six Headboard Legs to rough length (about 1" extra-long) from 1x3 boards, as shown in the cutting diagram. Glue and clamp three Footboard Legs together face to face, as shown. Make sure the edges of the board are flush. Repeat this for the second Footboard Leg, then use the same process to make a pair of thick legs for the Headboard. After the glue has completely dried, remove the clamps, scrape any excess glue off the edges of the Legs, and then cut the Legs to final length. Then sand all faces of the assembled legs.
-
Assemble the Headboard and Footboard
Position the Headboard Legs face up (so the glued edges are facing toward the sides, as shown) on a flat work surface. Set the headboard slat and rail assembly between the Legs, propped up on two ¾” spacers, with the pocket holes facing up. Make sure the Narrow Rail with the pocket holes along one edge is flush with the upper ends of the Legs. Secure the parts together with glue and 1 1/4" Kreg Pocket-Hole Screws. Finally, position the Wide Rail between the Legs at the location shown, and secure it with 1 1/4" Kreg Pocket-Hole Screws. In most rooms, the pocket holes in the Slats and Rails will face toward the wall, so you don’t have to plug these pocket holes—though you can if you prefer.
Assemble the Footboard Legs and slat/rail assembly in the same manner as the headboard. The pocket holes in the Narrow Rail and Slats may show on the footboard, even though they’ll face inward, depending on the mattress and box springs you use
-
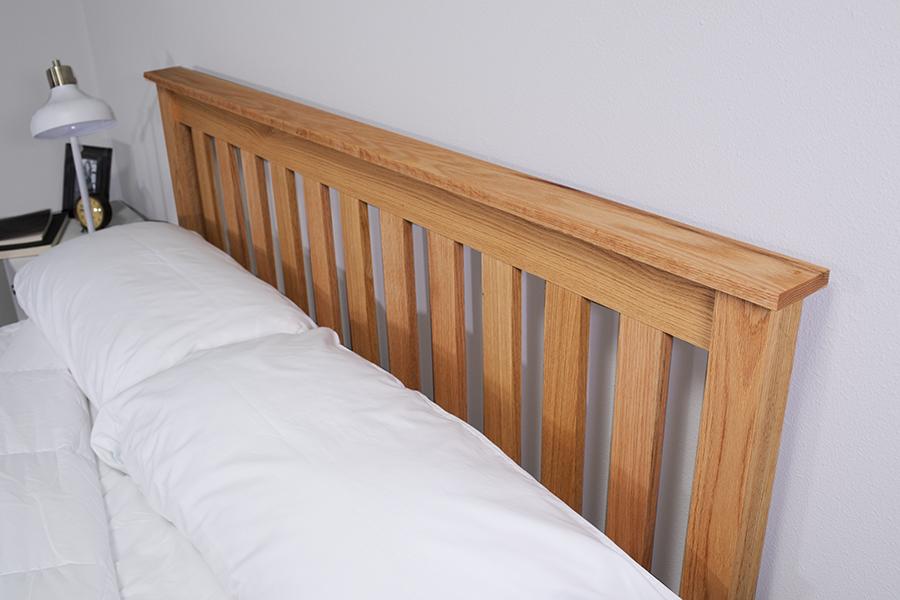
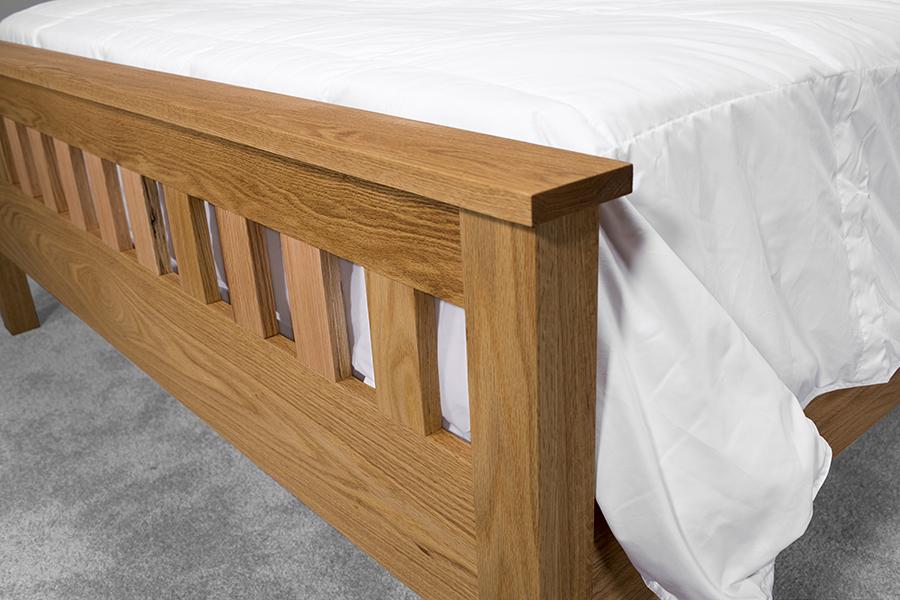
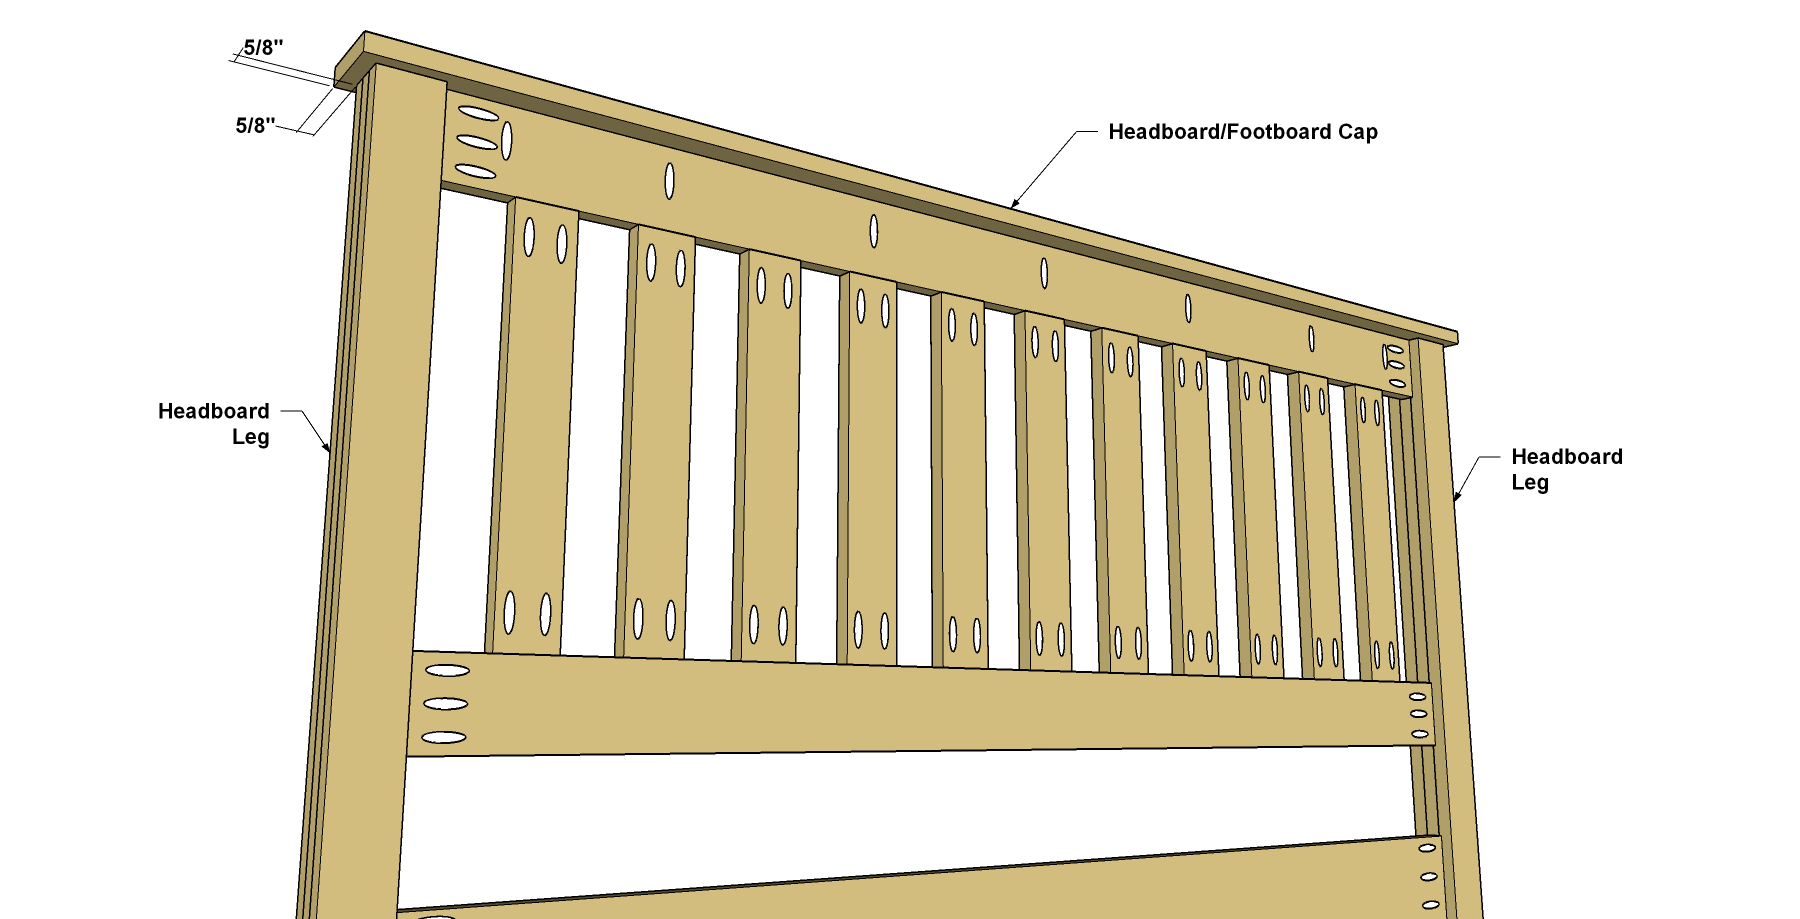
Cut and Attach the Caps
From 1x4 boards, cut the two Top Caps to length, as shown in the cutting diagram. Sand the faces, edges, and ends of the Caps smooth. Position each Cap so it hangs over the Legs evenly, as shown, and then secure each Cap to the Upper Narrow Rail on the headboard and the footboard using 1 1/4" Kreg Pocket-Hole Screws.
Now you can decide if you want to fill the pocket holes in your headboard and footboard assemblies. In most rooms, the pocket holes in the headboard face toward the wall, so they won’t show. In the footboard, though, the pocket holes may not be completely hidden by the mattress and box springs, so you may want to fill them. To do that, you’ll need 67 Kreg Pocket-Hole Plugs—oak in our case. Glue the plugs in, and then sand them flush when the glue dries.
-
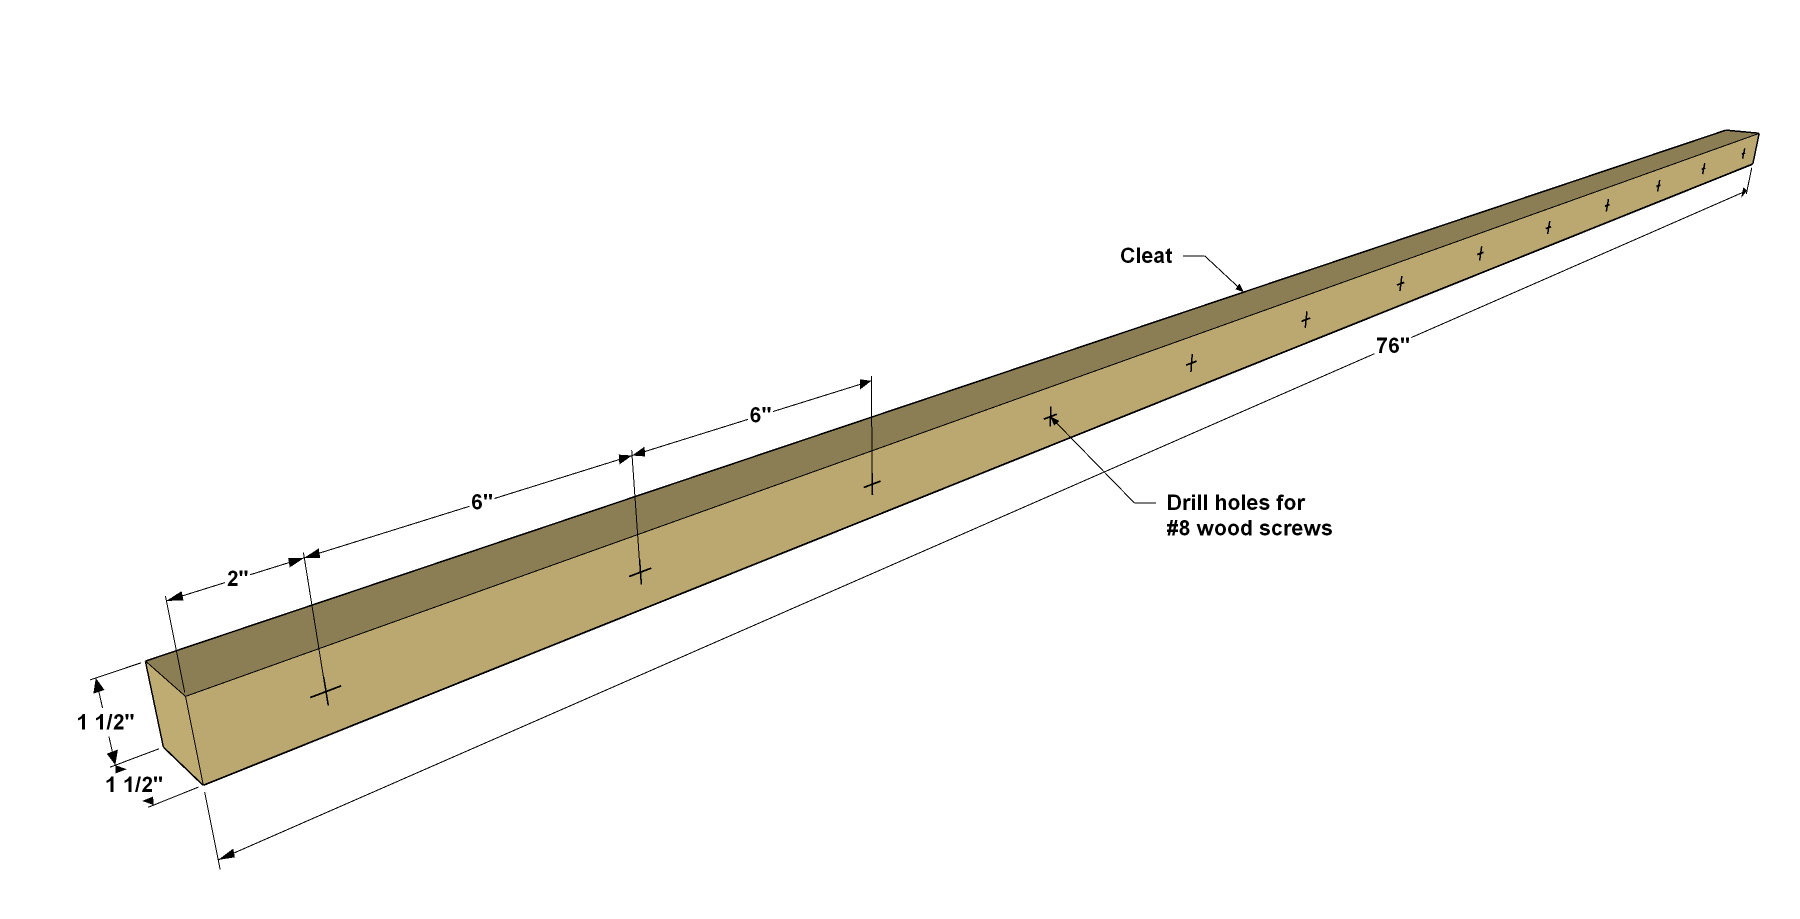
Make Side Rails and Cleats
Cut two Side Rails to length from 1x8 boards, as shown in the cutting diagram. Sand the faces and edges smooth. Next, cut two Cleats to length from 2x2 pine boards as shown in the cutting diagram. Drill mounting holes at the locations shown.
-
Attach the Cleats
Now position each Cleat on the Side Rail as shown, and then secure it in with glue and 2" flat-head wood screws.

-
Attach the Hardware
Attach the bed hardware to the Side Rails, the Headboard and the Footboard following the manufacturer’s instructions. Make sure, when you position the hardware on the Legs, that you’ll have that you’ll have 61" between the Bed Rails. Also, the Side Rails should hang at the same height as the Headboard and Footboard Wide Rail. On the headboard, make sure you’re mounting to the face that doesn’t show pocket holes. On the footboard, mount the brackets on the face that does show pocket holes.
-
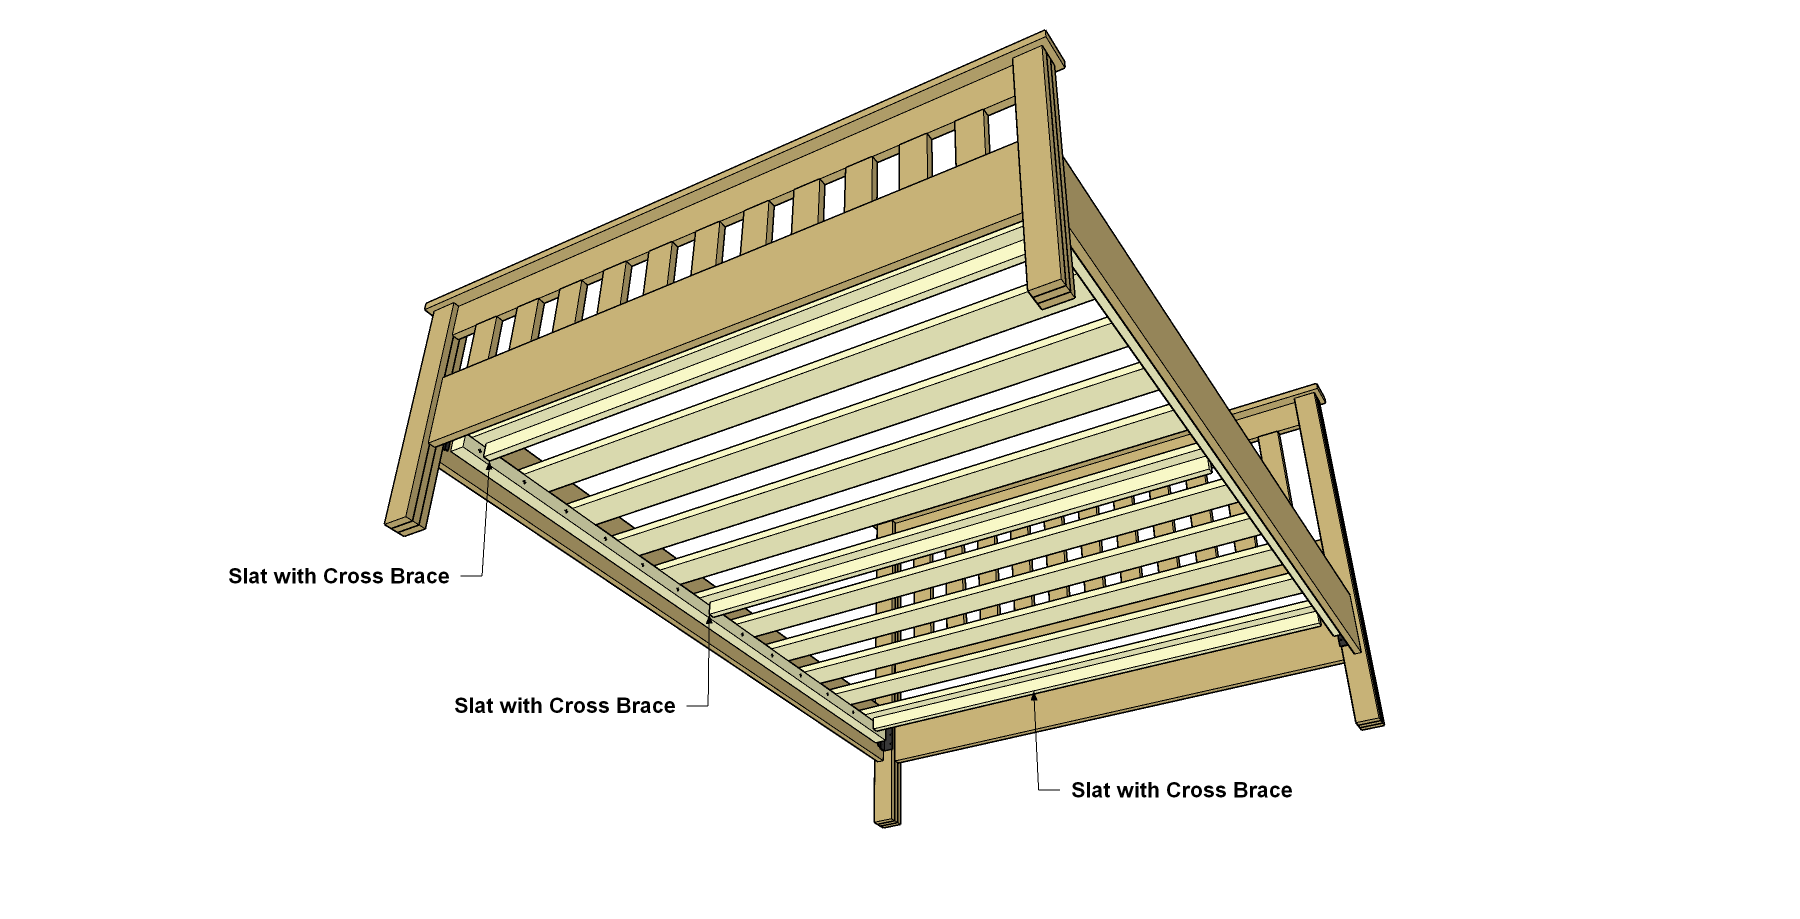
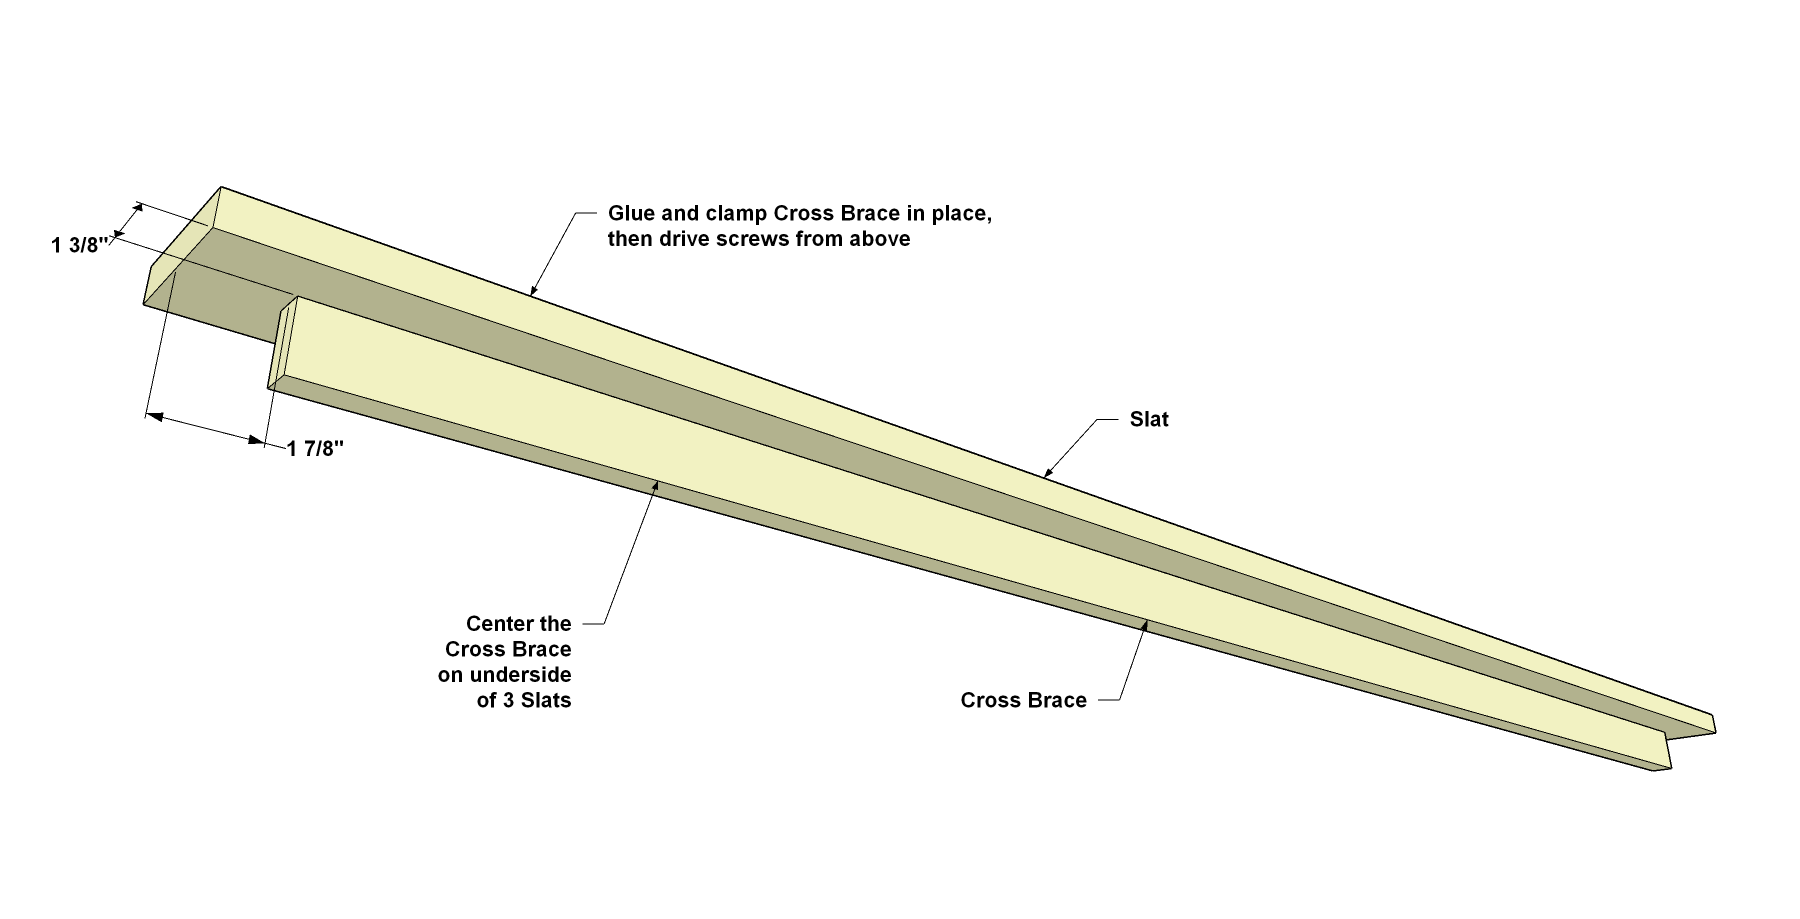
Cut the Slats and the Braces
Cut 11 slats to length from #2 pine 1x4s, as shown in the cutting diagram. Then, cut three Cross Braces to length from 1x2 boards, as shown. Secure the Braces centered on each of the three Slats using glue and 2" flat-head wood screws (approximately 6 screws per brace).
-
Apply Finish and Assemble
With all of the bed parts complete, you can apply the finish or stain. We wiped on two coats of an oil finish. After the finish dries, connect the Side Rails to the headboard and footboard using the bed hardware. Lay the Slats with Cross Braces in place at the headboard, footboard, and center of the bed, as shown. Then evenly space the remaining cleats. Finally, secure each Slat to the Cleat with one 1 1/2" flat-head wood screw.