


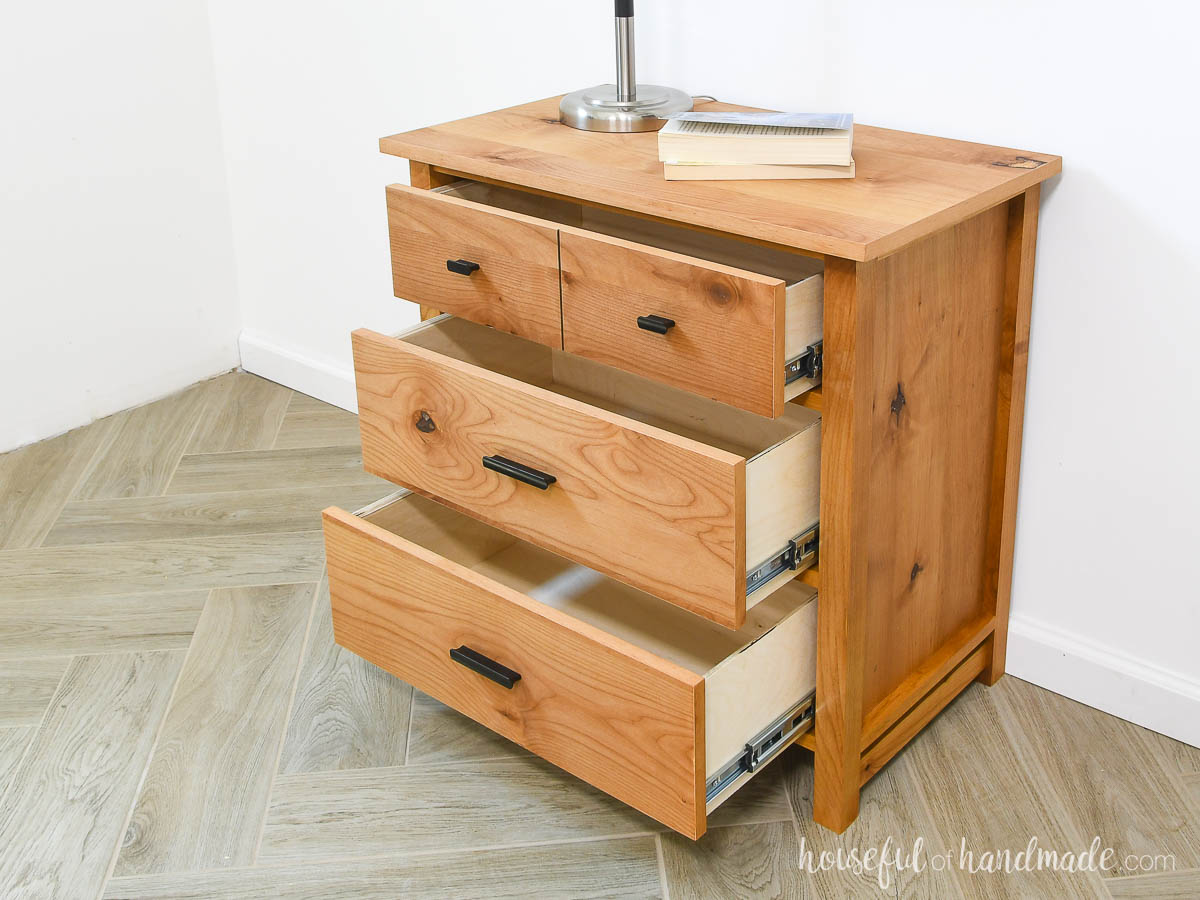
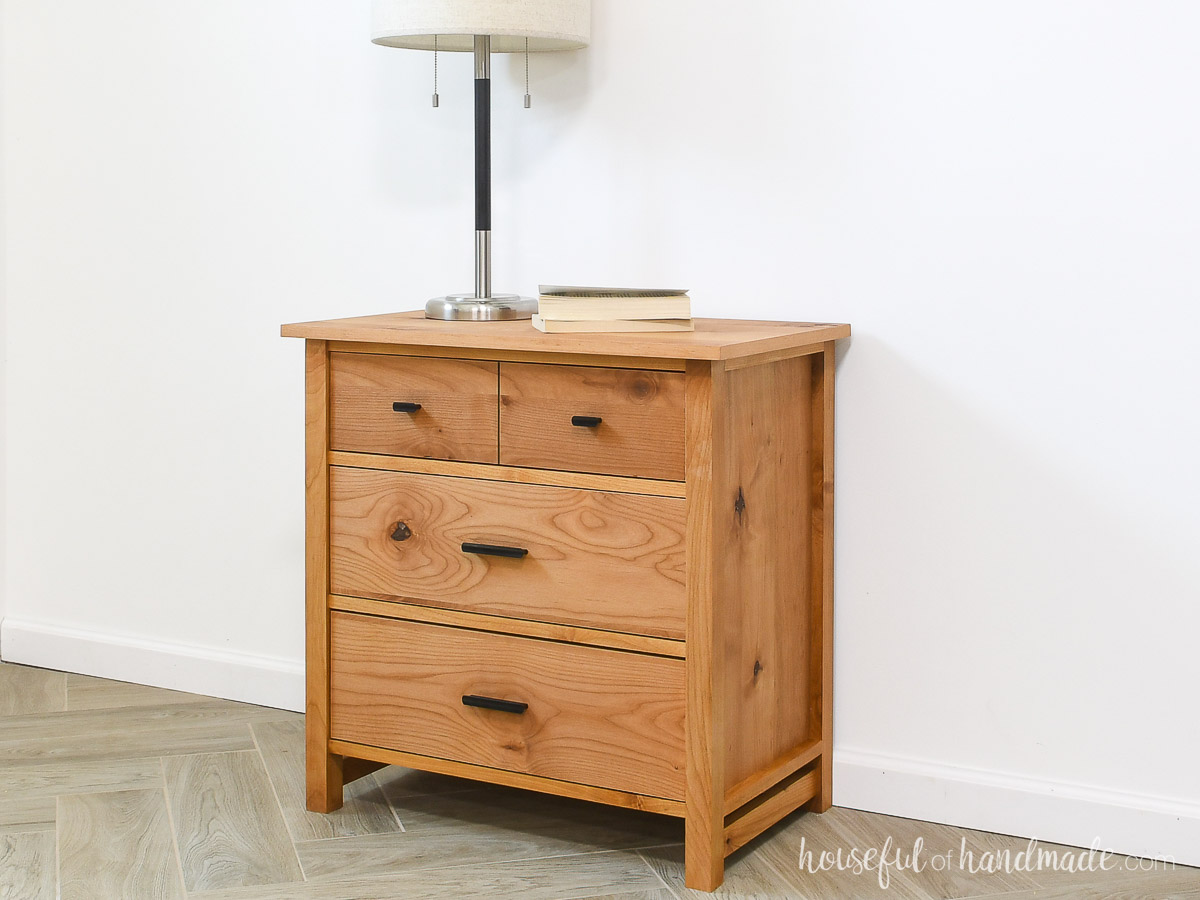
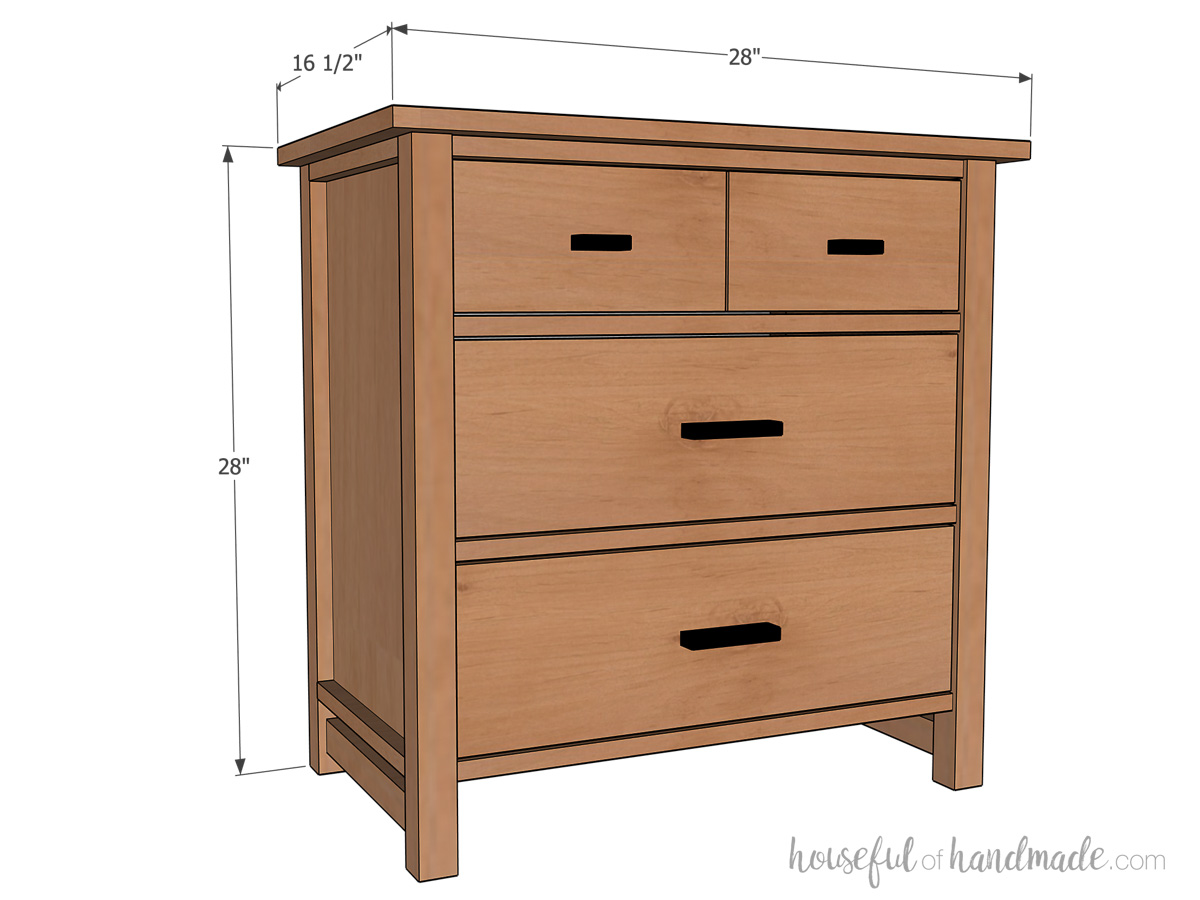


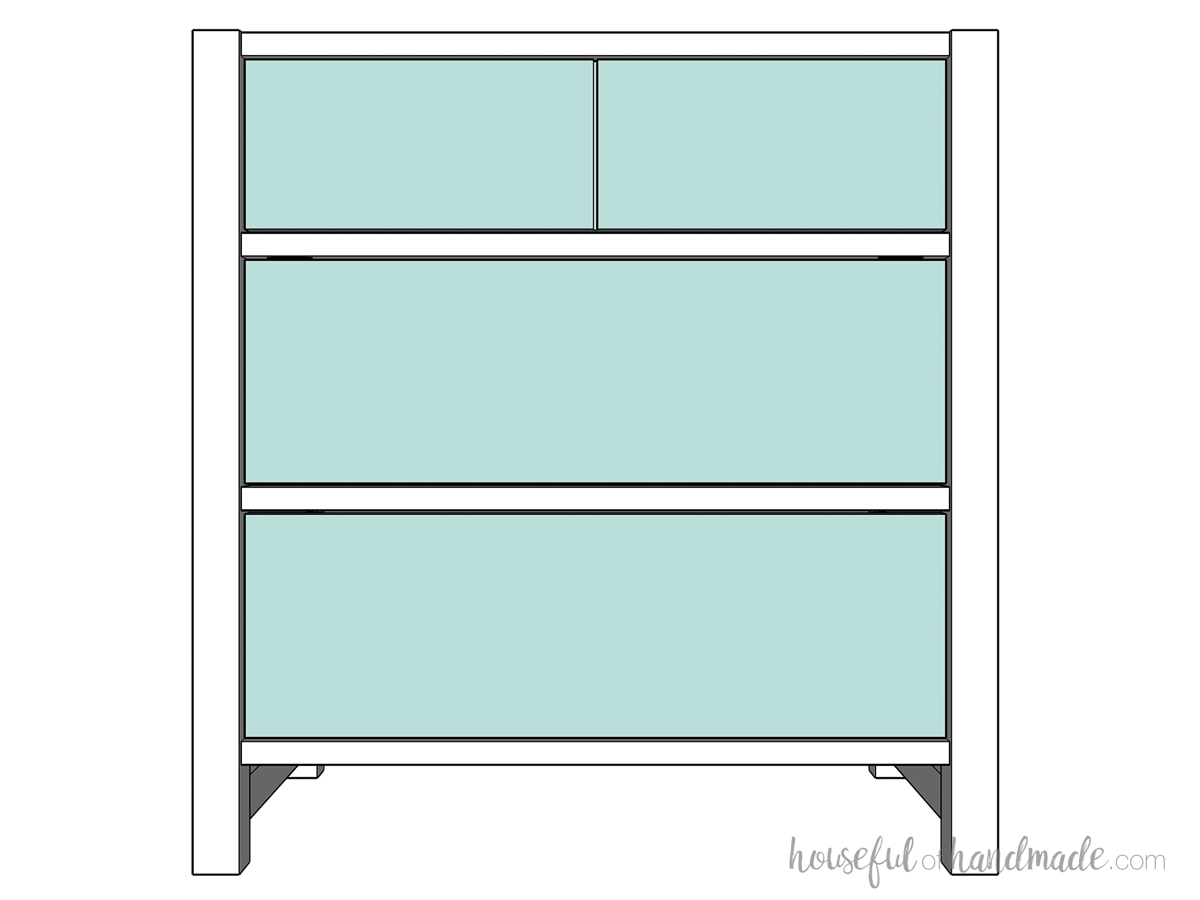
This easy to build nightstand has 3 drawers for lots of storage. The large nightstand is 28" wide so there is plenty of room for all the things you love to keep next to your bed.
Tools
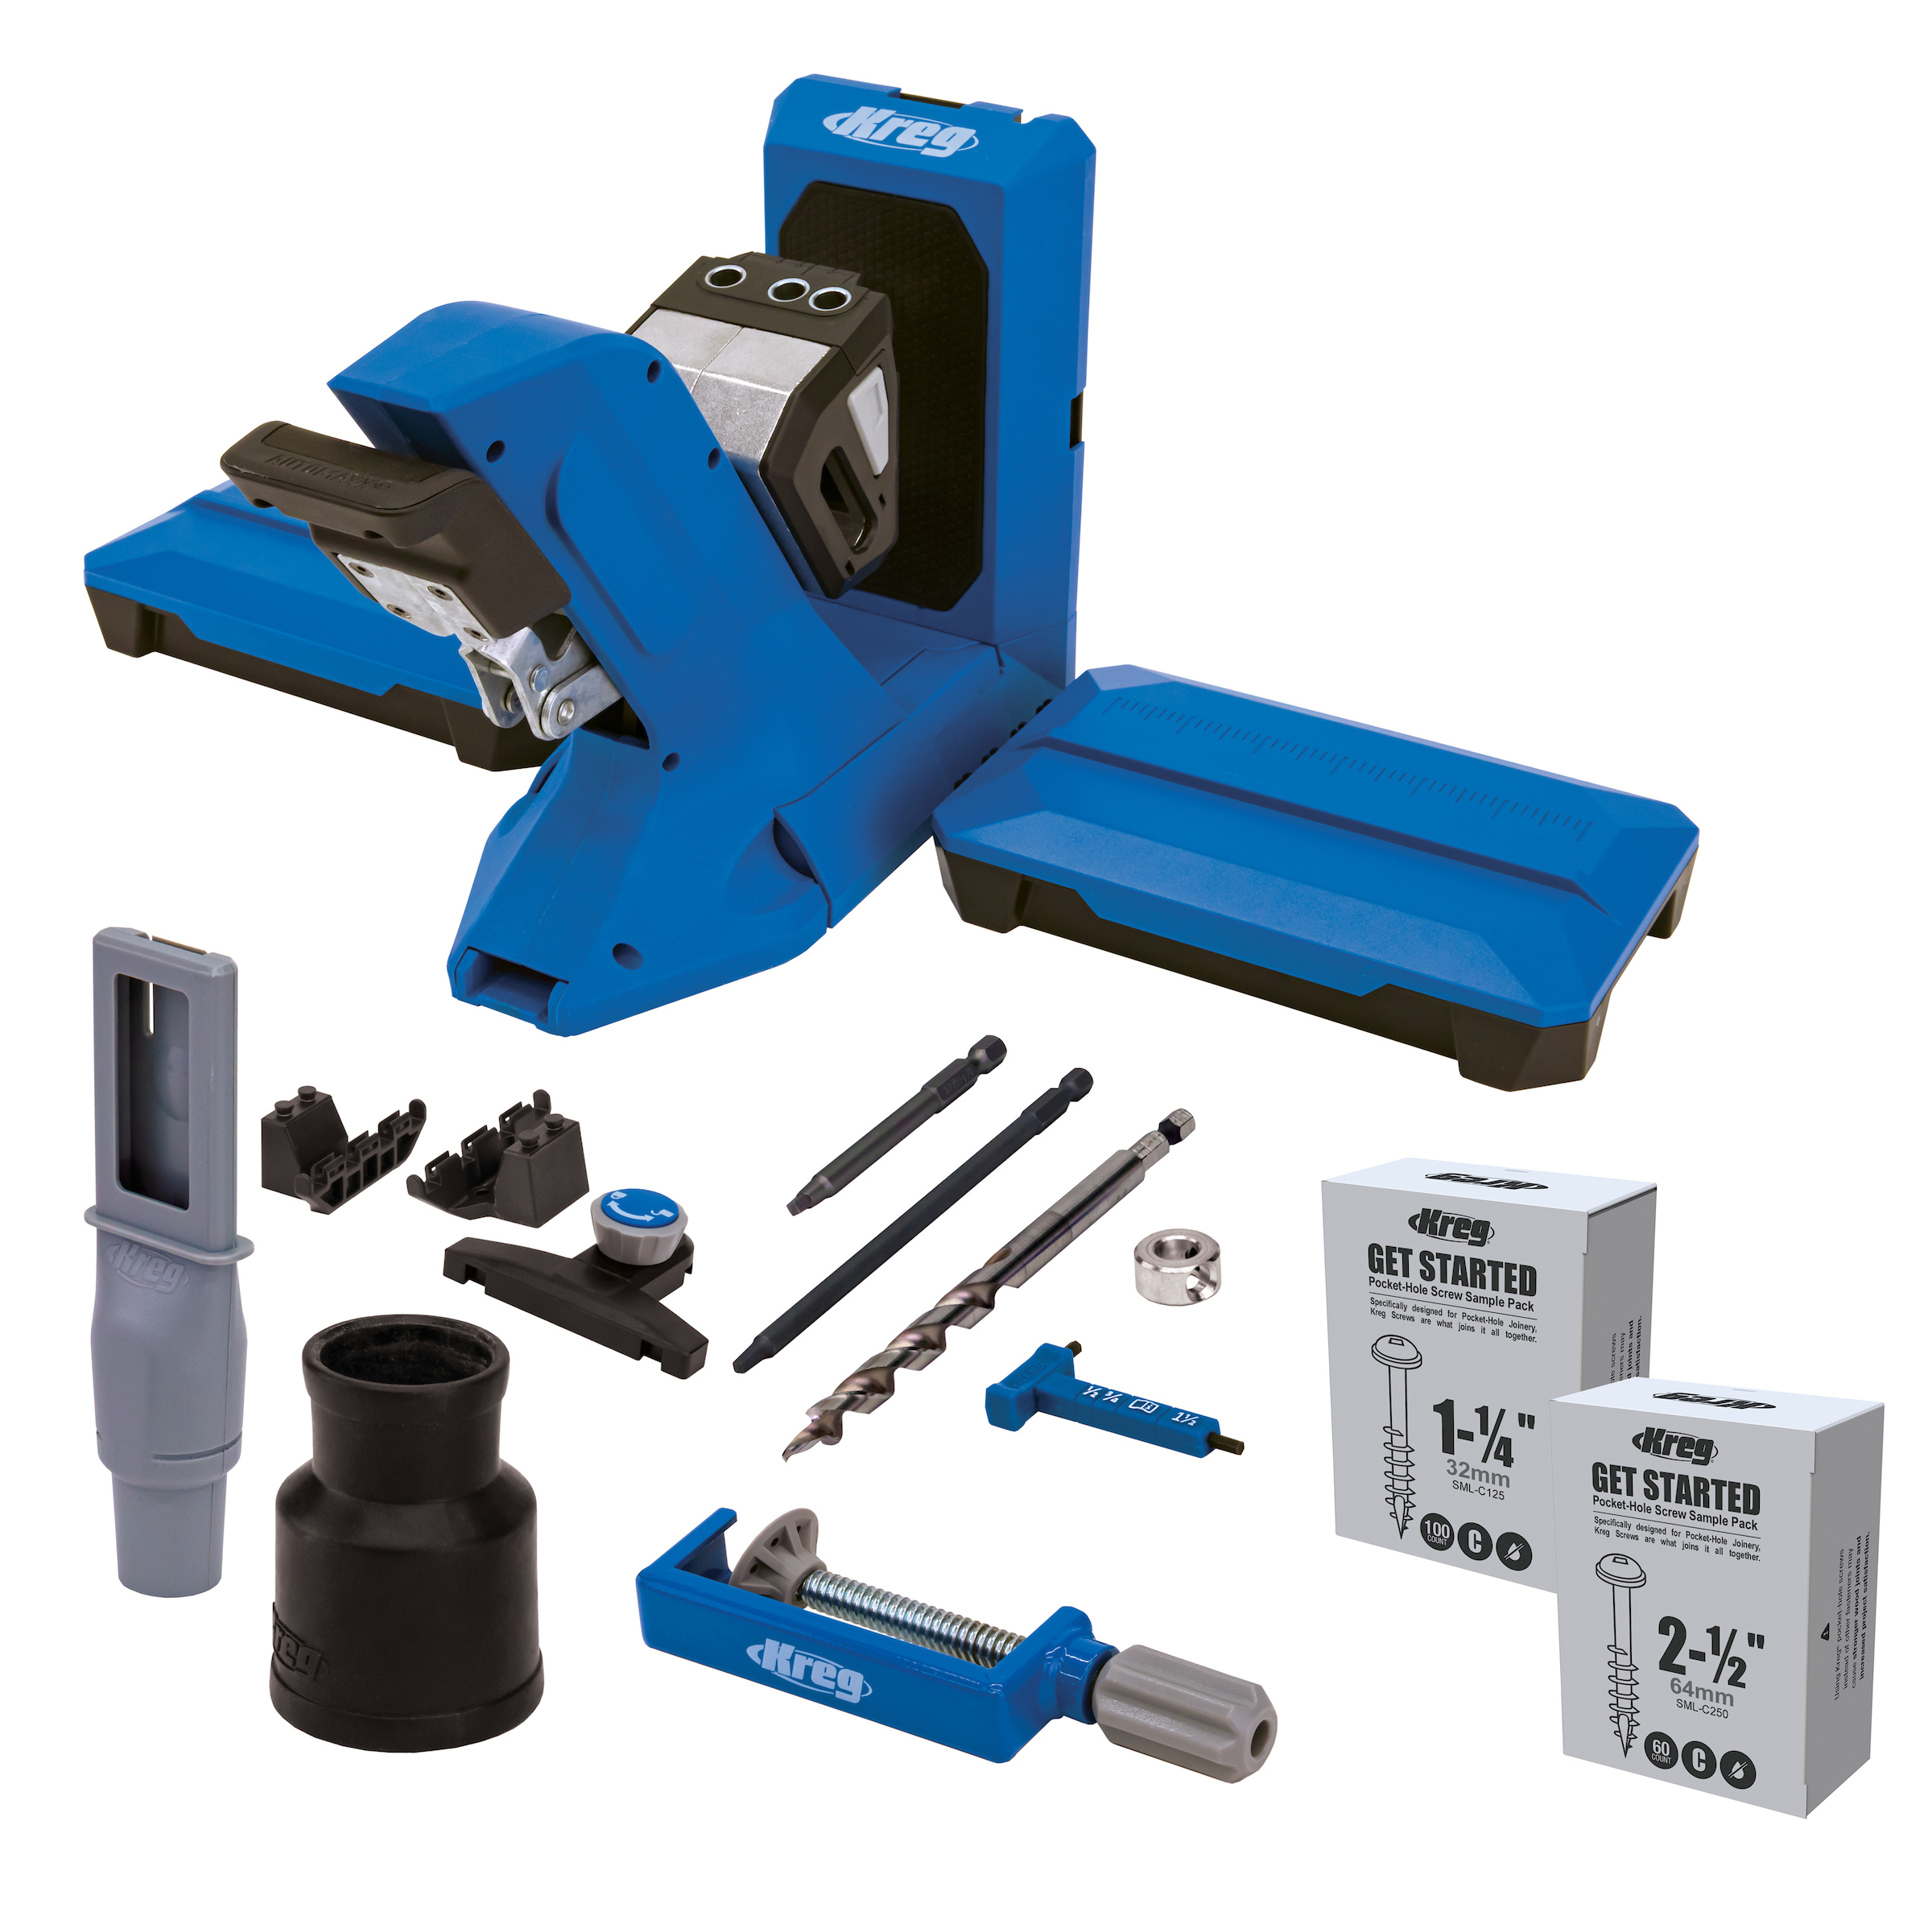
Kreg Tools


Other Tools
-
Miter saw

Materials
Wood Products
- 3 Board , 1x2 , 8' long
- 2 Board , 2x2 , 8' long
- 1 Plywood , 3/4" , 4x4 sheet
- 1 Plywood , 1/2" , 4x4 sheet
- 1 Plywood , 1/4" , 2x4 sheet
Hardware & Supplies
- 25 2 1/2" pocket hole screws
- 35 1 1/4" pocket hole screws
- 35 1" pocket hole screws
- 2 2" pocket hole screw or wood screws
- 3 Pair side drawer slides
- 2 Knobs
- 2 Drawer pulls
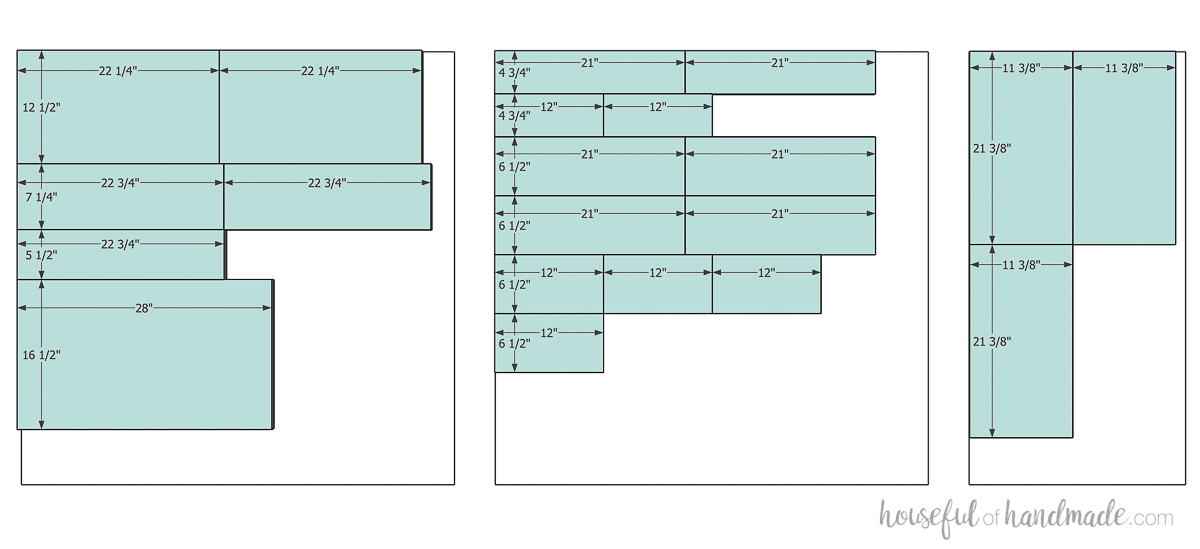
Cut List & Parts
- 4 Leg, 2x2 , 1 1/2" x 1 1/2" x 27 1/4"
- 2 Back, 2x2 , 1 1/2" x 1 1/2" x 23"
- 6 Side trim, 1x2 , 3/4" x 1 1/2" x 12 1/2"
- 5 Front/back trim, 1x2 , 3/4" x 1 1/2" x 23"
- 2 Side panel, 3/4" plywood , 12 1/2" x 22 1/4"
- 2 Large drawer front, 3/4" plywood , 7 1/4" x 22 3/4"
- 1 Small drawer front, 3/4" plywood , 5 1/2" x 22 3/4"
- 1 Top, 3/4" plywood , 16 1/2" x 28"
- 4 Large drawer box front/back, 1/2" plywood , 6 1/2" x 21"
- 4 Large drawer box side, 1/2" plywood , 6 1/2" x 12"
- 2 Small drawer box front/back, 1/2" plywood , 4 3/4" x 21"
- 2 Small drawer box side, 1/2" plywood , 4 3/4" x 12"
- 3 Drawer box bottom, 1/4" plywood , 11 3/8" x 21 3/8"
Directions
-
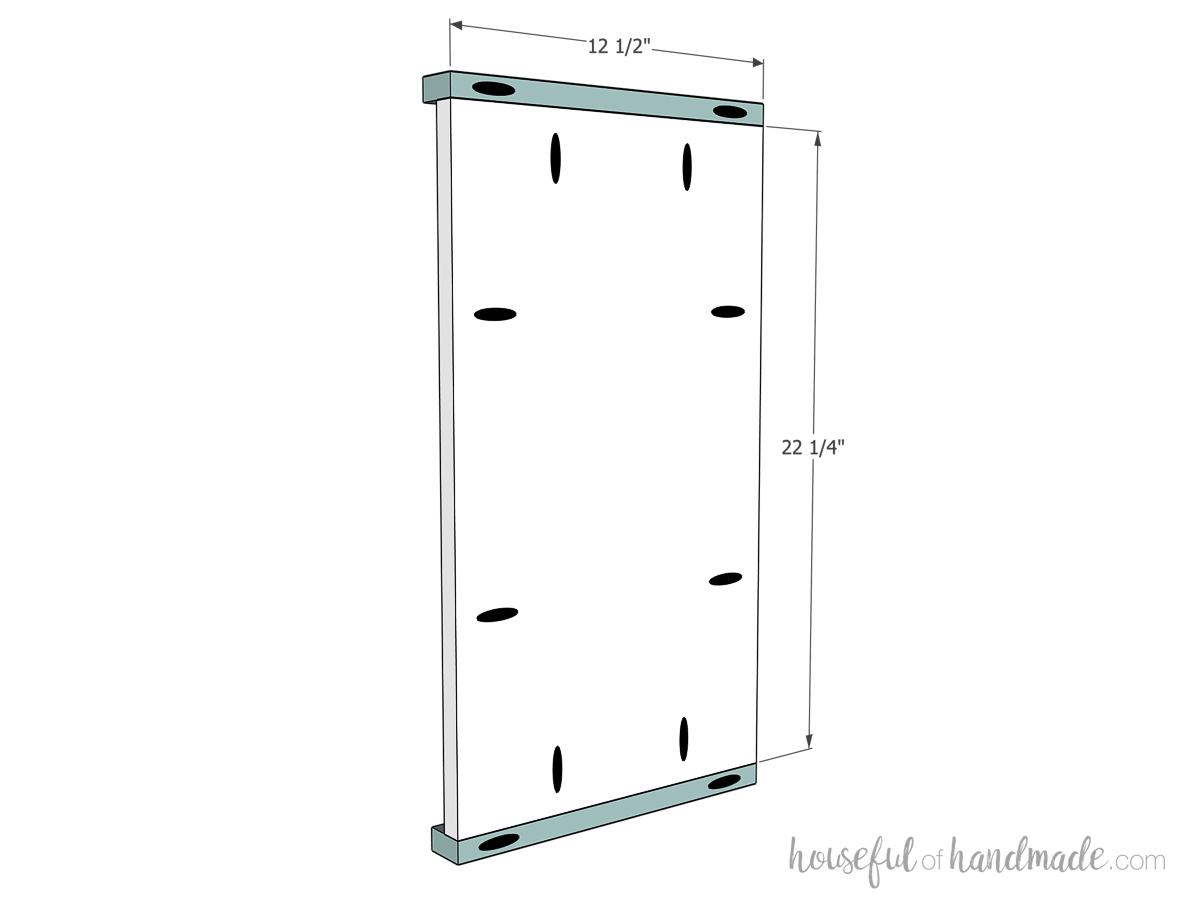
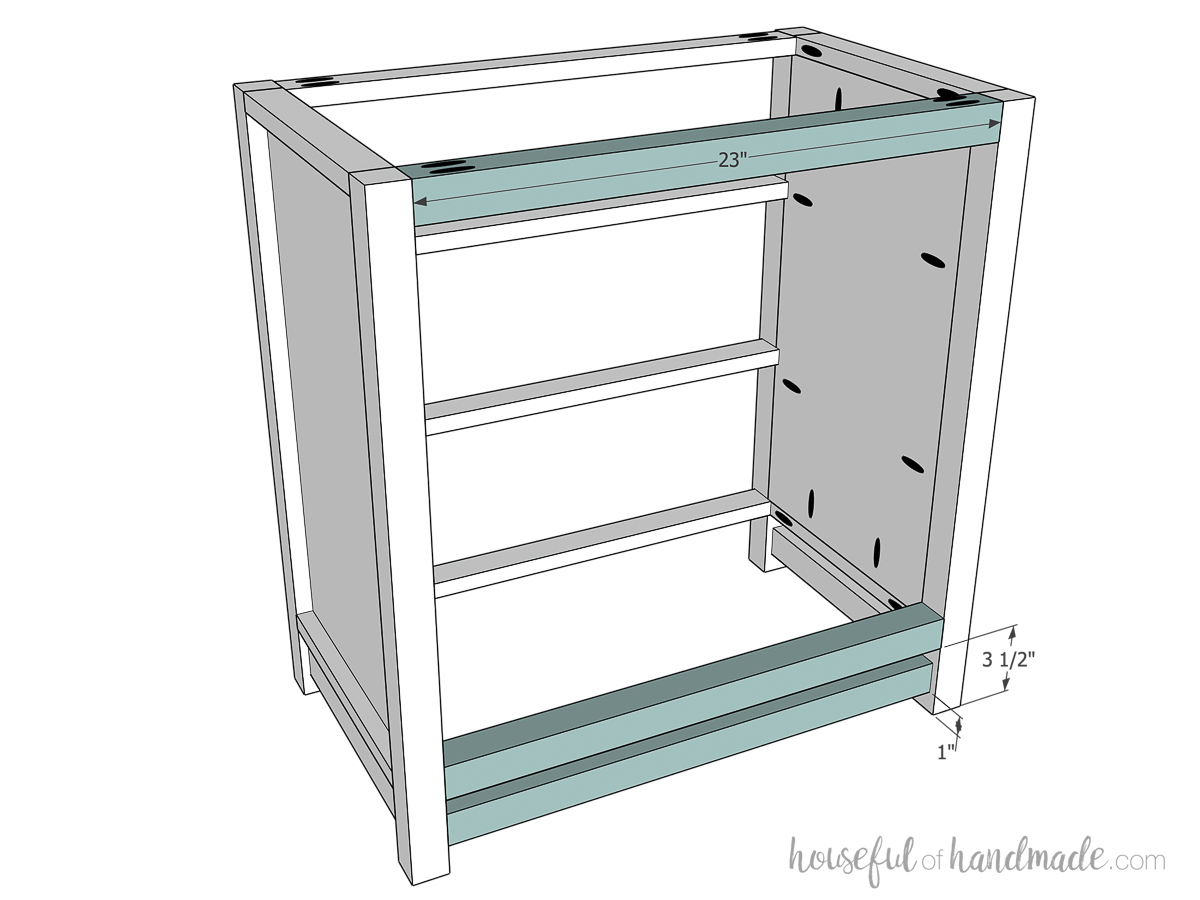
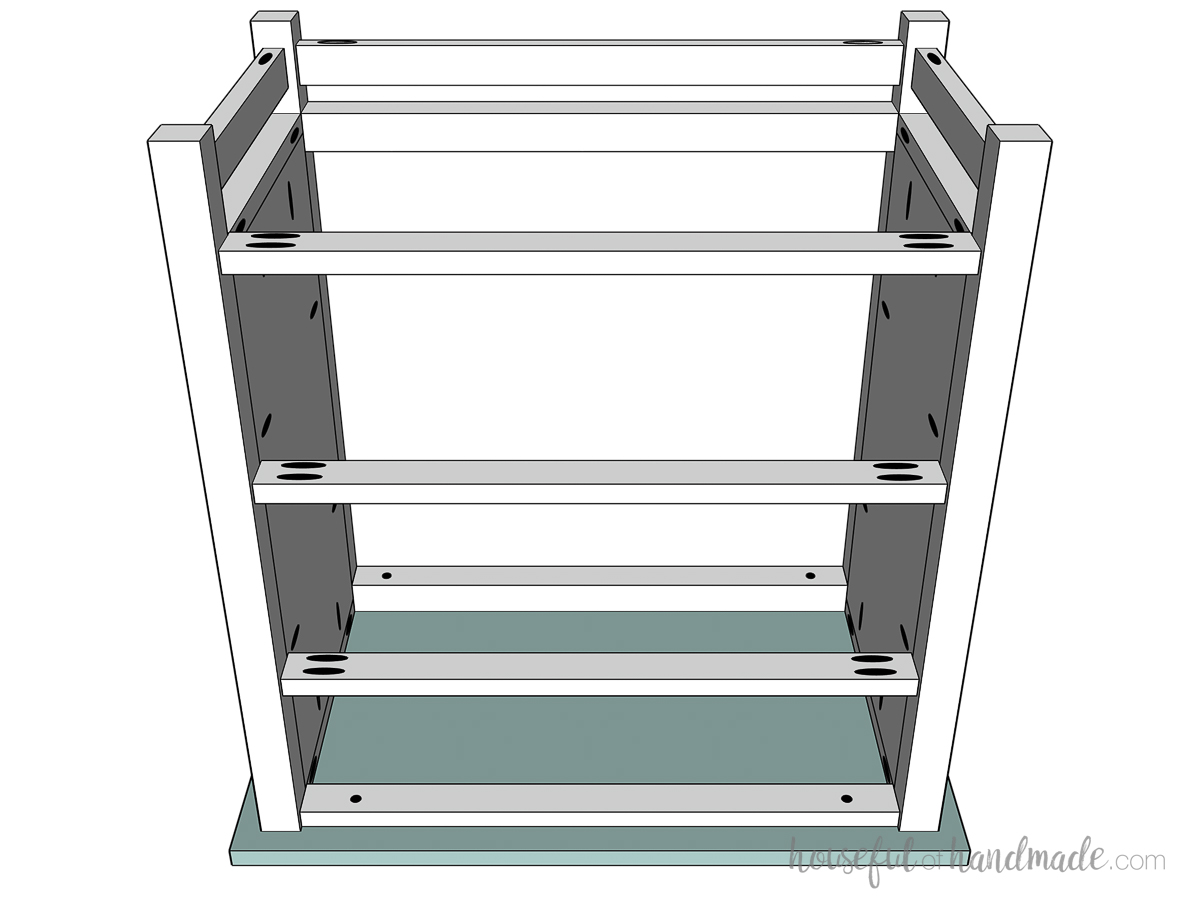
Attach side panel
Drill one pocket hole, set for 1 1/2” thick material, in both ends of the 3/4” wide edge of the (6) side trim pieces.
Drill pocket holes set for 3/4” thick material in the perimeter in the side panel pieces. On the top/bottom of the side panel, keep the pocket holes far enough away from the edge to not be in the way of the pocket holes on the side trim pieces.
Attach the side trim to the top and bottom of the panel with 1 1/4” pocket hole screws and wood glue so the panel is flush with the back of the trim board.
-
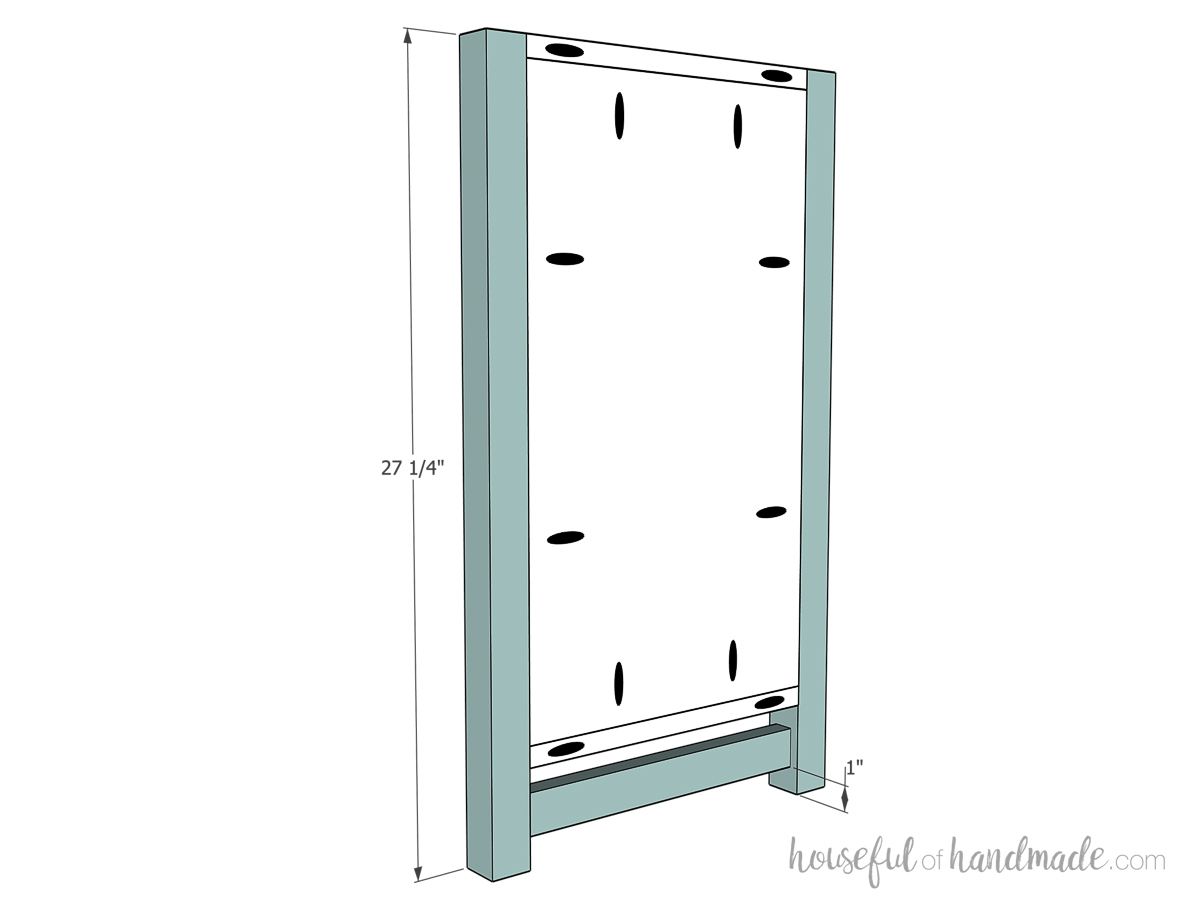
Assemble sides
Attach the side panel to one leg piece with wood glue and screws so it is flush to the top and the panel is flush to the back of the leg.
- Use 2 1/2” long pocket hole screws to secure the trim pieces to the leg.
- Use 1 1/4” pocket hole screws to attach the panel to the leg.Attach the third side trim piece to the bottom of the leg so it is 1” up from the bottom and centered (3/8” in from the front and back). Make sure the pocket hole is on the underside so it is hidden. Secure with glue and 2 1/2” pocket hole screws.
Then attach the second leg to the other side in the same way.
-
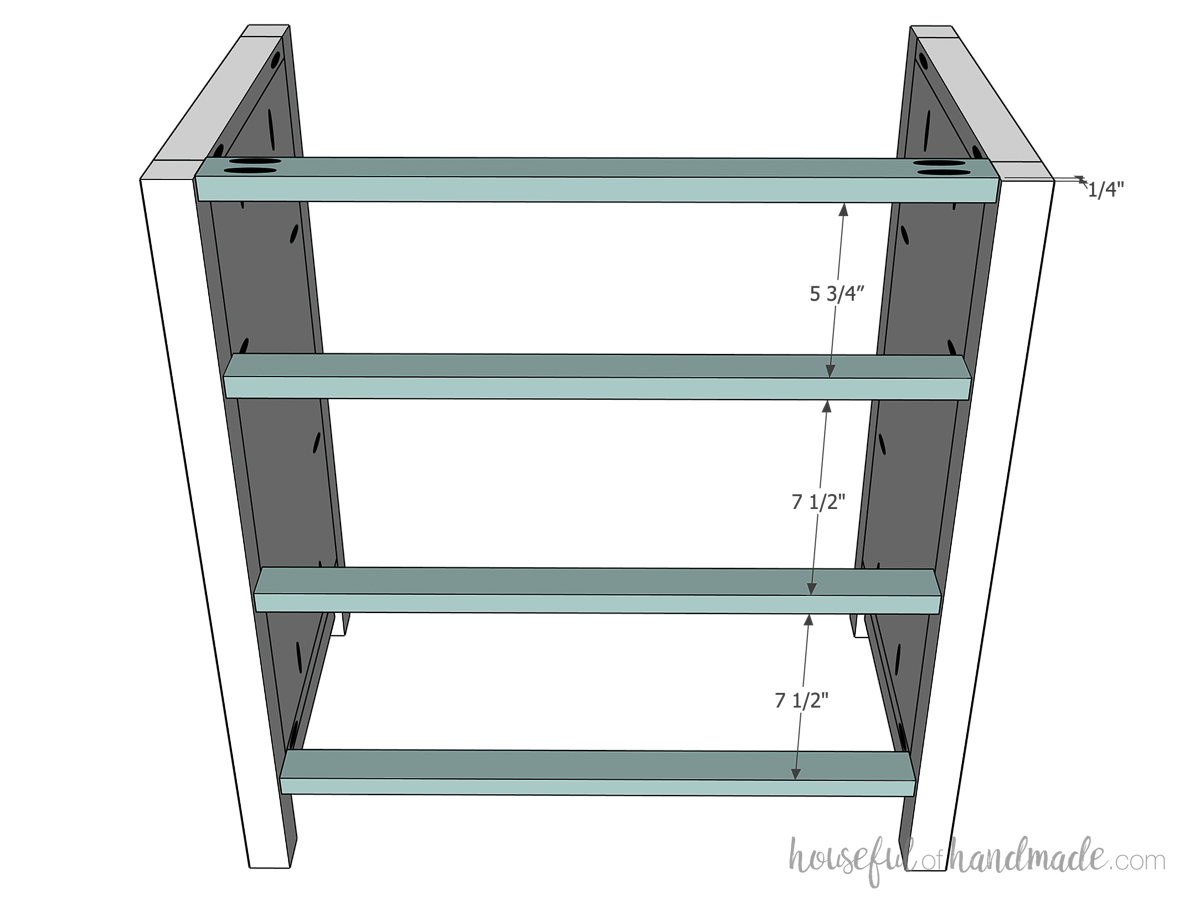
Attach sides together
Drill two pocket holes set for 3/4” thick material in each end of the (5) front trim pieces.
Attach the trim pieces between the sides so they are set back 1/4” from the front of the legs.
The top piece should be flush with the top. Then attach the remaining (3) trim according to the spacing in the diagram.
Secure with 1 1/4” pocket hole screws and wood glue.
Hide your pocket holes
To hide your pocket holes, face the pocket holes up on the top trim piece and down on the rest. That way they are hidden when the nightstand is finished.
-
Attach back boards
Drill pocket holes set for 1 1/2” thick material in both ends of the back pieces and the 3/4” wide edge of the back trim piece.
Attach the back pieces according to the diagram.
Attach the back trim between the sides so it is 1” up from the bottom and centered on the legs (3/8” in from each edge) with the pocket hole on the bottom to keep it hidden.
Secure with wood glue and 2 1/2” pocket hole screws.
-
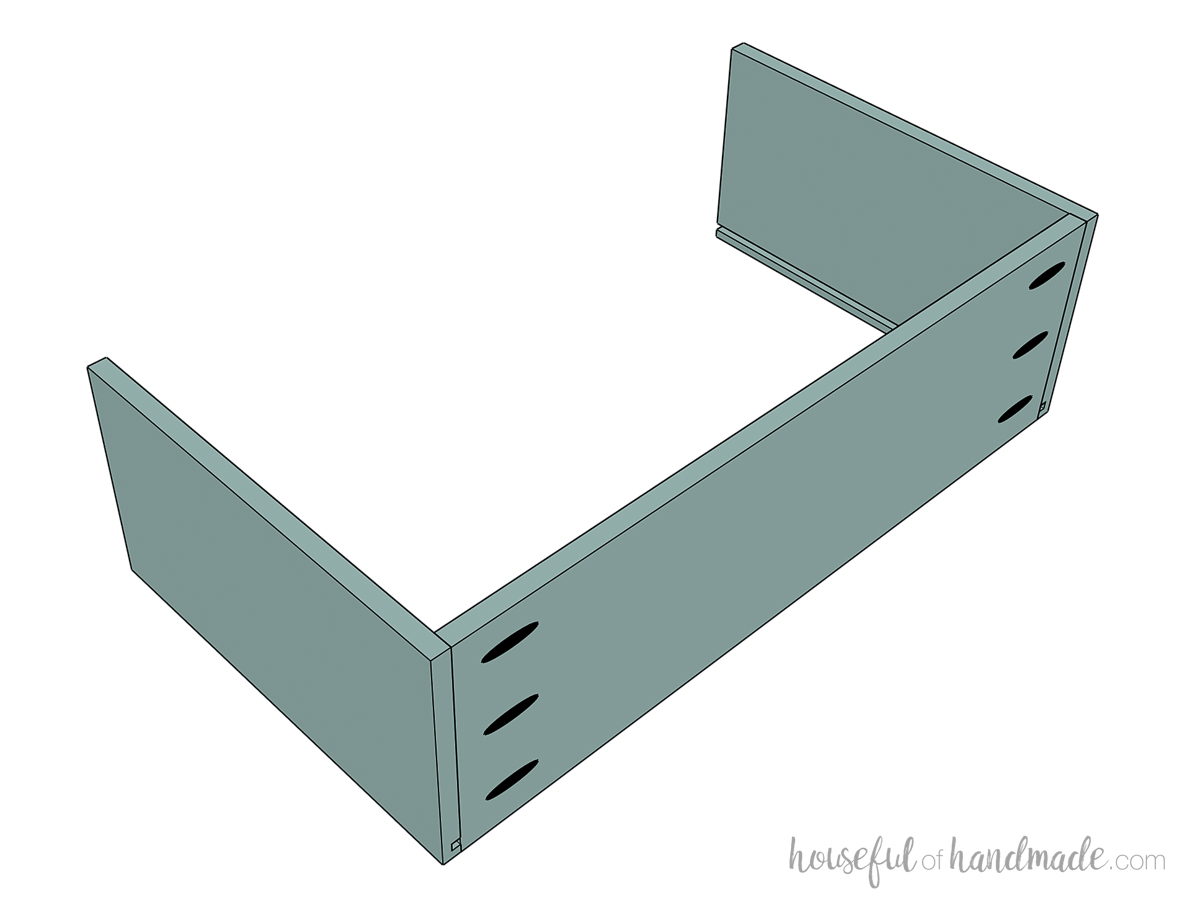
Build drawer boxes
Cut a 1/4" wide by 1/4" deep groove in the inside of the drawer box pieces 1/4" up from the bottom.
Drill pocket holes set for 1/2" material in the outside sides of the drawer box front and back pieces (not the same side as the groove).
Build the drawer boxes by securing the side pieces to the front pieces with wood glue and 1" pocket hole screws. Make sure the top of all the drawer box pieces is flush.
-
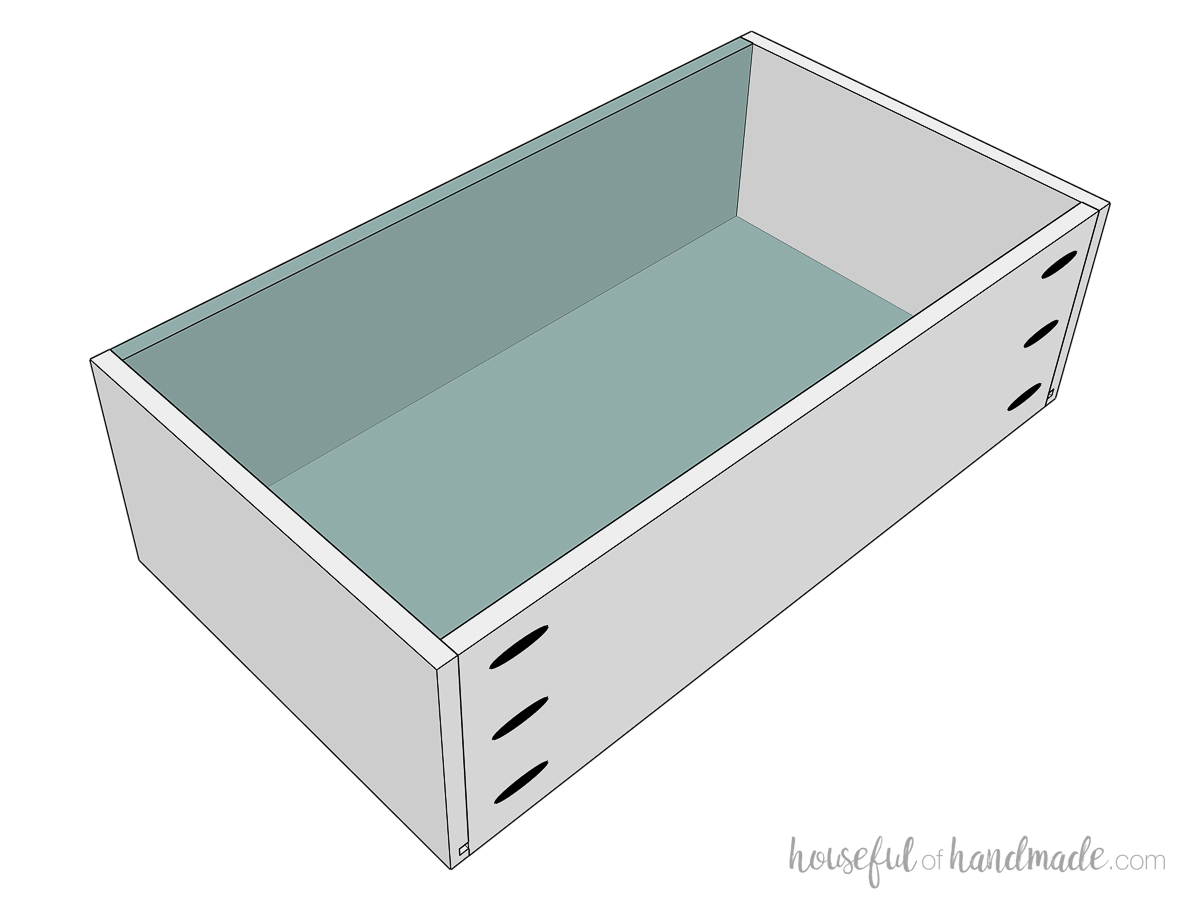
Finish drawer boxes
Slide the drawer box bottom piece into the groove on the sides and front. Then attach the back piece with 1" pocket hole screws to enclose it.
Repeat for the remaining drawer boxes.
If you prefer not to set the bottom into a groove, or to assemble the boxes with staples or nails, check out the post below for more details.
-
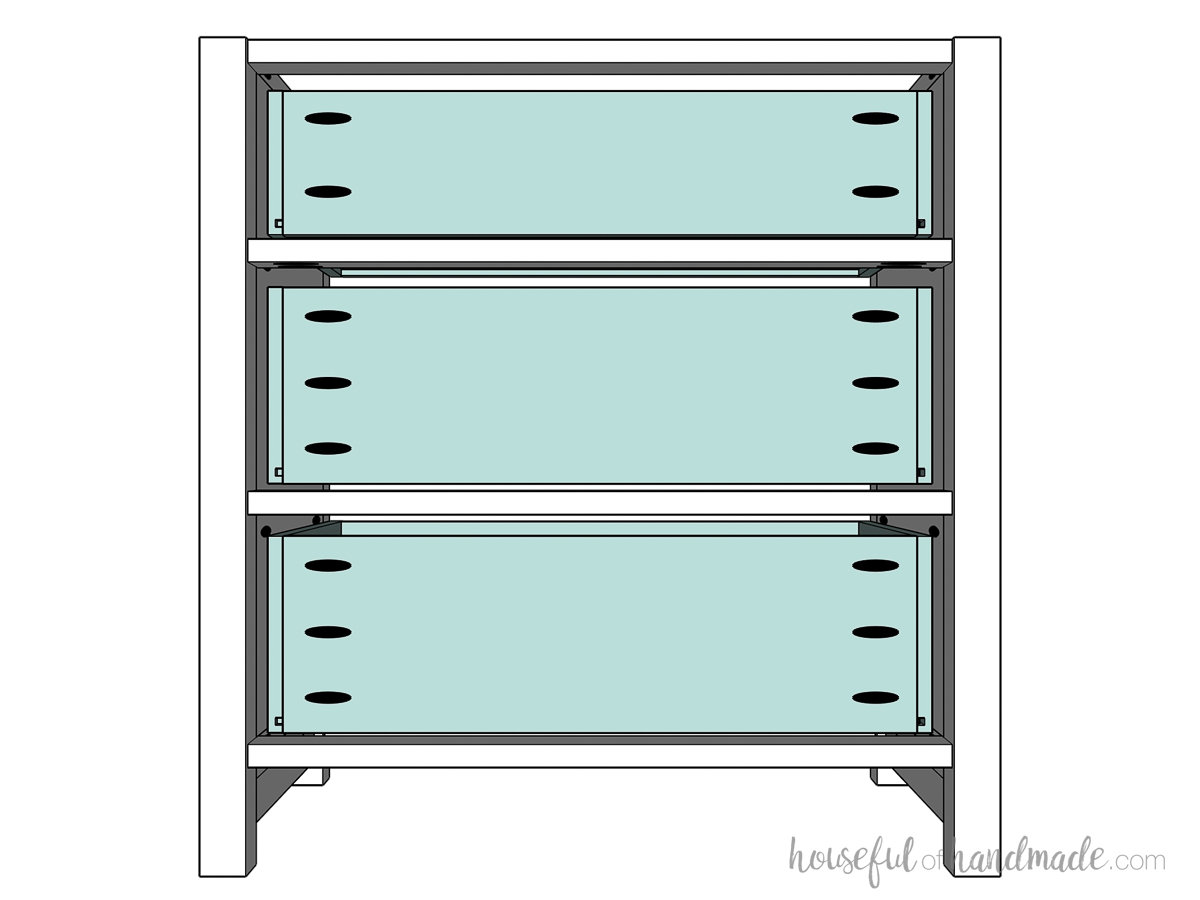
Install drawer boxes
Install the drawer boxes using the side drawer slides so the drawer boxes are set back 3/4” from the front of the front trim (1” back from the front of the legs). The drawer box measurements are made for slides that require 1/2” clearance on each side.
The drawer boxes should be 1/4” up from the bottom of the drawer opening, leaving 3/4” clearance on the top.
-
Attach drawer fronts
Iron edge banding around the perimeter of the drawer front pieces to cover the plywood edge. Alternately, you could cut the drawer fronts from 1x6 (actually 5 1/2” wide) and 1x8 (actually 7 1/4” wide) boards if you prefer solid wood drawer fronts.
To make the small drawer front on top look like 2 drawers, cut a 1/8" deep groove down the center.
Attach the drawer fronts so they sit inside the frame and are flush to the front. You should have 1/8” gap all the way around the drawer fronts.
Once the drawer front was lined up properly (use 1/8” spacers or playing cards to get the perfect reveal), I used a brad nailer with 1” nails to temporarily attach the drawer front from the inside of the drawer.
Then permanently attach the drawers using 1” Kreg screws from the inside of the drawer. Use (4) screws per drawer, one screw in each corner of the drawer front.
-
Attach top
I prefer to attach the top last so that you can easily access the inside of the drawers while installing them. So first, remove all the drawers, make sure to label them. I wrote their location on the back of the drawer box.
Iron edge banding around the perimeter of the top piece.
Place the top on your work table and then place the nightstand frame upside down on top of it. The top should be flush with the back of the dresser frame and hang over the sides and front 1”.
Drill 1/4” deep countersunk holes in the top of the frame in the front and back. I love using the Kreg Quick Flip tool for this. Attach the top with 1” screws in the holes on the front and 2” long screws in the back.
-
Finish and enjoy!
Sand and stain/paint/seal your finished nightstand.
Reinsert your drawers and add your desired drawer pulls. The Kreg cabinet hardware jig makes it easy to line up the holes for your hardware. I used a two knobs on the top drawer and a pull on each of the lower drawers.
Now you can enjoy your new nightstand.