

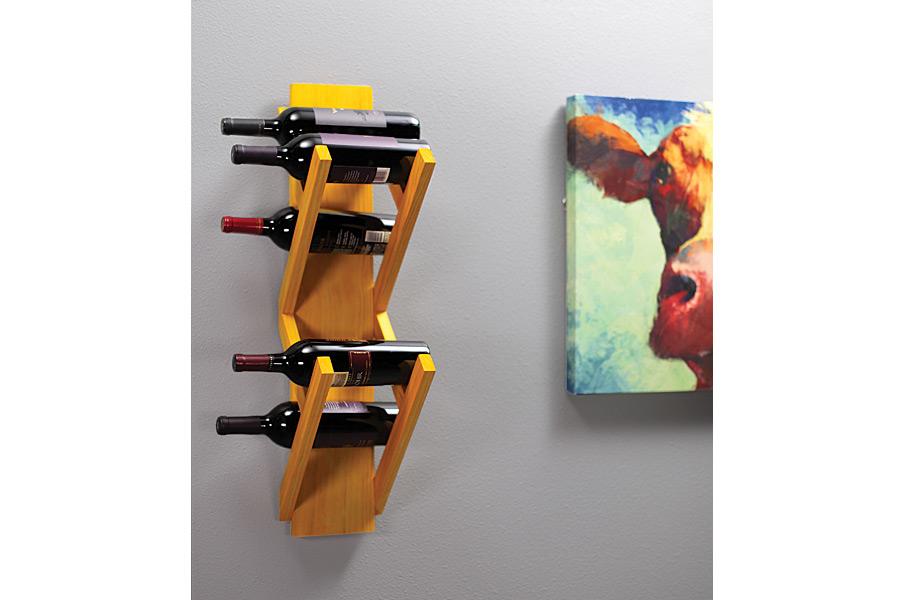
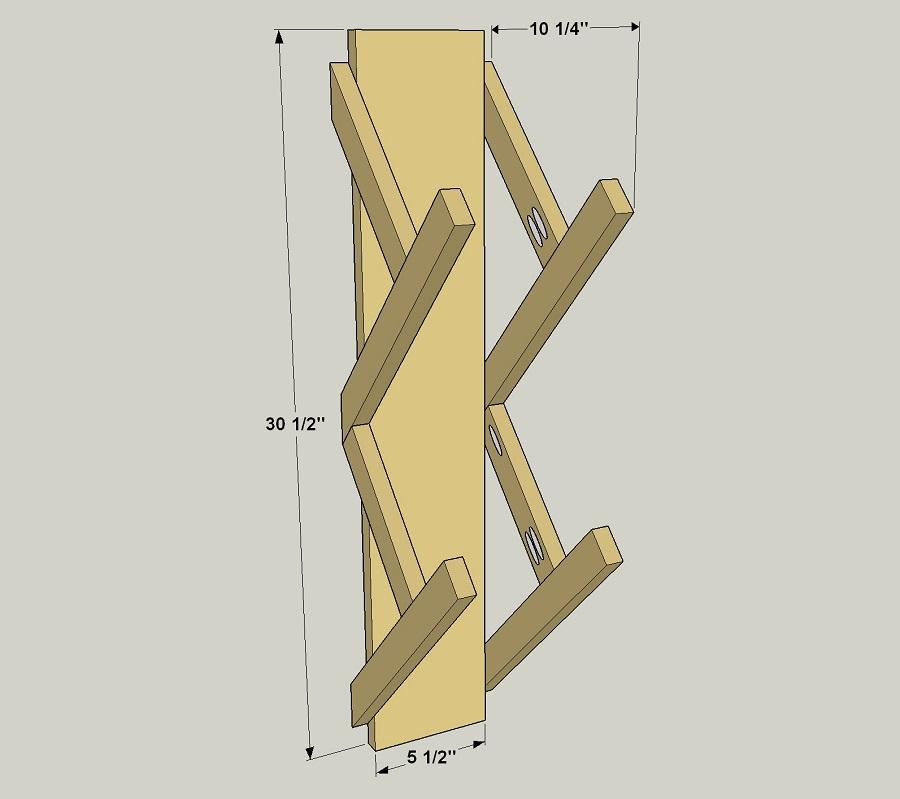


Keep a few of your favorite bottles of wine on hand with this wall-mounted wine rack. The clever design stores up to six bottles in a way that also adds fun decor to your dining area or kitchen. It’s made from just a few boards and a couple dozen pocket-hole screws, so you can make one in no time.
Tools
Kreg Tools


Other Tools
-
Miter Saw

-
Square
-
Tape Measure
Materials
Wood Products
- 1 Board , 1x6 , 36"
- 1 Board , 1x4 , 36"
- 2 Board , 1x2 , 48"
Hardware & Supplies
- 22 1 1/4" coarse-thread pocket-hole screws
- 10 Pine pocket-hole plugs
- 1 Wood glue
- 2 #10 x 3 1/2" flathead wood screws
- 1 Pint yellow dye stain
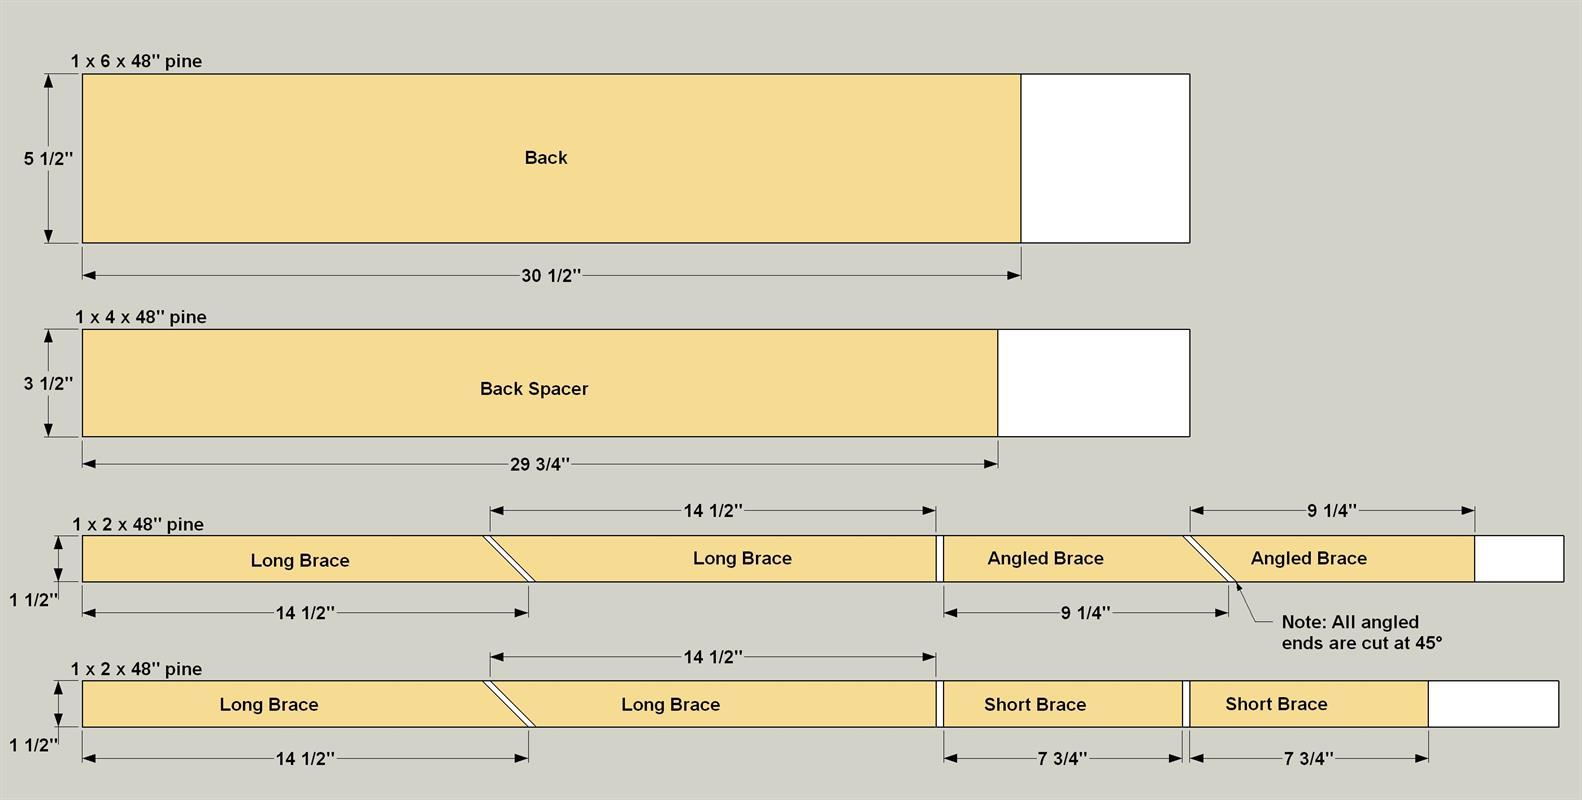
Cut List & Parts
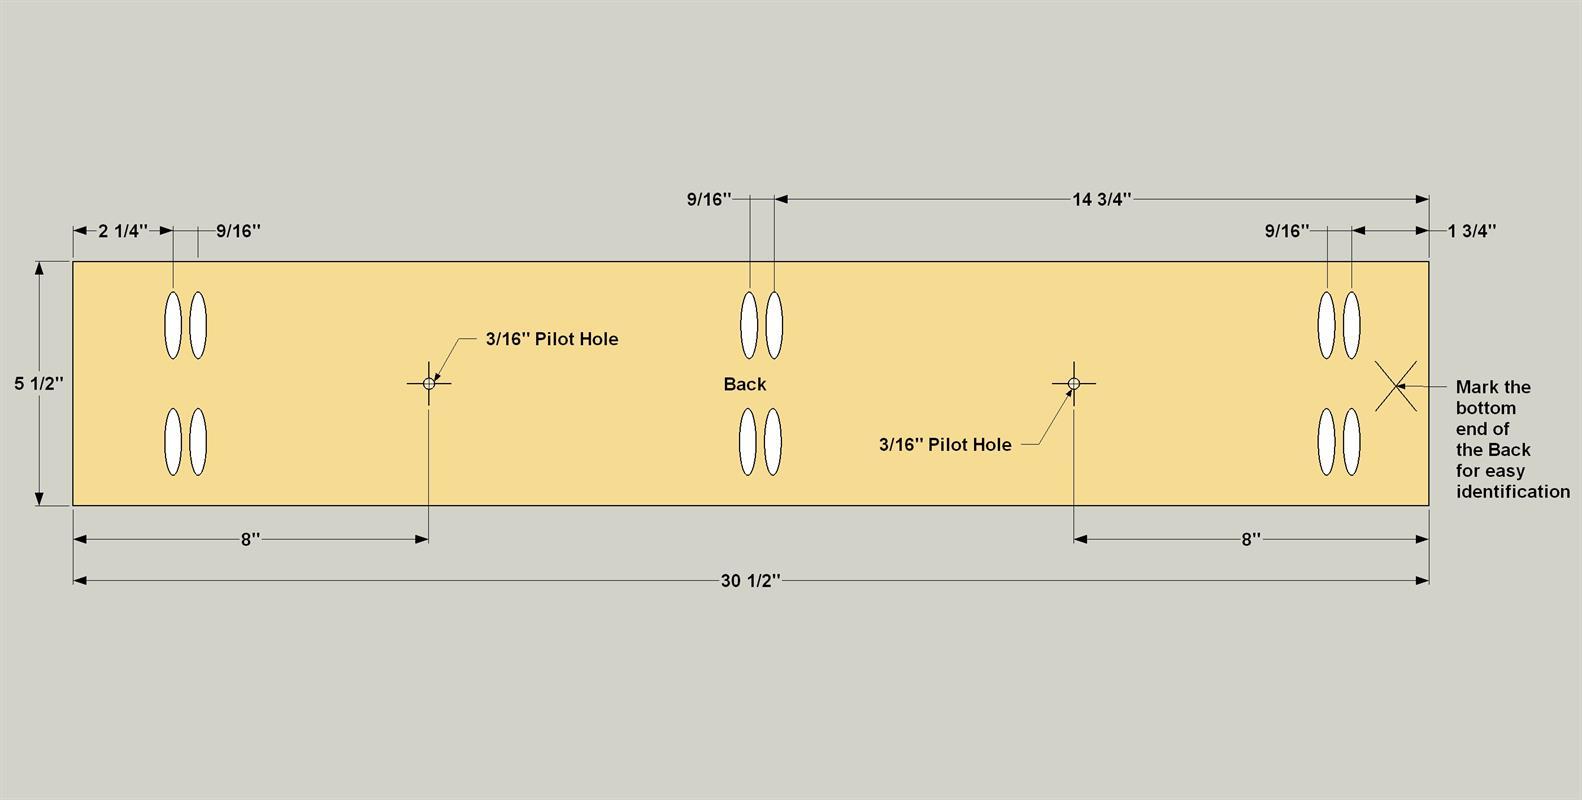
- 1 Back , 3/4" x 5 1/2" x 30 1/2" pine
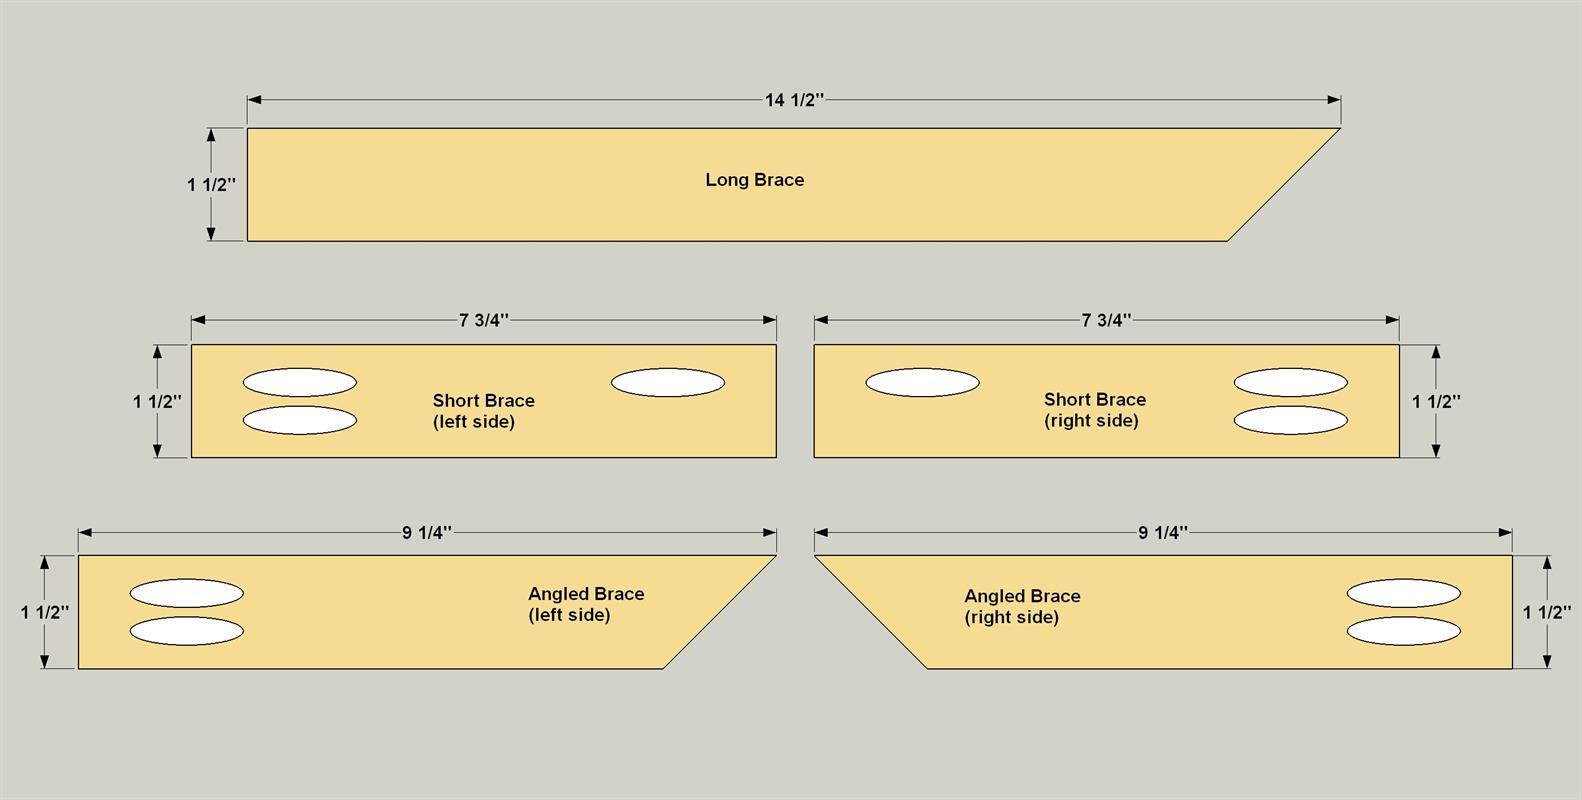
- 4 Long Brace , 3/4" x 1 1/2" x 14 1/2" pine
- 2 Short Brace , 3/4" x 1 1/2" x 7 3/4" pine
- 2 Angled Brace , 3/4" x 1 1/2" x 9 1/4" pine
- 1 Back Spacer , 3/4" x 3 1/2" x 29 3/4" pine
Directions
-
Make the Back
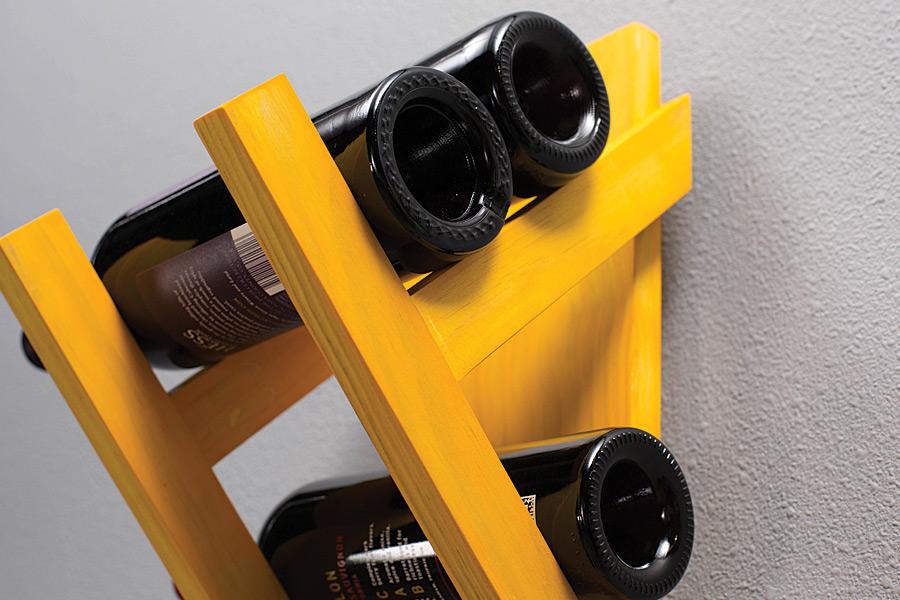
Cut one Back to length from 1x6 pine, as shown in the cutting diagram. Set your pocket-hole jig for 3/4"-thick material, and then drill pocket holes in the Back at the locations shown. With many projects, it doesn’t matter if the pocket holes are positioned precisely. When you’re drilling pocket holes in the Back, though, you want to pay close attention. That way, when you start final assembly of your wine rack, you know that everything will line up right. After drilling the pocket holes, drill two 3/16" holes through the Back at the locations shown. These holes will be used to mount the Wine Rack to the wall in the final step. Sand the Back smooth.
-
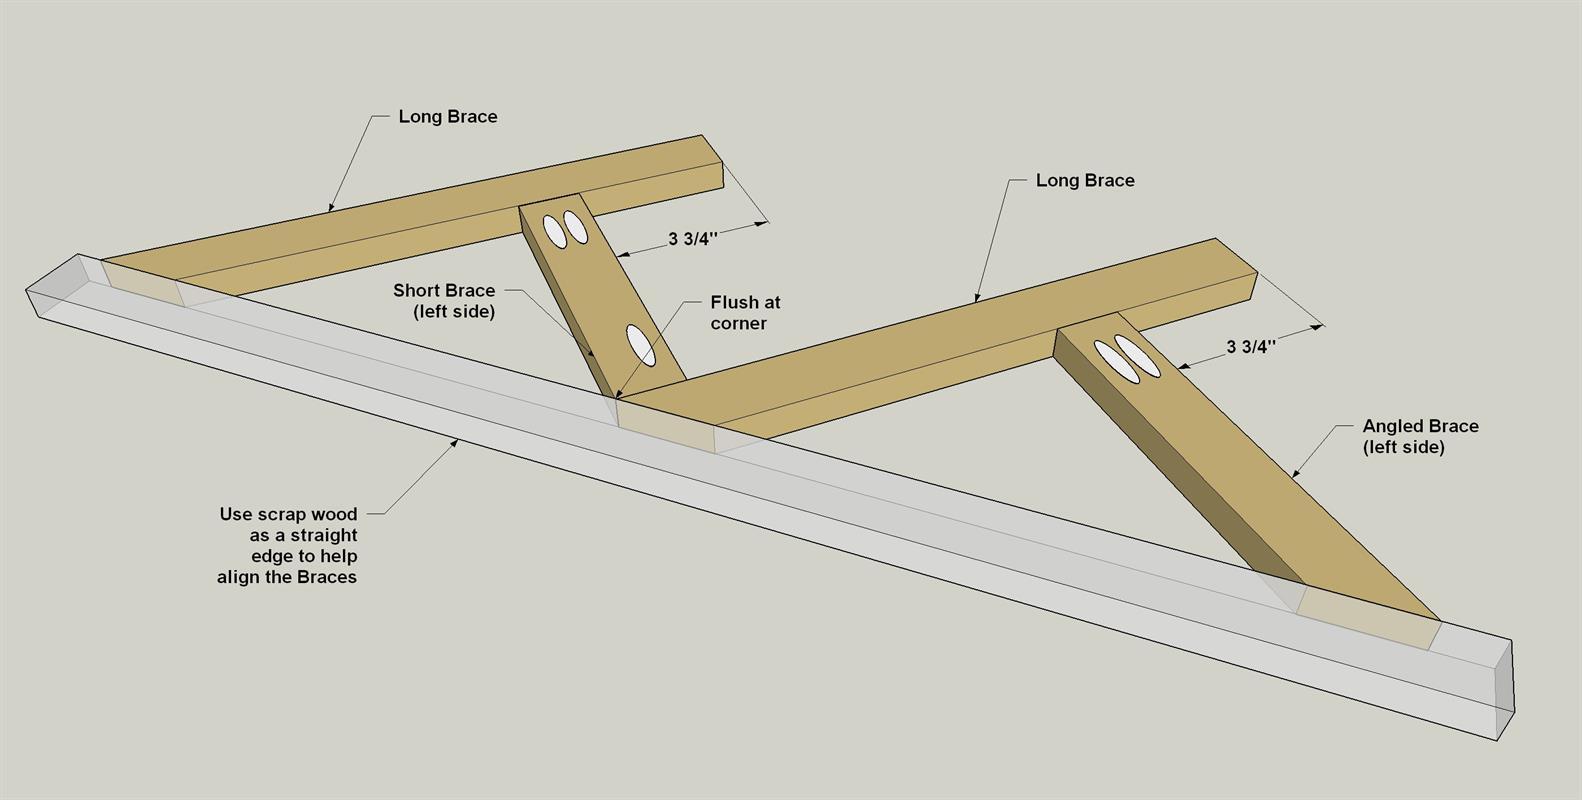
Make the Braces
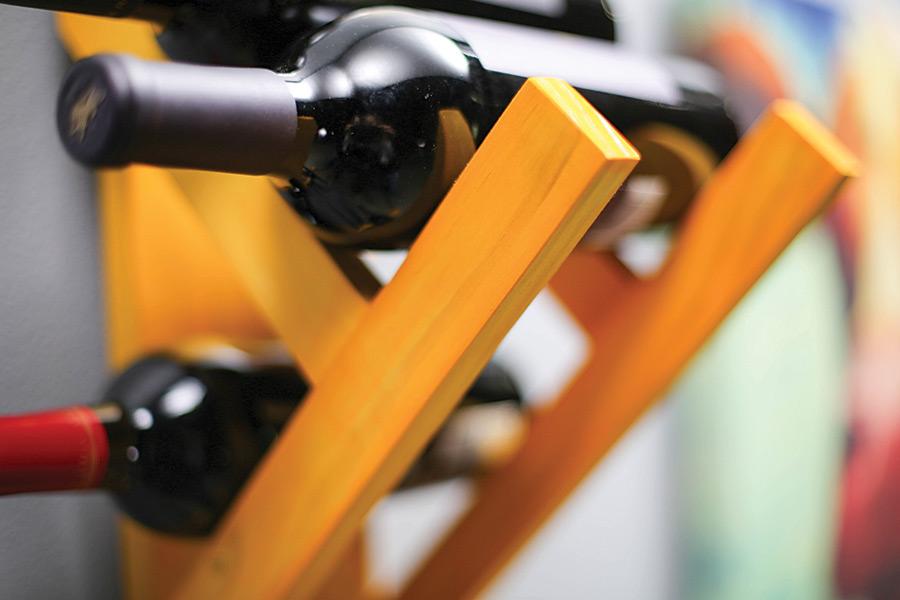
Next, cut four Long Braces and Two Angled Braces from 1x2 boards as shown in the cutting diagram. One end of each of these Braces is cut at 45°. Also cut Two Short Braces, making square cuts on each end of these. Next, you can drill pocket holes in the Angled Brace and the Short Braces, as shown. Make sure when you’re drilling them that you create “mirror image” left and right pieces. That way, the pocket holes can all be located facing inward when you assemble the sides in the next step.
-
Assemble the Sides
Now you can create a pair of side assemblies. Lay out two Long Braces, as well as the left side Angled Brace and Short Brace, as shown. Use a piece of scrap wood to help with alignment. Glue each joint (but don’t glue the assembly to the alignment board), and then secure the pieces using 1 1/4" pocket-hole screws. See the tip to help you decide on the correct screws. Repeat the process to put the right side assembly together. If you want to cover up the pocket holes, now is a good time to fill them with pocket-hole plugs. Glue the plugs into the holes, and let the glue dry. After that, trim the plugs flush with the wood surface, and then sand the side assemblies smooth.
Match the Screw To the Wood
We built our wine rack from pine, which is classified as a softwood. Softwoods are less dense than a hardwood like oak, so softwoods require a coarse-thread pocket-hole screw (shown at left in the photo). These screws have deep, aggressive threads for good holding power in softwoods. If you decide to build your wine rack from a hardwood, such as oak or maple, use fine-thread screws instead. They have less-aggressive threads, but more of them, to hold in dense hardwoods.
-
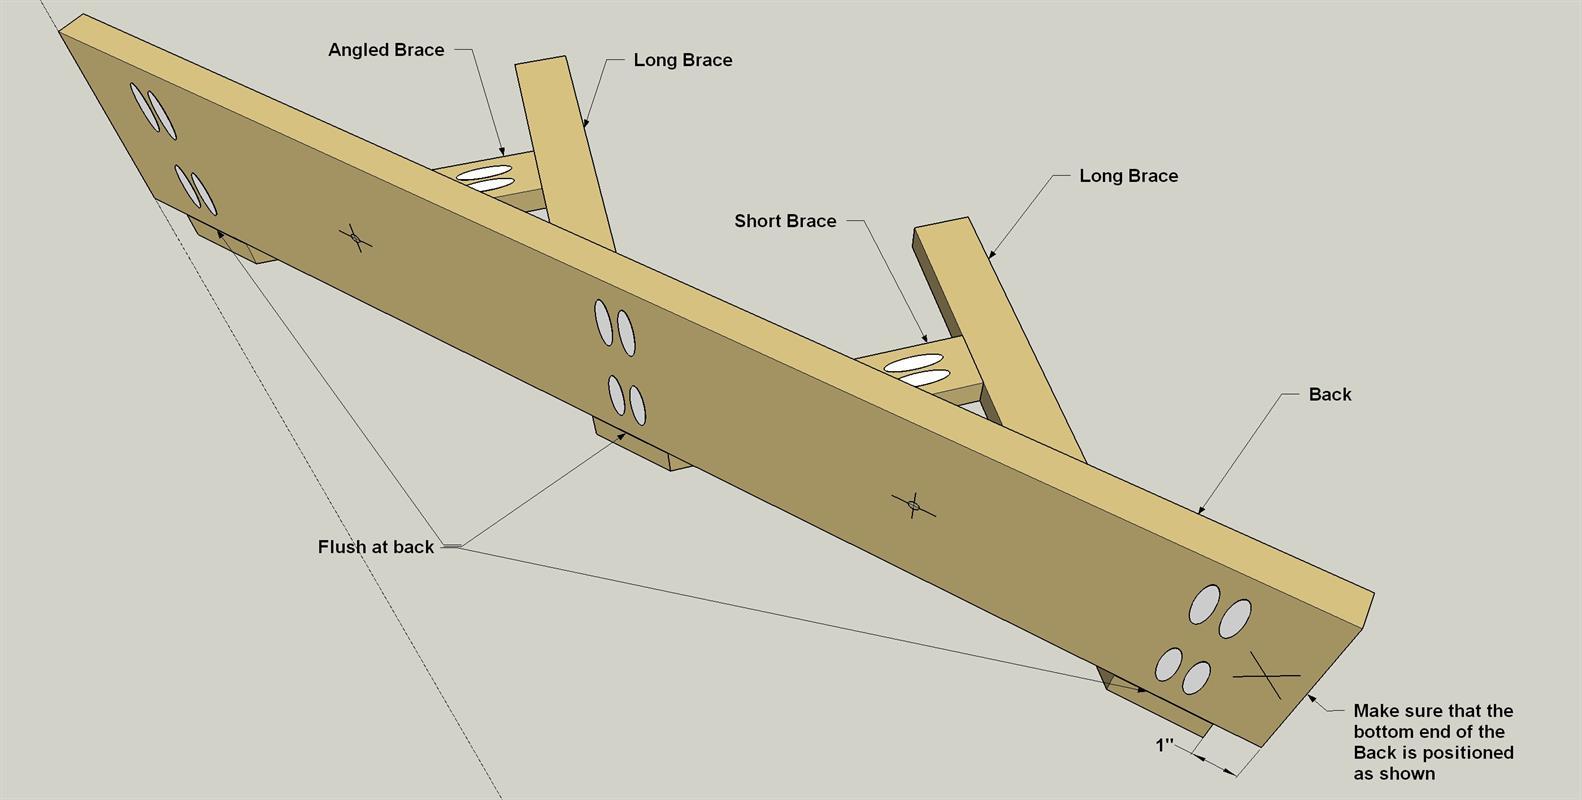
Attach the Back to One Side
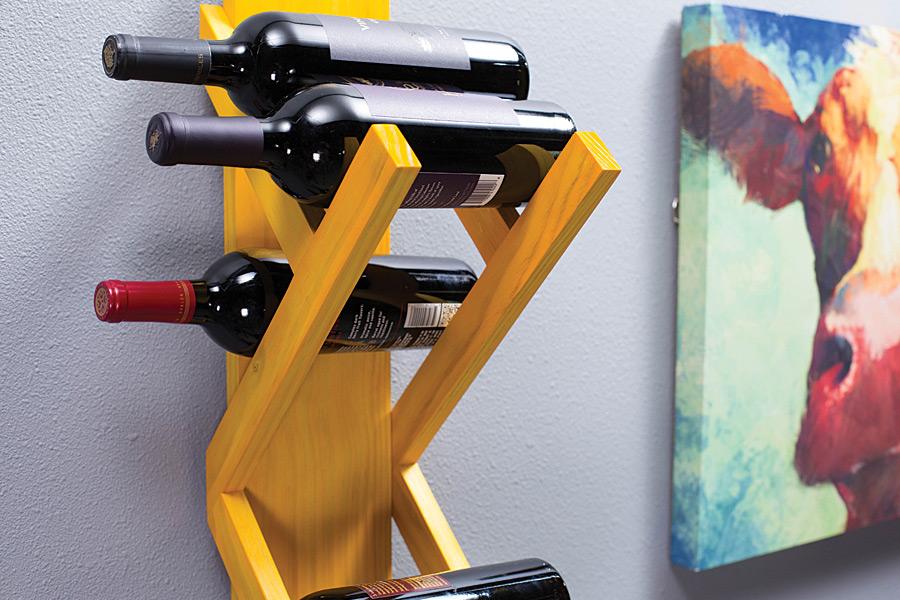
Lay one of the side assemblies (the right is shown) and position the Back on the assembly as shown. Make sure that the bottom end of the Back is positioned correctly—the pocket holes are located closer to the end at the bottom than at the top. Also make sure that the Back is flush with the angled cut of each brace. Apply glue, and then secure the Back to the side assembly using 1 1/4" pocket-hole screws.
-
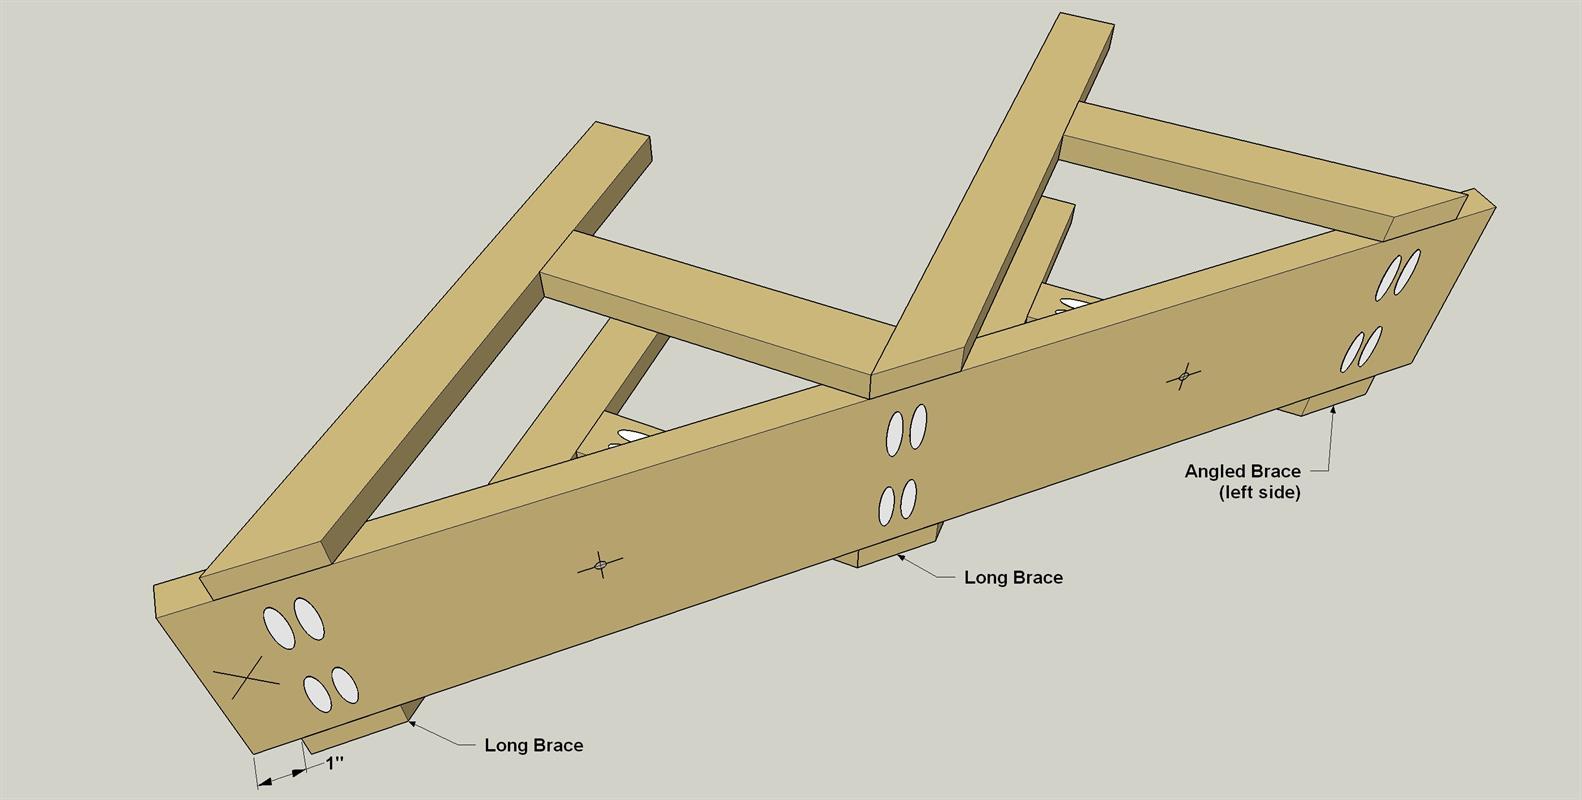
Attach the Second Side
Flip the partially-assembled wine rack over, and repeat the previous step to secure the second side assembly to the back. Make sure that the side assemblies are oriented correctly and aligned.
-
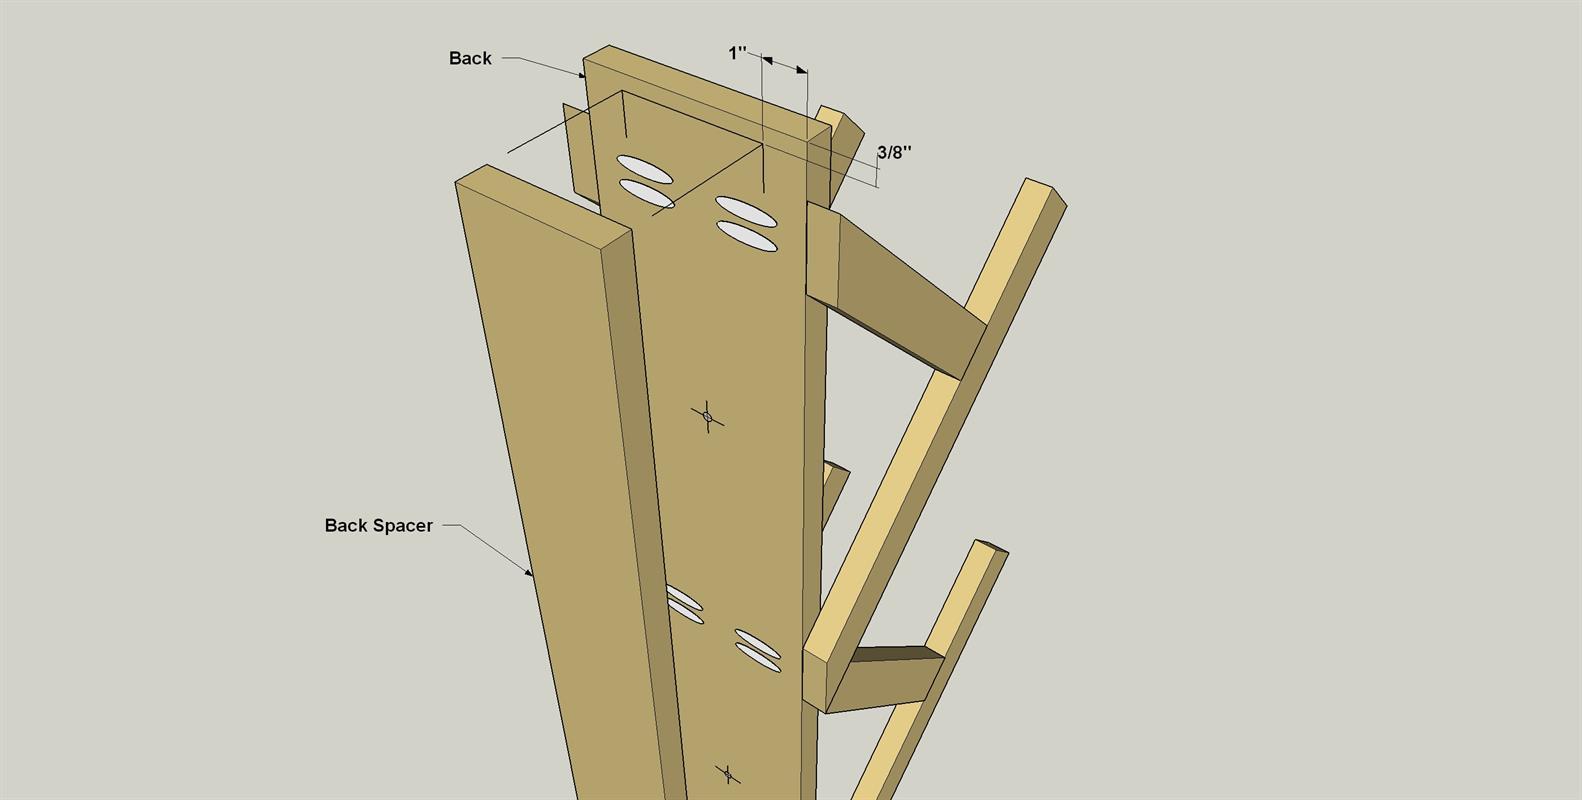
Add a Back Spacer and Finish
Cut a Back Spacer to length from a 1x4 board, as shown in the cutting diagram. Sand the Spacer smooth. Apply glue to one face of the spacer, center it on the Back, as shown, and then secure it in place with clamps while the glue dries. Using the pilot holes in the Back as guides, drill the pilot holes the rest of the way through the Spacer. Then you can paint or stain your wine rack to suit your taste. We used a bold yellow stain.
-
Install the Rack
Find the location on the wall where you want to install your wine rack. Ideally, locate the rack so that it’s centered on a wall stud. Then all you need to do is mark the hole locations, drill a pair of 3/32" pilot holes through the wallboard and into the studs, and then attach the wine rack using #10 x 3 1/2" screws. If you can’t locate the wine rack over a stud, mark the hole locations, install a pair of heavy-0duty wall anchors, and then mount the rack to the anchors.