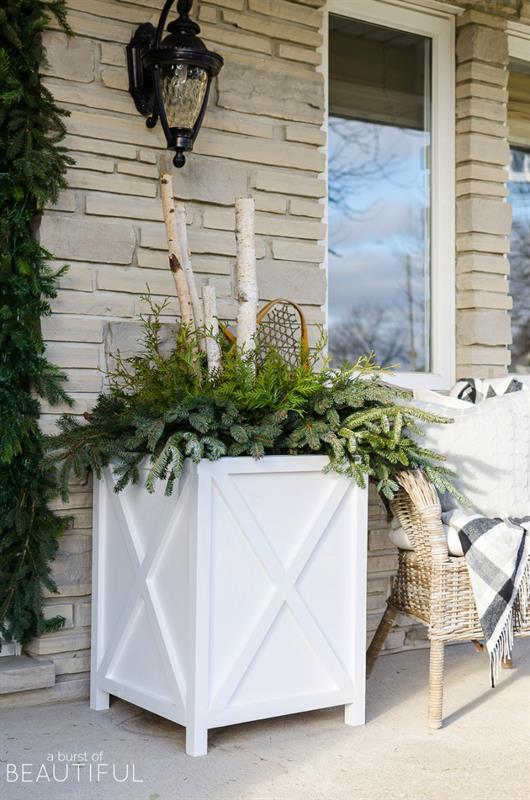

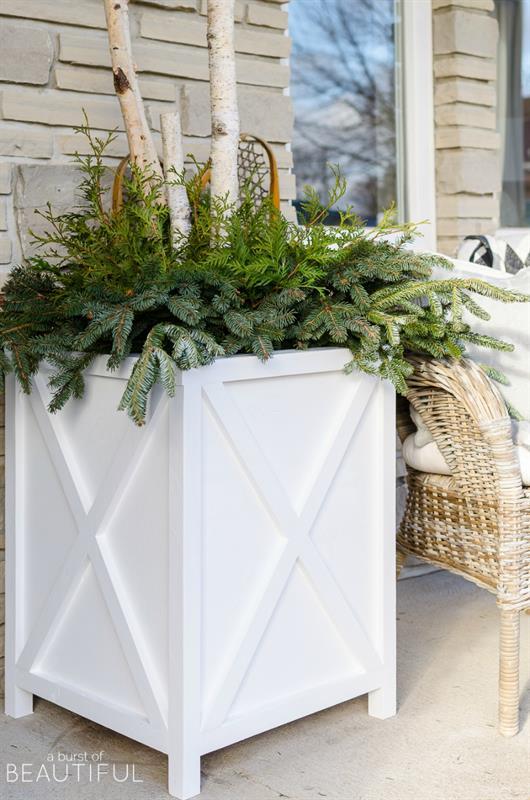
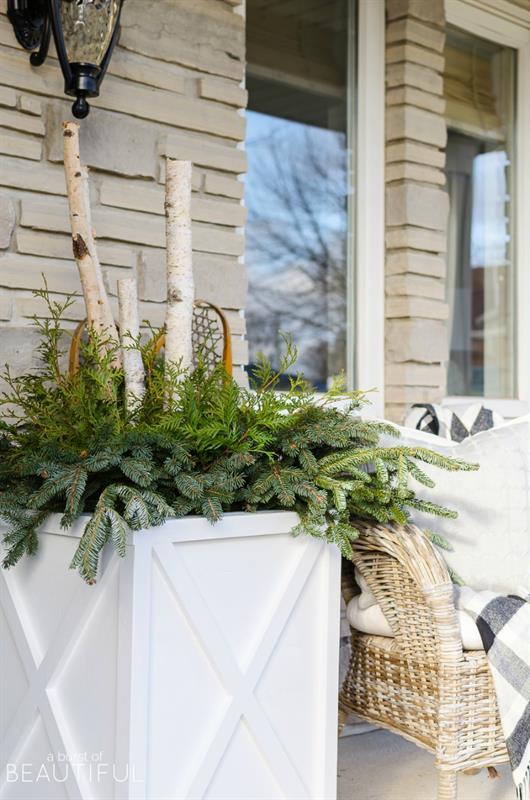


These X-style planters will fit any decor and are a great replacement for any plastic planters you may have outside your home. They add a classic farmhouse look to the front of your home. They are over-sized which make them a great scale for larger spaces. Overall measurements are 21"W x 28"H x 21"D
Tools
Kreg Tools


Other Tools
-
Miter Saw

-
Table Saw
-
Tape Measure
-
Clamps
-
Shop Vacuum
Materials
Wood Products
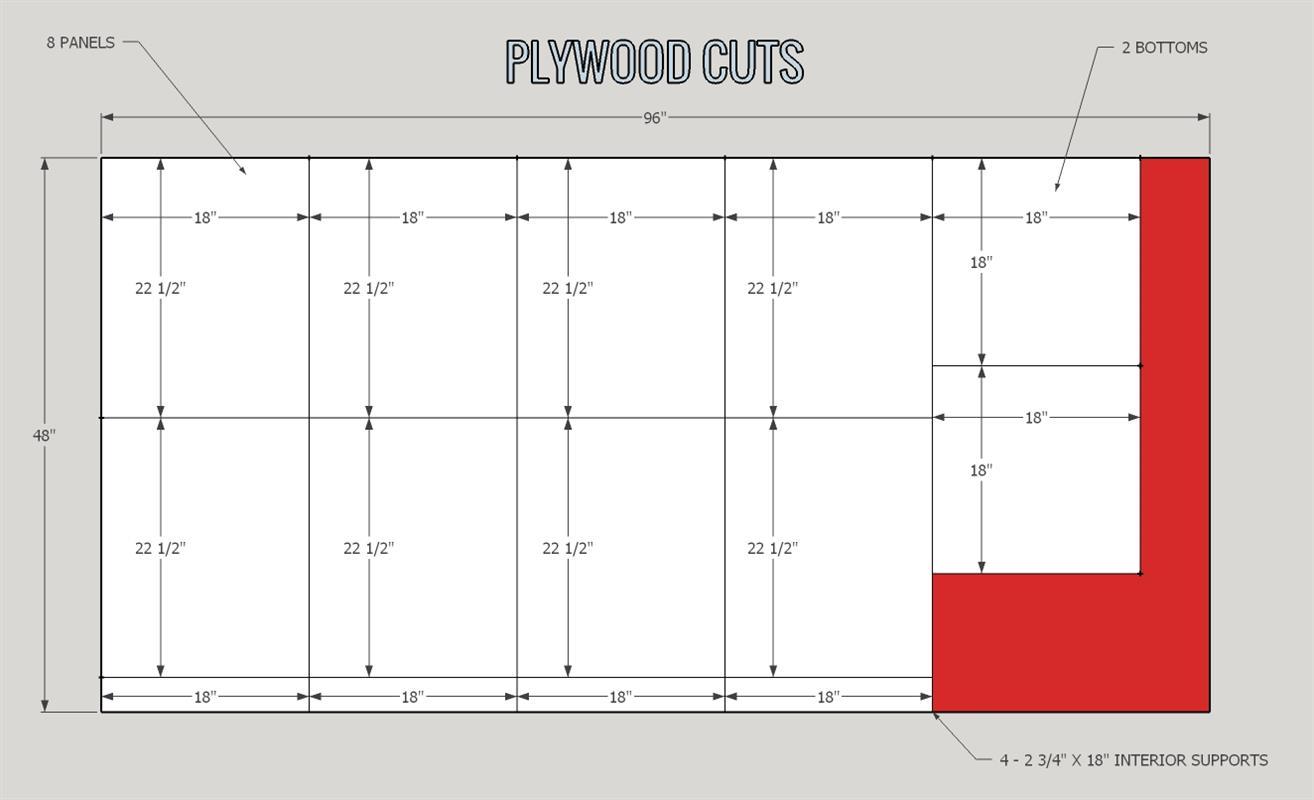
- 1 Quality Plywood , 3/4" Thick , Full Sheet
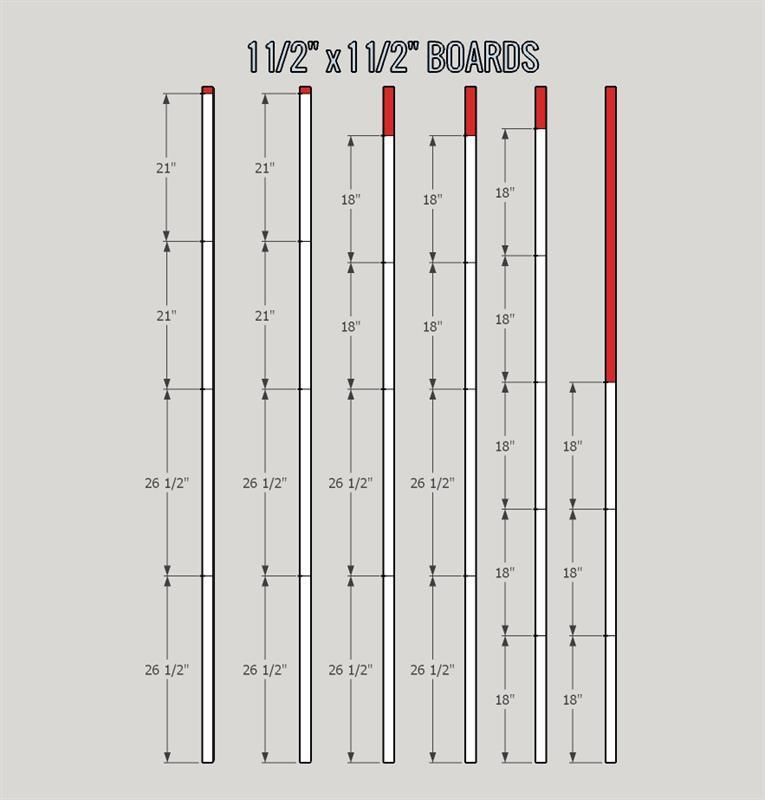
- 6 Board , 2x2 , 96"
- 1 Board , 2x4 , 96"
- 6 Board , 1x2 , 96"
Hardware & Supplies
- 1 Wood Glue
- 48 2 1/2" Kreg Pocket Hole Screws
- 80 1 1/4" Kreg Pocket Hole Screws
- 80 1 1/4" Brad Nails
- 1 Wood Filler
- 1 Silicone Caulking
- 1 Outdoor Paint
Cut List & Parts
- 8 Legs , 1 1/2" x 1 1/2" x 26.5"
- 4 Top Cross Boards , 1 1/2" x 1 1/2" x 21"
- 12 Upper & Lower Cross Boards , 1 1/2" x 1 1/2" x 18"
- 8 Plywood Boards , 3/4" x 18" x 22 1/2"
- 2 Bottoms if placing soil directly in planter , 3/4" x 18" x 18"
- 8 X - Full Length (This is rough cut measurment - you will cut angles on these ends in steps) , 3/4" x 1 1/2" x 30"
- 16 X - Half Length (This is rough cut measurment - you will cut angles on these ends in steps) , 3/4" x 1 1/2" x 15"
- 4 Plywood Interior Supports , 3/4 x 2 3/4" x 18"
- 4 Bottoms if placing plastic planter inside wood planter , 1 1/2" x 3 1/2" x 18"
Directions
-
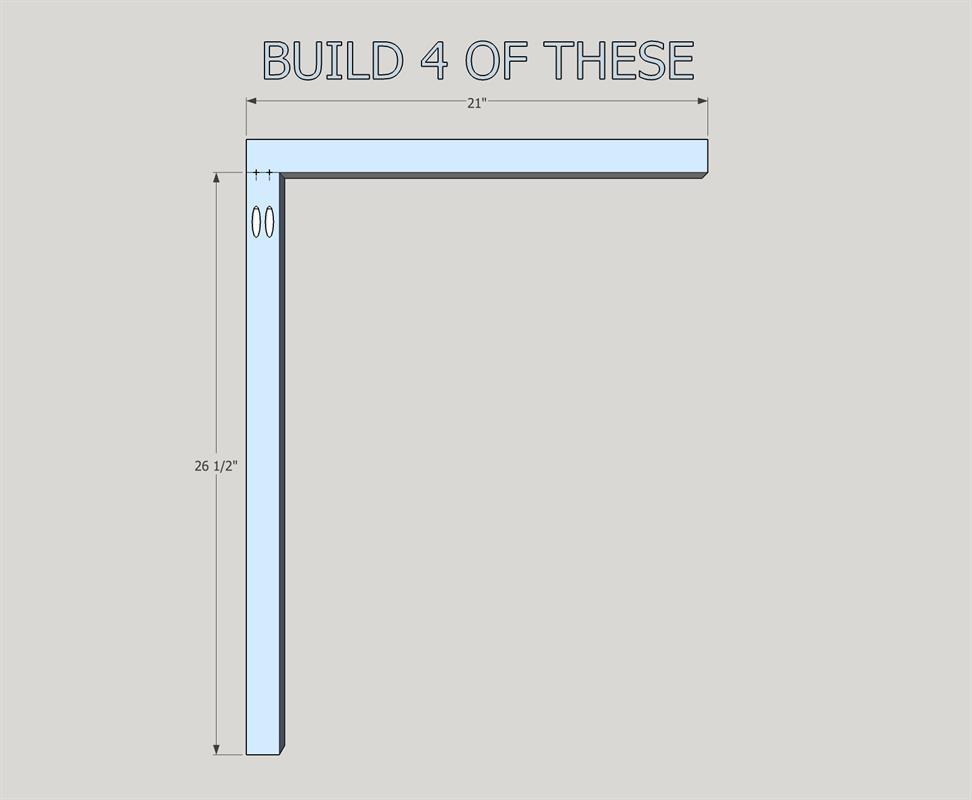
Frame - Part 1
Keep in mind that you are making 4 of these panels for 2 planters. Repeat steps 1-4 four times.
Lay the 1 1/2" x 1 1/2" x 26.5" leg on a flat surface with the pocket holes facing up. Attach to a 1 1/2" x 1 1/2" x 21" top span with wood glue and 2-2 1/2" pocket hole screws.
-
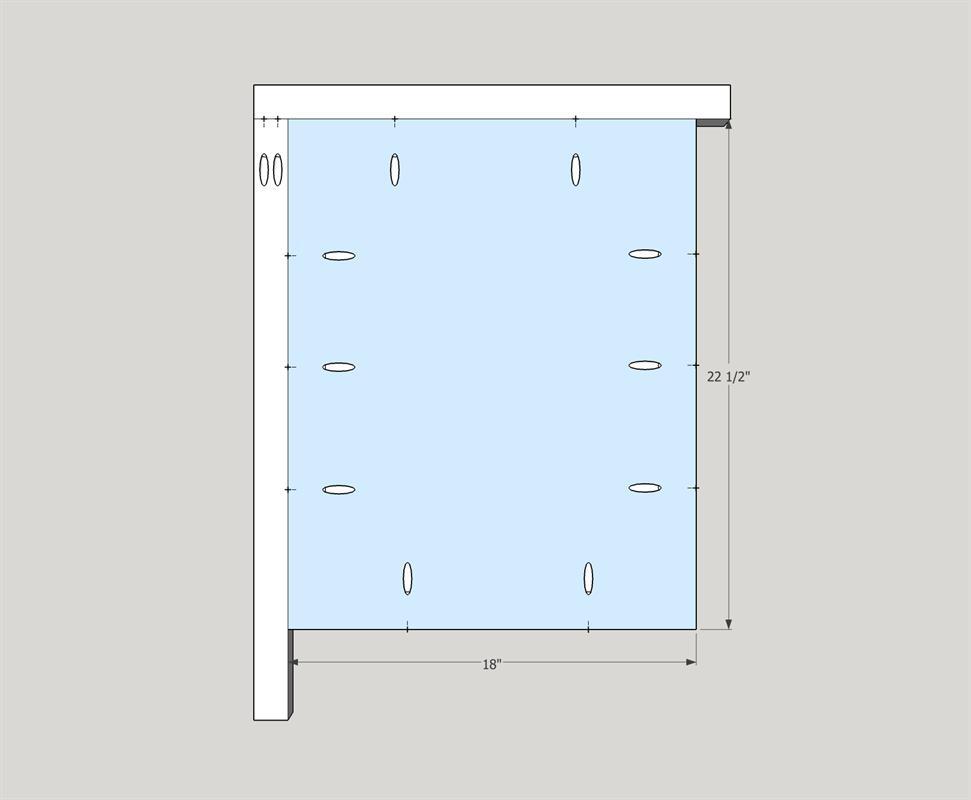
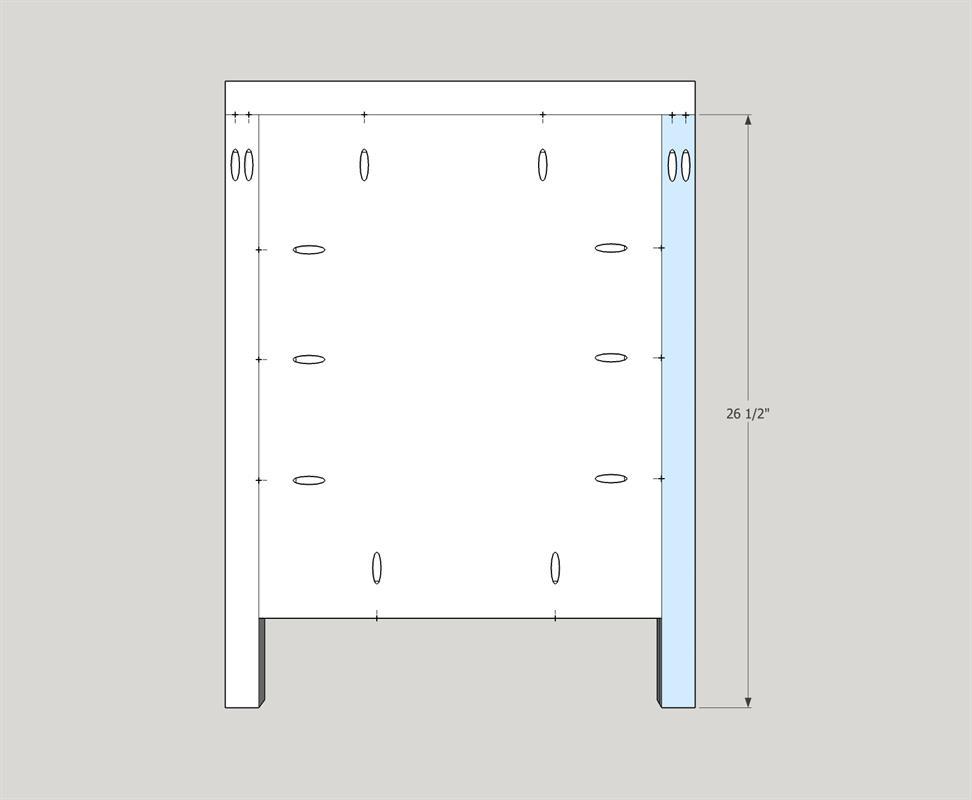
Frame - Part 2
Drill pocket holes into each into each of the 3/4" x 18" x 22 1/2" plywood boards as shown in the diagram above. Attach a plywood board flush with the inside of the frame. To do this, place a scrap piece of plywood under the plywood piece you are attaching. This will hold it up 3/4" and allow you to attach the 3/4" x 18" x 22 1/2" piece with 1 1/4" pocket hole screws.
-
Frame - Part 3
Attach the leg to the right side with wood glue and 2 1/2" pocket hole screws at the top, and 1 1/4" pocket hole screws along the side.
-
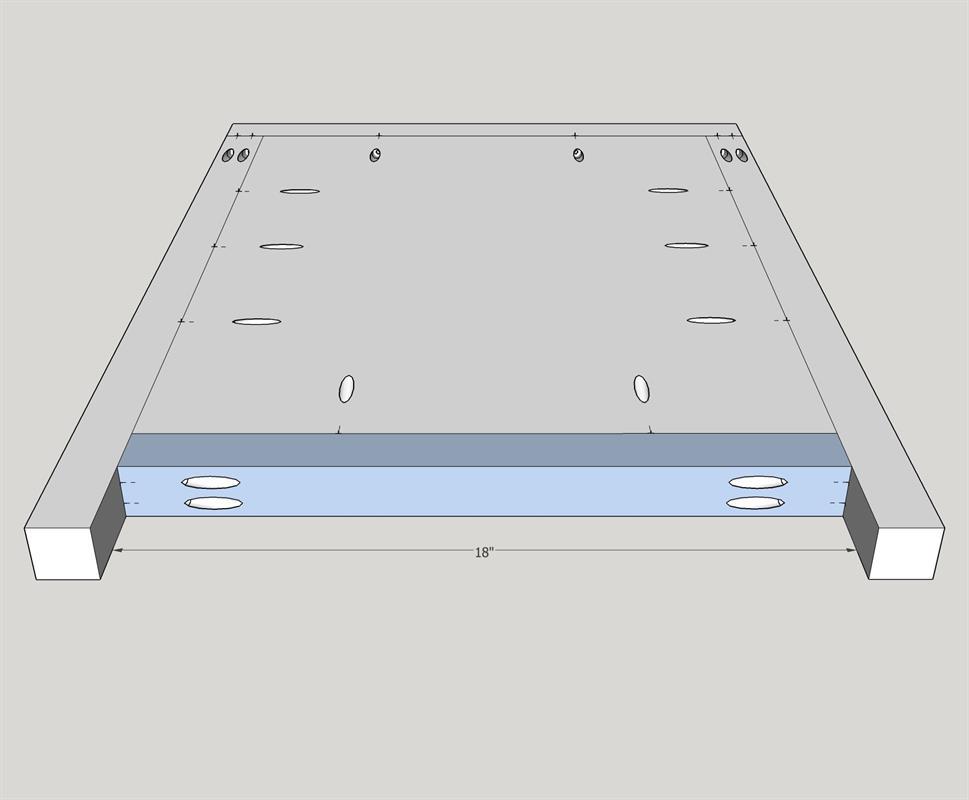
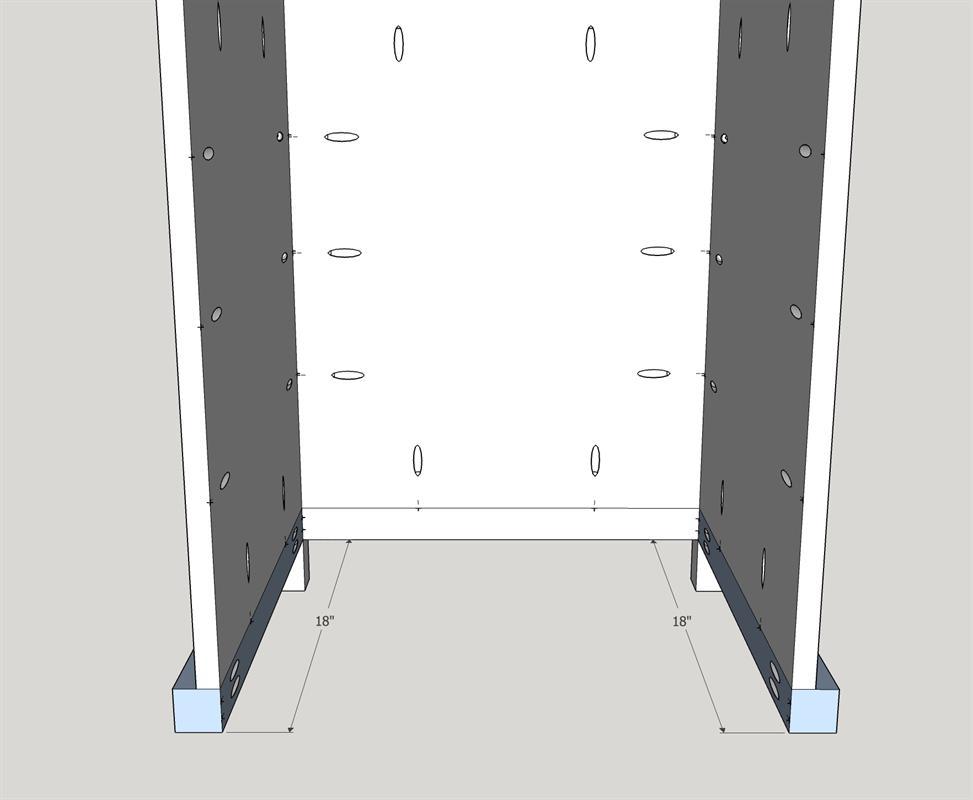
Frame - Part 4
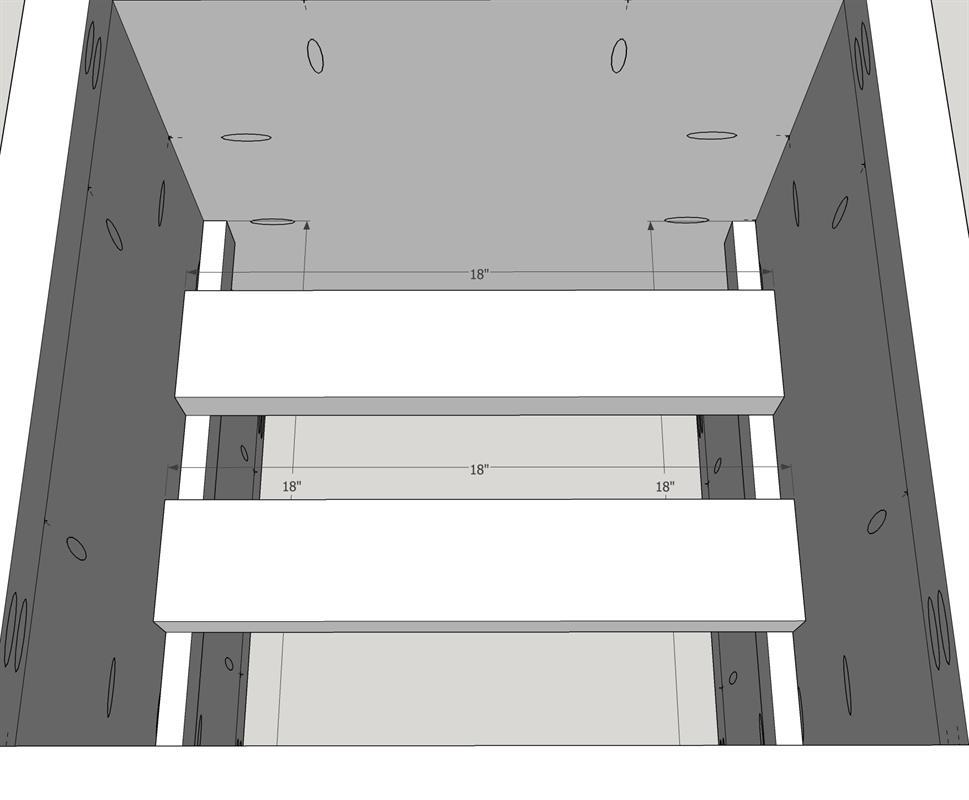
Drill two pocket holes into the ends of each of the 1 1/2" x 1 1/2" x 18" pieces. Insert between the two legs and along the bottom of the plywood with the pocket holes facing what will be the bottom of the planter. Attach with wood glue and 2 1/2" pocket hole screws.
-
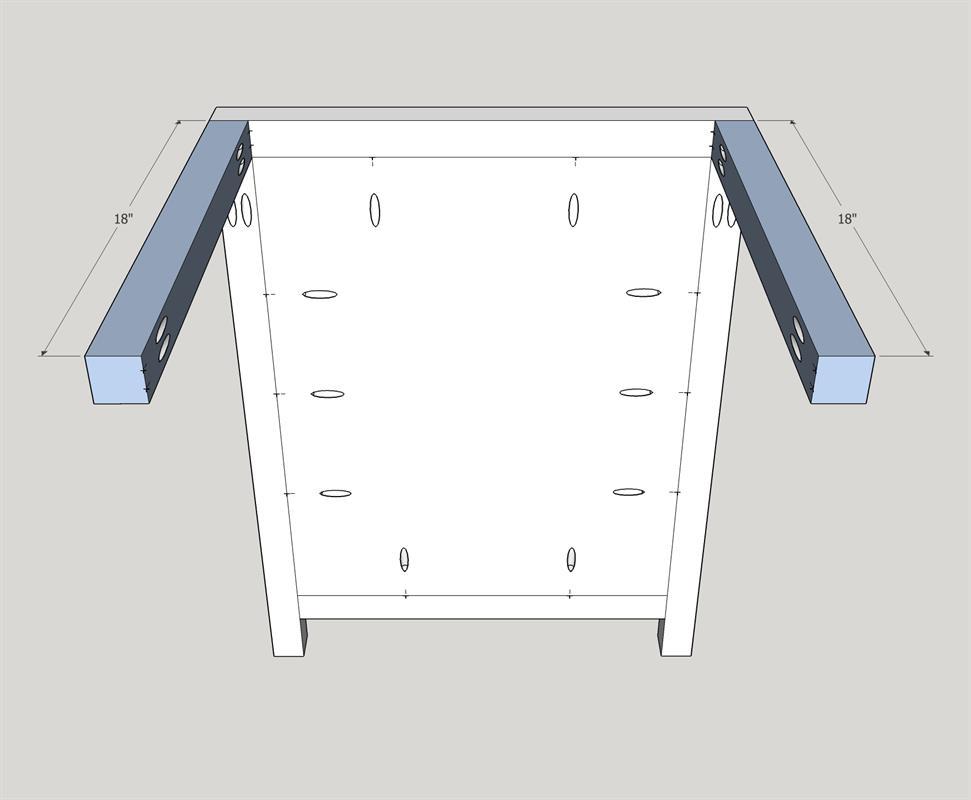
Frame - Part 5
Attach two of the 1 1/2" x 1 1/2" x 18" pieces to the top corners of the planters with the pocket holes facing towards the inside. Attach with wood glue and 2 1/2" pocket hole screws.
-
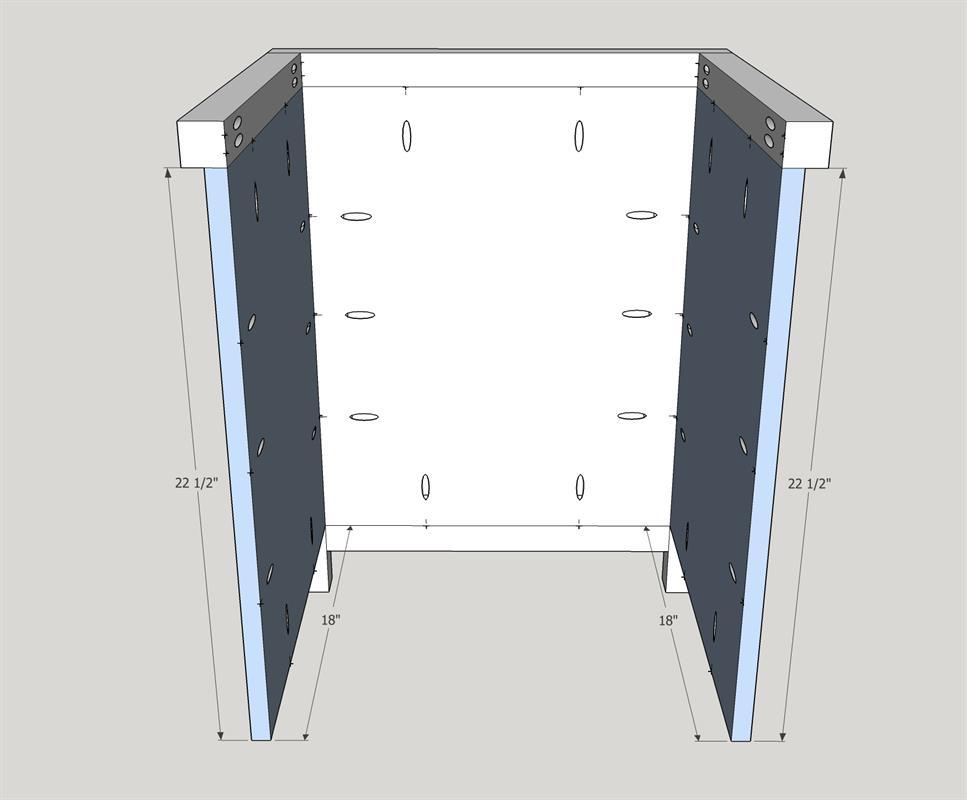
Frame - Part 6
Attach a 3/4" x 18" x 22 1/2" board to each side with the same method you used for the first board. I found it easiest if you lay the planter on the side you are attaching the plywood to with the scrap piece of plywood under to make it sit flush with the inside of the planter. Secure with 1 1/4 pocket hole screws.
-
Frame - Part 7
Attach a 1 1/2" x 1 1/2" x 18" board to each leg with wood glue and 2 1/2" pocket hole screws. Attach the plywood to the 18" boards with 1 1/4" pocket hole screws.
-
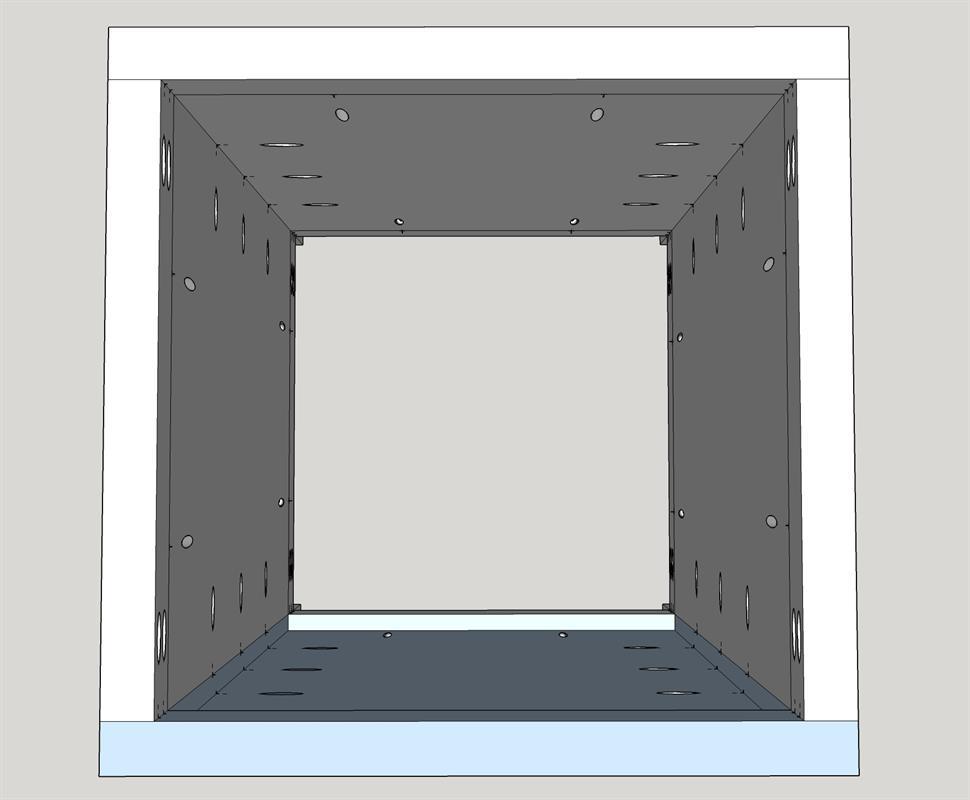
Frame - Part 8
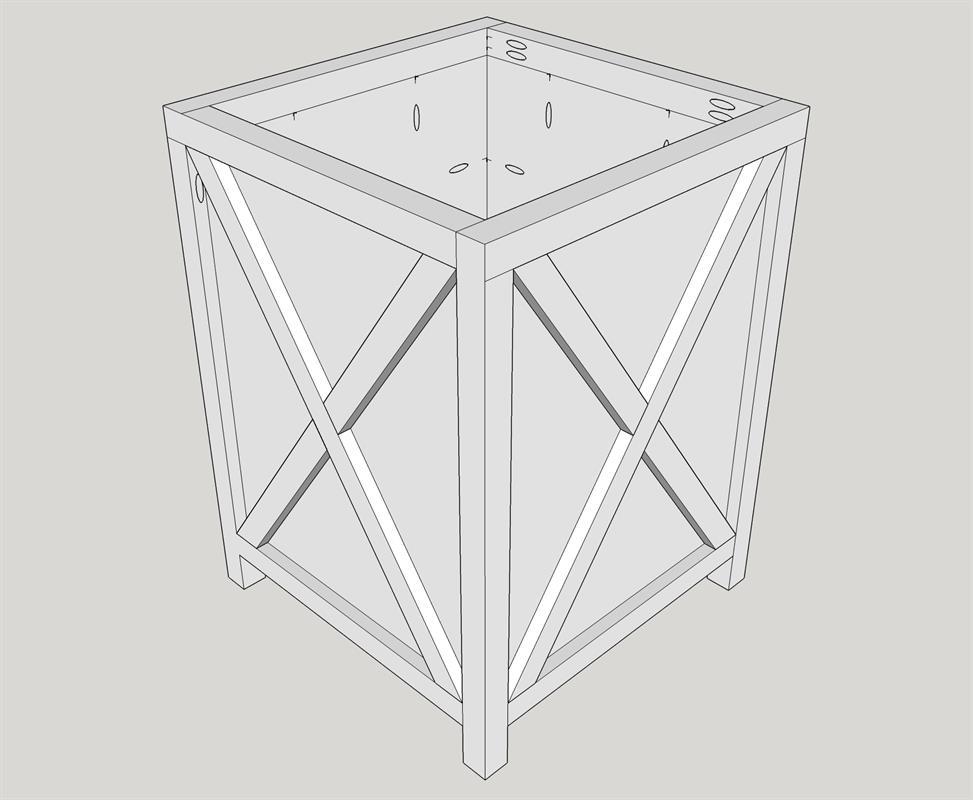
Lay one of the other completed panels you've already completed on a flat surface with the pocket holes facing up. Place the three-sided box onto the panel to create the complete four-sided planter. Attach the three panels to the fourth using wood glue and 2 1/2" pocket hole screws.
-
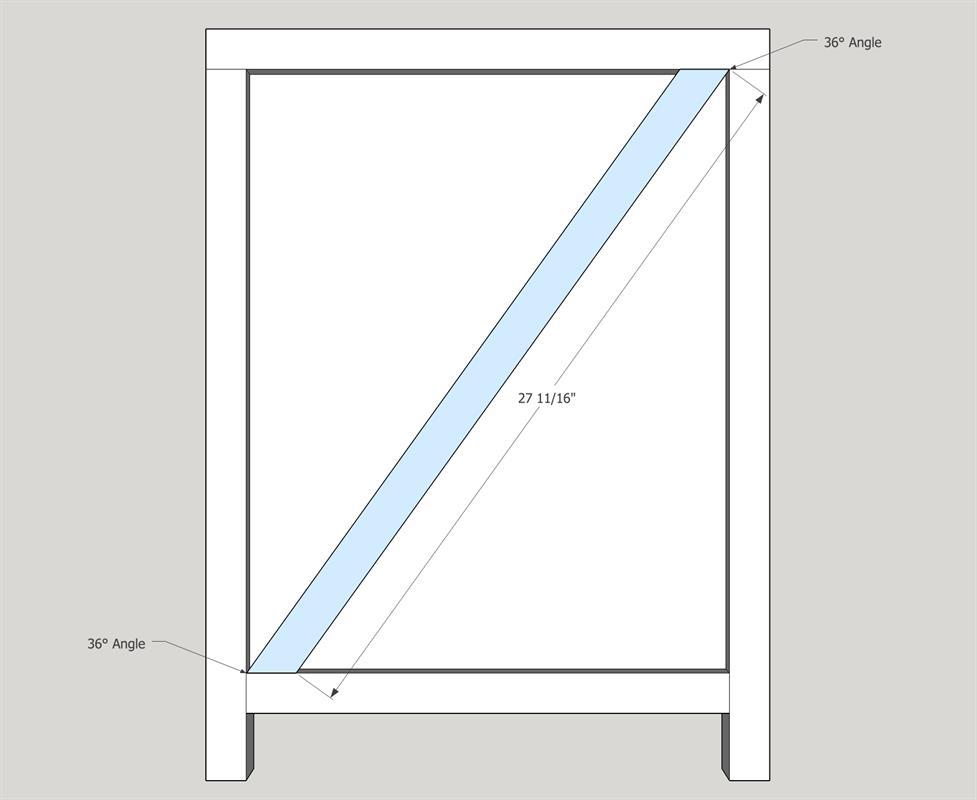
X on Outside of Planter - Part 1
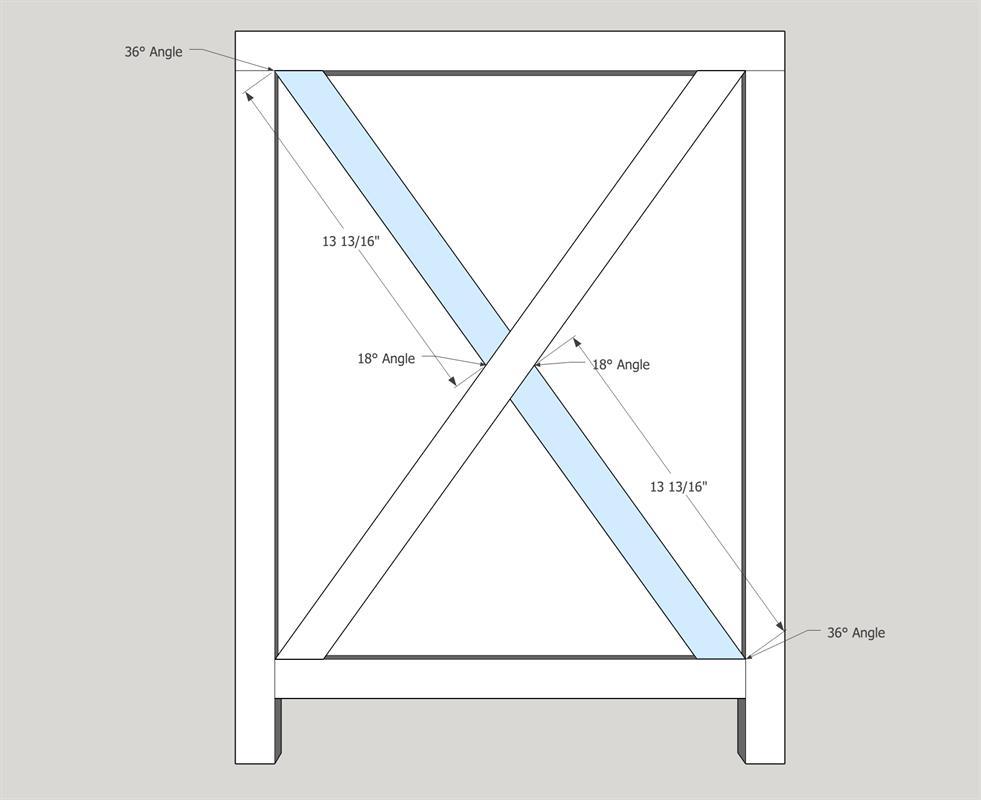
Cut a 3/4" x 1 1/2" as shown in the diagram. There should be opposing 36° angles on either end. Repeat on all four sides of each planter. Attach with wood glue and brad nailer using 1 1/4" nails. One easy way to do this is to place a piece of painters tape from corner to corner and mark with a pencil and then transfer the tape to the piece of wood and use that as your angle cutting guide. See step 11 for photo of this process.
-
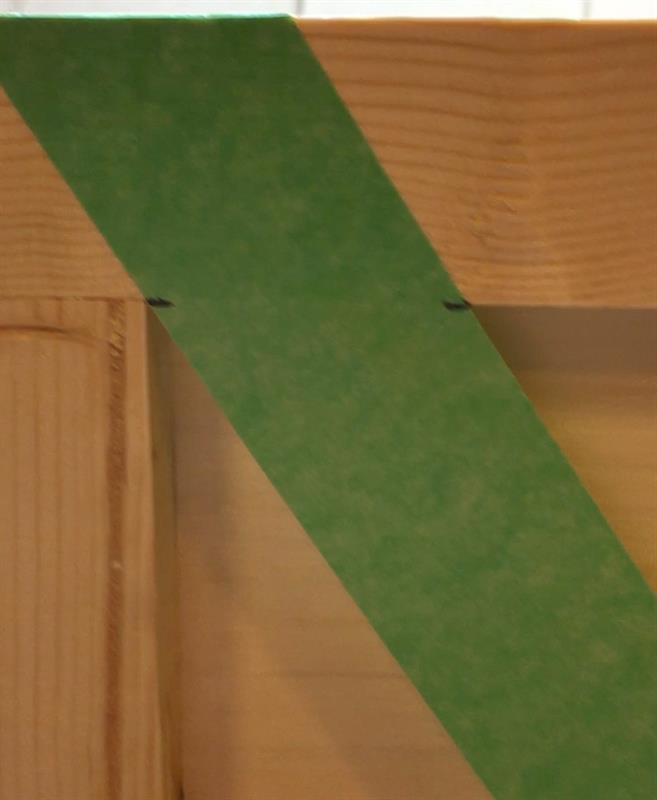
Photo & Video of Tape Trick
Here's a photo of how to mark the the painters tape to cut the X's easily without measuring angles. Once you've marked the tape, transfer the tape to the wood and set your miter saw according to the marks rather than measuring the angles. Here's a link to a video of this trick that may help: https://www.instagram.com/p/BblPbYCD5S6/?taken-by=thediyhubs
-
X on Outside of Planter - Part 2
Cut two 3/4" x 1 1/2" as shown in the diagram. There should be opposing 36° angle on one end and 18° on the other end. Repeat on all four sides of each planter. Attach with wood glue and brad nailer using 1 1/4" nails. One easy way to do this is to place a piece of painters tape from corner to corner and mark with a pencil at each corner and where the boards meet in the middle, and then transfer the tape to the piece of wood and use that as your angle cutting guide. See step 11 for photo of this process.
-
Fill Holes & Cracks & Sand
If your planters are going to be in an area where they will be subject to a lot of rain, it is advisable to fill the lower pocket holes that could collect water by using silicone caulking or using a Kreg Plug cutter to create plugs to fill the holes. This will keep the holes from retaining water and causing the wood to prematurely rot. Sand with 80 grit, followed by 120 and 220 grit to finish.
-
Paint
Paint with an OUTDOOR paint and make sure to coat all surfaces inside and out to protect it from the elements.
-
Option #1 - Plastic Pot Support
If you are planning to use an insert (plain square or round plastic planter that you can find buy at your local garden center) that can be easily removed, you will need to create a shelf at the level so that your plastic planter will sit about 1/2" below the top of the wood planter. Take the height of your plastic planter and add 2". Measure that distance from the top of the wood planter and mark it on two sides of the interior of the planter. Attach a 3/4" x 2 3/4" x 18" piece of wood to each side using wood glue and 1 1/4" screws. Cut two 1 1/2" x 3 1/2" x 18" boards and place them on top of the side pieces you just secured.
-
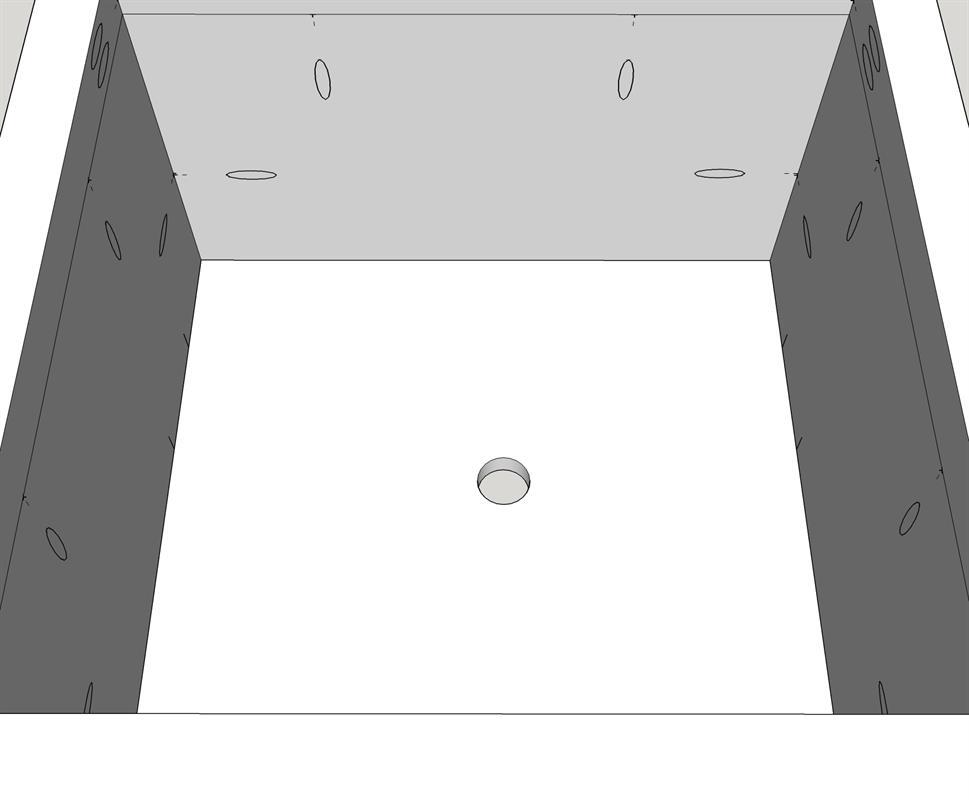
Option #2 - Built in Planter
If you would like to integrate the planter into the wood planter itself, you will add the 3/4" x 1 1/2" x 18" pieces on each side as in Option #1 above, but then add a full piece of 3/4" x 18" x 18" plywood with a 3/4" hole drilled in the center for water drainage. Line with 3.0 mil plastic sheeting by stapling 1 1/2" from the top of the planter. Pull some excess plastic through the hole in the bottom and cut to allow any water to drain. Then line with landscape fabric in the same way, but don't cut a hole in the bottom. Add some gravel/stones to allow for drainage and fill with soil.