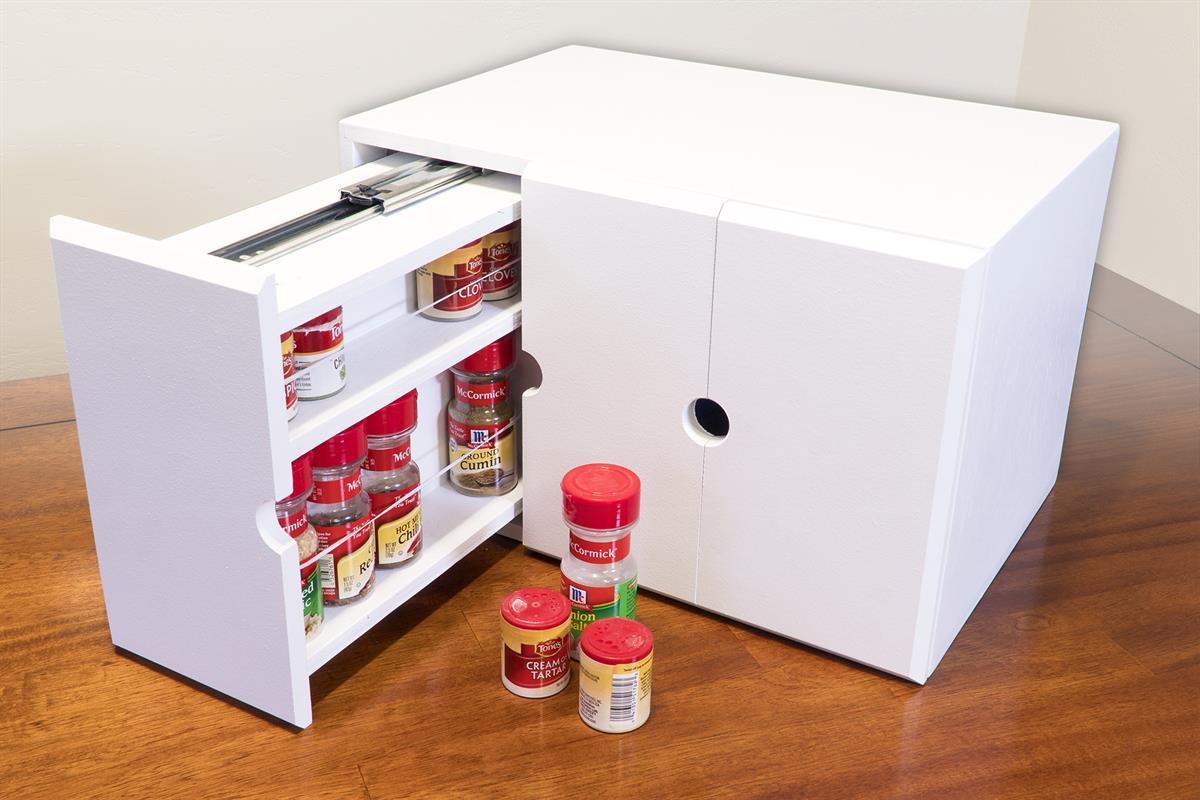


Sliding drawer spice organizer for kitchen cabinet or counter top.
Tools
Kreg Tools


Other Tools
-
Table Saw

-
Tape Measure
-
Clamps
-
Workbench
Materials
Wood Products
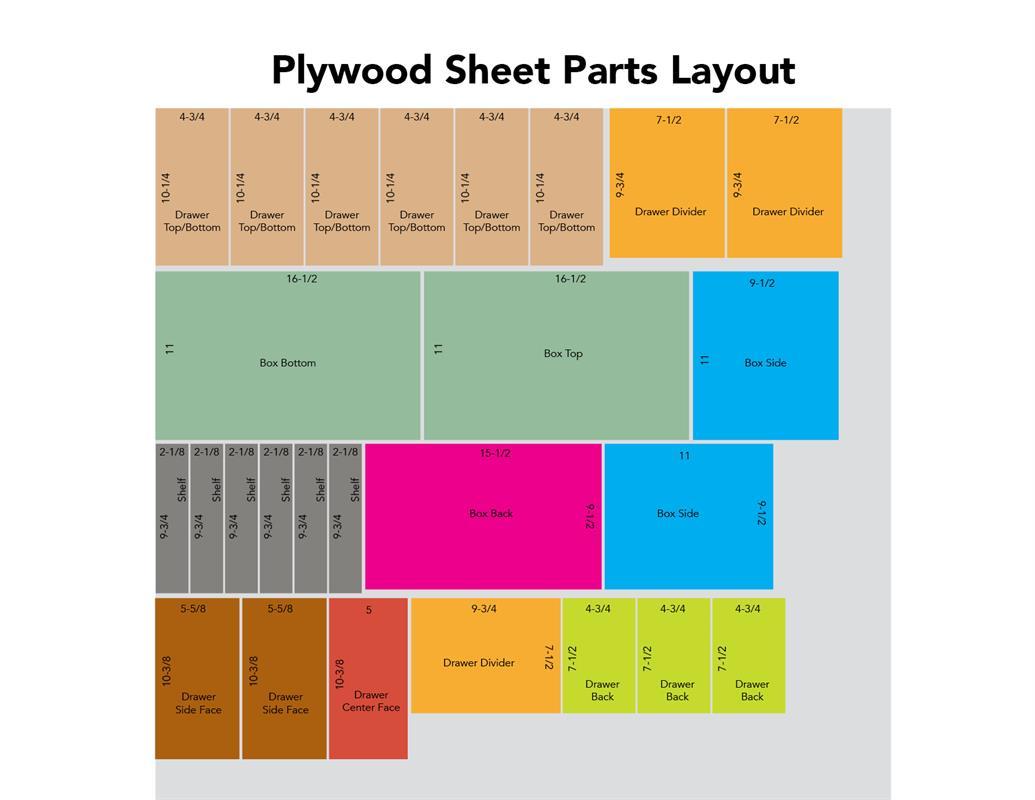
- 1 Plywood , 1/2" Thick , Half Sheet
Hardware & Supplies
- 40 3/4 or 1" Pocket Hole Screws (Depending on your material thickness)
- 30 7/16" Screws for drawer slides
- 24 Small Eye Bolts
- 6 10" Drawer Slides
- 1 Bundle of Small Elastic Cord
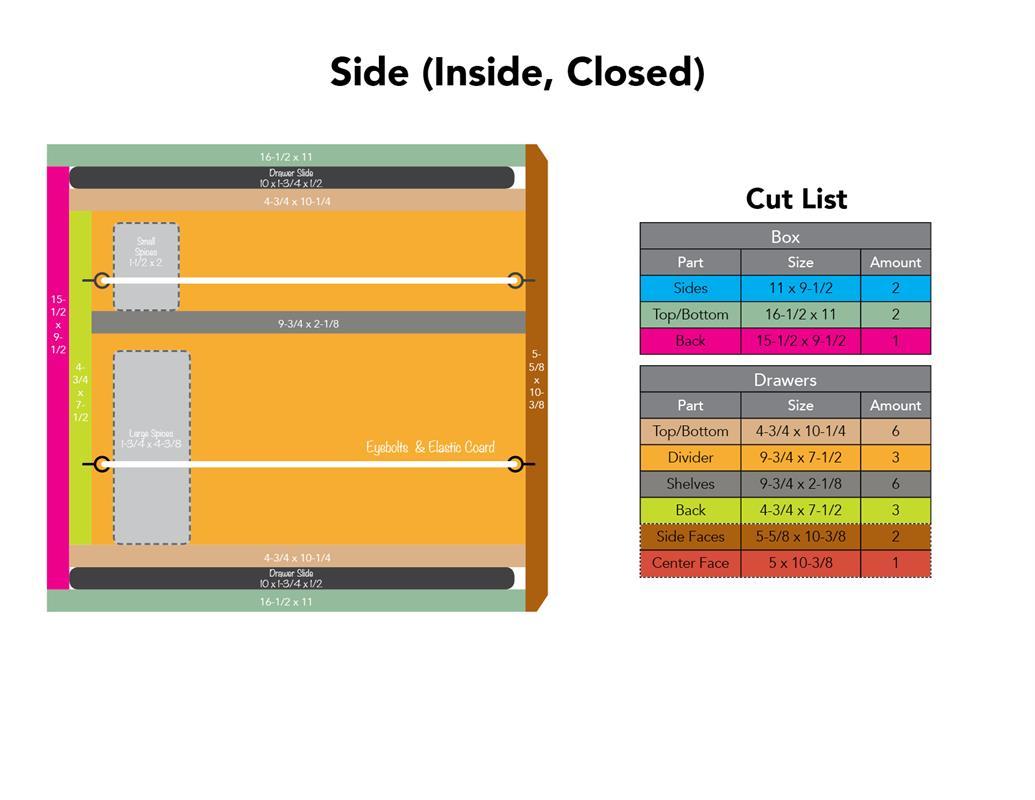
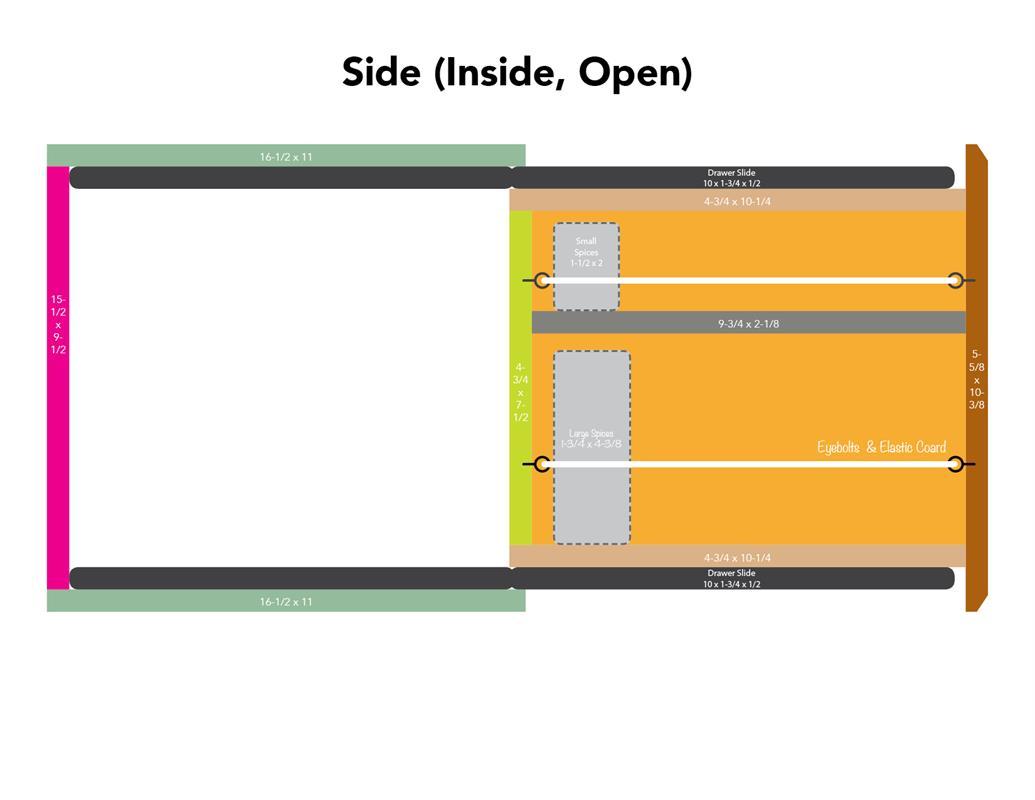
Cut List & Parts
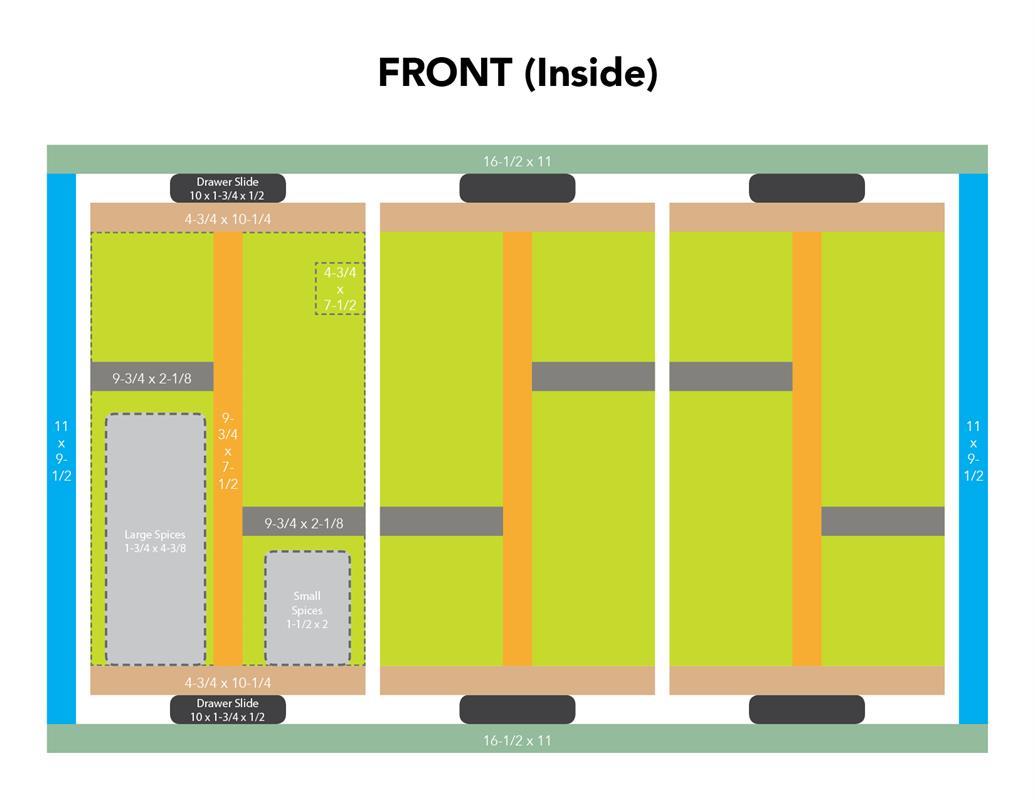
- 2 Box Sides , 11 x 9-1/2
- 2 Box Top/Bottom , 16-1/2 x 11
- 1 Box Back , 15-1/2 x 9-1/2
- 6 Drawer Top/Bottom , 4-3/4 x 10-1/4
- 3 Drawer Divider , 9-3/4 x 7-1/2
- 6 Drawer Shelves , 9-3/4 x 2-1/8
- 3 Drawer Back , 4-3/4 x 7-1/2
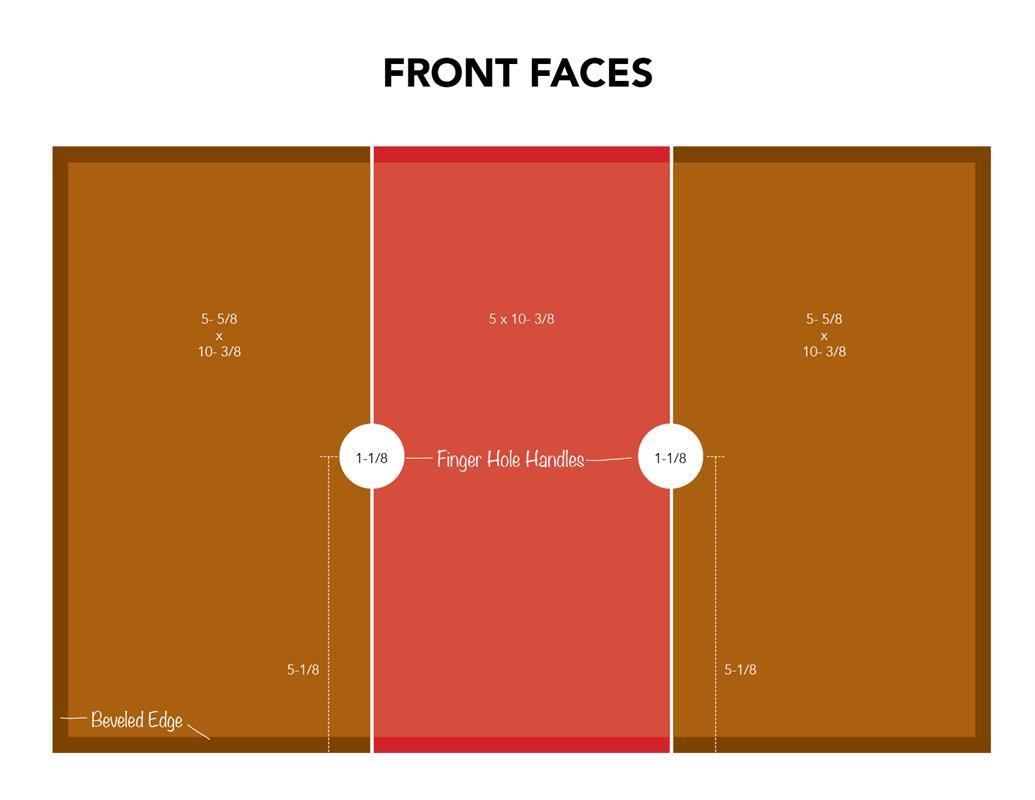
- 2 Drawer Side Face , 5-5/8 x 10-3/8
- 1 Drawer Center Face , 5 x 10⁻³/8
Directions
-
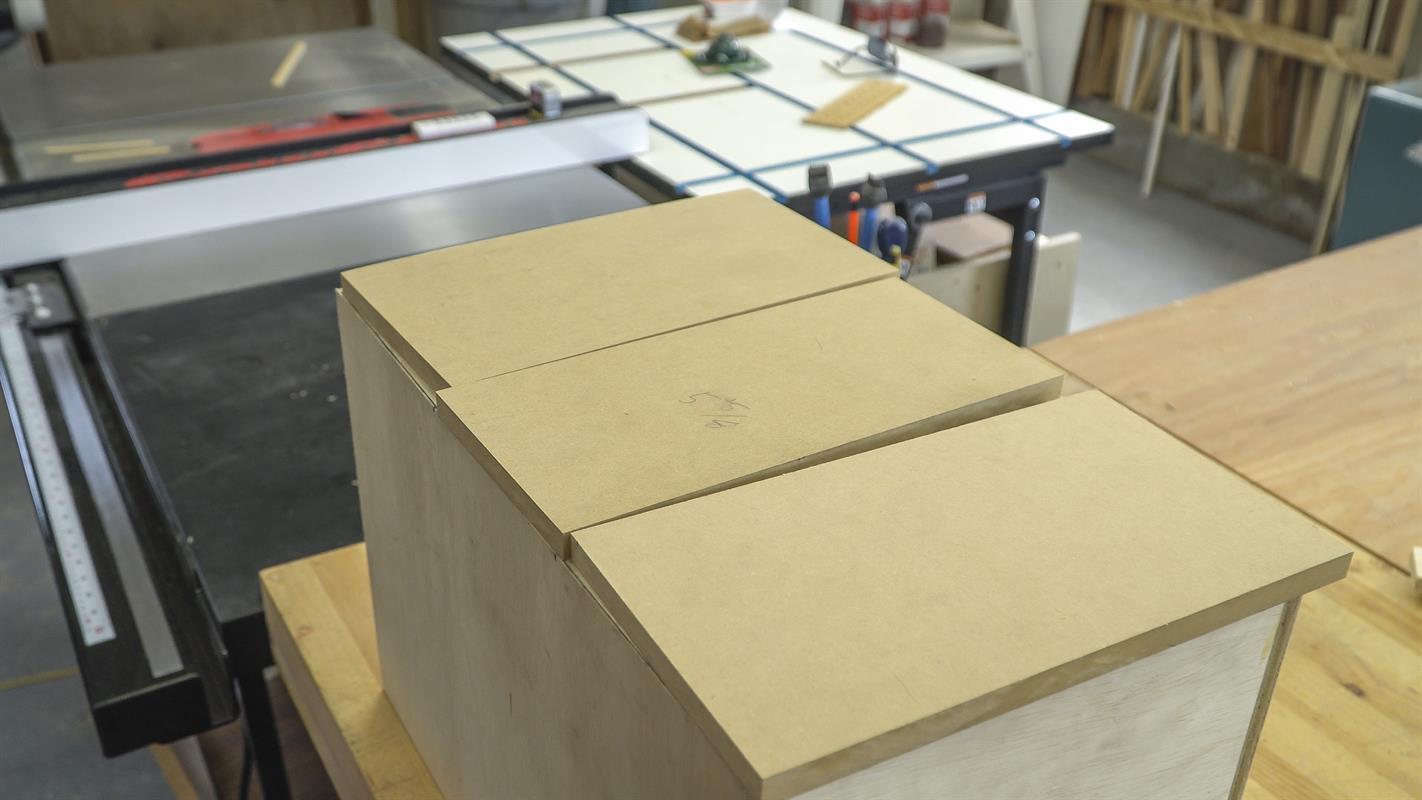
Cut Out The Parts
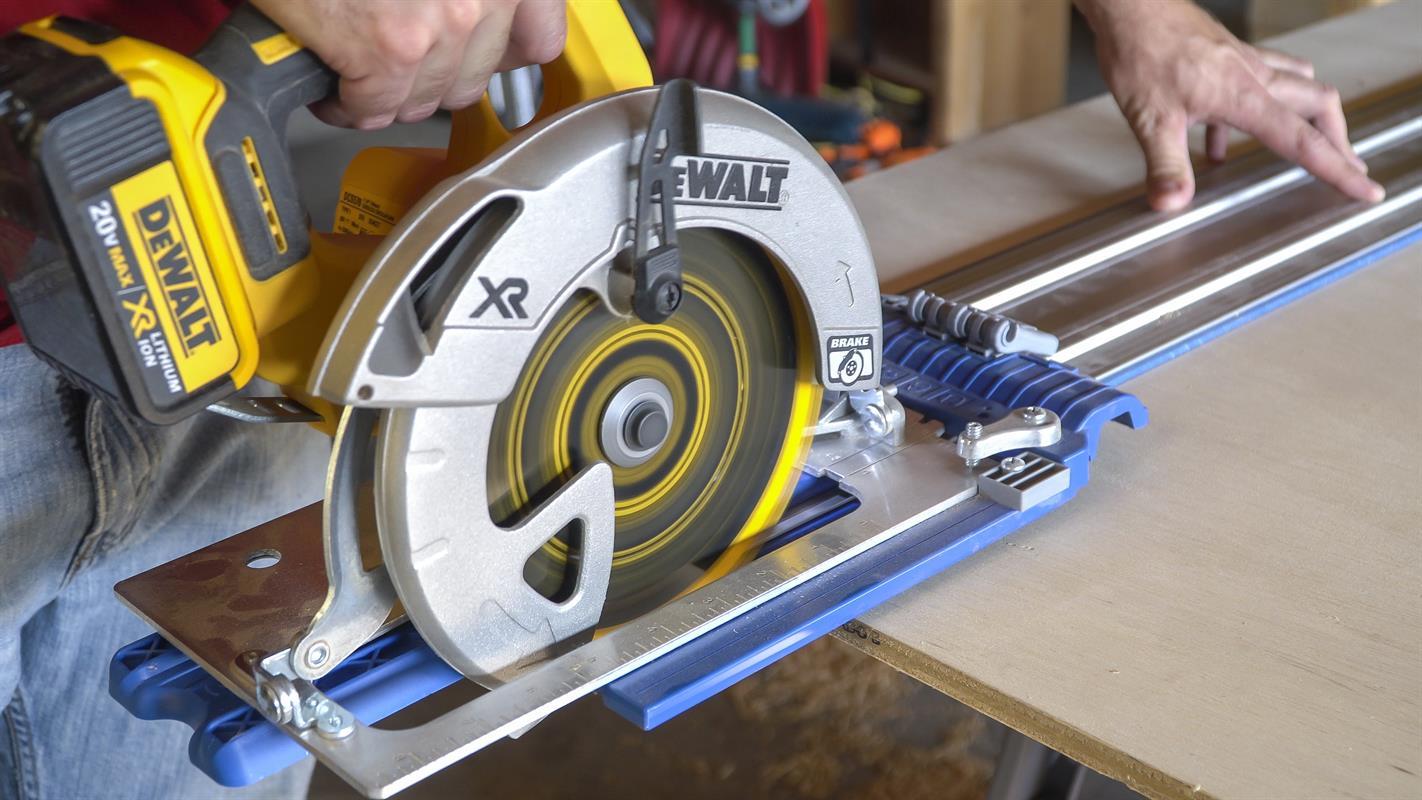
As with most projects, the first step is cutting the material to the right sized pieces. Since this is primarily a plywood project, that means breaking down a full-sized sheet. I used Kreg’s Accu-Cut circular saw track system to cut strips off the full sheet, then call all of the pieces to final size on my table saw.
-
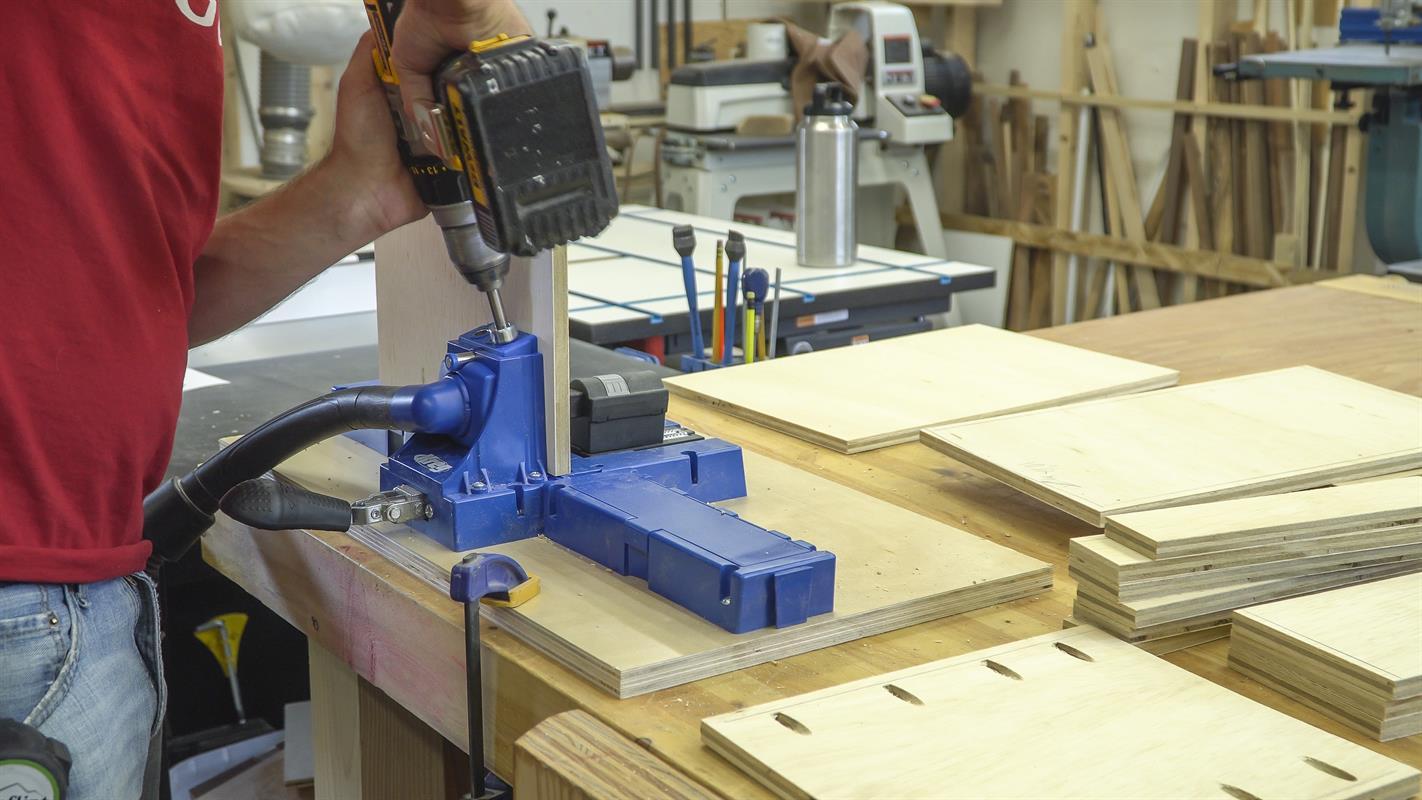
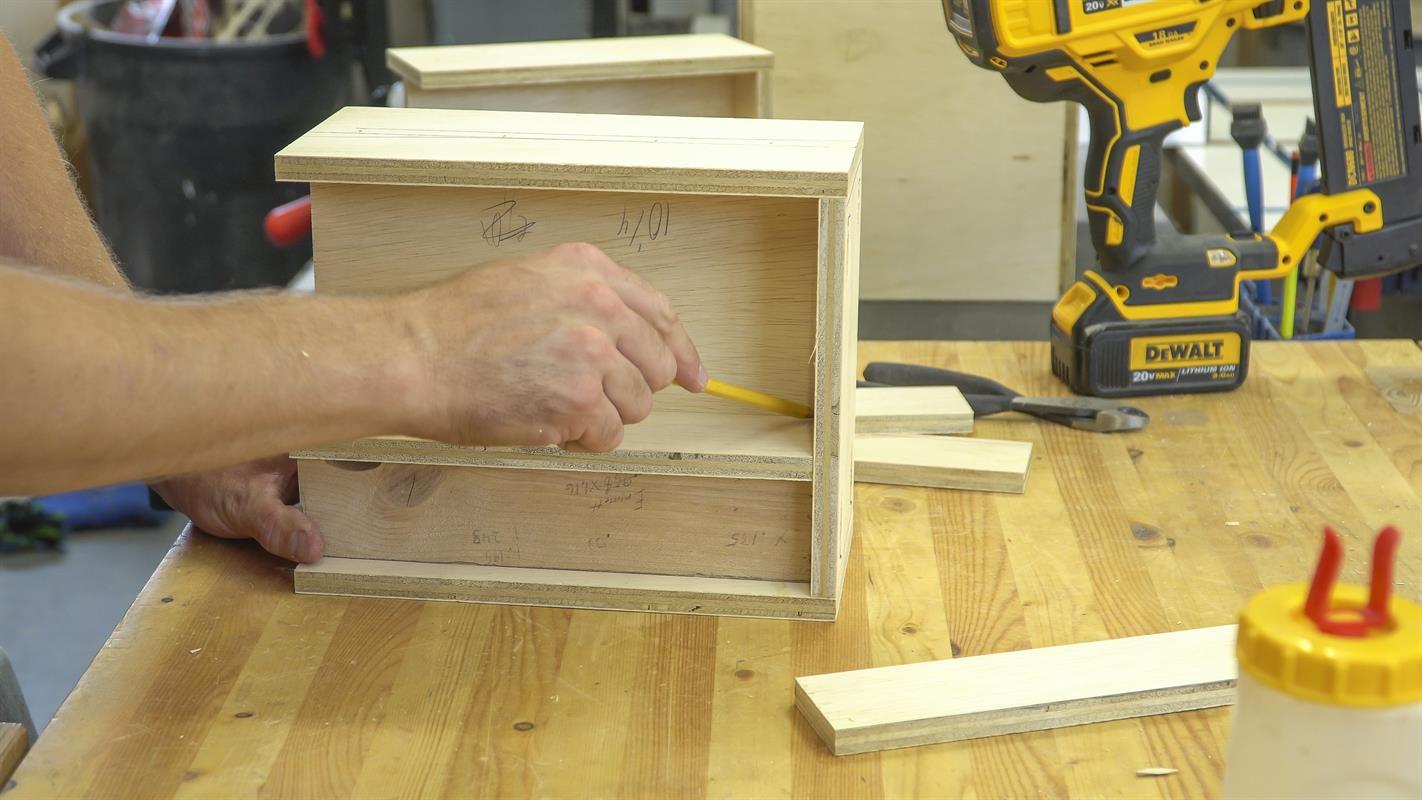
Drill Pocket Holes
Next, drill a whole mess of pocket holes. I find that it is much easier to drill all of the holes for the entire project in the same step. That way I’m not switching back and forth between assembly, and drilling more holes.
That being said, it might be difficult to picture just where the holes need to be in some of these parts until you start to assemble them. So if you have the room for it, it might be wise to leave your pocket hole jig setup for a while. I managed to miss some crucial holes and had to make up for it later on, make a note of step 18!
-
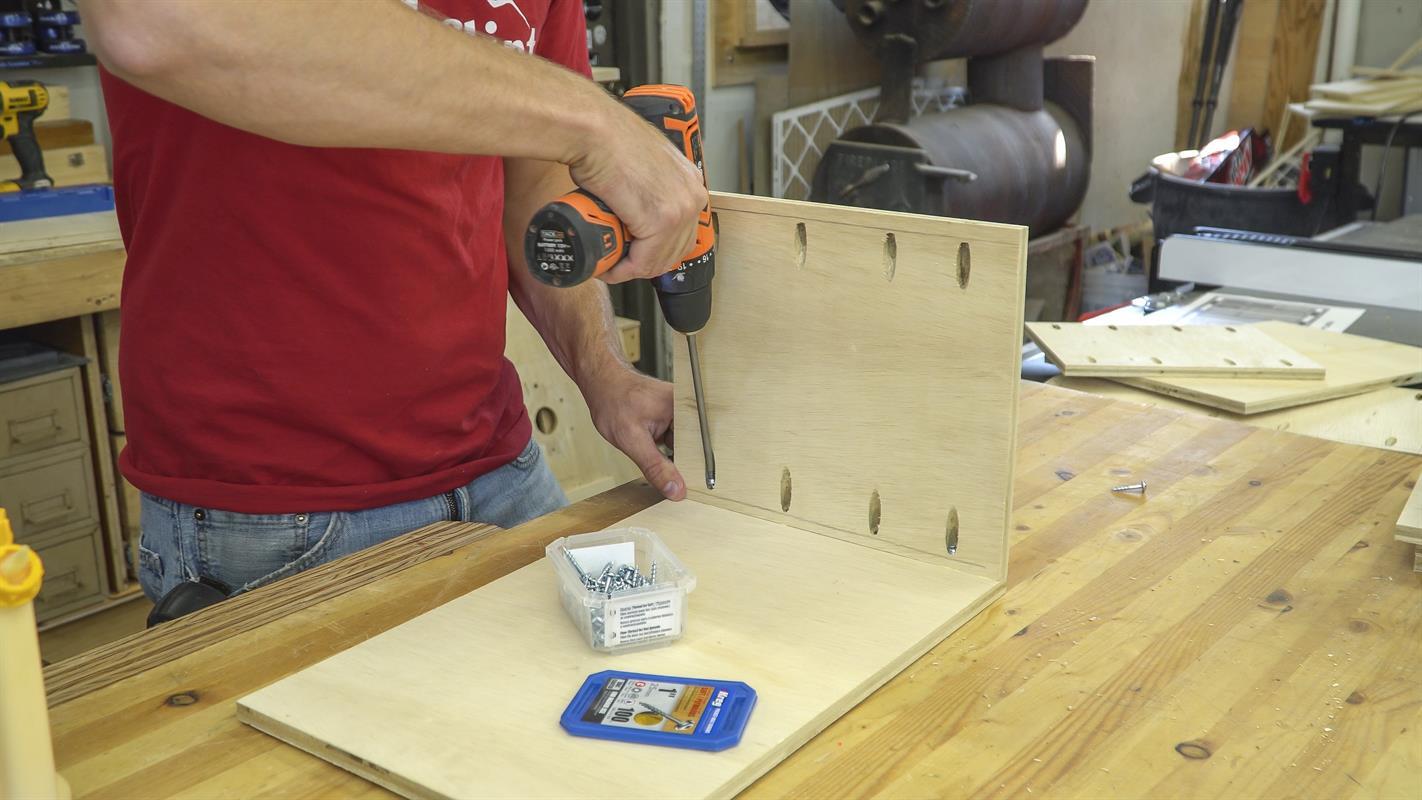
Assembly - Box Sides
Start assembling the main body of the cabinet first, which, let’s be honest, is just a box. Attach the side walls to the bottom first using glue and screws, making sure that the pocket holes are facing the inside.
-
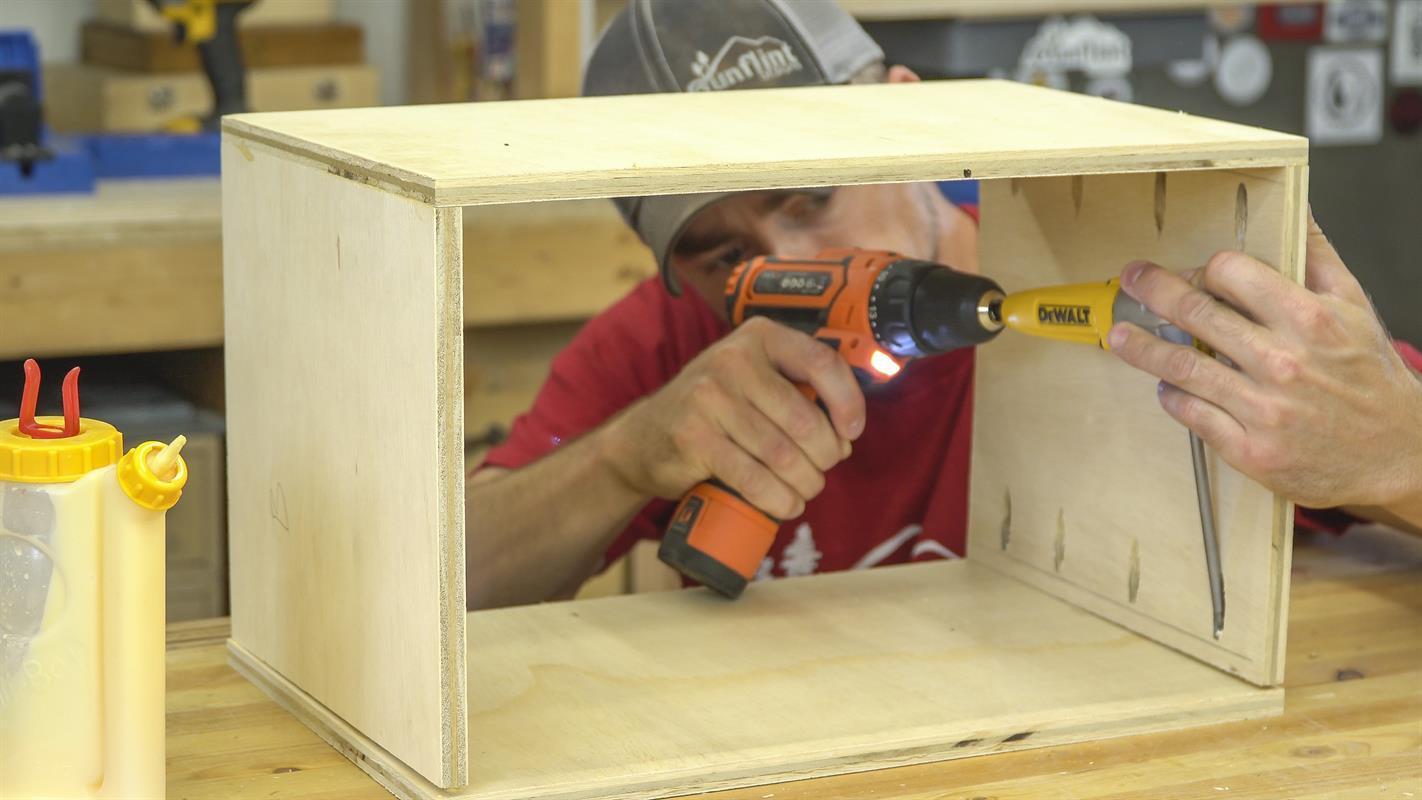
Assembly - Box Top
Next, flip the box over and attach the top. The space gets a little confined at this point, so I had to use an adapter on my drill to drive the screws in. If the holes were oriented to the outside this little inconvenience could be avoided, but having them on the inside means you won’t be able to see them once the drawers are in, and therefore you won’t have to fill any of the pocket holes with plugs later.
-
Assembly - Box Back
Now install the back into the box. This time the holes are facing out, because in my case, this whole project is going to sit inside a cabinet and you won’t ever see the back. So for the sake of easier construction I let the holes face the back side. If you wanted yours to sit out in the open, you may want to hide the holes on the inside.

-
Assembly - Drawer Body
Moving on to the drawer assembly, start by attaching the back to the top and bottom pieces. Once again, the holes face the back. You can use a second back piece to help support the pieces to make assembly easier.
-
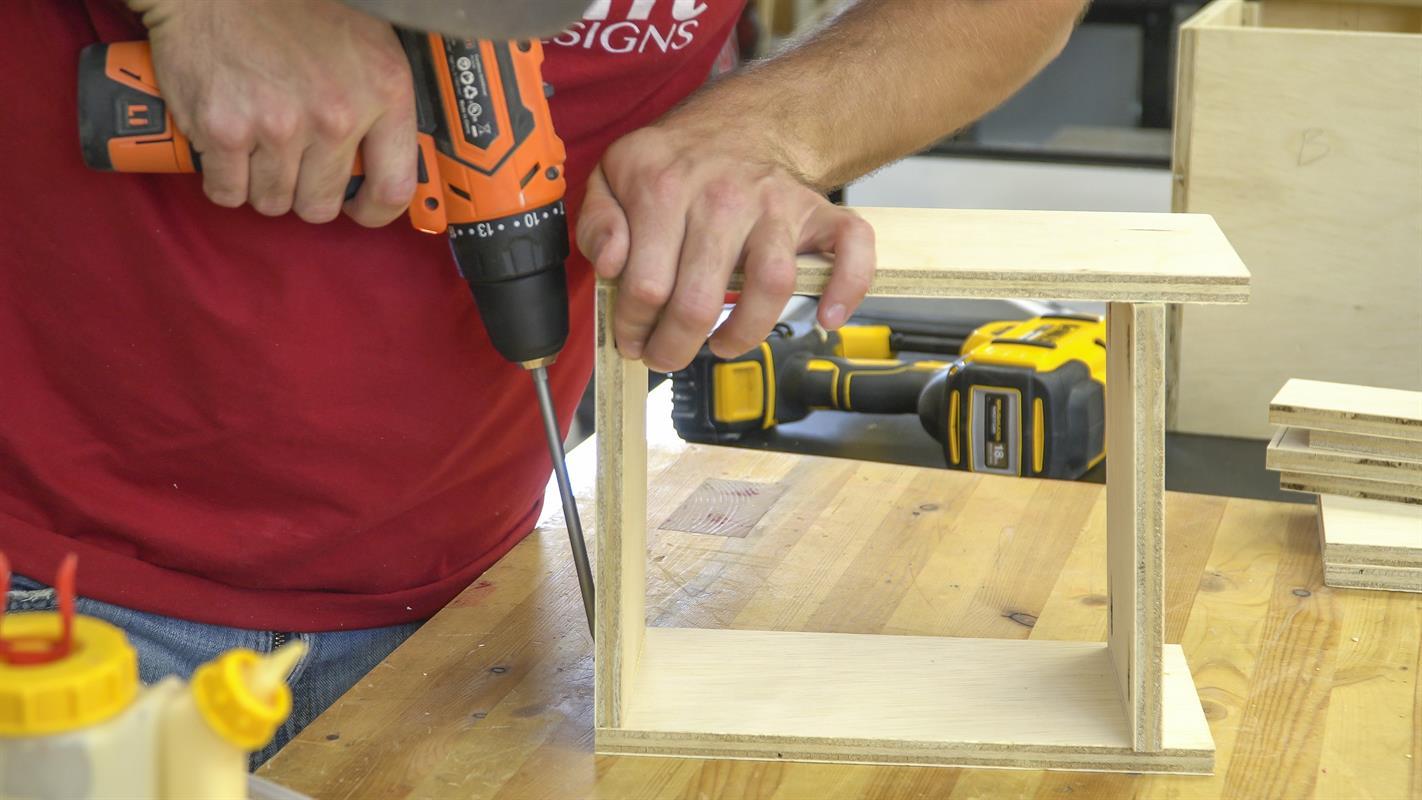
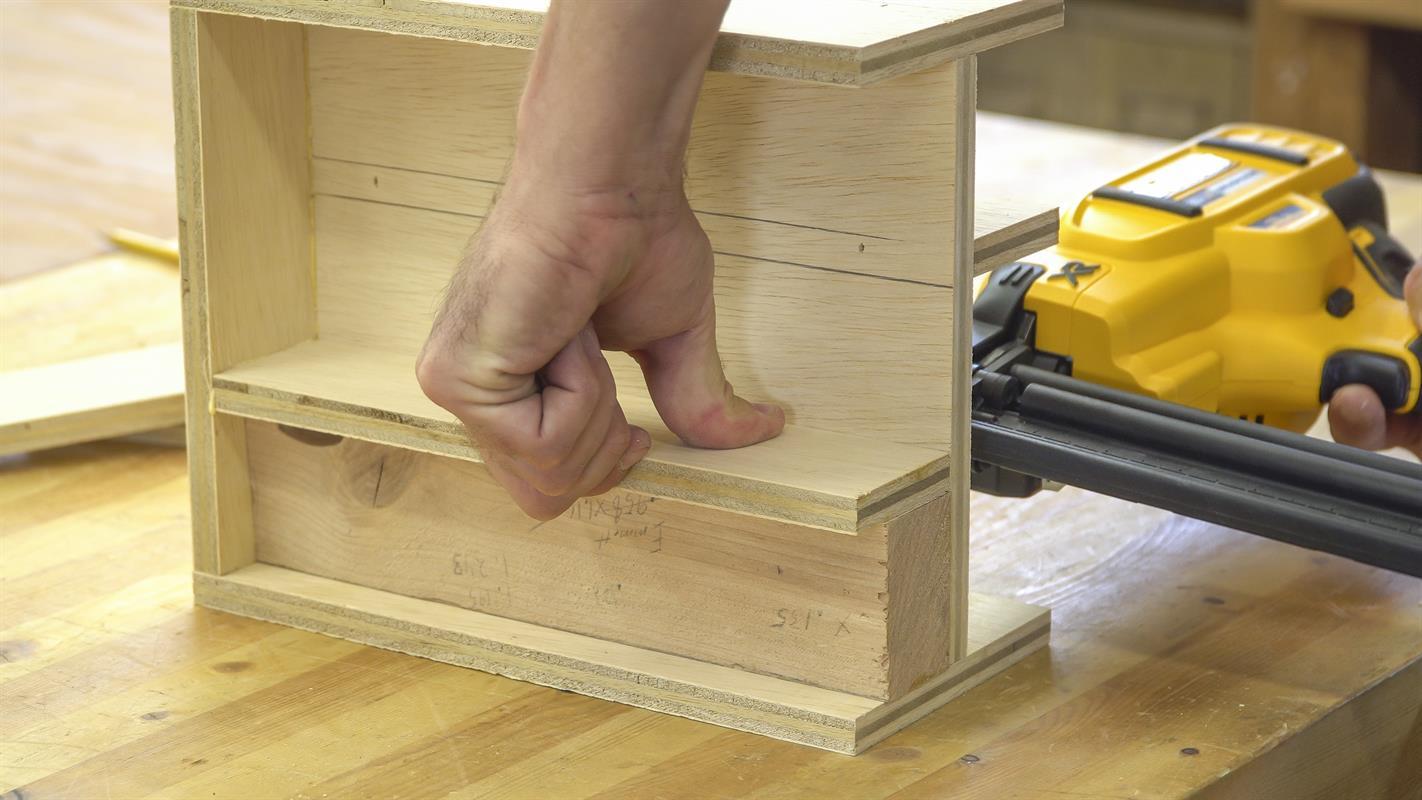
Assembly - Center Divider
Install the center divider by using the shelf pieces as spacers to make sure it’s sitting in the exact center. I also used those shelf pieces on the back side to draw lines to show me where the the center would be. This made it much easier to line up the nail gun and launch in some brads.

-
Shelf Position
Cut a scrap piece of wood to the exact height that you want the smaller shelf space to be. Use that piece to mark the location of the shelf on one side of the center divider so you can see where to drive in some nails.
-
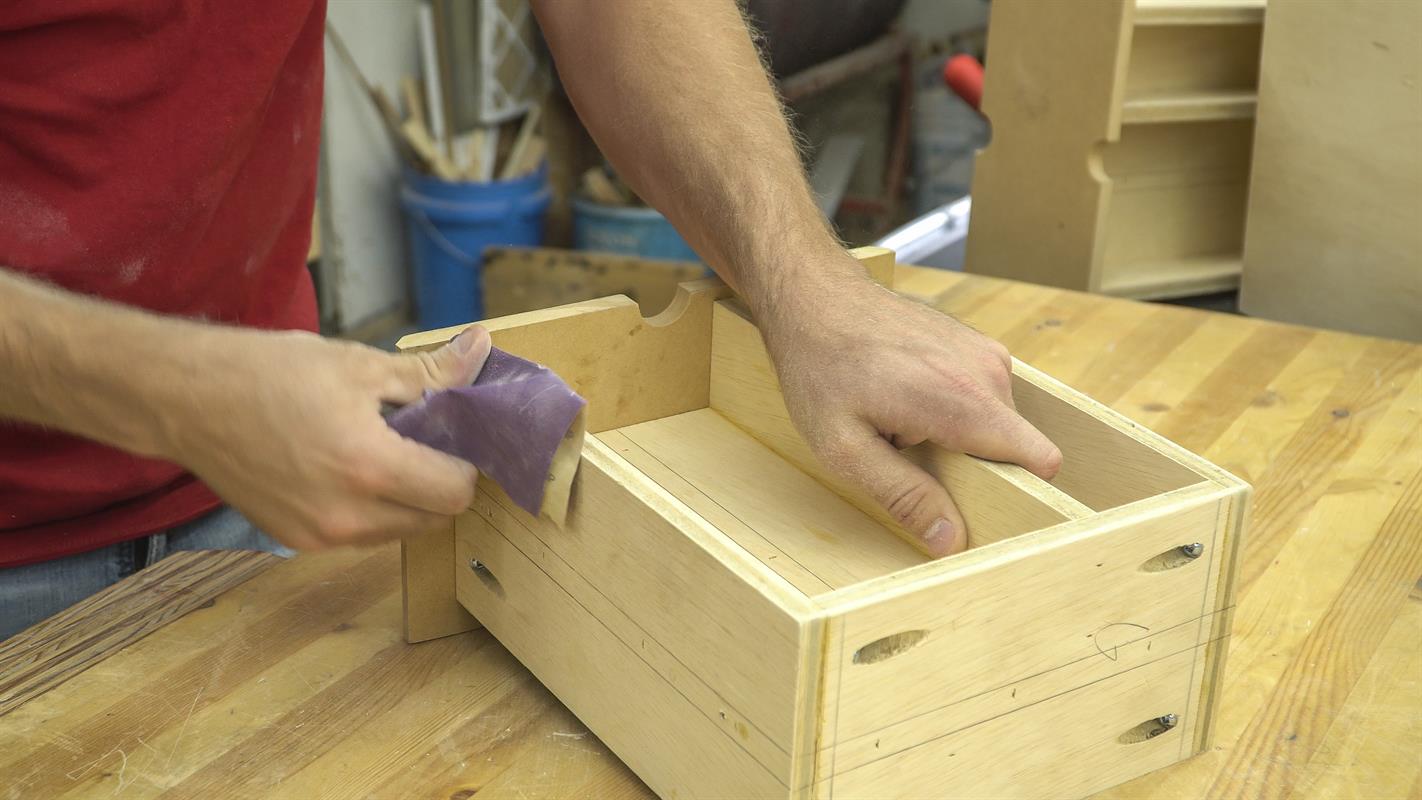
Assembly - Shelves
On the opposite side, put the spacer down and use it as a support to glue the shelf to the center divider while you nail it in place from the back side. Then just repeat the last few steps until you have 3 drawers with 2 shelves each.
-
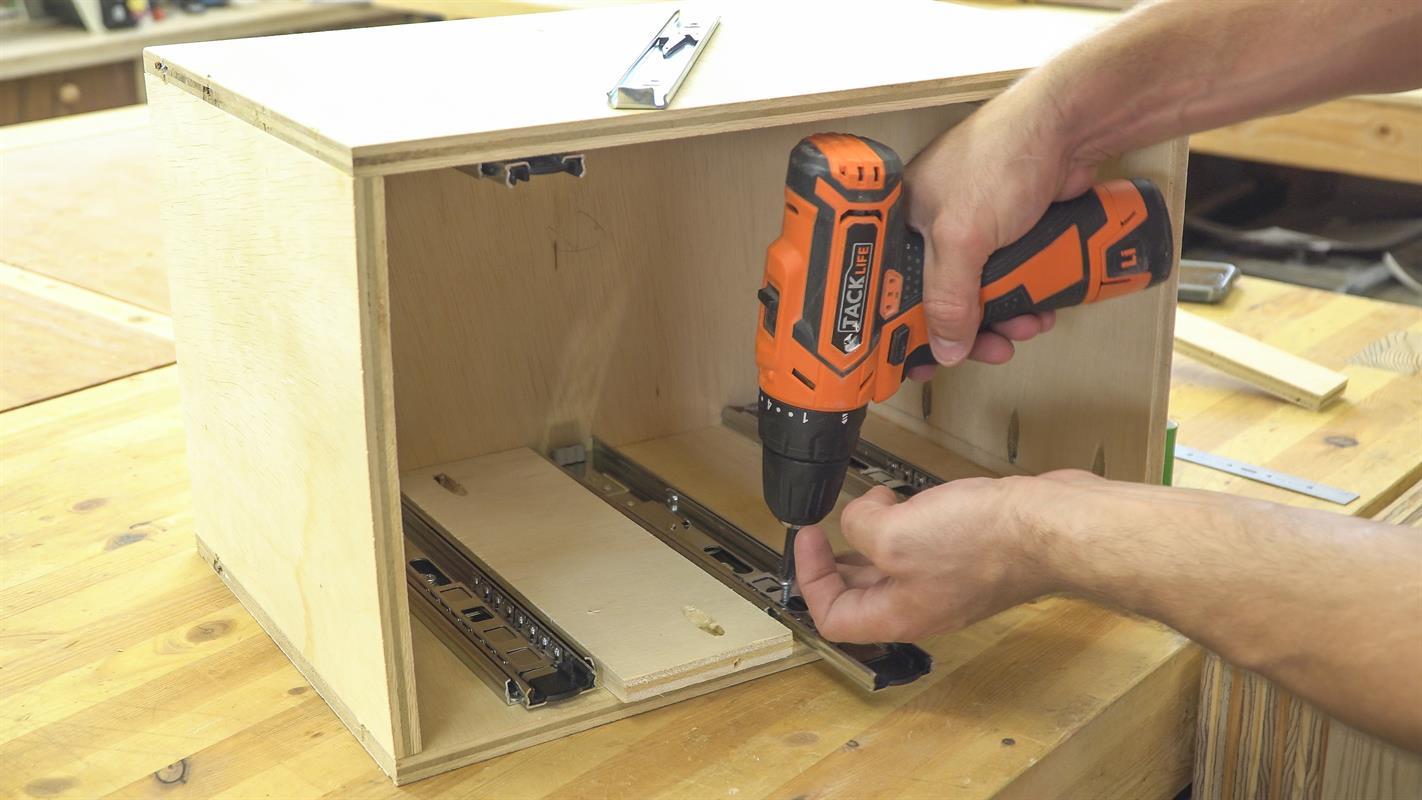
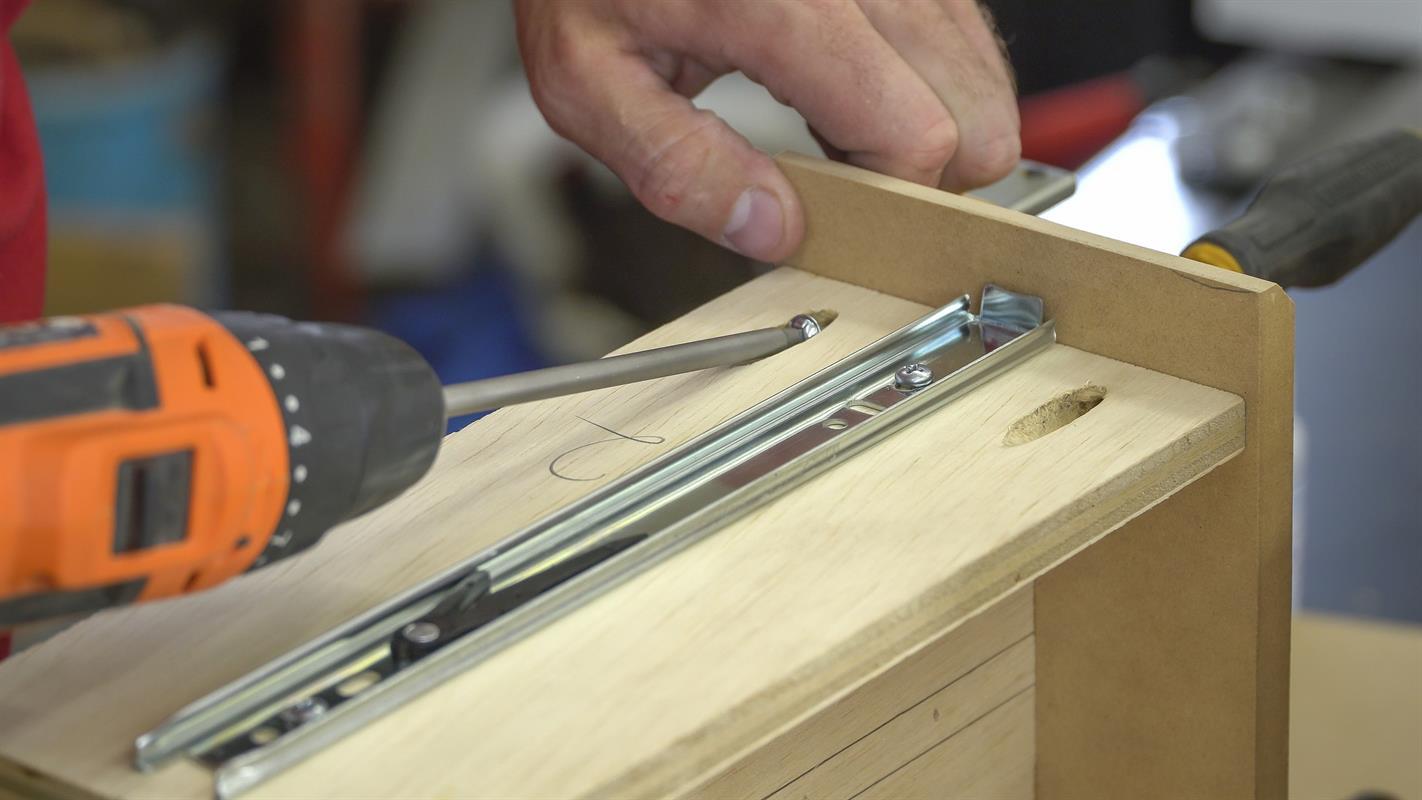
Box Slides
Put a thin scrap piece against one side of the box to space everything away from the wall a little bit. Then put a spacer against that for the edge of the slide to reference off of. Use short screws to attach the rails to the box so they don’t poke all the way through. Duplicate this step on the opposite face.

-
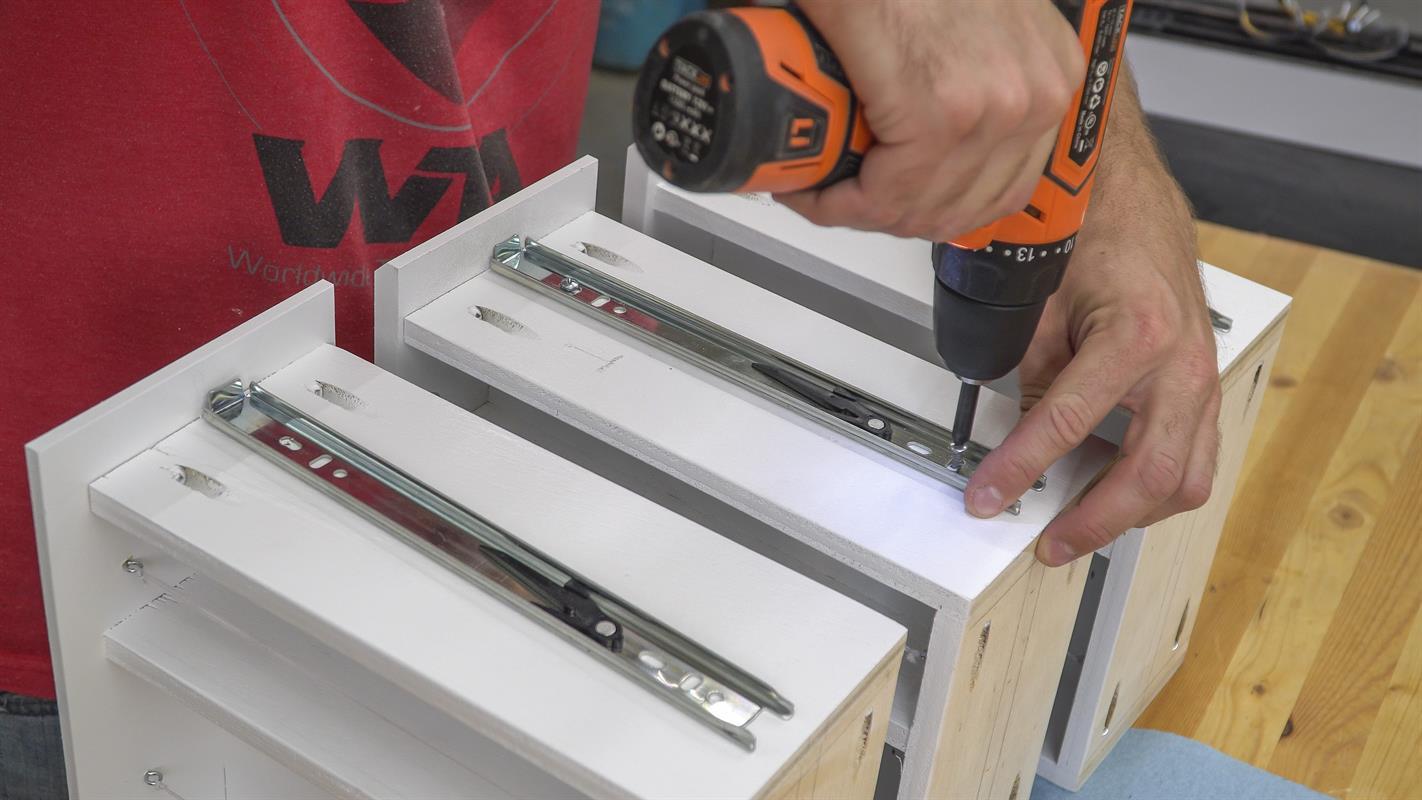
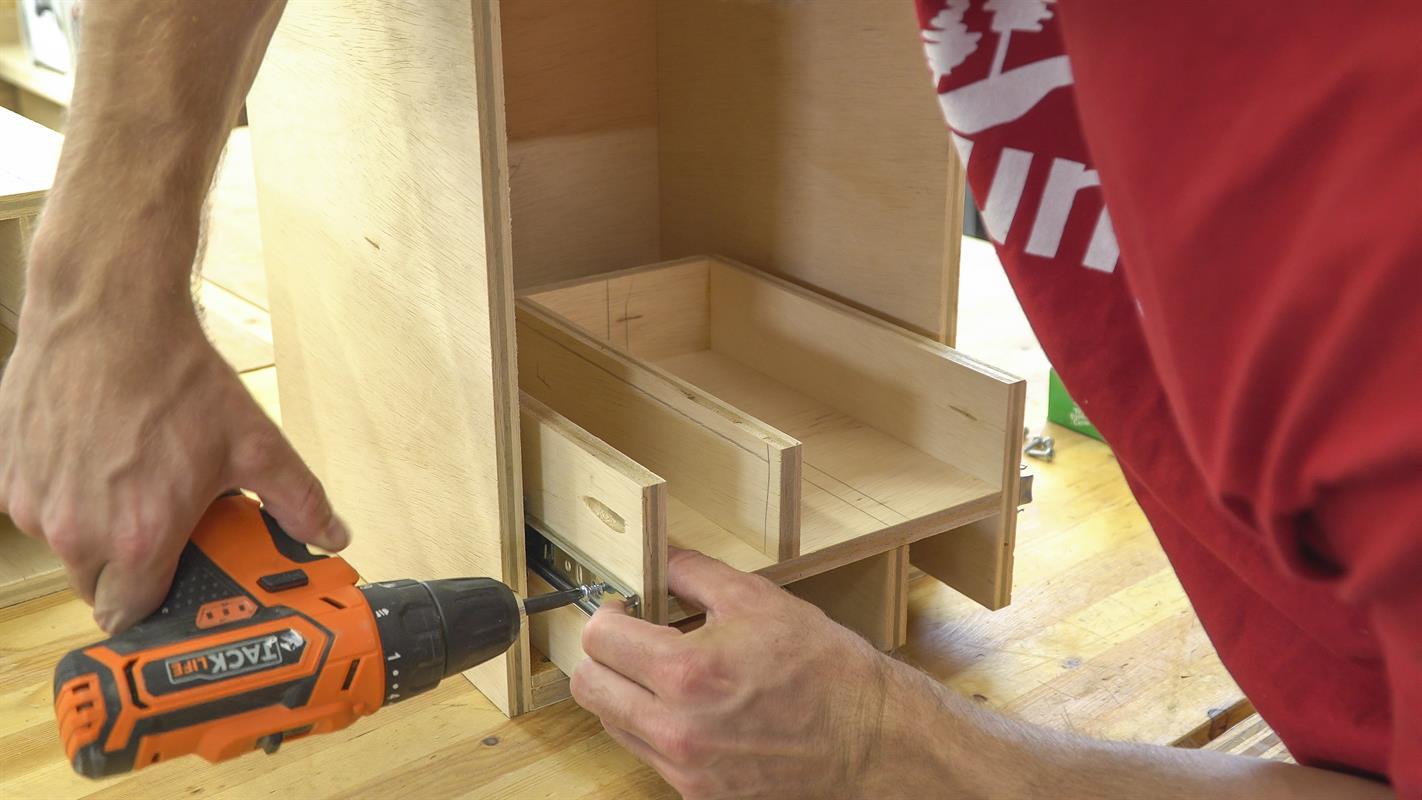
Drawer Slides
Turn the whole thing on it’s side then put the drawer in place between the slides. Pull the the drawer and slides out from the box just far enough to expose the first hole and run in some screws on each side. Then pull the drawer out far enough to reach the second set of holes and run in two more screws. If everything is spaced correctly, these screws will be directly in line with the center divider in the drawer.
-
The Rest Of The Slides
Mounting the rest of the slides follows the exact same procedure. Attach the slides on the opposite end first using the same spacers and just mirror the previous steps. Do the middle slides last because they will require a different sized spacer that will reference off the left and right slides, instead of the walls of the box.
-
Drawer Face Material
Next we need to mount the faces to the drawers. I ended up using MDF because I ran into voids in my cheap plywood while adding the beveled edge at the router table. A classy hardwood would also be a good option, especially if you planned to let this sit out on your counter.
-
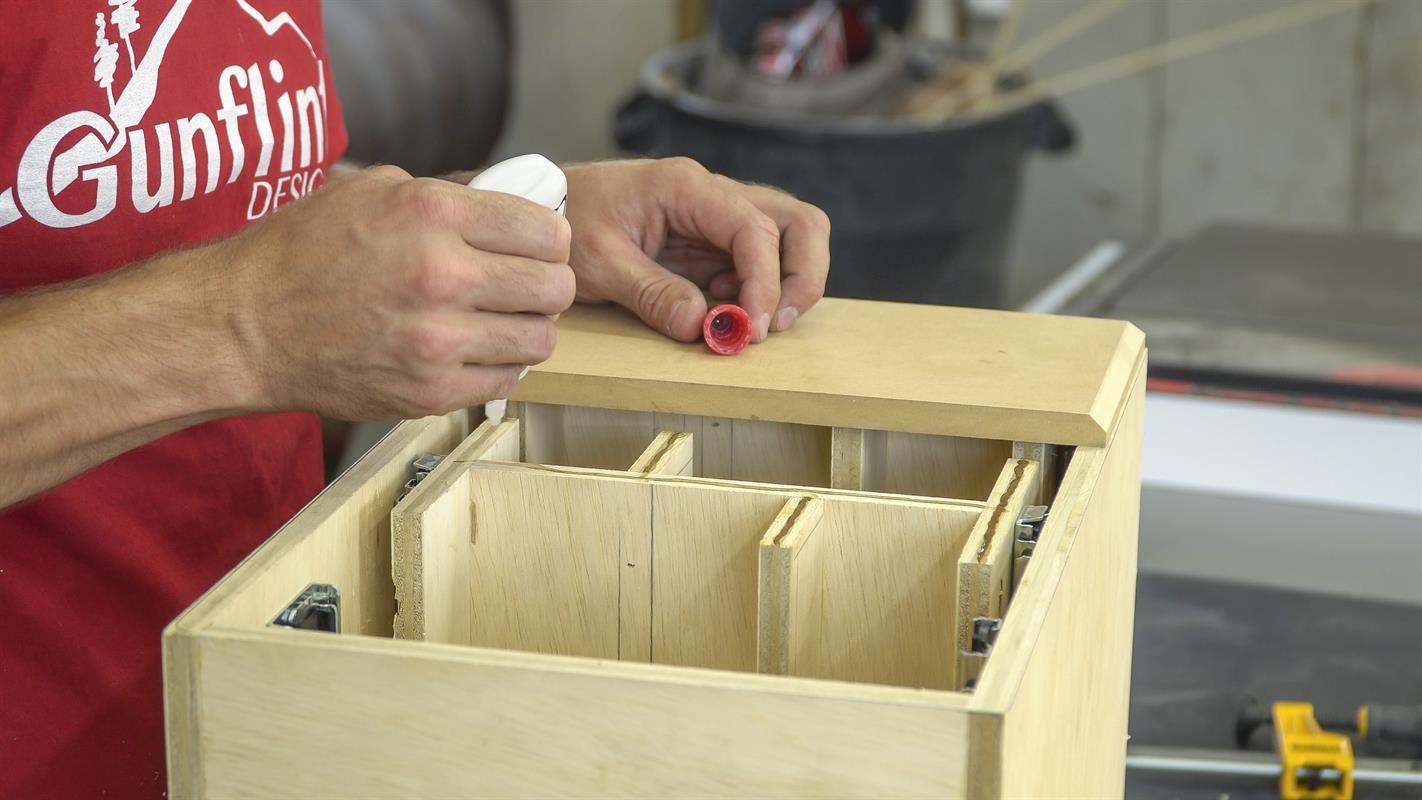
Glue On The Faces
Put CA glue on the leading edges of the drawer pieces, then spray accelerator on the back side of the face.
-
Human Clamp
There is just enough of a space between the drawers and the front of the box that you can set the faces down on top and get them perfectly aligned before lifting the drawer up and letting the CA glue take hold.
-
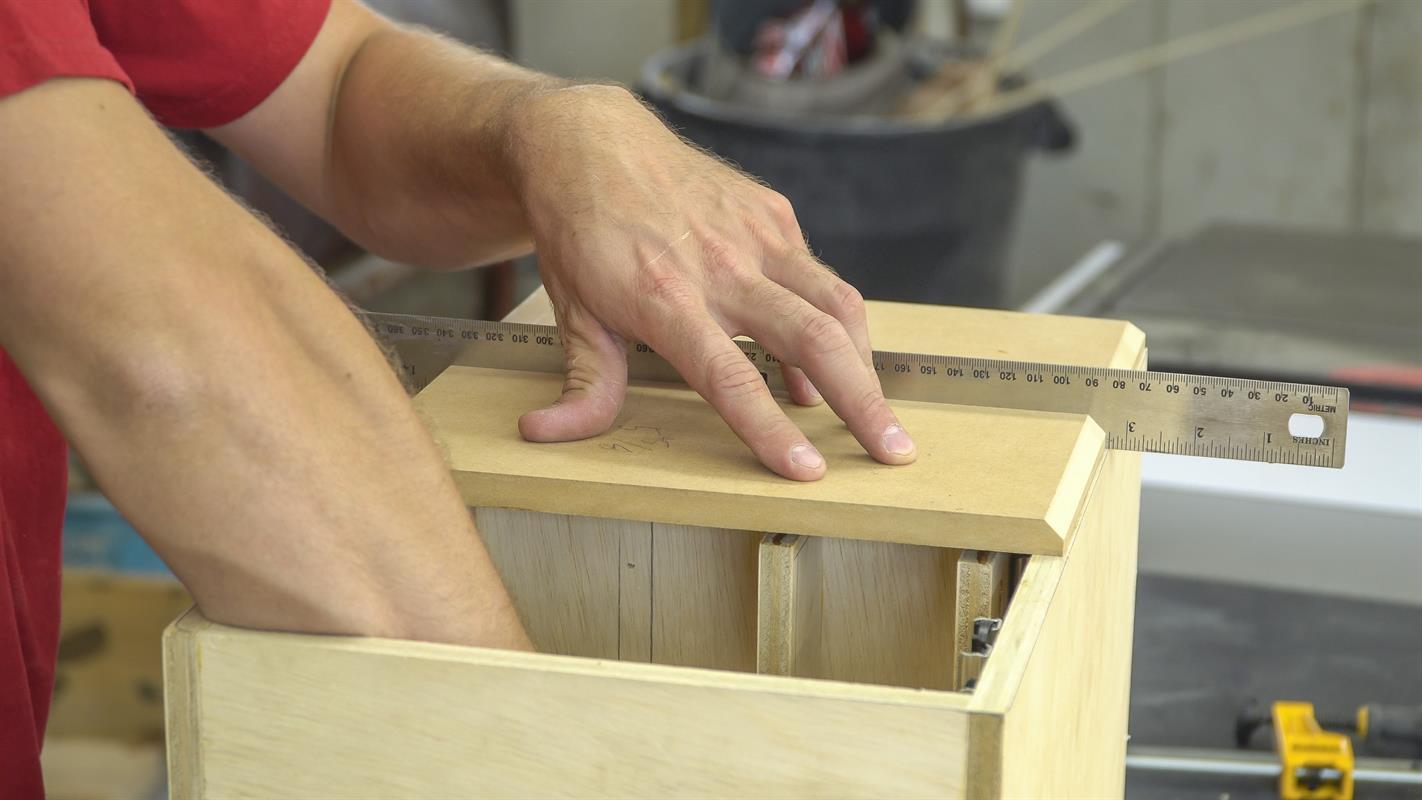
Screw On The Faces
After holding the pieces together and letting the glue set up for a few seconds, gently lift the drawer up and out of the box. Now you can put some pocket hole screws in permanently lock it in place. These are the holes that I forgot to drill back in step 2. It’s much easier if you don’t miss these!
-
Finger Holes
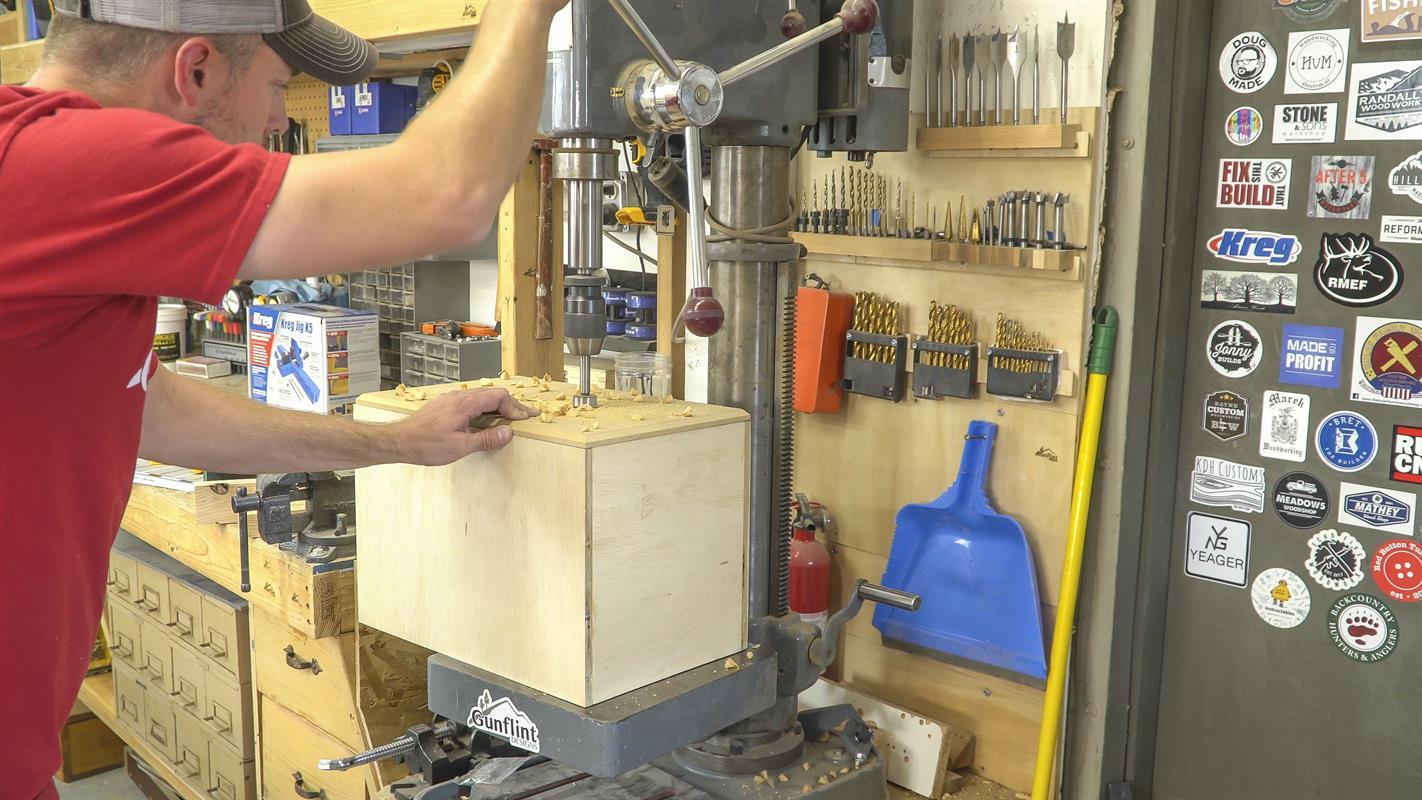
Drill large diameter finger holes in the faces to function as drawer pulls. I thought about drilling mine before mounting the faces to the drawers, but decided I had a better chance of keeping perfect alignment from one face to the next if I drilled them after they were in position. My beefy drill press was only barely tall enough for the job, so you might keep that in mind when you’re deciding how to drill yours.
-
Soften The Finger Holes
Chamfer the the edges of the fingers holes slightly to make them more plesant to hook your finger through. I used a great big stepped bit, but you could also use a small round-over bit in a router, or just sand them by hand.
-
Prep For Paint
Remove all the slides and sand all the corners to soften the sharp edges to get ready for painting.
-
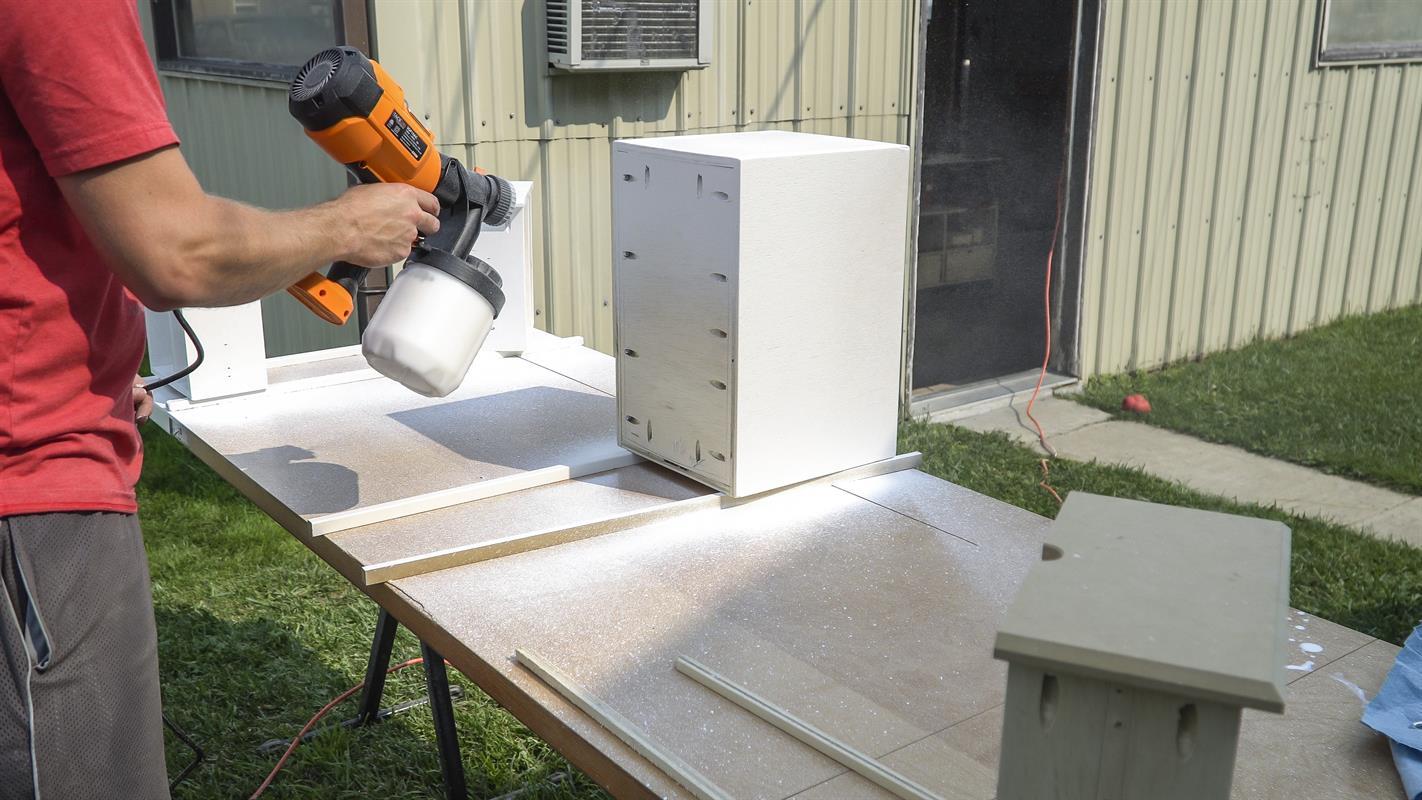
Paint
Paint your box and drawers. I used as sprayer because it was easier to get into all the nooks and crannies. This raw plywood was pretty thirsty so I ended up giving it 3 coats to get the job done.
-
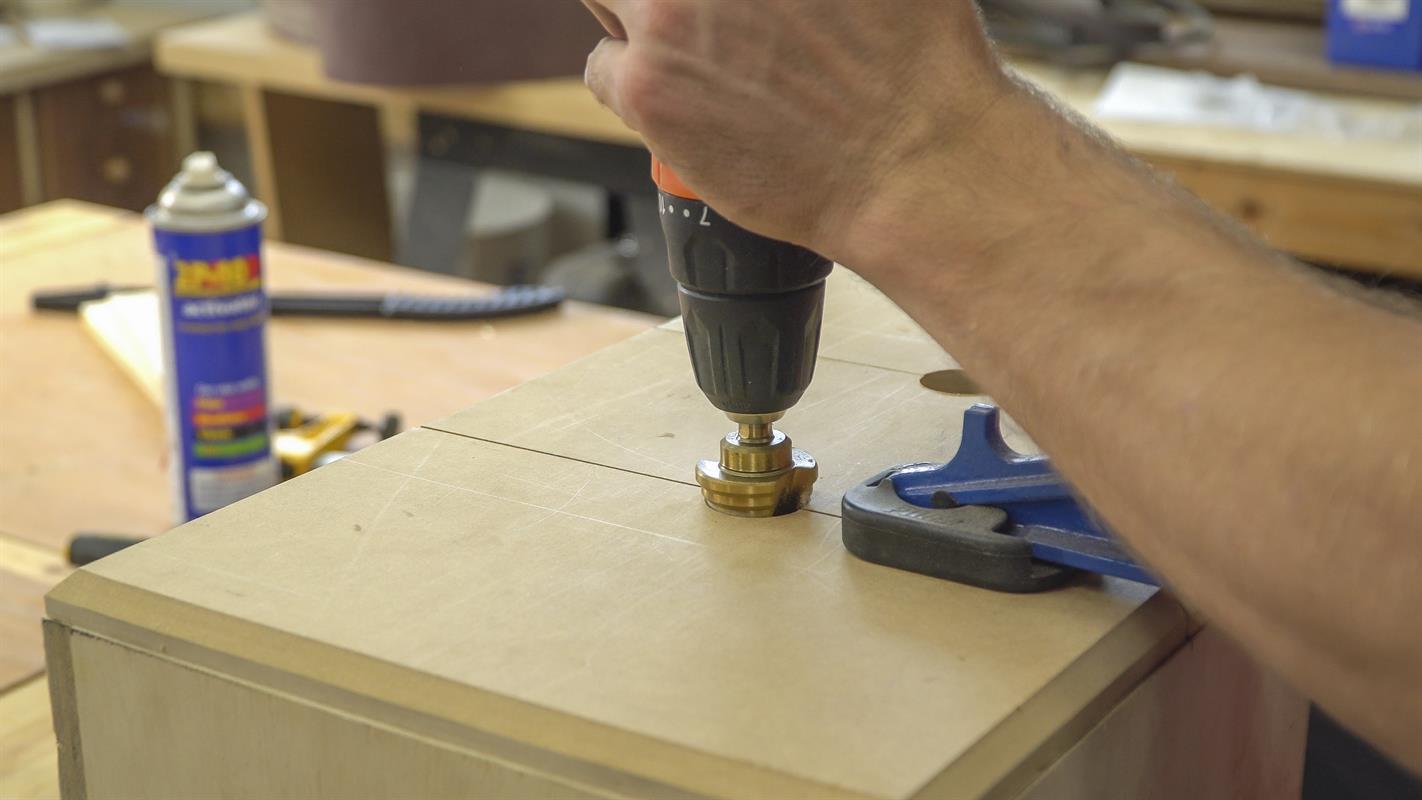
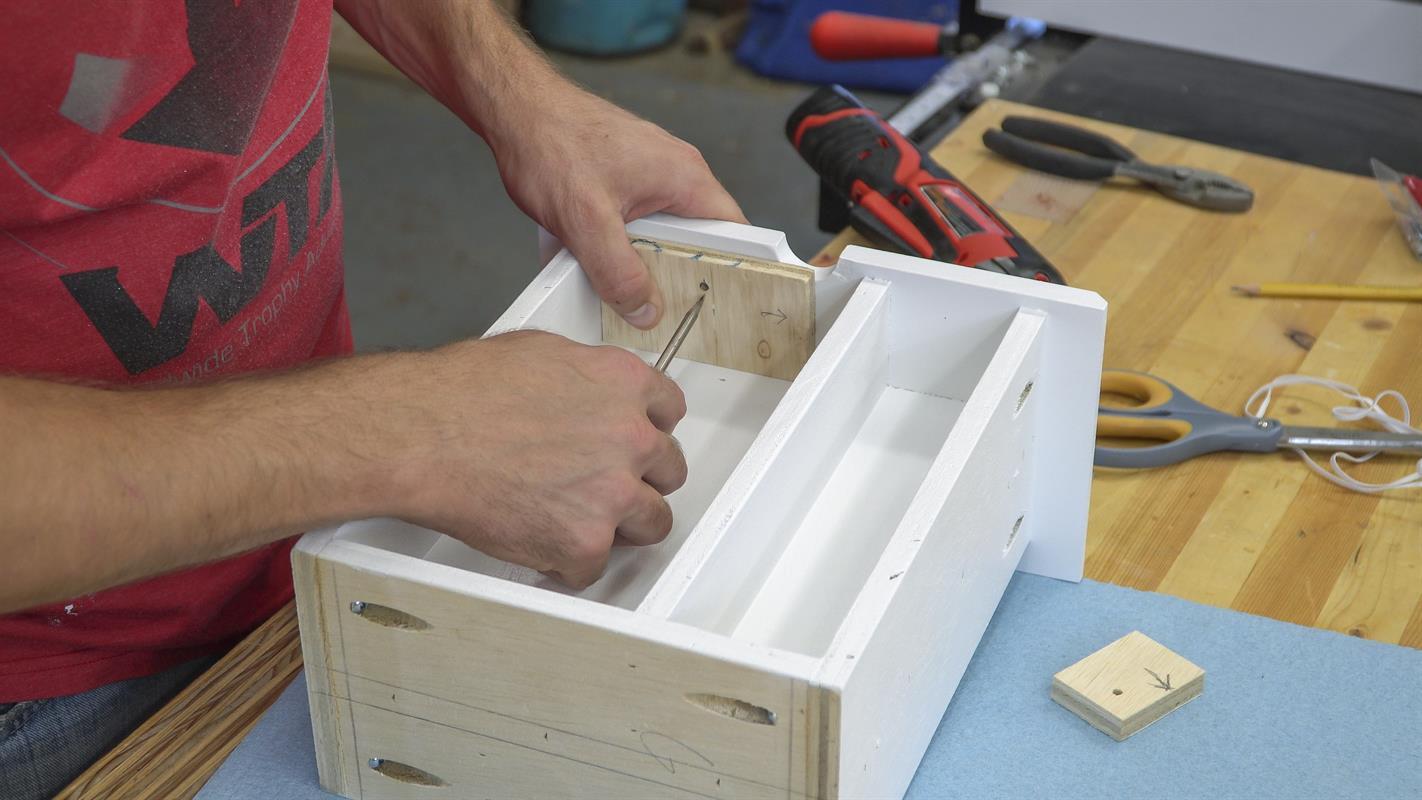
Consisten Hole Placement
Make guide blocks out of a few small scraps then used an awl to mark out the locations for small eye bolts. This way, you will get consistent placement on every shelf and will only have to measure once.
-
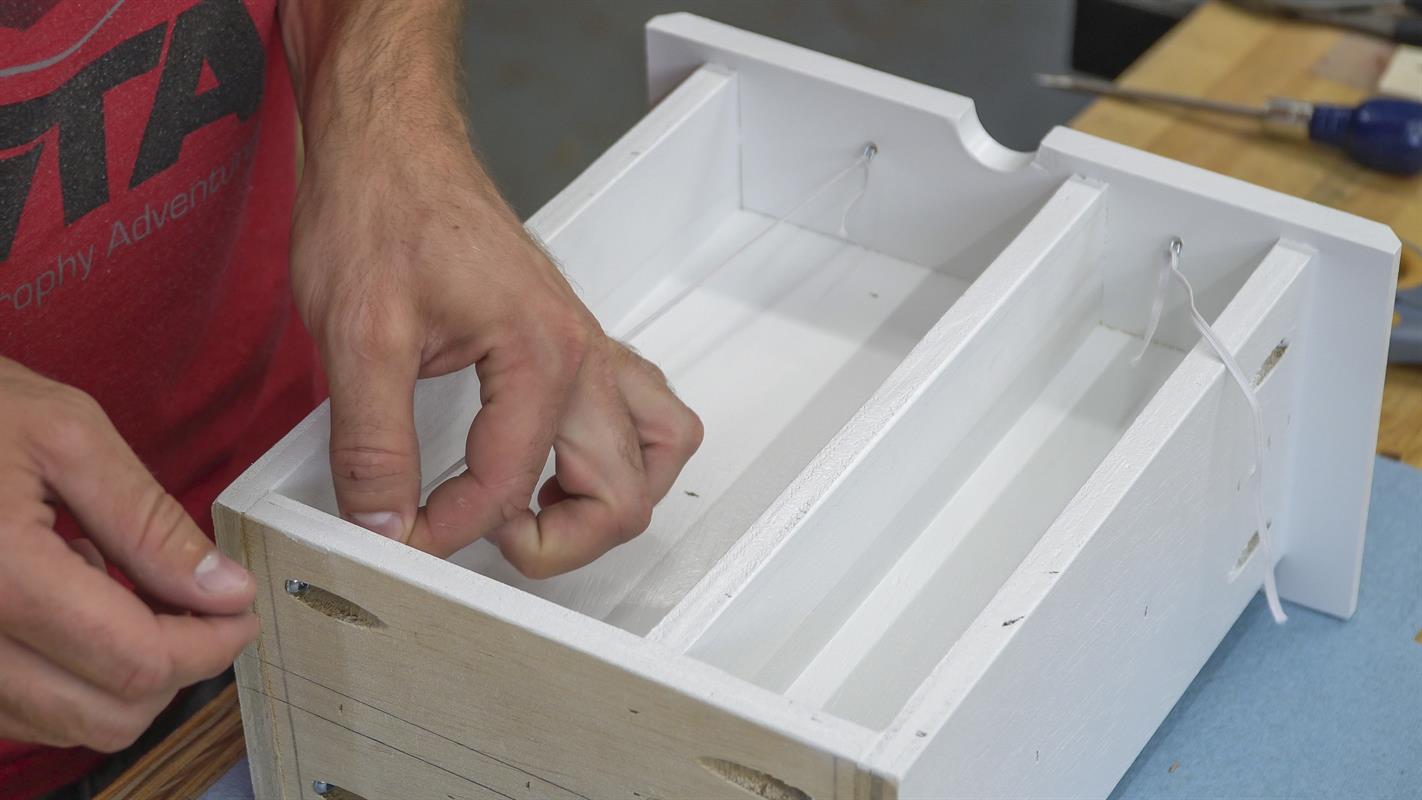
Restraining Cords
Drill pilot holes then spin in the eye bolts. Tie some lengths of thin elastic cords to both eye bolts across each shelf, making sure to keep it was fairly taught in the process. These strips will help keep the spice bottles from falling out. They don’t have to be very strong because all of the forces on these drawers are moving front to back.
-
Final Assembly
Reinstall the slide hardware to the drawers and to the cabinet body, then slide all the drawers in place to check out the finished project.