

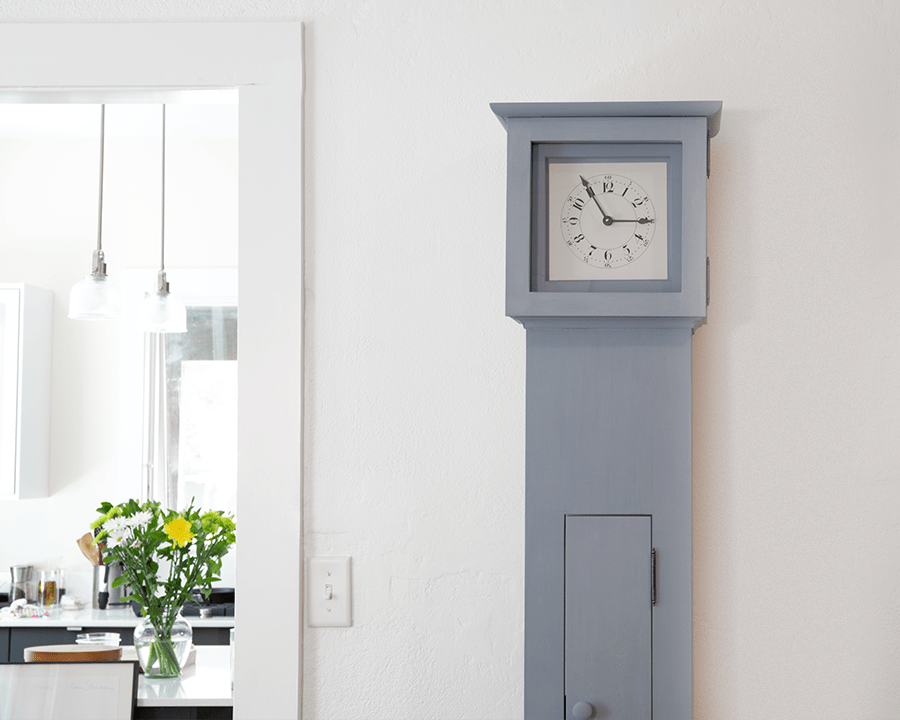
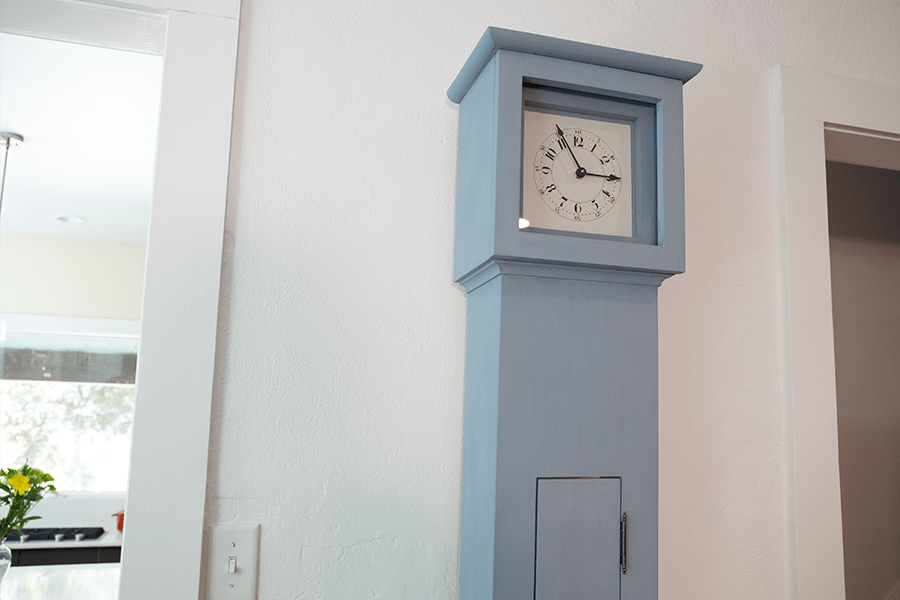
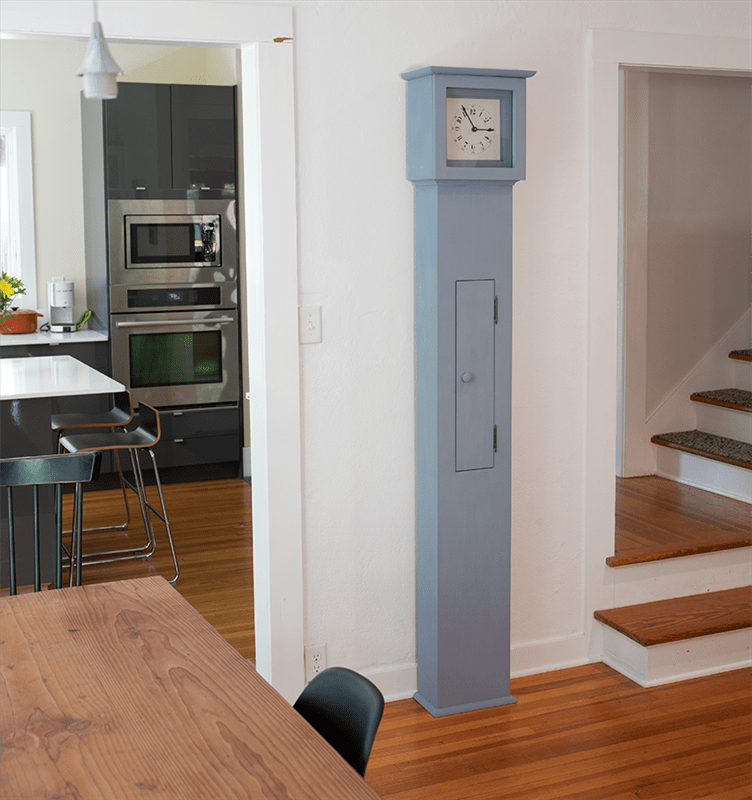


This one-of-a-kind clock is sure to become a centerpiece in your room decor. The simple lines, inspired by Shaker-style furniture, make it look great and help keep construction straightforward. With off-the-shelf boards, clock parts available online, and paint, you can make one for yourself.
Tools
Kreg Tools


Other Tools
-
Miter Saw

-
Square
-
Tape Measure
Materials
Wood Products
- 1 Board , 1x2 , 96"
- 1 Board , 1x3 , 96"
- 2 Board , 1x3 , 72"
- 1 Board , 1x6 , 96"
- 2 Board , 1x6 , 72"
- 1 Board , 1x8 , 48"
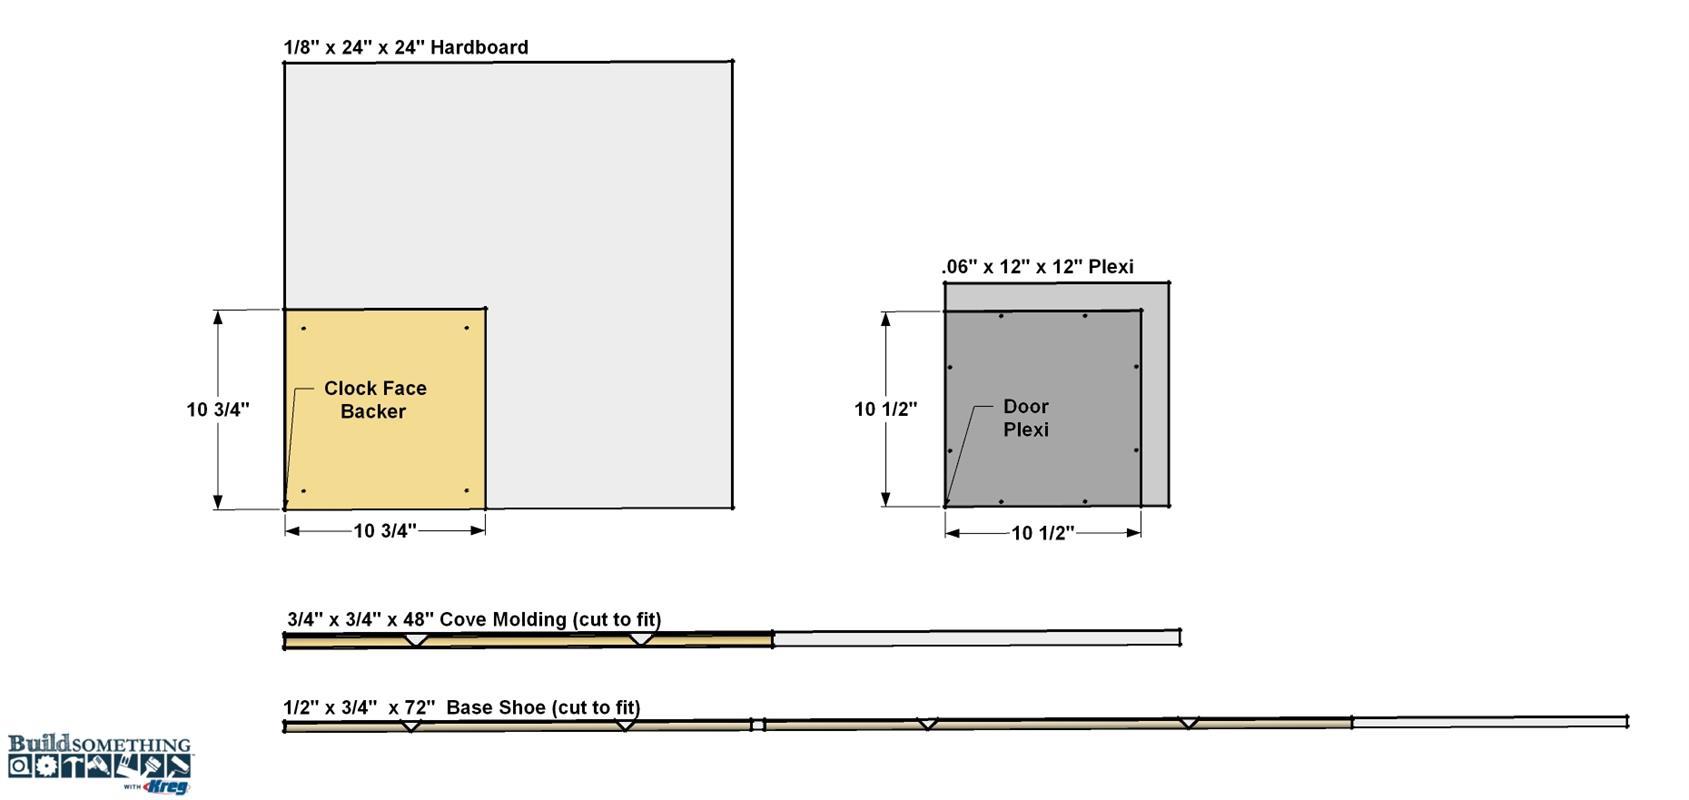
- 1 Hardboard , 1/8" Thick , 24" x 24"
- 1 Cove Molding , 3/4" x 3/4" , 48"
- 1 Base Shoe Molding , 1/2" x 3/4" , 72"
Hardware & Supplies
- 1 100-count 1 1/4" coarse-thread Kreg pocket-hole screws
- 1 Pair bronze non-mortise hinges
- 1 Package milk paint powder
- 1 Polycarbonate sheet, .08" x 12" x 12"
- 1 7 1/2" Shaker clock face
- 1 Clock movement
- 1 Clock hardware pack
- 1 Set of clock hands
- 1 Magnetic latch kit
- 1 Wood knob
- 1 Wood glue
- 12 #8 x 1/2" pan-head wood screws
- 1 Anti-tip kit
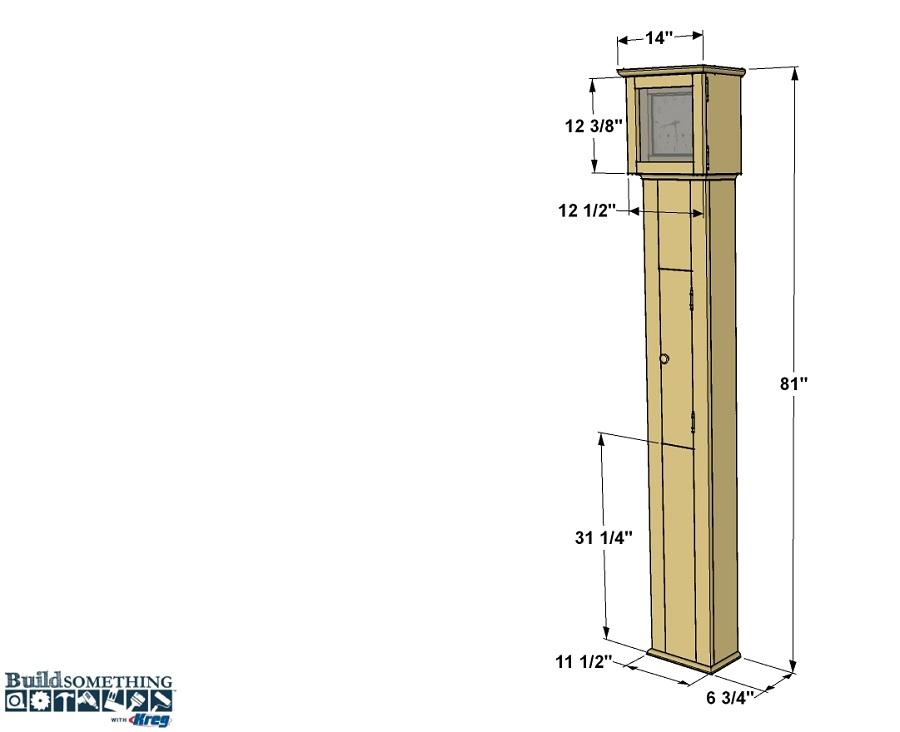
Cut List & Parts
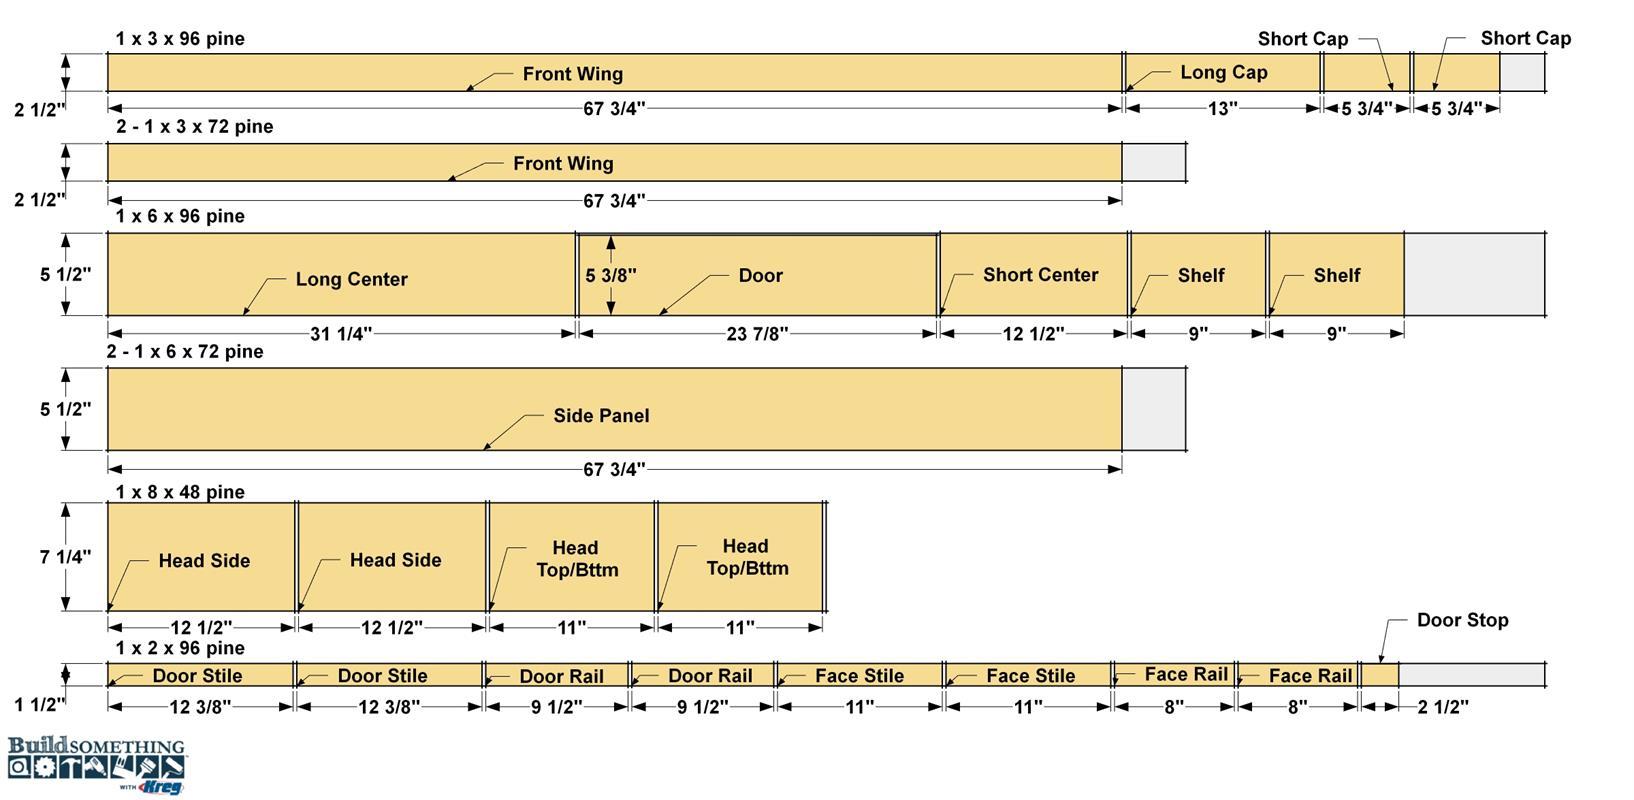
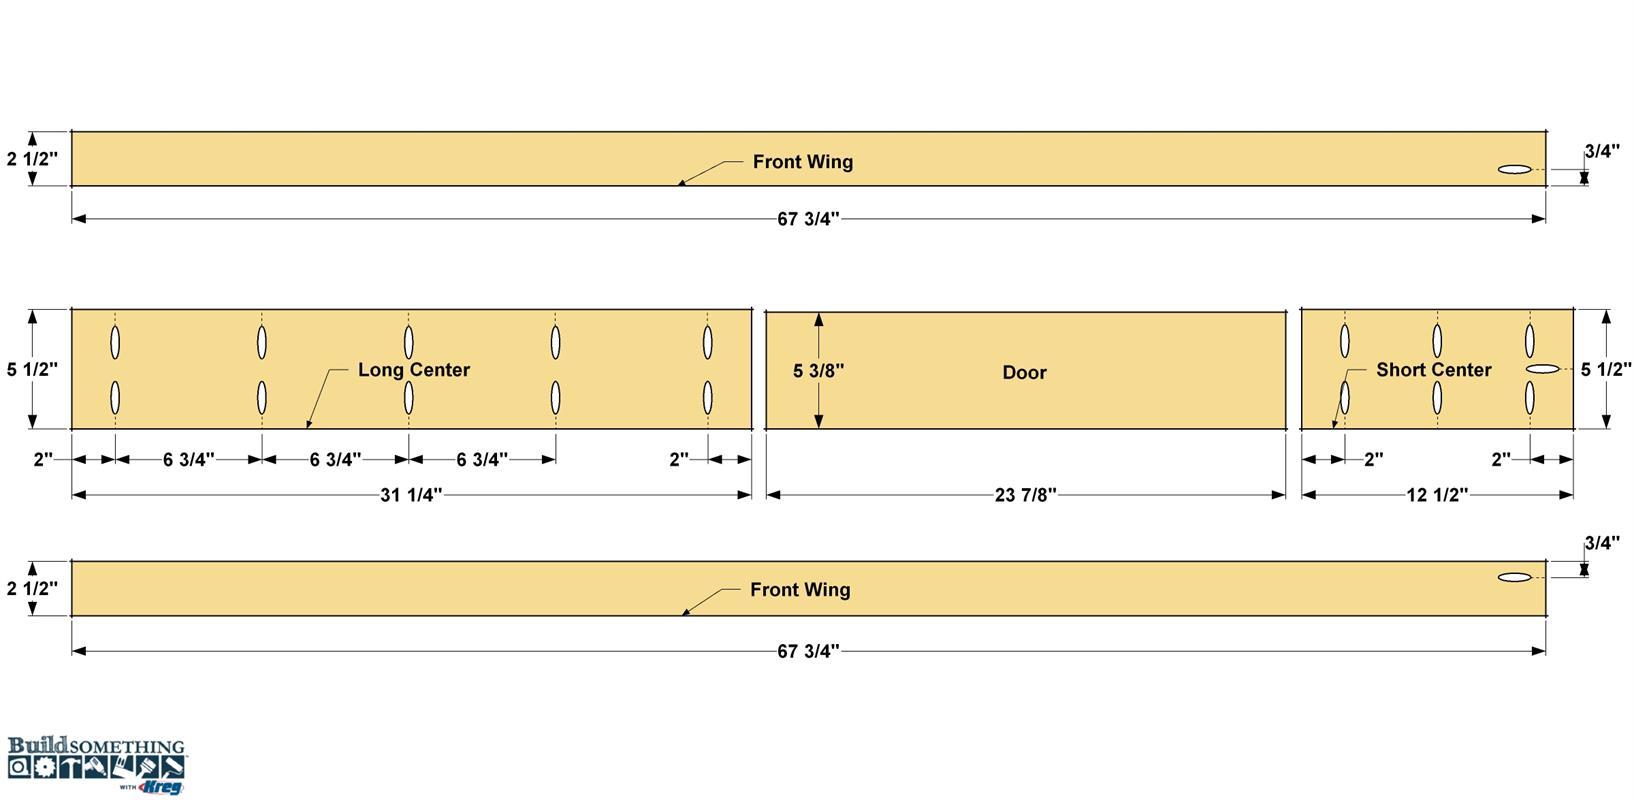
- 2 Front Wing , 3/4" x 2 1/2" x 67 3/4" pine
- 1 Short Center , 3/4" x 5 1/2" x 12 1/2" pine
- 1 Long Center , 3/4" x 5 1/2" x 31 1/4" pine
- 1 Door , 3/4" x 5 3/8" x 23 7/8" pine
- 2 Side Panel , 3/4" x 5 1/2" x 67 3/4" pine
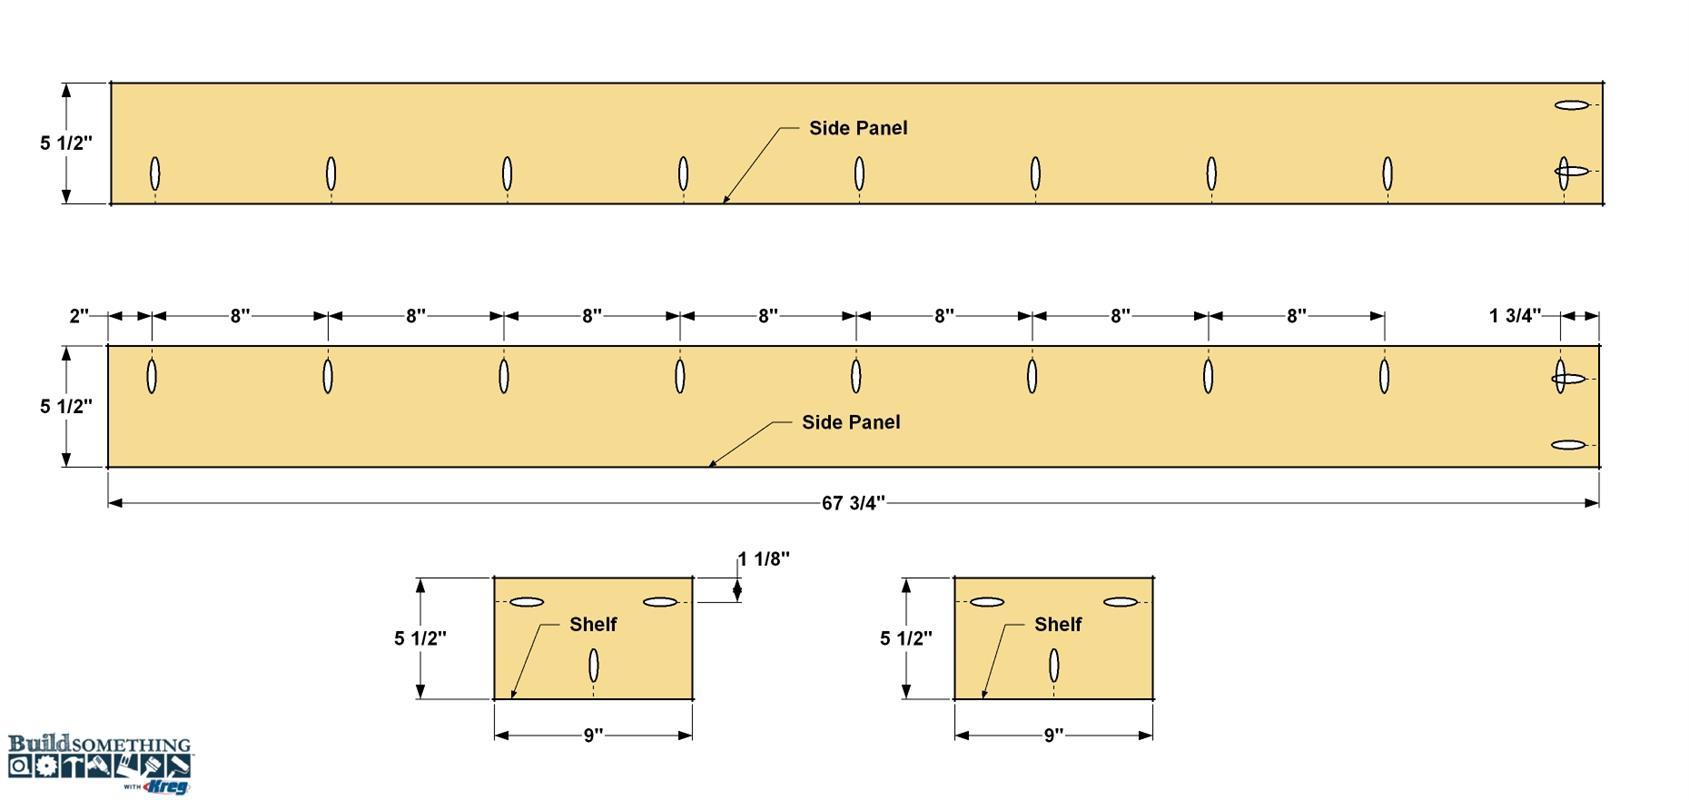
- 2 Shelf , 3/4" x 5 1/2" x 9" pine
- 6 Base Shoe Molding , 1/2" x 3/4" x cut length to fit
- 2 Head Side , 3/4" x 7 1/4" x 12 1/2" pine
- 2 Head Top/Bottom , 3/4" x 7 1/4" x 11" pine
- 2 Face Rail , 3/4" x 1 1/2" x 8" pine
- 2 Face Stile , 3/4" x 1 1/2" x 11" pine
- 1 Door Plexiglas , .08" x 10 1/2" x 10 1/2"
- 1 Clock Face Backer , 1/8" x 10 3/4" x 10 3/4" hardboard
- 1 Door Stop , 3/4" x 1 1/2" x 2 1/2" pine
- 2 Short Cap , 3/4" x 3 1/2" x 5 3/4" pine
- 1 Long Cap , 3/4" x 3 1/2" x 13" pine
- 3 Cove Molding , 3/4" x 3/4" x cut length to fit
- 2 Door Rail , 3/4" x 1 1/2" x 9 1/2" pine
- 2 Door Stile , 3/4" x 1 1/2" x 12 3/8" pine
Directions
-
Make the Front Panel Parts
Start by cutting the two Front Wings to length from 1x3 boards, as shown in the cutting diagram. To drill the pocket holes, set your Kreg Jig for 3/4"-thick material. Drill pocket holes at the locations shown. Next, cut the Long Center and Short Center from a 1x6, as shown in the cutting diagram. Drill pocket holes in these pieces locations shown. You can also cut a Door to length now. You’ll notice the Door is slightly narrower than a 1x6. To achieve this, mark a line along one long edge of the Door, and then sand it to that line. Set the Door aside for installation in a later step.
-
Assemble the Panel
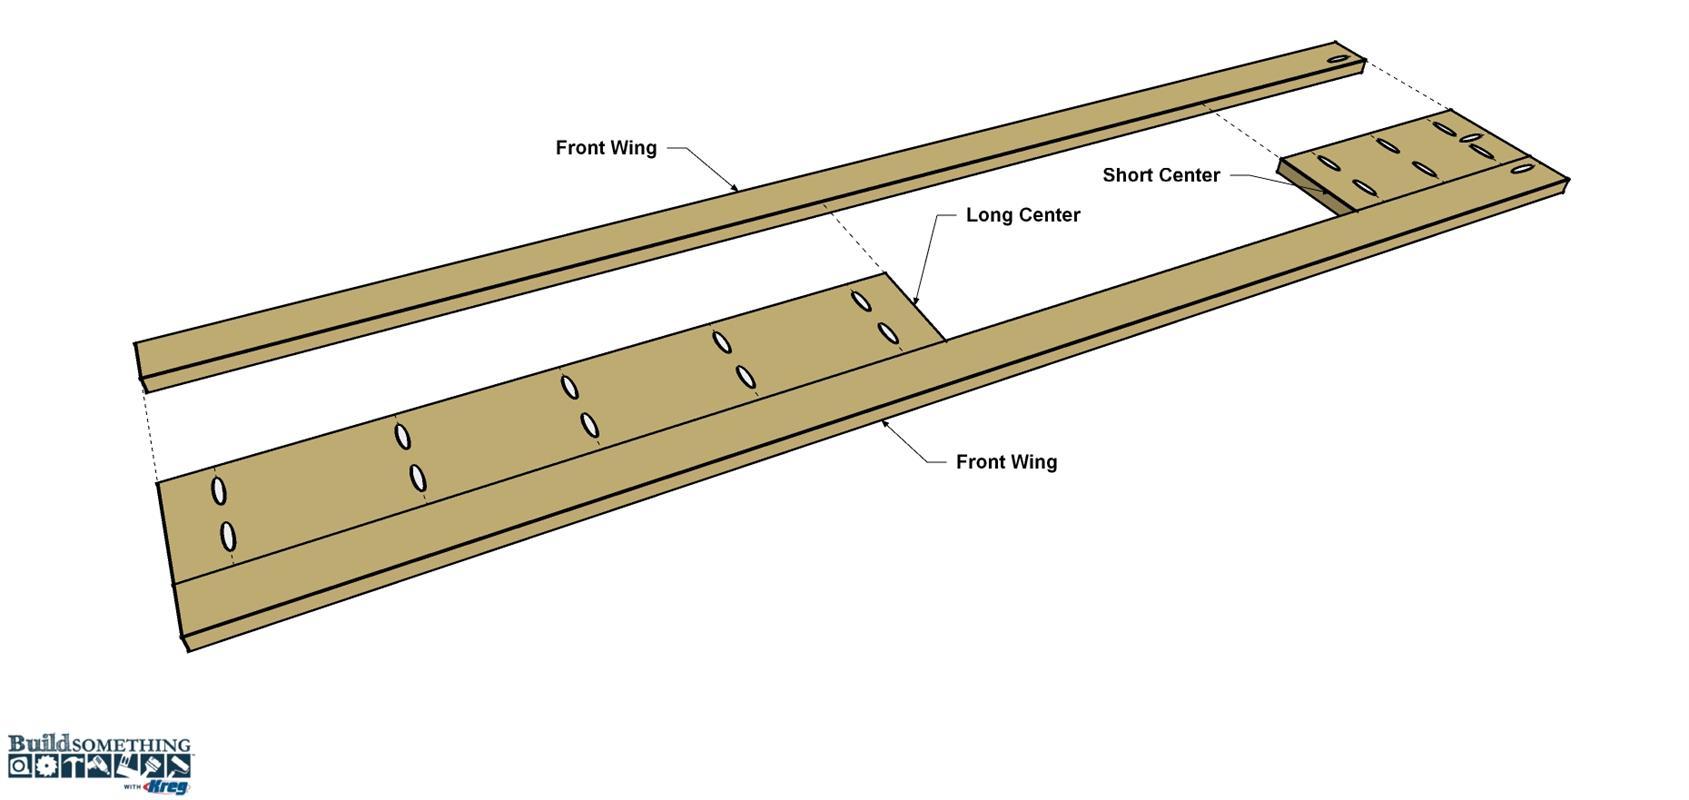
Apply glue to one edge of the Long Center and Short Center, and then position them against one of the Front Wings, as shown. Make sure the pocket hole in the Wing is at the top, and toward the inside. Secure the Centers to the Wing using 1 1/4" coarse-thread Kreg Screws. Repeat this process to attach the other Front Wing.
-
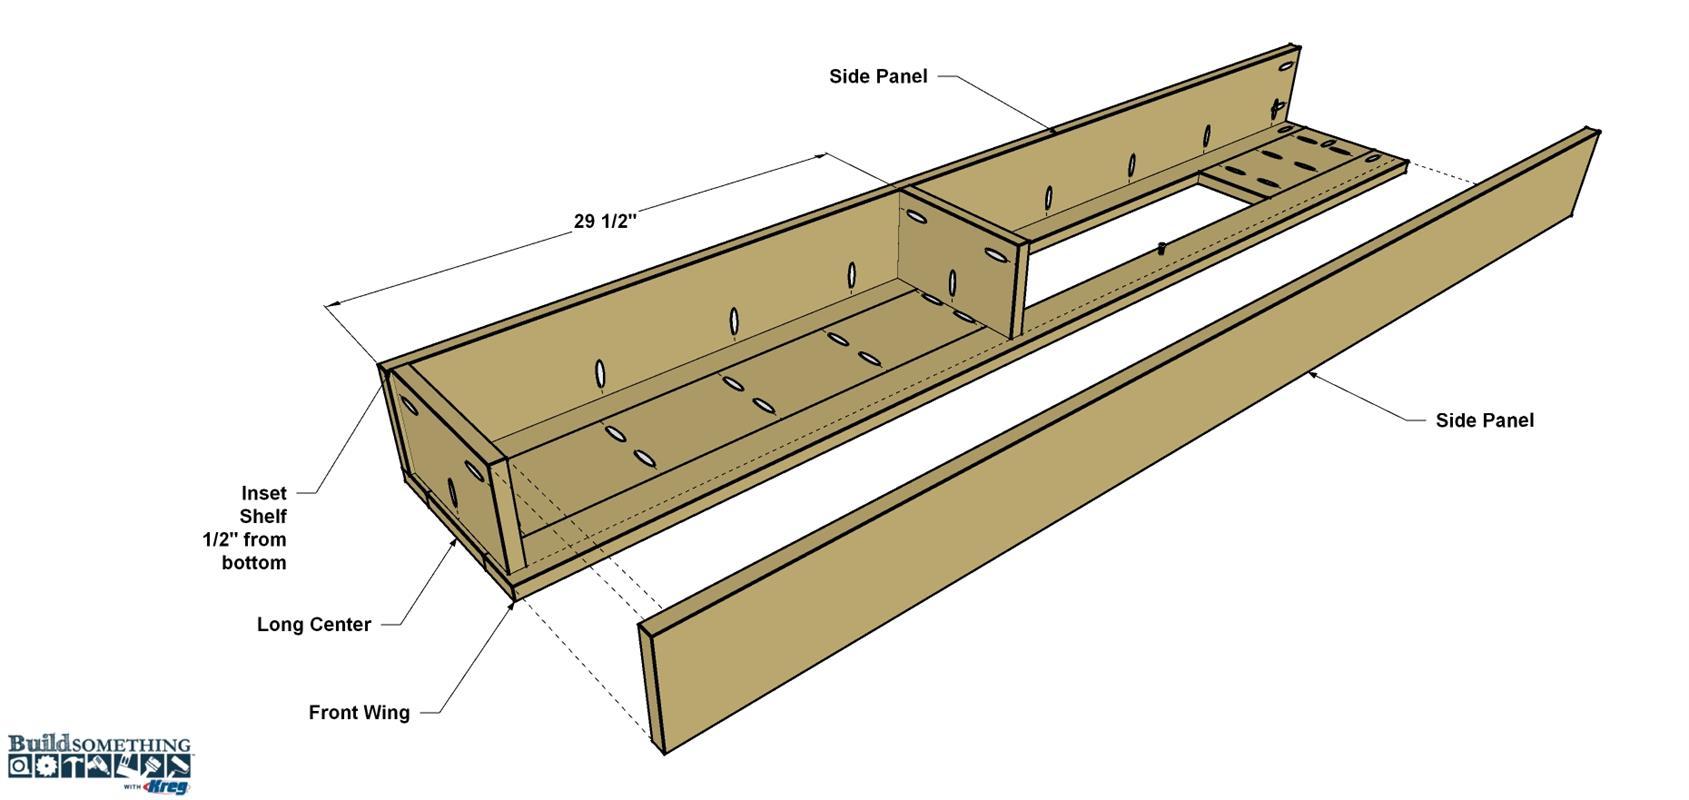
Make the Sides and Shelves
Cut two Side Panels to length from 1x6 boards, as shown in the cutting diagram. Drill pocket holes in each board as shown. Notice that these two boards “mirror” each other, so the pocket holes along the edge face one another, and the pocket holes are at the same end of each piece (this will be the upper end), as shown. Next, cut two Shelves to length form a 1x6. Drill pocket holes in each board at the locations shown.
-
Attach the Sides and Shelves
Apply glue to the pocket-hole edge of the first Side Panel, and position it so it is flush with the outside edge of the front assembly, as shown. Secure it using 1 1/4" coarse-thread Kreg Screws. Next, position the first Shelf at the lower end of the assembly. It’s set in 1/2" from the lower end, as shown. Secure this Shelf with Kreg Screws. Add the second shelf the same way at the location shown. Finally, glue and screw the second Side Panel in place.
-
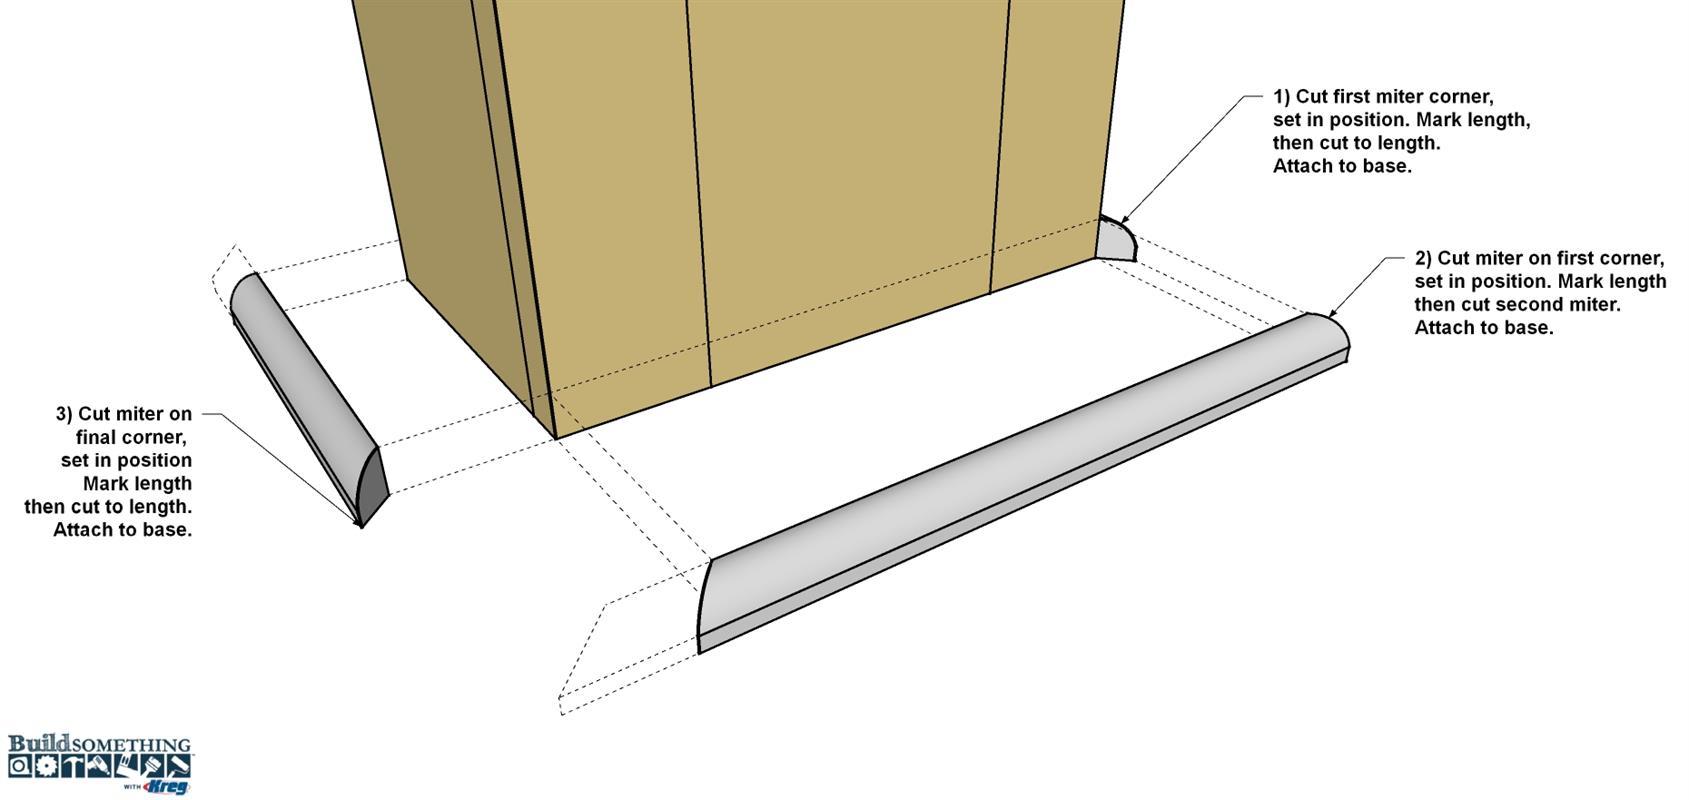
Apply the Base Shoe
Cut a rough length of Base Shoe with a 45° miter on one end. Align the miter to the lower end of one Side panel where it meets the face, as shown. Mark the length with a pencil, and then cut the molding to length. Work your way around cutting each piece to fit, as indicated. Then glue the Base Shoe in place. You can clamp the molding in place, or add a couple of brad nails in each piece, to hold them in place while the glue dries.
-
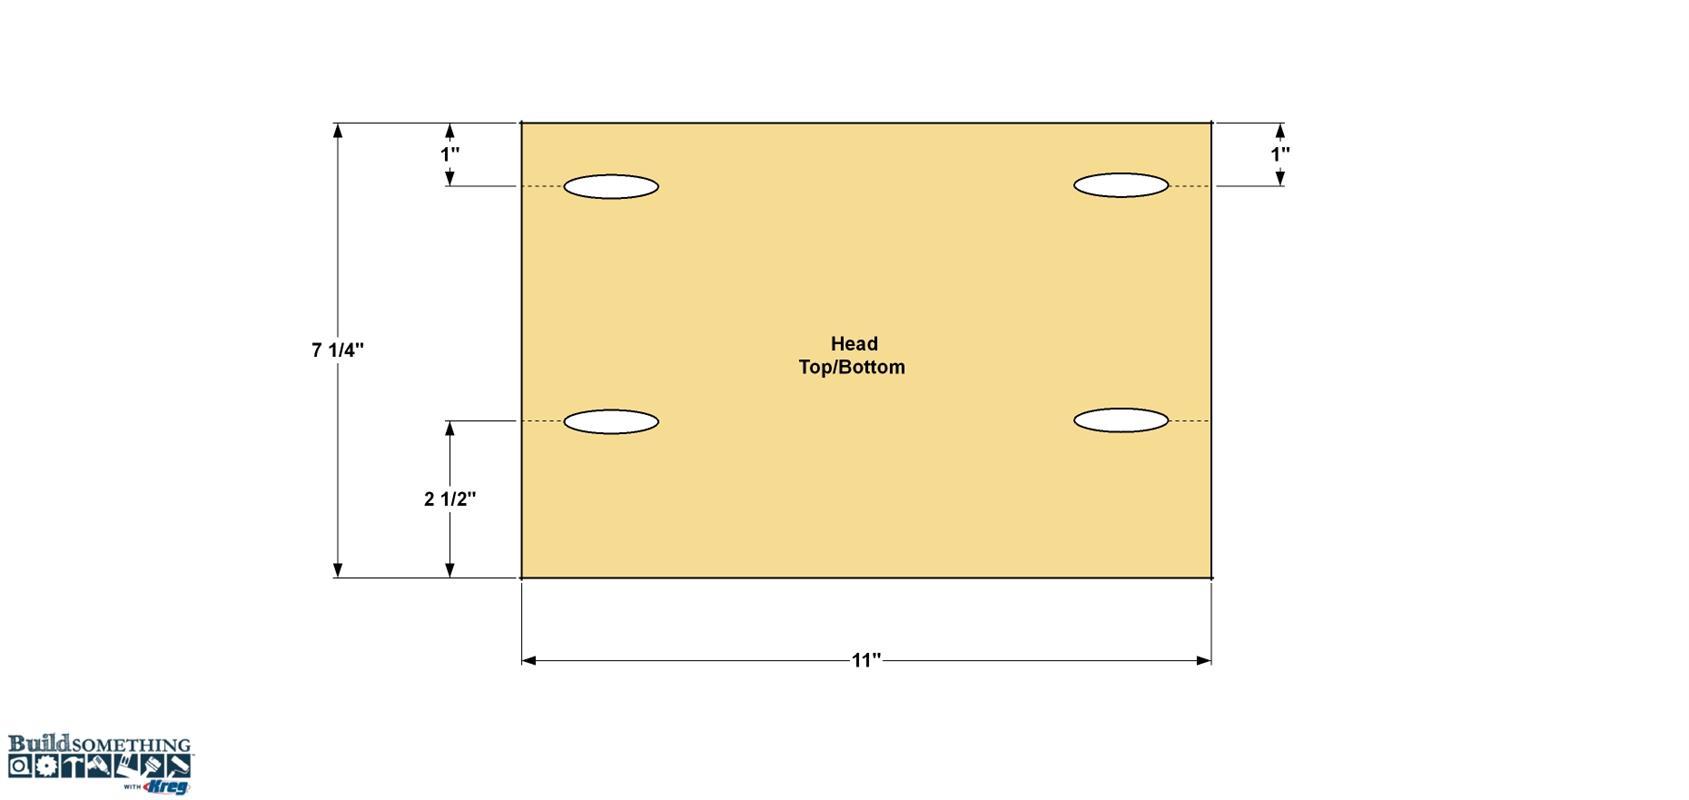
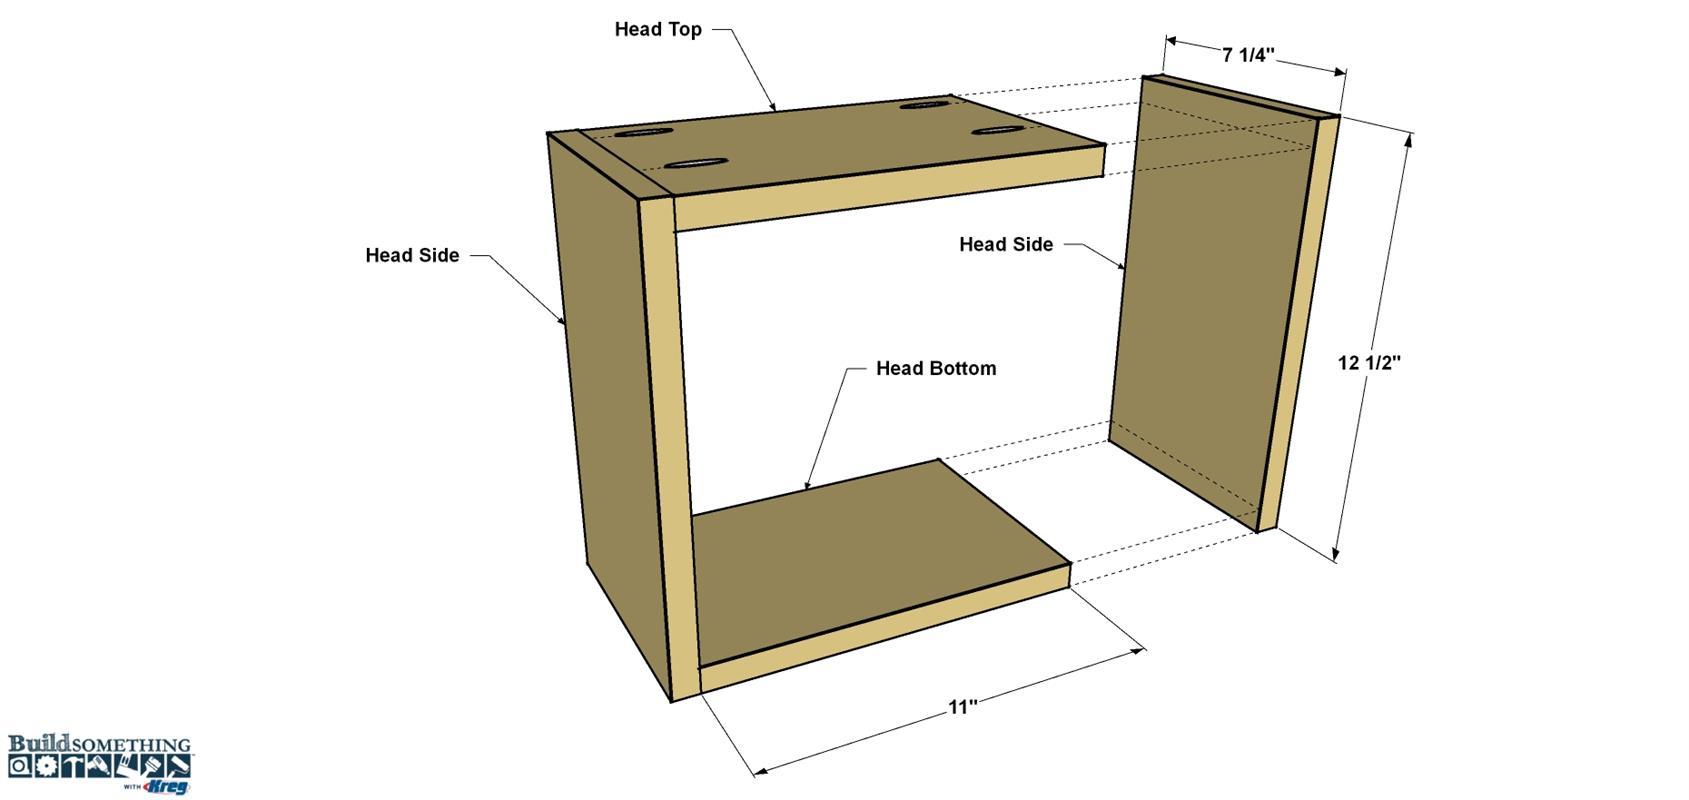
Make the Clock Head Parts
From a 1x8 board, cut two Head Sides, a Head Top, and a Head Bottom. Drill pocket holes in the Top and Bottom where shown. The pocket hole positions are important, so they don’t interfere with the assembly in a future step.
-
Assemble the Clock Head
Attach the Head Top and Bottom to one side using 1 1/4" coarse-thread Kreg Screws, as shown. Face the pocket holes outward so they are easily accessible. They won’t show once the whole clock is assembled. Next, add the second side.
-
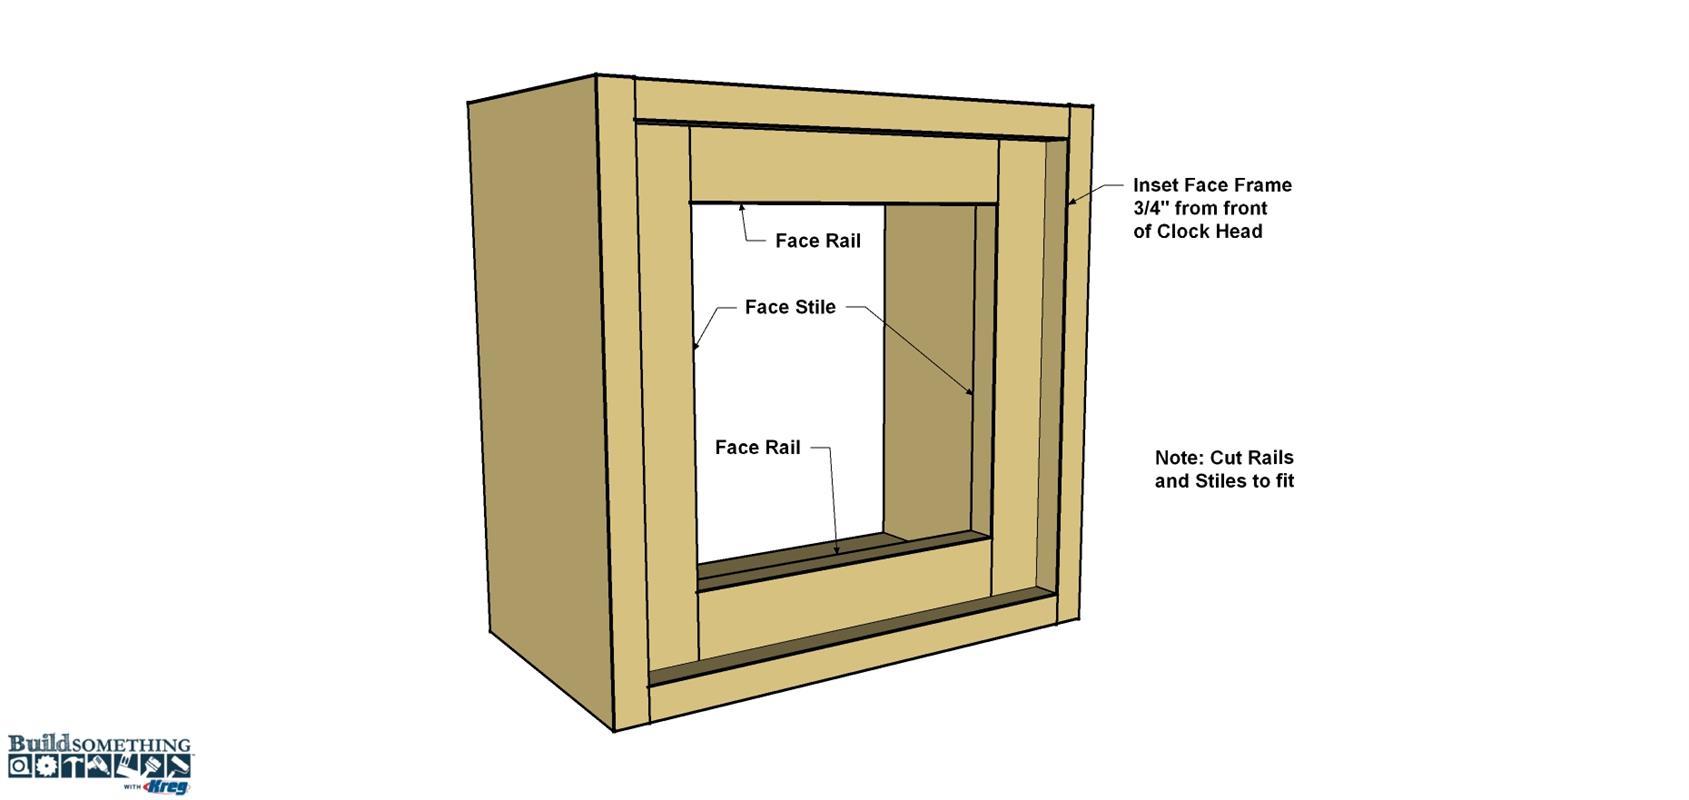
Add Face Rails and Stiles
Cut two Face Rails and two Face stiles to length from a 1x2, as shown in the cutting diagram. These parts will support the Clock Face Backer. They will be simply glued in place, so there’s no need to drill pocket holes. Position the Face Stiles and Rails inside the clock head assembly, as shown, so they sit 3/4" behind the front edge. Glue the Stiles and Rails in place, and clamp them until the glue dries.
-
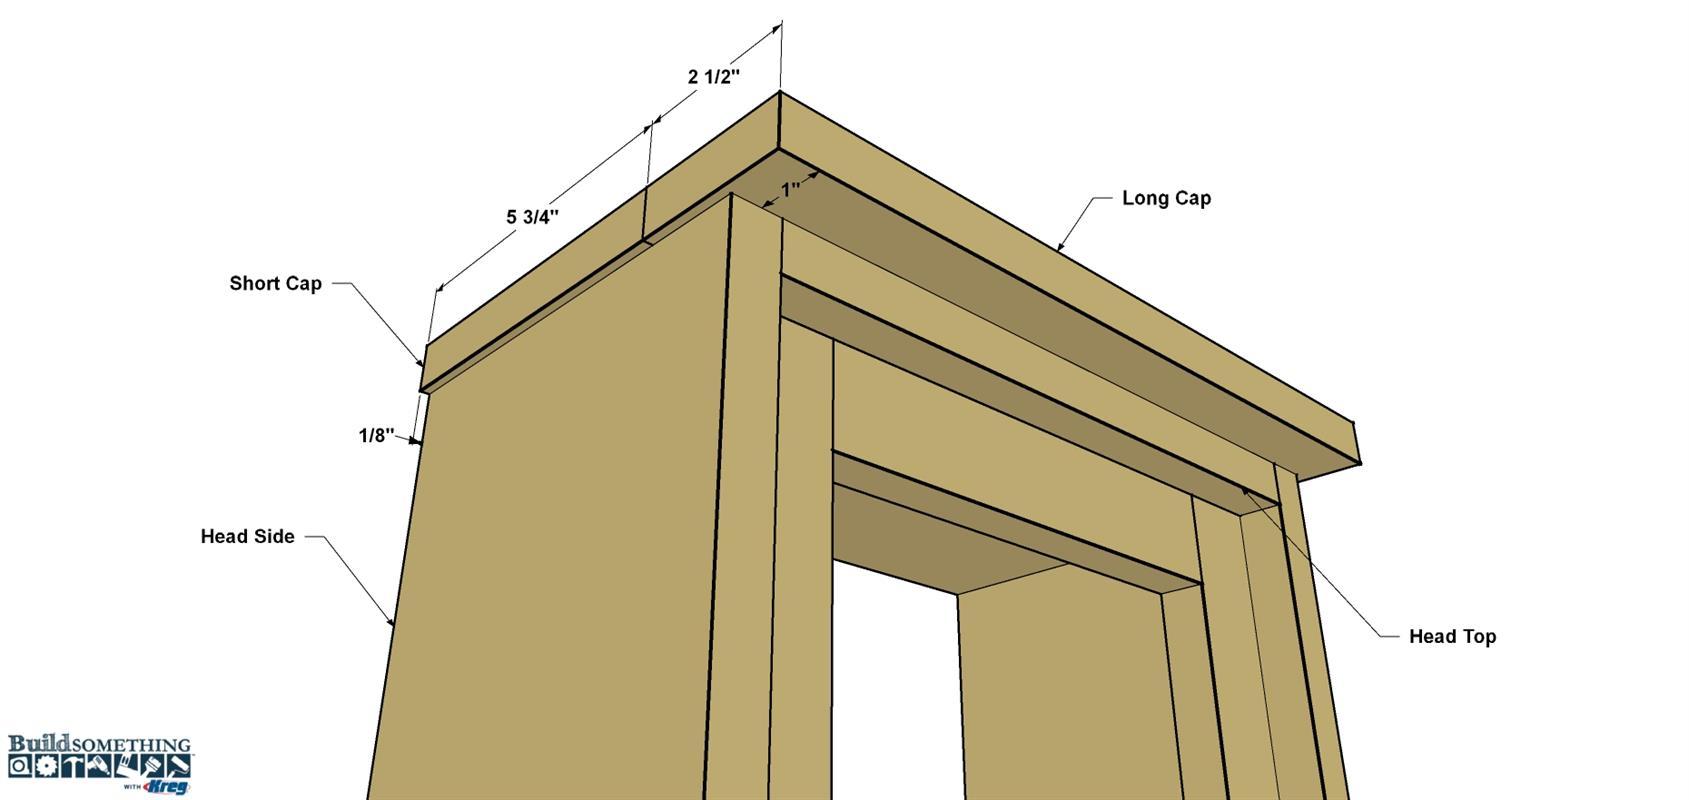
Add a Head Cap
Cut two Short Caps and one Long Cap to length from a 1x3, as shown in the cutting diagram. Test fit them to the clock head to see that, when positioned, the Caps overhang the head as shown. Apply glue to the face of each Cap—making sure you don’t get glue on the portion of each that will overhang—and then clamp the Caps in place until the glue dries.
-
Trim Out the Clock Head
Now you trim out the clock head by applying Base Shoe molding to the Caps. You’ll use the same procedure as in Step 5—cutting and fitting each piece. Once the pieces are cut to fit, glue them in place.
-
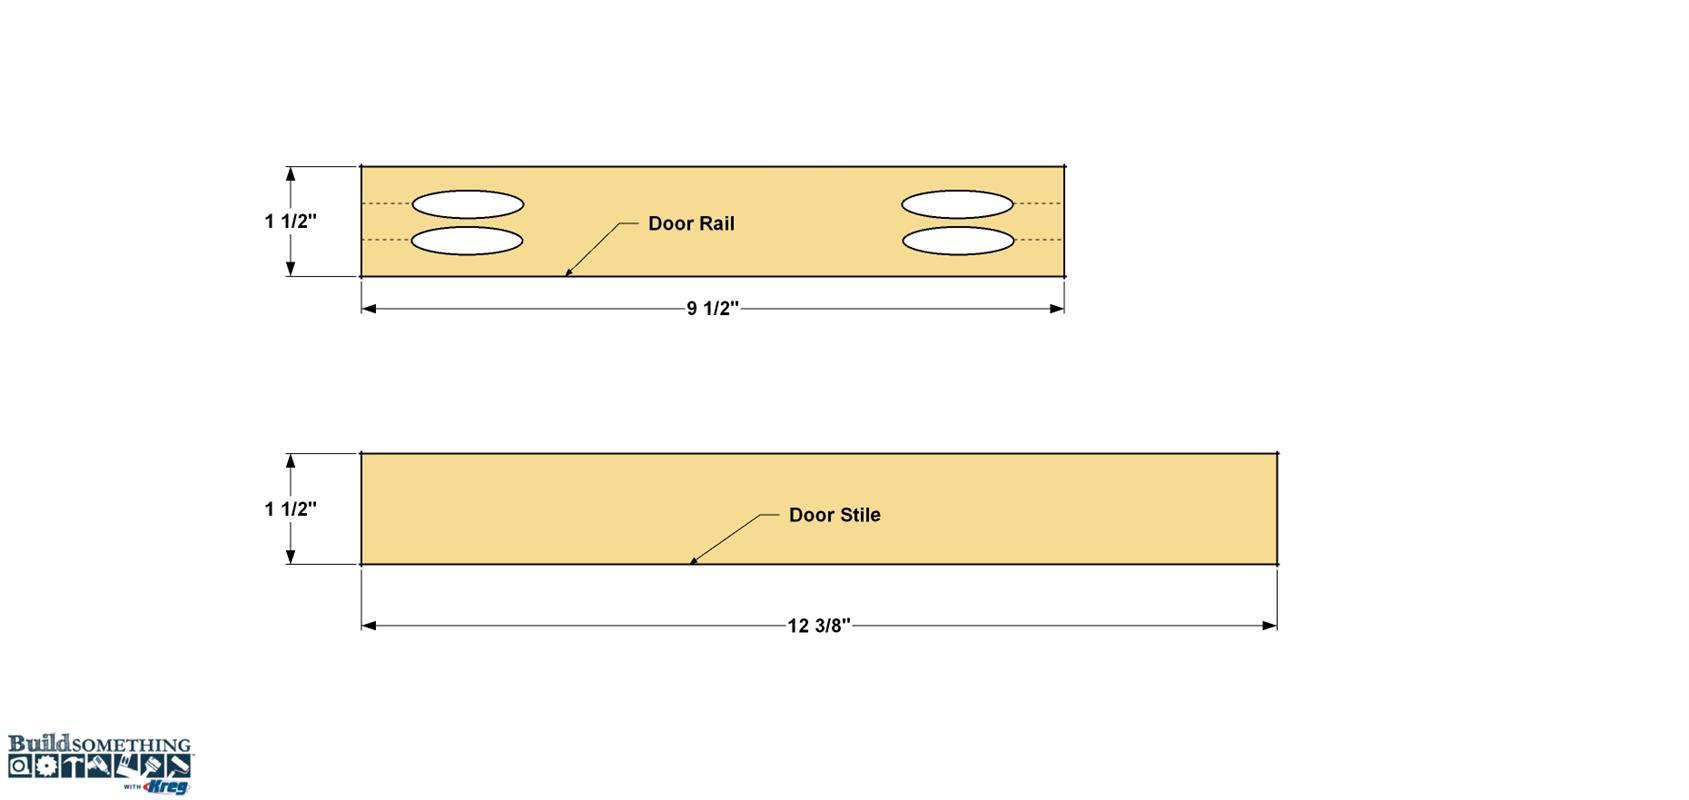
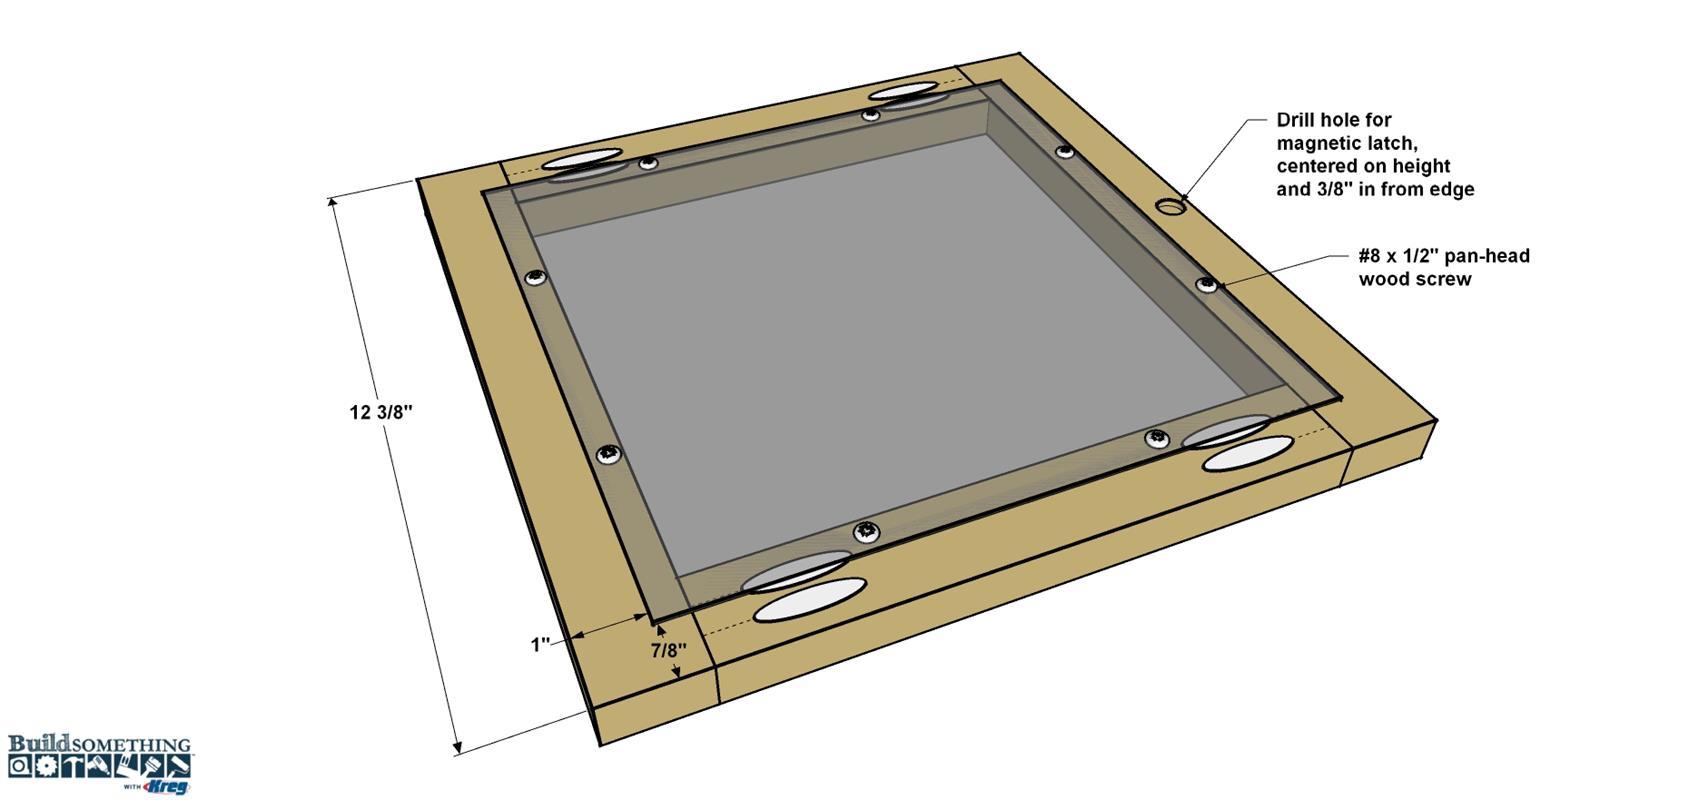
Make the Door Parts
Now you can begin making the door for the clock head. First, cut two Door Rails and two Door Stiles to length from a 1x2, as shown in the cutting diagram. Then drill pocket holes in each end of the Rails—but not in the Stiles.
-
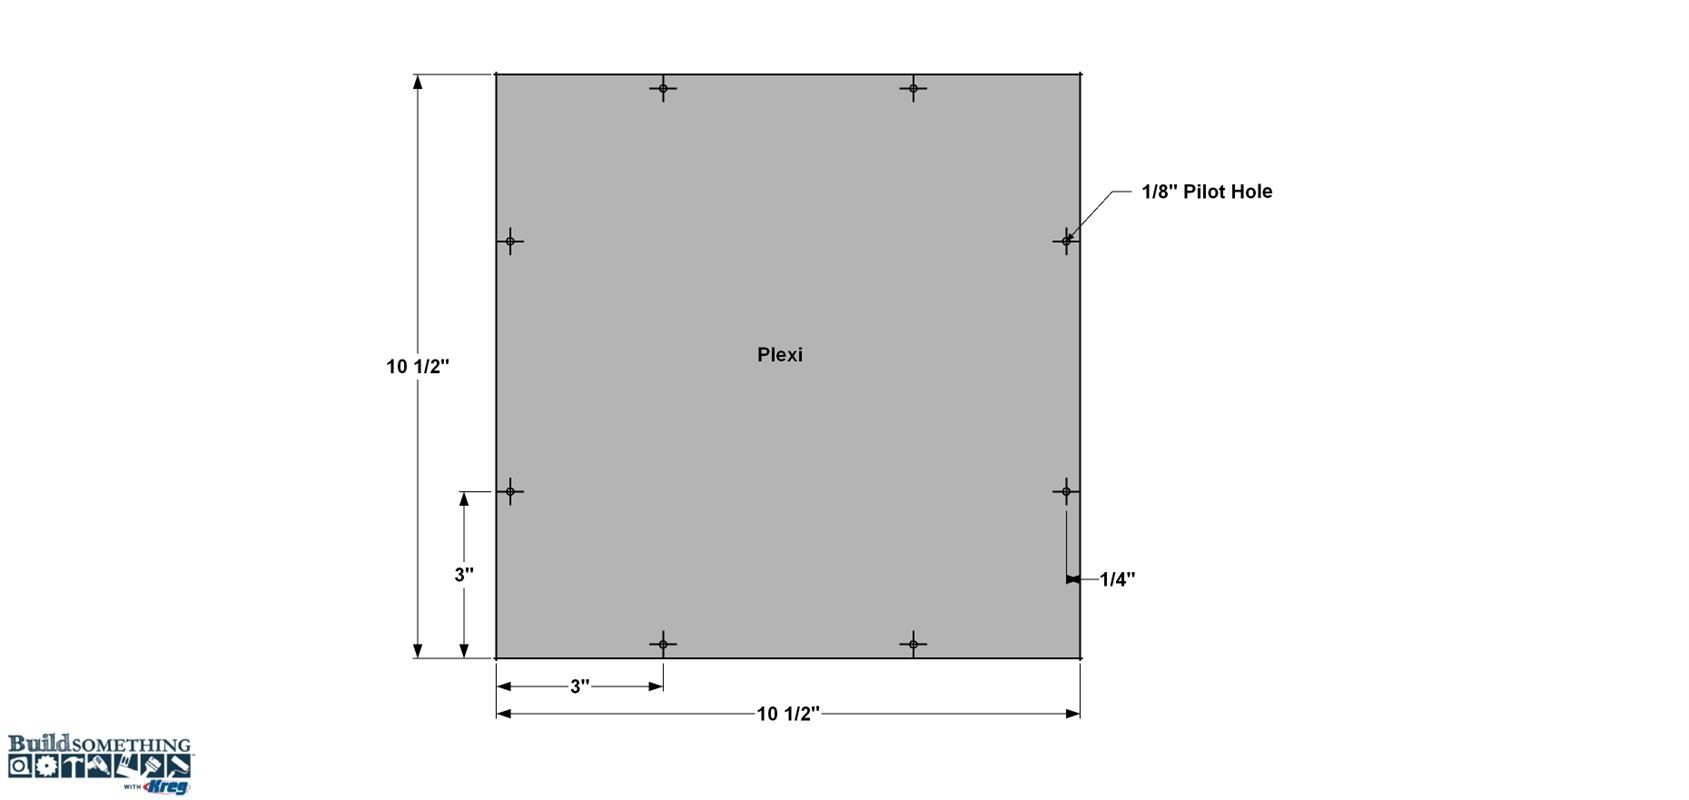
Cut Plexiglas for the Door
Cut a piece of Plexiglas to size for the door, and then drill holes around the perimeter, as shown.
-
Assemble the Door
Clamp the Rails and Stiles together and secure them with 1 1/4" coarse-thread Kreg Screws. Using your door latch as a guide, drill a shallow hole in one Stile, as shown, to match the diameter of the latch. Then you can Next, position the Plexiglas on the inside face of the door, as shown. Use the holes in the Plexiglas to locate and drill pilot holes for the mounting screws. Don’t permanently mount the Plexiglas or the door latch, though. You’ll want to wait until you’ve applied your paint or finish.
-
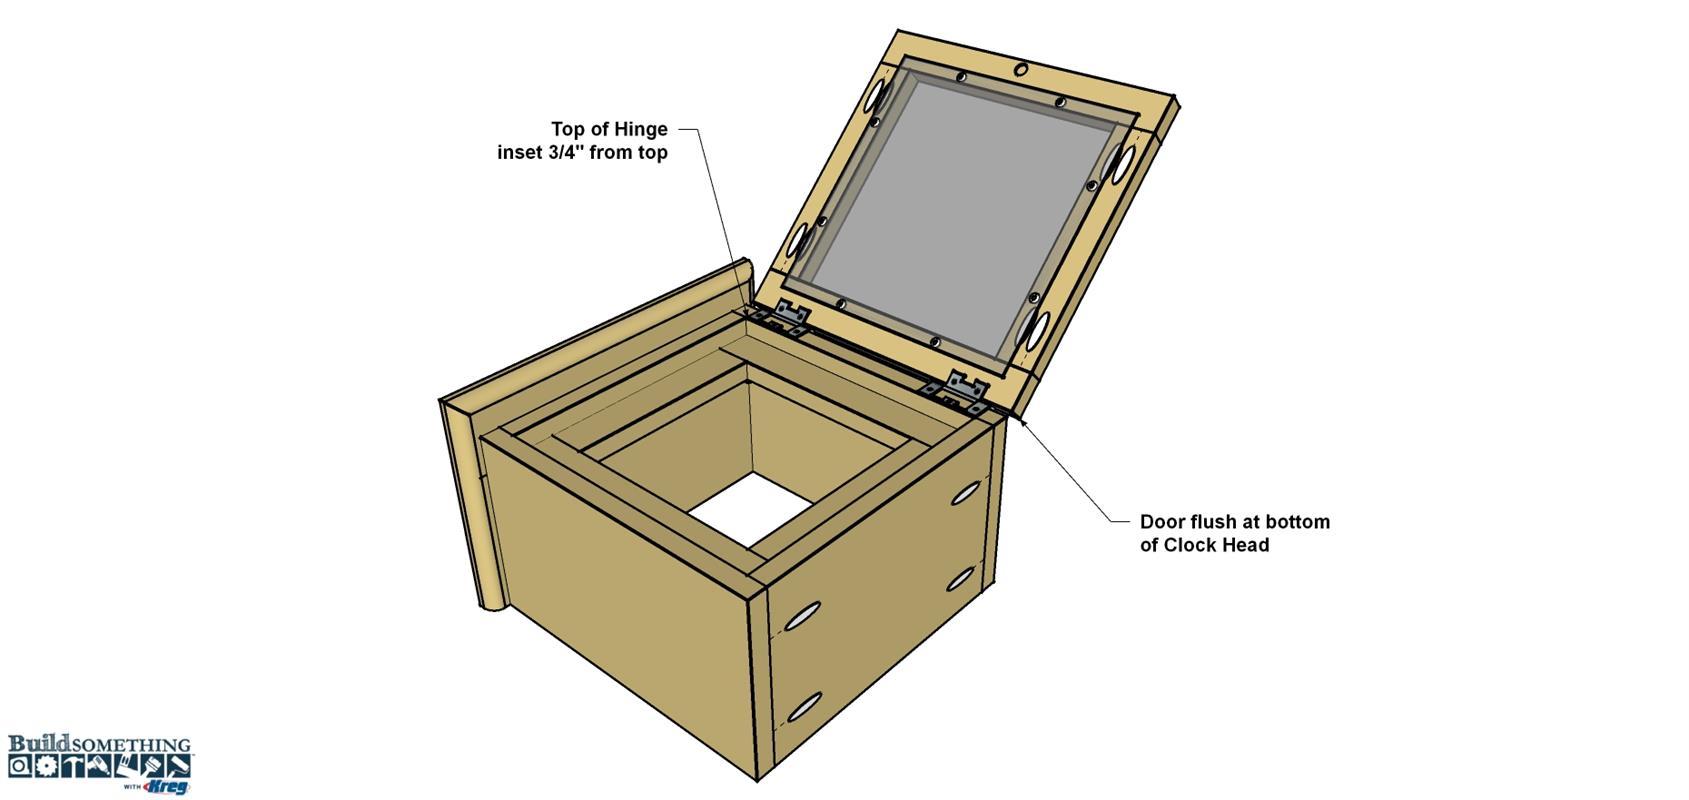
Mount the Door
Mount the two non-mortise hinges to the edge of the Door. Mount the door to the clock Head making sure the bottom of the Door is flush to the bottom of the Clock Head. You can also align the other half of the door catch, and drill a hole in the leading edge of that Head Side. After mounting the Door, carefully remove it from the Head, and remove the hinges. Again, you’ll reinstall them later, after painting or finishing.
-
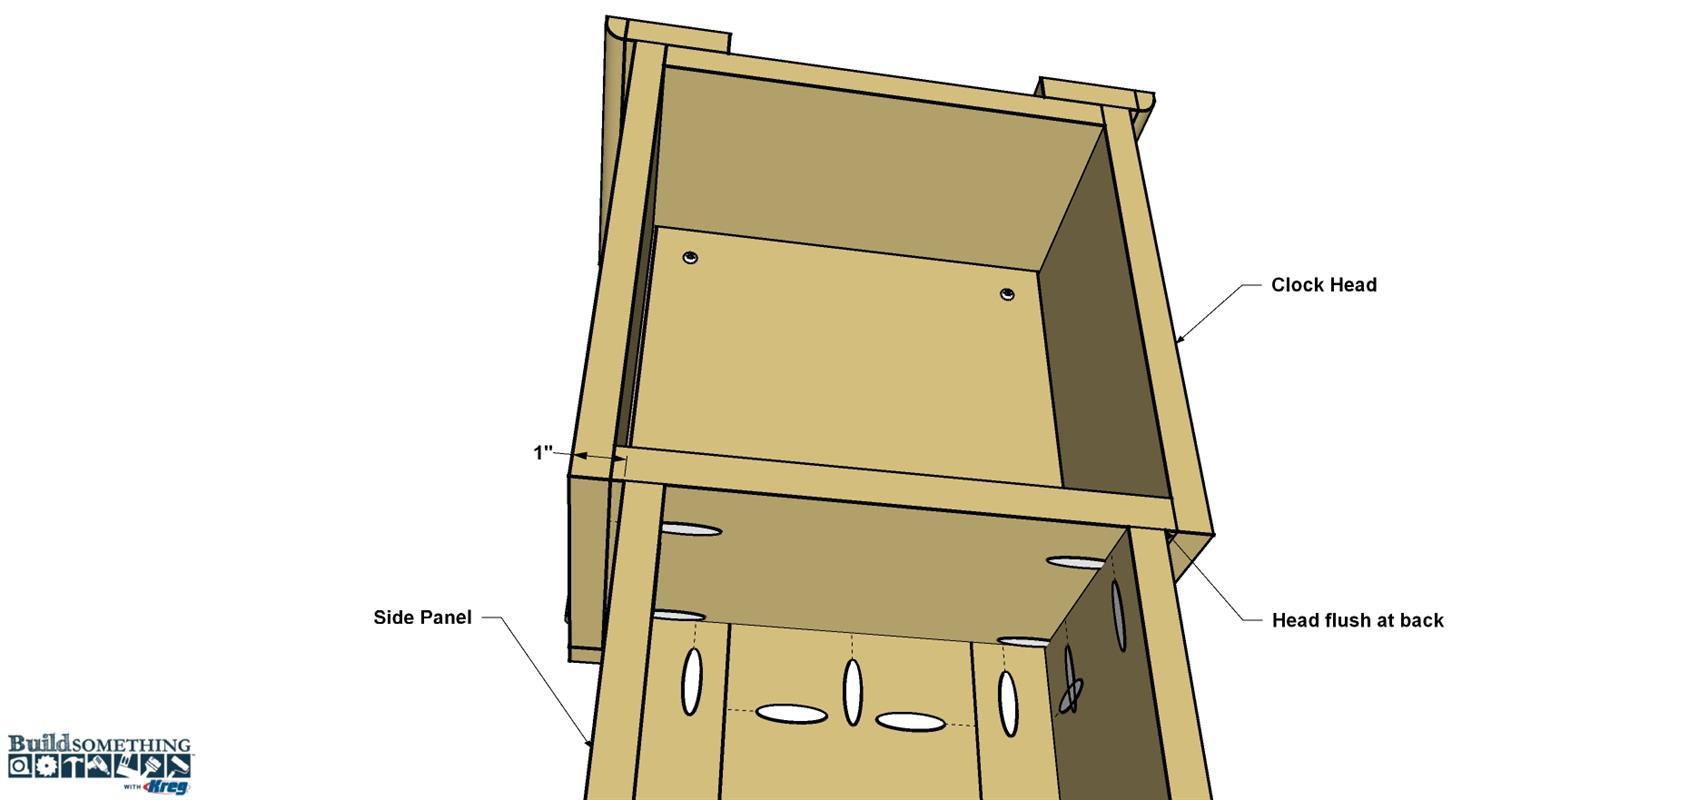
Attach the Clock Head
Position clock head on the lower case assembly, as shown, making sure the clock head is flush at the back, and it overhangs equally on each side. Secure he head by driving 1 1/4" coarse-thread Kreg Screws. Then attach 3/4" x 3/4" Cove Molding under the clock head by cutting and fitting each piece, just as you did when adding the Base Shoe.
-
Install the Lower Door
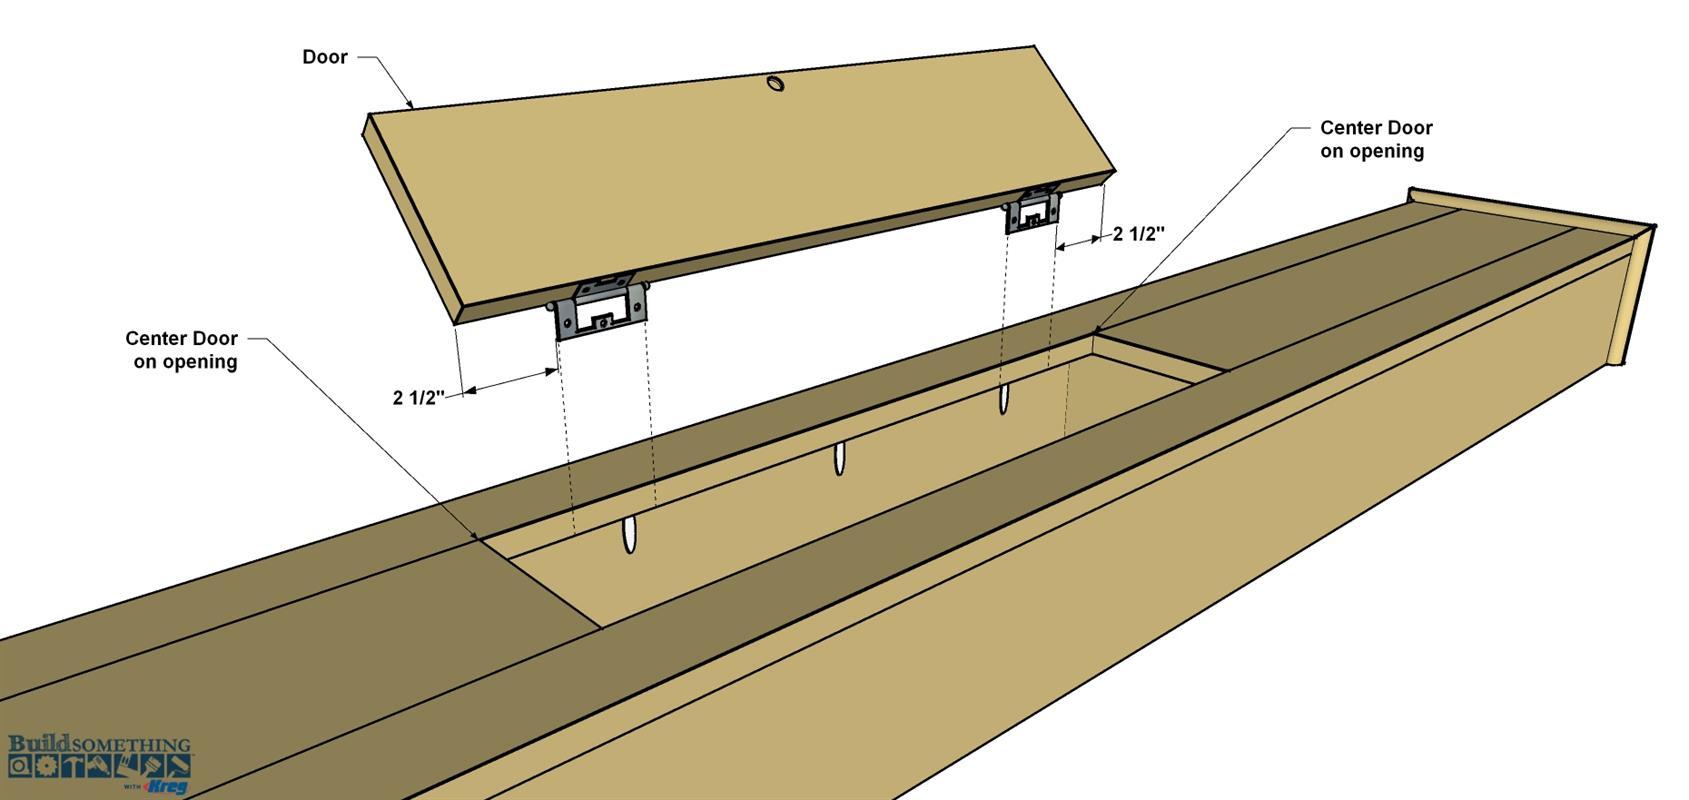
Mount no-mortise hinges to the lower Door, and then position the door and attach the hinges to the Wing in the lower case, as shown.
-
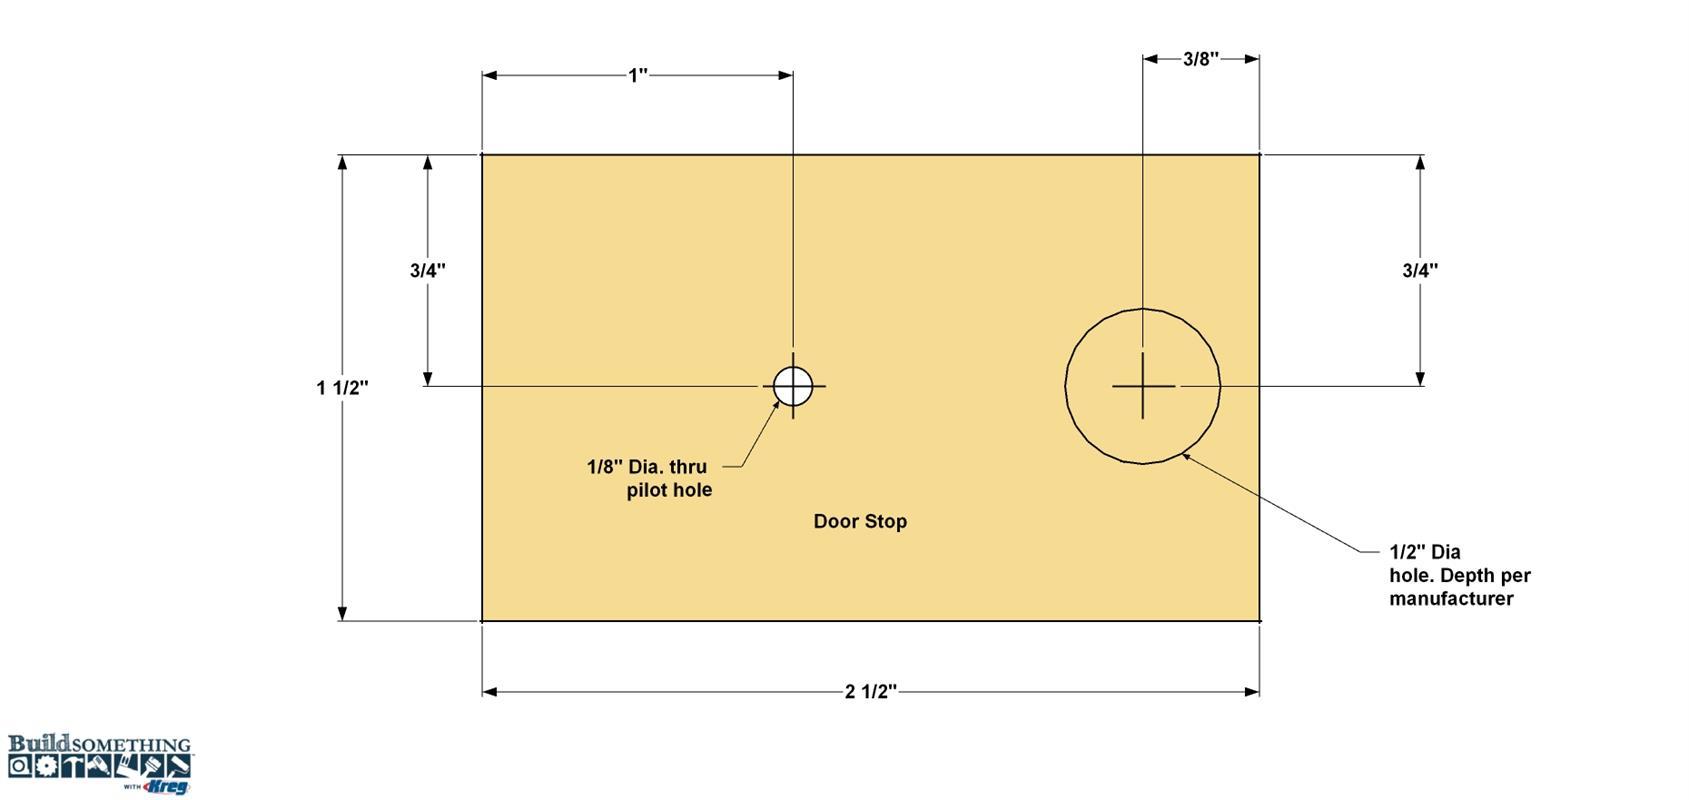
Make the Door Stop
From a 1x2, cut the Door Stop to length as shown in the cut diagram. Drill the shallow hole for the door latch where shown. Finally drill a pilot hole for the screw that will be used to mount the Stop.
-
Install the Door Stop
Apply glue to the latch side of the Door Stop. Position the Stop so it’s centered in the height of the door opening, and attach it using a 1 1/4" coarse-thread Kreg screw—there’s no pocket-hole, but a Kreg Screw works great here. Use the latch to locate the shallow hole in the door, and then drill it. You can also drill a hole in the door for the door knob. When done, go ahead and remove the door and hardware.

-
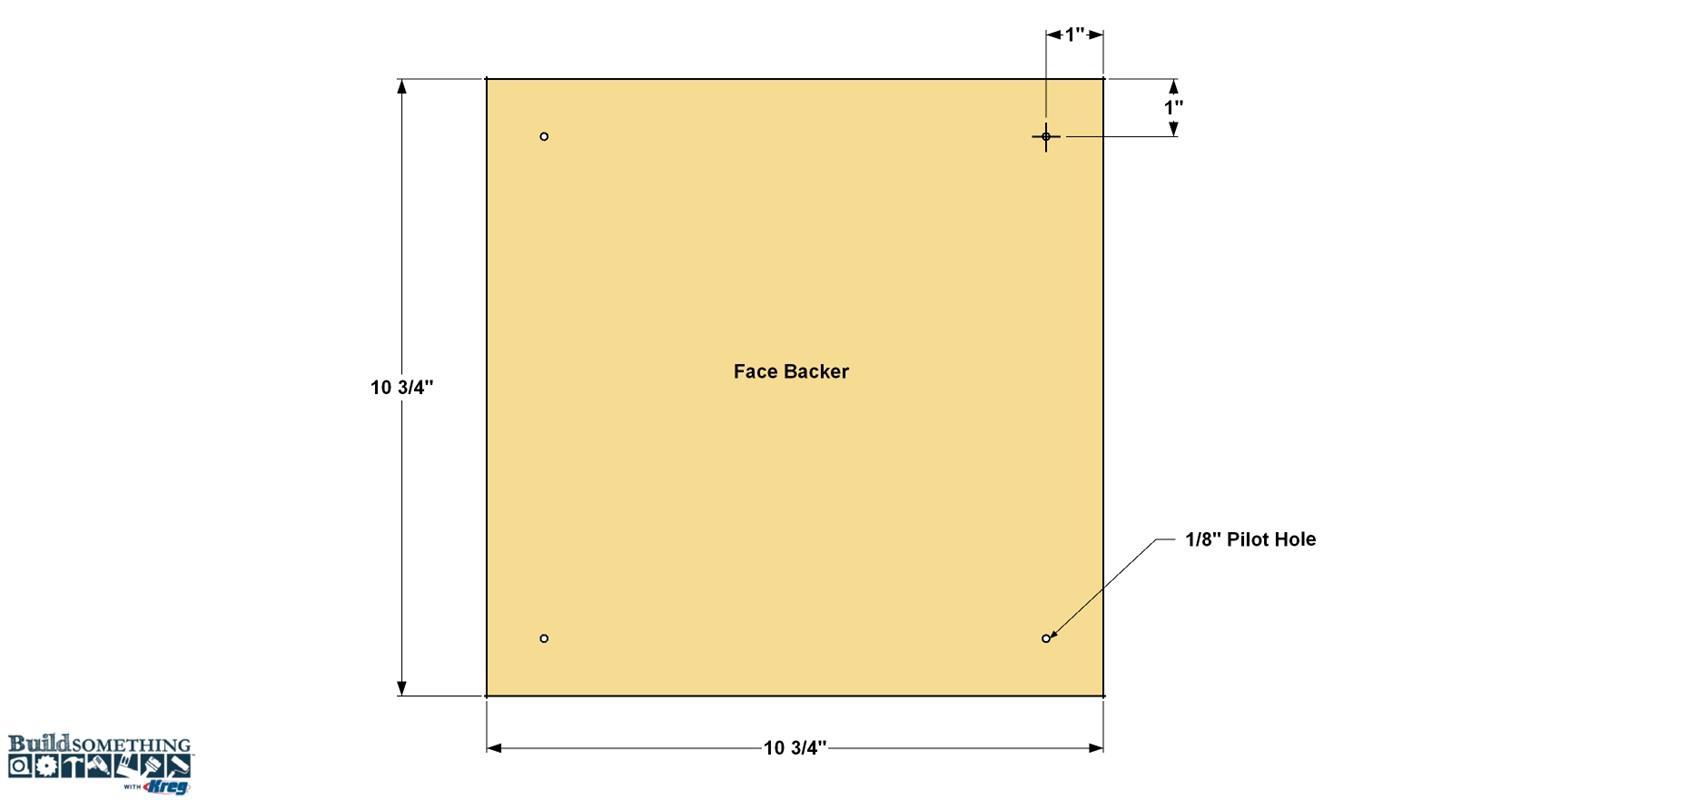
Make the Face Backer
From a piece of 1/8"-thick hardboard, cut the Face Backer to size, as shown in the cutting diagram. Drill pilot holes in each corner, where shown. Temporarily position the clock face on the backer, and carefully drill the center hole for the clock mechanism. Don’t mount the face to the Backer yet, though.
-
Sand, Paint, Install Hardware
With the main assemblies complete, sand your clock as needed to prepare it for paint or finish. We used a product called milk paint that gives a great traditional look. You can choose any paint you like, though, or stain. Paint all the parts that will be visible, including the front of the Clock Face Backer where the face won’t cover it. Once the paint dries, reinstall the hinges, latches, and the Plexiglas. Mount the clock face and movement to the Backer. Then mount the Backer in the head from behind using four #8 x 1/2" screws. Once you have the clock where you want it in your room, secure it to the wall using anti-tip hardware. You can attach one end to the underside of the clock head inside the case, and the other to the wall.