

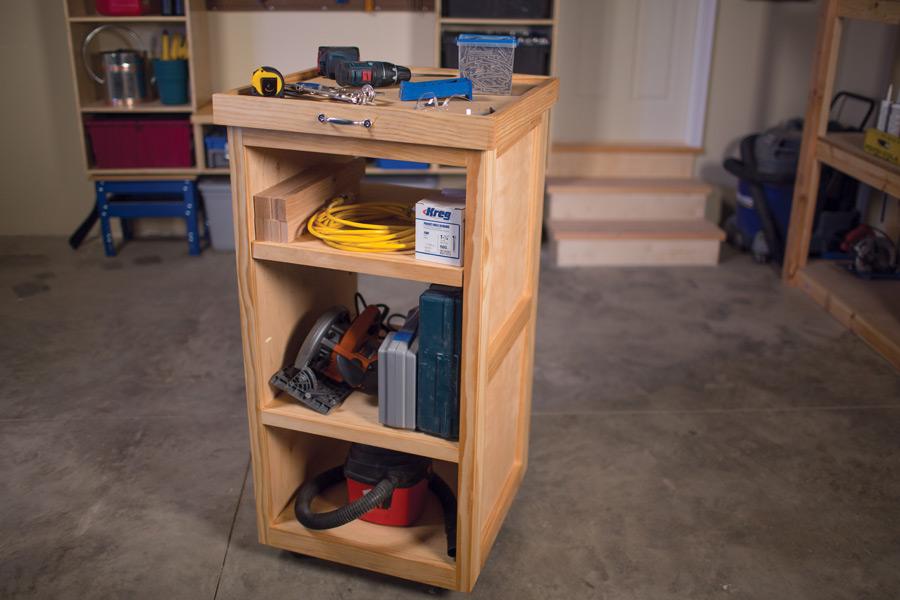
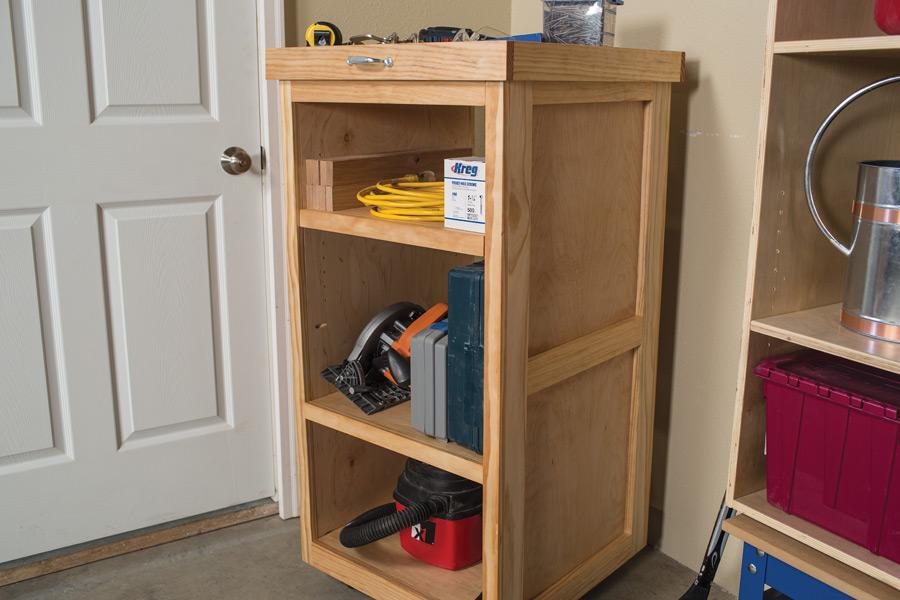
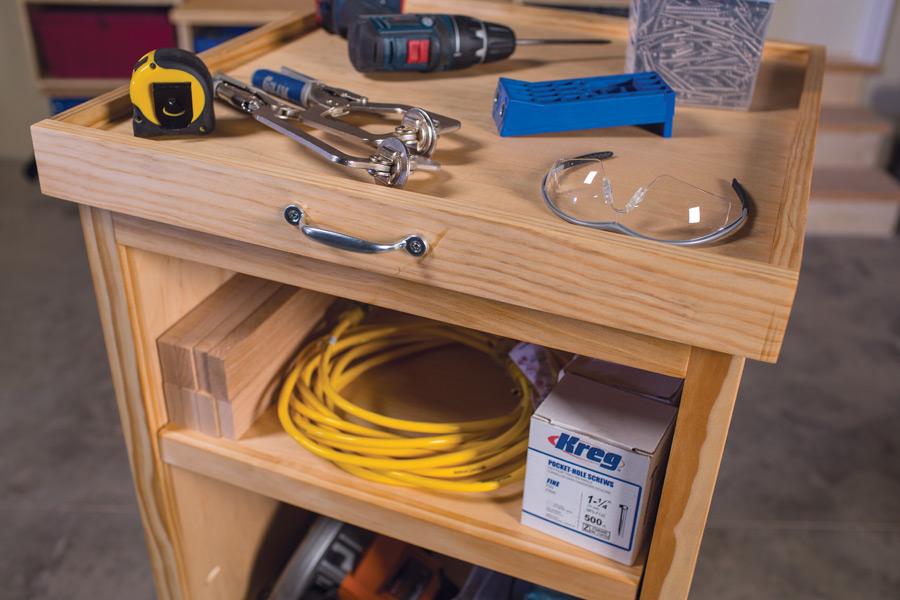
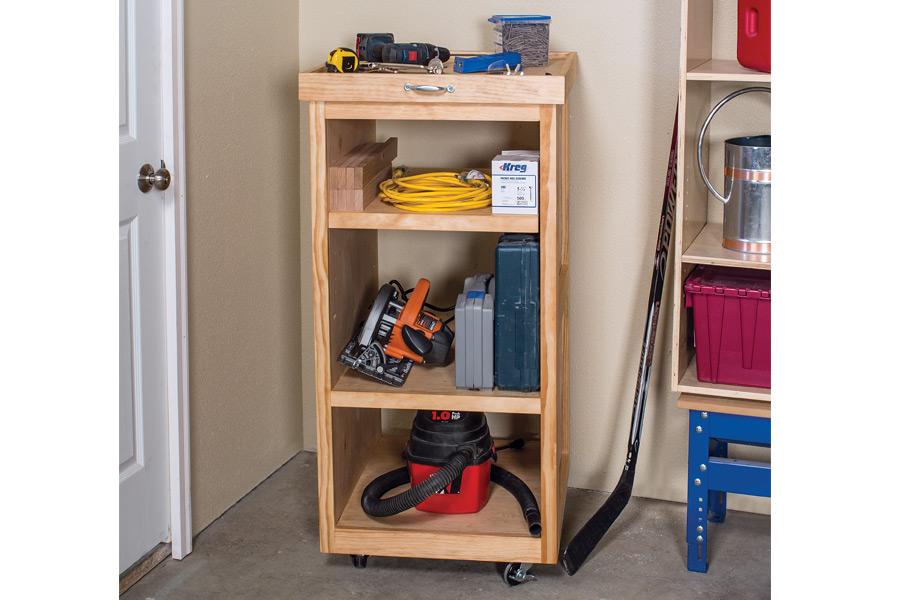
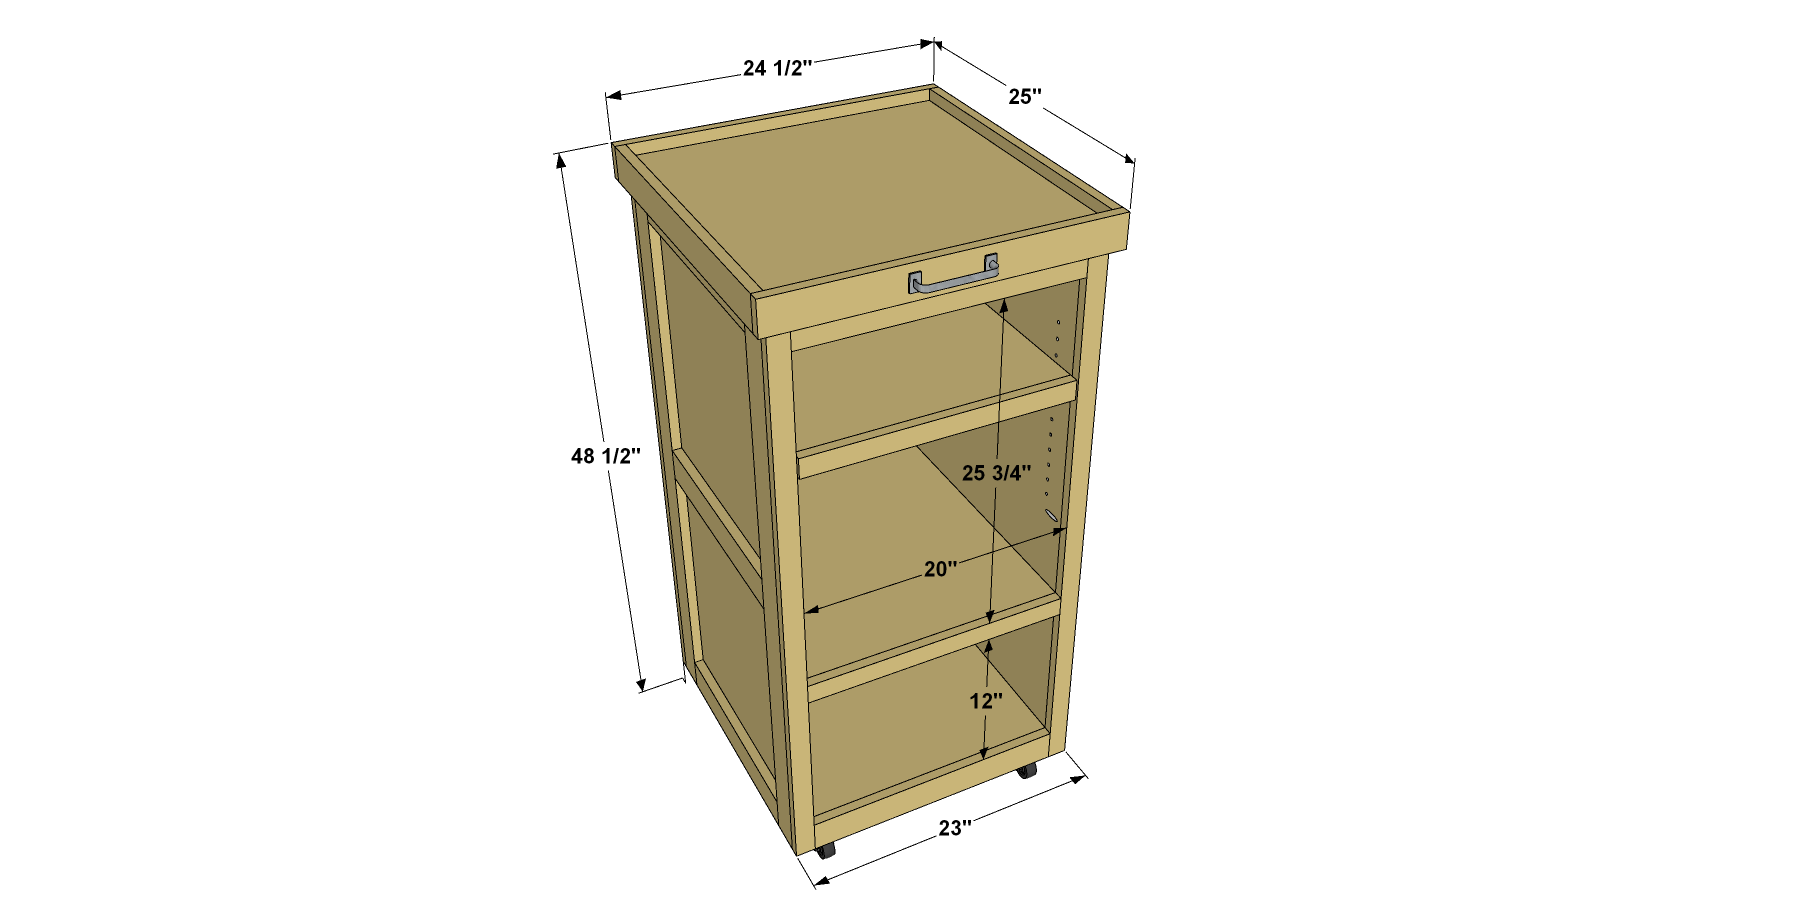


This rolling caddy offers lots of space for storing tools without taking up much floor space. Plus, it’s on wheels, so you can roll it out when you’re working, and tuck it away in between projects. There’s even a removable tray on top that you can use to carry hardware or small tools.
Tools
Kreg Tools


Other Tools
-
miter saw

-
tape measure
Materials
Wood Products
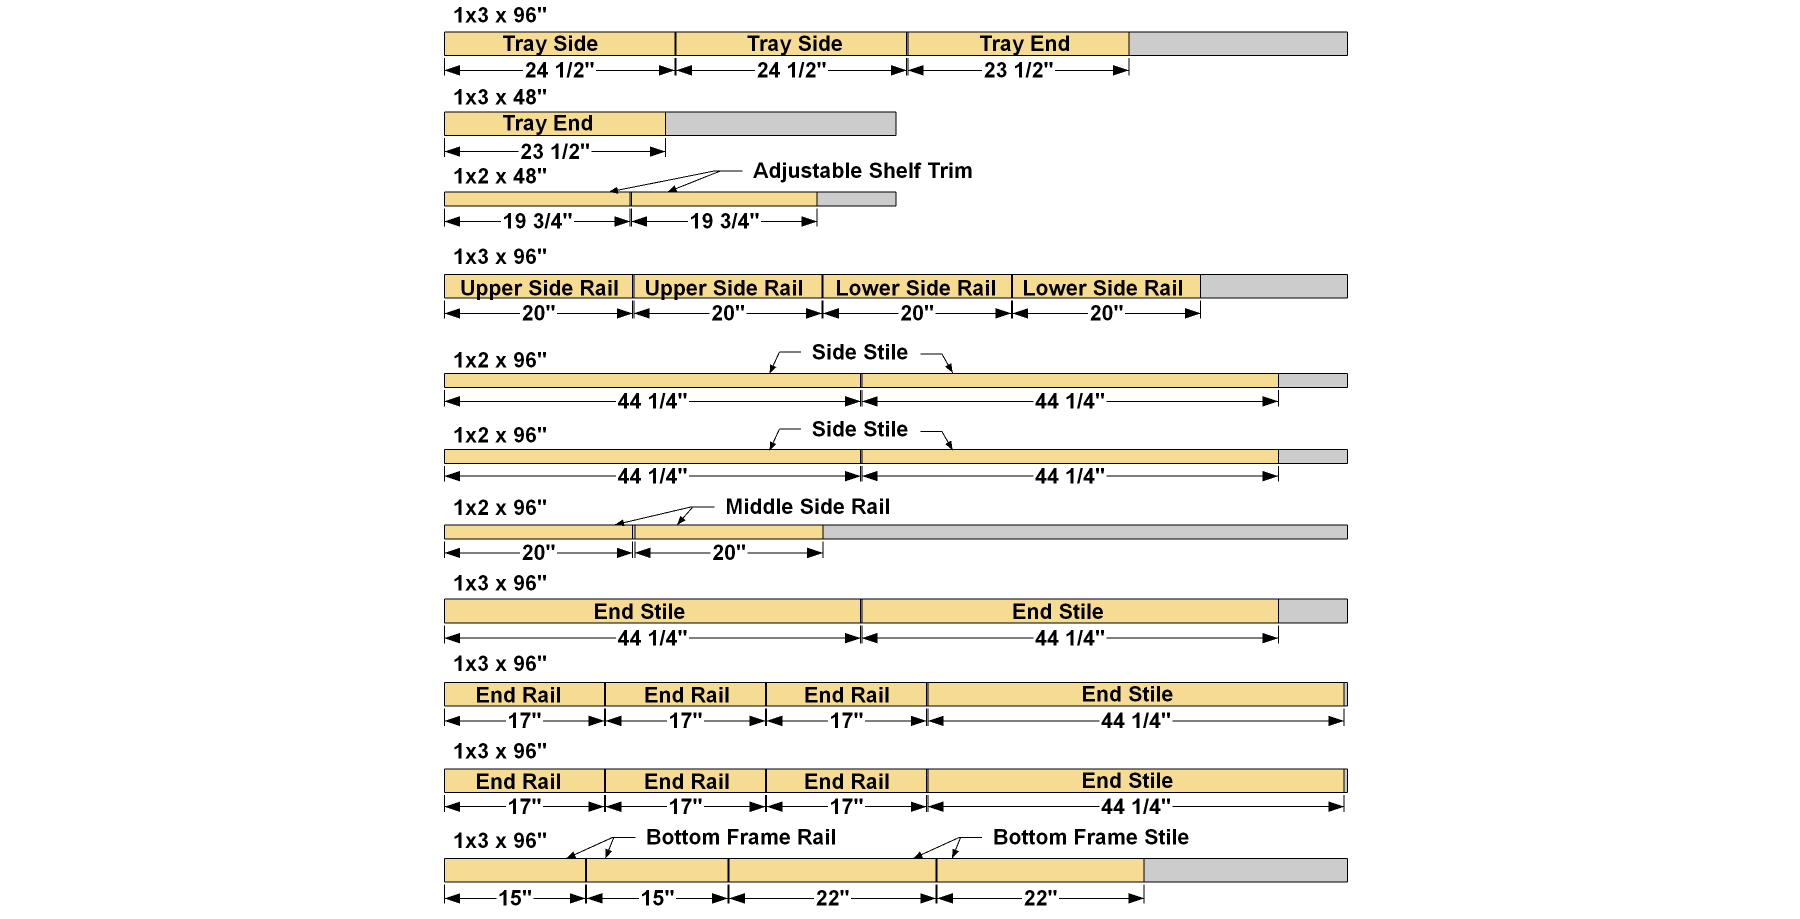
- 1 Board , 1x2 x 48"
- 3 Board , 1x2 x 96"
- 1 Board , 1x3 x 48"
- 6 Board , 1x3 x 96"
- 1 Plywood , 3/4" plywood, 48" x 96"
- 1 Plywood , 3/4" plywood, 24" x 48"
Hardware & Supplies
- 154 1 1/4" coarse-thread Kreg Pocket-Hole Screws
- 2 2 1/2" Locking swivel casters
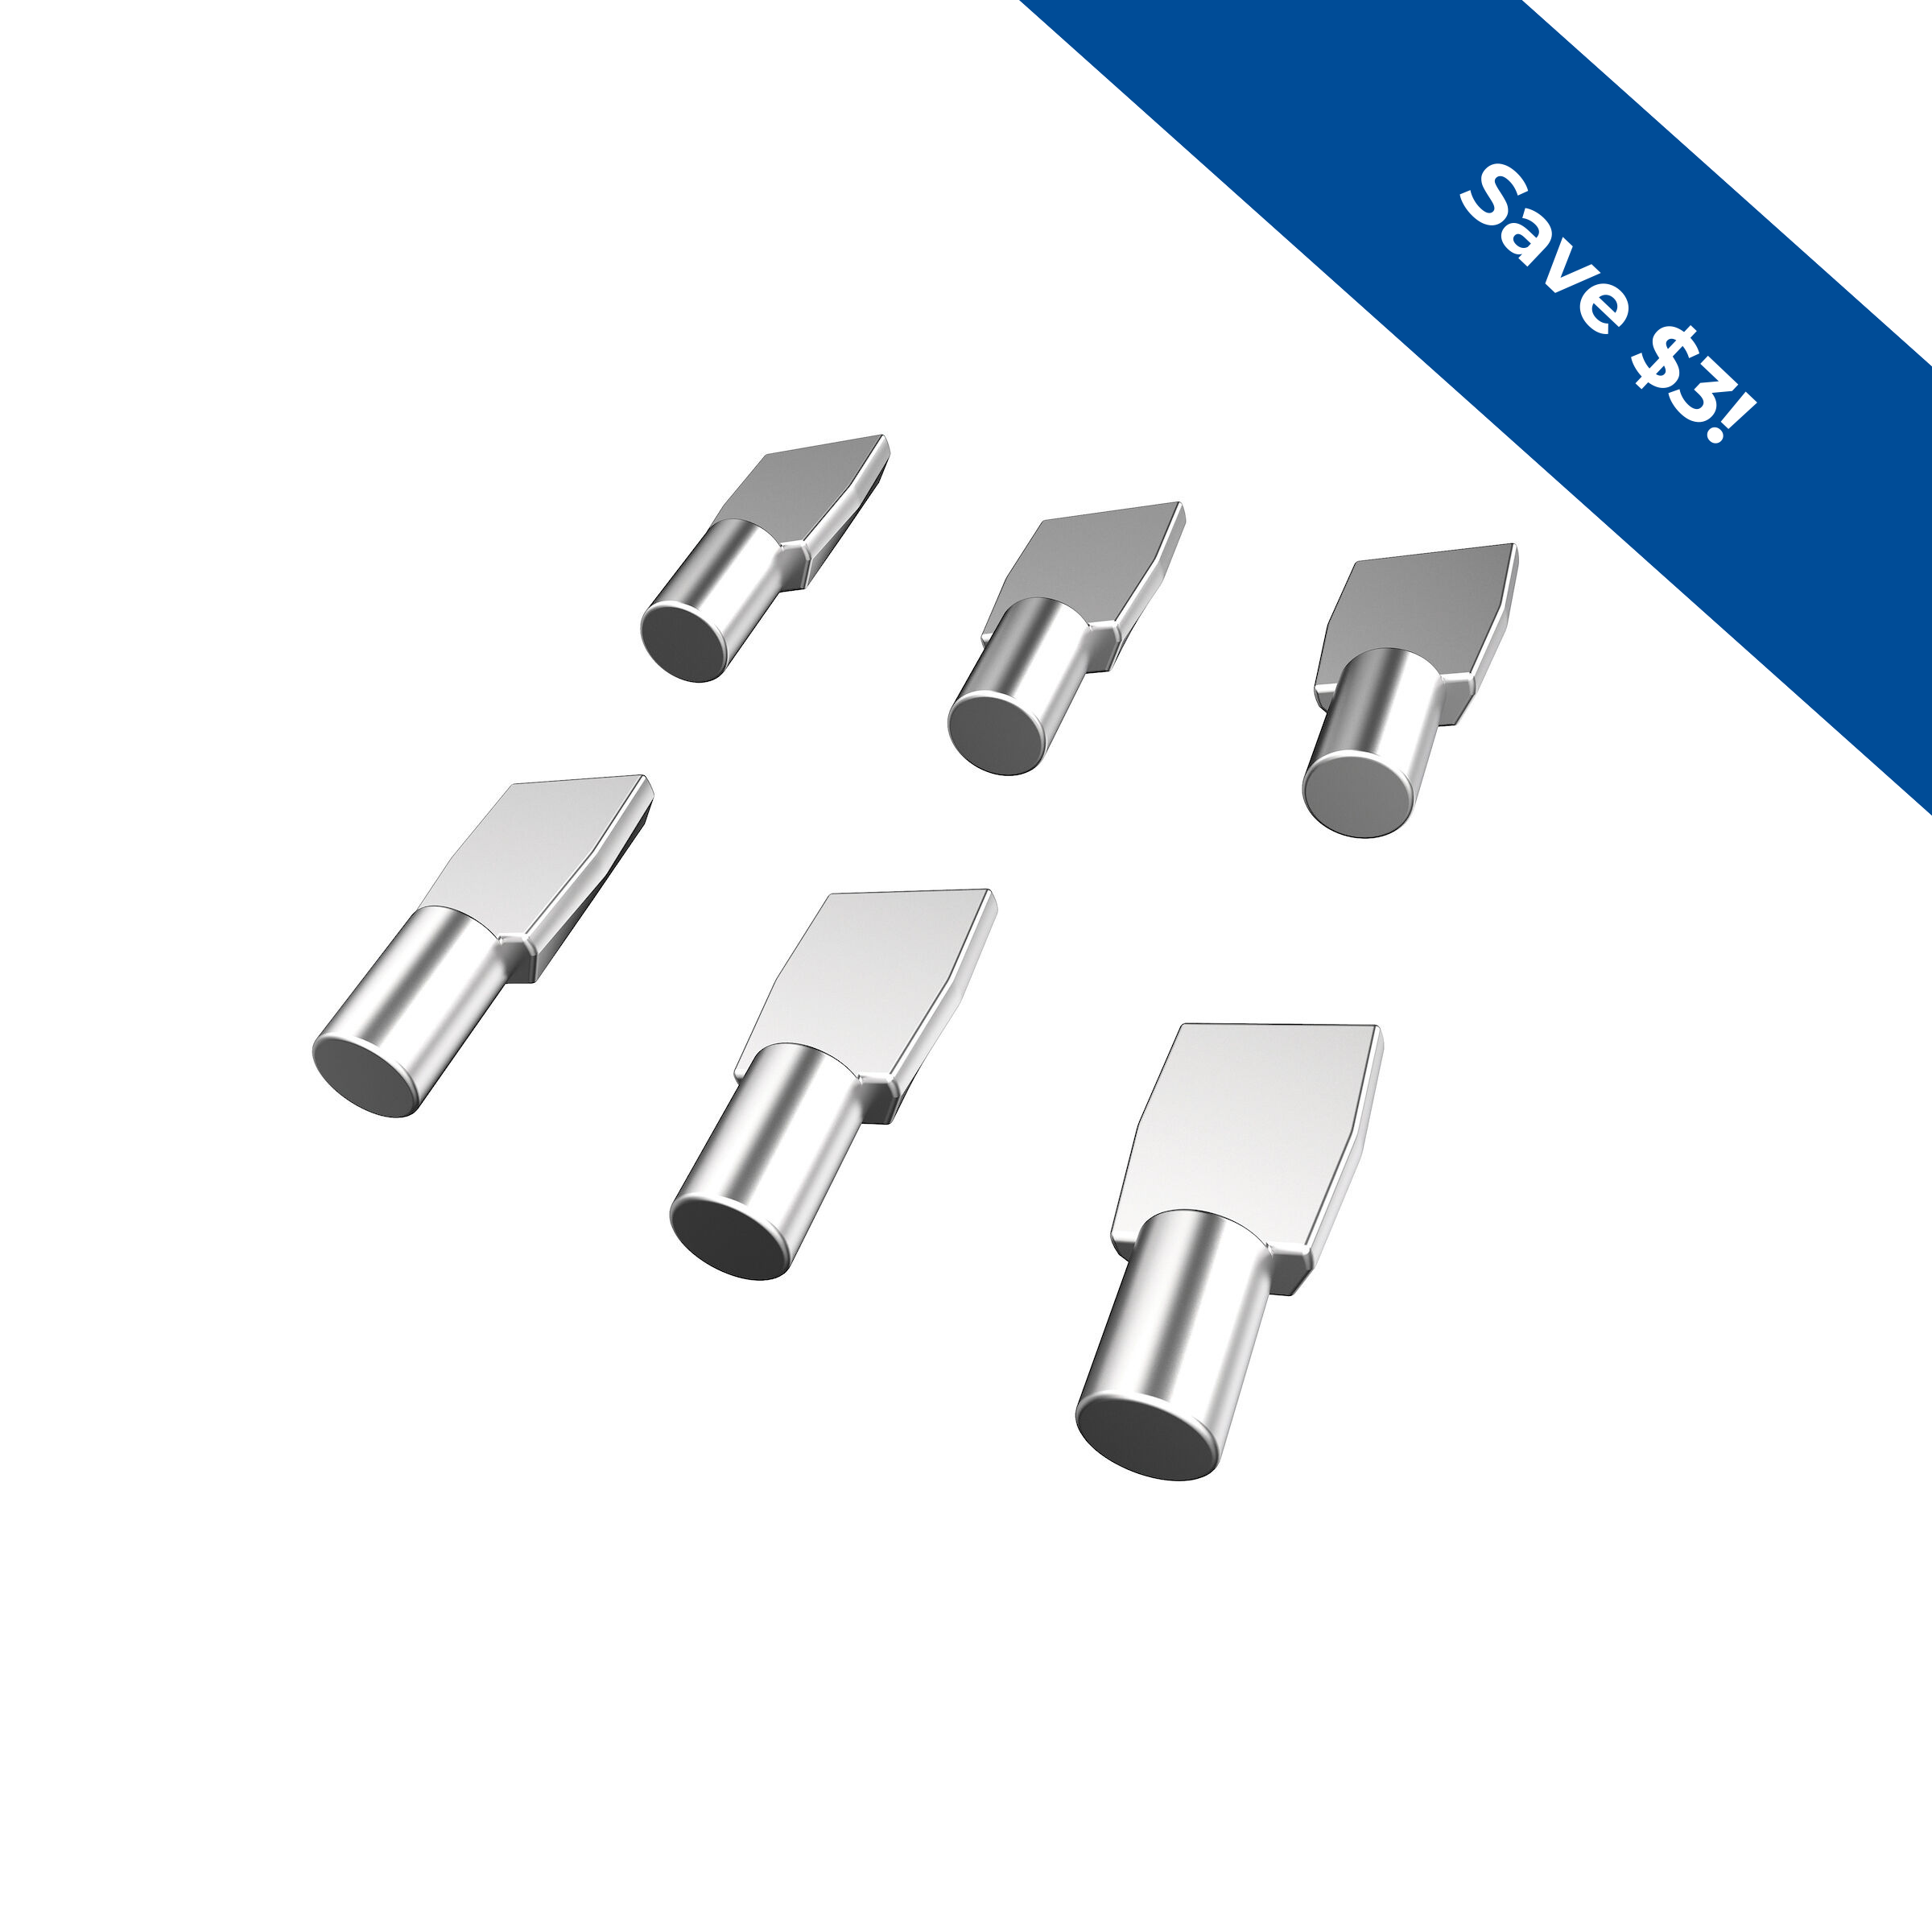
- 4 Shelf pins
- 2 Utility pulls
Cut List & Parts
- 6 End Rail , 3/4" x 2 1/2" x 17"
- 4 End Stile , 3/4" x 2 1/2" x 44 1/4"
- 2 Upper Side Rail , 3/4" x 2 1/2" x 20"
- 2 Middle Side Rail , 3/4" x 2 1/2" x 20"
- 2 Lower Side Rail , 3/4" x 2 1/2" x 20"
- 4 Side Stile , 3/4" x 1 1/2" x 44 1/4"
- 2 End Panel , 3/4" ply x 22" x 44 1/4"
- 2 Bottom Frame Rail , 3/4" x 2 1/2" x 15"
- 2 Bottom Frame Stile , 3/4" x 2 1/2" x 22"
- 1 Top , 3/4" ply x 20" x 22"
- 1 Fixed Shelf , 3/4" ply x 20" x 22"
- 1 Bottom , 3/4" ply x 20" x 22"
- 1 Adjustable Shelf , 3/4" ply x 19 3/4" x 22"
- 2 Adjustable Shelf Trim , 3/4" x 1 1/2" x 19 3/4"
- 1 Tray Base , 3/4" ply x 23" x 23 1/2"
- 2 Tray Ends , 3/4" x 2 1/2" x 23 1/2"
- 2 Tray Sides , 3/4" x 2 1/2" x 24 1/2"
Directions
-
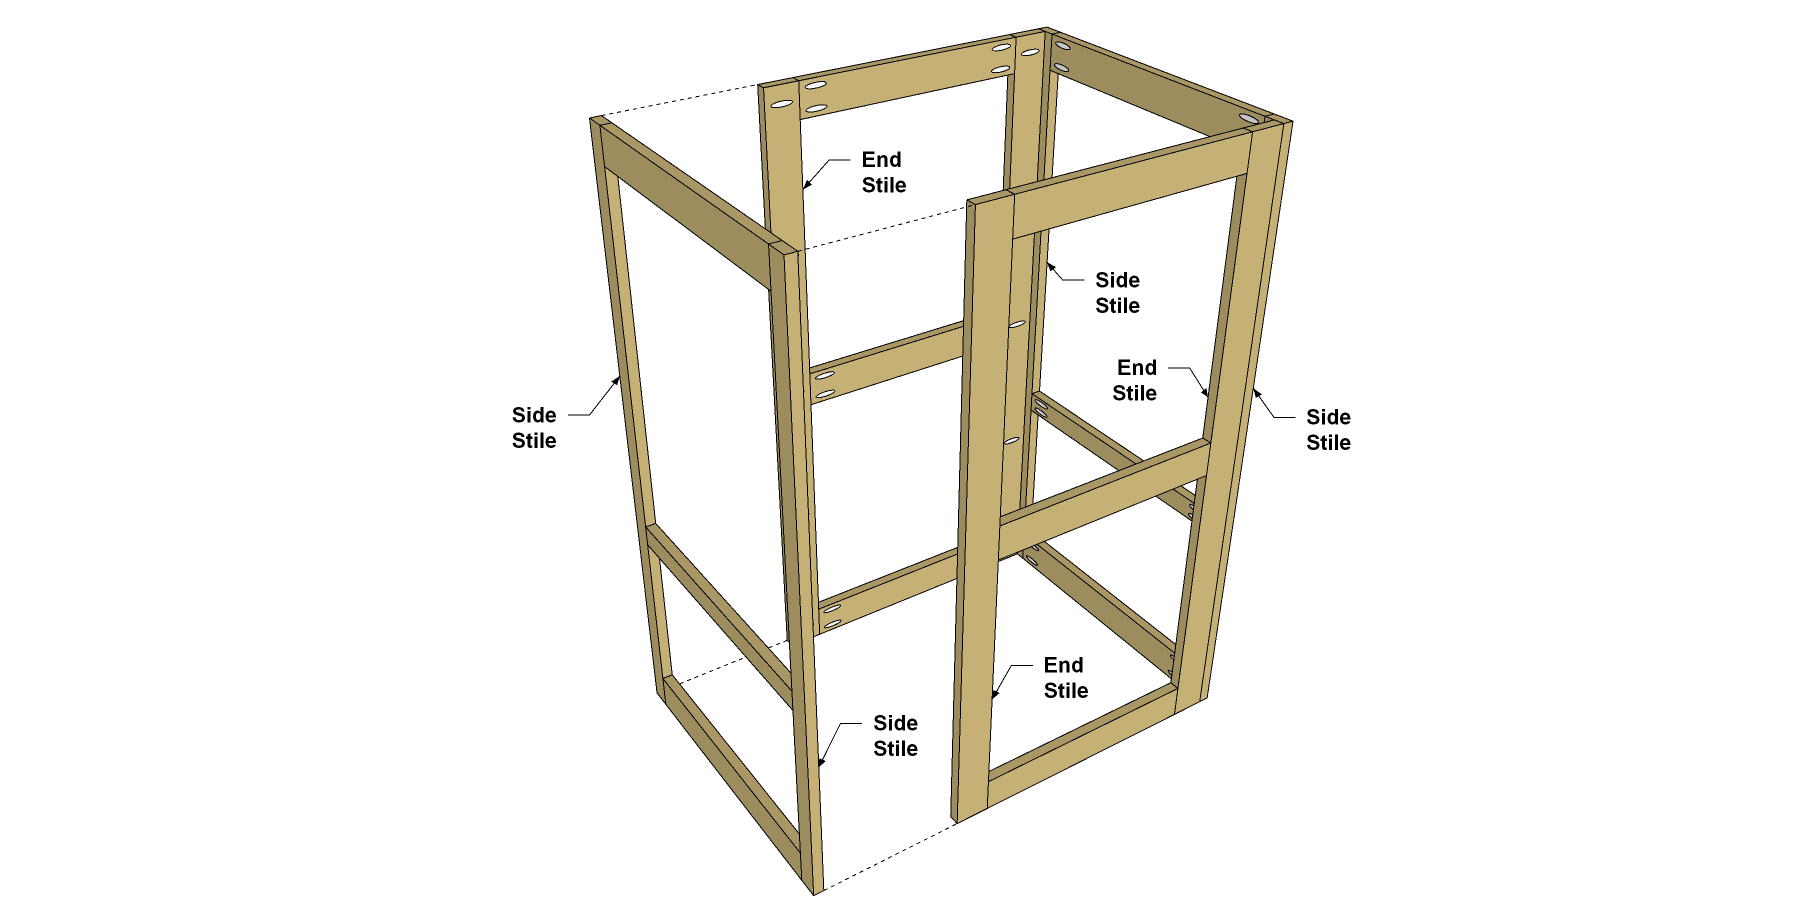
Start with the End Parts
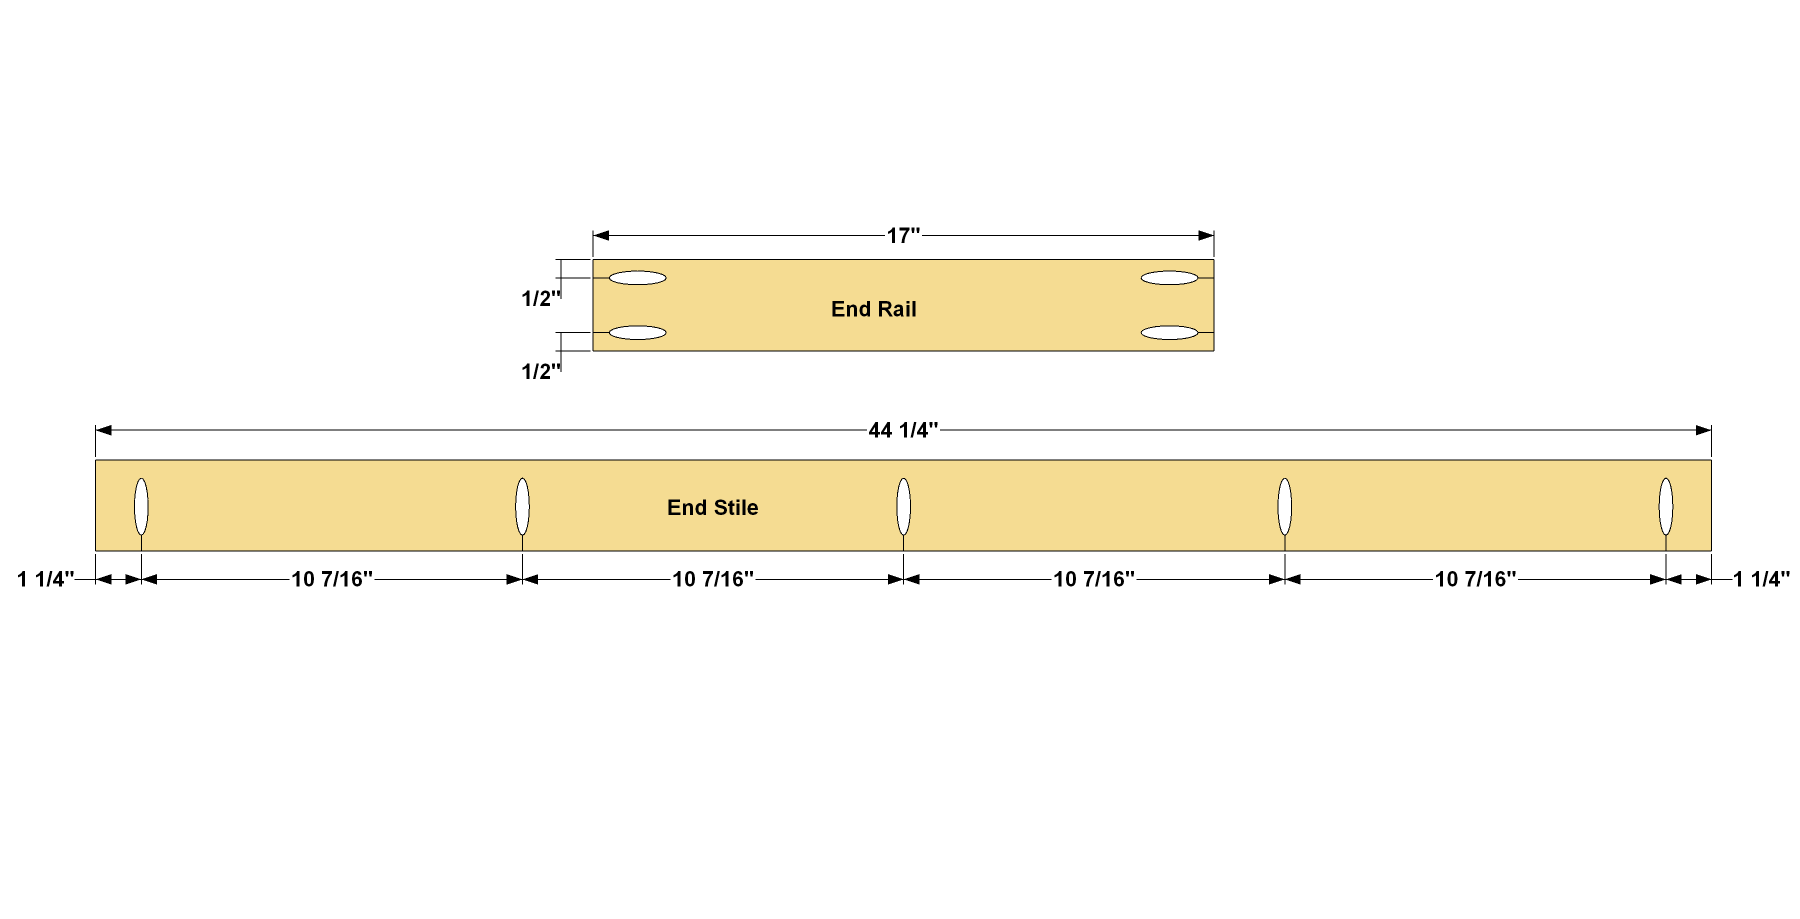
Cut six End Rails and four End Stiles to length from 1x3 boards, as shown in the cutting diagram. Set you Kreg® Pocket-Hole Jig for 3/4"-thick material, and then drill pocket holes in the End Rails and End Stiles, as shown. Sand the parts smooth.
-
Assemble the Ends
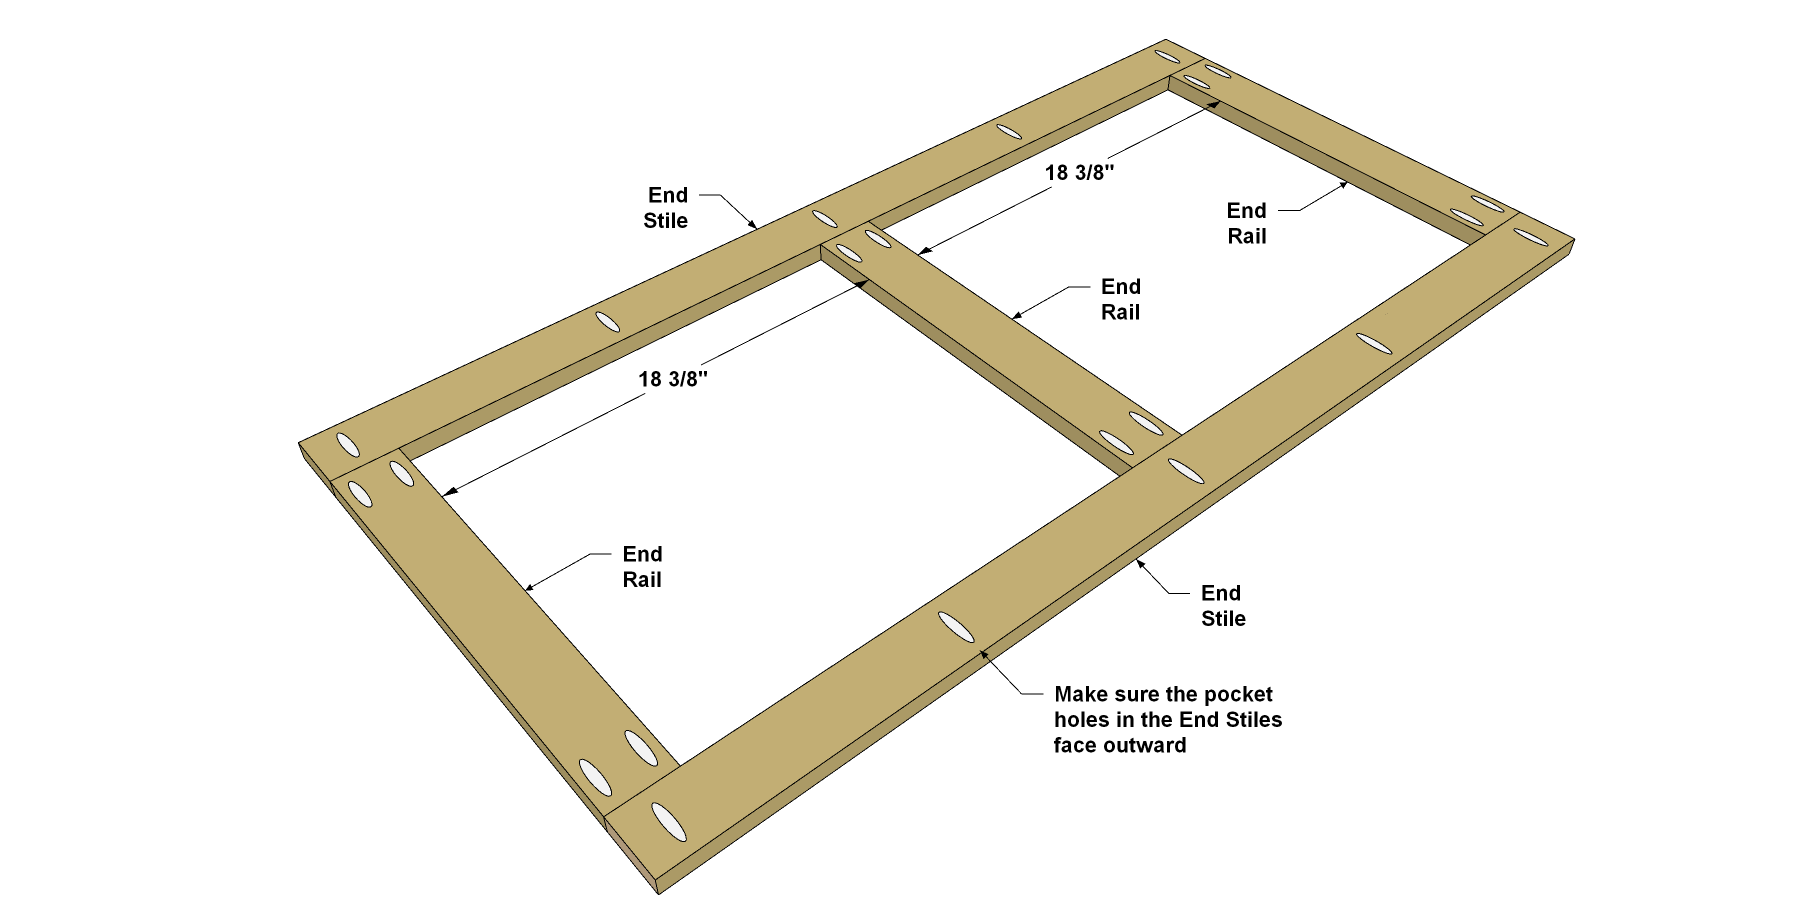
Next, attach the End Rails to the End Stiles using 1 1/4" coarse-thread Kreg Pocket-Hole Screws, as shown. Make sure that the pocket holes in the Stiles are pointing outward, as shown.
-
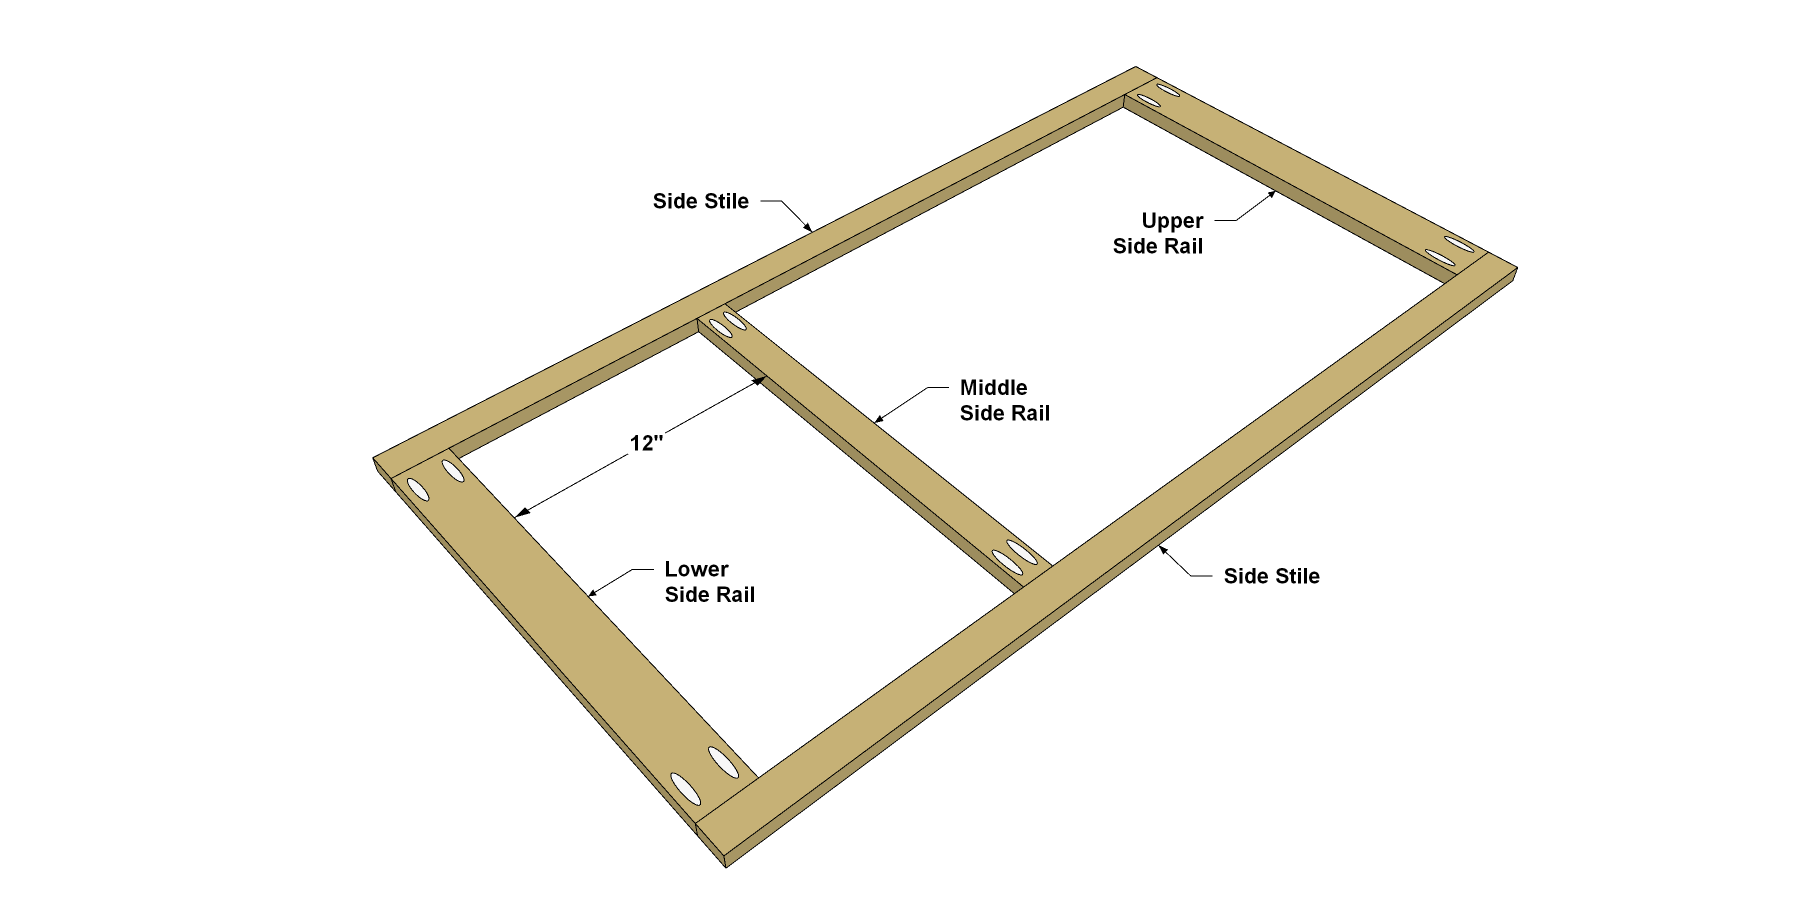
Make the Side Parts
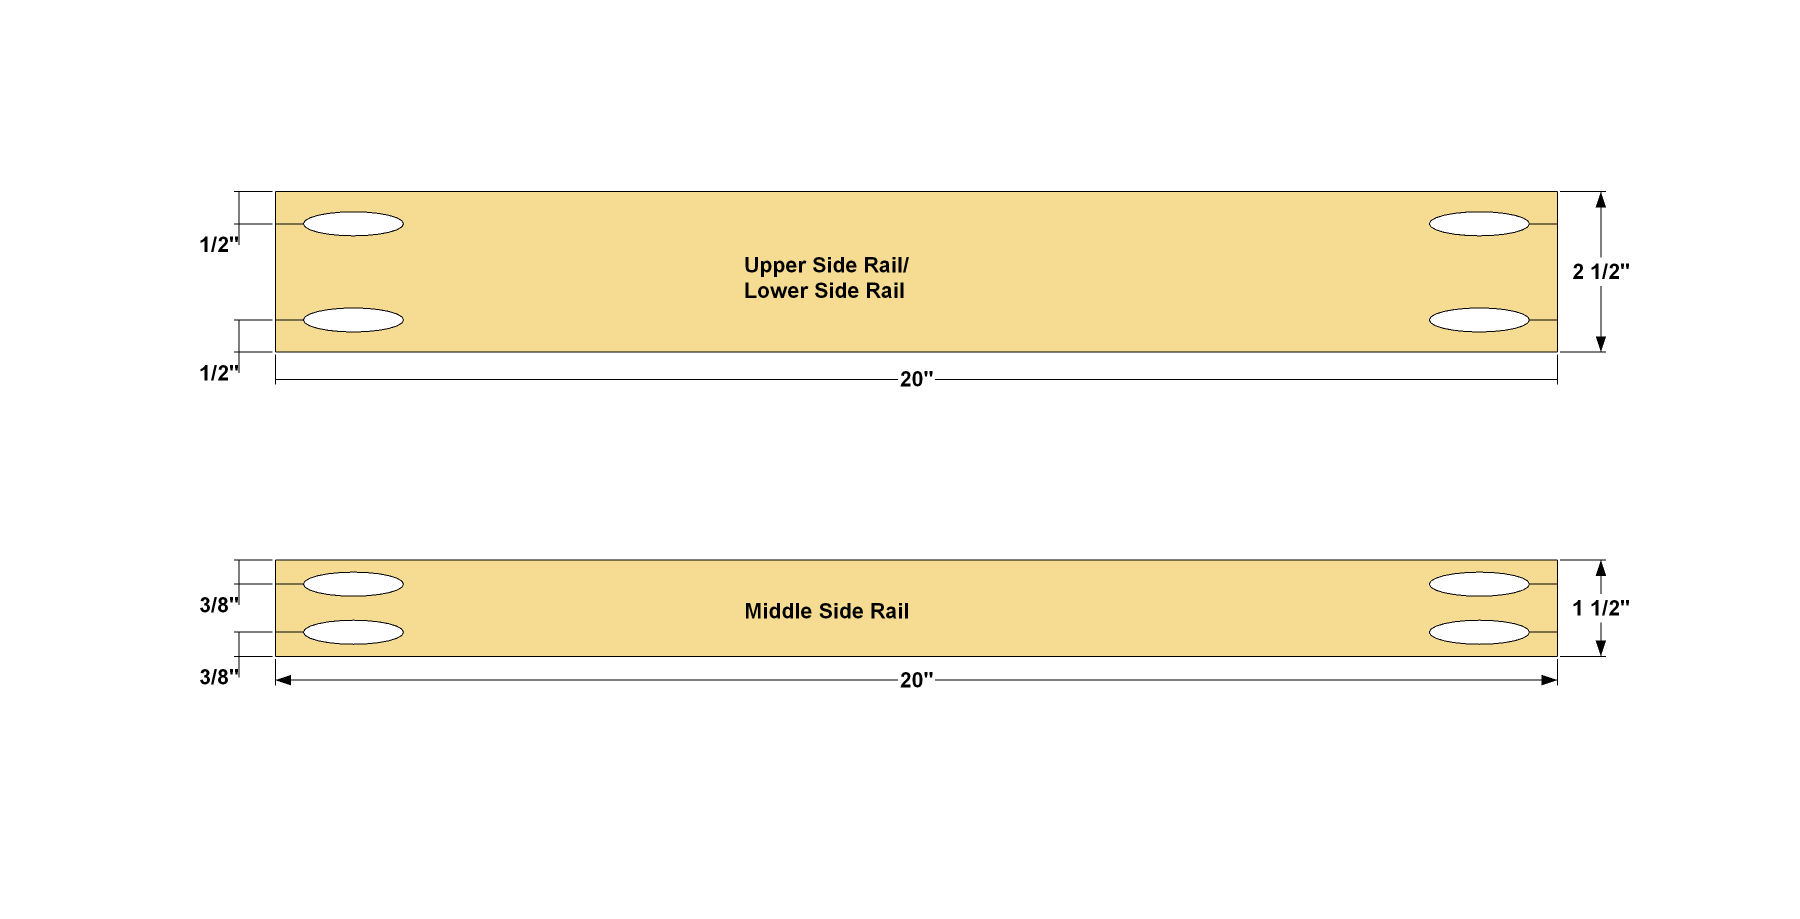
Cut two Upper Side Rails, and two Lower Side Rails to length from 1x3 boards, as shown in the cutting diagram. Also cut two Middle Side Rails and two Side Stiles to length from 1x2 boards, as shown in the cutting diagram. Then drill pocket holes in the Upper, Lower, and Middle Side Rails, as shown. Sand the parts smooth.
-
Assemble the Sides
Next, attach the Upper, Lower, and Middle Side Rails to the Side Stiles using 1 1/4" coarse-thread Kreg Pocket-Hole Screws, as shown.
-
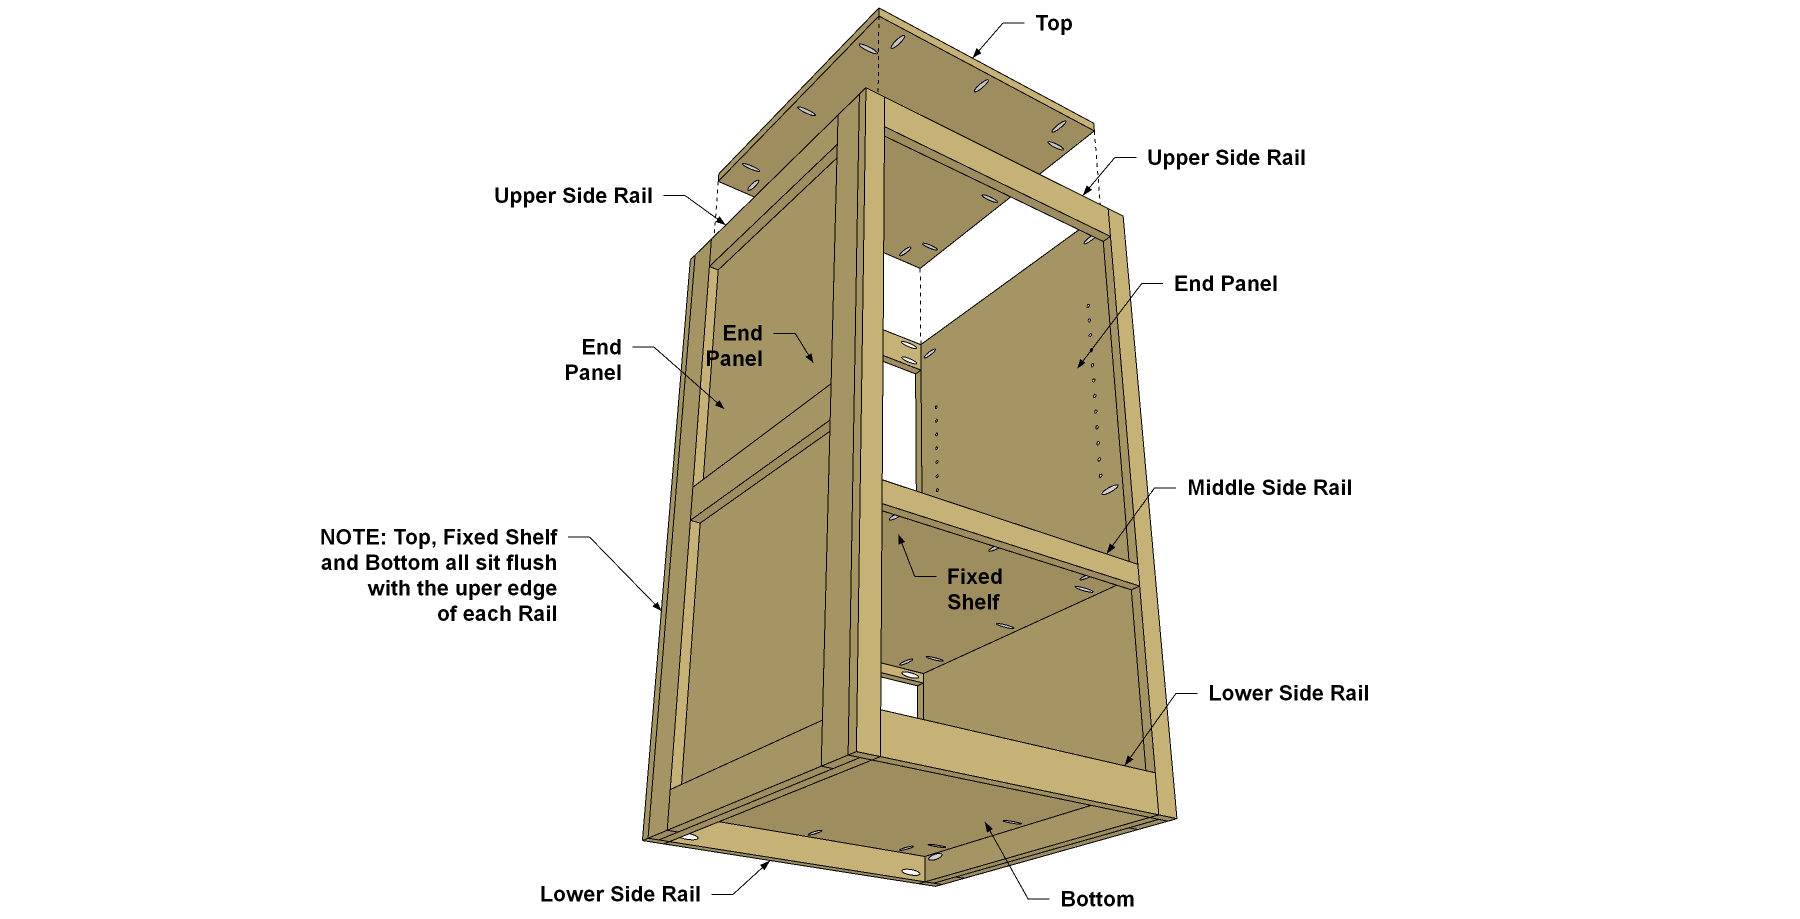
Assemble the Base Frame
Attach the End assemblies to the Side assemblies using 1 1/4" coarse-thread Kreg Pocket-Hole Screws, as shown. Make sure that the pocket holes in the Stiles are pointing outward, as shown.
-
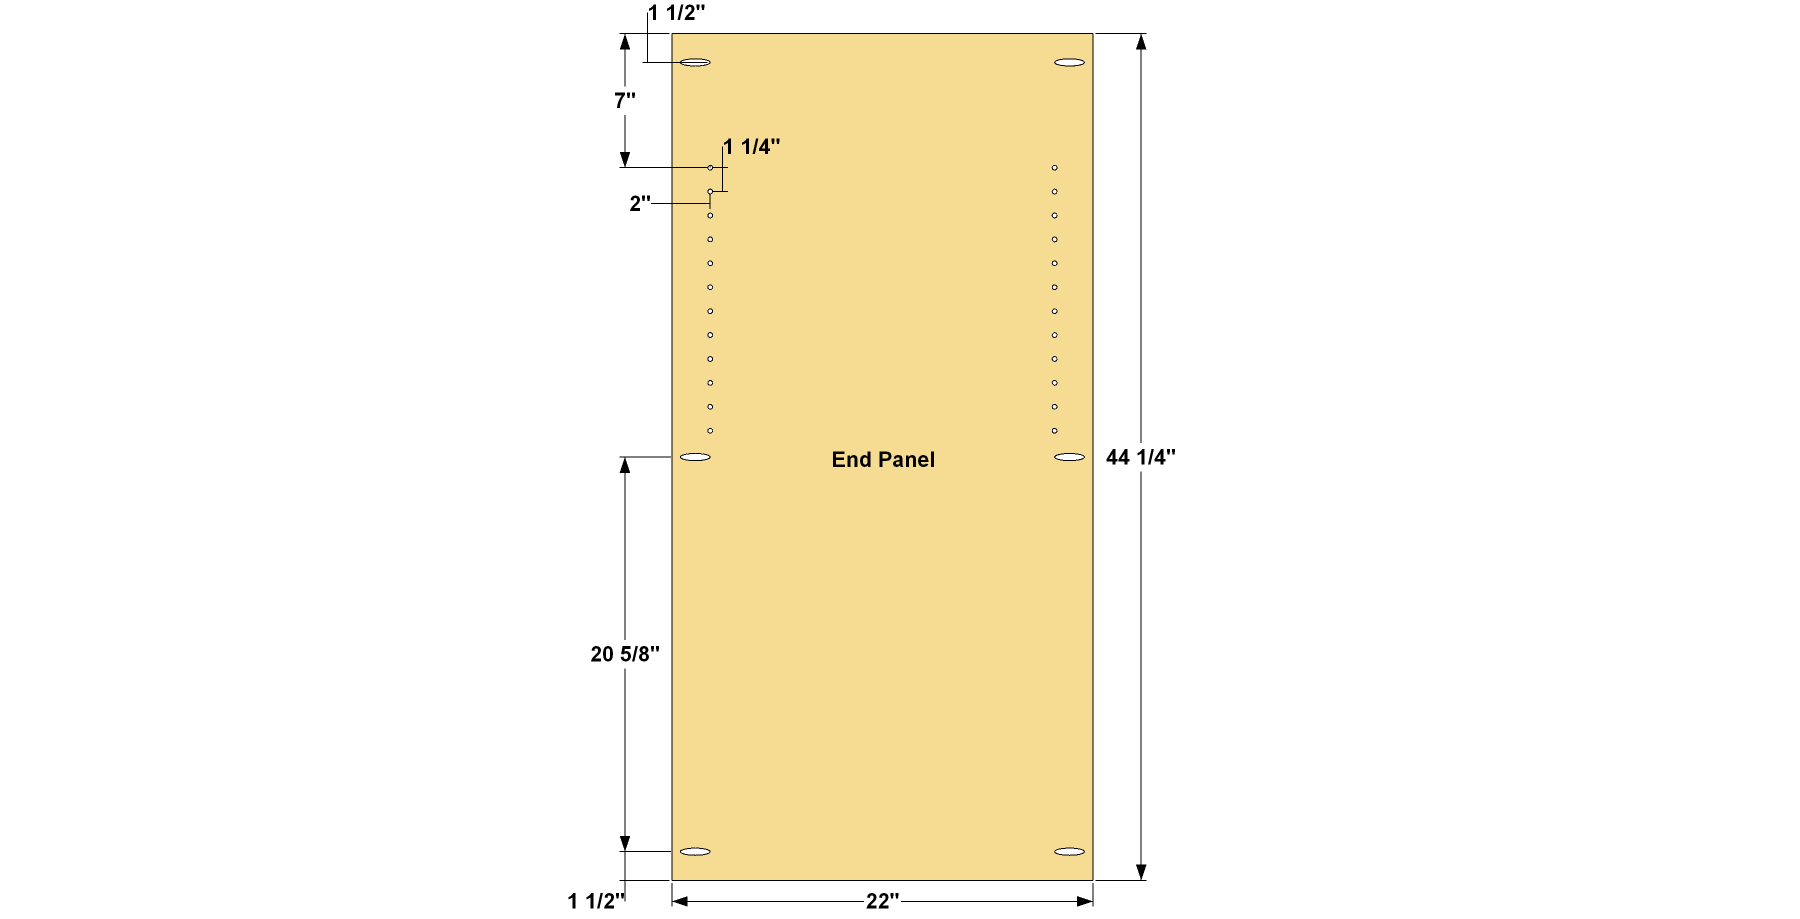
Make a Pair of End Panels
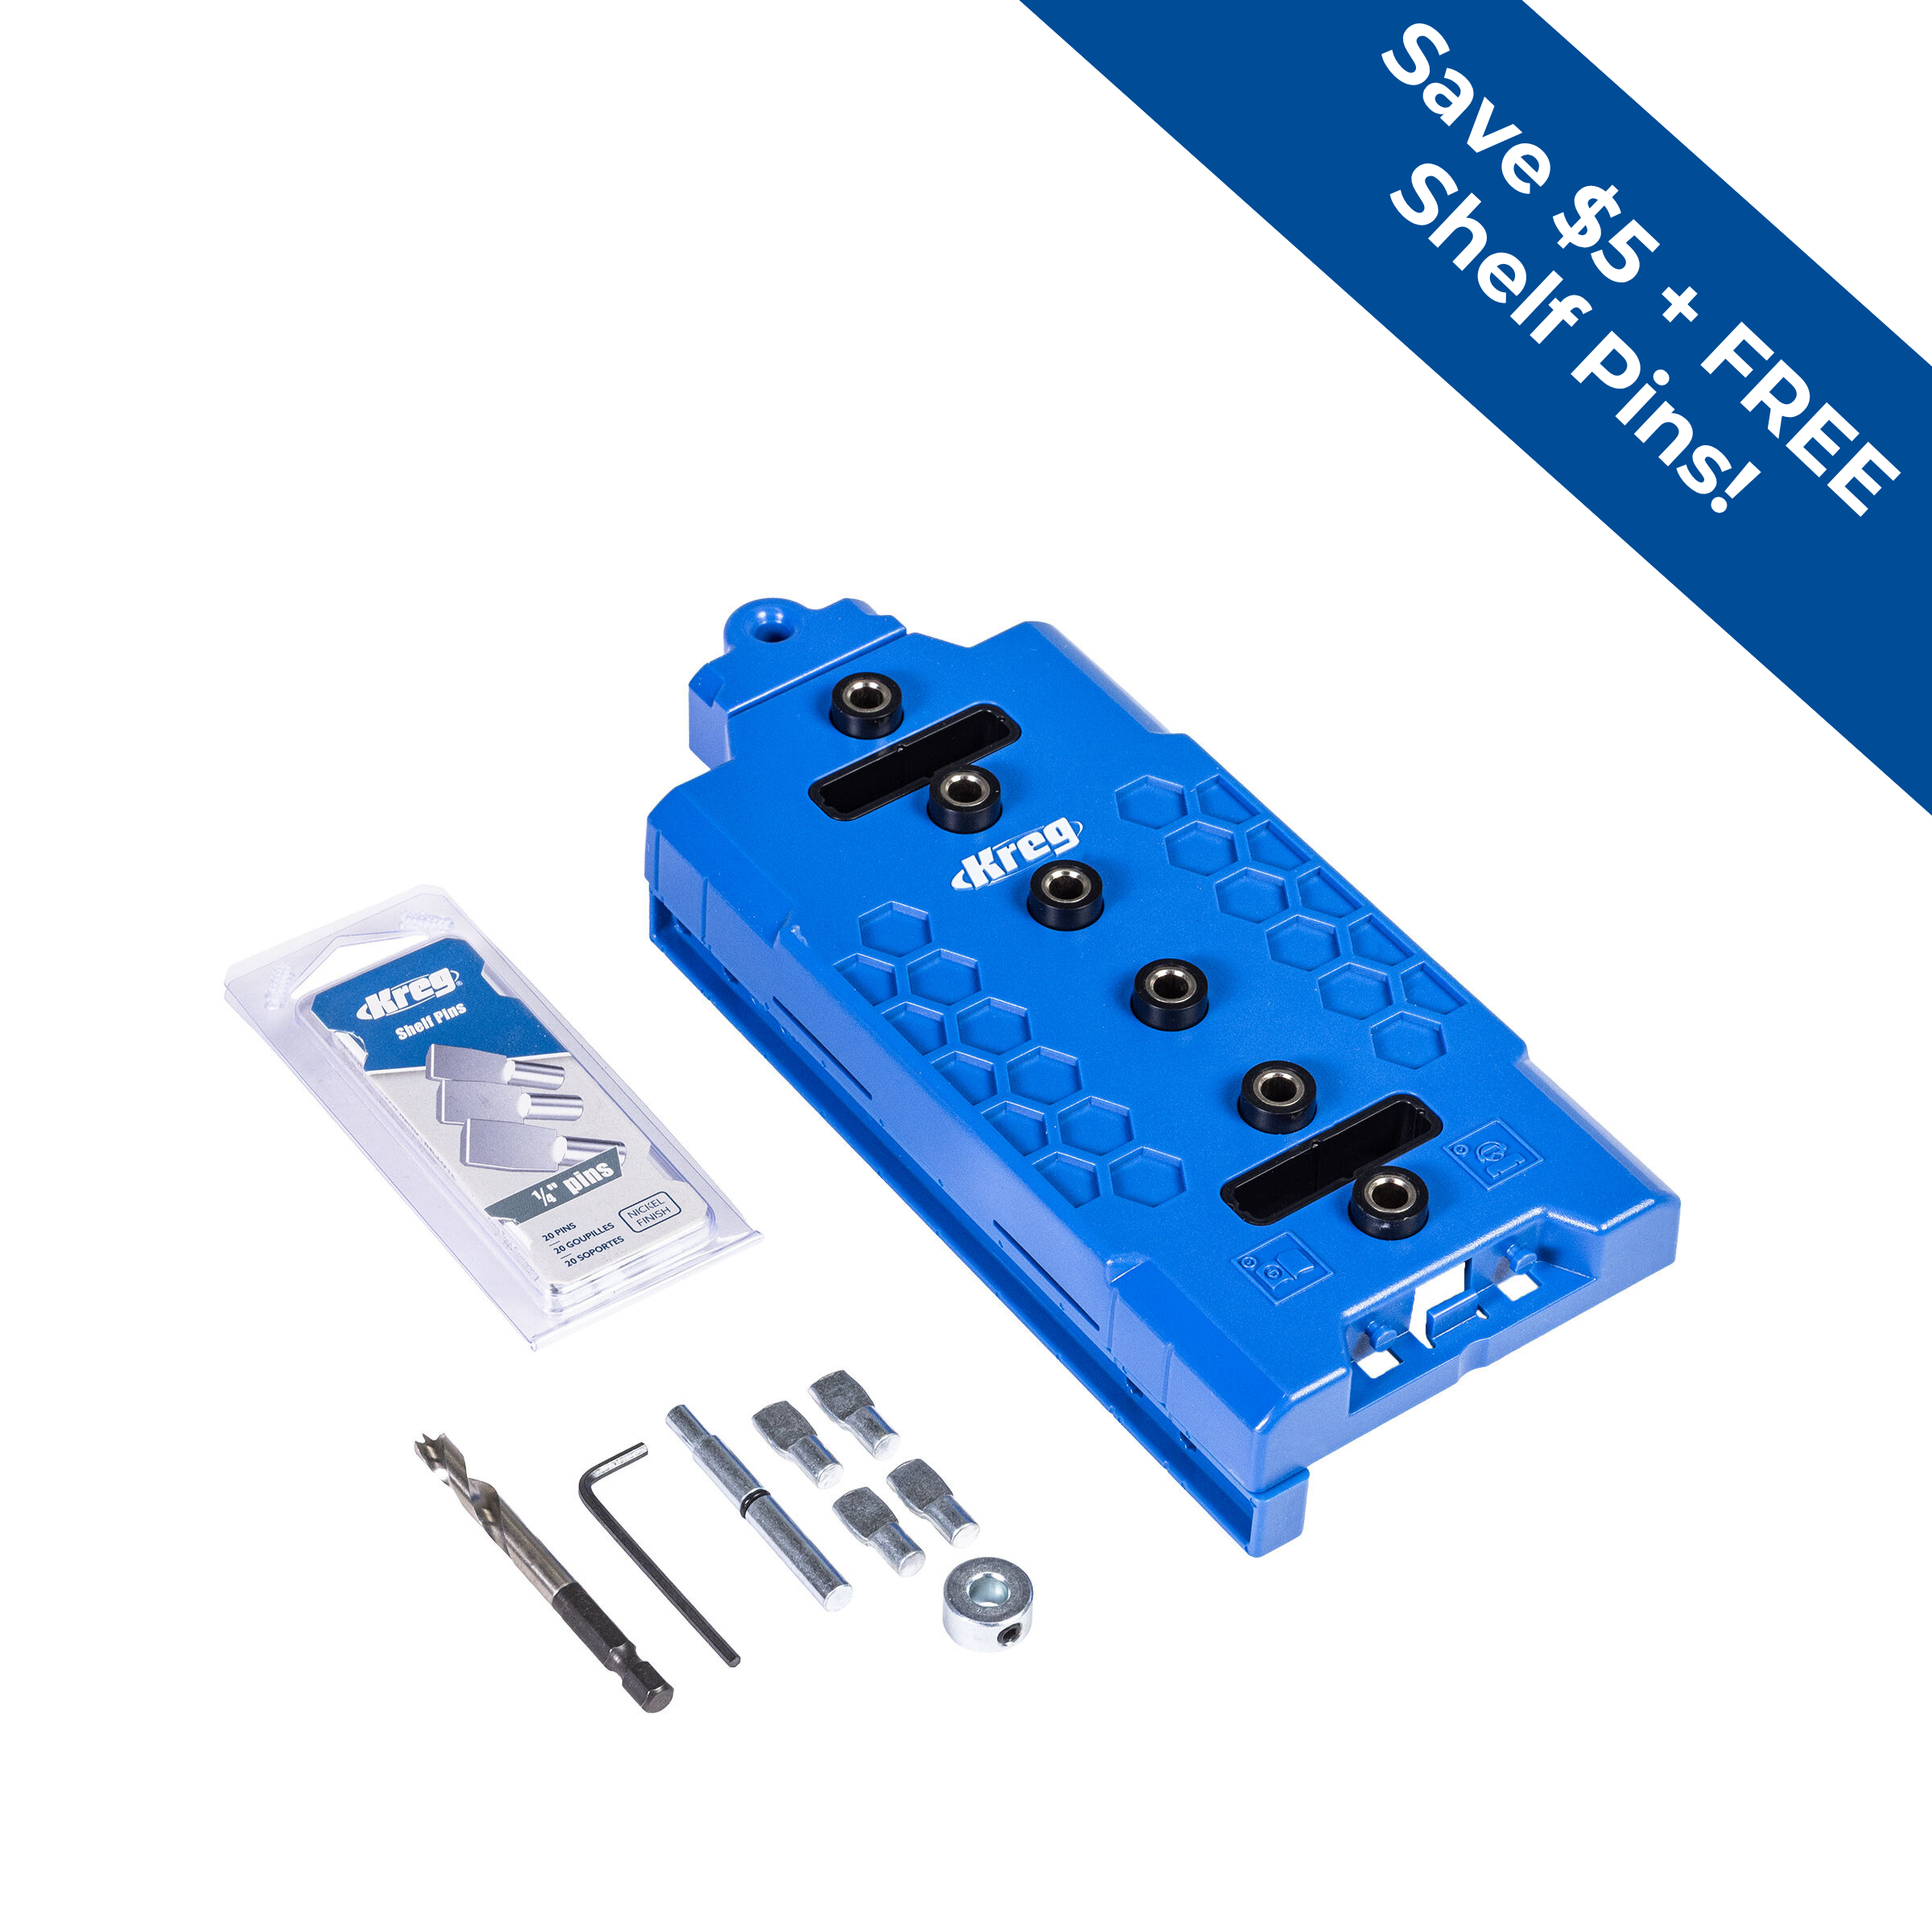
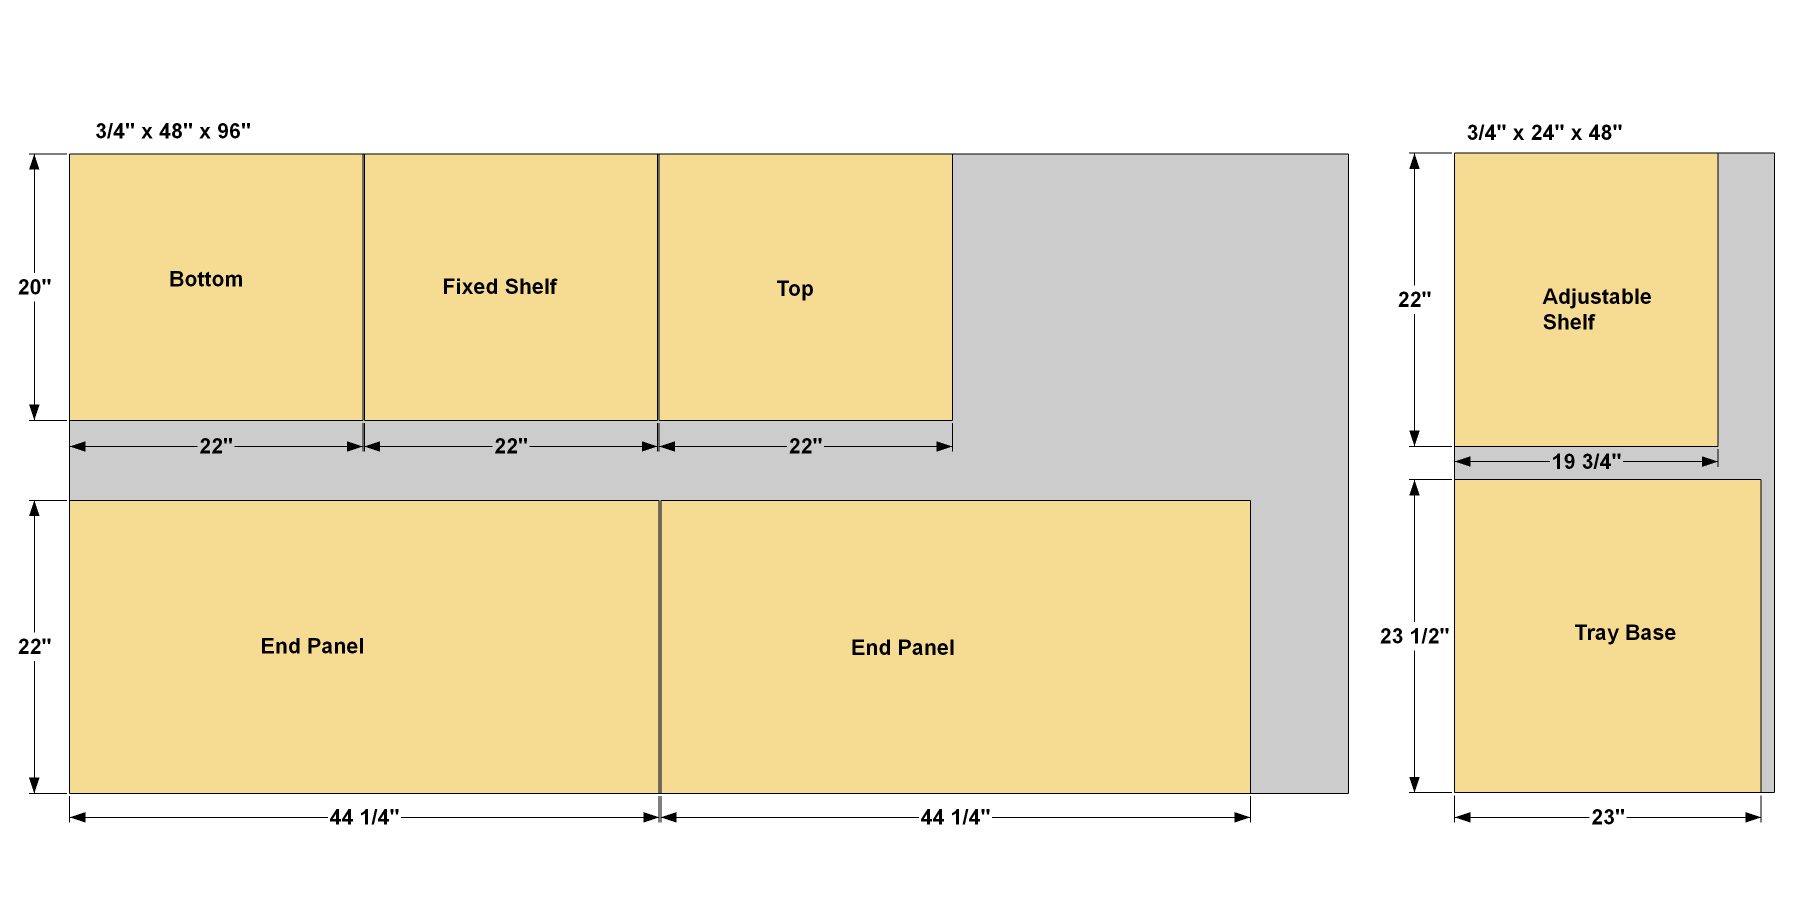
Cut two End Panels to size from 3/4" plywood, as shown in the cutting diagram. Drill pocket holes in the End Panels, as shown. Then, drill shelf pin holes in the End panels, as shown. A Kreg Shelf Pin Jig makes this process easy. Sand the faces smooth.
NOTE: The setback spacing (distance from the edge to the shelf-pin holes) shown throughout this plan matches the first-generation Kreg Shelf Pin Jig. The second generation model, released in March 2022, has different setback spacing. The vertical distance between the pin holes, though, matches the dimensions shown here—1 1/4". You can create the shelf-pin holes accurately using either the first- or second-generation jig.
-
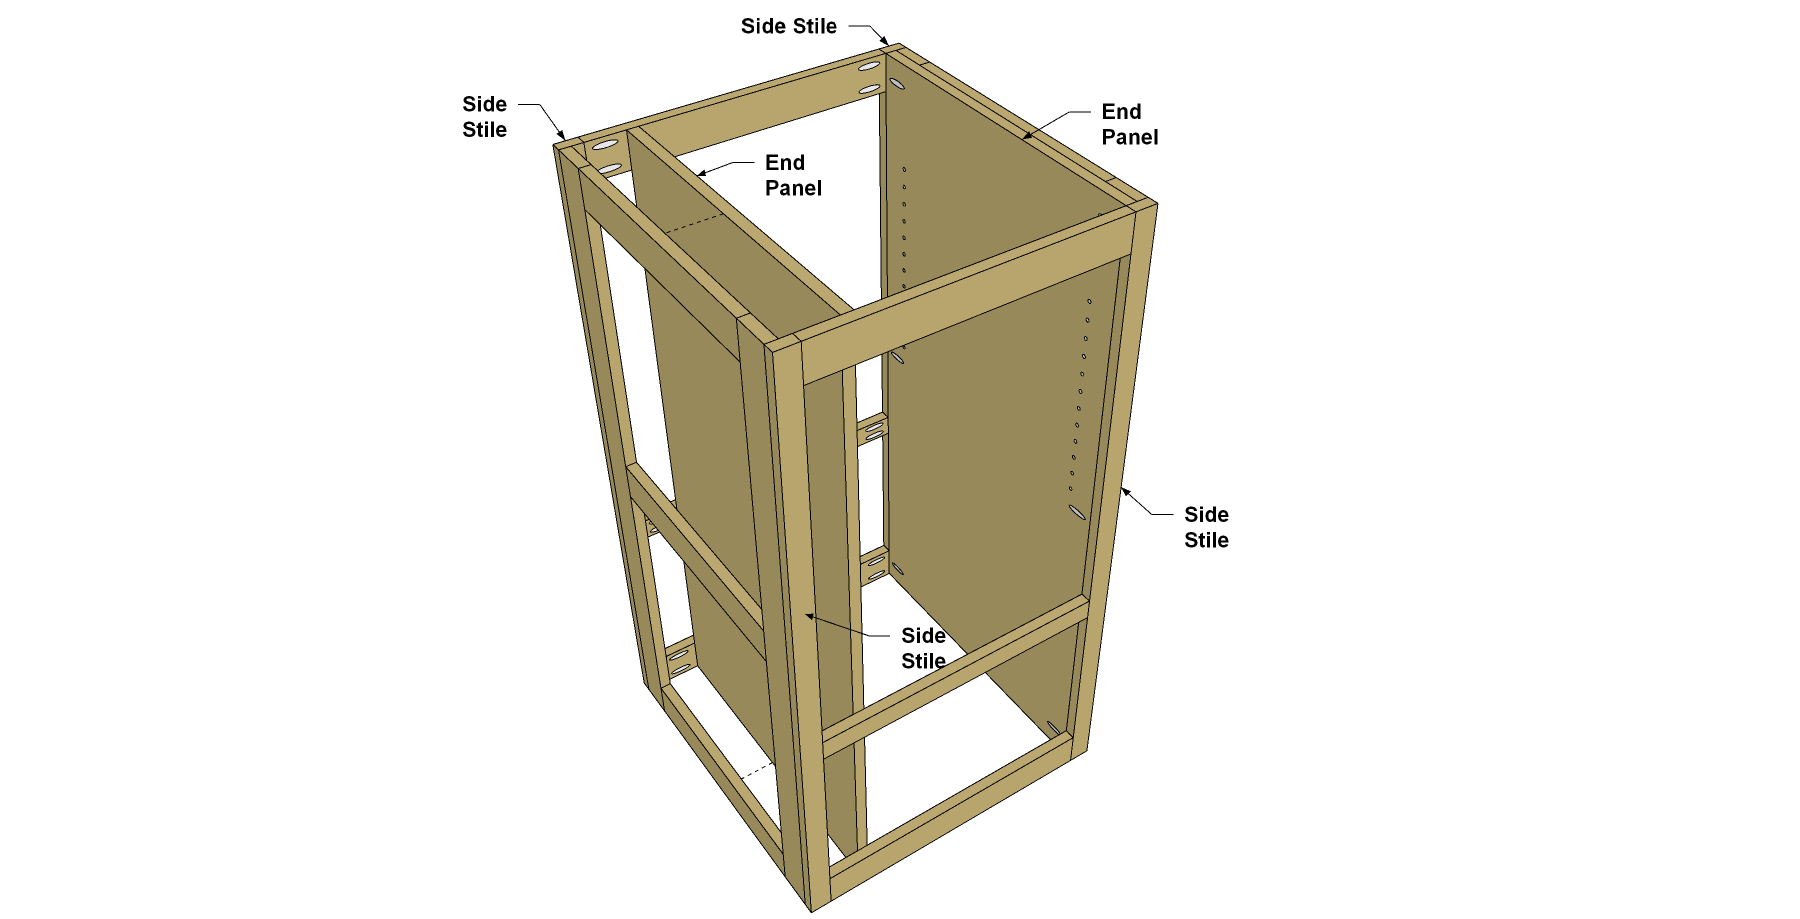
Install the End Panels
Attach the End Panels by positioning them inside the end frames, as shown. Make sure that the shelf pin holes are located in the upper portion of the frame. Then drive 1 1/4" coarse-thread Kreg Pocket-Hole Screws onto the Side Stiles.
-
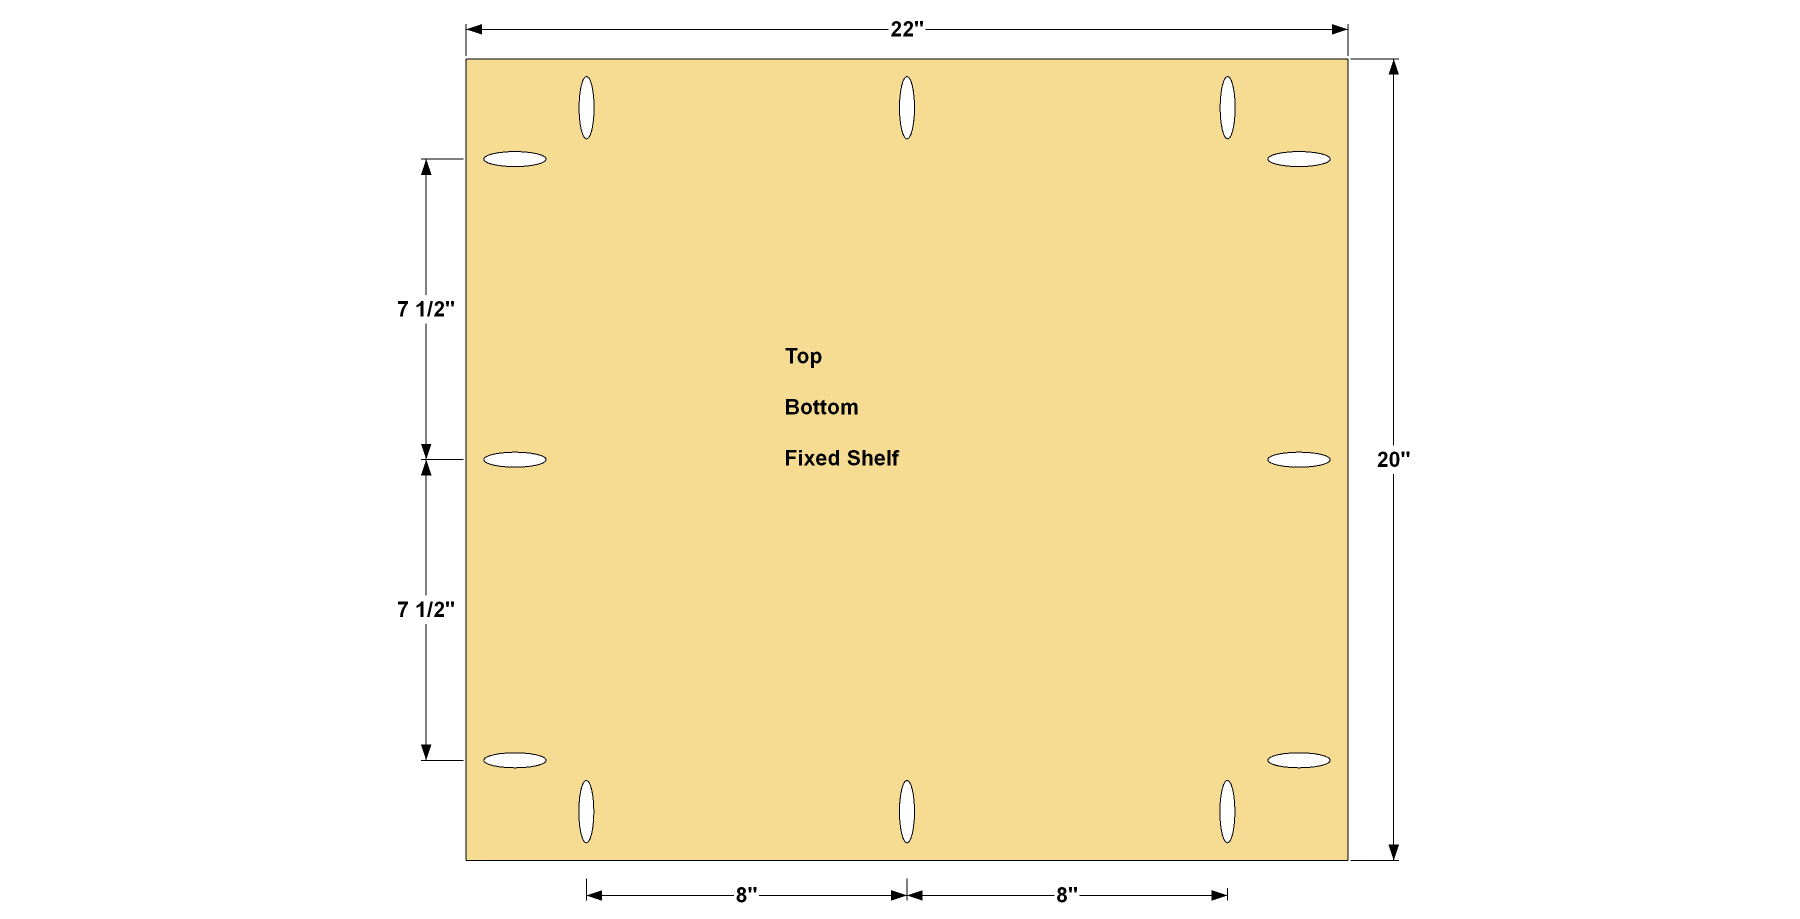
Make a Top, Bottom, and Fixed Shelf
Cut one Top, one Bottom, and one Fixed Shelf to size from 3/4" plywood, as shown in the cutting diagram. These parts are all identical. Drill pocket holes in these parts where shown, and then sand the faces smooth.
-
Install the Top, Bottom, and Fixed Shelf
Now you can attach the Top, Bottom, and Fixed Shelf. Position each one so that it sits flush with the upper edge of the appropriate Side Rail, as shown, and then attach it using 1 1/4" coarse-thread pocket hole screws Kreg Pocket-Hole Screws.
-
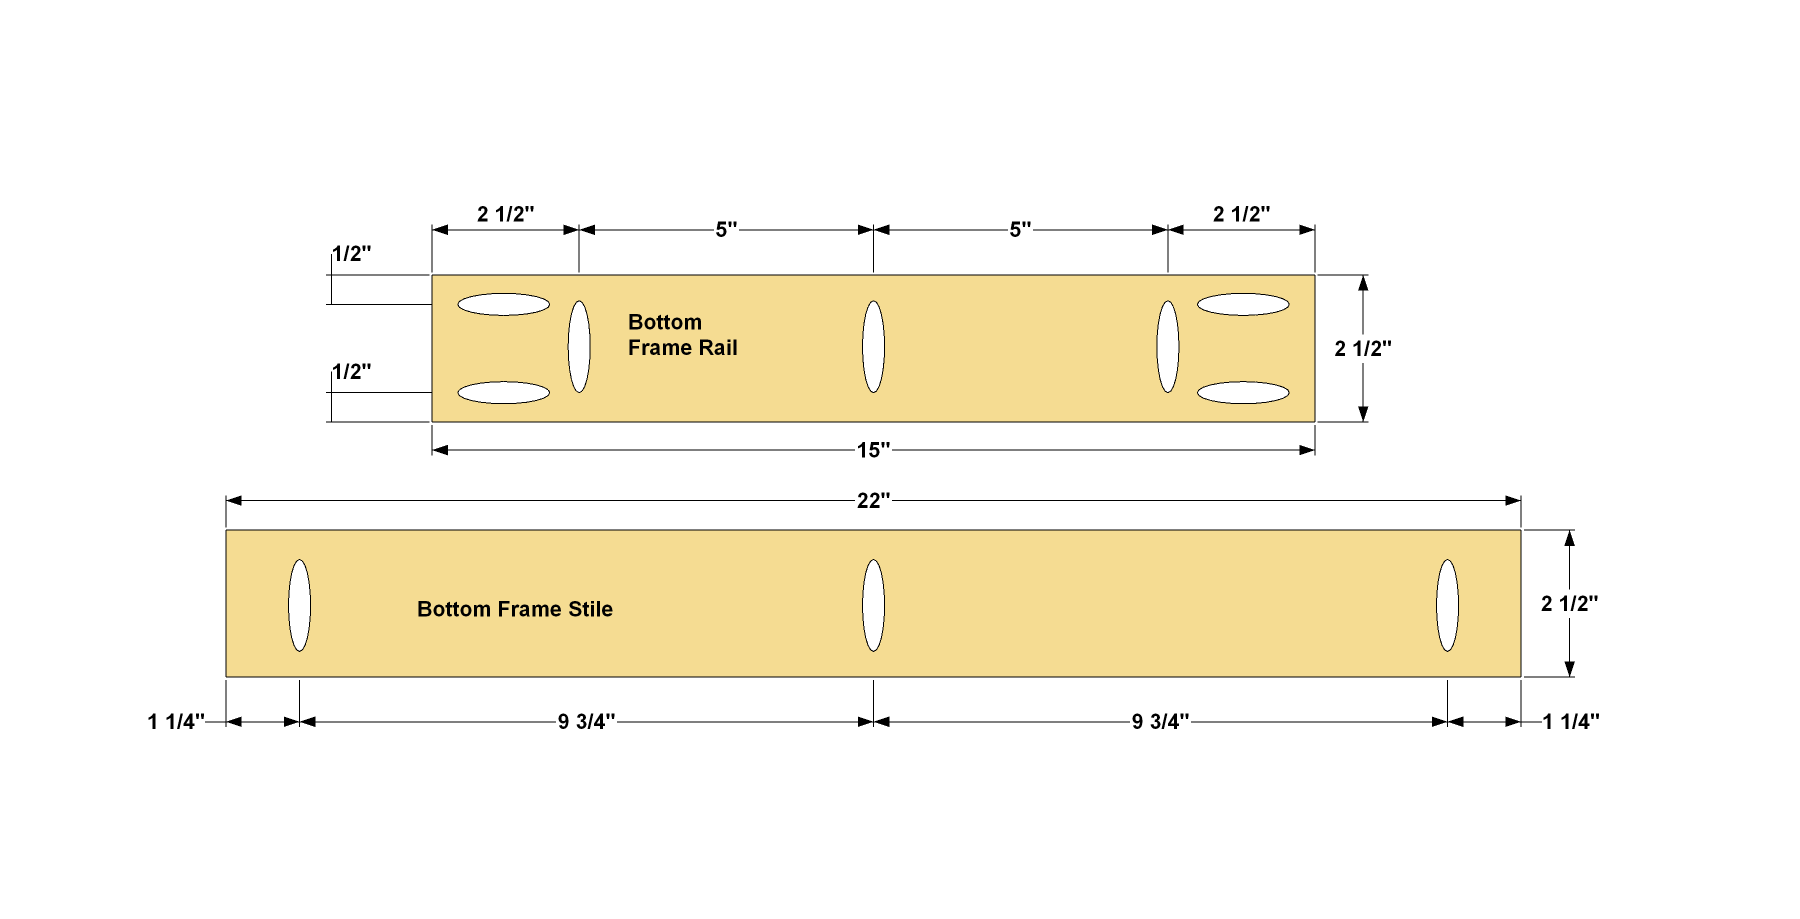
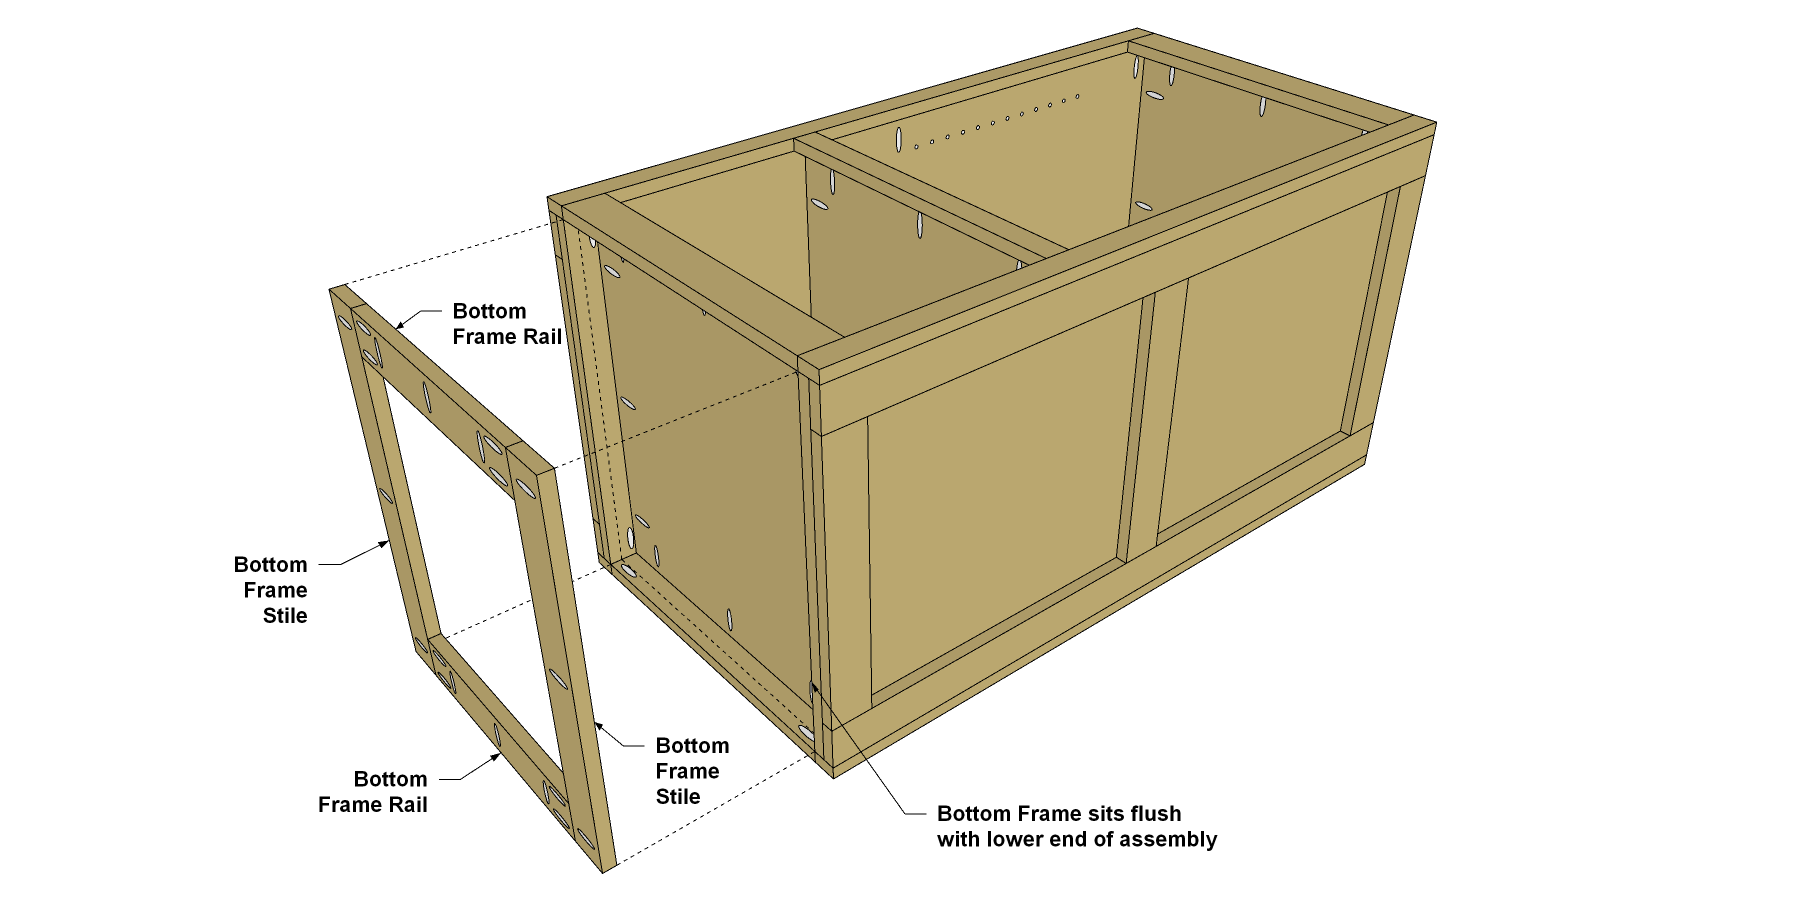
Make the Bottom Frame Parts
Cut two Bottom Frame Rails and two Bottom Frame Stiles to length from 1x3 boards, as shown in the cutting diagram. Then drill pocket holes in the Rails and Stiles, as shown. Sand the parts smooth.
-
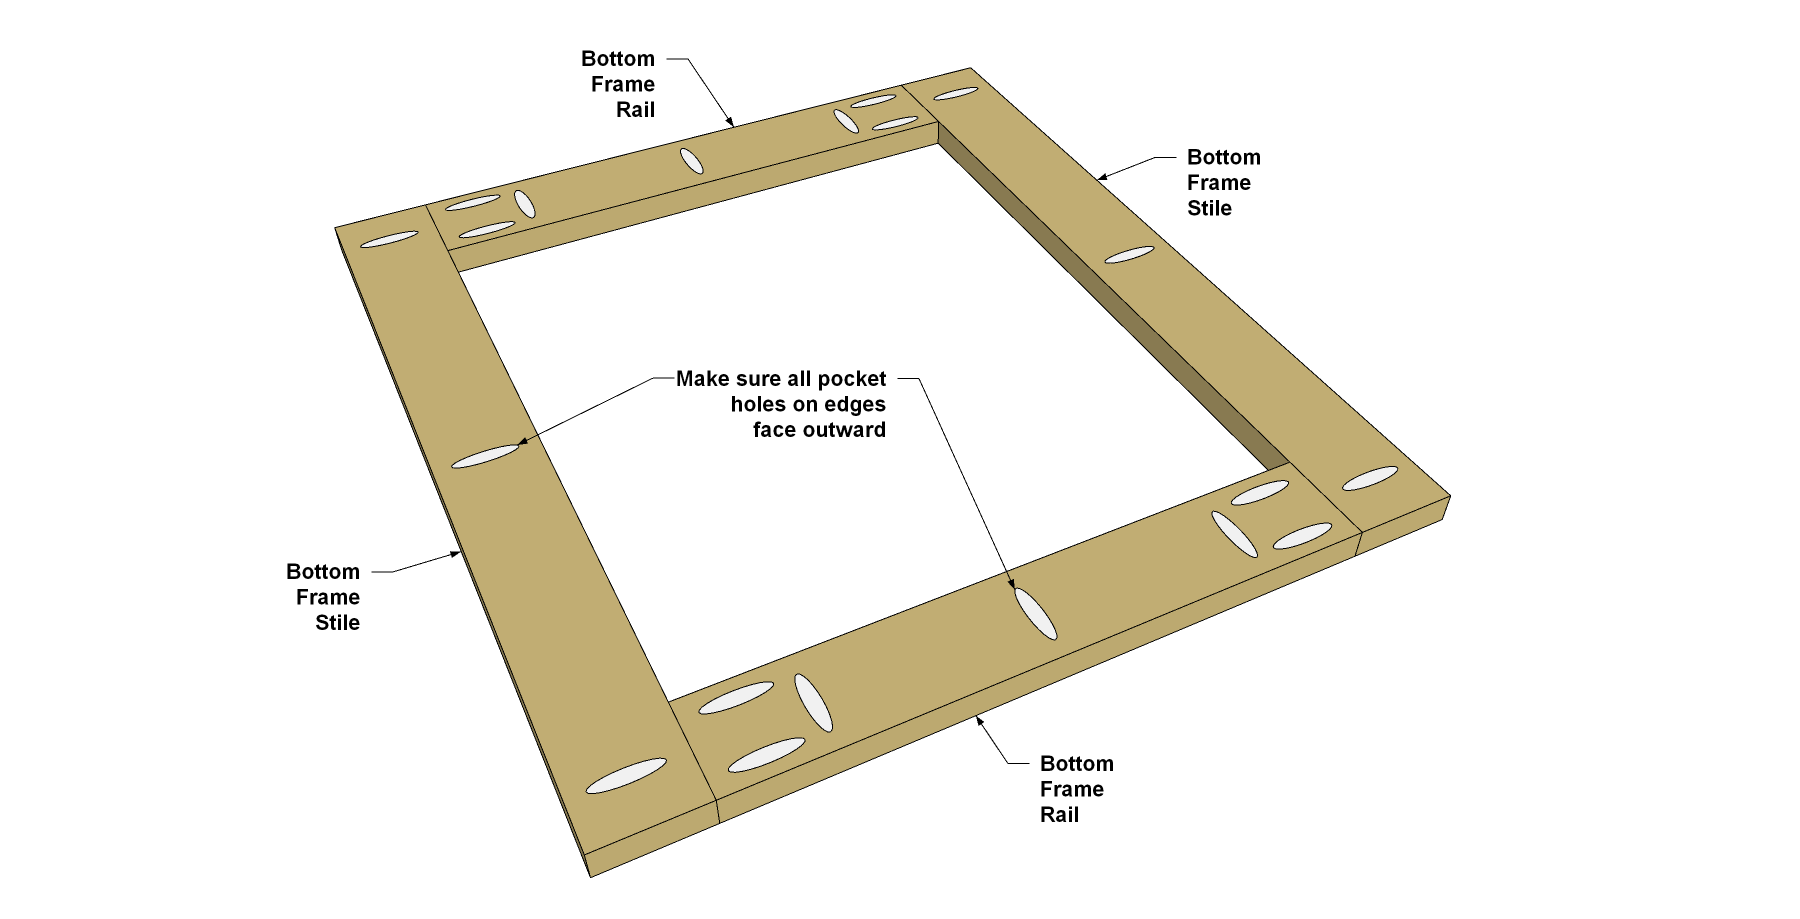
Assemble the Bottom Frame
Position the Bottom Frame Rails and Bottom Frame Stiles, as shown, and then attach the Rails to the Stiles using 1 1/4" coarse-thread Kreg Pocket-Hole Screws.
-
Install the Bottom Frame
Position the bottom frame assembly in the bottom of the cart, as shown. Note that the frame sits flush with the lower end of the cart. That leaves a gap between the frame and the cart Bottom.
-
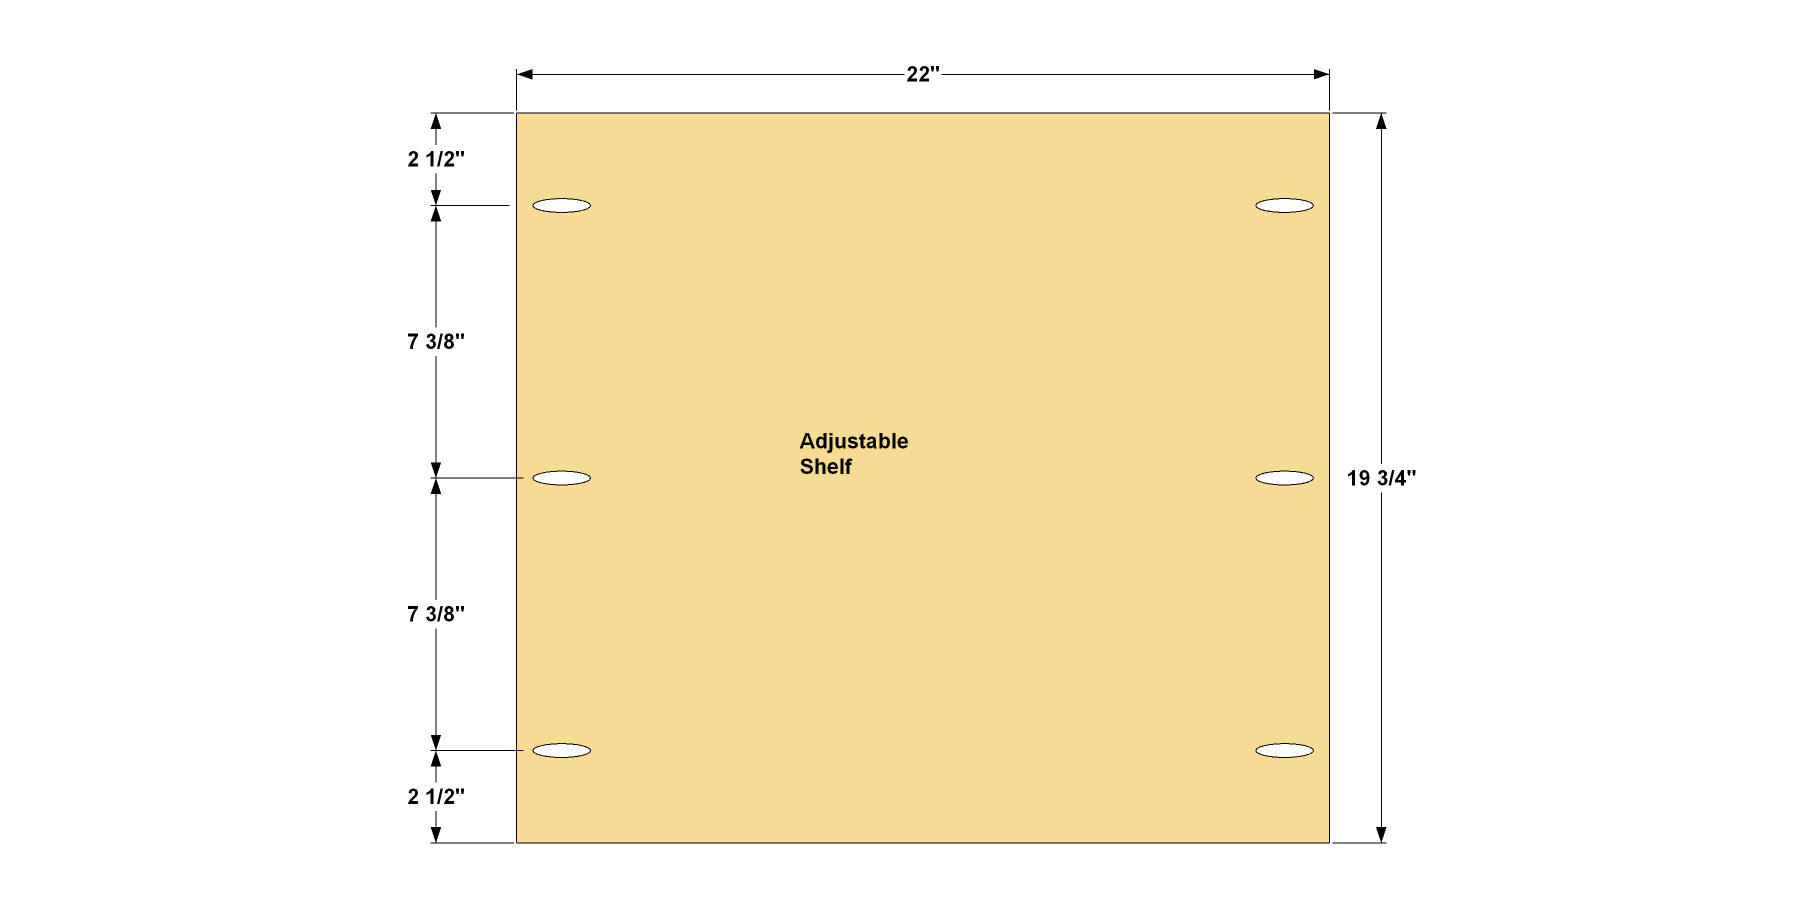
Create an Adjustable Shelf
Cut one Adjustable Shelf to size from 3/4" plywood, as shown in the cutting diagram. Also cut two pieces of Adjustable Shelf Trim to length from a 1x2 board. Then drill pocket holes in the Adjustable Shelf, as shown. Make sure you locate the pocket holes on the shorter edges. Sand the parts smooth.
-
Assemble the Adjustable Shelf
Position the Shelf Trim so the pieces fit flush with the upper face of the Adjustable Shelf, as shown. Then Attach the Trim using 1 1/4" coarse-thread Kreg Pocket-Hole Screws.

-
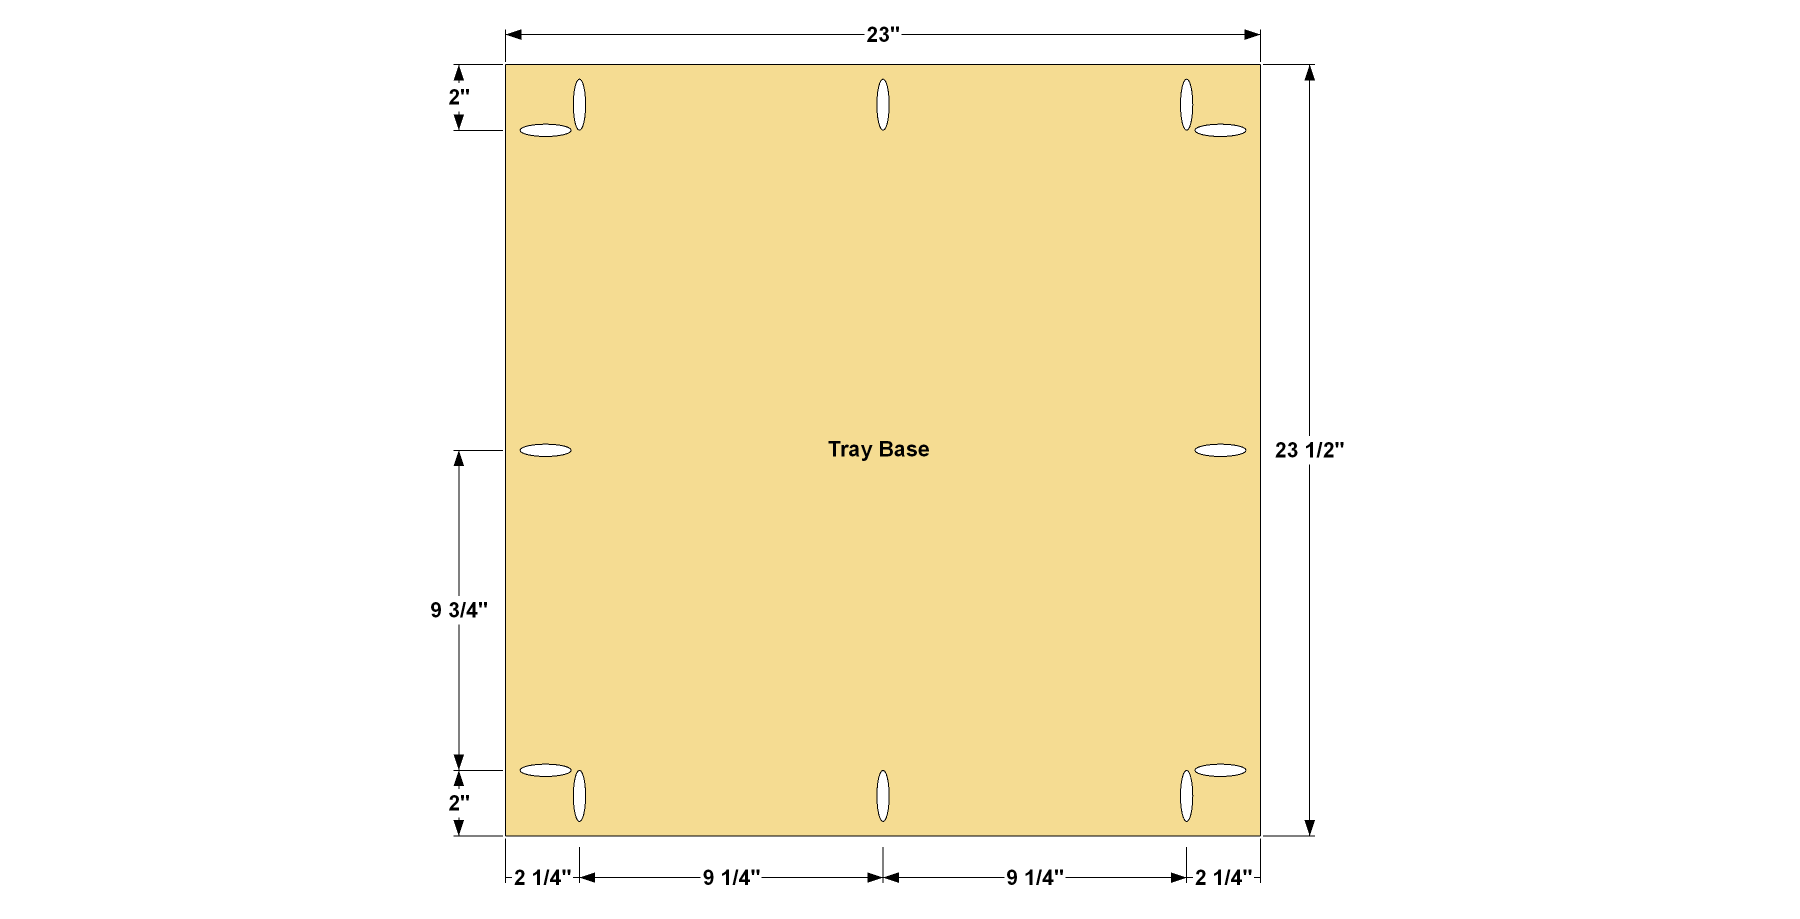
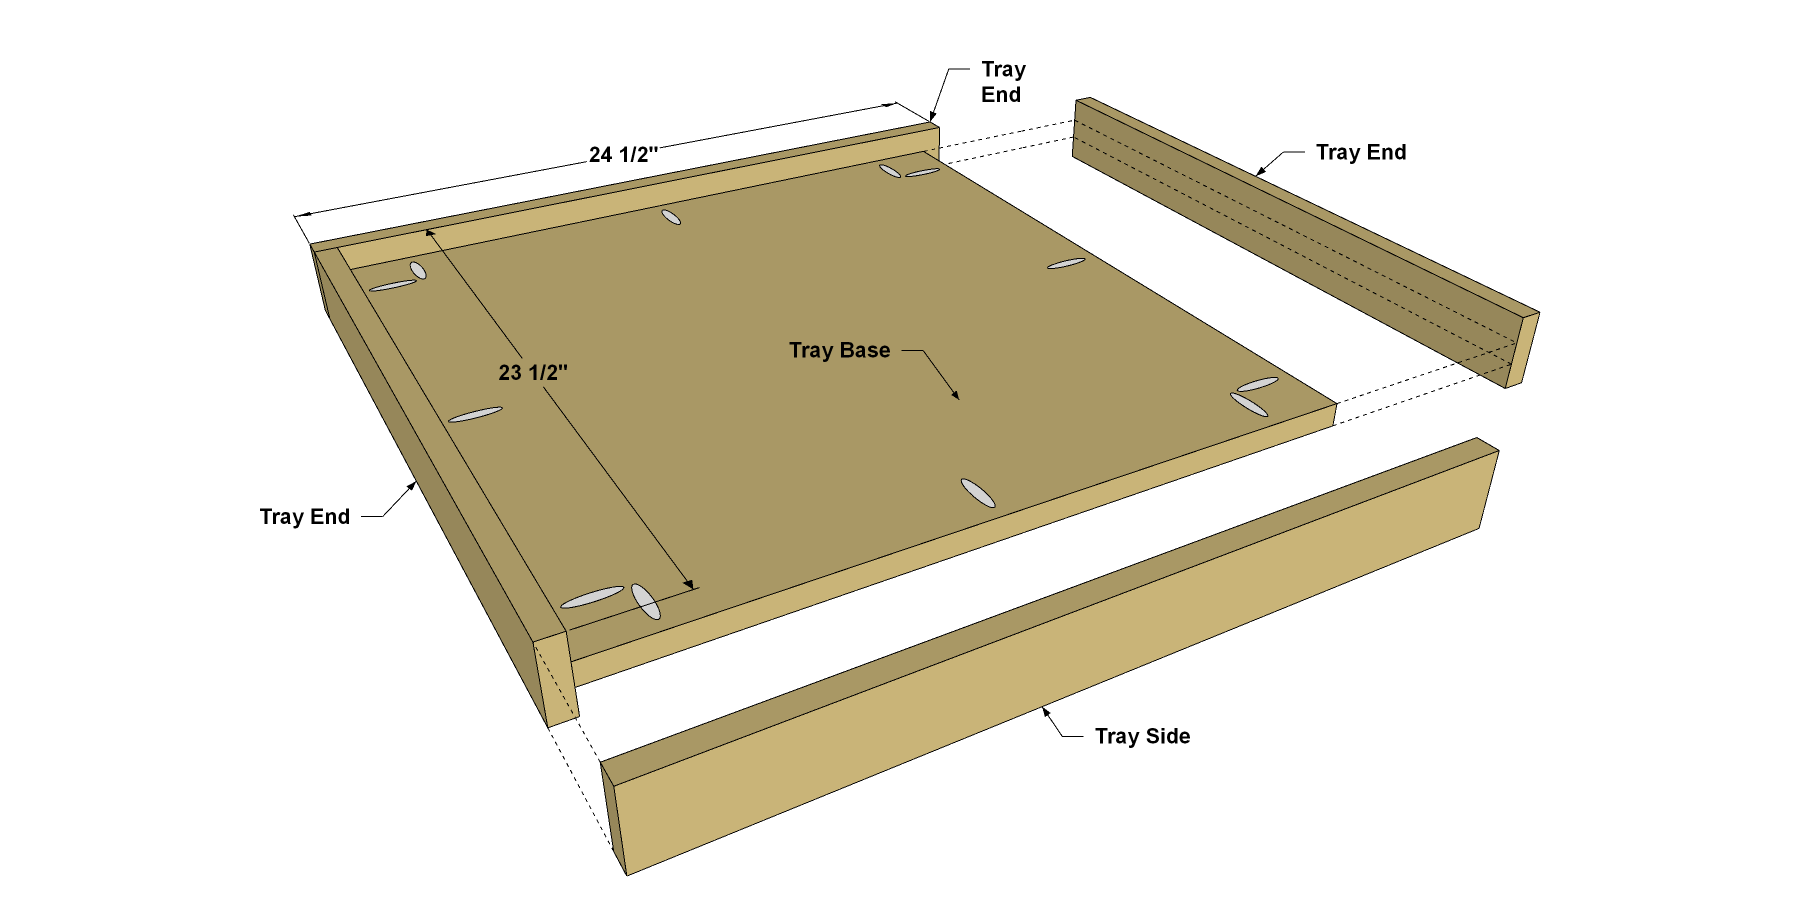
Make the Tray Parts
Cut one Tray to size from 3/4" plywood, as shown in the cutting diagram. Also cut two Tray Ends and two Tray Sides to length from 1x3 boards. Drill pocket holes in the Tray Base, as shown.
-
Assemble the Tray
Position the Attach the Tray Sides and Tray Ends around the perimeter of the Tray Base, as shown. Note that the Tray Base is centered on the width of the Sides and Ends. That way, you can slip the tray onto the top of the finished cart and it will stay in place. You can use a scrap of 3/4"-thick material to hold the tray base in position while you attach the Tray Sides and Tray Ends using 1 1/4" coarse-thread Kreg Pocket-Hole Screws.
-
Final Assembly
With all of the parts complete, you’ll want to protect your tool cart. Wiping on a simple coat of oil finish is simple and effective. Then, add four swivel casters to the bottom. For projects like this, casters with rubber wheels are nice. They roll more easily and quietly on rough floors. Position the adjustable shelf on shelf pins, and then screw a pair of utility pulls to the tray. Then load up your cart and get started building your next project!