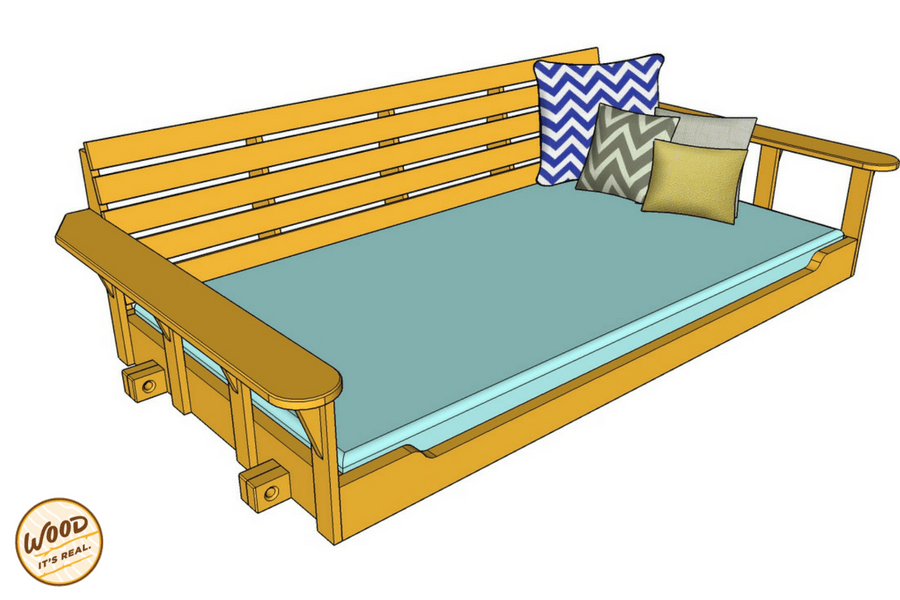
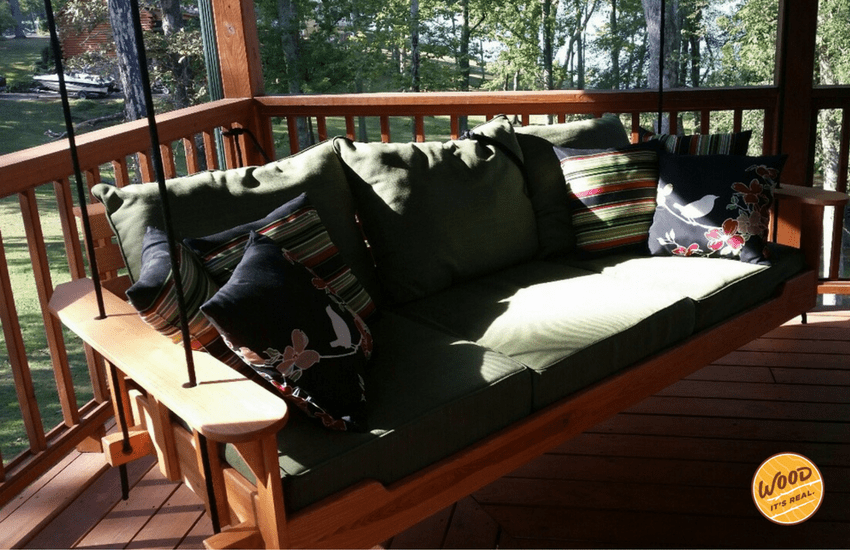


Imagine this: laying down on a Southern Yellow Pine porch bed swing in the warm breeze, head propped on a pillow, dozing the day away. That sounds pretty darn nice way to relax, right? Take a few hours on a weekend to make this project. Link for how-to video in Extras.
Tools
Kreg Tools


Other Tools
-
Miter Saw

-
Table Saw
-
Tape Measure
-
Clamps
-
Nail Gun
-
Pocket-Hole Jig
-
Pencil
-
Wood File
-
Straight Edge / Carpenter Square
-
Old Paint Brush
-
Safety Glasses / Ear Protection
-
Dust Mask / Work Gloves
Materials
Wood Products
- 5 Southern Yellow Pine Decking Boards , 5/4″ x 6″ , 120"
- 7 Pressure Treated Southern Pine , 1x6 , 96"
- 1 Plywood , 1/4" Thick , Full Sheet
Hardware & Supplies
- 2 Exterior Grade Wood Glue
- 100 2" Wood Deck Screws
- 1 Appropriate Drill Bit for Deck Screws
- 1 Combination Countersink Bit
- 1 3/8" Step/Pocket Hole Drill Bit
- 100 18-gauge, 1.5" Finishing Nails or 1.5" Staples
- 1 7/8" Forstner Drill Bit
- 1 Chamfer Router Bit
- 4 Heavy Ropes or Heavy Chains
- 1 Foam Pad (38" x 76") or Twin Mattress
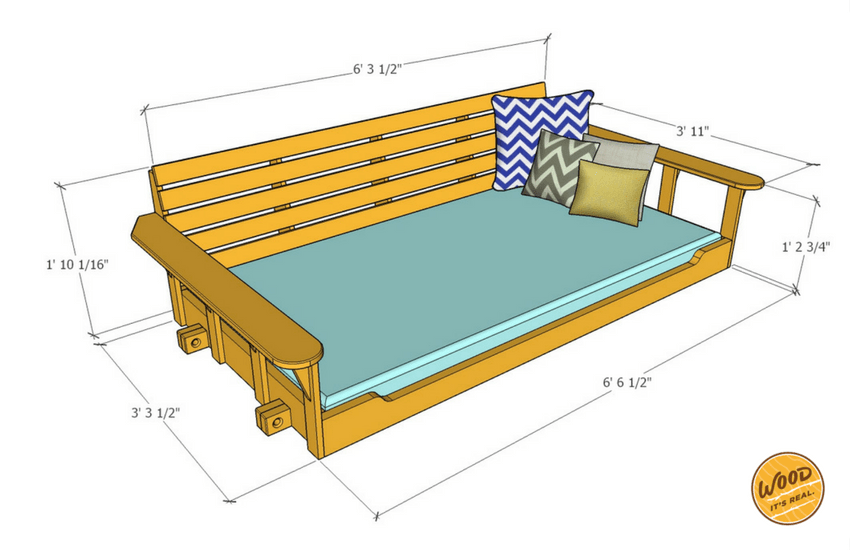
Cut List & Parts
- 5 Southern Yellow Pine Decking Boards , 5/4″ x 6″ x 10′
- 7 Pressure Treated Southern Yellow Pine , 1″ x 6″x 8′
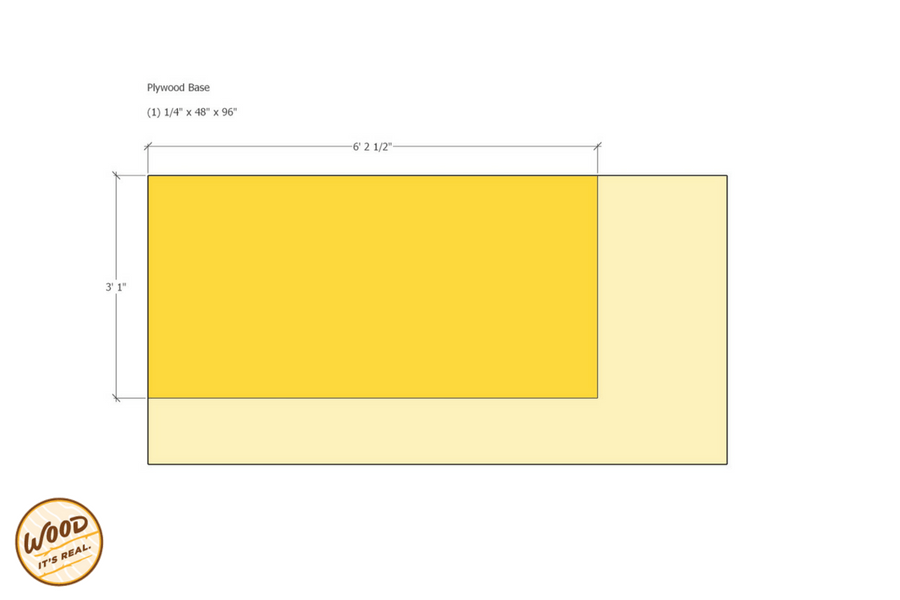
- 1 Plywood , 1/4″ x 48″ x 96″ Plywood
Directions
-
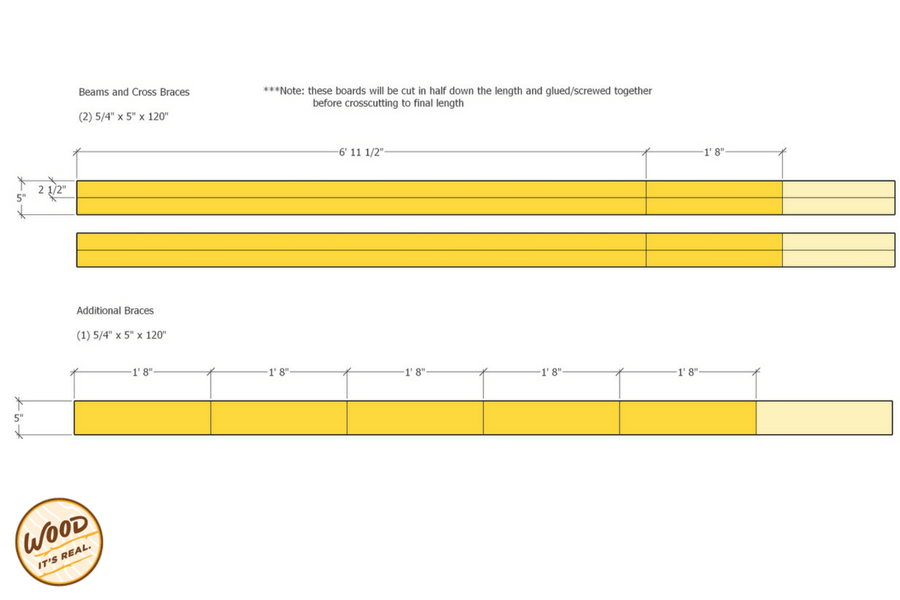
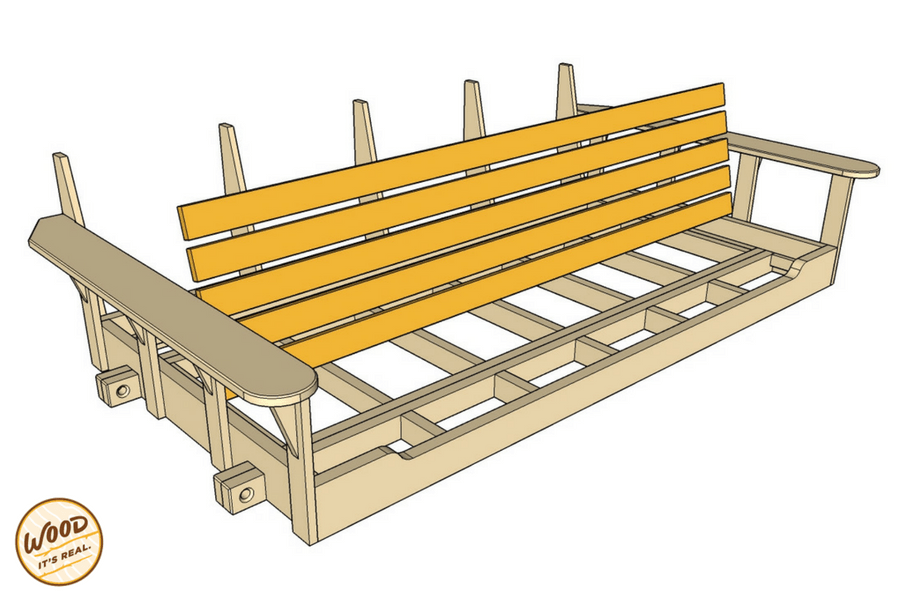
Build the Braces
1. Begin by squaring off the edges of a standard 10′ x 5/4″ deck board.
2. Once both shoulders have been removed, rip the lumber down the center leaving you with two lengths measuring 2 1/2″ wide.
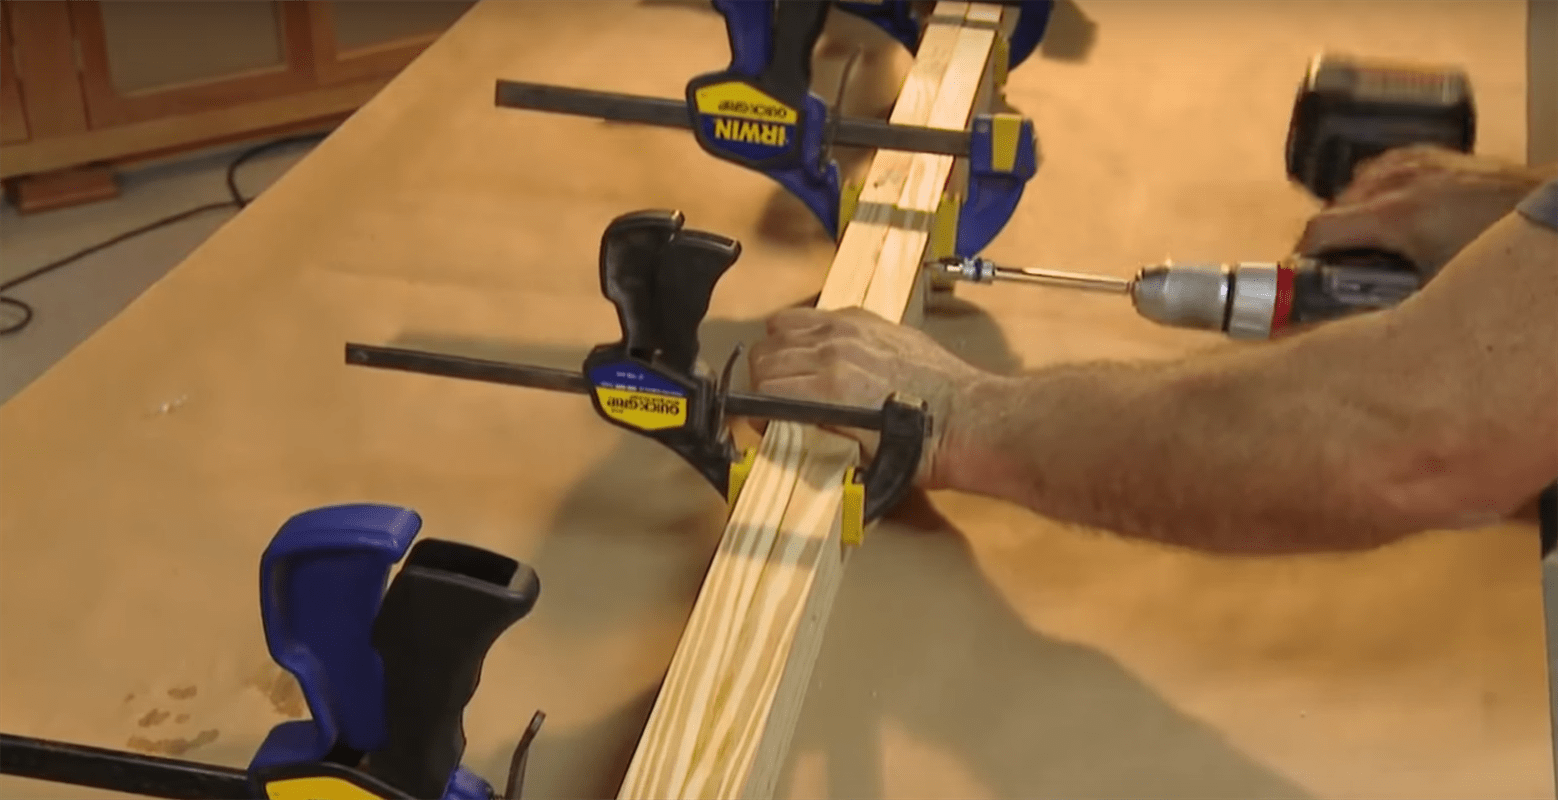
3. Use the two lengths to make a beam: Spread a uniform layer of exterior grade wood glue along the entire length of the wood, then align the boards facing the grain patterns against itself.
4. Clamp the length of the beam. Then use screws every six or seven inches to secure. If necessary, you can use a clamp along the width of the beam to align the edges.
5. Once you’ve installed screws along the length of the beam, wipe off any excess glue and set the beam aside to cure.
6. Once the glue is set up, cut two 83 1/2″ & two 20" beams.
-
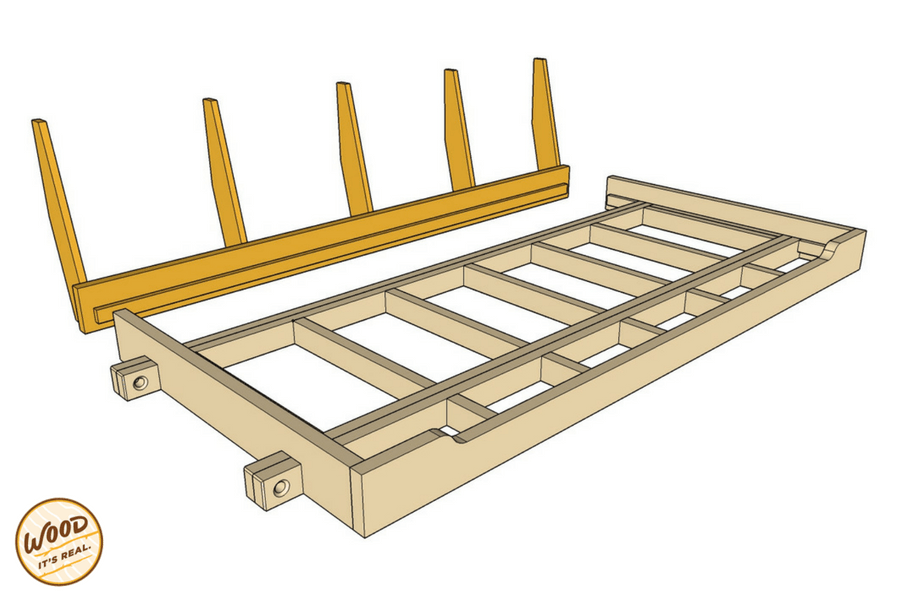
Assemble the Support Structure
1. Measure back from the end of each long beam 4 1/2″ and mark the location for the cross braces.
2. Use clamps to hold the braces in place while you drill pilot holes and install screws through the beam.
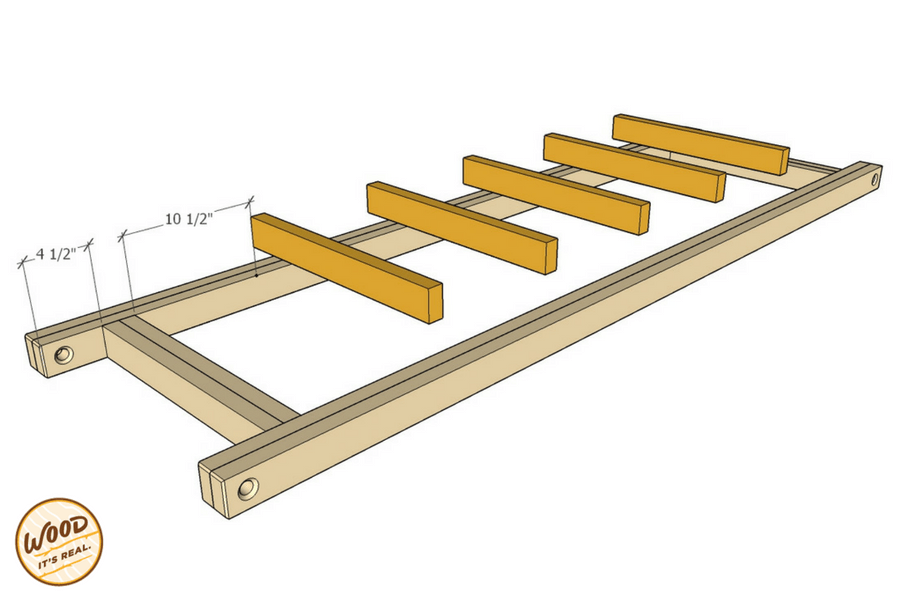
3. Next, square off and rip a 5″ length of 5/4″ deck board, and cut five more support braces for the support frame.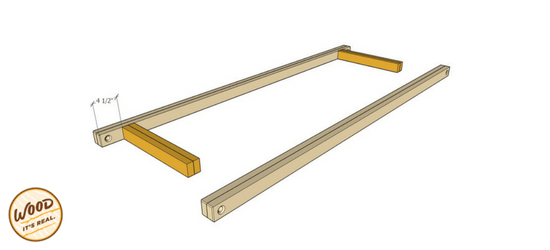
-
Support Braces & Rope Holes
1. Use a pocket hole jig for the simplest way to secure the bracing. If you don’t have a pocket hole jig, use toenail screws at the end of the braces.
2. Distribute the braces evenly across the frame, about every foot or so.
Measure out 3″ from the last cross brace and center mark the location for the rope hole.3. Use a 7/8″ forester bit and drill completely through the frame.
4. Lightly chamfer the hole to prevent fraying of the rope.
5. You can also chamber the ends of the beam if you like.
6. Lightly sand any rough edges.
-
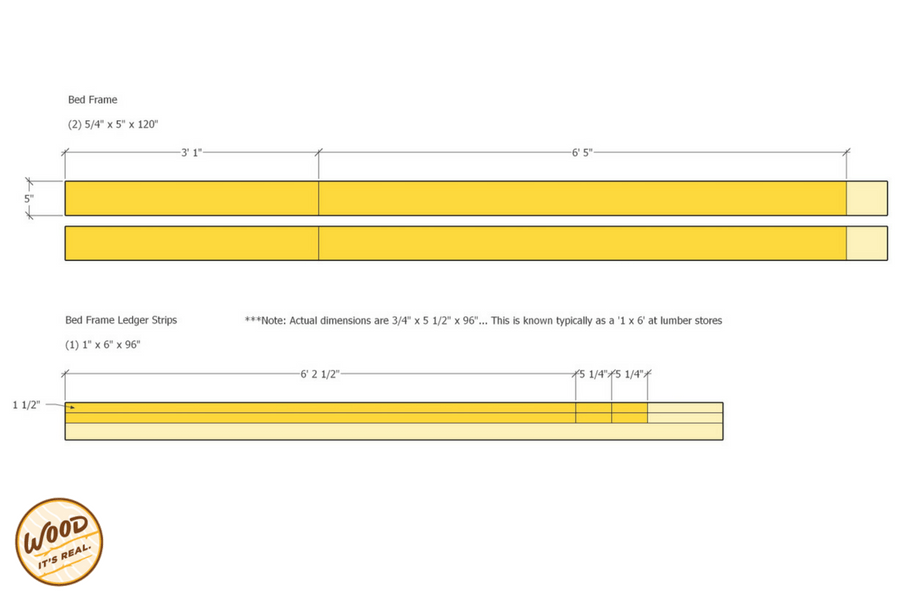
Build the Frame Ends
1. Choose pressure treated Southern Yellow Pine with a nice grain pattern for the frame.
2.Square another 5/4″ deck board and cut down to (2) two 37″ lengths for each end.
3. Measure and mark the center of both the support structure and each frame end.
4. Align these marks, and clamp the pieces together temporarily.
5. Use a straight edge to mark the location of both sides of the beams, measure and mark the depth of the beams as well.
6. Use a jig saw to cut along the lines, being careful not to cut away too much material at first.
7. Slide the frame ends over the teams and check for proper fit.
8. File or sand away obstructions.
Once the frame fits snuggly in place, clamp and use screws to secure it to the support structure on both ends.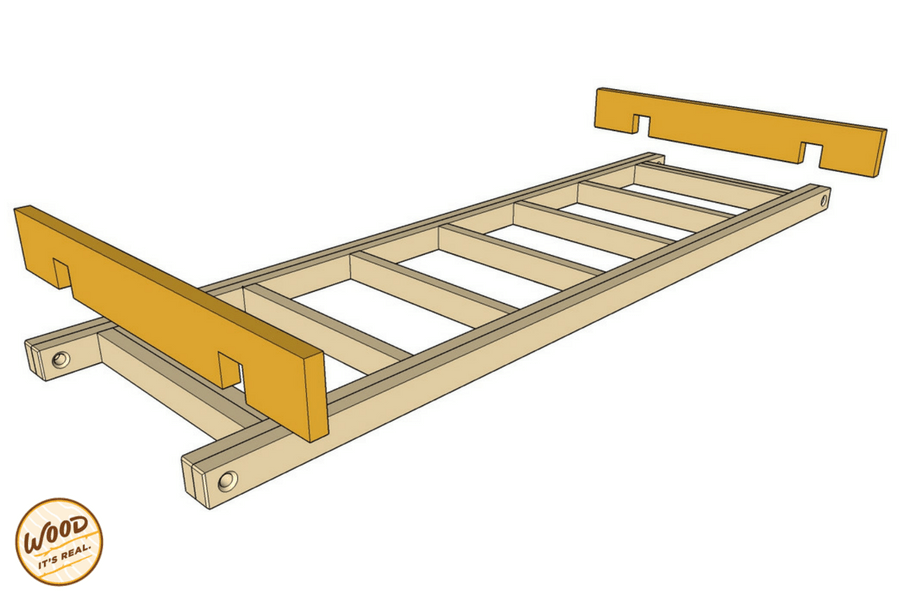
-
Cut the Front Frame
1. Measure and cut two more lengths of prepared 5/4″ deck board for the front and back of the frame.
2. To make a curve on the front board, measure down from the top edge an inch and a half. Measure in and mark from the end 7″.
3. Use a bottle or something similar to mark the first curve centered on this mark. Then shift the pattern over and draw a second circle.
4. Use a jigsaw to cut the pattern and then sand it smooth.
-
Cut and Install Ledger Strips
1. Draw a reference line along the two ends of the frame, level with the support structure.
2. Transfer this mark to the front piece and draw a line the entire length.
3. Use the location for a ledger strip along the inside front edge, using a length of 1″x 2″ board cut to fit between the ends.
4. Glue and nail the ledger strip into place
5. Install shorter ledger strips on the frame ends as well.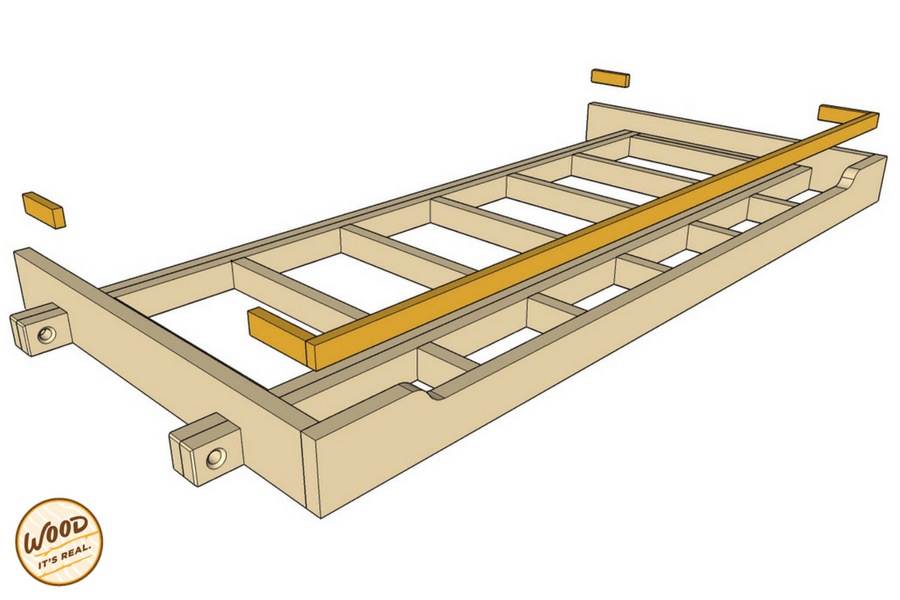
-
Attach Front Frame and Front Braces
1. Once the ledgers are glued and nailed in place, align the front, drill pilot holes, and install at least two screws at each end of the front frame.
2. Install short supports on the front of the frame. Measure the distance between the support structure and the front frame and use a pocket hole jig to attach the short braces.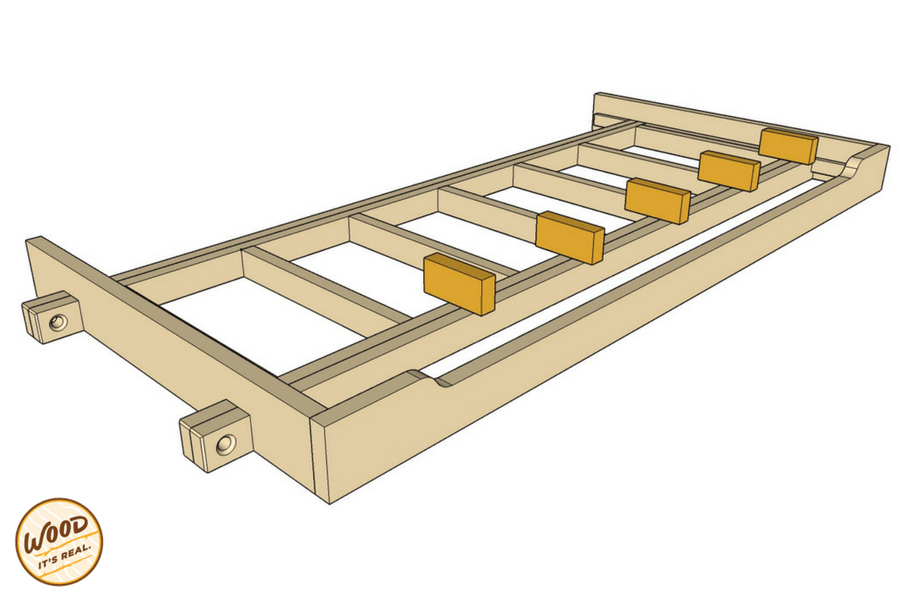
-
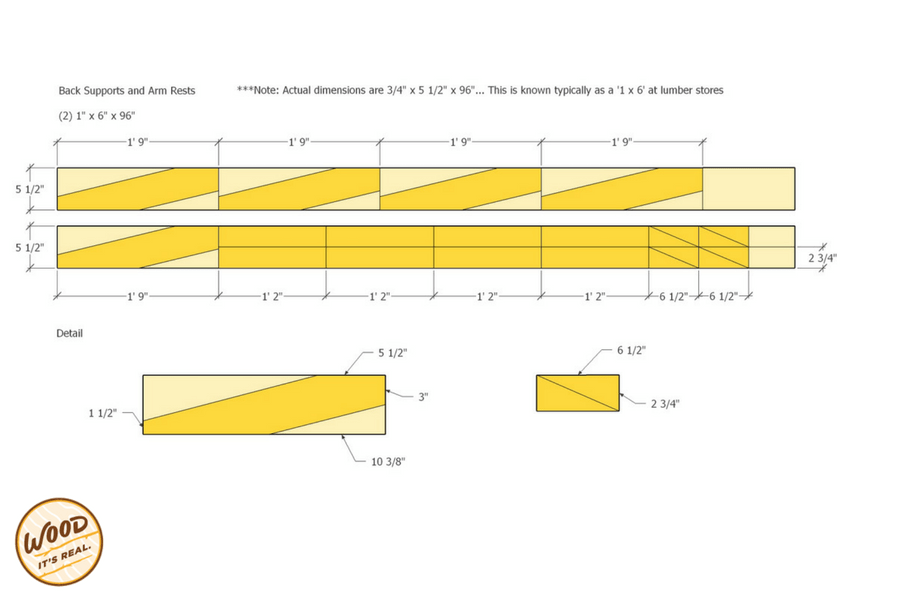
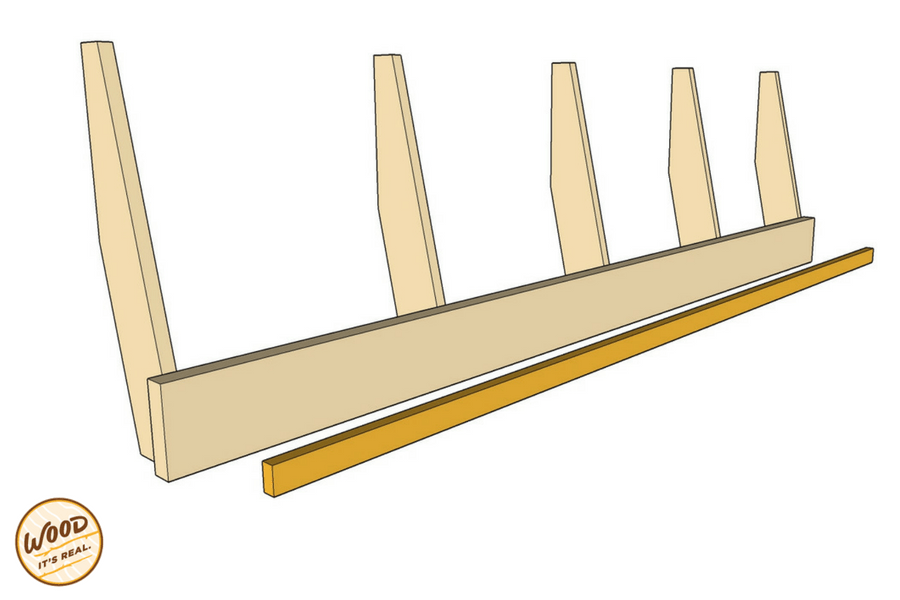
Cut the Back Rest Supports
1. Start with a 21″ 1×6 Southern Yellow Pine board and mark the measurements shown in the accompanying image. The cuts you’ll be making are parallel.
2. Once you’ve drawn out the pattern on the boards, it’s time to cut. To make it easier to make the cuts, attach a scrap of food aligned with one of the marks.
3. Run the assembly through the table saw to cut the first edge, then remove the scrap of wood, and run the pattern through to cut the second line.
4. Use this pattern to create 5 exact copies by attaching it to blanks.
5. Then use a guided router bit to cut the rest of the backrest supports.
6. Once you have all of the backrest supports made, set them aside, and turn your attention to the rear piece of the frame.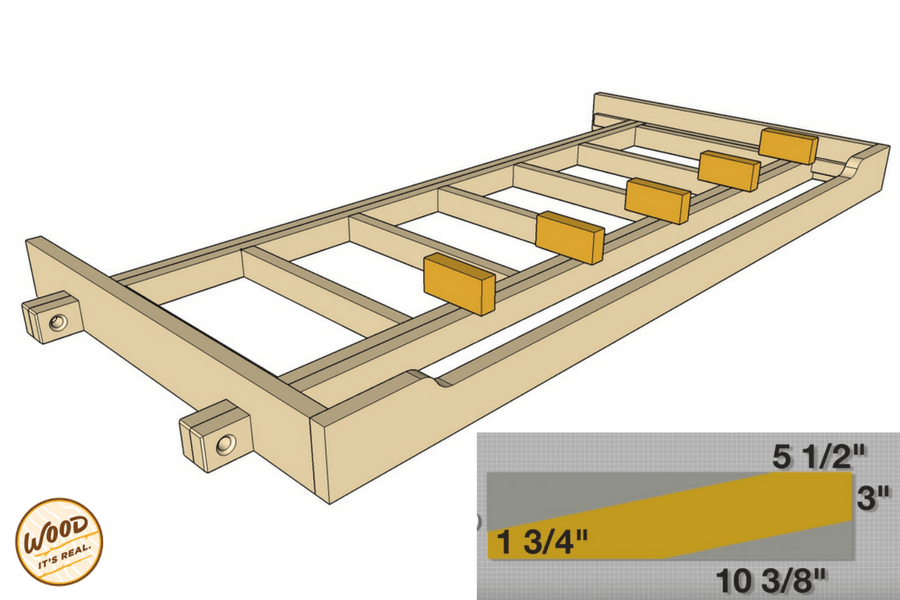
-
Install Back Supports
1. Measure in from the edge 1/2″ and drill a pilot hole for the screws.
2. Then draw a line 3/4″ from the end to align the first backrest support.
3. Clamp the support in place and drill pilot holes from the inside of the frame into the support.
4. Attach the support with glue and screws, moving the clamp as necessary.
5. Repeat this process at the opposite end of the frame, and space the other 3 supports evenly across the rear of the frame.
-
Install Ledger Strip on Back Frame
1. Attach a ledger strip (1″x 2″) across the length of the back in the same manner as the front, aligning it with the supports system.
-
Attach Back Assembly to Frame
1. Attach the entire assembly to the rear of the front, being careful to align the corners install screws in both ends.
-
Assemble Arm Rest Supports
1. Rip 14″ lengths of 1″x 6″board down the middle.
2. The triangle is created by drawing a diagonal line along a 6 1/2″ length of the same width.
3. Cut the triangles and sand the edges smooth.
4. Use glue and fasteners to combine the two elements into the arm support, aligning the top of the triangle to the top of the support.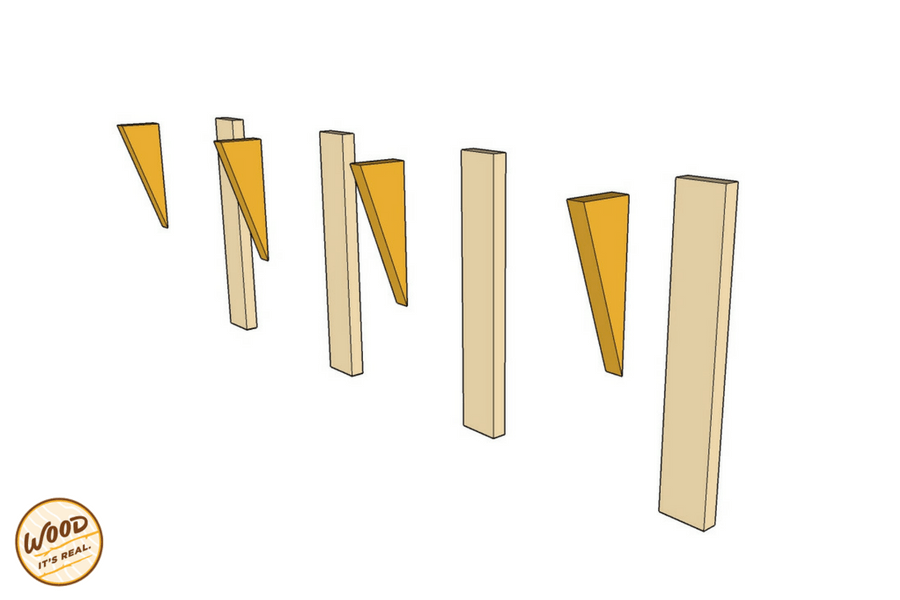
-
Attach Arm Rest Supports
1. Use glue and screws to attach the arm supports across the widths of the ends. Align the two outer supports with the edges of the frame, and space the inner supports equidistant.
2. Be sure to align the tops of the supports so that the arm fits snuggly.
-
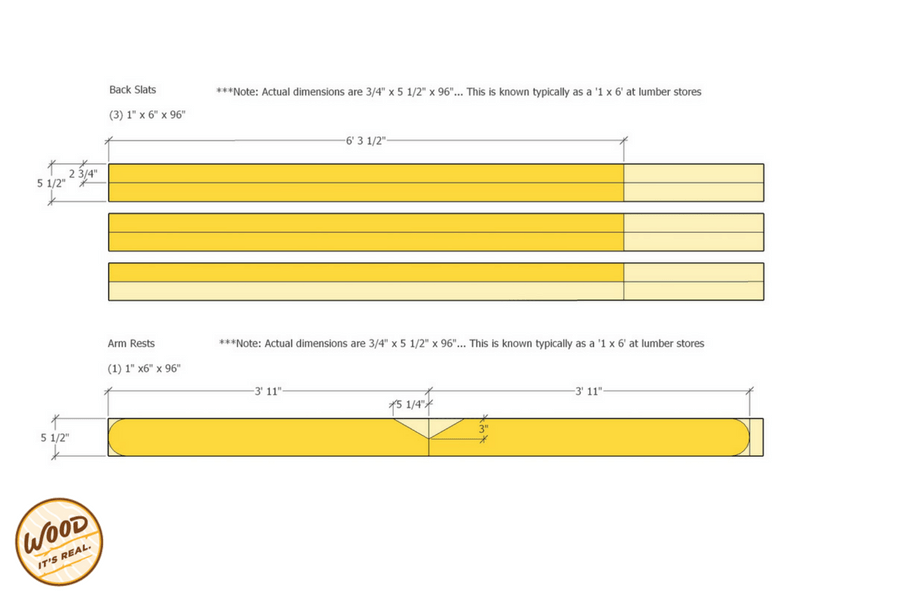
Cut and Attach Arm Rests
1. The arms are simply a length of 1″x 6″ Southern Yellow Pine cut to 47″.
2. At the forward end, use a paint can or something similar to draw the curve. Use a jigsaw to cut the curve and sand it smooth.
3. At the rear of the arm, measure out from the inside 3″ and forward along the outer edge 5 1/4″ and then draw a line to make a diagonal and cut along the line.
4. Align the rear edge of the arm along the back of the back support.
5. Use a block of 1″ material to space the inside edge of the arm for the supports.
6. Clamp it in place and attach using screws and glue. Fasteners can be installed along the top or underneath.
7. Once the arm is attached you can ease the edges with a chamfer bit to give it a smoother feel.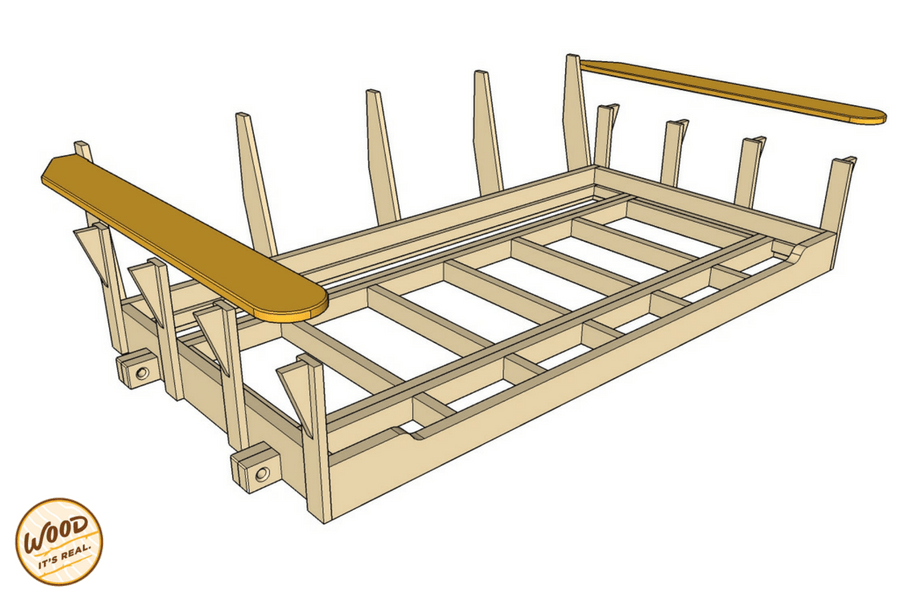
-
Cut Back Slats
1. For the back slats, rip another 1″ x 6″ board in half and soften the edges with a router bit.
-
Attach Back Slats
1. Tack slats on to the supports with a scrap of 3/4″ lumber that will act as a spacer at each connection point.
2. Use glue and finish nails or staples along each back support.
3. The slats should fit between the end supports.
4. If you need to splice one together, use bevel cuts in the ends and join them directly over one of the supports. Use glue where you join the bevels and it will become almost invisible.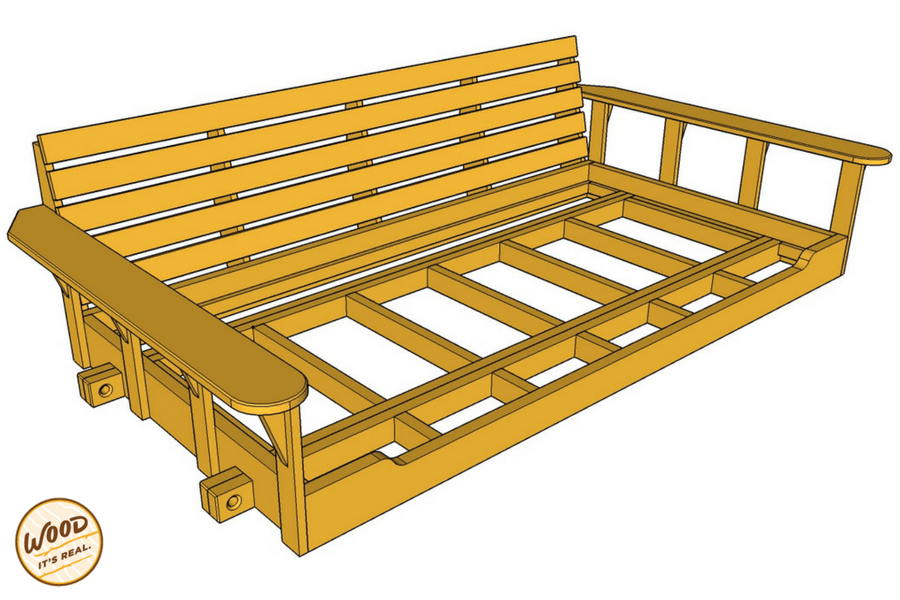
-
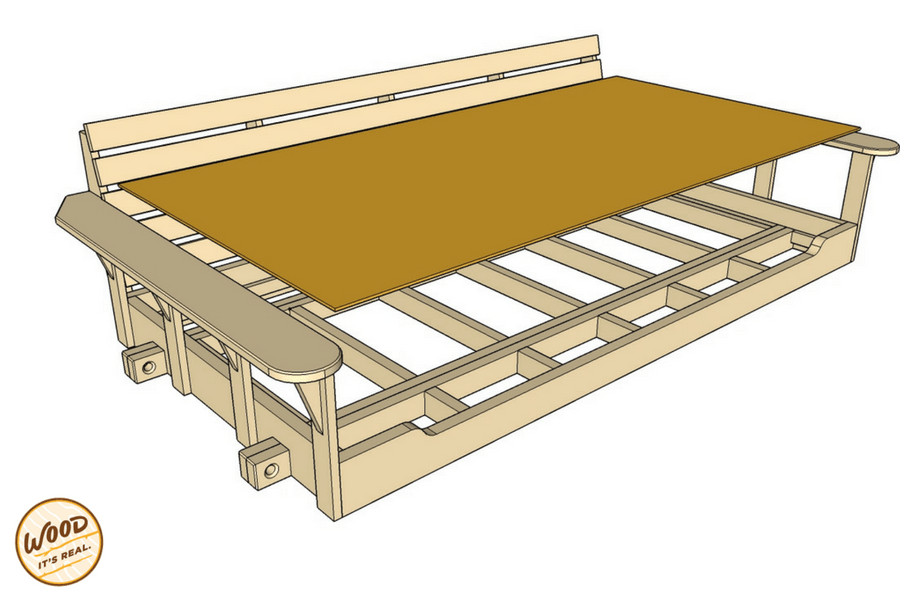
Cut the Porch Bed Swing Bottom
1. Clean any sawdust or debris from the support system and the frame.
-
Attach the Porch Bed Swing Bottom
1. Spread an even layer of glue over the entire support framework, and install a sheet of 1/4″ plywood cut to fit.
2. Staple or nail the bottom in place starting in the center and working towards the edges. Install the fasteners every few inches.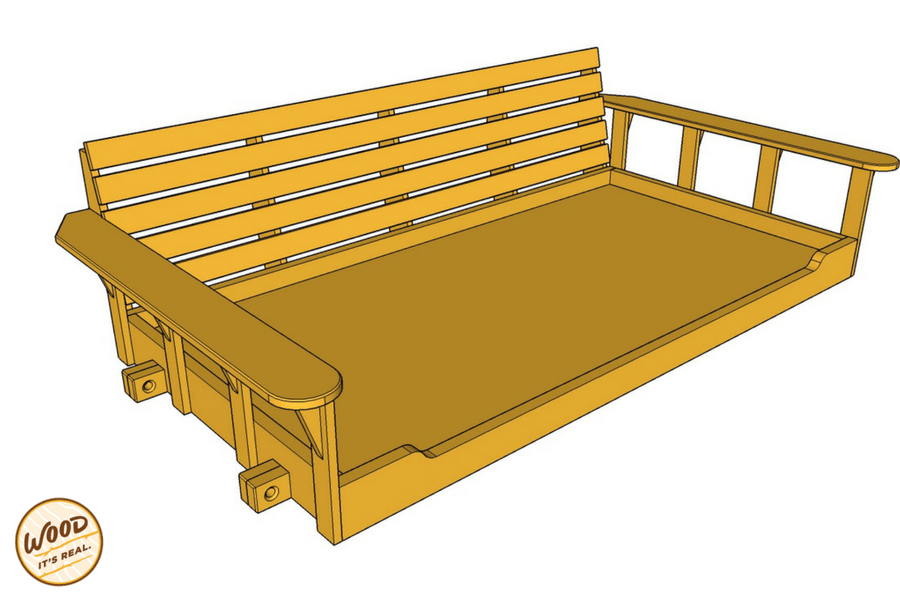
-
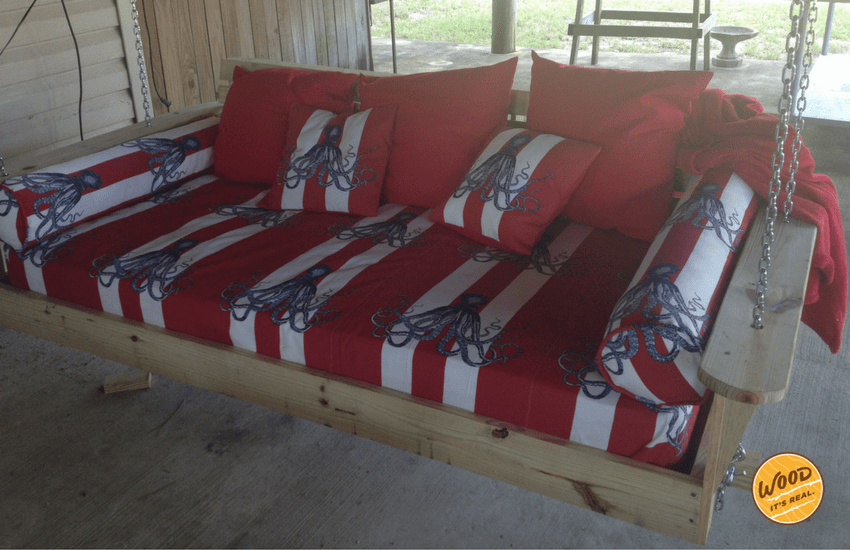
Install Mattress, Hang It Up, RELAX
1. Now for the most expensive single piece of this project: the foam mattress. Get a good one so you can really enjoy your hard work. (A twin mattress can also work.)
2. You’ll need to drill a couple of holes in the arms for your rope or chain to pass through using the 7/8″ forstner bit. Chamfer the edges to prevent splinters or rope abrasion.
3. Choose rope or chain to hang the swing. Pay attention tot he weight limits of either.
4. Hang the swing only from framing members on the porch that are designed to accept several hundred pounds of downward force. If you’re unsure, check with an architect or a structural engineer before you hang the bed swing.