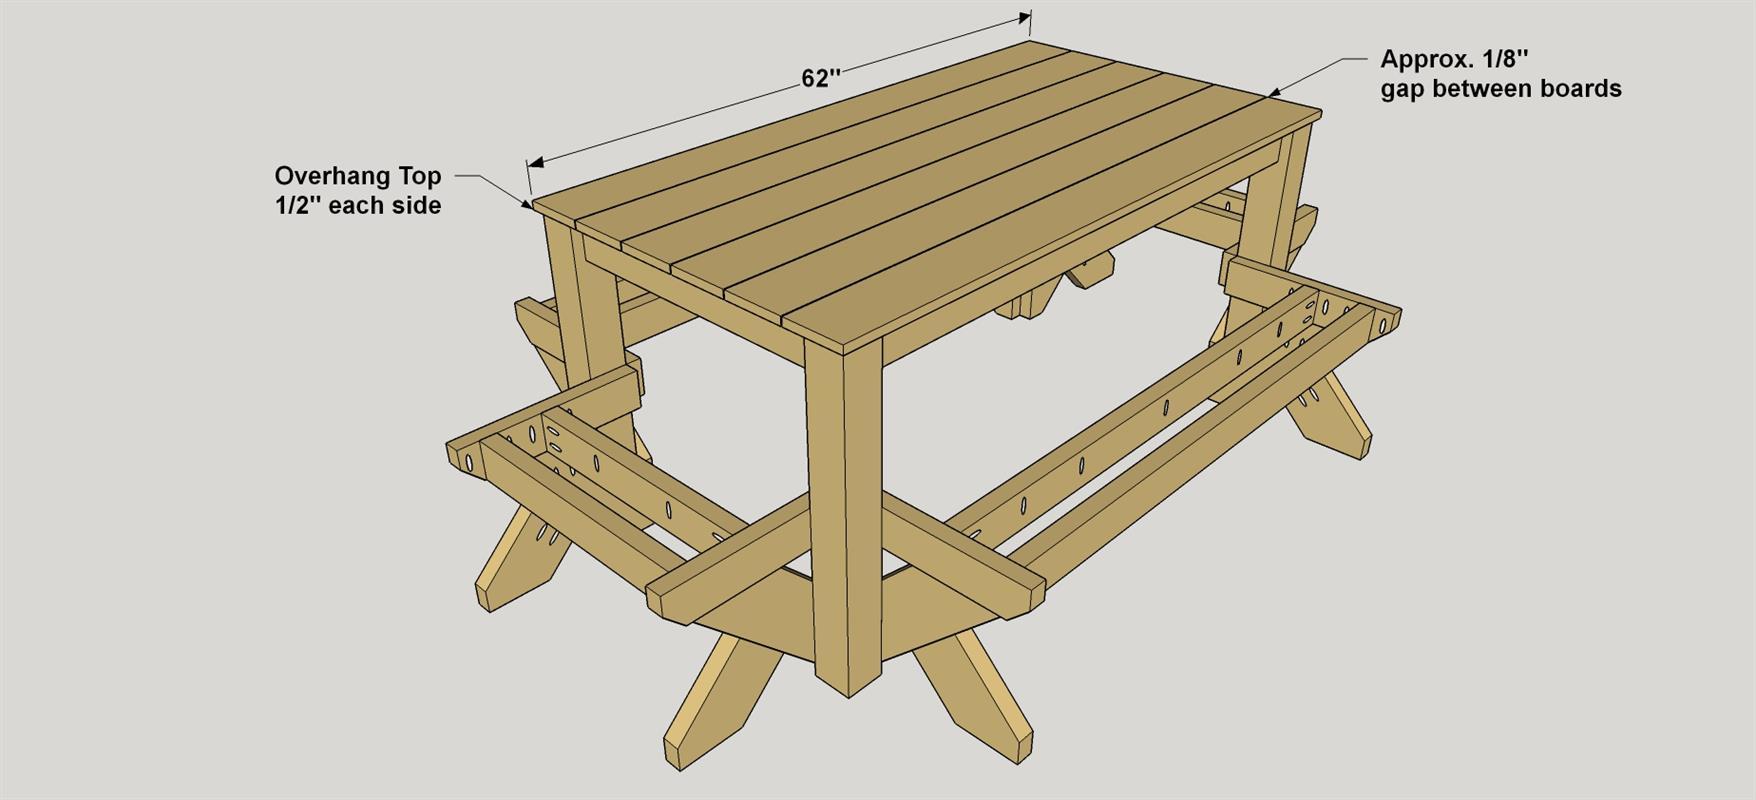
Picnic Table
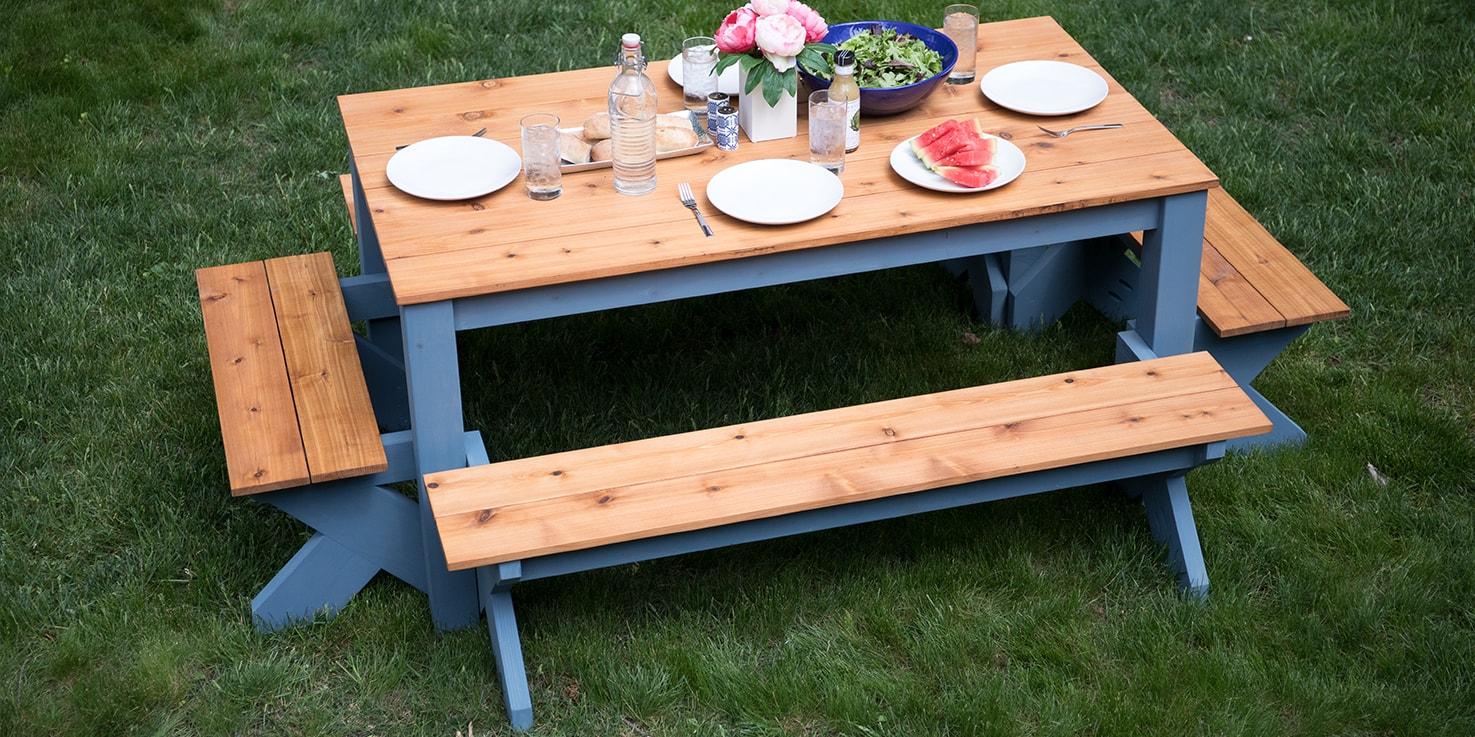
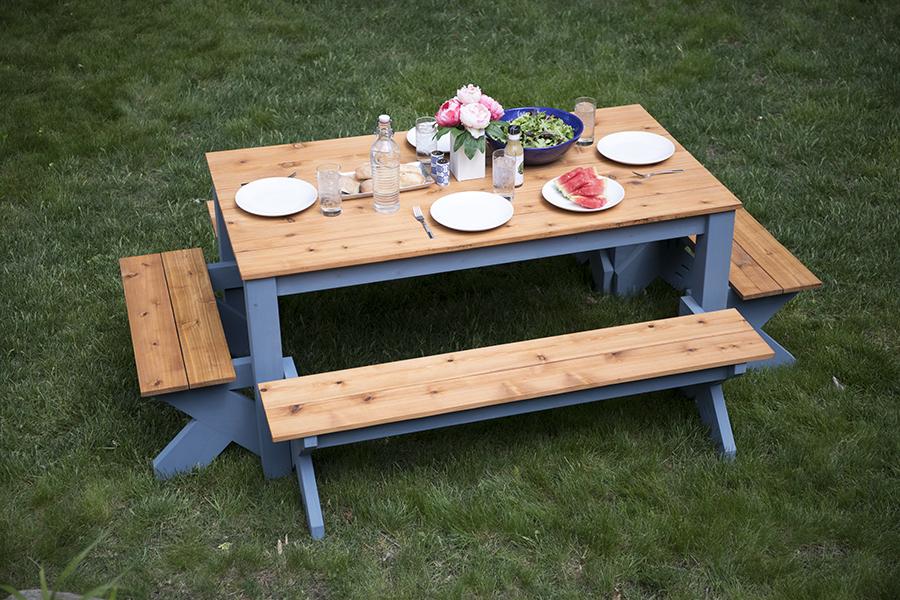
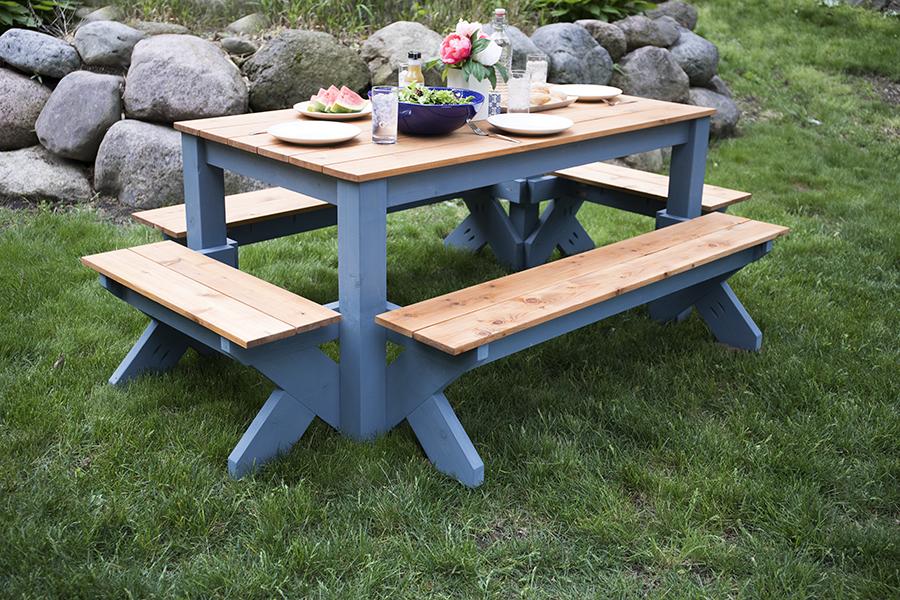
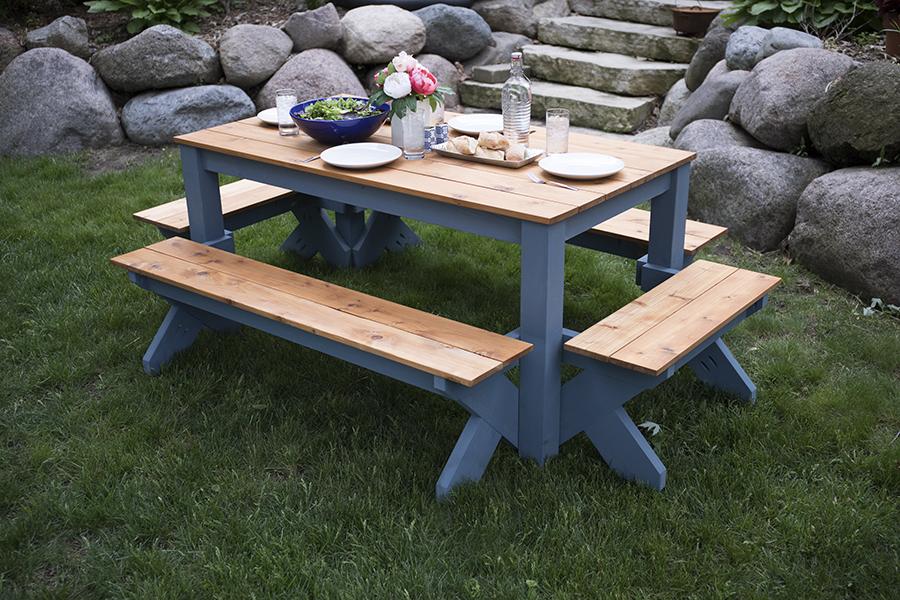
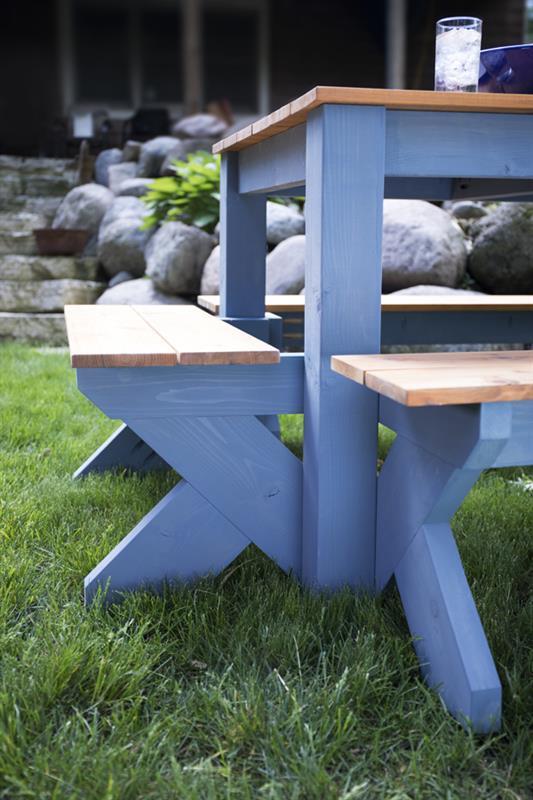
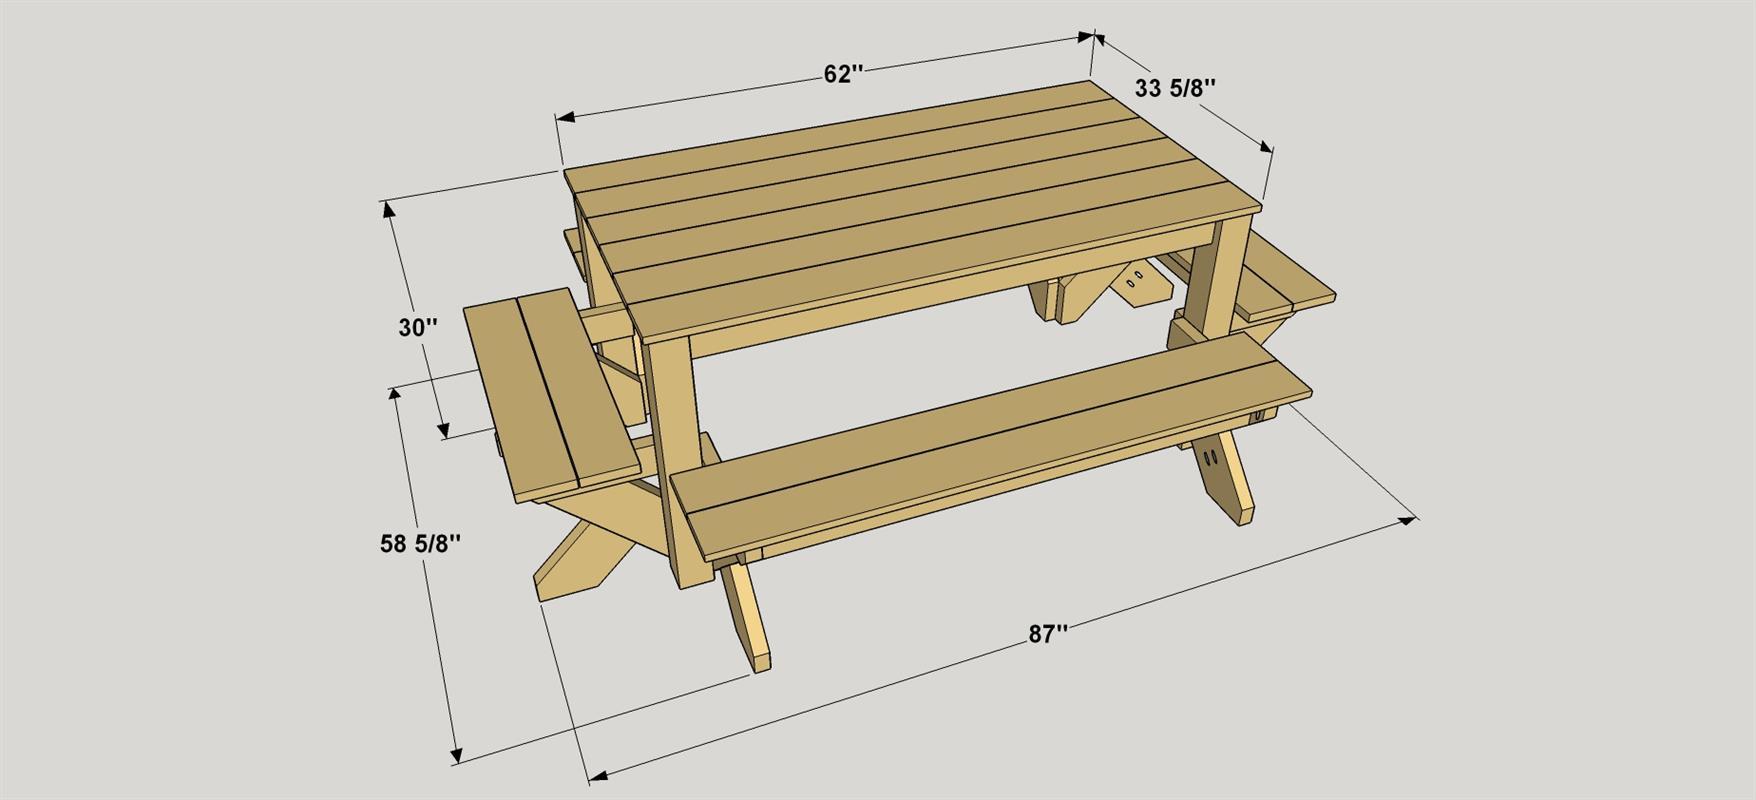
By Kreg ToolThis outdoor picnic table is a package deal. Benches on each side connect to the table legs to create a solid, stable footprint in any yard or patio. Seat the entire family around this spacious table and enjoy summer meals in style for years to come.
Directions
-
Start With the End Rails
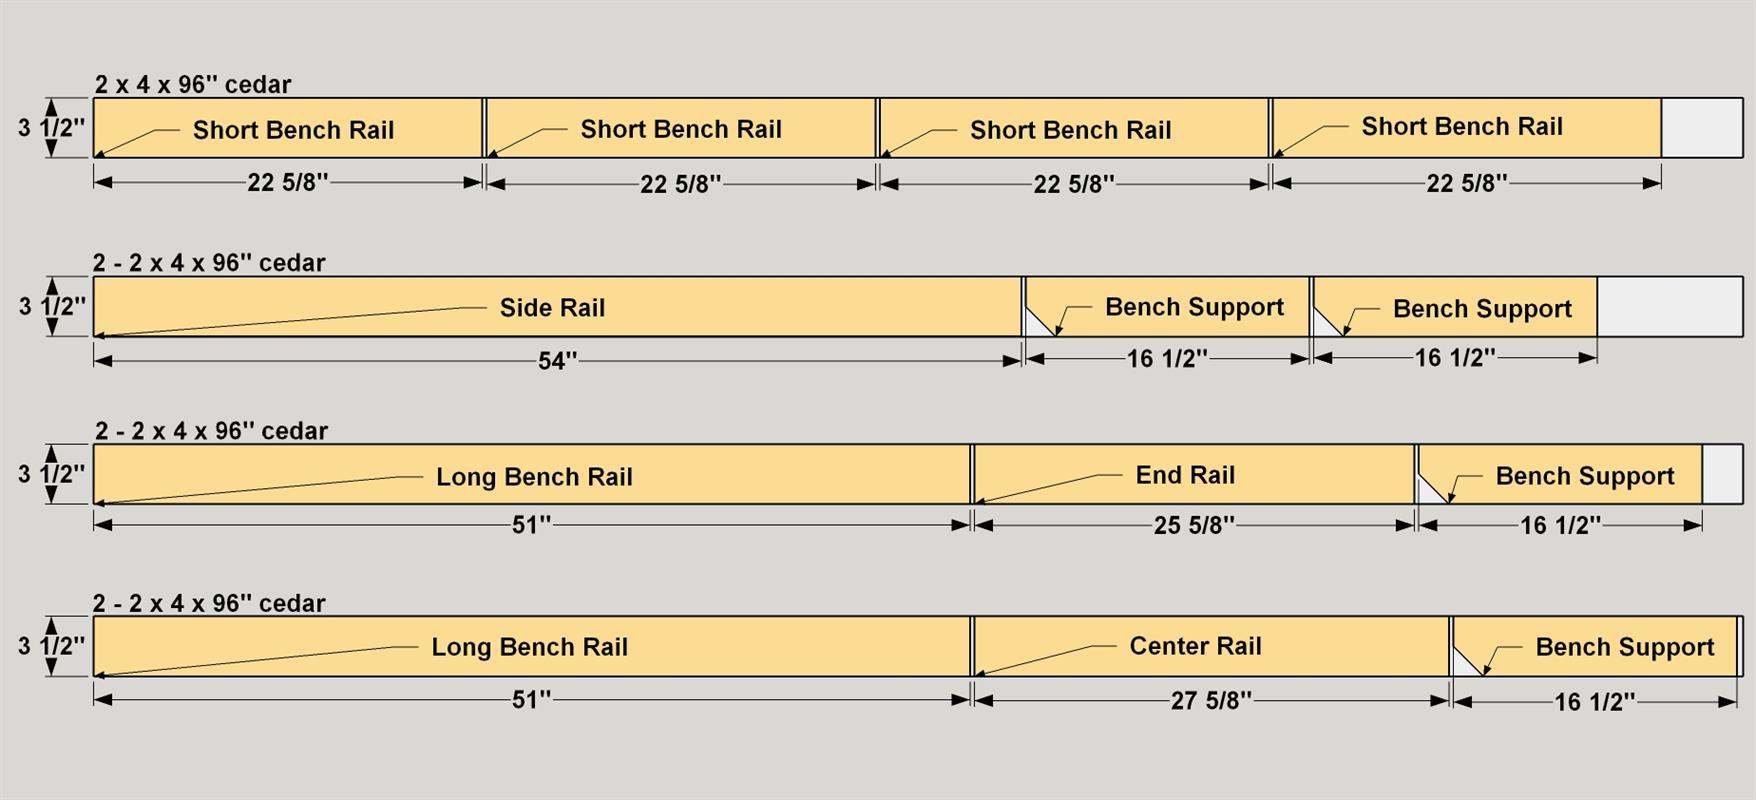
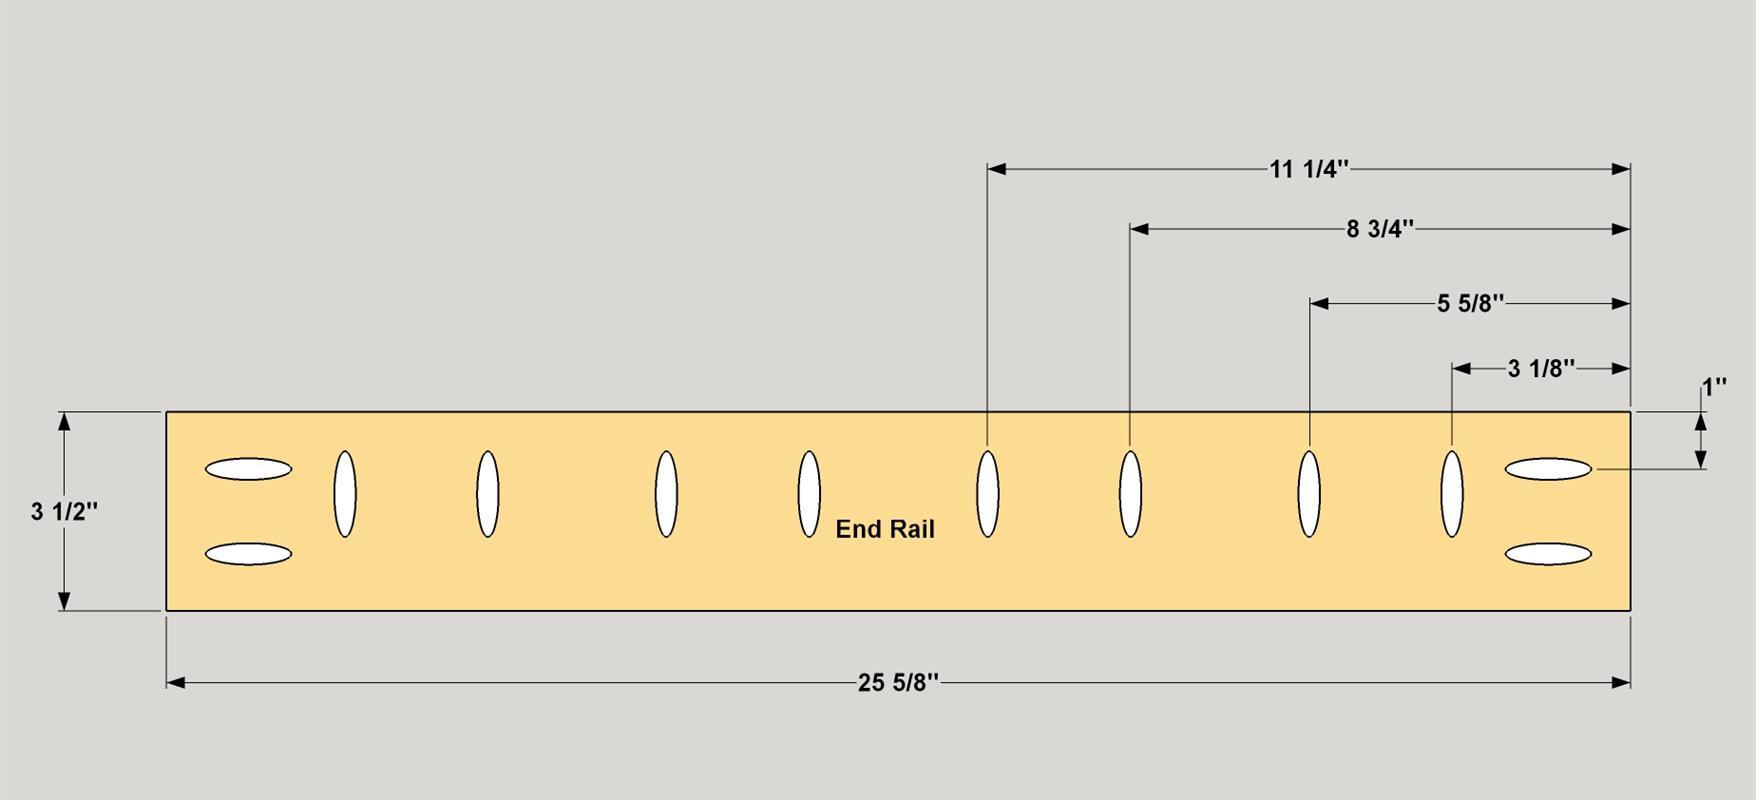
Cut two End Rails to length from a 2 x 4 cedar, as shown in the cutting diagram. With your pocket hole jig set up for 3/4" material, drill pocket holes along one edge of the End Rails at the locations shown. Then, set your jig and drill bit for
1 1/2" thick material, and drill holes in the ends of End Rails. -
Make the Side and Center Rails
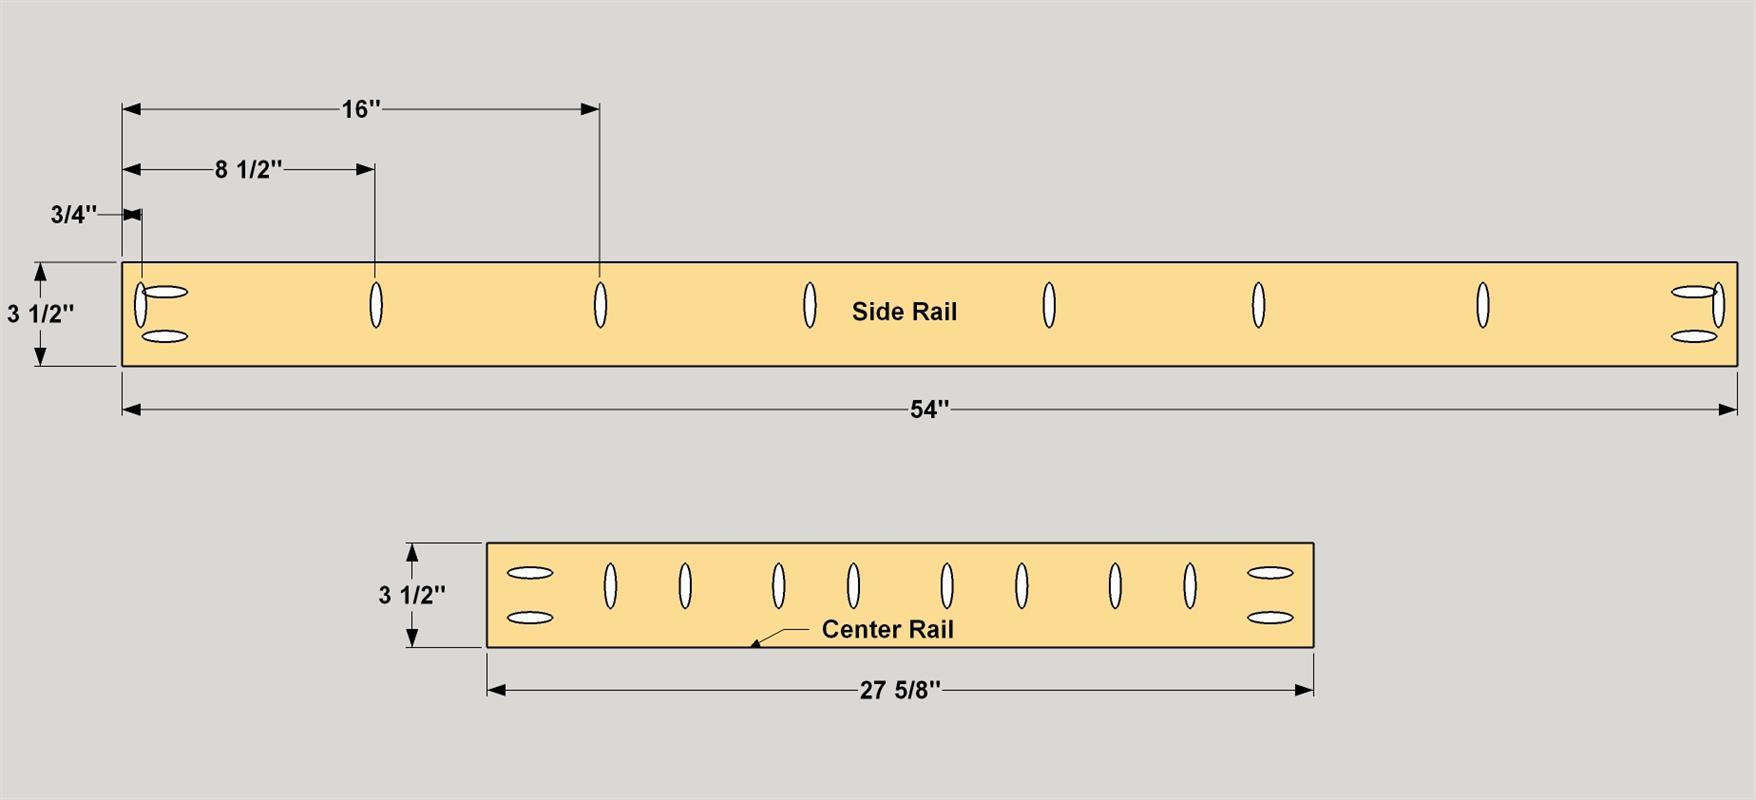
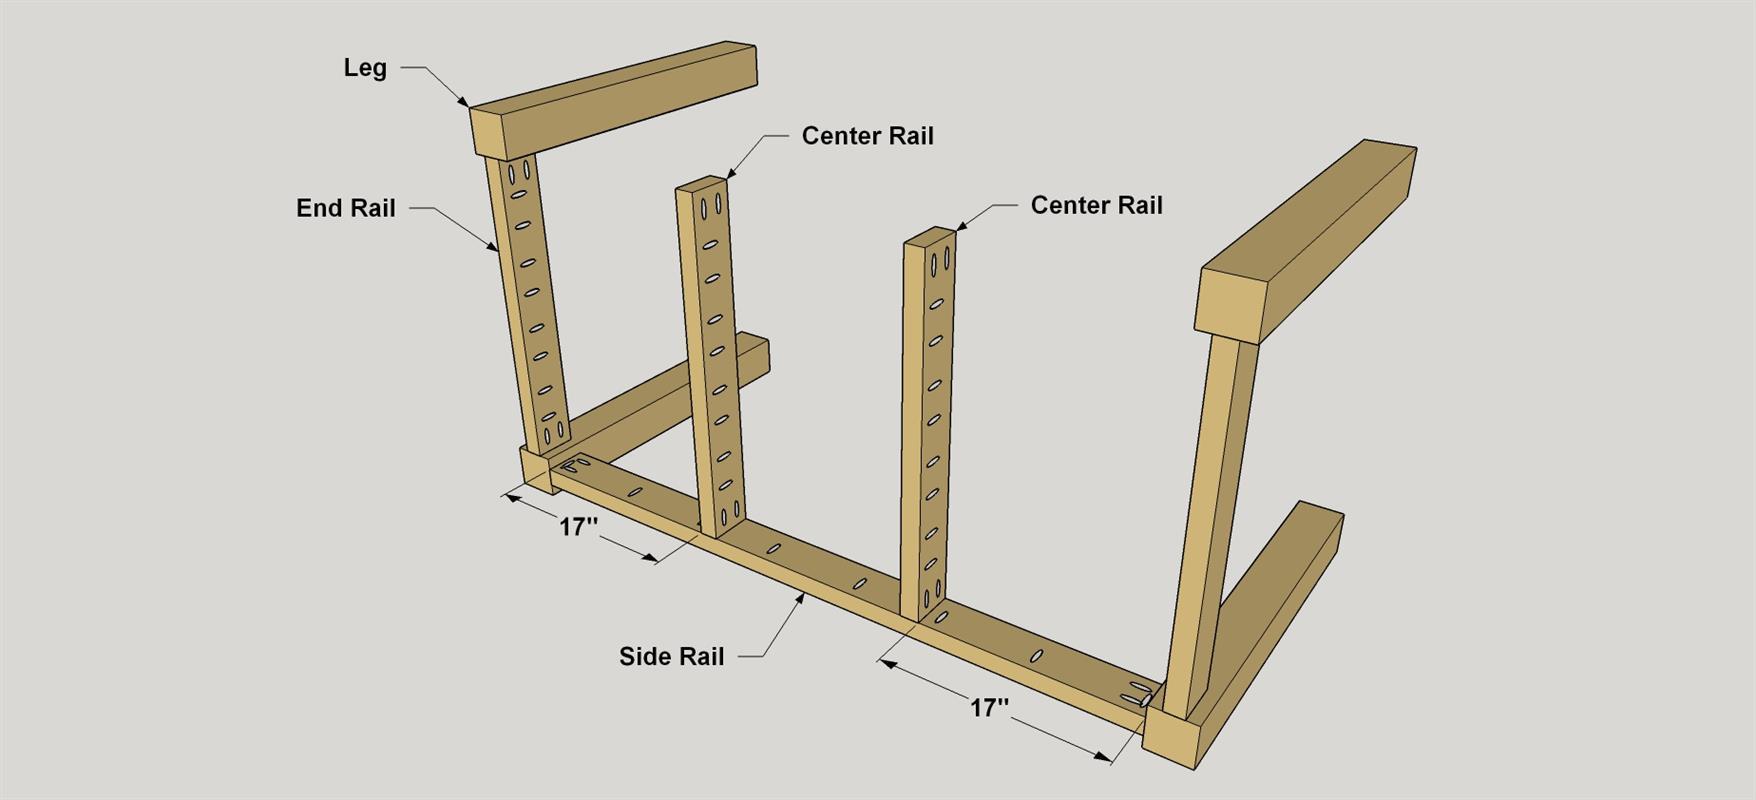
Cut two Side Rails and two Center Rails to length from 2 x 4 cedar, as shown in the cutting diagram. With your pocket hole jig set up for 3/4" thick material, drill pocket holes in the edge of the Side Rails and Center Rails in the locations shown. Then, set your jig and drill bit for 1 1/2" thick material and drill holes in the ends of the End Rails.
-
Cut the Legs
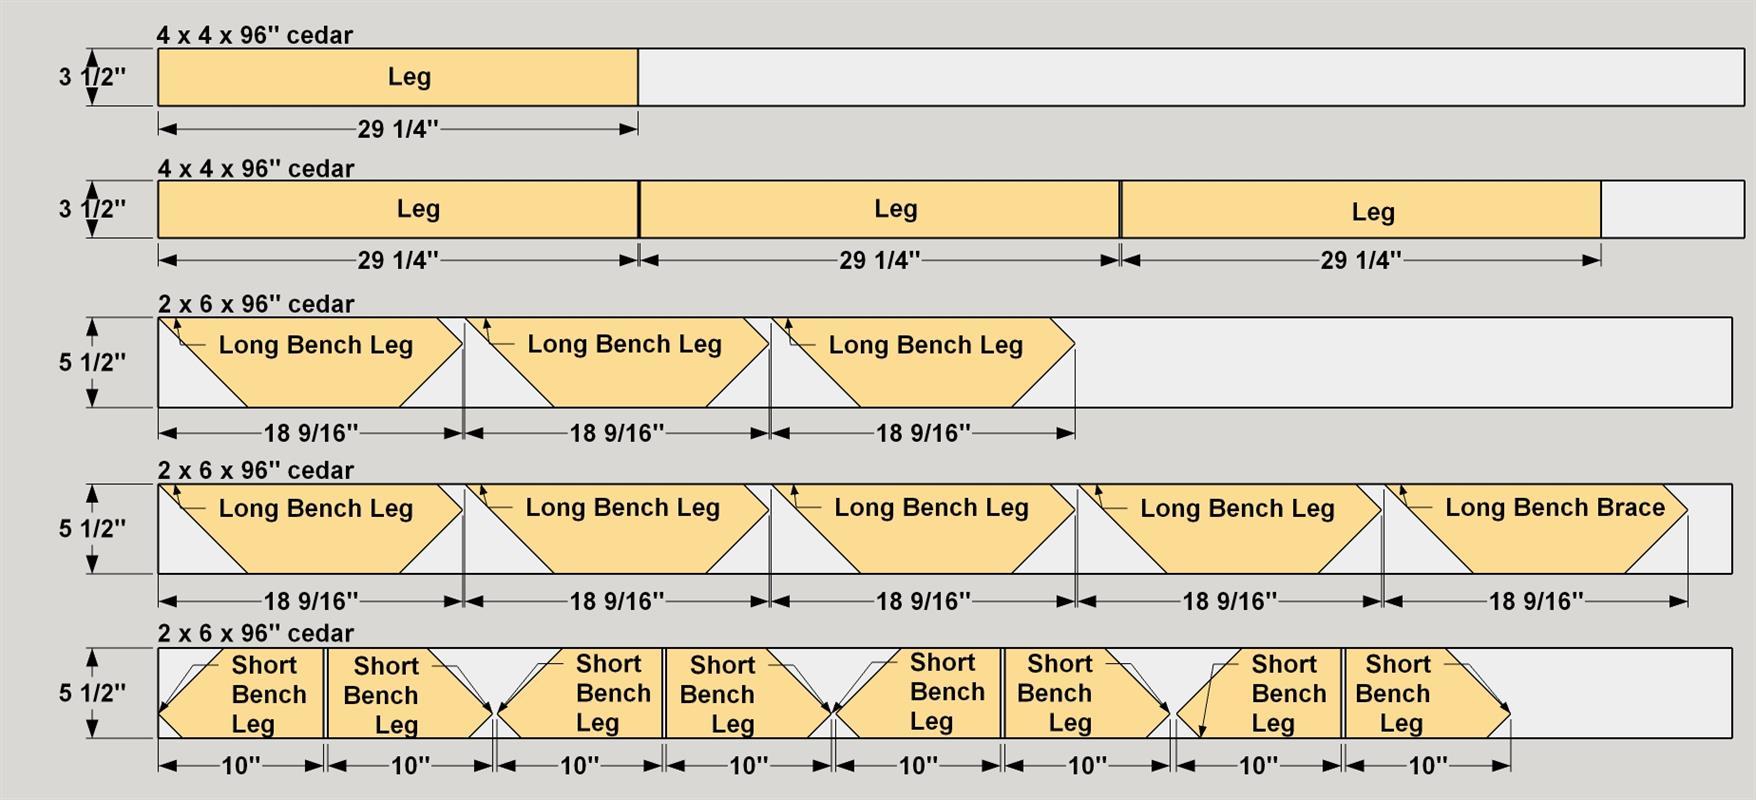
Cut four Legs to length from 4 x 4 cedar, as shown in the cutting diagram. Use a sander to ease the edges of each leg.
-
Assemble the End Rail and Legs
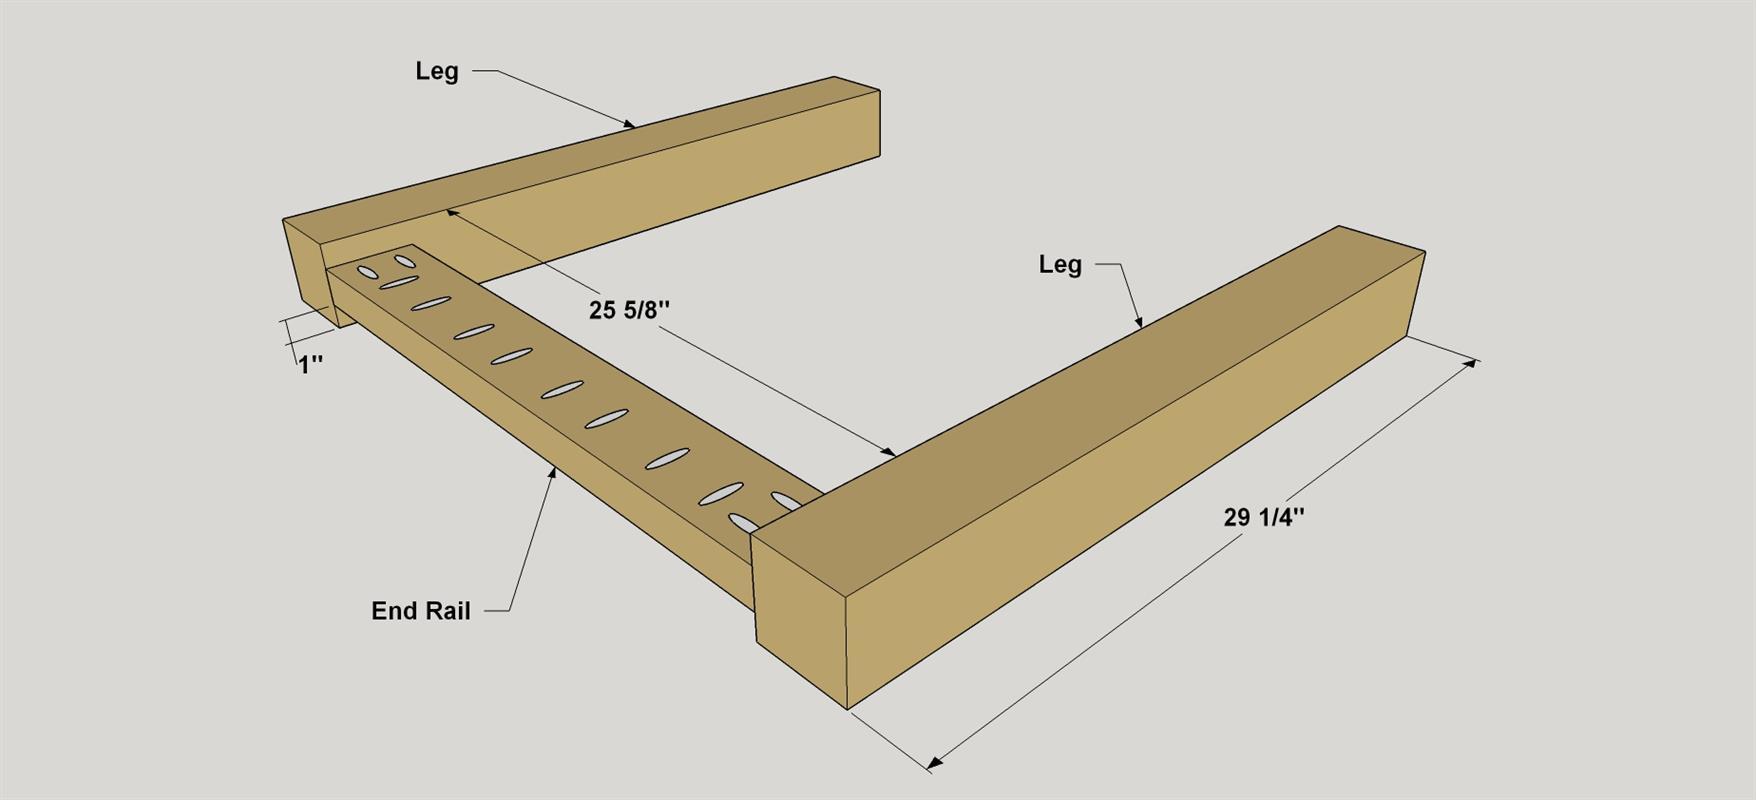
Secure the End Rails to the Legs with exterior wood glue and 2 1/2" coarse-thread Blue-Kote pocket-hole screws where shown. Repeat the process for the other end assembly.
-
Add the Side and Center Rails
Lay the Leg Assembly flat on a work surface then secure the first Side Rail to the Legs, glue and secure the parts together with 2 1/2" coarse-thread Blue-Kote pocket-hole screws, as shown. Position the Center Rails on the Side Rail where shown and secure them in the same way.
-
Add the Second Side Rail
Attach the second Side Rail with glue and 2 1/2" coarse-thread Blue-Kote pocket-hole screws to complete the base.
-
Make the Bench Legs
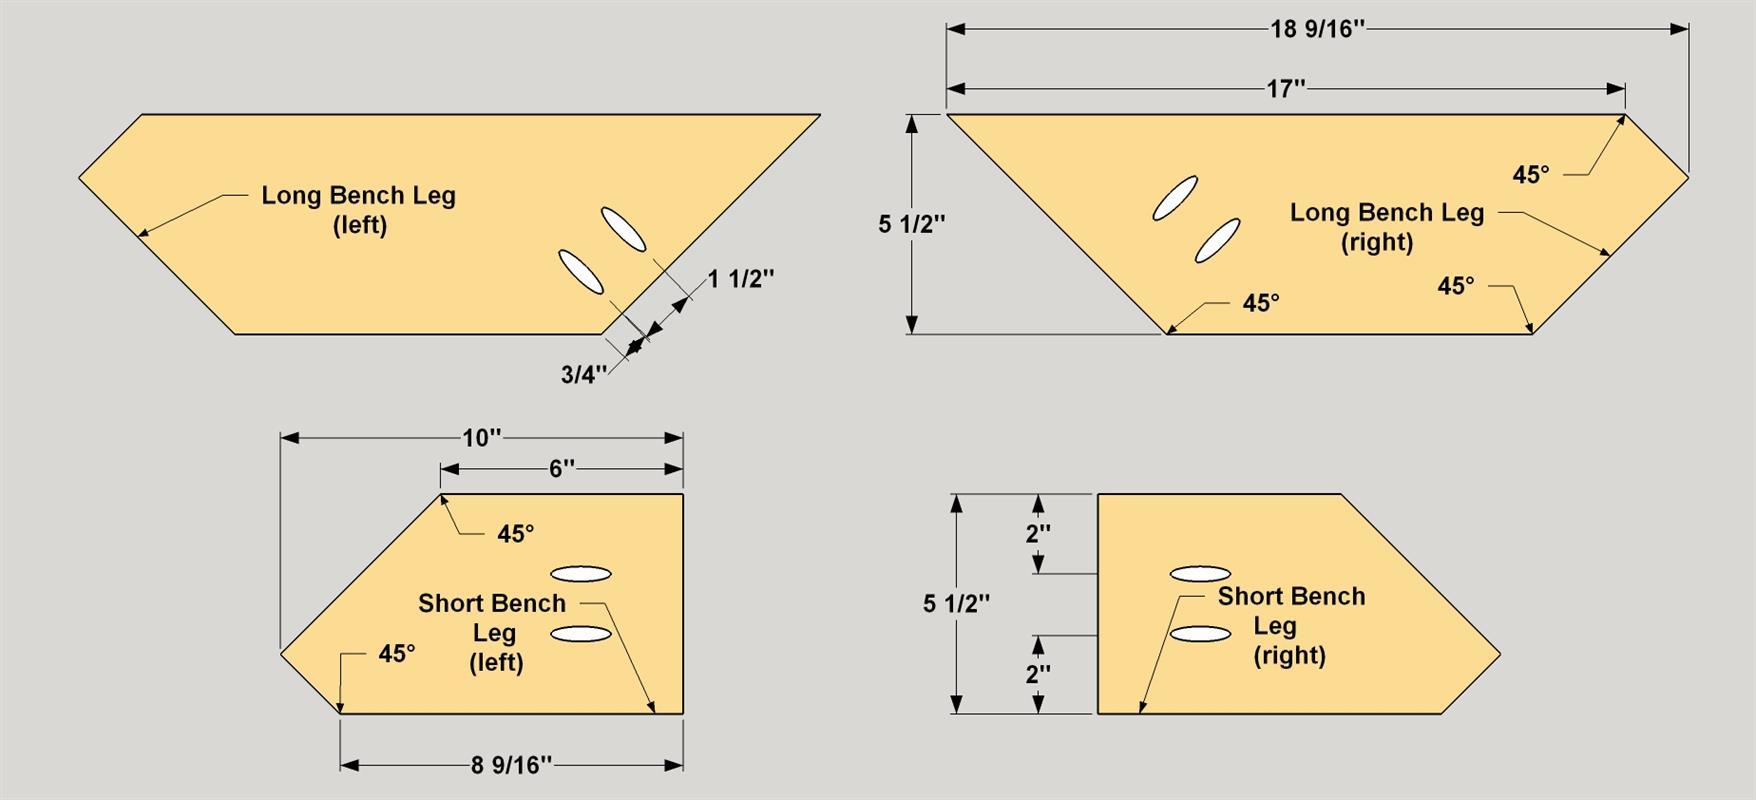
Cut eight Long and eight Short Bench Legs from 2 x 6 cedar boards as shown in the cut diagram. Set the pocket hole jig for 1 1/2" think material and drill pocket holes on the parts where shown.
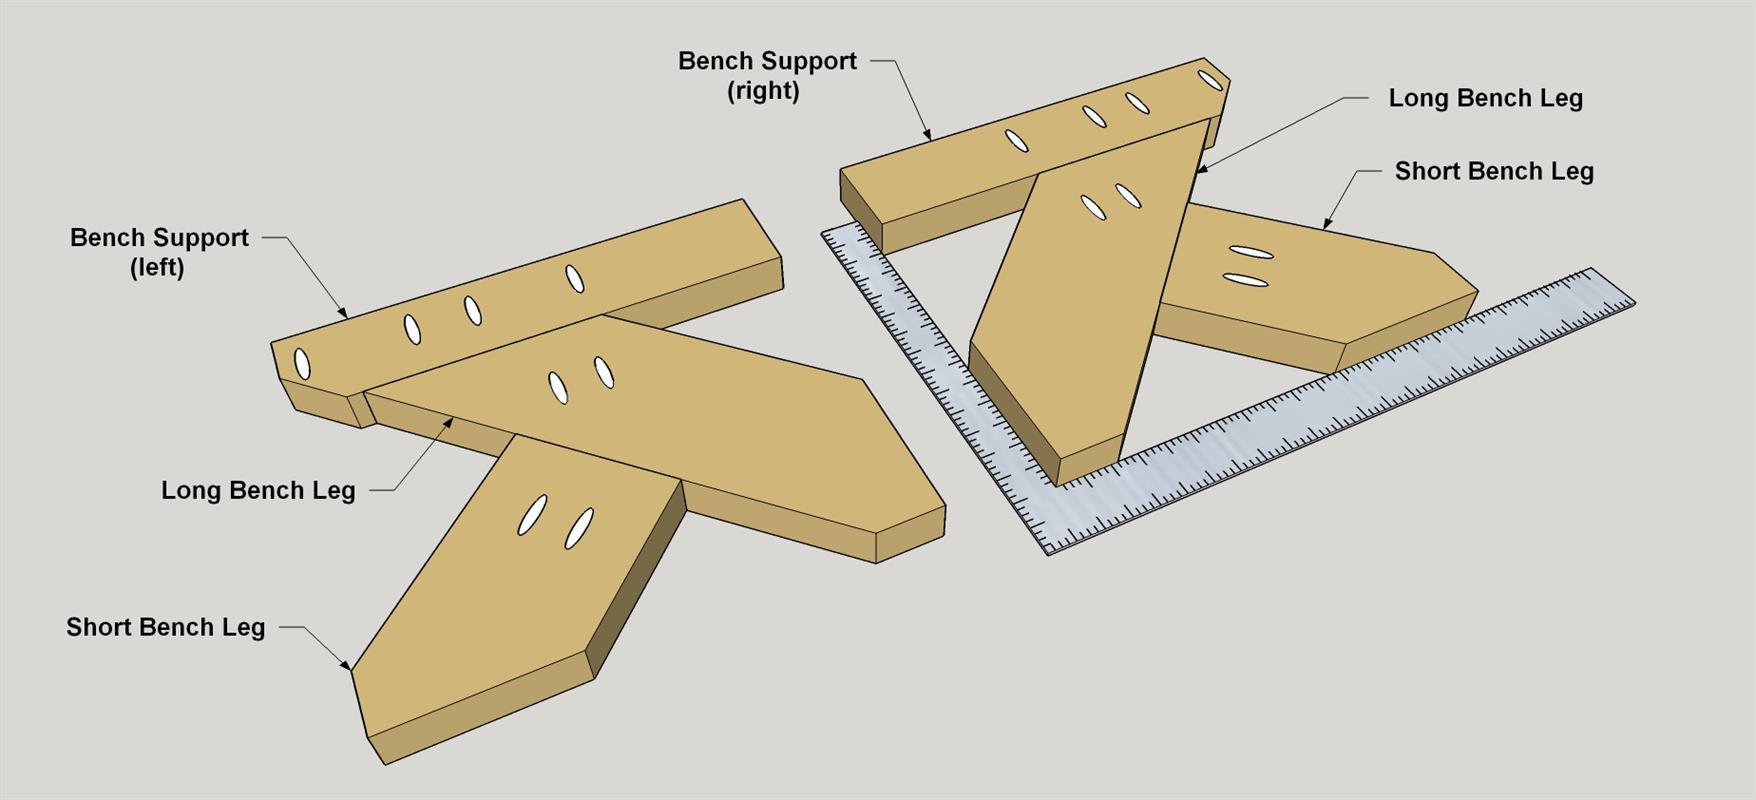
Note: there are four "left" and four "right" sides to each Leg so that the pocket holes on each assembled Leg will face inward. Make sure to orient the braces so they mirror one another as you drill the pocket holes. -
Assemble the Bench Legs
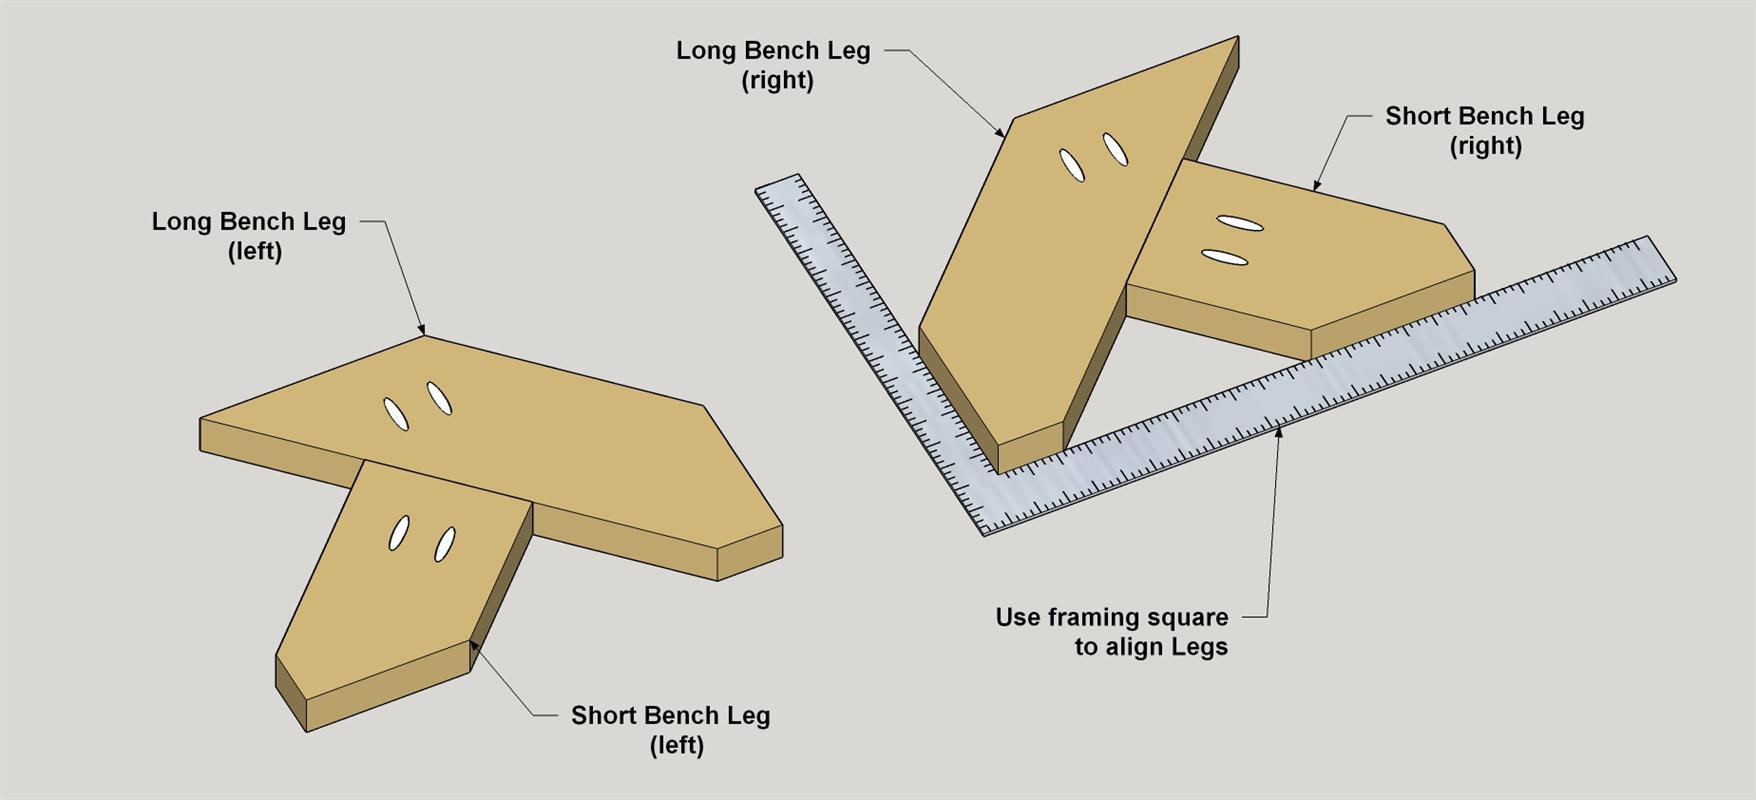
On a flat work surface, lay a Short Bench Brace, a Long Bench Brace and a Bench Support as shown. Use a framing square to help align the parts, apply glue at each part connection, and secure the Leg together with 2 1/2" coarse-thread Blue-Kote pocket-hole screws. Repeat this process with mirrored parts for the other side of the Bench. Then, repeat this step for the other six Bench Legs.
-
Cut the Bench Supports
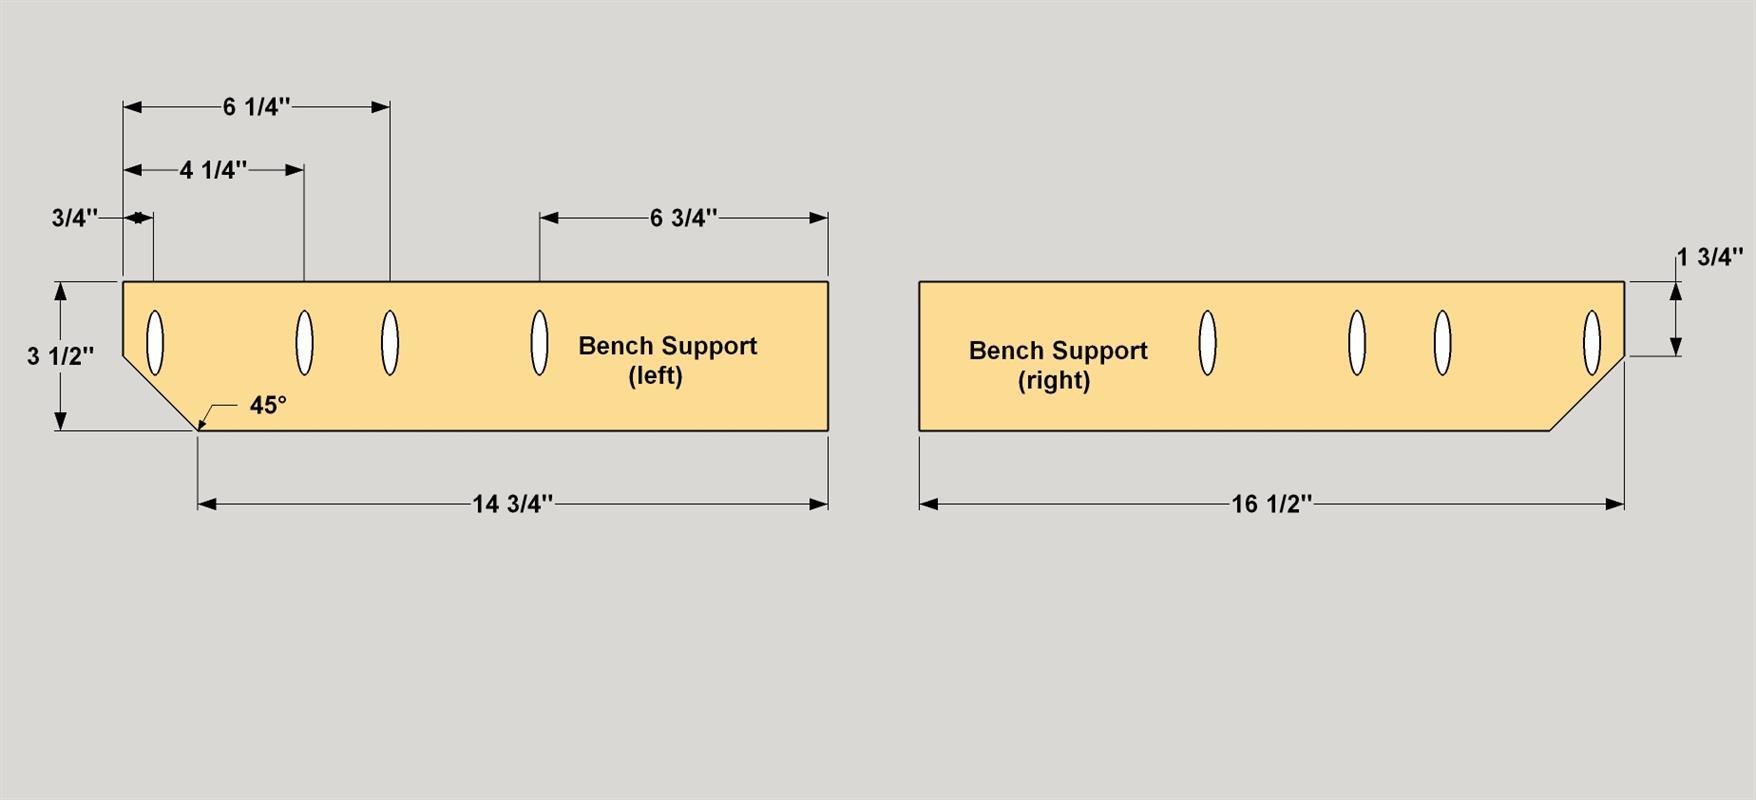
Cut eight Bench supports from 2 x 4 boards as shown in the cut diagram. Set your pocket hole Jig for 3/4" thick material and drill pocket holes at the locations shown. Again, make sure to orient the Seat Supports so they mirror one another when you drill the pocket holes.
-
Add the Bench Supports
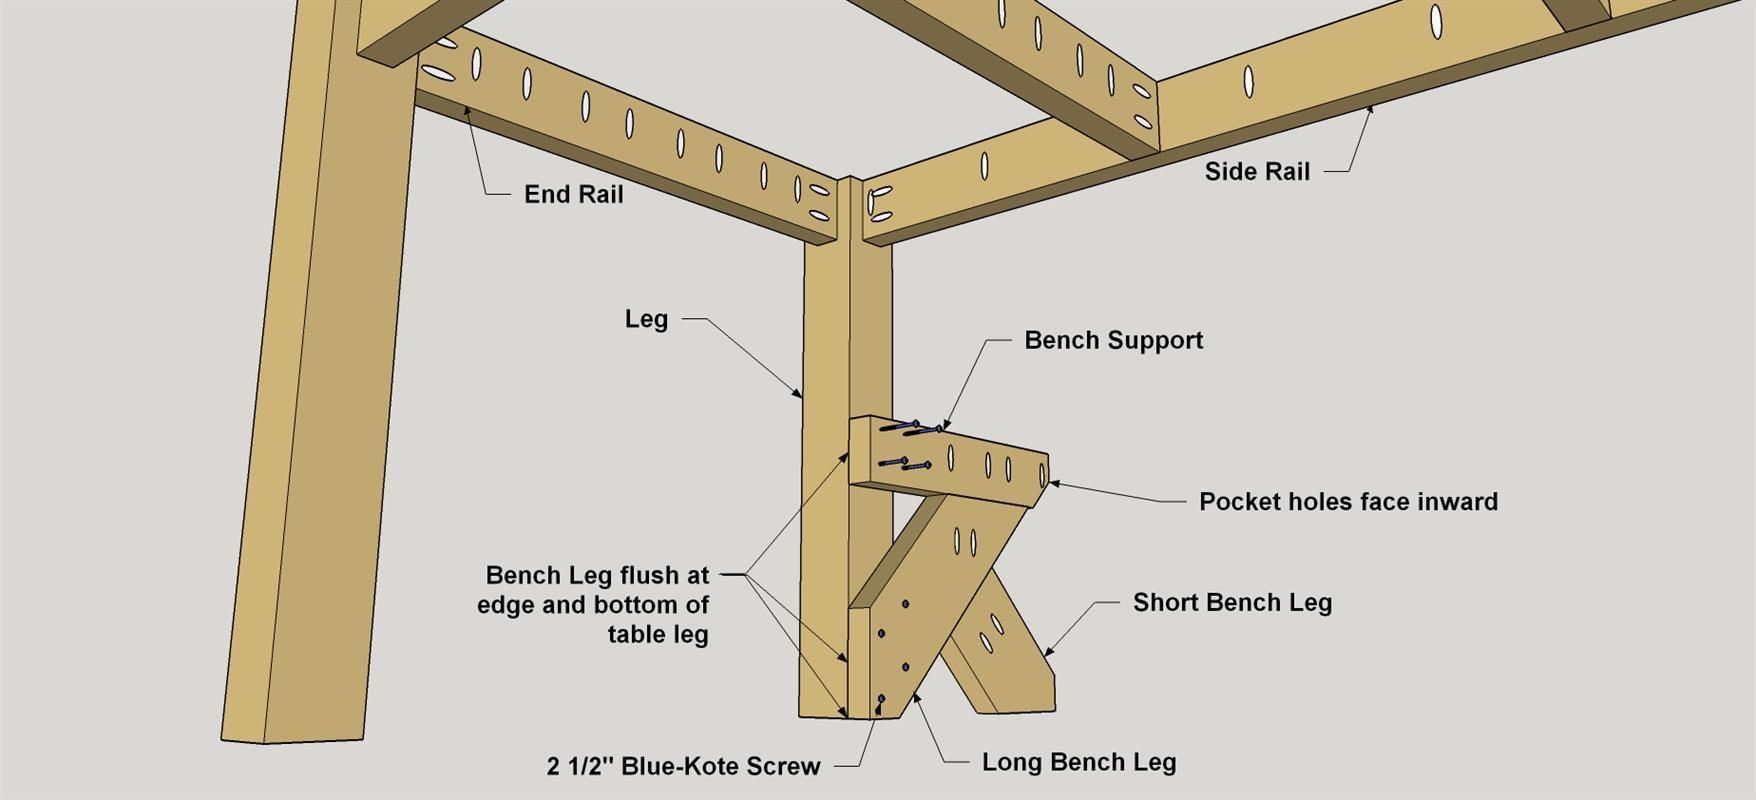
With the framing square still in position, align the Bench Support to the Leg as shown. Apply glue and secure the Bench Support to the Leg with 2 1/2" coarse-thread Blue-Kote pocket-hole screws. Repeat this for the other six Bench Legs.
-
Install the Bench Legs
With the table on a flat, level surface, set the first Leg assembly against the inside of a table leg so that the inside end of the Bench Leg assembly is flush with the inside of the Leg face as shown. Face the pocket holes inward. Secure the Bench Leg to the Table Leg with glue and 2 1/2" coarse-thread Blue-Kote pocket-hole screws as shown. Repeat this same process for the Other Bench Legs.
-
Make the Bench Rails
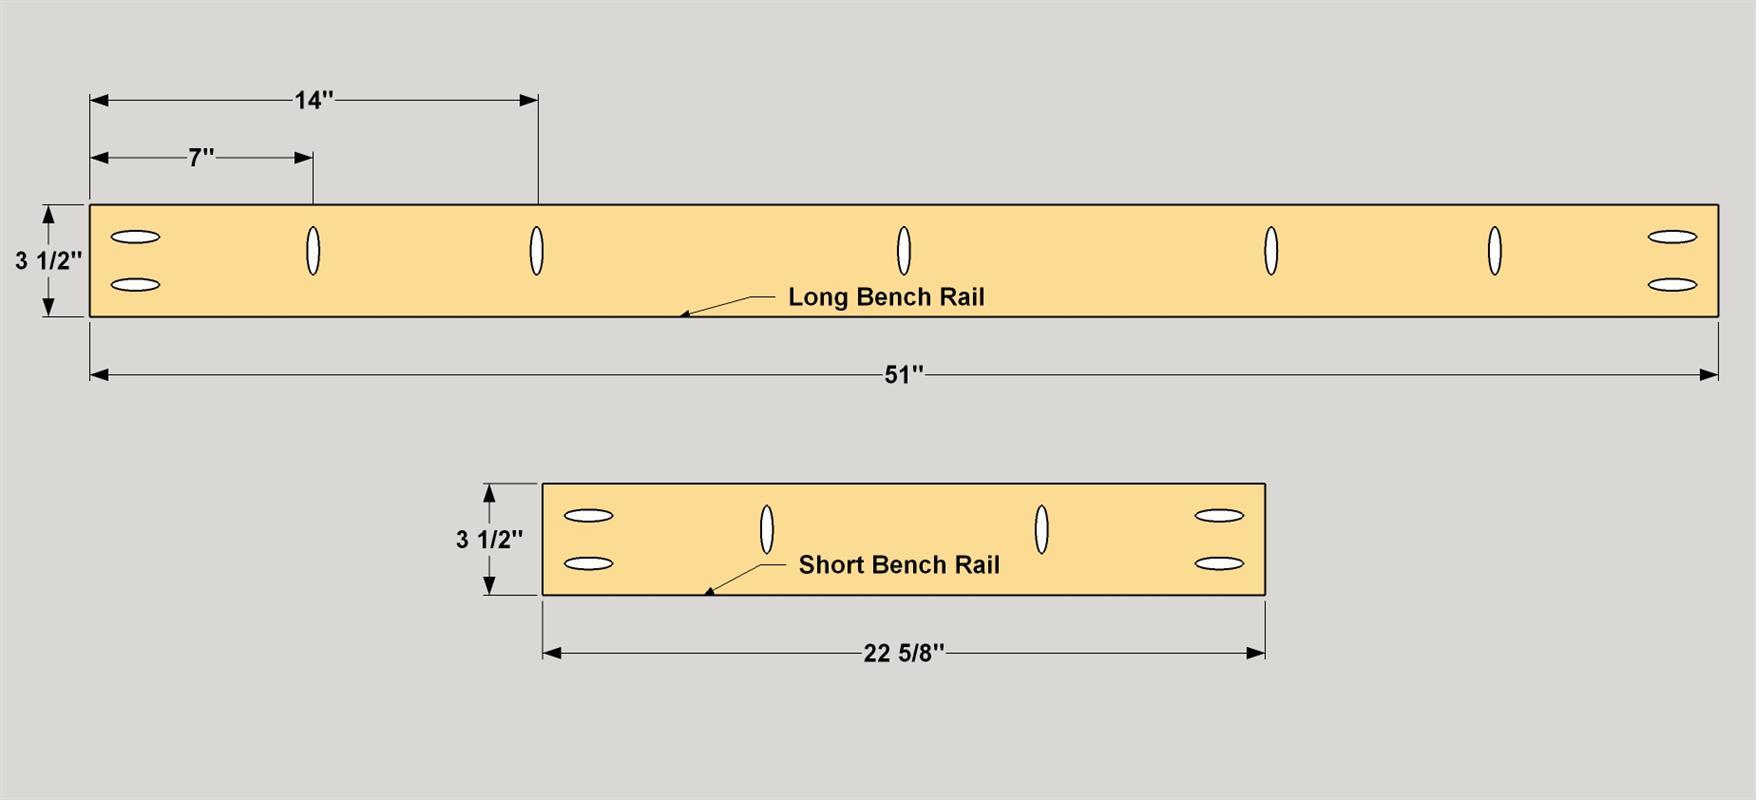
From 2 x 4 cedar boards, cut four Long Bench Rails and four Short Bench Rails as shown in the cut diagram. With your pocket hole jig set up for 3/4" thick material, drill pocket holes along one edge of the Bench Rails at the locations shown. Then, set your jig and drill bit for 1 1/2" thick material and drill holes in the ends of all of the Bench Rails.
-
Install the Bench Rails
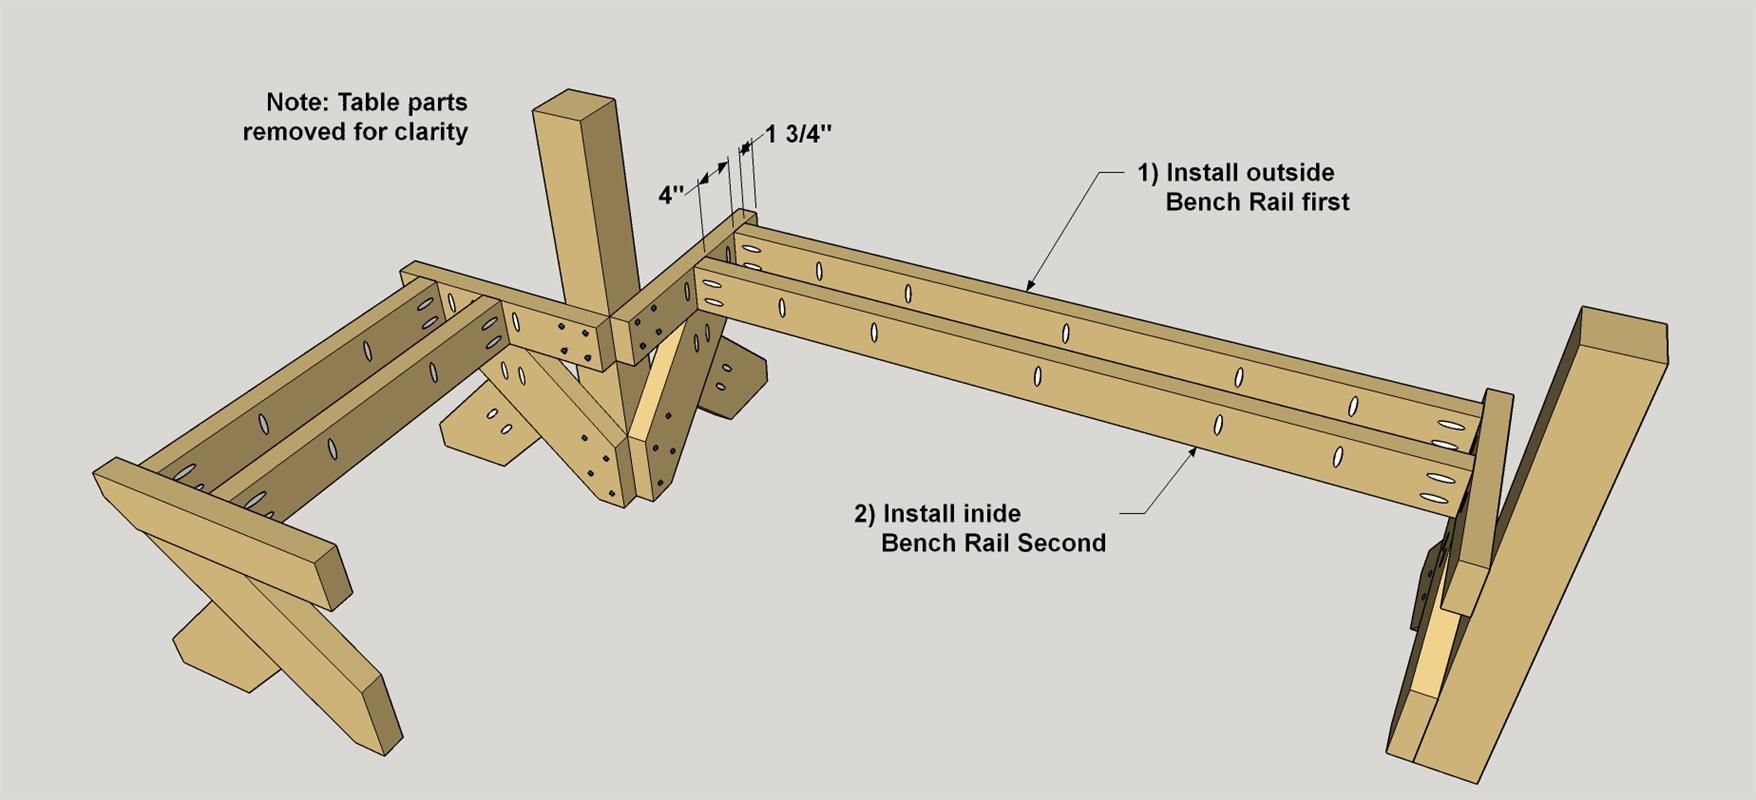
Starting with the outer most Bench Rail first, secure the rail to the Bench Leg assembly at the location shown, with glue and 2 1/2" coarse-thread Blue-Kote pocket-hole screws. Position the second rail with the pocket holes facing in as well, and repeat this process. Install the rails for the other three benches the same way.
-
Finish the Base
We are going for a two-tone look with this table, with a solid stain on the table base, and a natural tone on the Top Boards. Applying the finish to the Base is much easier at this point in the project, before you install the contrasting Top Boards and the Bench Slats.
-
Cut the Top Boards
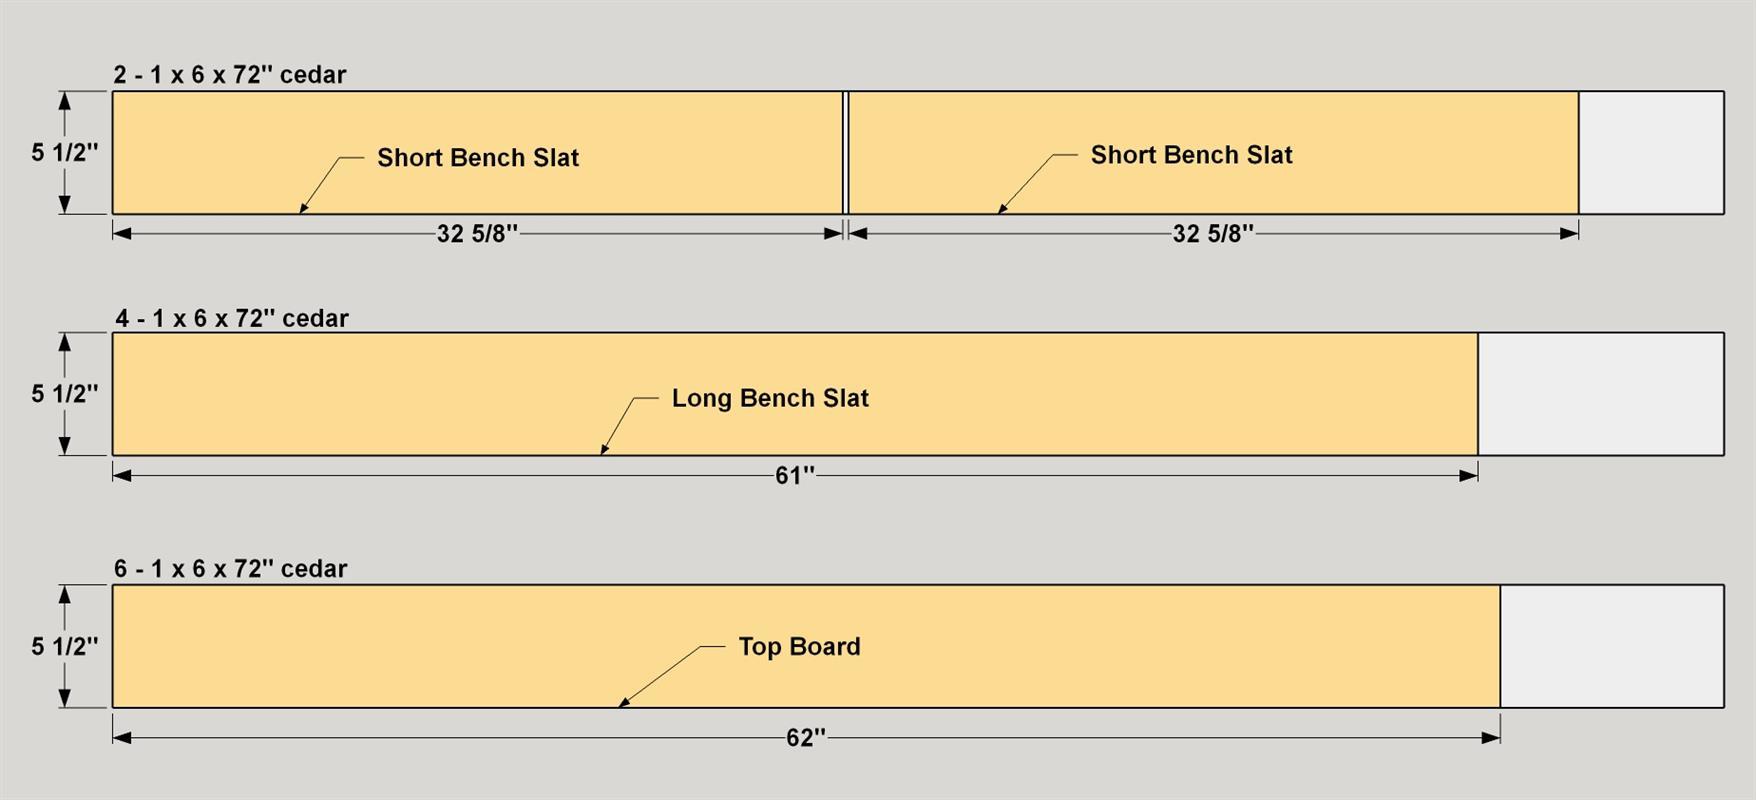
Cut six Top Boards to length from 1 x 6 cedar, as shown in the cutting diagram. Sand any rough edges, clean thoroughly, and then apply the natural finish to the Top Boards. Make sure to allow enough time for the boards to dry before installing them.
-
Install the Top Boards
Install the six Top Boards with 1 1/4" coarse-thread Blue-Kote pocket-hole screws, as shown. Make sure the gaps between the boards are consistent and that the ends all align as you install them.
-
Make the Bench Slats
From 1 x 6 cedar boards, cut four Long Bench Slats and four Short Bench Slats as shown in the cut diagram. Sand any rough edges, clean, and apply the finish. Allow enough time for the boards to dry before installing them.
-
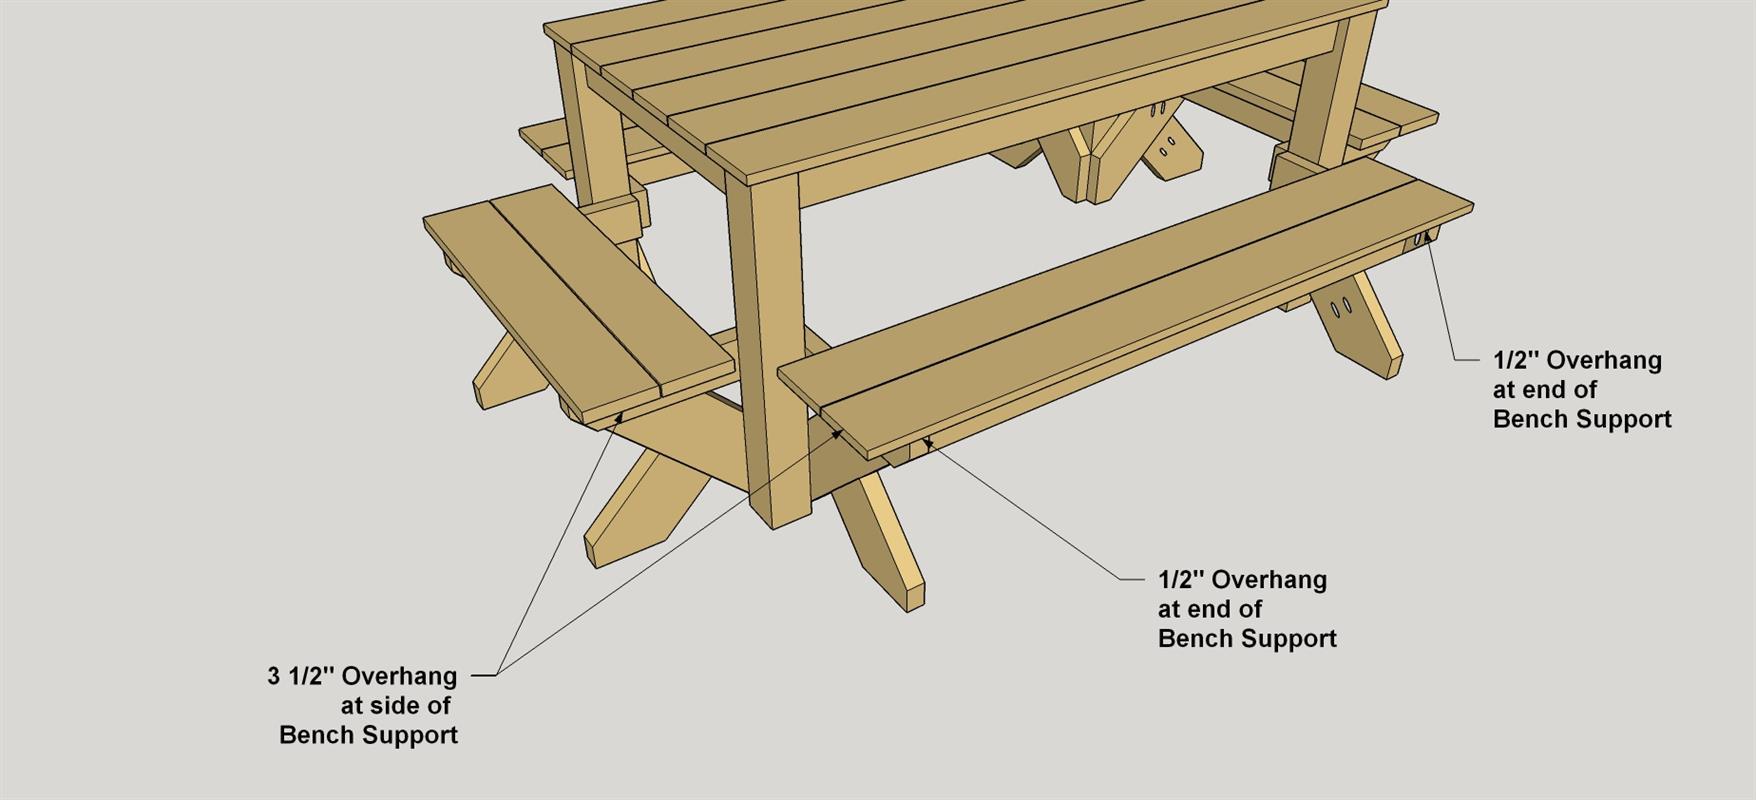
Install Bench Slats
Starting with the outside Long Bench Slat first, position it as shown and secure it to the Bench Rails and Legs with glue and 1 1/4" coarse-thread Blue-Kote pocket-hole screws. Next, position the second Slat and secure it the same way as the first. Repeat this process for the other three benches.


