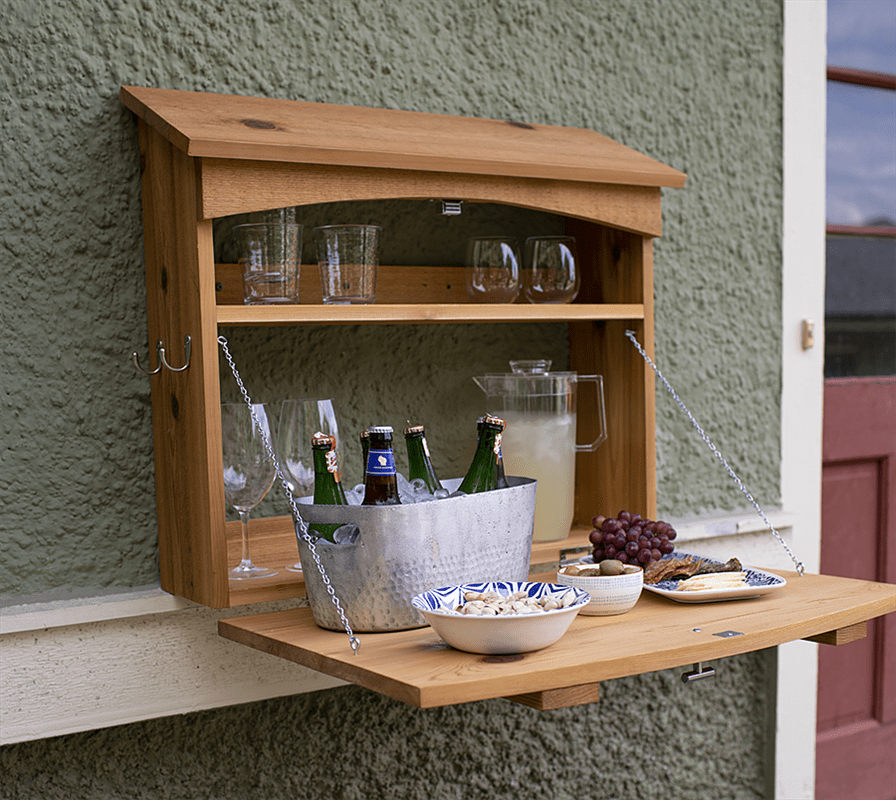
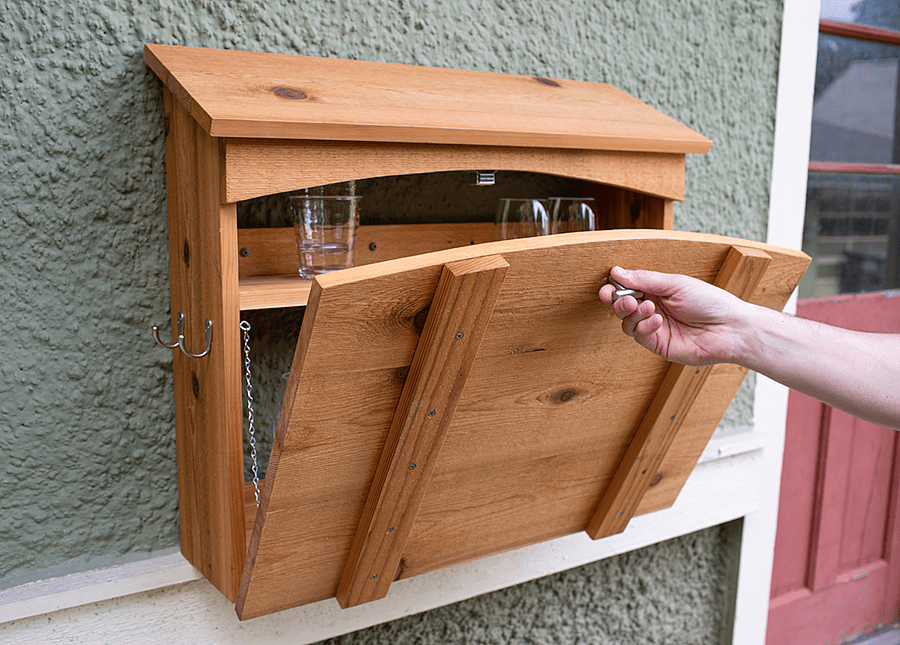
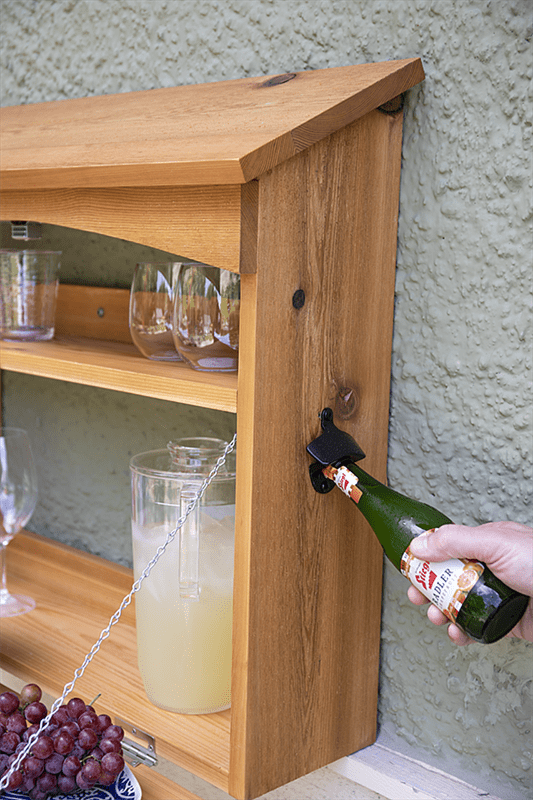
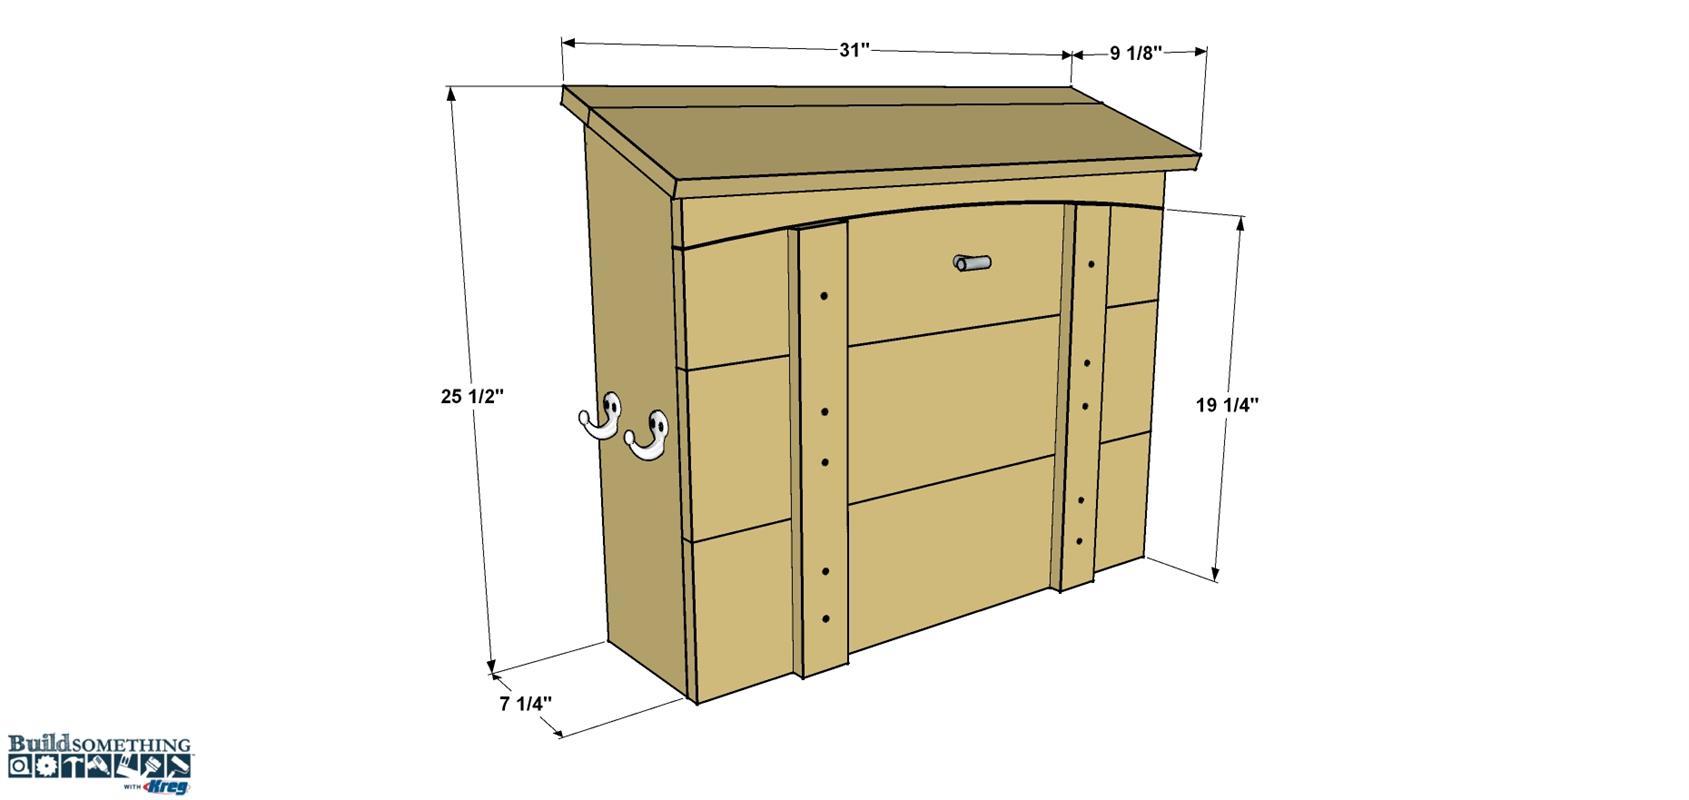
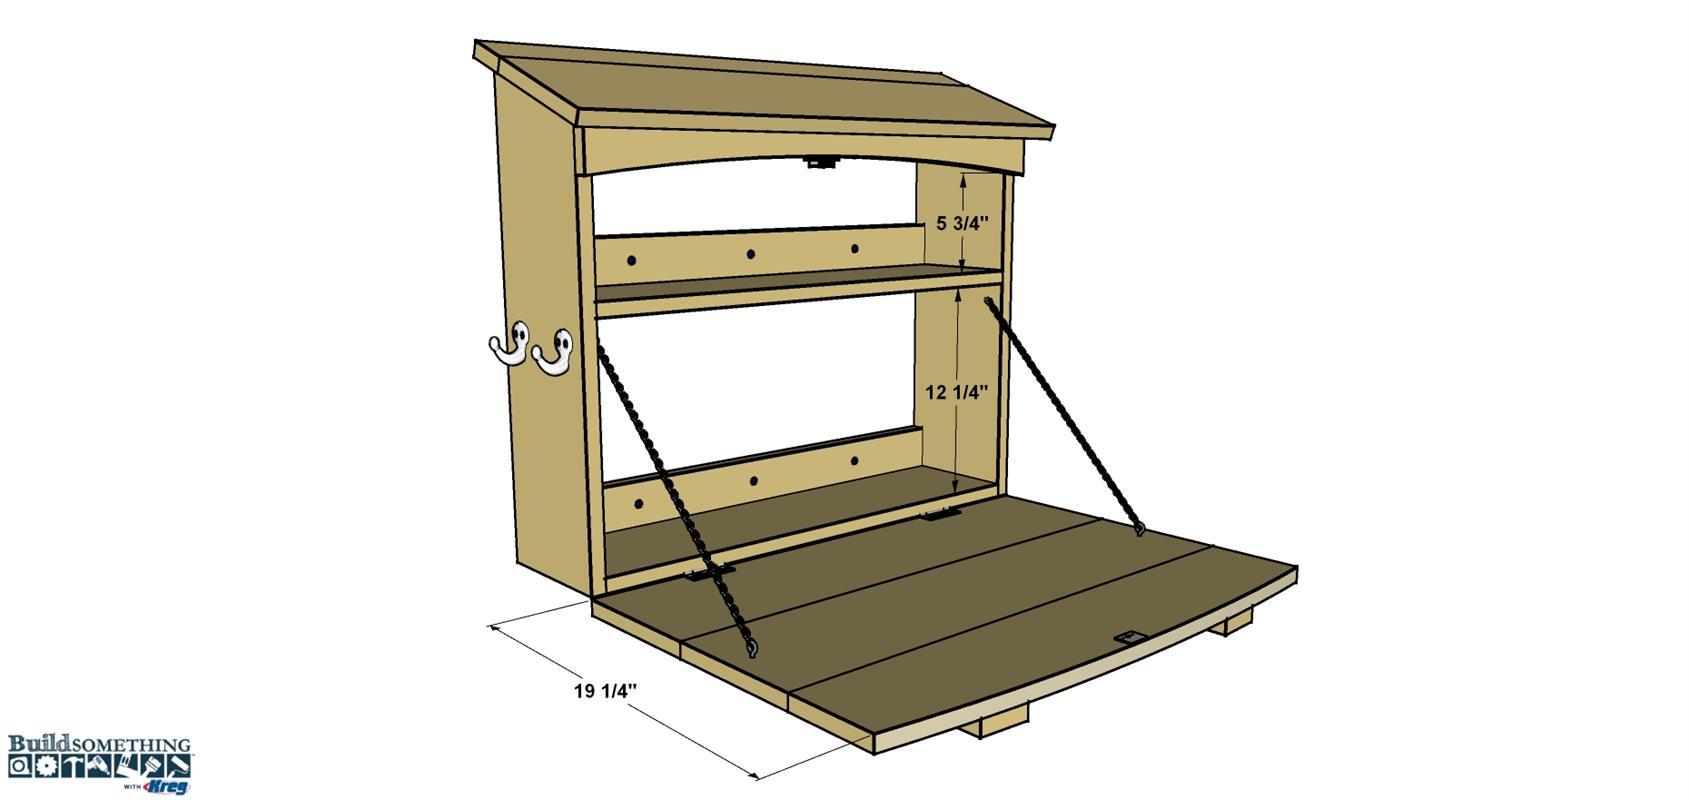


This versatile outdoor bar folds away when not in use, making it perfect for small spaces. The bar top provides just enough work surface to mix a cocktail or serve up brunch. The server is made from five cedar boards and goes together using pocket-hole joinery. You can build one in a weekend.
Tools
Kreg Tools


Other Tools
-
Miter Saw

-
Square
-
Clamps
-
Tape Measure
Materials
Wood Products
- 2 Board , 1x8 , 96"
- 1 Board , 1x8 , 72"
- 1 Board , 1x3 , 96"
- 1 Board , 1x3 , 48"
Hardware & Supplies
- 1 1 1/4" Blu-Kote coarse-thread Kreg pocket-hole screws
- 1 2 1/2" Blu-Kote coarse-thread Kreg pocket-hole screws
- 2 2 1/2" Non-Mortise Hinges
- 10 1 1/4" exterior flat-head wood screw
- 1 Magnetic catch
- 3 Feet jack chain
- 1 Pull
- 2 Hooks
- 1 Bottle opener
- 1 Exterior wood glue
- 1 Qt. Cedar Natural-tone Semi-Transparent Advanced Exterior Stain and Sealant
Cut List & Parts
- 2 Side , 3/4" x 7 1/4" x 24 3/4" cedar
- 1 Shelf , 3/4" x 7 1/4" x 27 1/2" cedar
- 1 Bottom , 3/4" x 7 1/4" x 27 1/2" cedar
- 2 Wall Cleat , 3/4" x 2 1/2" x 27 1/2" cedar
- 1 Wide Top , 3/4" x 7 1/4" x 31" cedar
- 1 Narrow Top , 3/4" x 2 1/2" x 31 " cedar
- 3 Door Board , 3/4" x 7 1/4" x 29 " cedar
- 2 Door Brace , 3/4" x 2 1/2" x 20" cedar
- 1 Latch Block , 3/4" x 5 1/4" x 3/4" cedar
Directions
-
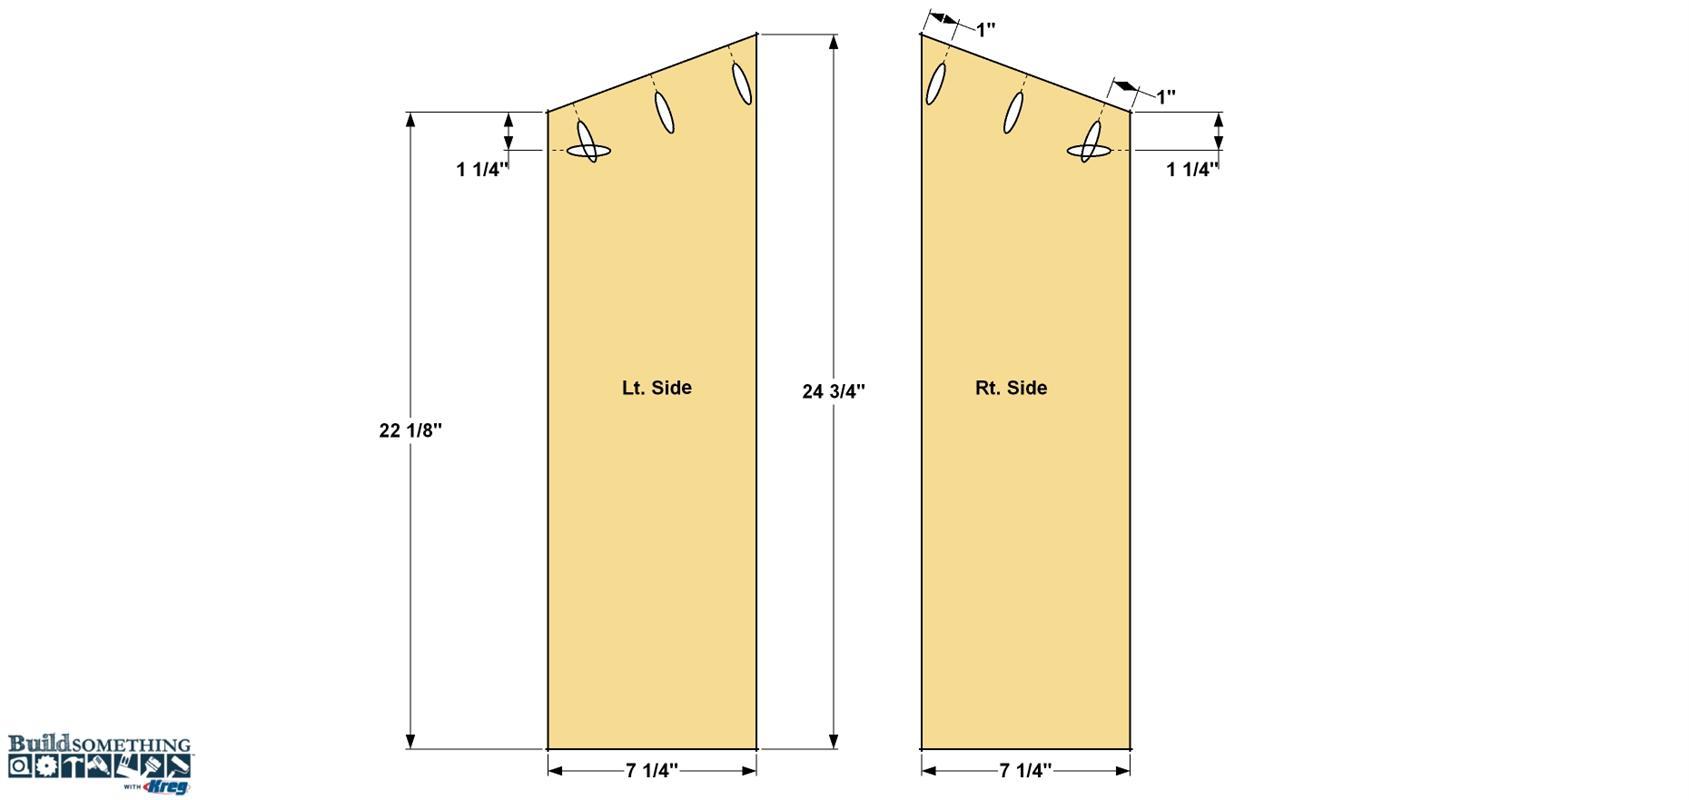
Make the Sides
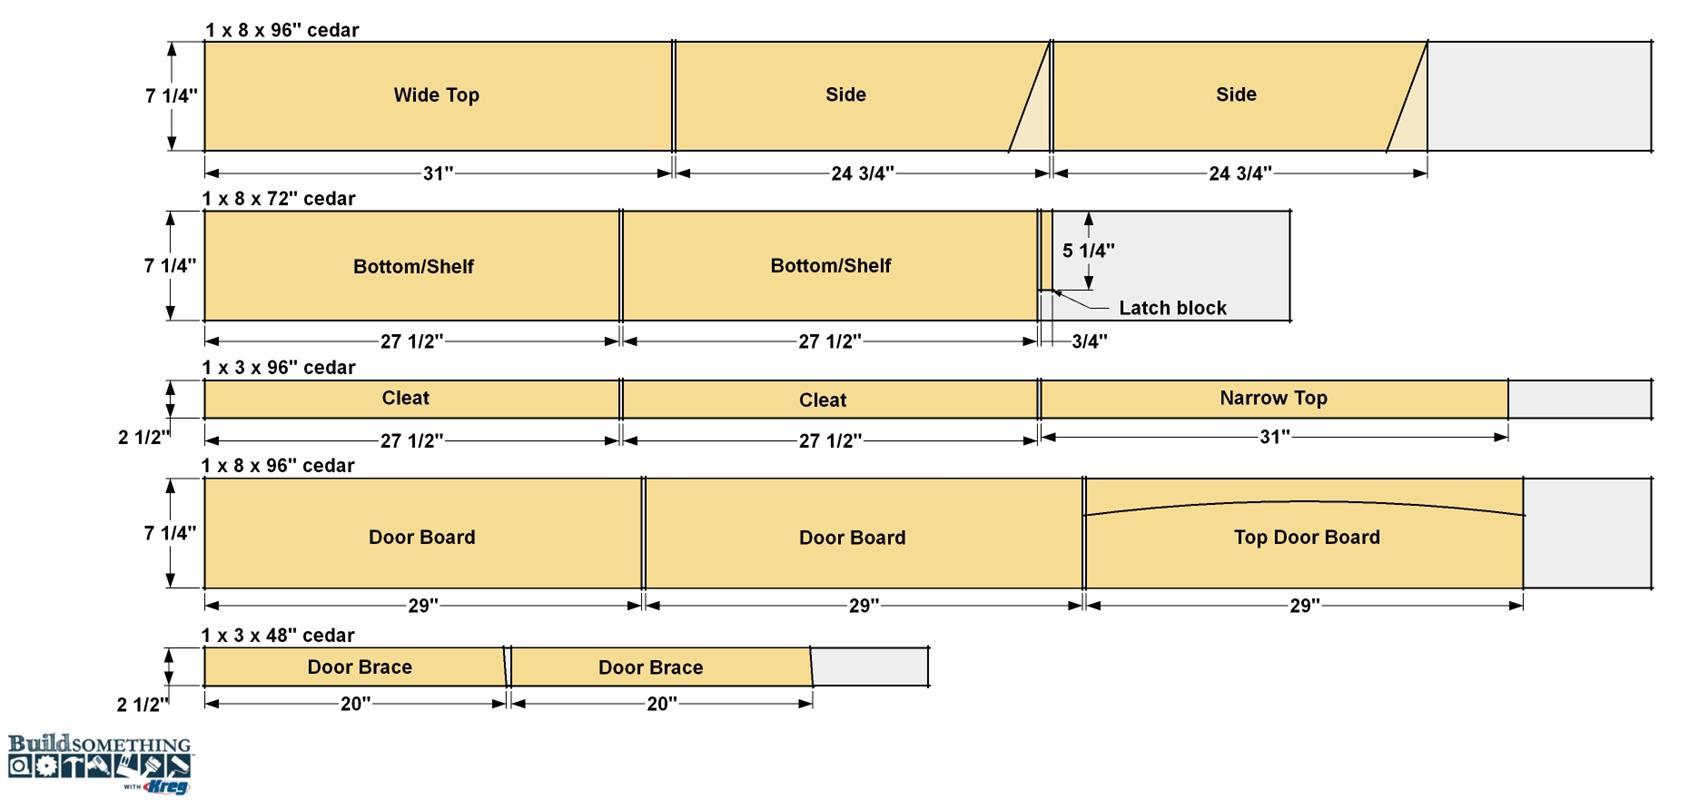
Start by cutting two Sides to length from a 1x8 cedar boards, as shown in the cutting diagram. Measure from the bottom to mark the length of the short edge. Cut the angled top as shown. Sometimes cedar has a smooth side and a rough side, for this project we chose to face the smooth sides inward. That means the two sides should mirror one another when drilling the pocket holes. Set your Kreg Pocket-Hole Jig for 3/4"-thick material, and then drill pocket holes in each of the parts at the locations shown.
-
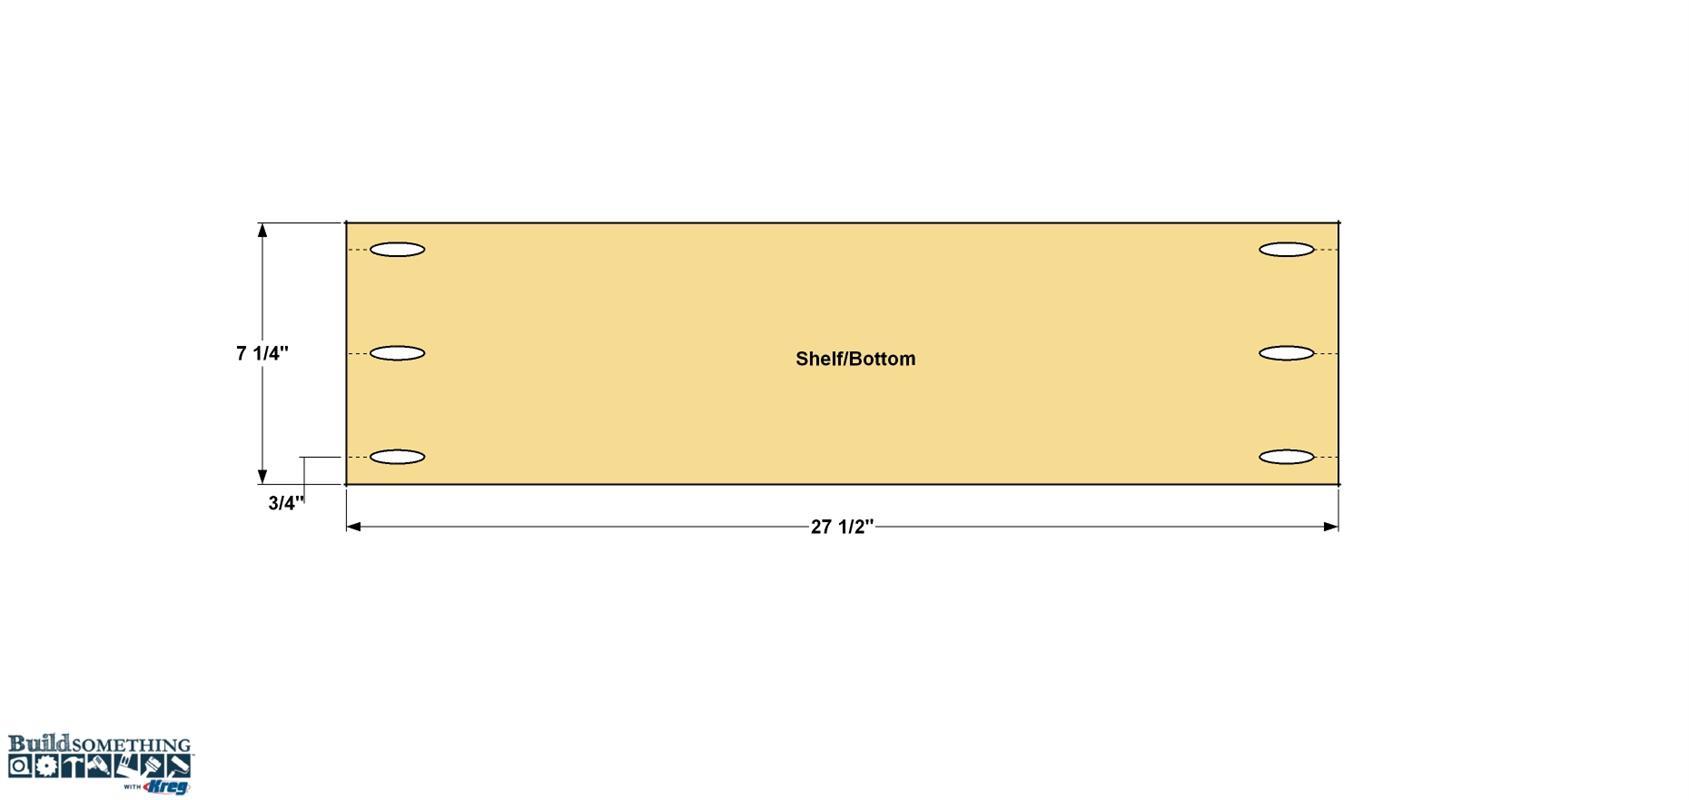
Make the Shelf and Bottom
Cut one Shelf and one Bottom from 1x8 cedar board, as shown in the cut diagram. Drill pocket holes on the rough side of each board at the locations shown.
-
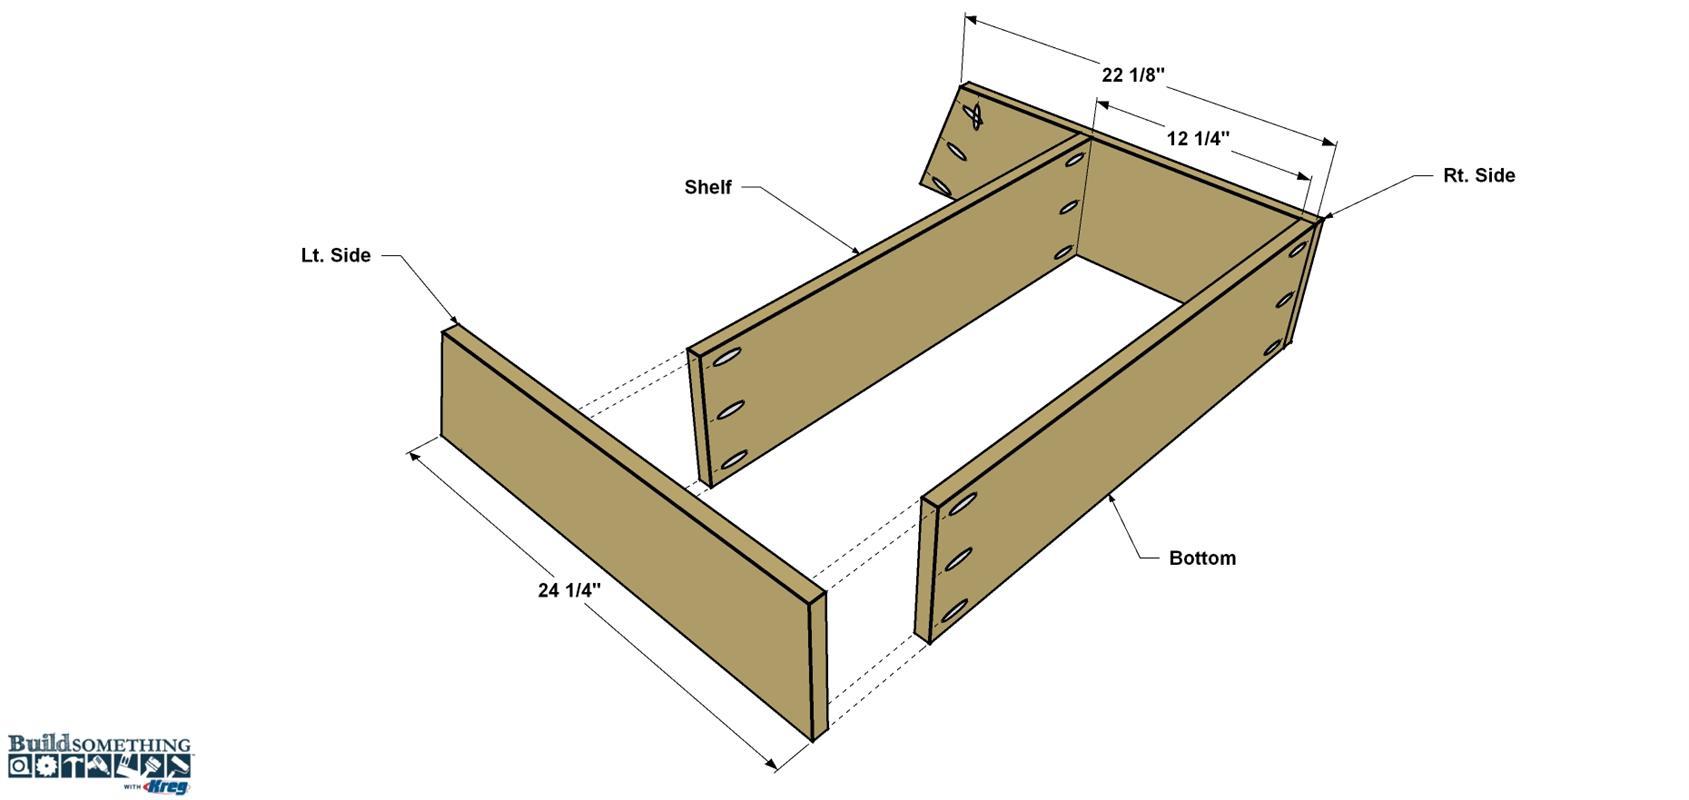
Assemble the Sides Shelf and Bottom
Position the first Side against the edge of the Bottom board so they are flush at the bottom, as shown. Make sure the pocket holes face down. Secure the Bottom to the Side with 1 1/4" corrosion resistant Kreg Blue-Kote™ screws. Next, apply glue to the ends of the Shelf, again with the pocket holes facing down, and position it against the Side where shown. Secure the Shelf with Kreg screws. Repeat the process for the second side.
-
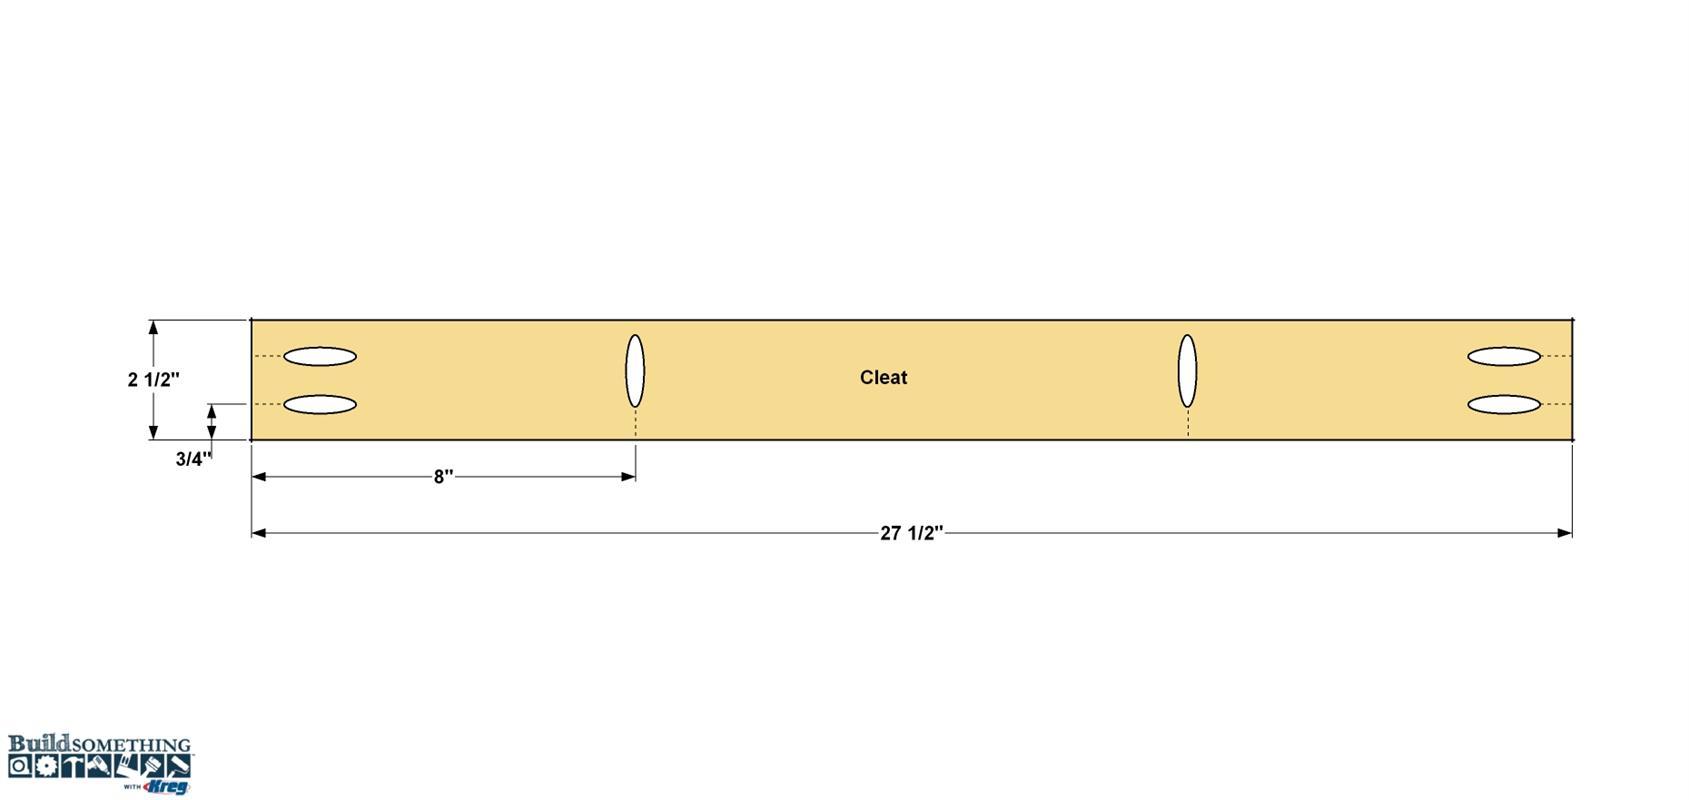
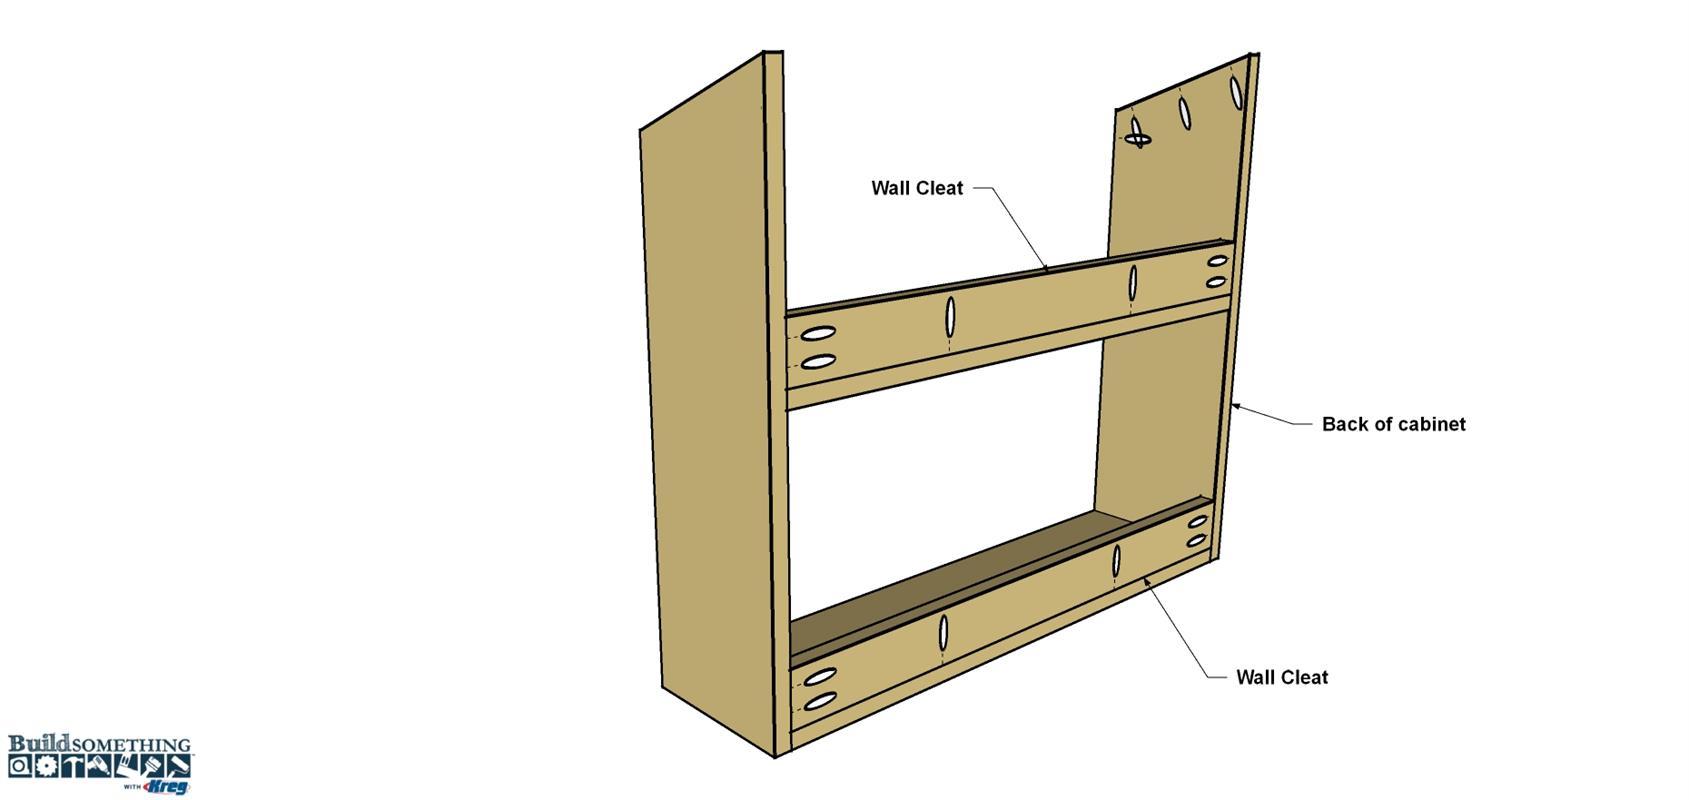
Make the Wall Cleats
From a 1x3 cedar board, cut two Wall Cleats to length, as shown in the cutting diagram. Drill pocket holes in each board at the locations shown
-
Install the Wall Cleats
Cut the Wide Top board from a 1x8 and the Narrow Top as shown in the cutting diagram. Drill pocket holes in the Wide Top at the locations shown.
-
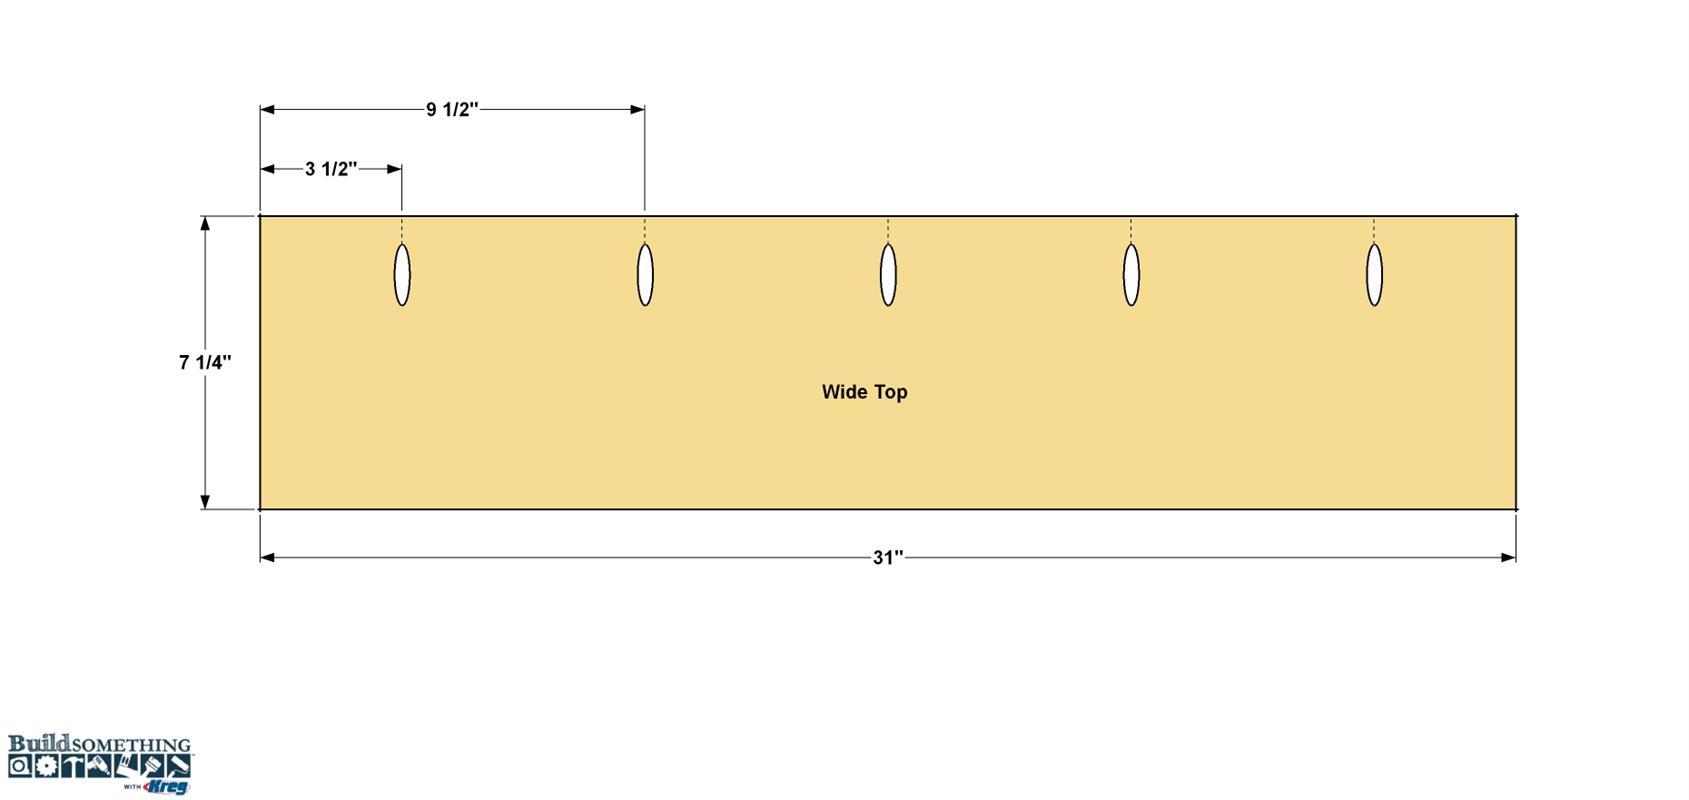
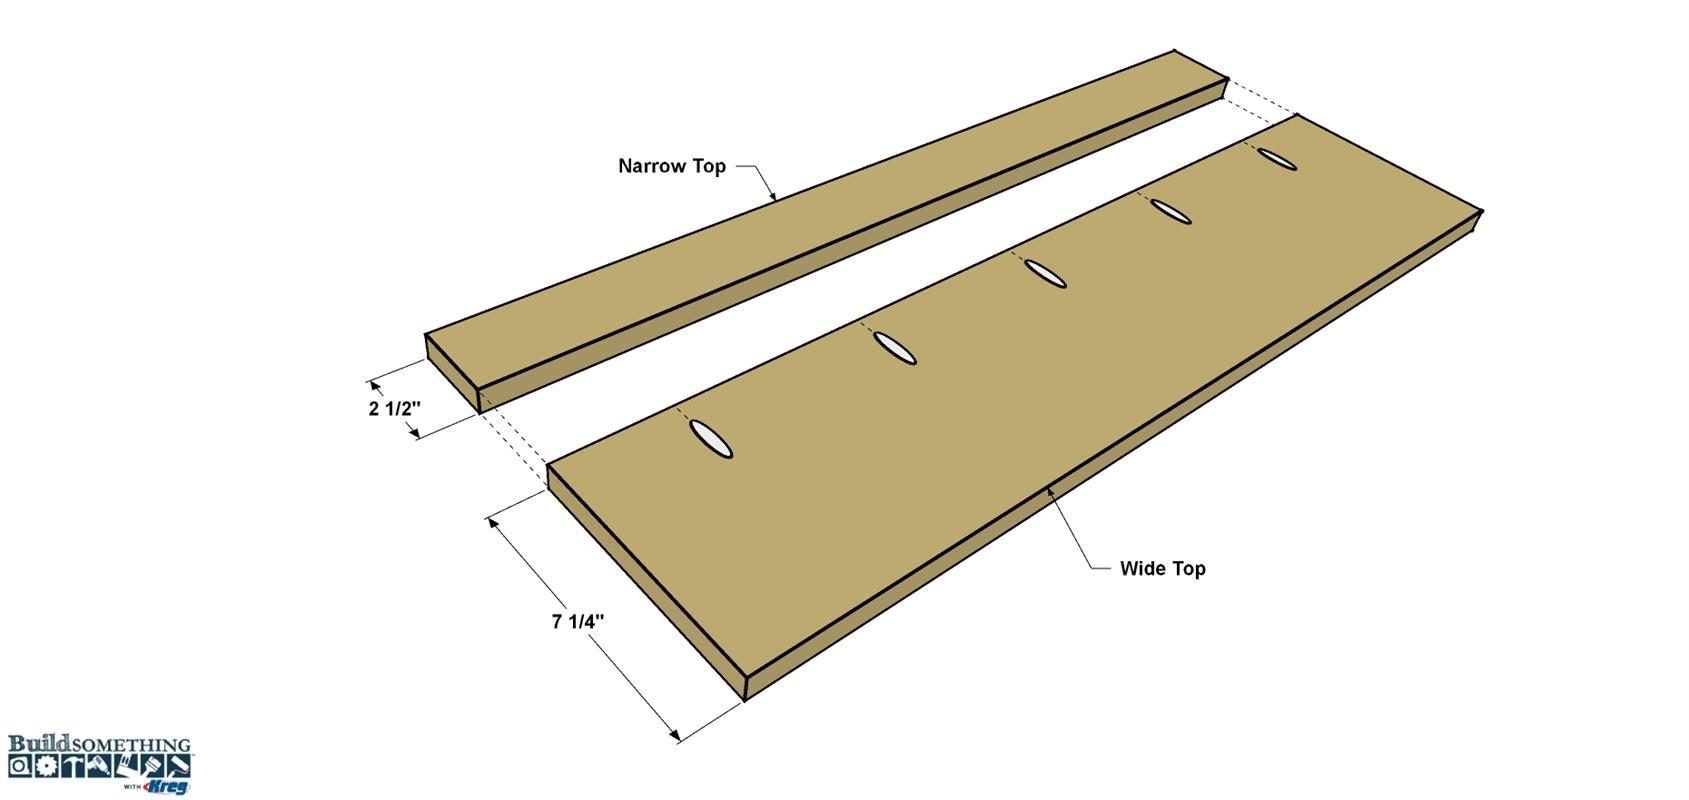
Cut the Top Boards
Cut the Wide Top board from a 1x8 and the Narrow Top from a 1x3 board as shown in the cutting diagram. Drill pocket holes in the Wide Top at the locations shown.
-
Assemble the Top
Apply glue to the mating edges of the boards, secure them with clamps and make sure the faces and ends are flush. Secure the boards with 1 1/4" Kreg Blue-Kote™ screws.
-
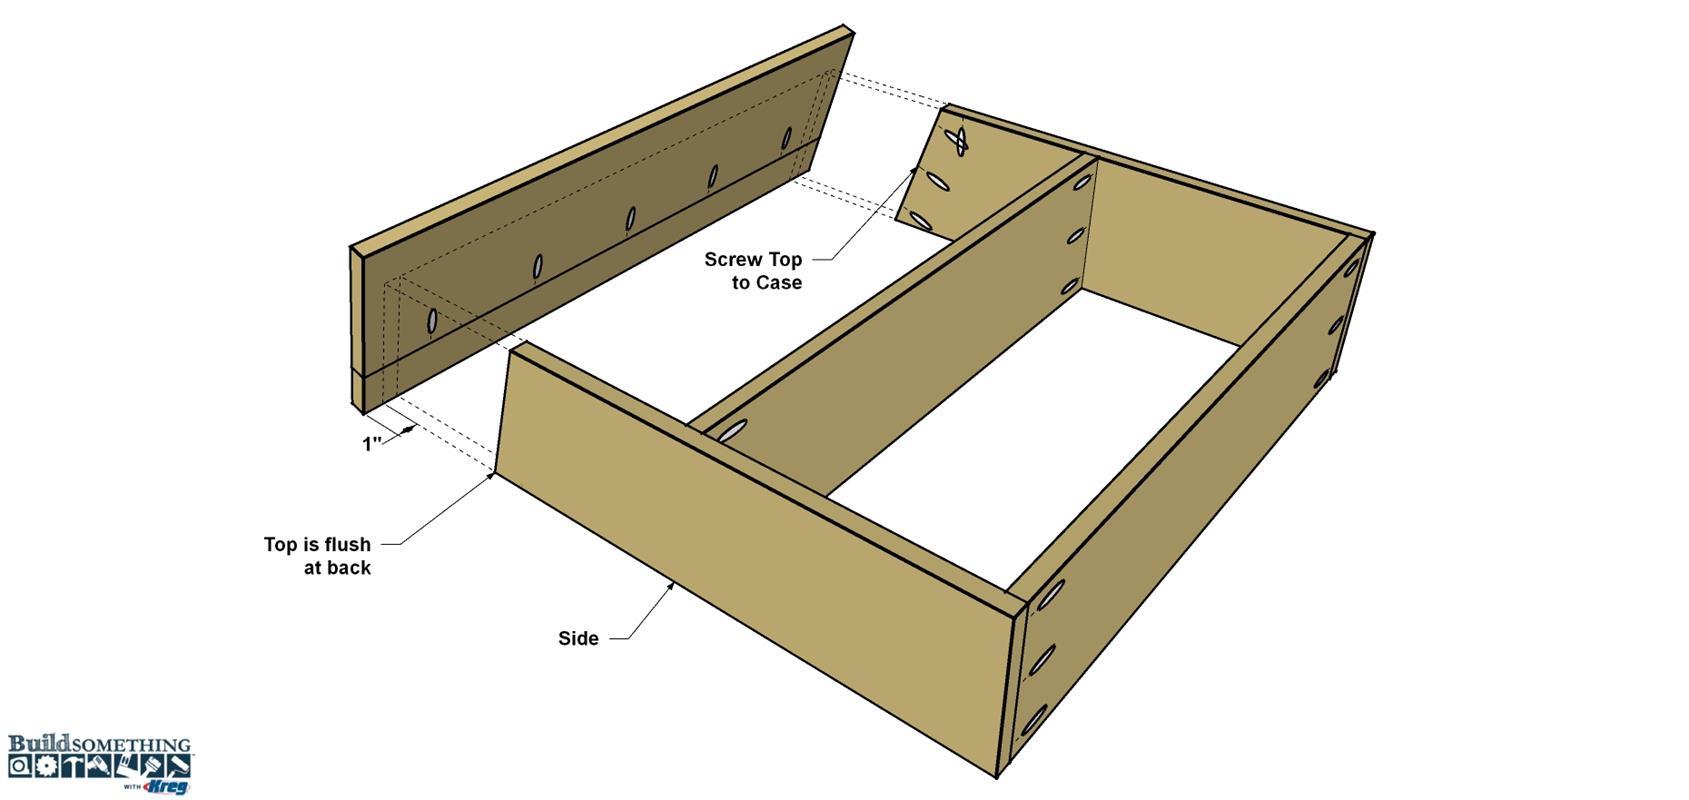
Attach the Top
Now you can attach the Top to the server. Add glue to the upper angled edge of each Side. Position the Top so it is flush at the back and overhangs equally on each side. Secure the Top with Kreg Blue-Kote™ screws.
-
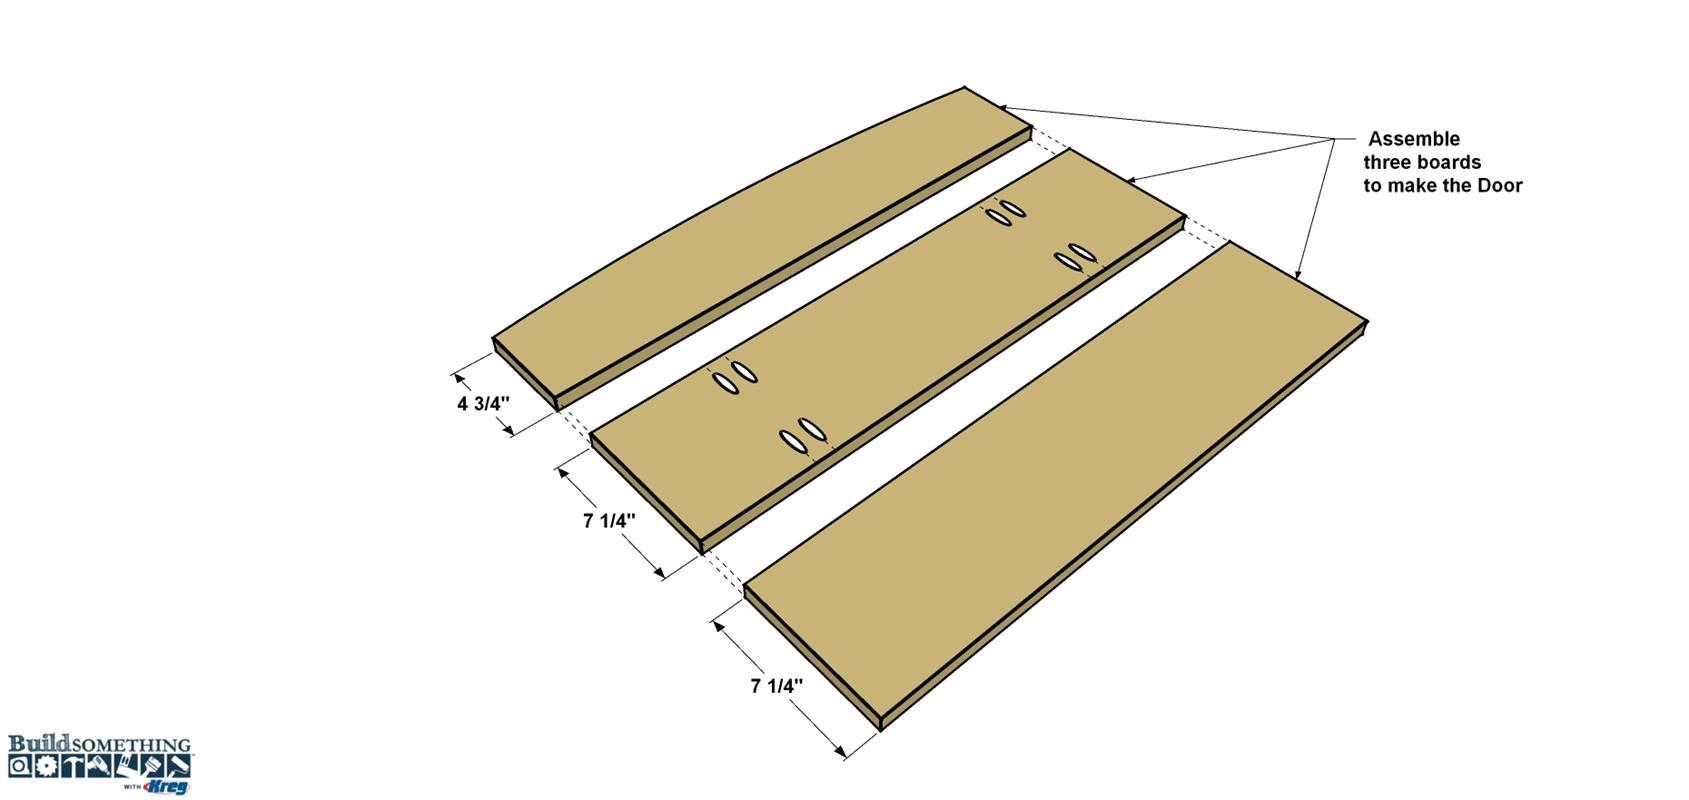
Make the Door Boards
Cut three Door boards to length from a 1x8 as shown in the cutting diagram. Set one aside for a later step. On one board, drill pocket holes on the rough side, at the locations shown, this will be the middle board. On the second board, layout the arch and cut the itout with a jigsaw. See the tip below for how to layout large curves. Sand the curves smooth. Set the smaller Arch board aside for the moment. We will come back to it in step 11.
TIP: Layout Large Curved Lines
Here’s an easy way to lay out a smooth, consistent curve, as is needed for the table Top edges, by using a piece of screen molding. This inexpensive molding is available in any home center, and it’s flexible enough to bend, but stiff enough to do so consistently. First, Mark the centerline of the plywood, as well as the locations of the ends of the curves as shown. Set the screen molding on one end mark, and then position a clamp, as shown, to hold it in place. Then do the same at the other end. Now flex the screen molding at the center line until it reaches the edge of the plywood. Then trace the molding to mark the curve onto the table top. Do this along one edge, and then the other.

-
Assemble the Door
Glue and align the Door boards as shown. Secure the boards with Kreg Blue-Kote™ screws.
-
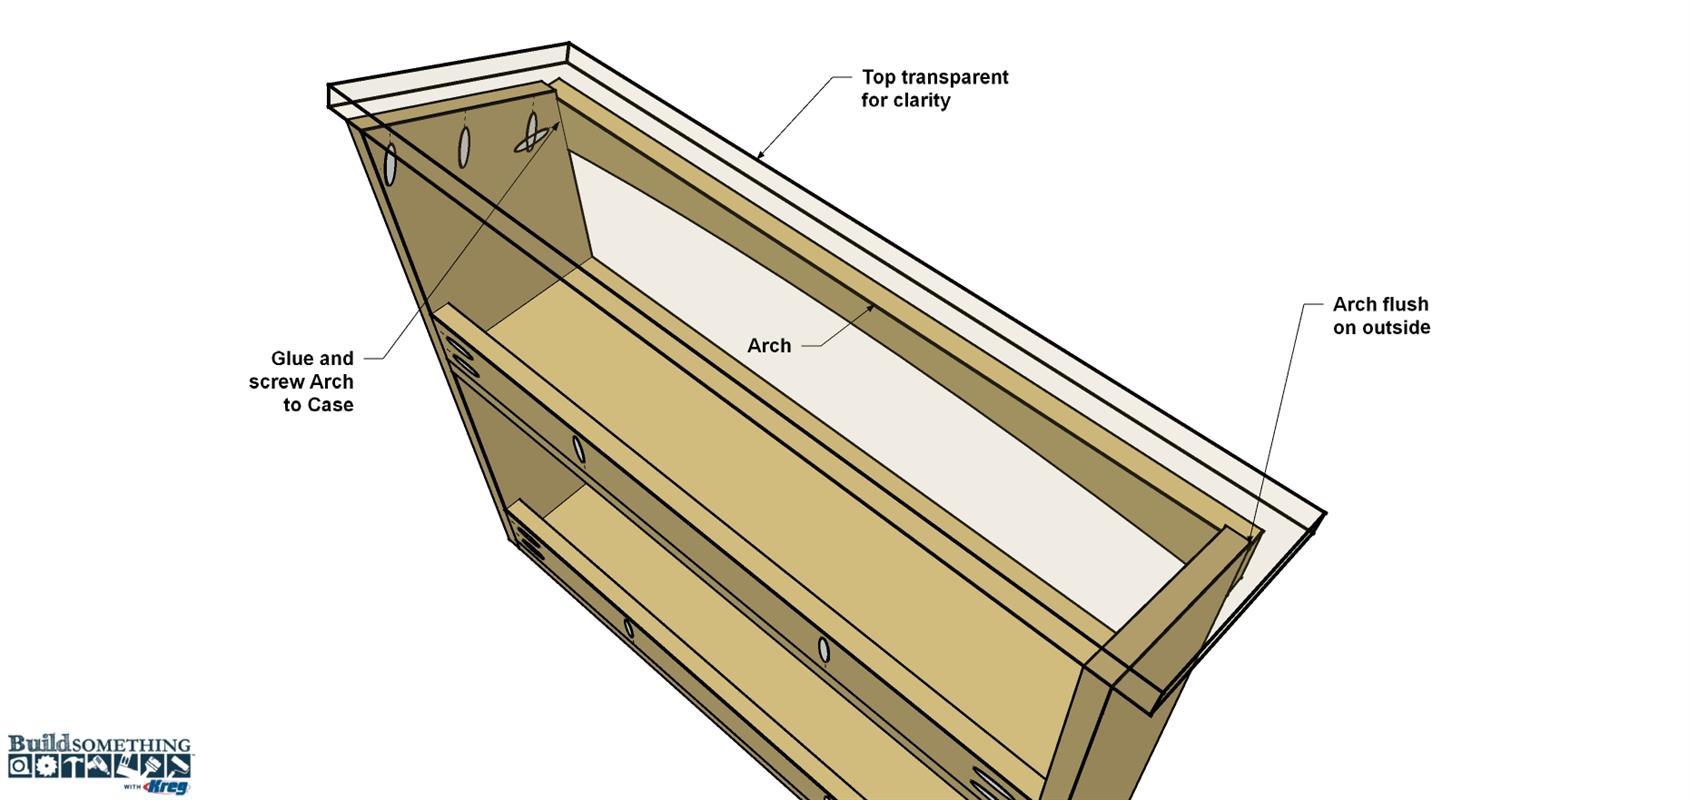
Attach the Top Arch
Finally, add the small Arch board from step 9, to the server just under the Top. Apply glue to the Arch where it will contact the Sides, and position against the cabinet, as shown. Secure the arch to the server with two Kreg Blue-Kote™ screws.
-
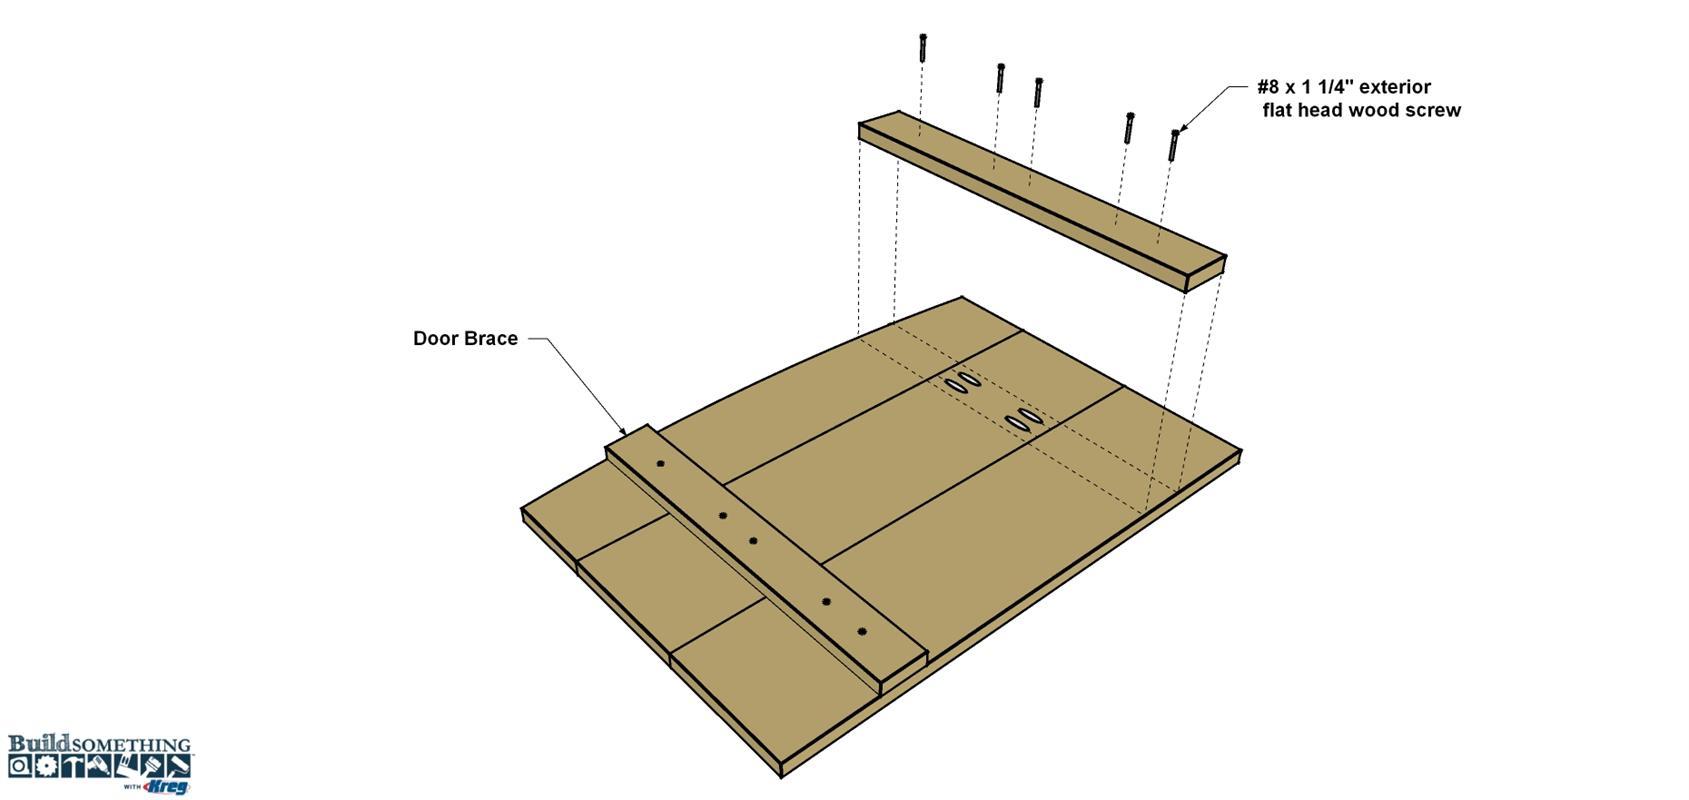
Cut the Door Braces
Cut two Door Braces to length from a 1x3 board, as shown in the cutting diagram. Cut the shallow angles on the top ends of each Brace so they mirror one another and are close to the angle of the Door curve. You can sand the Braces flush with the curve later. Lay out and drill pilot holes one each Brace at the locations shown.

-
Add the Door Braces
For this next step we won’t use any glue. Position each brace on where the Door, where shown, and secure them with 1 1/4" exterior wood screws.
-
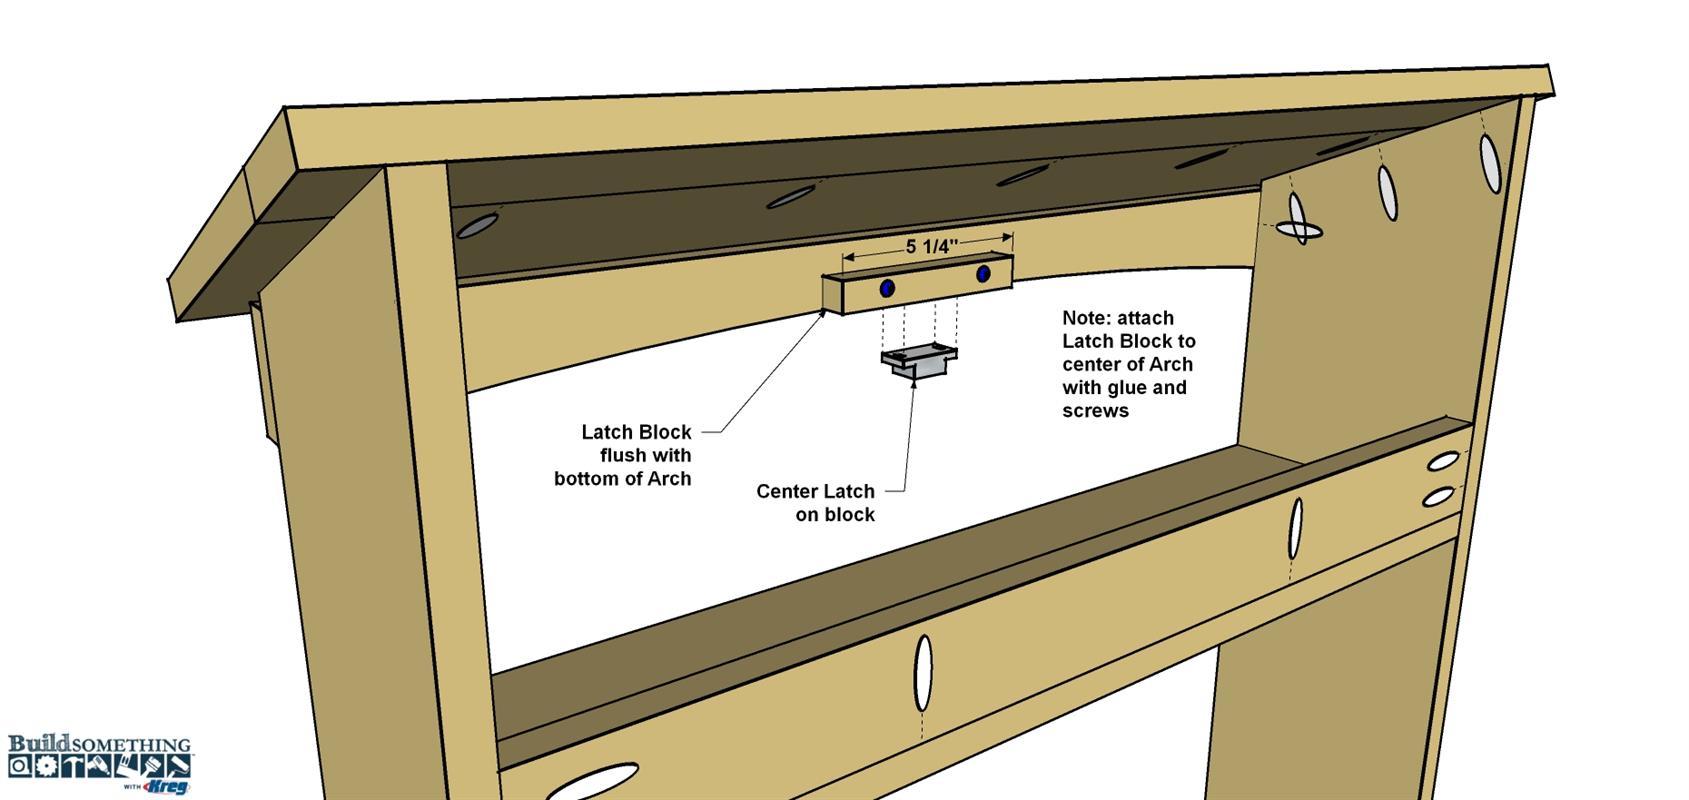
Make and Install the Latch Block
Cut a Latch Block from a 1x8 board, as shown in the cutting diagram. The block will support the magnetic latch used to secure the door when it’s in the closed position. Drill a couple of small pilot holes in the block to avoid splitting it when you screw it to the inside of the server. Attach it to the server with some glue and two 1 1/4" Kreg Blue-Kote™ screws, where shown. This will support the magnetic latch used to secure the door when it’s in the closed position.
-
Sand and Finish
Sand any rough edges of the server, clean any dust with a rag, and apply an exterior rated finish. We used Olympic Natural Cedar-Tone Semi-transparent stain and sealer.
-
Install the Hardware
First, place the hinges so they align with the bottom of the Door Braces and install them according to the manufacturer’s instructions.
Next, install the eye screws, the door chains, the magnetic latch and the door pull where shown. Lastly, apply any accessories you’d like to add to the outsides of the cabinet. We attached a couple of towel hooks and a bottle opener to the sides.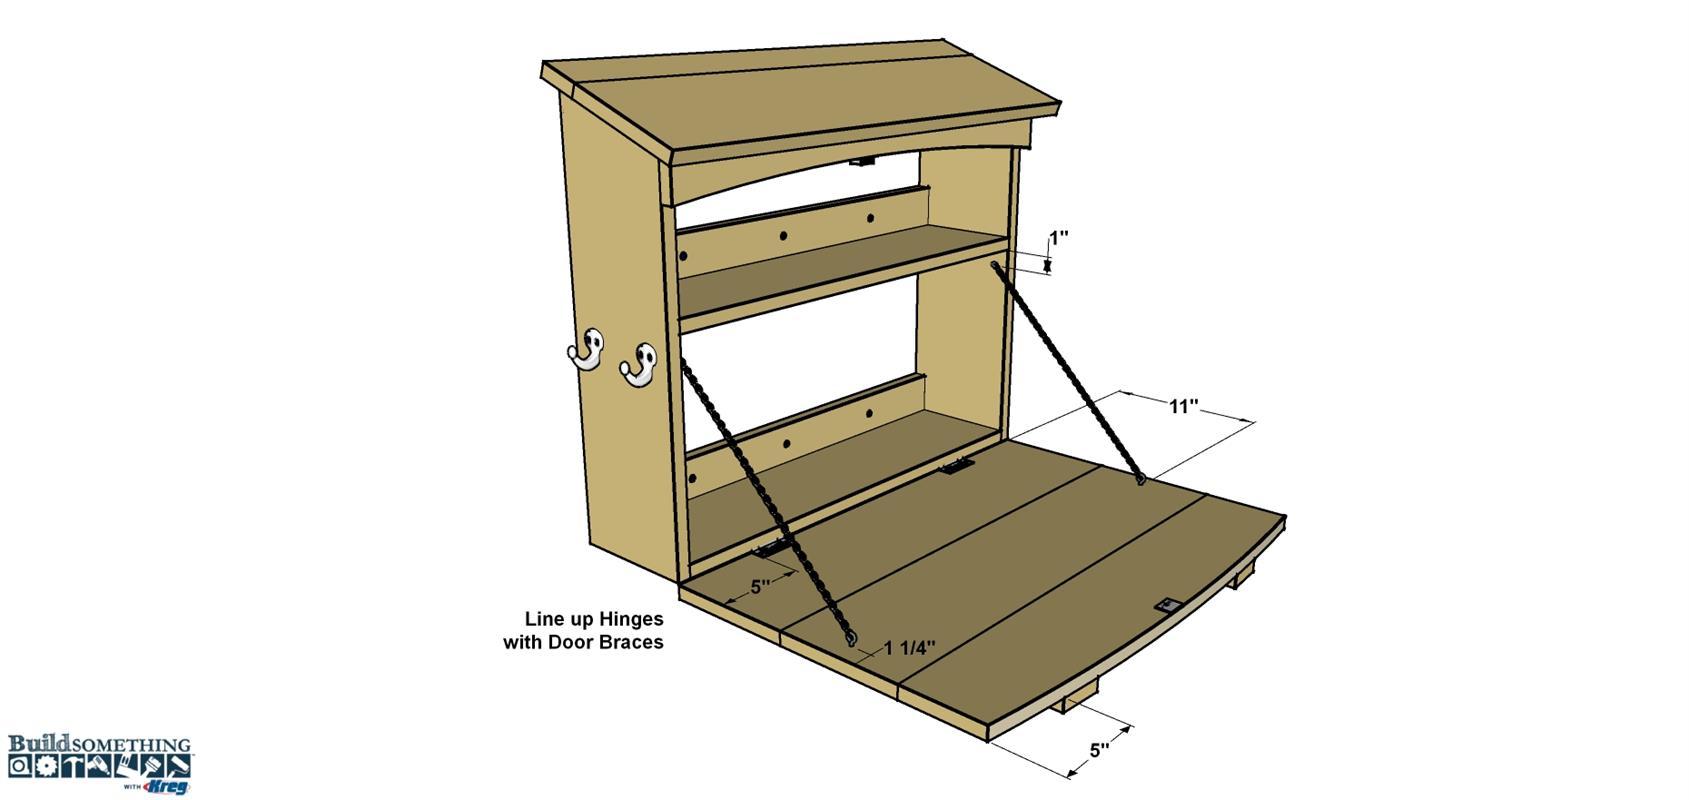
-
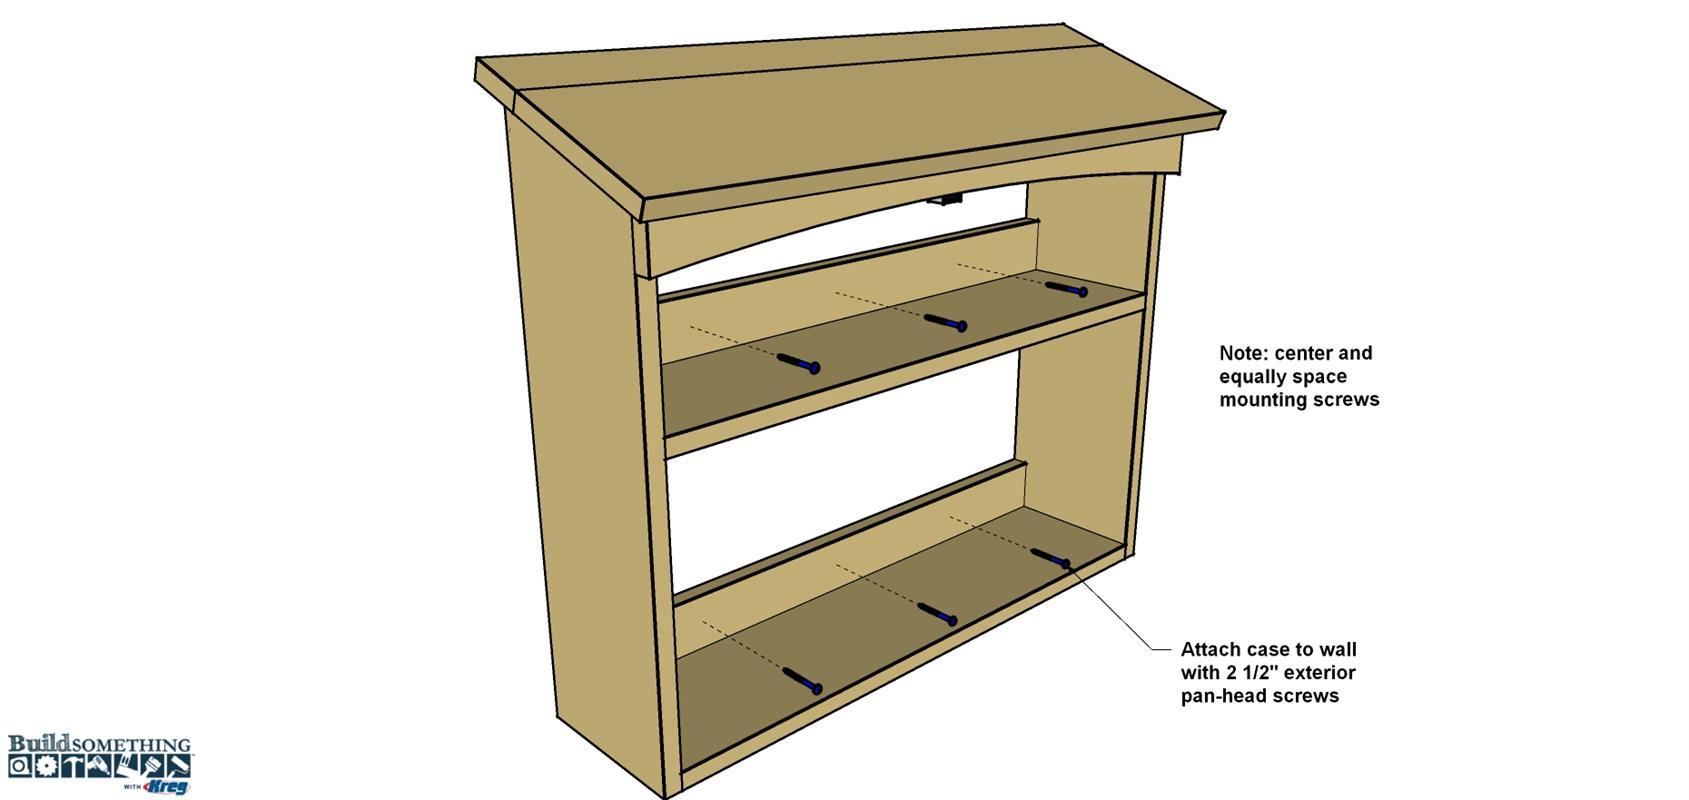
Hang the Server
With some help from a friend, place the server against the wall and make sure it’s level. Try and locate studs to anchor the cabinet to. Drill pilot holes through the wall cleats and drive 2 1/2" Kreg Blue-Kote™ screws to hold it in place. If you’re unable to locate wall studs, it may be necessary to install a few wall anchors first.