DIY Outdoor Bar – Outdoor Bar Project Plan
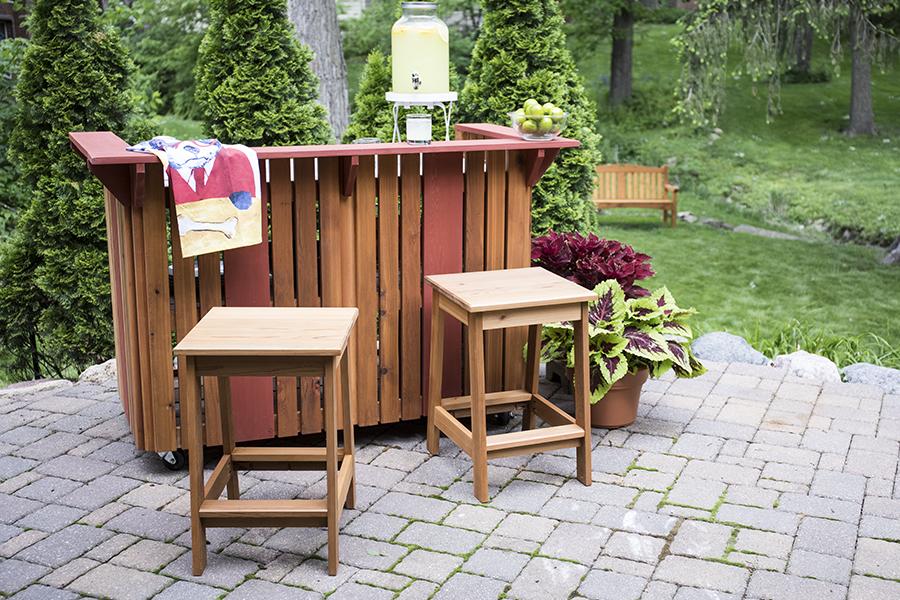
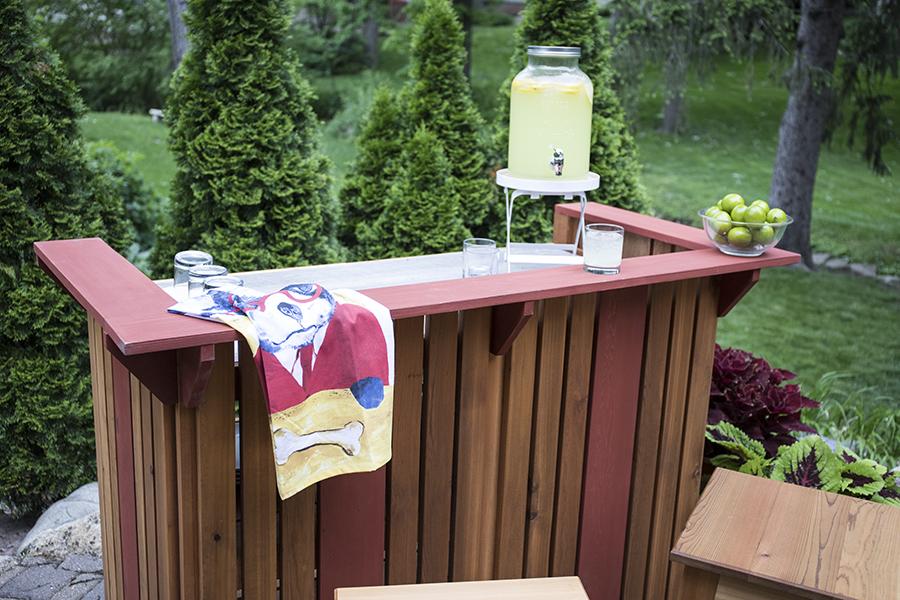
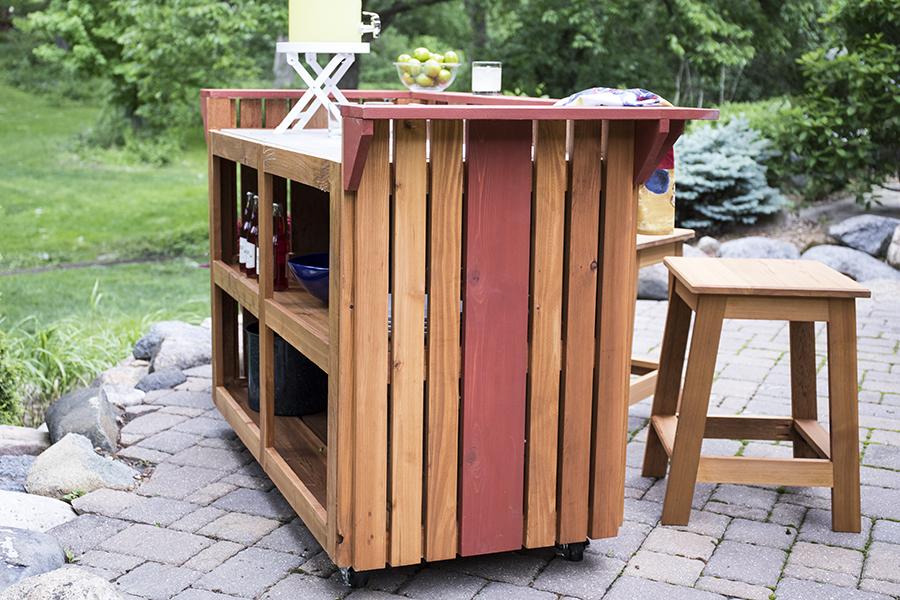
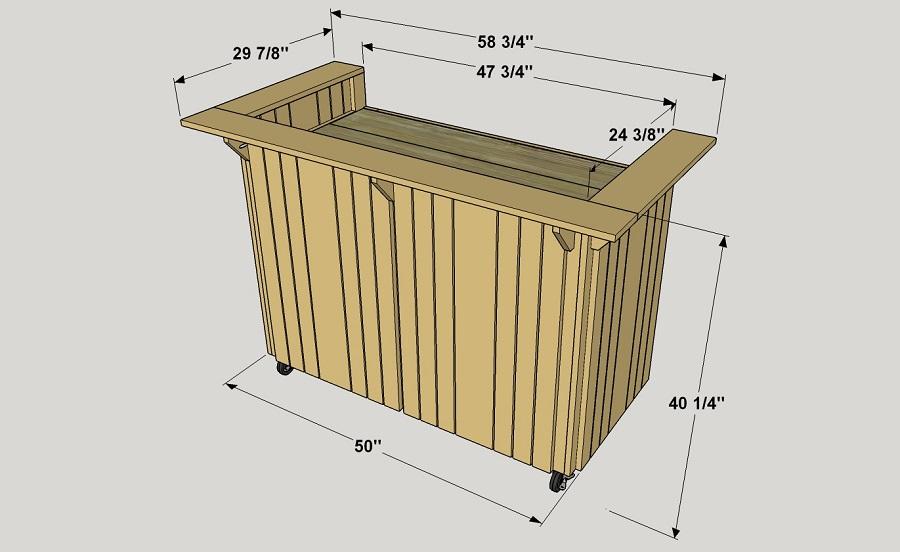
By Kreg ToolStep up your entertaining swagger with an outdoor bar that’s sure to be the hit of any backyard event. It’s made from cedar so it looks great and will last, and it has a tile top for easy cleanup. You can build one for yourself using just a few tools and by making basic cuts.
Directions
-
Make the Shelf Frame Parts
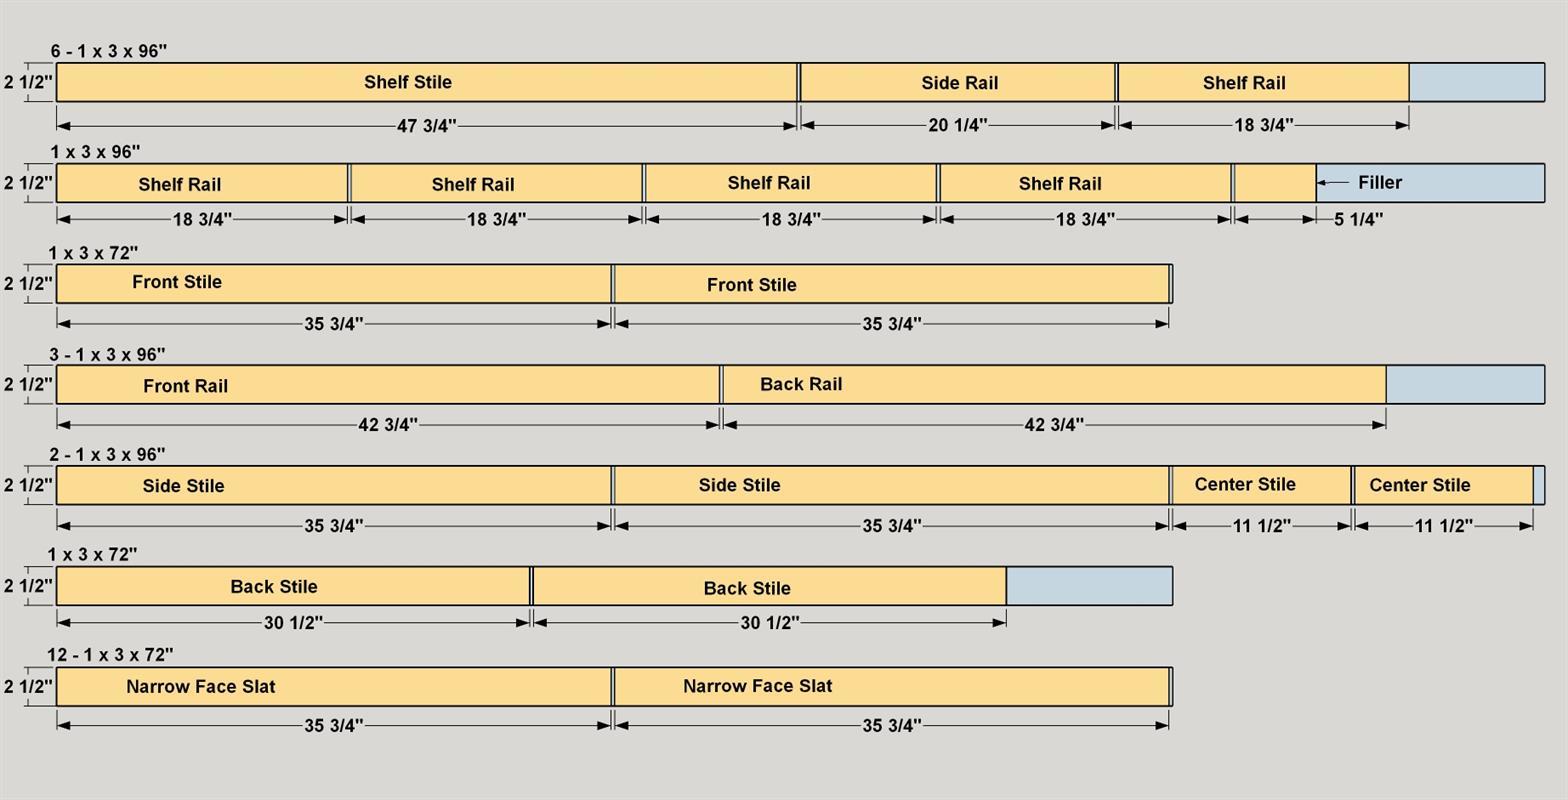
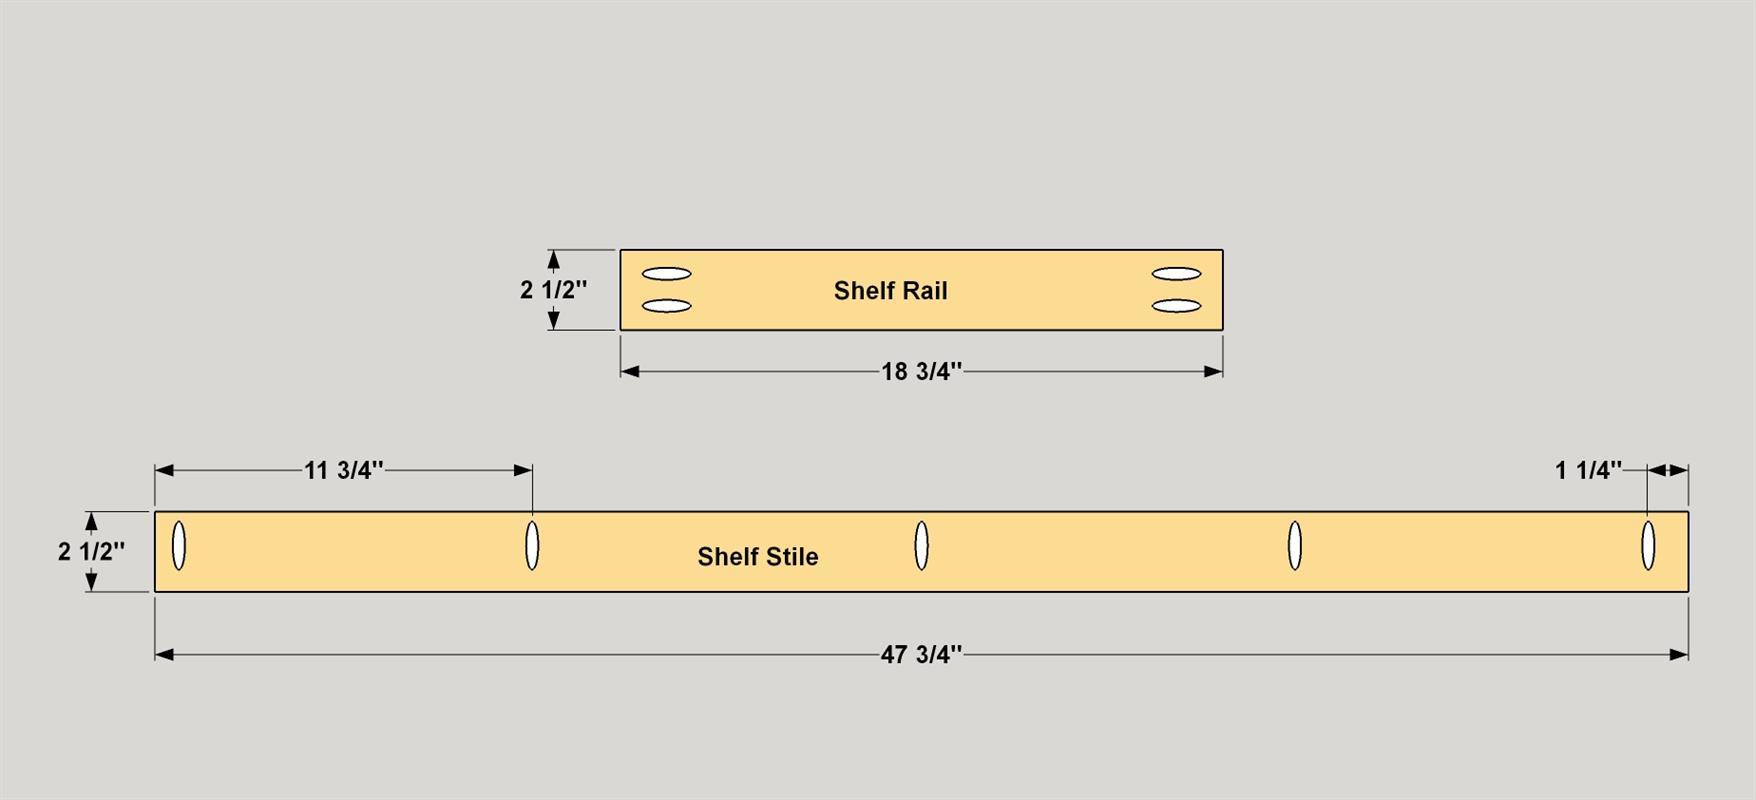
Cut six Shelf Stiles and ten Shelf Rails to length from 1x3 cedar, as shown in the cut diagram. Set your Kreg Jig® for 3/4"-thick material, and then drill pocket holes in the ends of each Rail, and along one edge of each Shelf Stile, as shown. Typically, “1-by” cedar has a smooth face and a rougher face. For the best look on this project, drill the pocket holes in the rough face of the boards throughout this project.
-
Assemble the Shelf Frames
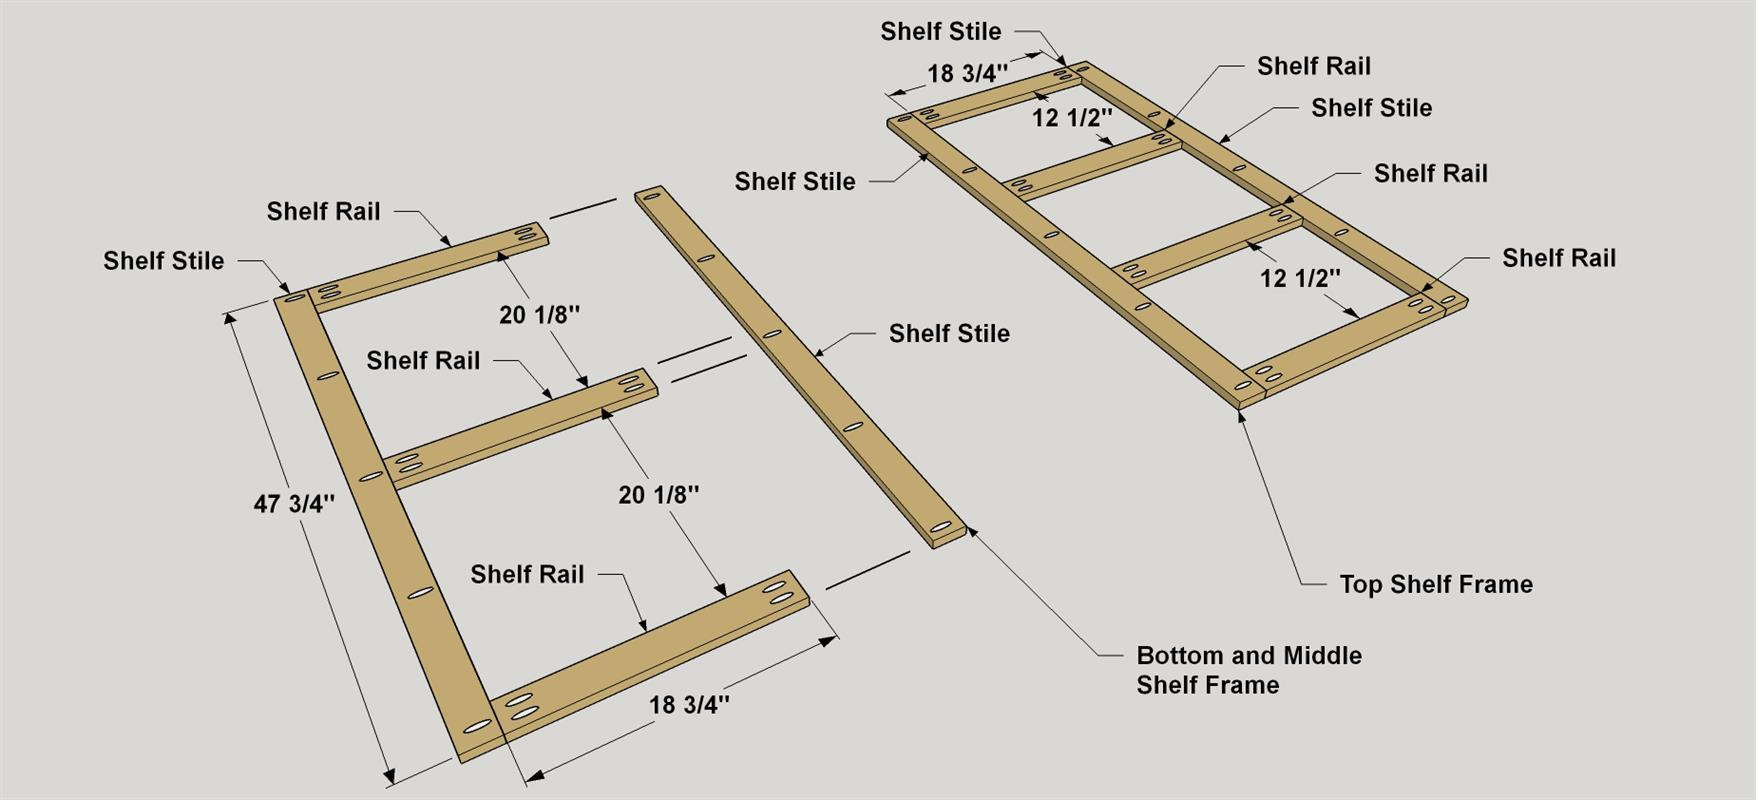
Assemble the bottom and middle shelf frames by positioning three Shelf Rails and two Stiles as shown. Make sure the Shelf Stiles are oriented so that the pocket holes point outward. Apply waterproof glue to the ends of the Rails, and then screw them to the Stiles using 1 1/4" Blue-Kote™ pocket-hole screws. Then assemble the top shelf frame as shown, in the same way. It has four rails, instead of three, because it supports the tile backer and tile that will get added later.
-
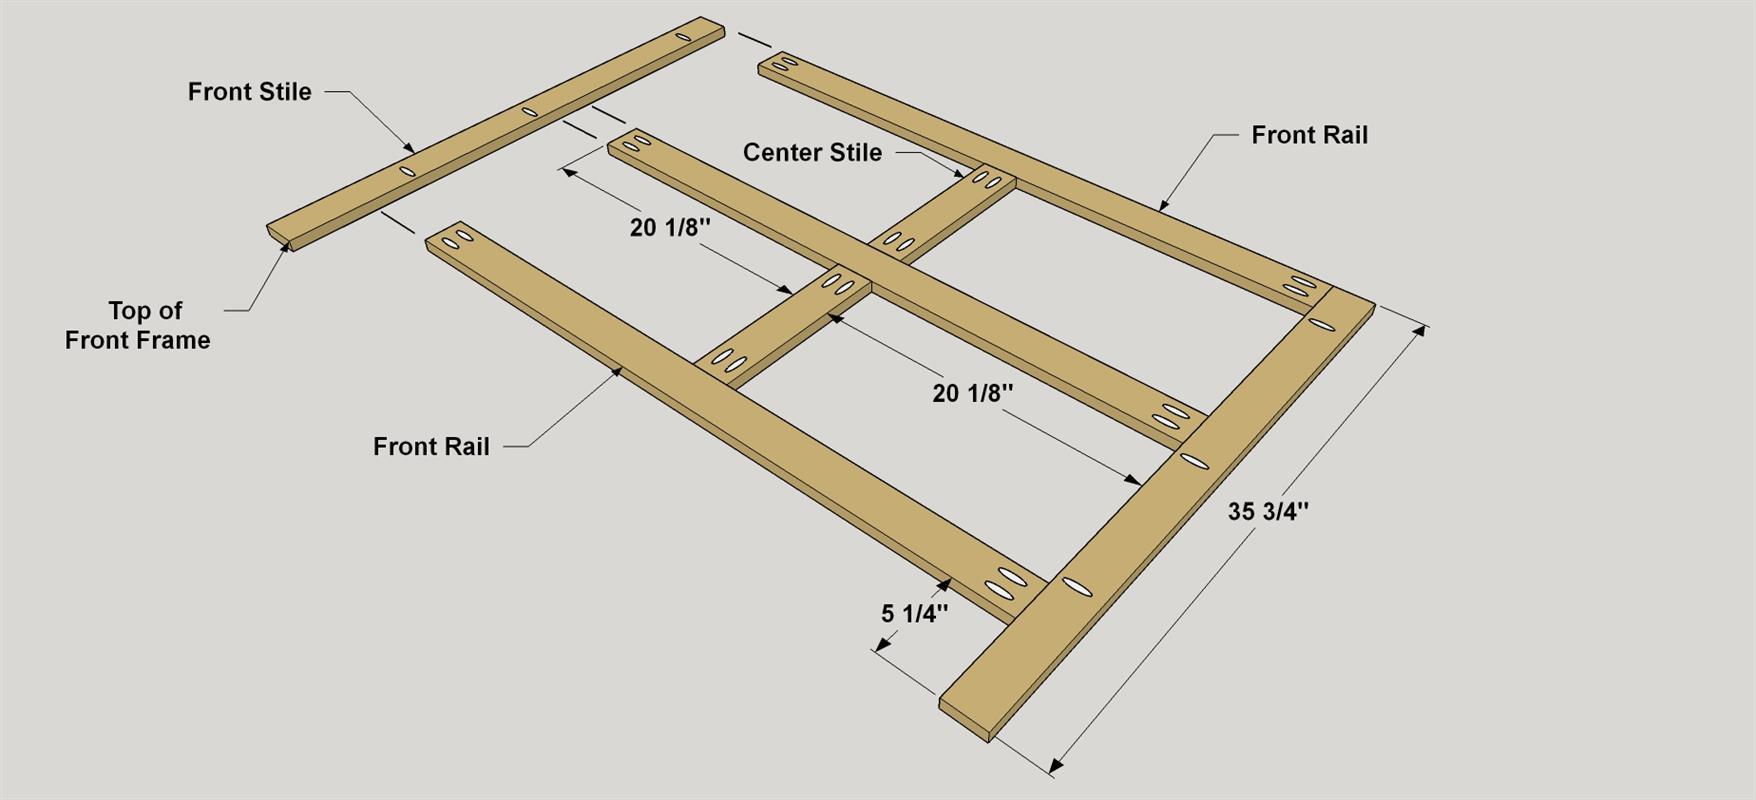
Make the Front Frame Parts
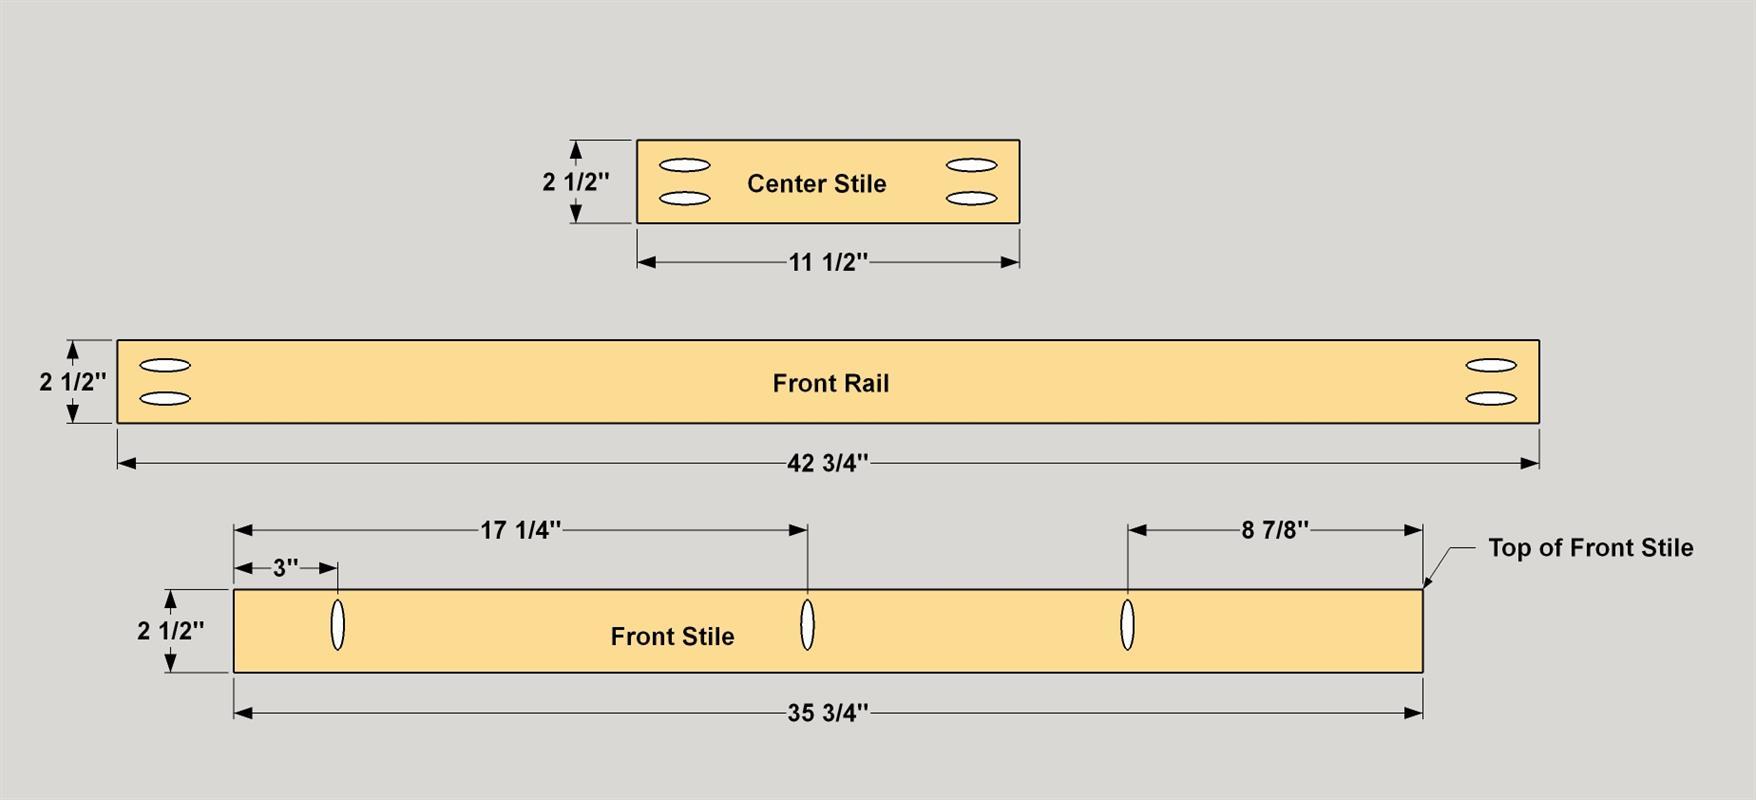
Cut three Front Rails, two Front Stiles, and two Center Stiles to length from 1x3 cedar, as shown in the cut diagram. On the rough side of the board, drill pocket holes in the ends of each Front Rail and each Center Stile, as shown. Then drill pocket holes along the edge of each Front Stile. Note that you’ll need the Front Stiles to be “mirror images” of each other, so that the pocket holes will face outward on each Stile
-
Assemble the Front Frame
First, position the lowest Front Rail even with the end of one of the Front Stiles, as shown. Make sure the pocket holes in the Stile face outward. Attach Rail to the Stile using glue and 1 1/4" Blue-Kote pocket-hole screws. Next, position the first Center Stile at the location shown and secure it with glue and screws. Repeat the process for the next Front Rail, Center Stile, and then for the last Front Rail. Finally, add the last Front Stile.
-
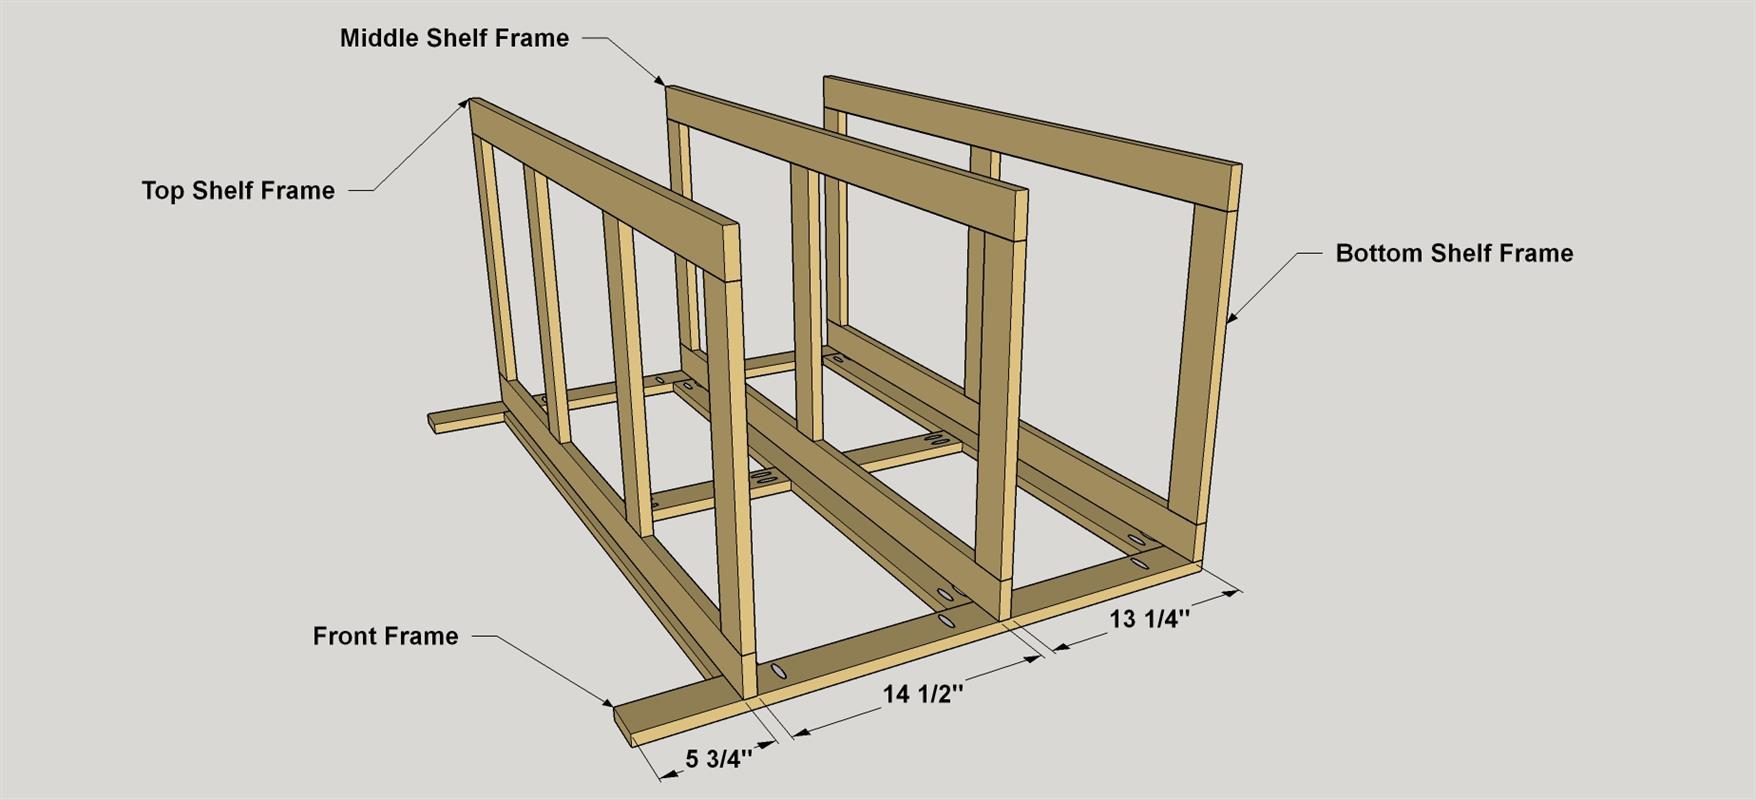
Attach the Shelf Frames
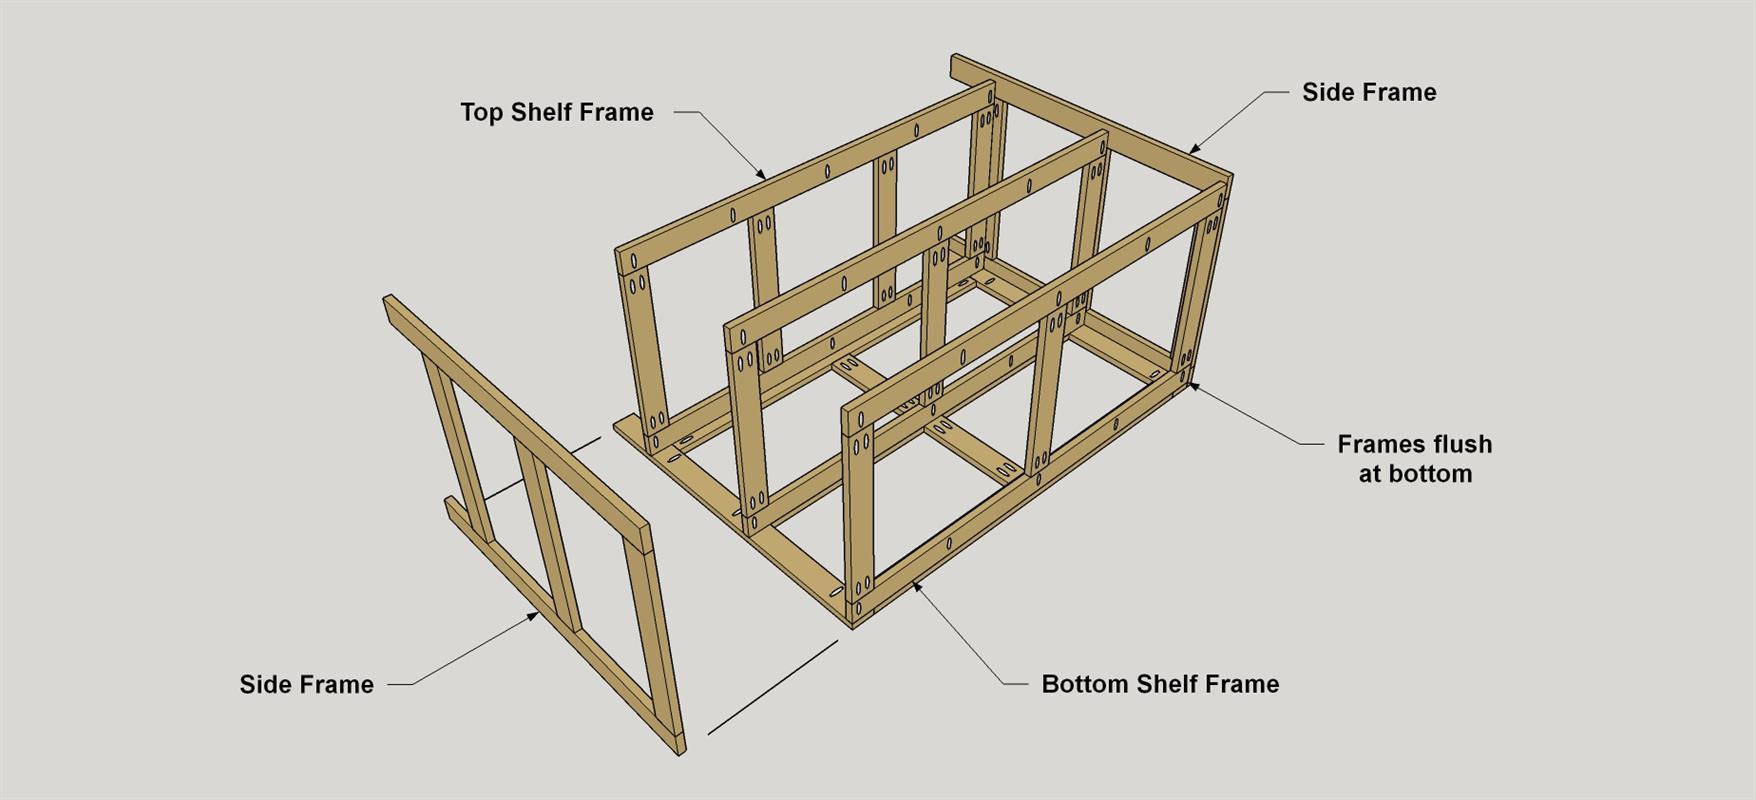
Place the Front Frame flat on a work surface with the pocket holes facing up. Position the each Shelf Frame as shown (with the pocket holes facing toward the bottom of the front frame). Apply waterproof glue to the mating edge of each shelf frame, and then attach it using 1 1/4" Blue-Kote screws.
-
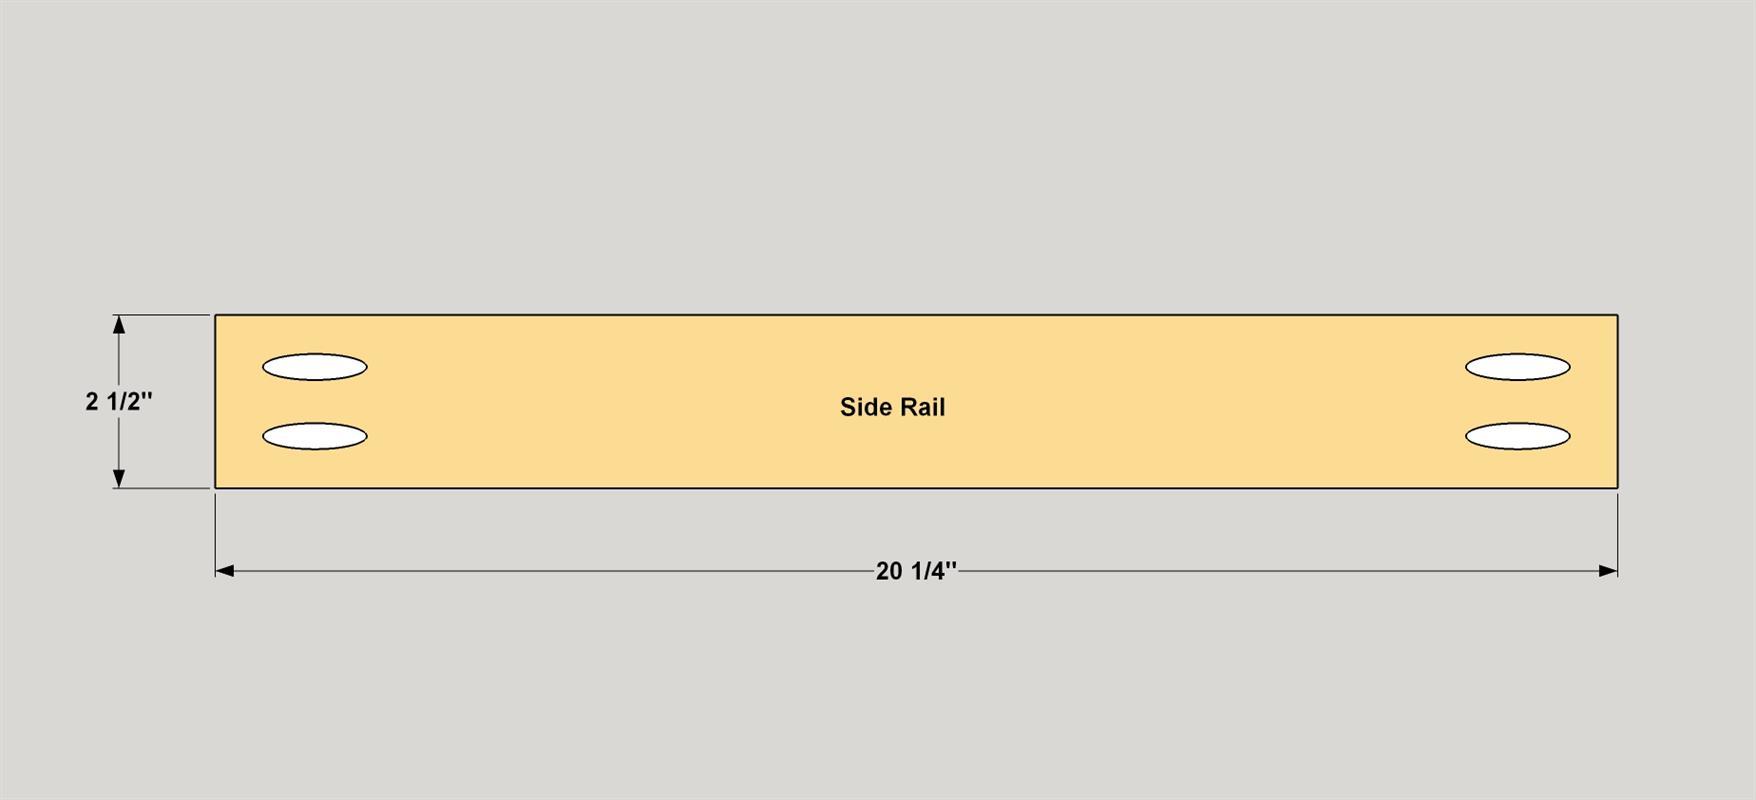
Make the Side Frame Parts
Cut six Side Rails and four Side Stiles to size from 1x3 cedar, as shown in the cut diagram. Drill pocket holes in the ends of the six Sides Rails—remembering to place the pocket holes on the rough face of each board. The Side Stiles don’t need pocket holes.
-
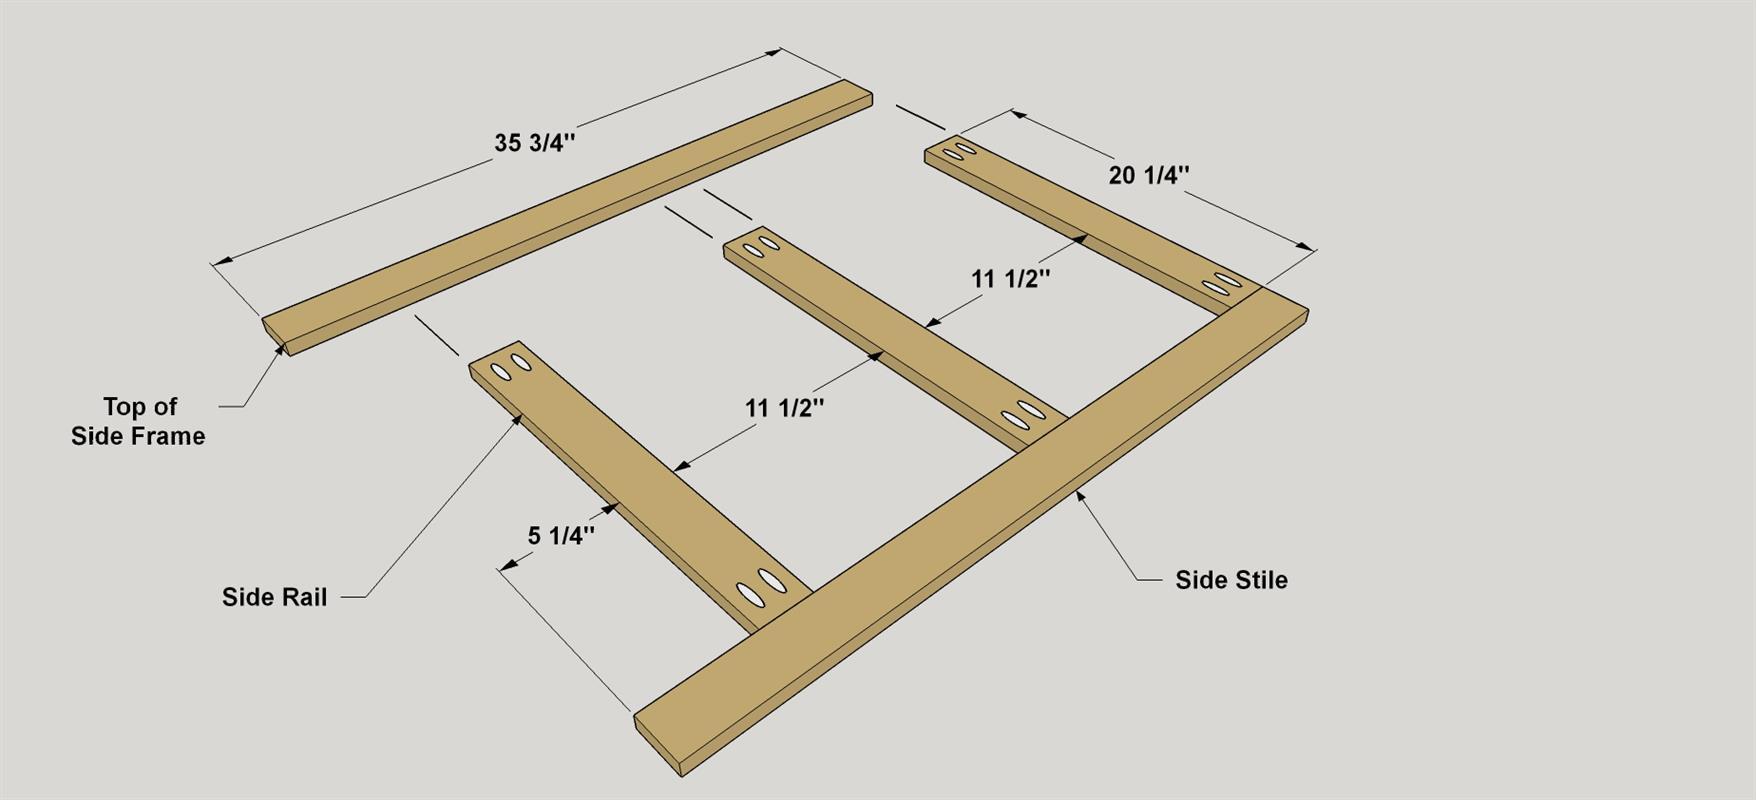
Assemble the Side Frames
Position three Side Rails on one Side Stile at the locations shown. Secure them with glue and 1 1/4" Blue-Kote pocket-hole screws. Attach the second Side Stile in the same manner. Then repeat this process to create the other side frame.
-
Attach the Side Frames
Spread glue along the edges of the bar assembly that will mate with the Side Frame. Set the first side frame in place, making sure that the side frame sits flush at the bottom and that the assembly is all square. Clamp the side frame in place, and then secure it to the Front Stiles using 1 1/4" Blue-Kote pocket-hole screws. Repeat the process for the second Side Frame. You’ll add more screws to secure the side frames in an upcoming steps as you attach the back frame, which you can build next.
-
Make the Back Frame Parts
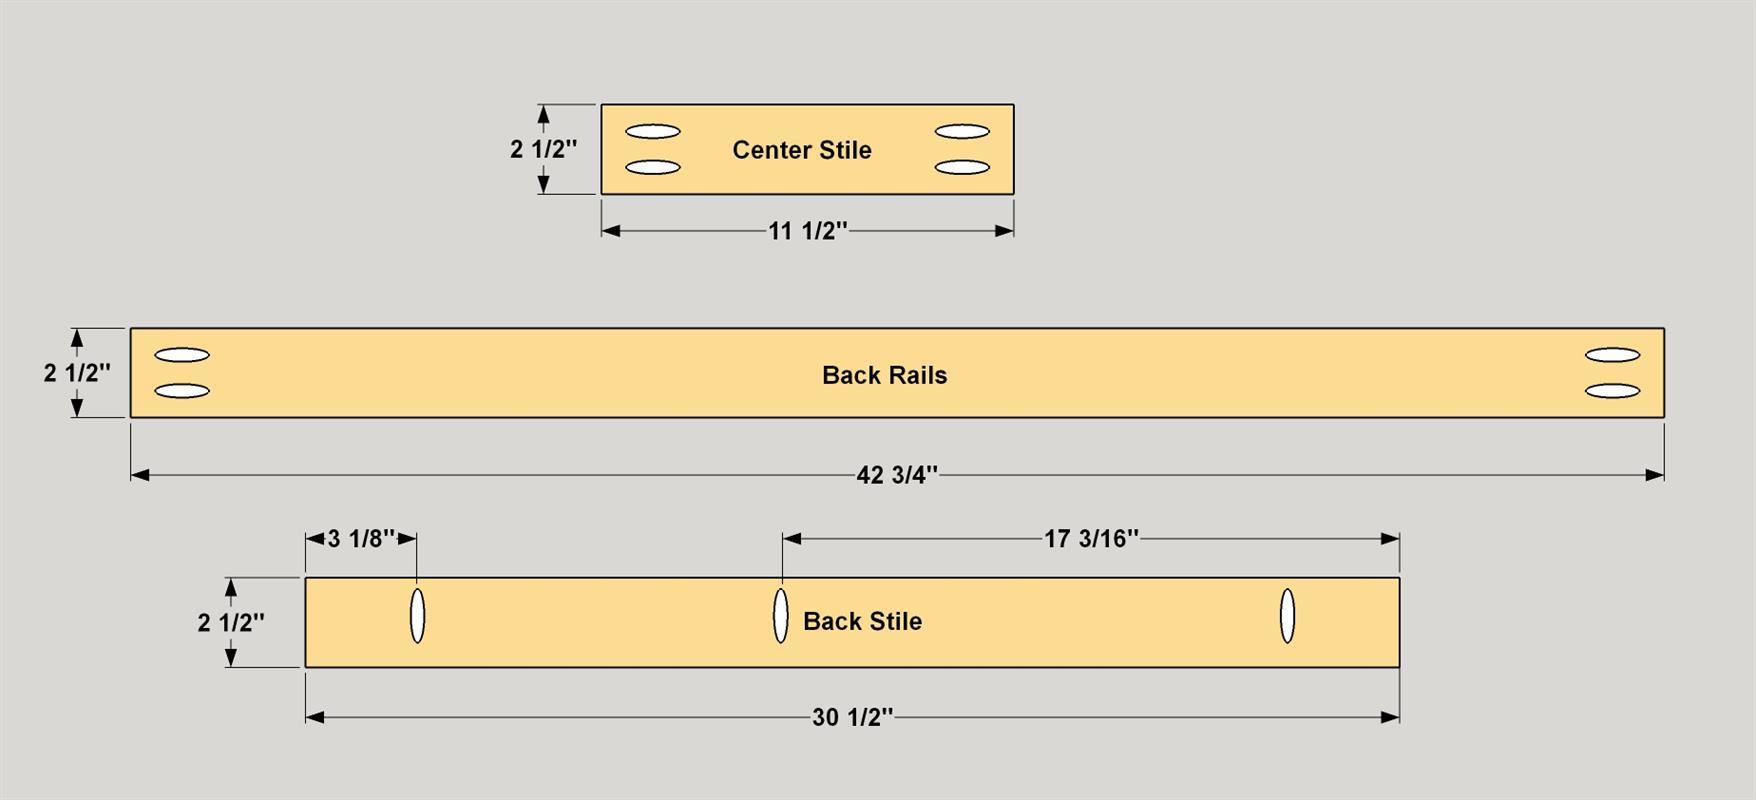
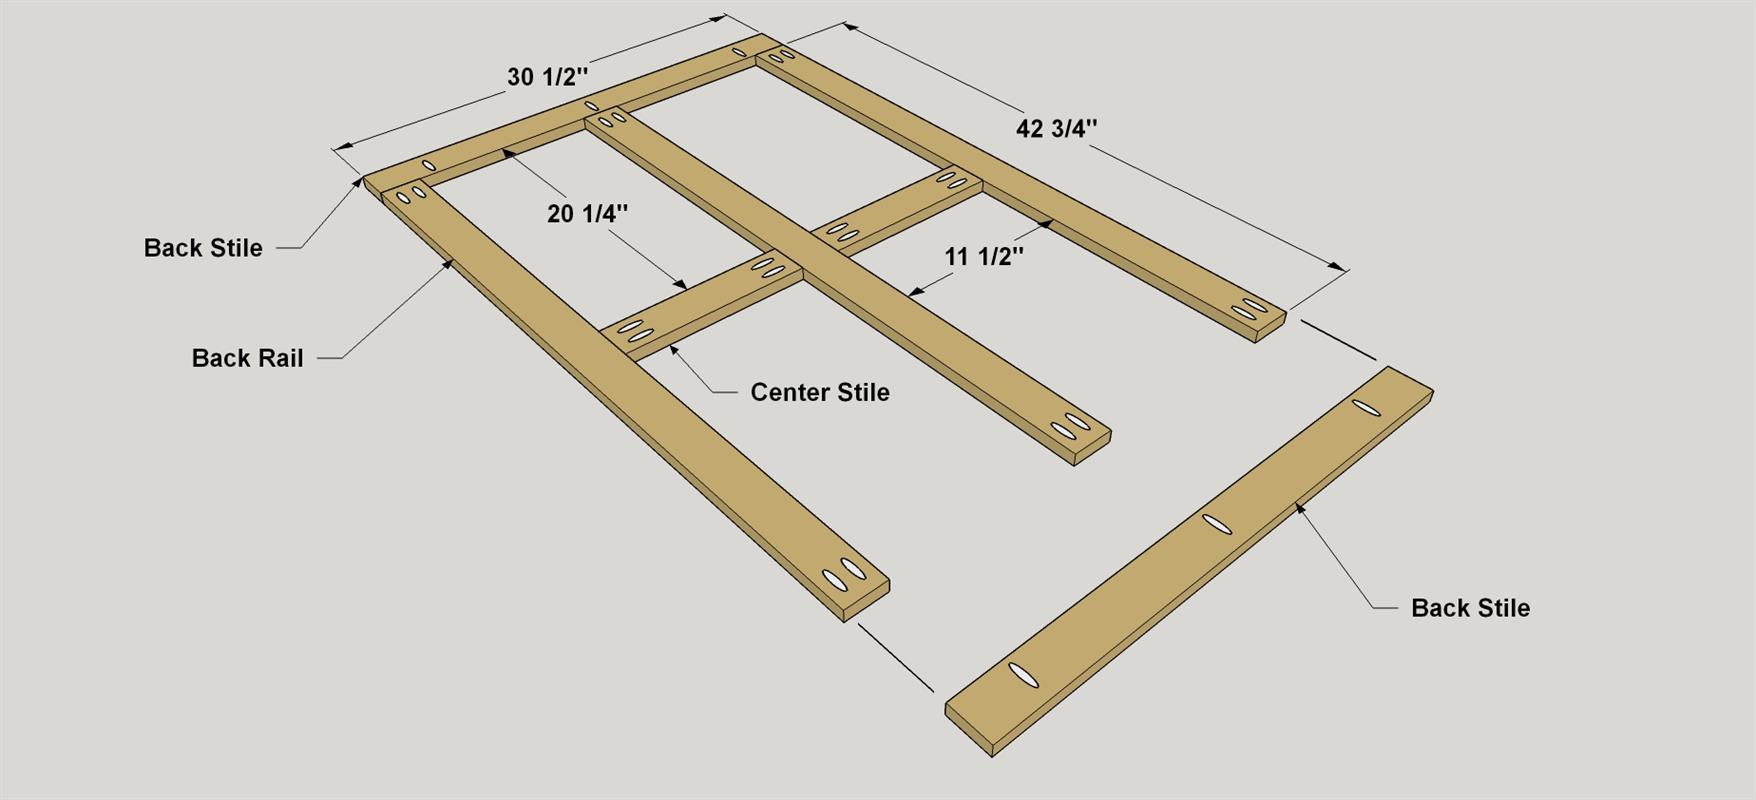
Cut three Back Rails, two Back Stiles, and two Center Stiles to length from 1x3 cedar, as shown in the cut diagram. Drill pocket holes in the ends of each Back Rail, at the ends of each Center Stile, and along one edge of each Back Stiles. Like the Front Stiles, the Back Stiles are mirror images.
-
Assemble the Back Frame
Assemble the Back Frame, as shown making sure that the Back Stiles are oriented so that the pocket holes face outward. Again, you’ll use waterproof glue and 1 1/4" Blue-Kote pocket-hole screws.
-
Attach the Back Frame
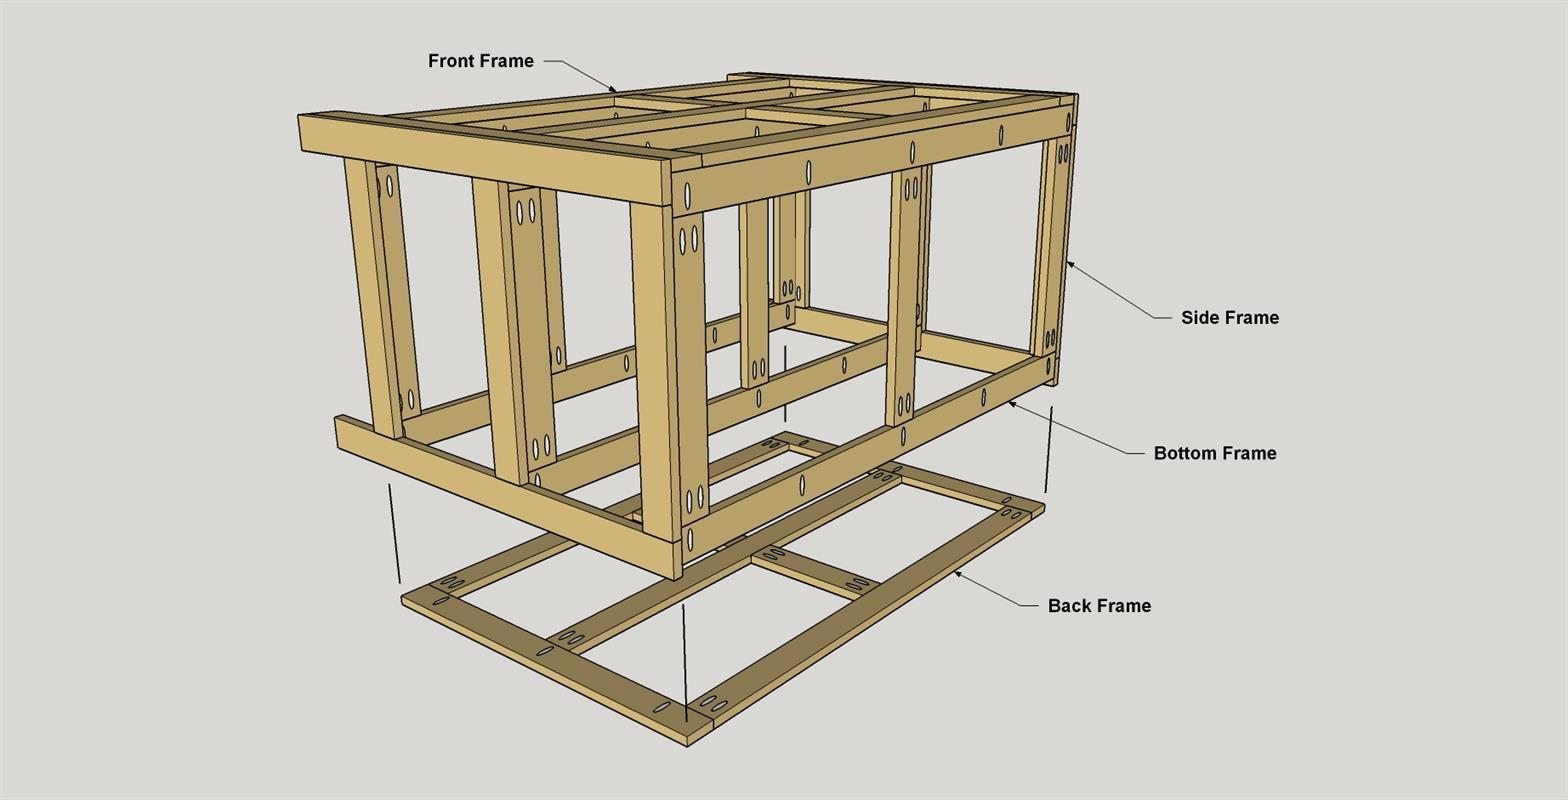
Spread glue on the rear edges of the shelf frames, and on the edges of the Back Stiles. Then set the back frame assembly in place, making sure that the frame sits flush with the bottom of the bar assembly. Clamp the back frame in place, and then rive and 1 1/4" Blue-Kote pocket-hole screws into the Side Stiles. Leave the assembly clamped up until the glue dries.
-
Make the Filler
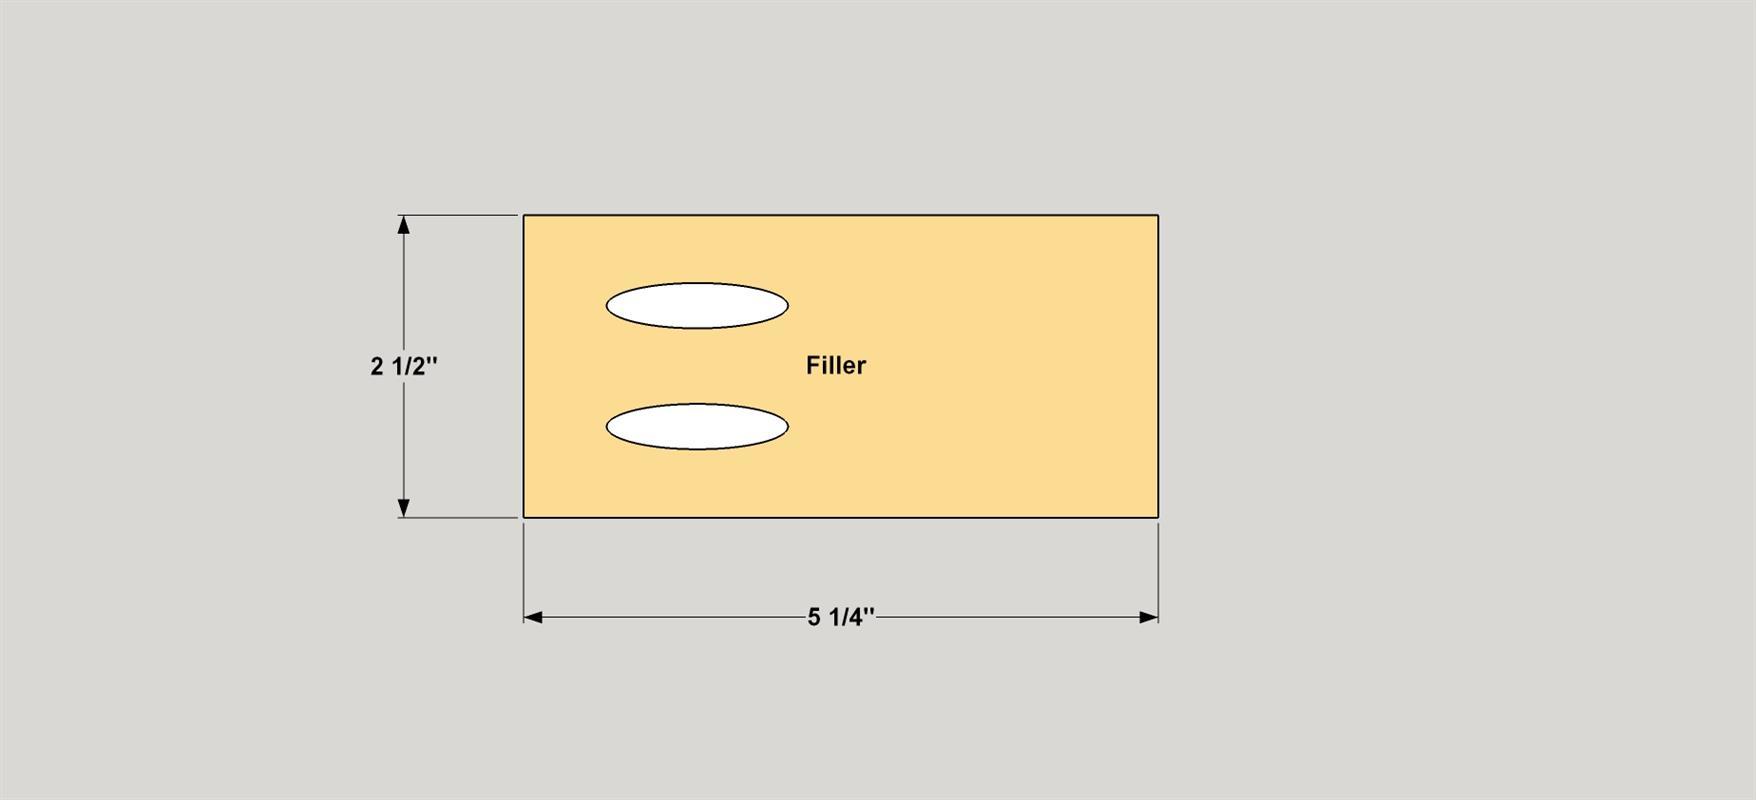
Cut one Filler to length from 1x3 cedar, as shown in the cut diagram. On the rough side of the board, drill pocket holes in one end as shown.
-
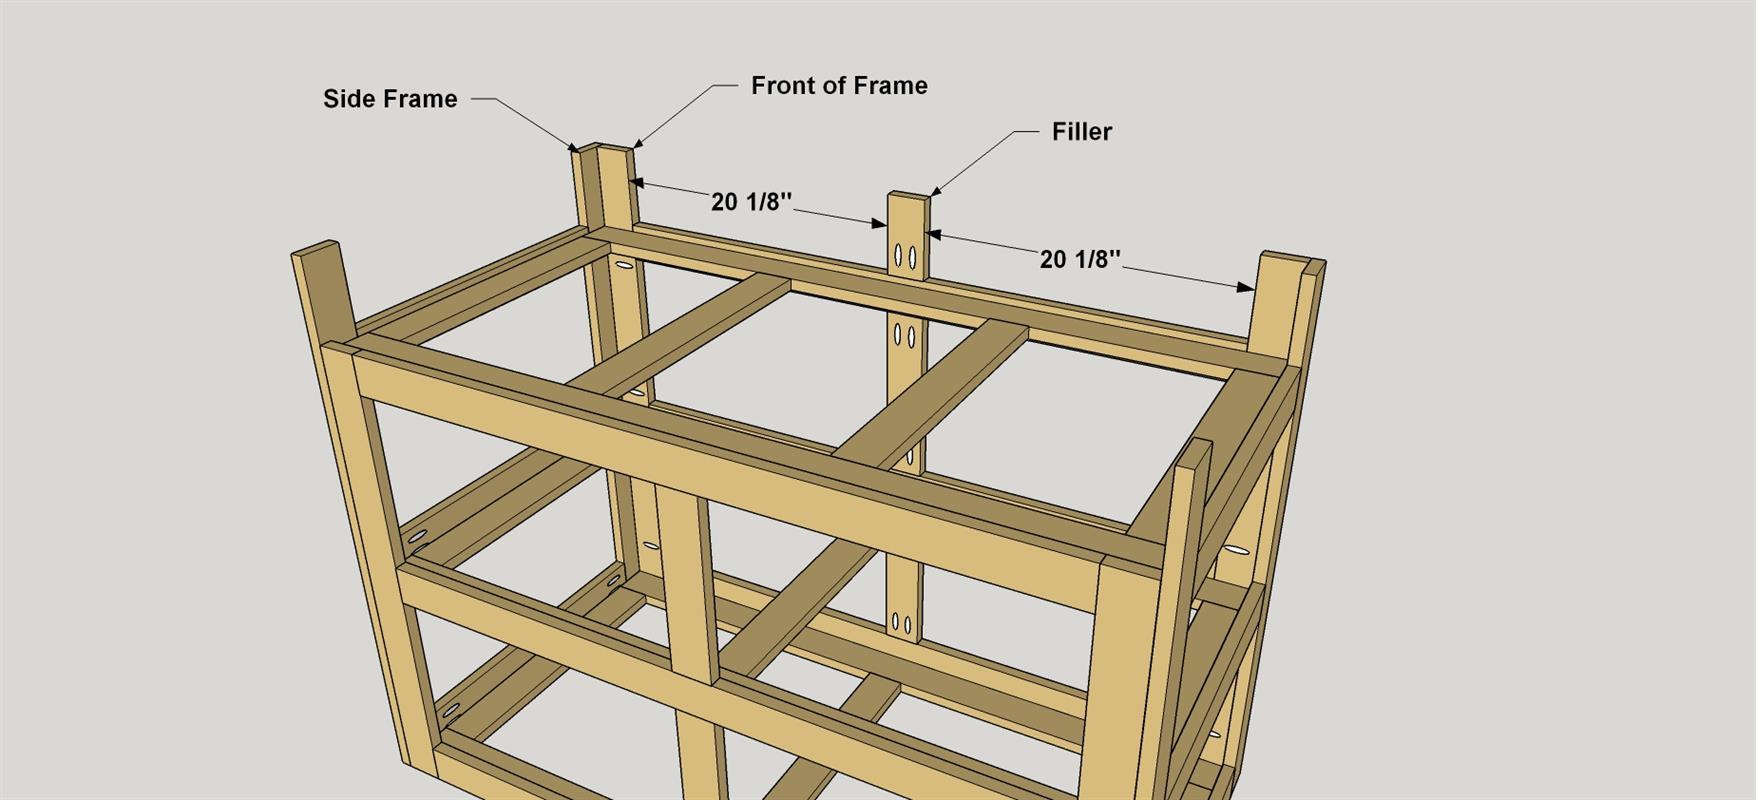
Install the Filler
Place the Filler on the top Front Rail at the location shown, and then secure it with glue and 1 1/4" Blue-Kote screws.
-
Make the Brackets
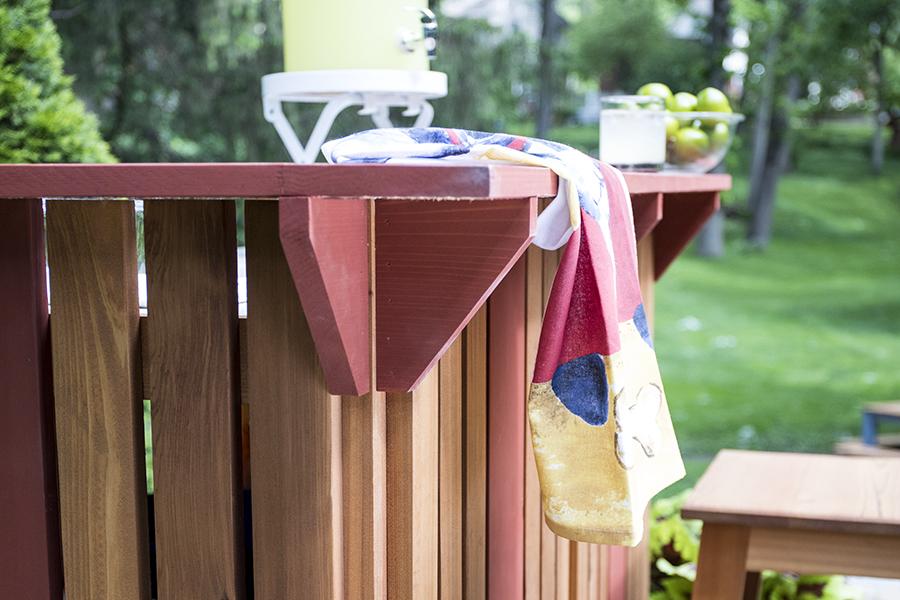
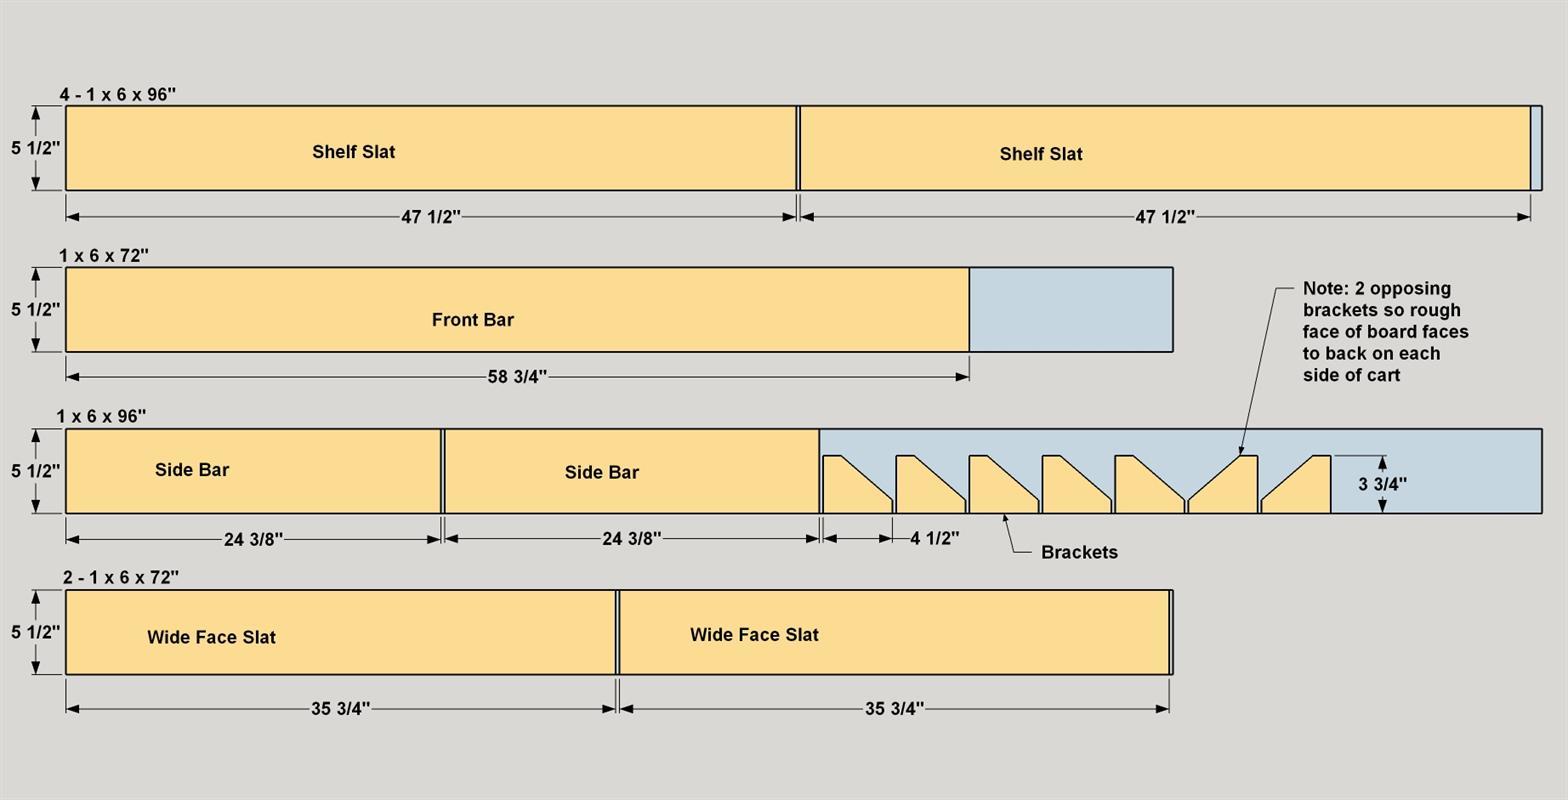
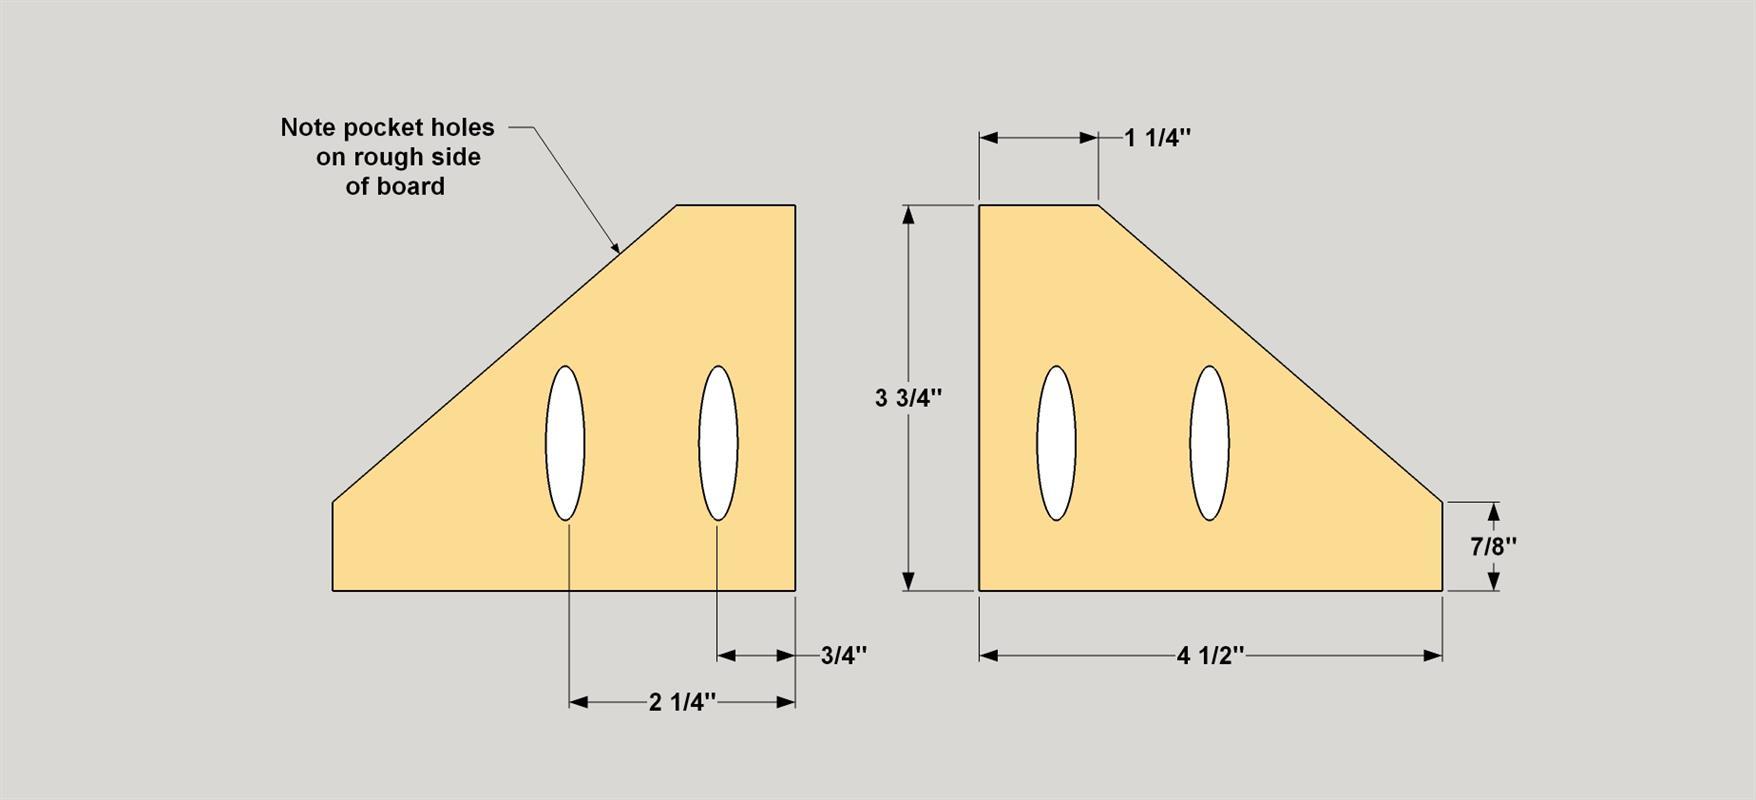
Now you can make the Brackets that support the wide, flat bar. To do that, first cut seven pieces to 4 1/2" long from a 1x6 board, as shown in the cut diagram. Note there are two Brackets that face the opposite way. This is so the rough face of the board (the face with the pocket holes) will be oriented toward the back of the. Next, cut the Brackets to shape. You can do this by marking out the final shape, and then cutting it with a jigsaw. On the rough side of the boards, drill pocket holes where shown.
-
Install the Brackets
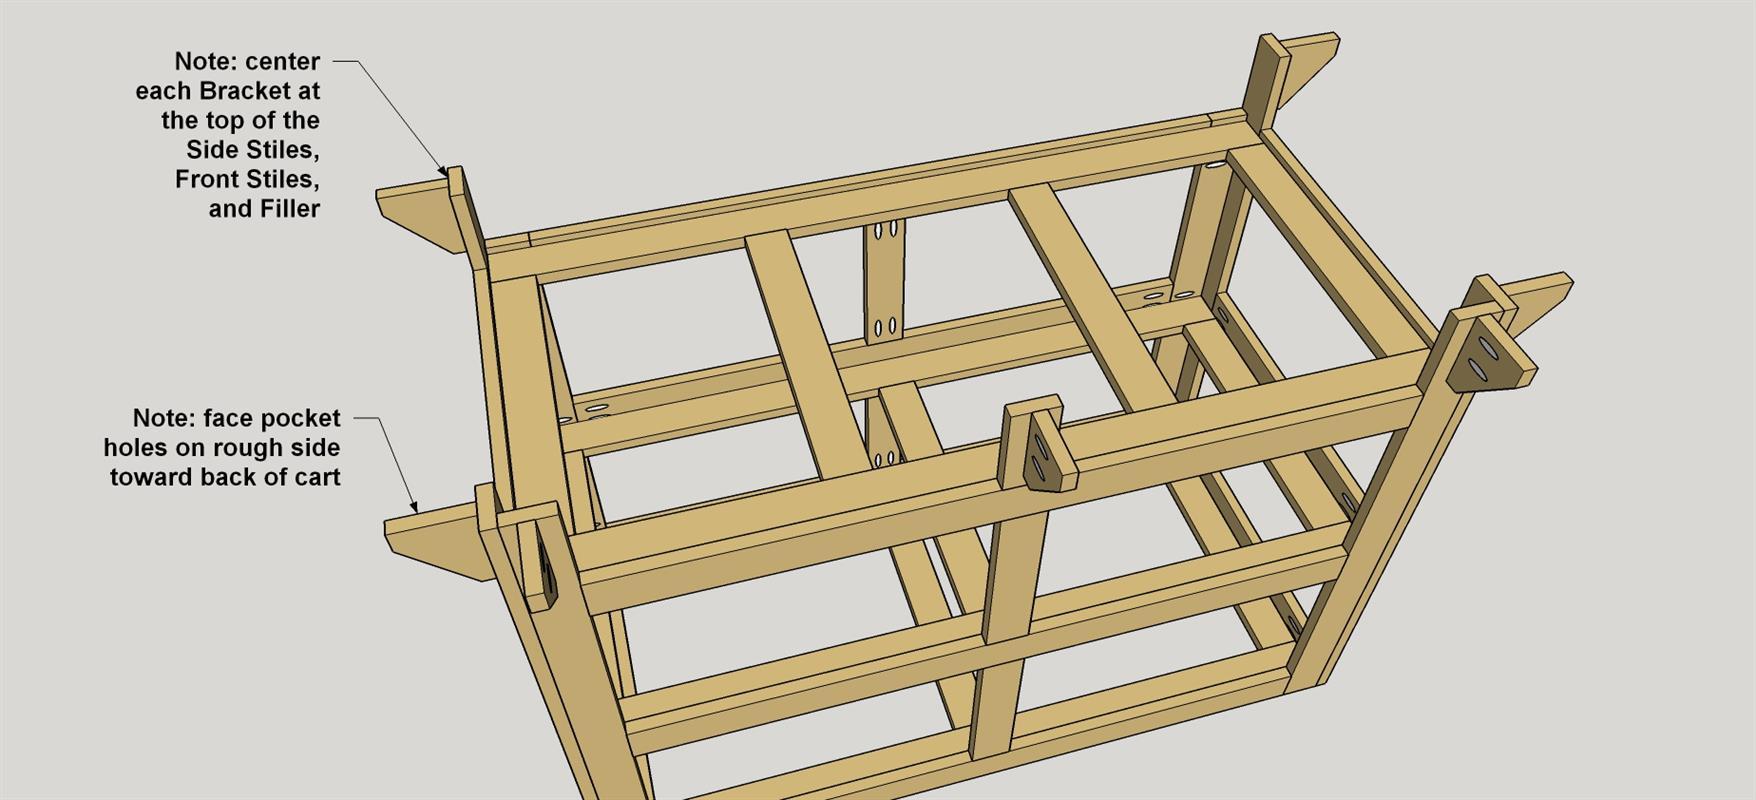
Apply exterior glue to the long edge of each Bracket, and then clamp them to the Front Stiles, the Side Stiles, and the Filler at the locations shown. Secure the Brackets using 1 1/4" Blue-Kote pocket-hole screws.
-
Make the Bar Parts
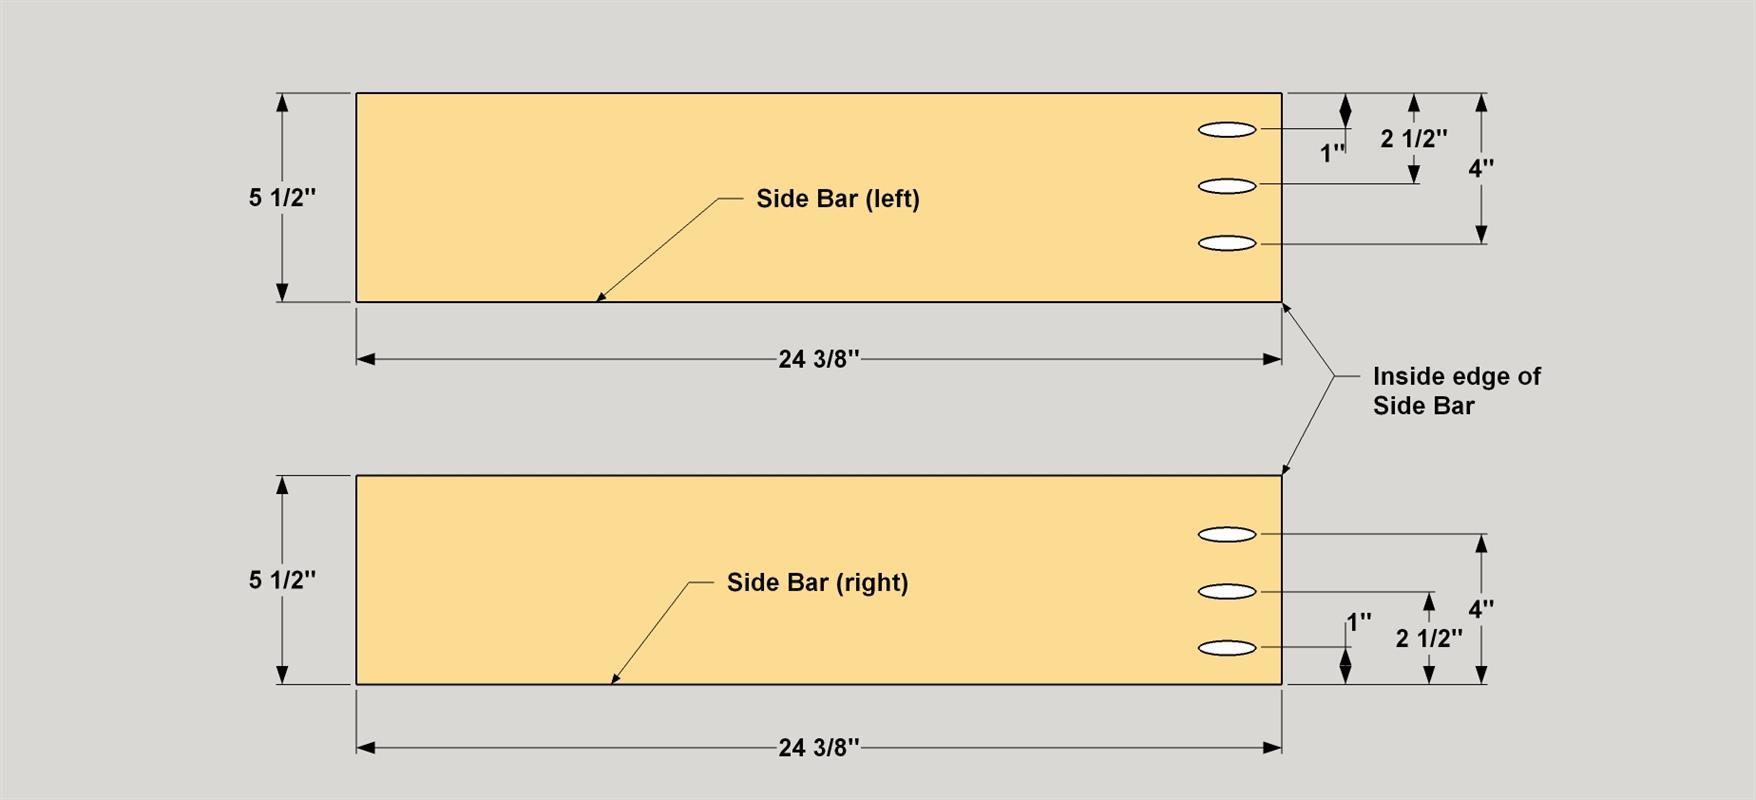
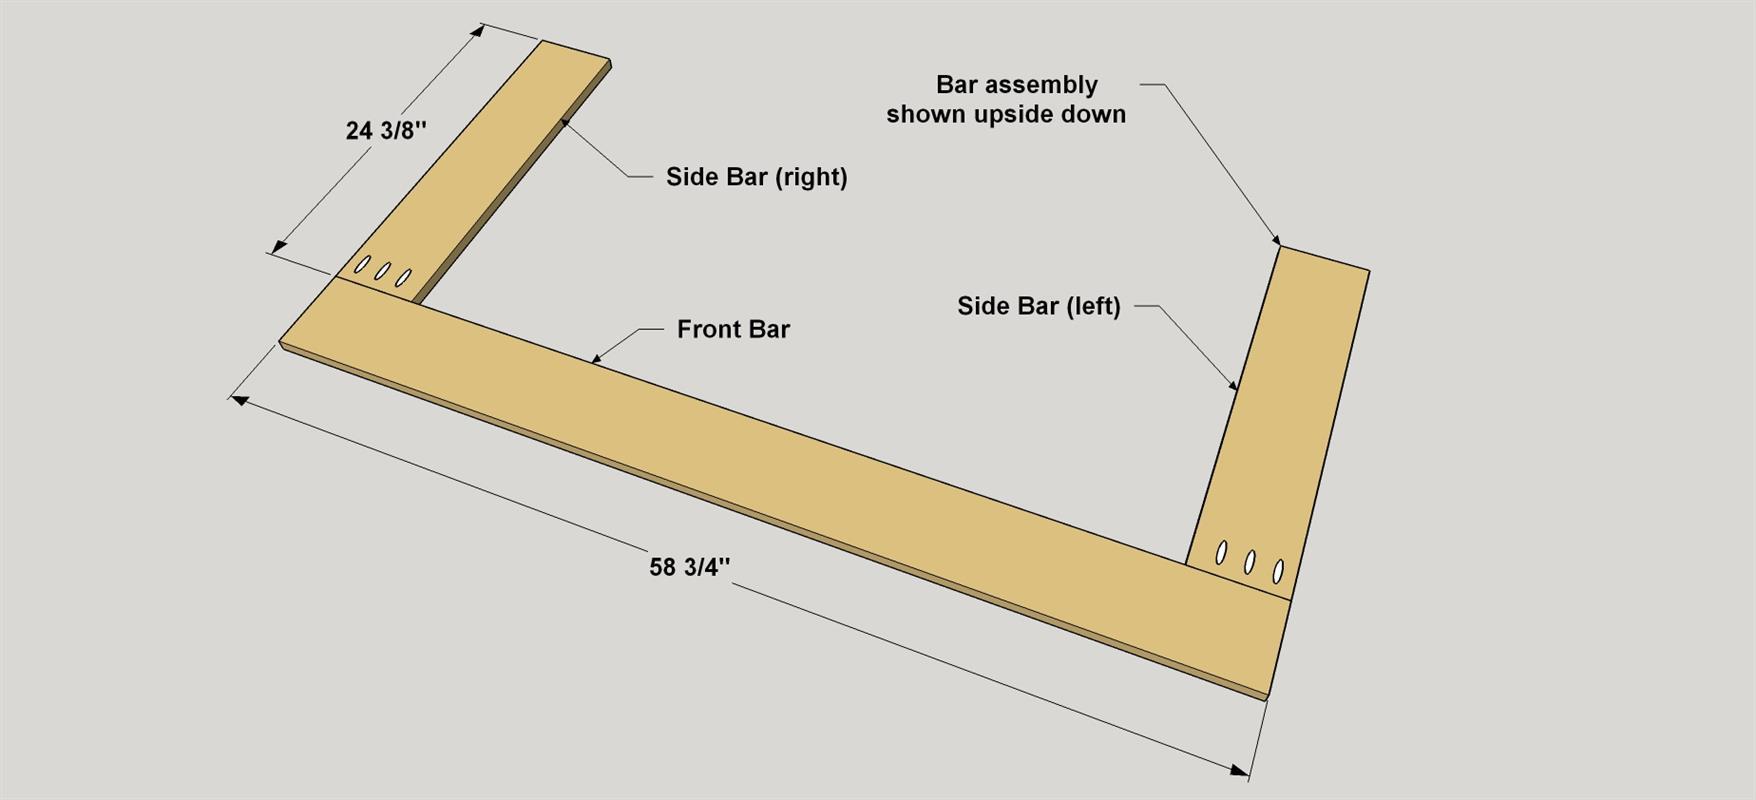
Cut two Bar Sides and one Bar Front from 1x6 cedar, as shown in the cut diagram. On the rough face of the Side Bars, drill pocket holes on one end. Take note of the locations of the pocket holes. There is a left and right side.
-
Assemble the Bar Top
Position the Bar boards with the smooth side facing up, apply glue to the edges, and secure the pieces using 1 1/4" Blue-Kote screws.
-
Install the Bar Top
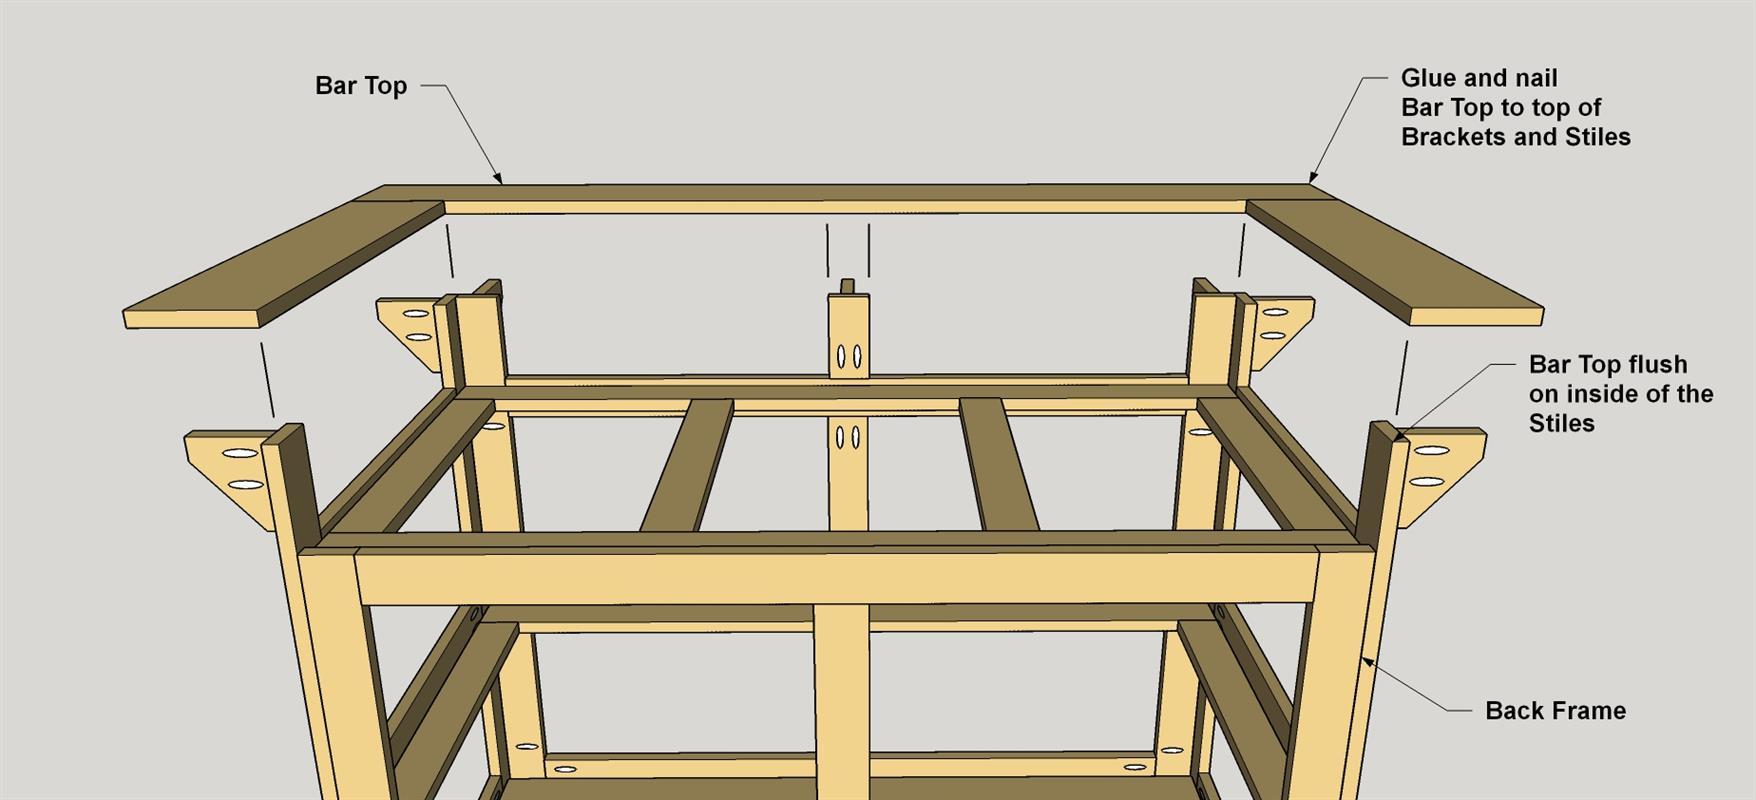
Apply exterior glue to the upper edges of the bar assembly where the bar assembly will touch. Position the Bar assembly and secure it with 1 1/4" brad nails. Drive a couple of nails into each Stile and each Bracket,. A nail gun works best for this. If you don’t have one, you can pick one up fairly inexpensively, or you can rent one.
-
Install the Casters
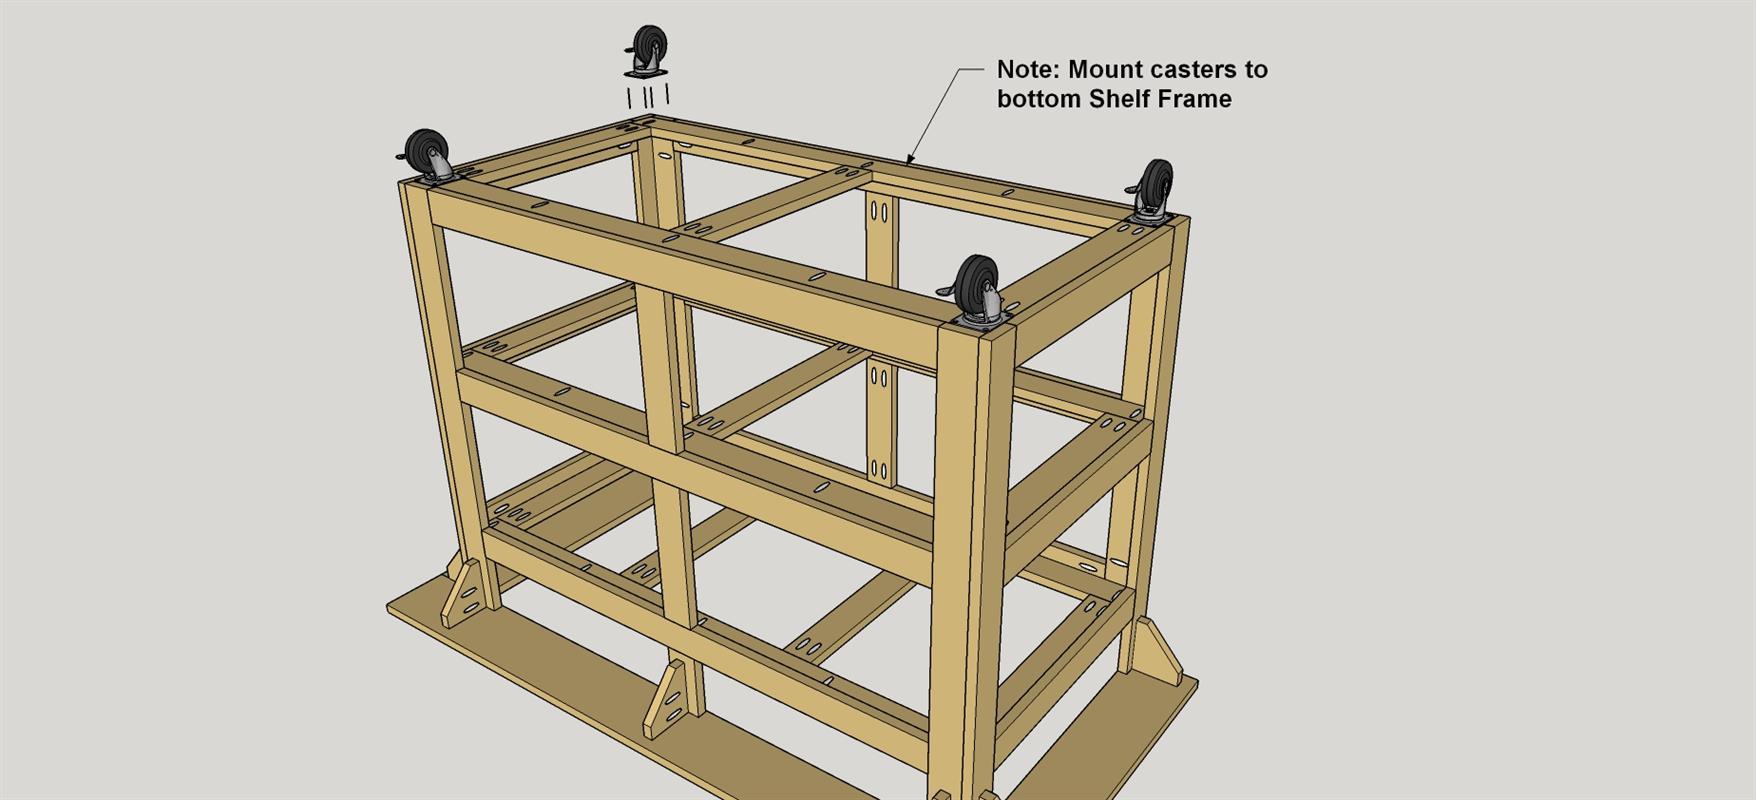
Position four swiveling casters toward the outside corners of the bottom shelf frame. Drill four pilot holes for each caster, and then secure them to the frame with 3/4" exterior pan-head screws
-
Cut and Install the Shelf Slats
Cut six Shelf Slats to length from 1x6 cedar, as shown in the cut diagram. Apply glue to the bottom and middle shelf frames where needed, space the slats equally on the frames, and secure the Shelf Slats using 1 1/4" brad nails.
-
Finish the Frame
With the frame completed, this is a good time to apply a finish before attaching the Face Slats to the frame. We used a transparent exterior stain in a color called “Cedar Natural Tone” on everything except the Bar and Brackets. This stain came premixed. For the Bar and Brackets, we used a solid-color stain that we had mixed in a color called “Navajo Red.”
-
Make the Face Slats
Cut four Wide Face Slats and 24 Narrow Face Slats to length from cedar, as shown in the cut diagram. It’s much easier to apply finish to the Slats now, before you install them. We used the “Cedar Naturaltone” stain on the Narrow Face Slats, and the “Navajo Red” stain on the Wide Face Slats.
-
Install the Face Slats
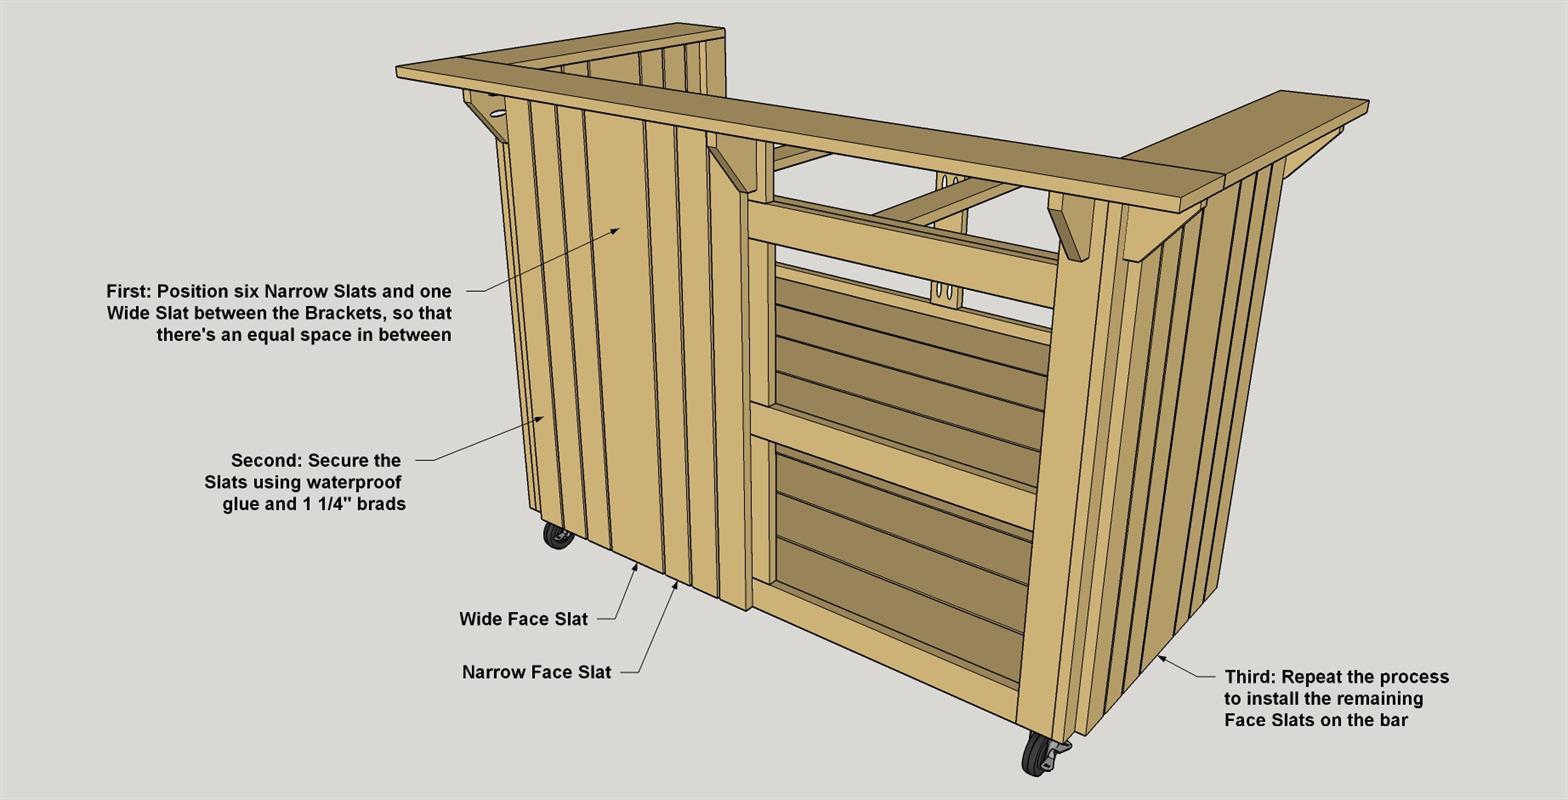
Once the stain is dry, you can install the Face Slats, as shown. To do this, start by positioning three Narrow Face Slats, then one Wide Face Slat, and then three more Narrow Face Slats as shown. Push the outer Narrow Slats tight against the Brackets, and space the others equally in between. Attach the Face Slats using glue and 1 1/4" brad nails. For the Narrow Slats, drive a couple of nails into each Front Rail. Use three nails at each location for the Wide Slat. Work your way around the bar in this same way until all of the Face Slats are installed.
-
Cut the Tile Backer and Install
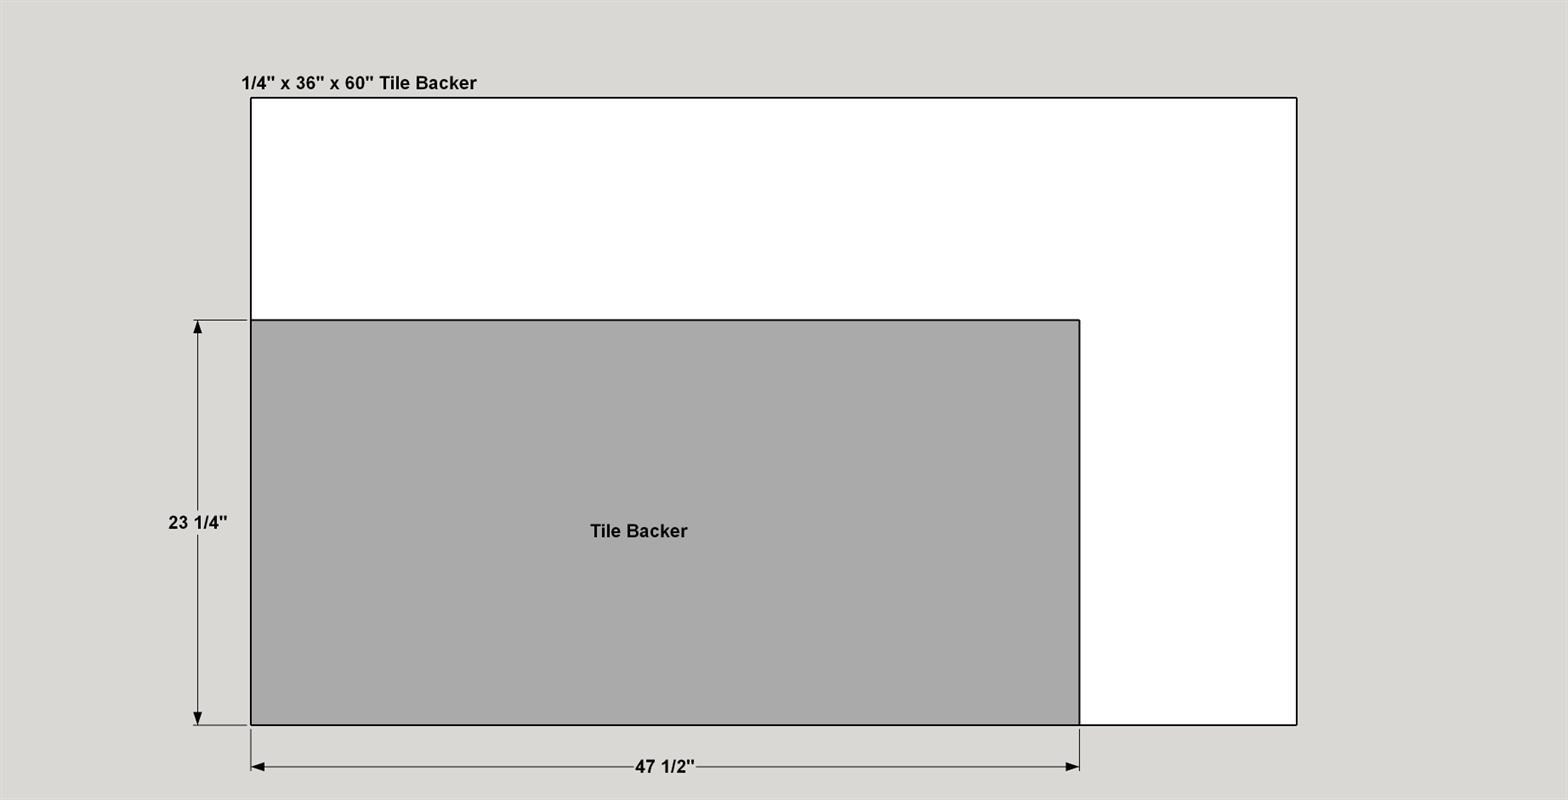
To create the prep counter area, start by cutting a Tile Backer to size from tile backer board, as shown in the cut diagram. The easiest way to do this is to score a line with a utility knife, then snap the backer board at the score line. Center the Backer on the top shelf frame, and then secure it with 1 1/4" cement board screws. Note: We were unable to locate cement board screws shorter than 1 1/4". That means they will protrude slightly inside the bar, but they are up out of the way and shouldn’t be an issue.
-
Add the Tile
Generously apply landscape adhesive to the back of each of the tiles and lay them in place on the tile backer. We butted the tiles together edge-to-edge, and didn’t use any grout. Gently apply pressure to make sure there is good contact between the tile and the backer, and then allow time for the adhesive to cure per the manufacturer's instructions. After that, it’s time to belly up to your new outdoor bar and have a beverage to reward your project-building prowess.


