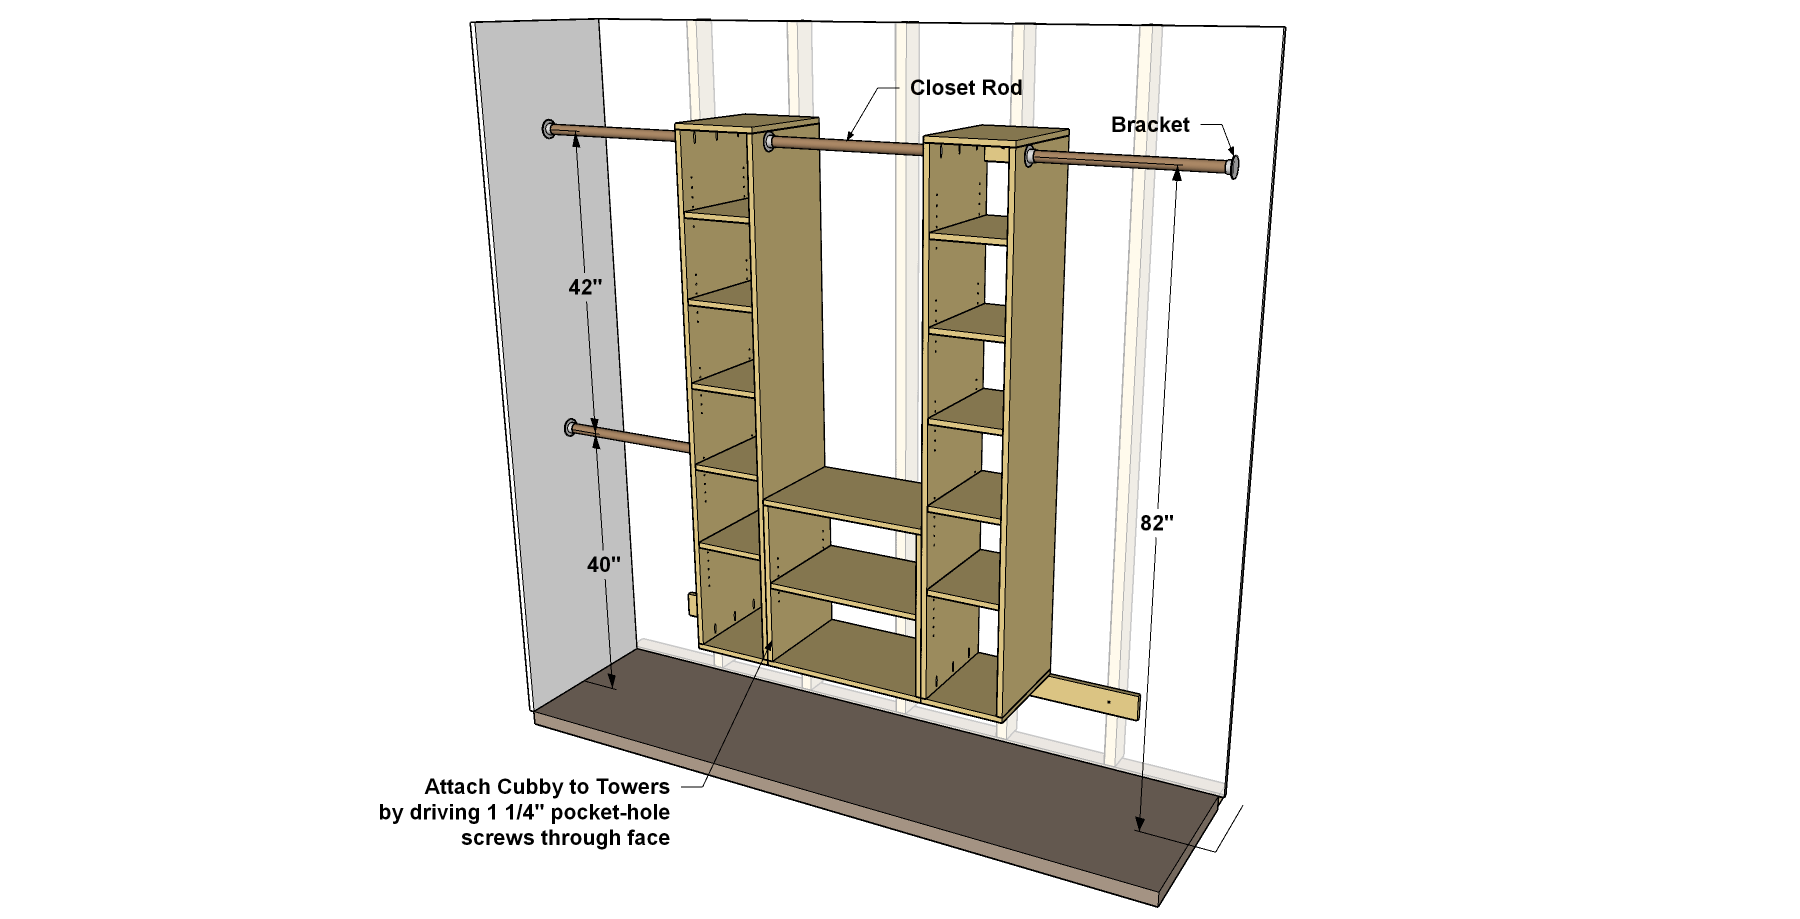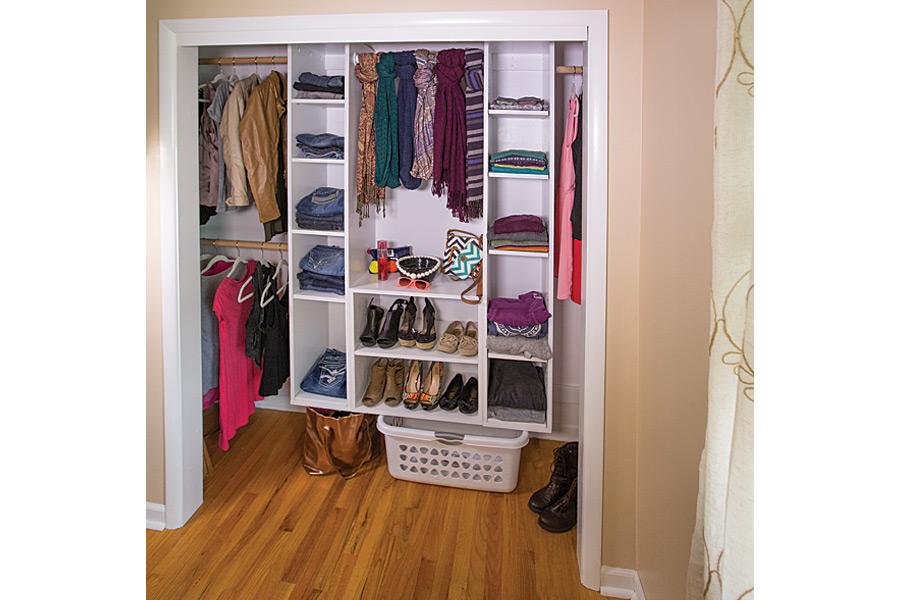
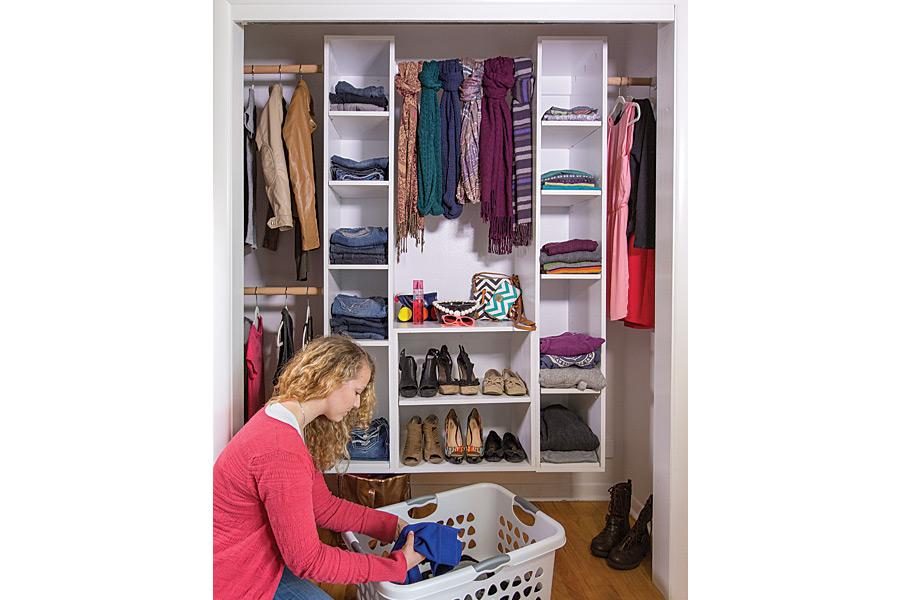
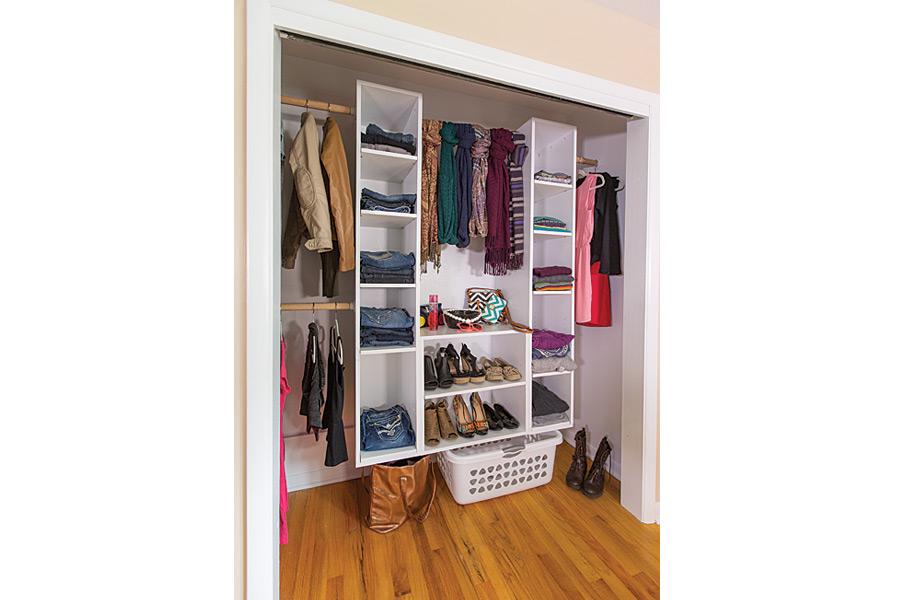
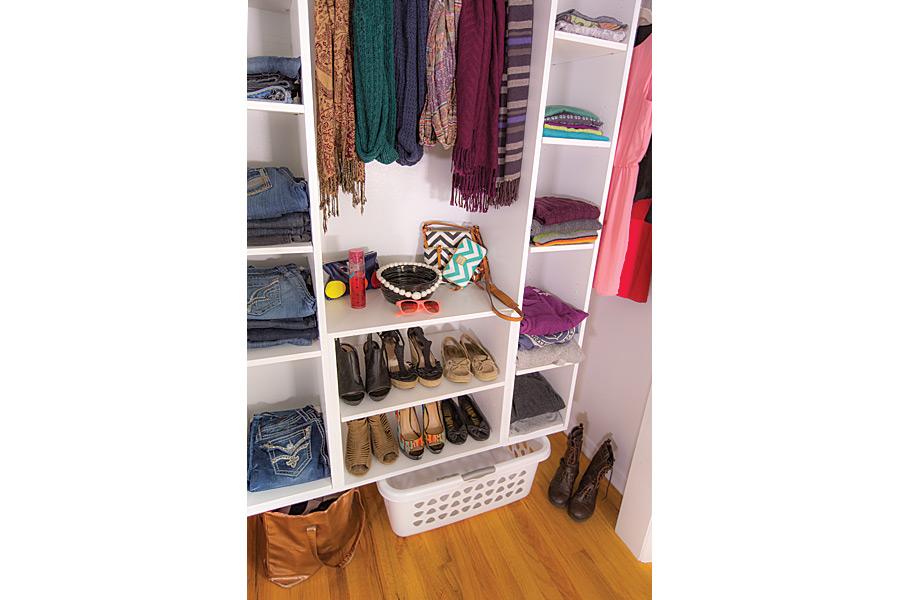


This organizer makes it easy to turn a chaotic closet into a clean, organized space. It’s made up of a couple of basic pieces: Two towers with adjustable shelves, and wide cubby. You can build it as shown here or, because it’s modular, arrange it in a different way to best suit your storage needs.
Tools
Kreg Tools


Other Tools
-
tape measure

Materials
Wood Products
- 2 Board , 1x4 x 72"
- 2 Plywood , 3/4" x 48" x 96"
Hardware & Supplies
- 65 1 1/4" coarse-thread Kreg Pocket-Hole Screws
- 44 1/4" Shelf Pins
- 8 #12 x 3" Screws
- 2 8' Closet Rods (cut to fit)
- 4 Pairs Closet Rod Brackets
- 6 Heavy-Duty Wall Anchors (if needed)
Cut List & Parts
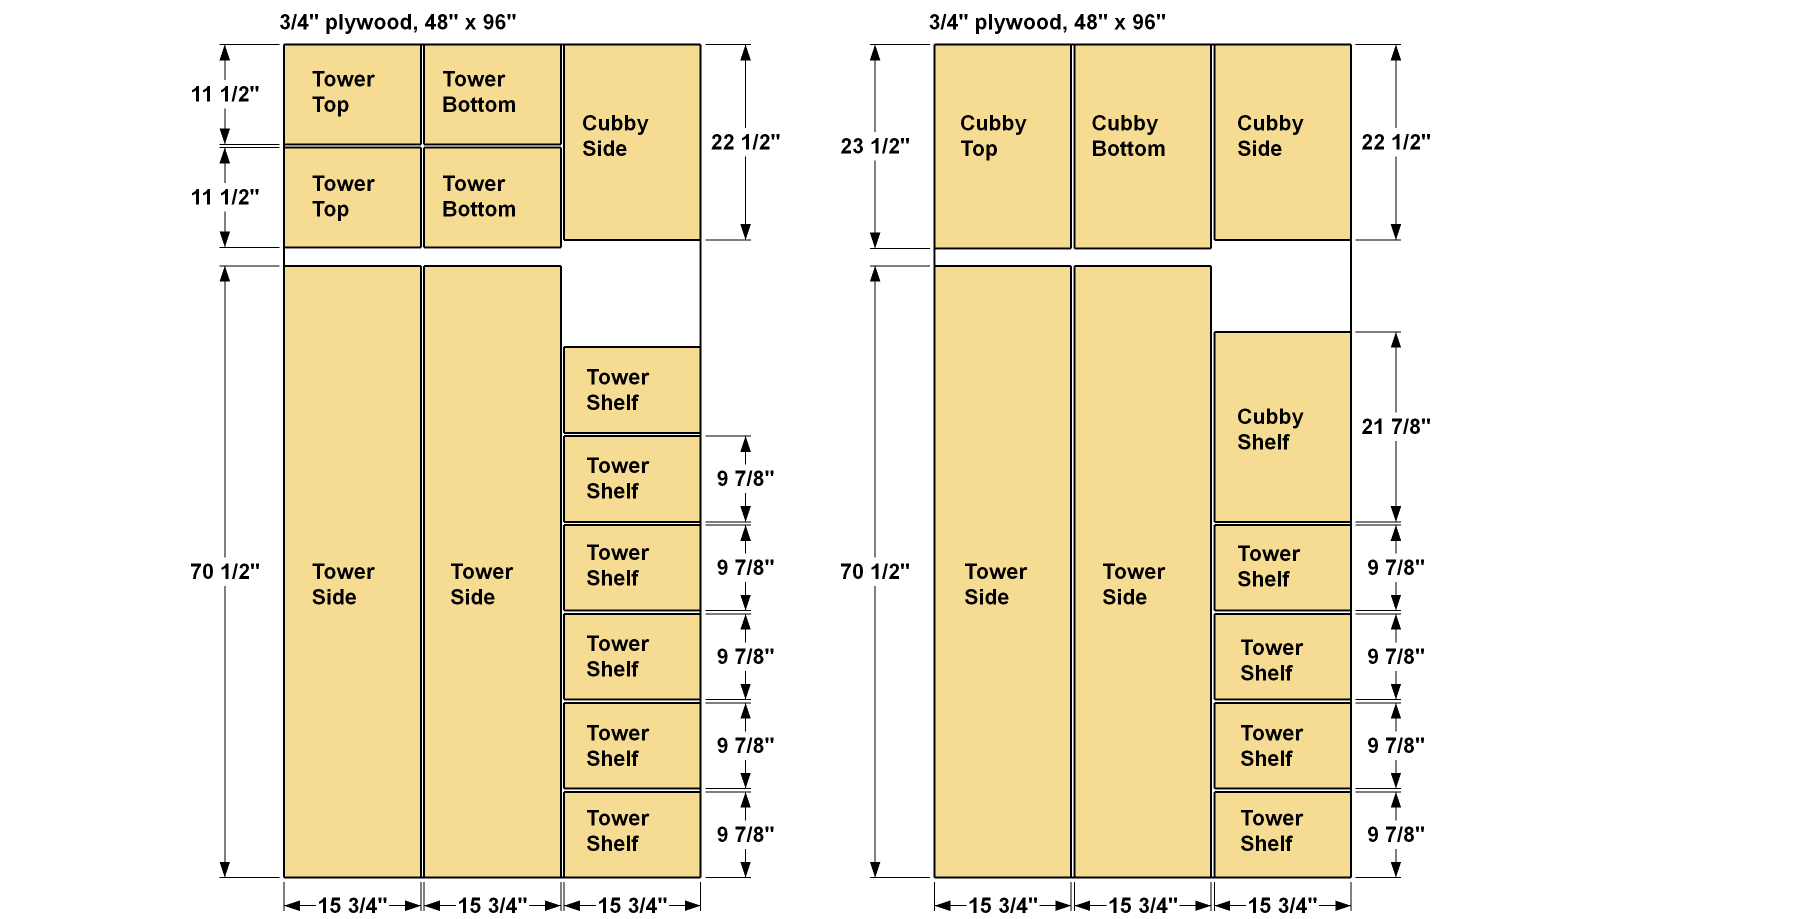
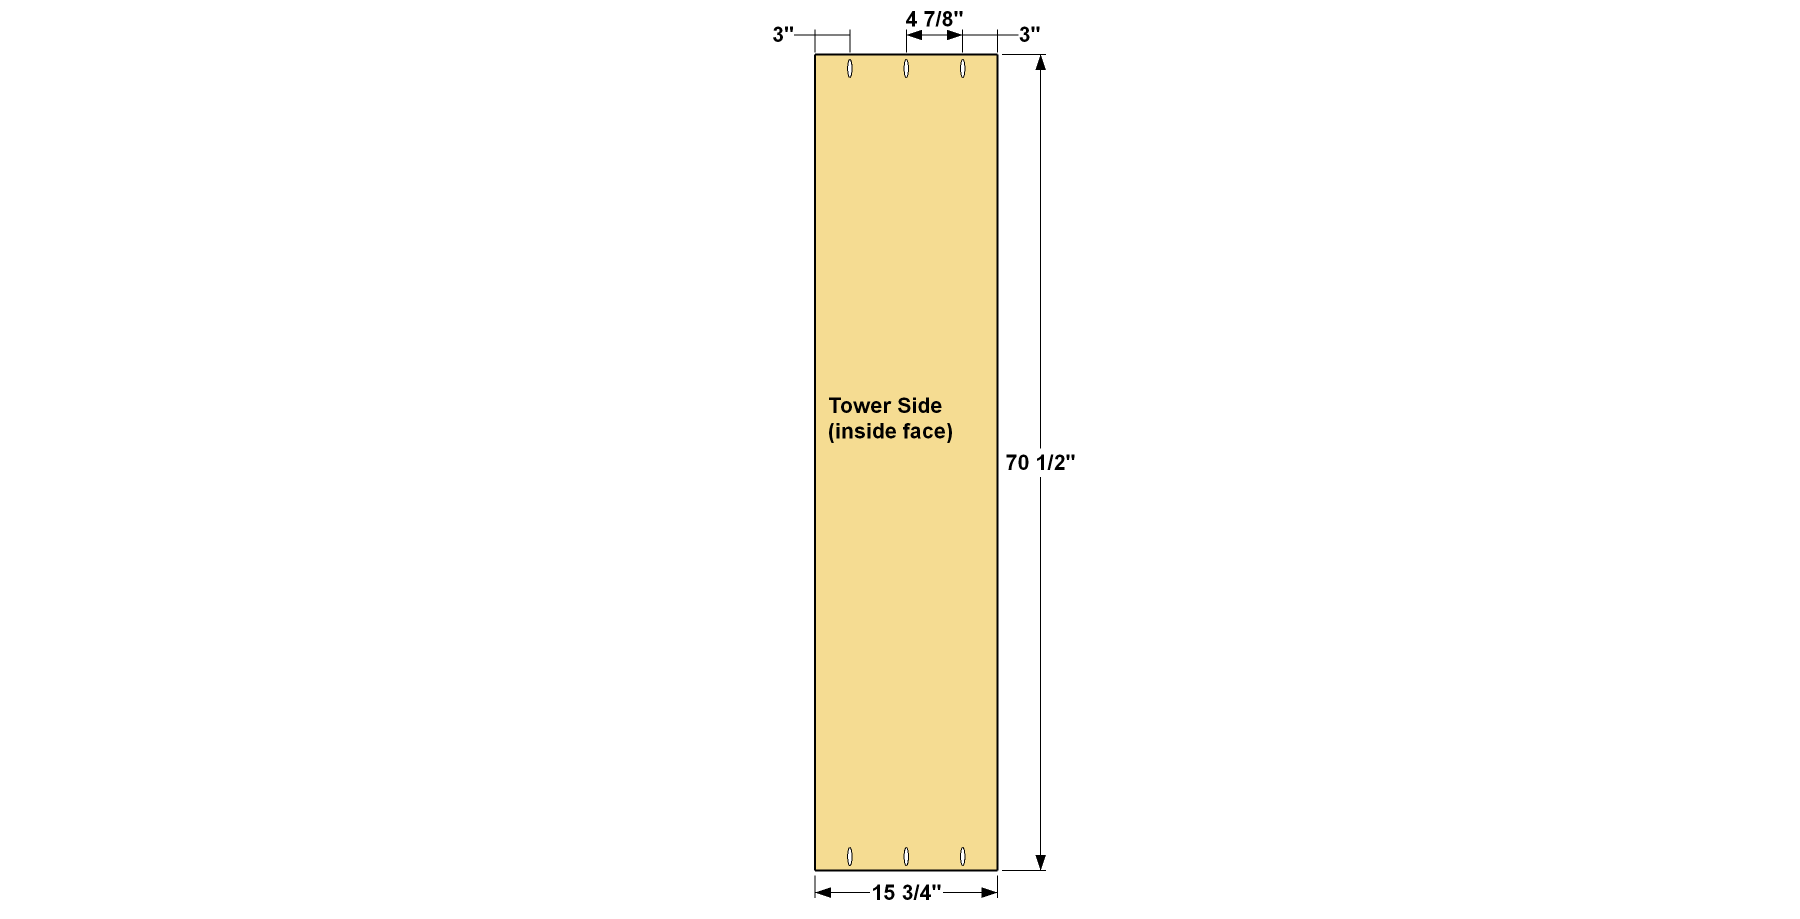
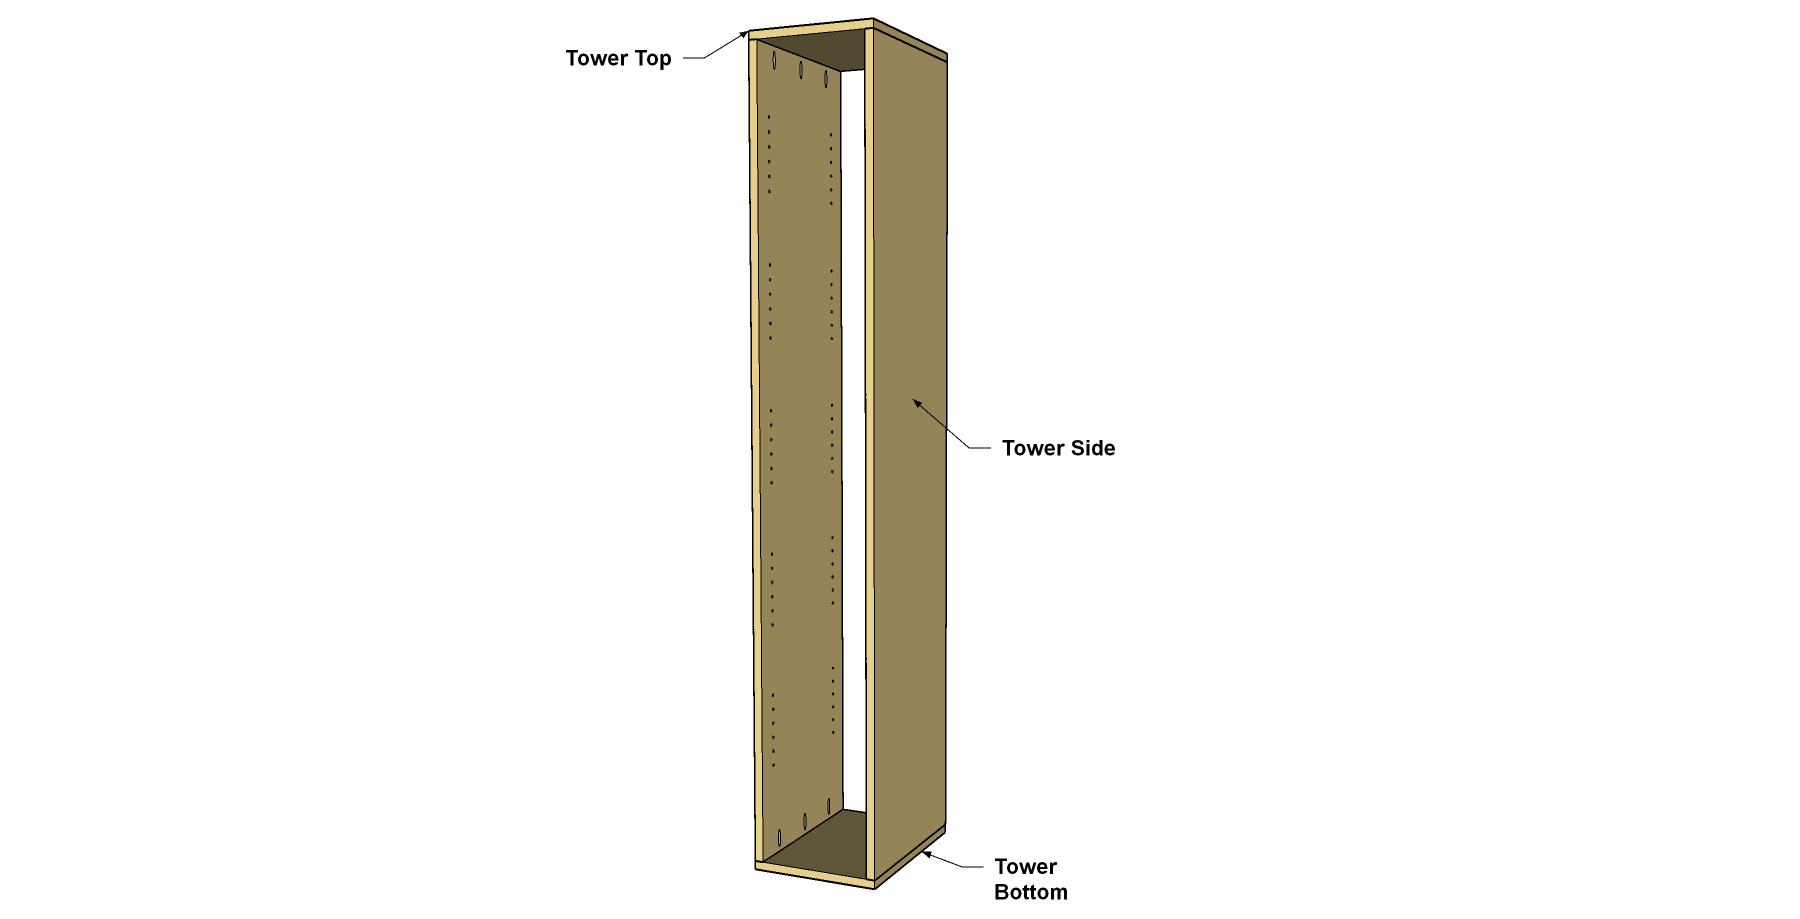
- 4 Tower Side , 3/4" x 15 3/4" x 70 1/2"
- 2 Tower Top , 3/4" x 15 3/4" x 11 1/2"
- 2 Tower Bottom , 3/4" x 15 3/4" x 11 1/2"
- 10 Tower Shelf , 3/4" x 9 7/8" x 15 3/4"
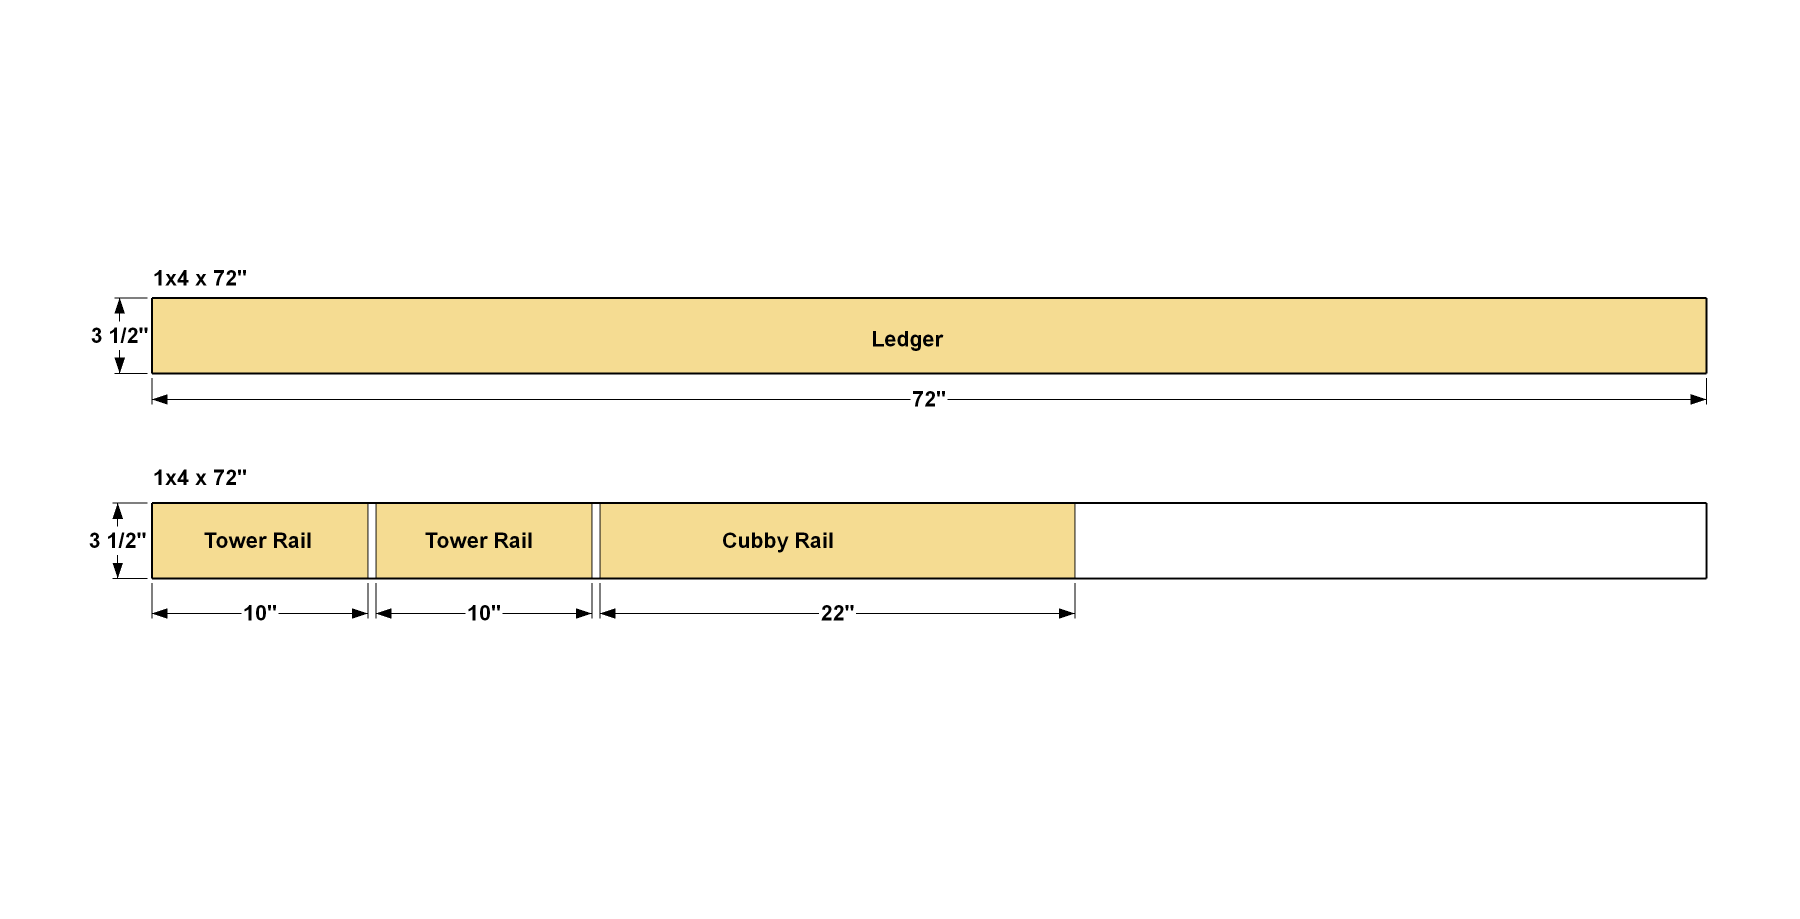
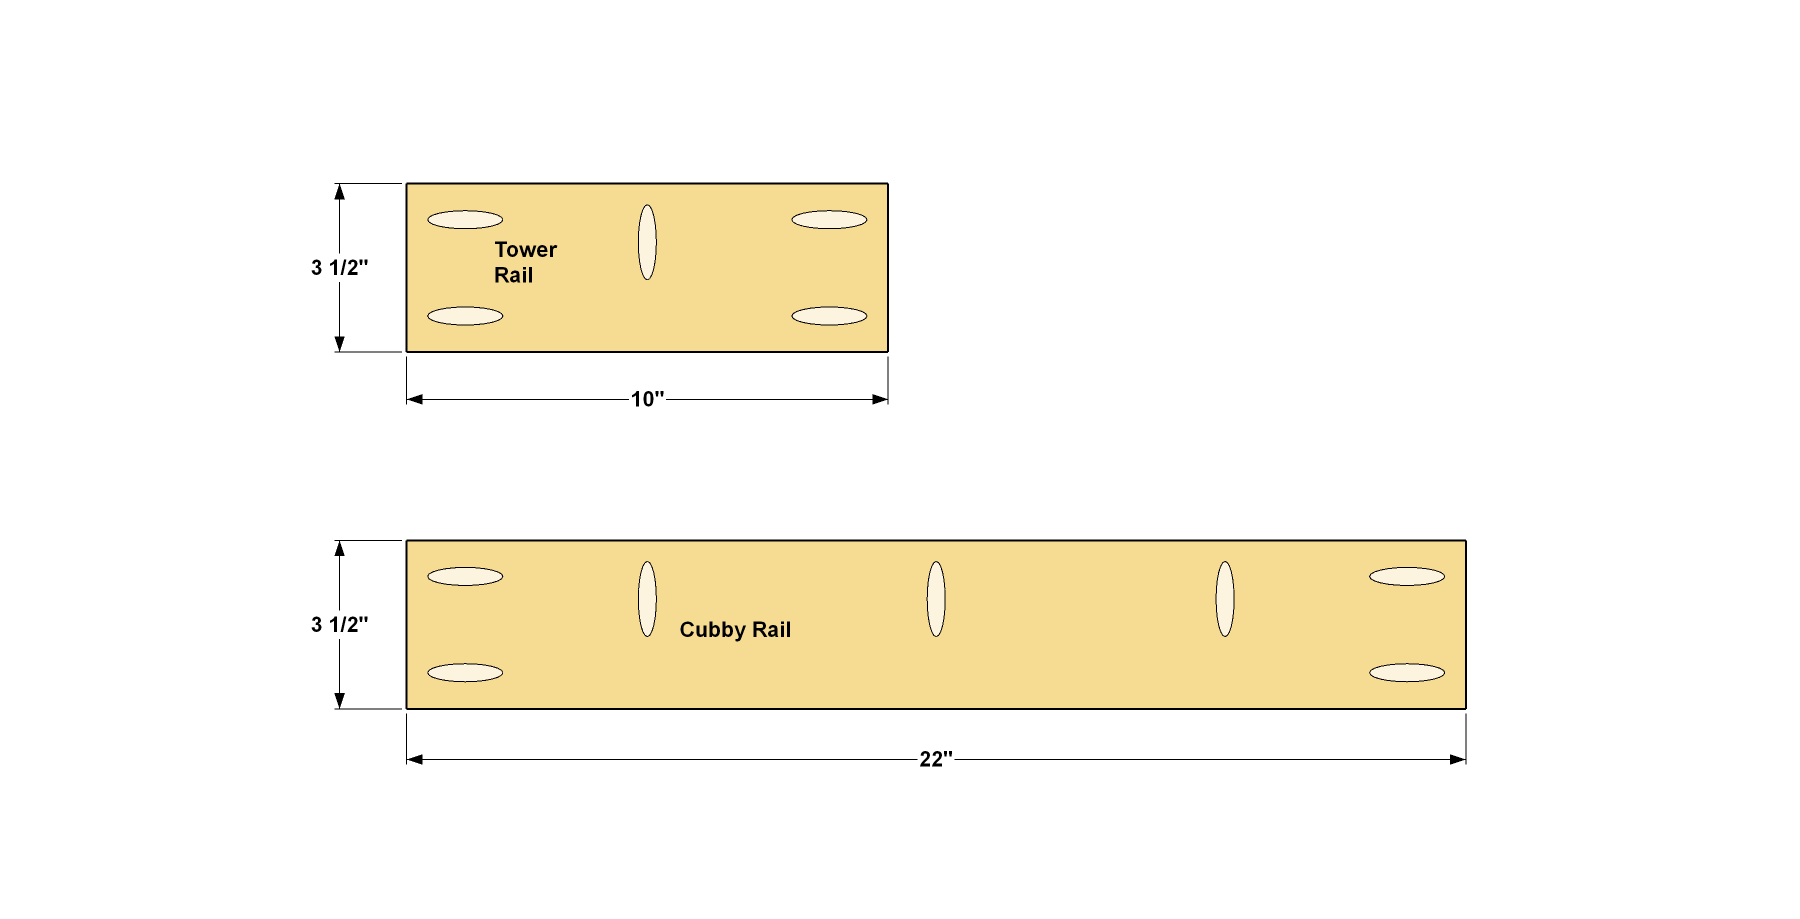
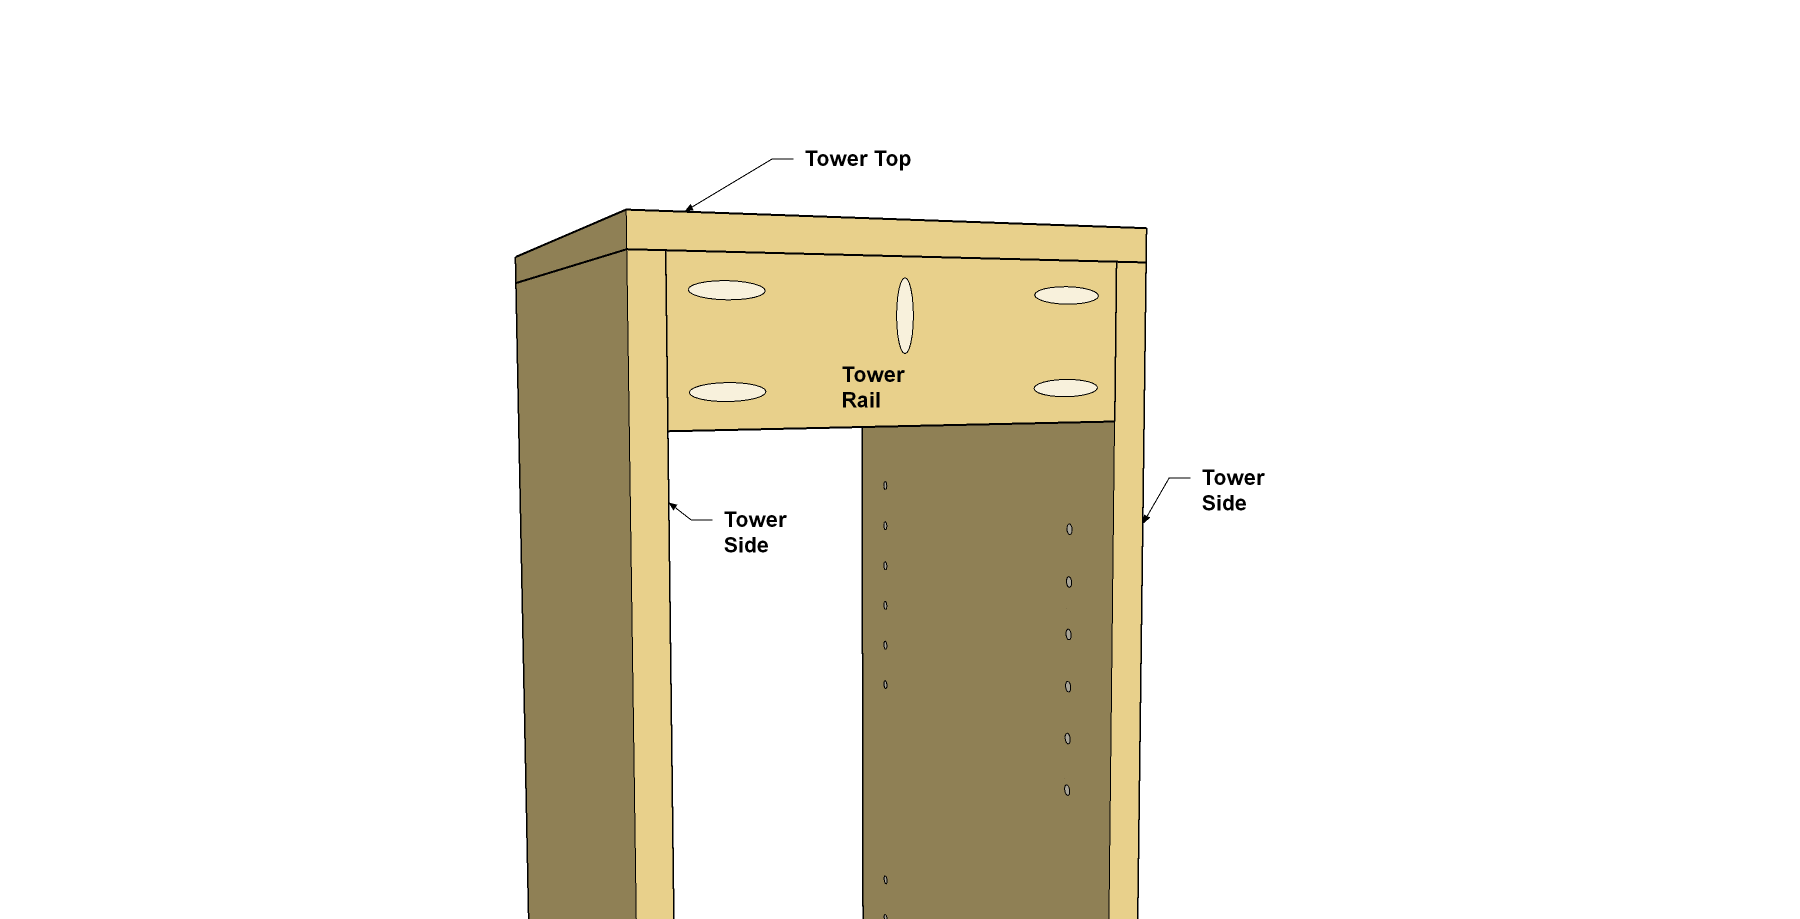
- 2 Tower Rail , 3/4" x 3 1/2" x 10"
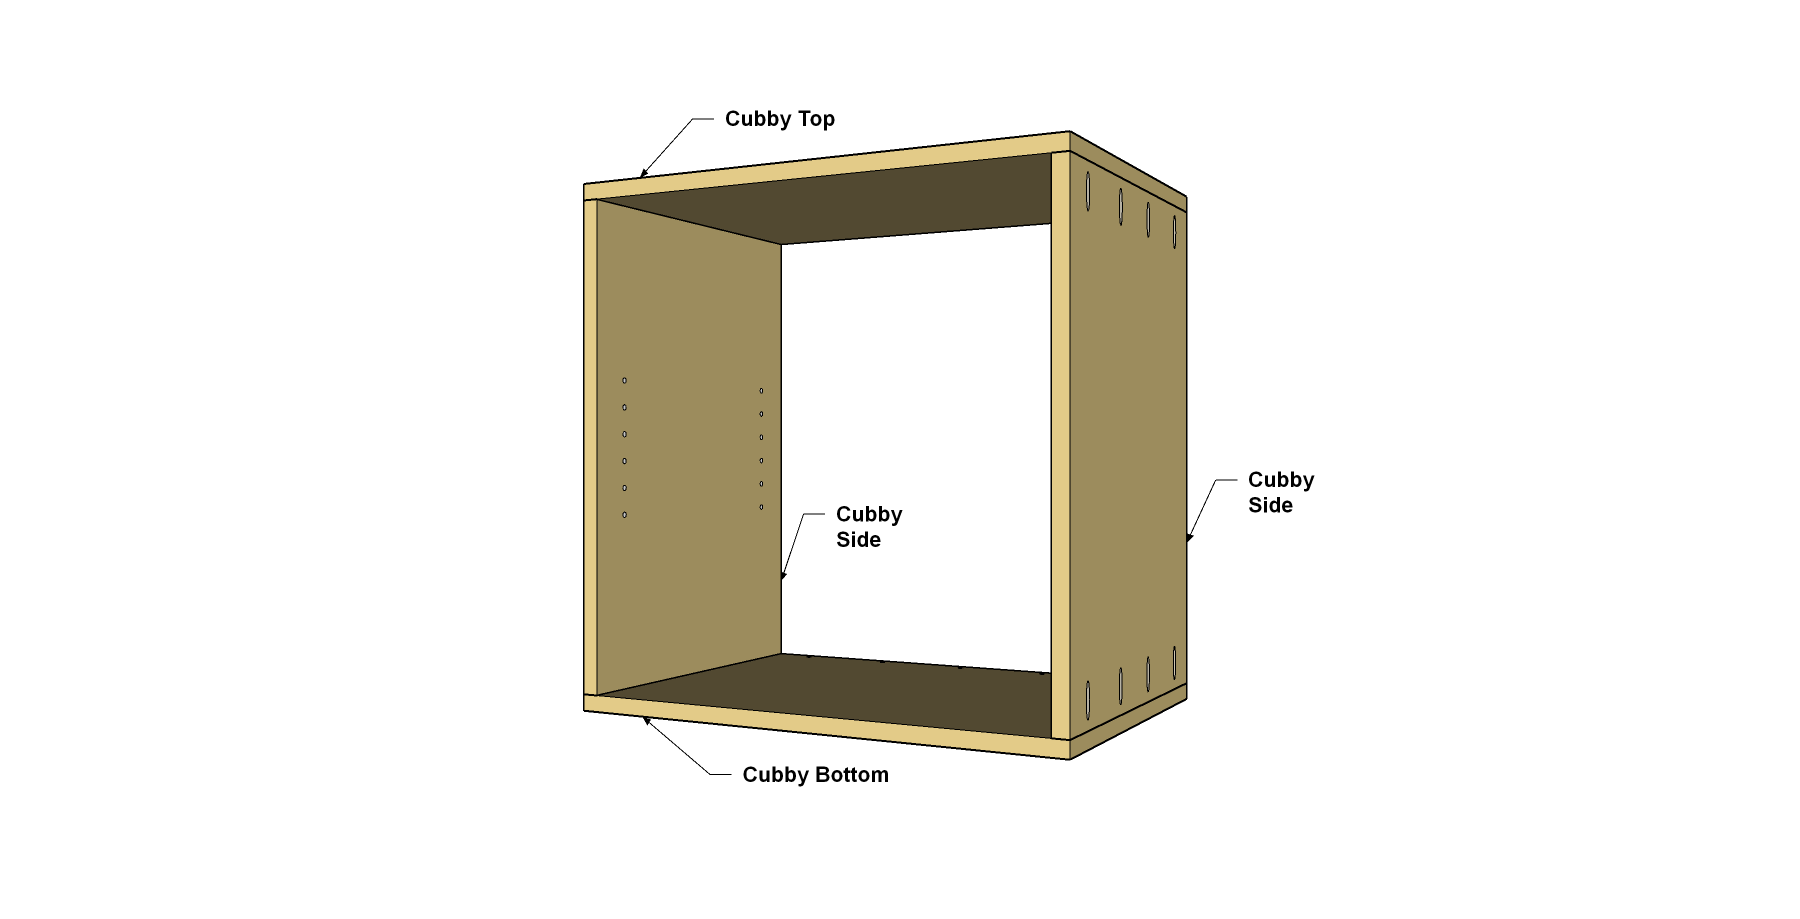
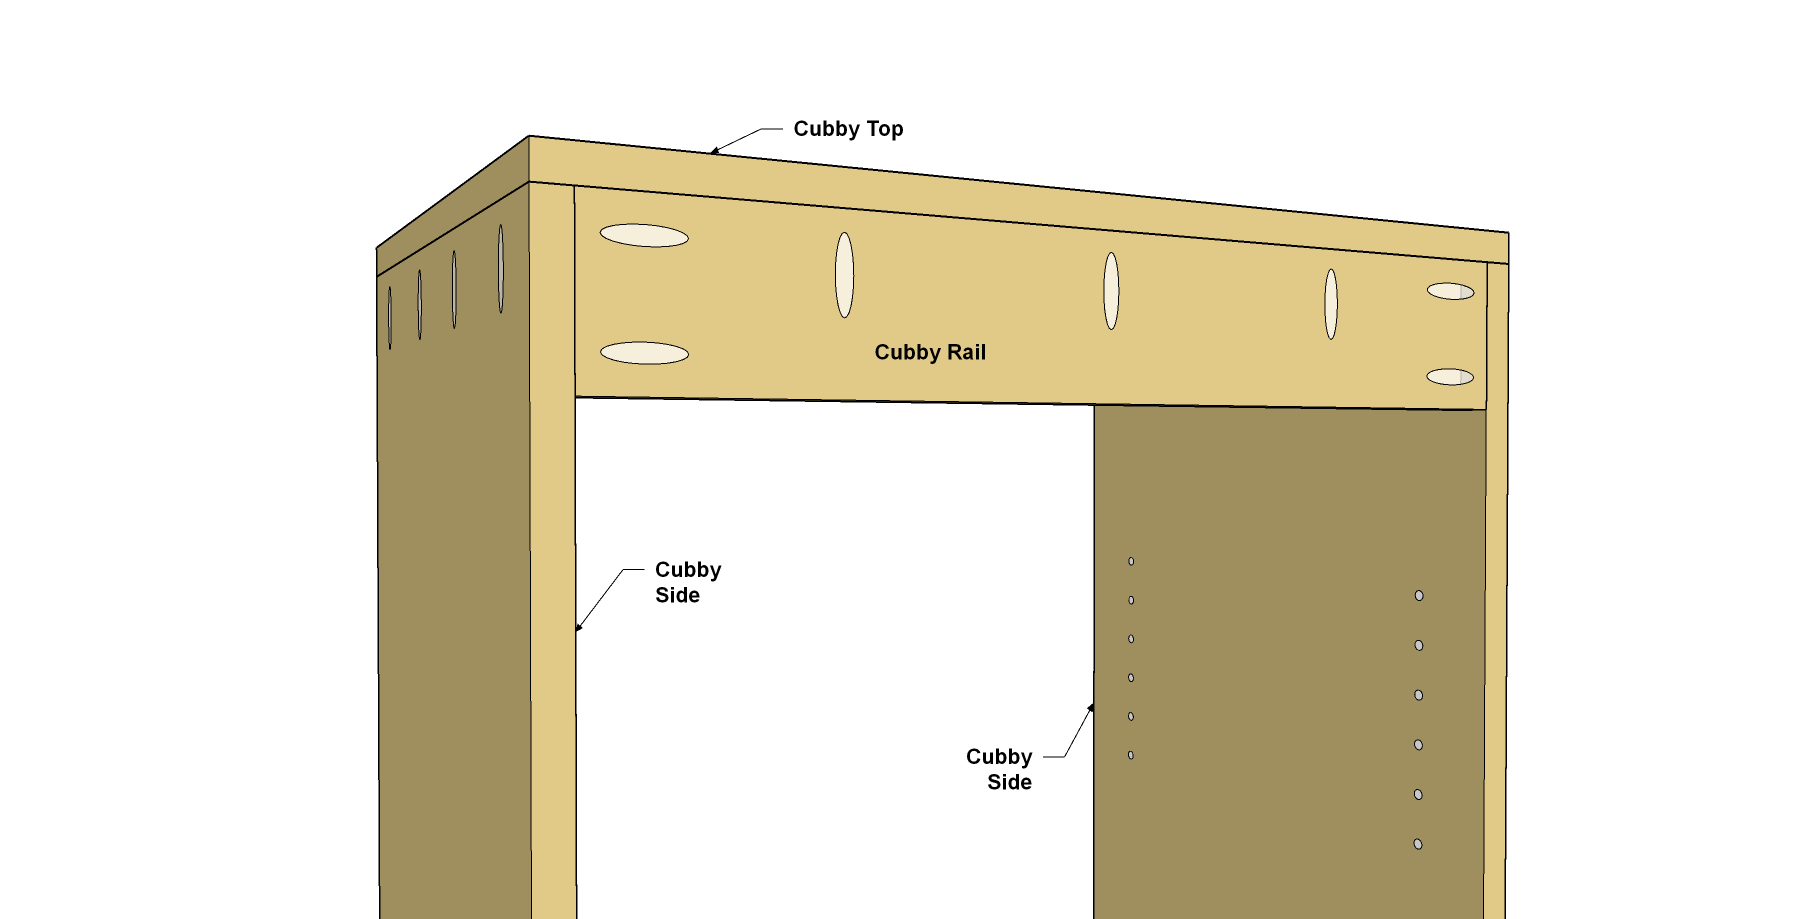
- 2 Cubby Side , 3/4" x 15 3/4" x 22 1/2"
- 1 Cubby Top , 3/4" x 15 3/4" x 23 1/2"
- 1 Cubby Bottom , 3/4" x 15 3/4" x 23 1/2"
- 1 Cubby Shelf , 3/4" ply x 15 3/4" x 21 7/8"
- 1 Cubby Rail , 3/4" x 3 1/2" x 22"
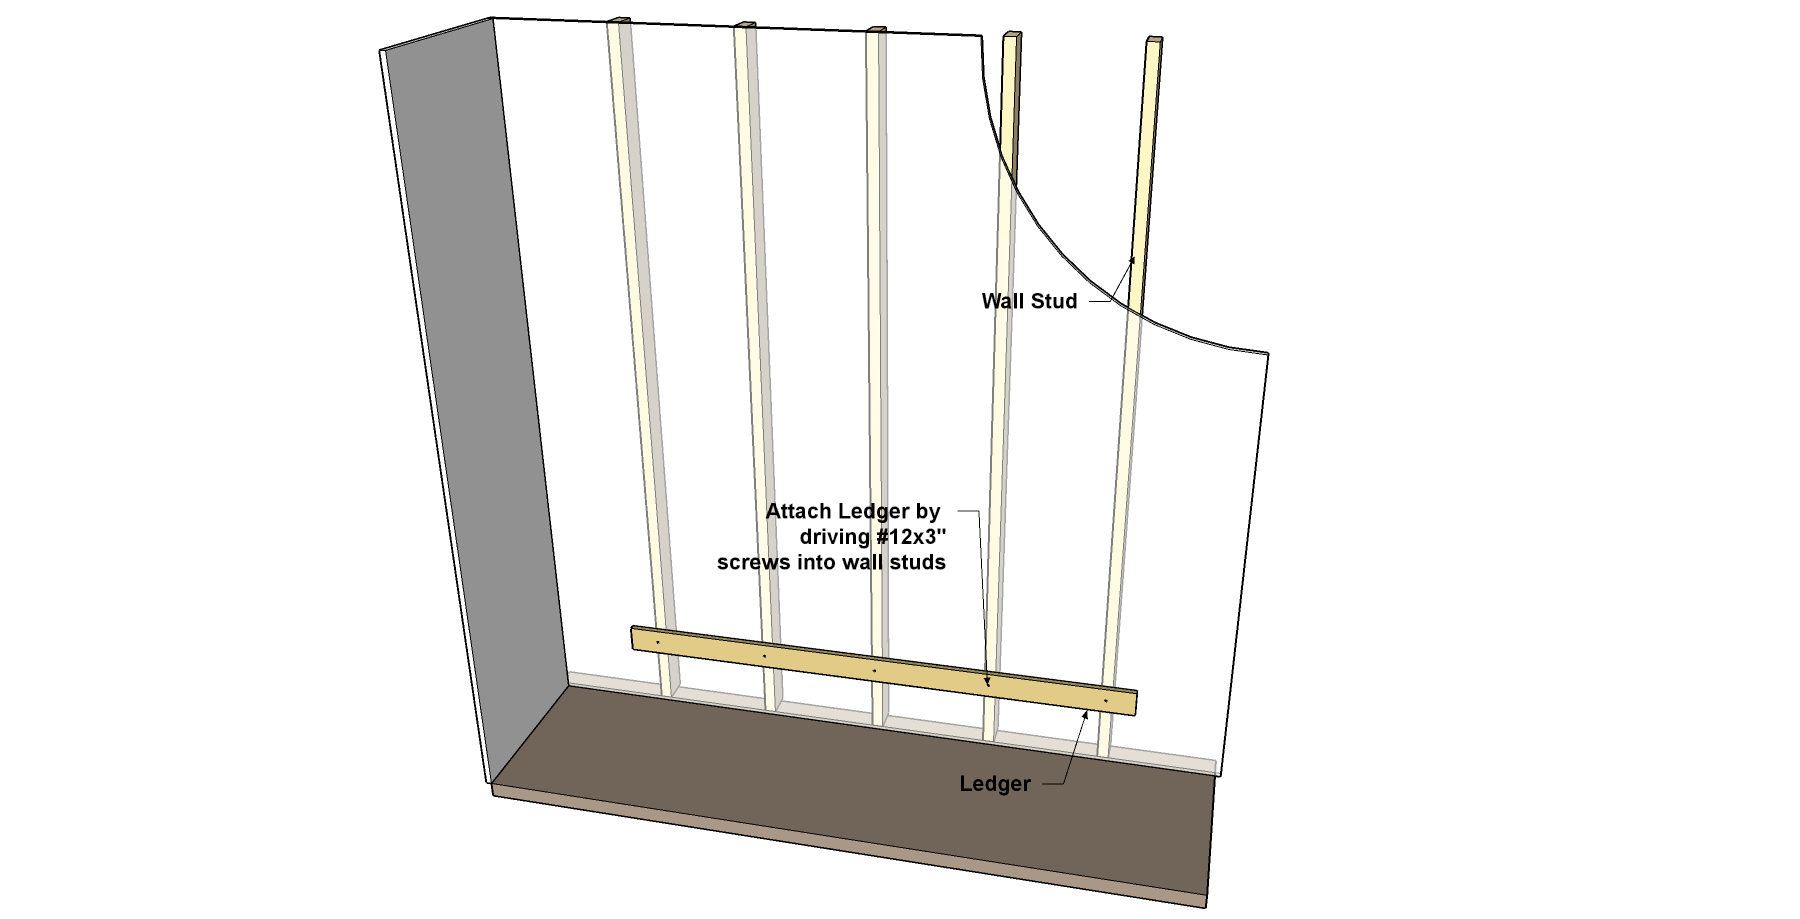
- 1 Ledger , 3/4" x 3 1/2" x 72"
Directions
-
Cut the Plywood Parts
Cut the plywood parts to size from 3/4" plywood, as shown in the cutting diagram. You’ll need four Tower Sides, two Tower Tops, two Tower Bottoms, and ten Tower Shelves. You’ll also need to cut two Cubby Sides, one Cubby Top, one Cubby Bottom, and a Cubby Shelf. Because some of the parts are similar in size, be sure to mark them so you don’t get mixed up in later steps.
-
Create the Rails
Cut two Tower Rails and one Cubby Rail to length from a 1x4 board, as shown in the cutting diagram. With your Kreg® Pocket-Hole jig set up for 3/4"-thick material, drill pocket holes in the Tower Rail and the Cubby Rail, as shown.
-
Drill Pocket Holes in the Tower
Now you can drill pocket holes in the inside face of the Tower Sides, as shown.
-
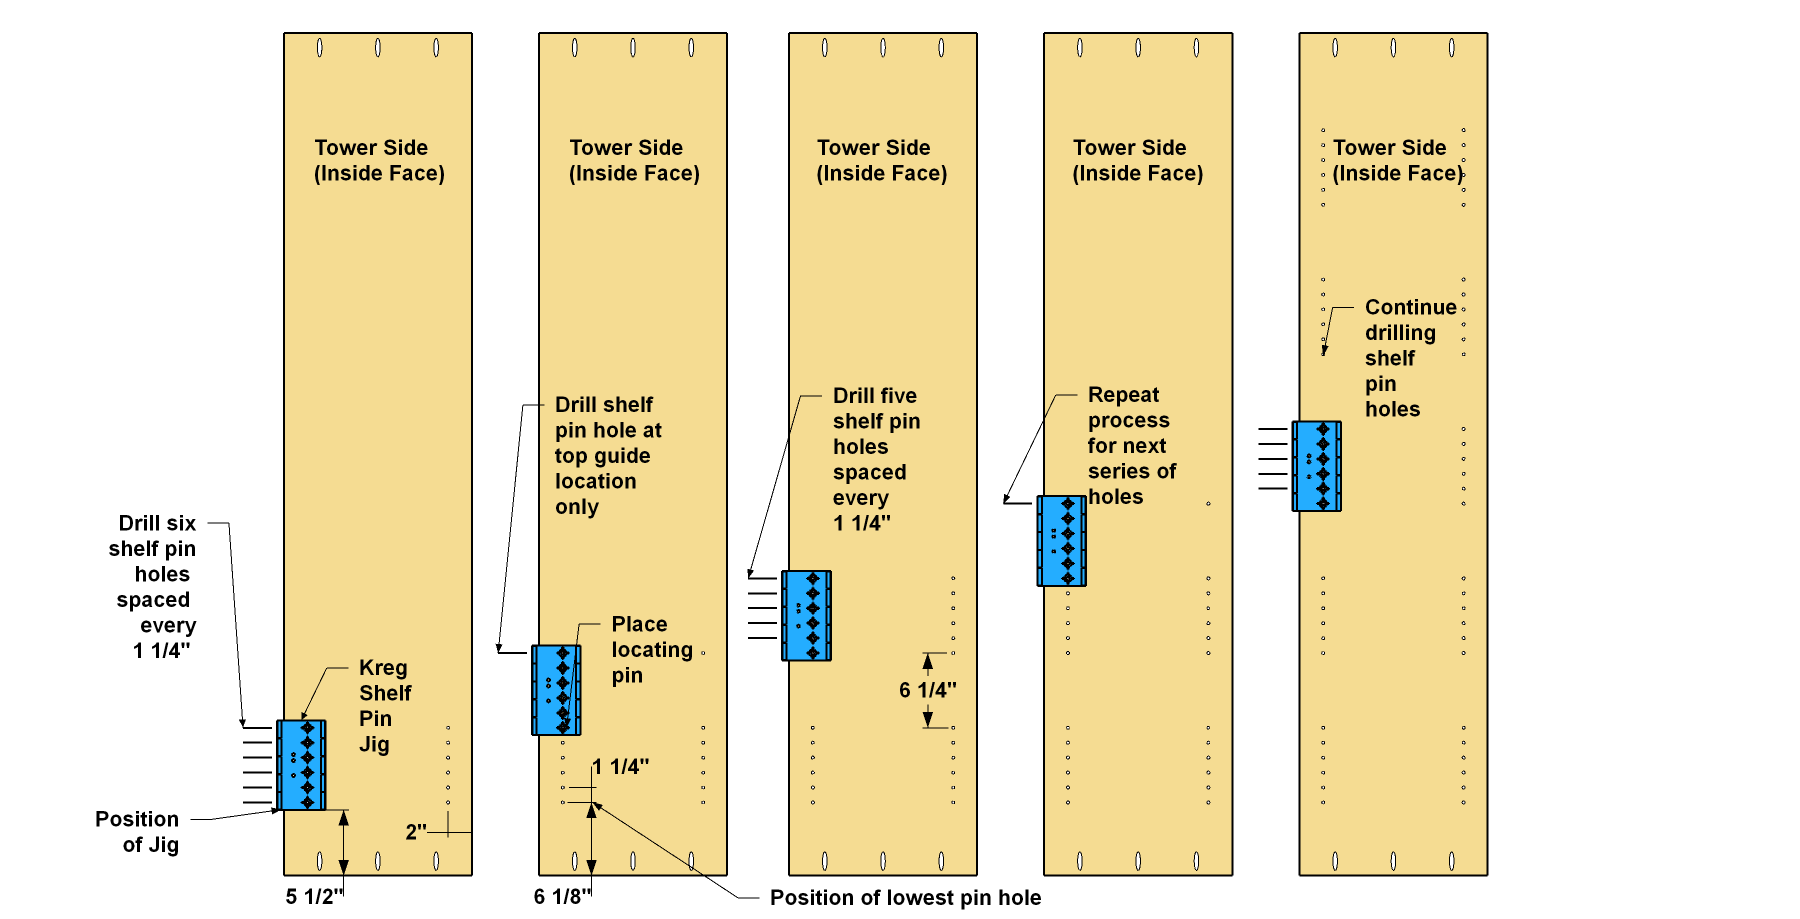
Add Shelf Pin Holes
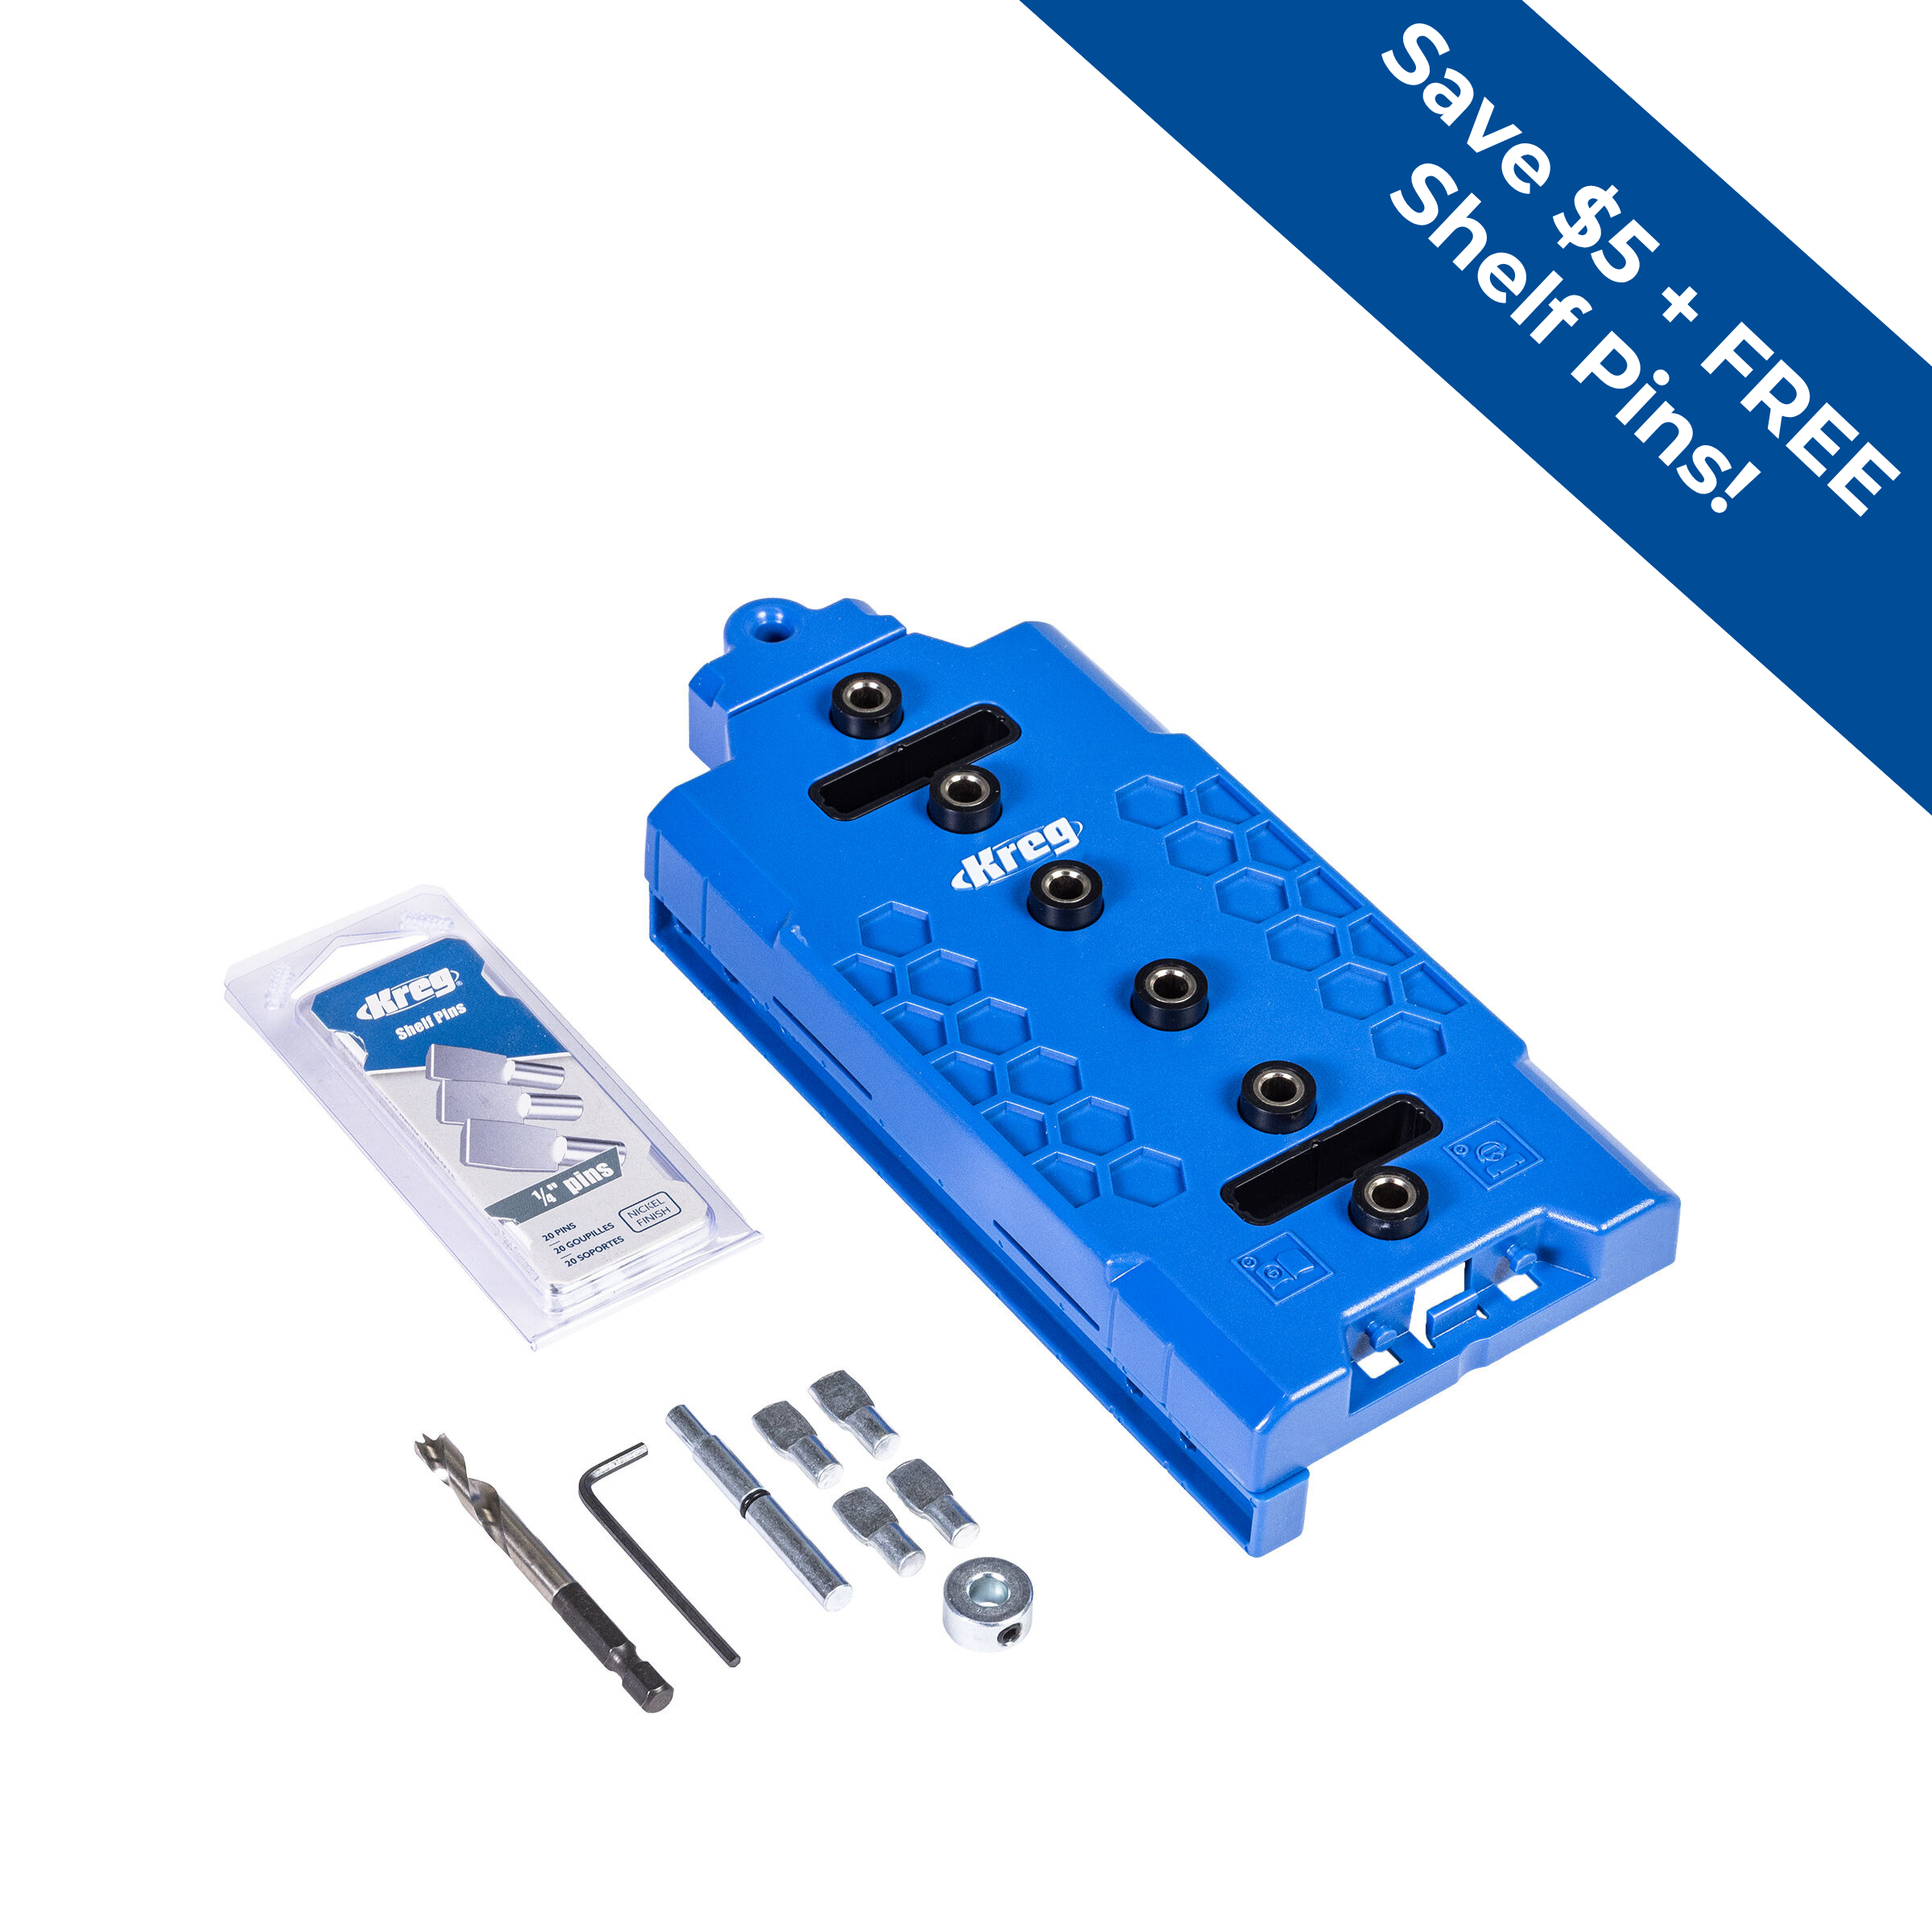
Now create adjustable shelves for your towers by drilling holes for shelf pins. The best way to do this is with a Kreg Shelf Pin Jig. The jig makes it much easier to get consistent hole spacing, and to align the holes from side to side for level shelves.
NOTE: The setback spacing (distance from the edge to the shelf-pin holes) shown throughout this plan matches the first-generation Kreg Shelf Pin Jig. The second generation model, released in March 2022, has different setback spacing. The vertical distance between the pin holes, though, matches the dimensions shown here—1 1/4". You can create the shelf-pin holes accurately using either the first- or second-generation jig.
-
Start Tower Assembly
Sand the Tower Top, Bottom, and Sides as needed, and then assemble them, as shown, using 1-1/4" coarse-thread Kreg Pocket-Hole Screws.
-
Add the Tower Rail
Sand each Tower Rail as needed, and then install them, as shown, using 1-1/4" coarse-thread Kreg Pocket-Hole Screws.
-
Drill Pocket Holes in the Cubby
Drill pocket holes in the outside face of the Cubby Sides, as shown.

-
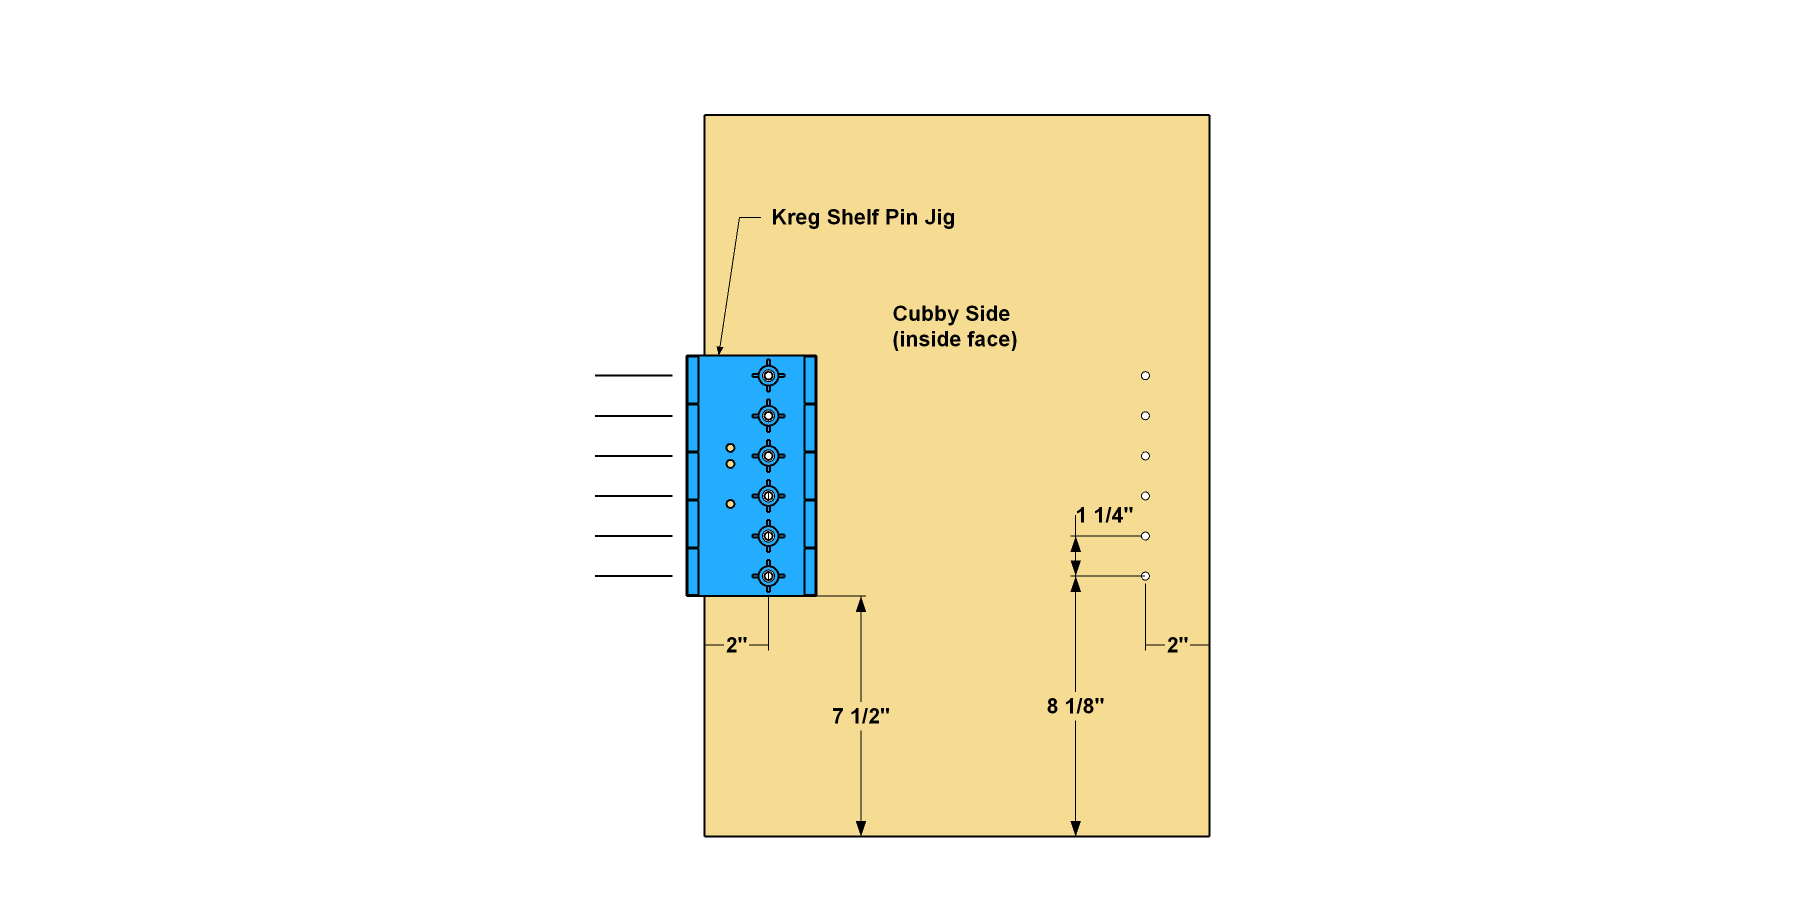
Add Shelf Pin Holes
Now drill holes for shelf pins in the inside face of the cubby sides. Again, measurements are shown for positioning the Kreg Shelf Pin Jig, as well as for positioning the holes if you choose another method.
-
Start Cubby Assembly
Sand the Cubby Top, Bottom, and Sides as needed, and then assemble them, as shown, using 1-1/4" coarse-thread Kreg Pocket-Hole Screws.
-
Add the Cubby Rail
Sand the Cubby Rail as needed, and then install it, as shown, using 1-1/4" coarse-thread Kreg Pocket-Hole Screws.
-
Paint Prior to Installation
With the towers and cubby assembled, you can do any additional sanding needed, and sand the Tower Shelves and Cubby Shelf. Then, examine the front edges of all the pieces. There may be rough spots or voids in the plies. If so, fill them with wood filler or spackling compound, and then sand the edges smooth. After that, you can paint or finish all of the parts. It’s much easier to do before you install them in your closet.
-
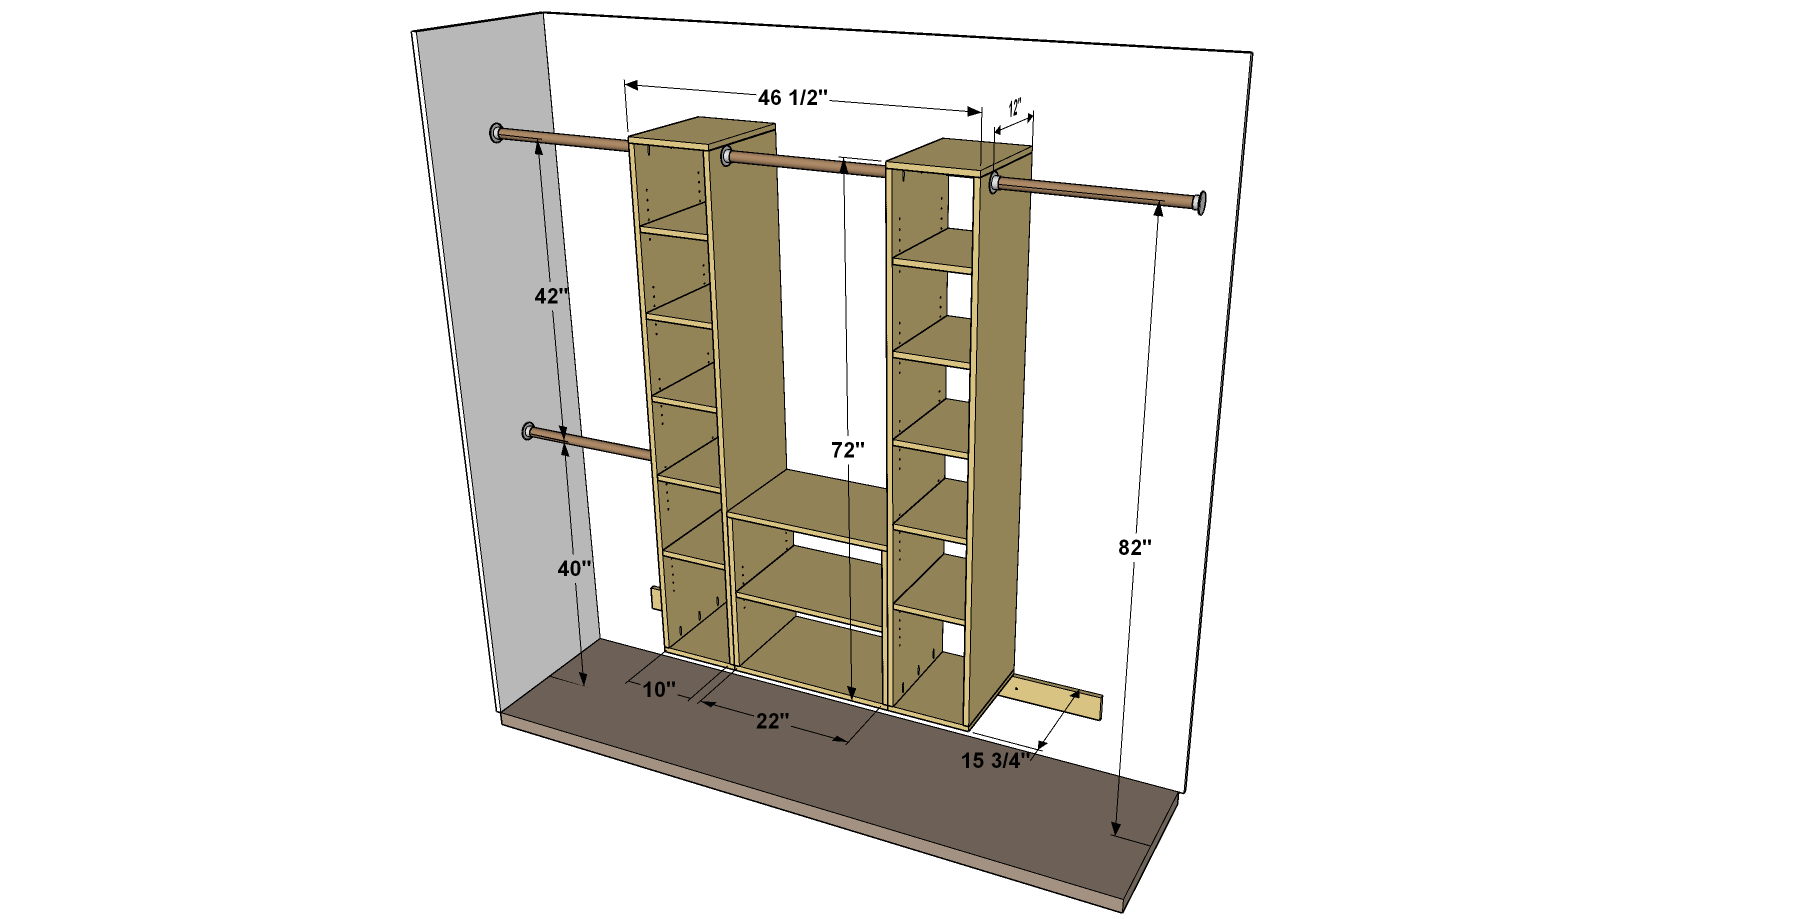
Start Installation
To install your closet organizer, the first step is to remove any existing shelves or rods. Then locate and mark the positions of the wall studs. Next, you can install the Ledger. It’s just a 72"-long 1x4 board. Make sure your ledger is straight. You may want to paint it to match your wall color before installation. With that done, install the ledger so its top edge is located 12" above the floor. Make sure the Ledger is level, and then secure it by driving a #12x3" screw through the Ledger and into each wall stud.
-
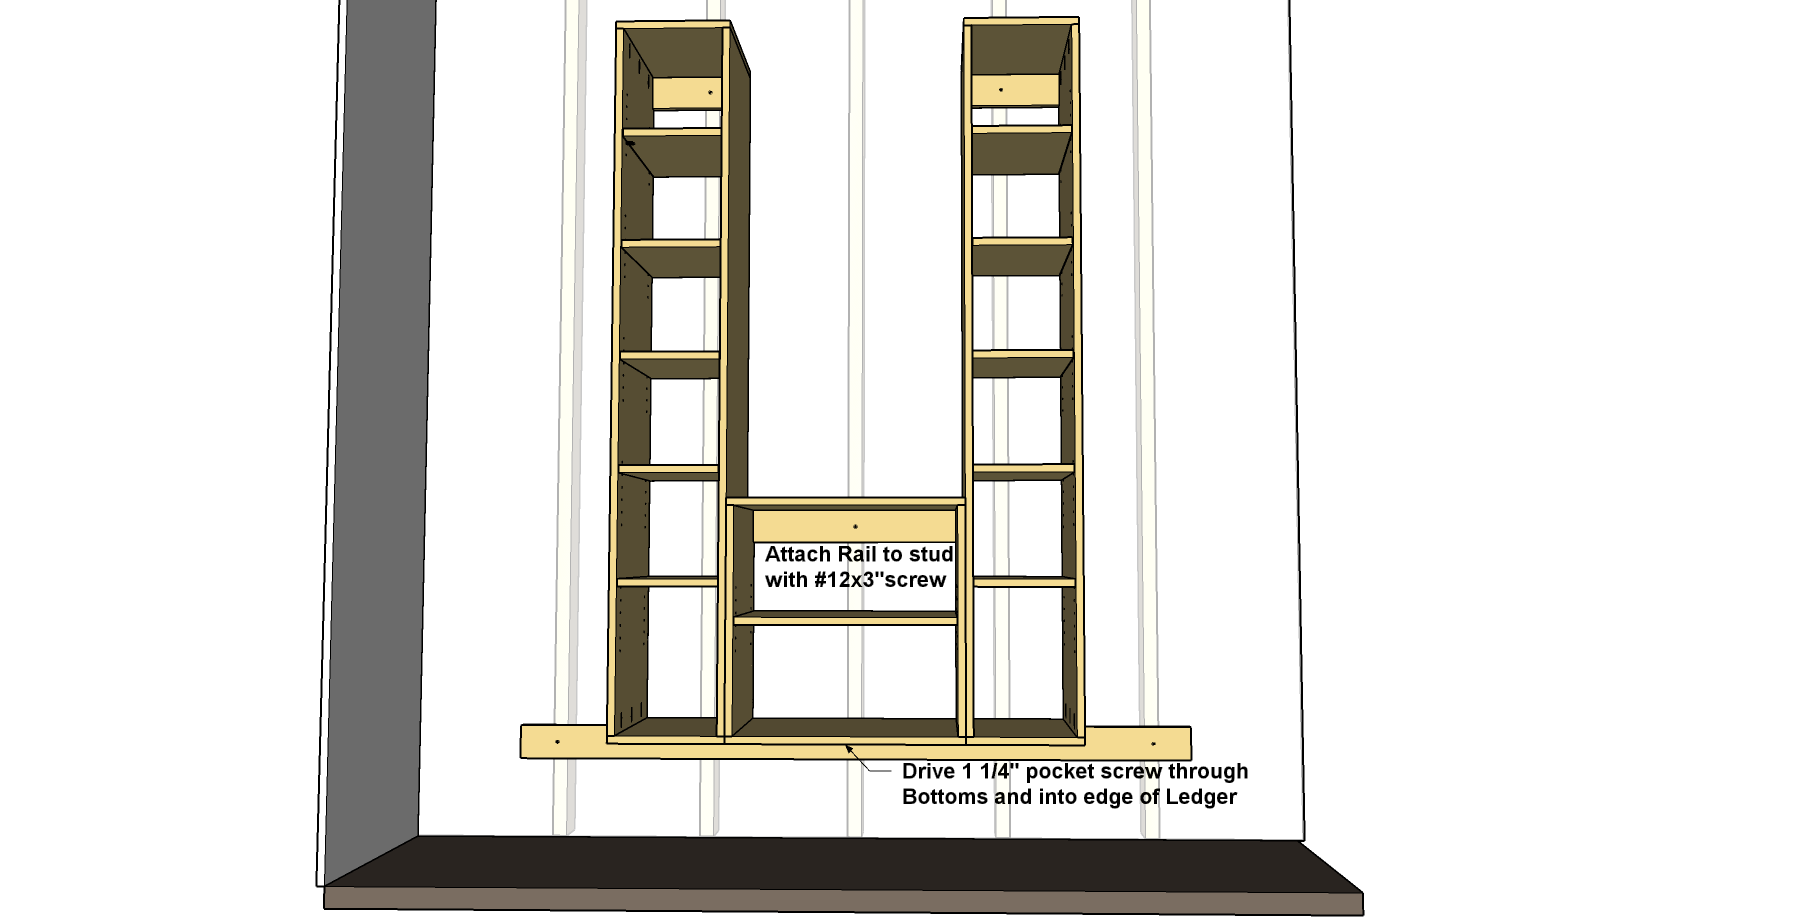
Add the Towers and Cubby
Now you can mount the organizer. With a helper, position the first tower in the Ledger and make sure it’s plumb (straight up and down). Drive a #12x3" screw through the Rail and into a wall stud. If you can’t hit a stud, use heavy-duty wall anchors—two per tower and cubby. Then drive two 1-1/4" Kreg Pocket-Hole Screws though the Tower Bottom and into the upper edge of the Ledger. Pocket-hole screws are self-tapping, so you won’t need to predrill. You’ll probably have to drive the screws at a slight angle. Add the cubby next, and then the other tower. Finally, drive a couple of 1-1/4" coarse-thread Kreg Pocket-Hole Screws through the Cubby Sides and into the Tower Sides to tie the structure together.
-
Mount Closet Rods
Once the Organizer is in place, you can slip in the shelves. Then it’s time to add closet rods. We positioned them at fairly standard heights. On the right, the rod is positioned for long dresses and coats. On the left, the rods are positioned for shirts and jackets above, and folded hanging pants, as well as shirts, below. The center rod can hold shirts and pants, too. Just where you place your closet rods, and how many you add, is up to you depending on your storage needs.