Modern Outdoor Bench
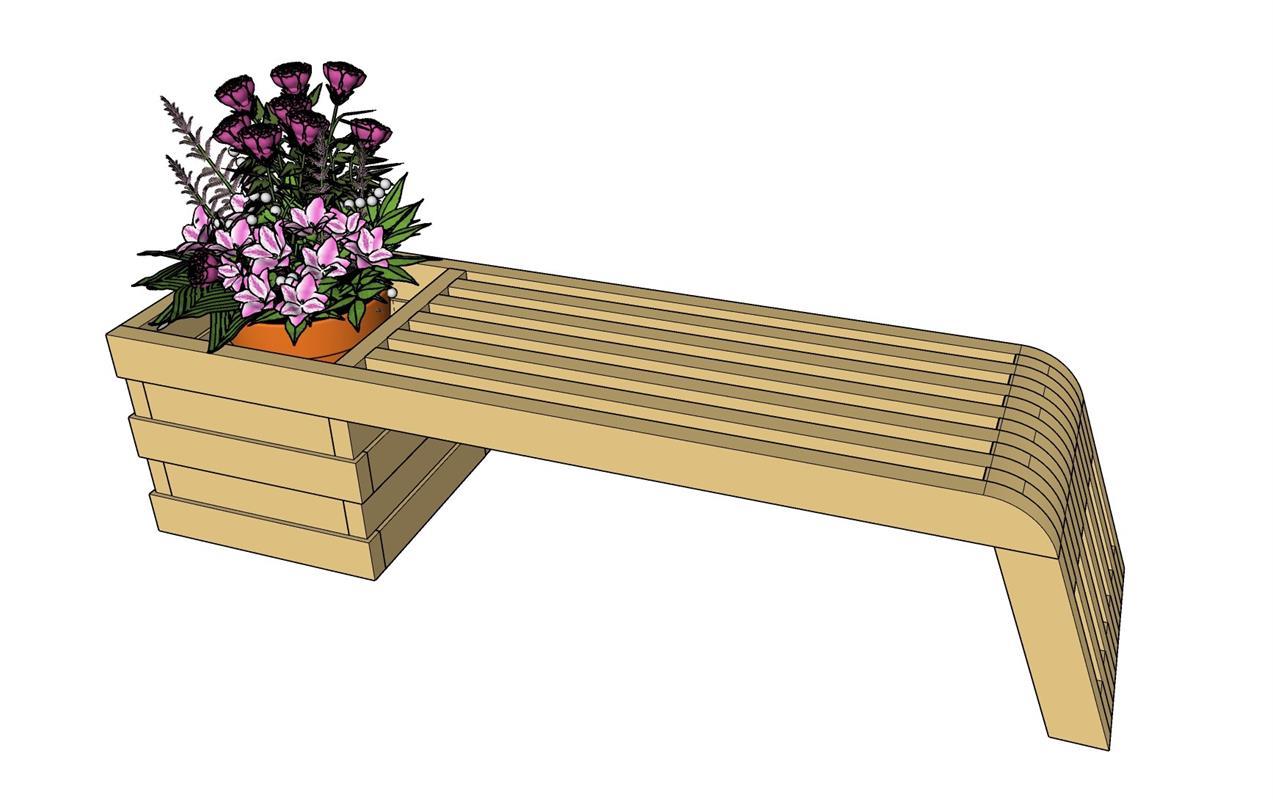
By Makers Challenge CentralThe Builders Challenge is back for Season 9 and this time we’ve teamed up with our friends from Kreg Tool and Build Something for the design of this Modern Outdoor Storage Bench. Match it exactly or put your own spin on it! Build along with us https://www.builderschallenge.com/
Directions
-
Cut The Box Parts
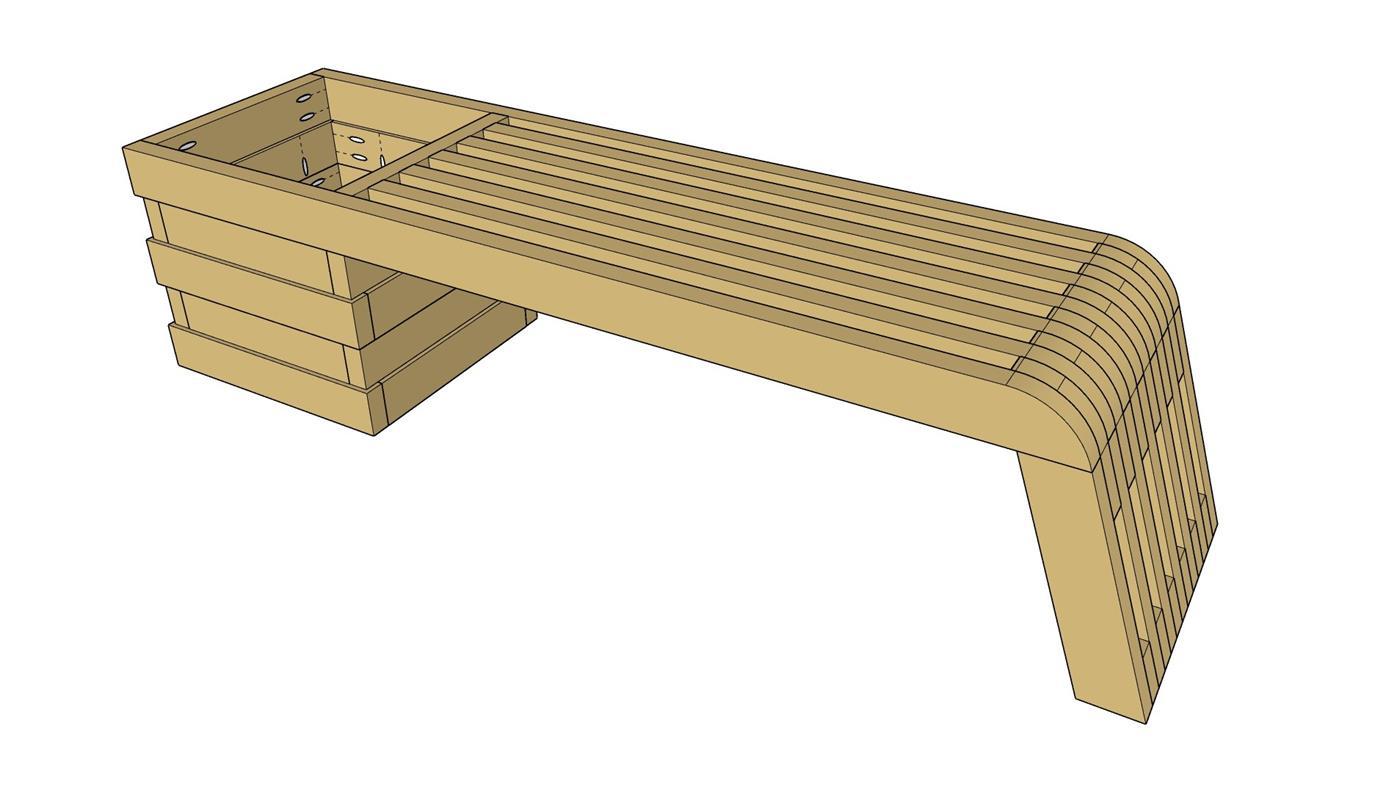
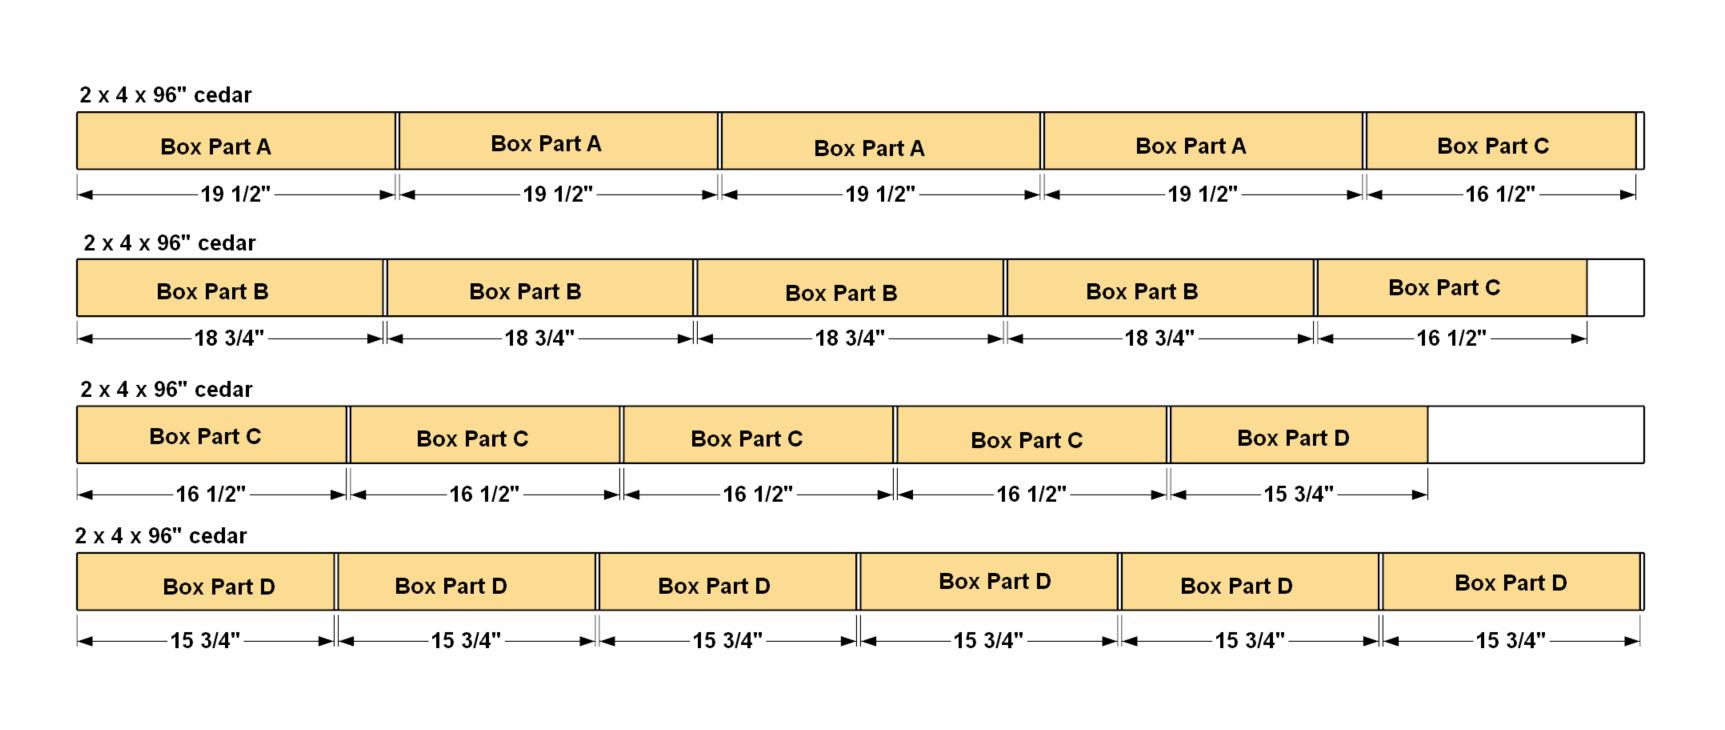
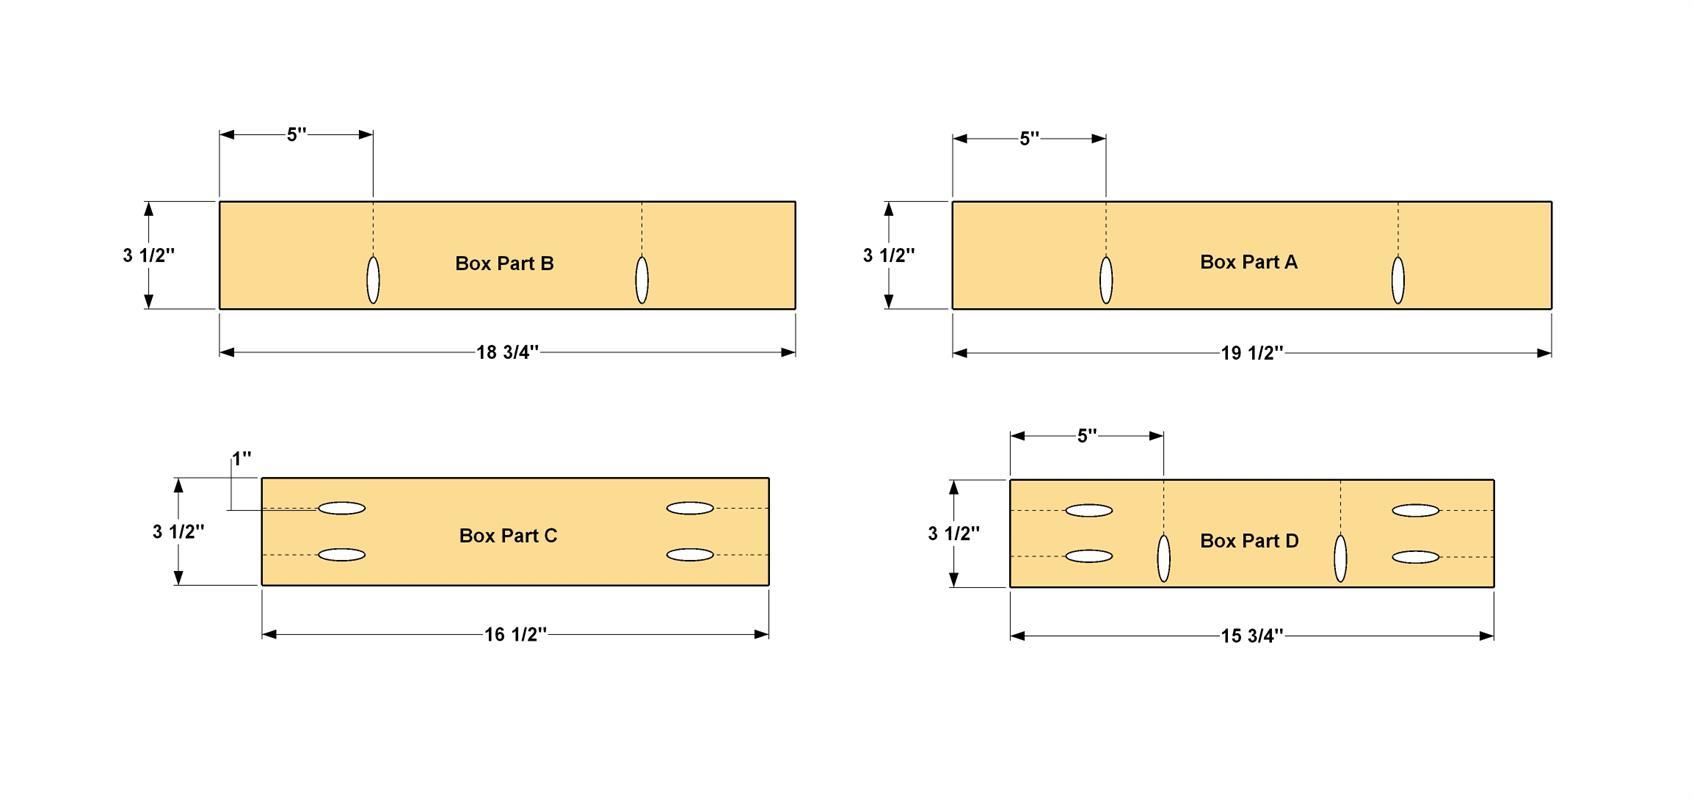
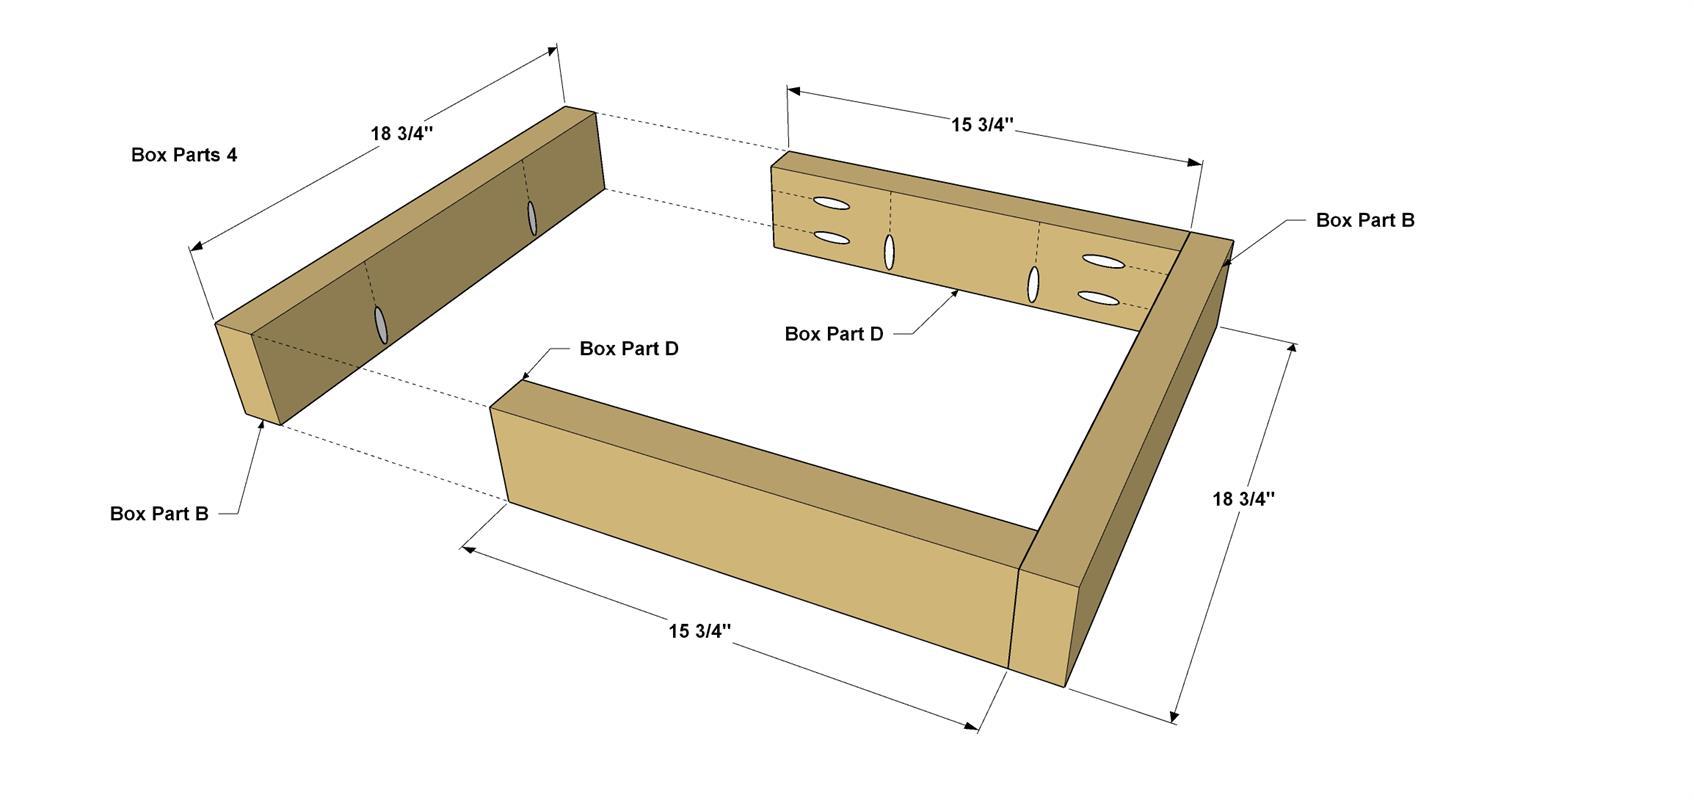
Cut 4 – Part A, 4 – Part B, 6 – Part C, and 7 – Part D Box parts to length from 2x4 cedar boards, as shown in Cut Diagram. Set your pocket hole jig for 1 1/2" thick material and drill pocket holes in each part as shown in the illustration. The end pocket holes connect the boards to form a layer and the perpendicular pocket holes connect one layer to the next. Make sure the perpendicular pocket holes face down after the final box assembly. This prevents water from accumulation in the pocket holes.
-
Build The First Box Layer
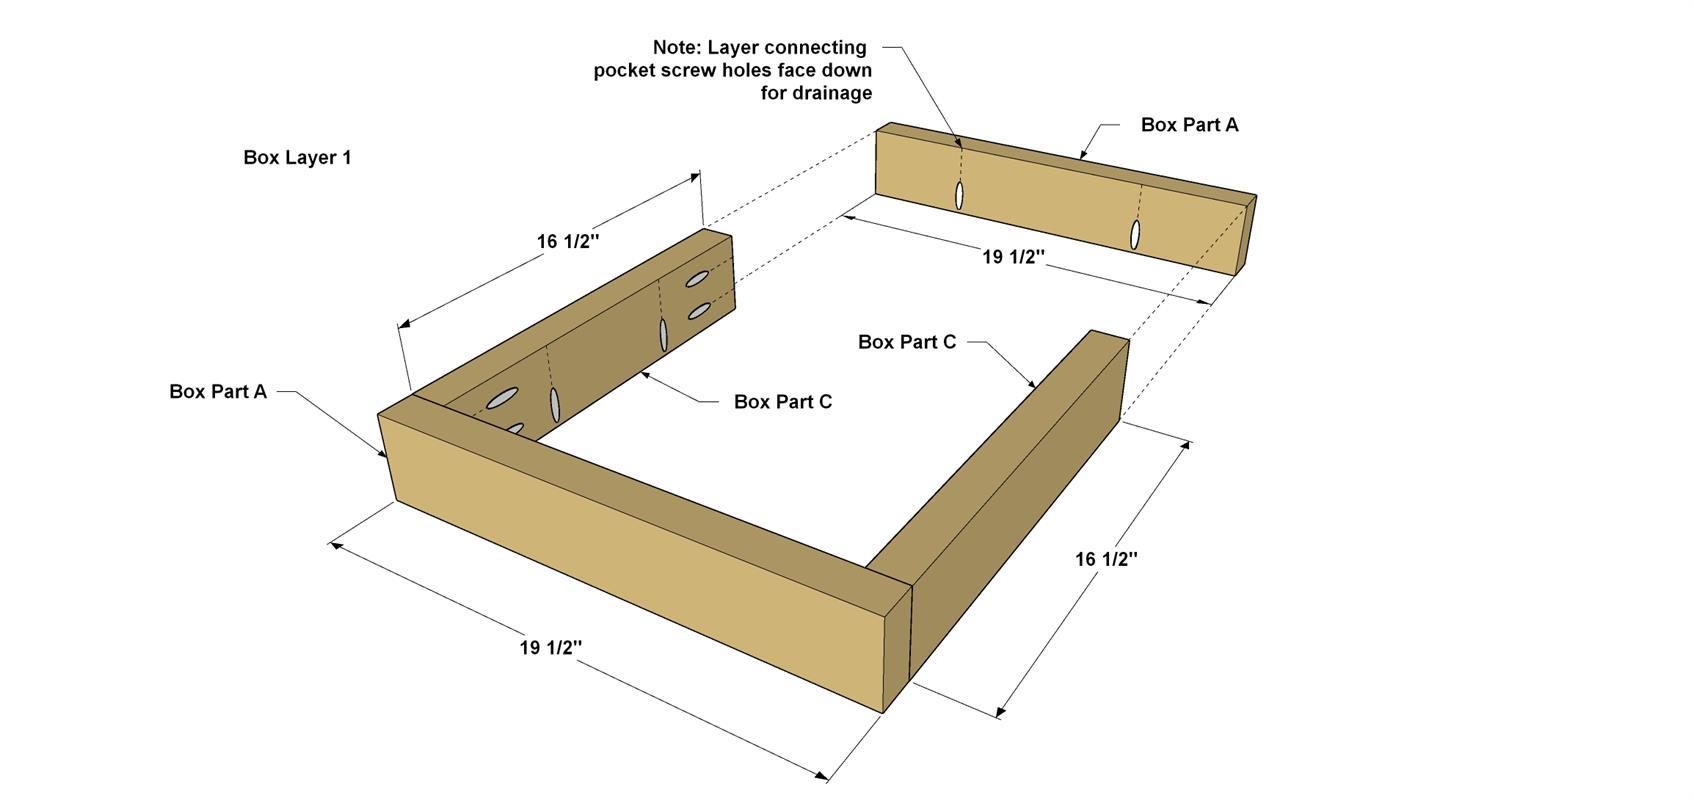
Starting with the first Box Layer, which will become the bottom of the box. Assemble 2 - Part A, and 2 Part C as shown in the illustration. Connect the boards with glue and 2 1/2" Kreg Blue-Kote Screws as shown.
-
Build Box Layer 2
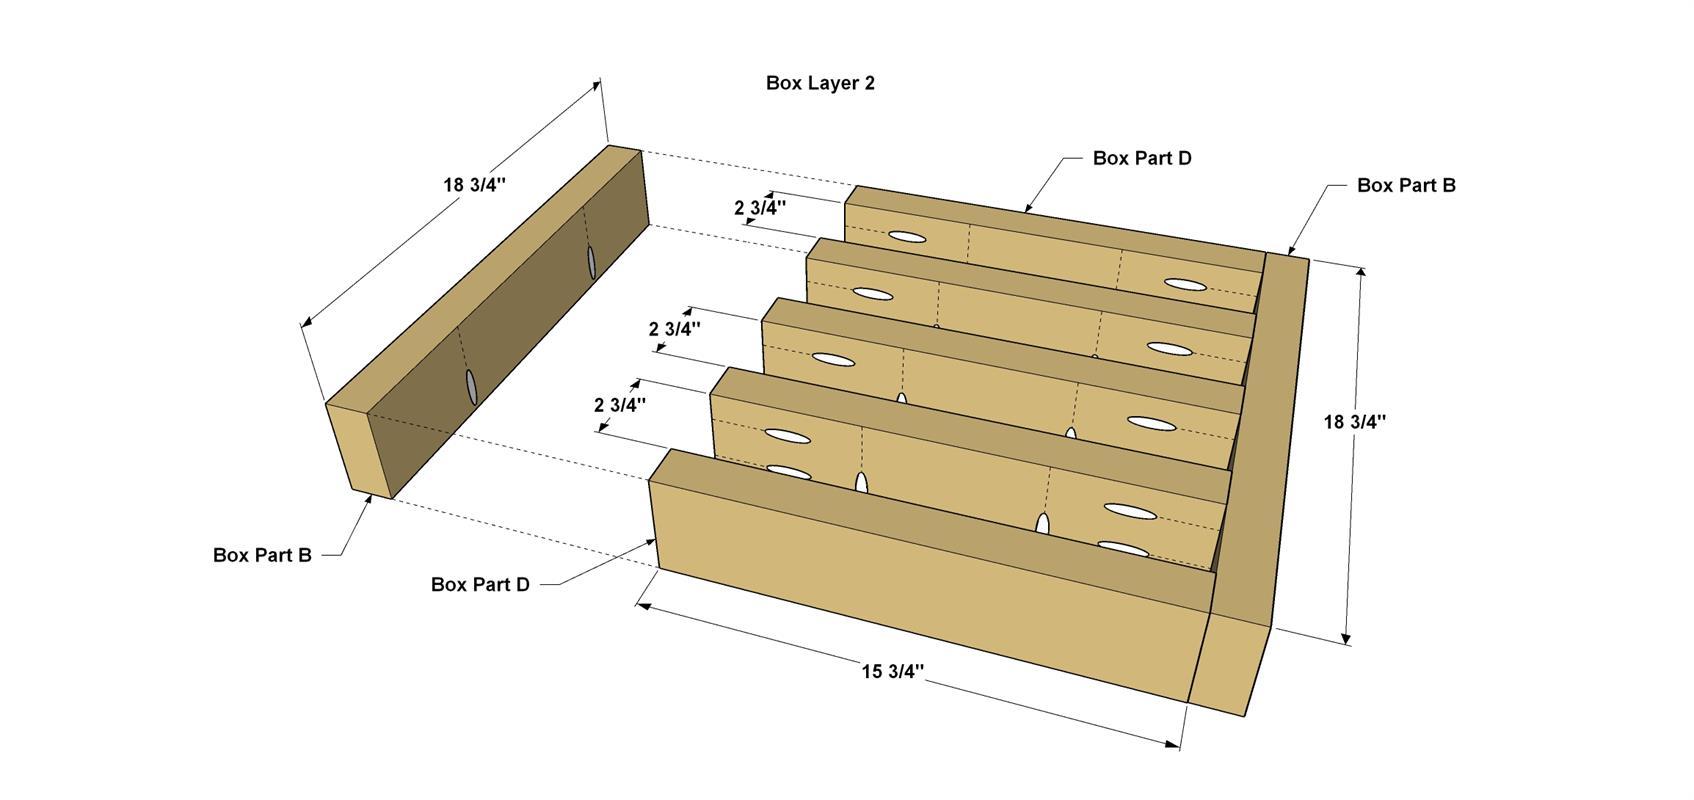
Box Layer 2, second from the bottom, is the shelf layer. It's made from 2 - Part B, and 5 Part D. Space each Part D equally, about 2 3/4" apart, and secure them to each Part B with 2 1/2" Kreg Blue- Kote screws, as shown.
-
Build Box Layer 3
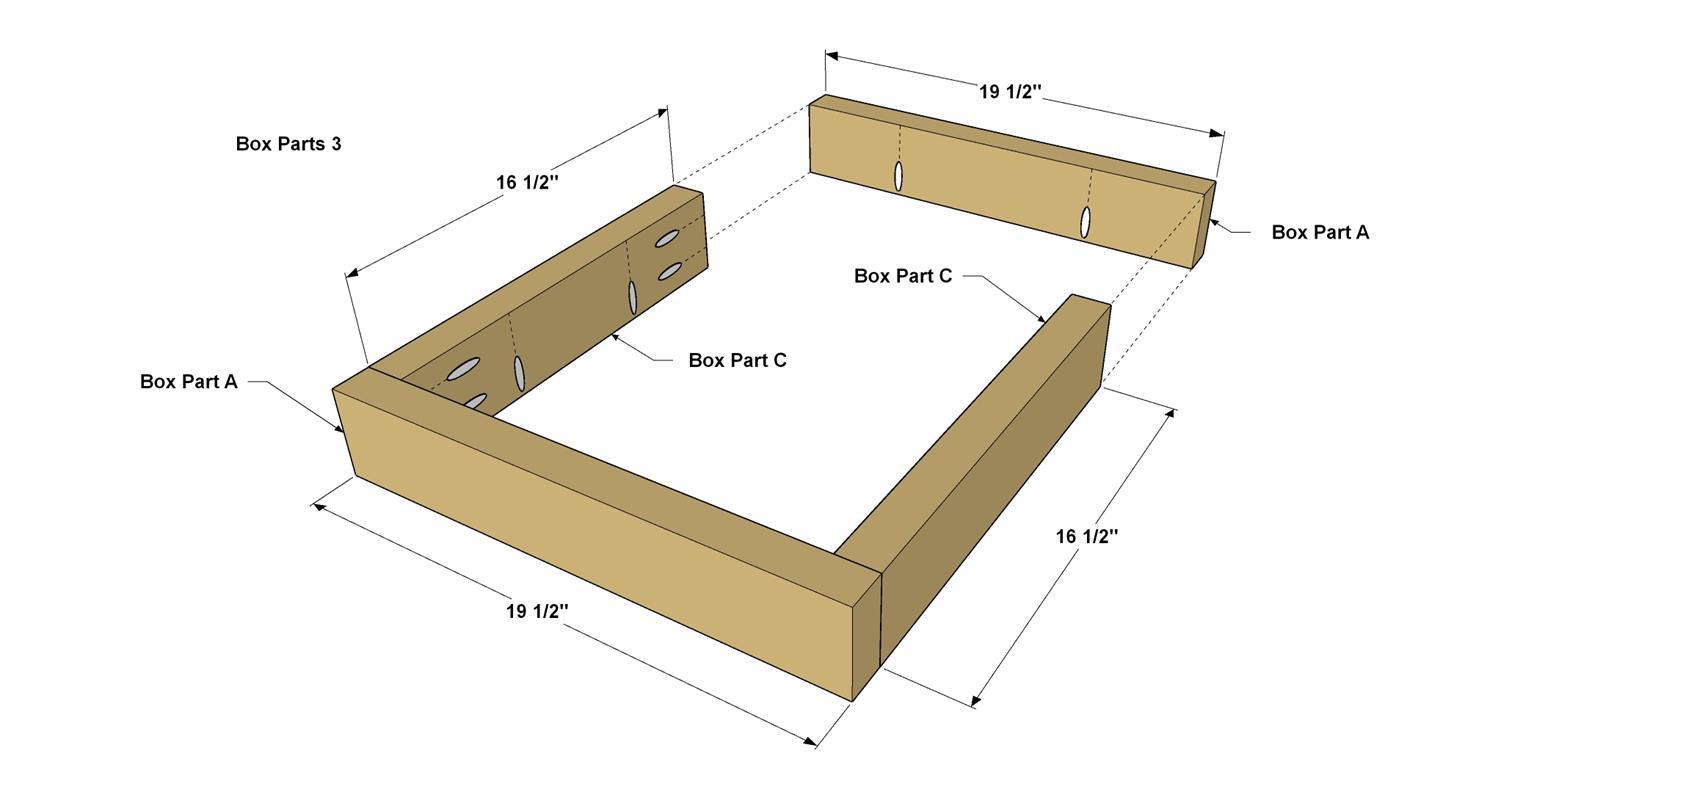
Box Layer 3 is made from 2-Part A, and 2 Part C. Position the boards as shown, and secure them with glue and 2 1/2" Kreg Blue-Kote screws.
-
Build Box Layer 4
Box Layer 4 is made from 2-Part B, and 2 Part D. Position the boards as shown, and secure them with glue and 2 1/2" Kreg Blue-Kote screws, as shown. With each Box Layer complete, set them aside for the time being. We'll come back to them for the final bench assembly.
-
Slats, Legs, Blocks and Fillers
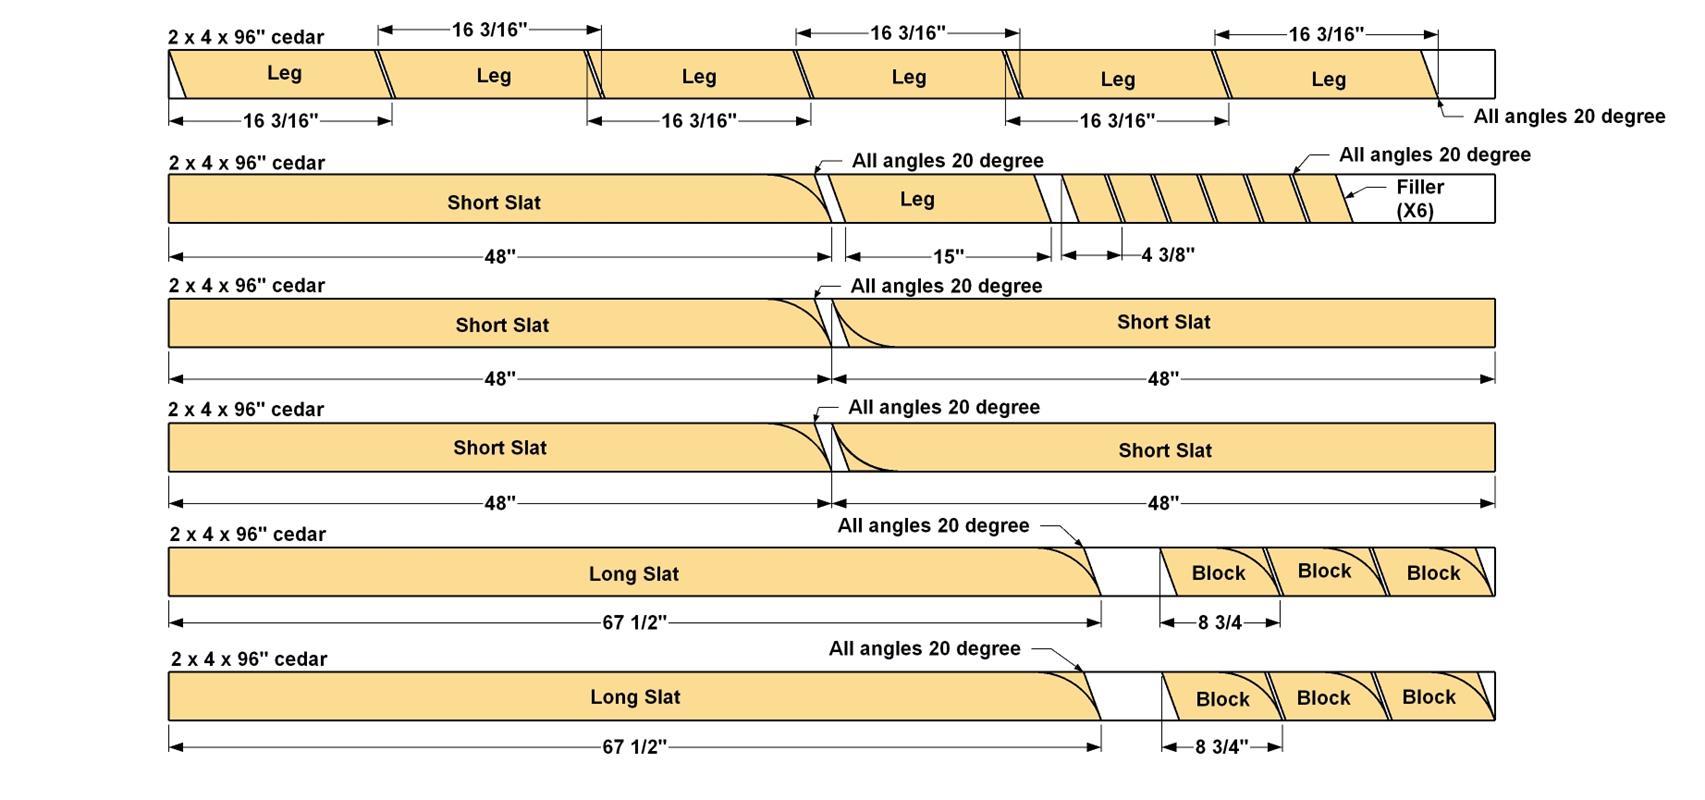
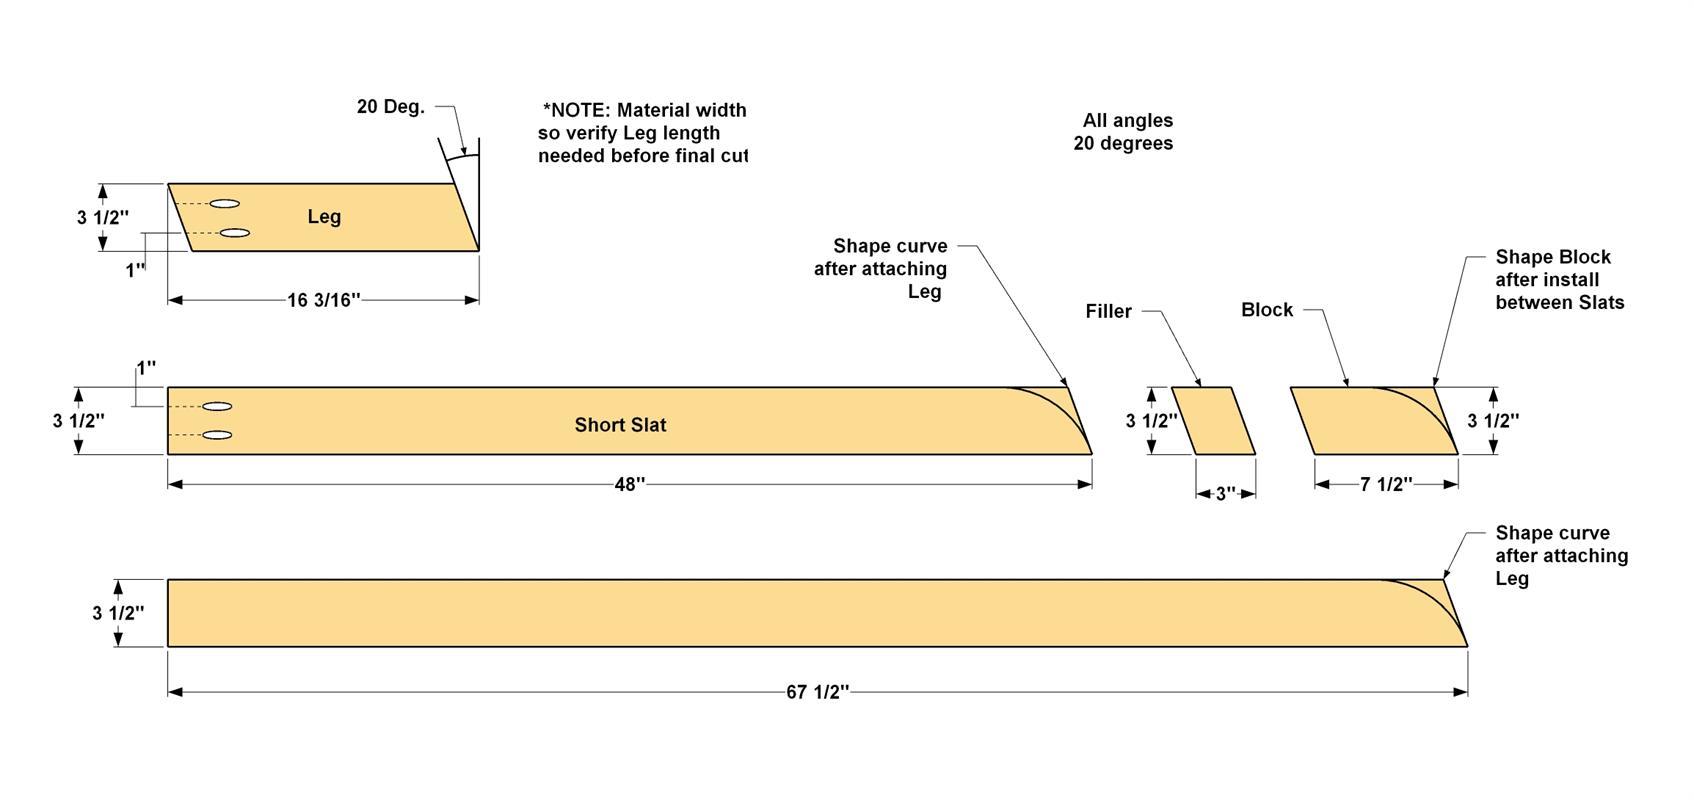
From 2x4 cedar boards, cut 2-Long Slats, 5-Short Slats, 7 Legs, 6-Blocks and 6-Fillers to length as shown in Cut Diagram 2. Note that the Legs, Fillers, and Blocks all have parallel 20° angles on the ends. The slats, both Long and Short, have a 90° cut on one end, and a 20° cut on the other end. Drill pocket holes only on the 90° end of the Short Slats. Drill pocket holes on one end of the Legs where shown. The Slats and Blocks and will have curves on one end of them but wait to make this cut until the Slat assembly step.
-
Assemble the Slats and Legs
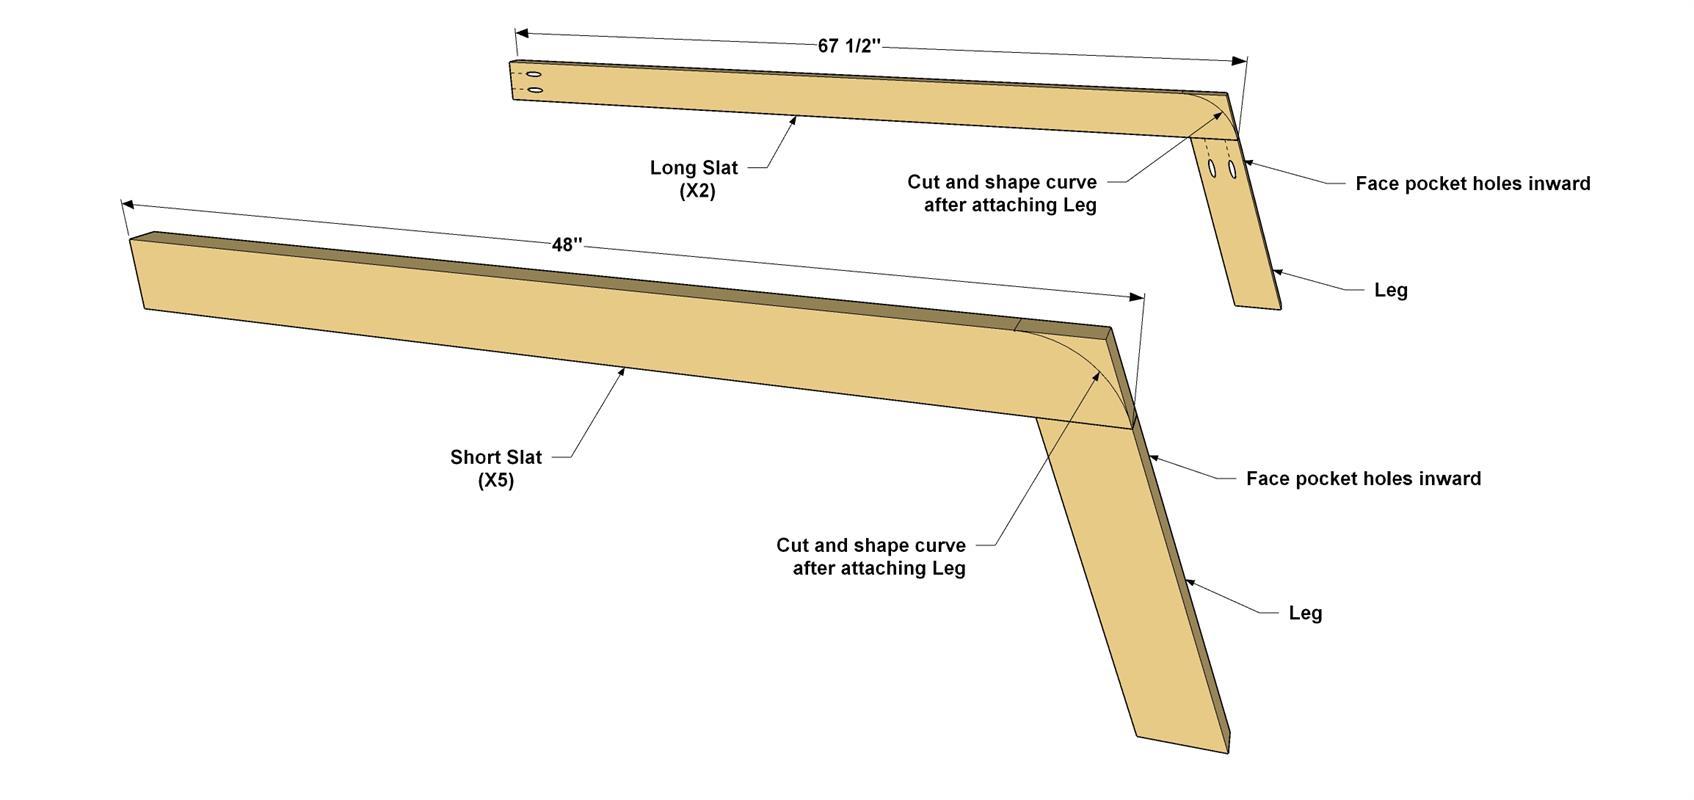
Lay the first Short Slat on a flat work surface. Position a Leg against the bottom of the slat as shown and secure it with glue and 2 1/2" Kreg Blue-Kote screws. Repeat this process for the other four Short Slats and the two Long Slats. Make sure the pocket holes on the two Long Slats face to the inside of the bench as noted. The position of the pocket holes on the Short Slats is less important.
-
Layout The Curves
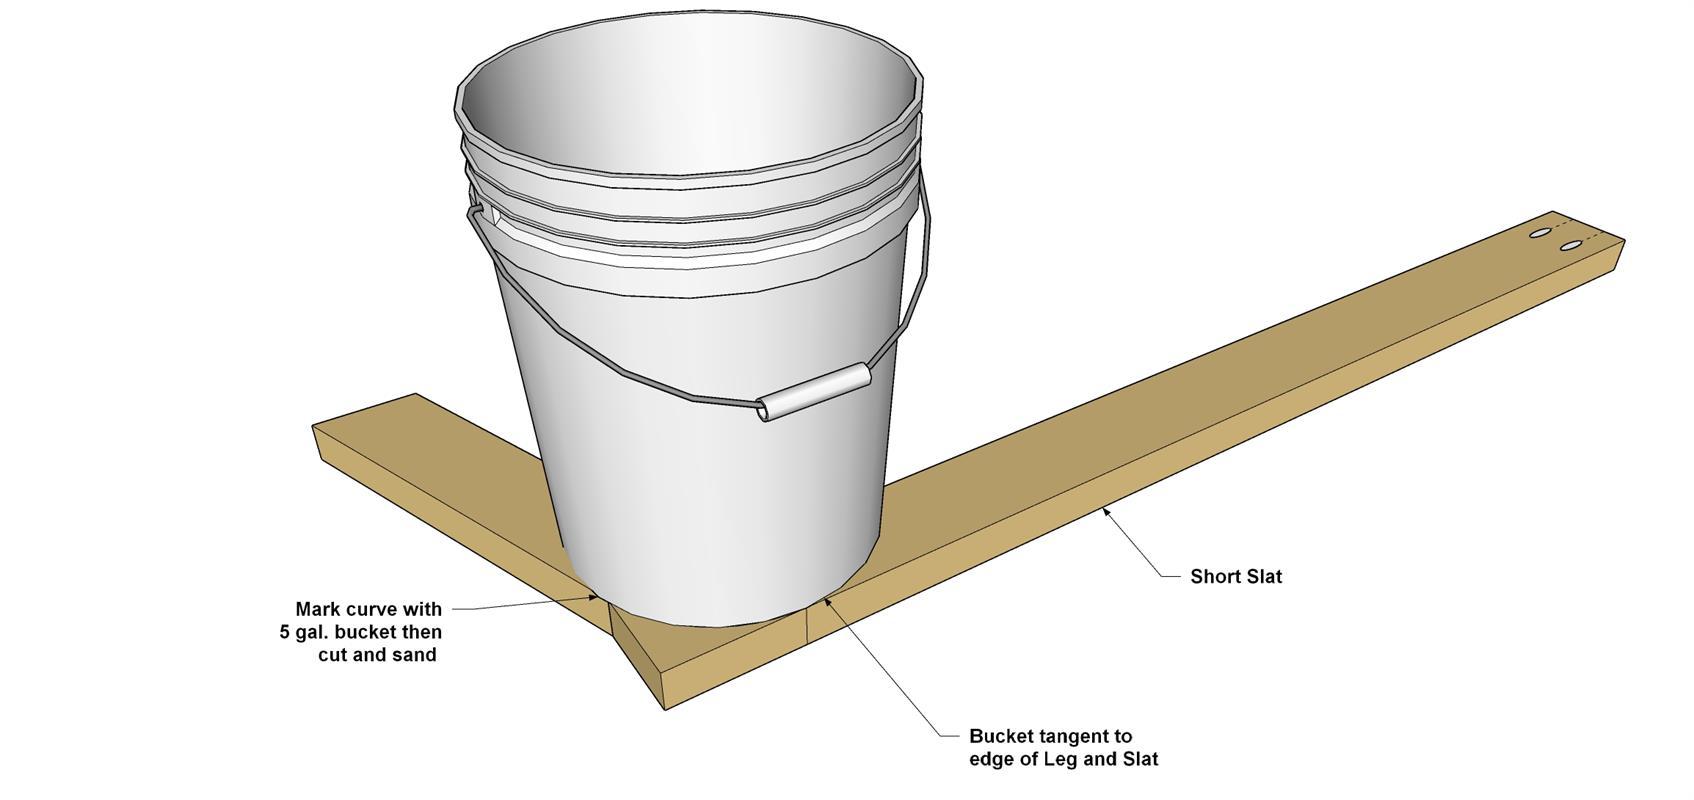
Using a standard 5-gallon bucket as a template, lay the bucket on the first Leg/Slat assembly so the curves are tangent to boards, as shown. Mark the curve with a pencil, secure the assembly to a work surface, and rough cut the curve with a jig saw. Cut close to line but leave some material. Once the bench is assembled, you can sand all the curves to a smooth shape.
-
Add Filler and Block
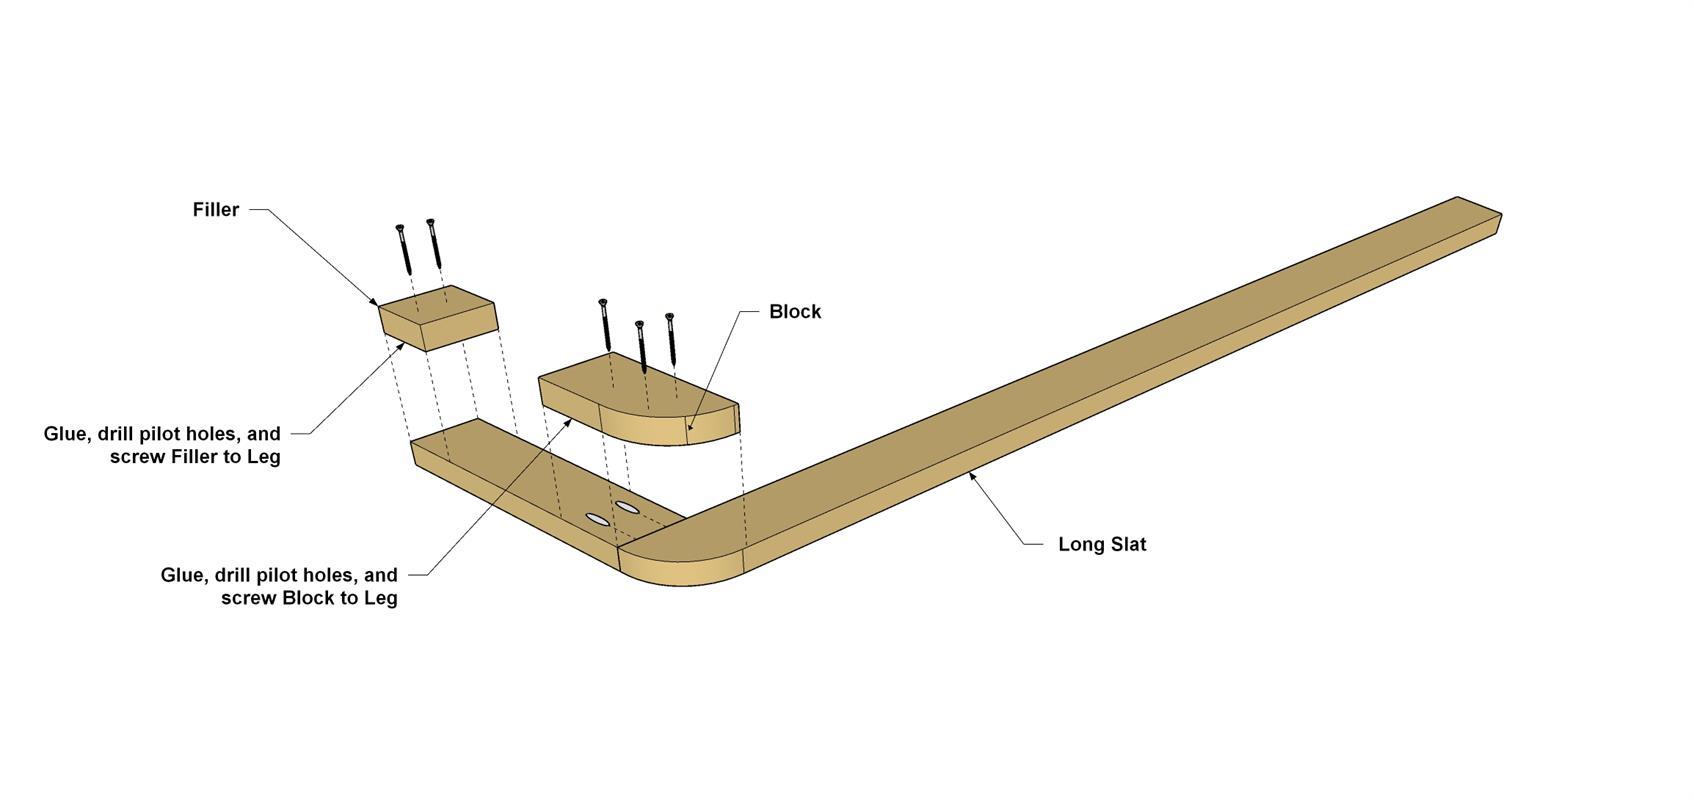
Apply glue to the first Filler and position it so it is flush with the bottom, front, and back edges of the Leg. Apply glue and clamp it in place. Drill a couple evenly spaces pilot holes and secure the Filler to the Leg with 2 1/2" exterior flat head wood screws. Position the first Block on the Slat and Leg. Transfer the curve profile from the first Slat to the first Block. Secure the Block and rough cut the curve with a jigsaw. Apply glue to the first Block and position it over the Leg and Slat joint where shown. Clamp it in place and drill pilot holes. Secure the Block with 2 1/2" exterior flat head wood screws.
-
Add The First Slat
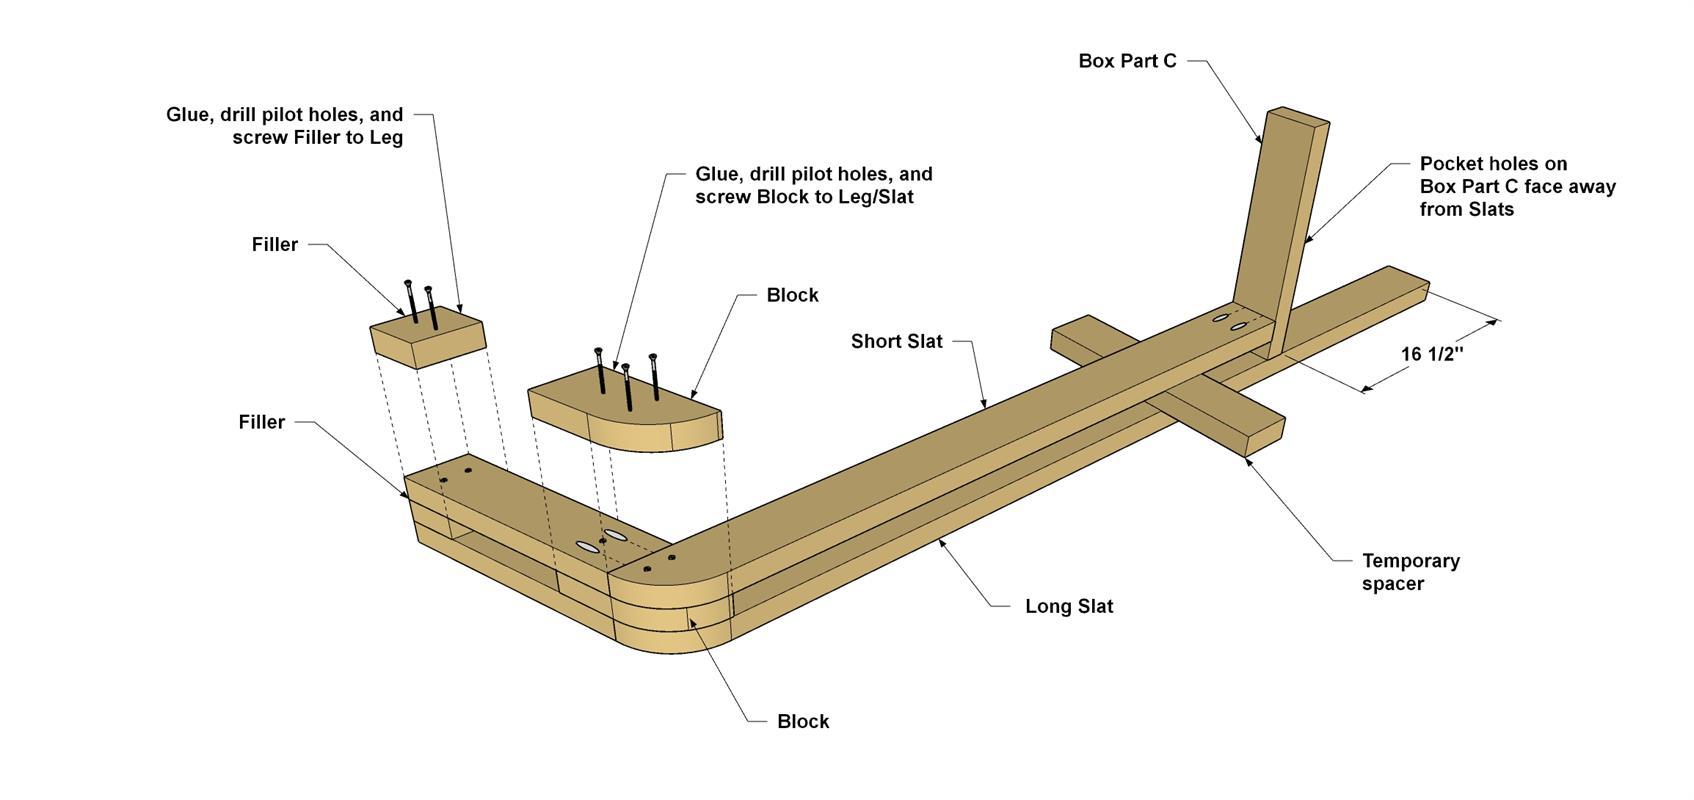
Lay a temporary spacer on the Long Slat where shown. Apply glue to the Filler and Block and then position the first Short Slat assembly so the edges are flush with the Filler, Block and first Long Slat. Clamp it in place, drill pilot holes, and secure it to the Filler and Block with 2 1/2" flat head exterior wood screws. Place one Box Part C against the end of the Short Slat as shown. Add Glue and secure it to the Long and Short Slat with 2 1/2" Kreg Blue-Kote screws. Repeat this process for each layer.
-
Add The Last Slat
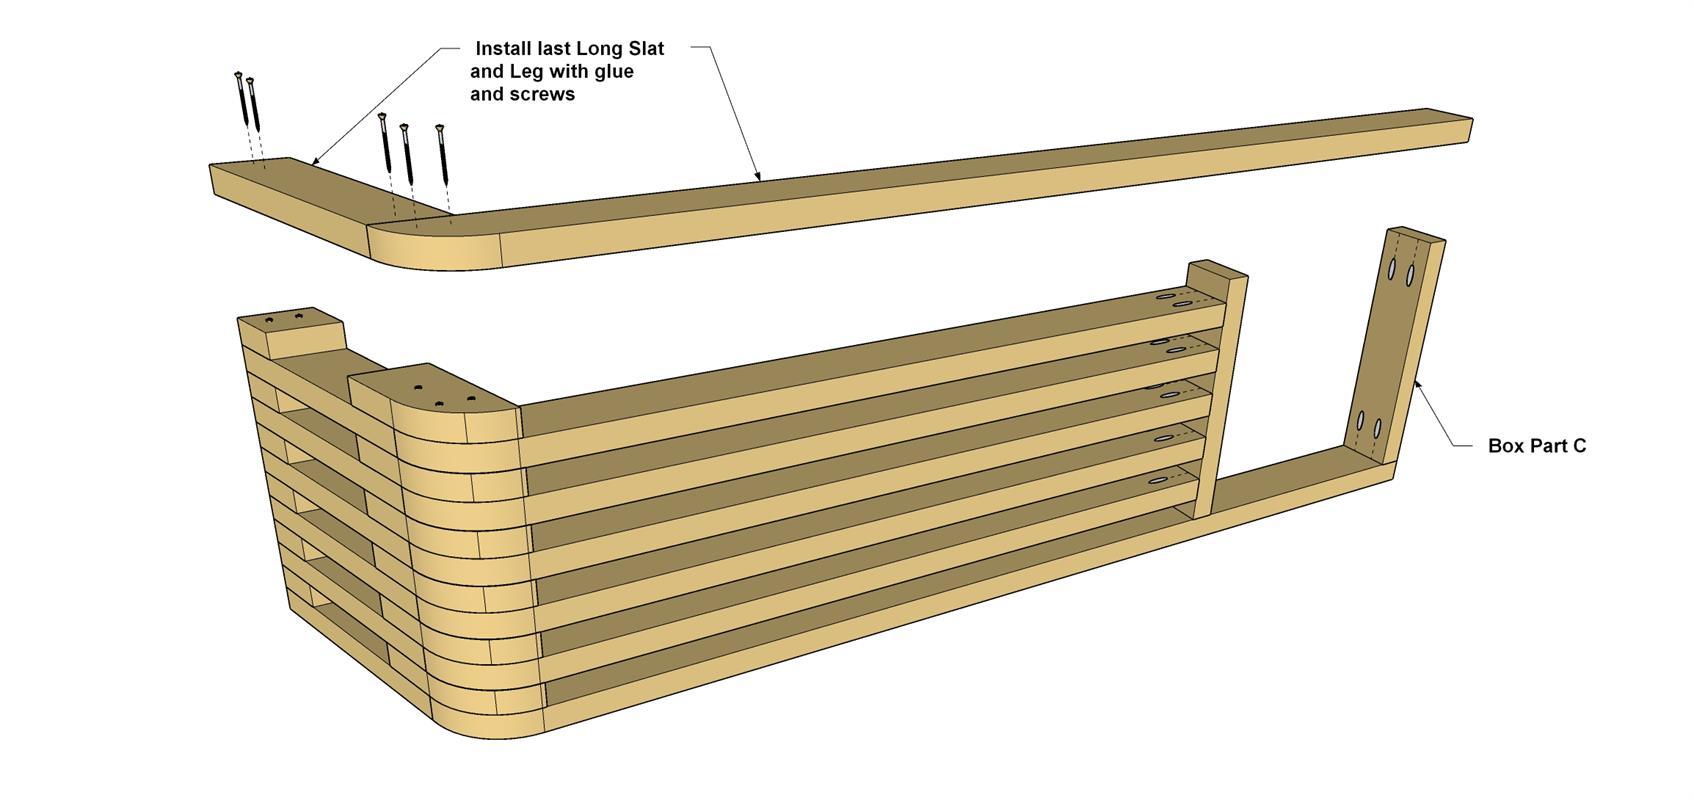
Before adding the last Long Slat, attach the second Box Part C to the end of the first Long Slat where shown. Add glue and secure it with 2 1/2" Kreg Blue-Kote screws. Add glue to the Filler, Block, and the ends of each Box Part C, and position the second, Long Slat so it is flush with the others. Drill pilot holes and secure the Slat and Leg to the Filler and Block with 2 1/2" exterior flat head wood screws. Finally, attach the end of the Long Slat to the two Box Part C boards with 2 1/2" Kreg Blue-Kote screws.
-
Add Box Layer 4
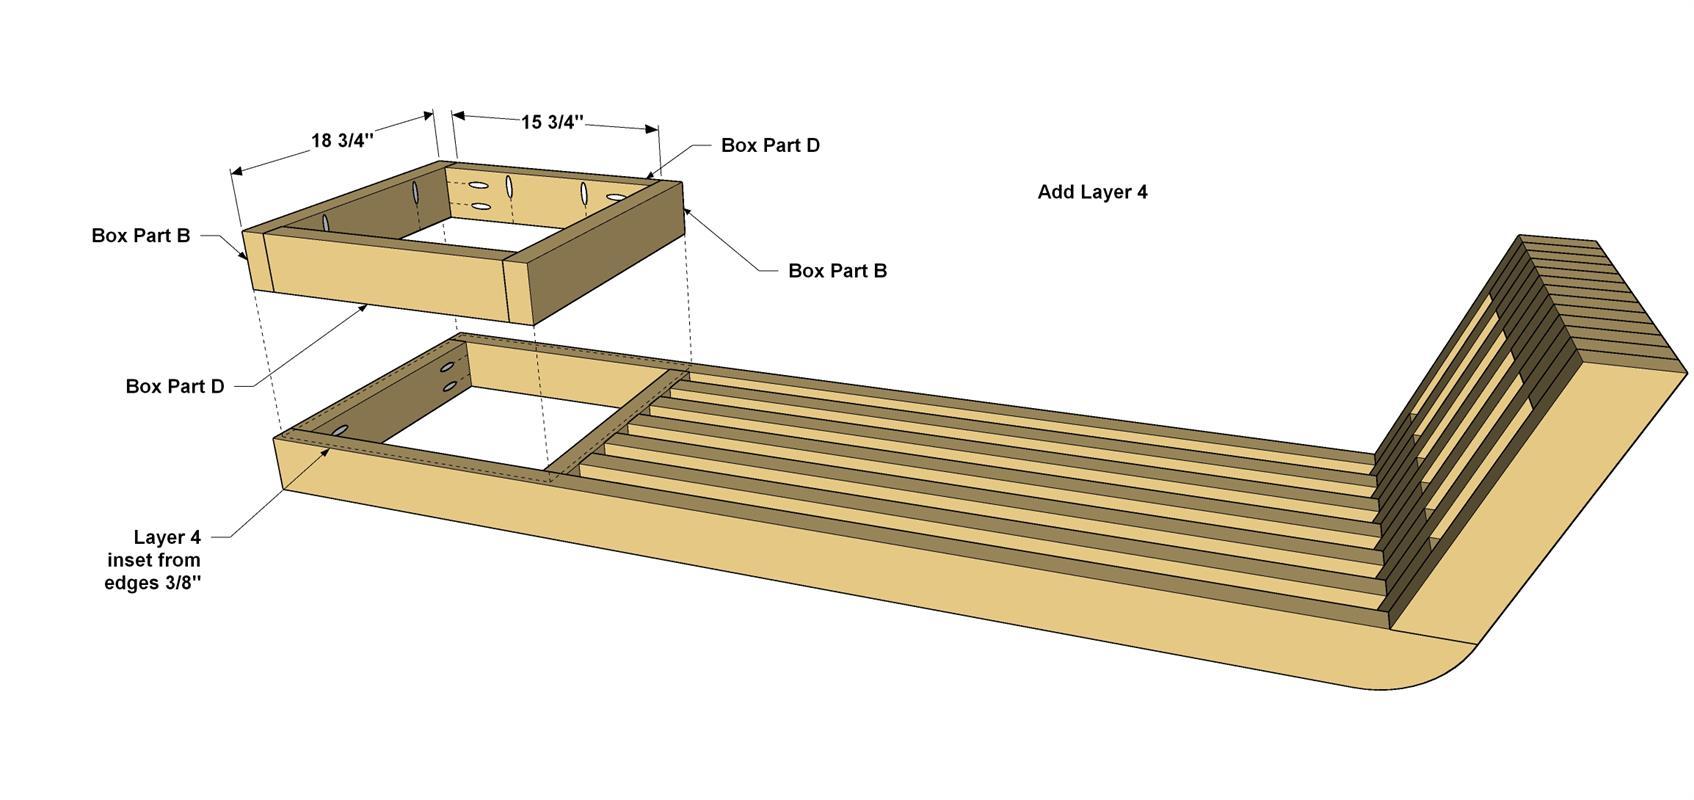
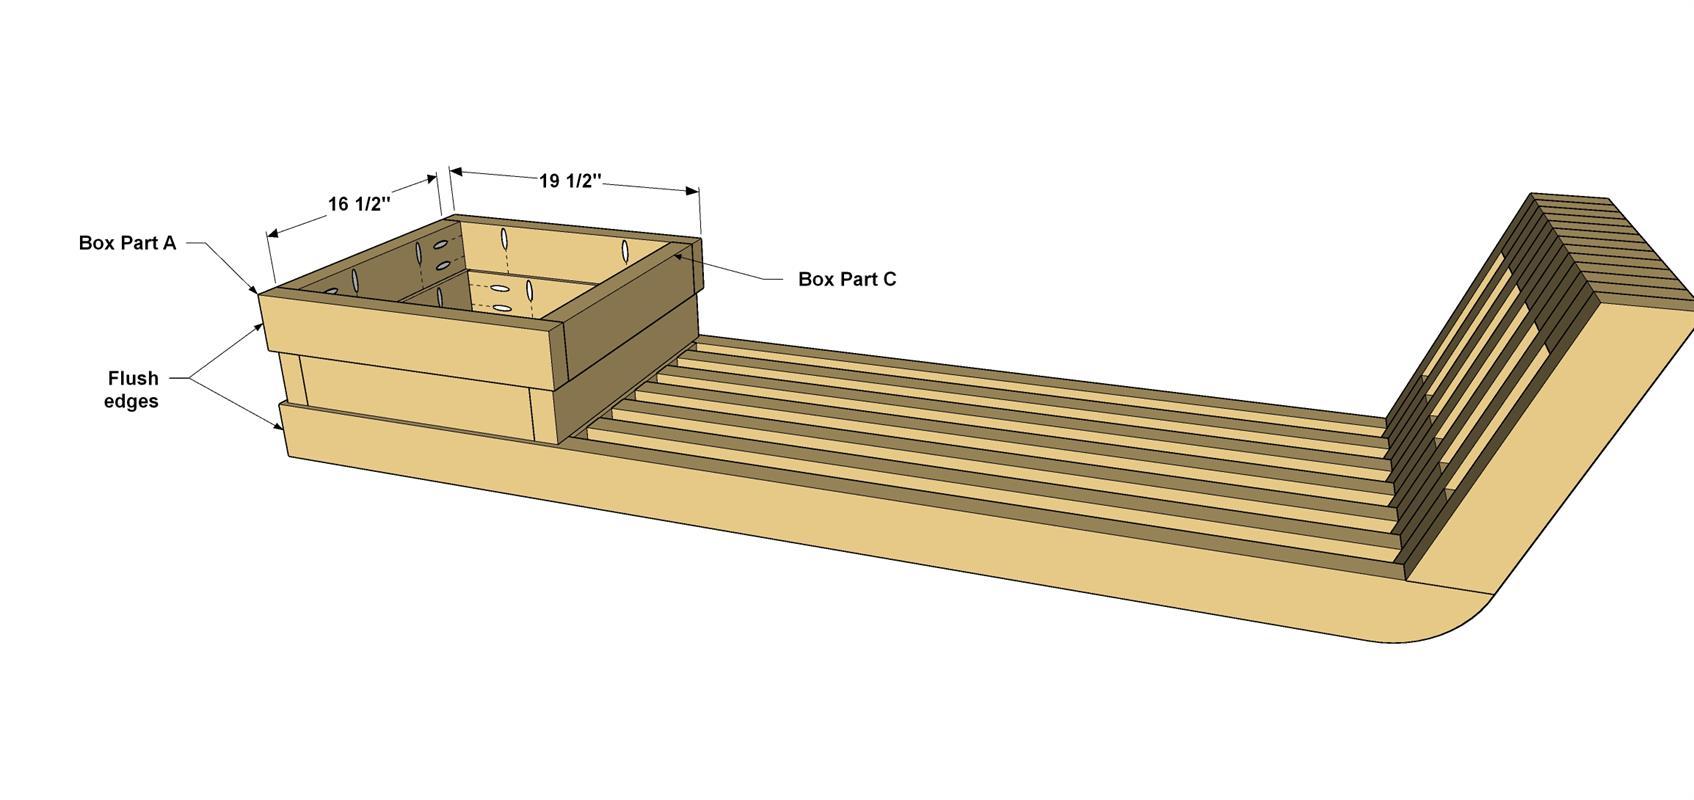
Flip the Slat and Leg assembly upside down on a work surface, as shown. Add glue to the edges of Box Layer 4 (made from two Part B, and two Part D) and position it on the Slat assembly as shown. Make sure the ends of each Box Part B are oriented as shown in the illustration. Adjust the Box Layer so it is inset equally from the edges of the Slat assembly. This should be about 3/8" on each side. Secure it with 2 1/2" Kreg Blue-Kote screws.
-
Add Box Layer 3
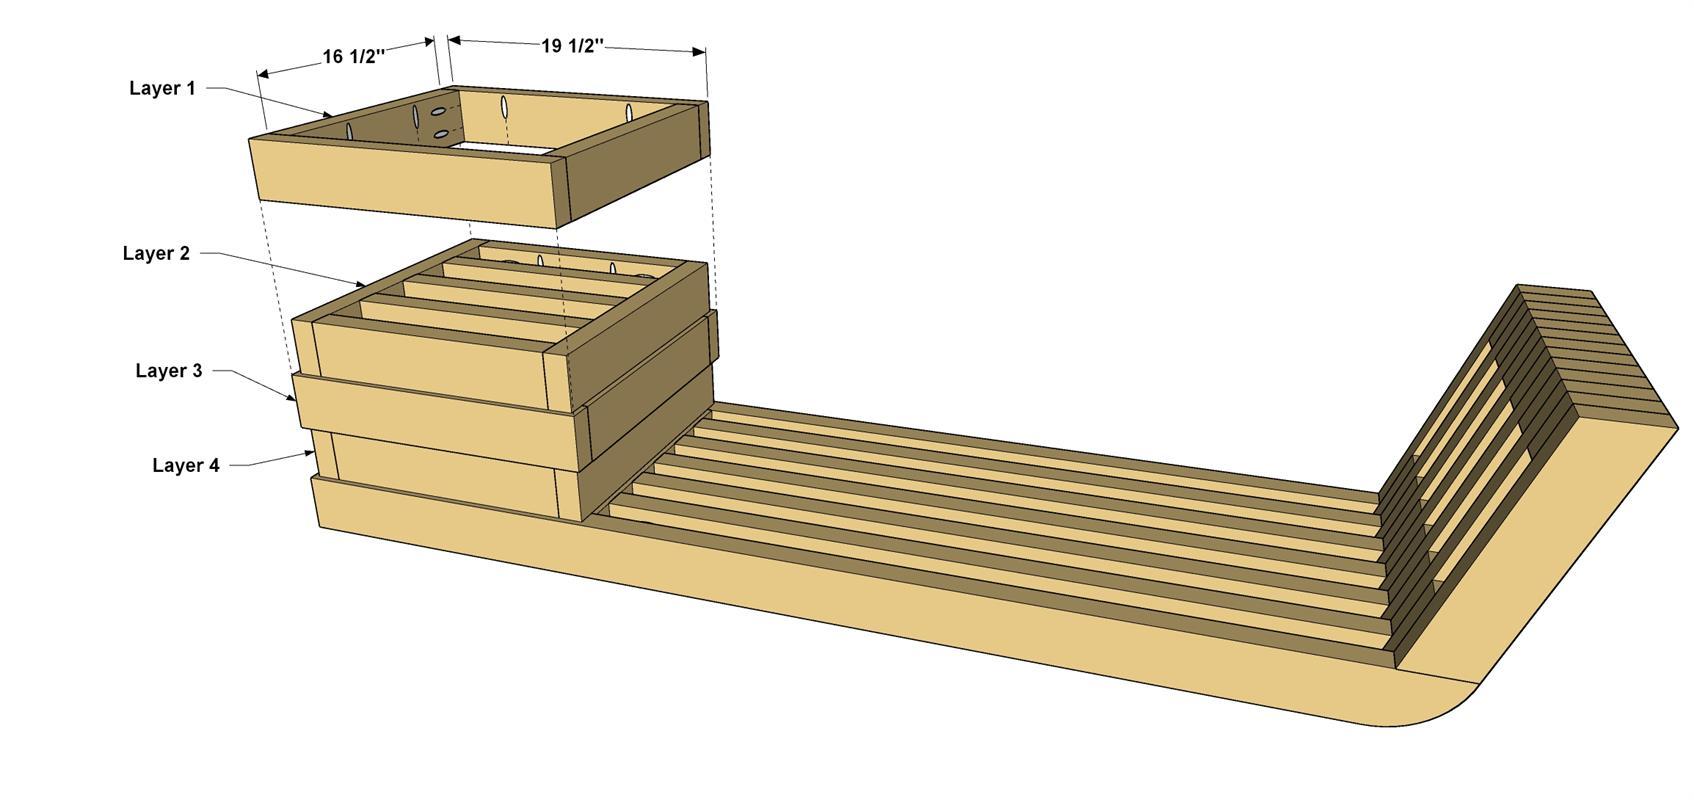
Apply glue and position Box Layer 3 (made from 2 - Box Part A, 2 - Box Part C) so the edges are flush with the Slat assembly and overhang the previous layer, as shown. Secure it to the previous Box Layer with 2 1/2" Kreg Blue-Kote screws.
-
Install The Final Two Layers
Position Box Layer 2 (made from 2 - Box Part B, 5 - Box Part D) so it matches the orientation of, and is flush with, Box Layer 4. Secure it with glue and 2 1/2" Kreg Blue-Kote screws. Position Box Layer 1 (made from 2 - Box Part B, 2 - Box Part D) to match the orientation of Box Layer 3 and secure it with glue and 2 1/2" Kreg Blue-Kote screws as shown.
-
Finishing Up
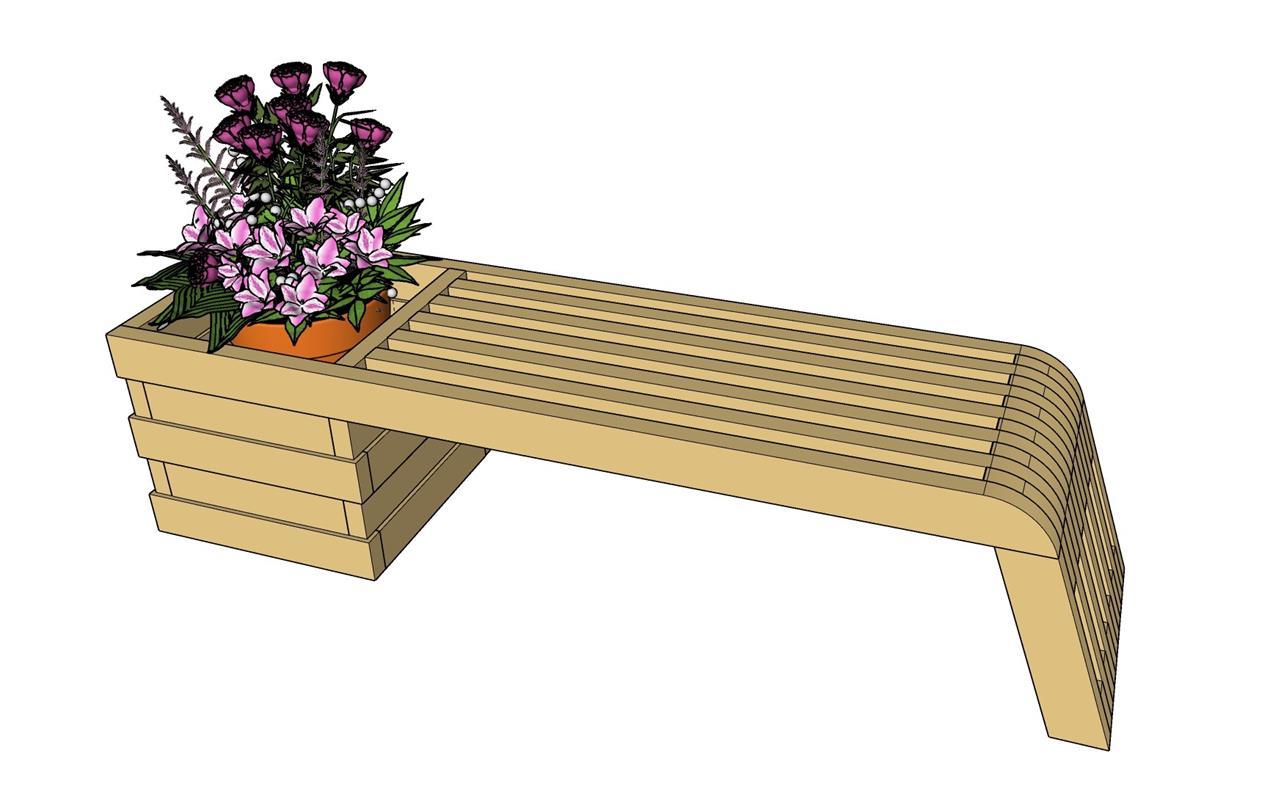
Flip the assembled bench upright and sand the curve profile of the Slats and Blocks smooth. Sand the rest of the benches' faces and edges. Clean the bench thoroughly and apply your favorite exterior stain or oil. Allow the finish to dry completely and then set it in your favorite outdoor space. The added benefit to this bench is you can add a planted pot with your favorite flowers. Set the pot in the planter box and enjoy the add beauty and fragrance it brings to the relaxing time you spend on your new bench.


