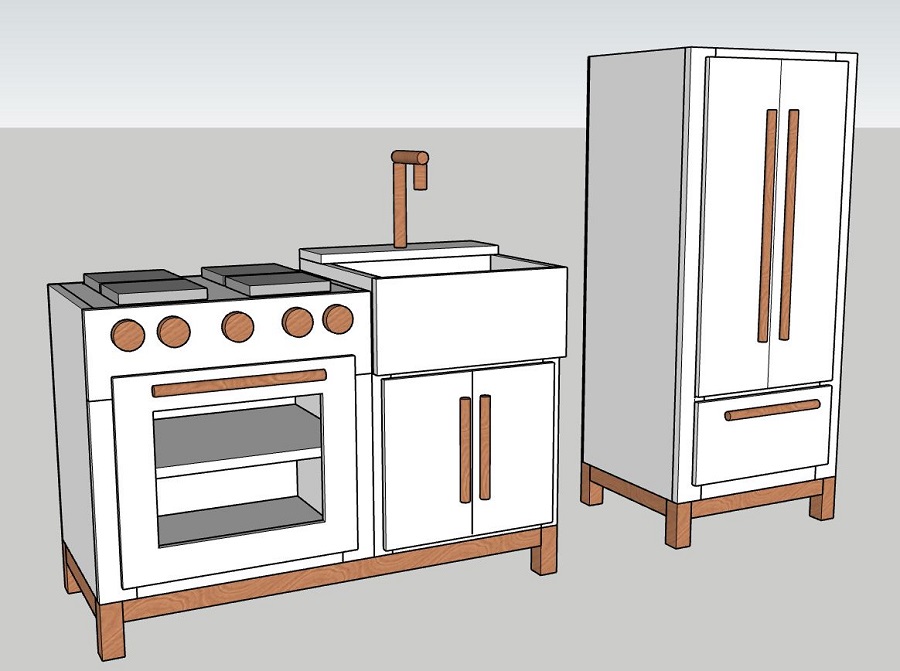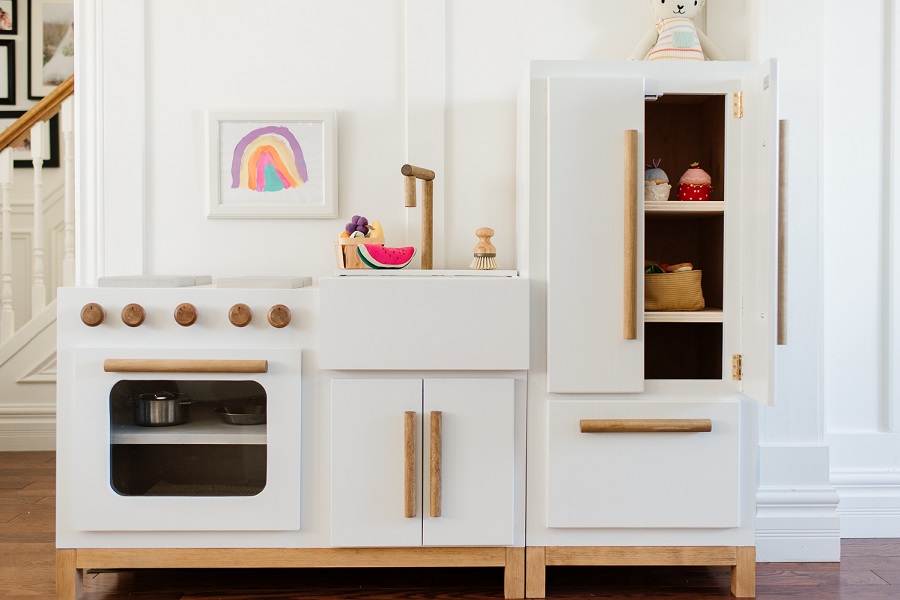
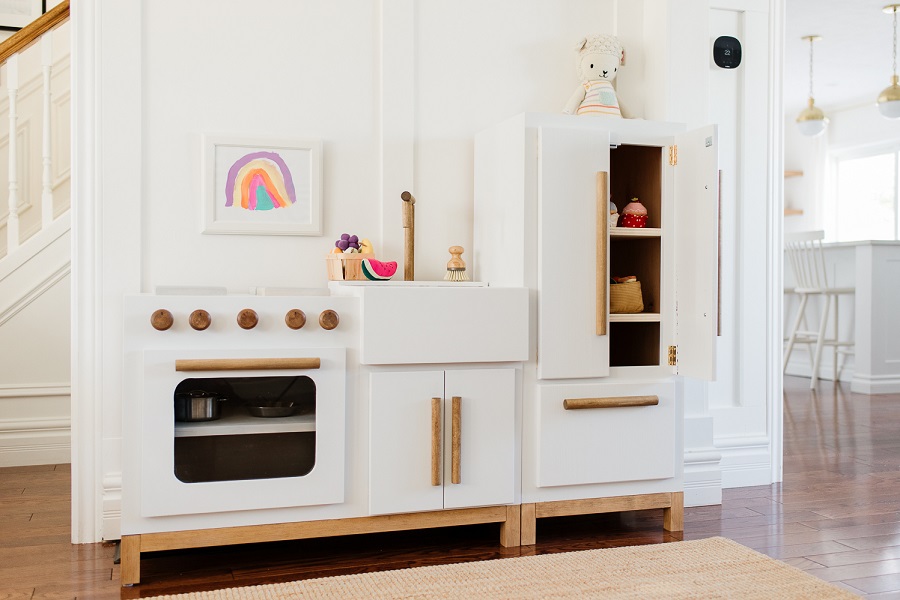
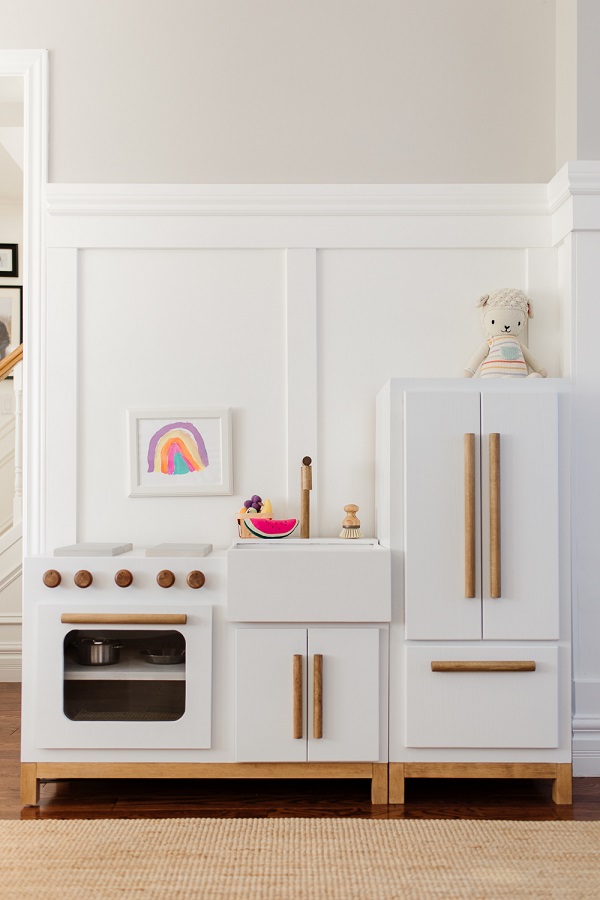


Get the kids cooking! This kids play kitchen would make the perfect gift for the little ones in your life. This piece has a simple clean design that will fit any space. You can customize the hardware, stove elements, faucet and colors to your liking!
Tools
Kreg Tools


Other Tools
-
Brad Nailer

-
Tape Measure
Materials
Wood Products
- 1 Sheet of plywood , 3/4" x 4’ x 8’
- 1 Half sheet of plywood , 1/2" x 4’ x 4’
- 1 Half sheet of plywood , 1/4" x 4’ x 4’
- 2 Boards , 2 x 2 x 8’
- 1 Board , 1 x 2 x 8’
- 2 Boards , 1 x 3 x 8’
- 2 Boards , 1” x 4’ Round Dowels
Hardware & Supplies
- 5 Sets of 1" hinges
- 32 2 ½” Pocket Hole Screws (see tool list)
- 84 1 ¼” Pocket Hole Screws (see tool list)
- 29 2” Wood Screws
- 1 Box 1 ¼” Brad Nails
- 1 Box ¾” Brad Nails
- 1 120 and 220 Grit Sandpaper
- 1 Wood Glue
- 1 Piece plexiglass minimum 13x10.5 x ¼” thick (optional)
- 8 Shelf Pins (optional if doing shelving in fridge)
- 5 Sets of 2” Narrow Brass hinges
- 1 Single Magnetic Catch
- 2 Double Magnetic Catches
Cut List & Parts
- 8 Legs , 1.5x1.5x4”
- 4 Base side spans , 1.5x1.5x12”
- 2 Base front/back spans , 1.5x1.5x33”
- 2 Fridge base front back spans , 1.5x1.5x15”
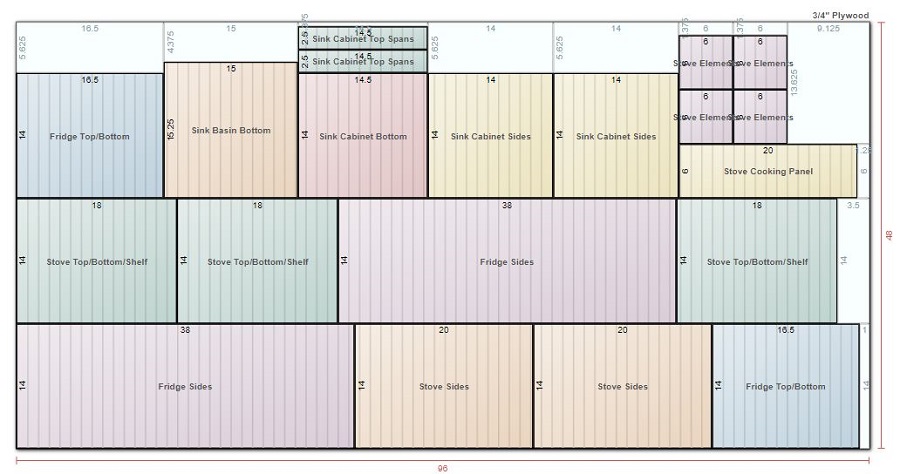
- 2 Stove sides , ¾” x 20x14”
- 3 Stove top/bottom/shelf , ¾” x 18x14”
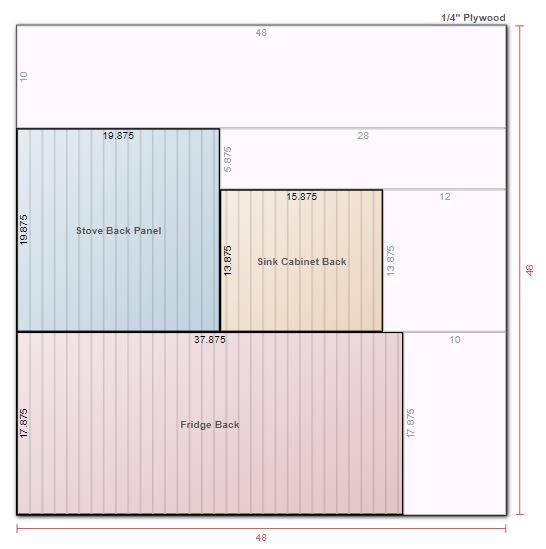
- 1 Stove back , ¼” x 19.875x19.875”
- 2 Sink cabinet sides , ¾” x 14x14”
- 1 Sink cabinet bottom , ¾” x 14.5x14”
- 2 Sink cabinet top spans , ¾” x 14.5x2.5”
- 1 Sink cabinet back , ¼” x 15.875x13.875”
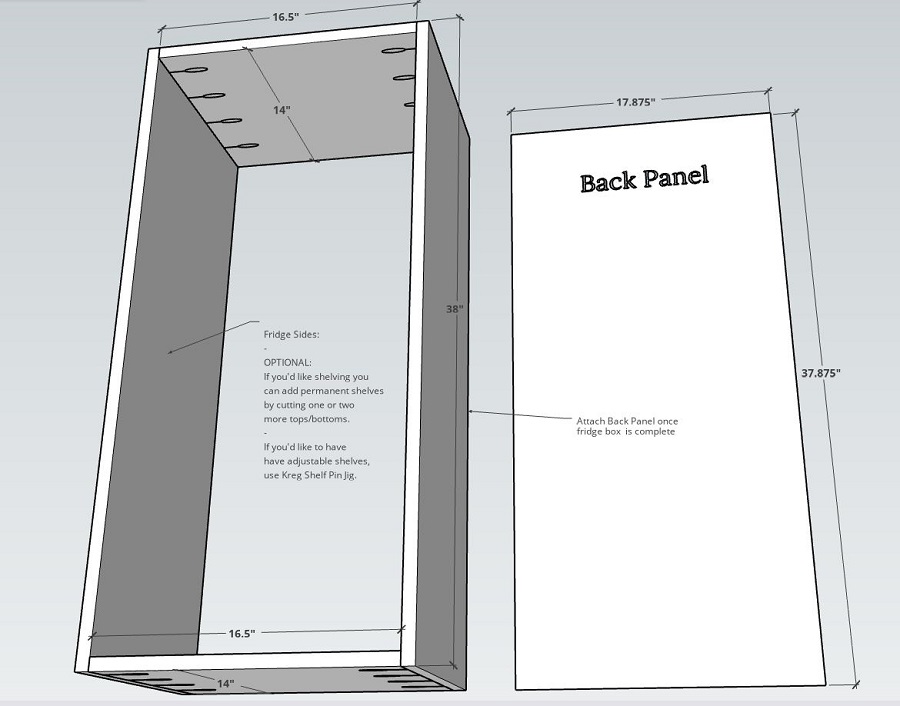
- 2 Fridge top/bottom , ¾” x 16.5x14”
- 2 Fridge sides , ¾” x 38x14”
- 1 Fridge back , 37.875 x 17.875”
- 1 Stove cooking panel , ¾” x 20x6”
- 2 Stove face vertical , 3/4x2.5x14”
- 1 Stove face horizontal , 3/4x2.5x15”
- 2 Sink base face vertical , 3/4x1.5x14”
- 2 Sink base face horizontal , 3/4x1.5x15
- 3 Fridge face vertical , 3/4x2.5x13”
- 2 Fridge face vertical , 3/4x2.5x38”
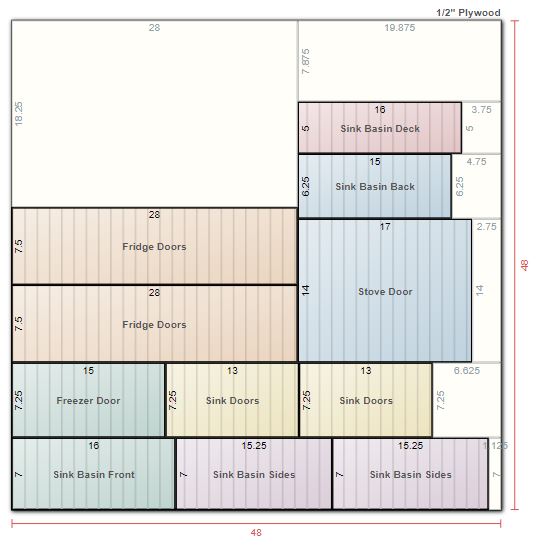
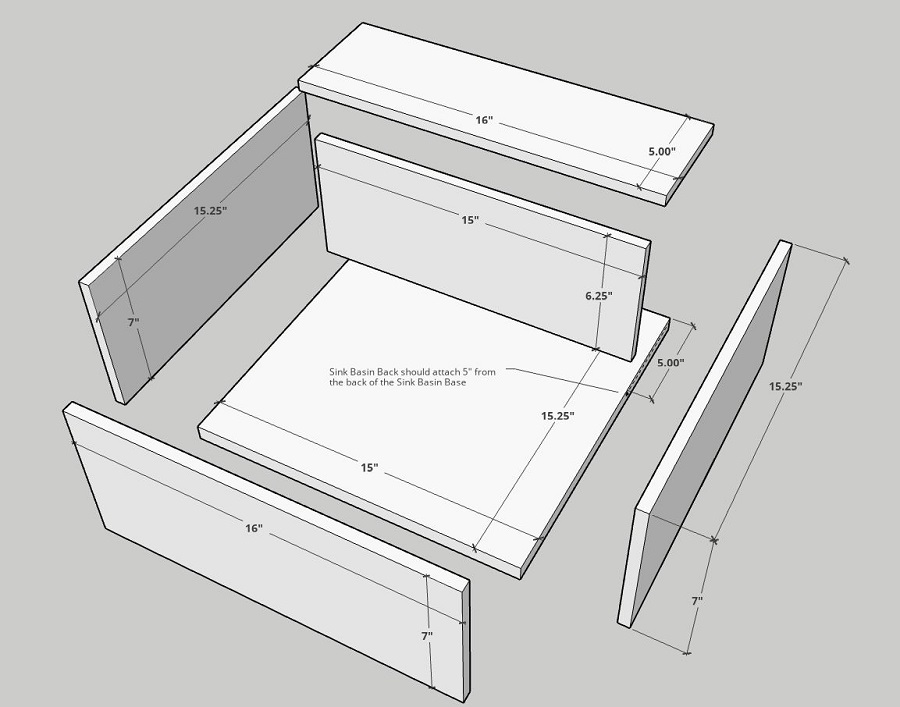
- 1 Sink basin bottom , ¾” x 15x15.25”
- 1 Sink basin back , ½” x 15x6.25”
- 2 Sink basin sides , ½” x 15.25x7”
- 1 Sink basin deck , ½” x 16x6”
- 2 Sink doors , ½” x 13x7.25”
- 1 Stove door , ½” x 17x14”
- 1 Freezer door , ½” x 15x7.25”
- 2 Fridge doors , ½” x 28x7.5”
- 4 Stove elements , ¾” x 6x6”
- 2 Sink door handles round dowels , 1” x 7.75”
- 2 Fridge door handles round dowels , 1” x 17.5”
- 1 Freezer door handle round dowel , 1” x 12”
- 1 Stove door handle round dowel , 1” x 12”

Directions
-
Assemble bases
Drill pocket holes in the locations shown on the diagram and assemble with wood glue and 2 ½” pocket hole screws. Set these aside.

-
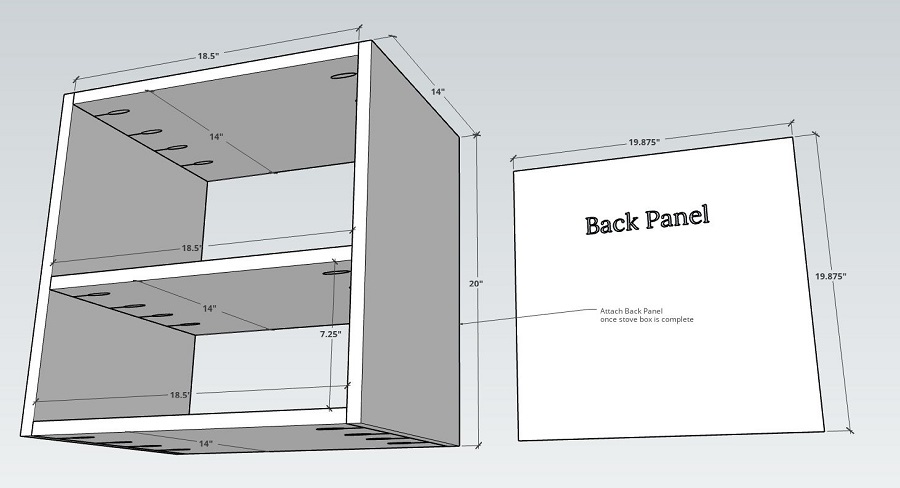
Assemble stove box
Drill pocket holes on the 14” edges of the 3 x Stove Bottom/Top Shelf pieces. Attach to Stove Side pieces as shown with wood glue and 1 ¼” pocket hole screws. Attach Stove Back panel using wood glue and 1 ¼” brad nails around the perimeter.
-
Assemble sink cabinet
Drill pocket holes on the 14” edges of the 1 x Sink Cabinet Bottom piece. Drill two holes on either end of the Sink Cabinet Top Spans. Attach to Sink Cabinet sides as shown. Attach Sink Cabinet Back panel using wood glue and 1 ¼” brad nails around the perimeter.

-
Assemble fridge
Drill pocket holes on the 14” edges of teh 2 x Fridge Top/Bottom pieces. Attach to Fridge Side pieces as shown. Attach Fridge Back panel using wood glue and 1 ¼” brad nails around the perimeter.
-
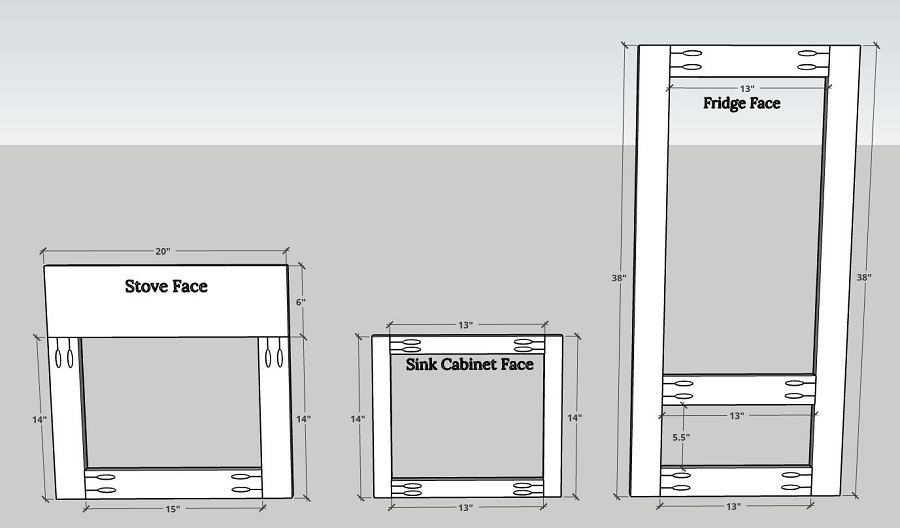
Assemble face frames
Drill pocket holes on pieces as shown and assemble the stove, sink cabinet, and fridge face frame using wood glue and 1 ¼” pocket hole screws.Note: If you are painting the cabinets, this would be an ideal time to paint them all before further assembly.
-
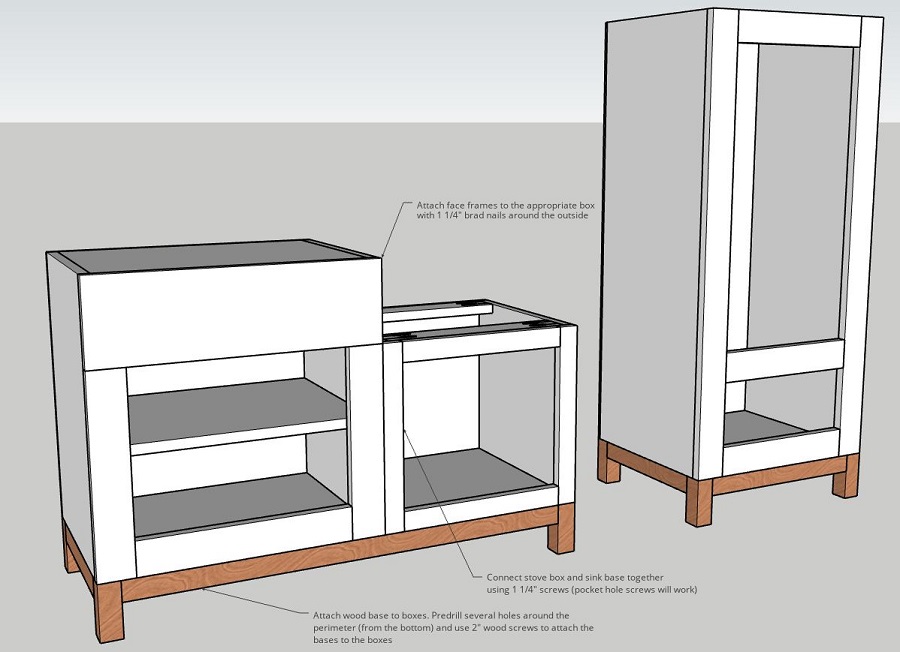
Attach face frames and base
Attach face frames to the appropriate box with 1 ¼” brad nails around the perimeter. Next, connect the stove and sink cabinets together using 1 ¼” pocket hole screws from one box to the other (on the interior). Attach the wood base to the boxes by pre-drilling holes from the bottom of the base and securing it into the cabinets with 2” wood screws. Ideally, use 2 or 3 screws per side.
-
Assemble sink basin
Assemble all pieces as shown, using wood glue and ¾” brad nails. Note that the front and side pieces will surround the base piece. While the back piece will be on top of the base, 5” from the back of the piece.
-
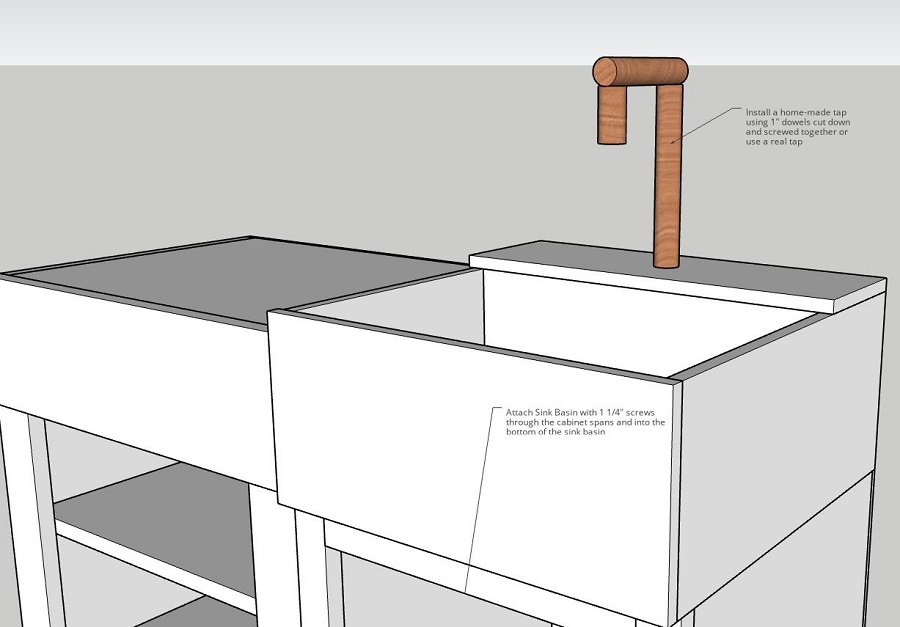
Attach sink to cabinet
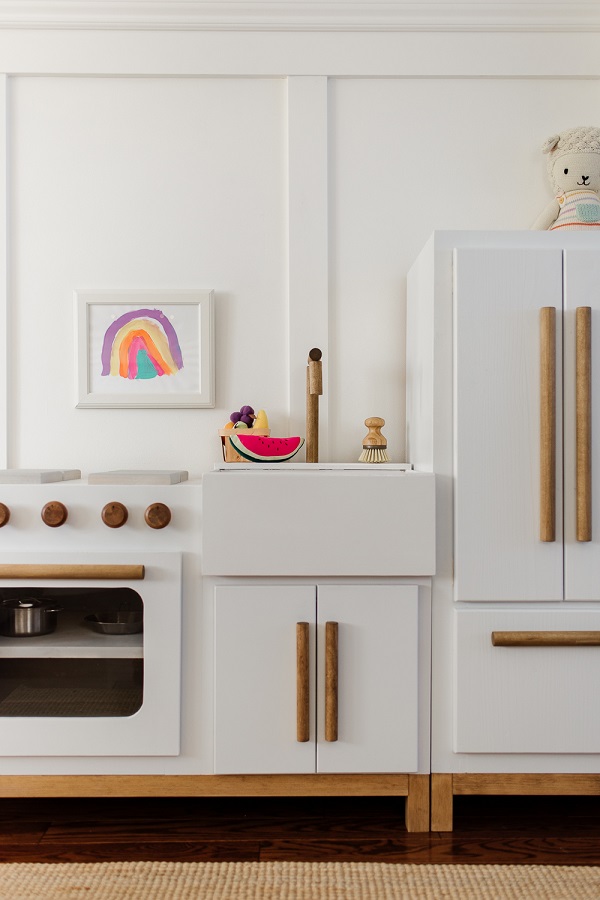
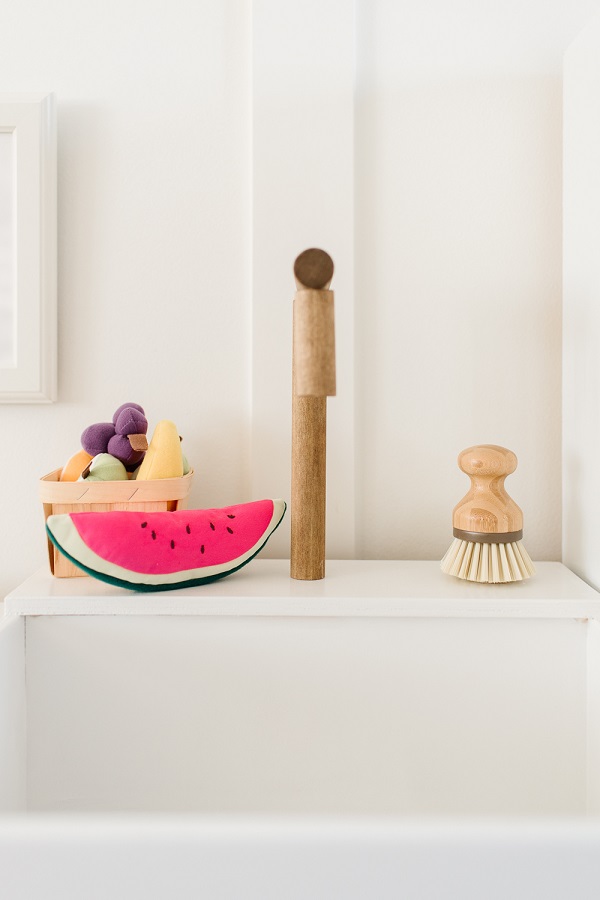
Line up the sink with the back of the cabinet. Attach the sink to the cabinet by securing with 1 ¼” pocket hole from inside of the cabinet, up through the Sink Cabinet Spans and into the Sink Basin Bottom. At this point, you can make a faucet out of 1” dowels, or purchase a more realistic one to install!
-
Router edges
Router the fridge, freezer and sink cabinet doors with a round-over bit if desired.
-
Attach doors
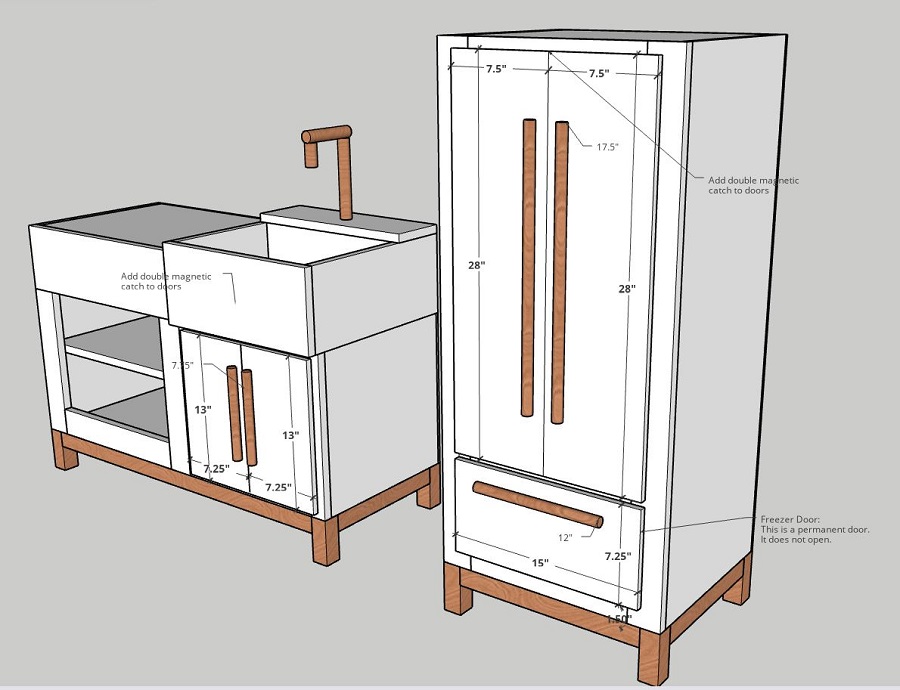
Attach the Freezer Door over the bottom opening of the fridge box 1 ½” from the bottom. Attach Fridge doors as shown with 2” brass (or alternative) narrow hinges. Leave a ½” gap between the top of the freezer door, and the bottom of the fridge doors. Locate the hinges approximately 2.5” from the top and bottom of each door.
Attach the Sink Cabinet Doors in the same manner with the hinges approximately 1.5” from the top and bottom of each door.
Inside, install a double magnetic catch on both the Sink Cabinet doors and Fridge Doors.
-
Attach handles
Predrill two holes for each dowel in the desired location for the handles (or alternative handles if desired). Attach the dowels with 1 ¼” screws from the inside of the cabinet door, drilling into the dowels.
-
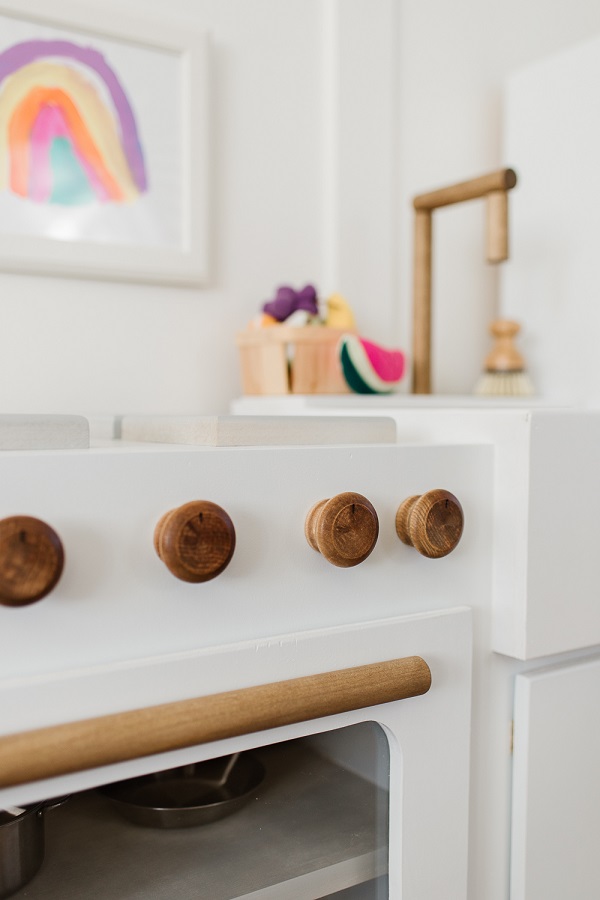
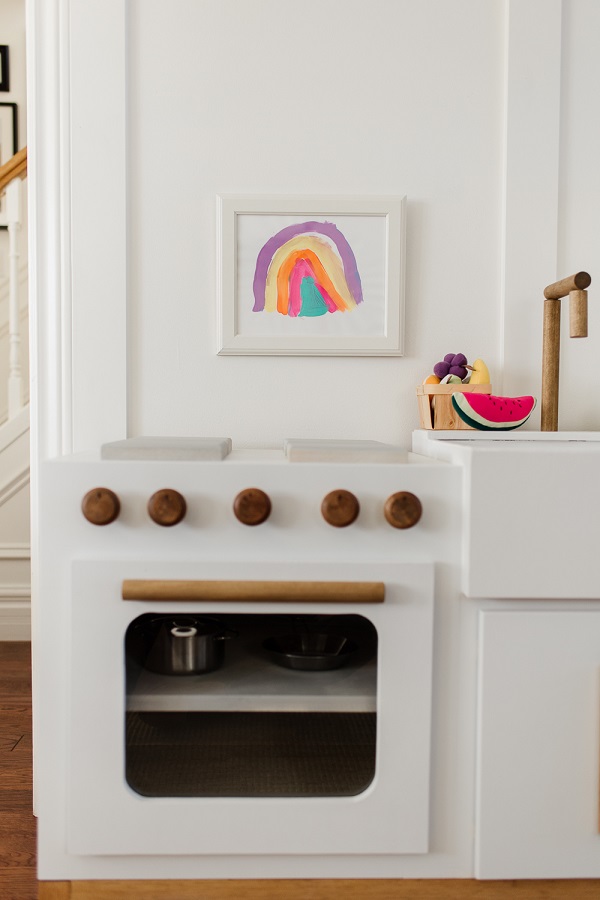
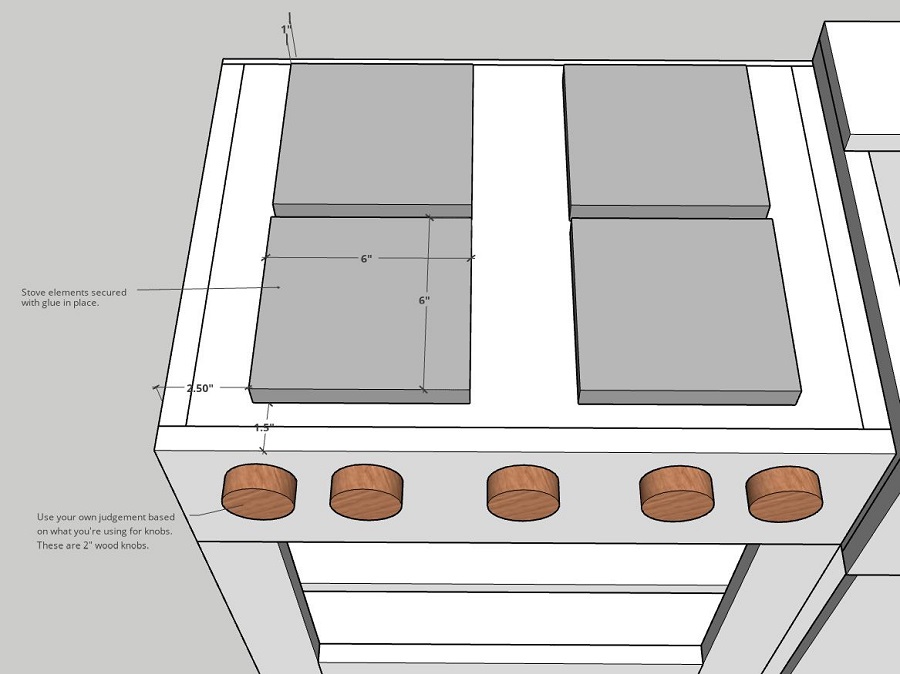
Stove elements & knobs
This is where you can get a bit creative! We opted for simple square stove elements with rounded edges, however, you could do these round, painted, wood burning design, natural wood, etc. For the knobs, we used 2” wood knobs, but you could cut your own or use something entirely different. You can also use a similar placement, or do something completely different. To secure ours, we simply used glue.
-
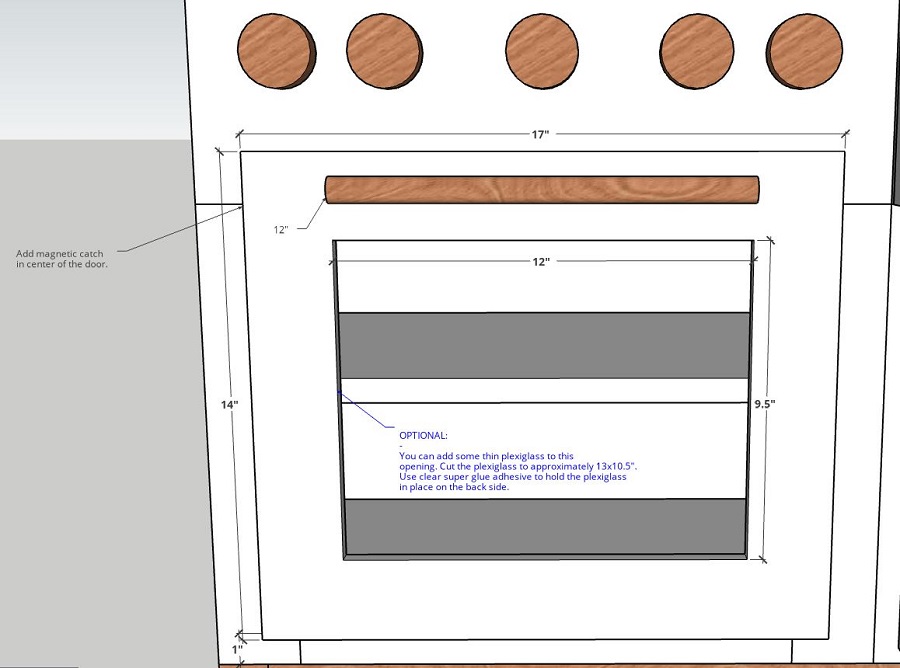
Stove door
Cut a 12x9.5” hole in the stove door using a jigsaw. You can leave the interior corners square or round them out. Add the stove dowel handle (similar to step 11).
You can add a thin piece of plexiglass to the back of the opening if desired. Cut the plexiglass to 13x10.5 and use clear super glue adhesive to hold the plexiglass in place on the back side.
Attach the stove door with 2” narrow (or alternative) hinges at the bottom or side of the door (your preference if you’d like it to swing down or to the side).
Inside, install a magnetic catch at the top of the door.
-
Have fun!
Watch the kids have hours and hours of fun with their very own kitchen!