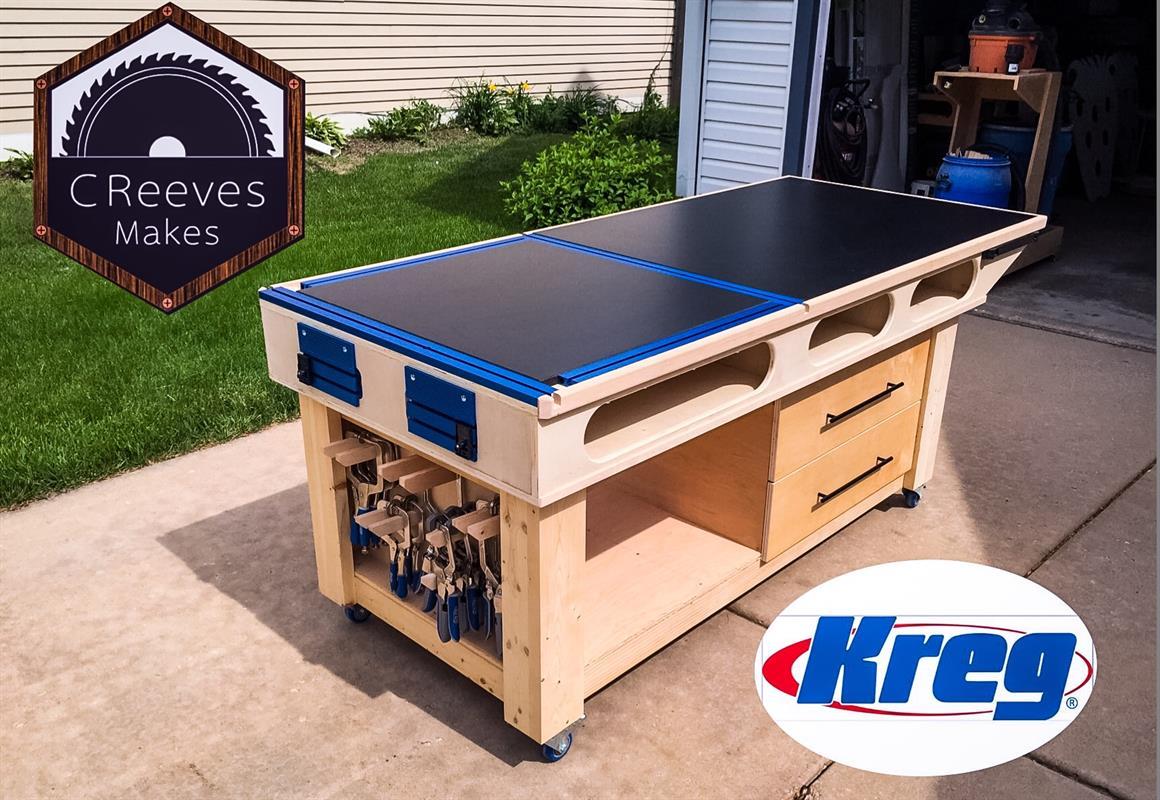
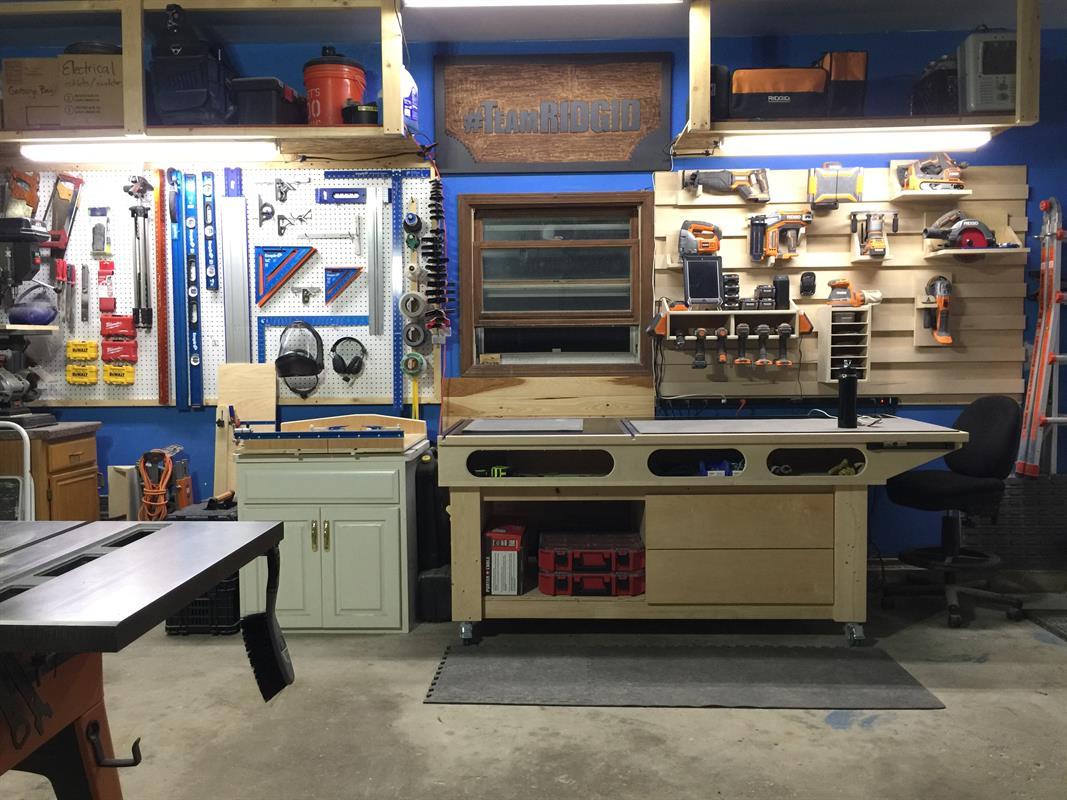


For over a year, I have been wanting and designing a Mobile Outfeed Assembly Table (MOAT). This is the culmination of multiple decisions and research into what I desired for my shop. For a video representation of the build, see the link in the Extras tab! Thanks!
Tools
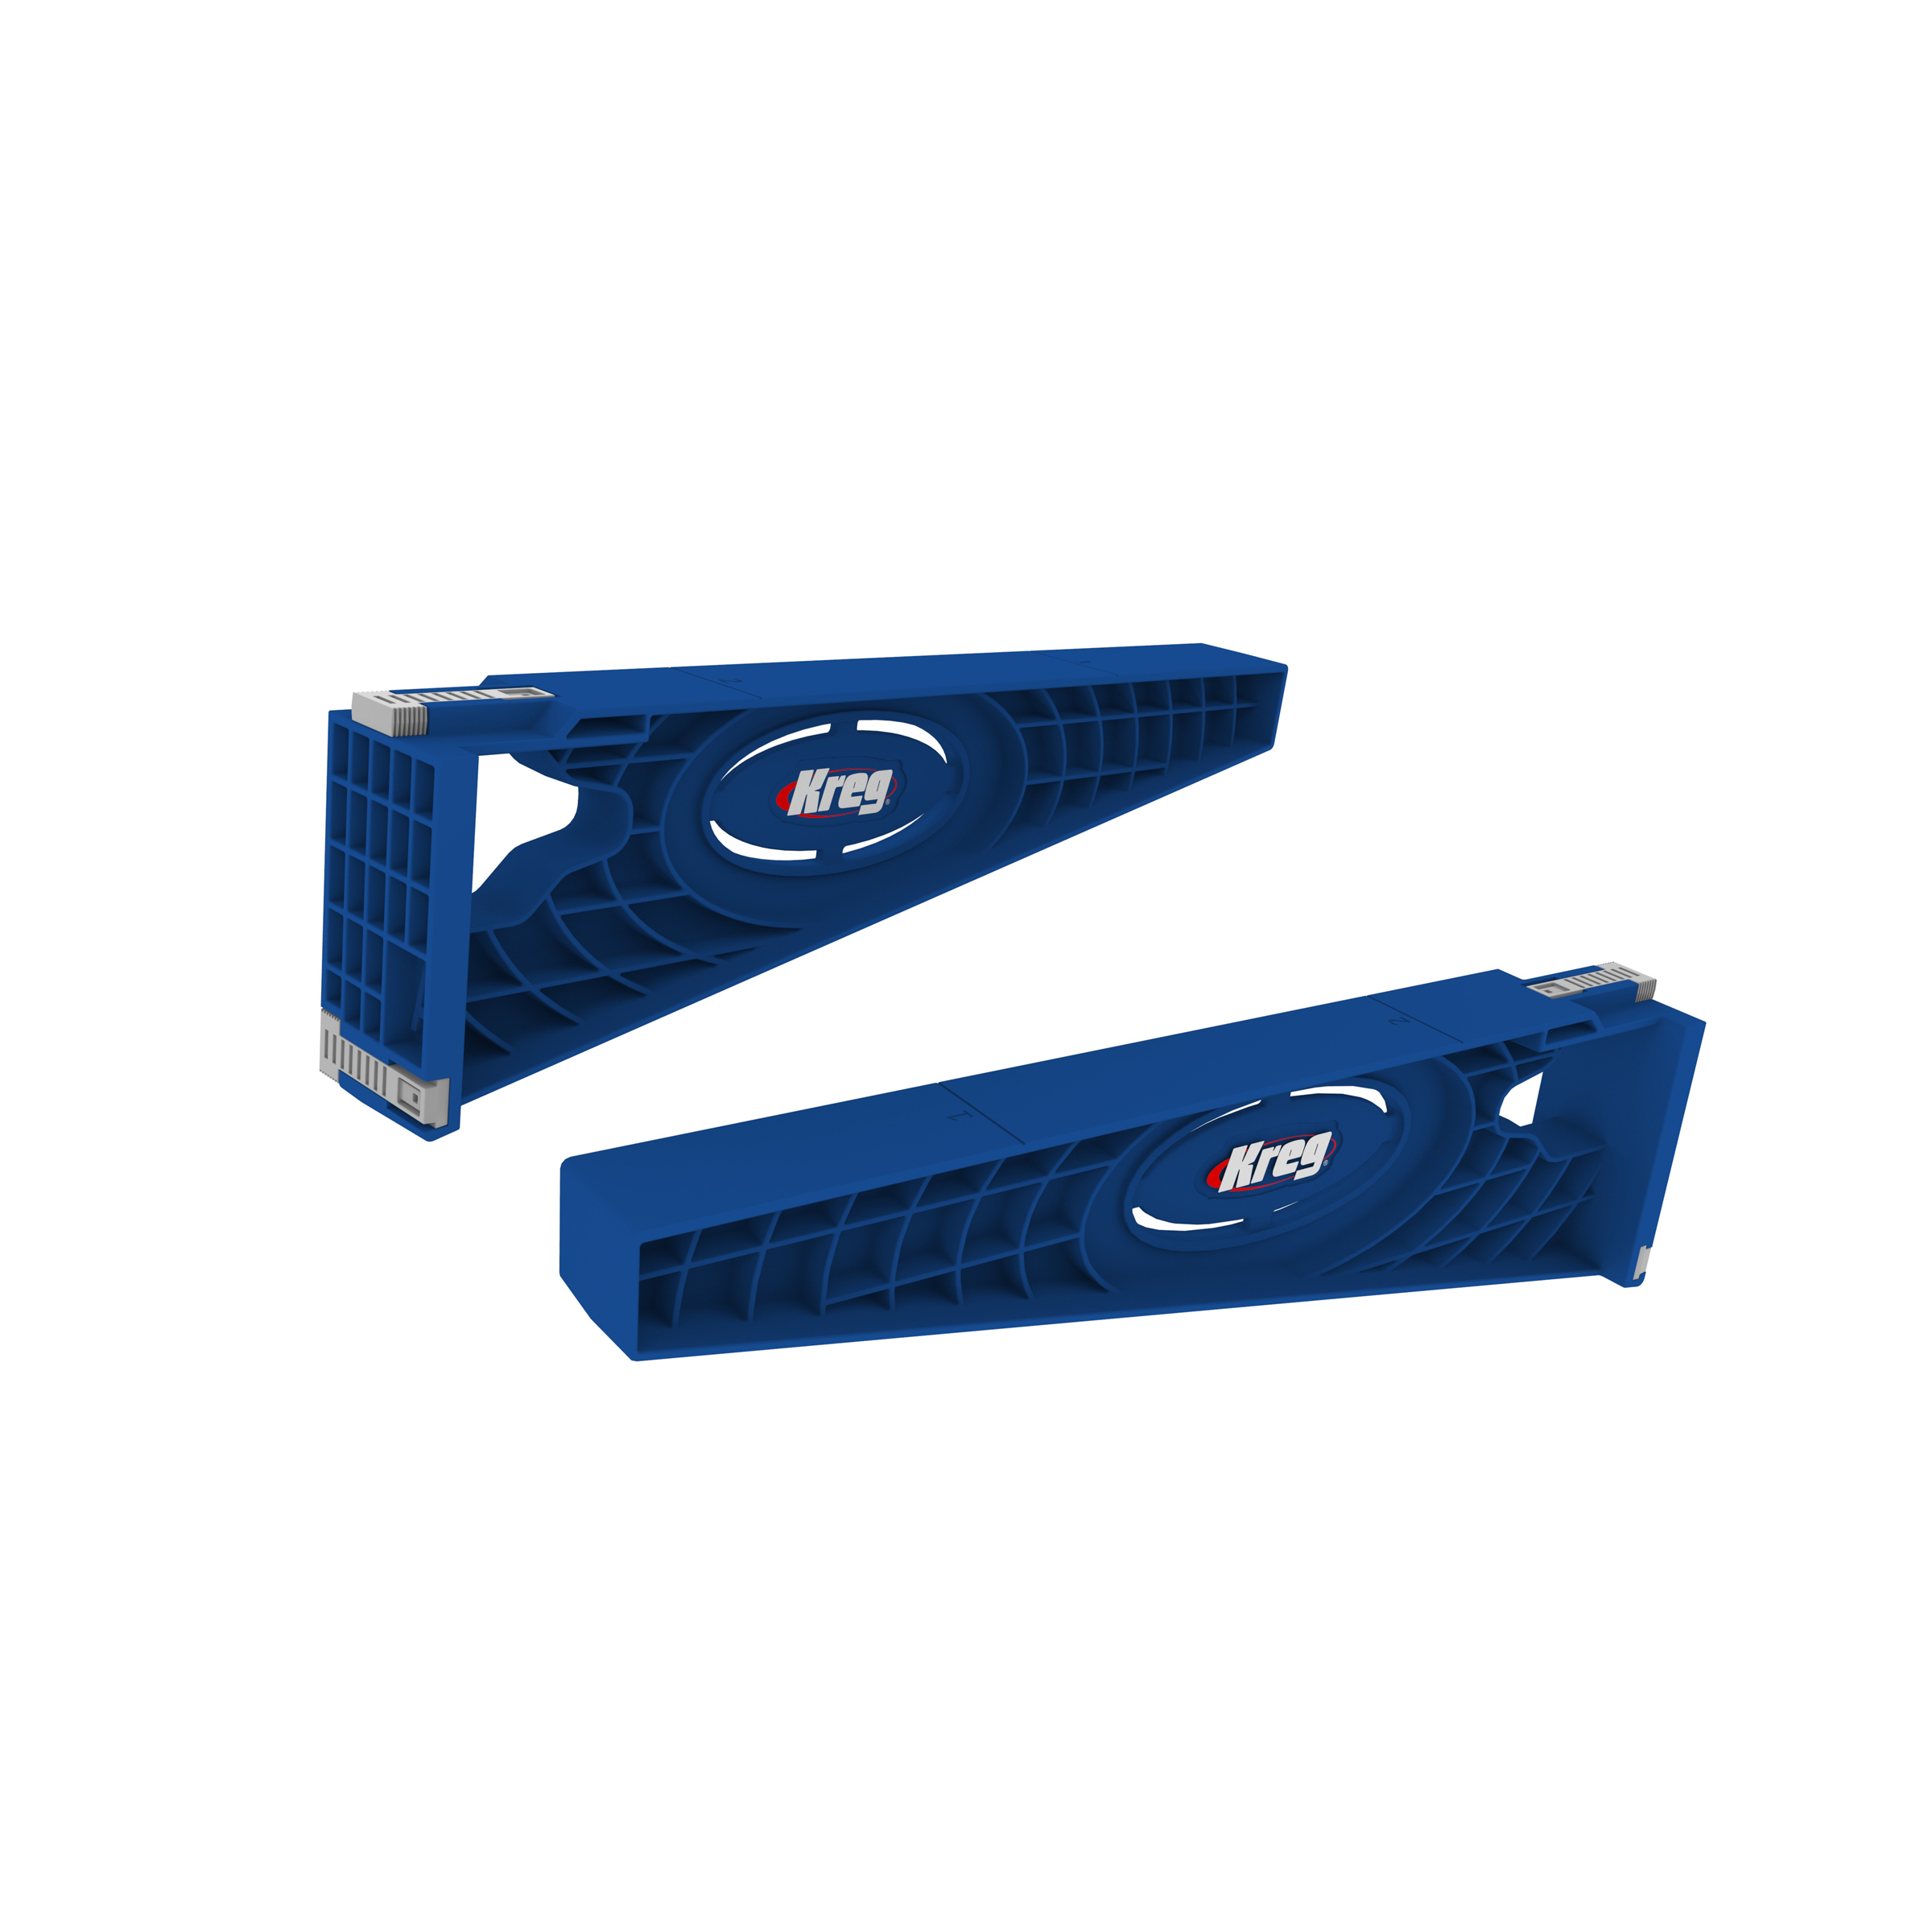
Kreg Tools


Other Tools
-
Miter Saw

-
Square
-
Table Saw
-
Tape Measure
-
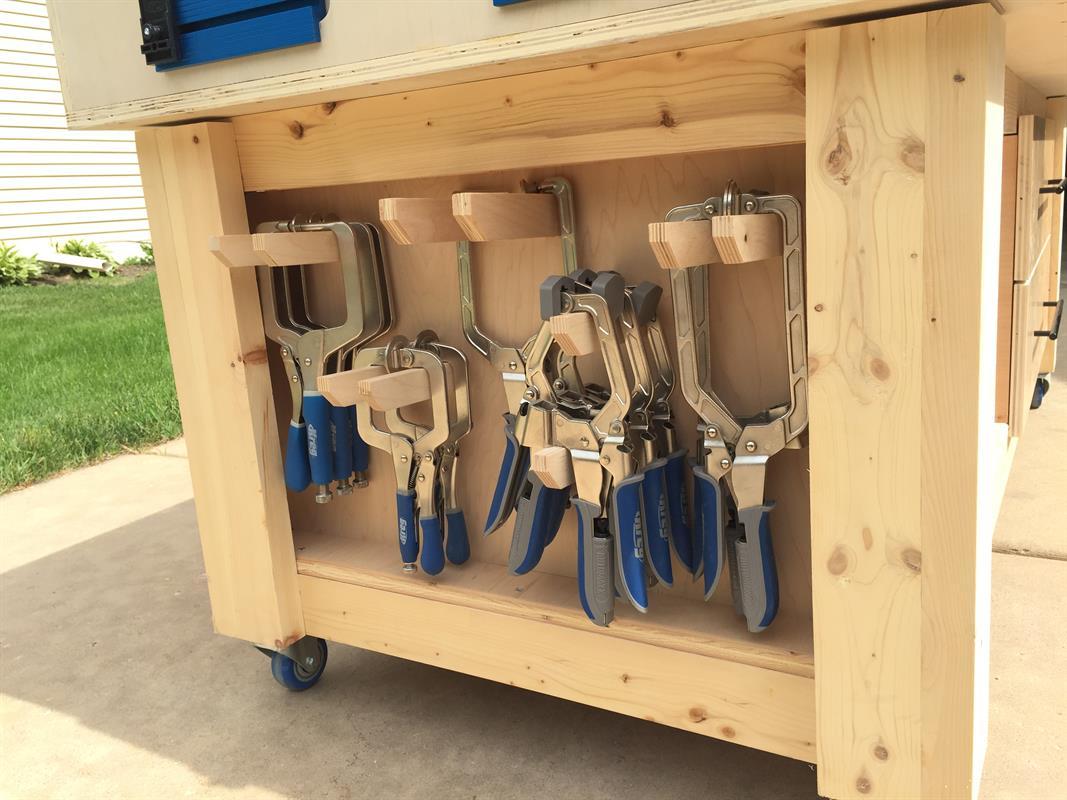
Clamps
-
Nail Gun
-
Shop Vacuum
-
Sawhorse
Materials
Wood Products
- 4 Plywood , 3/4" Thick , Full Sheet
- 1 Melamine Panel , 3/4" Thick , Full Sheet
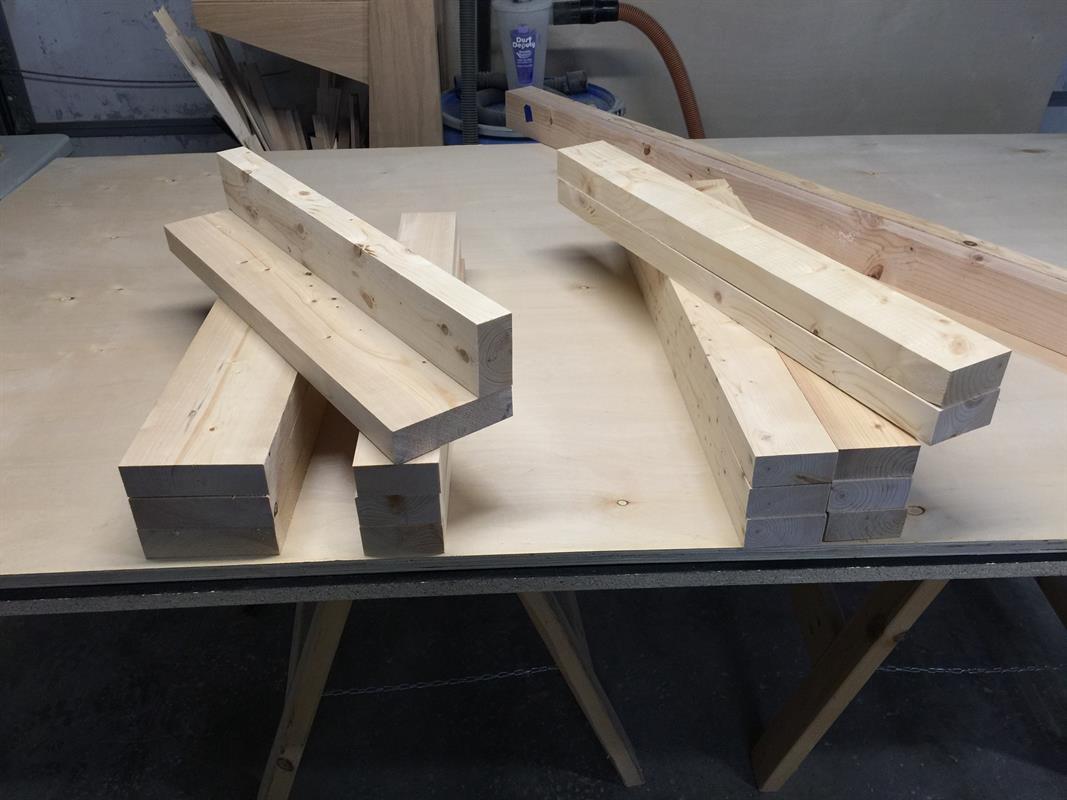
- 7 Board , 2x4 , 96"
- 1 Board , 2x6 , 96"
- 1 Plywood , 1/4" Thick , Half Sheet
Hardware & Supplies
- 200 1 1/4" Coarse Kreg screws
- 50 2-1/2" Coarse Kreg screws
- 1 Titebond II or glue of choice
- 1 Polyurethane or comparable clear finish
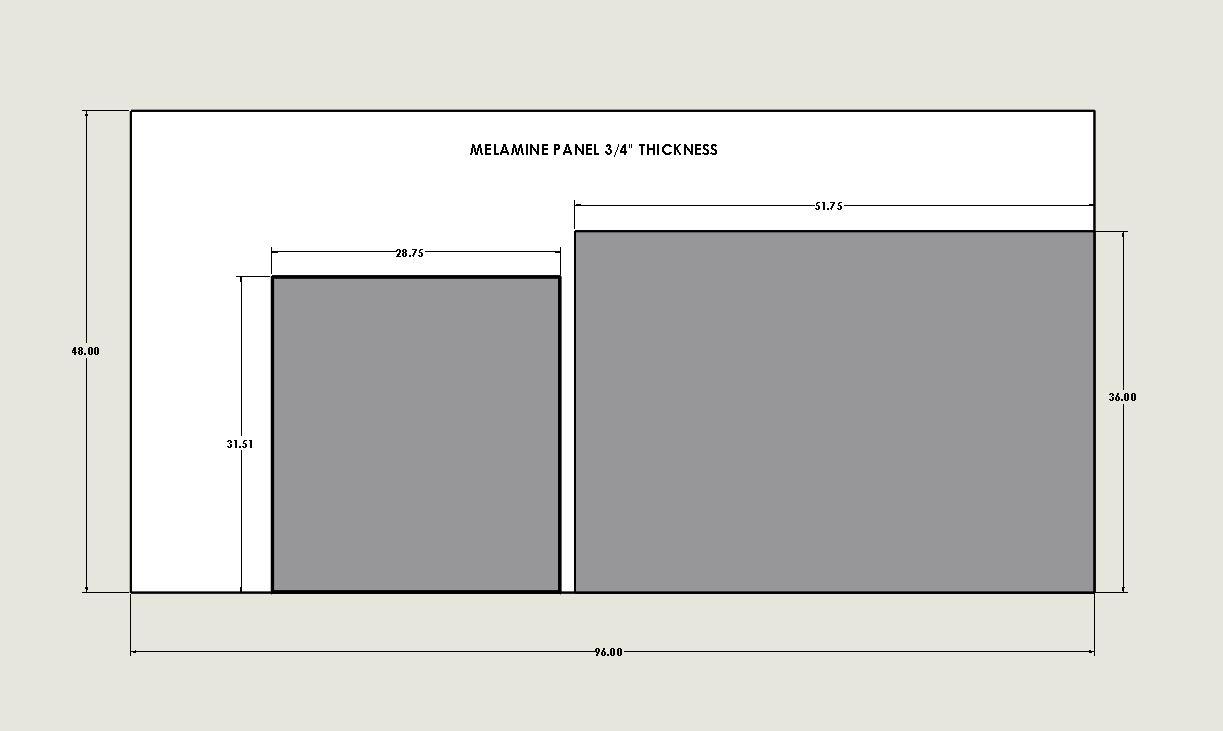
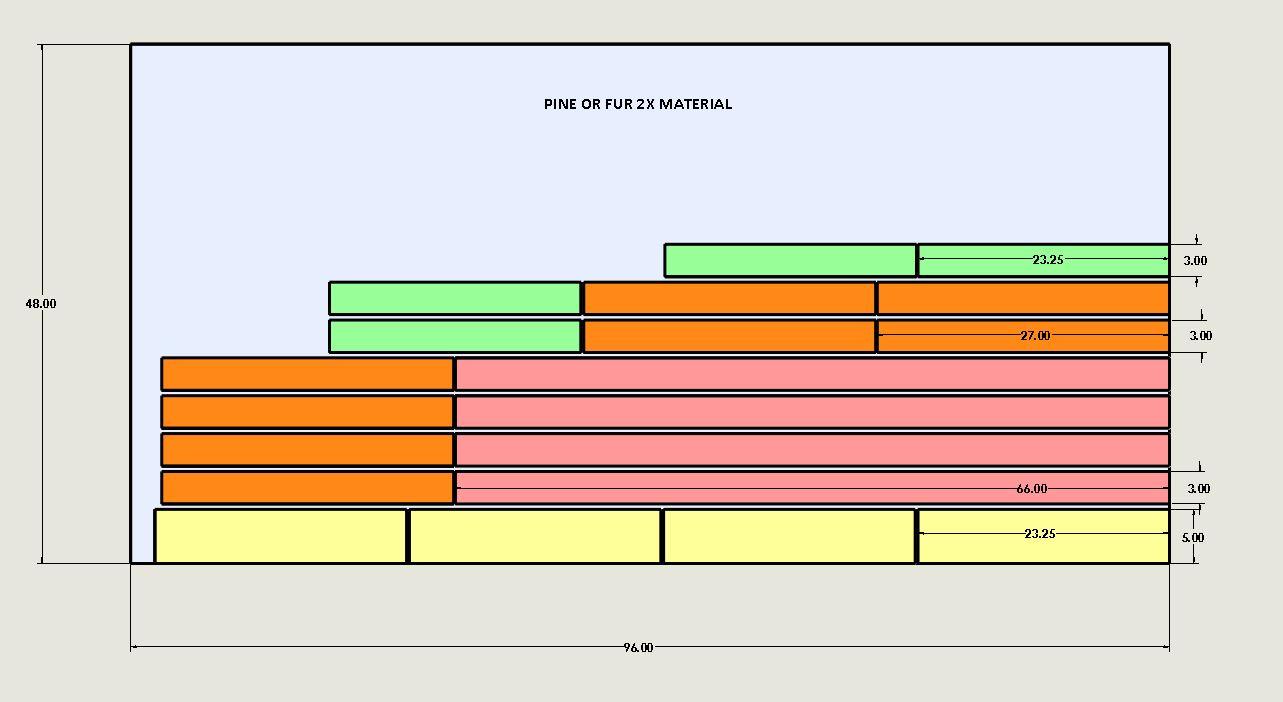
Cut List & Parts
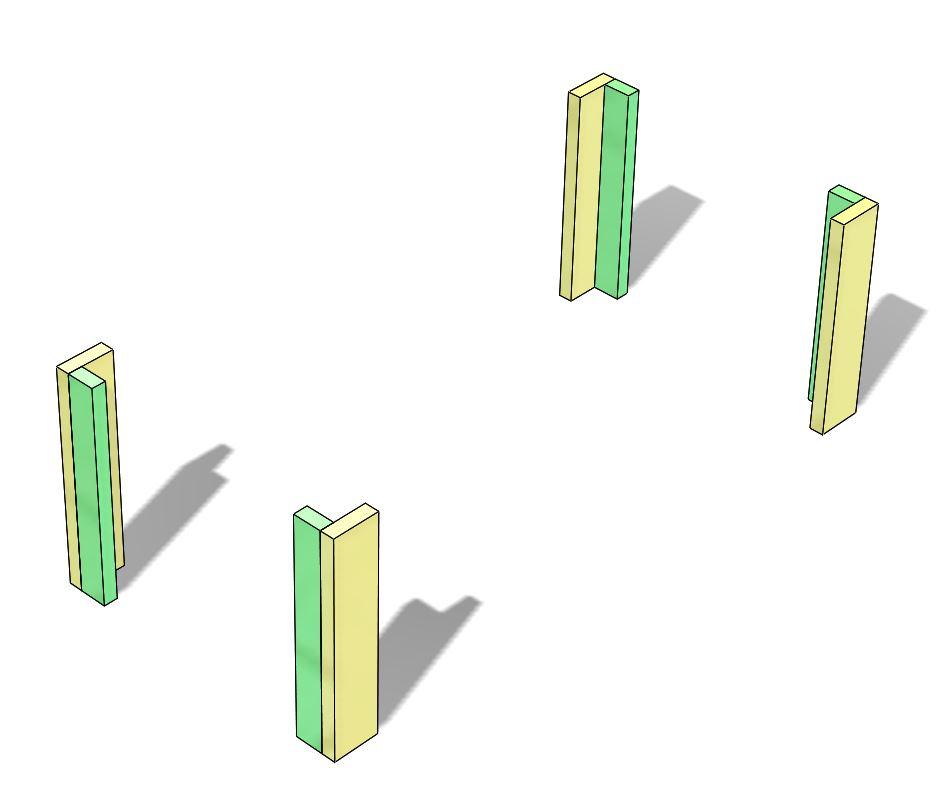
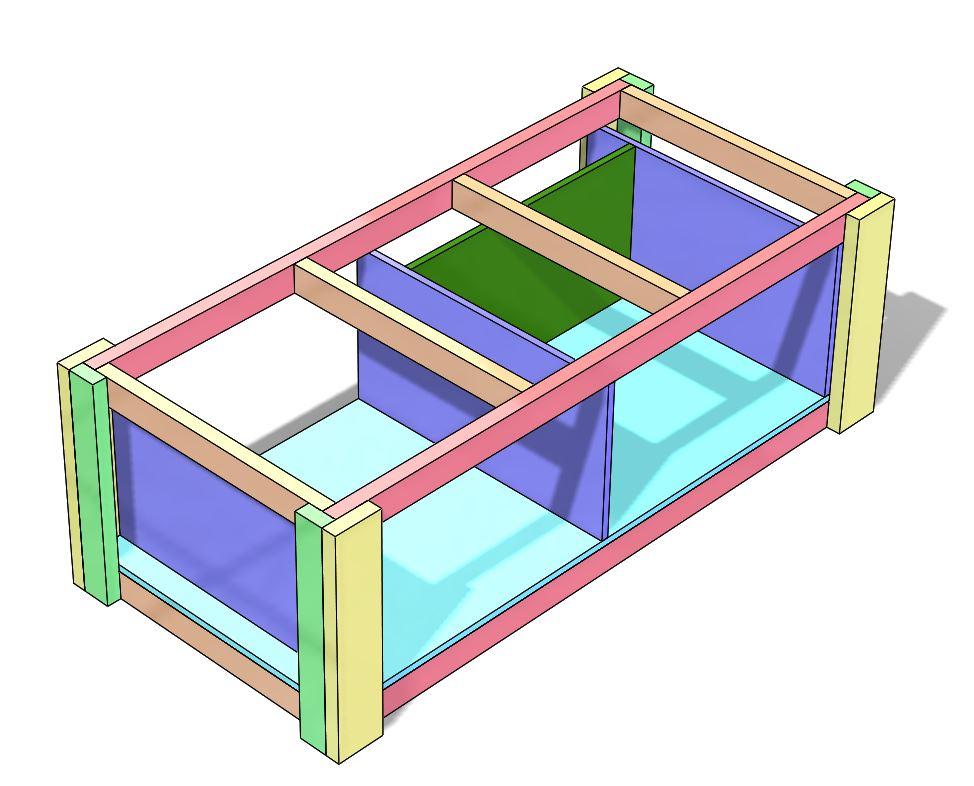
- 4 Yellow Leg 2 x 6 , See Diagram
- 4 Green Leg 2 x 4 , See Diagram
- 4 Red Frame Member , See Diagram
- 8 Orange Frame Member with Pocket Holes , See Diagram
- 2 Green Torsion Box Side Panels with Slots and Pocket Holes , See Diagram
- 2 Orange (light) Torsion Gusset Panel with Pocket Holes , See Diagram
- 4 Green End Panel with Pocket Holes , See Diagram
- 1 Green Cabinet Panel , See Diagram
- 1 Yellow Lower Torsion Box Panel , See Diagram
- 1 Red Torsion Box Top Sub Panel , See Diagram
- 4 Blue (light) Drawer Panel , See Diagram
- 4 Green (light) Drawer Panel , See Diagram
- 2 Orange Drawer Front , See Diagram
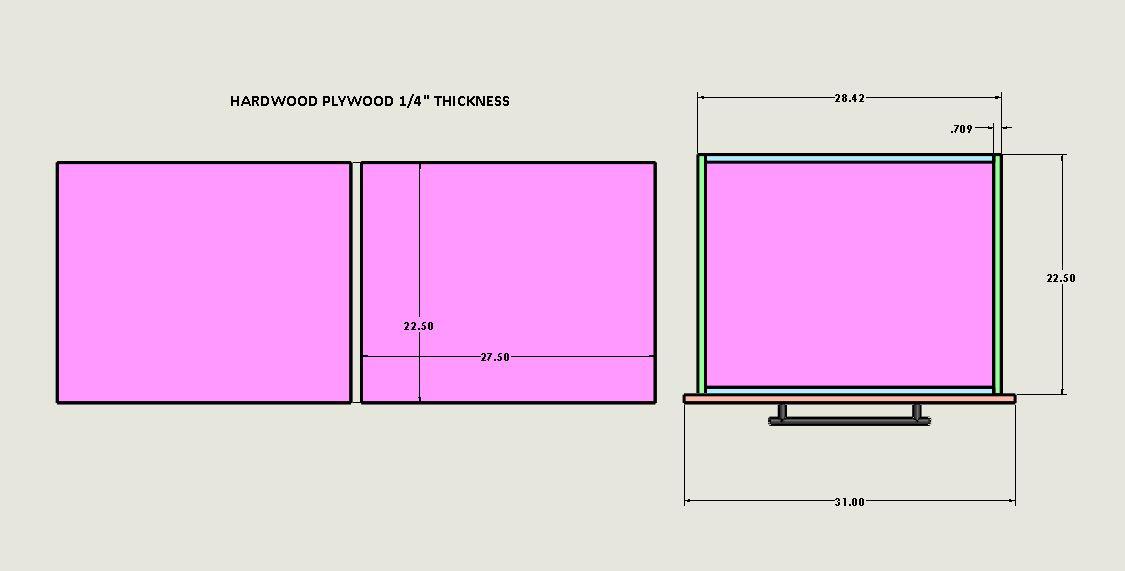
- 3 Blue Cabinet Base Panel , See Diagram
- 2 Pink Drawer Bottom , See Diagram


Directions
-
Milling and Cutting Base Pieces
I had some left over 2X6 boards that I had previously milled and the rounded corners were no longer there, so I decided to mill all of the 2X4's and 2X6's to match each other. This is not required to complete this build. It is strictly subjective to the look that you want.
-
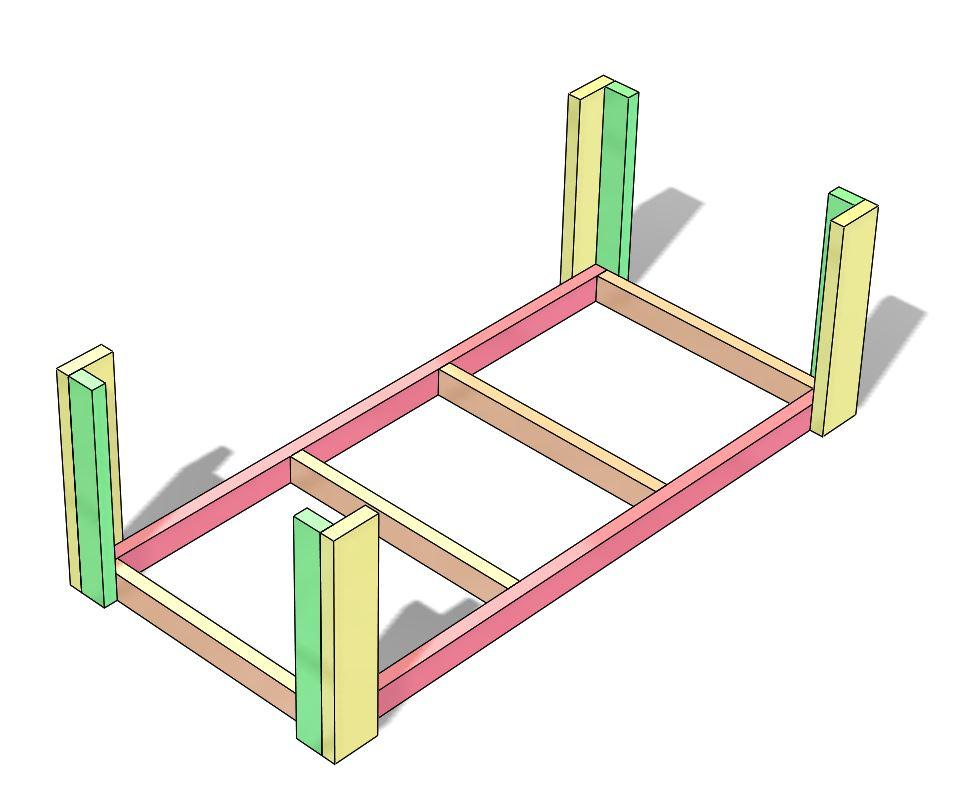
Leg Assembly
Add pocket holes to the side of the 2X4 portion of the leg and then using glue and screws, assemble the leg sets.
-
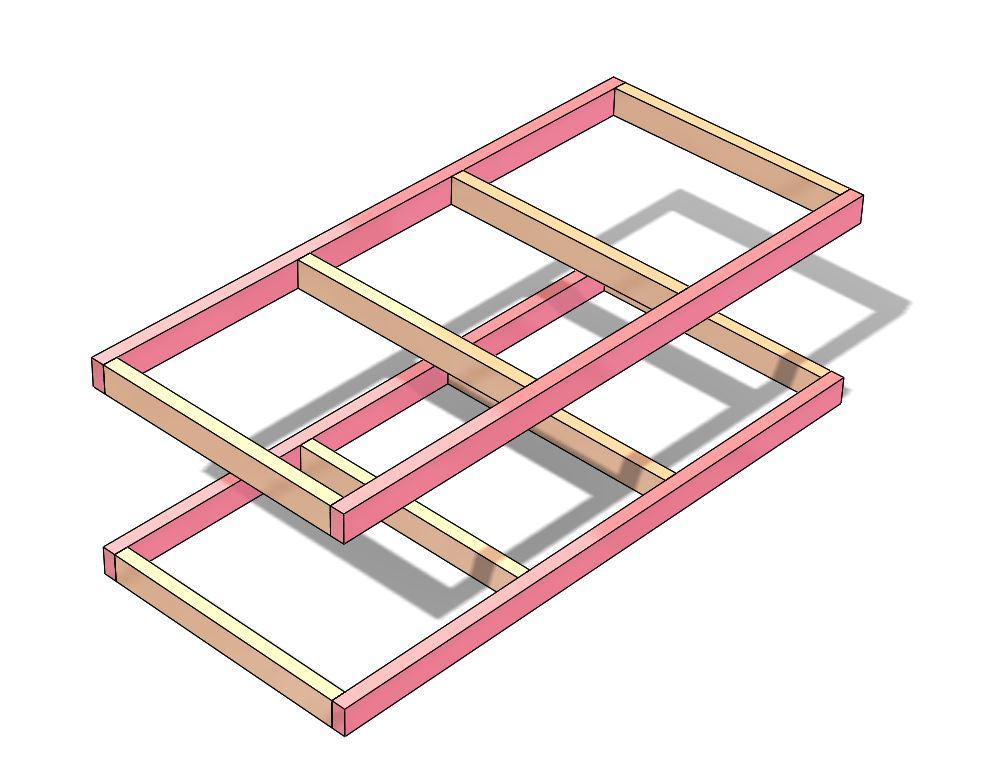
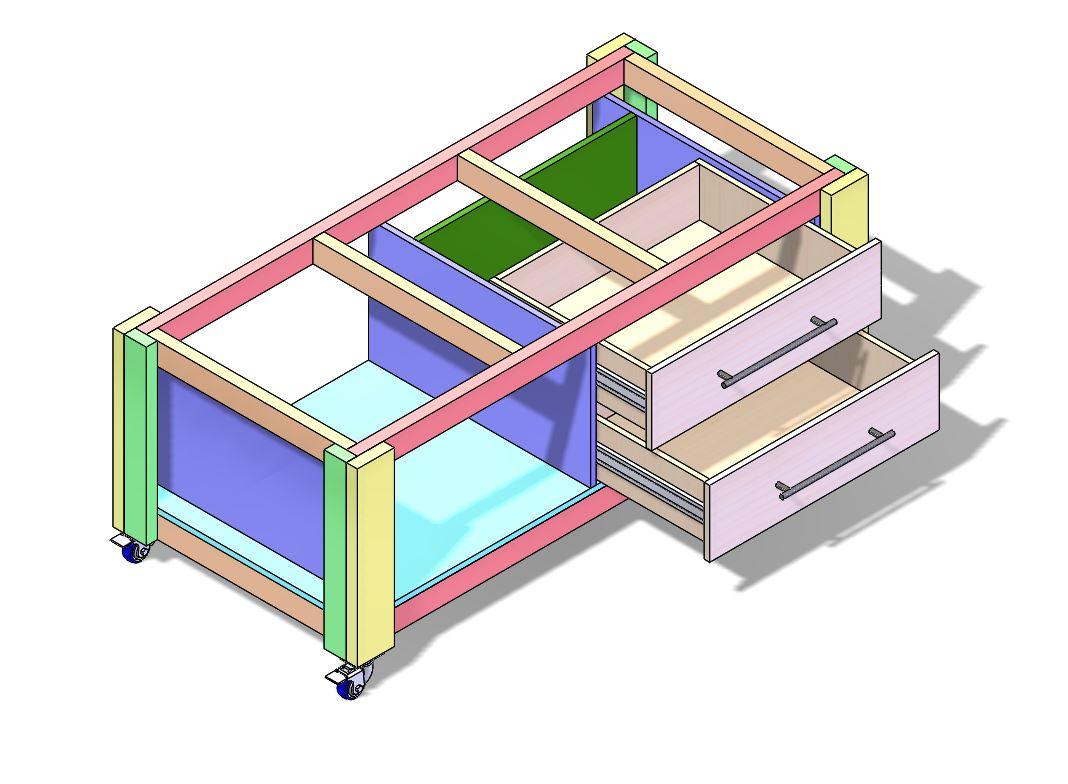
Upper and Lower Frame Assembly
After all the pieces are cut to size, add pocket holes to the ends of the short cross pieces. These will get glued and screwed to the long rails. Be sure to check the frame for square once its assembled. Both frames are identical. I just made all the spacing equal between the tan short parts.
-
Leg and Lower Frame Assembly
Once the frames are completed, set the legs into place at each corner. You can use multiple ways to mount the legs, but I chose to pre drill and screw them to the frames from the inside out. Make sure that the leg and frame surfaces are flush and flat to each other.
-
Caster Installation
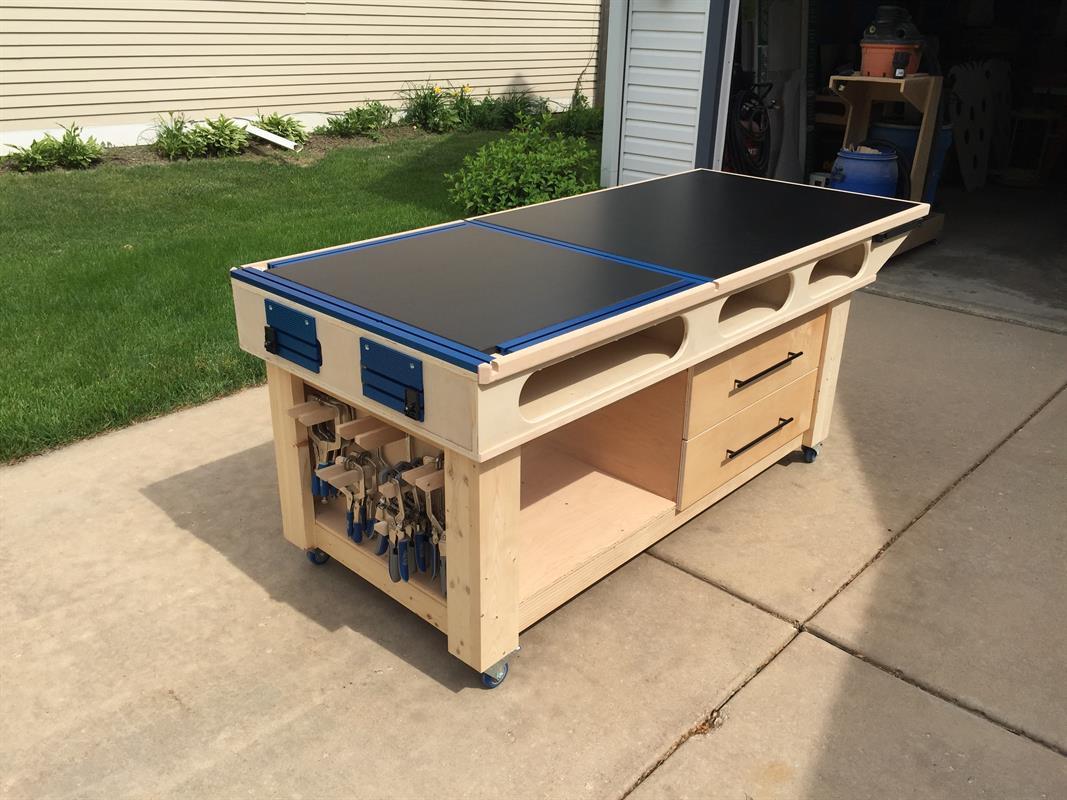
The casters are pretty straight forward, but there are some tips and tricks to installing them. Most casters have large slots for bolts to mount them. Rather than buy the bolts, you can use basic wood screws to mount them. I drill all the screws inwards on an angle to lock the casters in with the screws. Be sure that you leave room for your toe to access the locks of the casters if required. Also, casters come in many shapes and sizes. Keep this in mind when laying out your bench. The driving factor to the height of mine was my table saw which is 36" to the bottom of the miter track. If you add up the height of the caster, length of the leg assembly, and thickness of the torsion box top, be sure it matches what your height goal is.

-
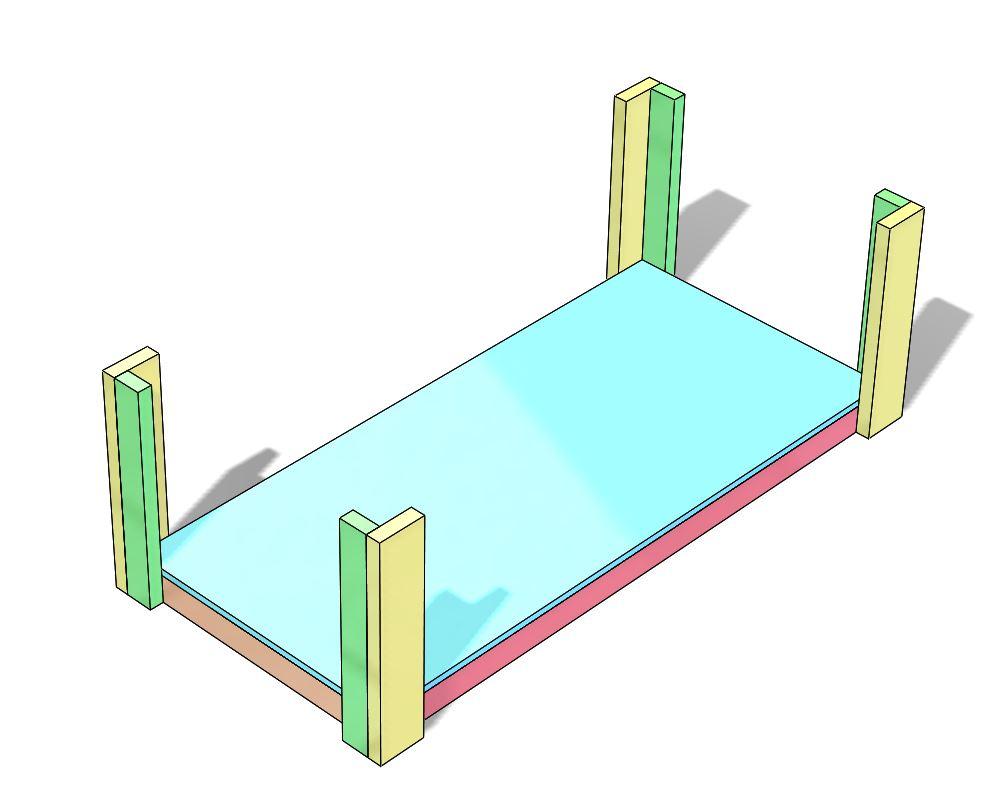
Lower Shelf Installation
Cut the lower shelf to size and drop it in on the lower frame, between the inside corners of the leg sets.
-
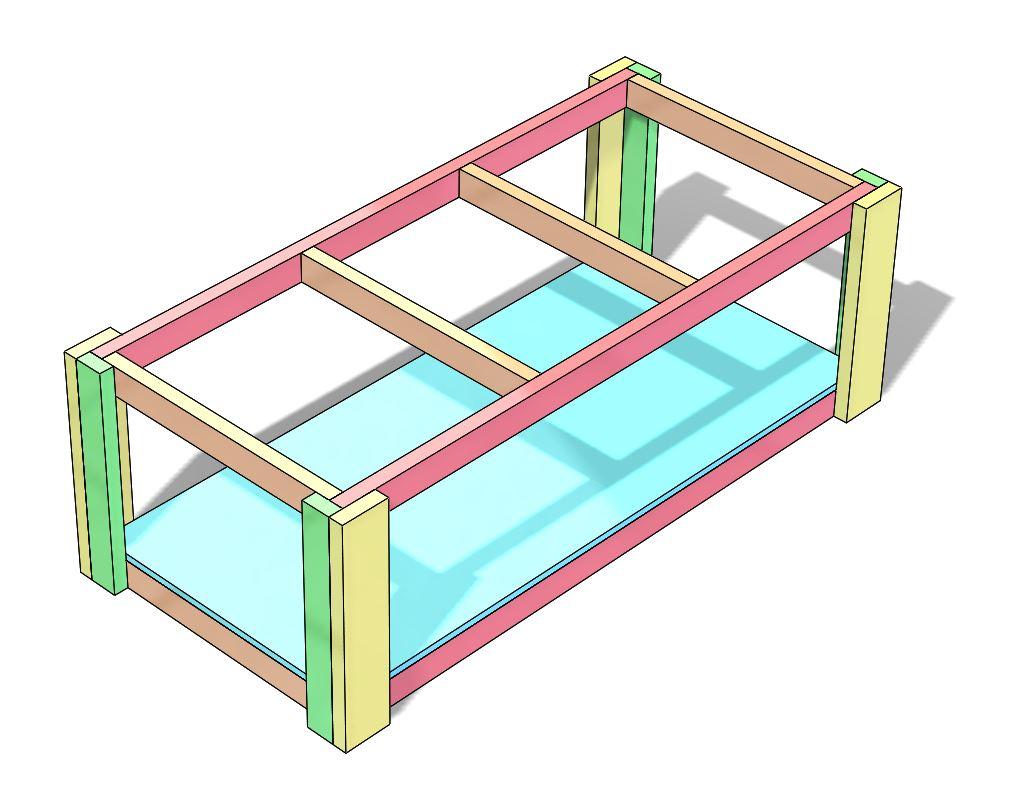
Upper Frame Installation
Once the shelf is attached to the lower frame, place 4) clamps onto the legs at ~4" from the top of each of the legs. You can also use precut spacers at are all the same length. This gives you a solid and stable place to set the upper frame assembly onto. Once the frame assembly is set in place, use levels or measurements to make sure its exact.
-
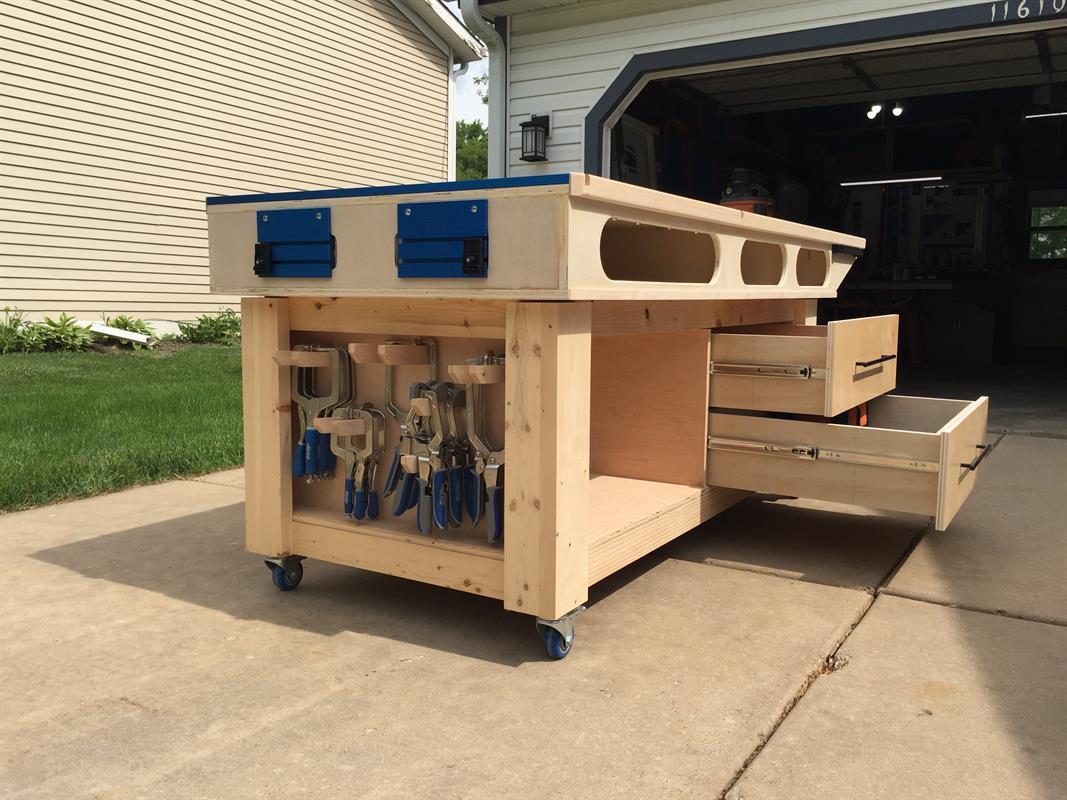
Cabinet Installation
The "cabinet" is more of panels that hold drawers, rather than an actual carcass cabinet. I added pocket holes to the bottom of each of the side panels and access the bottom and sides of the back panel. I then used glue and screws to install them into the base assembly.
-
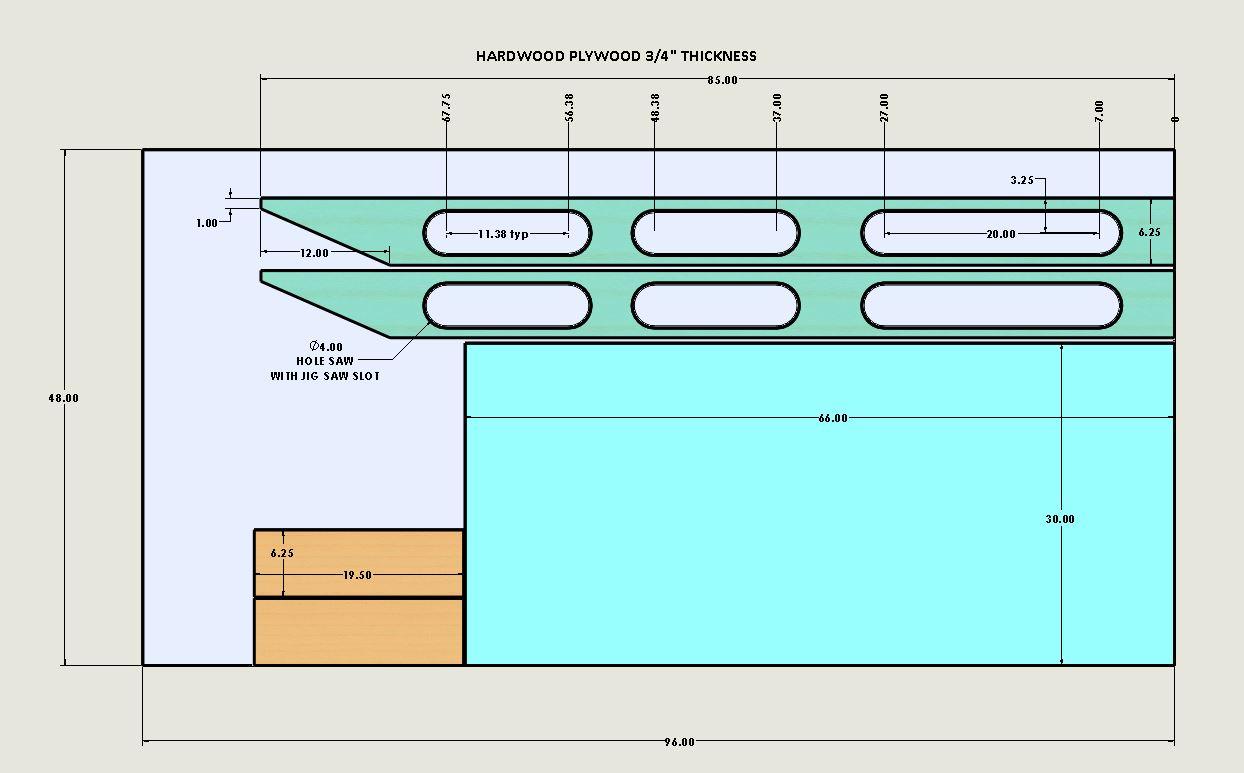
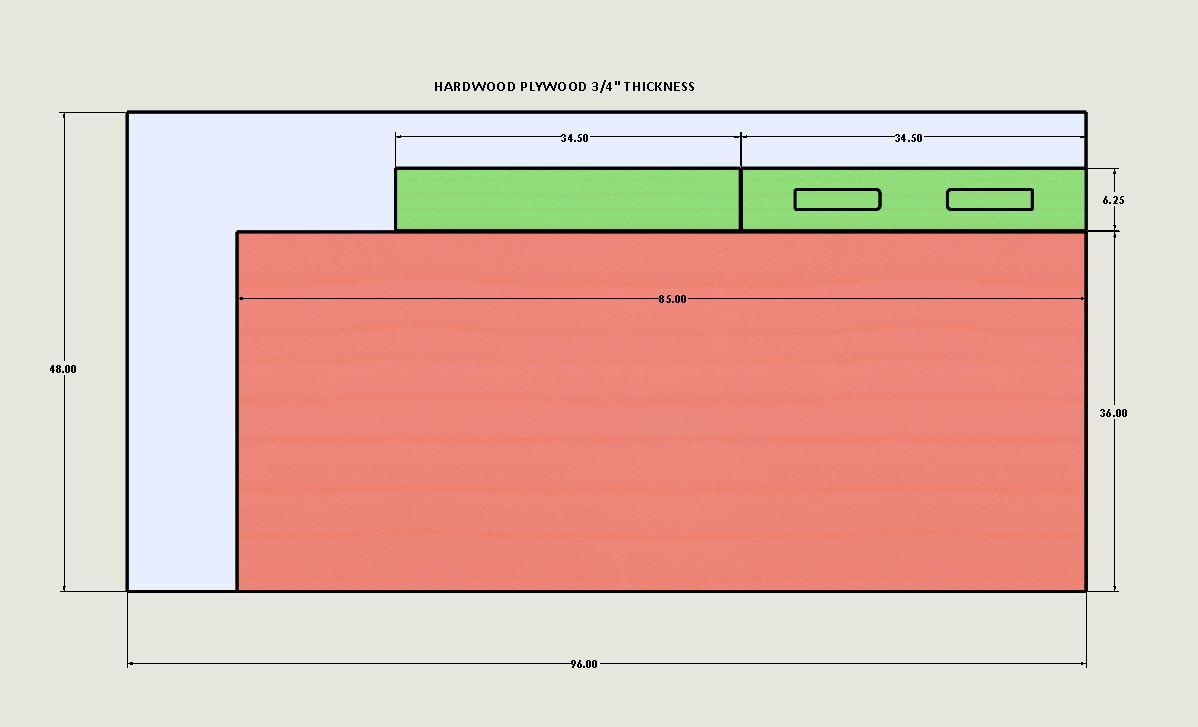
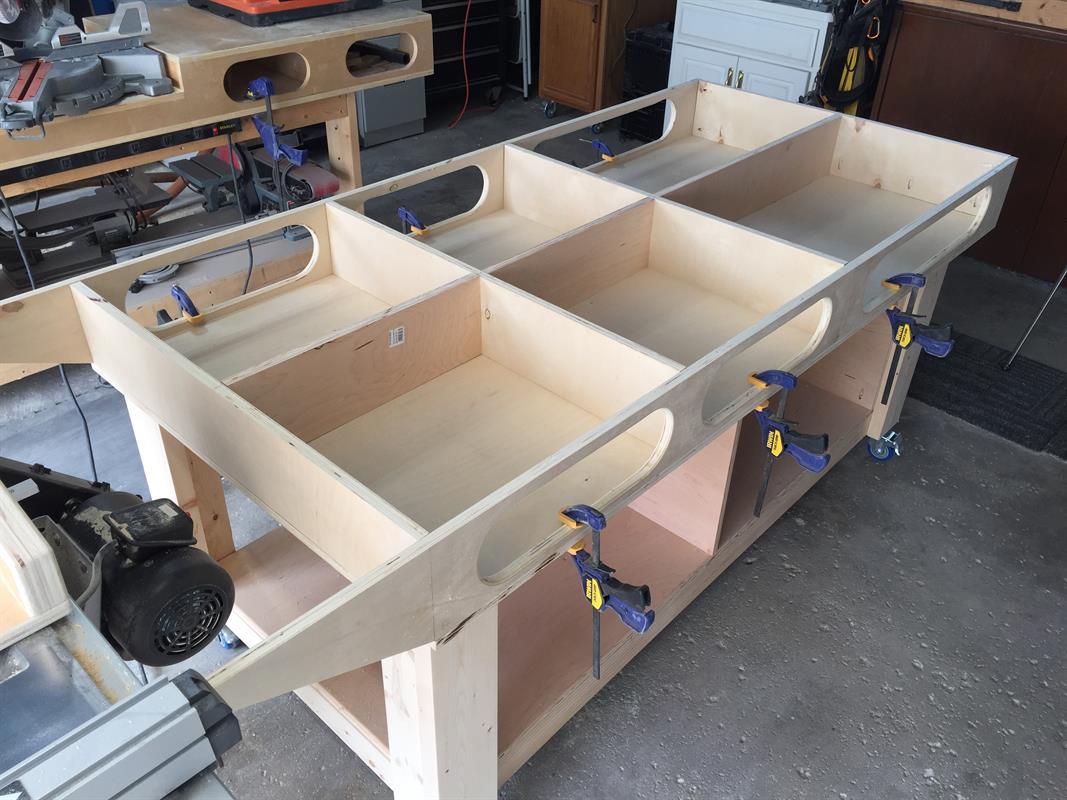
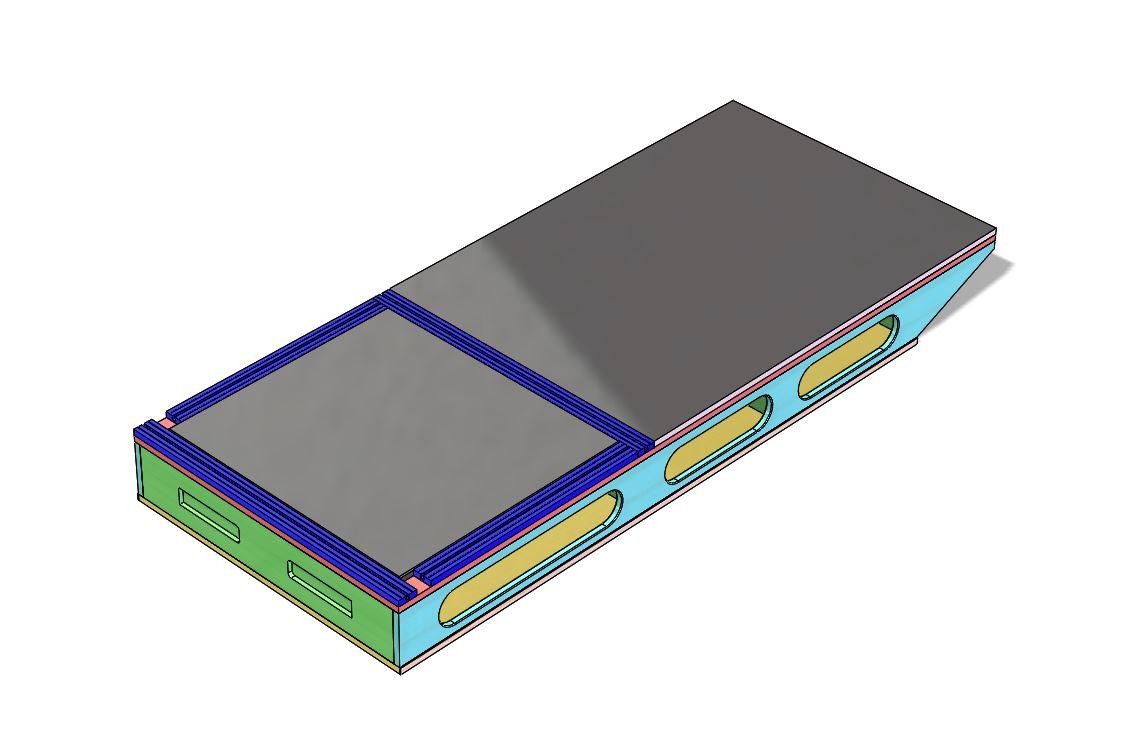
Torsion Box Top
After the cabinet panels were in place, I moved to the torsion box top. Following my cutlist, I cut all the plywood to size, leaving a little extra length on most of the pieces, just to be safe. I cut larger "top" panel first and then moved to the shorter side panels (these will get the slots). After the side panels were cut, I moved to the shorter internal pieces of the box, as well as the front and back panels of the box. All of the panels get pocket holes on three sides of them with the exception of the long side panels. They get pocket holes on the "top" side only, but we will do those after you add the Paulk slots.
-
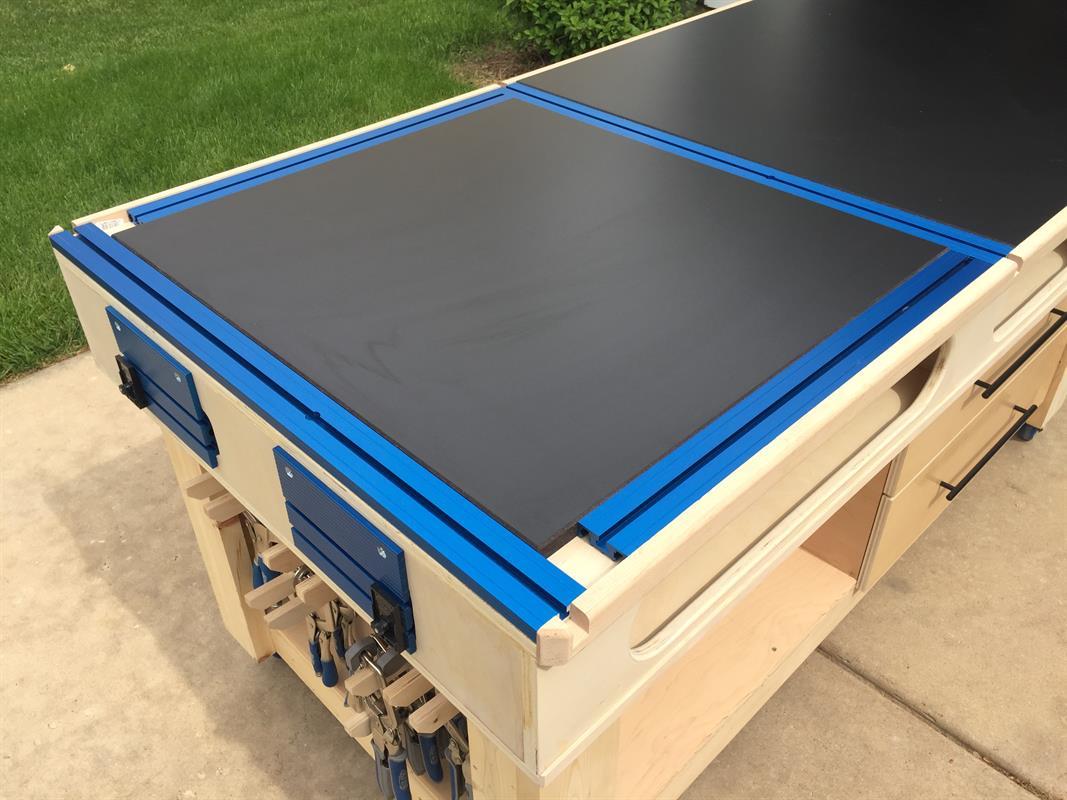
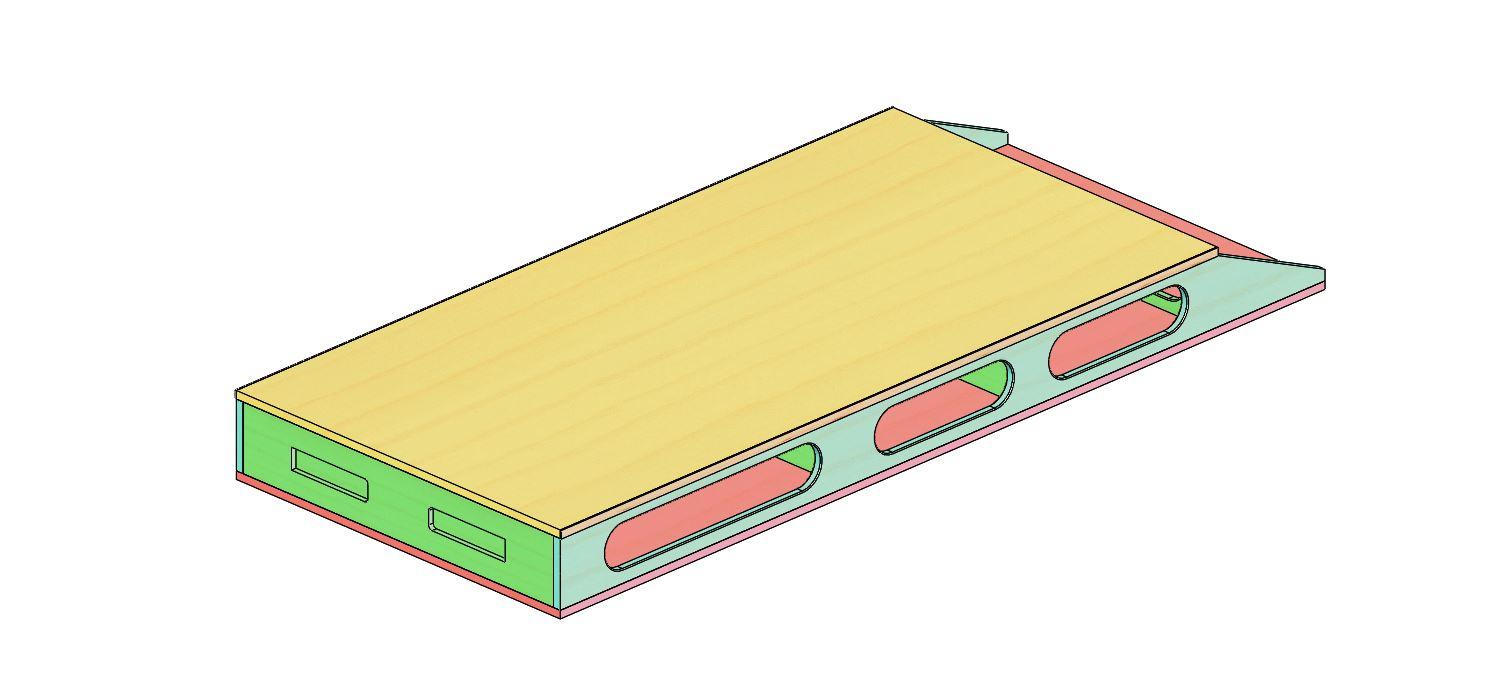
Saw Taper/ Paulk Slots
On the two long torsion box side panels, you need to add your cubby access slots. I used a 4" hole saw in my drill press and then used my table saw to connect the two holes. This is a comfort step and you do not need to use a drill press or table saw to do this. You can also mark out the slot and complete the cut with a jigsaw or make a template and use a router. Its all in what you are comfortable with doing in your shop.
Once all the slots were cut, I used a 1/4" roundover bit in my router and cleaned up all the holes to make a "smooth" access point for the cubbies.
My bench needs to clear the top of my table saw motor, so I had to add a taper to the top. I just used a tape measure and a square to figure out my angles.

-
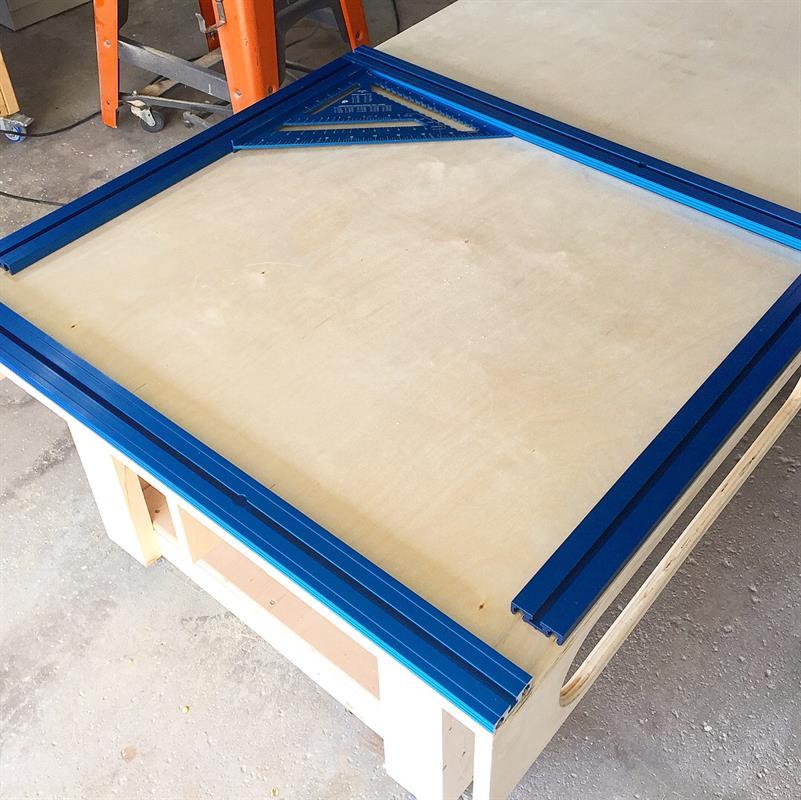
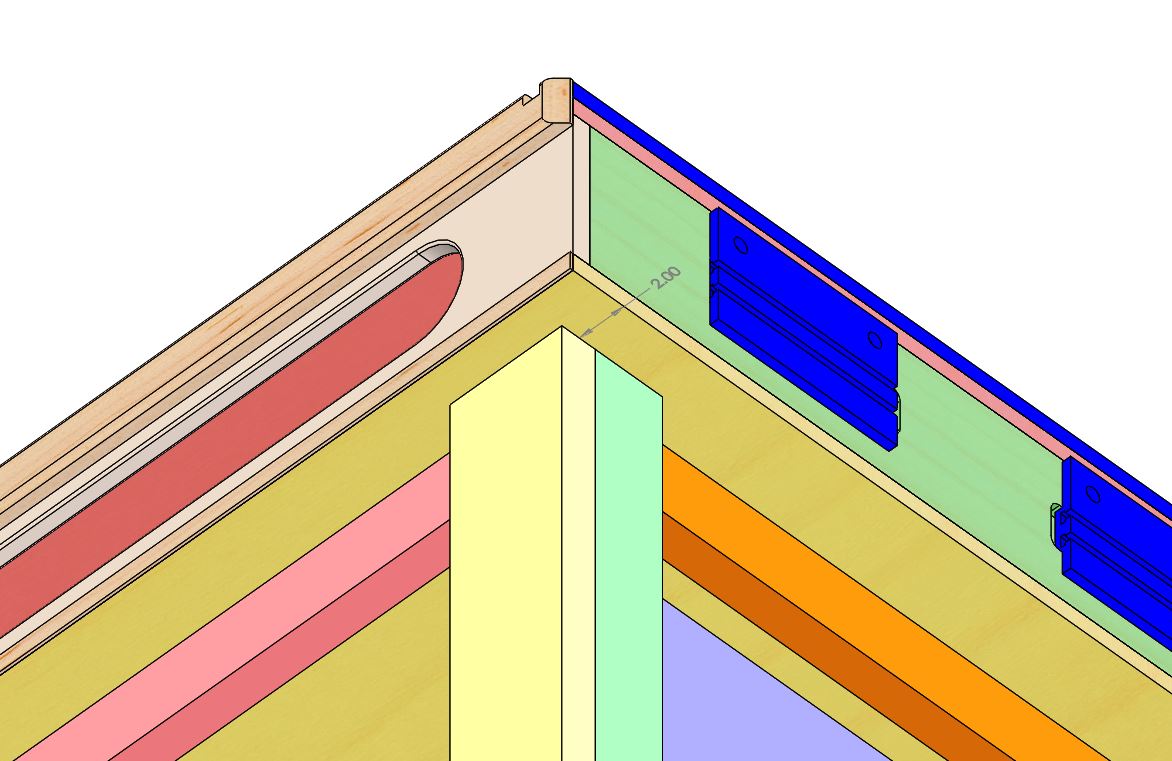
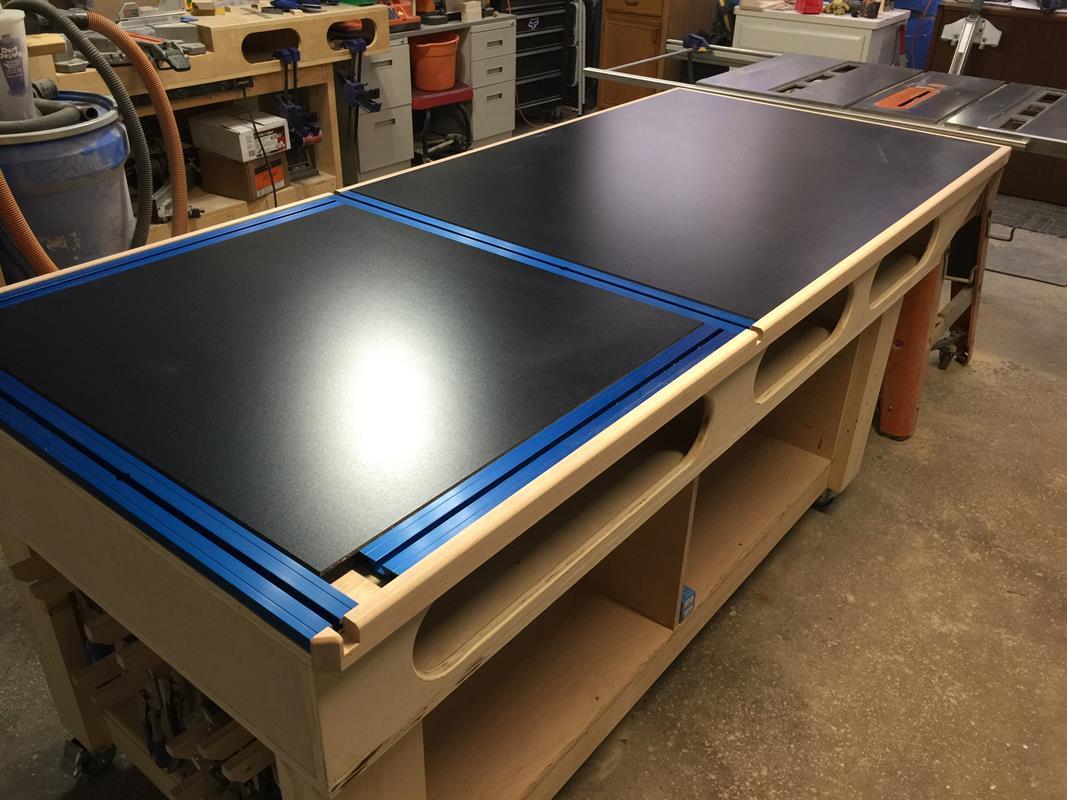
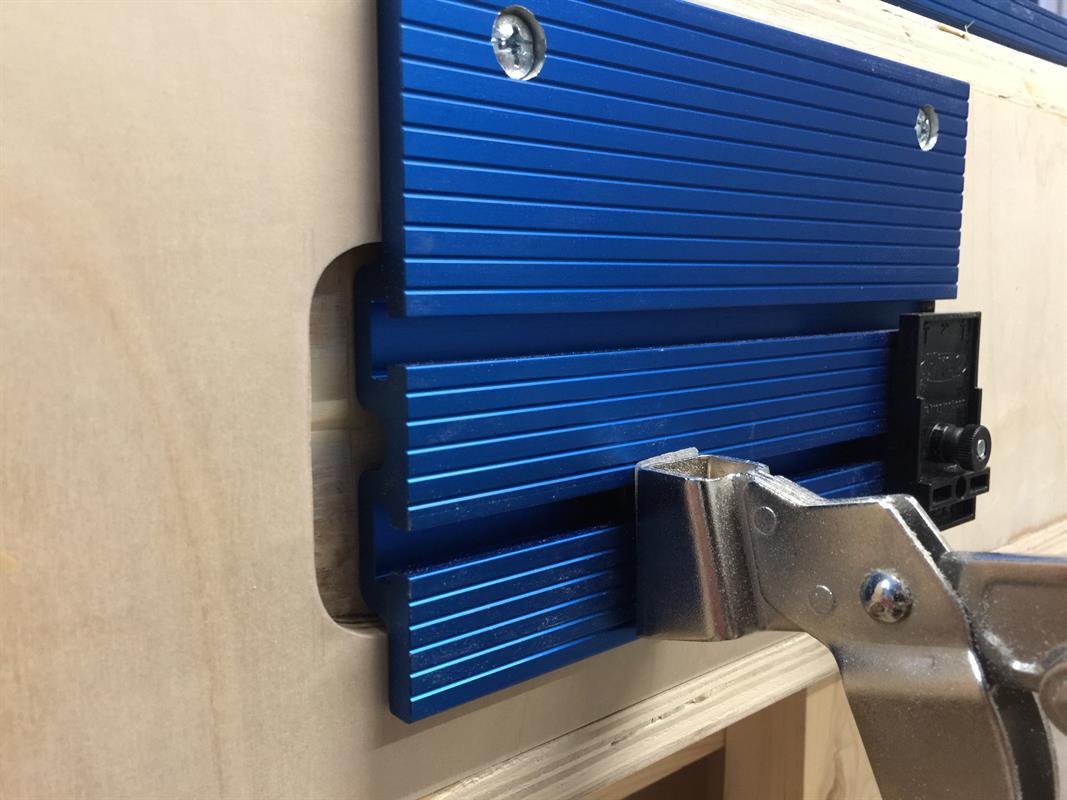
Kreg Clamp Track
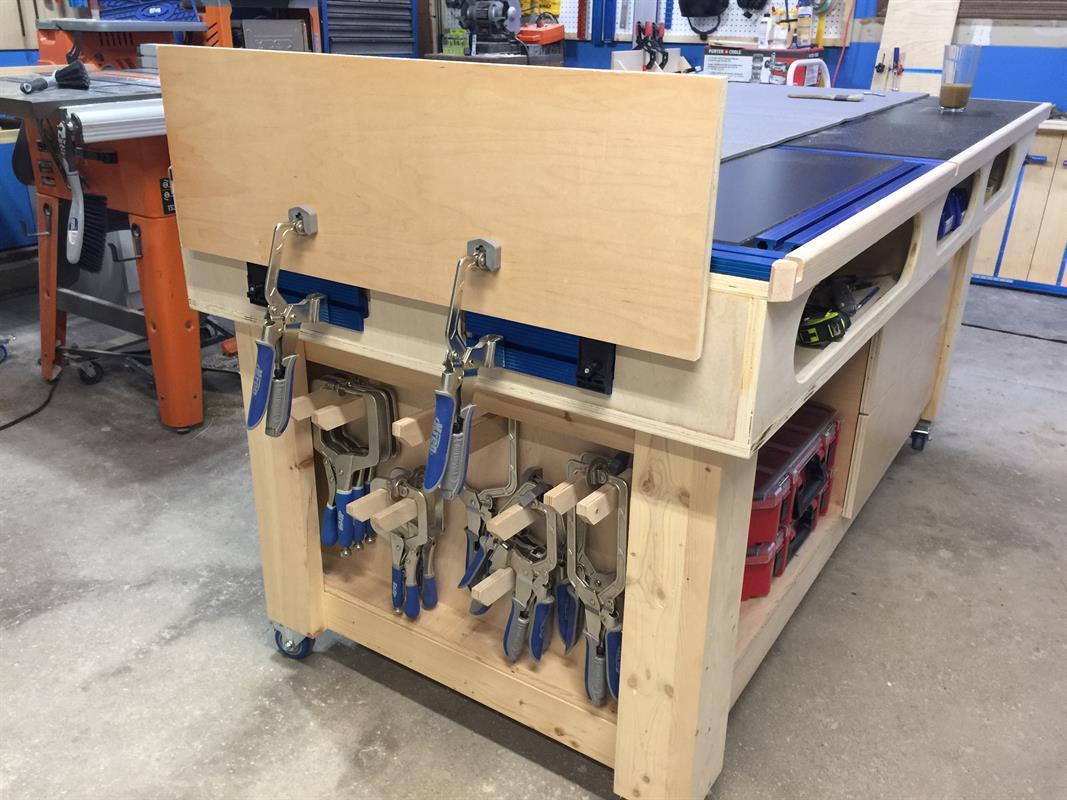
After the torsion box is assembled, you need to flip the carcass over and lay out the clamp tracks. I used the 27" and 45" track kits and cut the 45" pieces to 36" lengths. I placed one 36" piece flush across the edge of the top panel and then placed the two 27" at 1-3/4" from that piece to create a cavity for tools and clamps to fit into. Then the final 3" piece completes the frame. Using Kregs instructions, play out the hole locations onto the top panel. Drill clearance holes and install the hardware as indicated. I had to shorten the screws for the areas where the track was passing over the cubbyhole slots. Once all the hardware is in place, slide the tracks on, square them to eachother and tighten them down.
-
Bottom Panel
Flip the box back over, being careful not to scratch the new track. Now slide the bottom panel into place and screw it down. I did not glue this part as I wanted to be able to take it off in the future to access the track hardware or add other benchtop features.
-
Top Mounting
Now you can locate and screw the torsion box to the base. I made the dimension the same from each face of the leg assembly (refer to image). Use a ruler to determine where the base is located under the plywood and insert 6-8 screws from inside the cubbies into the base 2x4 framing.
-
Melamine Top
Cut the large piece of melamine to size and slide it onto the torsion box. Butt it up to the Kreg track and notice that you may have a slight height difference between the two surfaces. I used a chamfer bit in my router to bring the edges tangent to each other. This is not necessary, it will just save the melamine edge over time. Once the panel is in place, add some 1-1/4" screws from underneath to hold it in place. I then used a flush trim bit in my router to make the end of the bench the exact same.
Next, cut the clamp area melamine to size and run the chamfer bit around it (if needed). Now, drop it into place between the tracks. You may have to loosen the tracks a bit to get it to slide in, but it all depends on your cut.
-
Maple Cap (optional)
I wanted to protect my bench top, so I added some maple 1x2 material to the sides and saw end of the top. I cut the pieces long and scribed them in place to get the sizes exact for the length. Be sure to cut relief slots where the track t-slot access is required. I then added glue to the BOTTOM PLYWOOD PANEL ONLY and used 2-1/4" brads to hold the caps on. This allows you to take out the melamine in the future if it gets damaged or worn. After installation, I used the 1/4" roundover bit again to remove all sharp edges on the maple.
-
Drawers
I added two large (28-1/2" x 22-1/2" x 8") drawers to my cabinet. You can make these whatever size you want based on the cabinet size you build. Just keep in mind that the standard drawer slides require the drawer to be ~1" narrower than the panel opening. Check out Brads video from Fix This Build That where he explains how he builds drawers. There are several different methods and all are good. It just depends on what kind of weight you want to put in them.
-
Vise Option
I decided to add 2 of the Kreg Vises to my bench. These are meant to be mounted to the outside edge of a traditional workbench, so I had to use my router to cut holes into the face of my plywood panel. You can also add smaller pieces of plywood to the area to improve the strength and rigidity of the vises. Its all in what you want from the system. Once the pockets were cut, be sure to add relief to one side of the vise for screws to get into the track of the vise plate.
-
Completeion
When finished, the bench will be 36" tall, 37-1/2" wide, and 85-3/4" long. This is all based on the height of your casters, length of your legs, and overall torsion box size. This bench can be built out to 4'x 8' if wanted!Thank you for your interest and good luck with the build!