


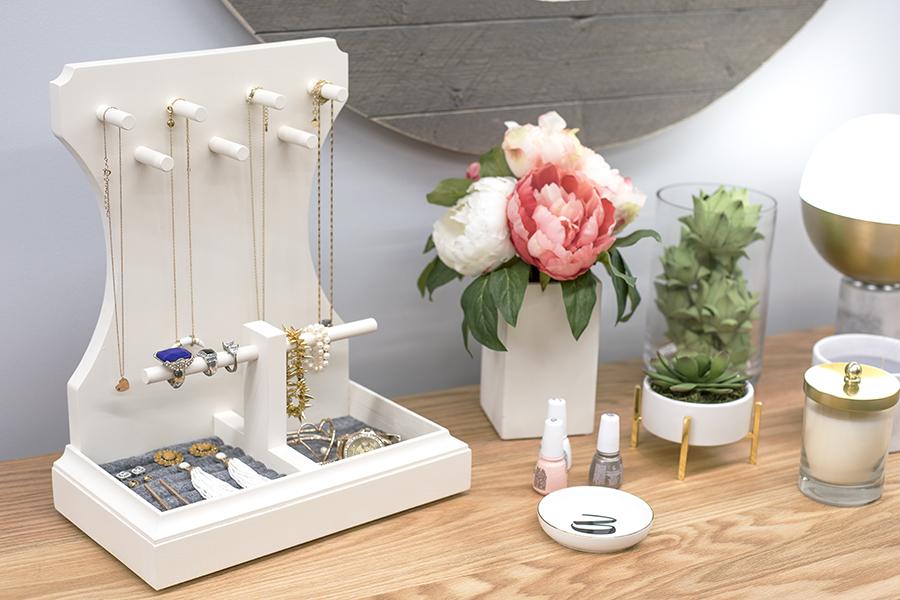
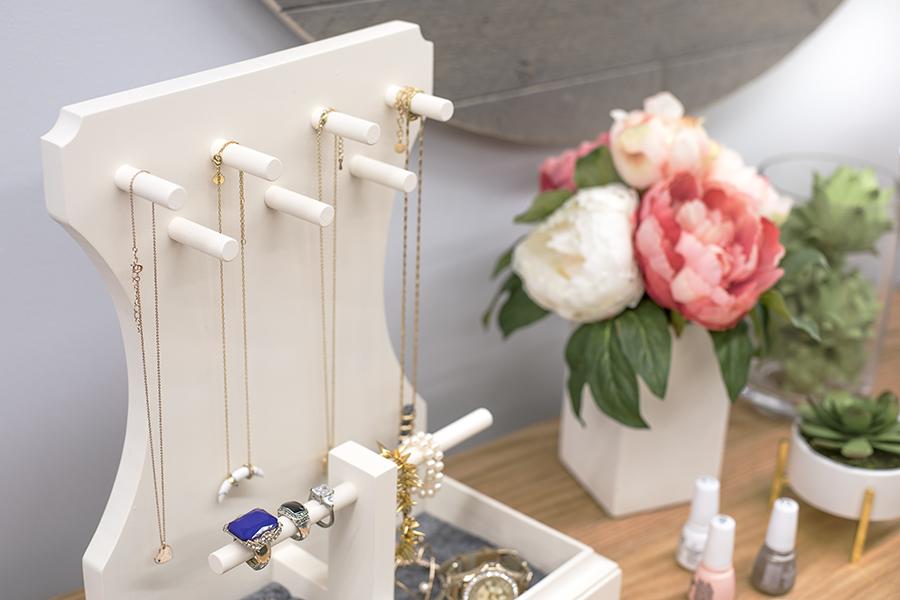
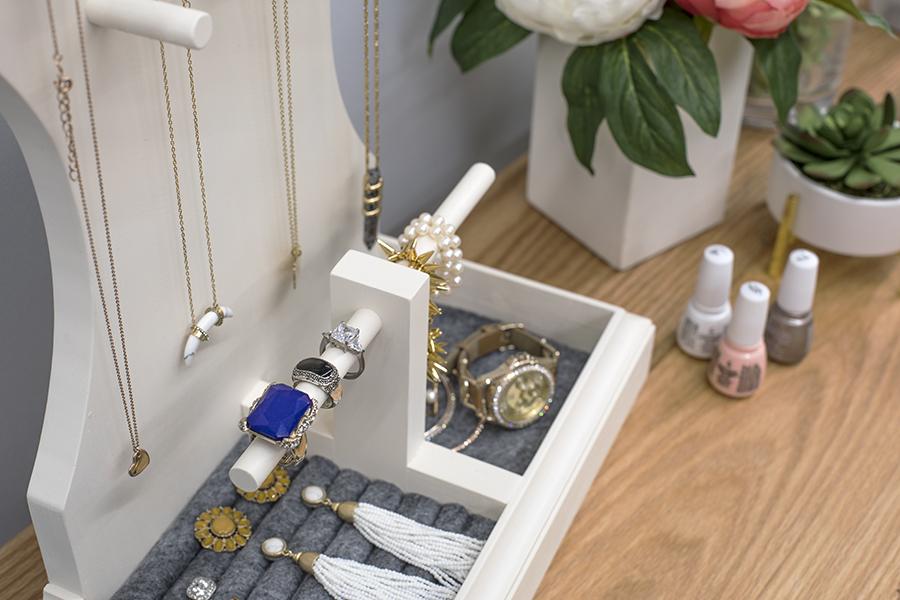


Keep all of your favorite jewelry organized and easily accessible using this handy tabletop jewelry organizer. It features posts to hang necklaces or hold rings, plus a tray to hold rings and other items. It’s a fun project to build, and it’s one that you—or someone you know—will love to have.
Tools
Kreg Tools


Other Tools
-
Miter Saw

-
Square
-
Tape Measure
Materials
Wood Products
- 1 Board , 1x2 , 48"
- 1 Board , 1x6 , 48"
- 1 Dowel , 1/2" Diameter , 36"
- 1 Cove Molding , 11/16" , 36"
Hardware & Supplies
- 11 1 1/4" coarse-thread Kreg® Screws
- 1 1/4 yard felt fabric
- 1 Wood glue
- 1 Can white spray paint
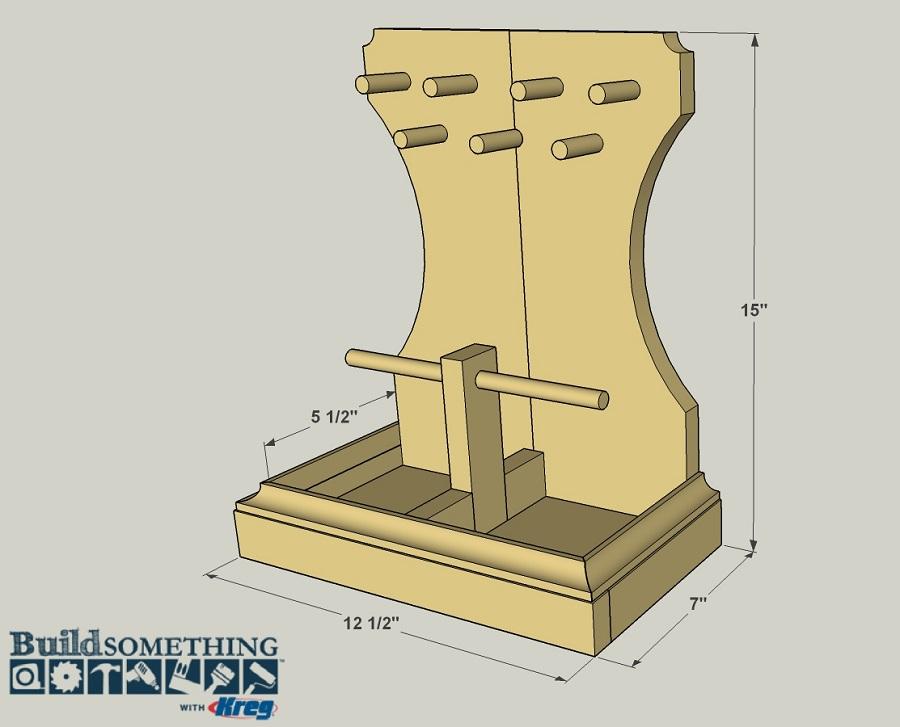
Cut List & Parts
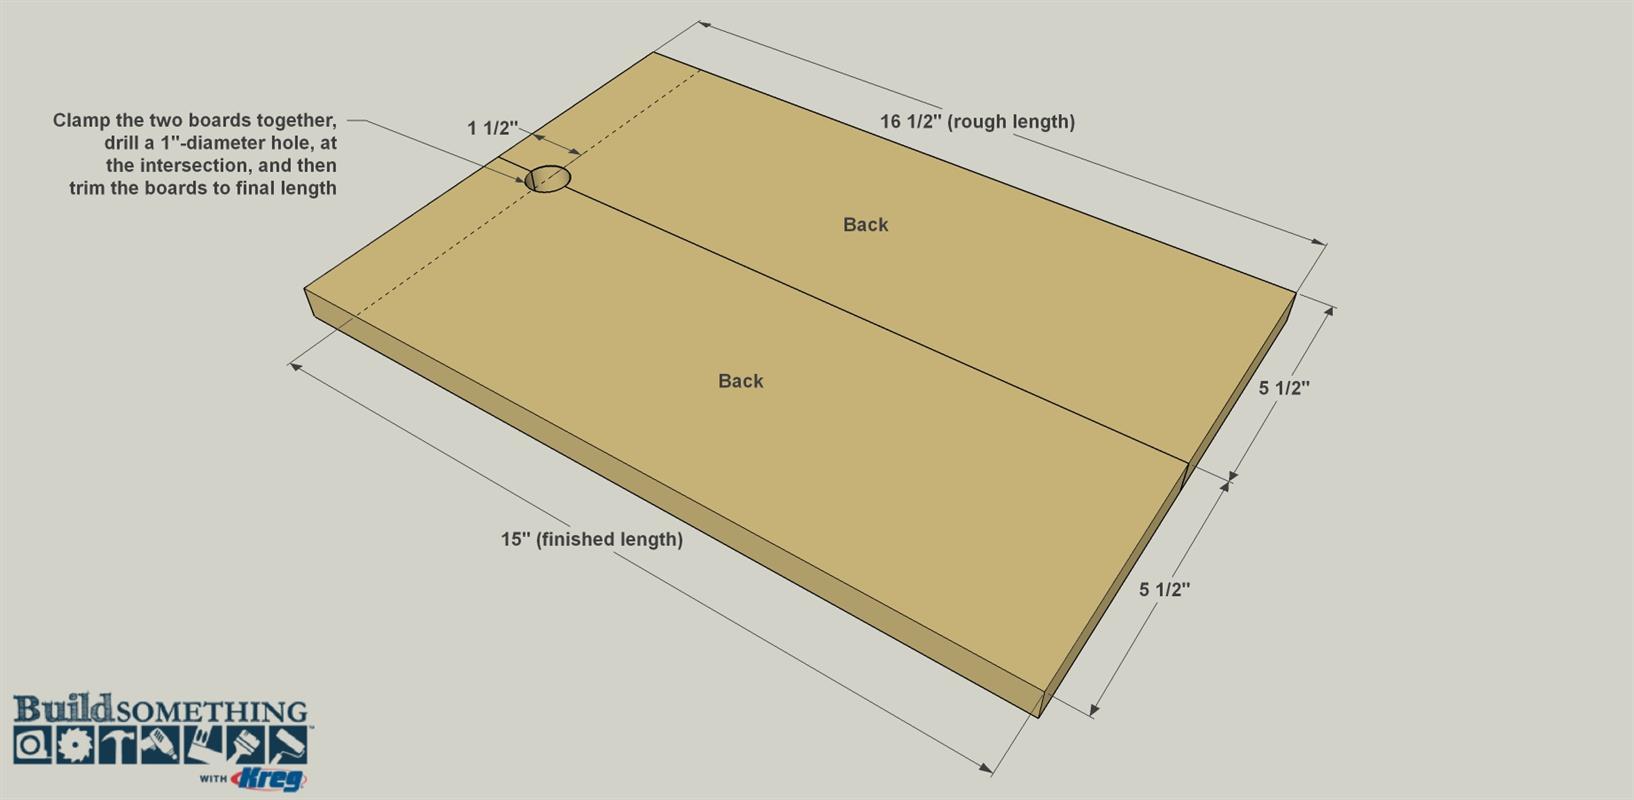
- 2 Back , 3/4" x 5 1/2" x 15" (initially cut to 16 1/2") poplar
- 1 Bottom , 3/4" x 5 1/2" x 11" poplar
- 2 Side Edging , 3/4" x 1 1/2" x 6 1/4" poplar
- 1 Front Edging , 3/4" x 1 1/2" x 12 1/2" poplar
- 1 Tall Divider , 3/4" x 1 1/2" x 5 1/2" poplar
- 2 Short Divider , 3/4" x 1 1/2" x 2" poplar
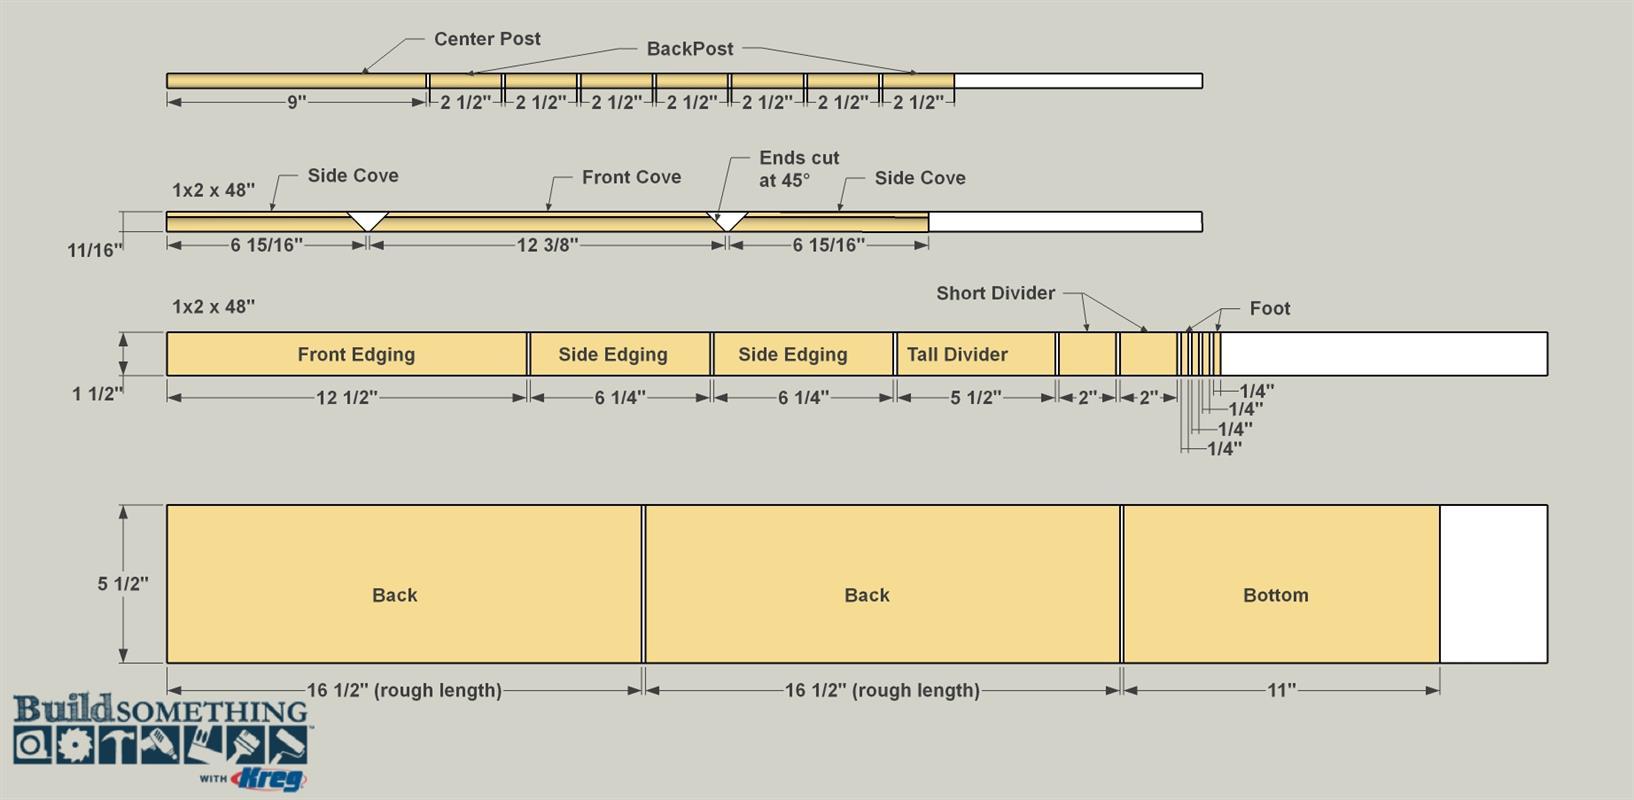
- 1 Center Post , 1/2"-dia. x 9" poplar dowel
- 7 Back Post , 1/2"-dia. x 2 1/2" poplar dowel
- 2 Side Cove , 11/16" x 11/16" x 6 15/16" cove (cut to fit)
- 1 Front Cove , 11/16" x 11/16" x 12 3/8" cove (cut to fit)
- 4 Foot , 1/4" x 3/4" x 1 1/2" poplar
Directions
-
Make the Backs
Cut two Backs to rough size from a 1x6 board, as shown in the cutting diagram. The Backs are cut extra-long to make it easy to add a decorative detail. To add that, clamp the two boards together so the ends are flush. At the joint where the Backs meet, lay out and drill a 1"-diameter hole, as shown. Remove the clamps, and then cut the Backs to their final 15" length, as shown. You’ll cut right through area where you drilled, and, once the backs are assembled, this will create the decorative corner notches.
-
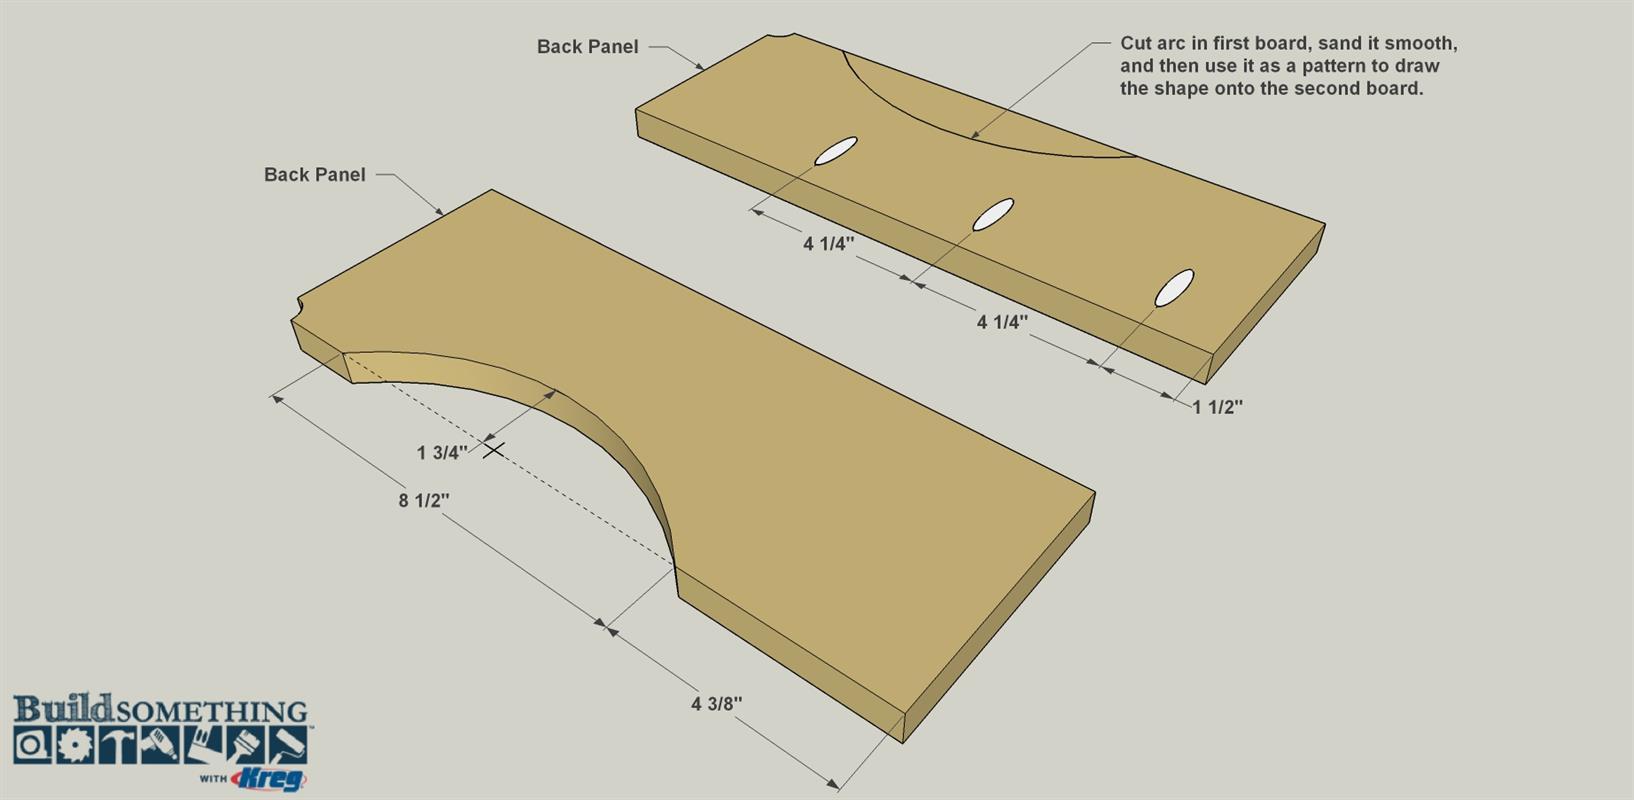
Shape the Back Boards
On one of the Backs, lay out the arc shape along one edge at the location shown. Cut the arc with a jigsaw, and then sand it smooth. Lay this piece over the second Back, and then trace the arc to transfer the pattern. Cut the second arc and sand it smooth, as well. Next, with your Kreg Jig® set for 3/4"-thick material, drill pocket holes where shown on the rear face of one of the boards. Screw the two Backs together using 1 1/4" coarse-thread Kreg® Screws.
-
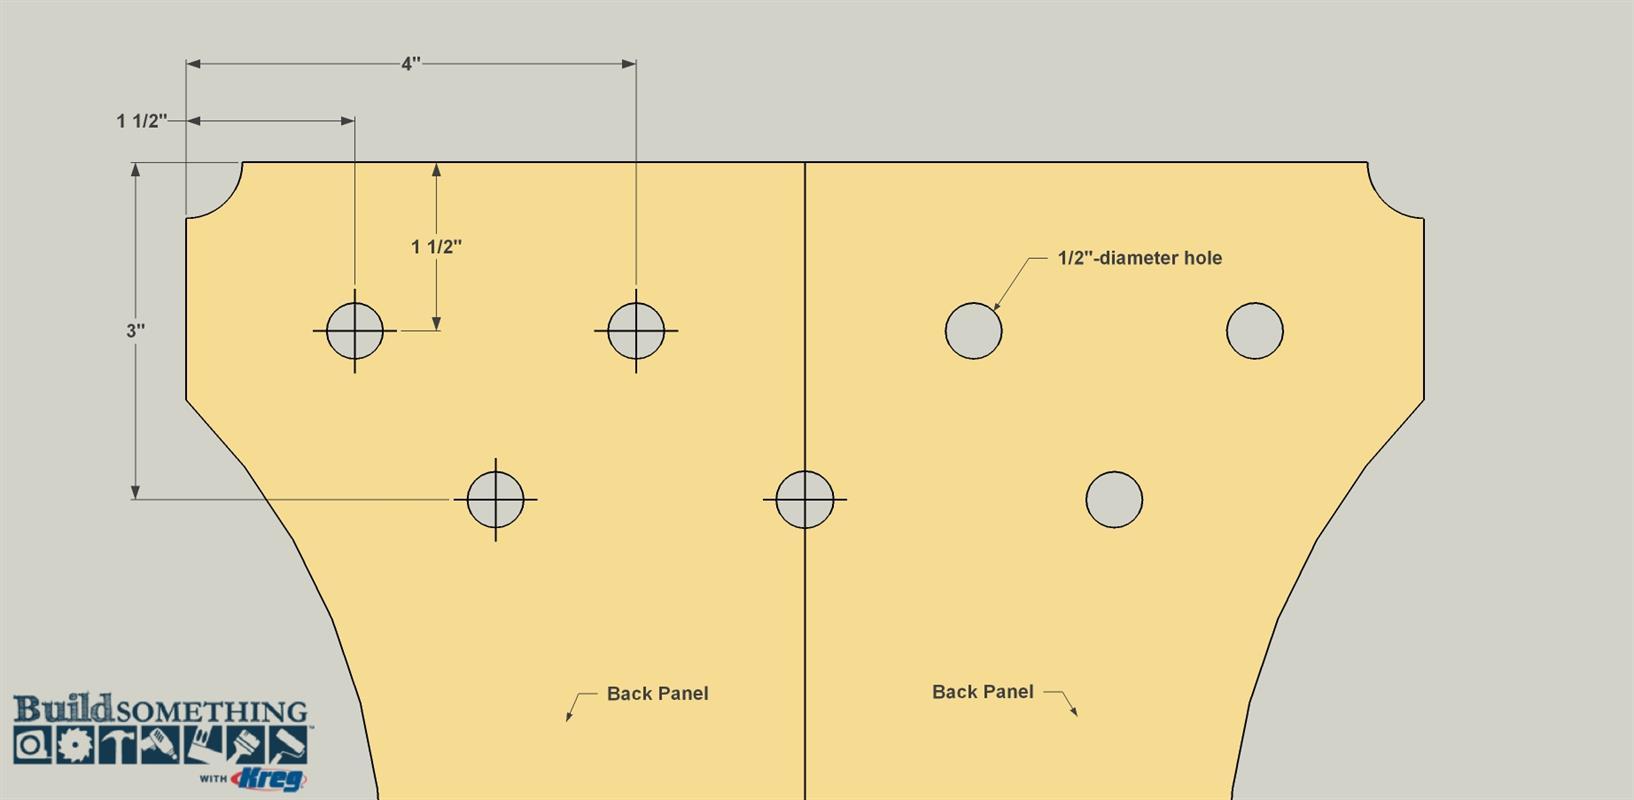
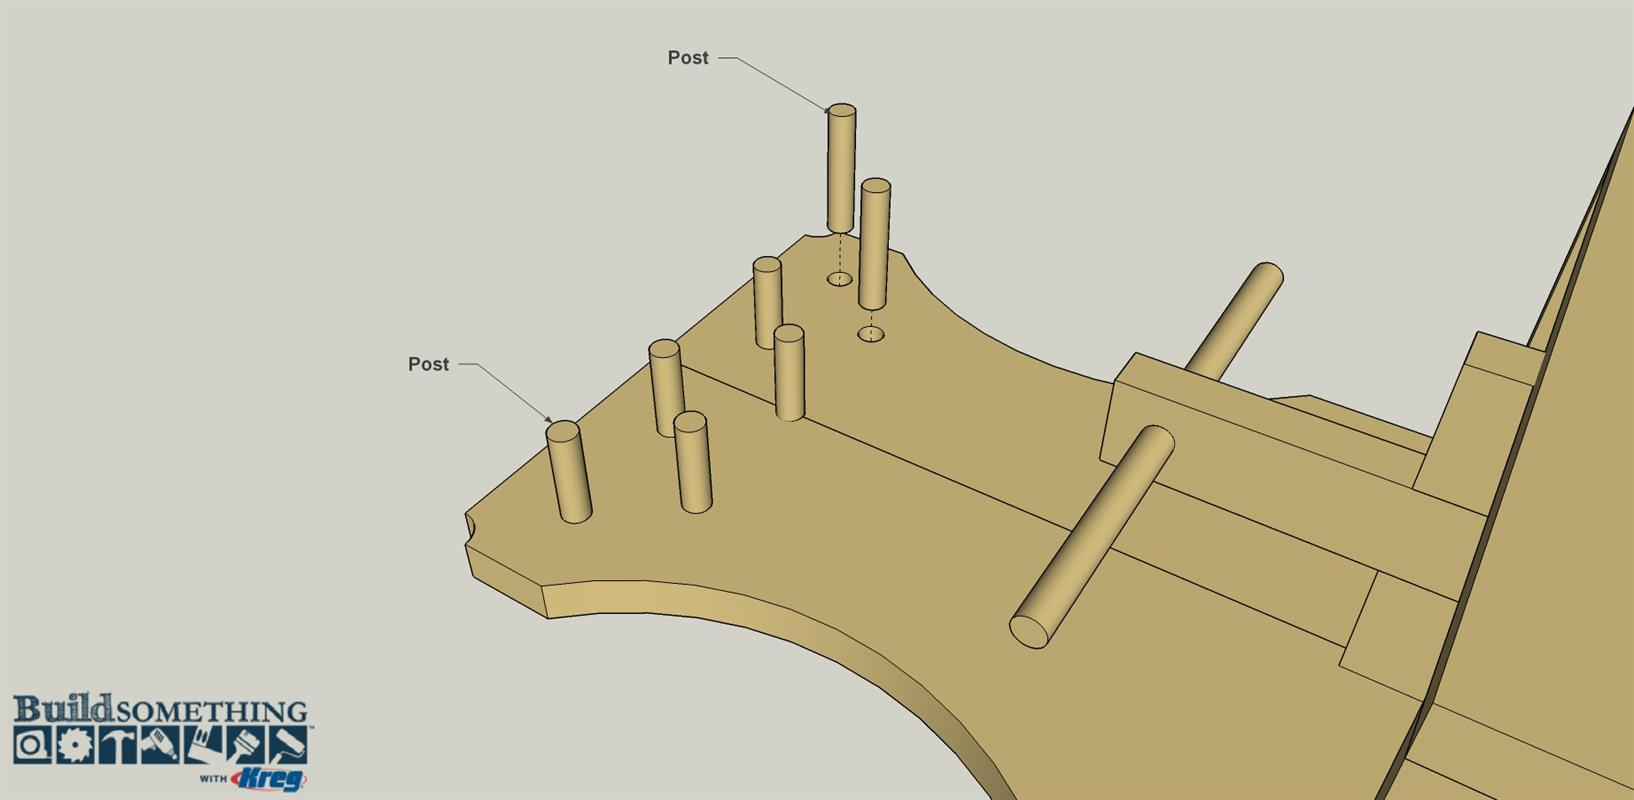
Add Holes for Posts
Now you can lay out and drill seven 1/2"-diameter holes, as shown, for the posts that will get added later. Make sure the holes are straight so that the posts will all stand straight out when installed. The How-To video below shows a great tip for drilling straight holes with a hand drill. When you’re done with the holes, you can sand the faces and edges of the back assembly. If you’re painting, you won’t need to go finer than 120-grit.
-
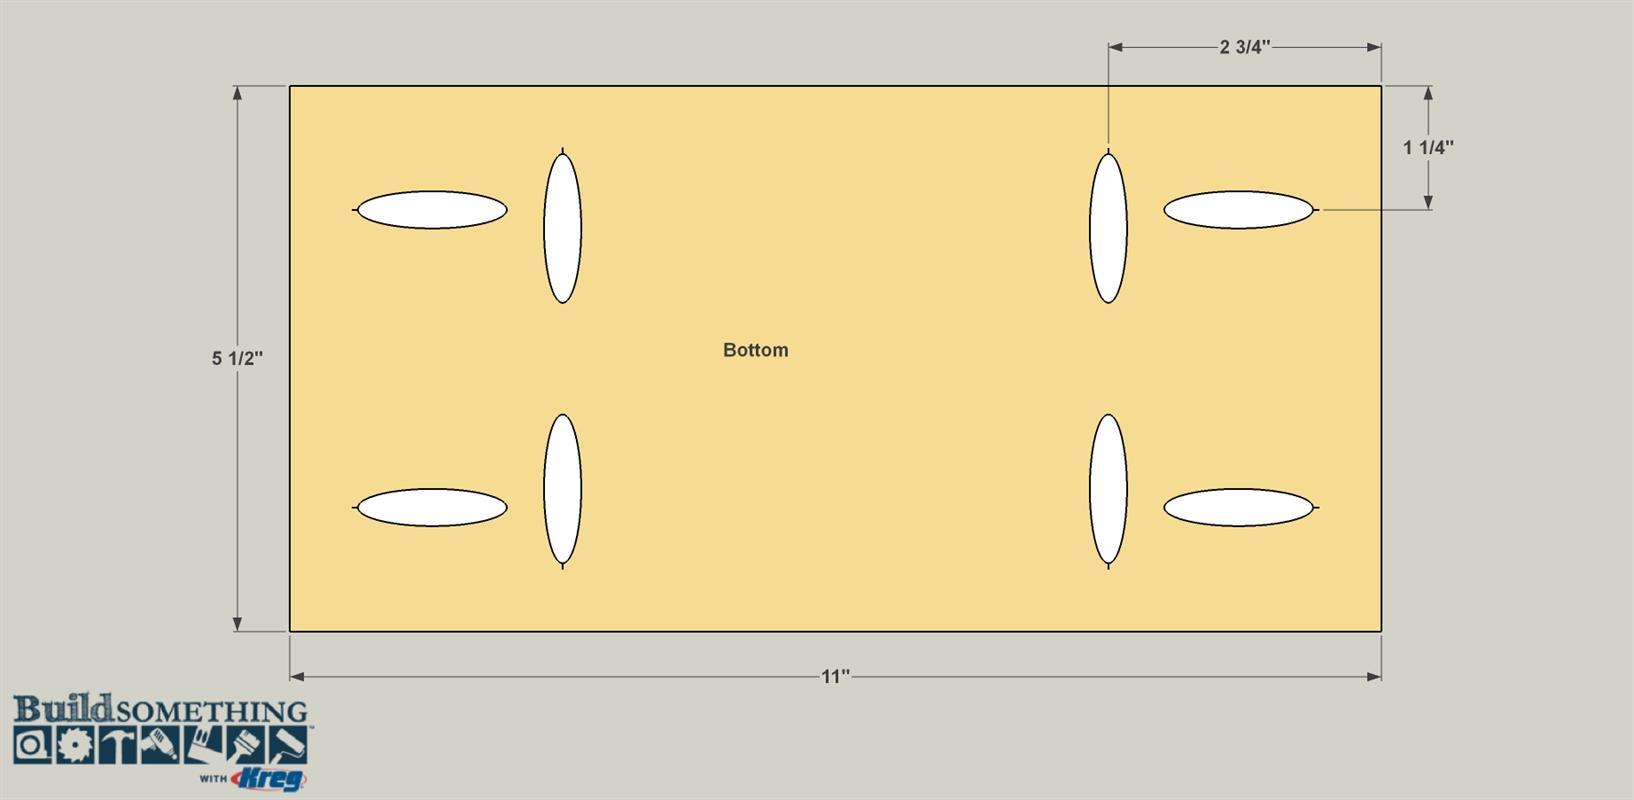
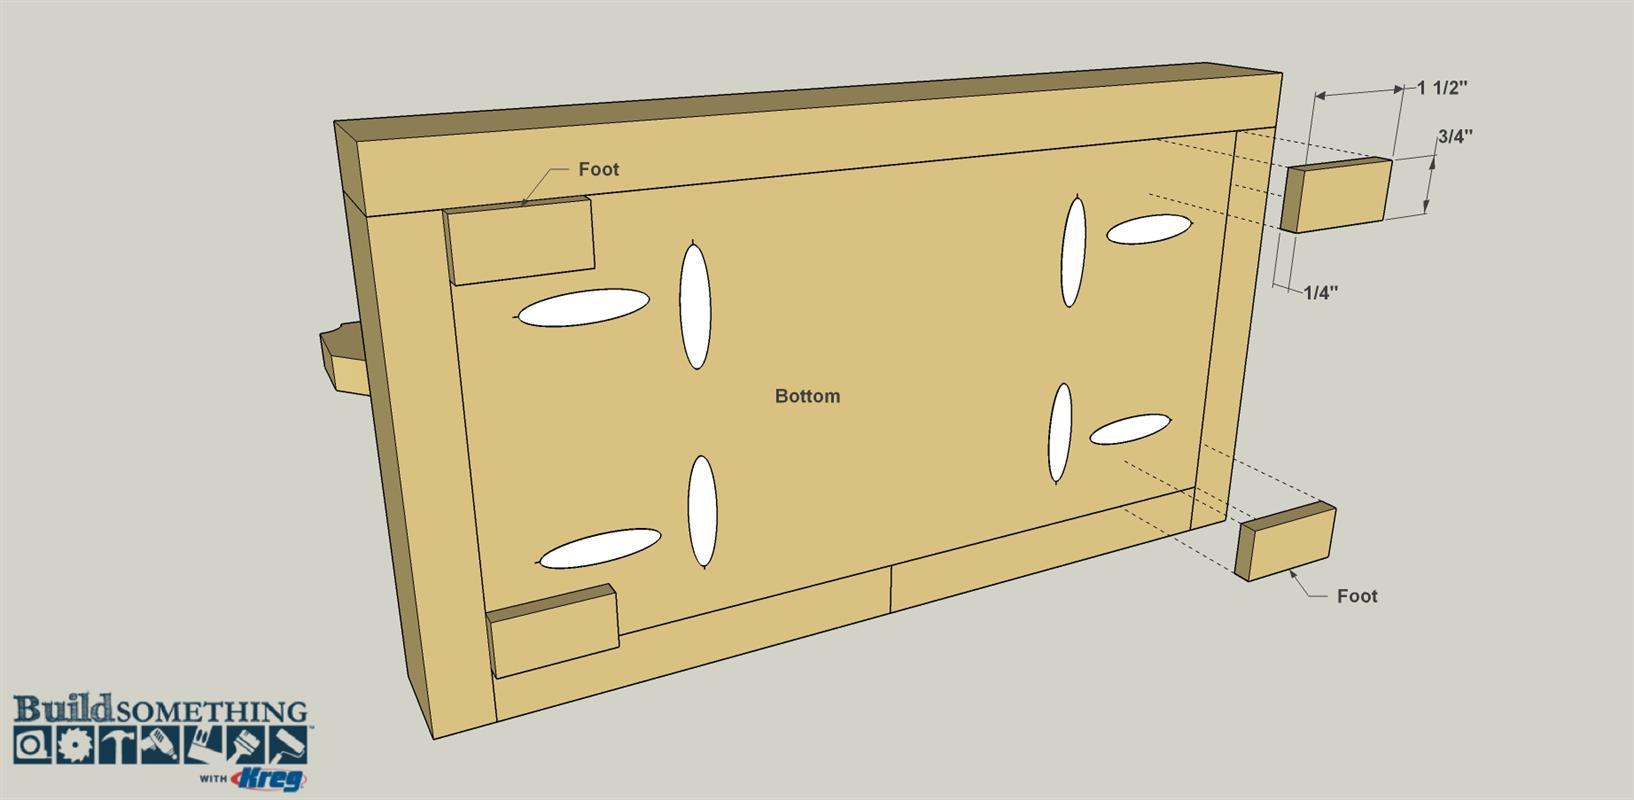
Make the Bottom
Cut the Bottom to length from a 1x6 board, as shown in the cutting diagram. With your Kreg Jig® set up for 3/4"-thick material, drill pocket holes in the underside of the Bottom at the locations shown. Sand the faces smooth, but not the edges.
-
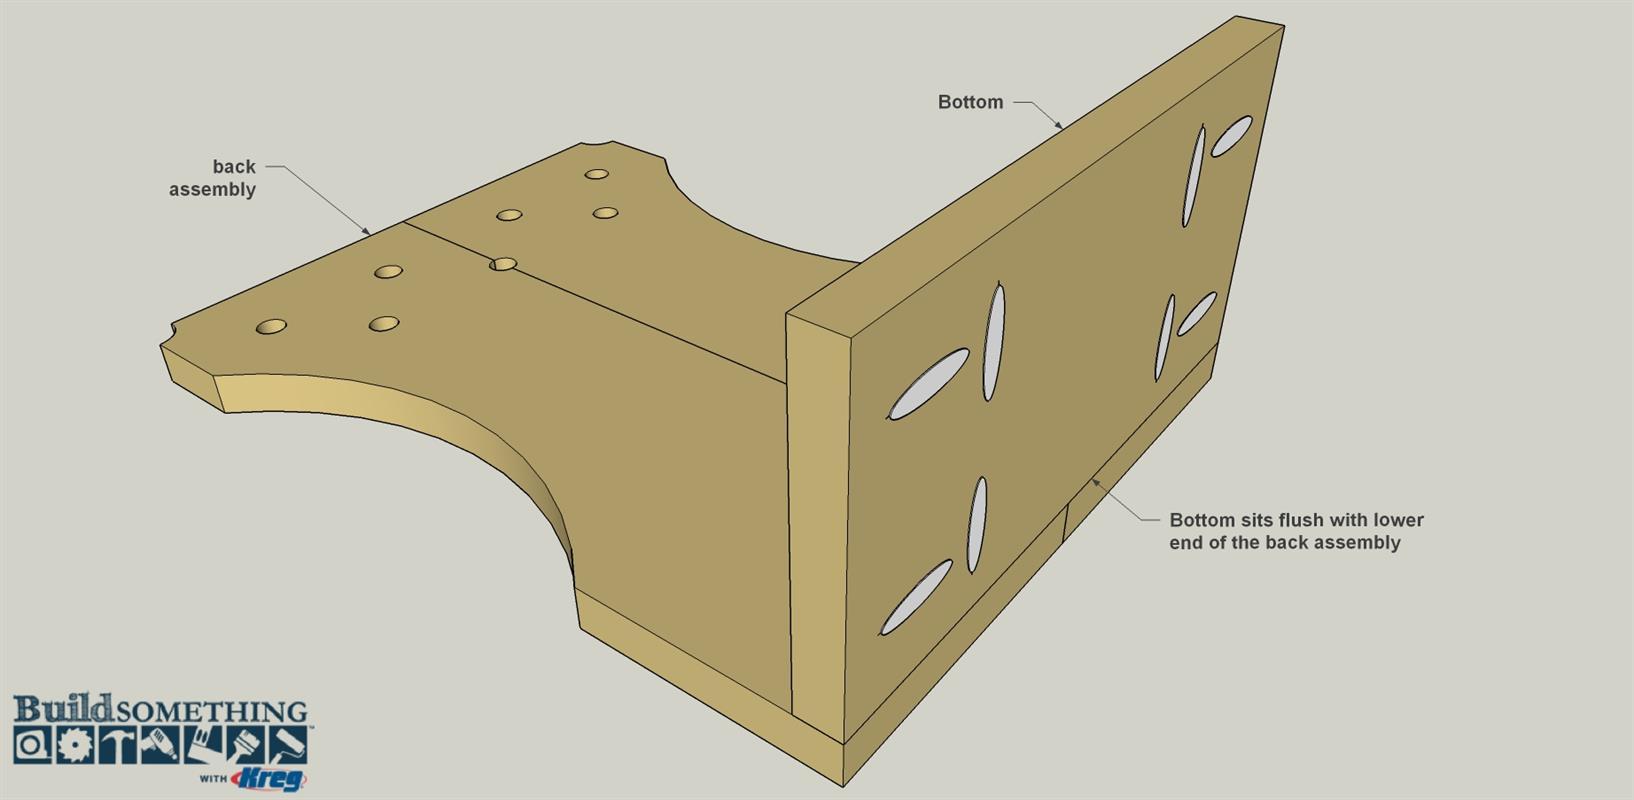
Attach the Bottom
Position the Bottom against the front face of the back assembly, as shown, making sure that the Bottom is flush with the lower end and edges of the back assembly. Attach Bottom using 1 1/4" coarse-thread Kreg® Screws.
-
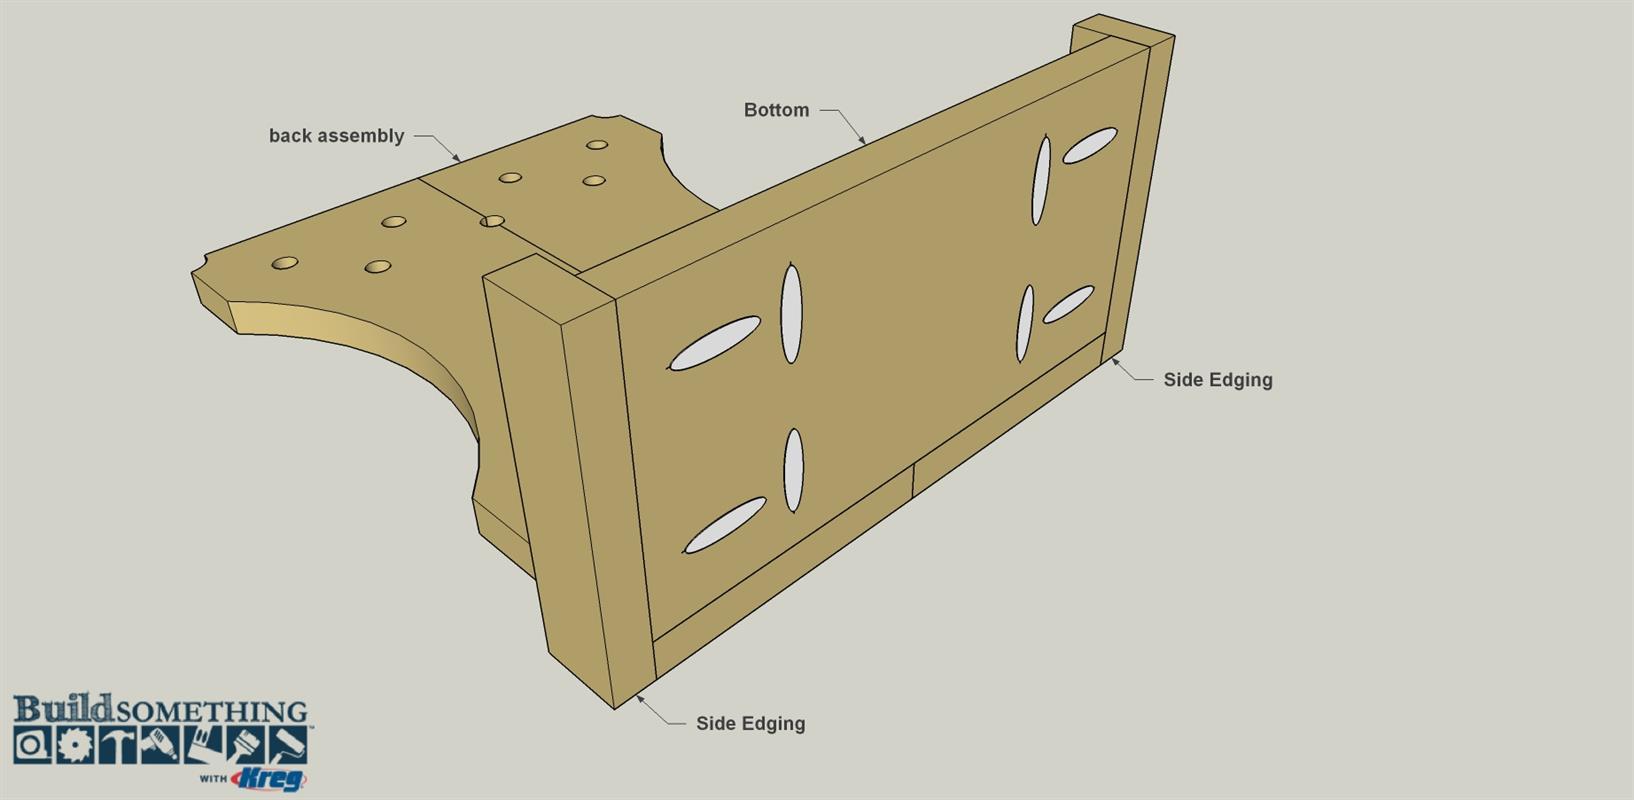
Cut and Attach the Side Edging
From a 1x2 board, cut two pieces of Side Edging to length, as shown in the cutting diagram. Sand the pieces smooth. Then secure the Side Edging to the Bottom, as shown, using 1 1/4" coarse-thread Kreg® Screws.
-
Add the Front Edging
Cut the Front Edging to length from a 1x2 board, as shown in the cutting diagram. Sand the Front Edging smooth, and the secure it to the Bottom using 1 1/4" coarse-thread Kreg® Screws.

-
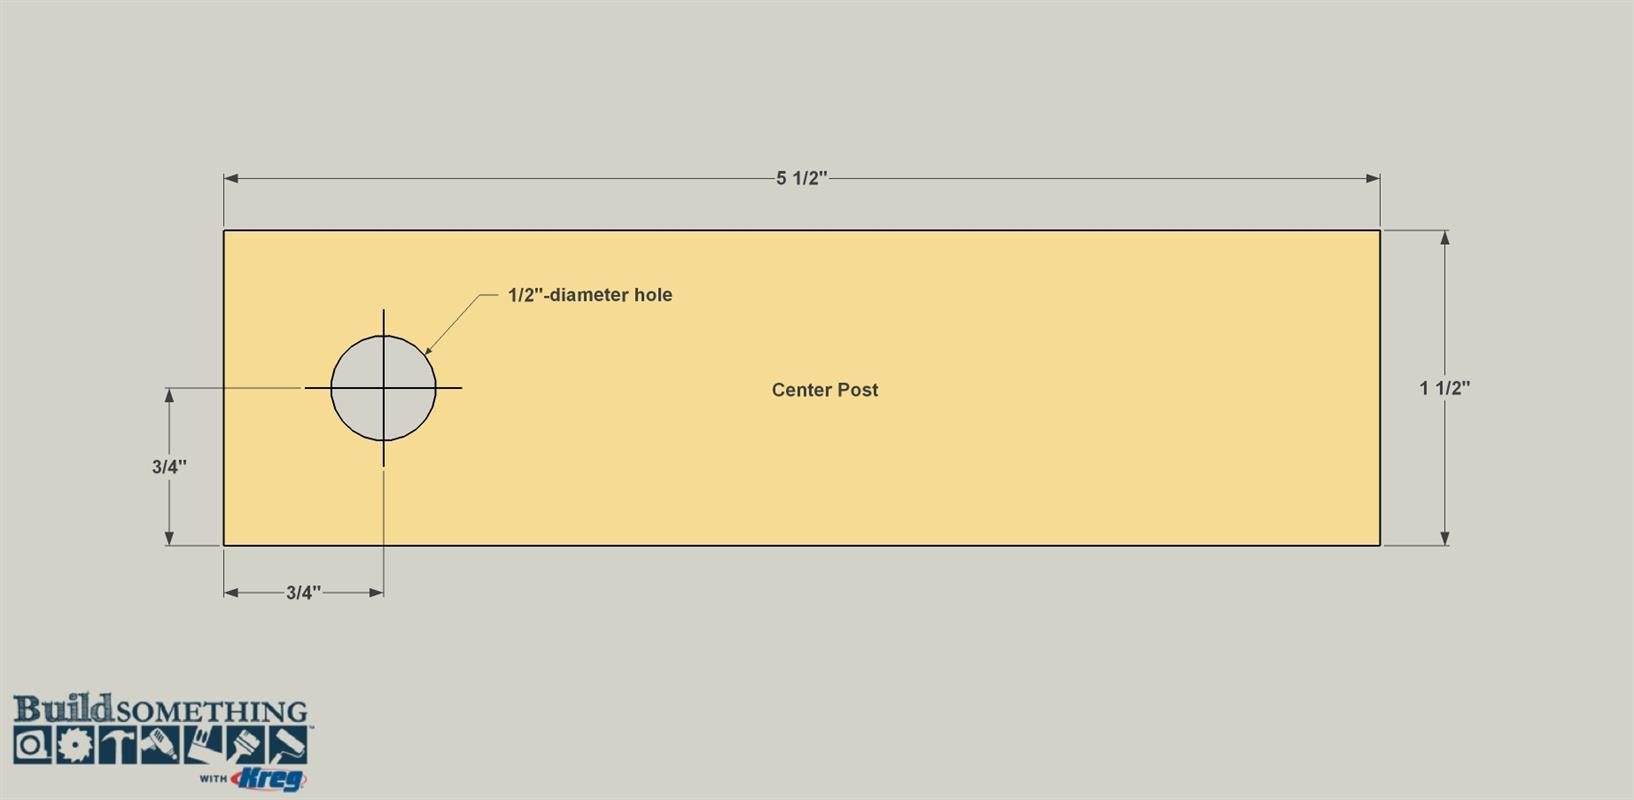
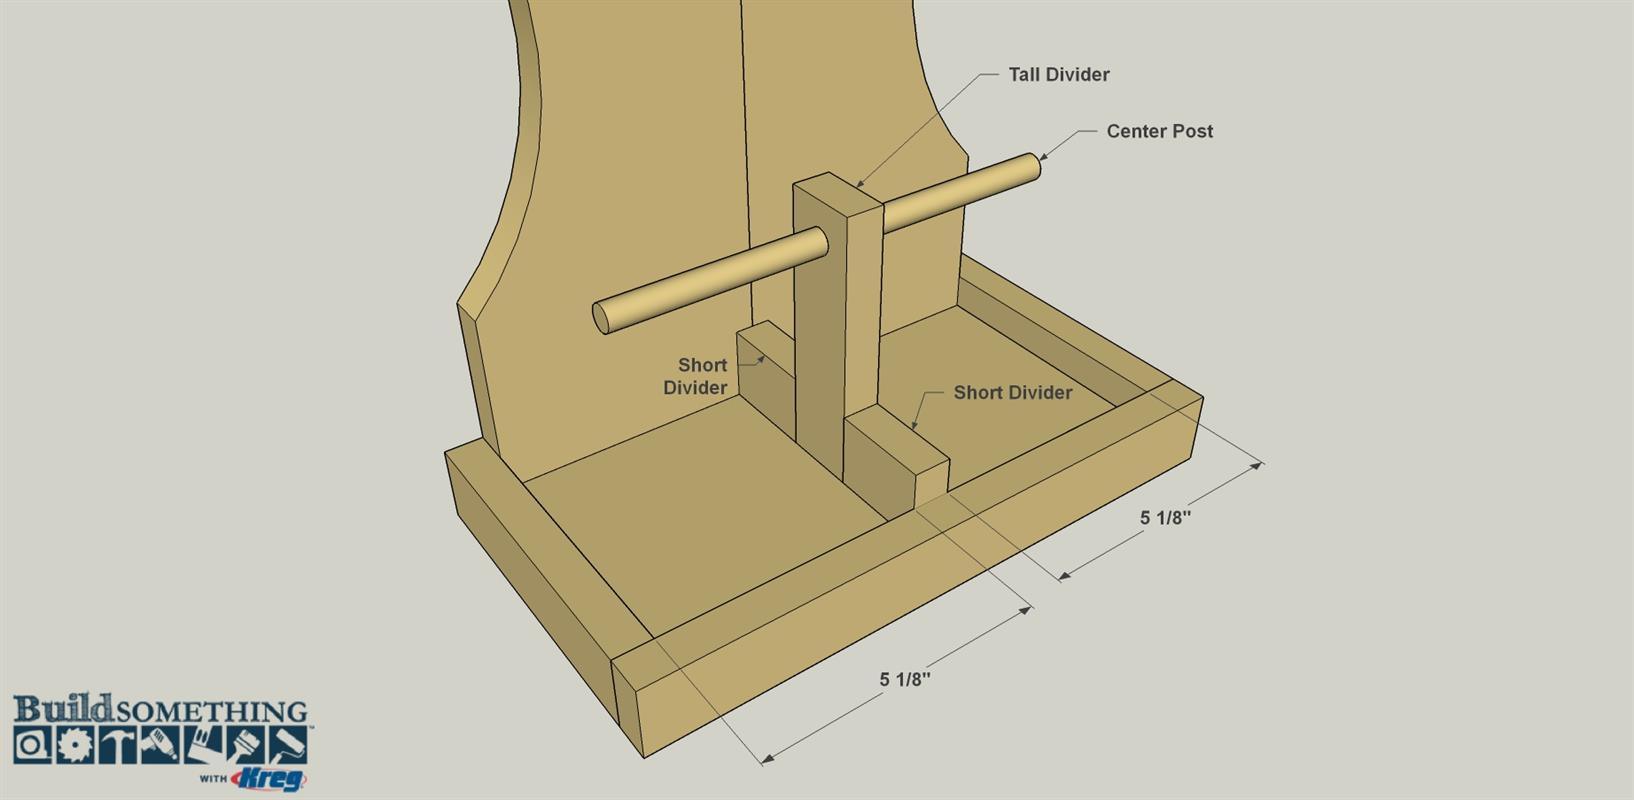
Make the Dividers
From a 1x2 board, cut two Short Dividers and one Tall Divider to length, as shown in the cutting diagram. In the Tall Divider, drill a 1/2"-diameter hole where shown. Then sand these pieces.
-
Attach the Dividers and Center Post
Cut a Center Post to length from a 1/2" dowel, as shown in the cutting diagram. Insert the dowel through the hole in the Center Post. Position the Center Post so it’s centered and make a mark on the dowel. Then pull the Center Post one direction about 1/4", dab some glue on the Post, and slide it back into the hole. Next, glue the Short Dividers and the Long Divider in place, as shown.
-
Cut and Install the Back Posts
From a 1/2" dowel, cut seven Back Posts to length, as shown in the cutting diagram. Apply glue inside the holes in the back assembly, and then tap each Back Post into the holes until the Posts are flush with the rear face of the back assembly.
-
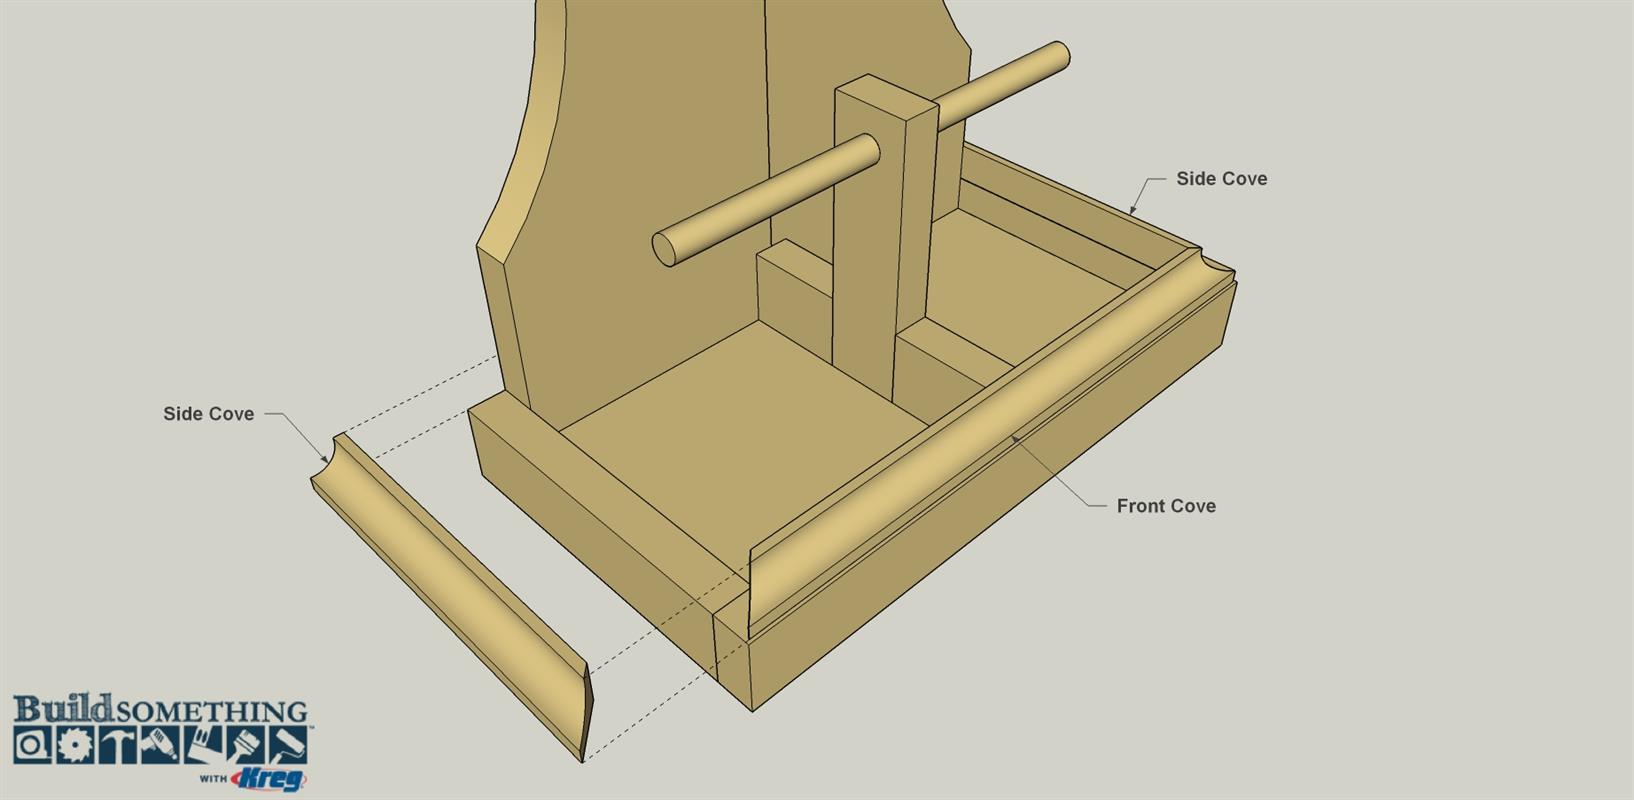
Install the Cove Molding
Now you can add pieces of cove molding to dress up the organizer. We used 11/16" cove molding. You will also find 3/4" cove molding, but we used the slightly smaller version to create a small 1/16" offset, or reveal, around the outer edge. Once you have selected your molding, cove one Front Cove and two Side Coves to length, as shown in the cutting diagram. Then you can glue the Front Cove and Side Coves in place on top of the Front and Side Edging.
-
Cut and Install the Feet
Cut four 1/4" thick pieces from a longer 1x2 board to create the Feet, as shown in the cutting diagram. Sand each Foot as needed, and then glue them to the four corners of the Bottom board.
-
Apply the Paint
We used white spray paint to finish our organizer. Spraying is a great solution for projects with irregular parts like this one. Before you paint, do any final sanding of your organizer that’s needed, and scrape off any glue that might have squeezed out. Then spray on an even base coat. When that dries, lightly sand any rough areas and apply another coat. Repeat this process as needed to evenly cover the project.
-
Install Felt In the Tray
To finish the organizer, we added thin felt material, commonly found at any fabric or craft store, to the tray. On one side, simply cut a sheet the size of the tray, and then glue it in place. For the other side, we made felt rolls to hold rings and earrings in place. Cut felt strips 5 1/8" wide and roll them tightly until your roll is about 5/8" to 3/4" in diameter. Cut off any excess, dab a small amount of wood glue along the exposed edge, and use masking tape to hold the roll closed until the glue dries. Repeat the process until you have enough rolls to fill the tray—eight in our case. Once the glue dries, simply stuff the rolls into the tray with the glued edge down. Then, you’re all set to keep your favorite jewelry organized.