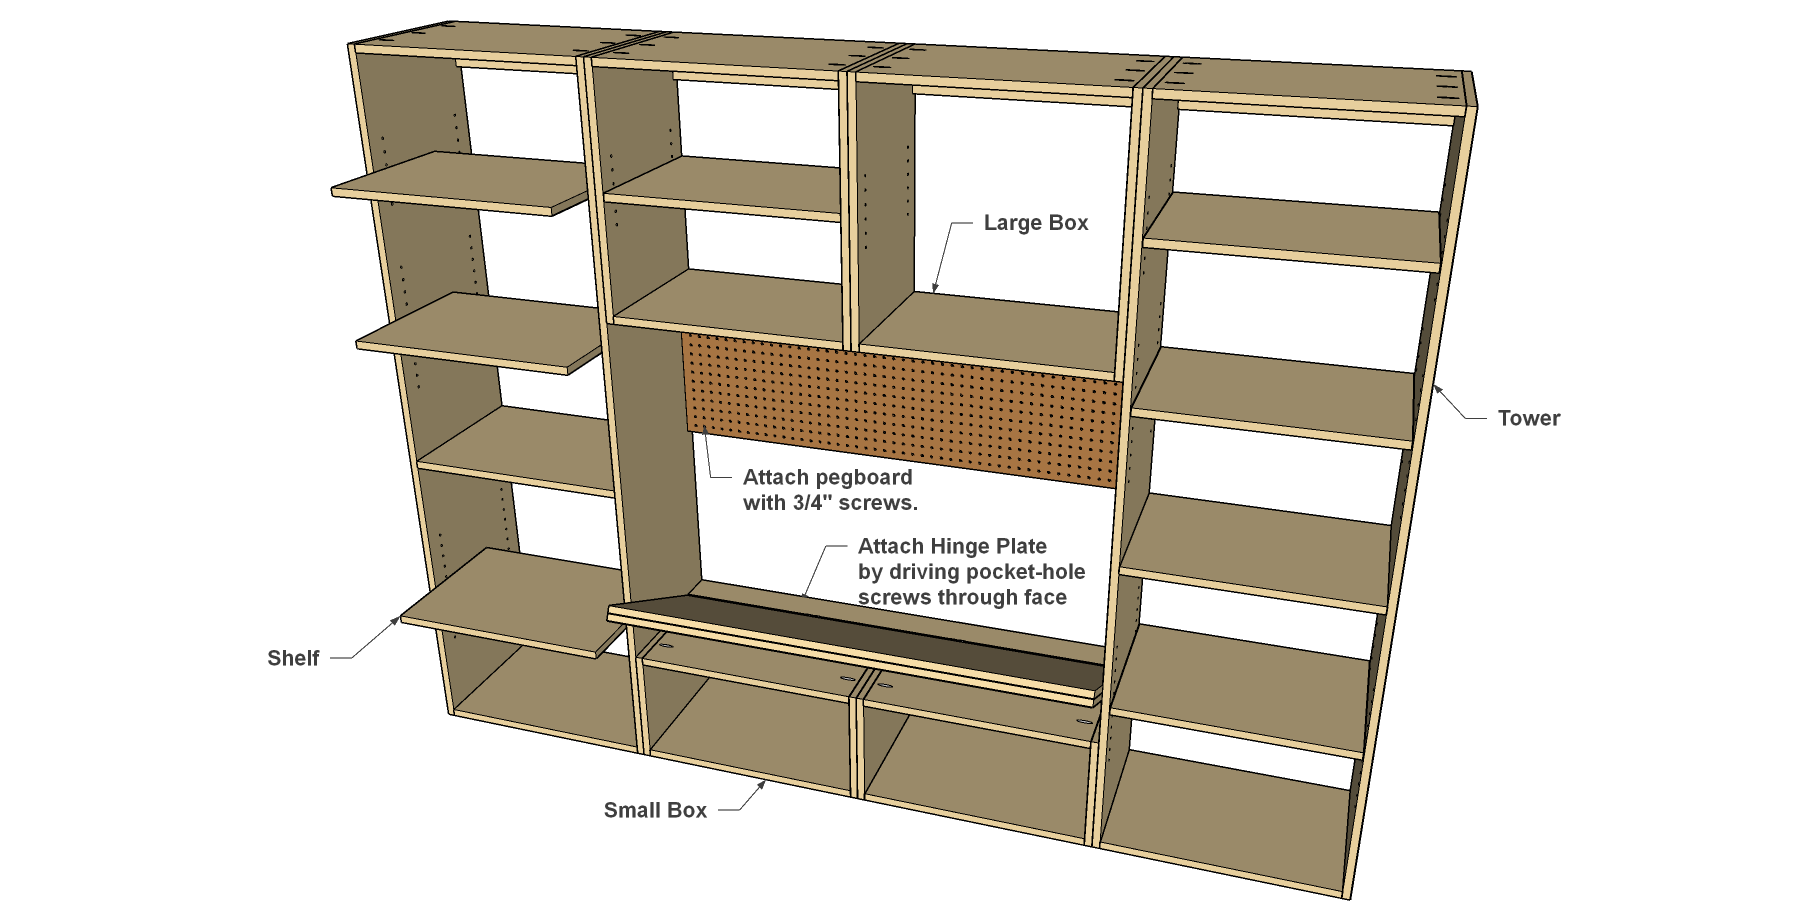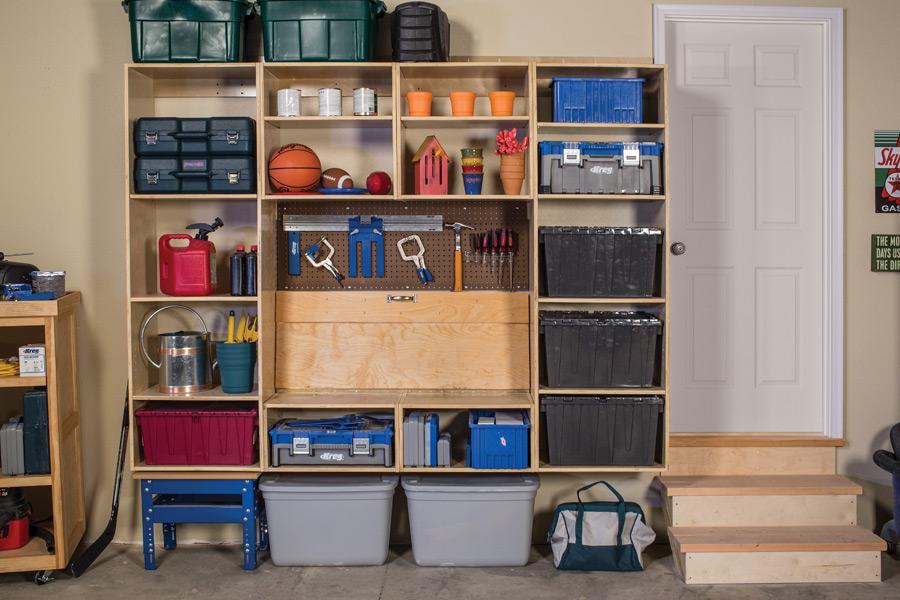
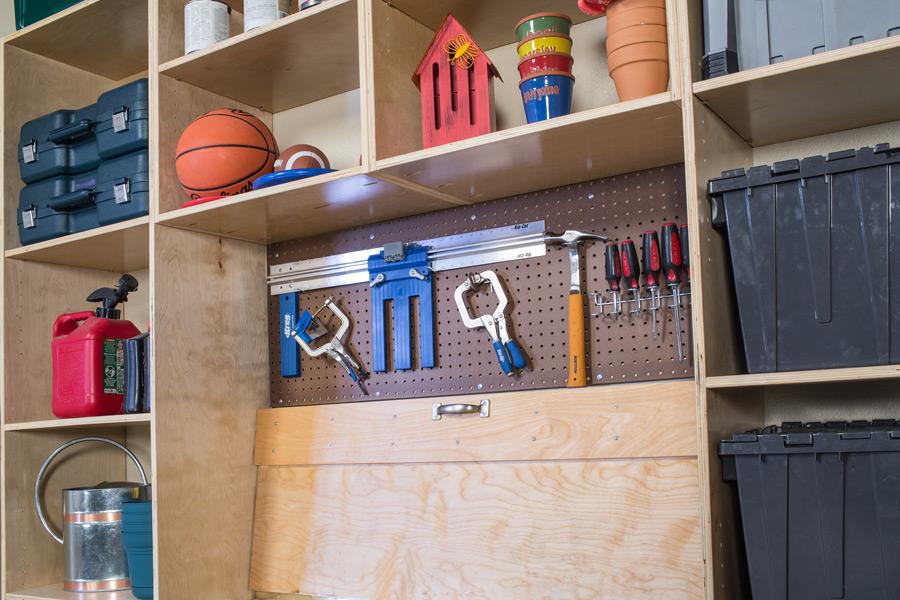
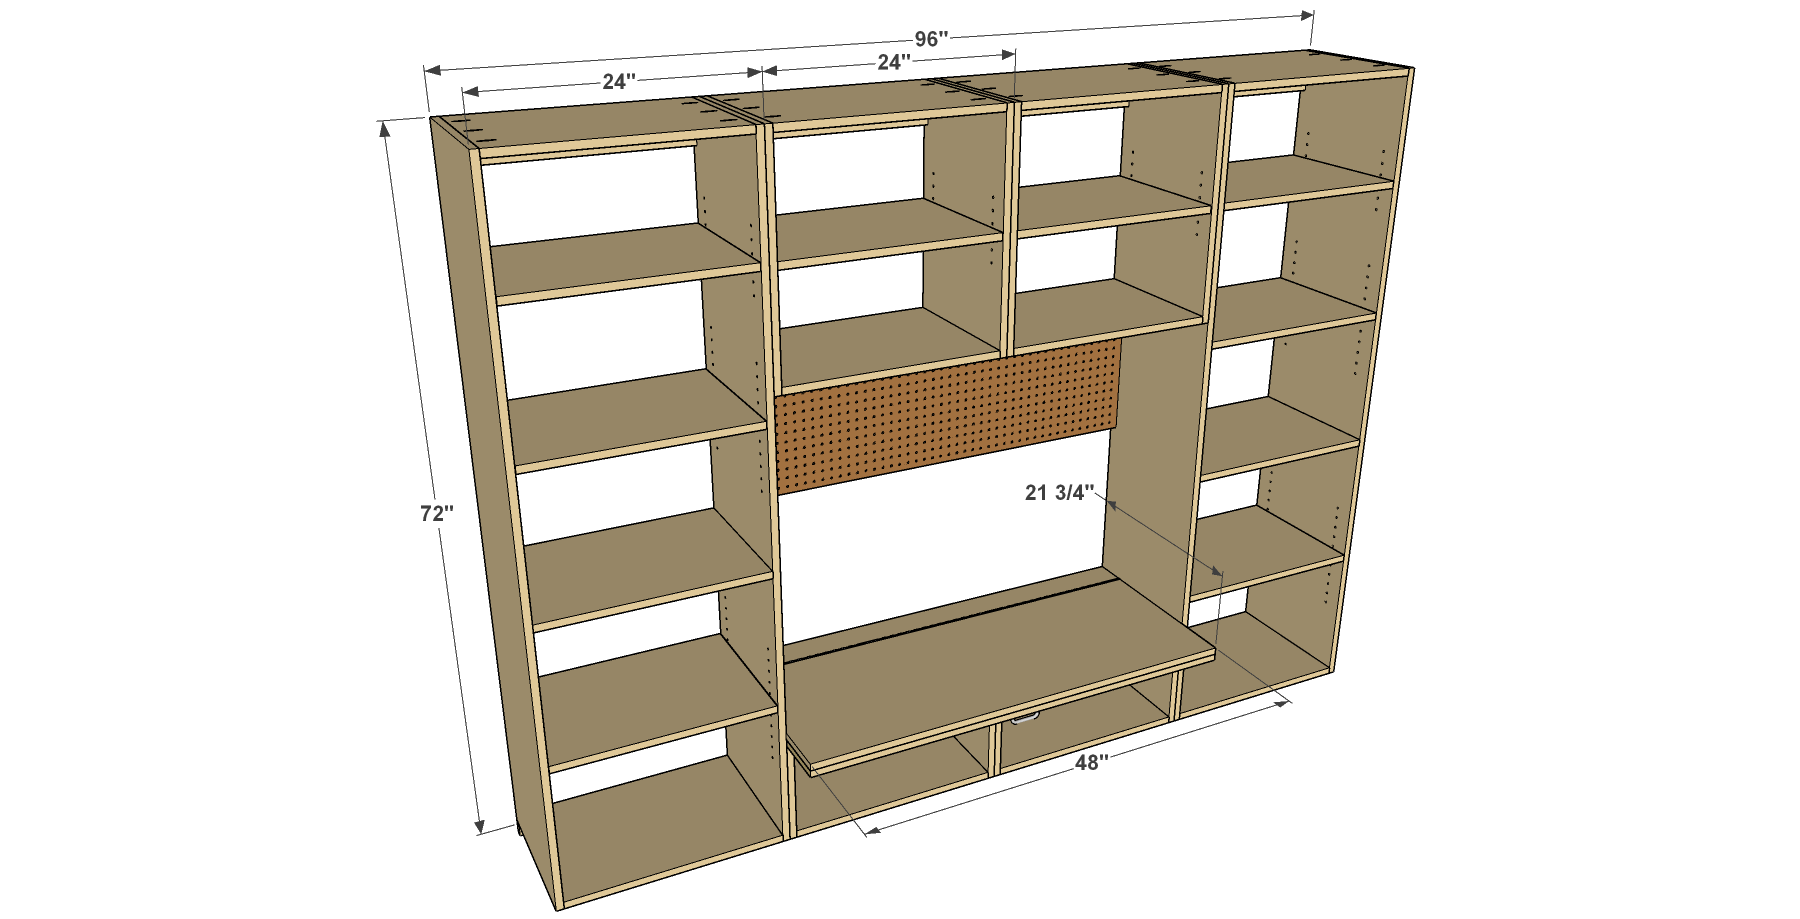


Need more space in your garage? This storage unit packs almost 40 feet of shelving into a package that’s just 8' wide by 6' tall. Plus, it’s equipped with a fold-down workbench and a pegboard area for hanging tools. Best of all, it’s built from four sheets of plywood and a couple of 1x2 boards.
Tools
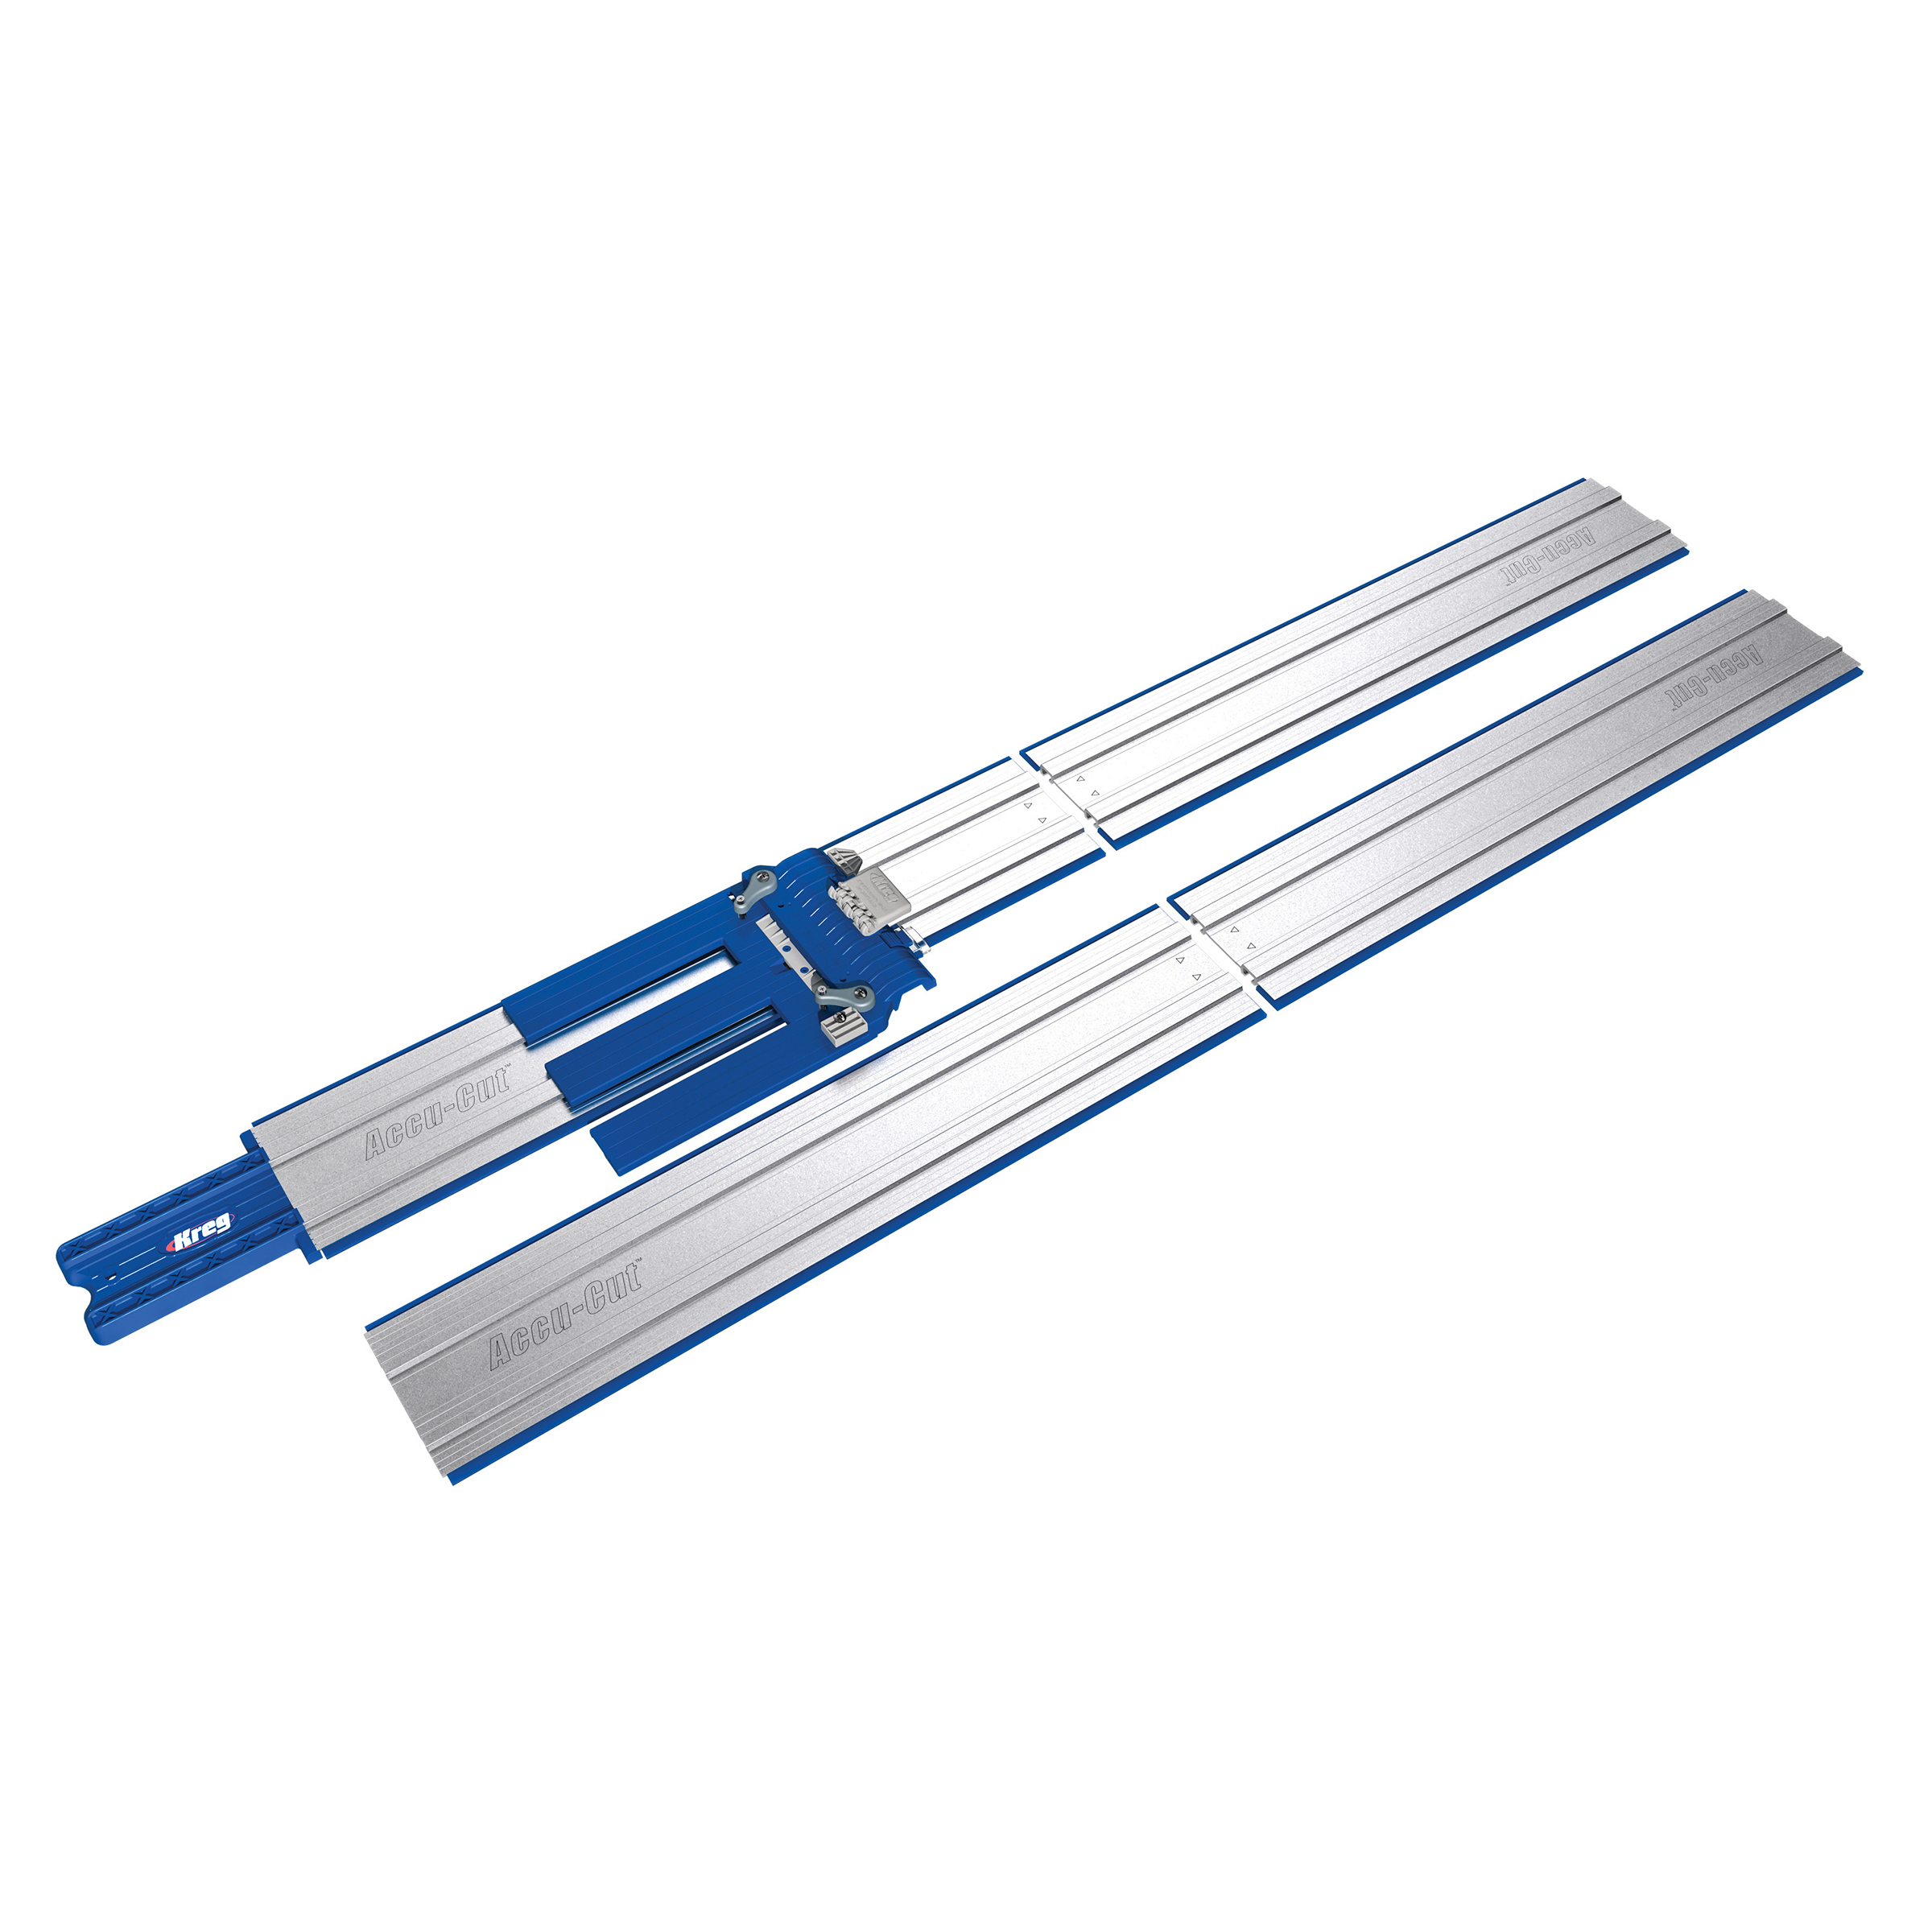
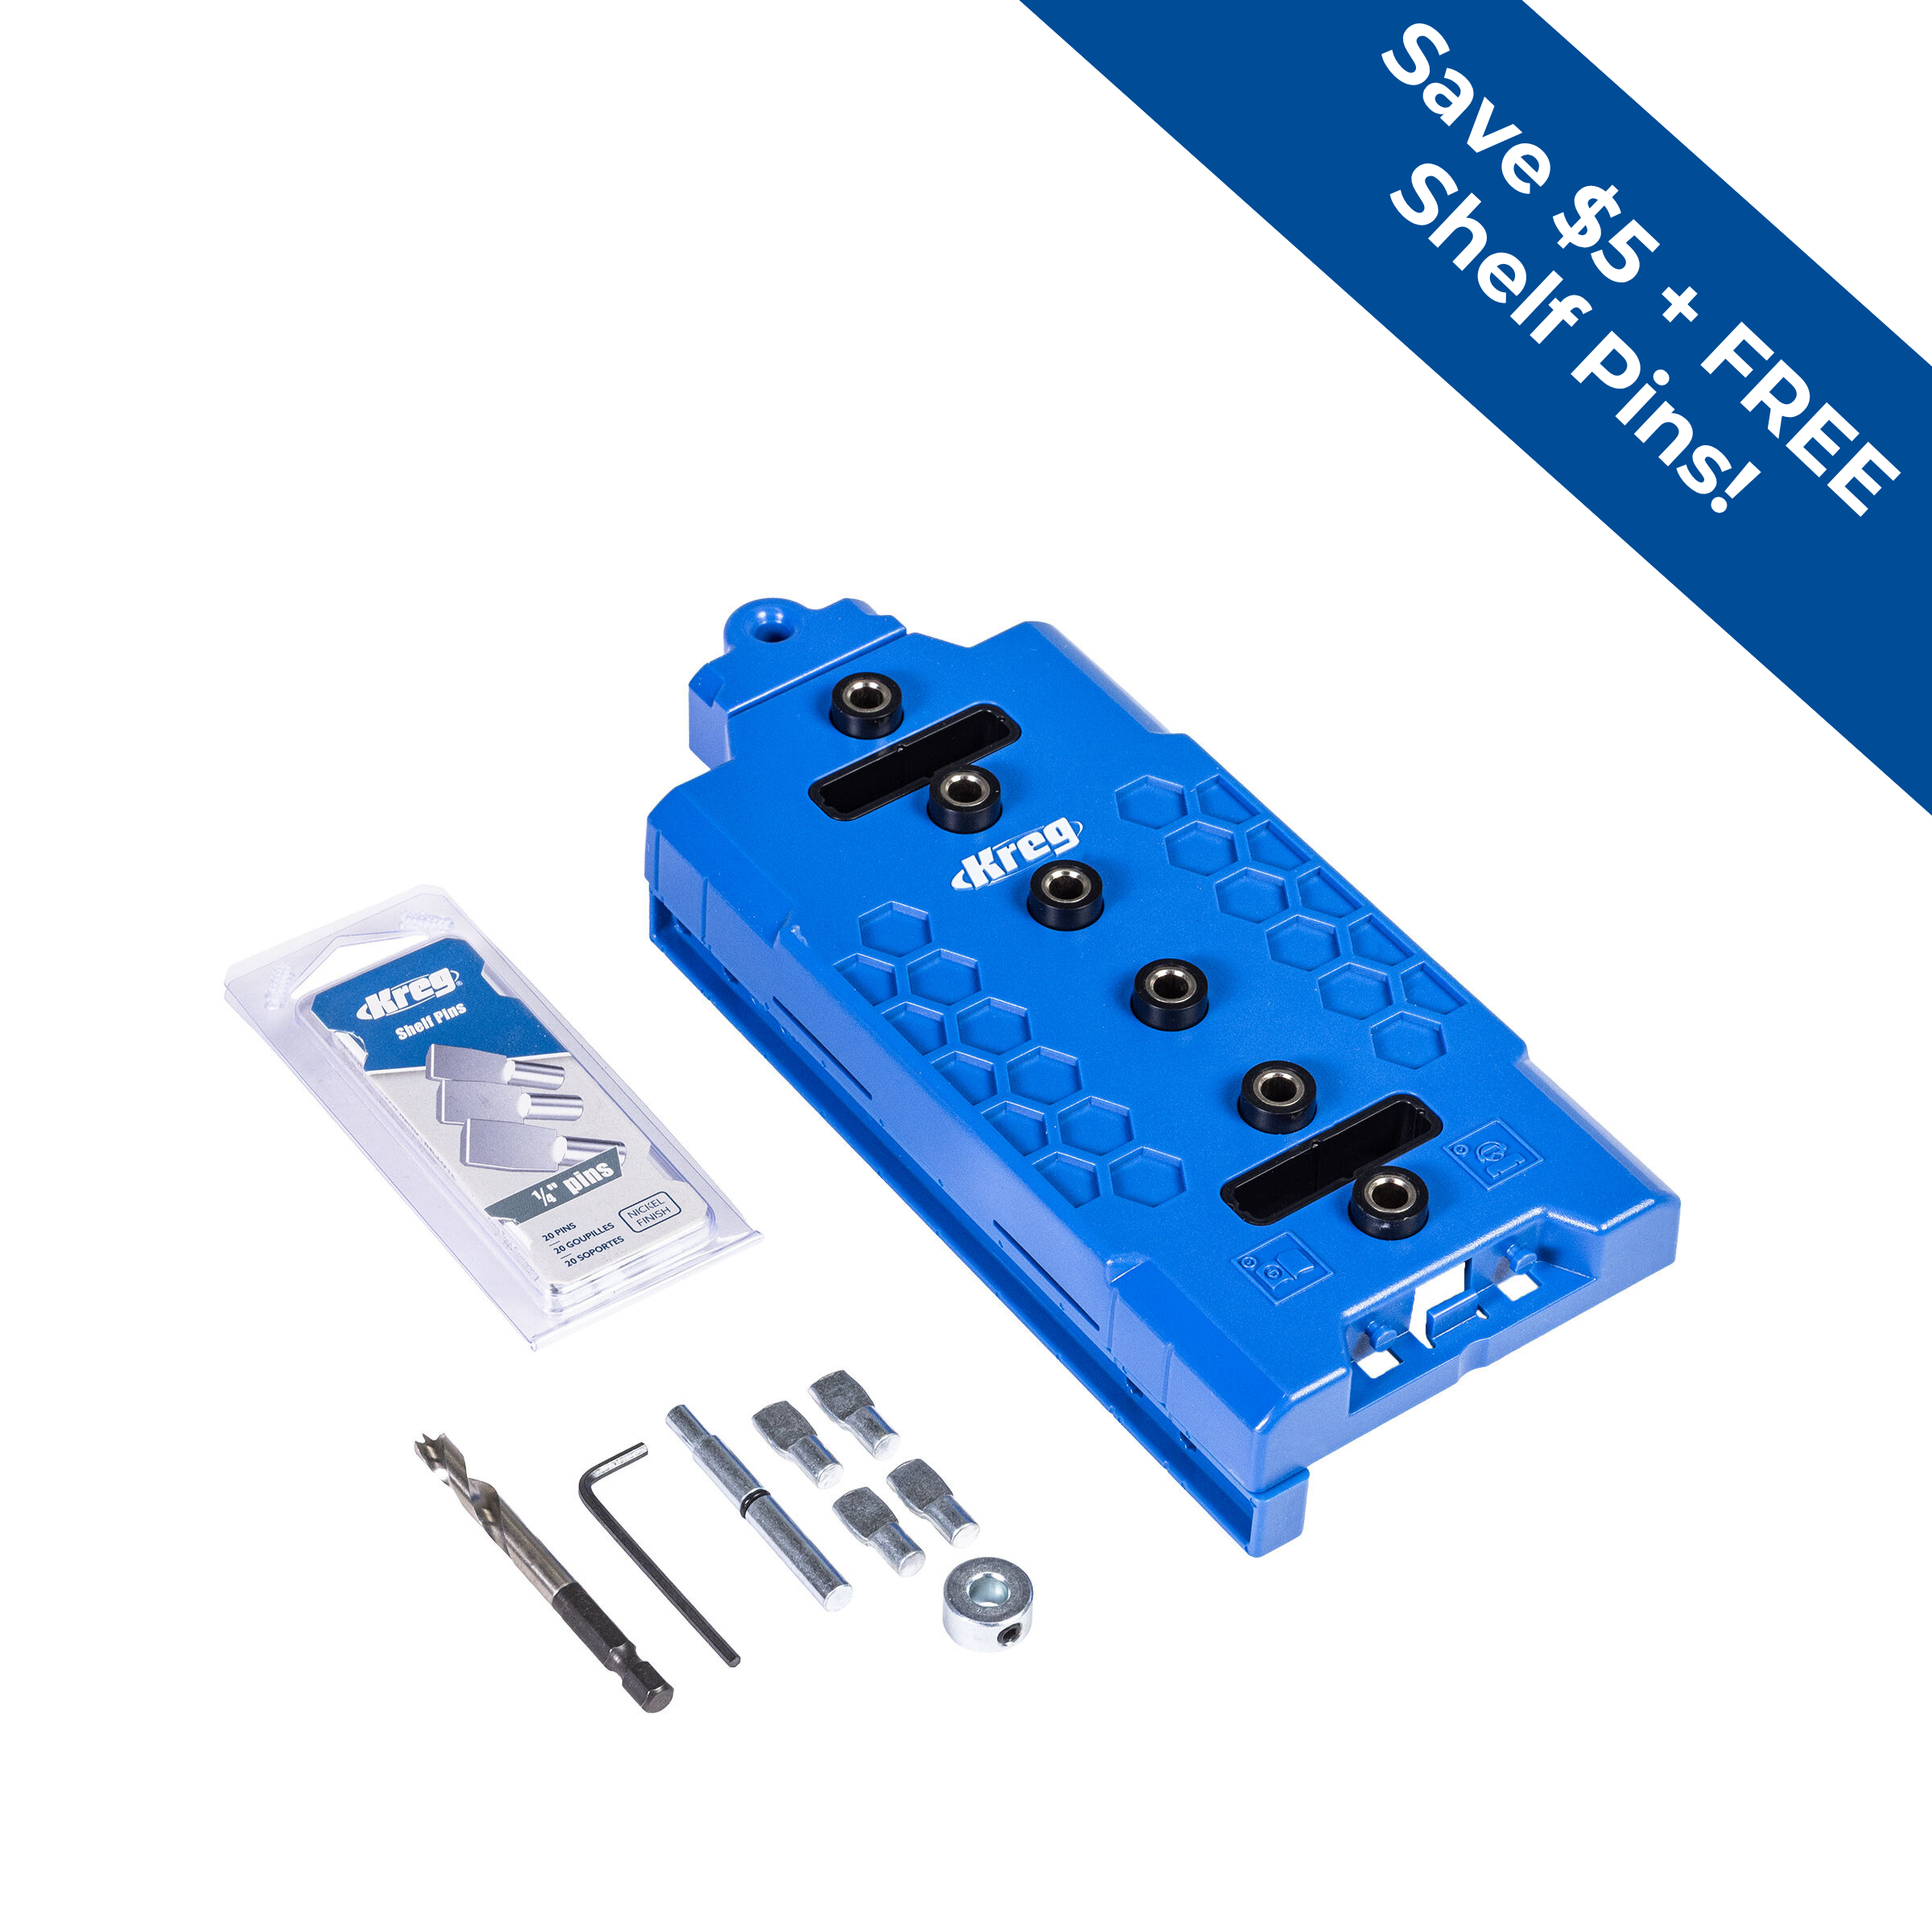
Kreg Tools


Other Tools
-
level

-
framing square
-
tape measure
-
stud finder
Materials
Wood Products
- 2 Board , 1x2 x 96"
- 4 Plywood , 3/4" x 48" x 96"
- 1 Pegboard , 1/4" x 24" x 48"
Hardware & Supplies
- 175 1 1/4" coarse-thread Kreg Pocket-Hole Screws
- 30 3" flat-head wood screws or deck screws
- 8 3/4" wood screws
- 1 1 1/2" x 48" cabinet hinge
- 1 4" utility pull
- 36 1/4" shelf pins
Cut List & Parts
- 4 Tower Side , 3/4" x 15 3/4" x 72"
- 4 Tower Top/Bottom , 3/4" x 15 3/4" x 22 1/2"
- 2 Tower Divider , 3/4" x 15 3/4" x 22 1/2"
- 2 Tower Rail , 3/4" x 3 1/2" x 22 1/2"
- 6 Tower Shelf , 3/4" x 15 3/4" x 22 3/8"
- 4 Large Box Side , 3/4" x 15 3/4" x 24"
- 4 Large Box Top/Bottom , 3/4" ply x 15 3/4" x 22 1/2"
- 2 Large Box Rail , 3/4" ply x 3 1/2" x 22 1/2"
- 2 Large Box Shelf , 3/4" ply x 15 3/4" x 22 3/8"
- 4 Small Box Side , 3/4" ply x 15 3/4" x 12"
- 4 Small Box Top/Bottom , 3/4" ply x 15 3/4" x 22 1/2"
- 2 Small Box Rail , 3/4" ply x 3 1/2" x 22 1/2"
- 1 Lower Ledger , 3/4" x 1 1/2" x 96"
- 1 Upper Ledger , 3/4" x 1 1/2" x 48"
- 1 Pegboard , 1/4" x 16 3/4" x 48"
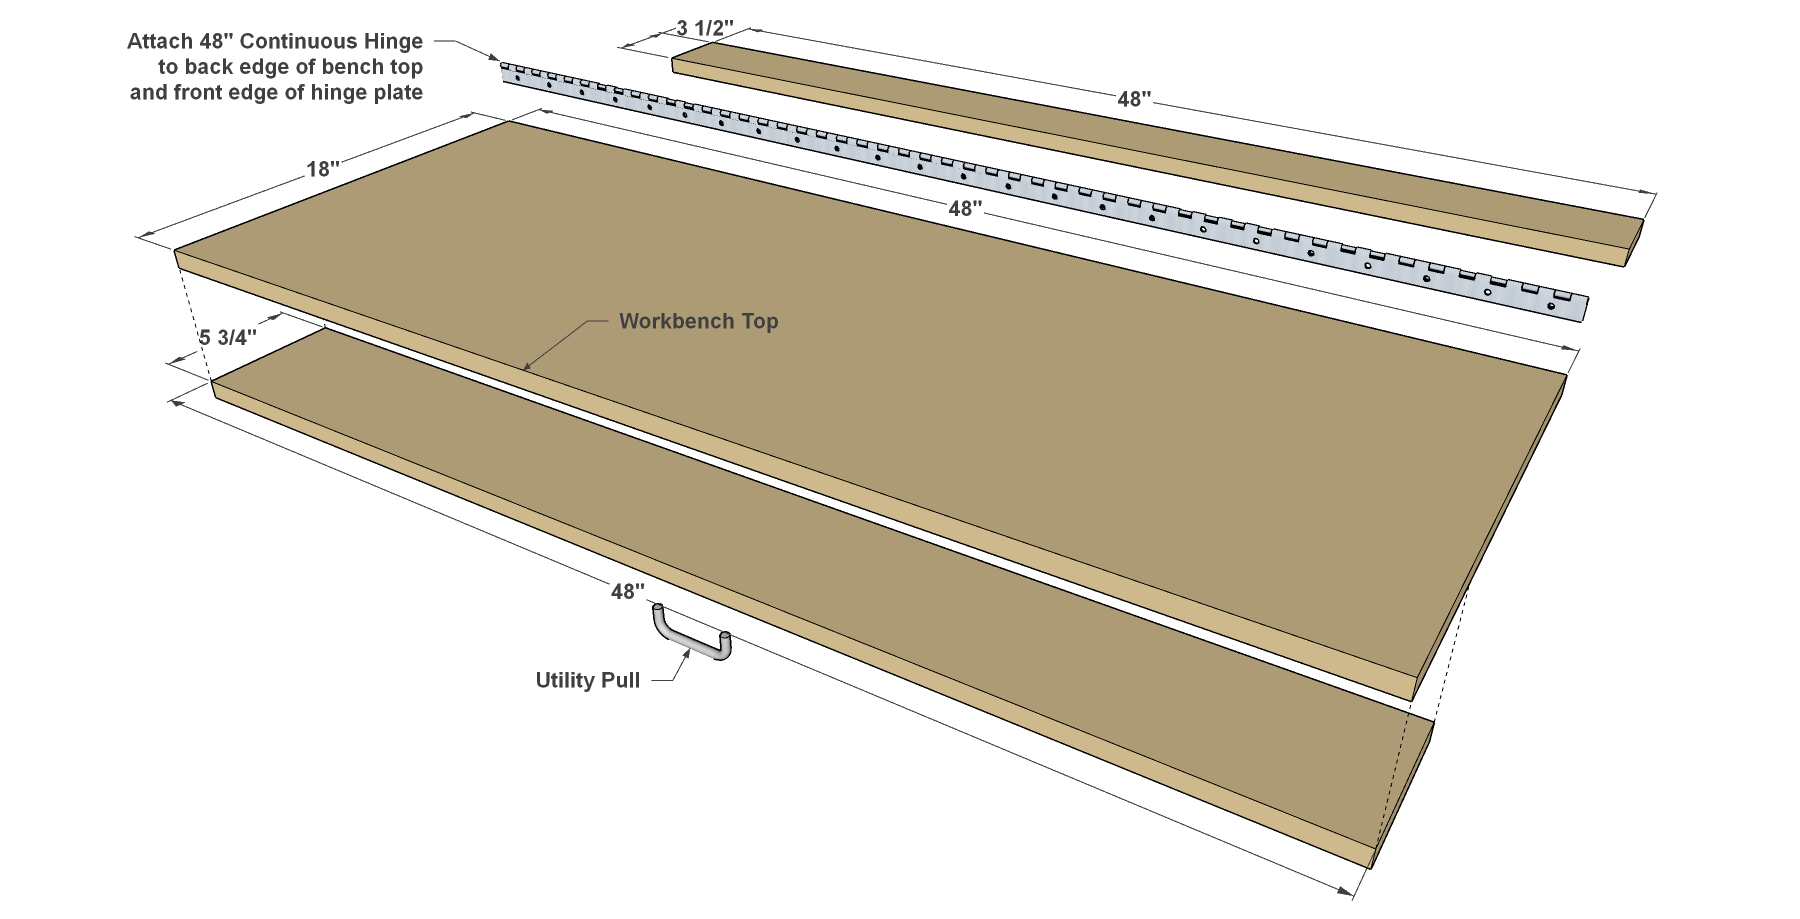
- 1 Workbench Top , 3/4" ply x 18" x 47 3/4"
- 1 Workbench Brace , 3/4" ply x 5 1/2" x 47 3/4"
- 1 Workbench Hinge Plate , 3/4" ply x 5 1/2" x 47 3/4"

Directions
-
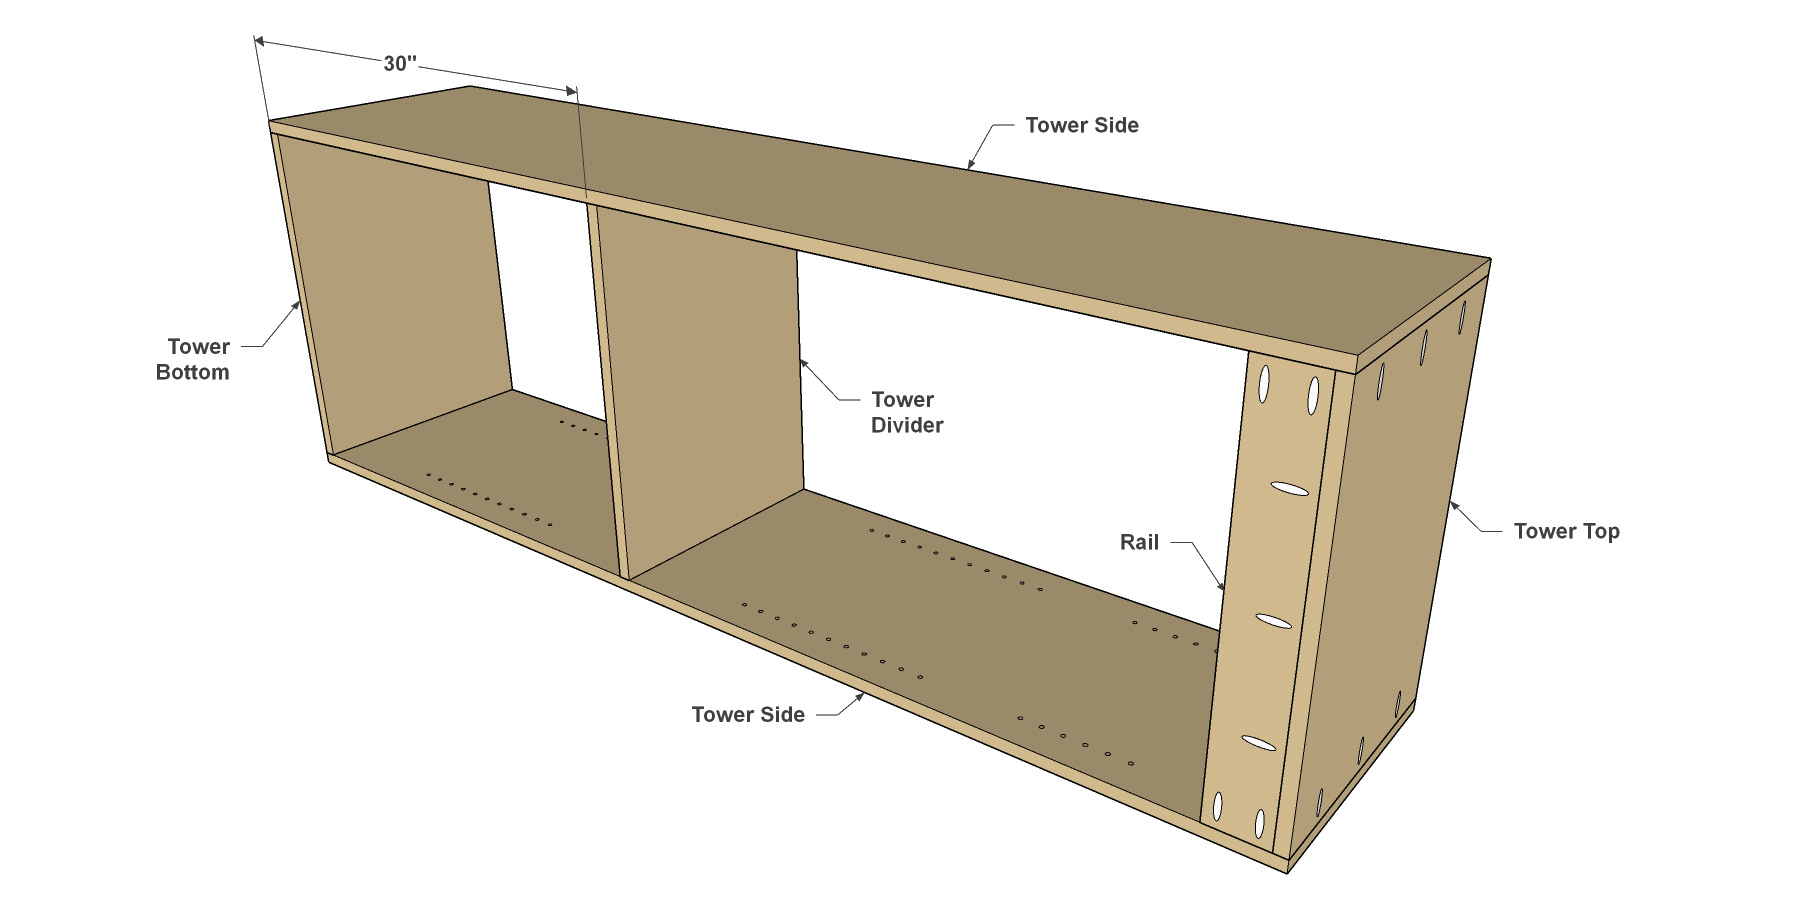
Start with the Tower Parts
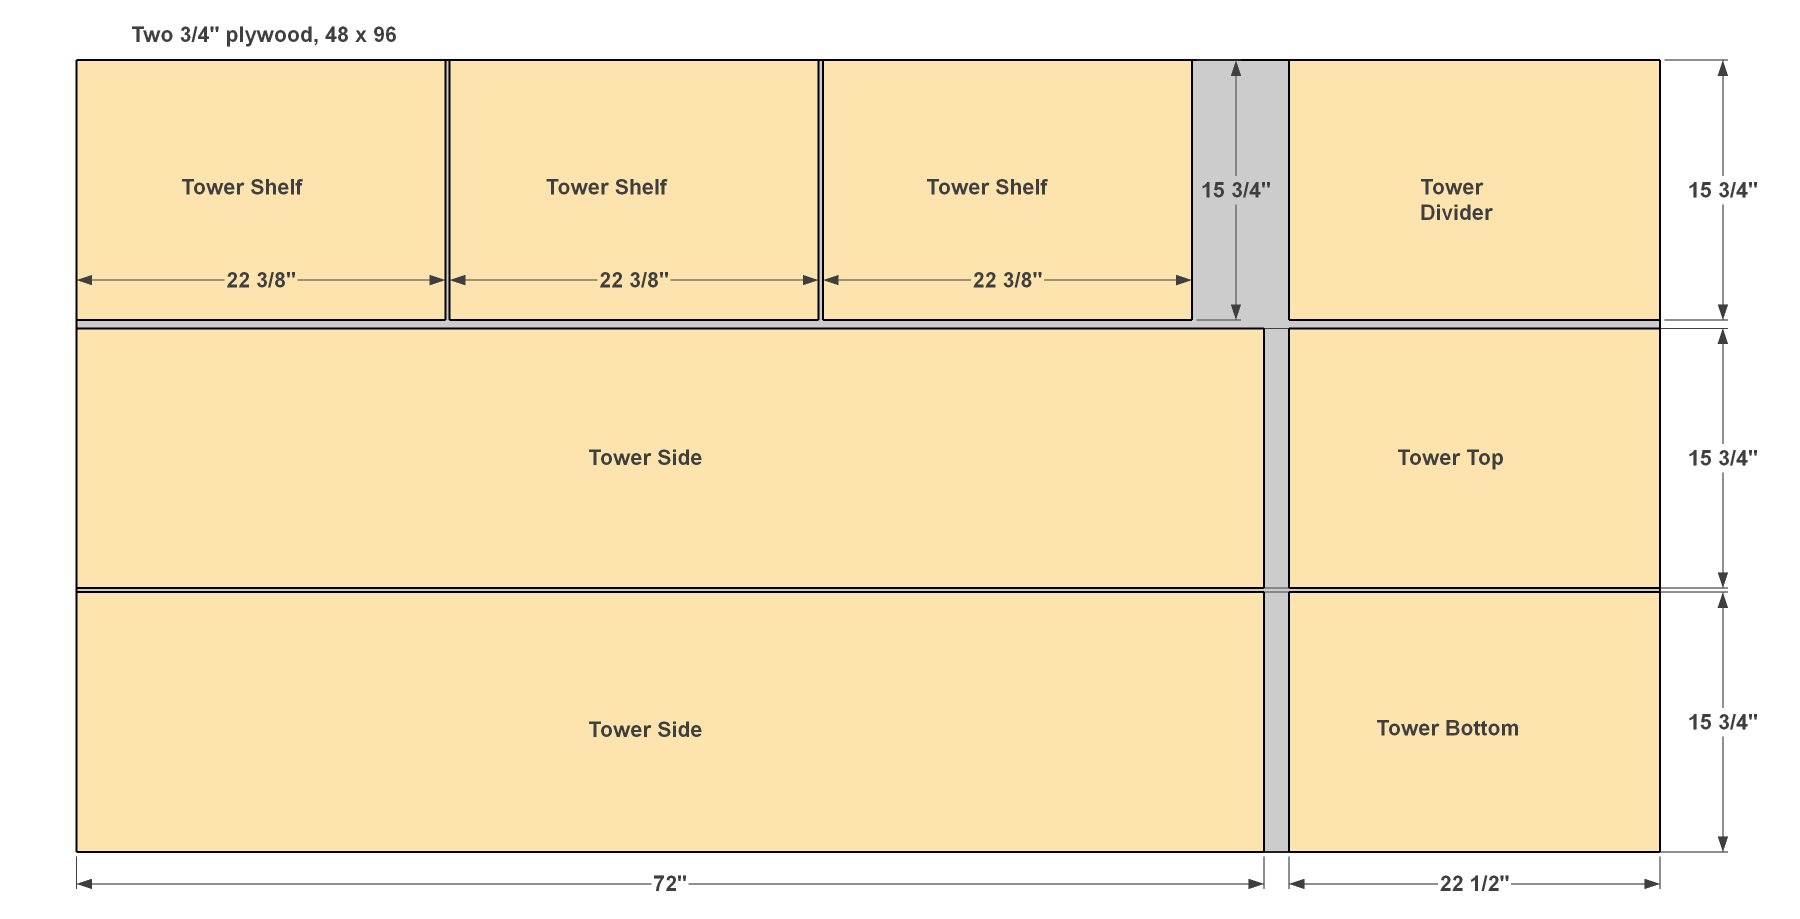
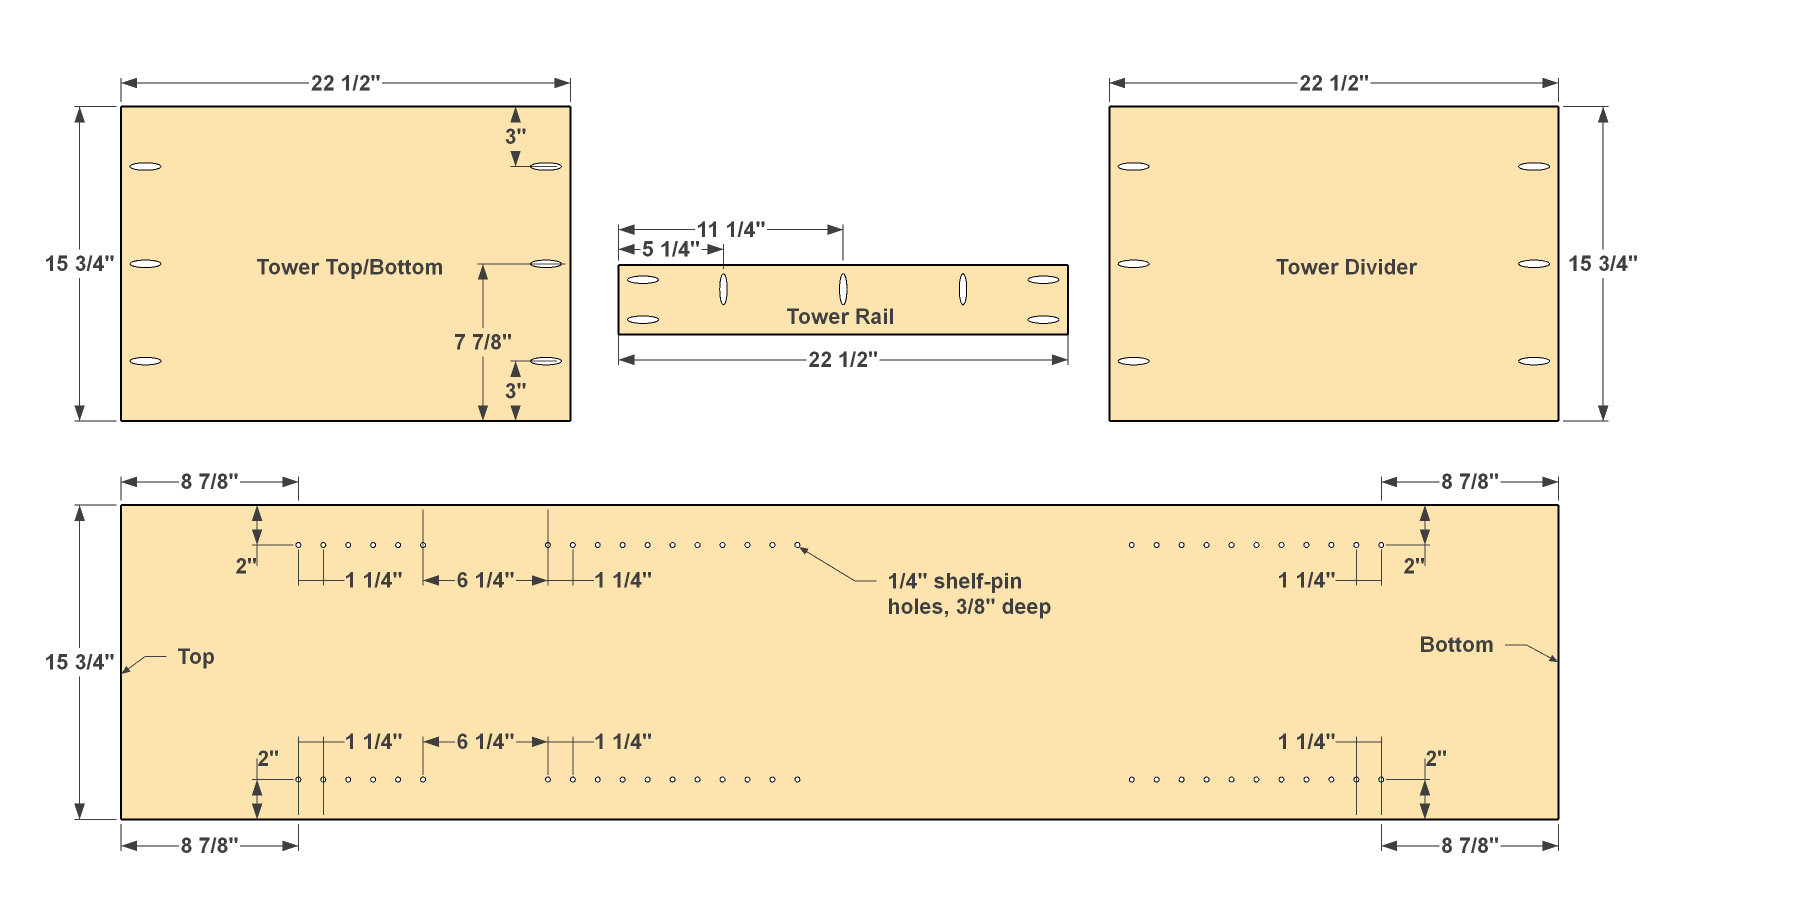
Cut the parts for a pair of towers—four Tower Sides, two Tower Tops, two Tower Bottoms, two Tower Dividers, two Tower Rails, and six Tower Shelves to size from 3/4" plywood, as shown in the cutting diagram. Then, with your Kreg® Pocket-Hole Jig set for 3/4"-thcik material, drill pocket holes in the Tops, Bottoms, Dividers, and Rails, as shown.
After that, you can Drill holes for adjustable-shelf pins in the Tower Sides, as shown. The easiest way to do this is by using a Kreg Shelf Pin Jig. That way, you can be assured of getting consistent spacing with all of the holes.
NOTE: The setback spacing (distance from the edge to the shelf-pin holes) shown throughout this plan matches the first-generation Kreg Shelf Pin Jig. The second generation model, released in March 2022, has different setback spacing. The vertical distance between the pin holes, though, matches the dimensions shown here—1 1/4". You can create the shelf-pin holes accurately using either the first- or second-generation jig.
-
Assemble the Towers
Now you can assemble the towers using 1 1/4" coarse-thread Kreg Pocket-Hole Screws, as shown. Make sure that you have both Tower Sides oriented correctly, and that you position the Tower Rail at the top end.
-
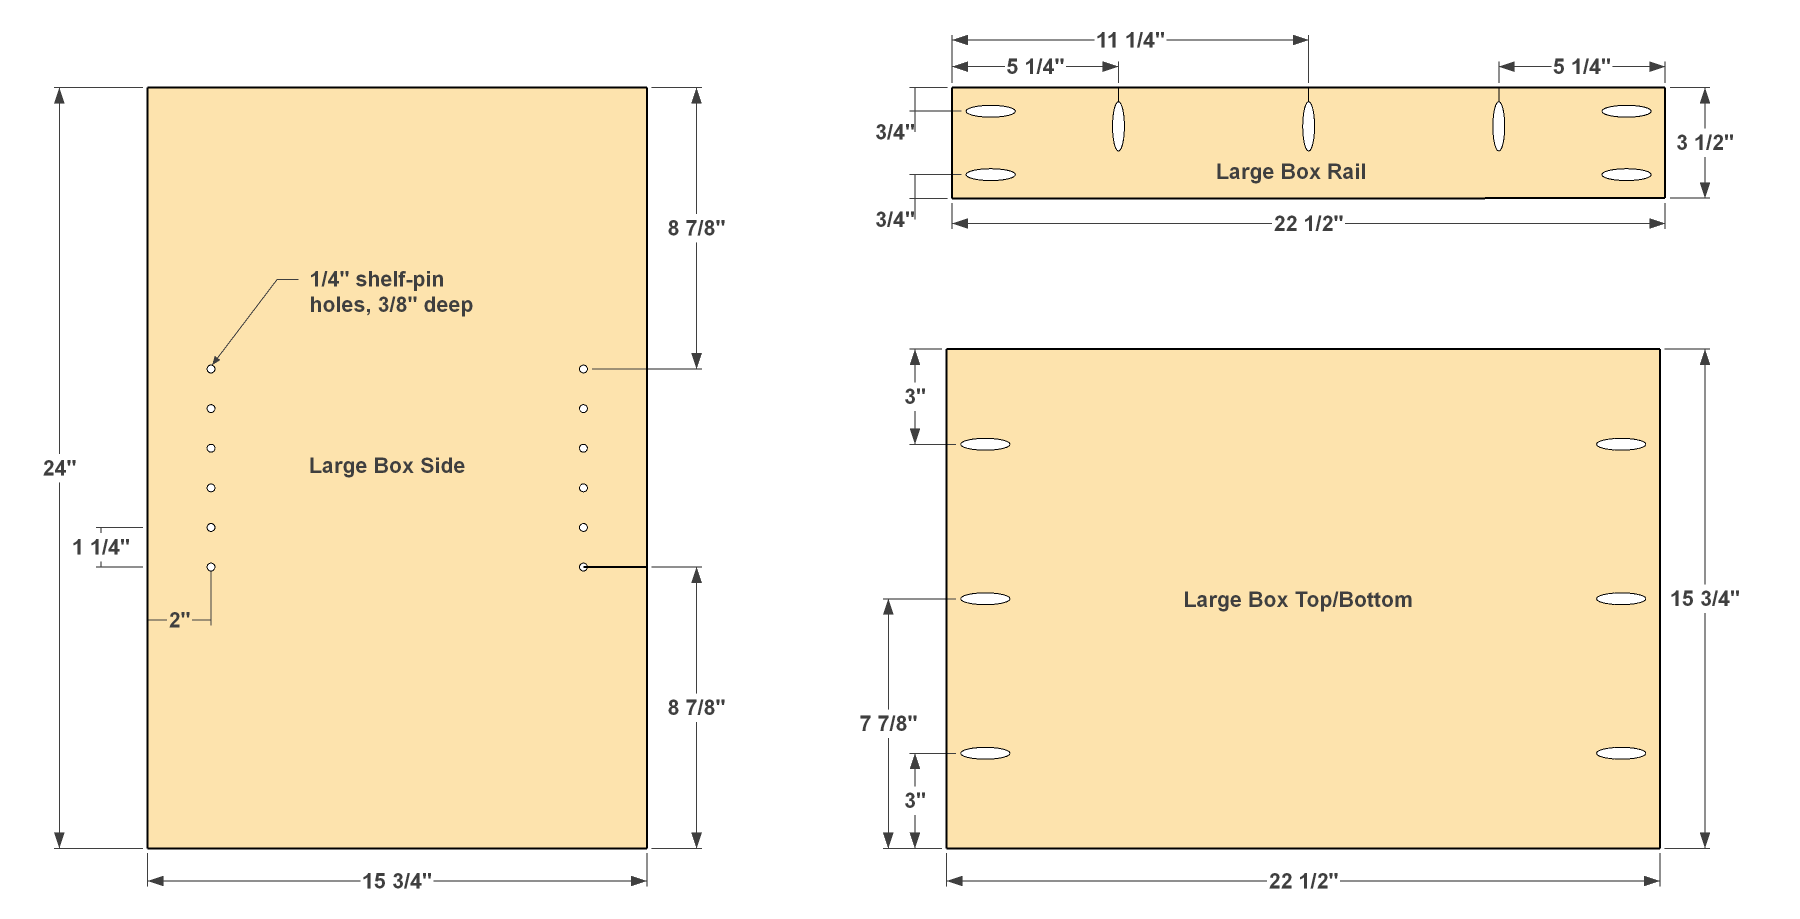
Make the Large Box Parts
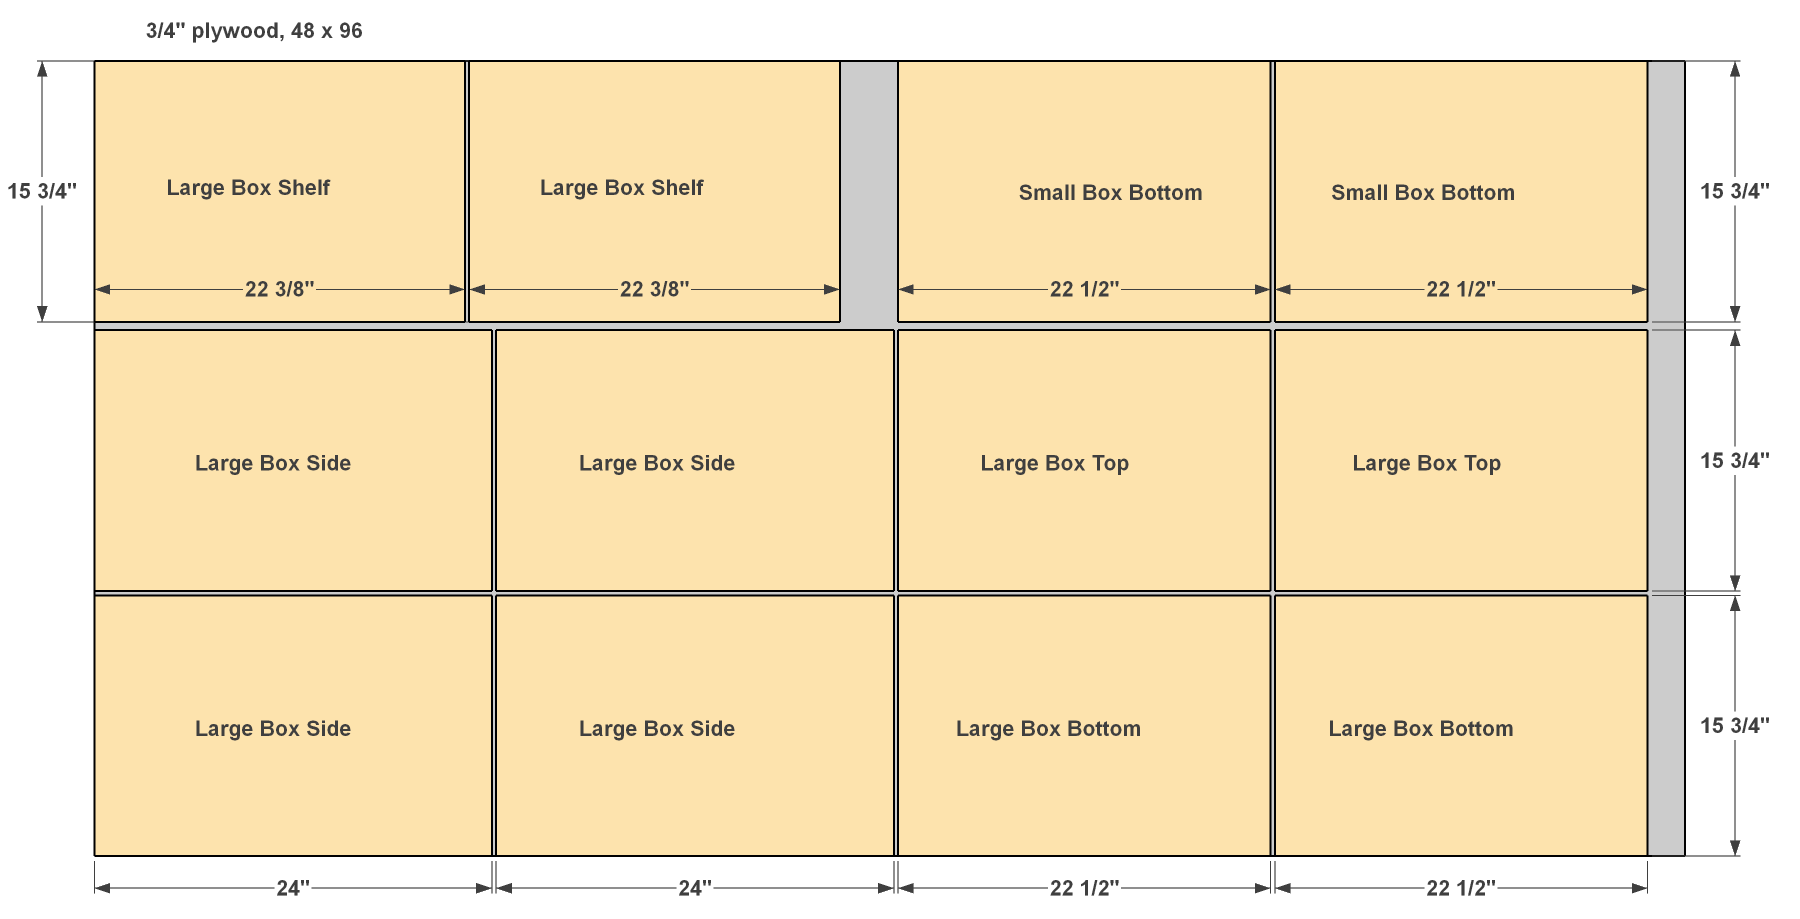
Cut the parts for a pair of large boxes—four Large Box Sides, two Large Box Tops, two Large Box Bottoms, two Large Box Dividers, two Large Box Rails, and two Large Box Shelves to size from 3/4" plywood, as shown in the cutting diagram. Then, with your jig set up for 3/4" stock, drill pocket holes in the Tops, Bottoms, and Rails, as shown. Then drill holes for adjustable-shelf pins in the Large Box Sides, as shown.
-
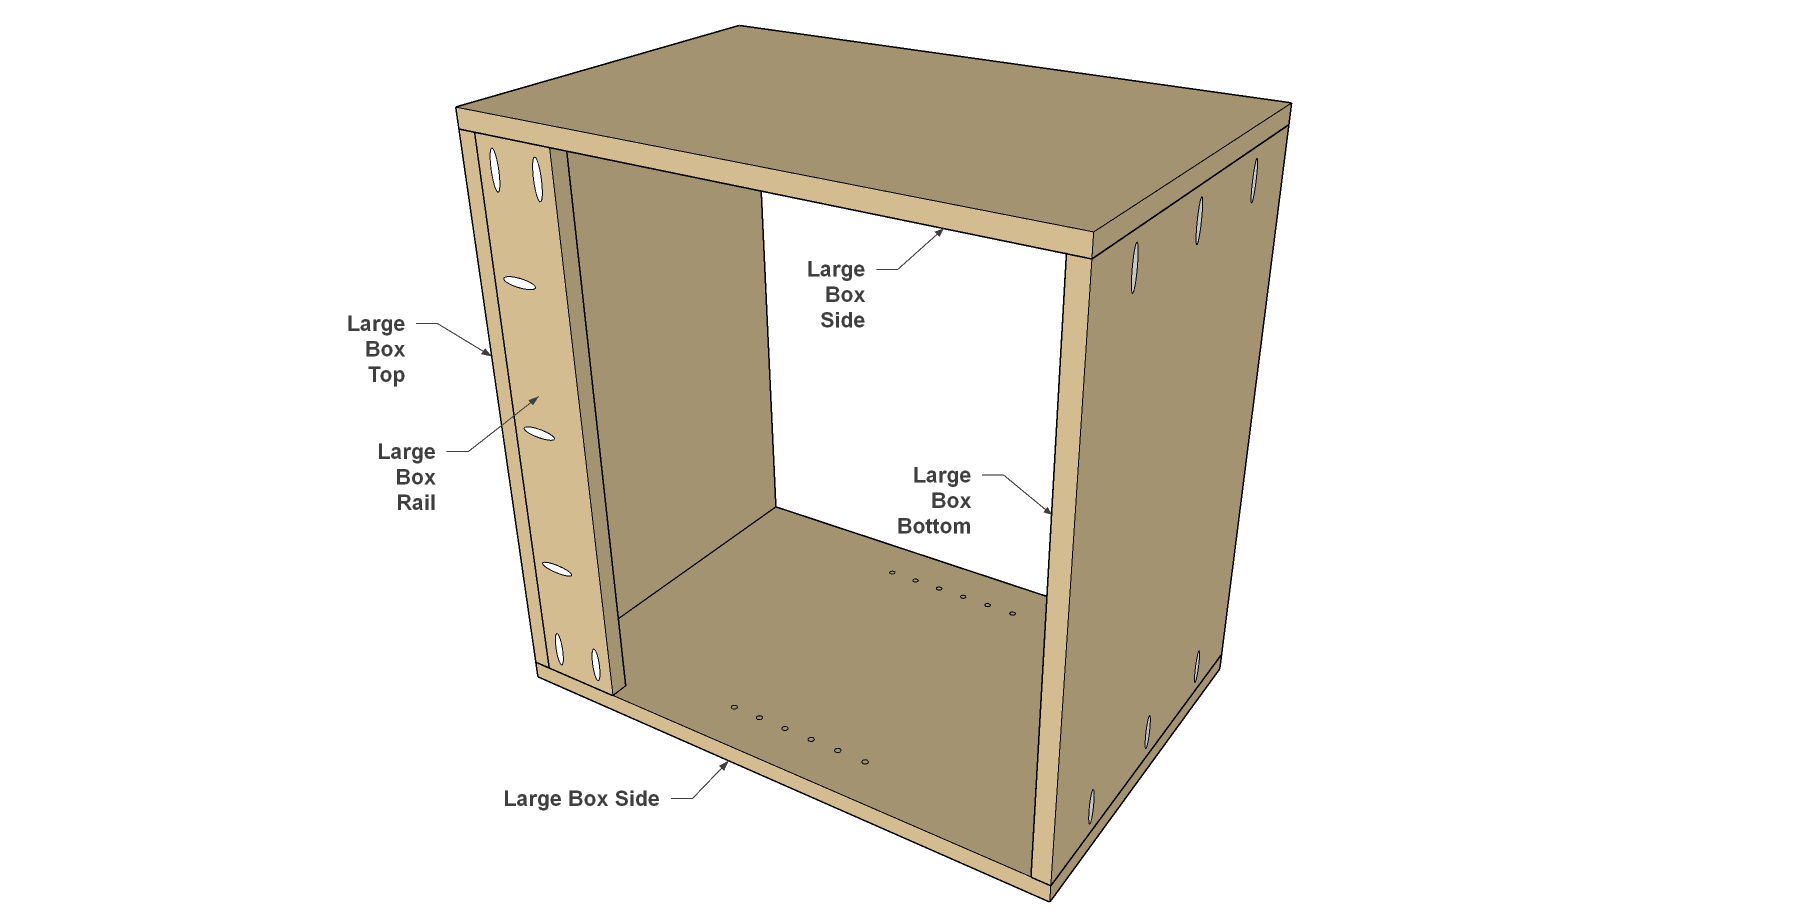
Assemble the Large Boxes
Now you can assemble the large boxes using 1 1/4" coarse-thread Kreg Pocket-Hole Screws, as shown. Make sure that you have both Large Box Sides oriented correctly, and that you position the Rail at the top end.
-
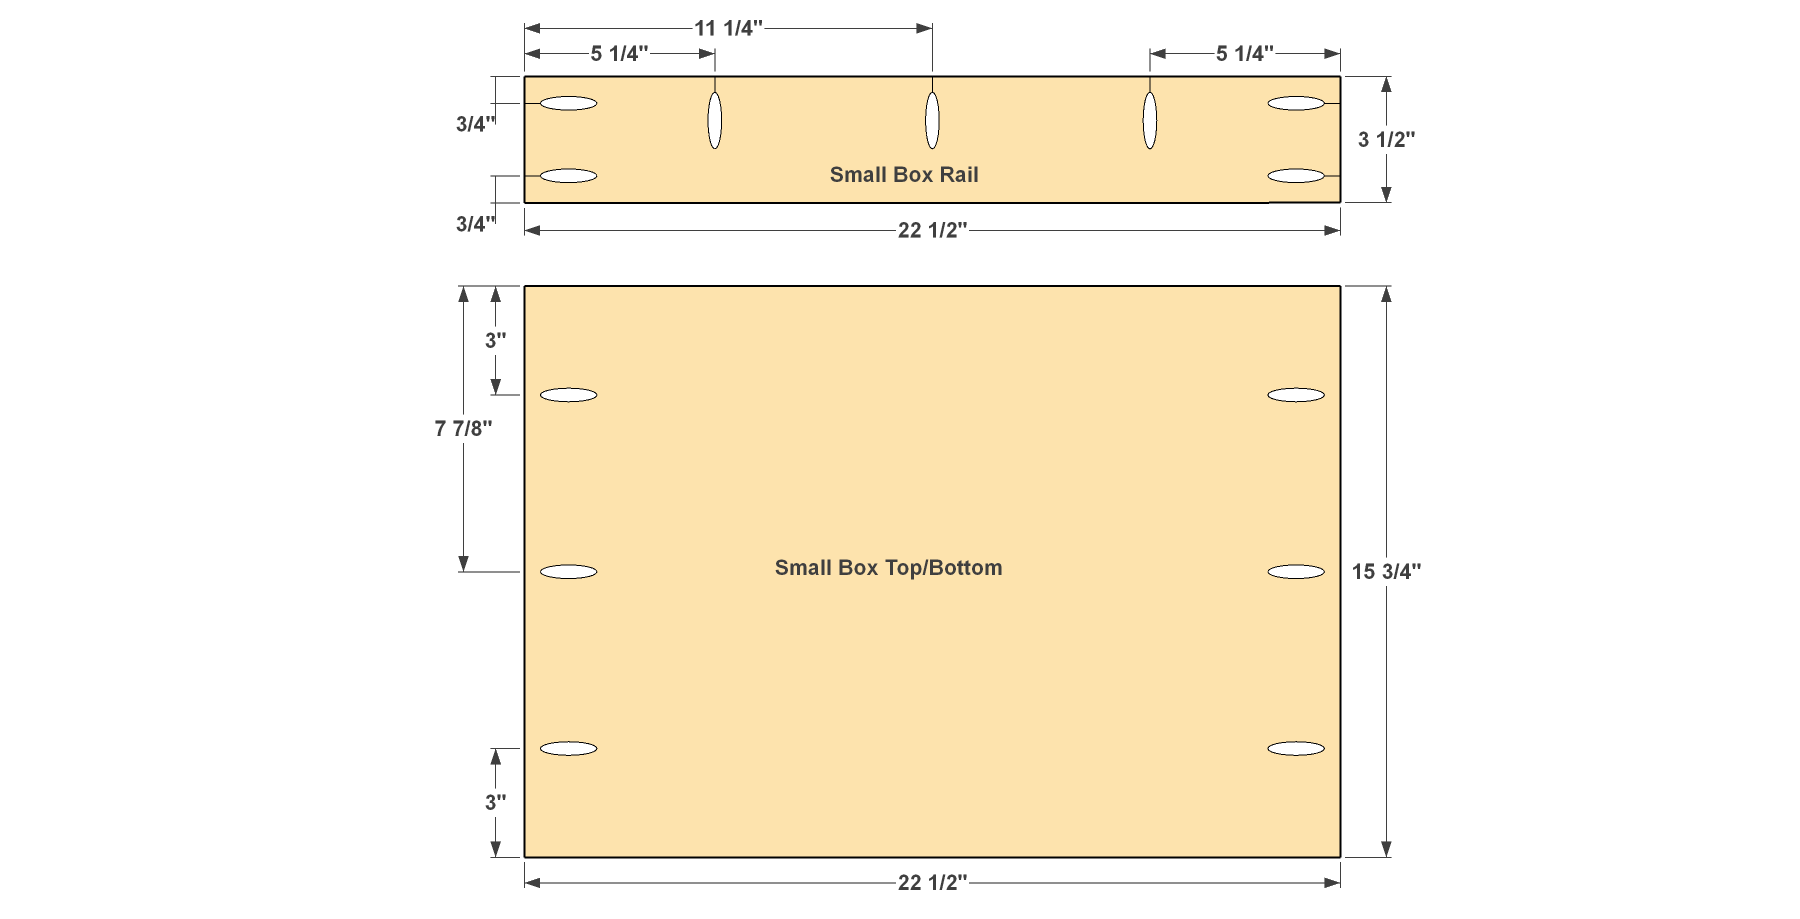
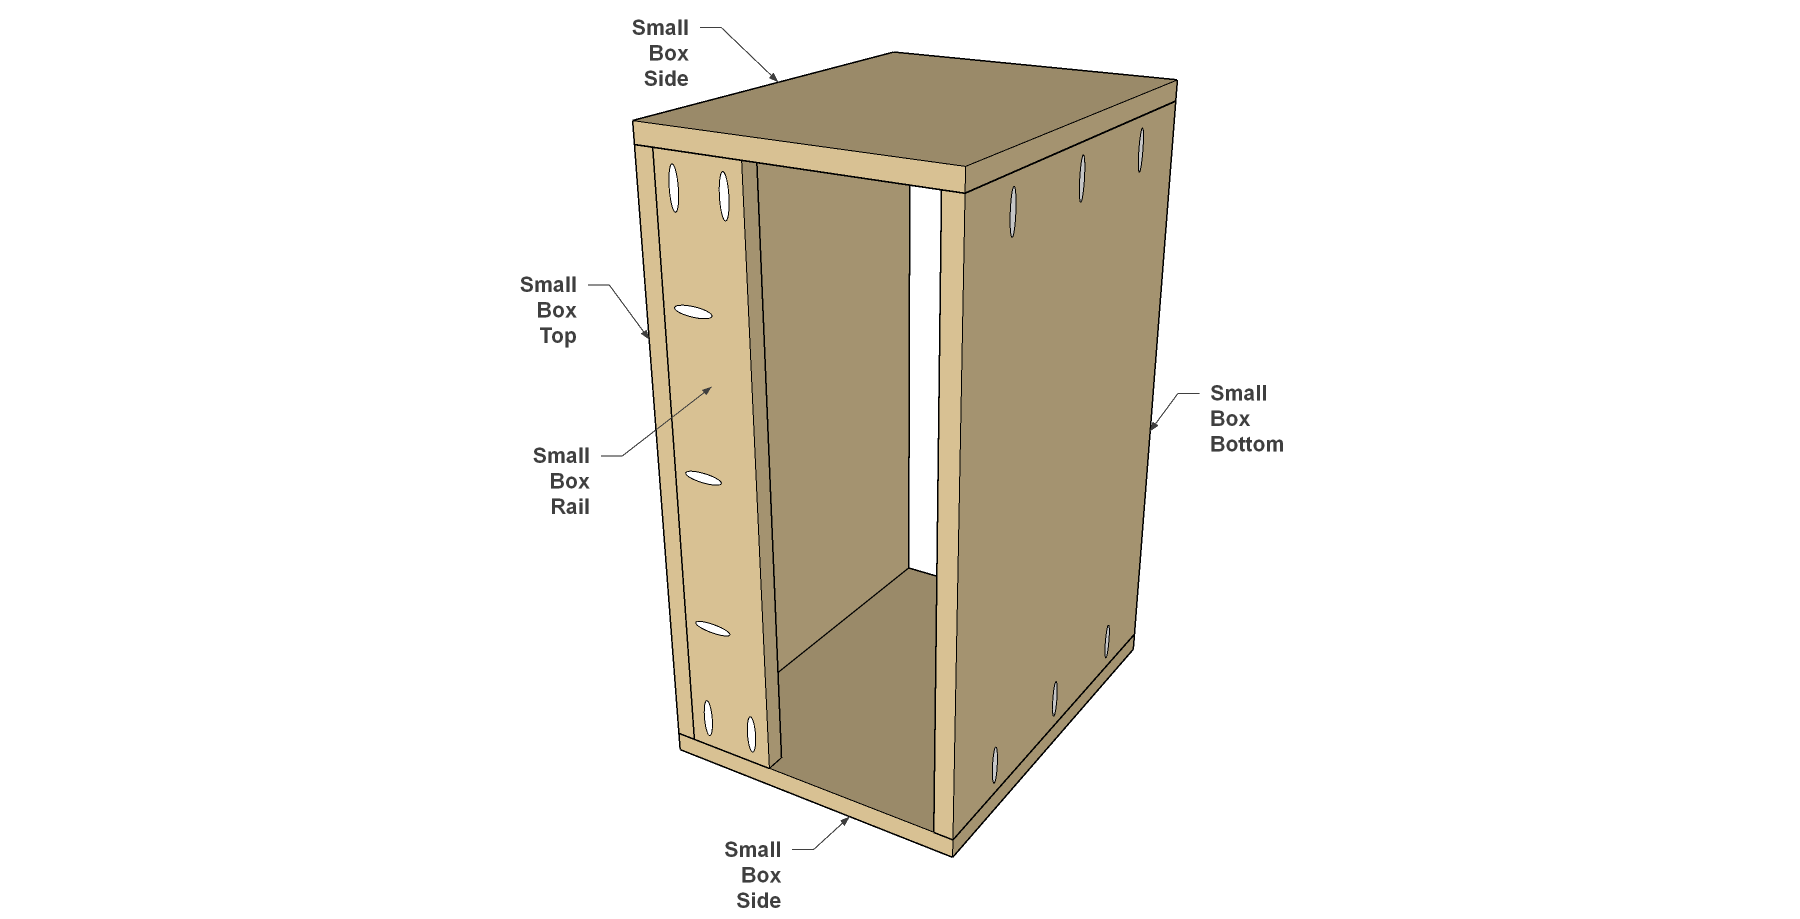
Make the Small Box Parts
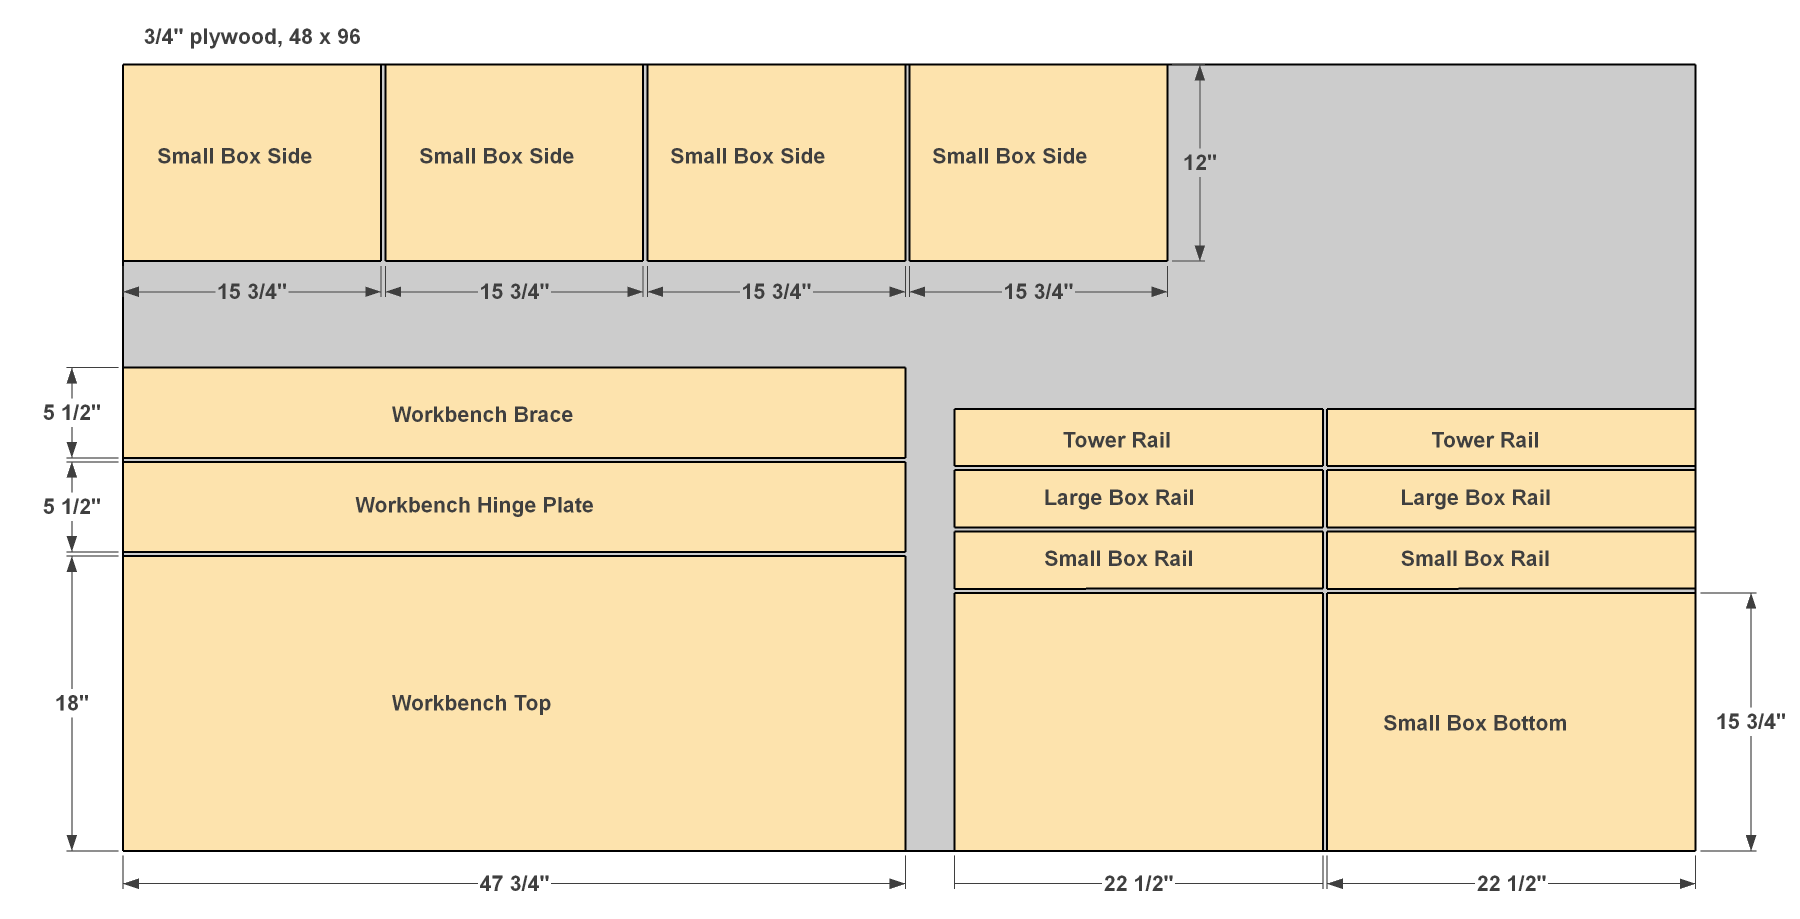
Cut the parts for a pair of small boxes—four Small Box Sides, two Small Box Tops, two Small Box Bottoms, and two Small Box Rails from 3/4" plywood, as shown in the cutting diagram. Drill pocket holes in the Tops, Bottoms, and Rails, as shown.
-
Assemble the Small Boxes
Now you can assemble the small boxes using 1 1/4" coarse-thread Kreg Pocket-Hole Screws, as shown.
-
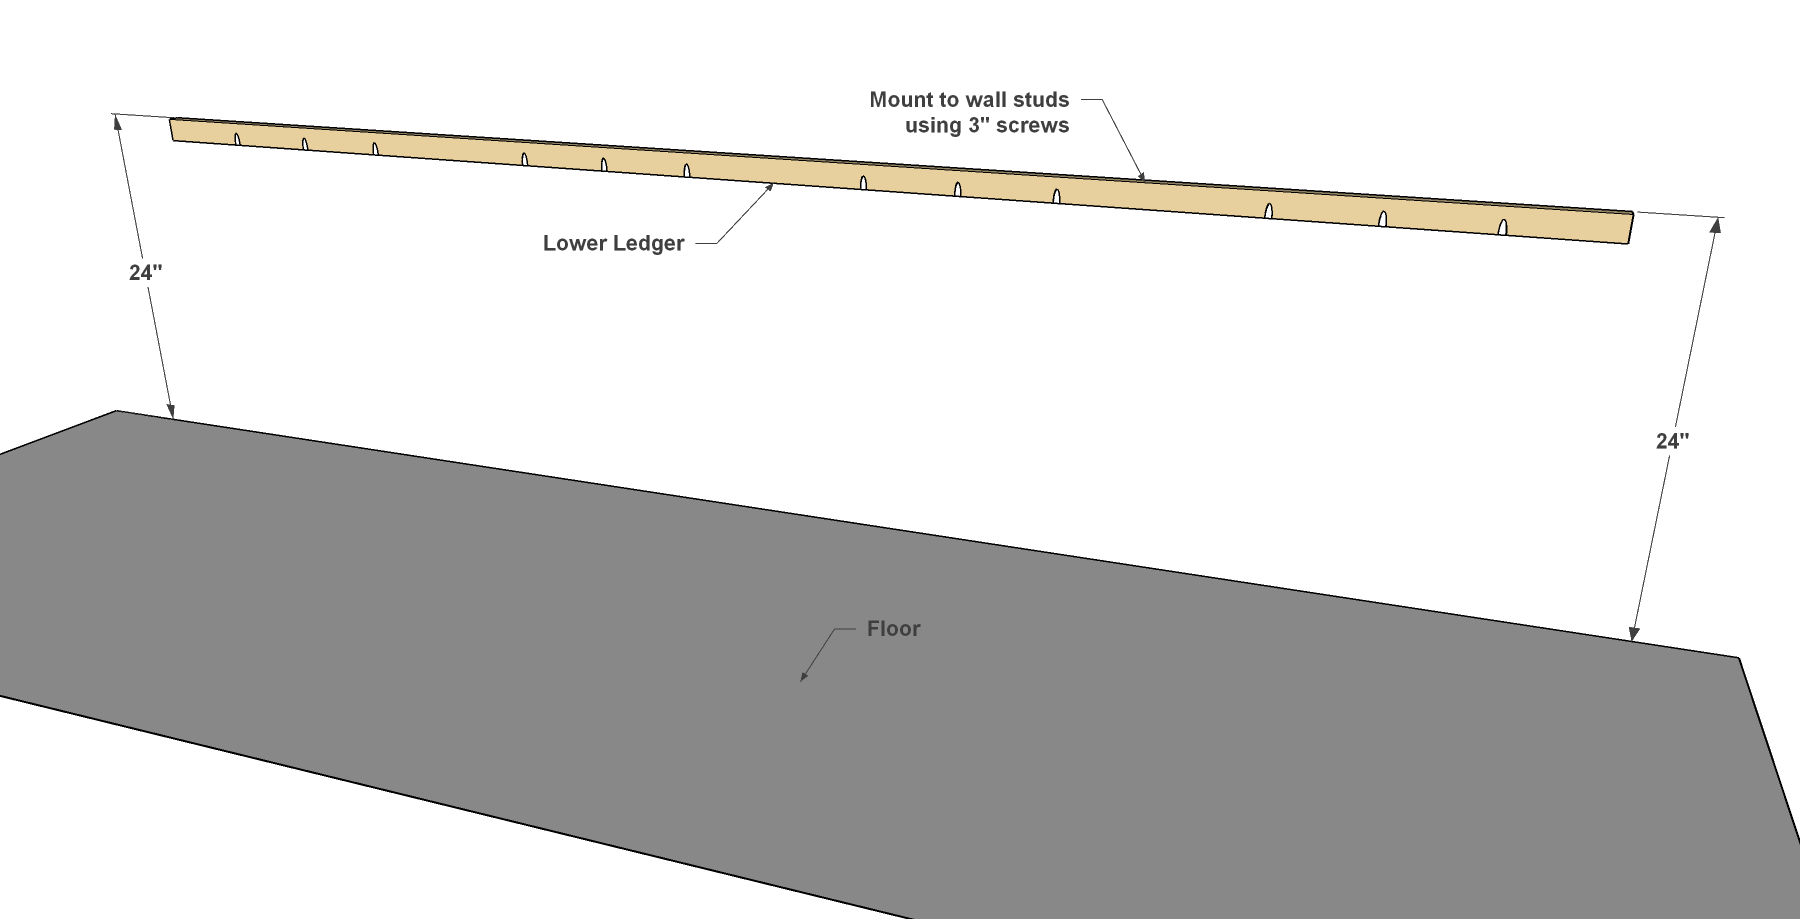
Make Ledgers
Next, you can create a Lower Ledger and an Upper Ledger from 1x2 boards, as shown in the cutting diagram. Then drill pocket holes in the Ledgers, as shown.

-
Start Installation with Ledgers
To mount the garage unit to your wall, start by locating the studs. If you won’t be able to attach the Ledger to at least five studs, also use heavy-duty wall anchors at the locations where studs aren’t available. Then, position the Lower Ledger 24" from the floor, make sure the Ledger is level, and that the pocket holes are facing up. Attach the Ledger by driving 3" screws through it and into the studs (or wall anchors).
-
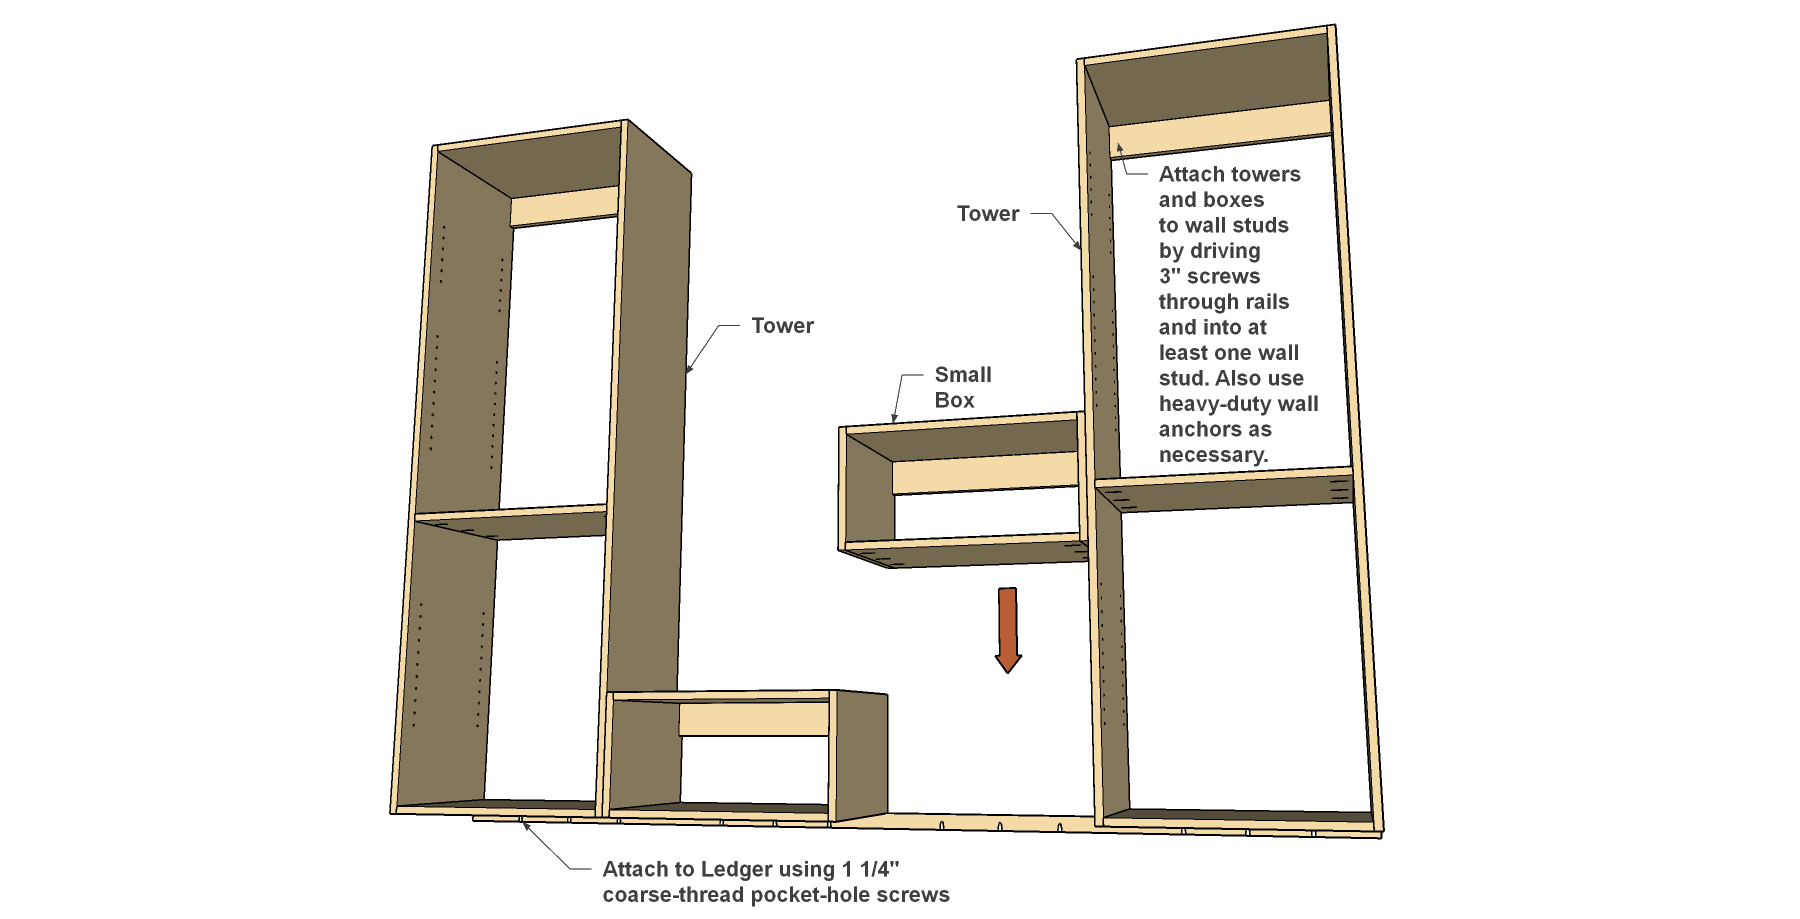
Mount the Towers and Small Boxes
Start at one end to install the first tower. You’ll want a helper for this. Rest the tower on the Lower Ledger, make sure it is standing straight. Attach it by driving 1 1/4" coarse-thread Kreg Pocket-Hole Screws from the Ledger into the Tower Bottom, and by driving 3" screws through the Tower Rail and into wall studs (or wall anchors). You can then attach the small boxes, as well as the other tower. Make sure the upper ends of the towers have 48" of space in between.
-
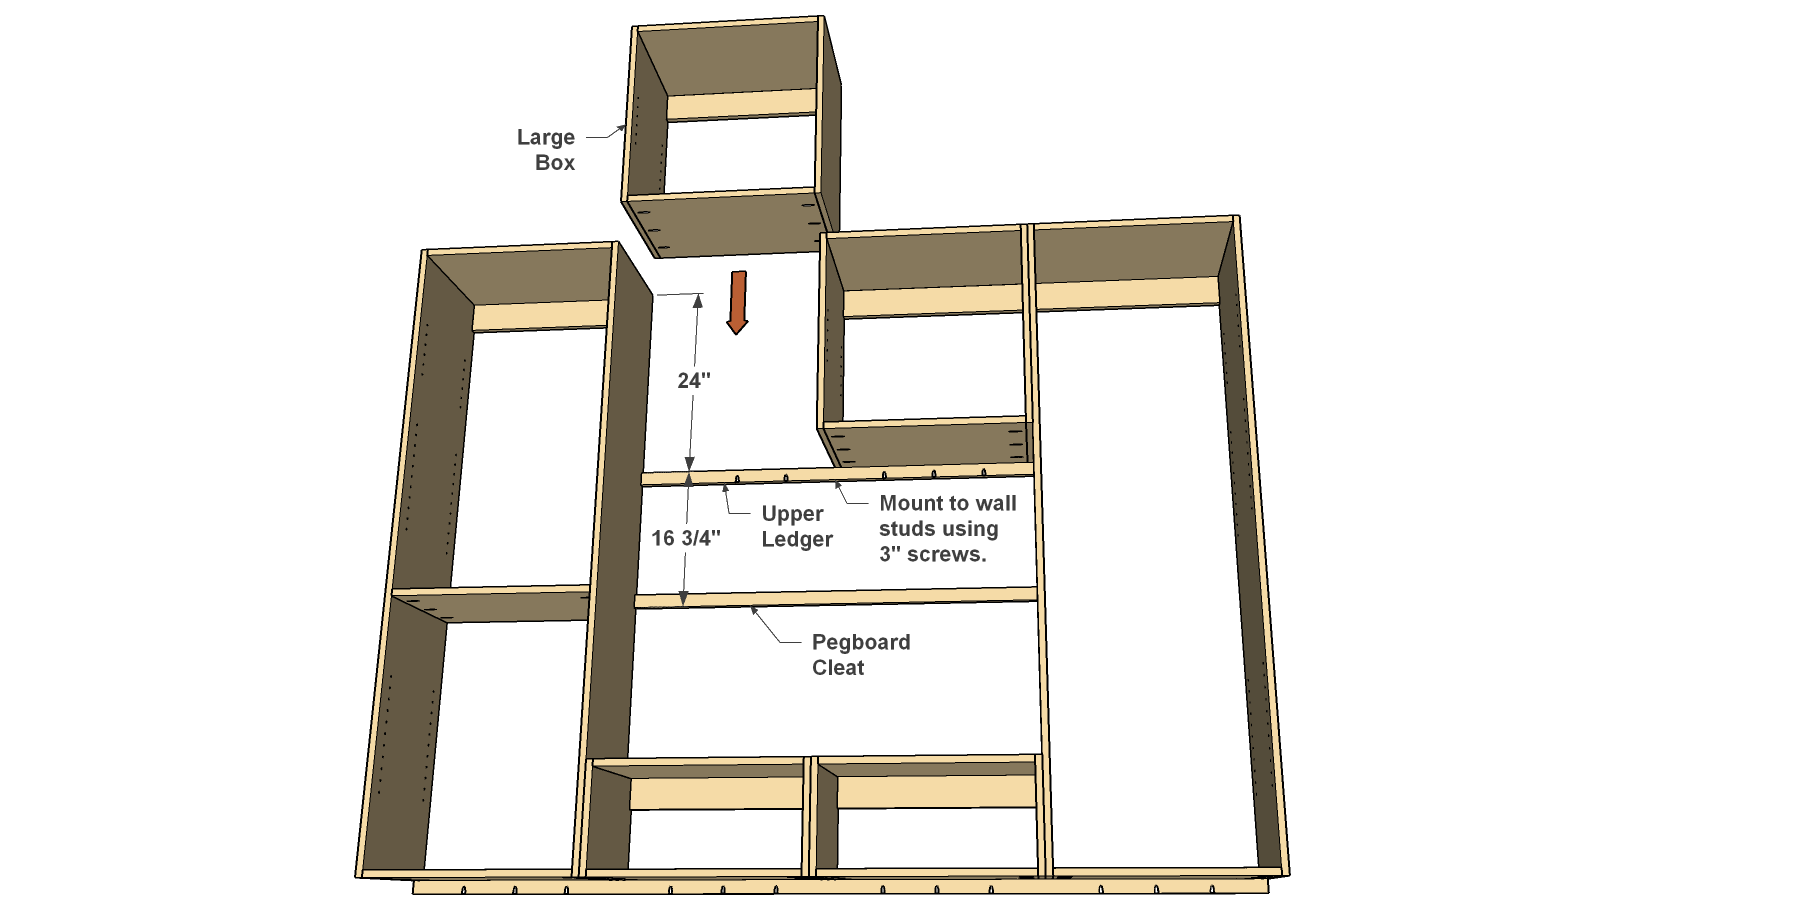
Add the Large Boxes
Next, measure down 24" from the upper end of the towers, and then install the Upper Ledger by driving 3" screws through it and into the studs (or wall anchors). Then mount the Large Boxes in the same way as used for the Towers and Lower Boxes.
With everything in place, attach all of the boxes and towers to one another. To do that, drive several screws through one side and into the adjacent side. You can use 1 1/4" coarse-thread Kreg Pocket-Hole Screws for this. Just drive them straight in. No pilot holes are needed.
-
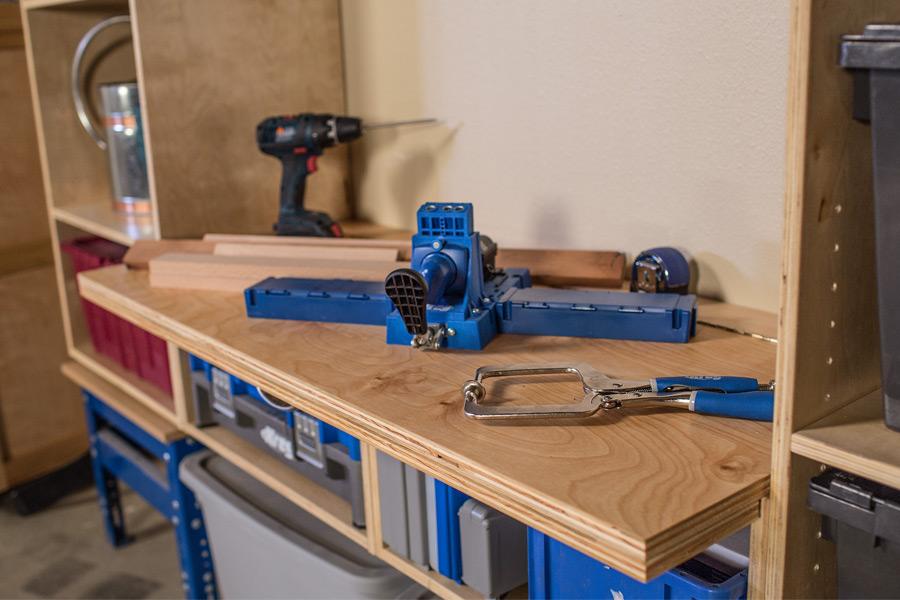
Make a Workbench
Cut a Workbench Top, Workbench Brace, and Workbench Hinge Plate to size from 3/4" plywood, as shown in the cutting diagram. Then assemble these parts using a long continuous hinge, as shown.
-
Install the Bench and Pegboard
To mount the bench. Slide it into position on the Small Boxes. Attach the Hinge Plate by driving 1 1/4" coarse-thread pocket hole screws into the Small Box Tops.
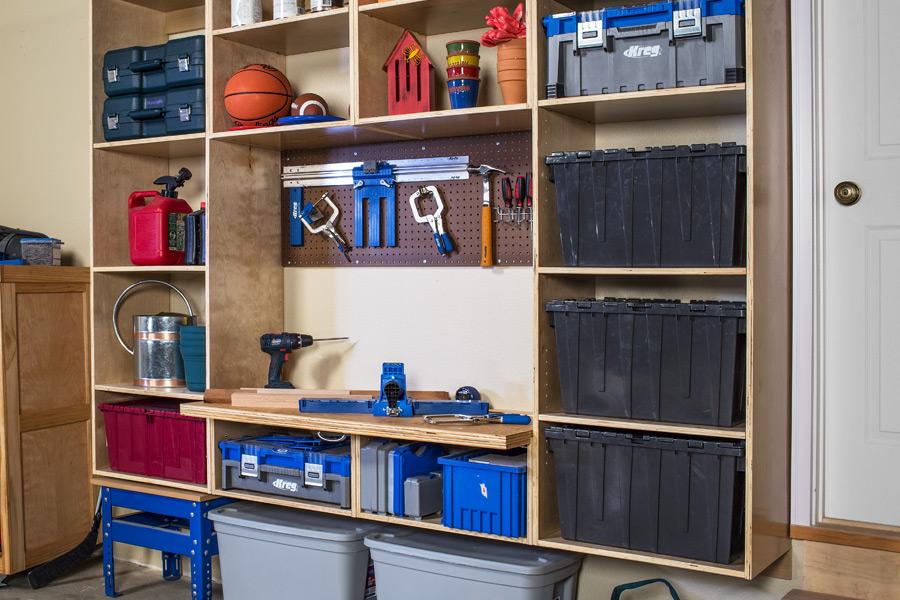
If you want to add a Pegboard panel, cut it to size, as shown in the cutting diagram. Also cut a Pegboard Cleat from a 1x2 board. Measure down 16 3/4" from the underside of the Large Boxes, and then secure the cleat to the wall. It doesn’t need the heavy-duty anchoring that the Ledgers require. Just drive a couple screws into the studs or into wall anchors. Then attach the Pegboard to the cleat and the Upper Ledger with 3/4" screws.
You can leave your storage unit bare but adding finish or paint will protect it and keep it looking good. We just added a coat of wipe-on a polyurethane. Finish the Shelves, as well, and then put them in place on shelf pins. Then load up your storage and work center!