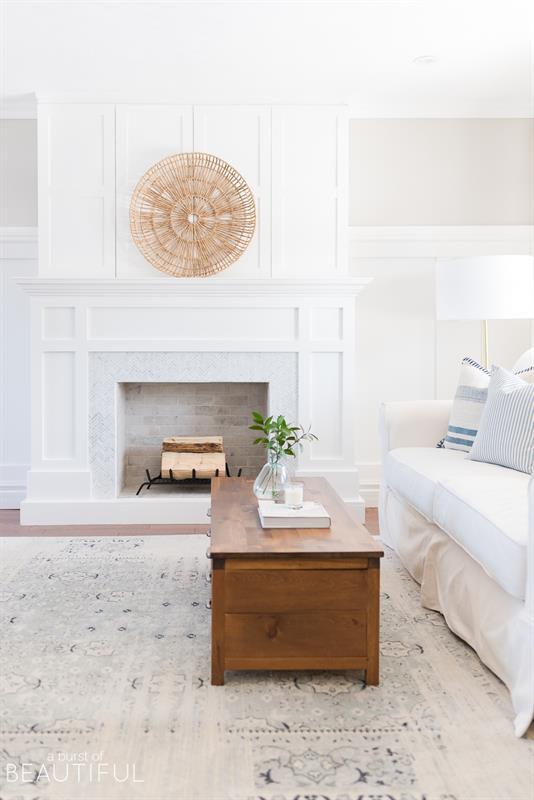
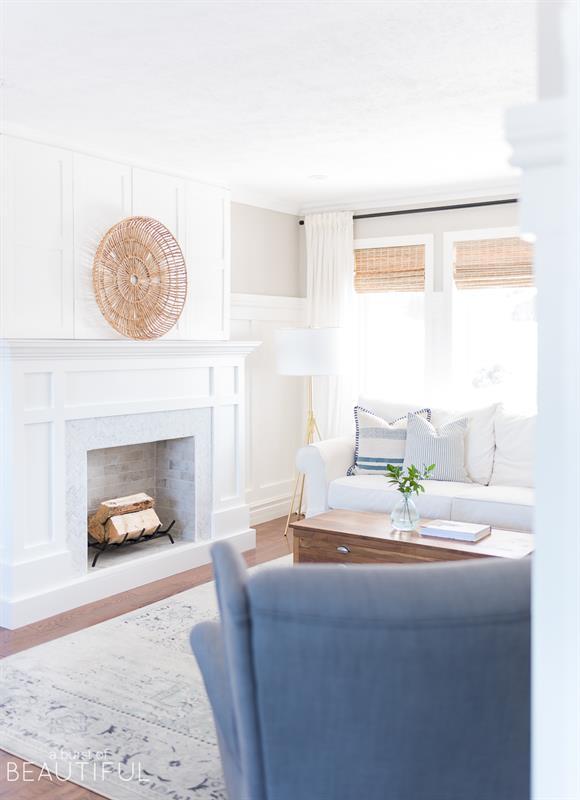
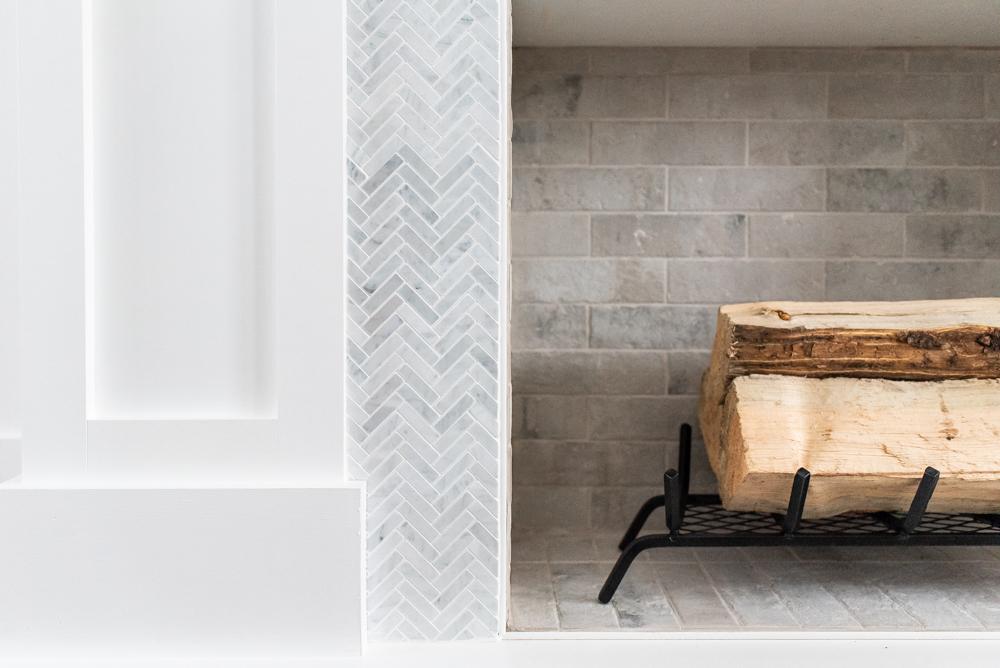


This faux fireplace will add style and character to any living room with an 8' ceiling. It has an authentic fireplace feel that will "warm" up your space. You can also customize the opening to fit an electric or gas insert. The optional overmantle cabinet is perfect to hide your TV.
Tools
Kreg Tools


Other Tools
-
Miter Saw

-
Table Saw
-
Tape Measure
-
Clamps
-
Nail Gun
-
Shop Vacuum
Materials
Wood Products
- 4 Plywood , 3/4" Thick , Full Sheet
- 1 Plywood , 1/4" Thick , Full Sheet
- 4 Board , 1x3 , 96"
- 3 Board , 1x6 , 96"
- 1 Board , 1x8 , 96"
- 1 Crown Molding , 4 1/2" , 120"
- 1 Board , 1x2 , 96"
- 1 Board , 2x4 , 48"
Hardware & Supplies
- 2 Sets of Hinges (see Extra's for link)
- 2 Sets of non-mortise hinges (see Extra's for link)
- 200 1 1/4" Pocket Hole Screws
- 1 Wood Glue
- 1 Molding Caulking
- 1 Tile of your choice
- 1 Thinset Mortar (see tile manufacturer's recommendation)
- 1 Grout (see tile manufacturer's recommendation)
- 100 1 1/4" 18G Brad Nails
- 1 Wood Filler
Cut List & Parts
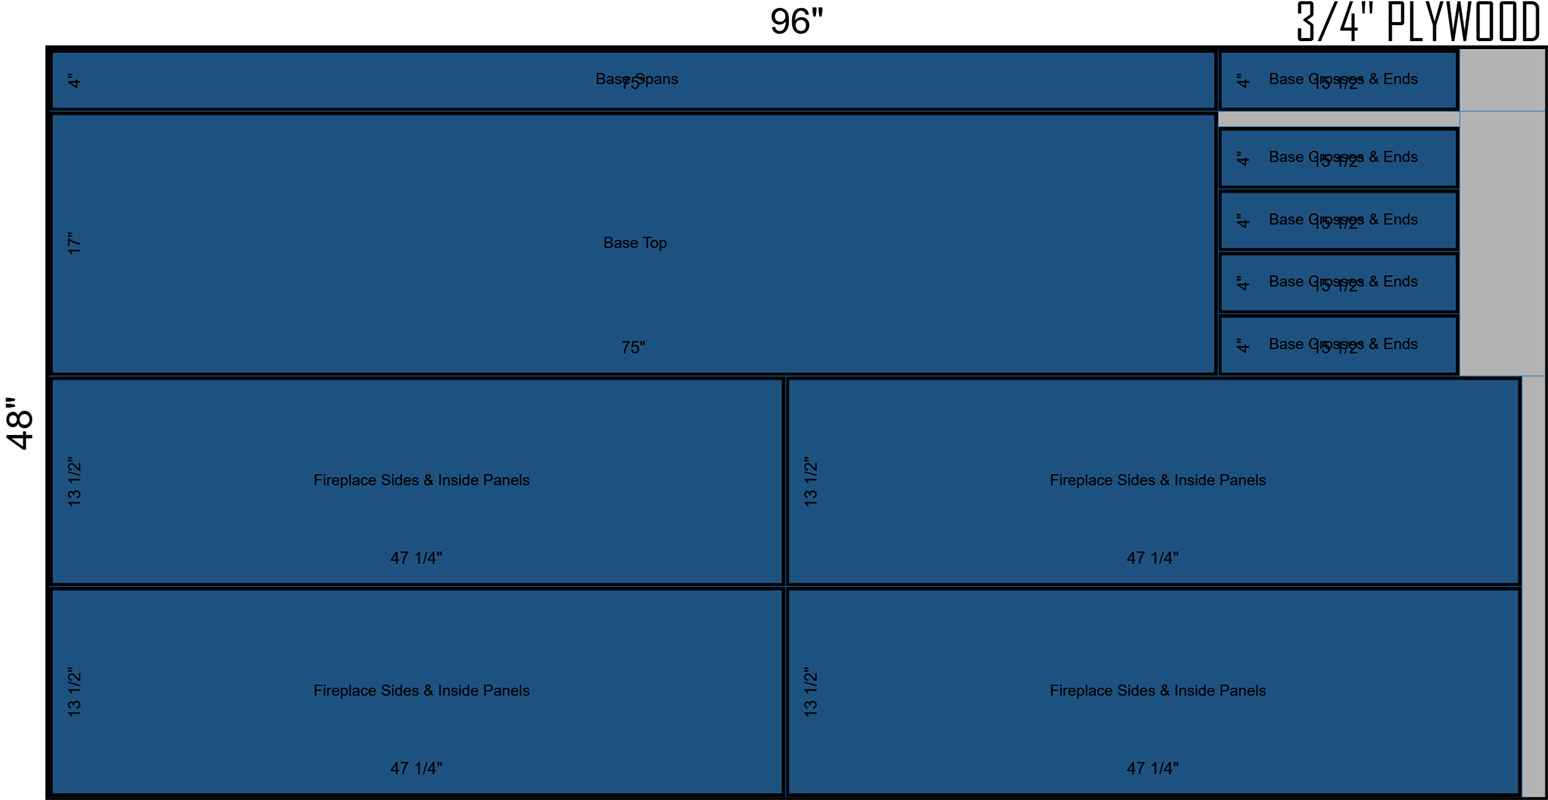
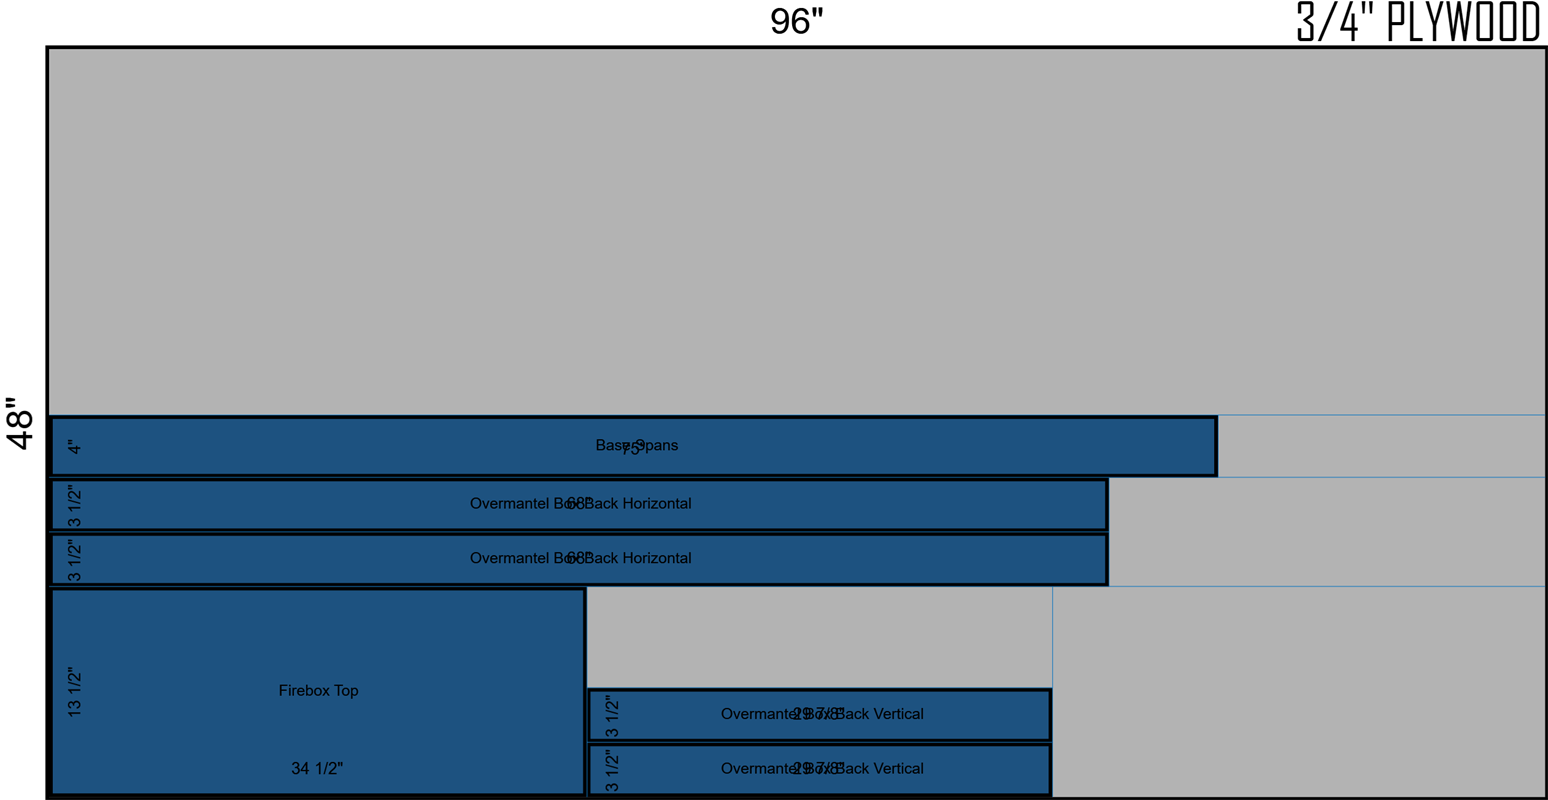
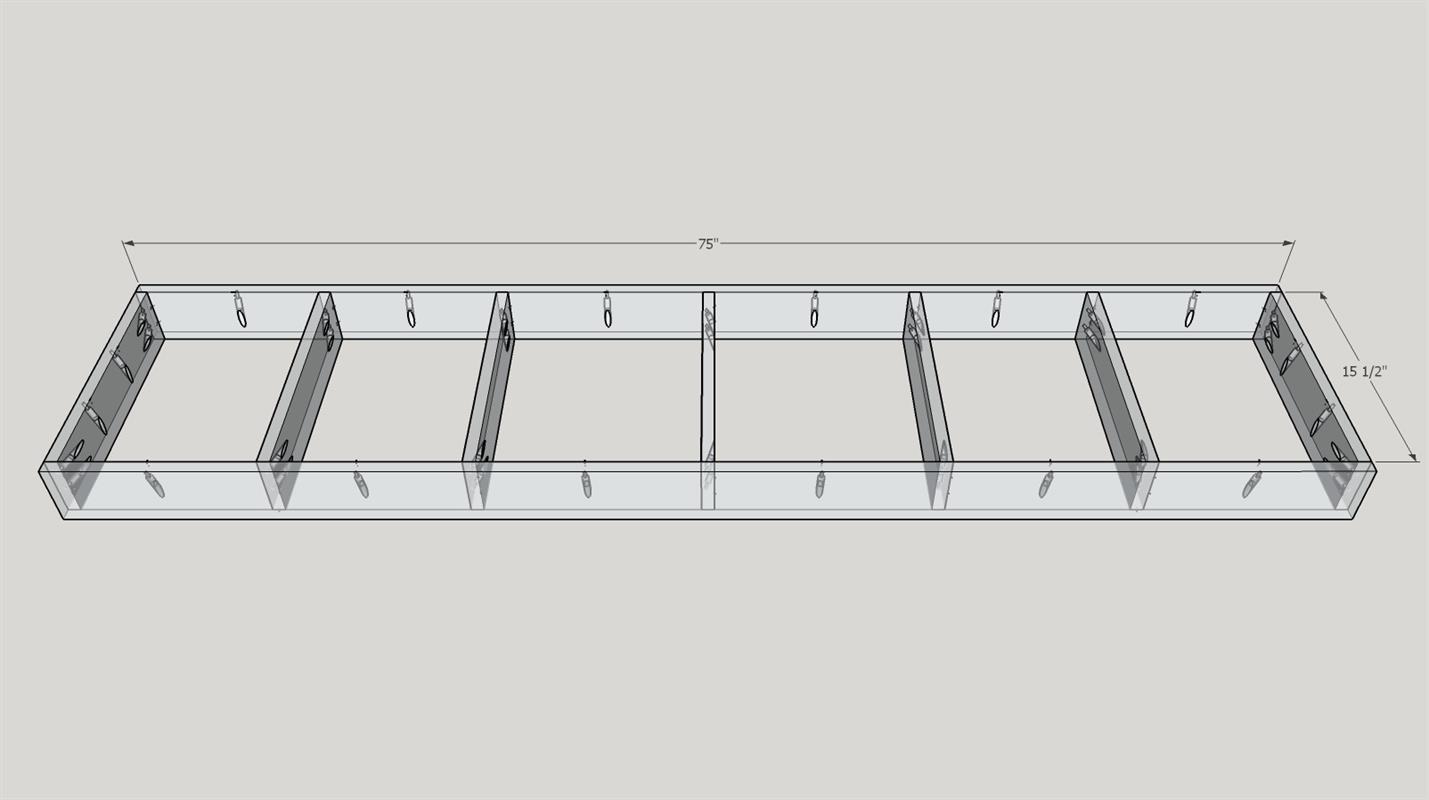
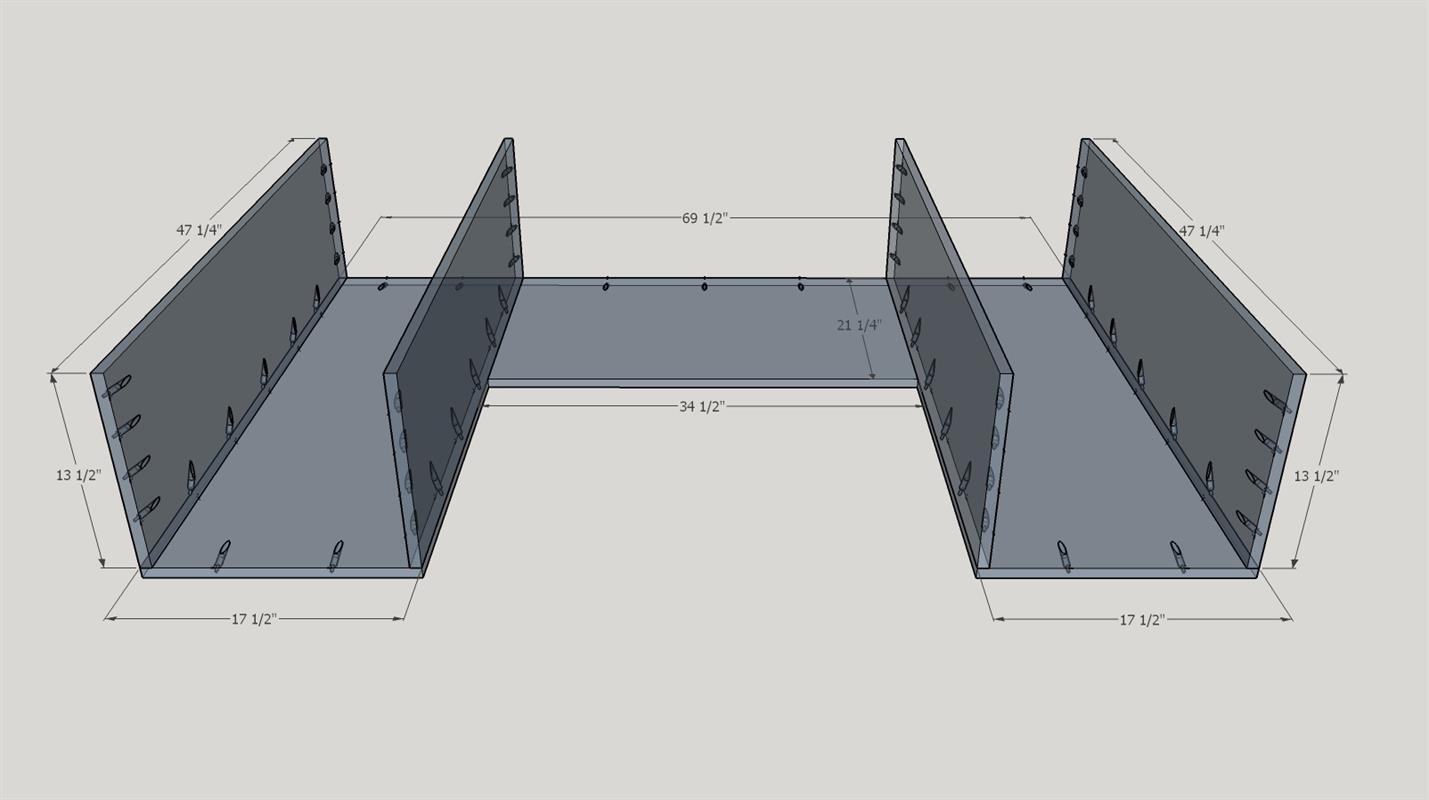
- 2 Base Spans , 3/4" Plywood x 4" x 75"
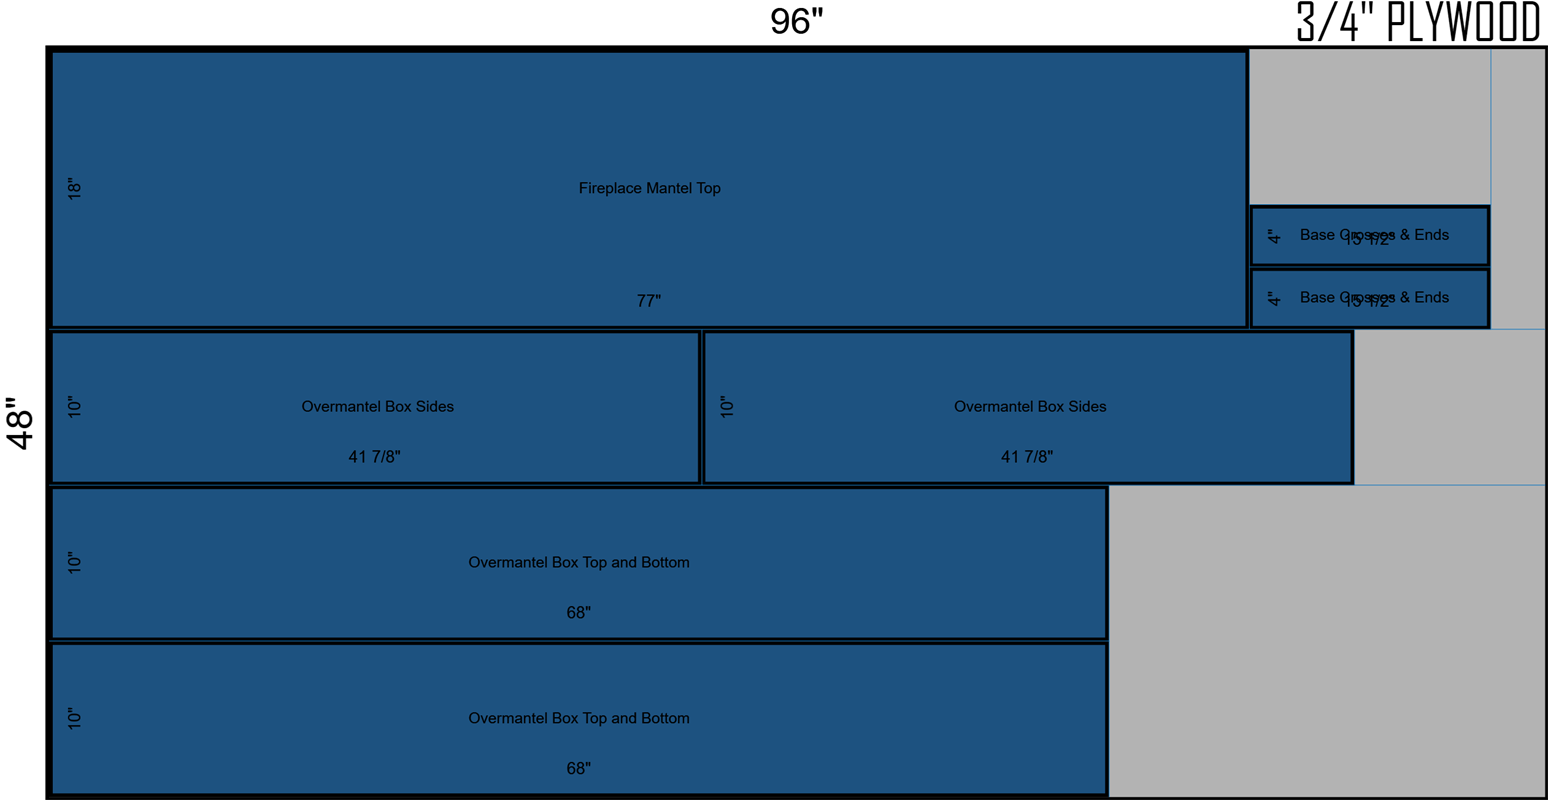
- 7 Base Crosses & Ends , 3/4" Plywood x 4" x 15-1/2"
- 1 Base Top , 3/4" Plywood x 17" x 75"
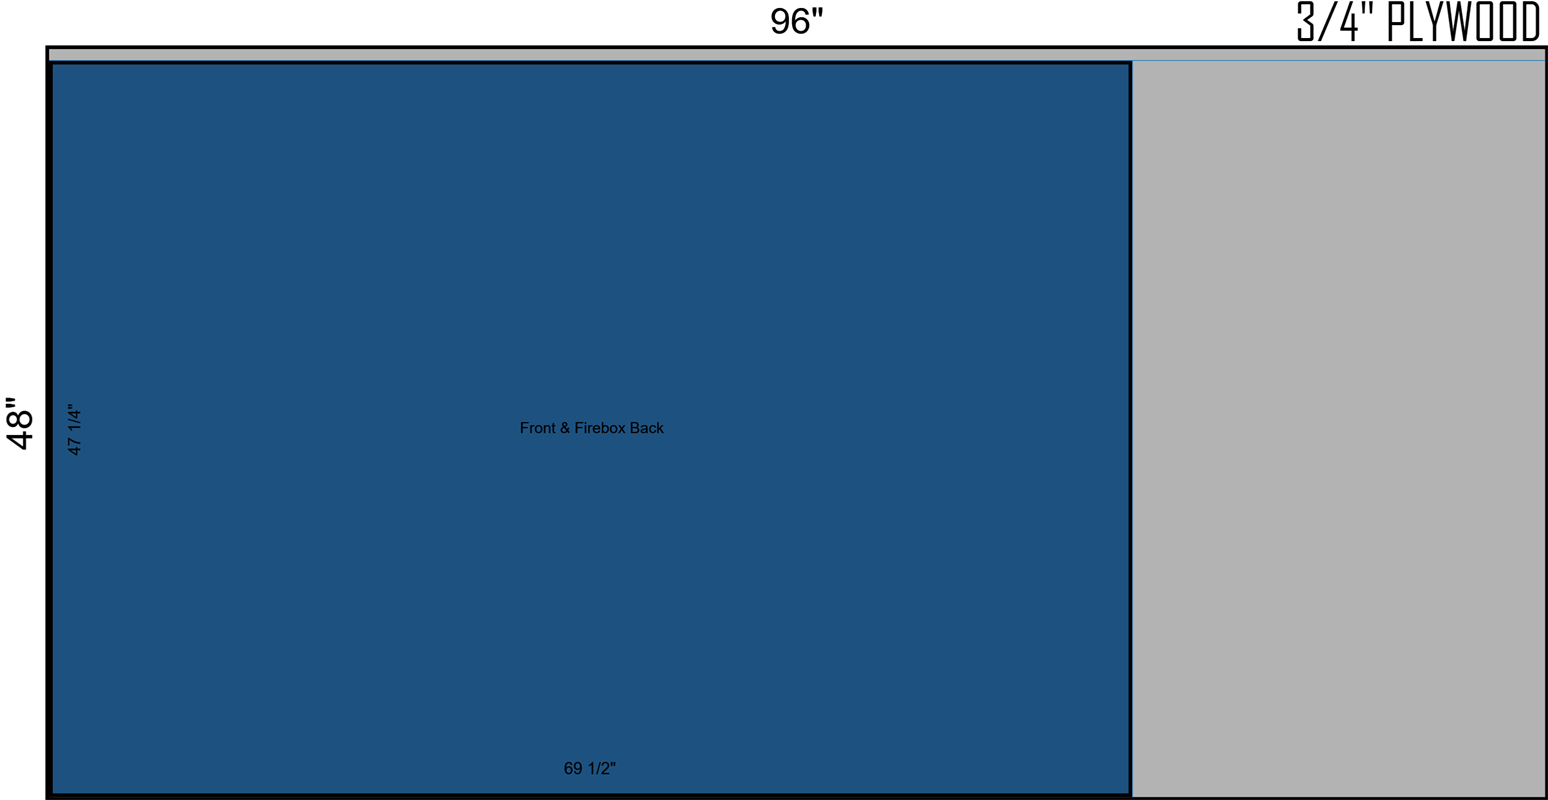
- 1 Front & Firebox Back , 3/4" Plywood x 47-1/4" x 69-1/2"
- 4 Fireplace Sides & Inside Panels , 3/4" Plywood x 13-1/2" x 47-1/4"
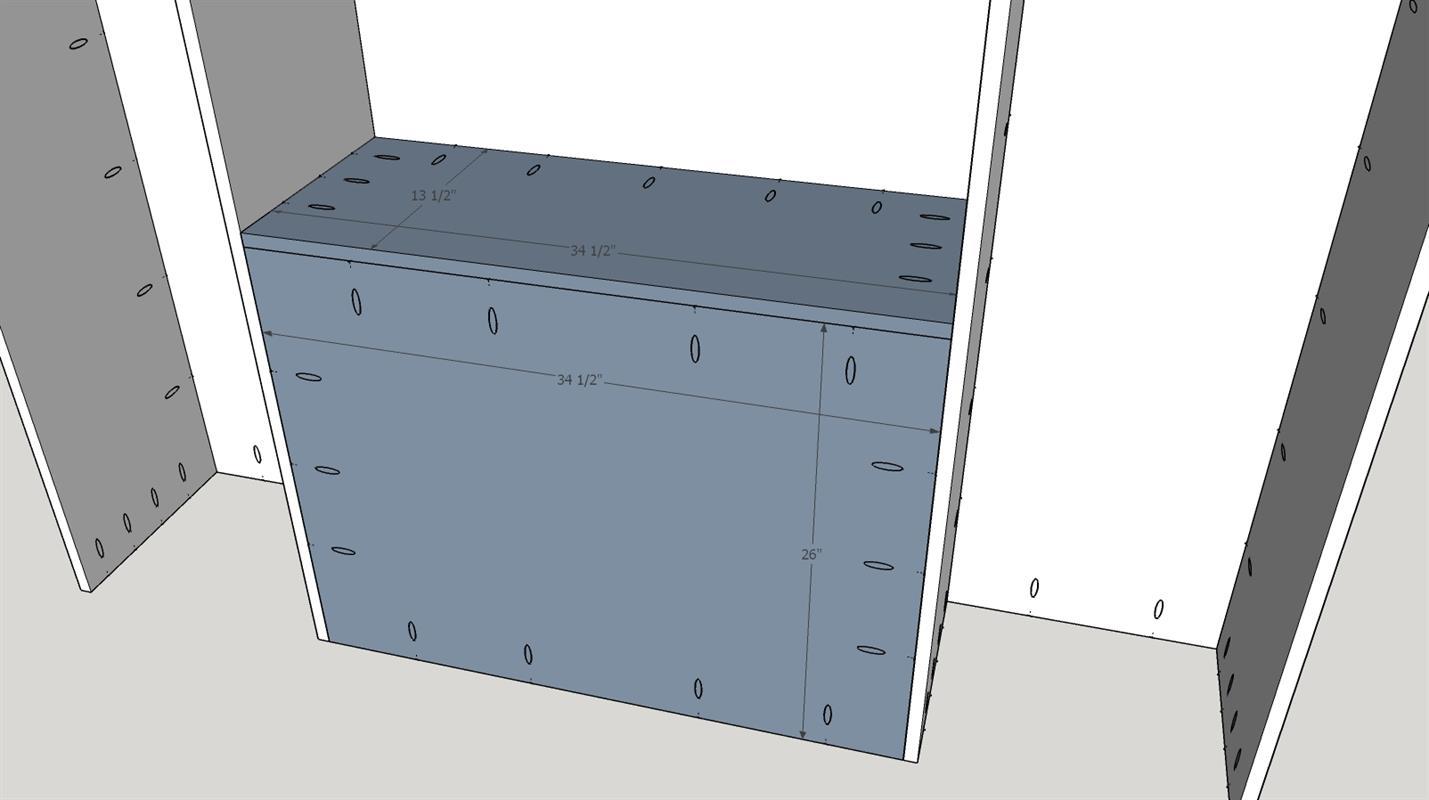
- 1 Firebox Top , 3/4" Plywood x 13-1/2" x 34-1/2"
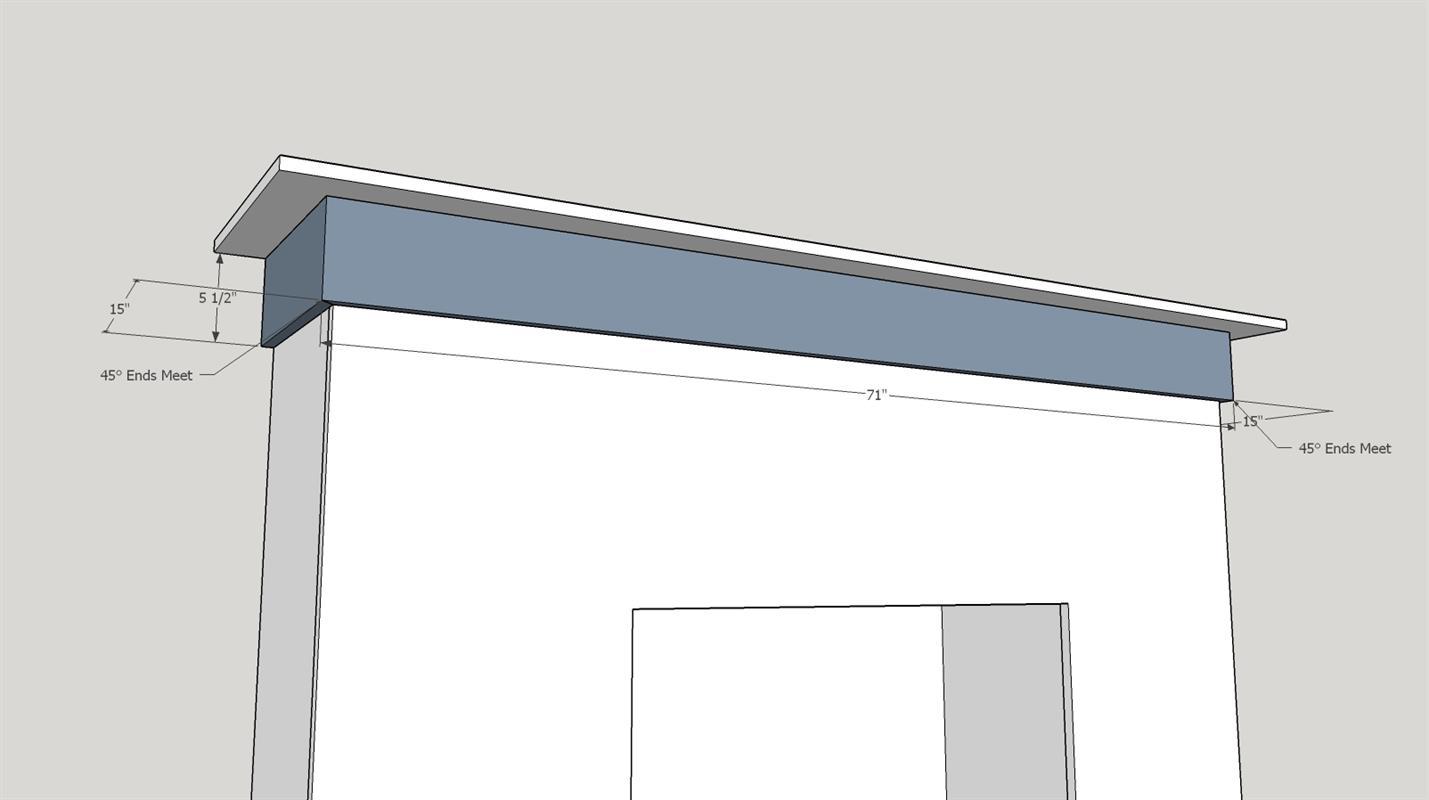
- 1 Fireplace Mantel Top , 3/4" Plywood x 18" x 77"
- 1 Top Face Board , 3/4" x 5-1/2" x 71"
- 2 Top Side Boards , 3/4" x 5-1/2" x 15"
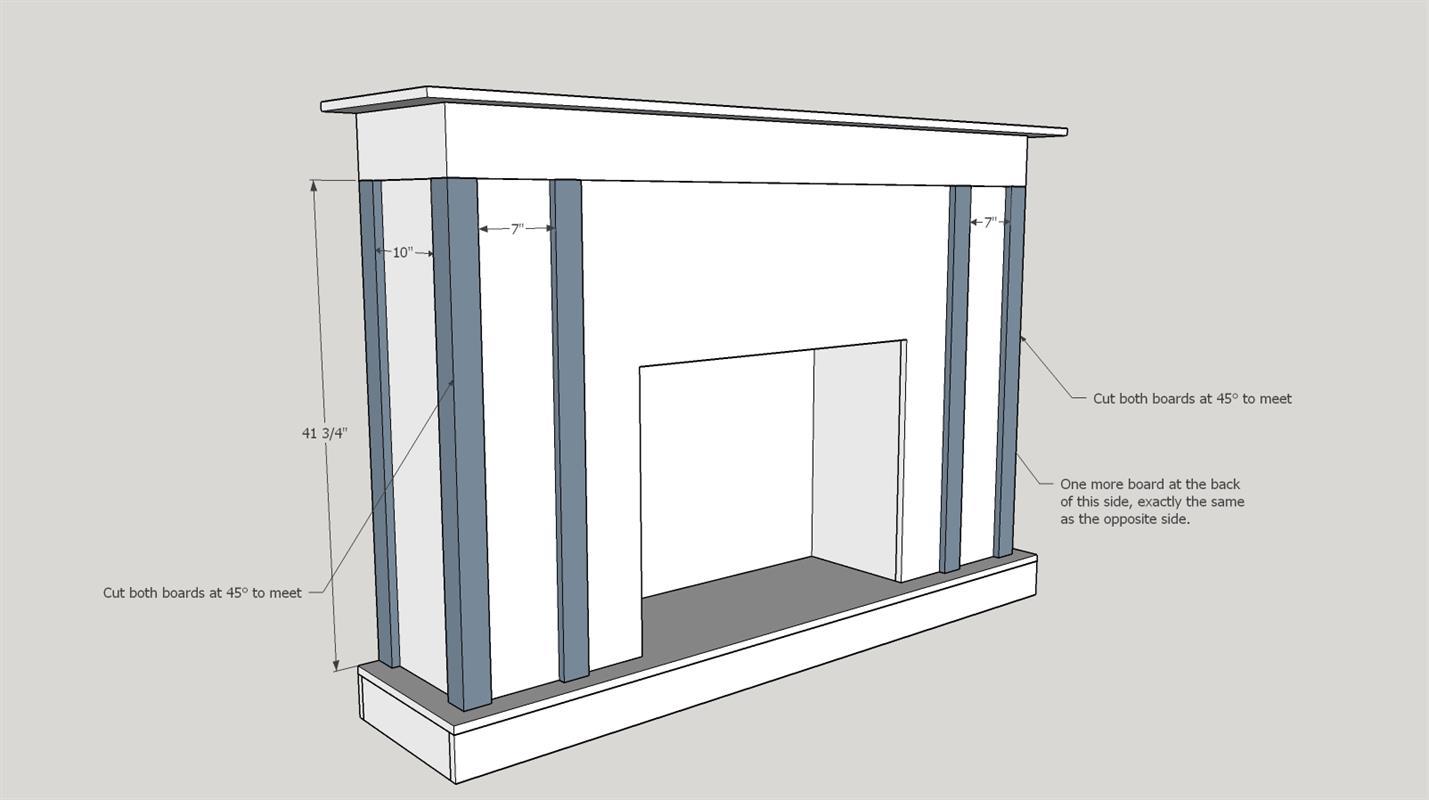
- 8 Vertical Face Boards , 3/4" x 2-1/2" x 41-3/4"
- 4 Horizontal Face Boards , 3/4" x 2-1/2" x 7"
- 4 Horizontal Face Boards , 3/4" x 2-1/2" x 10"
- 2 Base Trim Side Boards , 3/4" x 6-1/2" x 15-3/4"
- 2 Base Trim Front Boards , 3/4" x 6-1/2" x 13-1/2"
- 1 Crown Molding Face , 4-1/2" x 77"
- 2 Crown Molding Sides , 4-1/2" x 18"
- 2 Overmantel Box Sides , 3/4" Plywood x 10" x 41-7/8"
- 2 Overmantel Box Top & Bottom , 3/4" Plywood x 10" x 68"
- 2 Overmantel Box Back Vertical , 3/4" Plywood x 3-1/2" x 29-7/8"
- 2 Overmantel Box Back Horizontal , 3/4" Plywood x 3-1/2" x 68"
- 1 Overmantel Box Top Face , 3/4" x 4-1/4" x 69-1/2"
- 2 Overmantel Box Face Vertical , 3/4" x 1-1/2" x 37-5/8"
- 1 Overmantel Box Face Bottom Horizontal , 3/4" x 1-1/2" x 66-1/2"
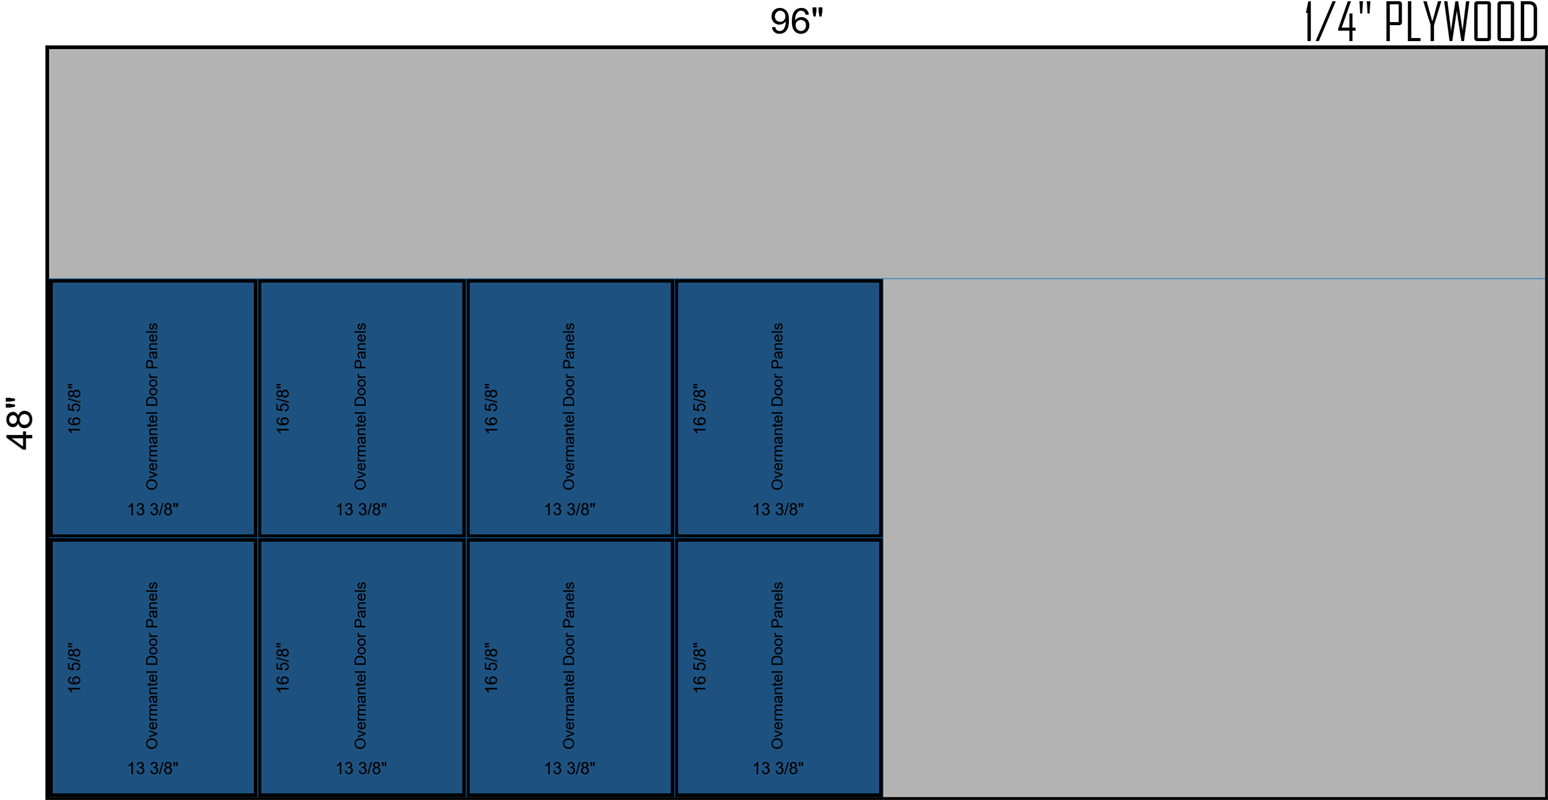
- 8 Overmantel Doors Stiles , 3/4" x 2-1/2" x 38-3/4"
- 12 Overmantel Doors Rails , 3/4" x 2-1/2" x 13-3/8"
- 8 Overmantel Door Panels , 1/4" Plywood x 13-3/8" x 16-5/8"
- 2 Overmantel Top Trim - Sides , 3/4" x 1-1/2" x 11-1/4"
- 1 Overmantel Top Trim - Face , 3/4" x 1-1/2" x 70-1/2"
- 1 Horizontal Face Board , 3/4" x 2-1/2" x 47"
- 2 Wall Mounts (2x4's) , 1-1/2 x 3-1/2" x 14"
Directions
-
Assemble Base
Drill pocket holes on all BASE CROSSES & ENDS and BASE SPANS in the approximate locations indicated on the diagram and assemble as shown using wood glue and 1-1/4" pocket hole screws.
-
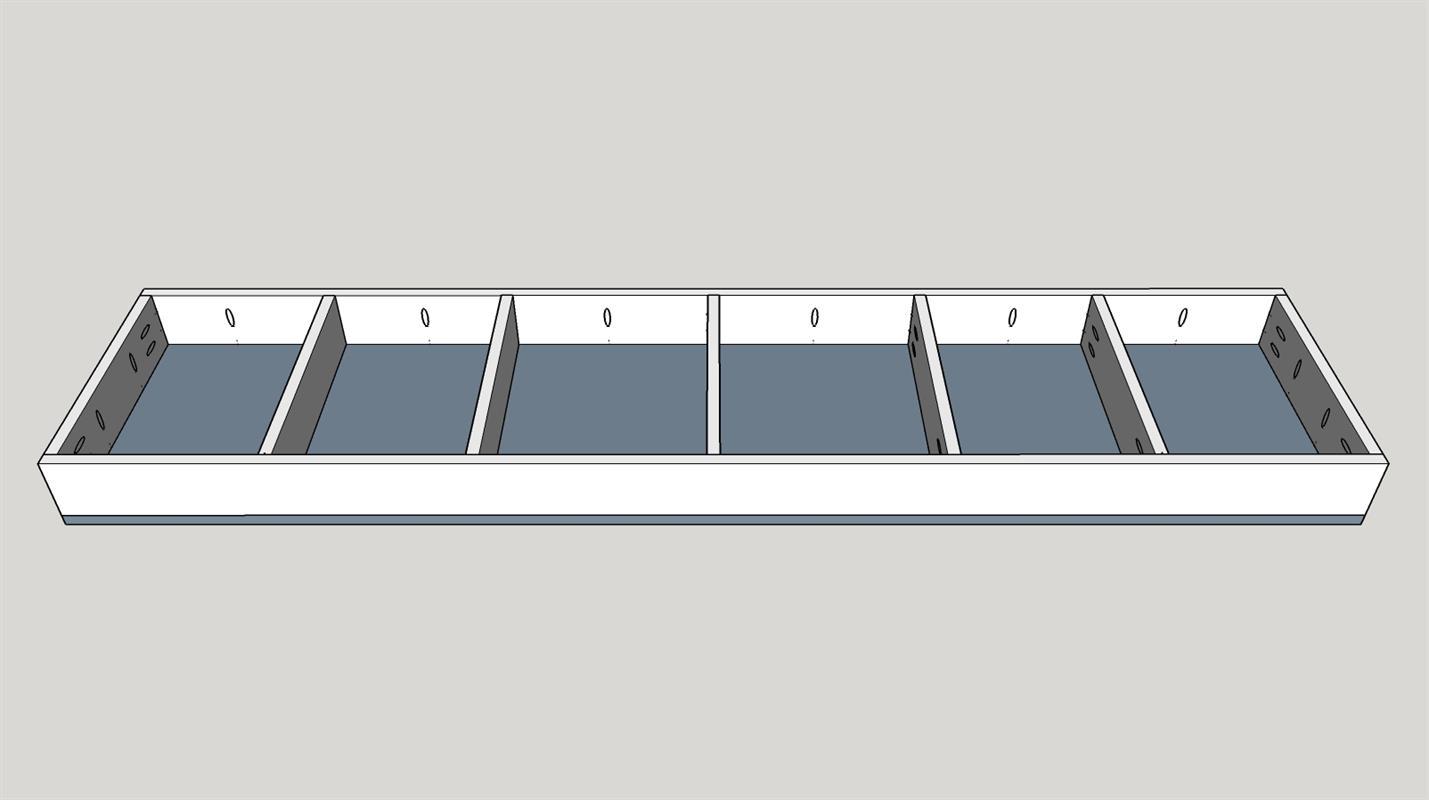
Attach Base Top
Lay the BASE TOP on a flat surface and flip over the frame you completed in step one and lay it on top.secure with wood glue and the pocket holes you drilled in the base frame. Fill the exposed plywood edge of the BASE TOP and base ends with compound, wait for it to dry and sand to a fine finish. There is no trim that will cover this part, it is going to get painted along with the rest of the fireplace.
-
Assemble Front to Sides
Carefully cut a 34-1/2" wide x 26" tall opening for the firebox out of the FRONT & FIREPLACE BACK panel using a circular saw and jigsaw. Set that piece aside as you will use it in STEP 4. Drill pocket holes on all FIREPLACE SIDES and INSIDE PANELS as shown. Attach the four panels as shown using wood glue 1-1/4" pocket holes, taking note of which way the pocket holes are facing so that you don't see any of them inside your firebox.
-
Assemble Firebox Back and Top
Using the piece you cut out of the FRONT & FIREBOX BACK, drill pocket holes around the outer edge and attach as shown using wood glue and 1-1/4" pocket hole screws. (NOTE: The saw kerf on both sides will make this piece not fit exactly, but the screws will pull the boards together on either side). Drill pocket holes on the FIREBOX TOP around the three edges shown and attach to the back of the fireplace front first, then the sides with wood glue and 1-1/4" pocket hole screws.
-
Attach to Base
Center the fireplace on the base, leaving approximately 2-3/4" on either side. Secure to the base using 1-1/4" pocket hole screws.

-
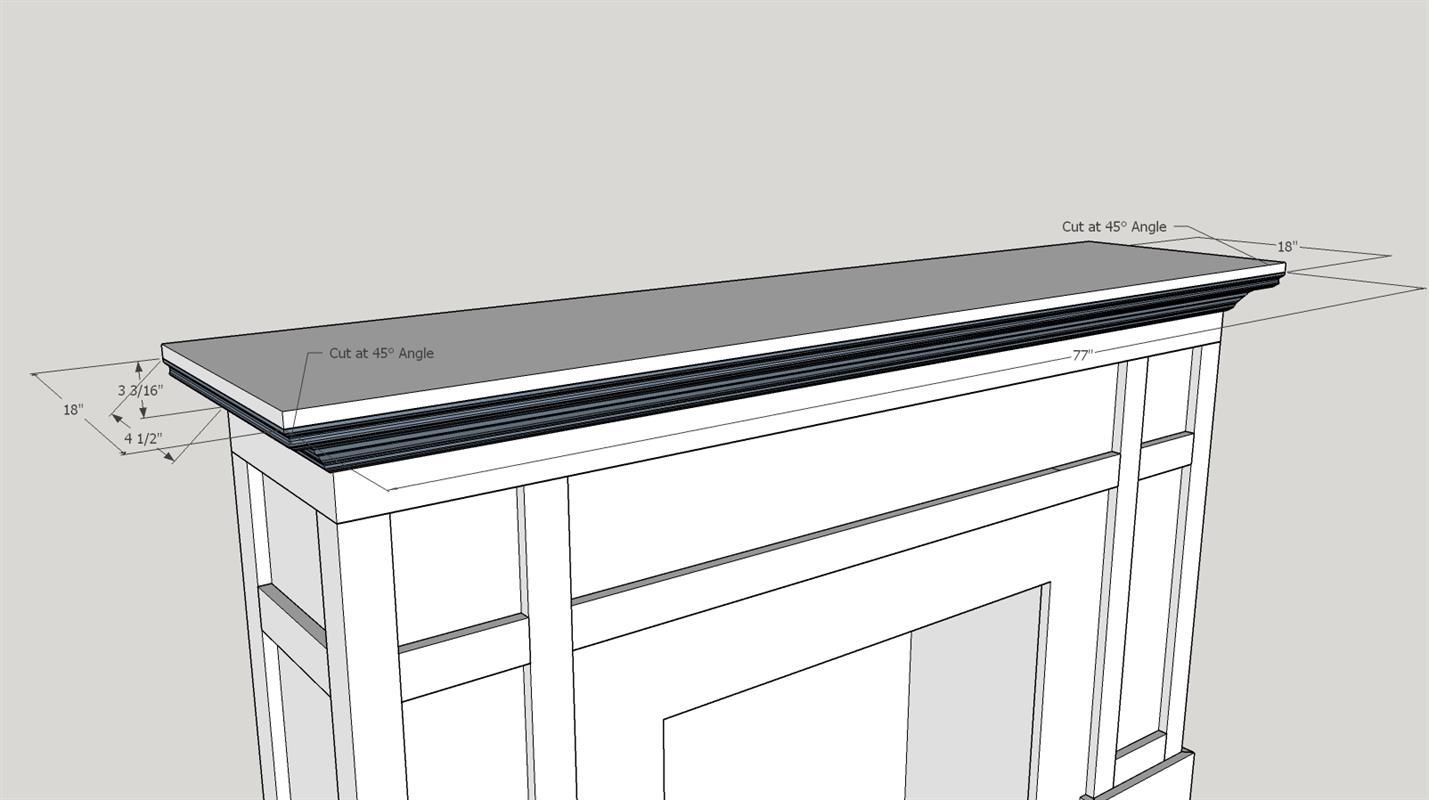
Attach Mantel Top
Center and attach the FIREPLACE MANTEL TOP, leaving 3-3/4" reveal on both sides. Use 1-1/4" pocket hole screws to attach.

-
Attach Top Face Trim
Attach the TOP FACE BOARD and TOP SIDE BOARDS as shown. You will need to make 45° angle cuts to meet at the corners as shown. Attach with wood glue and 1-1/4" brad nails.
-
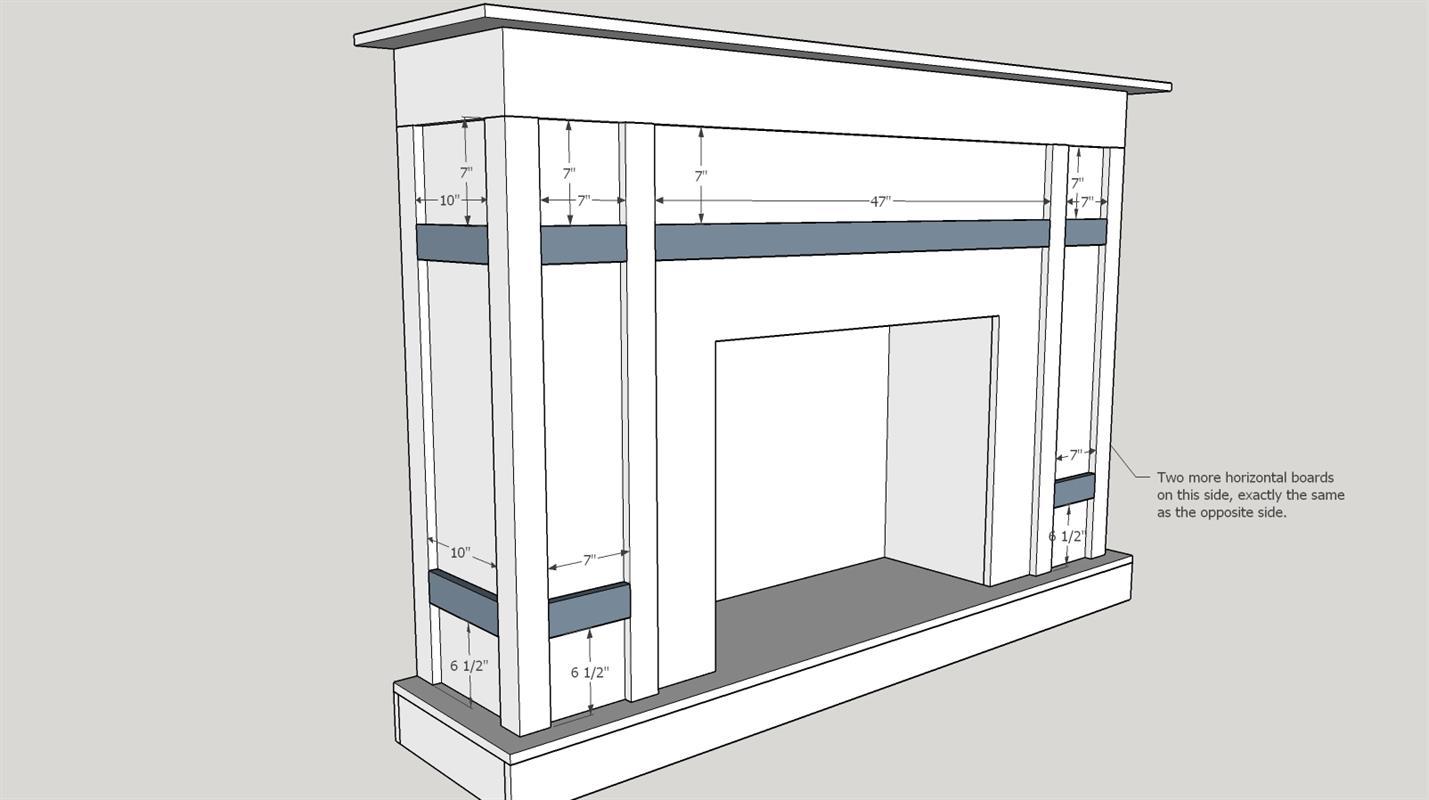
Attach Vertical Face Boards
Cut a 45° angle on one face of 4 of the VERTICAL FACE BOARDS. These boards will be used for the corners. See diagram. Attach as shown with wood glue and 1-1/4" brad nails.
-
Attach Horizontal Face Boards
Attach all of the HORIZONTAL FACE BOARDS (4-7", 4-10", 1-47") as shown using wood glue and 1-1/4" brad nails.
-
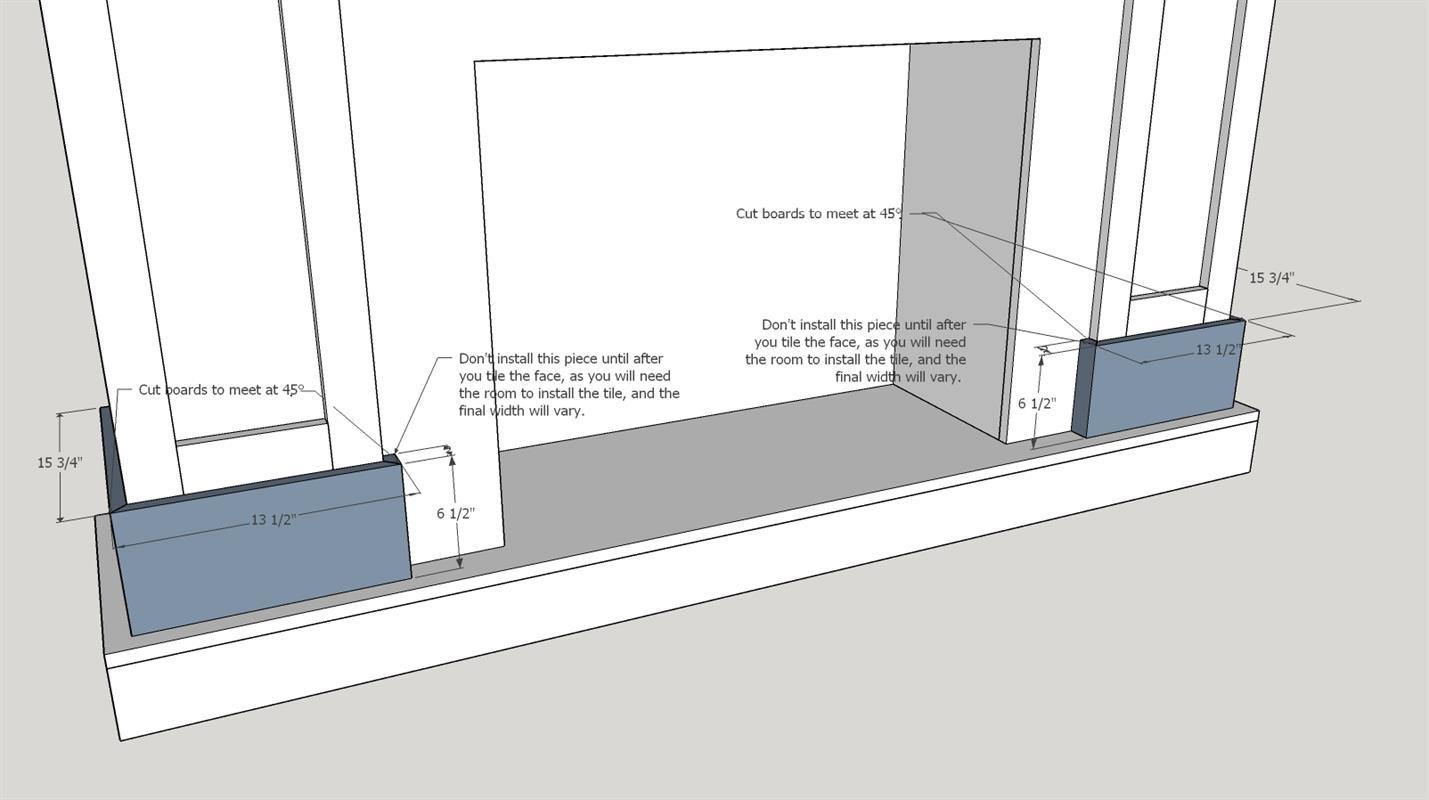
Attach Base Trim Boards
Attach BASE TRIM SIDE BOARDS and BASE TRIM FRONT BOARDS as shown, cutting a 45° angle on the boards that meet at each corner. For the small piece that butts up to the fireplace, save some of this lumber to complete that piece once you've tiled or decided on your finish in that area (as noted on the diagram).
-
Attach Crown under Mantel
Attach the MANTEL CROWN MOLDING SIDES and MANTEL CROWN MOLDING FACE at a 45° angle, and meeting at a 45° angle on both corners, as shown in the diagram. Secure with wood glue and 1-1/4" brad nails (or longer if you need). Be careful you don't aim your nailer too high or you could puncture through the MANTEL TOP. Note: You may need a helper to hold the front crown piece in place.
-
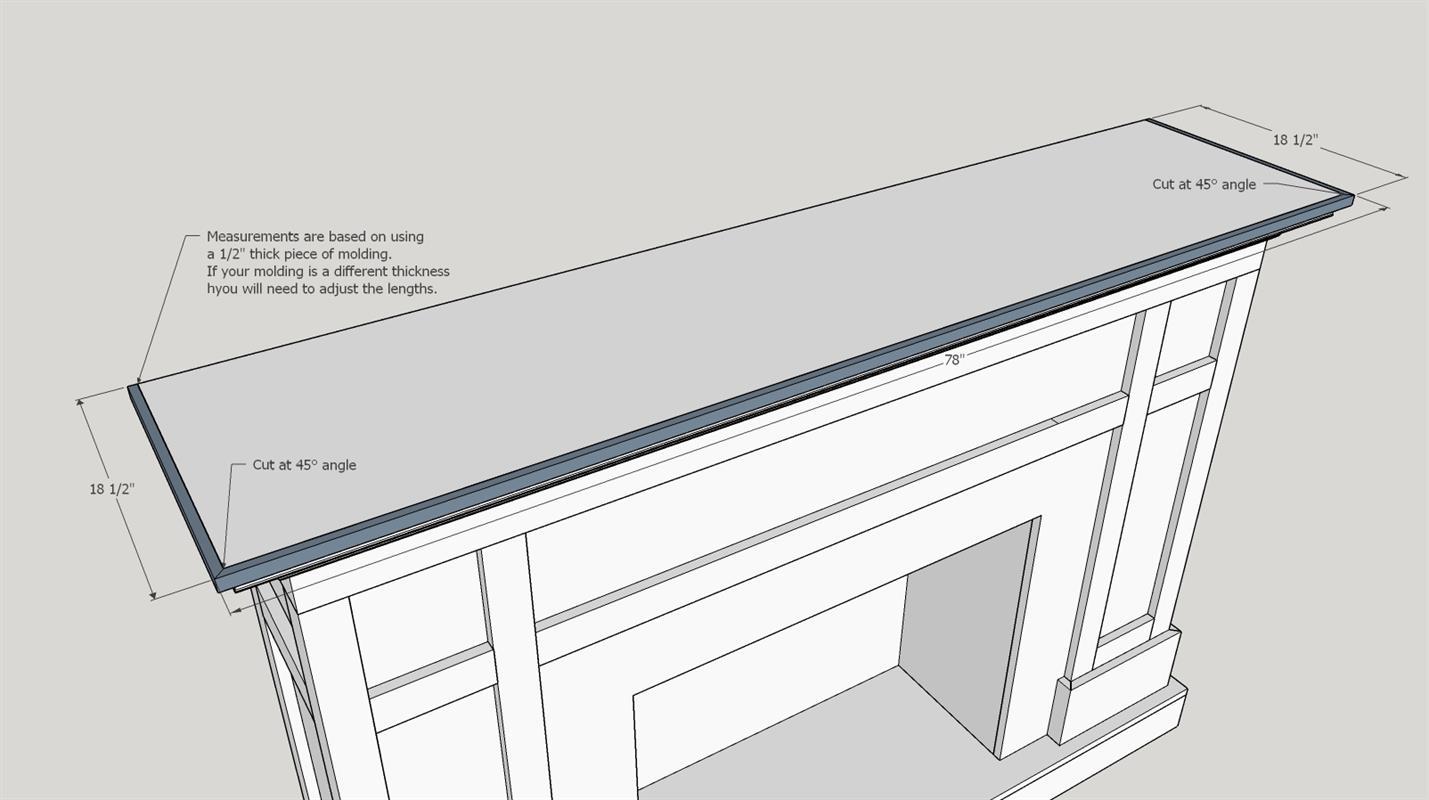
Attach Edge Trim to Mantel
I used a piece of 1/2" thick x 3/4" molding to trim out the fireplace. There are multiple options available at your hardware store for 3/4" molding. Cut at 45° angles on the two front corners as shown in the diagram.
-
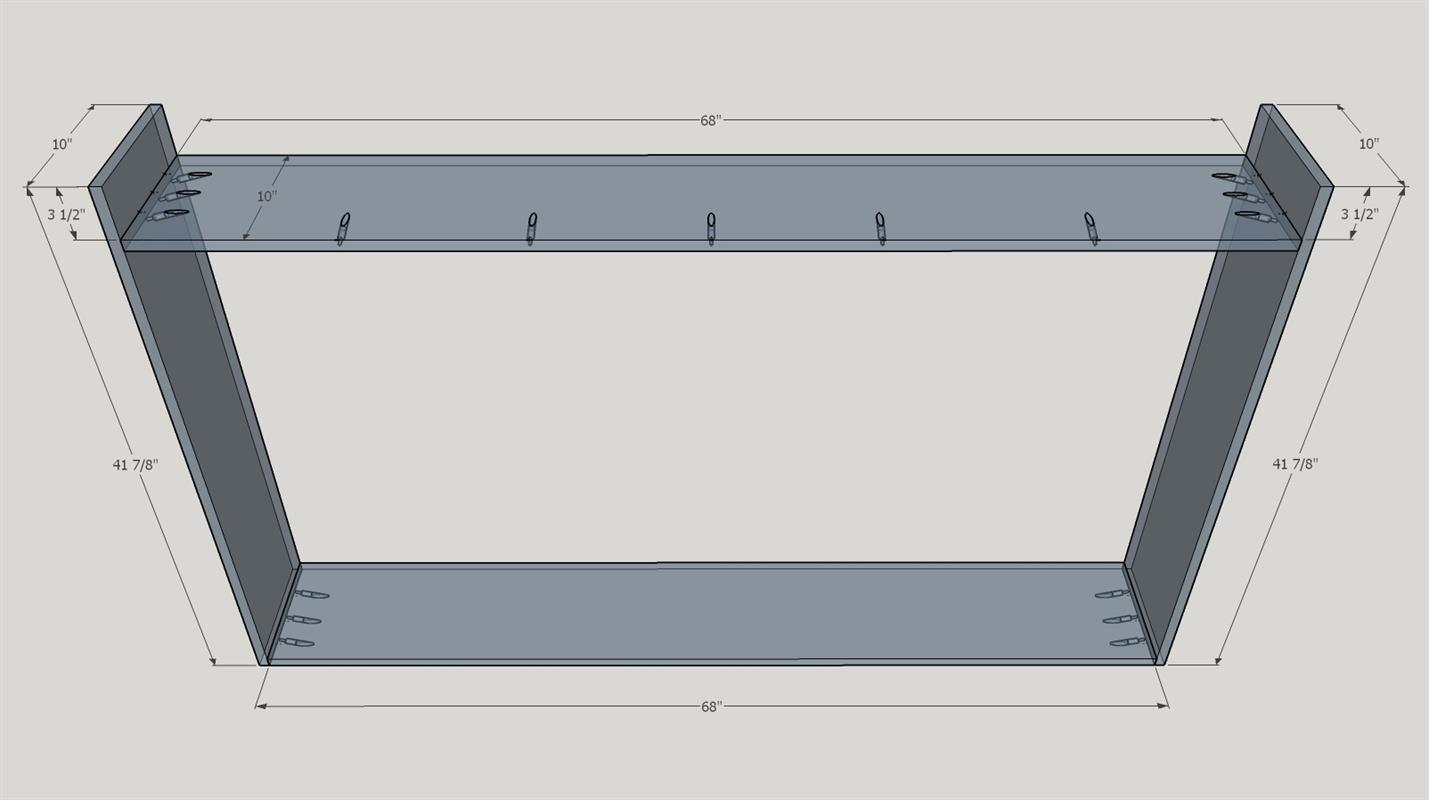
Create Overmantel Box
Attach the OVERMANTEL BOX SIDES to the OVERMANTEL BOX TOP AND BOTTOM to create the box frame. The top piece will attach 3-1/2" from the top as shown on the diagram. Secure with wood glue and 1-1/4" pocket hole screws.
-
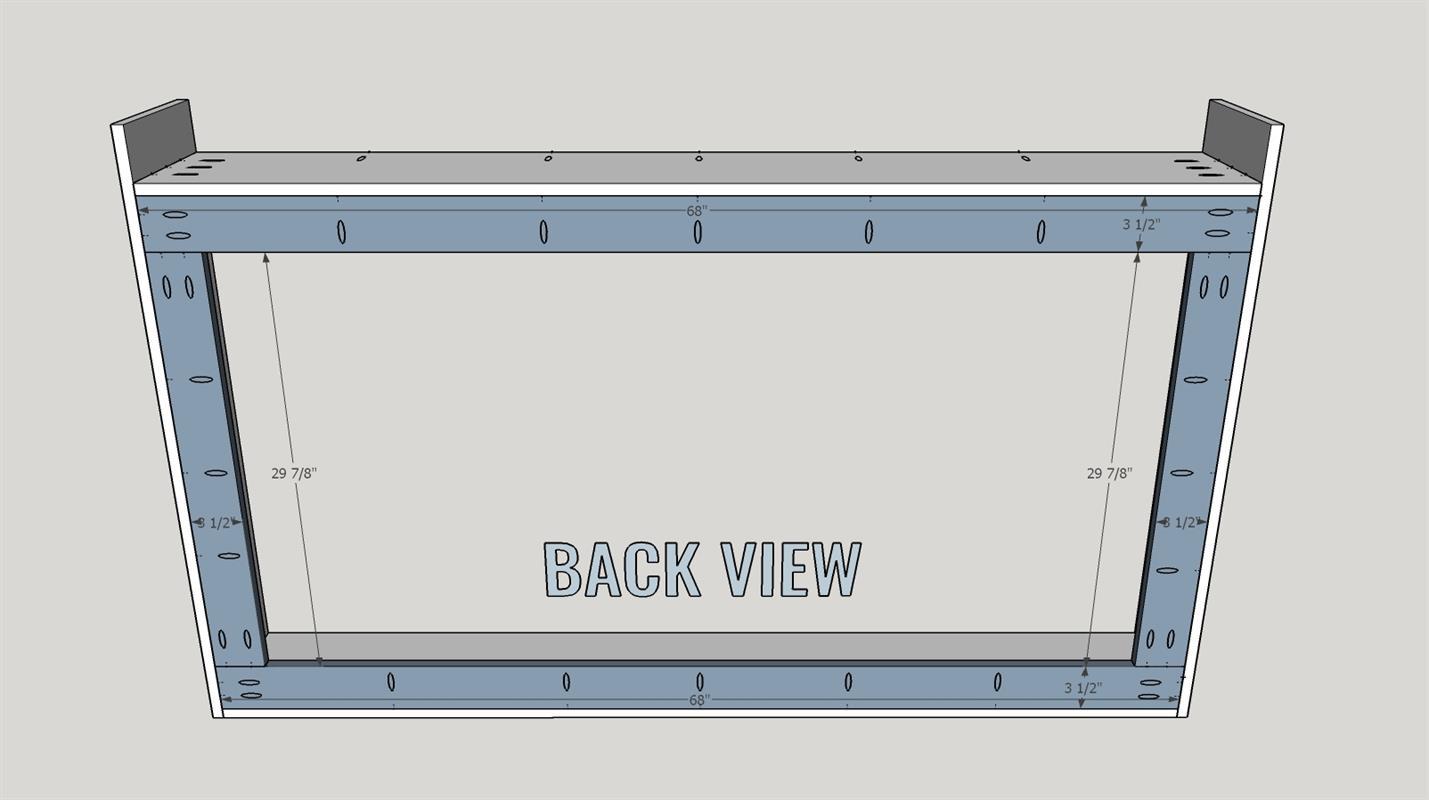
Overmantel Inside Back Assembly
Attach OVERMANTEL BOX BACK VERTICAL and HORIZONTAL pieces as shown in the diagram using wood glue and 1-1/4" pocket hole screws.
-
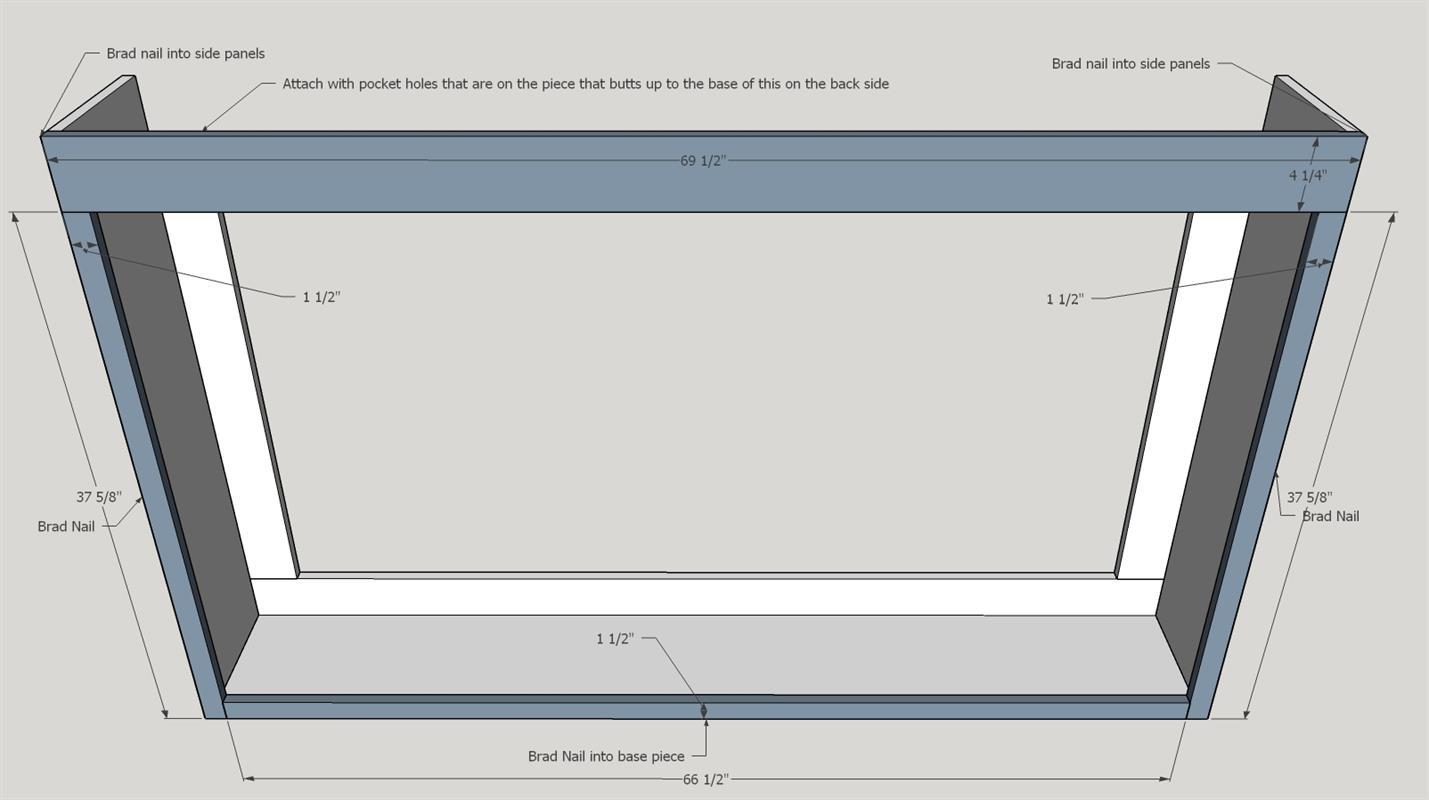
Attach Overmantel Face Boards
Attach OVERMANTEL BOX TOP FACE, OVERMANTEL BOX FACE VERTICAL and HORIZONTAL pieces as shown in the diagram with wood glue and 1-1/4" pocket hole screws at the top, and brad nails on the side and bottom pieces.
-
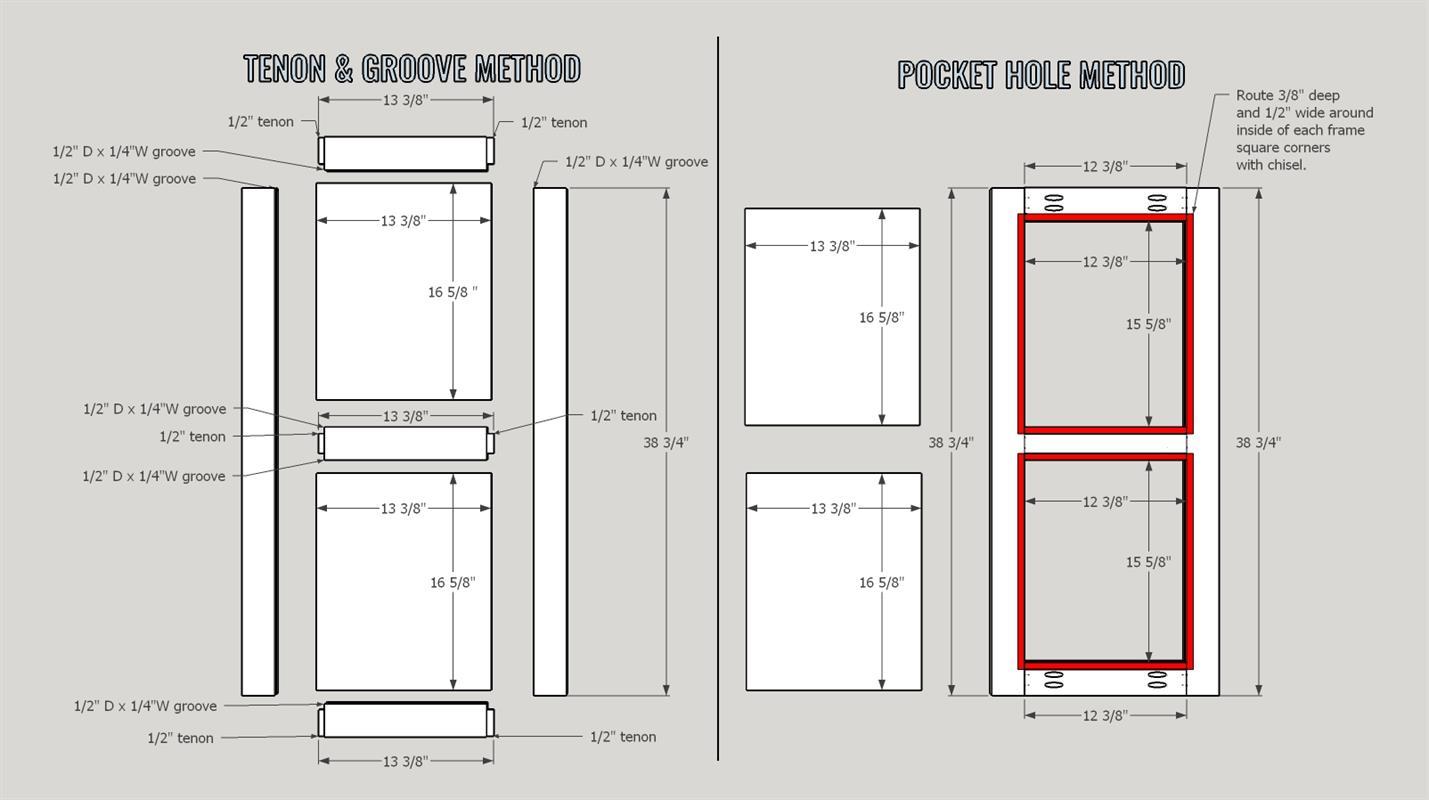
Build Four Doors
Build four doors, either using the TENON & GROOVE METHOD or POCKET HOLE METHOD. Both are shown on the attached diagrams. You will be using the OVERMANTEL DOOR STILES, RAILS and PANELS from the parts list. If you opt to use the POCKET HOLE METHOD, you will need to trim your stiles 1" shorter. You will also need to route out a groove in the back of the door openings to glue the DOOR PANELS into (see diagram). Add a bit of caulking around the outside of the panel after you've inserted it to keep it in place.
-
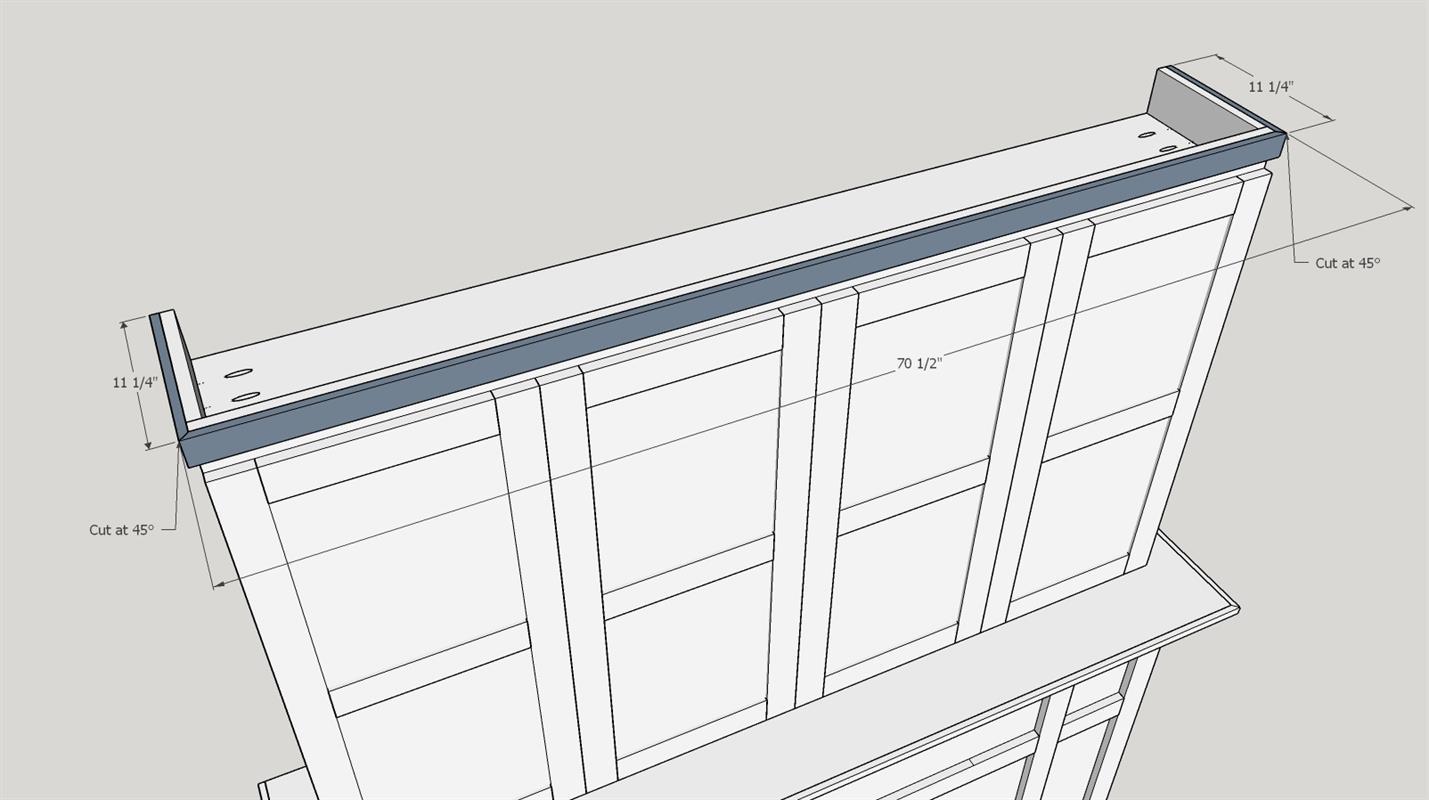
Add Top Trim
Add OVERMANTEL TOP TRIM SIDES and FRONT with the two front corners meeting at 45° each. You may need to make some scribing adjustments if your ceiling is not straight.
-
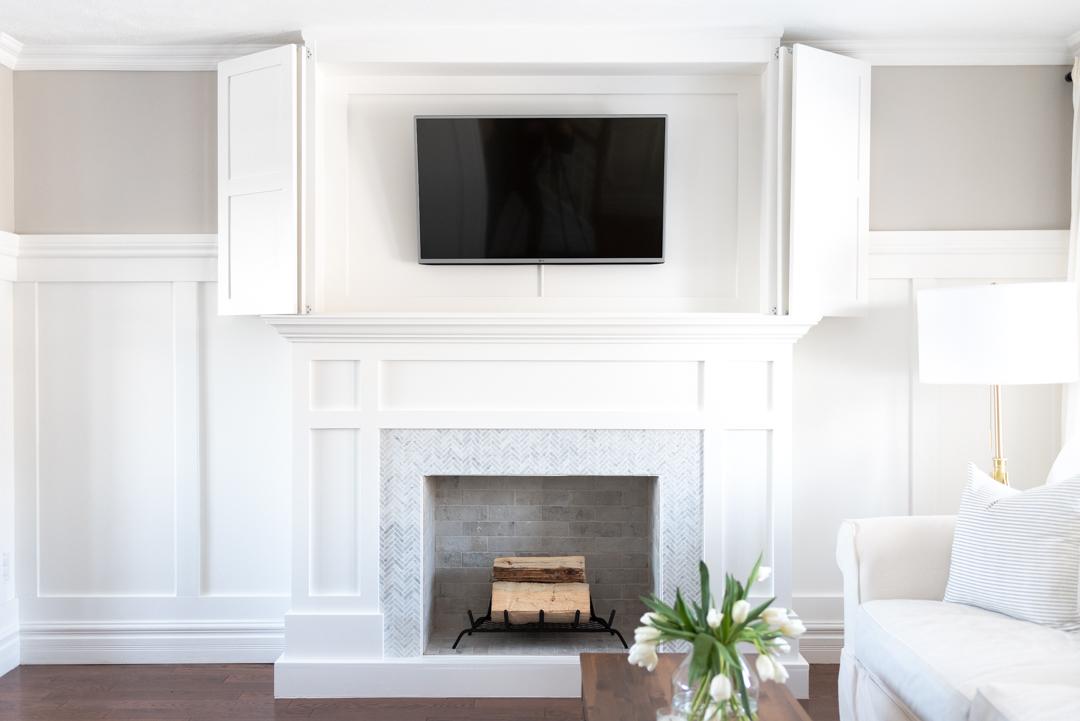
POWER & VIDEO CABLES
If you are going to build the TV cabinet over the fireplace, you will need to plan out your electrical components. This will be different for everyone, but if you need to move outlets, please consult a licensed electrician to do so. To maintain code, make sure all outlets are accessible. (ie. If your outlet is behind the fireplace, you will need to put an access hole on one side of the fireplace so that you can still get to it.
-
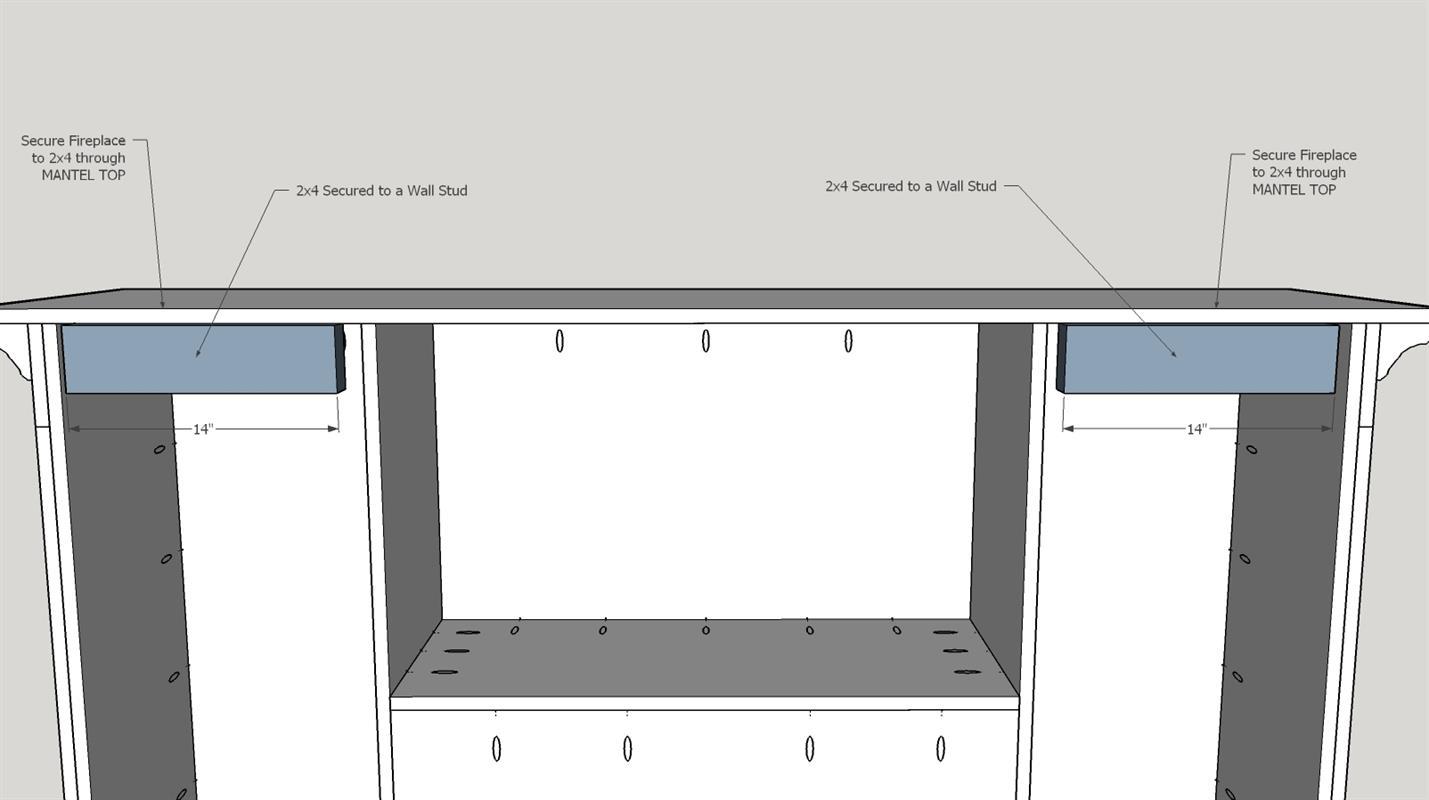
Attach Base to Wall
This will be different for each installation. We suggest attaching a piece of 2x4 to the studs that will sit in the empty voids on either back side of the fireplace. You can then secure the fireplace to the wall through the MANTEL TOP into the 2x4's (see diagram for example). You can also attach one in the center void for extra security.
-
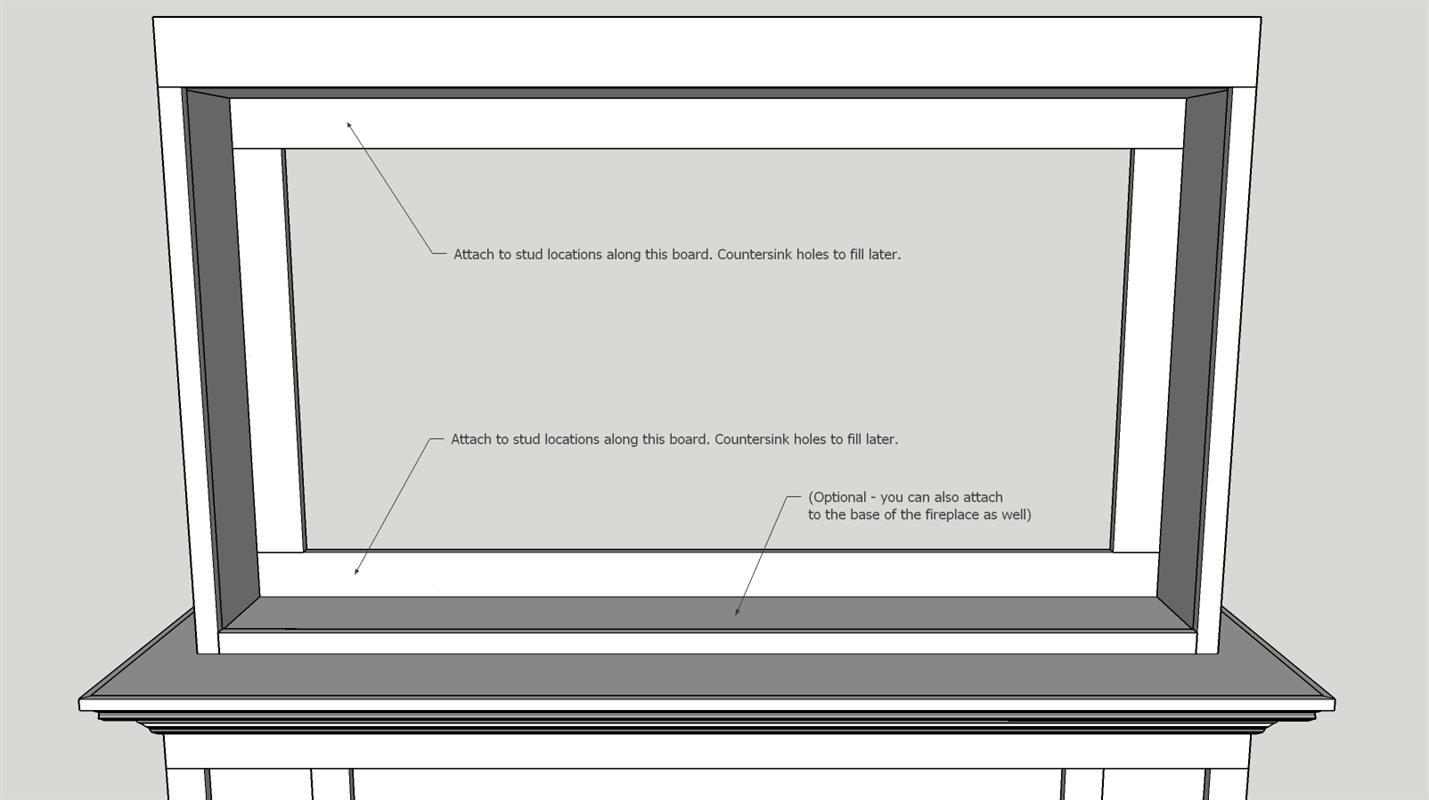
Secure Overmantel to Wall
Place on top of the MANTEL TOP. You may have to plane down some areas at the top of the OVERMANTEL FRAME to fit along your ceiling. Secure to stud locations along this board using 2-1/2" construction nails. Countersink these holes for easy filling later (see diagram).
-
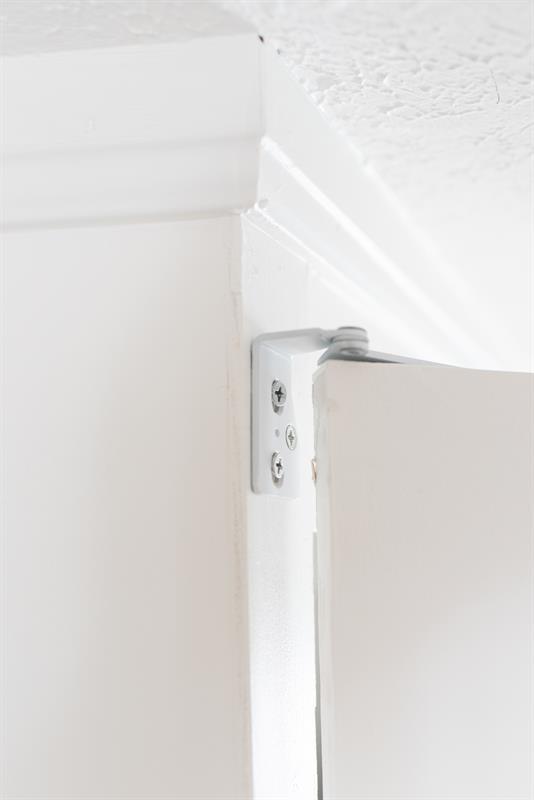
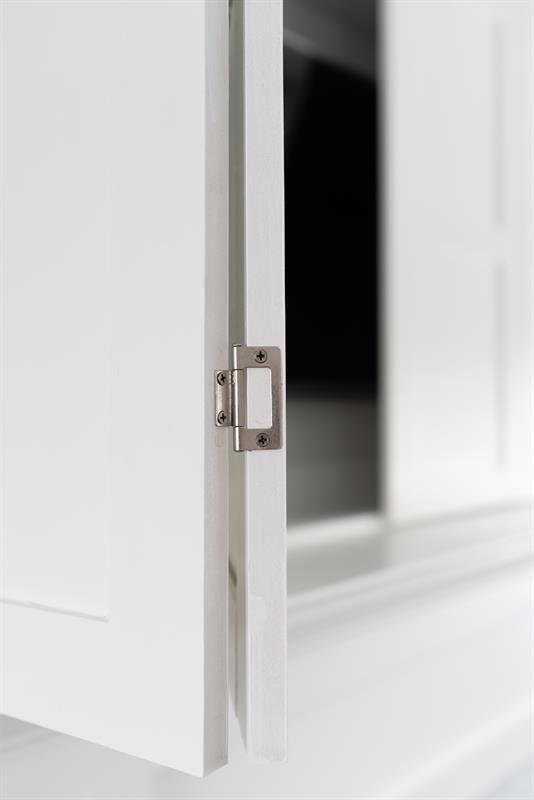
Attach Hinges between doors
Links for Hinges are in the Extra's section.
Attach two of the doors with two non-mortised hinges about 3 - 4" from the top and bottom. Do the same to the other set of two doors. (See image)
-
Caulk and Paint
Caulk all points where there is a void where your lumber meets (ie corners). Caulk where the wall and fireplace and overmantel meet on either side and all edges inside the TV cabinet where it meets the wall.
-
Tile
Tile the firebox with your choice of tile pattern. Tile the front face surround as well. You can alternatively use stick tiles or any element that suits your design and skill level.

-
Attach sets of doors to Overmantel
Links for Hinges are in the Extra's section.
Attach one side of each door set to the OVERMANTLE BOX FACE VERTICAL pieces with the hinges at the top and bottom (see image).