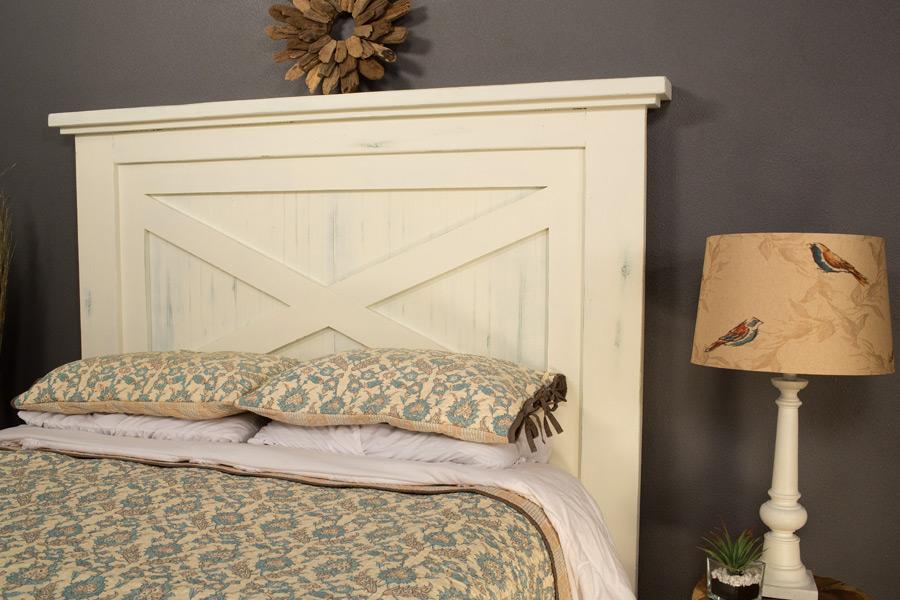


With its casual style, this headboard can blend into a variety of decorating styles. The headboard is sized to fit a Queen-size mattress, and it can easily be bolted to a wood or metal bed frame. Built from off-the-shelf materials from your local home center, and this project can easily be customized with different paint or stain treatments to suit your decor.
Tools
Kreg Tools


Other Tools
-
miter saw (if not using Adaptive Cutting System)

-
cuircular saw (if not using Adaptive Cutting System)
-
tape measure
Materials
Wood Products
- 3 Board , 2x6 x 96"
- 1 Board , 2x4 x 96"
- 1 Board , 1x4 x 96"
- 1 Board , 1x4 x 72"
- 1 Beadboard plywood , 3/16" x 48" x 96"
Hardware & Supplies
- 48 1 1/4" coarse-thread Kreg Pocket-Hole Screws
- 8 2-1/2" coarse-thread Kreg Pocket-Hole Screws
- 6 1-1/4" wood screws
- 40 5/8" wood screws
Cut List & Parts
- 2 Inner Rail , 3/4" x 3 1/2" x 46"
- 2 Inner Stile , 3/4" x 3 1/2" x 30 3/4"
- 2 Short Brace , 3/4" x 3 1/2" x 25"
- 1 Long Brace , 3/4" x 1 1/2" x 51 5/8"
- 1 Upper Outer Rail , 1 1/2" x 3 1/2" x 53"
- 1 Lower Outer Rail , 1 1/2" x 3 1/2" x 53"
- 2 Leg , 1 1/2" x 5 1/2" x 57 3/4"
- 1 Lower Cap , 3/4" x 3 1/2" x 66"
- 1 Upper Cap , 1 1/2" x 5 1/2" x 68"
- 2 Back Panel , 3/16" x 30" x 36"

Directions
-
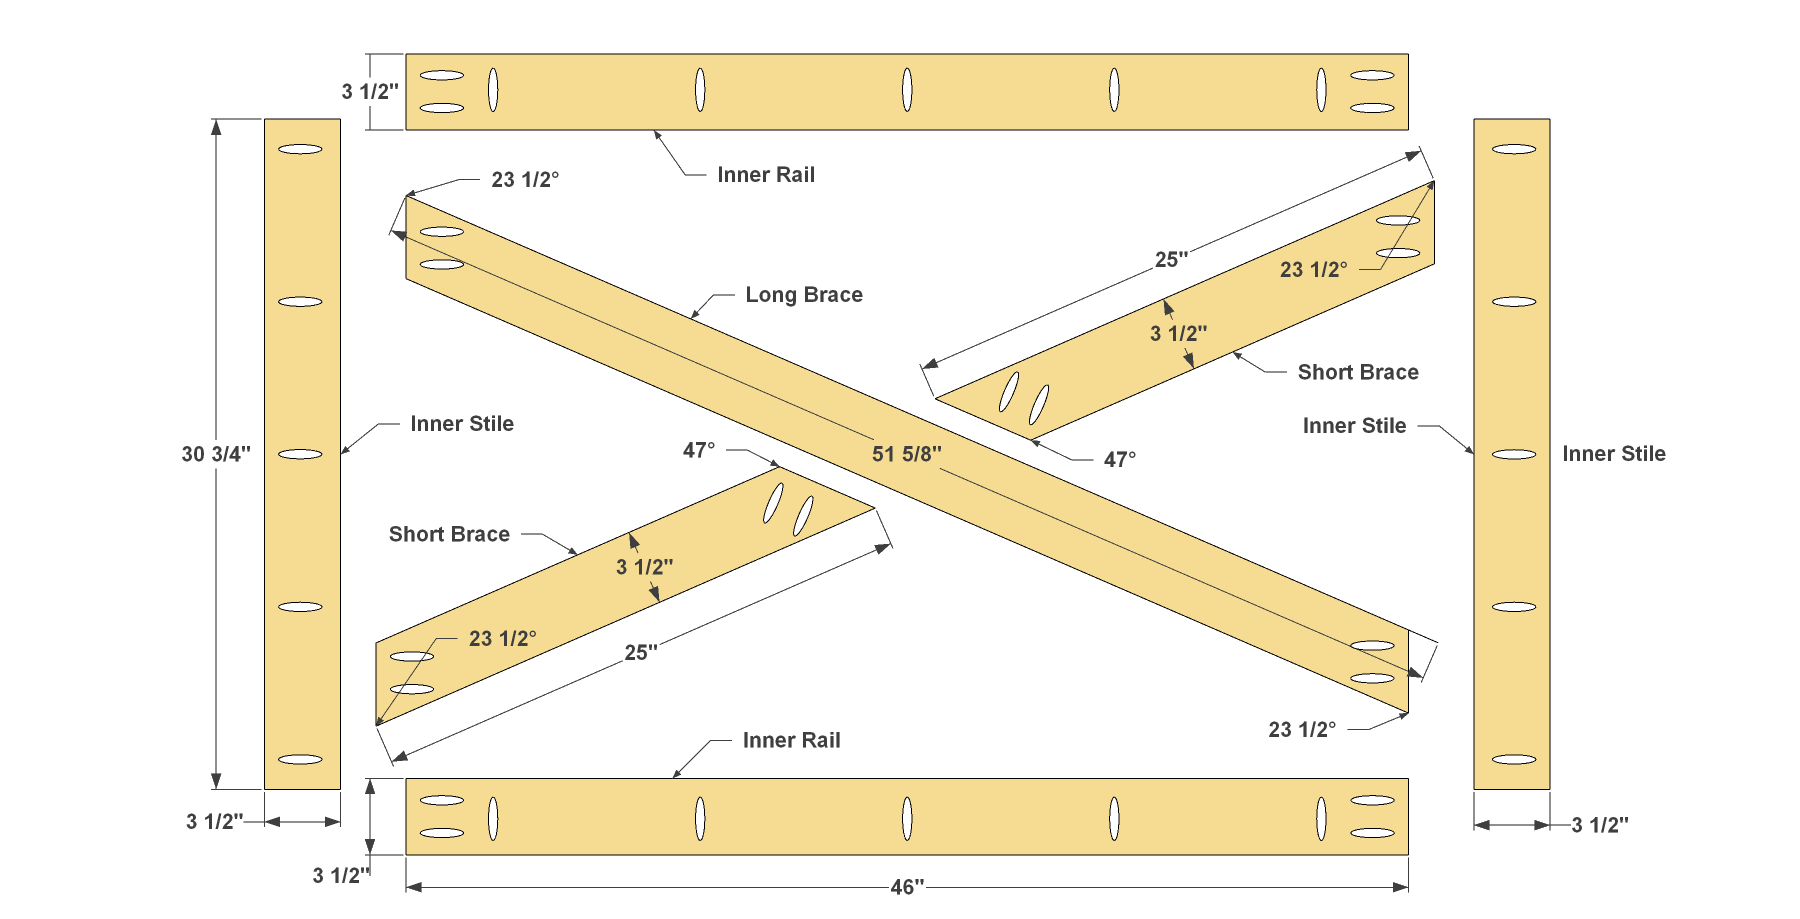
Cut the Inner Frame Parts
Using the Cutting Diagram as a guide, cut two Inner Rails and two Inner Stiles to length from 1x4 boards. Also cut one Long Brace (D), mitering both ends at 23-1/2°. An easy way to get the length and angles exact for this is to temporarily line up the Stiles and Rails, then lay your board in place as the Long Brace will sit, and mark the ends. That will show you the correct length, as well as the correct angles—which should fall at 23 1/2°.
Next, you can cut the two short braces two Short Braces. Keep your miter saw set at the same angle you just used for the Long Brace, and cut one end of each Short Brace. Then position then cut the other end to fit at 47°.
Now Set your Kreg® Pocket-Hole Jig for 3/4"-thick material, and then drill pocket holes in each of the pieces, as shown. Sand the faces and edges of the pieces smooth, but don’t sand the ends.
-
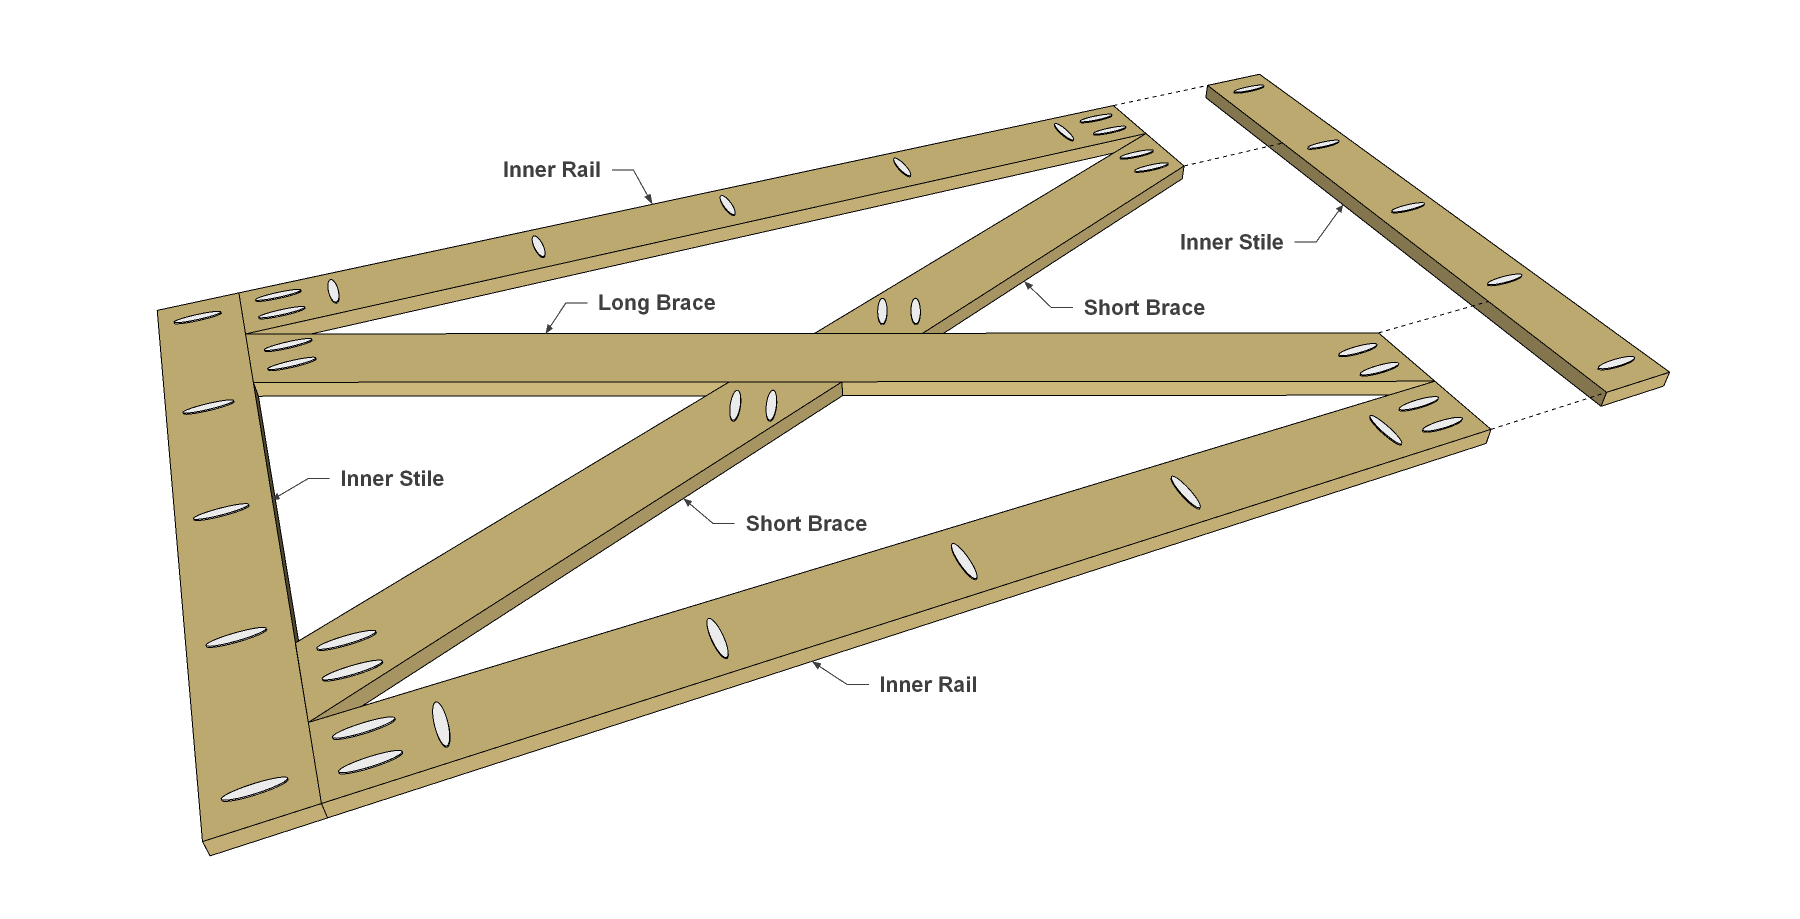
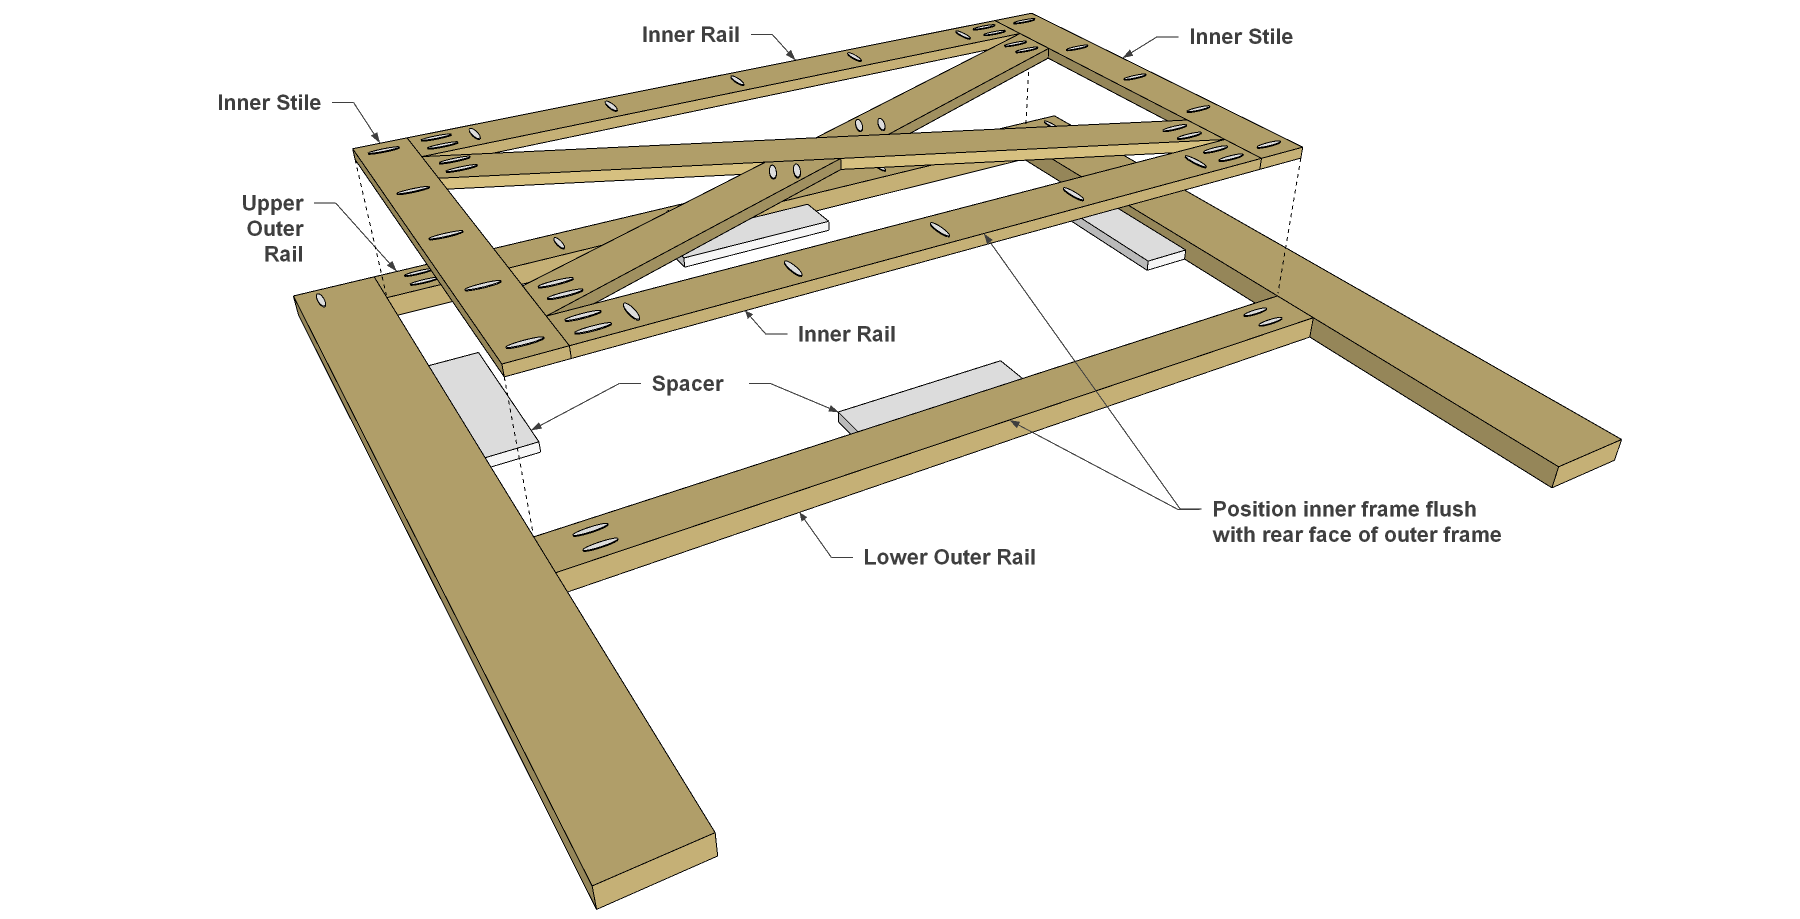
Assemble the Inner Frame
Now you can assemble the inner frame. First, lay all the pieces out to ensure that everything fits together tightly. Make sure the pocket holes in the Inner Rails and Inner Stiles are pointing outward, so you’ll be able to attach them to the outer frame later. Then assemble the rails and braces using 1-1/4" Kreg Pocket-Hole Screws. We built our headboard from pine, so we used coarse-thread screws.
-
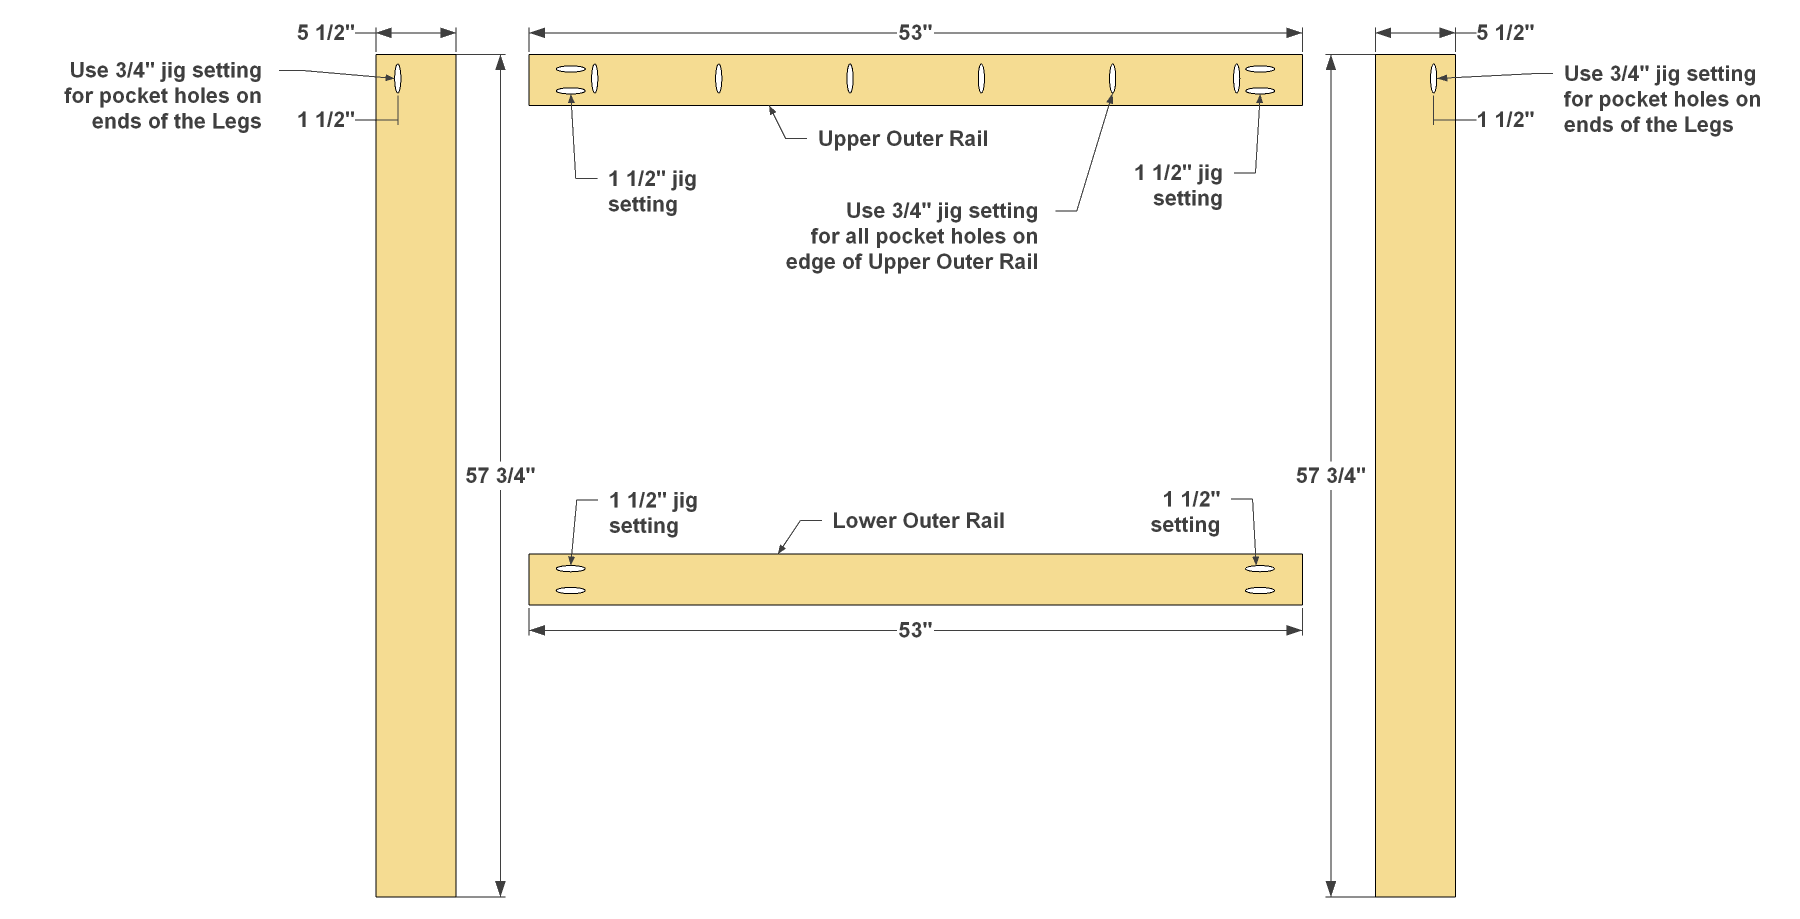
Make the Legs and Outer Rails
Using the Cutting Diagram as a guide, cut two one Upper Outer Rail and one Lower Outer Rail to length from 2x4 boards. Also cut two Legs to length from 1x6 boards. With Your Kreg® Pocket-Hole Jig still set up for 3/4"-thick material, drill a single pocket hole in the end of each Leg, as shown. Also drill pocket holes along one edge of the Upper Outer Rail, as shown. These will be used to attach the top cap assembly later. Then set your jig and bit for 1 1/2"-thick material, and drill pocket holes at the ends of both Outer Rails, as shown. Sand the faces and edges of these parts smooth, but don’t sand the ends.
-
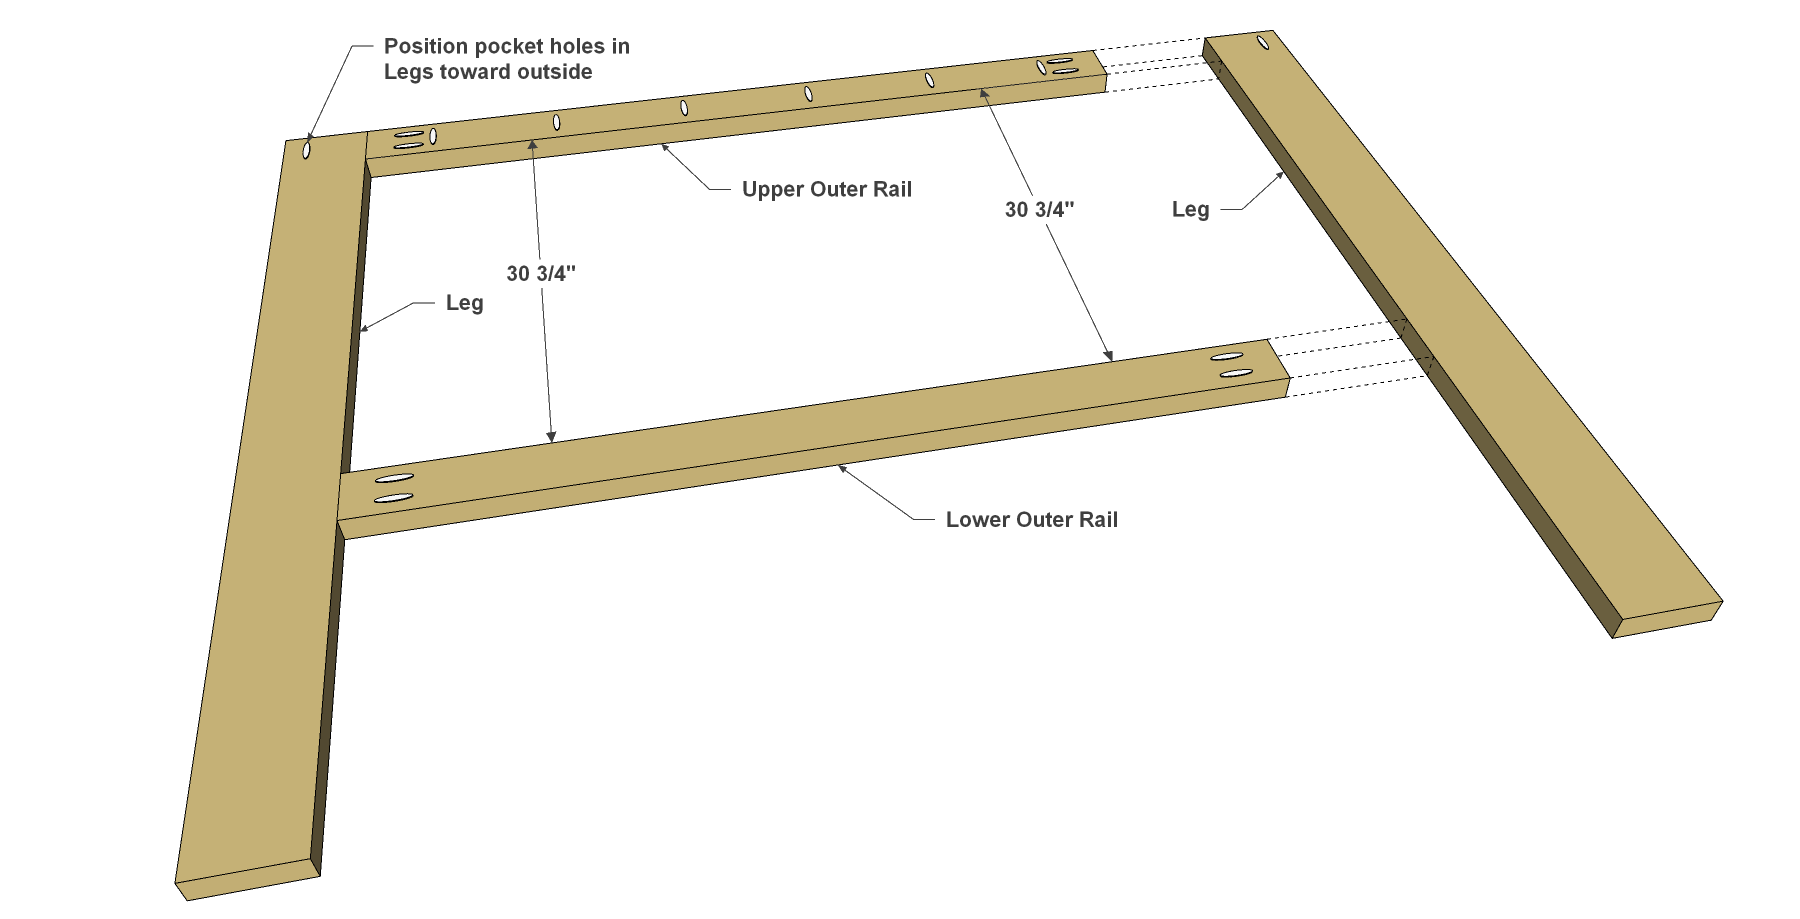
Assemble the Outer Frame
Now you can attach the Upper Outer Rail and Lower Outer Rail to the Legs. For these joints, you’ll want to spread glue on the ends of the Rails. Then attach them to the Legs where shown using 2 1/2" Kreg Pocket-Hole Screws.
-
Bring the Assemblies Together
Lay the outer rail/leg assembly face down on a flat work surface. Then, place scraps of your 1x stock inside the framed area. Lay the inner frame/brace assembly on the scraps face down, so that the assembly rests flush with the rear face of the Legs and Rails. Attach the assembly using 1-1/4" Kreg Pocket-Hole Screws.
-
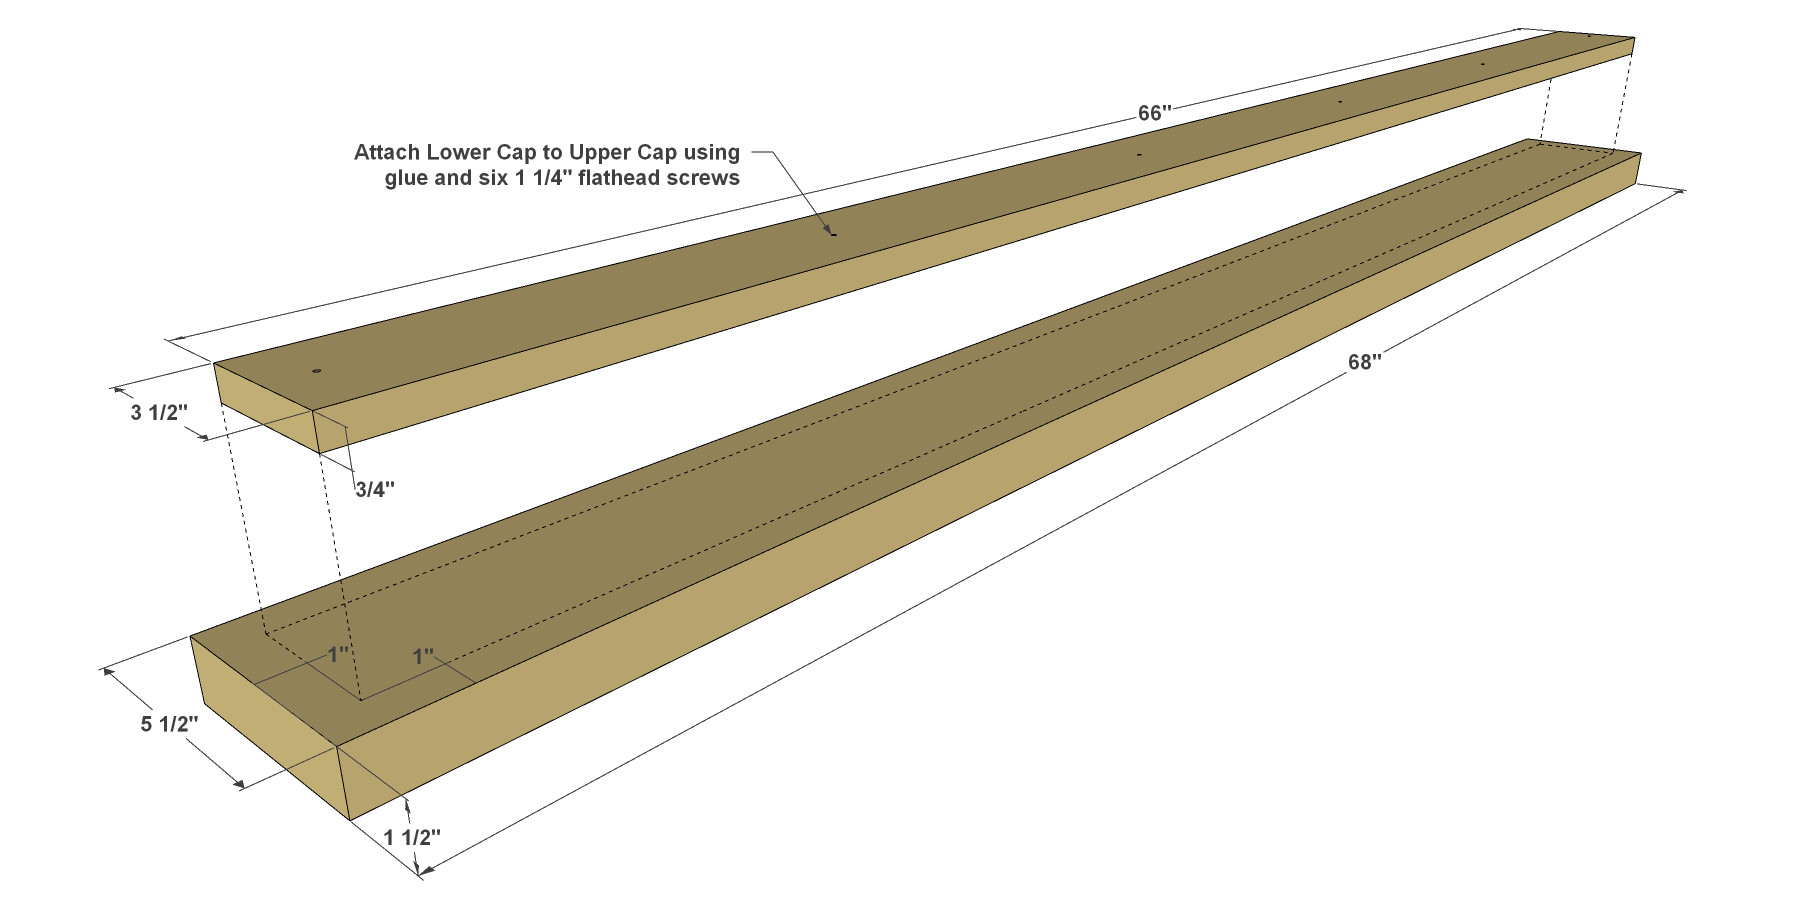
Cap It Off
Using the Cutting Diagram as a guide, cut one Lower Cap to length from a 1x4 board. Also cut one Upper Cap to length from a 2x6 board. Center the Lower Cap on the Upper Cap, and attach it using 1-1/4" flathead wood screws.
-
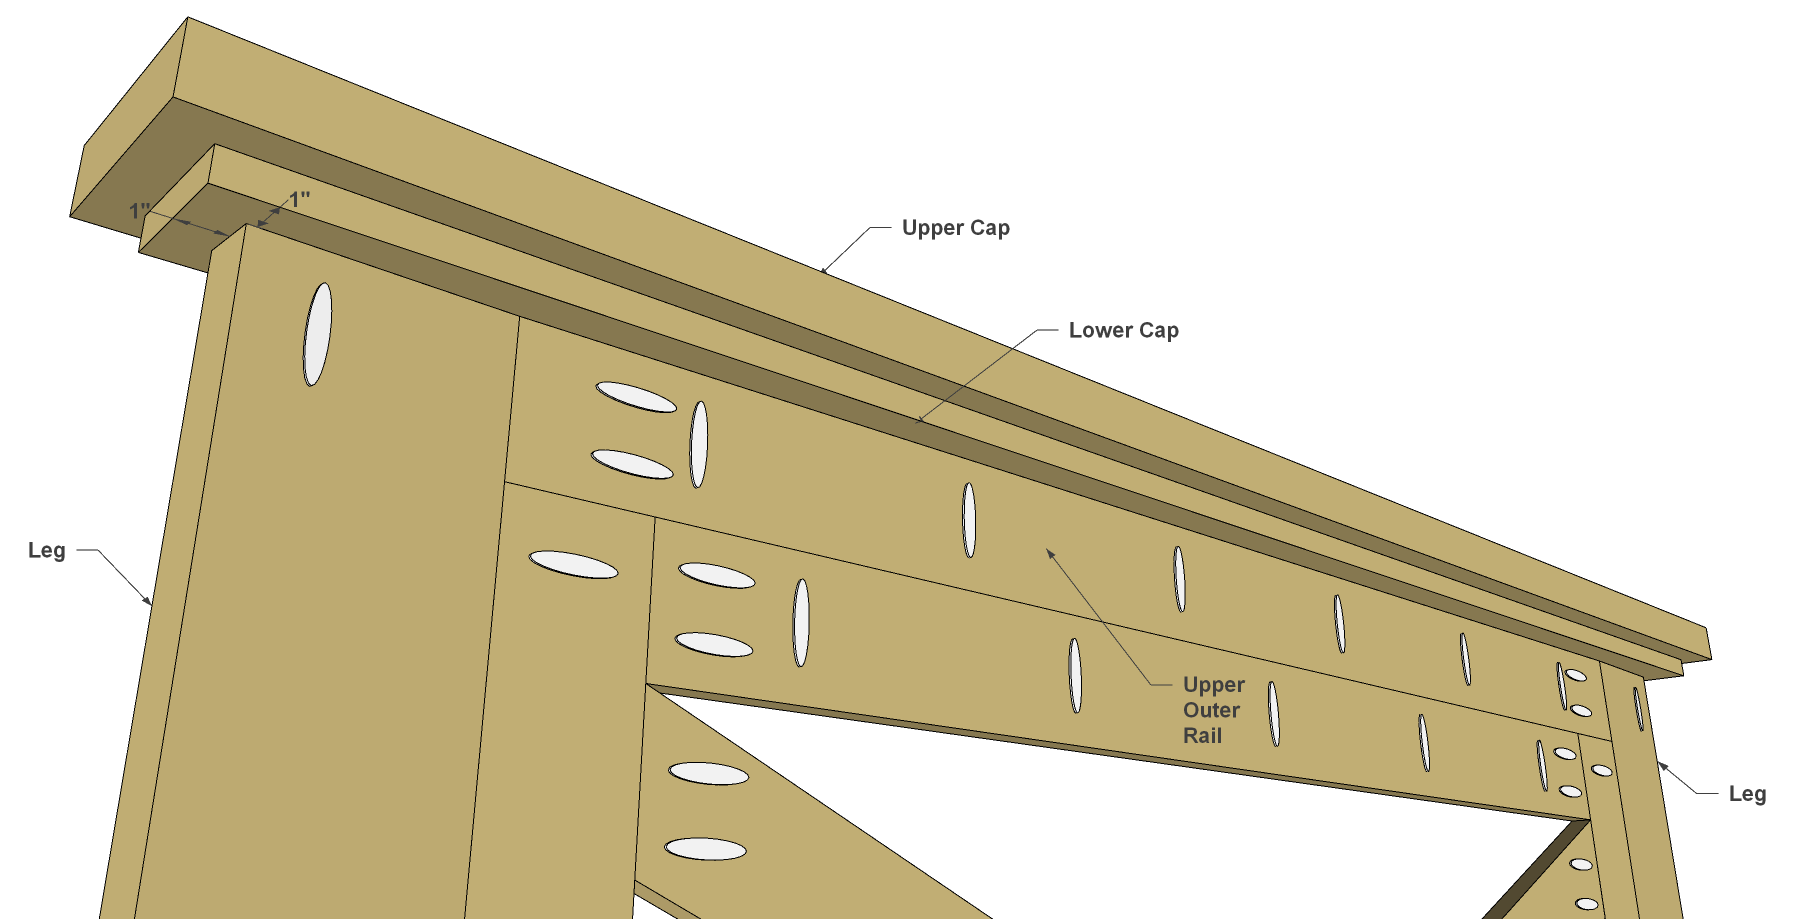
Attach the Cap
Center the cap assembly on the leg/frame assembly so there are equal overhangs on the front, back, and ends. Attach the cap assembly to the Upper Outer Rail and to the Legs using 1-1/4" Kreg Pocket-Hole Screws.
-
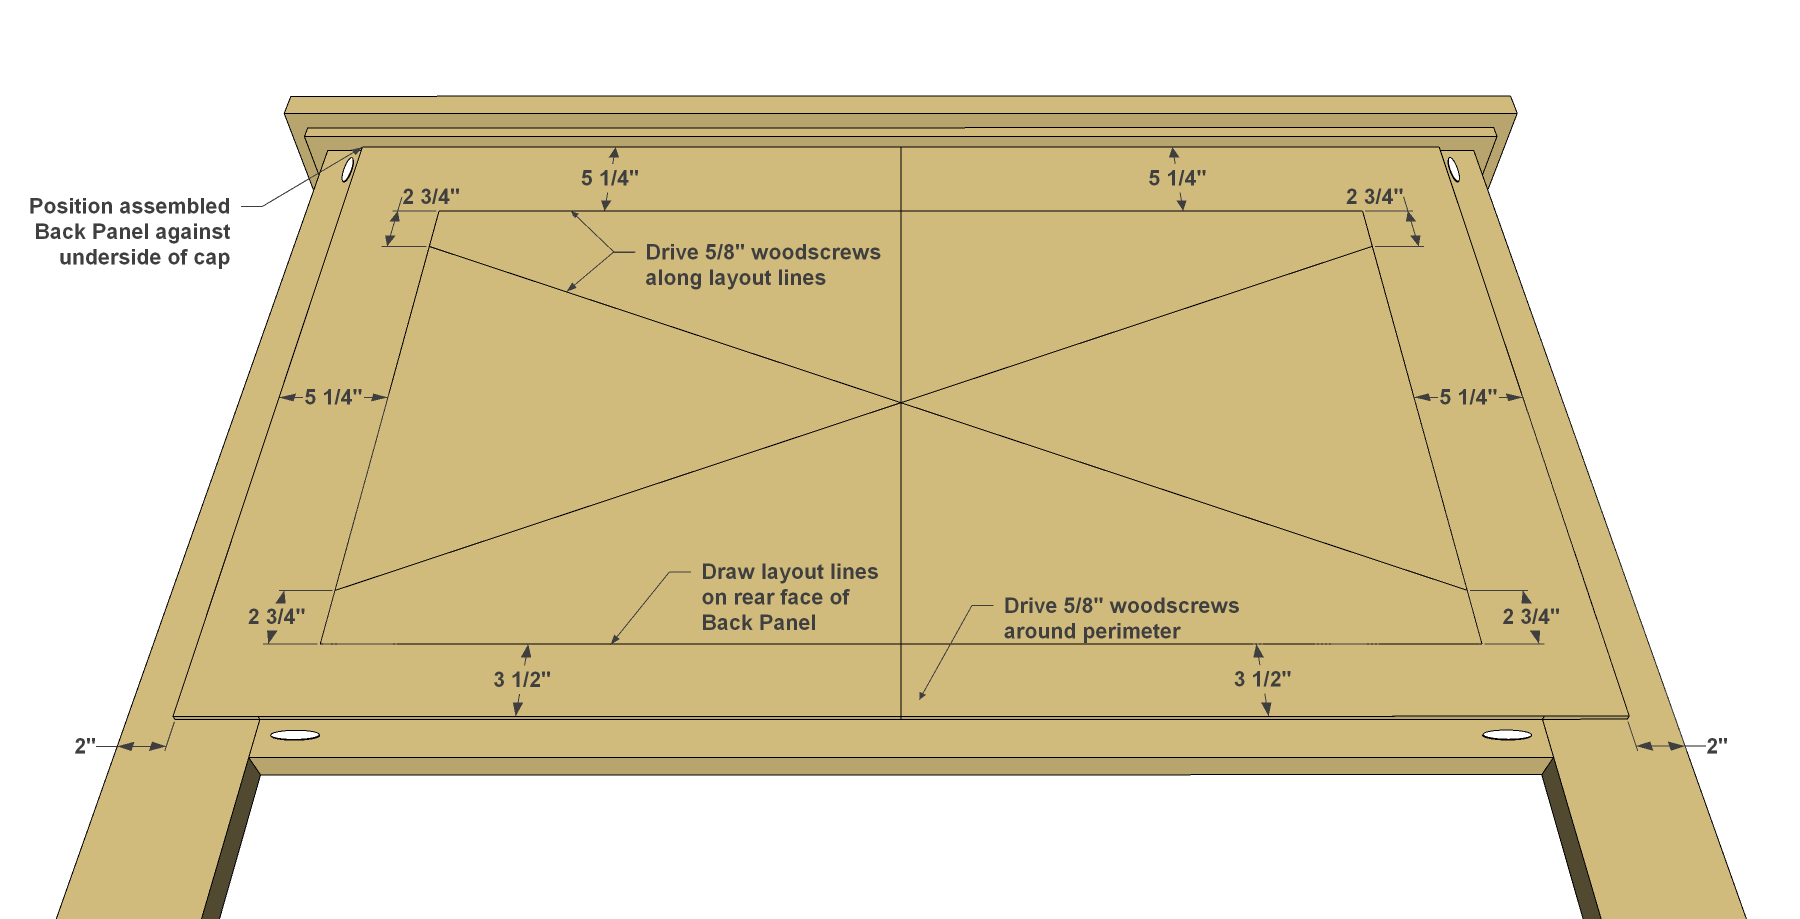
Bring on the Back
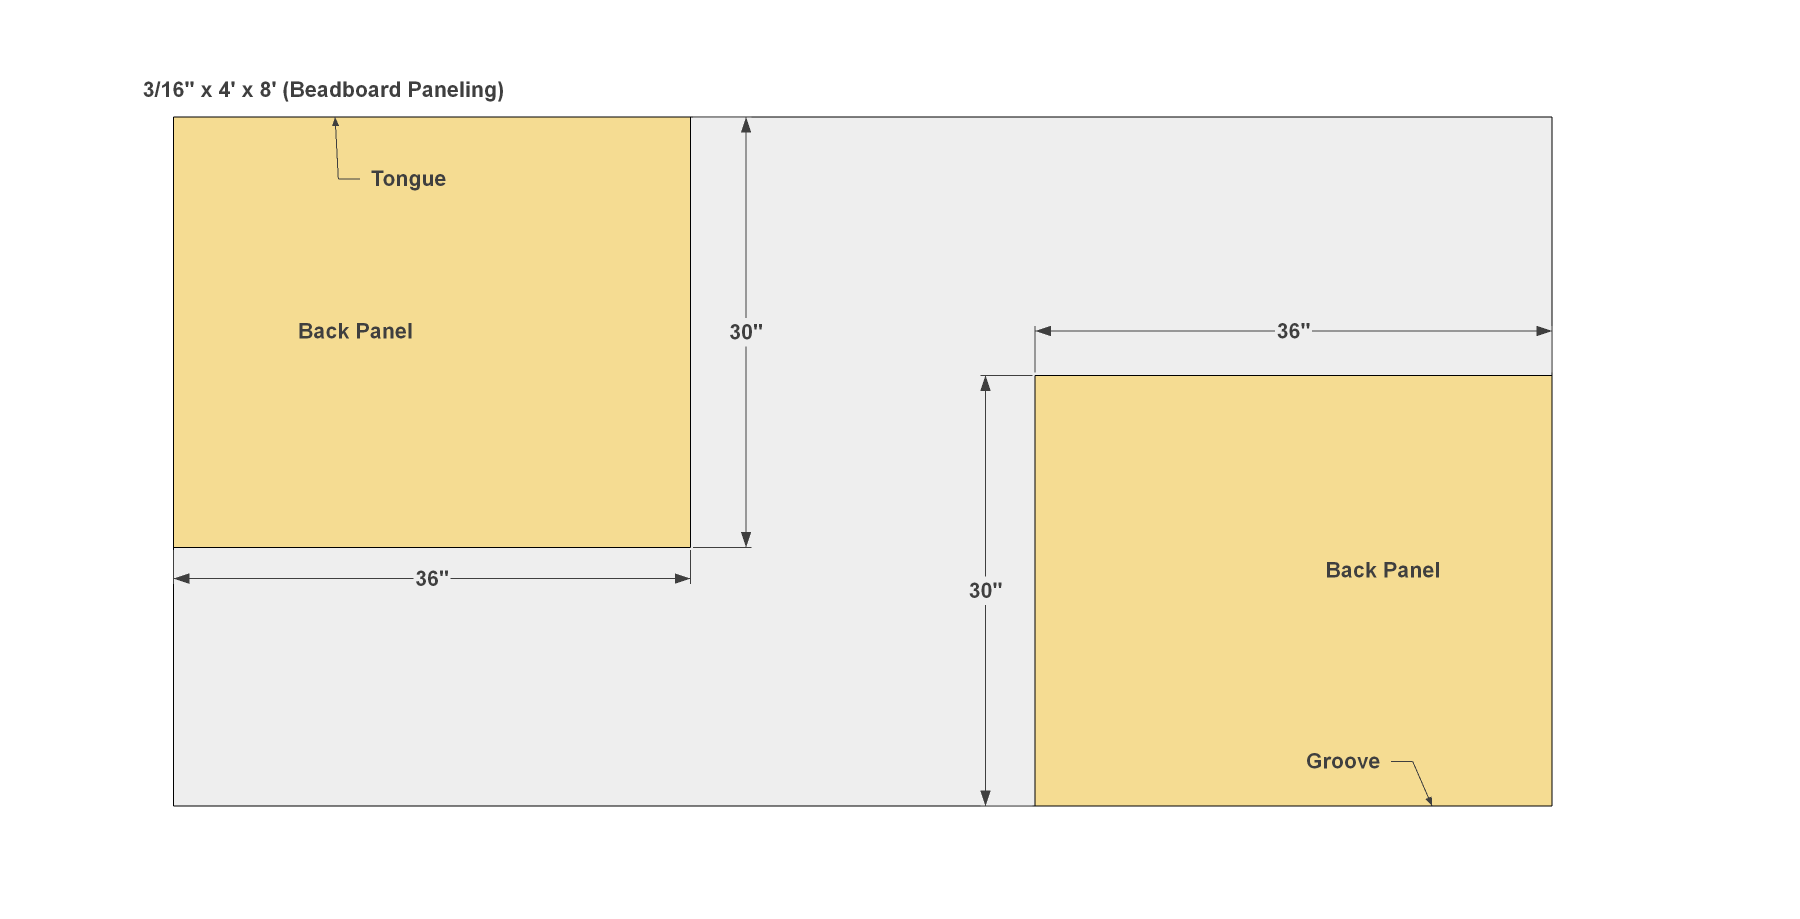
Using the Cutting Diagram as a guide, cut two Back Panels to size from a sheet of beadboard plywood. They’re cut as shown so the tongue and groove on the sheet will line up when installed. Position the panels on the assembled frame so that the two pieces meet at the center of the “X” formed by the braces. Attach the panels using 5/8" flathead wood screws, as shown.
With everything complete, do any touch-up sanding, and then paint or finish the headboard as you see fit. We created a worn look for ours. First, we applied a coat of gray stain, and then added off-white paint after the stain dried. Then we sanded some areas by hand with 120-grit sandpaper to expose the stain.