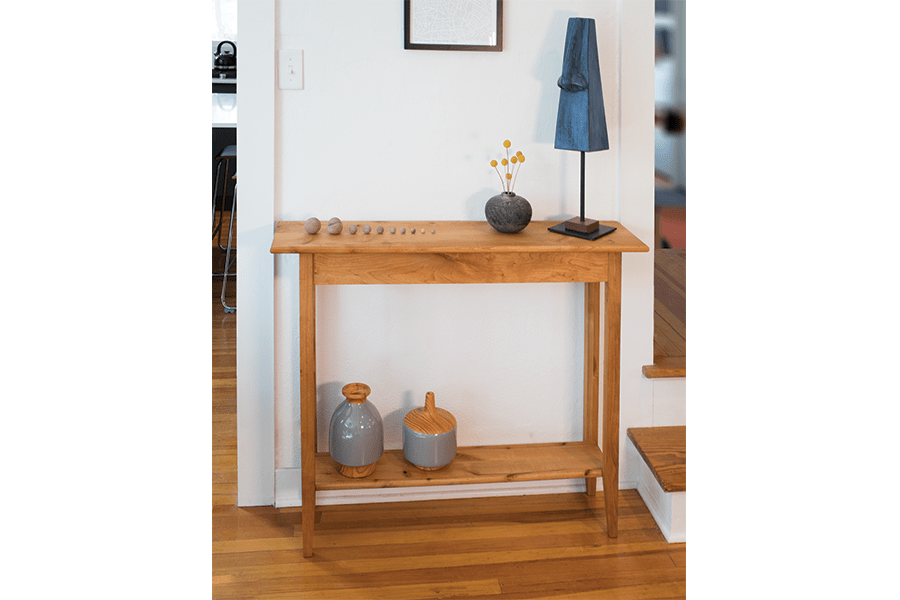


This compact console table is perfect to place behind a sofa or in a hallway. Tapers at the bottom of the legs and a “bullnose” profile on the shelf and top—are easy to add, if desired. We made ours from alder, which has beautiful color and grain, but just about any wood species would work.
Tools
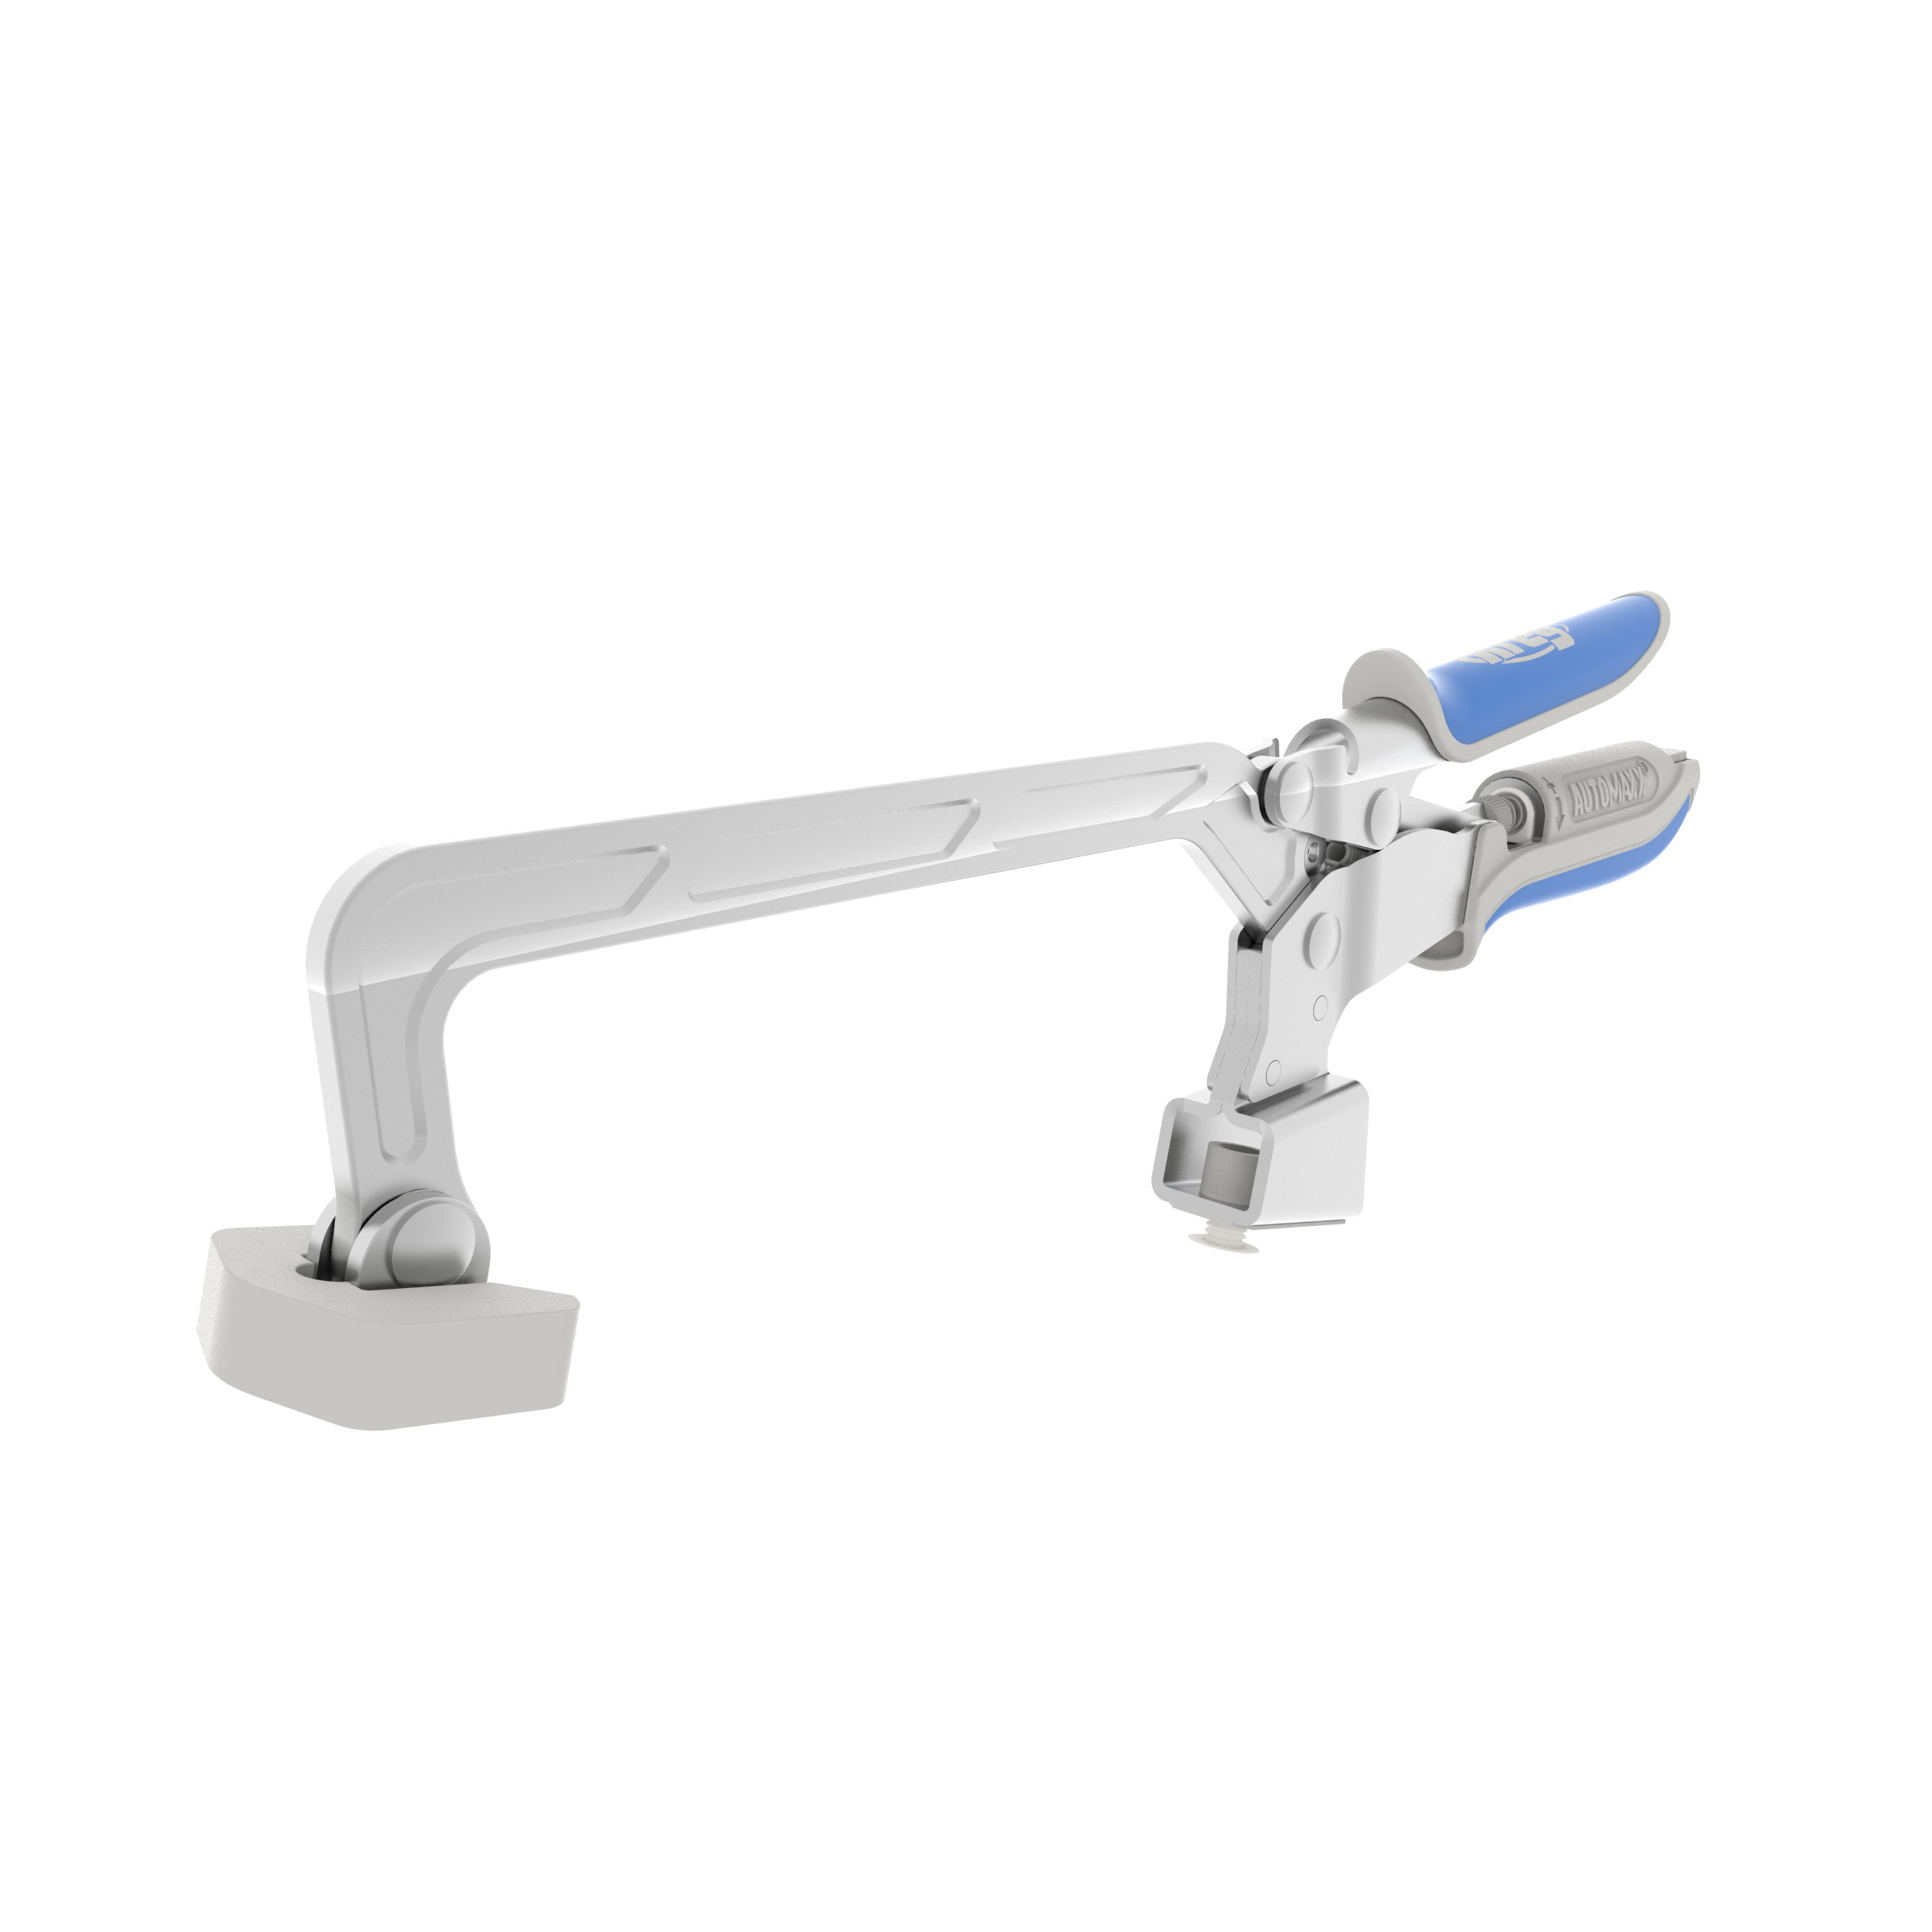
Kreg Tools


Other Tools
-
miter saw

-
tape measure
-
workbench
Materials
Wood Products
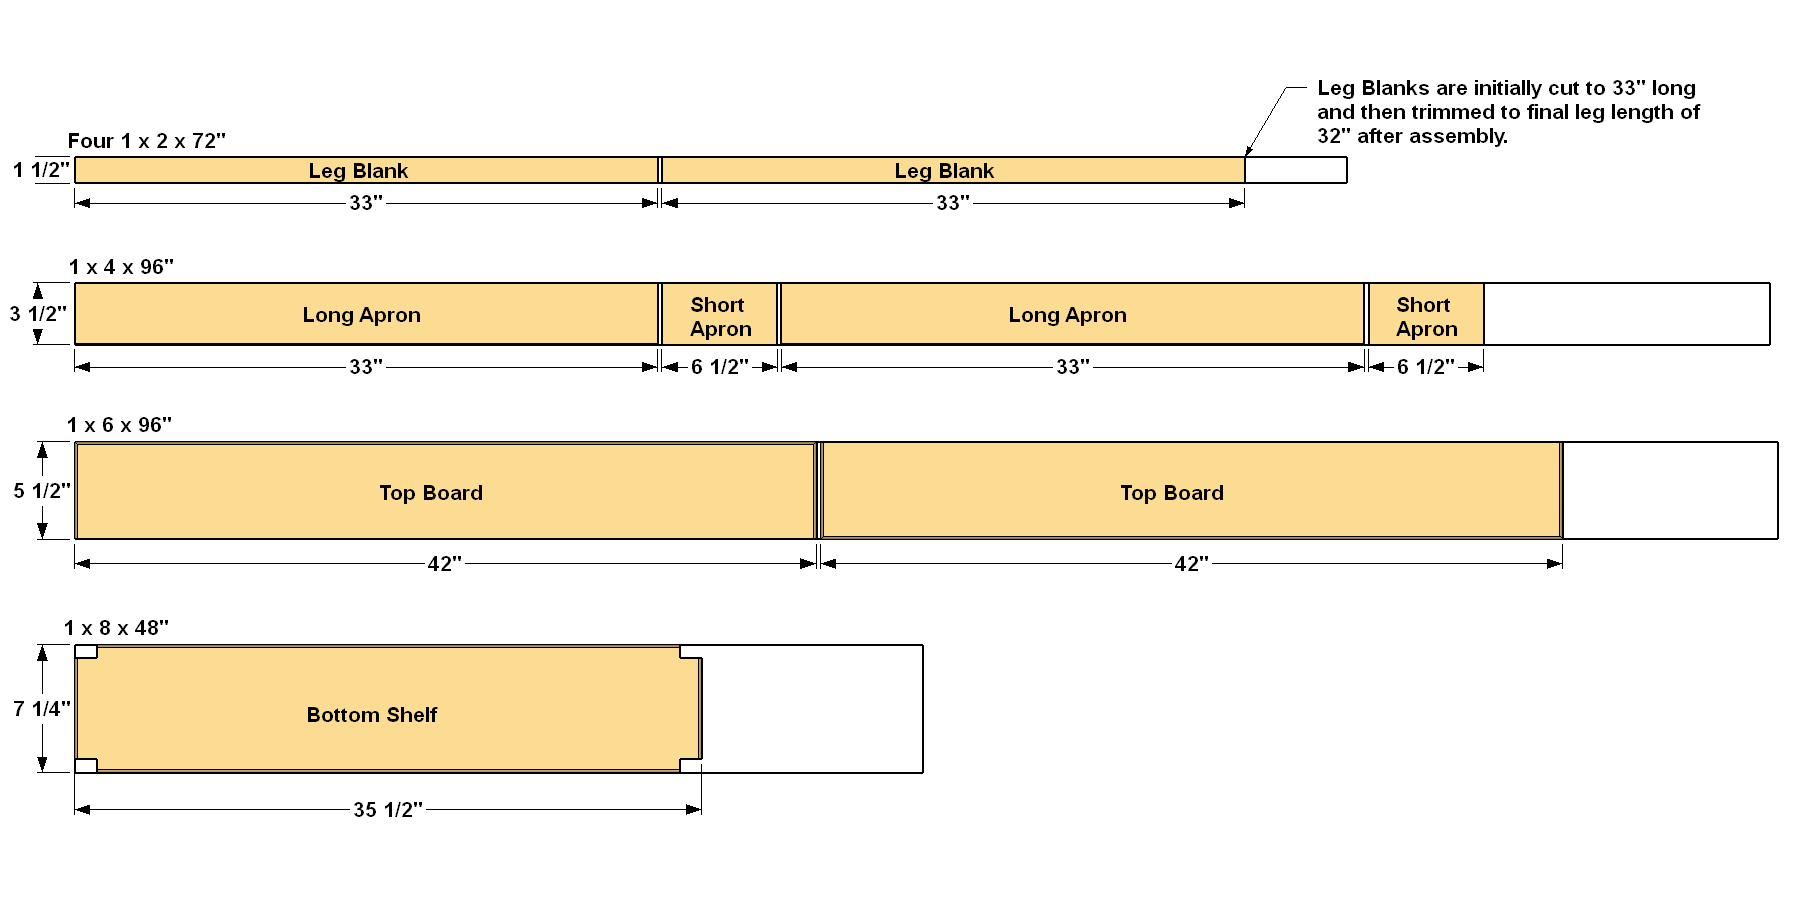
- 4 Board , 1x2 x 72"
- 1 Board , 1x4 x 96"
- 1 Board , 1x6 x 96"
- 1 Board , 1x8 x 48"
Hardware & Supplies
- 41 1 1/4" fine-thread Kreg Pocket-Hole Screws
- 1 Wood glue
- 1 1/2" round-over router bit
Cut List & Parts
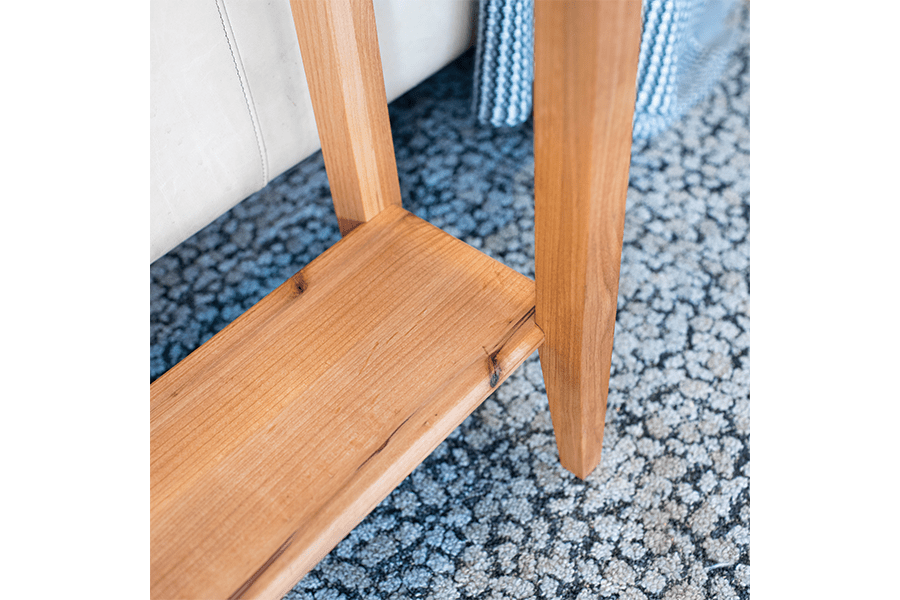
- 8 Leg Blank , 3/4" x 1 1/2" x 33" (rough length)
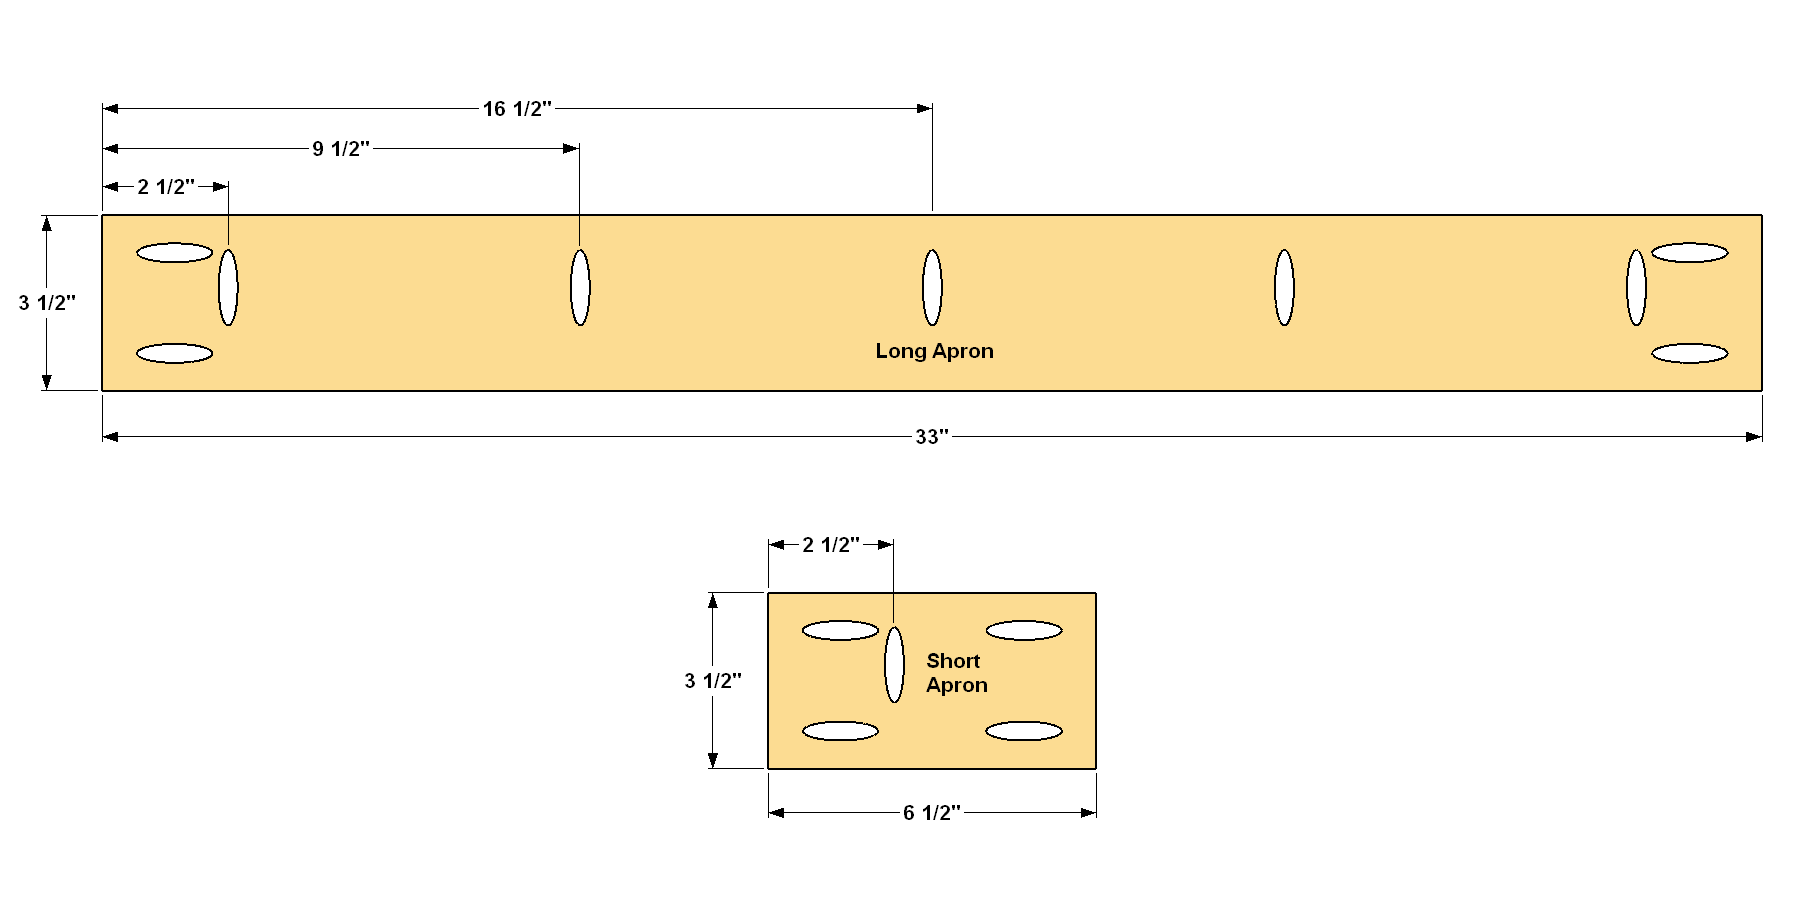
- 2 Long Apron , 3/4" x 3 1/2" x 33"
- 2 Short Apron , 3/4" x 3 1/2" x 6 1/2"
- 2 Top Board , 3/4" x 5 1/2" x 42"
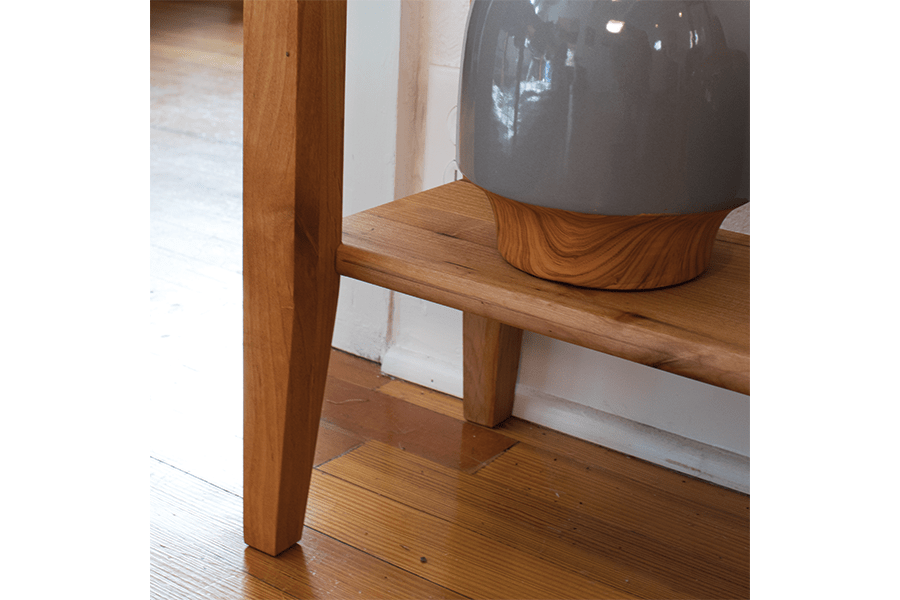
- 1 Bottom Shelf , 3/4" x 7 1/4" x 35 1/2"
Directions
-
Create the Leg Blanks
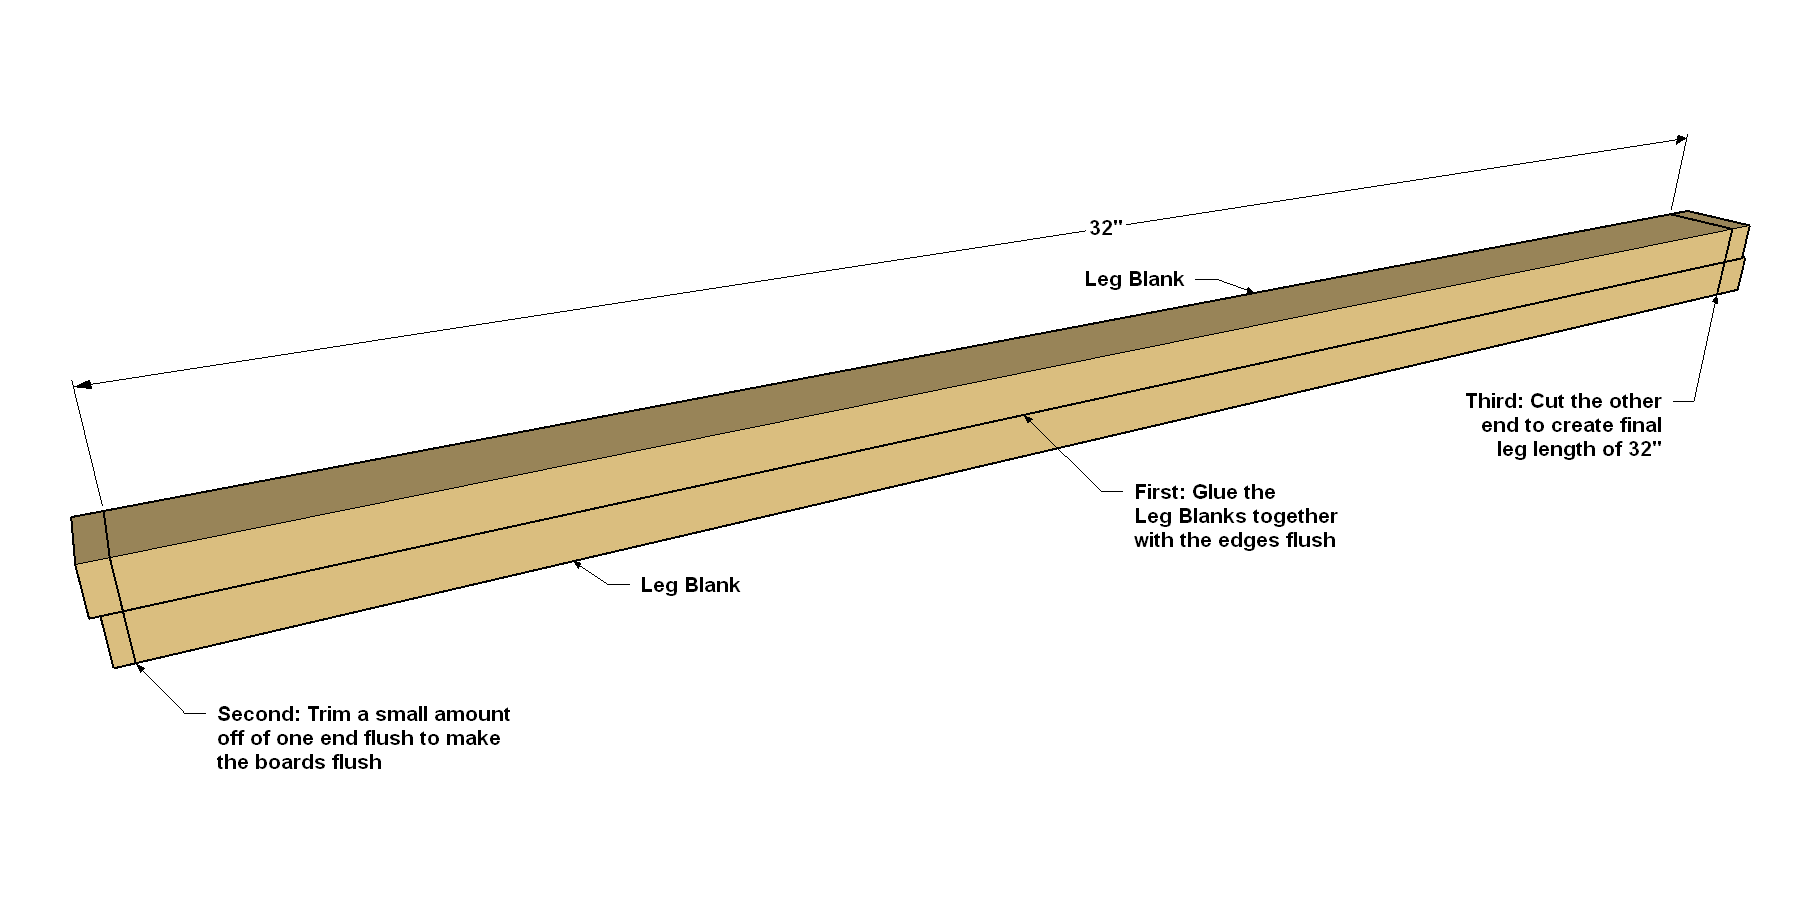
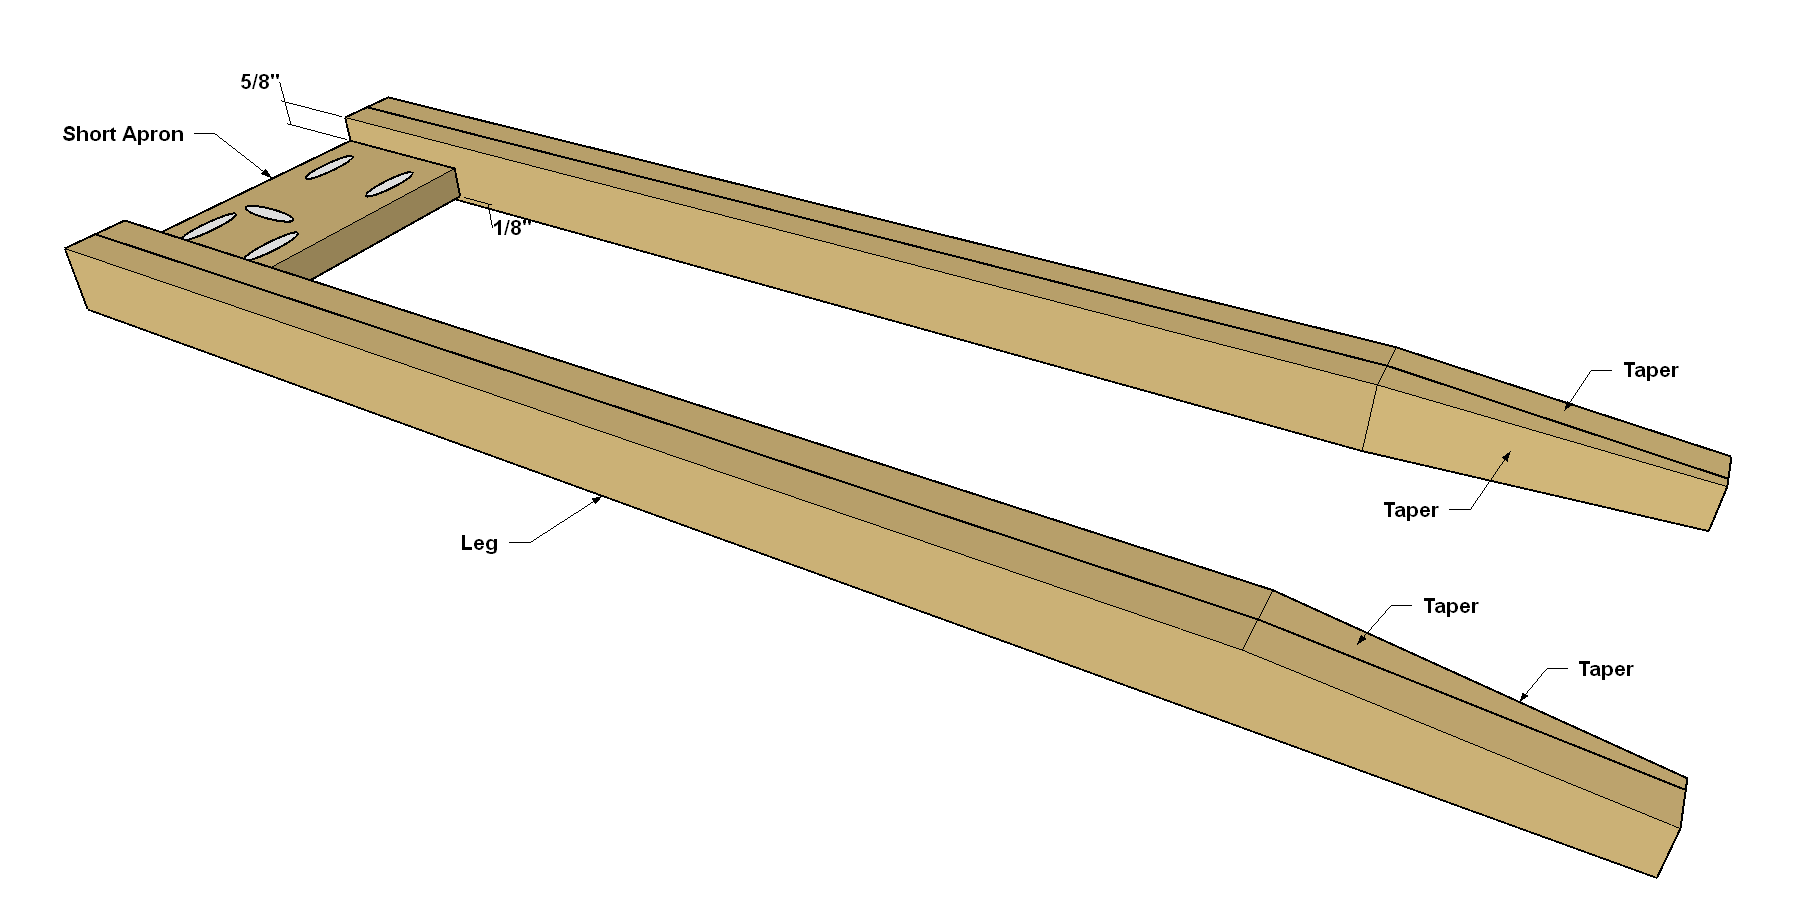
Cut eight Leg Blanks to rough length from 1x2 boards, as shown in the cutting diagram. These blanks are actually 1" longer than the final length. They’ll get trimmed after assembly. Glue together two Leg Blanks making sure the edges are flush with one another. The ends don’t need to be exactly flush, but make sure they’re not too far off. Clamp the assembly together until the glue dries. Repeat this process with the other Leg Blanks. When the glue is try, trim the Legs to their final length. You may want to start by taking just a little bit off of one end to make it flush.
-
Create the Tapers
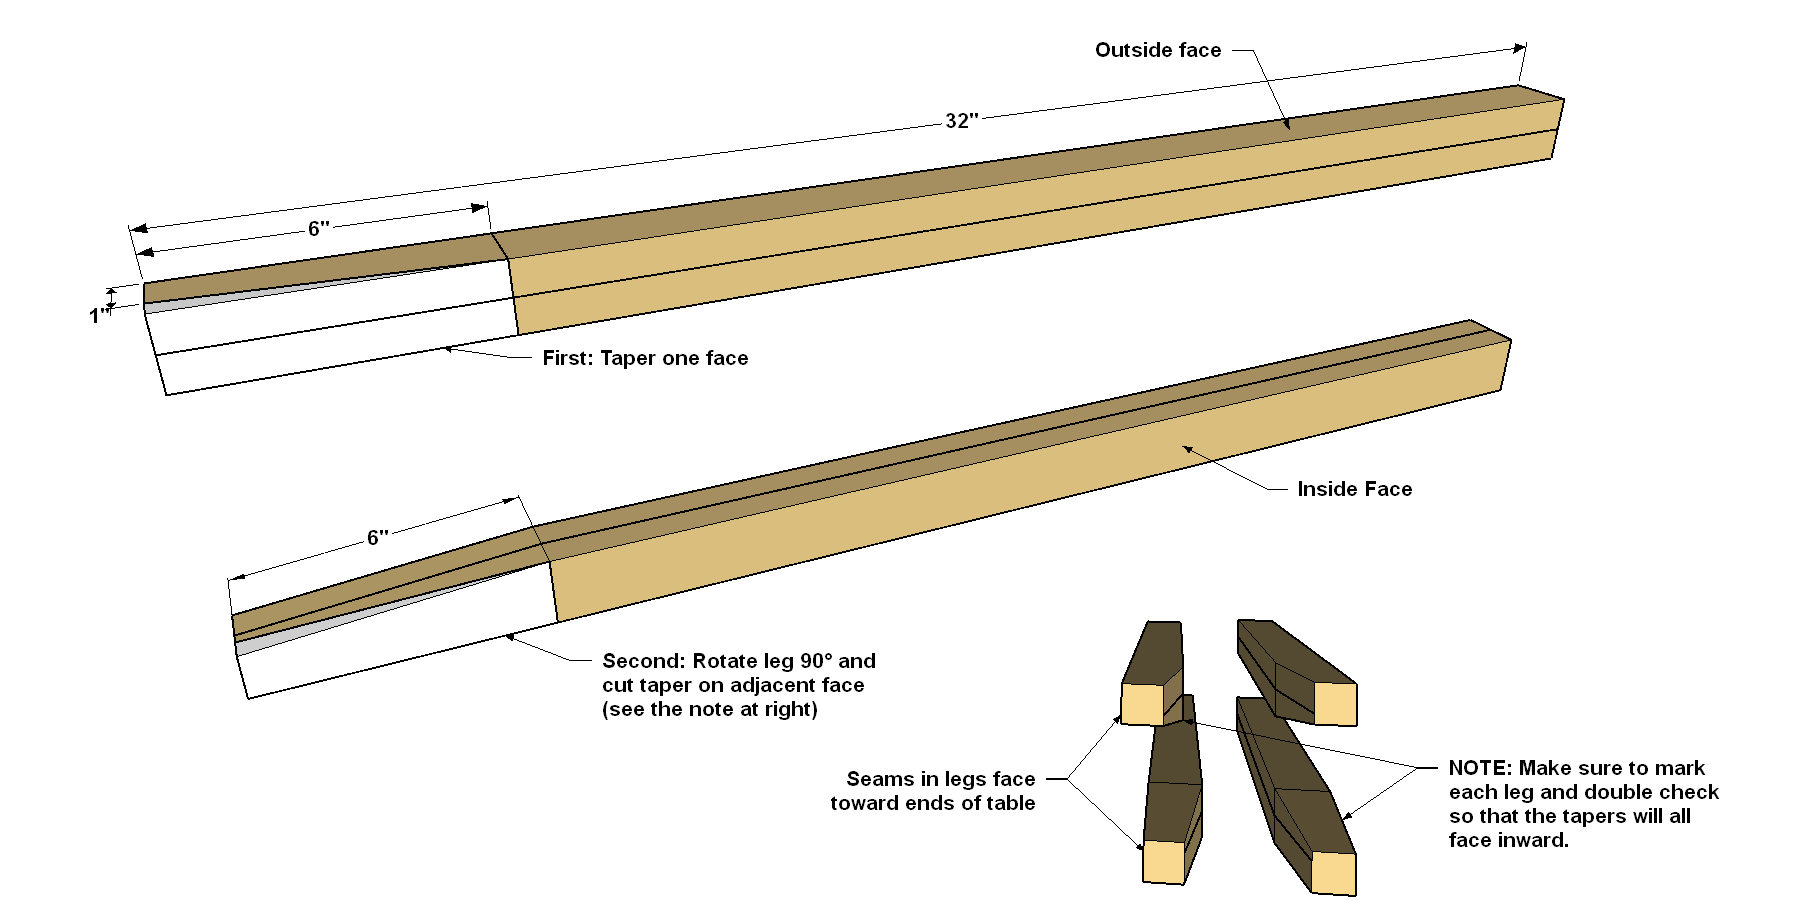
You can leave the legs as they are, or add the decorative tapers at the bottom, as we did. If you look, you’ll see that the tapers are on two sides only—the sides that face in. Notice that we laid out the legs so the smooth face of each faces toward the front and back, and the seams are at the ends of the table. With that in mind, mark where the tapers will go. Then lay them out, as shown, and cut the tapers using a jigsaw. It’s easiest to start the cuts from the end of the leg. After you cut, sand the tapers—and the rest of each leg—smooth.
-
Make the Aprons
Cut two Long Aprons and two Short Aprons to length from a 1x4 board, as shown in the cutting diagram. Set your Kreg® Pocket-Hole Jig for 3/4"-thick material, and then drill pocket holes in the Aprons at the locations shown. Sand the Aprons smooth.
-
Assemble the Table Ends
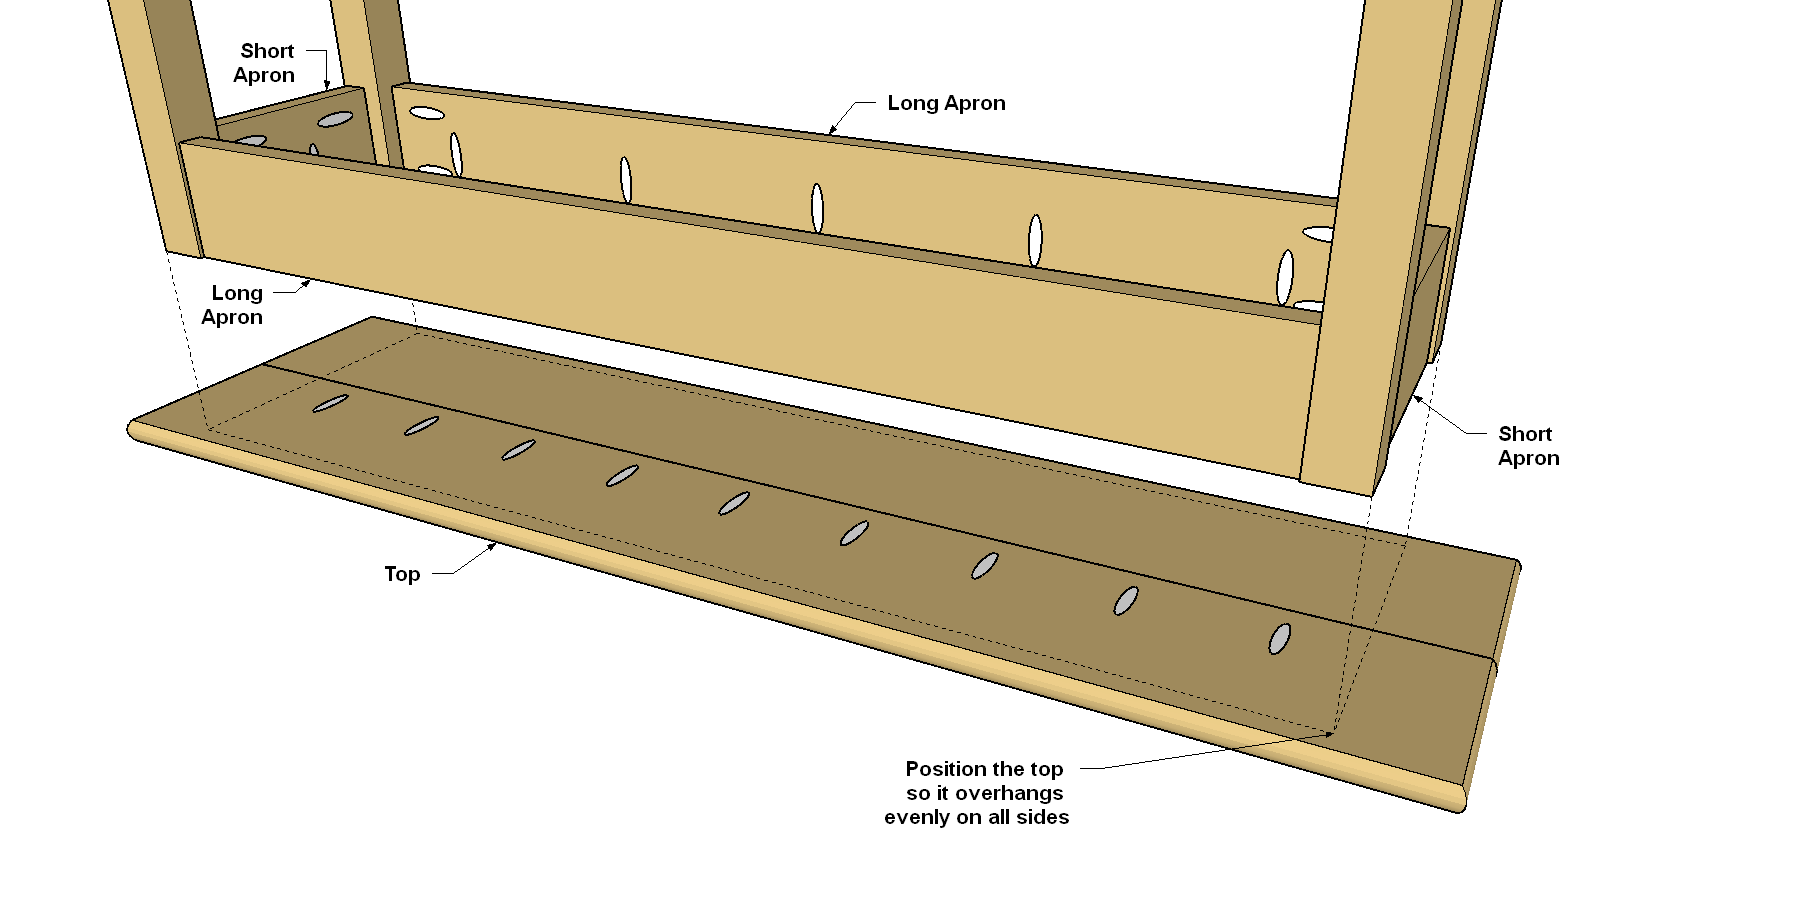
Lay two legs on a work surface making sure the tapers face upward and inward, as shown. Position a Short Apron so it is flush at the top of the legs and inset 1/8" in from the outside face of the legs. Make sure the pocket-hole for attaching the Top later faces in the proper direction. Secure the Apron to the Legs with 1 1/4" Kreg Pocket-Hole Screws. We built our table from a hardwood, so we used fine-thread screws. If you build from a softwood, such as pine, instead, you’ll want to use coarse-thread screws. Repeat the process to create the other end assembly.
-
Add the Long Aprons
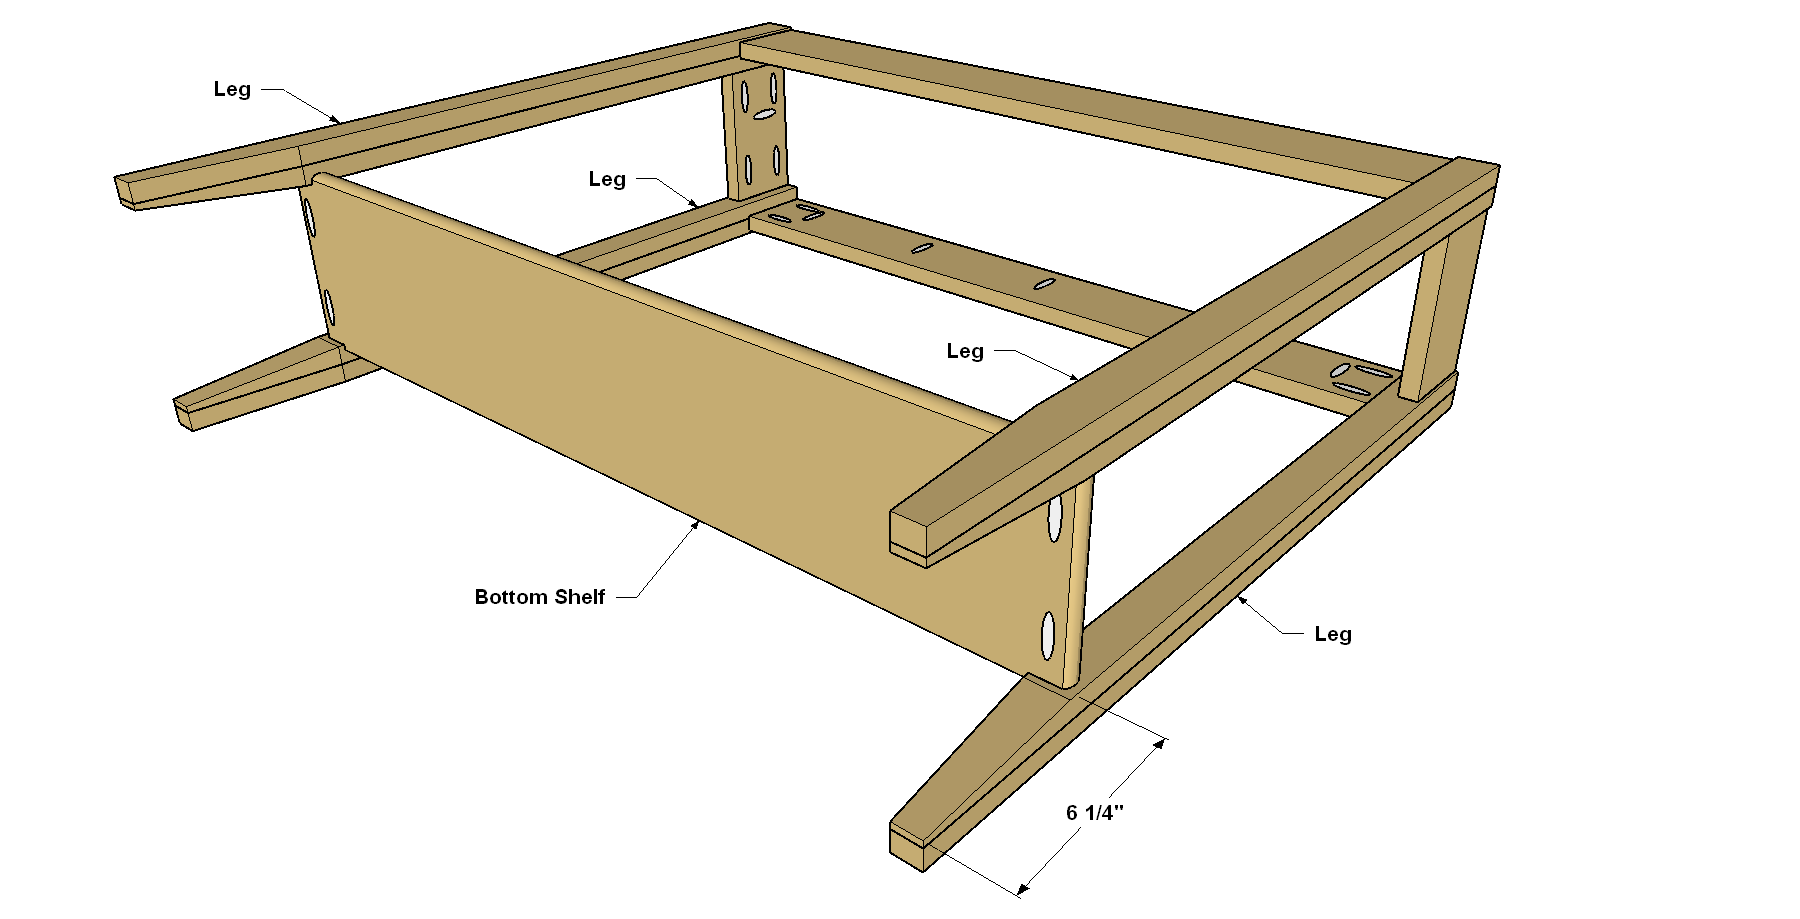
Position a Long Apron between two Leg assemblies so it is flush at the top of the Legs and inset 1/8" from the face of the Legs, just as you did with the Short Aprons. Again, make sure that the pocket holes are oriented correctly. Attach the Long Apron with 1 1/4" Kreg Pocket-Hole Screws. Repeat the process for the second Long Apron to complete the table base.

-
Make the Bottom Shelf
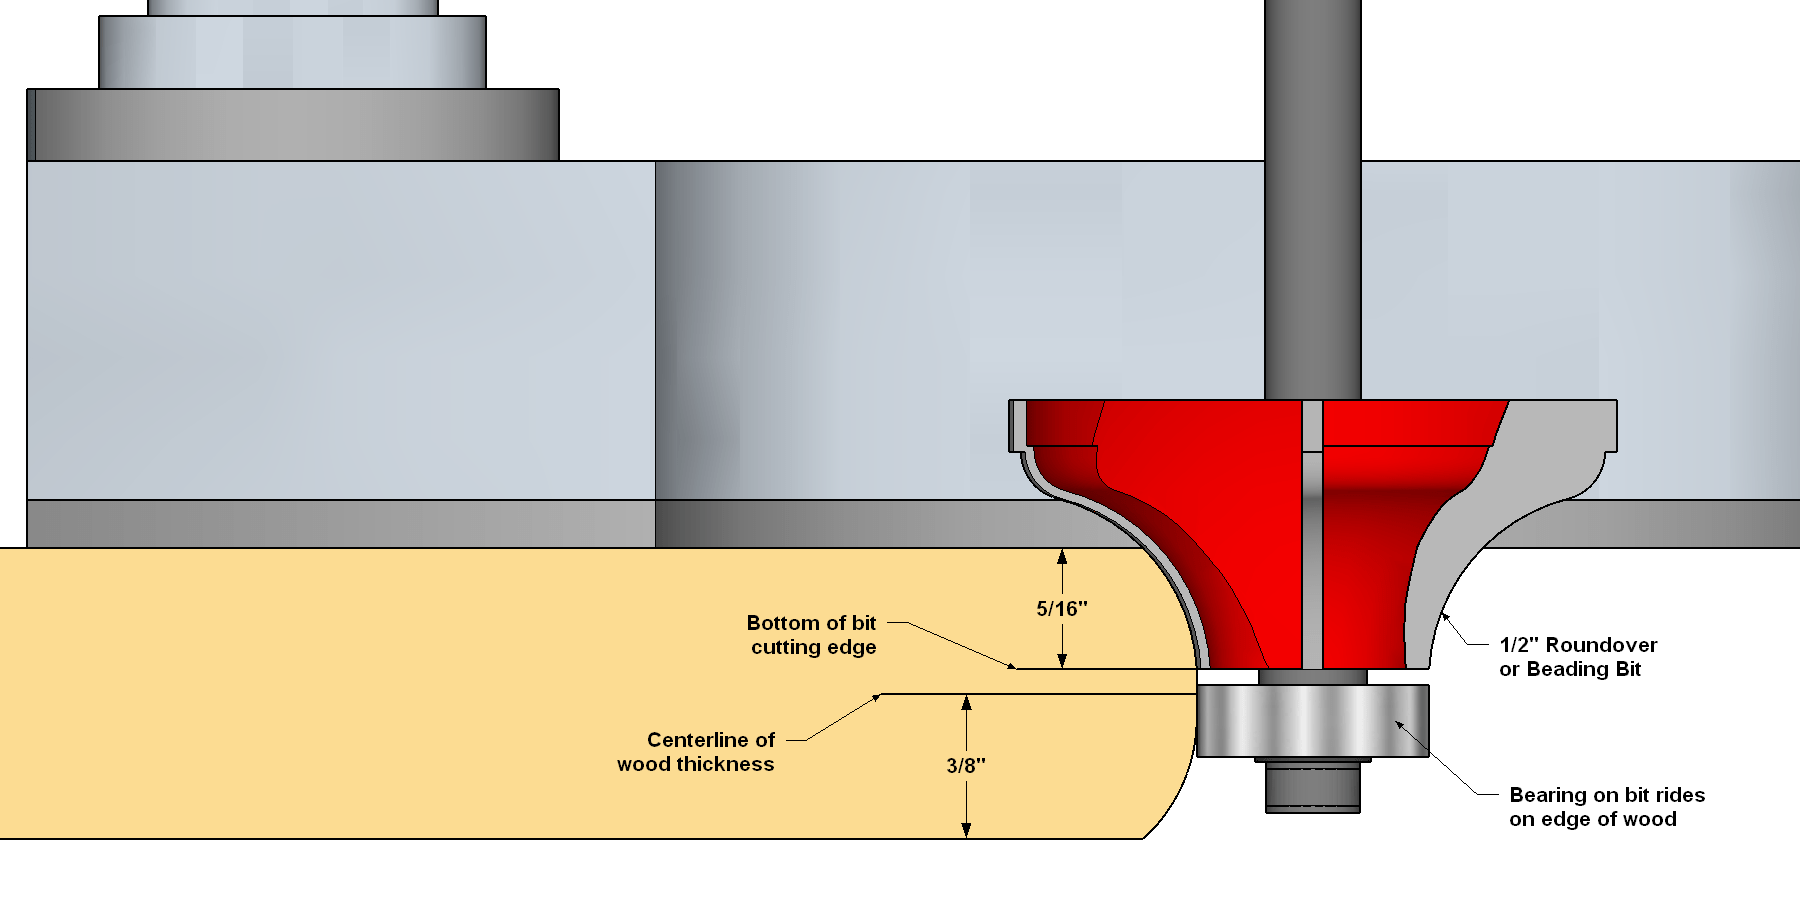
From a 1x8 board, cut the Bottom Shelf to size, as shown in the cutting diagram. Mark the locations of the four corner notches, and then cut them out with a jigsaw. drill a single pocket hole in the underside of the Shelf at each notch location, as shown. These will be used to attach the Shelf to the Legs. Then, you can add the decorative edge profile, if desired. It’s called a “bullnose” profile, which is a subtle roundover of the edges. The Tip below shows how it’s done using a router.

-
Add a Classic Bullnose Profile
Now you can add the decorative edge profile, if desired. It’s called a “bullnose” profile, which is a subtle roundover of the edges. Instead of rounding the edge completely to create a half-circle profile, you just use a portion of the router bit to create a more-gentle curve. To do this, install a 1/2" -diameter roundover or beading bit in your router, and set it to the depth shown in the illustration. Rout the edges of one face, flip the board over, and rout the edges of the other face. Then sand the edges smooth to complete this classic profile.
-
Attach the Bottom Shelf
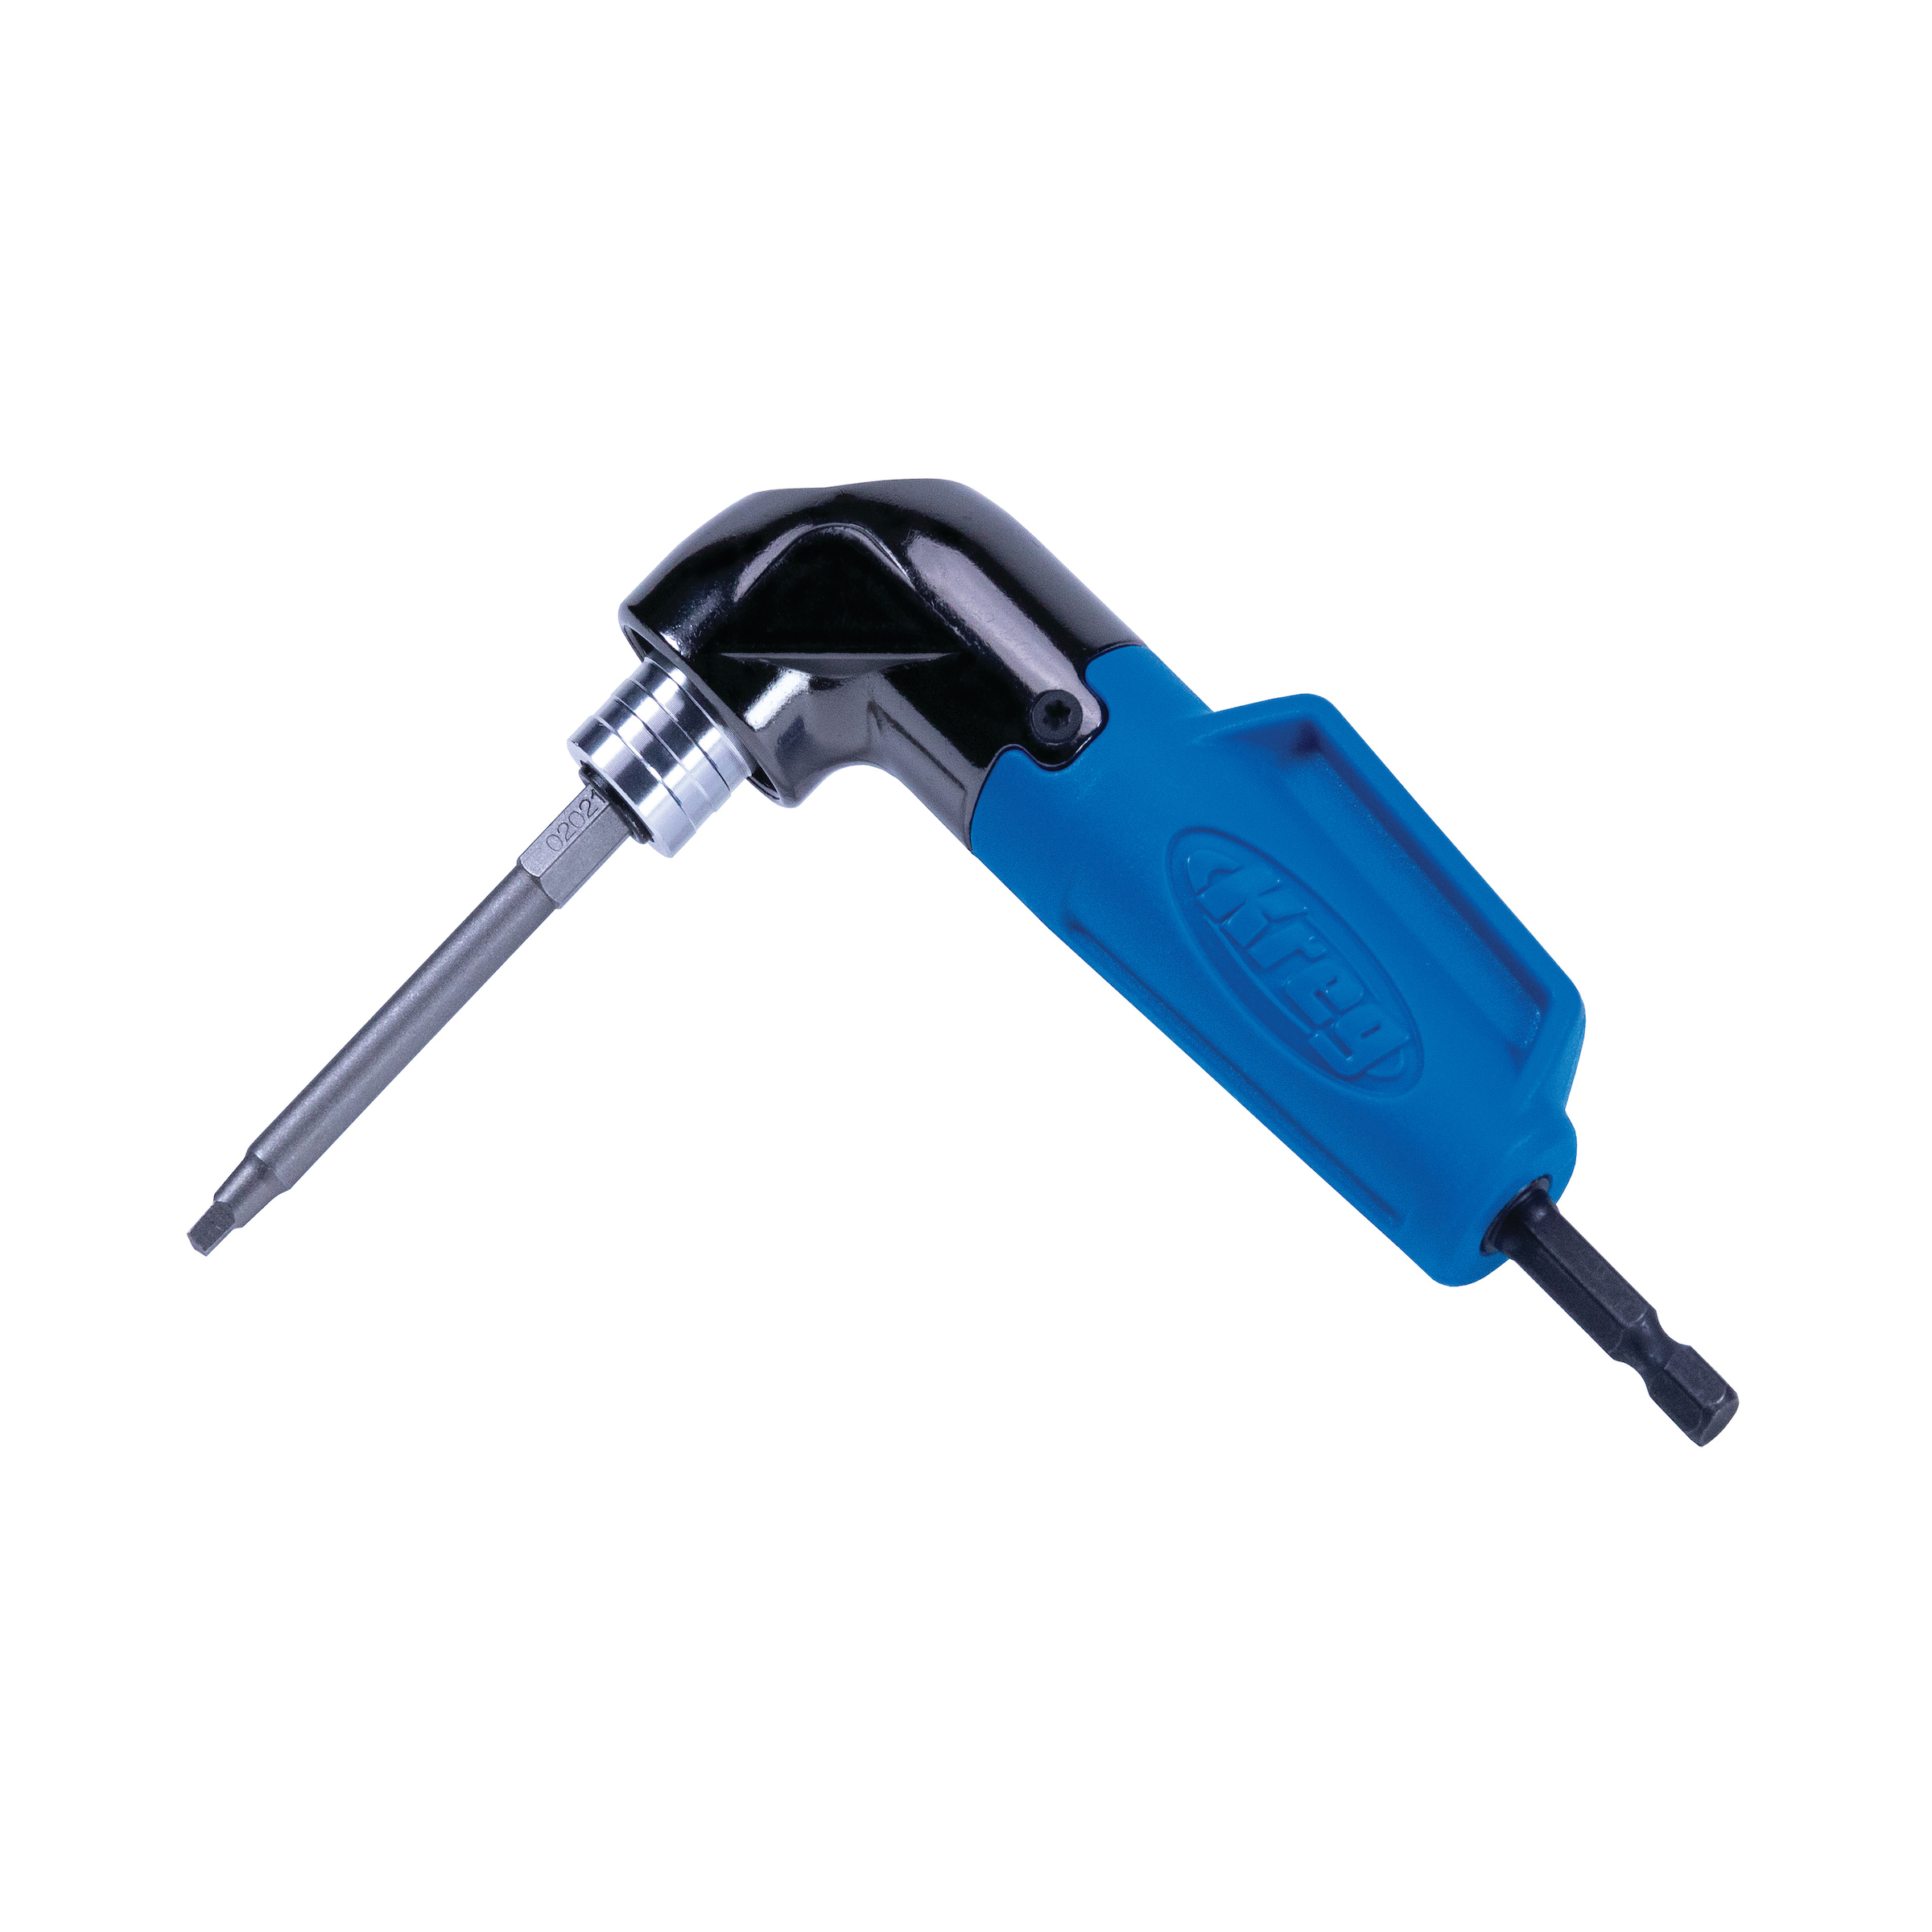
Lay the base assembly on its side on a flat work surface. Position the Bottom shelf at the location shown, and then secure it to the Legs with 1 1/4" coarse-thread Kreg Pocket-Hole Screws. You will need a right-angle drill attachment, like the Kreg 90° Pocket-Hole Driver, to reach into the tight space for these screws.
-
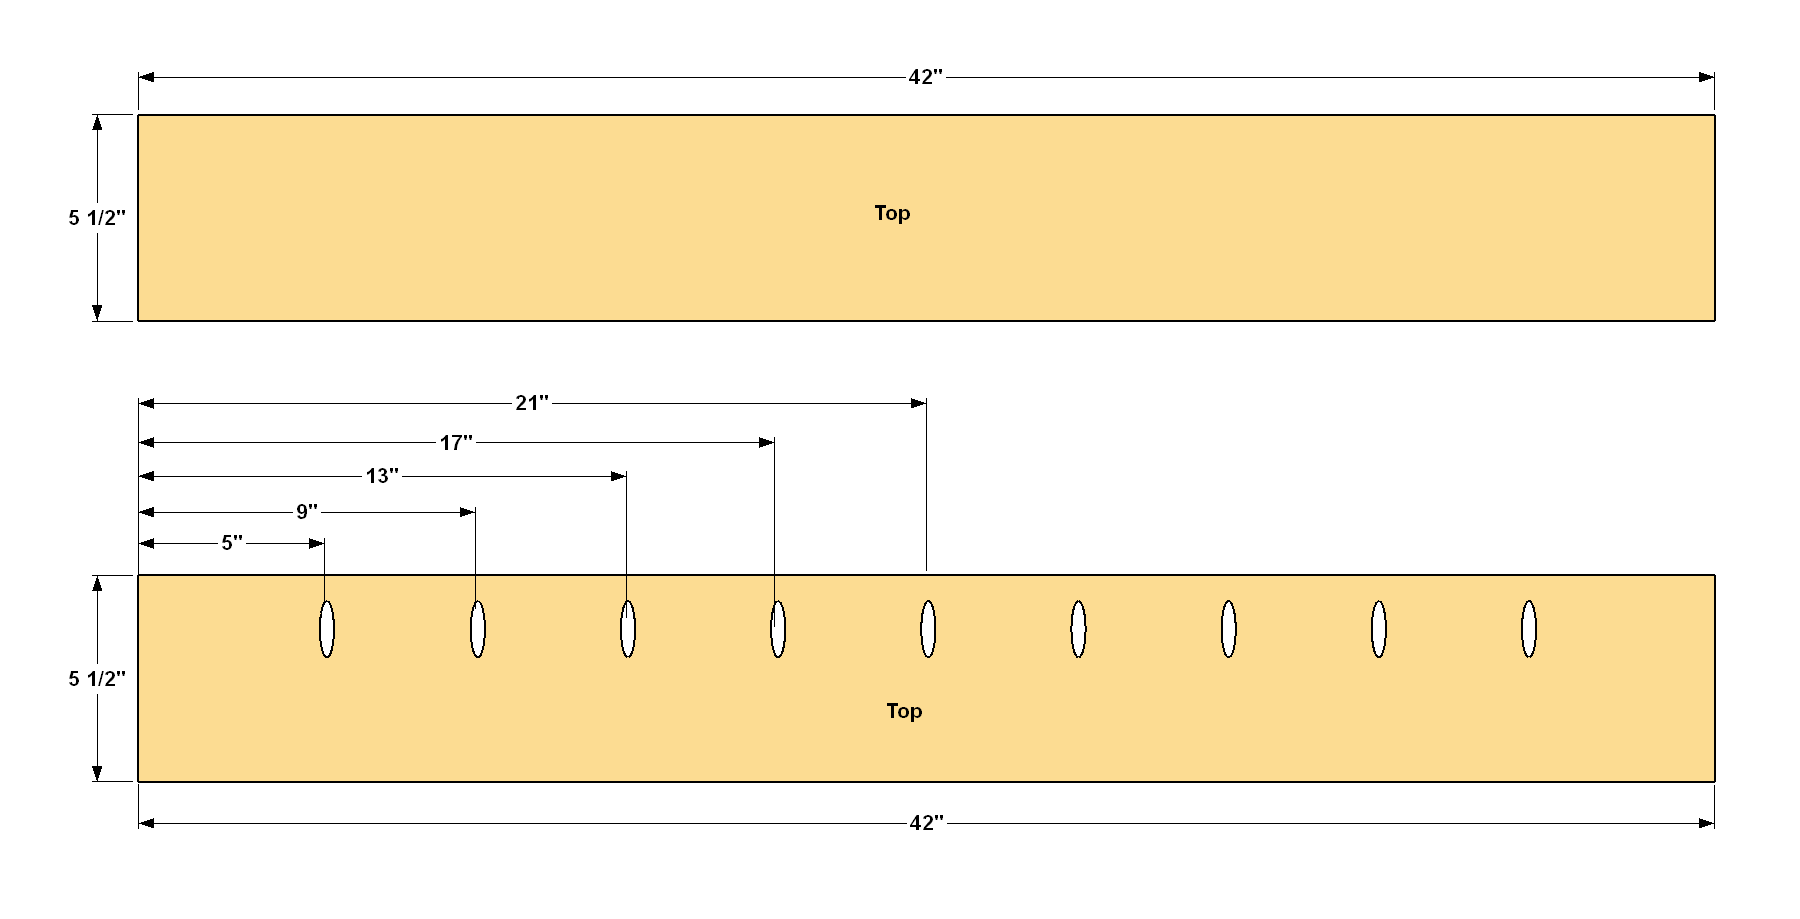
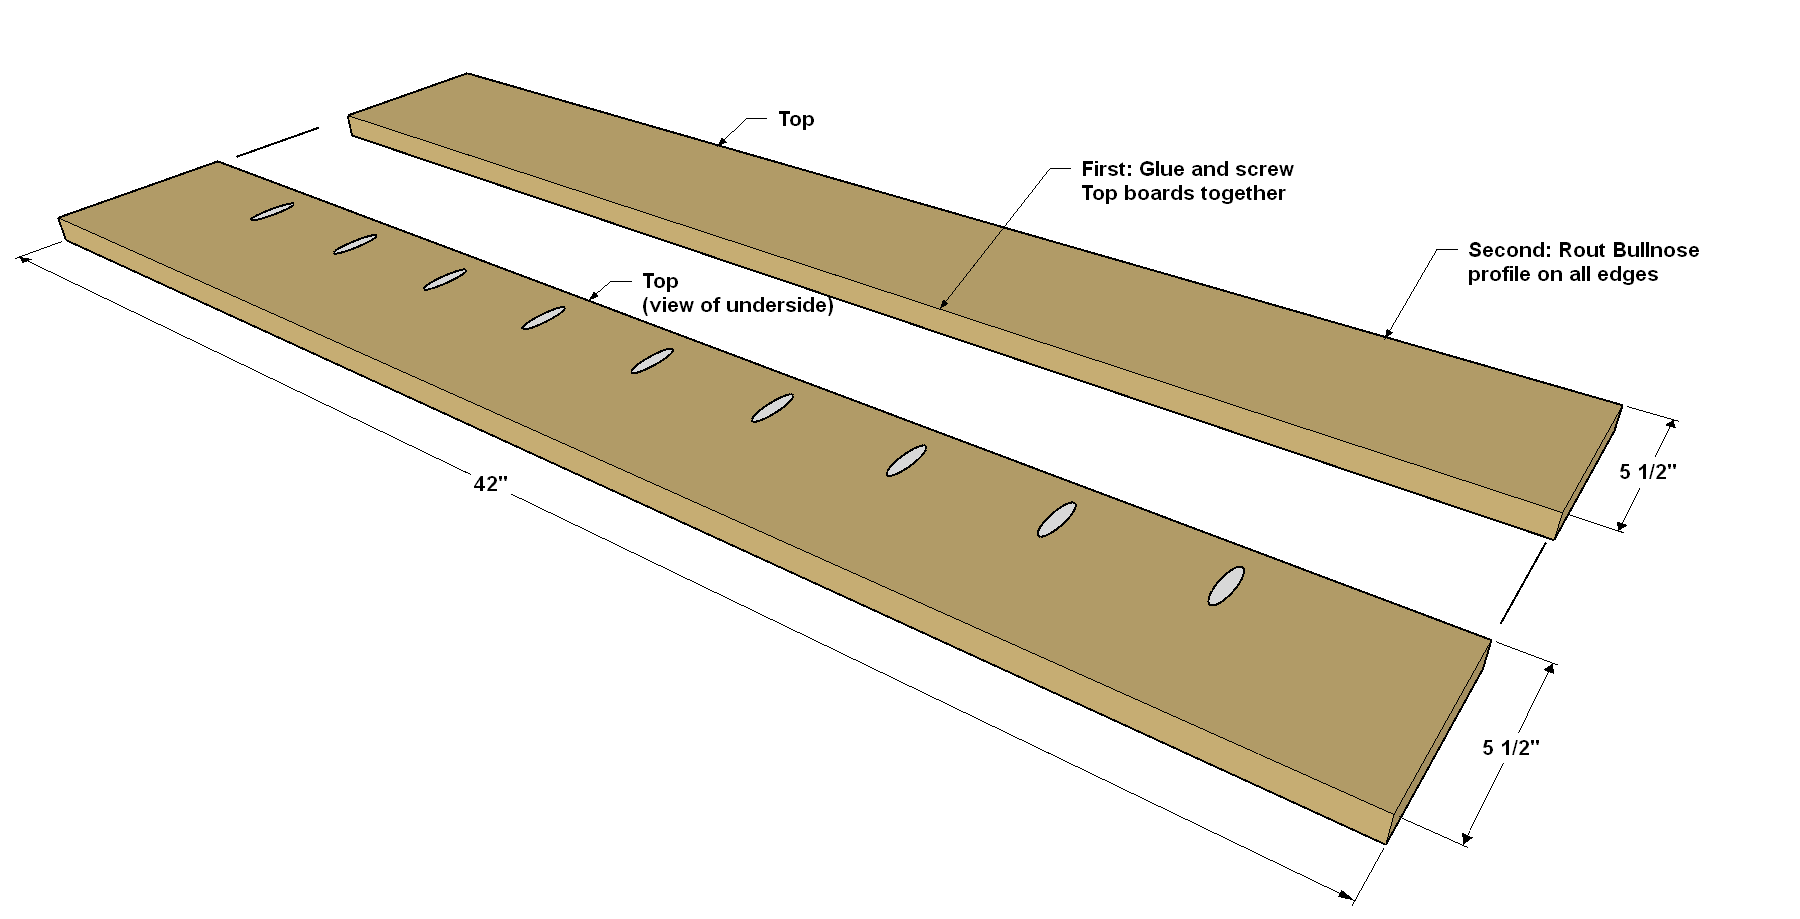
Make the Top Boards
Cut two Top Boards to length from a 1x6, as shown in the cutting diagram. Drill pocket holes on the underside of one of the boards at the locations shown.
-
Assemble and Complete the Top
Attach the two Top Boards together using glue and 1 1/4" Kreg Pocket-Hole Screws, making sure that the ends and faces are flush. Then sand the faces smooth to eliminate any ridge that might exist where the boards are joined. After that, you can add the bullnose detail to the edges of the table top.
-
Attach the Top to the Base
Lay the Top face down on a work surface. Place the table base on the top and center it. Secure table top to the base using 1 1/4" Kreg Pocket-Hole Screws.
-
Apply a Final Finish
With the table complete, do any final sanding that’s needed. Then you can apply a finish. There are many options available. To bring out the beautiful color of the alder wood we used, we applied a finished called Tried and True. It’s a non-toxic finish that wipes on easily with a rag, and provides a traditional look while imparting just a bit of amber color.