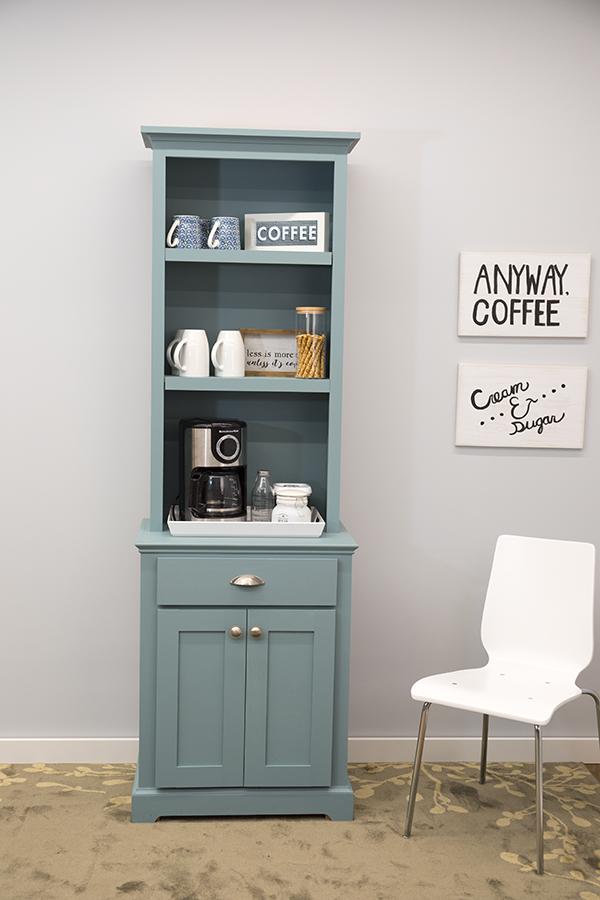
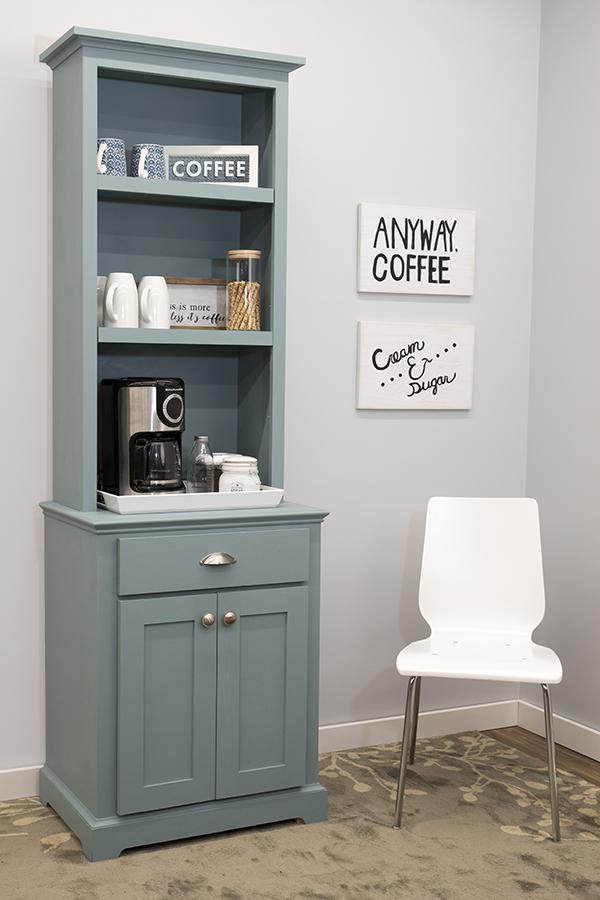
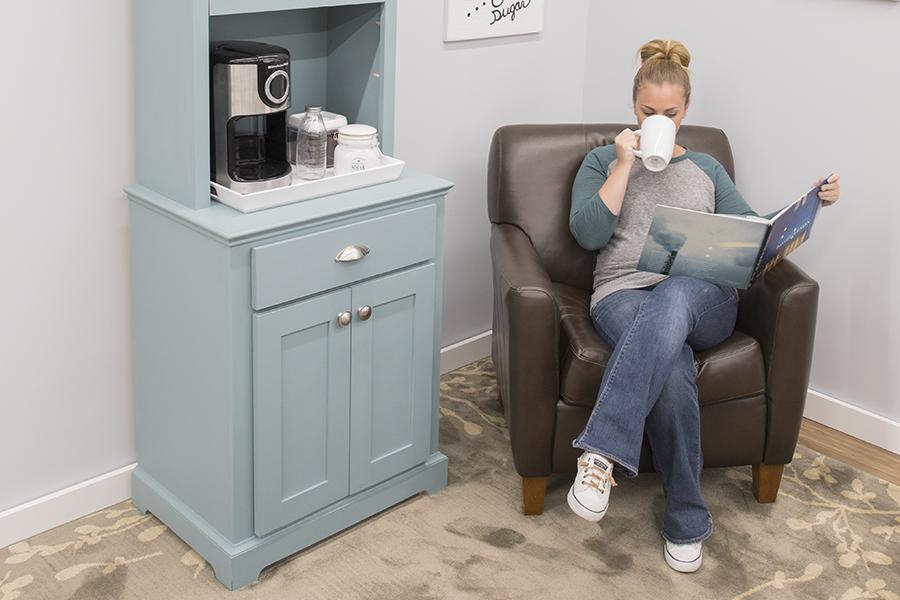


The stepback cupboard has been popular for ages, and for good reason. It’s a handsome, handy piece of furniture that can be anything from a coffee bar to kitchen storage to a display cabinet. You can make your own using plywood, dimensional lumber, and simple joinery to create your own heirloom.
Tools
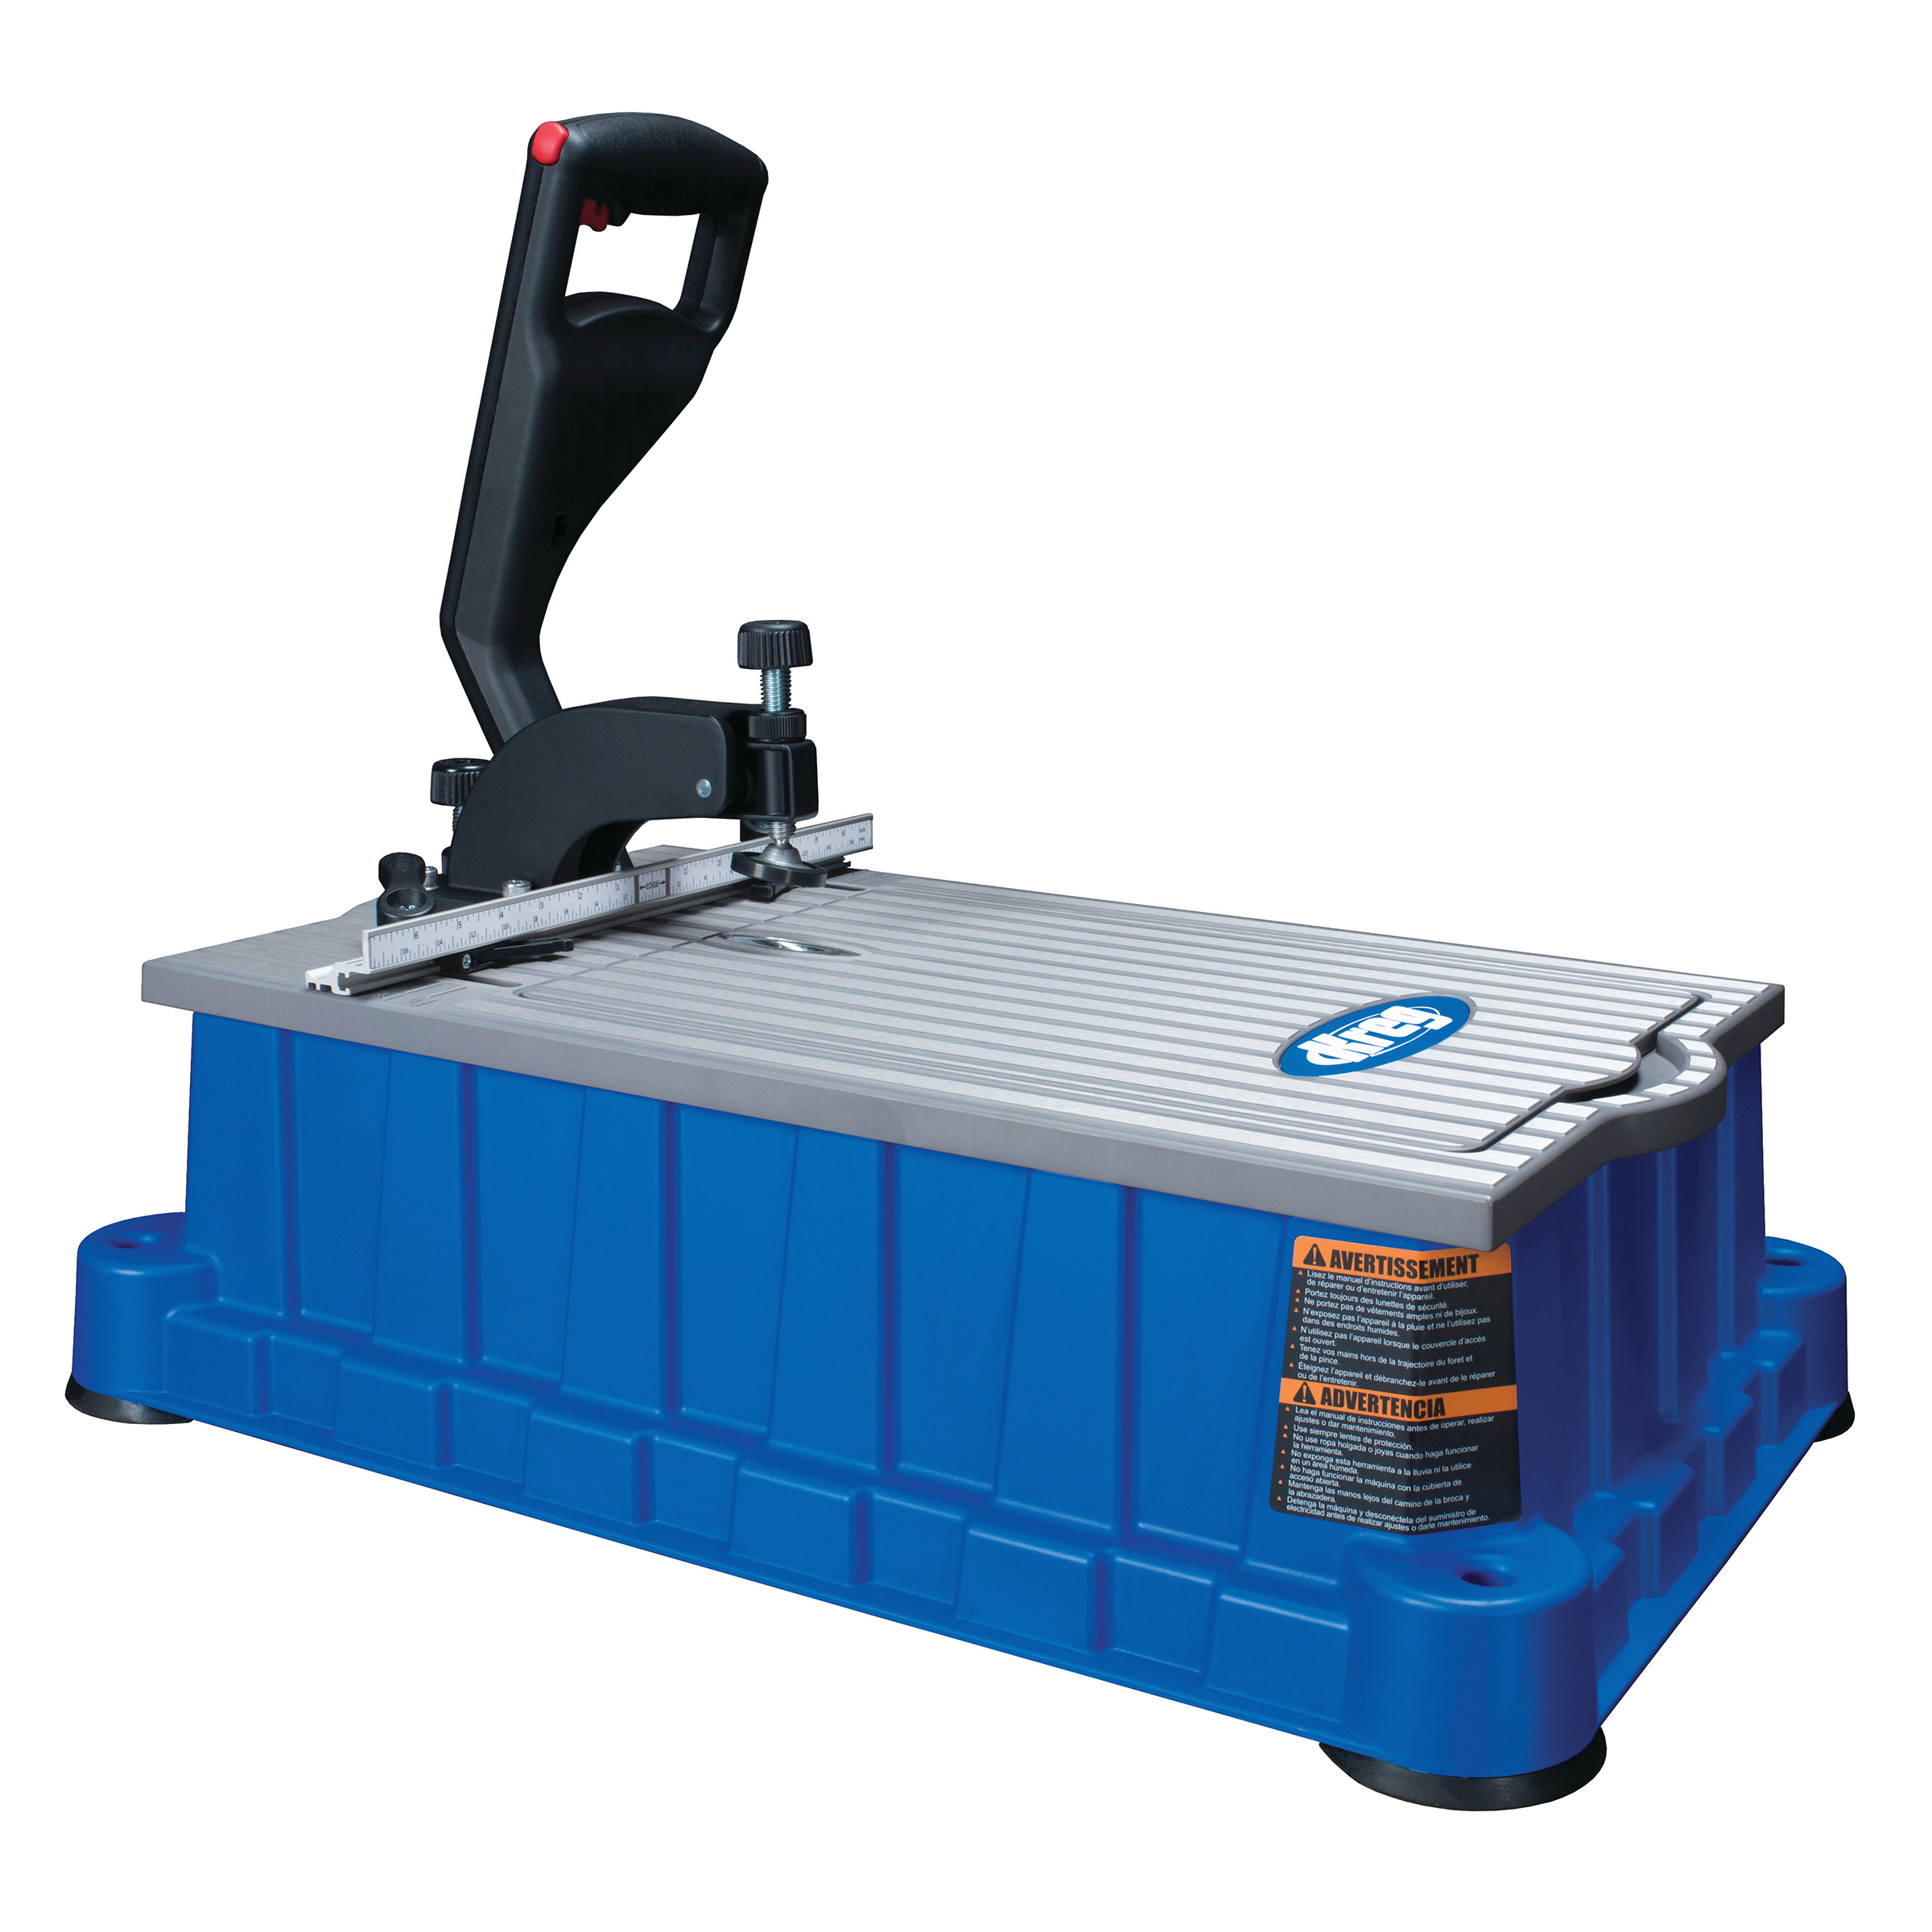
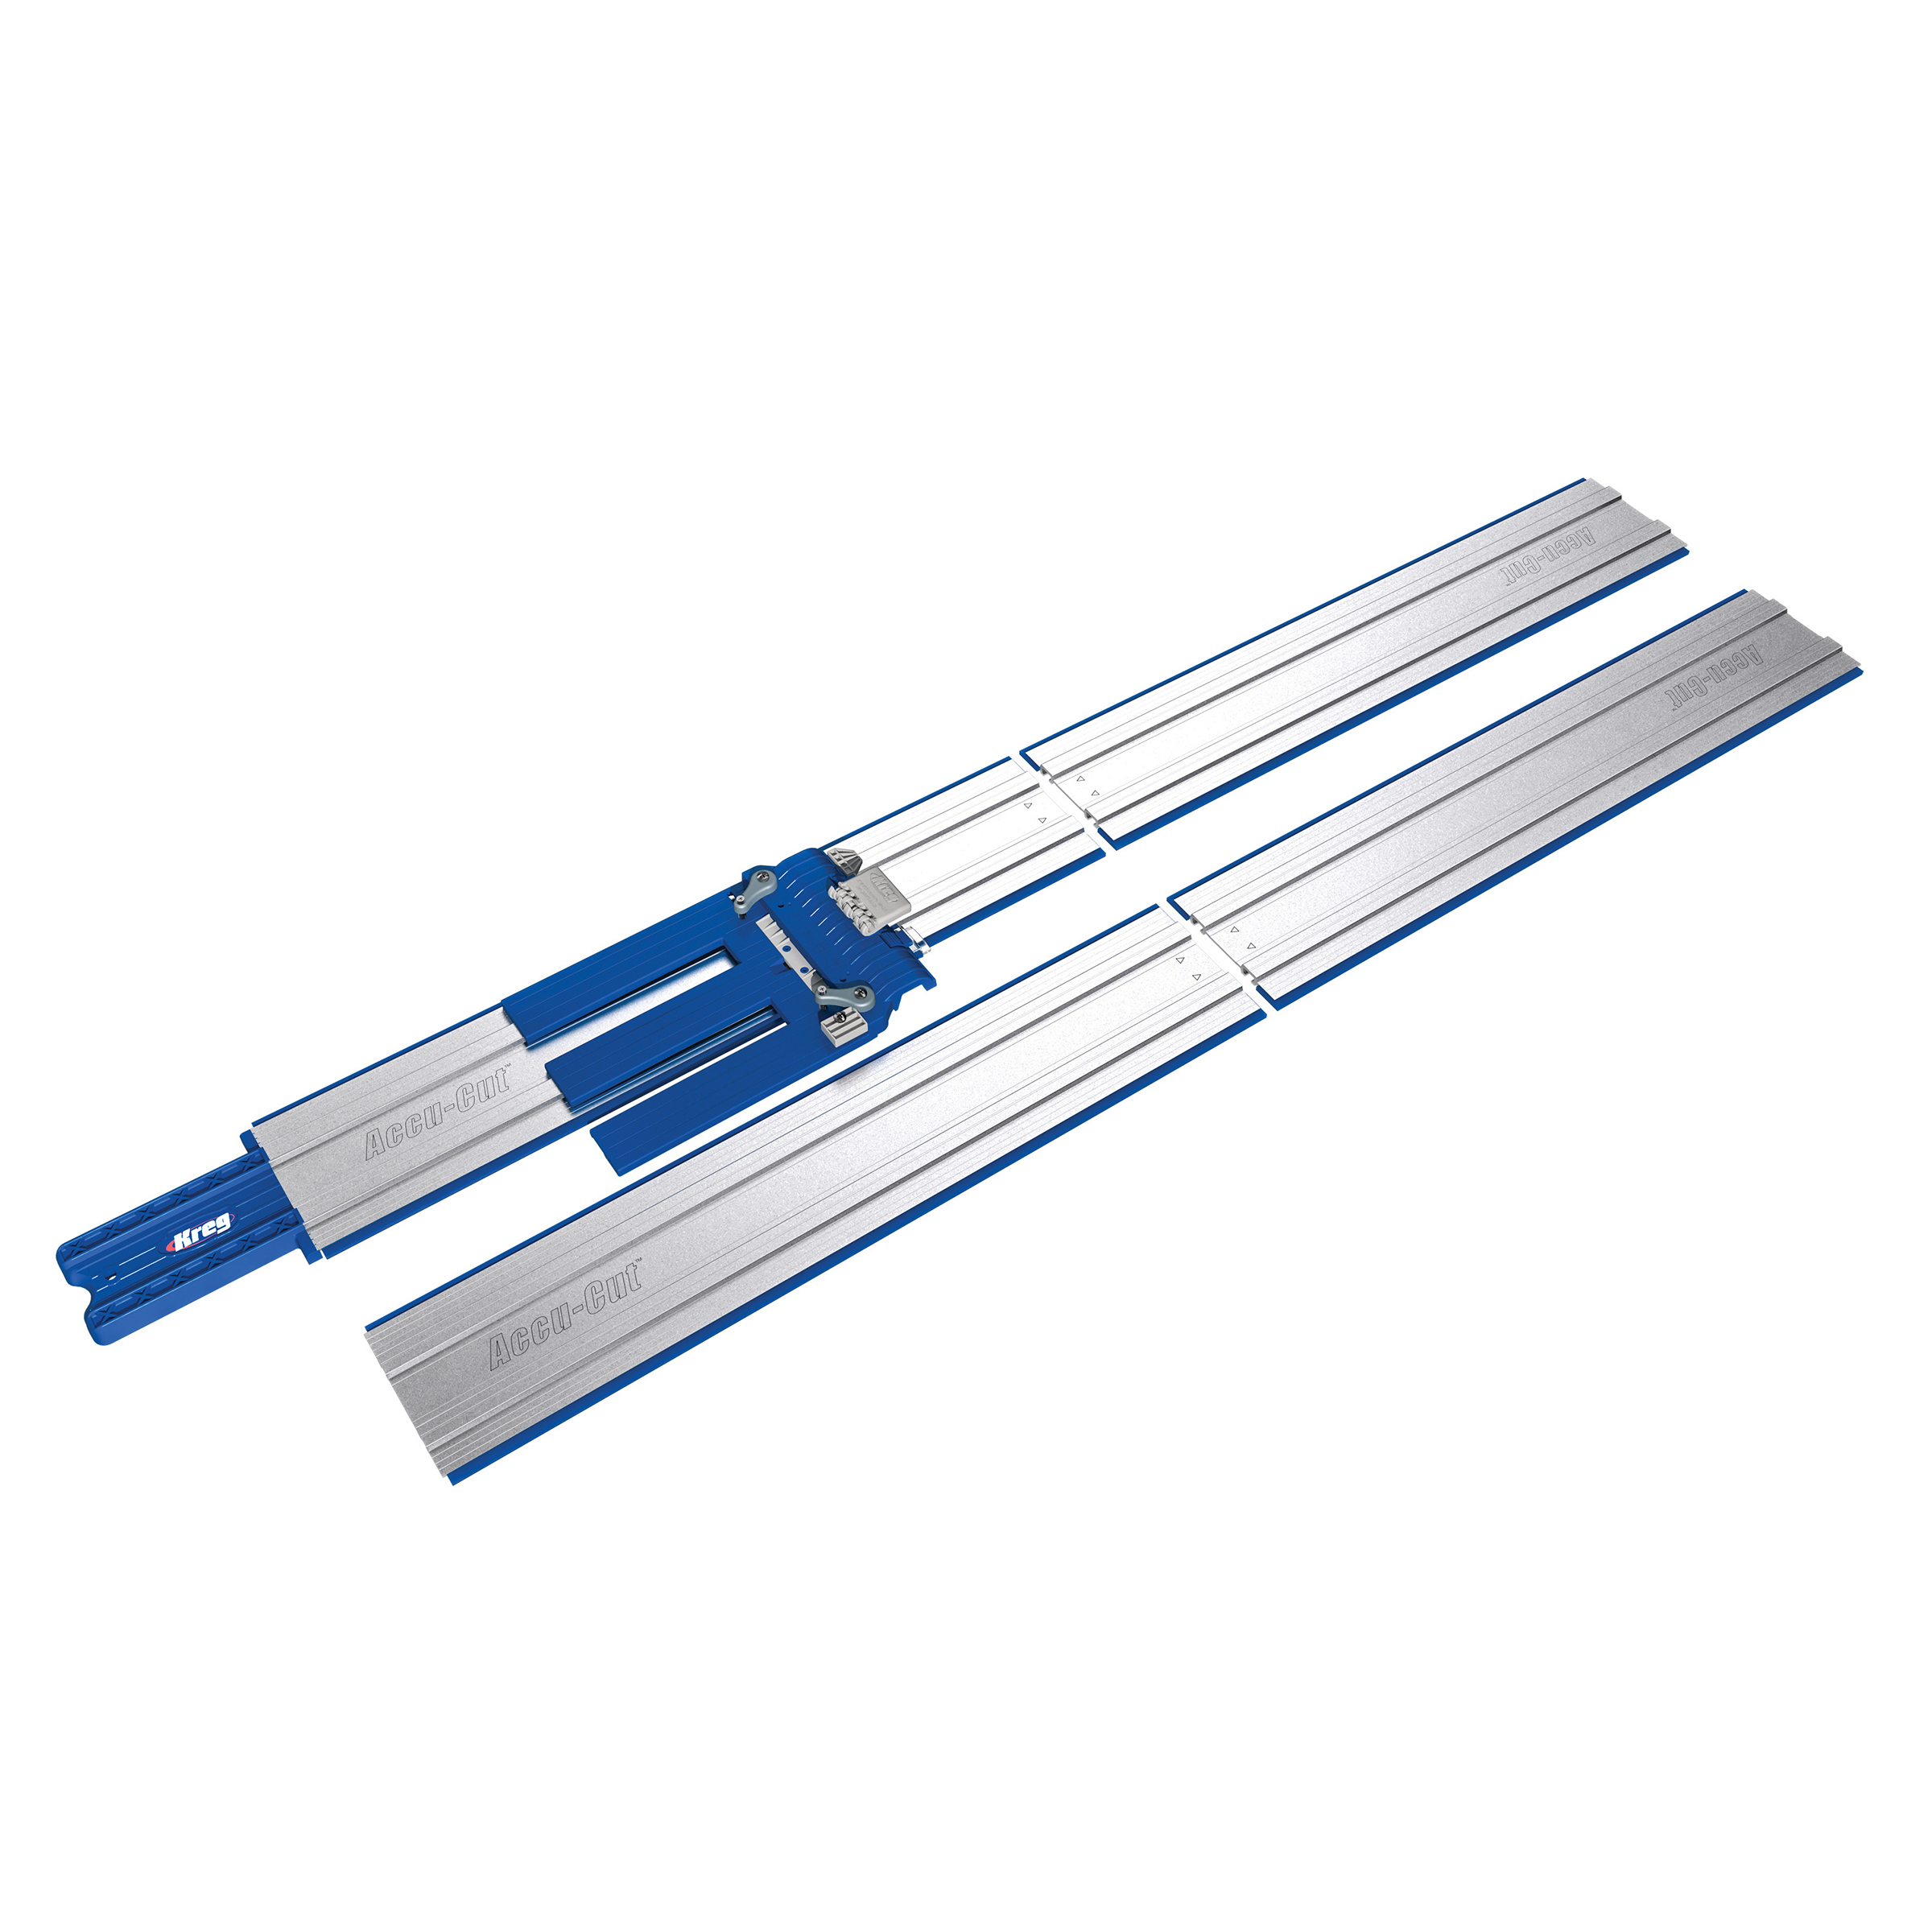
Kreg Tools


Other Tools
-
miter saw

-
1/4" rabbeting bit
-
tape measure
-
chisel
Materials
Wood Products
- 1 Plywood , 3/4" x 48" x 96"
- 1 Plywood , 3/4" x 48" x 48"
- 1 Plywood , 1/2" x 24" x 24"
- 1 Pine , 3/4" x 3 1/2" x 96"
- 2 Pine , 3/4" x 1 1/2" x 72"
- 2 Pine , 3/4" x 1 1/2" x 48"
- 4 Pine , 3/4" x 2 1/2" x 96"
- 2 Pine , 1/2" x 3 1/2" x 48"
- 1 Pine , 3/4" x 5 1/2" x 24"
- 3 Square dowel , 1/4" x 1/4" x 36"
- 1 Base cap molding , 72"
- 2 Cove molding , 3/4" x 3/4" x 72"
Hardware & Supplies
- 1 Box of 250 - 1 1/4" coarse-thread Kreg pocket-hole screws
- 1 Box of 50 - 3/4" Kreg pan-head (Micro-Pocket™) pocket-hole screws
- 75 1/2" brad nails
- 75 1" brad nails
- 1 Pair 16" drawer slides
- 2 Cabinet door knobs
- 1 Bin pull
- 4 1/2"-overlay concealed cabinet hinges
- 12 1/4" shelf pins
- 1 Wood glue
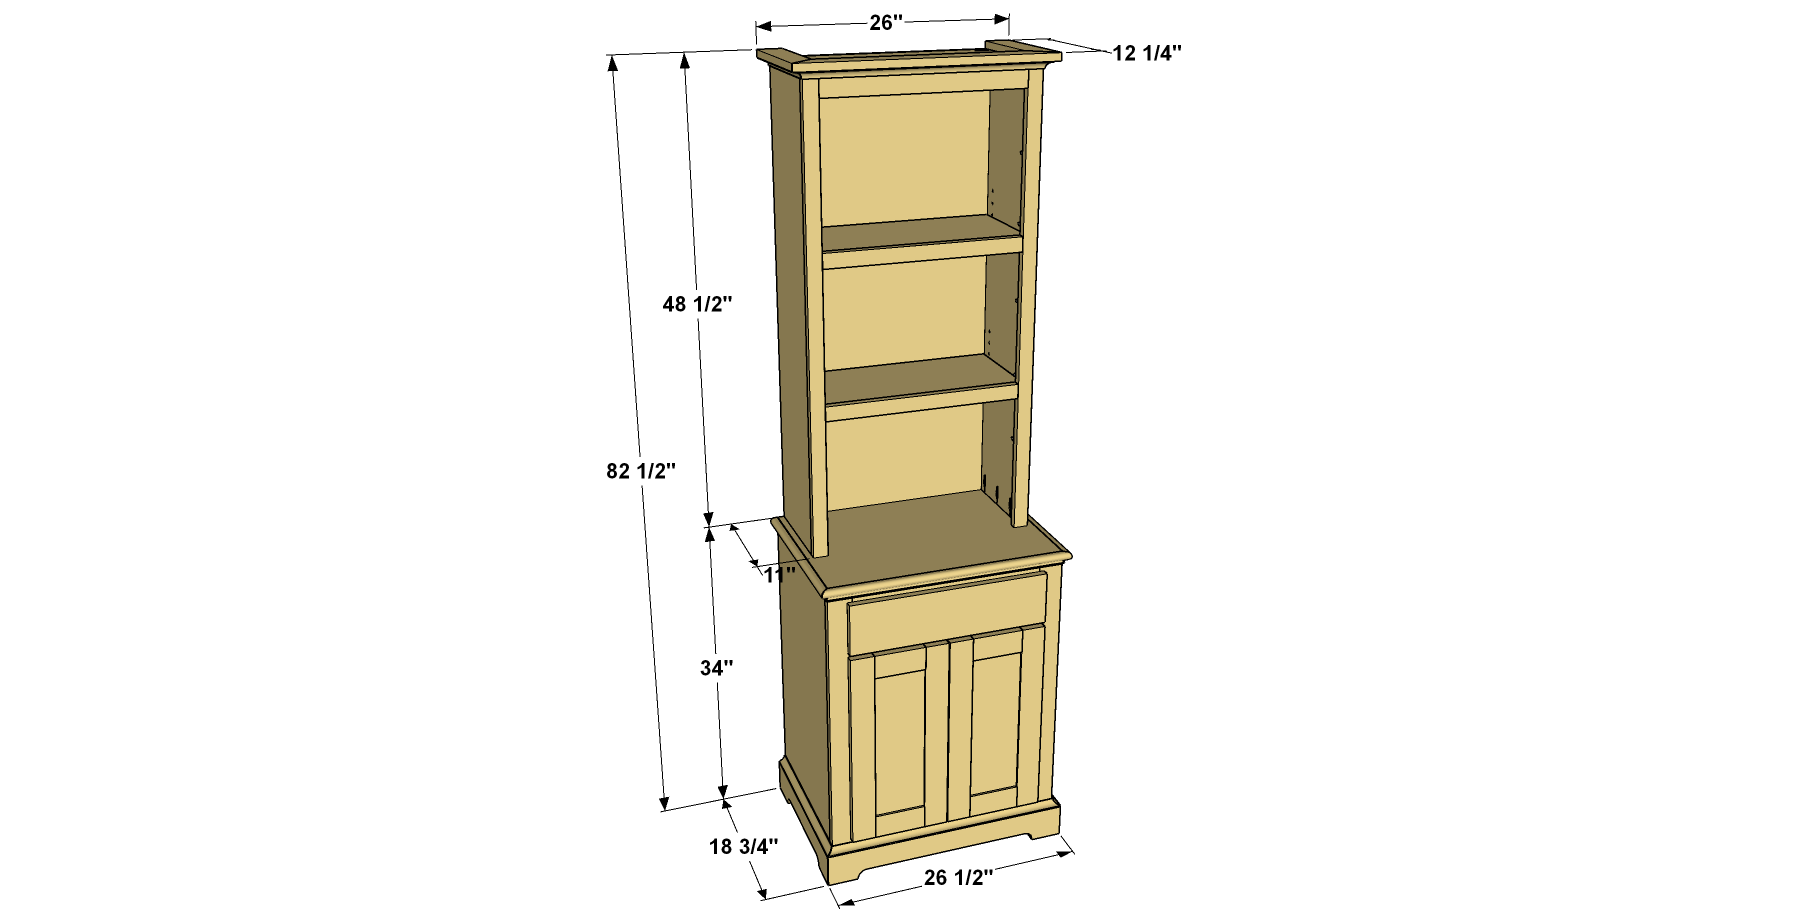
Cut List & Parts
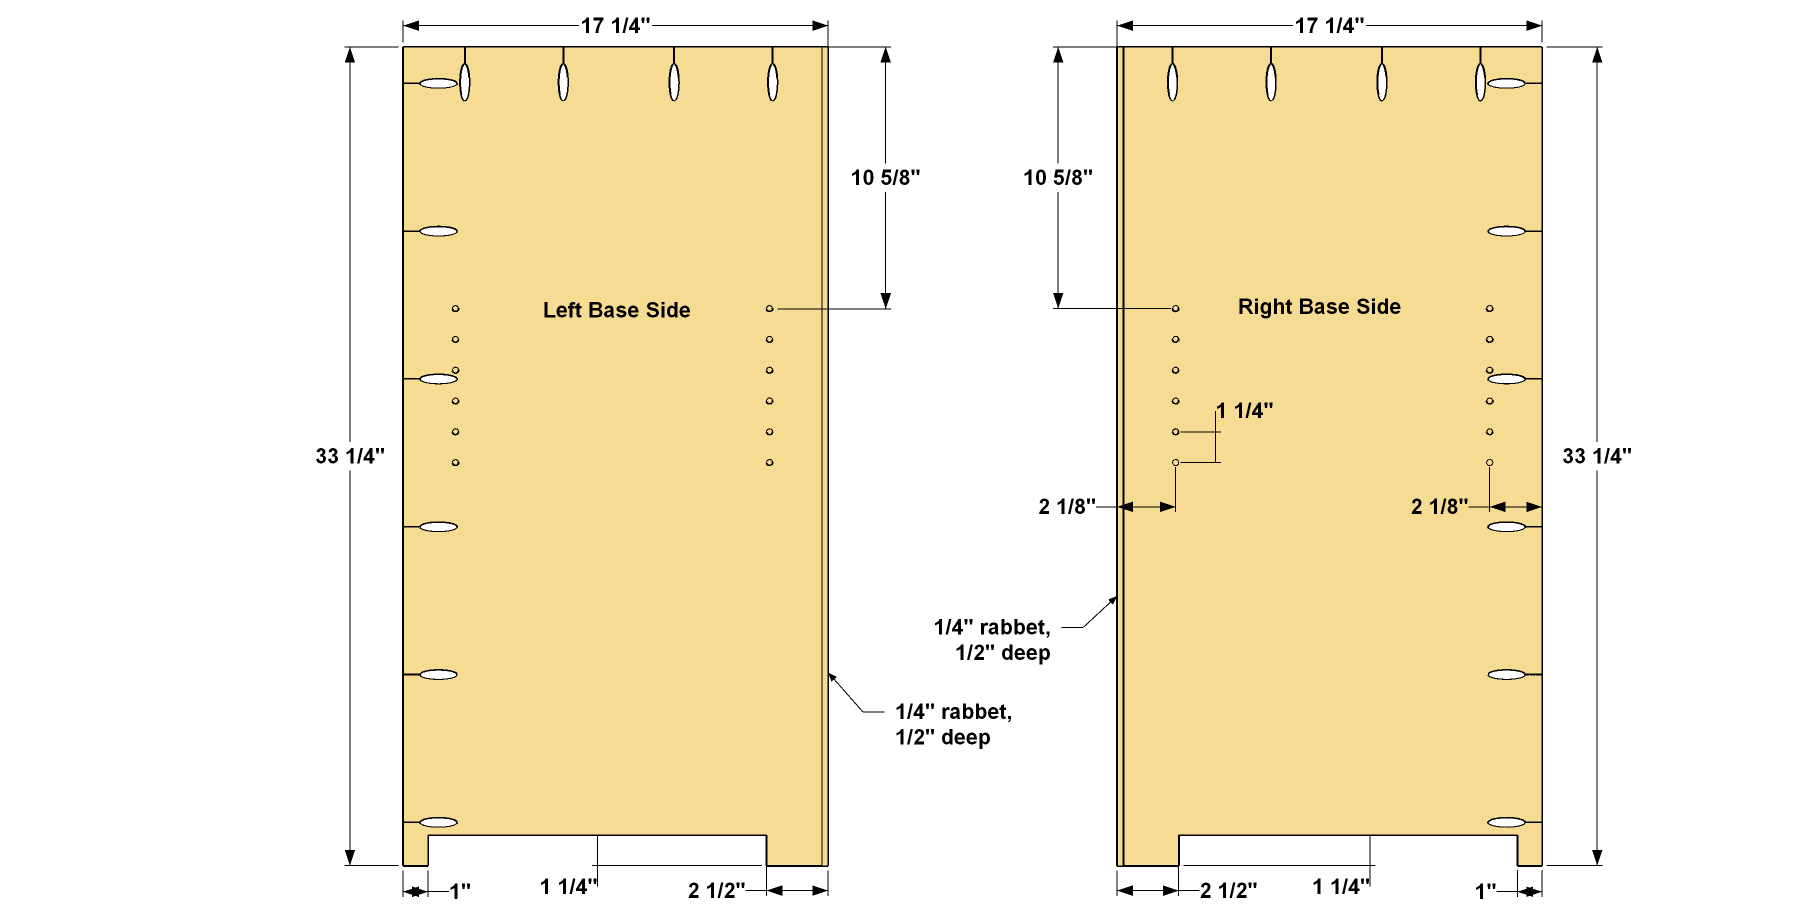
- 2 Lower Side , 3/4" x 17 1/4" x 33 1/4"
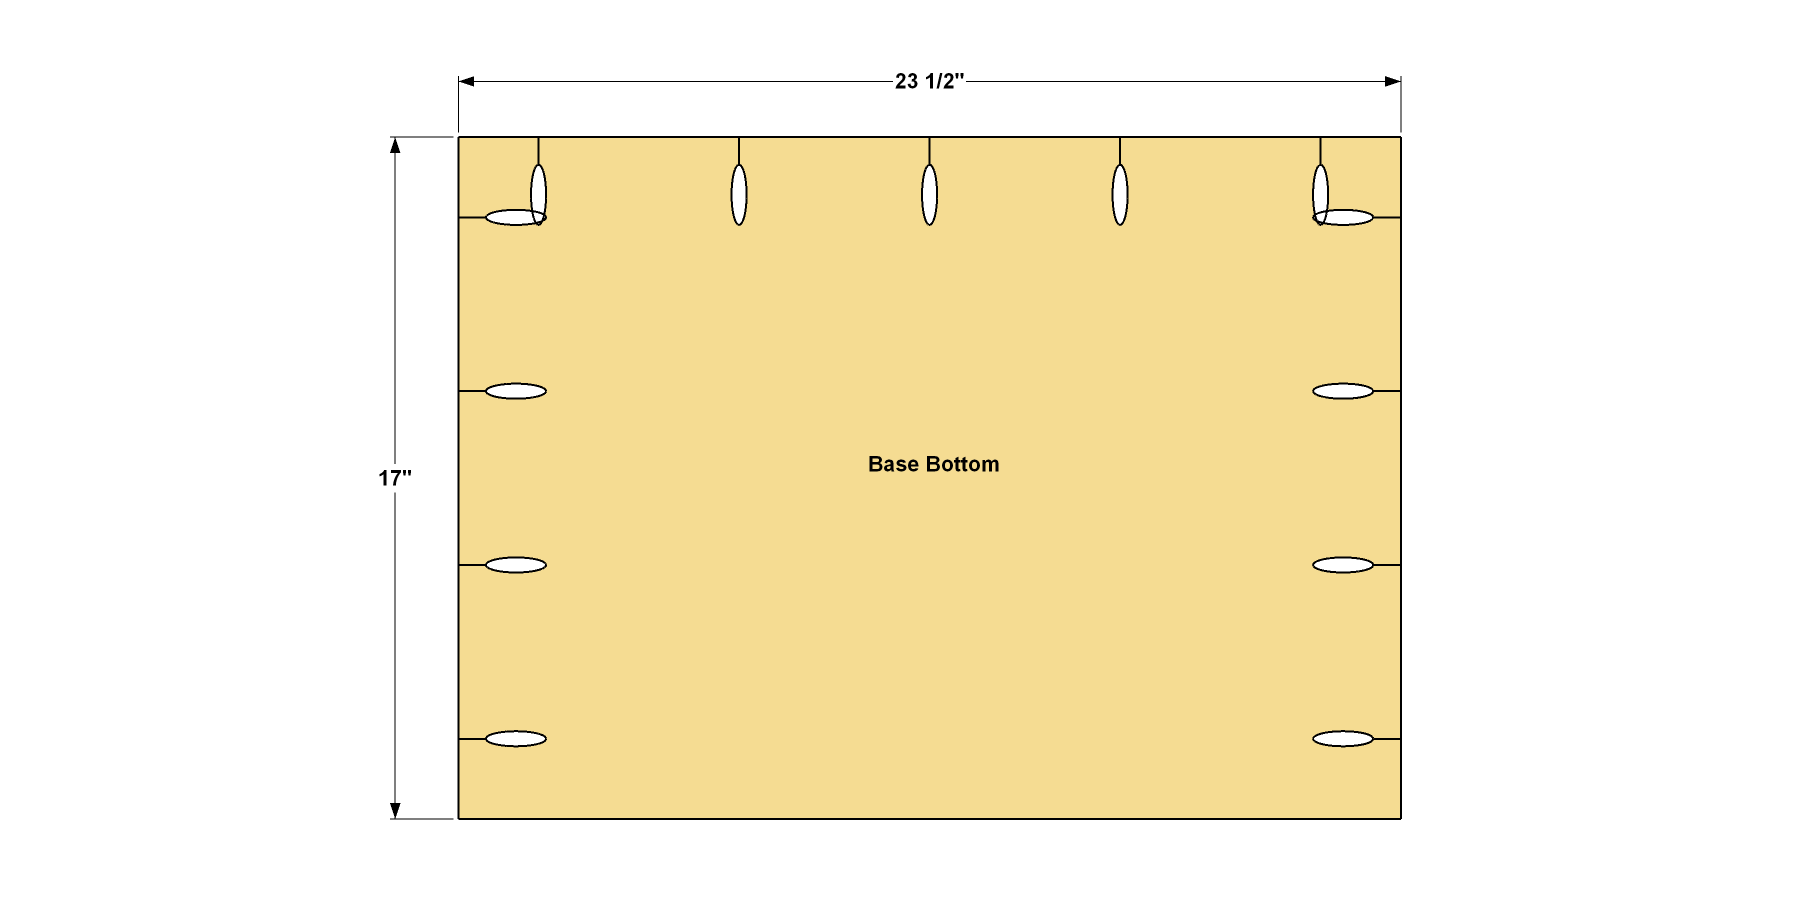
- 1 Base Bottom , 3/4" x 17" x 23 1/2"
- 2 Lower Stile , 3/4" x 2 1/2" x 33 1/4"
- 1 Lower Base Rail , 3/4" x 2 1/2" x 20"
- 1 Base Mid Rail , 3/4" x 1 1/2" x 20"
- 1 Base Upper Rail , 3/4" x 1 1/2" x 20"
- 1 Front Base Trim , 3/4" x 3 1/2" x 18 3/4"
- 2 Side Base Trim , 3/4" x 2 1/2" x 16 1/4"
- 2 Side Drawer Blocking , 3/4" x 2 1/2" x 16 1/4"
- 1 Rear Drawer Blocking , 3/4" x 2 1/2" x 23 1/2"
- 1 Base Top , 3/4" x 18" x 25"
- 1 Front Base Cove , 3/4" cove molding - cut to fit
- 2 Side Base Cove , 3/4" cove molding - cut to fit
- 1 Front Base Cap , 1 3/8" base cap molding ¬- cut to fit
- 2 Side Base Cap , 1 3/8" base cap molding ¬- cut to fit
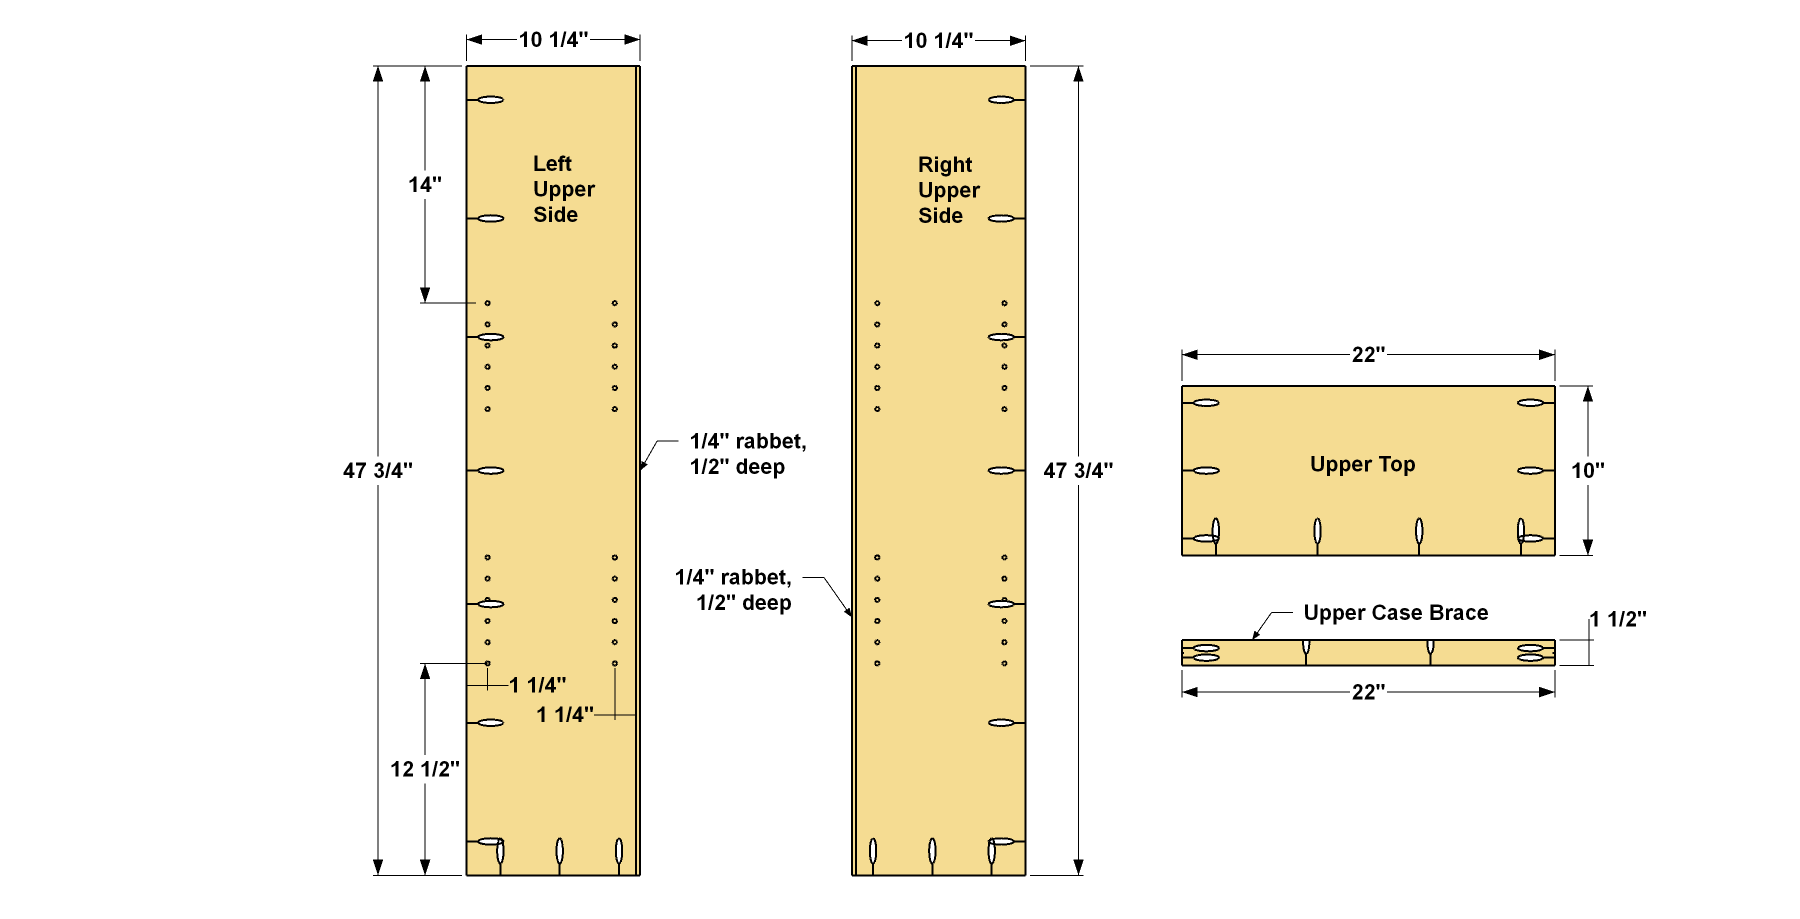
- 2 Upper Side , 3/4" x 10 1/4" x 47 3/4"
- 1 Upper Top , 3/4" x 10" x 22"
- 1 Upper Case Brace , 3/4" x 1 1/2" x 22"
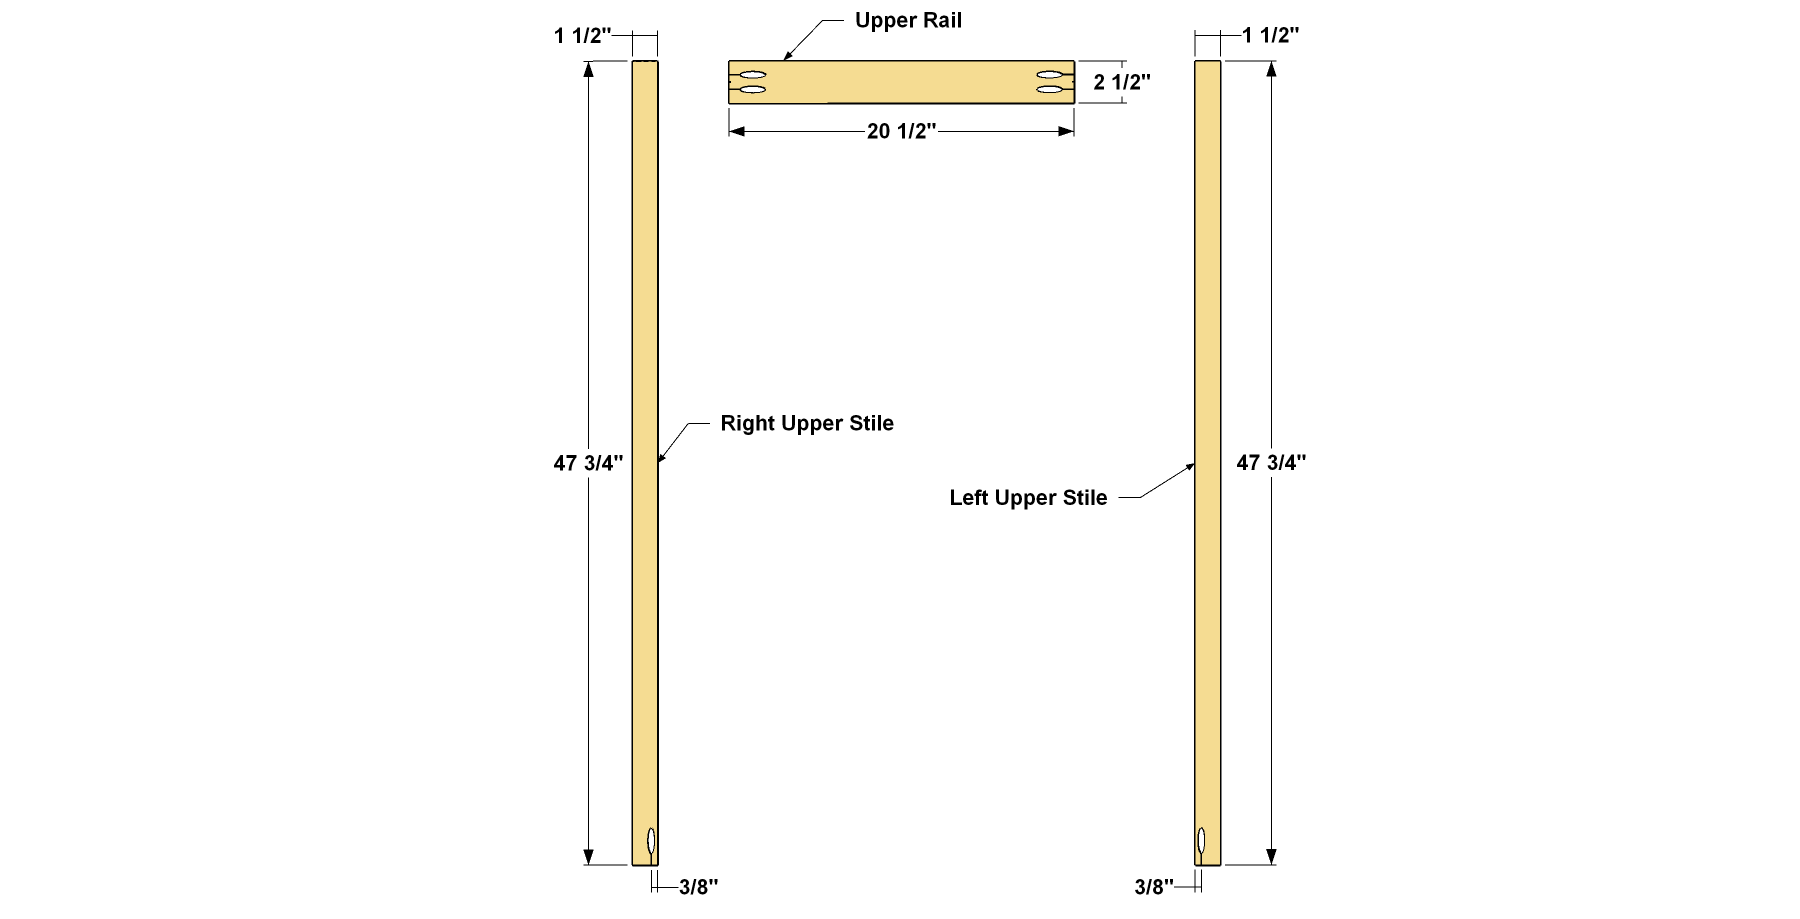
- 2 Upper Stile , 3/4" x 1 1/2" x 47 3/4"
- 1 Upper Rail , 3/4" x 2 1/2" x 20 1/2"
- 1 Front Upper Cove , 3/4" cove molding - cut to fit
- 2 Side Upper Cove , 3/4" cove molding - cut to fit
- 1 Front Cap , 3/4" x 2 1/2" – cut to fit
- 2 Side Cap , 3/4" x 2 1/2" – cut to fit
- 1 Lower Back , 1/4" x 24 1/2" x 28 3/4"
- 1 Upper Back , 1/4" x 23" x 47 3/4"
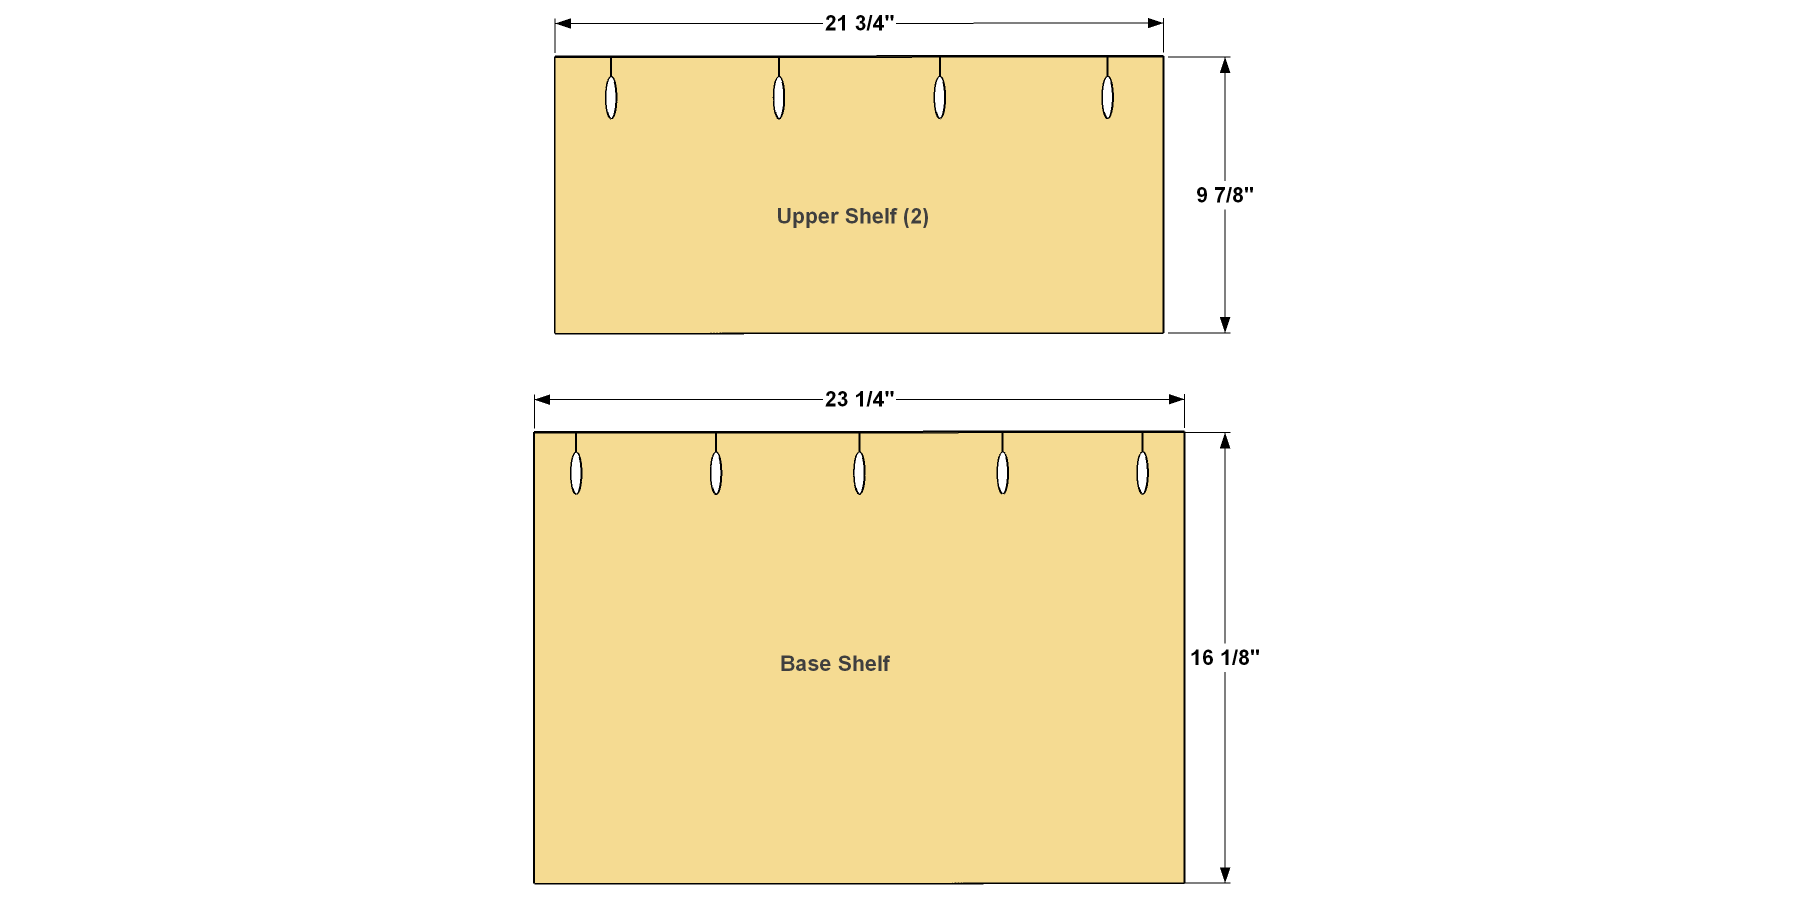
- 1 Base Shelf , 3/4" x 16 1/8" x 23 1/4"
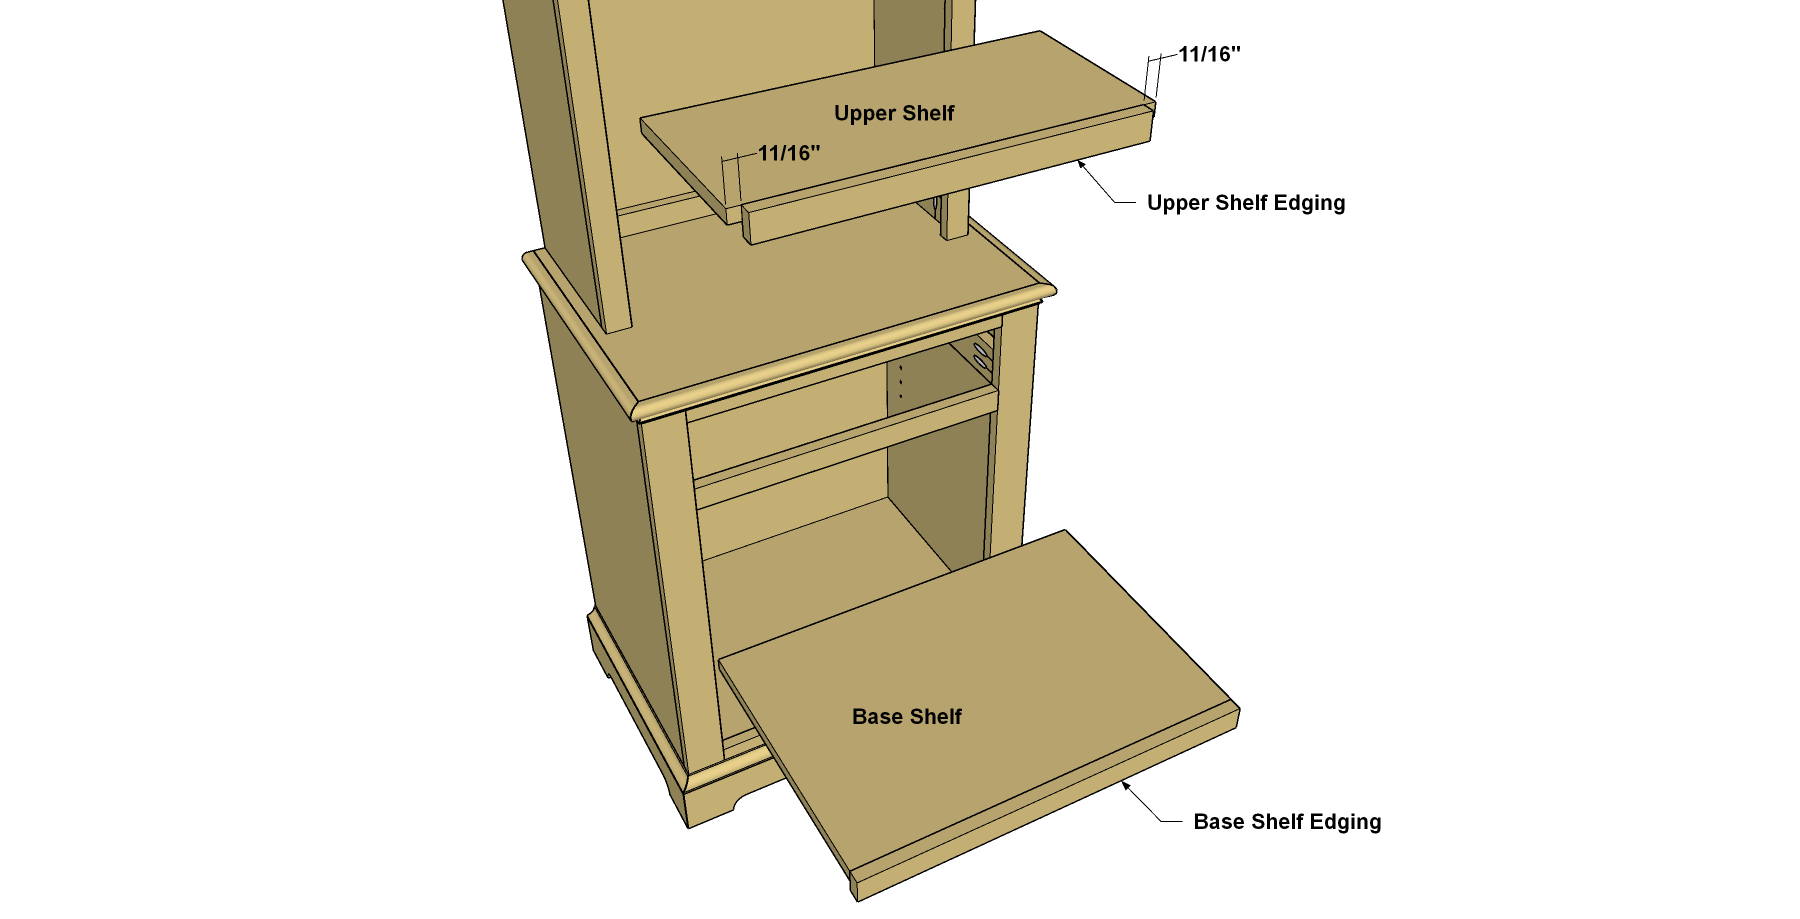
- 1 Base Shelf Edging , 3/4" x 1 1/2" x 23 1/4"
- 2 Upper Shelf , 3/4" x 9 7/8" x 21 3/4"
- 2 Upper Shelf Edging , 3/4" x 1 1/2" x 20 3/8"
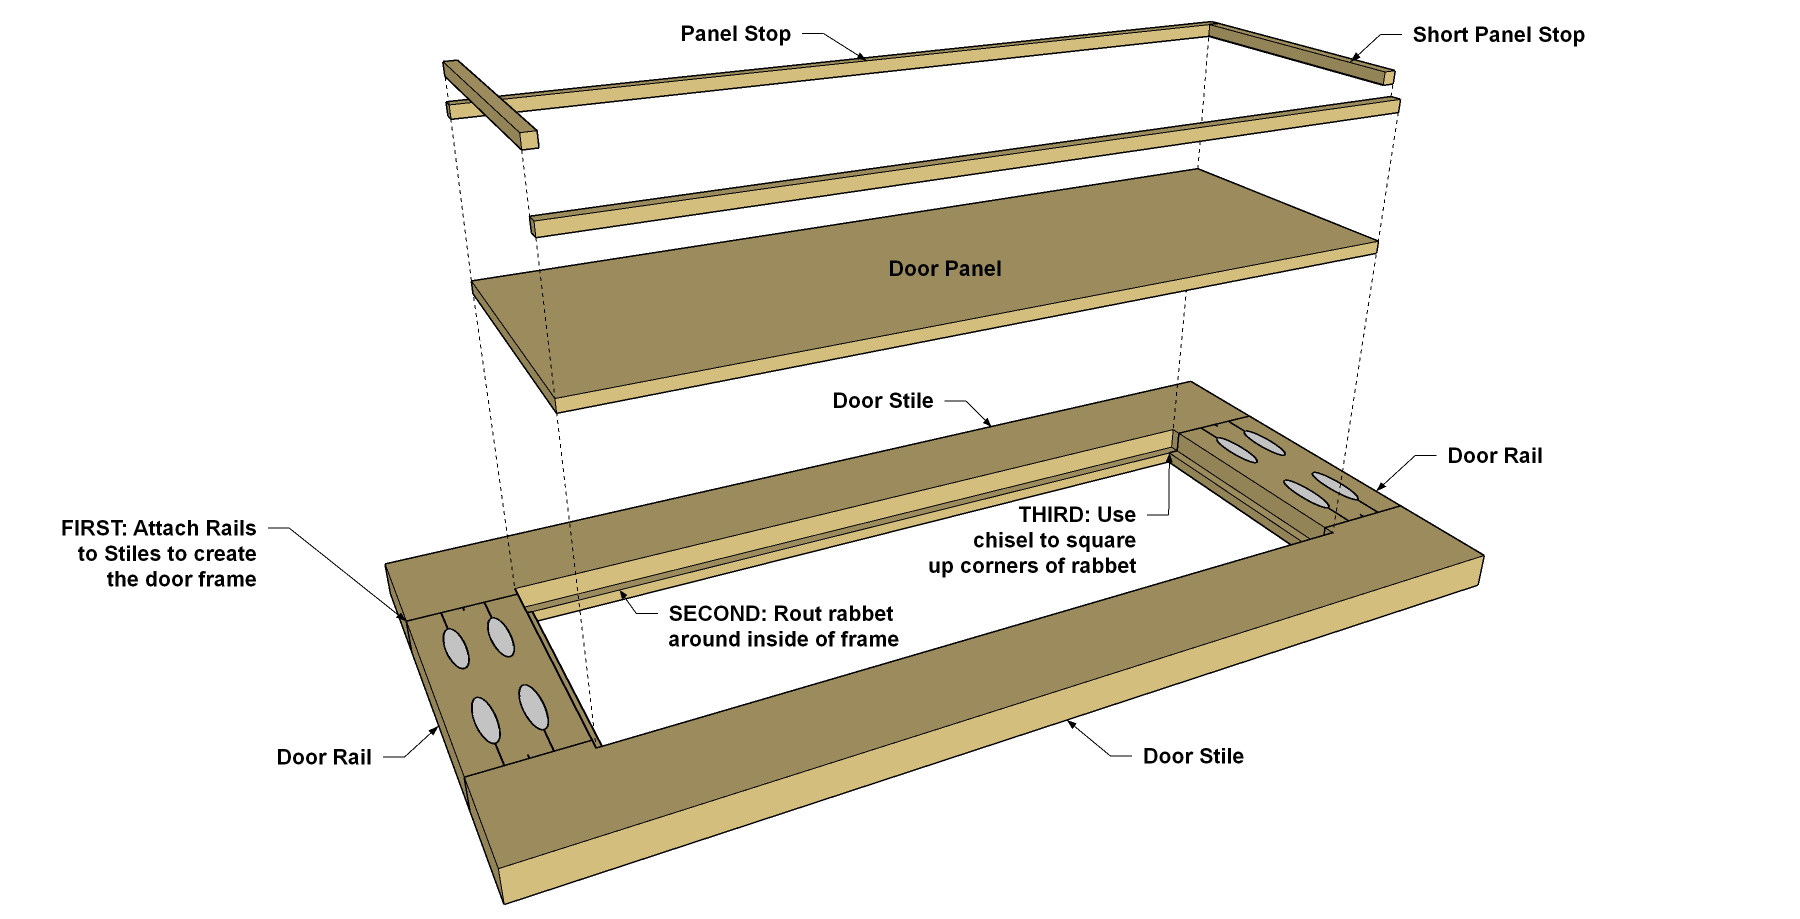
- 4 Lower Door Stile , 3/4" x 2 1/2" x 21 3/8"
- 4 Lower Door Rail , 3/4" x 2 1/2" x 5 7/16"
- 2 Door Panel , 1/4" x 5 15/16" x 16 7/8"
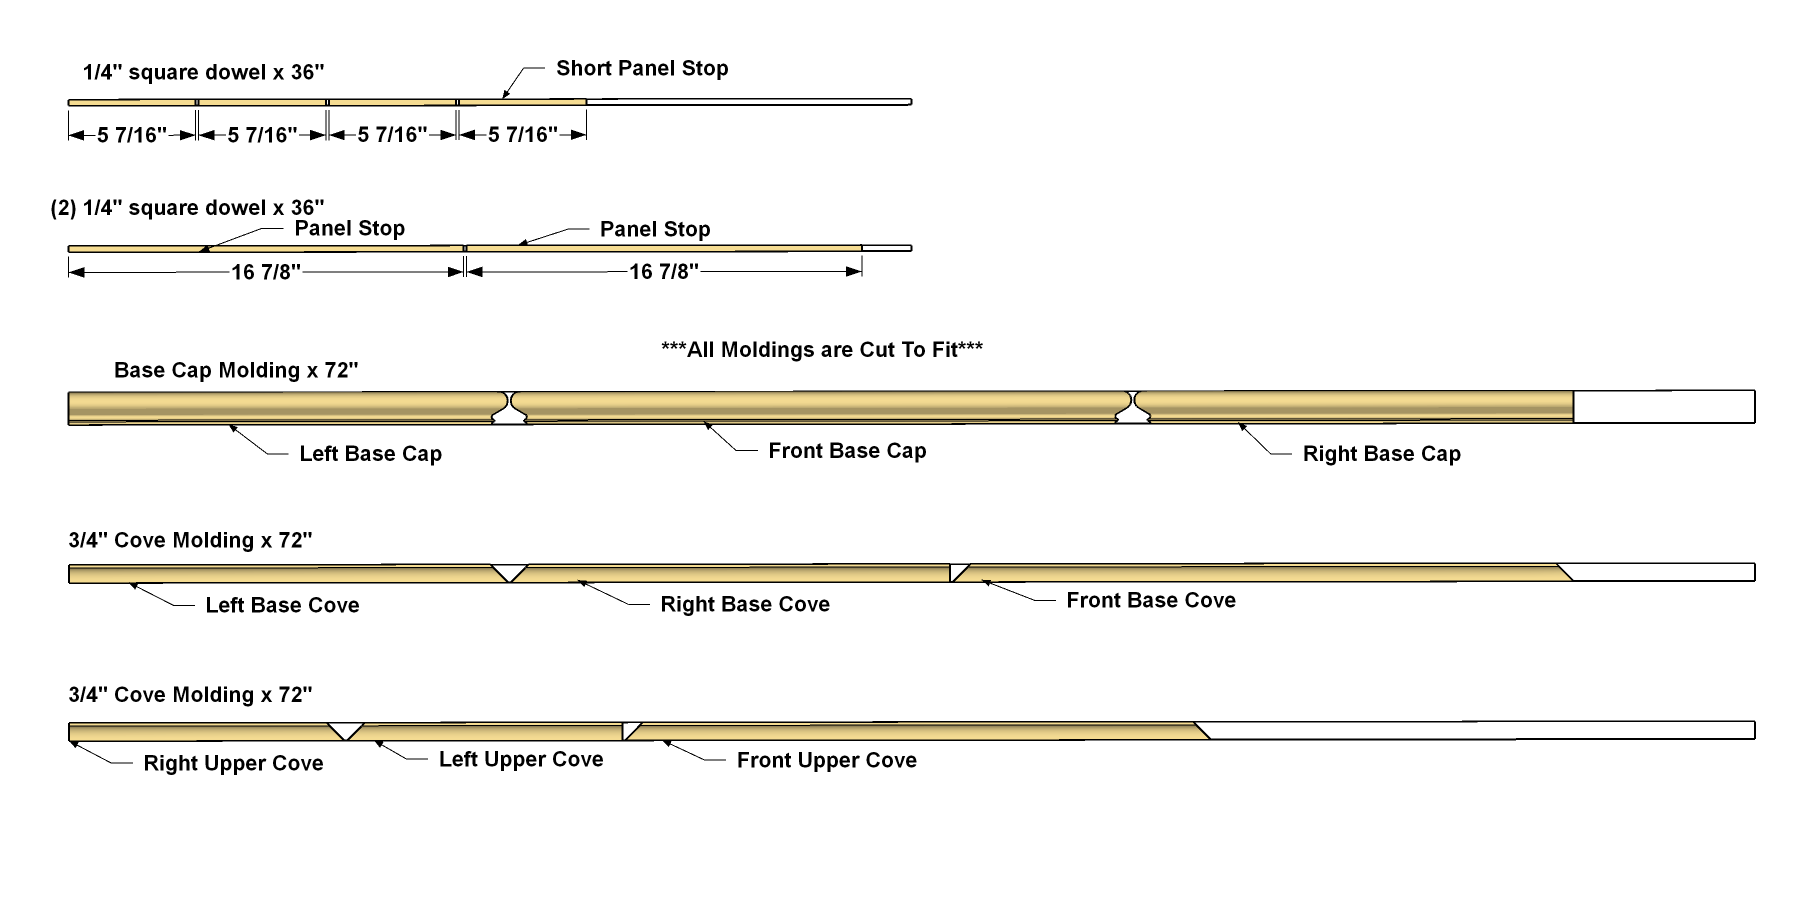
- 4 Panel Stop , 1/4" x 1/4" x 16 7/8"
- 4 Short Panel Stop , 1/4" x 1/4" x 5 7/16"
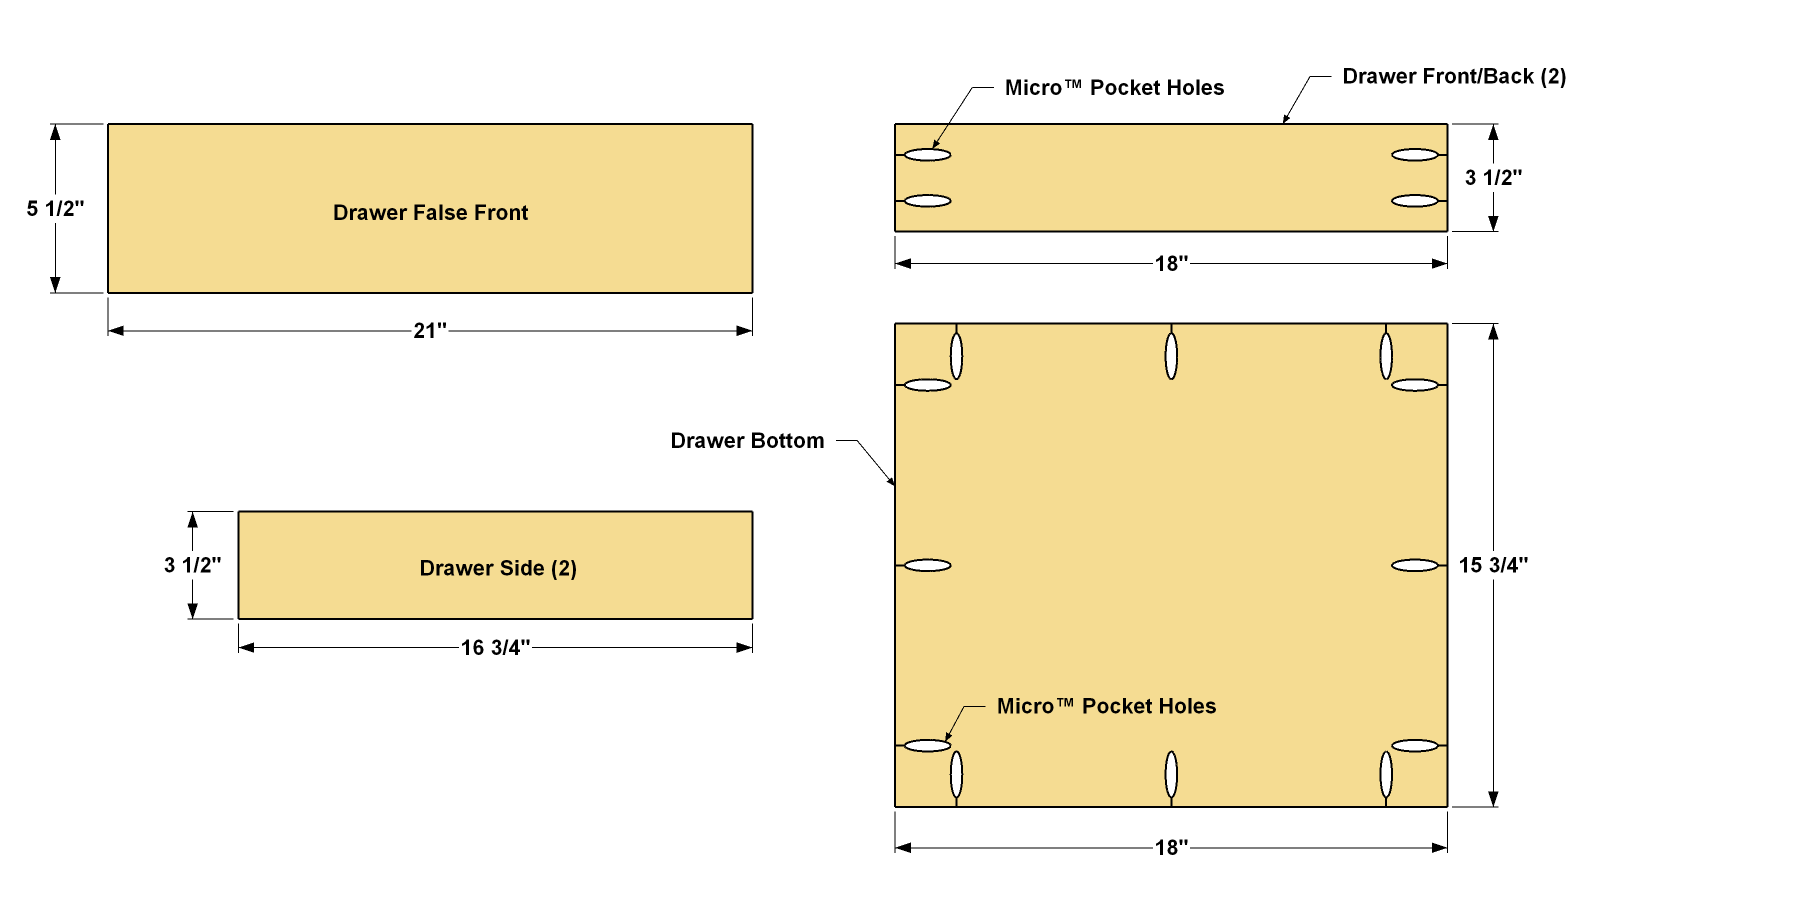
- 2 Drawer Front/Back , 1/2" x 3 1/2" x 18"
- 2 Drawer Side , 1/2" x 3 1/2" x 16 3/4"
- 1 Drawer Bottom , 1/2" x 15 3/4" x 18"
- 1 Drawer False Front , 3/4" x 5 1/2" x 21"
Directions
-
Make the Base Sides
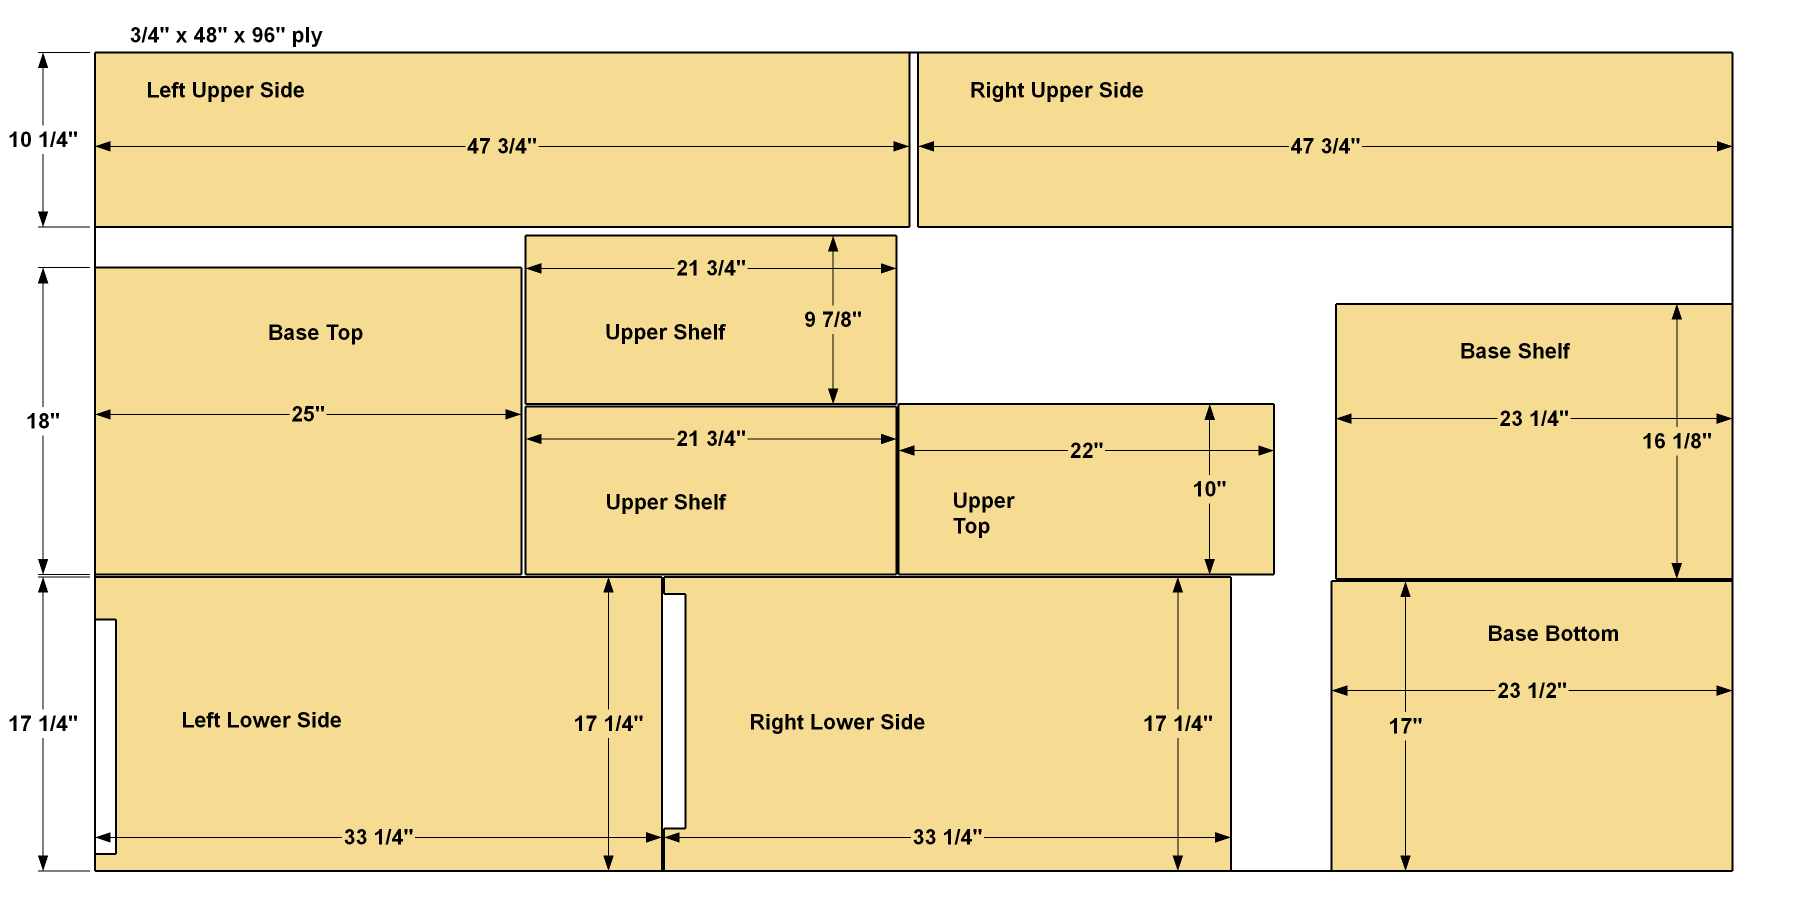
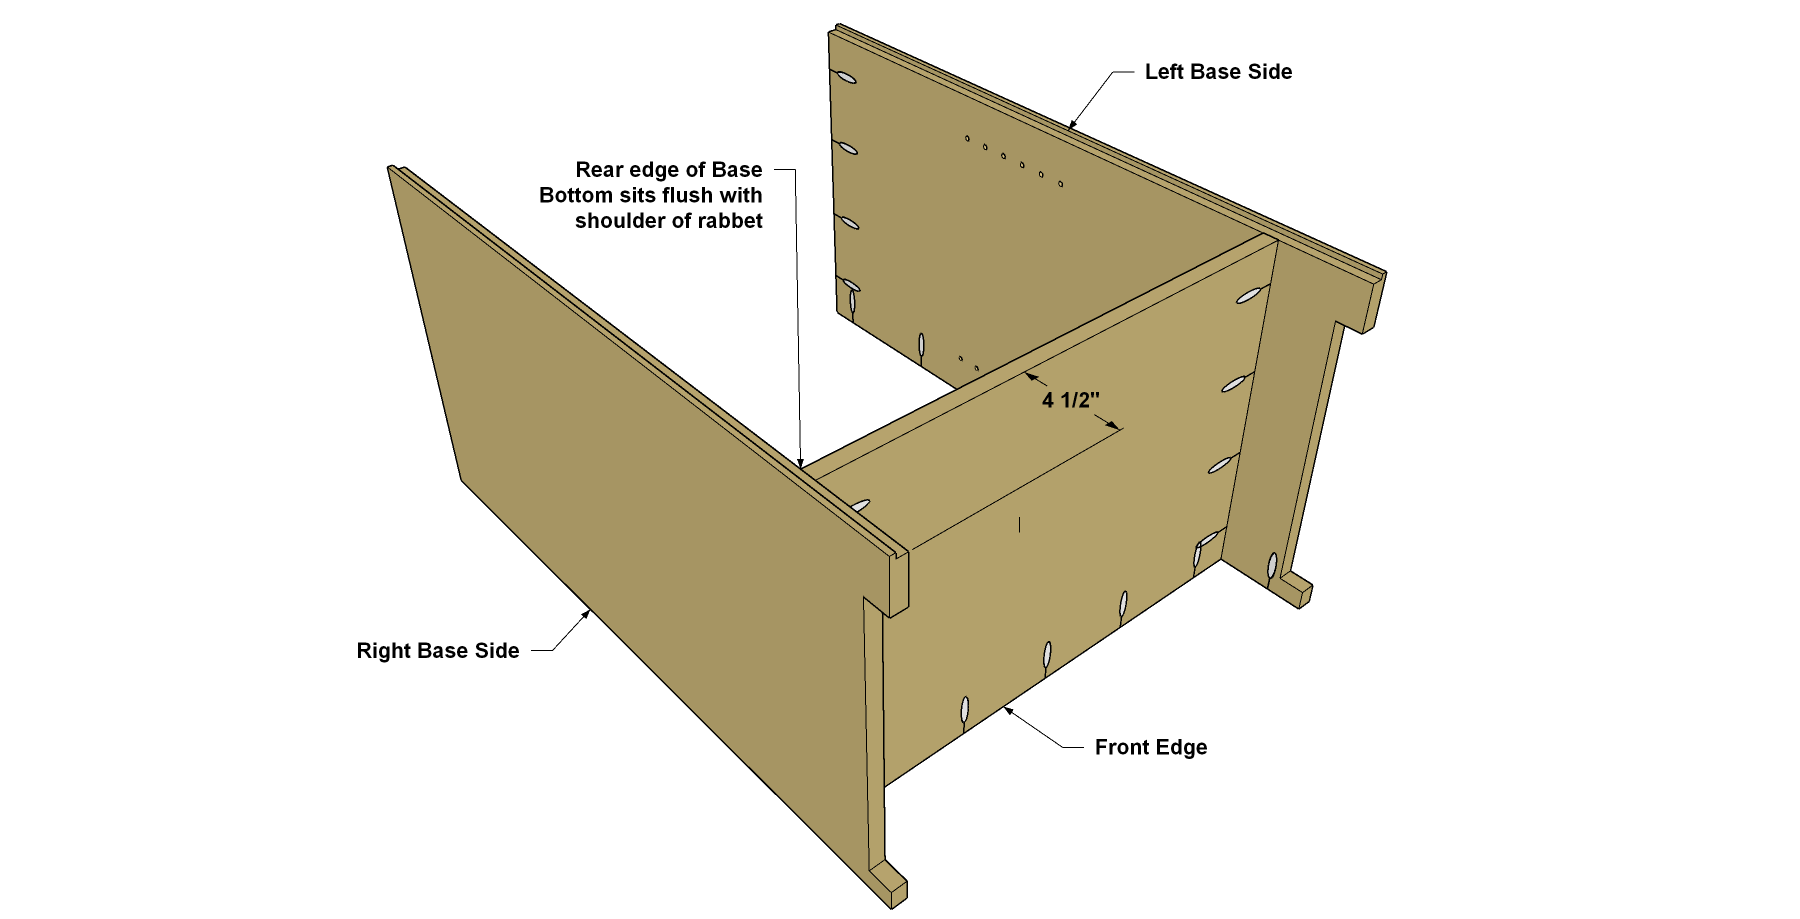
Start by cutting two Base Sides to size from 3/4" plywood, as shown in the cutting diagram. Then, using a jigsaw, cut the notch in the lower edge of each Side, as shown. Next, use a Kreg Shelf Pin Jig to drill shelf pin holes at the locations shown. To drill the pocket holes, set your Kreg Jig for 3/4" material (you’ll leave it on this setting for the entire project, until you build the drawer in later steps). Now drill the pocket holes along the upper and front inside edges, making sure to miss the shelf-pin holes. Finally, use a router equipped with a 1/4" rabbeting bit to rout a rabbet along the rear inside edge of each side. Sand the parts smooth.
NOTE: The setback spacing (distance from the edge to the shelf-pin holes) shown throughout this plan matches the first-generation Kreg Shelf Pin Jig. The second generation model, released in March 2022, has different setback spacing. The vertical distance between the pin holes, though, matches the dimensions shown here—1 1/4". You can create the shelf-pin holes accurately using either the first- or second-generation jig.
-
Make the Base Bottom
Cut the Base Bottom to size from 3/4" plywood, as shown in the cutting diagram. Then drill pocket holes along the front and side edges, as shown. Sand the bottom smooth.
-
Attach the Bottom to the Sides
Now you can attach the Base Bottom to the Base Sides. Position the parts, as shown, so that the rear edge of the Base Bottom (without pocket holes) is aligned with the rabbets in the Base Sides, as shown. Measure to position the Bottom correctly, and then use a square to double-check. Then attach the Base Bottom to the Sides using 1 1/4" coarse-thread Kreg Screws.
-
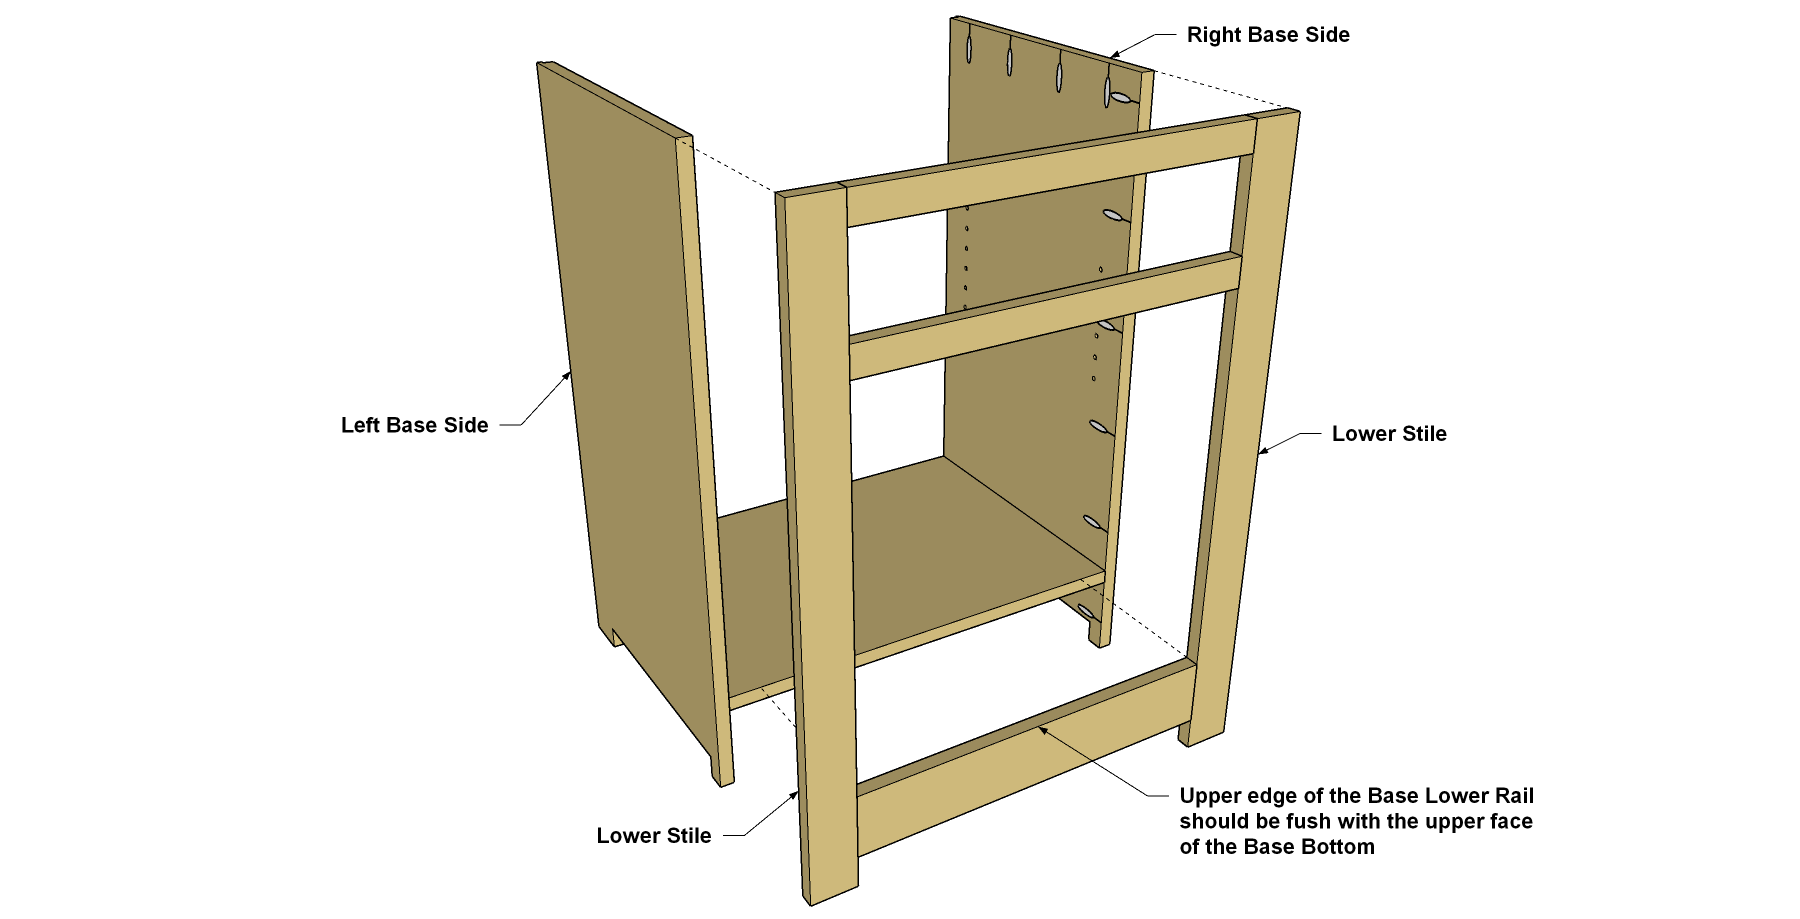
Make Base Face Frame Parts
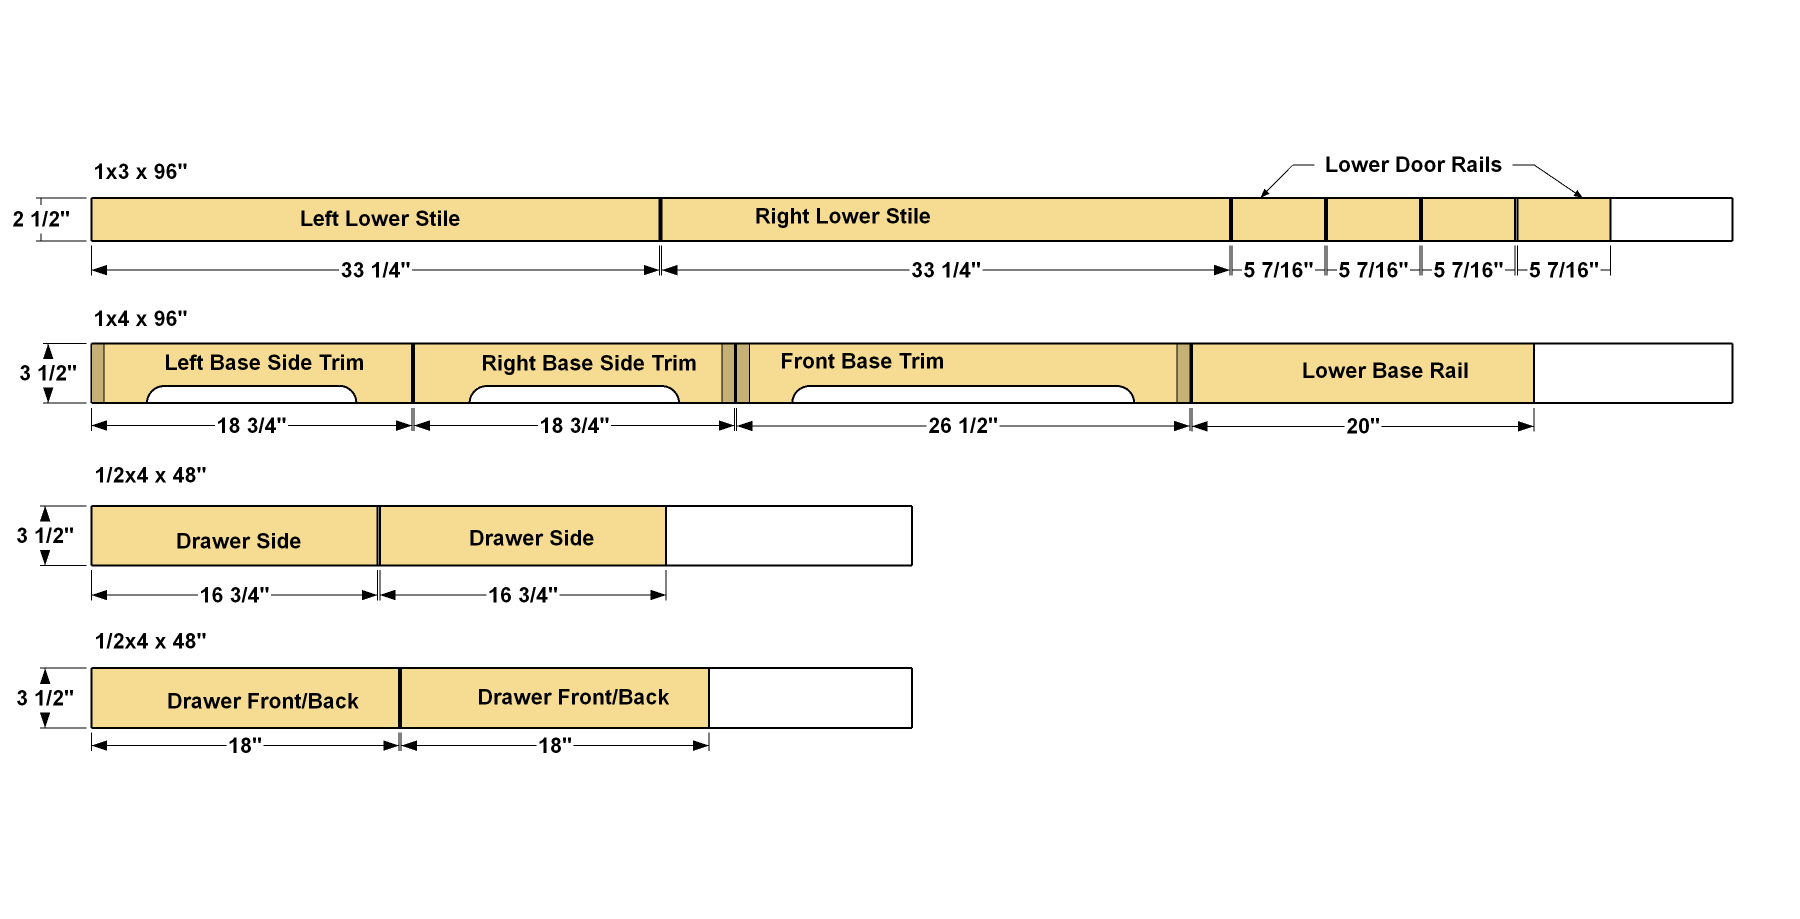
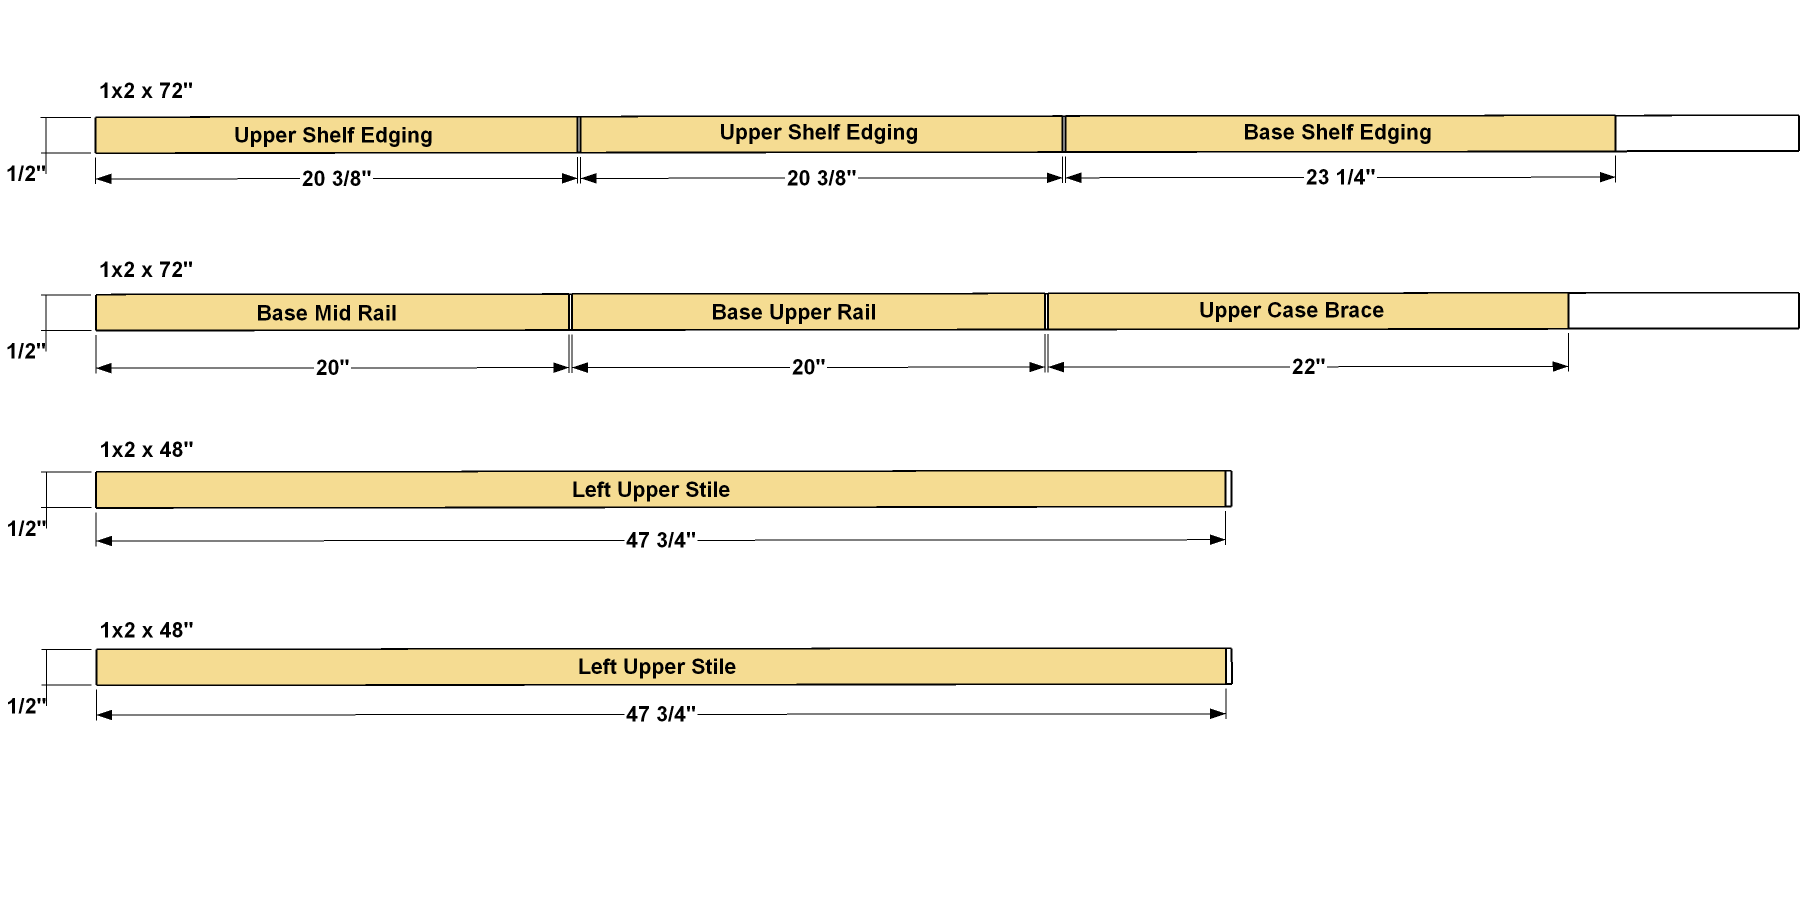
To make the face frame that gets attached to the base, first cut two Lower Stiles to length from a 1x3 board, as shown in the cutting diagram. Then cut a Lower Base Rail from a 1x4, and a Base Mid Rail and Base Upper Rail from a 1x2. Drill pocket holes in all of the rails, as shown. Sand the faces and edges of the parts after you drill the pocket holes.

-
Assemble the Face Frame
Now position the Base Mid Rail, Base Upper Rail, and Lower Base Rail between the Lower Stiles at the positions shown. Make sure that the pocket holes in the Upper Rail are oriented correctly for attaching the Base Top later. Attach the Rails to the Stiles using 1 1/4" coarse-thread Kreg Screws. Give the faces a final sanding to ensure that all of the joints are smooth.

-
Attach the Face Frame
Now you can attach the face frame assembly to the base assembly using 1 1/4" coarse-thread Kreg Screws. Note that the upper edge of the Lower Base Rail should be flush with the base Bottom.
-
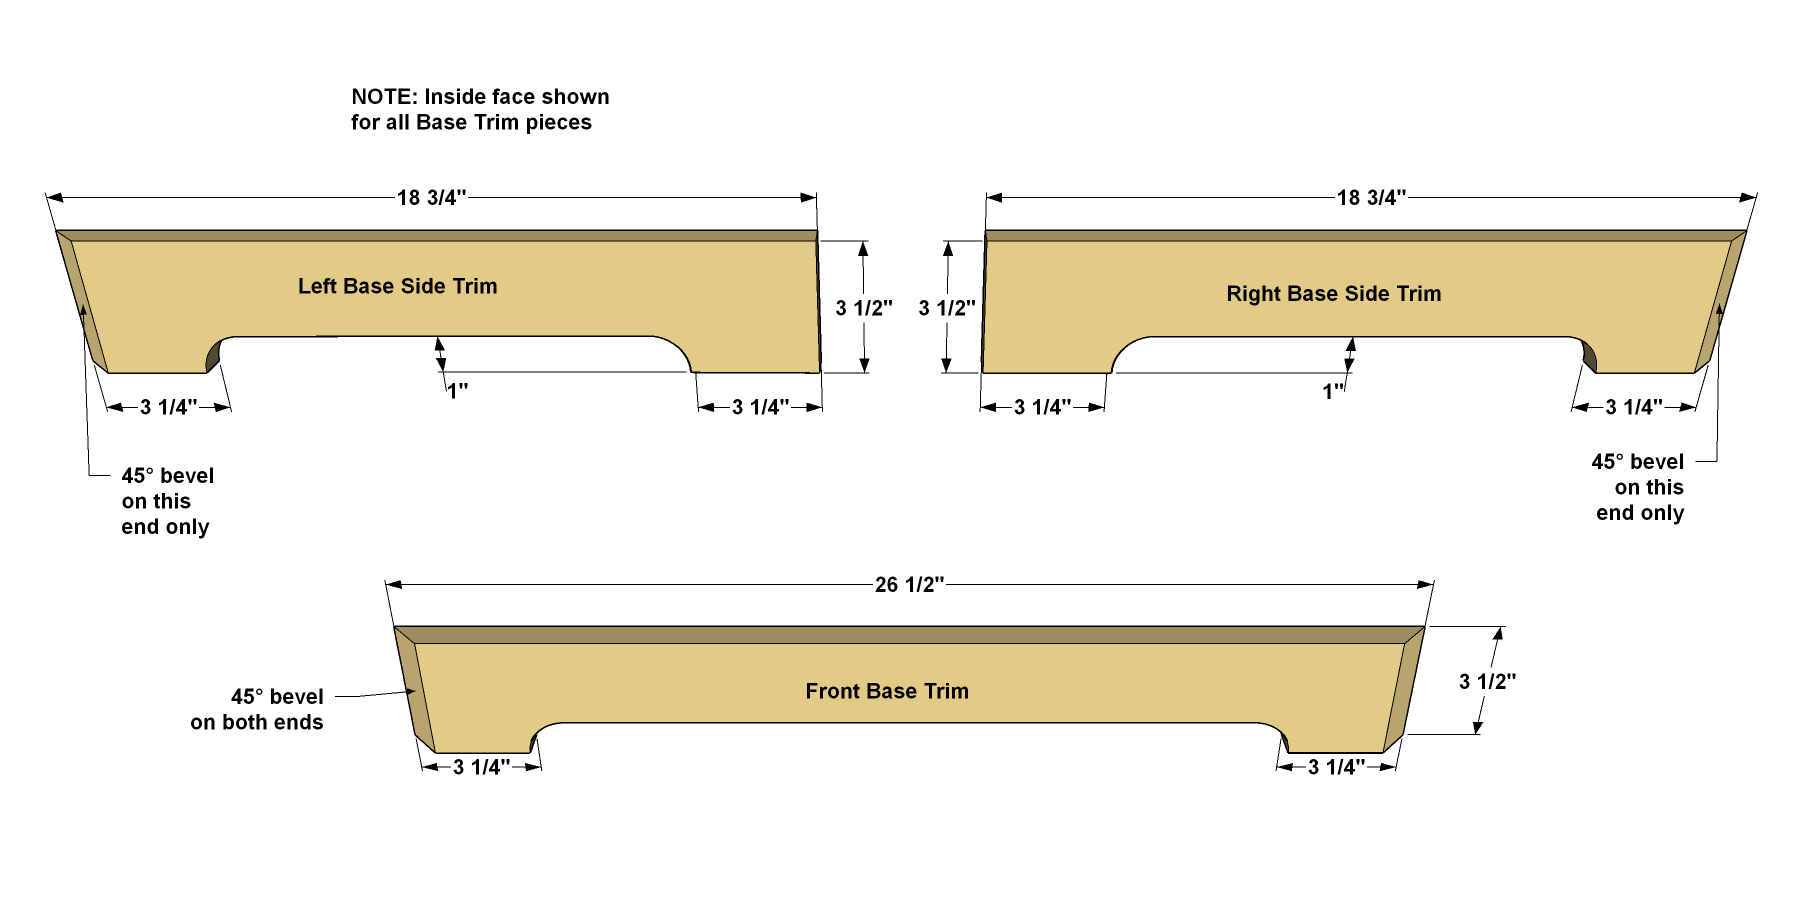
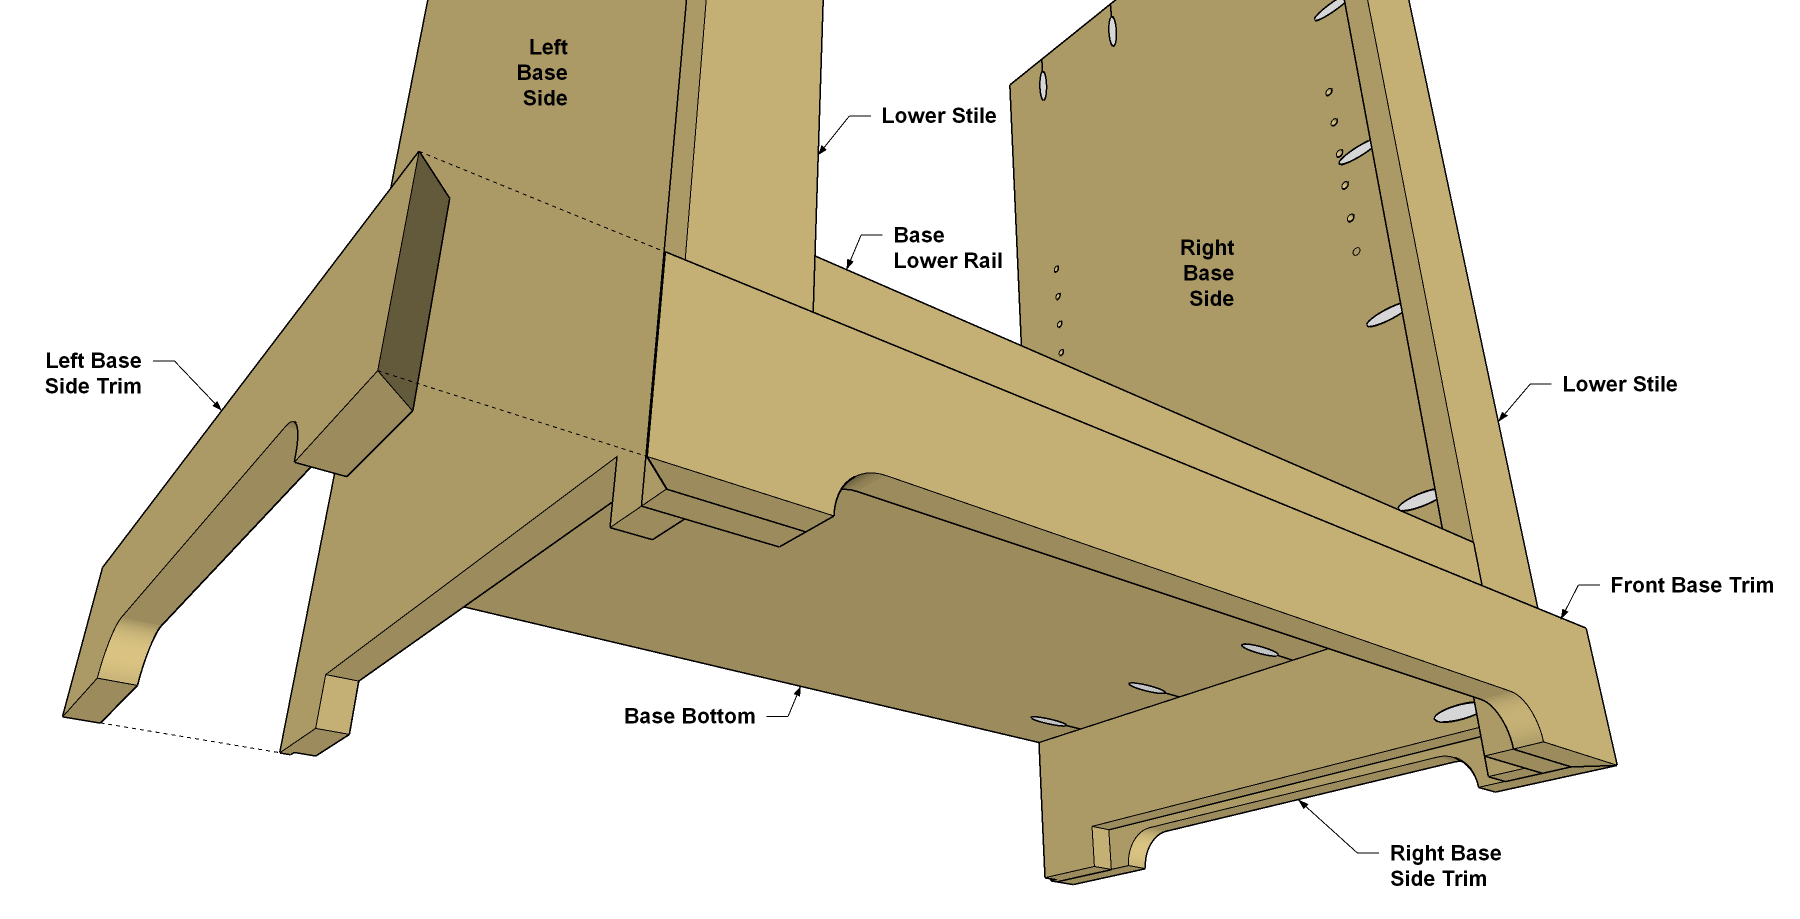
Make Base Trim
The base gets wrapped with three pieces of trim. Cut the pieces to size from 1x4 boards. Note that one end of each Base Side Trim is beveled at 45°, while both ends of the Front Base Trim are mitered at 45°. After you cut the pieces to length, lay out and cut the notches as shown using a jigsaw. Sand the cut edges of the notches, along with the faces of the pieces, smooth.
-
Attach the Base Trim
Position the Front and Side Base Trim pieces as shown to double-check their fit. Then spread glue on the 45° bevels and on the back face of each piece. Hold the parts in place while you drive in 1" brads. They’ll “clamp” the parts in place while the glue dries. A brad nailer works best for this. You can buy one economically in a home center, or you can rent one for your project.
-
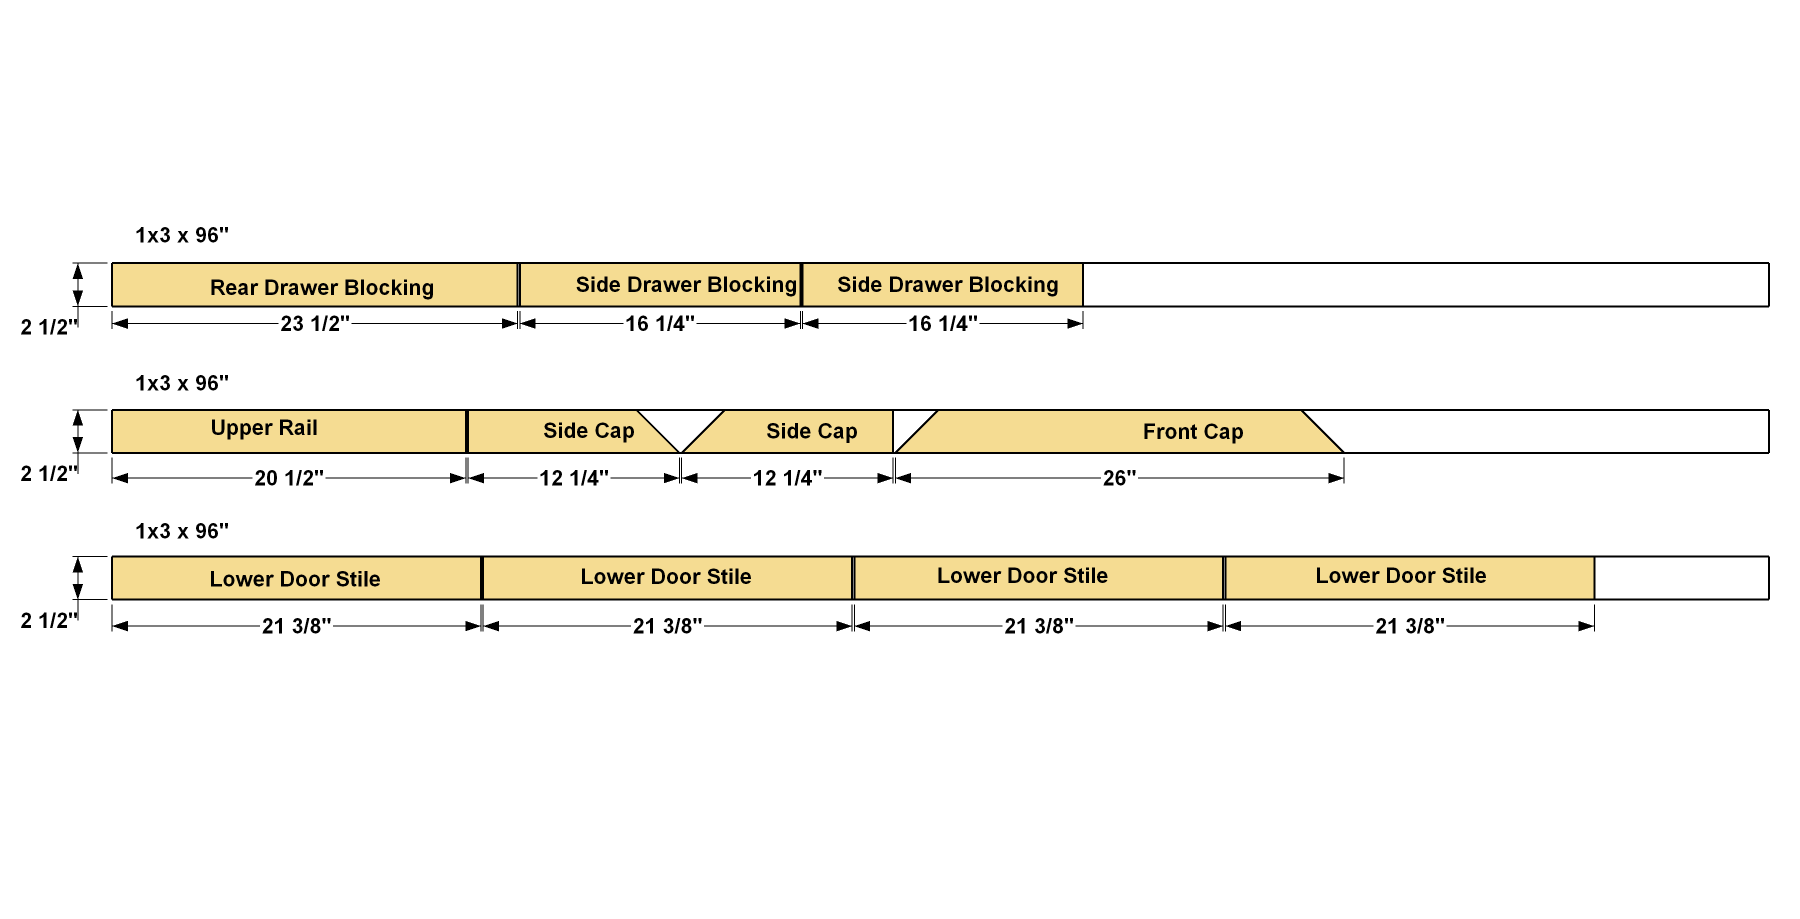
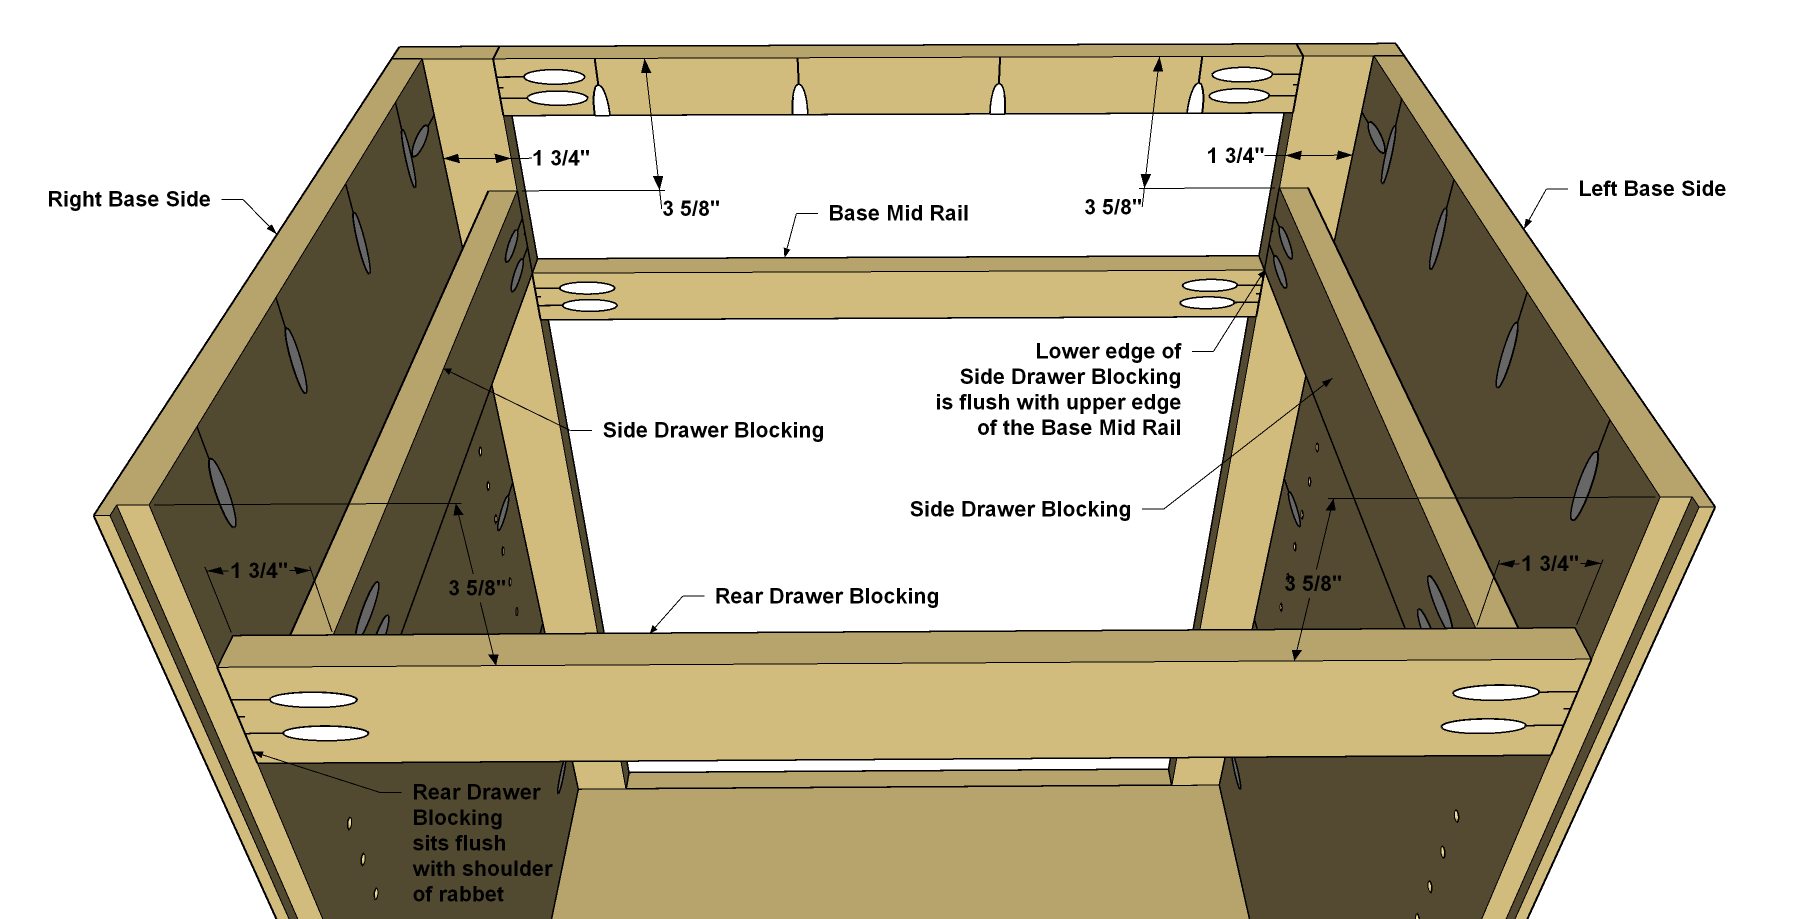
Make Drawer Blocking
From 1x3 boards, cut two pieces of Side Drawer Blocking and one Front Drawer Blocking to length. Then drill pocket holes in the Side Drawer Blocking, as shown. Sand the pieces
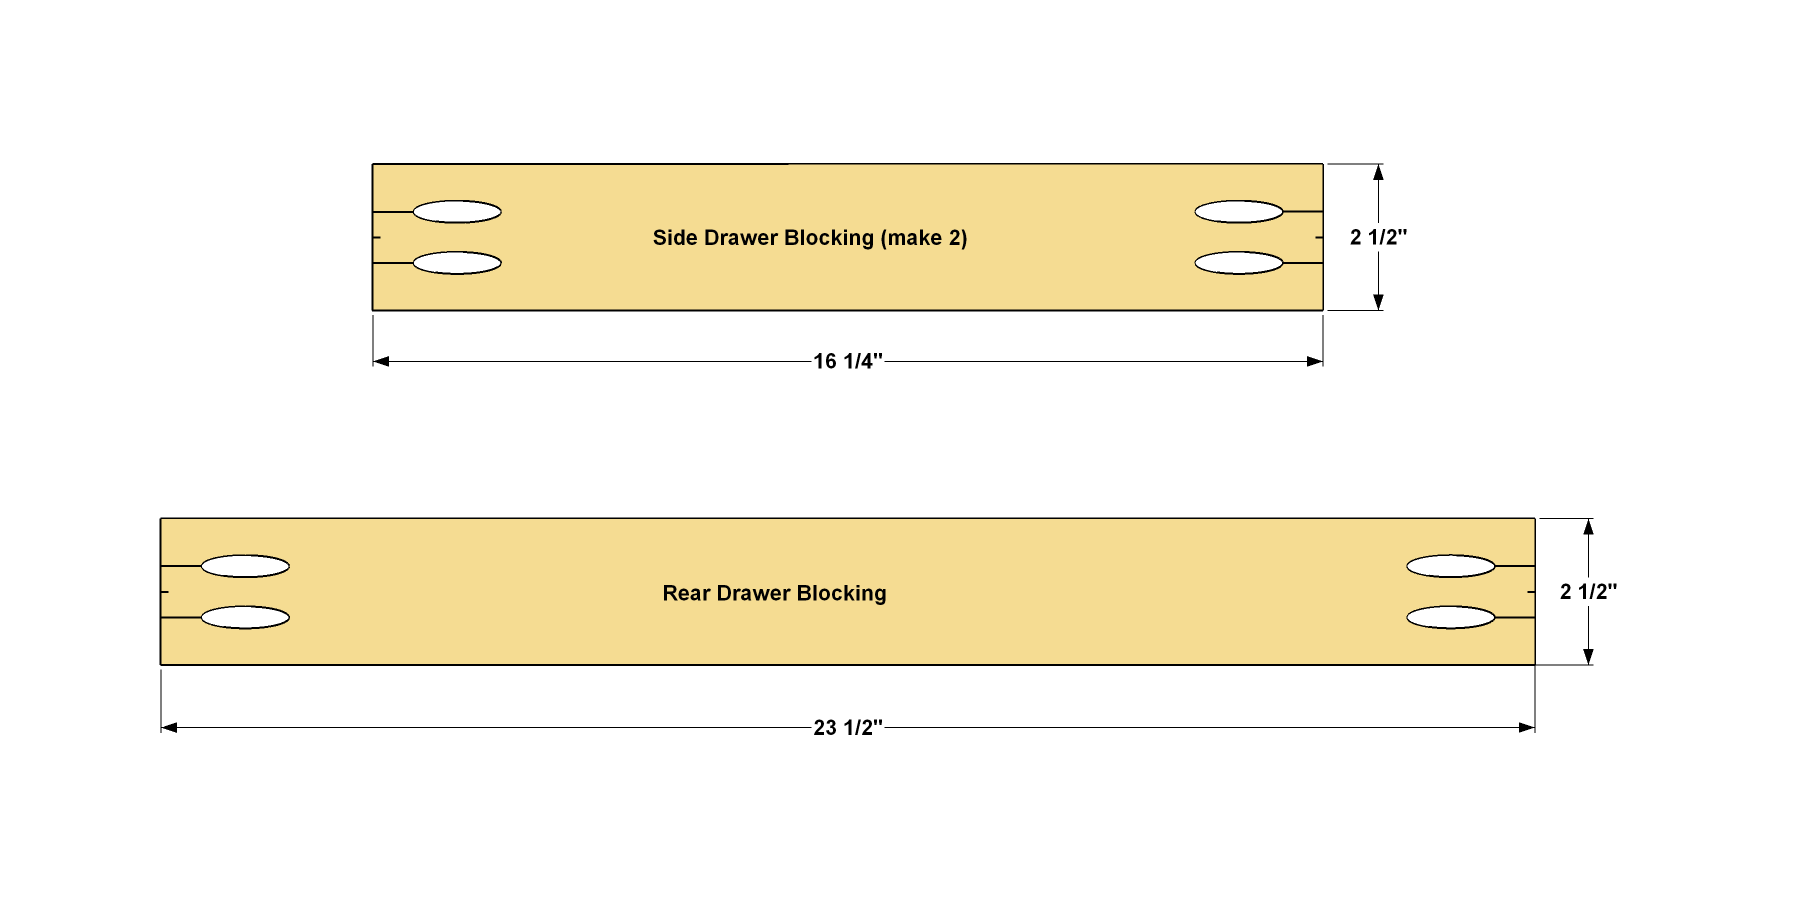
-
Install the Drawer Blocking
Now you can install the Drawer Blocking as shown. The Rear Drawer Blocking should fit flush with the rabbets in the Lower Sides. At the front of the base assembly, the Side Drawer Blocking are flush with the upper edge of the base Mid Rail.
-
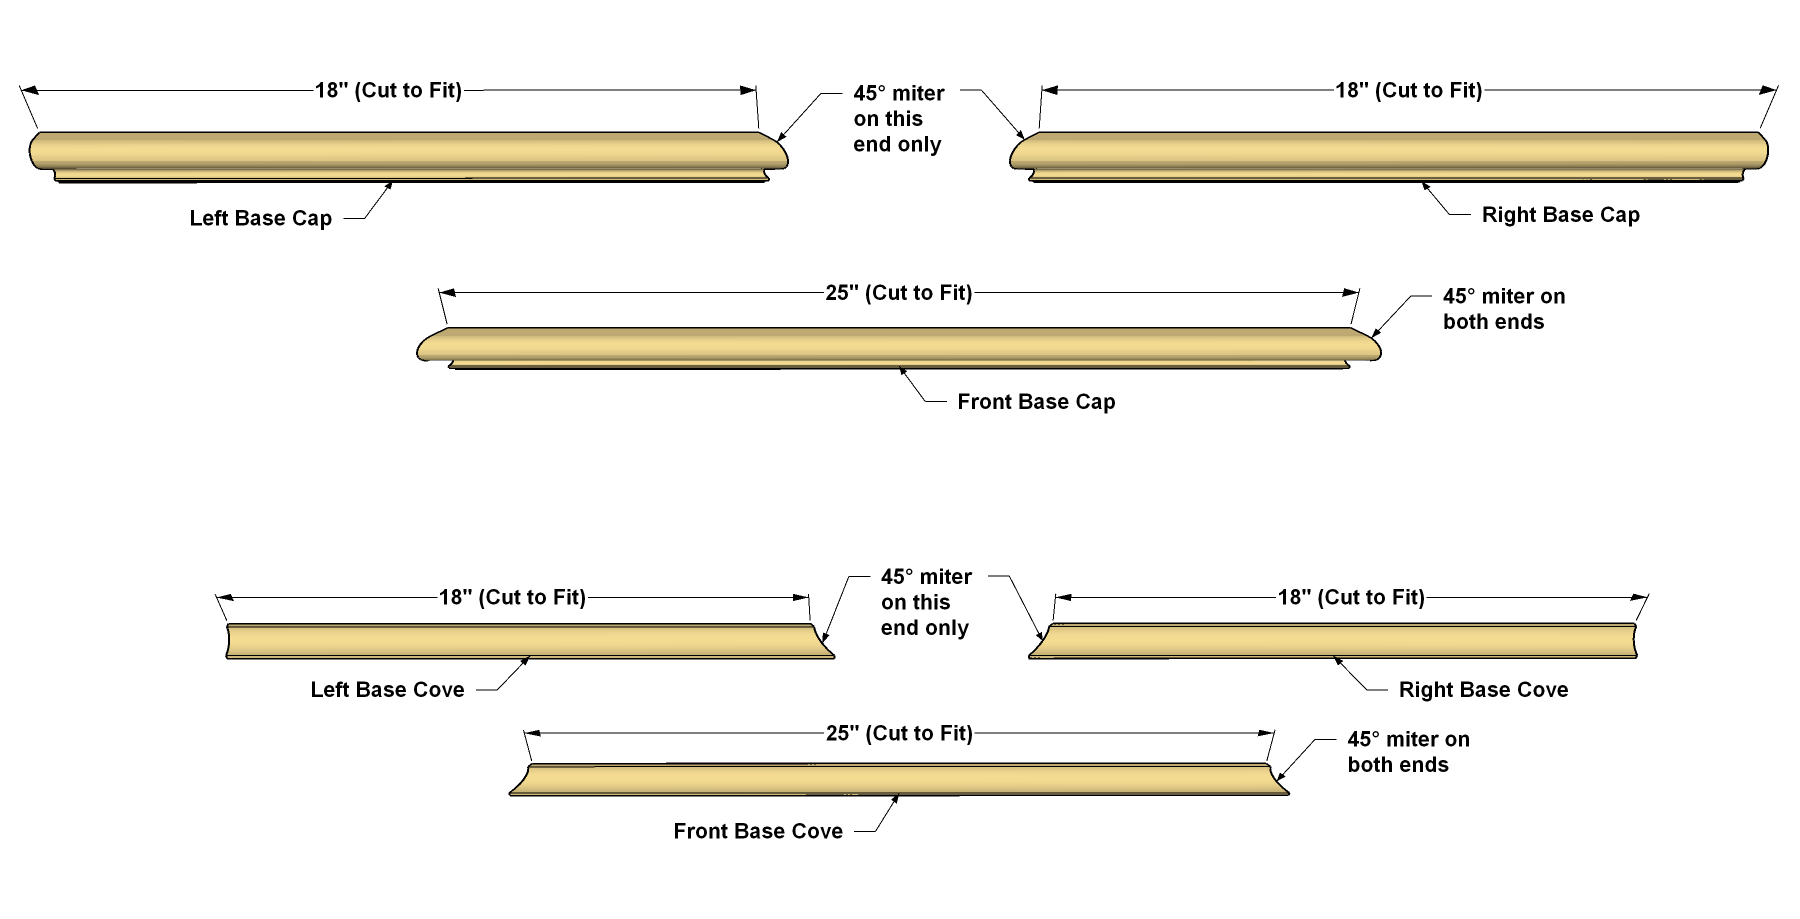
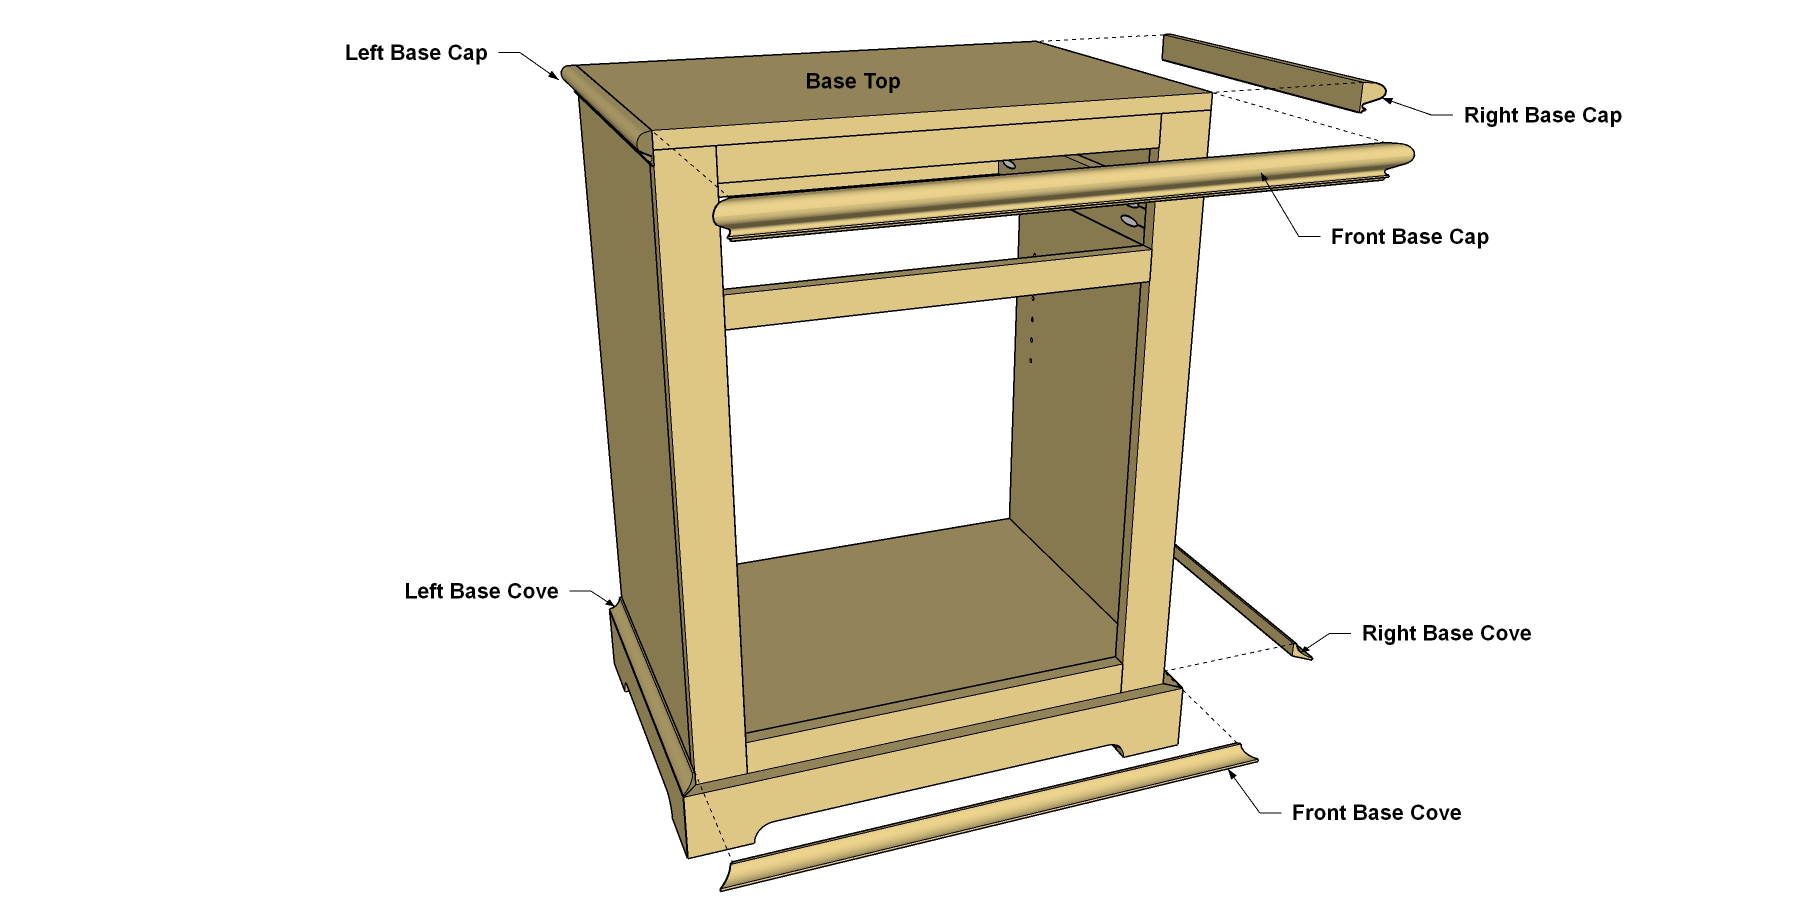
Cut a Base Top and Molding
Cut a Base Top to size from 3/4" plywood, as shown in the cutting diagram. Then cut two types of molding to dress up the base. Three pieces of Base Cove get cut to fit around the base above the Base Trim. Three pieces of Base Cap get cut to wrap around the Base Top Measure your base assembly and cut these pieces to fit, as shown.
-
Attach the Base Top and Molding
With the Base Top and molding cut, you can install them. First attach the Top using 1 1/4" Kreg Screws. Then the moldings, as shown, using glue and 1/2" brads.
-
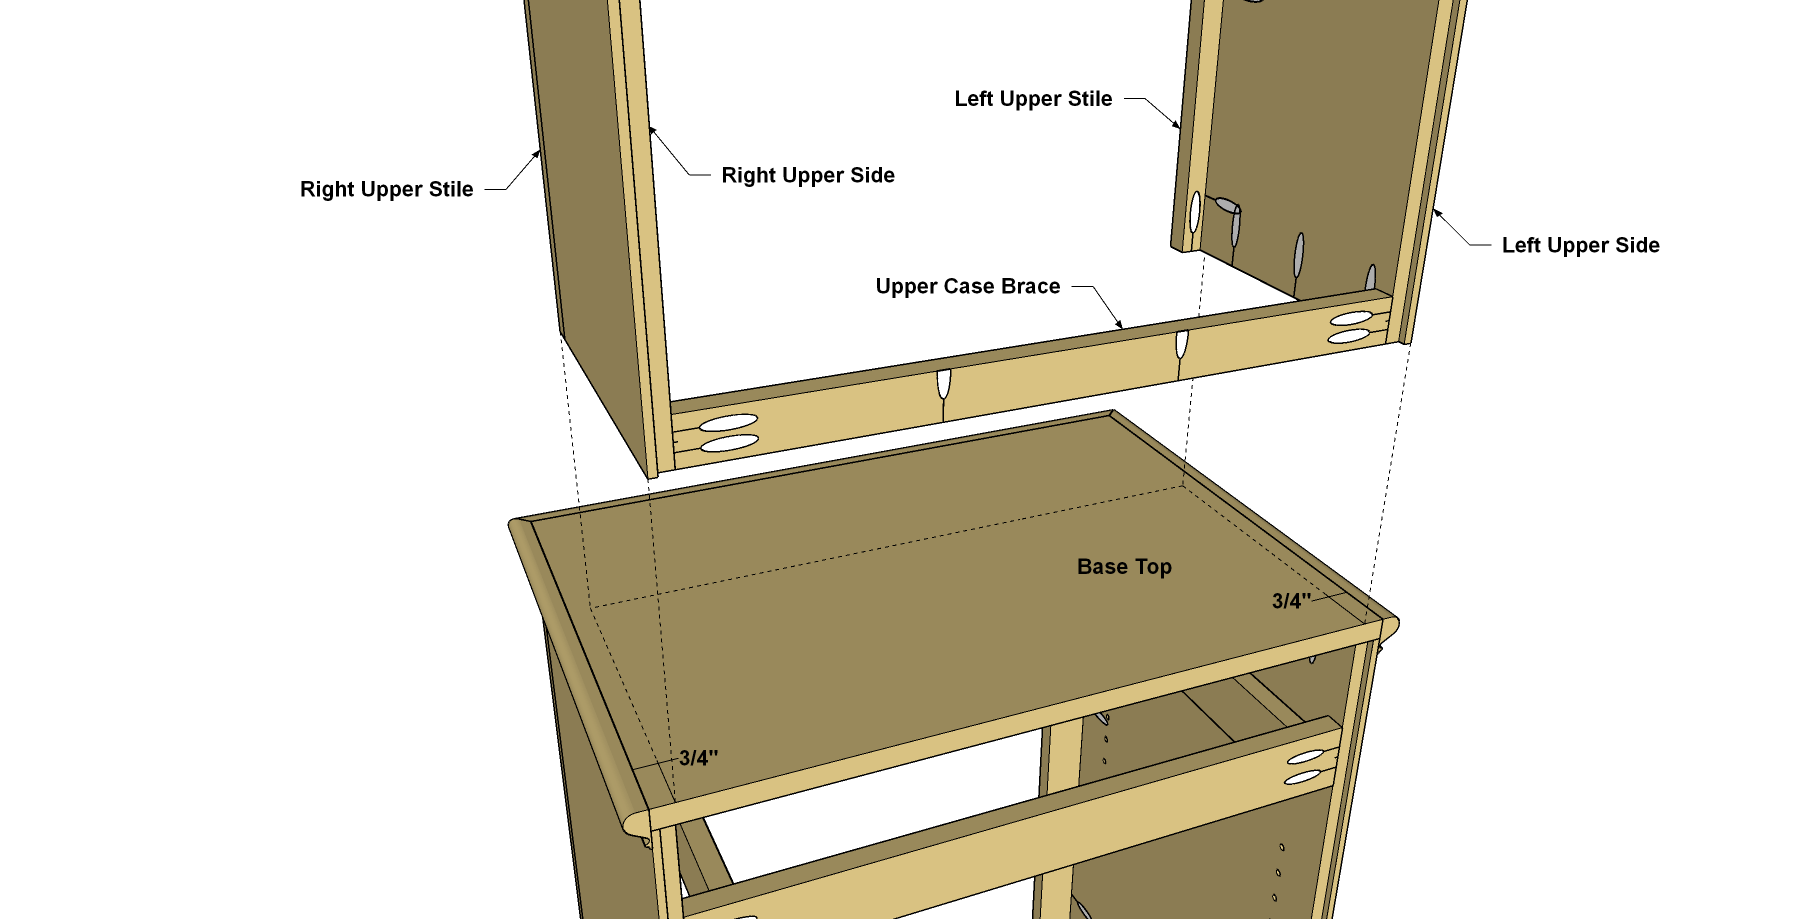
Make Parts for the Upper Case
Cut two Upper Sides and an Upper Top to size from 3/4" plywood, as shown in the cutting diagram. Also Cut a Base Brace from a 1x3 board. Next, use a Kreg Shelf Pin Jig to drill shelf pin holes in the Upper Sides at the locations shown. Drill pocket holes in all of the pieces, as shown. Make sure to miss the shelf-pin holes in the Upper Sides. Finally, use a router equipped with a 1/4" rabbeting bit to rout a rabbet along the rear inside edge of each side. Sand the parts smooth.
-
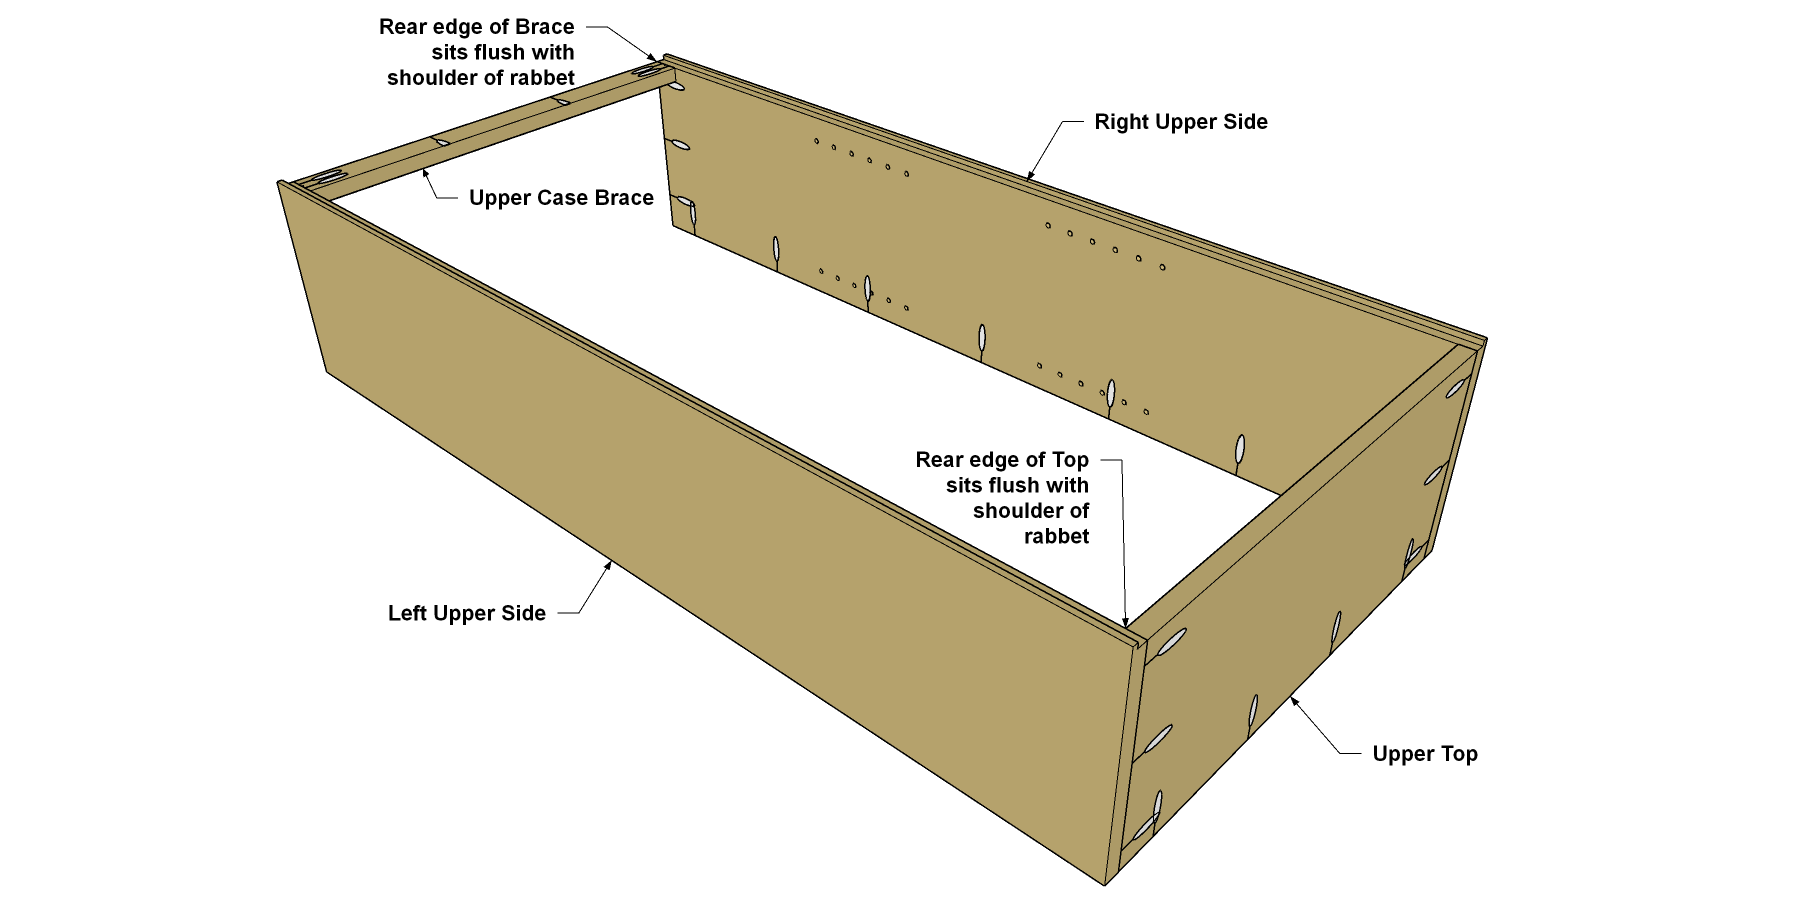
Assemble the Upper Case
Now attach the Upper Top to the Upper Sides, as shown. This is done using 1 1/4" Kreg Screws, and is done just like you assembled the base parts in Step 3. Also attach the Base Brace where shown.
-
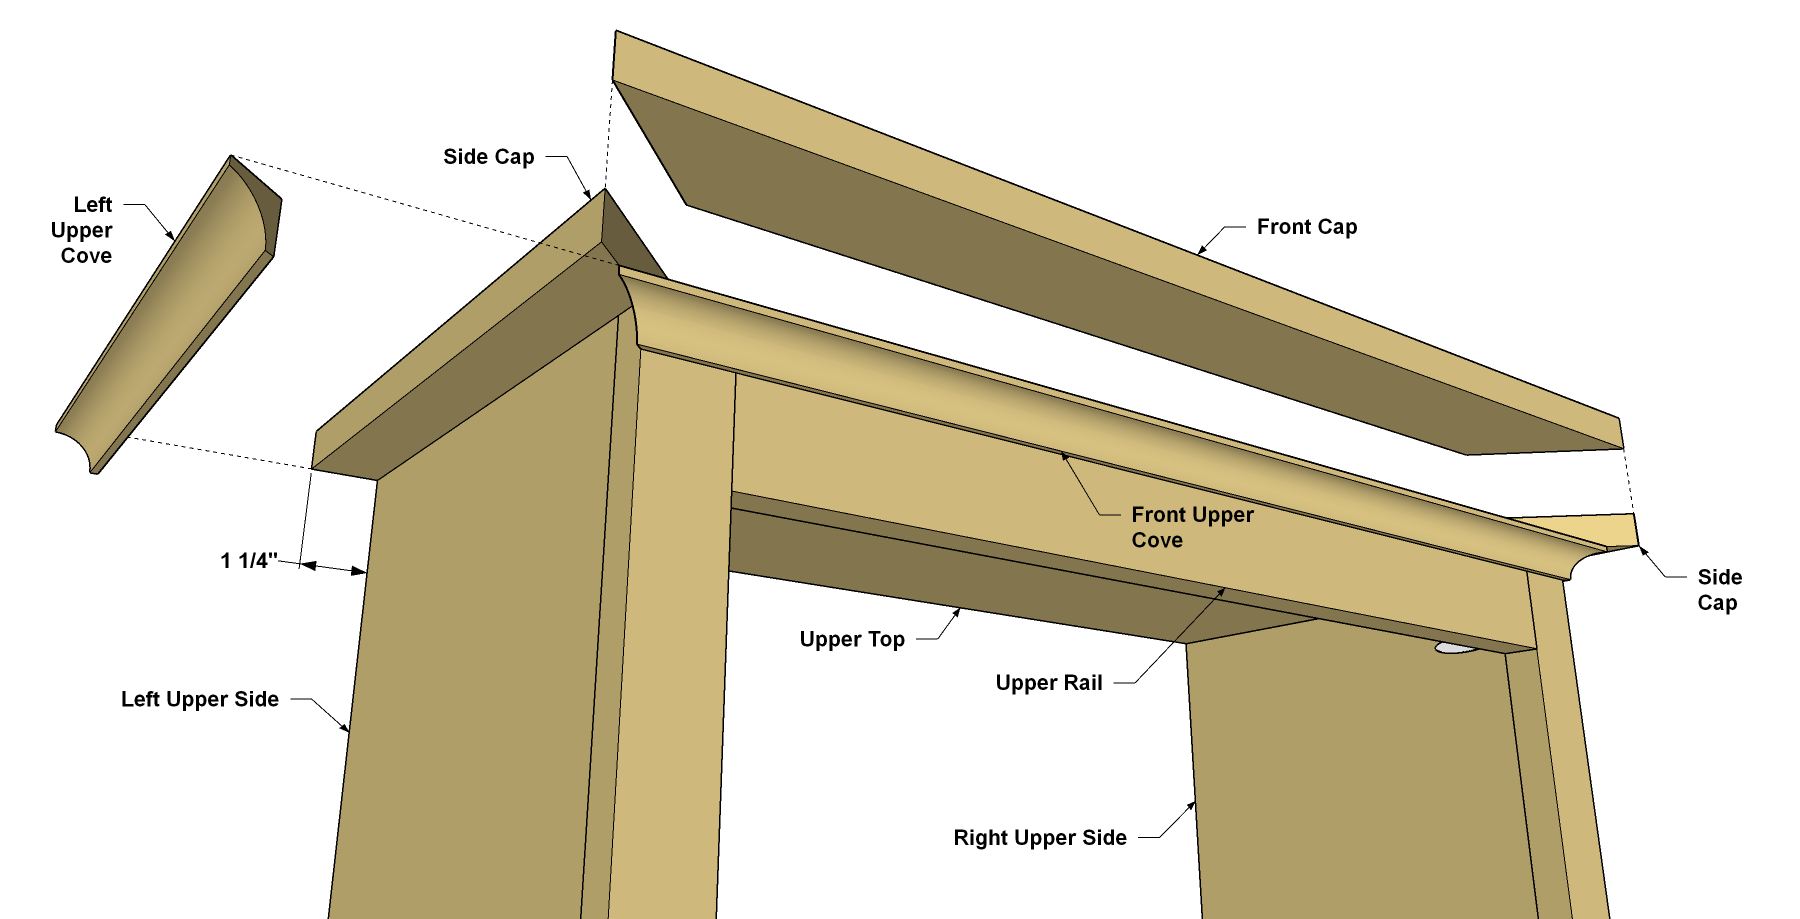
Make the Upper Face Frame
From 1x2 boards, cut two Upper Stiles to length, as shown in the cutting diagram. Also cut an Upper Rail from a 1x3 board. Then drill pocket holes in these pieces, where shown. Note that the holes in one end of each Stile are inset toward the inside. That way, the holes will be accessible when you attach the upper case to the base later. Sand the parts smooth.
-
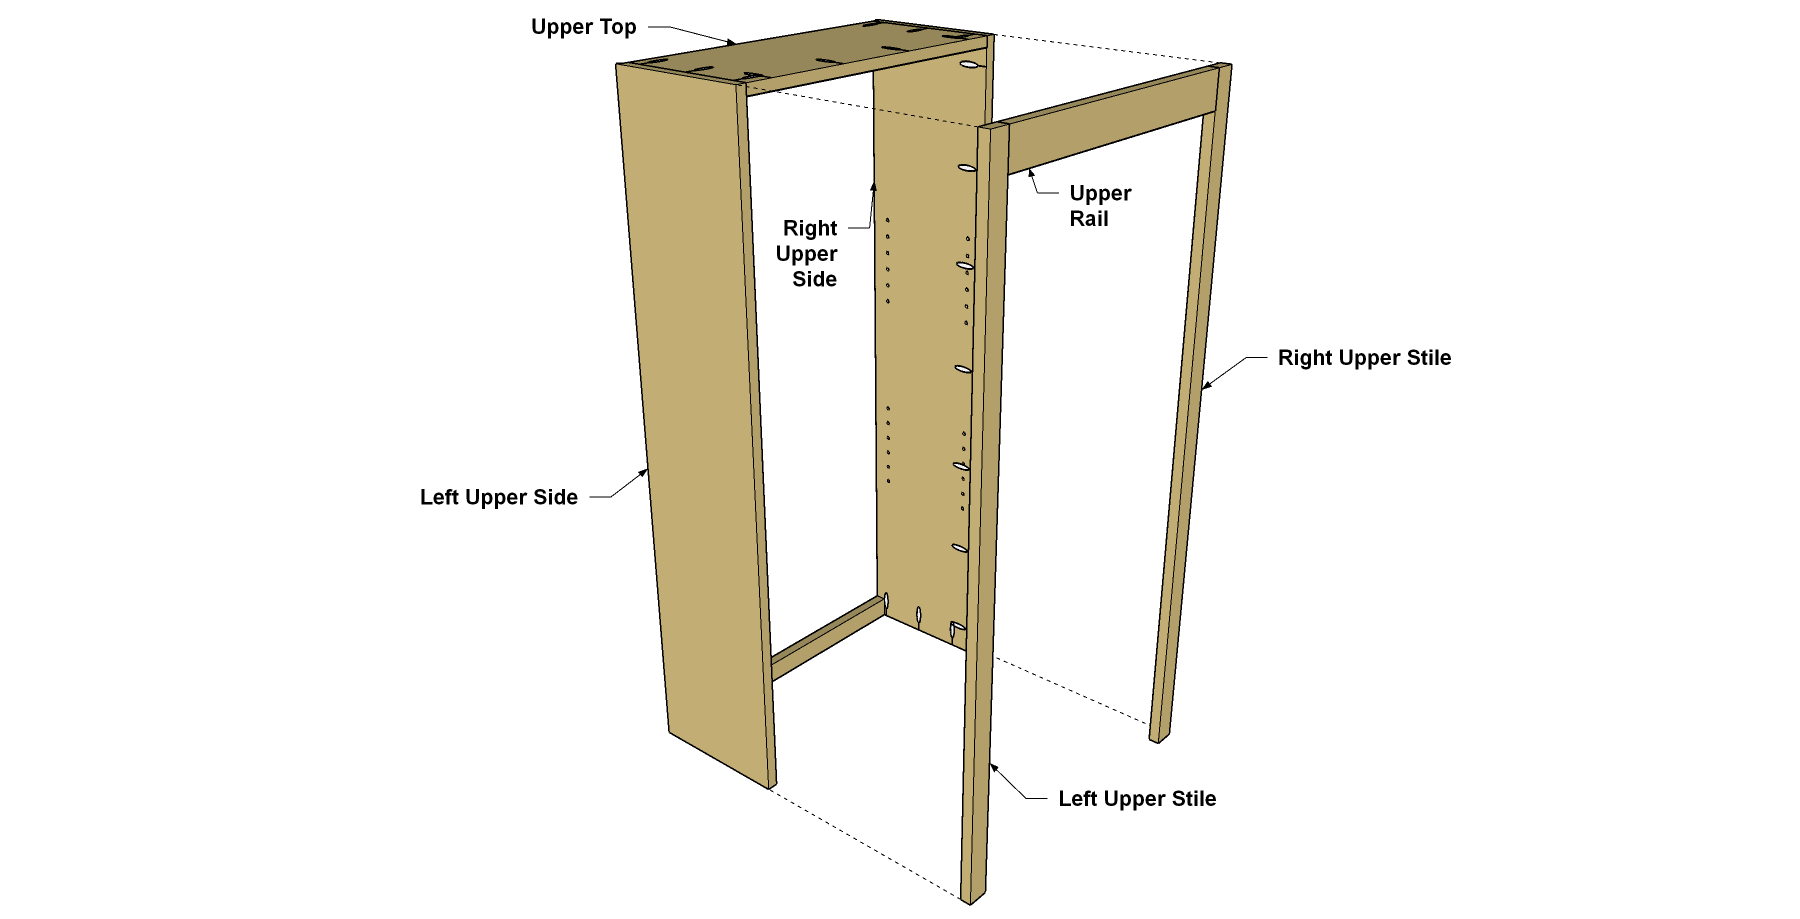
Assemble and Install the Frame
Attach the Upper Rail to the Upper Stiles using 1 1/4" Kreg Screws, making sure the pocket holes in the Stiles are toward the inside. Sand the joints smooth as needed. Then attach the face frame to the upper case, as shown, using 1 1/4" Kreg Screws.
-
Make an Upper Cap and Molding
Cut two Side Caps and one Front Cap from 1x3 boards, as shown. Make sure to miter both ends of the Front Cap, but only one end of each Side Cap. Sand the faces smooth. Then cut the Upper Cove pieces from 3/4" cove molding to fit around the upper case assembly.
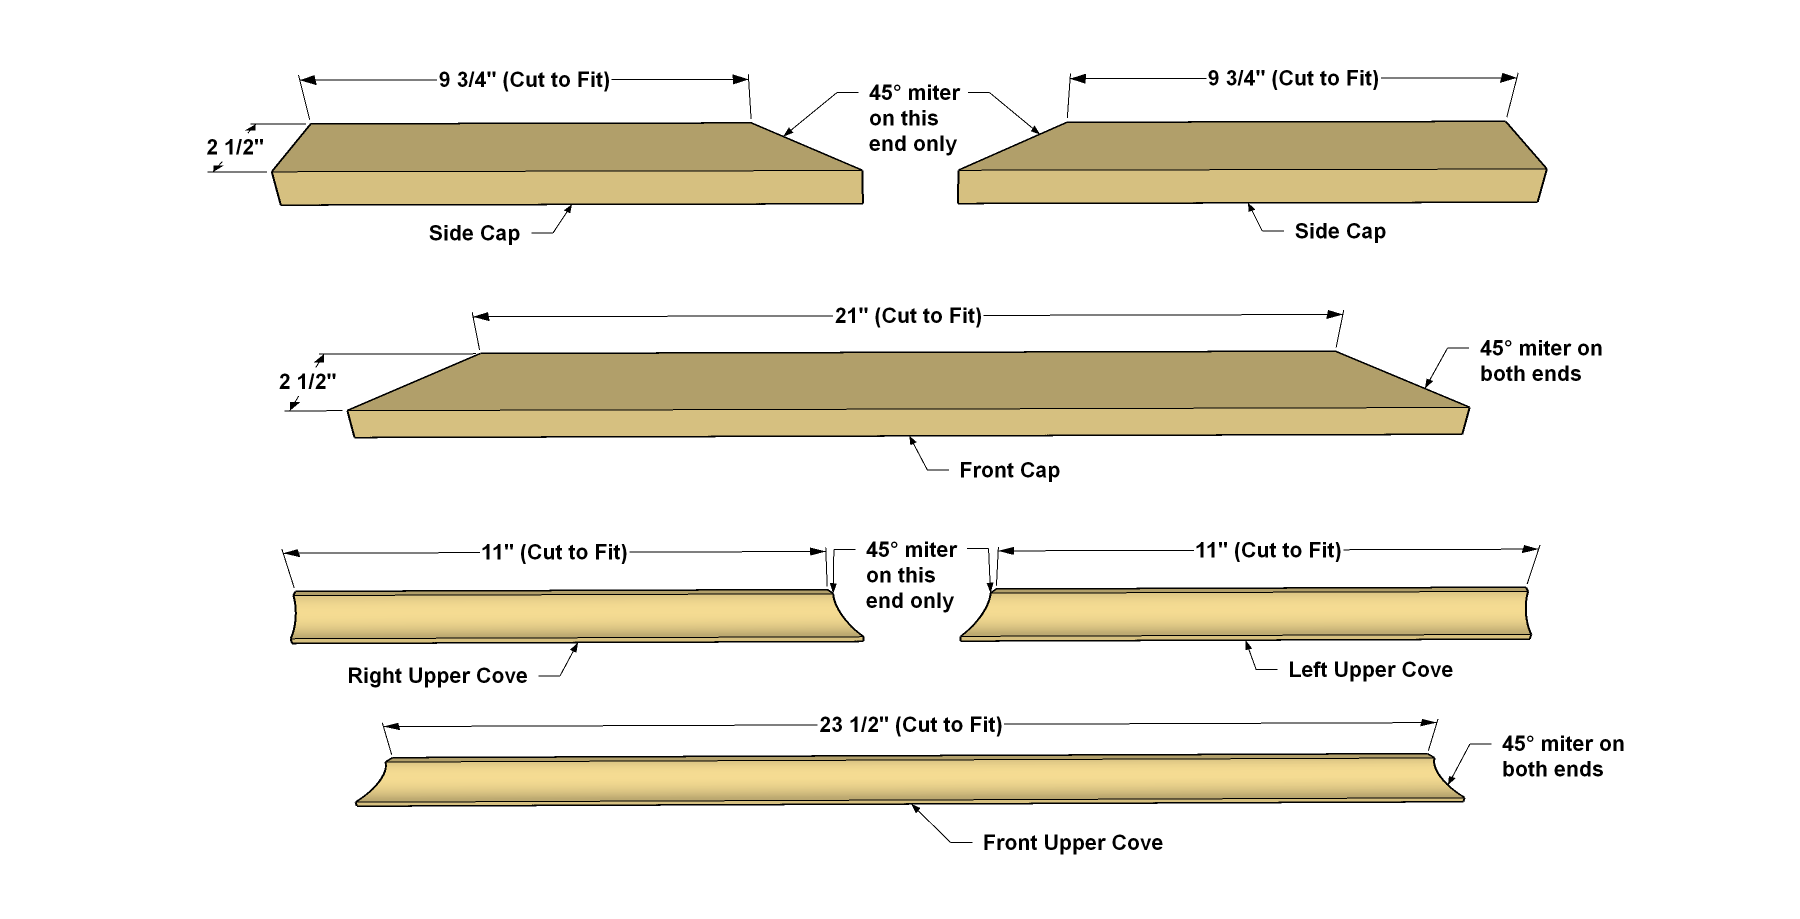
-
Attach the Cap and Molding
Position the Cap pieces on top of the upper case, as shown and double-check for equal overhangs. Then spread glue on the upper edges of the Upper Sides, and on the surfaces of the Top where the Caps will sit. Also spread glue on the mitered ends of the Caps, position them, and use 1" brads to “clamp” them in place while the glue dries. Then attach the Upper Cove pieces using glue and 1/2" brads.
-
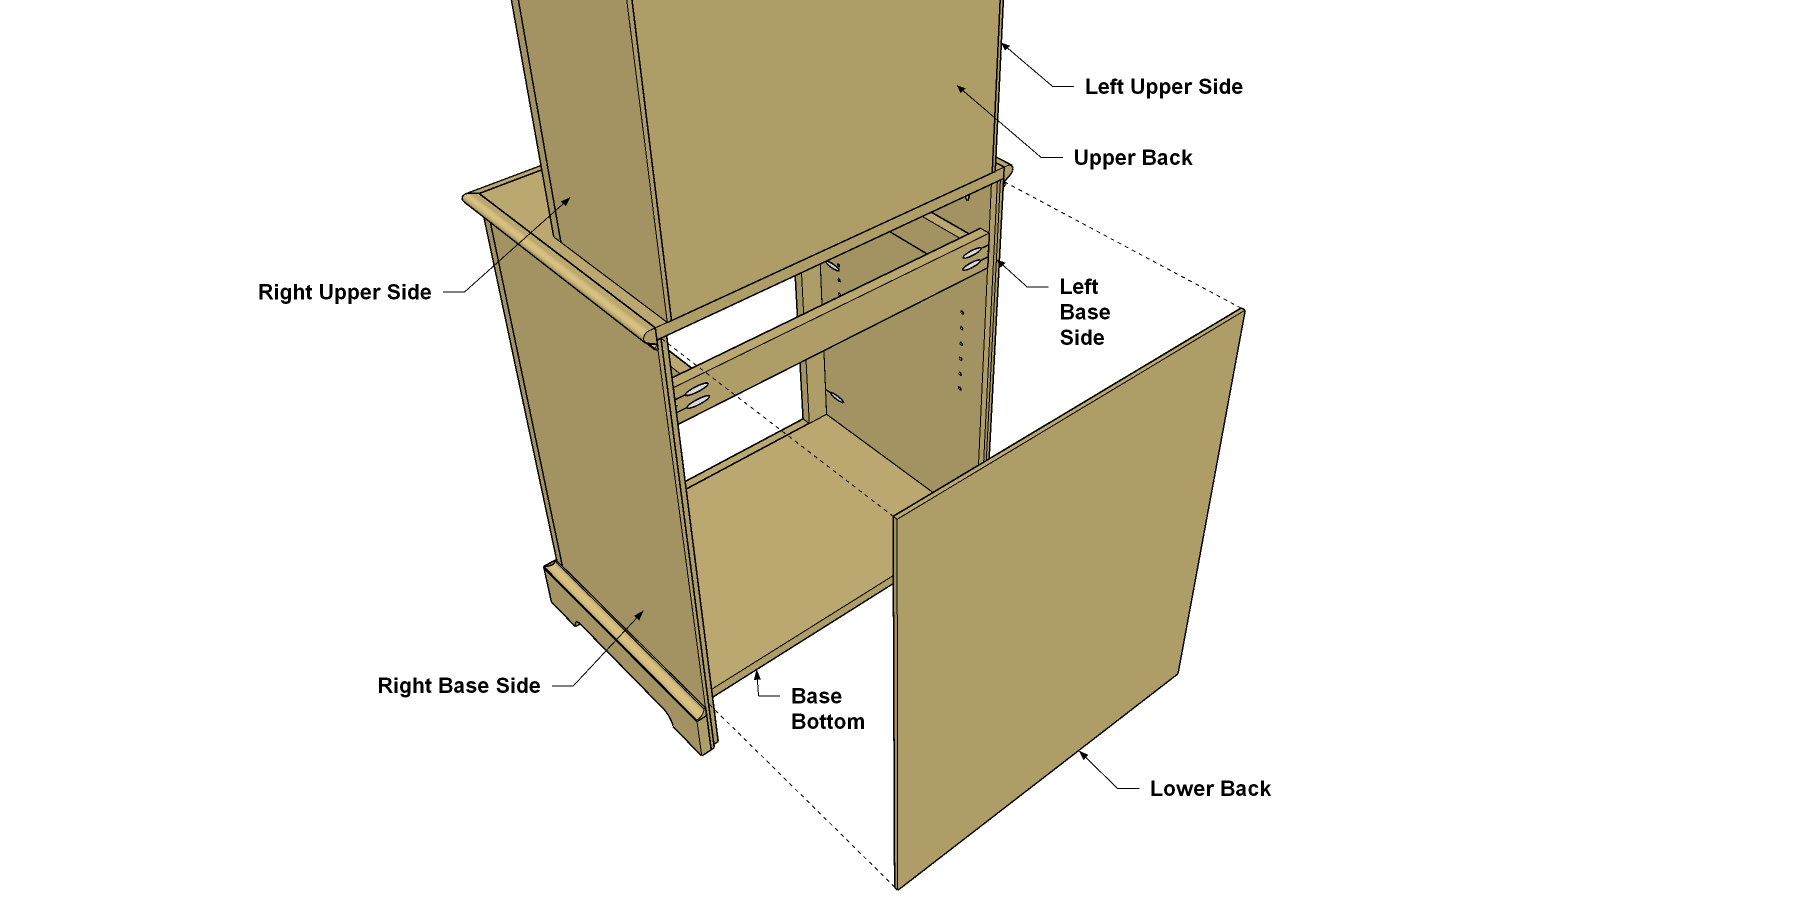
Attach the Case to the Base
Position the upper case assembly on the base so that the case is flush with the rear edge of the Base Top, and so the Case is inset equally from Side to Side. Attach the case using 1 1/4" Kreg Screws.
-
Add Back Panels
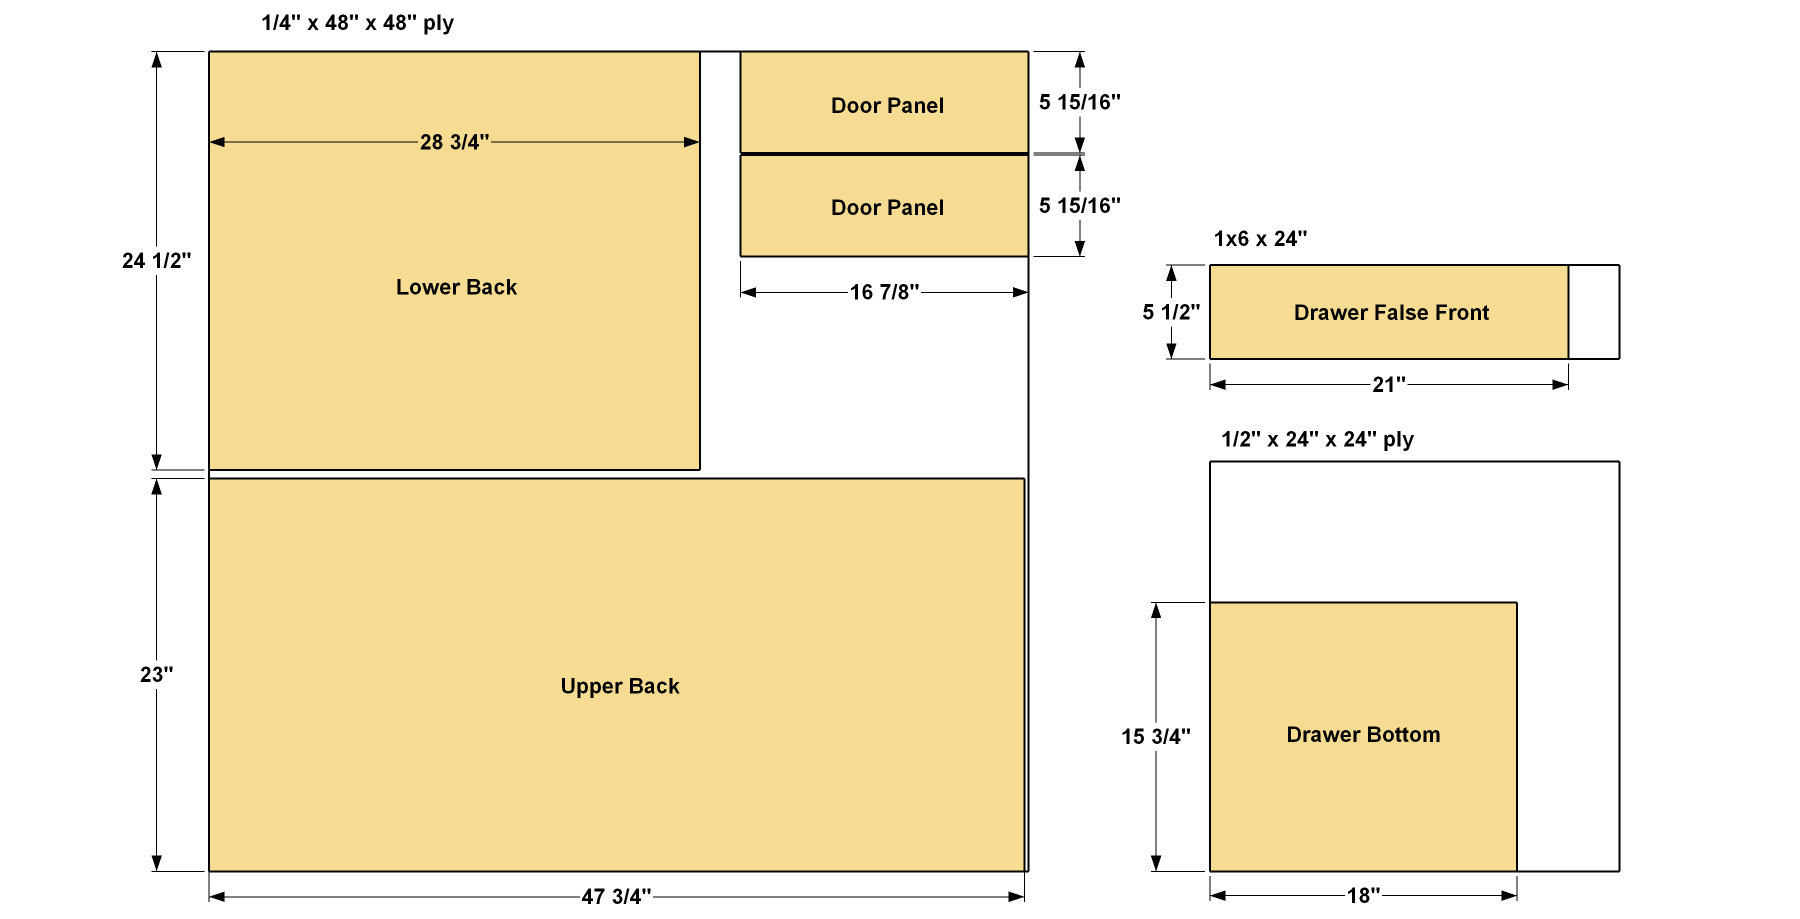
Cut an Upper Back and Lower Back to size from 1/4" plywood, as shown in the cutting diagram. Then position the backs as shown, so that they fit into the rabbets in the Upper and Lower Sides. Drive 1/2" brads into the Base Sides and Rails, and into the Upper Sides, Top, and Brace to attach the Backs.
-
Make the Shelves
Cut two Upper Shelves and one Lower Shelf to size from 3/4" plywood, as shown in the cutting diagram. Then drill pocket holes in the Shelves, as shown. Also cut two pieces of Upper Shelf Edging and one Base Shelf Edging to length from 1x2 boards. Sand the parts smooth.
-
Install the Shelves
Using 1 1/4" Kreg Screws, attach the Upper Shelf Edging to the Upper Shelves so it is inset equally on both ends, as shown. Attach the Lower Shelf Edging, as well. It fits flush with the edges of the Base Shelf. Then test fit the shelves in the cupboard by installing shelf pins and resting the shelves on them.
-
Make Parts for the Doors
The base of the cupboard is enclosed by frame-and-panel doors. They’re easier to make than you might think. Cut four Door Rails and four Door Stiles to length from 1x3 boards, as shown in the cutting diagram. Then drill pocket holes in the Rails. Note that the pocket holes are offset toward the outer edge of each Rail. Also cut two Door Panels from 1/4" plywood, and cut Panel Stops from 1/4" square dowel.

-
Assemble the Doors
Attach the Door Rails to the Door Stiles, as shown, using 1 1/4" Kreg Screws. Next, rout the 1/4"-wide by 1/2" deep rabbet around the inner perimeter of each door frame assembly. Square up the corners of the rabbet using a chisel. Sand the faces of the door frames smooth. Apply small beads of glue in the rabbets and drop the Door Panels in place. Again, put small beads of glue in place for the Panel Stops, and then secure the Stops by driving 1/2" brads sideways into the Rails and Stiles.
-
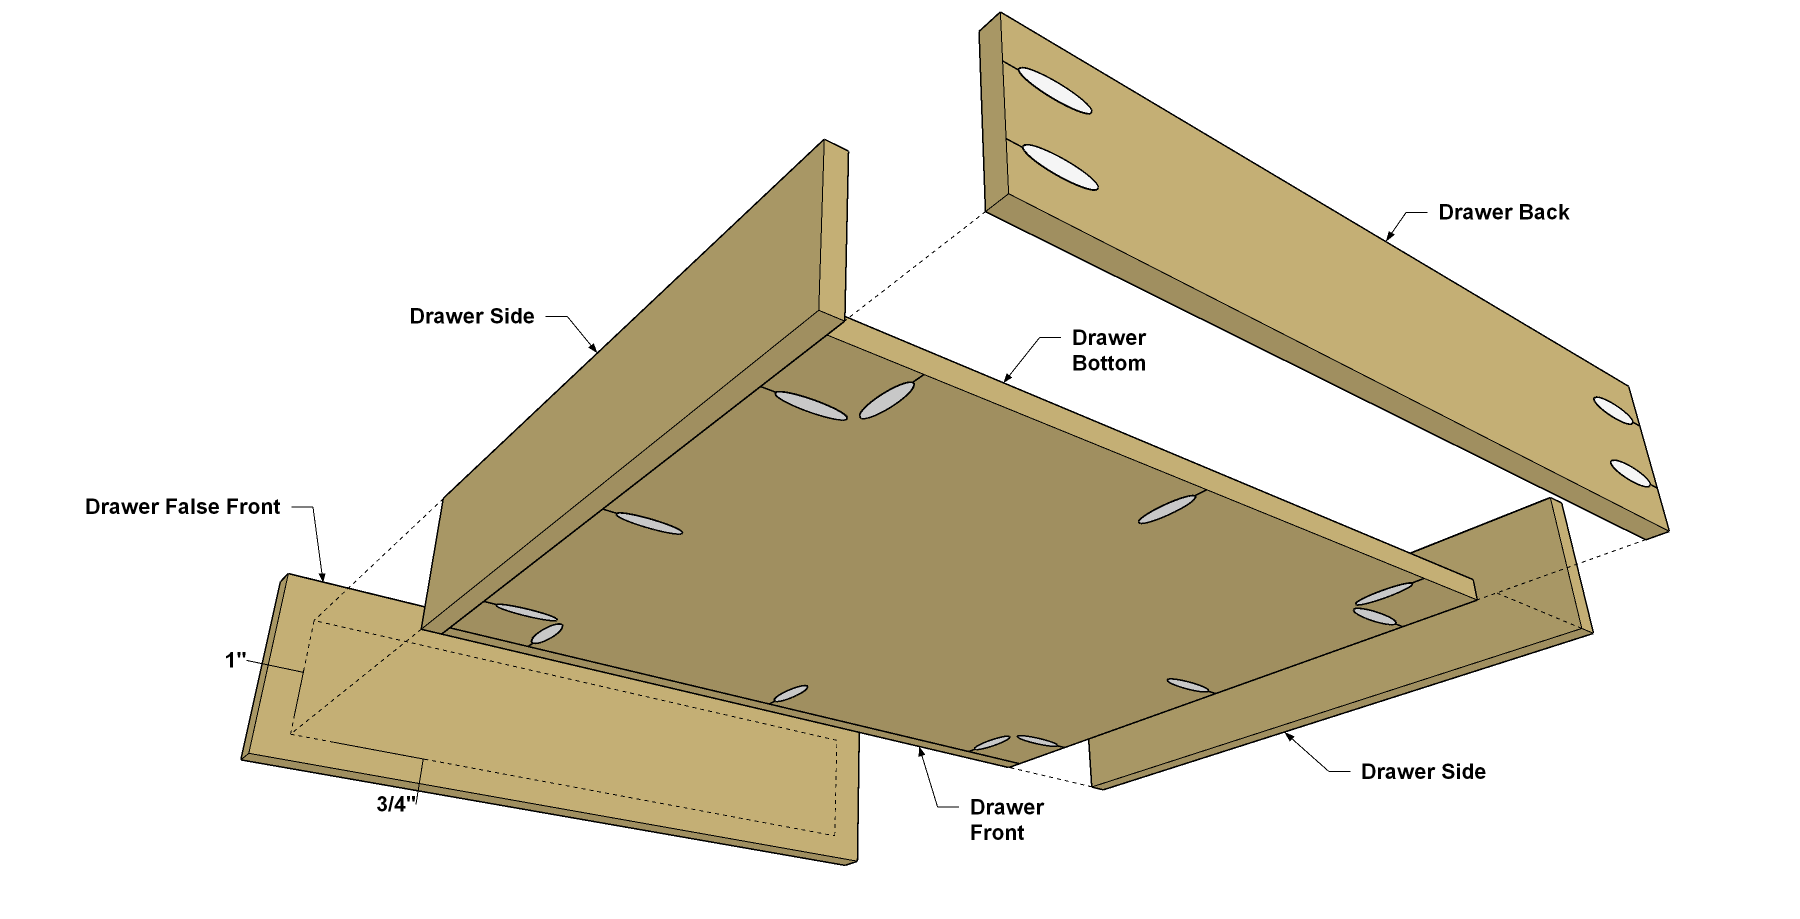
Make the Drawer Parts
Cut two Drawer Sides, a Drawer Front, and a Drawer Back to length from 1/2"x 4 boards, as shown in the cutting diagram. Also cut a Drawer Bottom from 1/2" plywood. Now you can drill pocket holes in the Drawer Front, Back, and Bottom. While a regular Kreg Jig, set up for 1/2" material, will work for this, the ideal is the Kreg Micro-Pocket Drill Guide. It creates a smaller pocket holes that is perfect for 1/2"-thick materials. Sand the parts smooth. Then cut a Drawer False Front to length from a 1x6 board, as shown in the cutting diagram, and sand it smooth.
-
Assemble the Drawer
To assemble the drawer, attach the Drawer Front and Back to the Sides using 3/4" Kreg Screws. Then attach the Drawer Bottom using the same size screws. Finally, position the False Front as shown, and attach it by driving a couple of 1 1/4" Kreg Screws through the Drawer Front from inside and into the False Front.
-
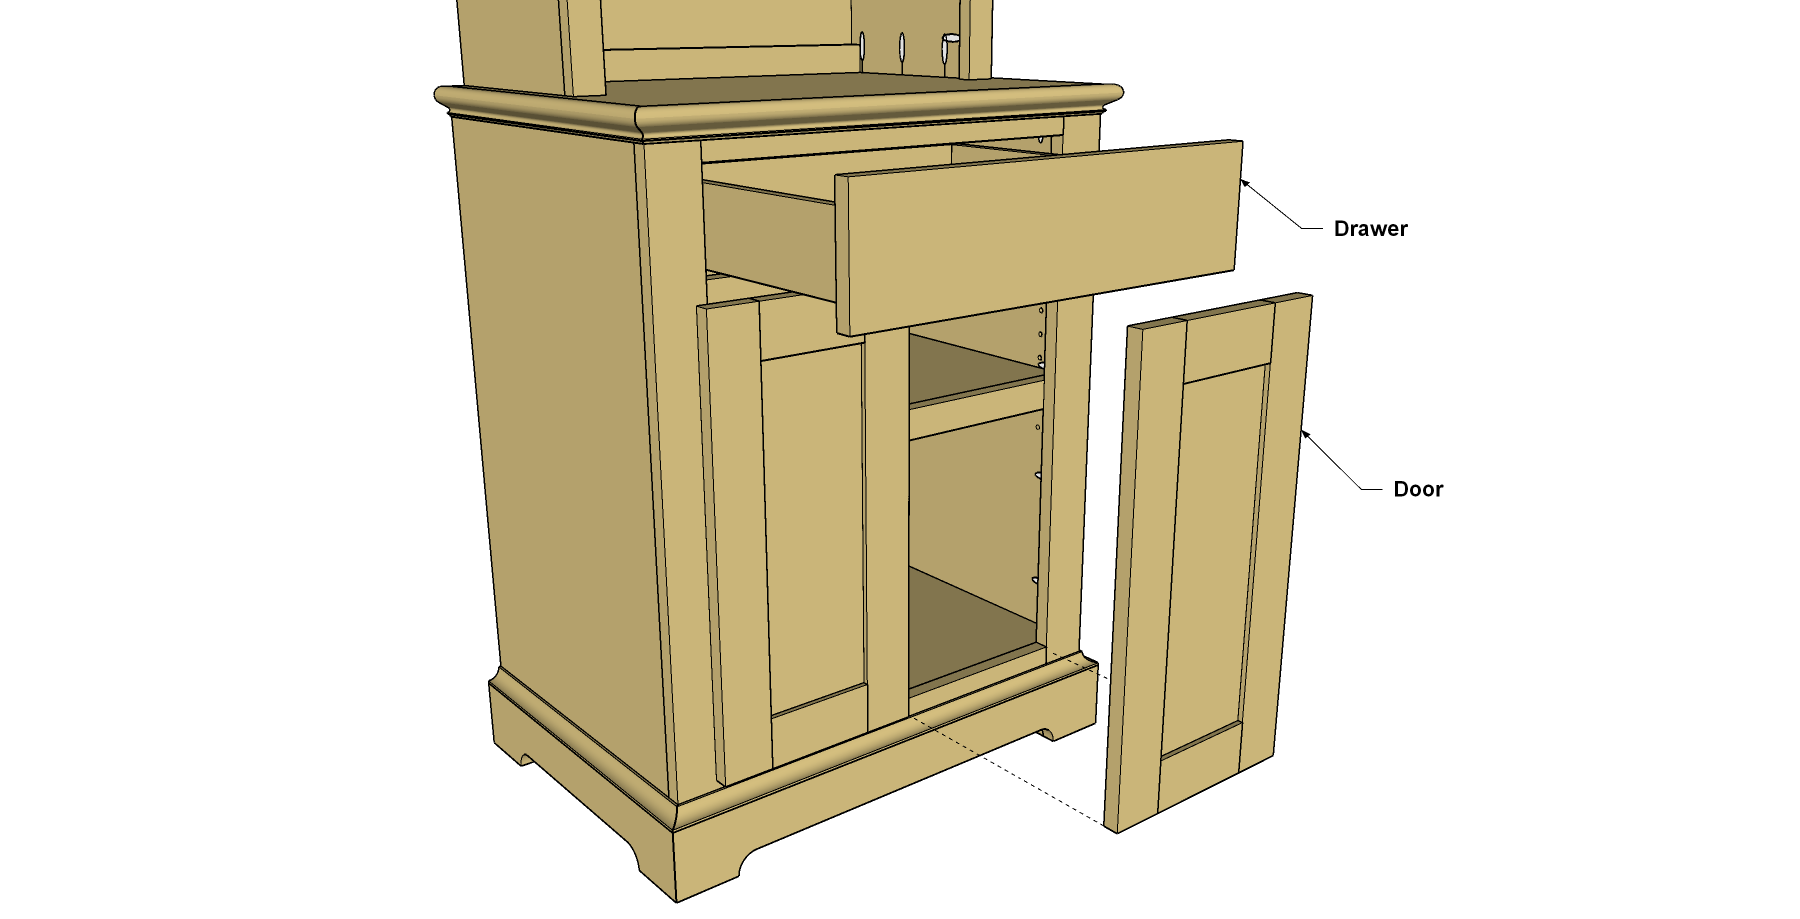
Mount the Doors and Drawer
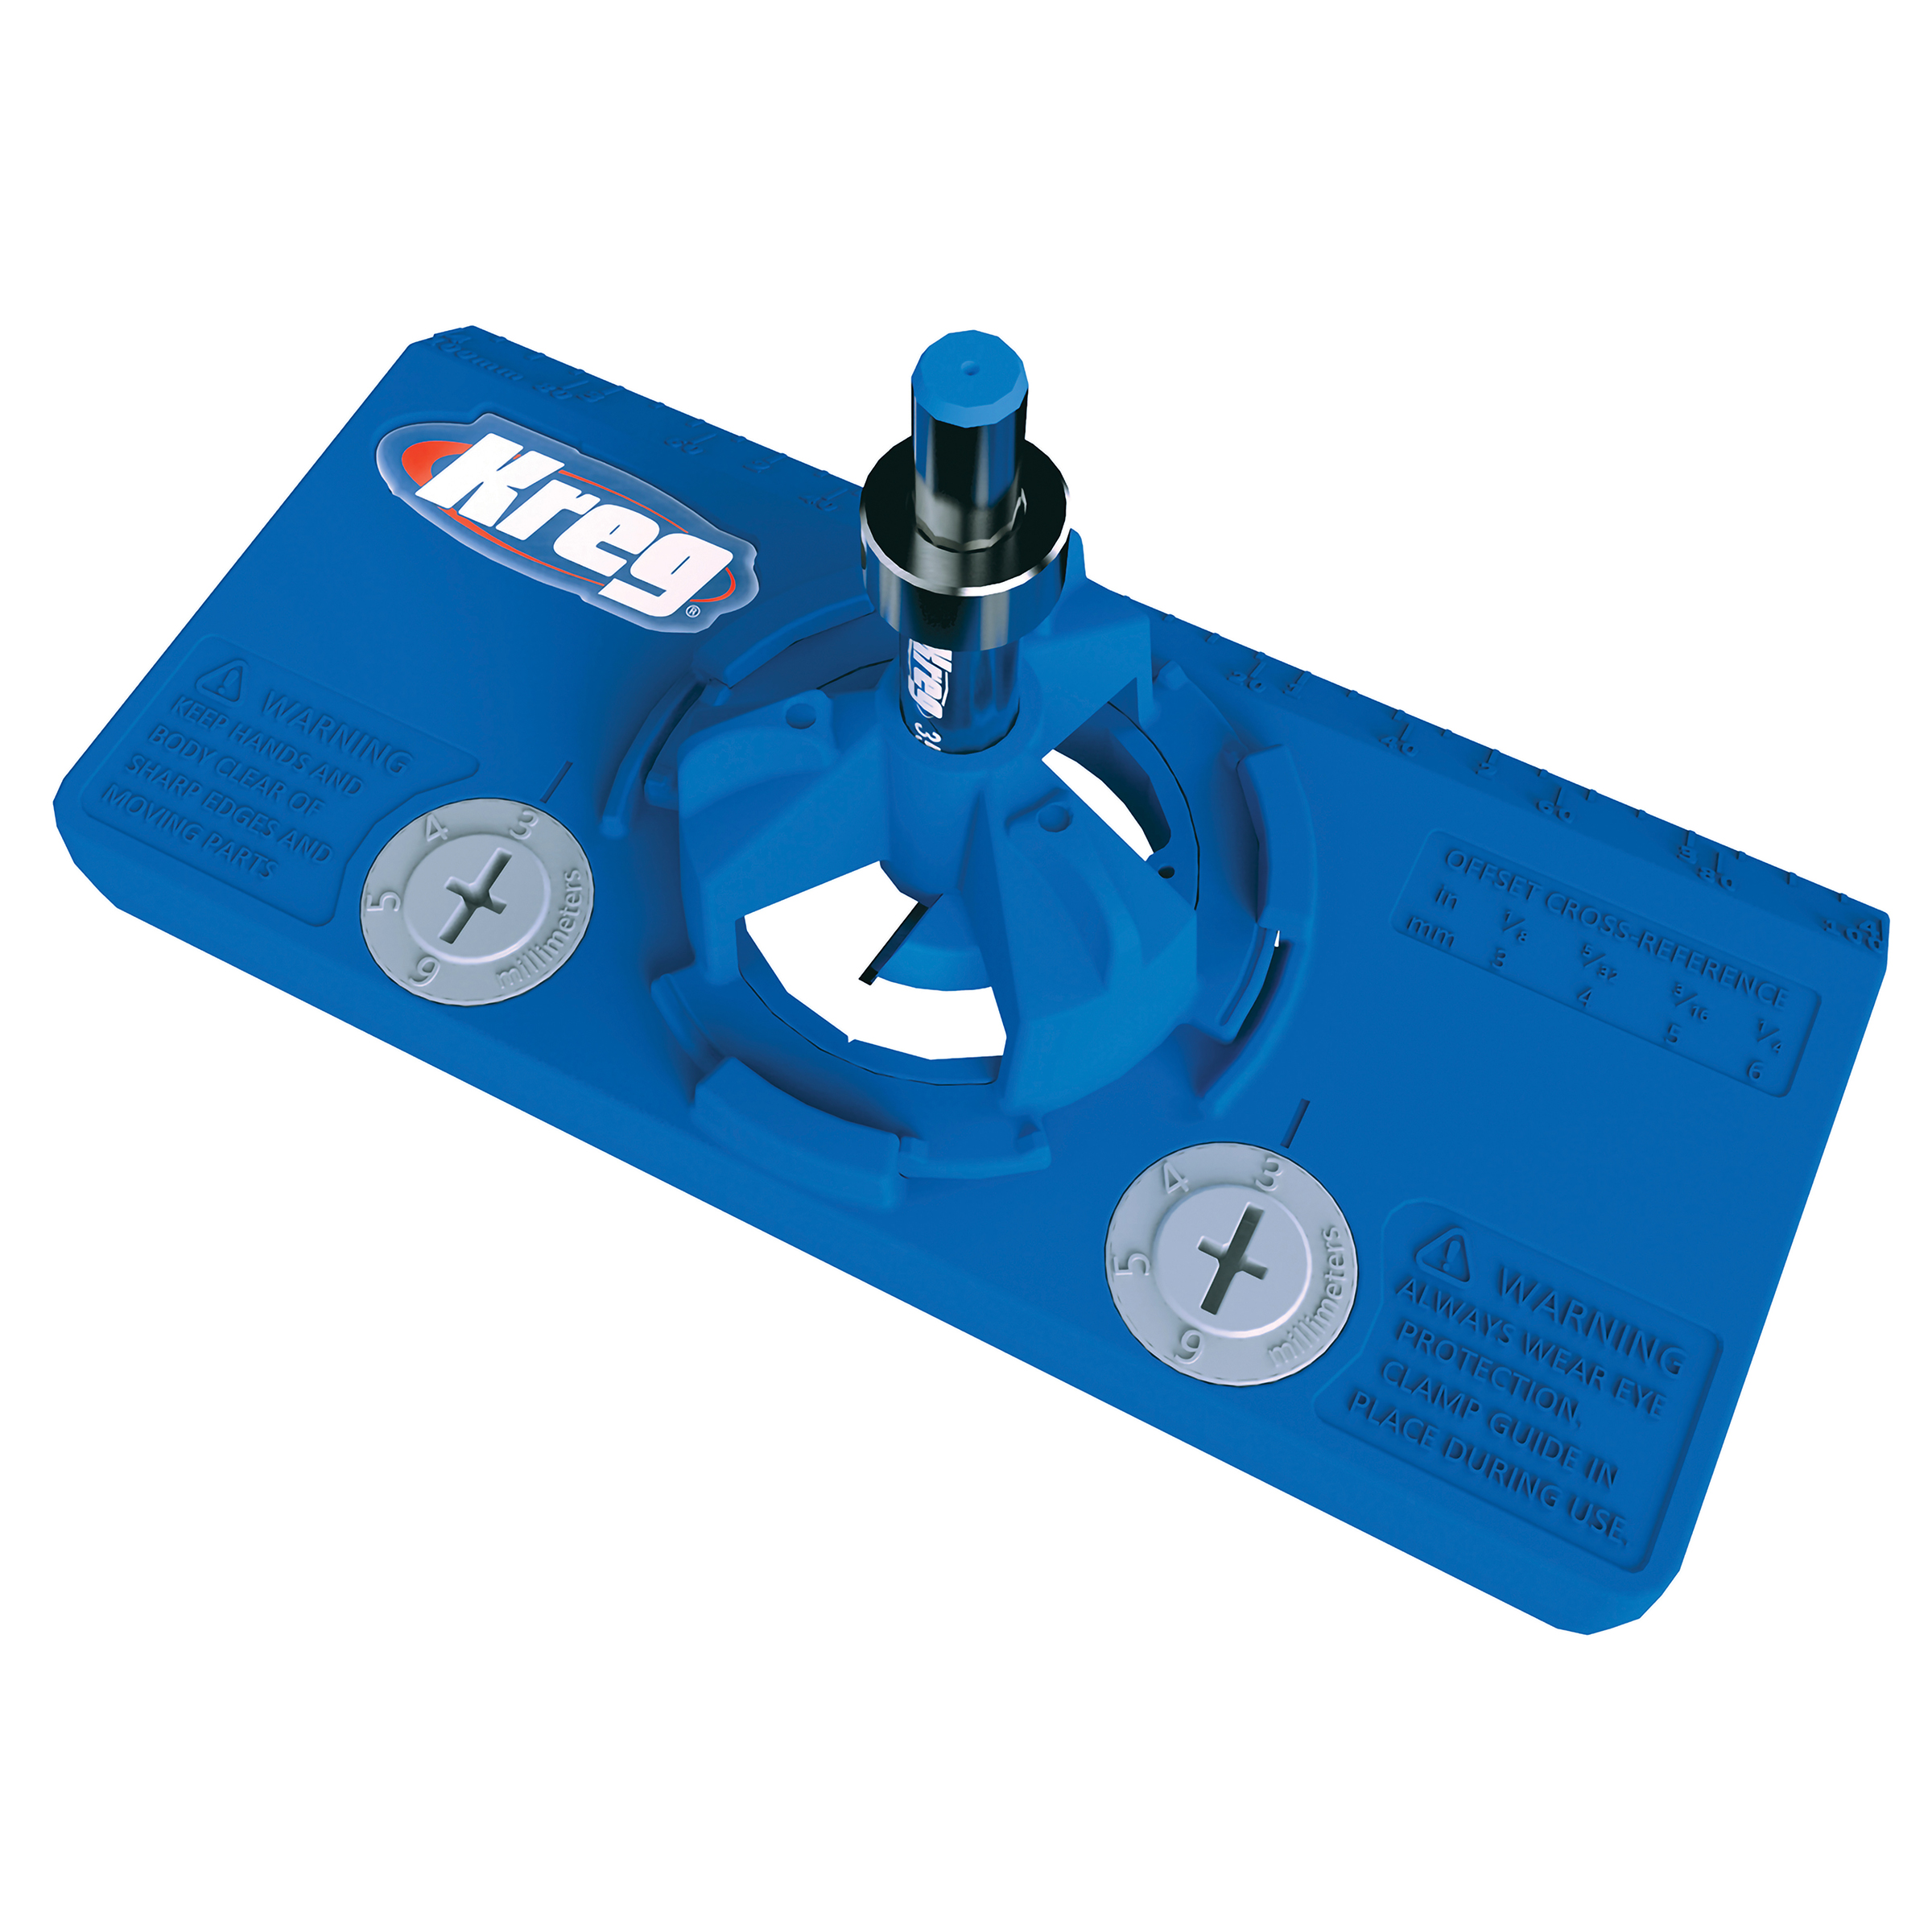
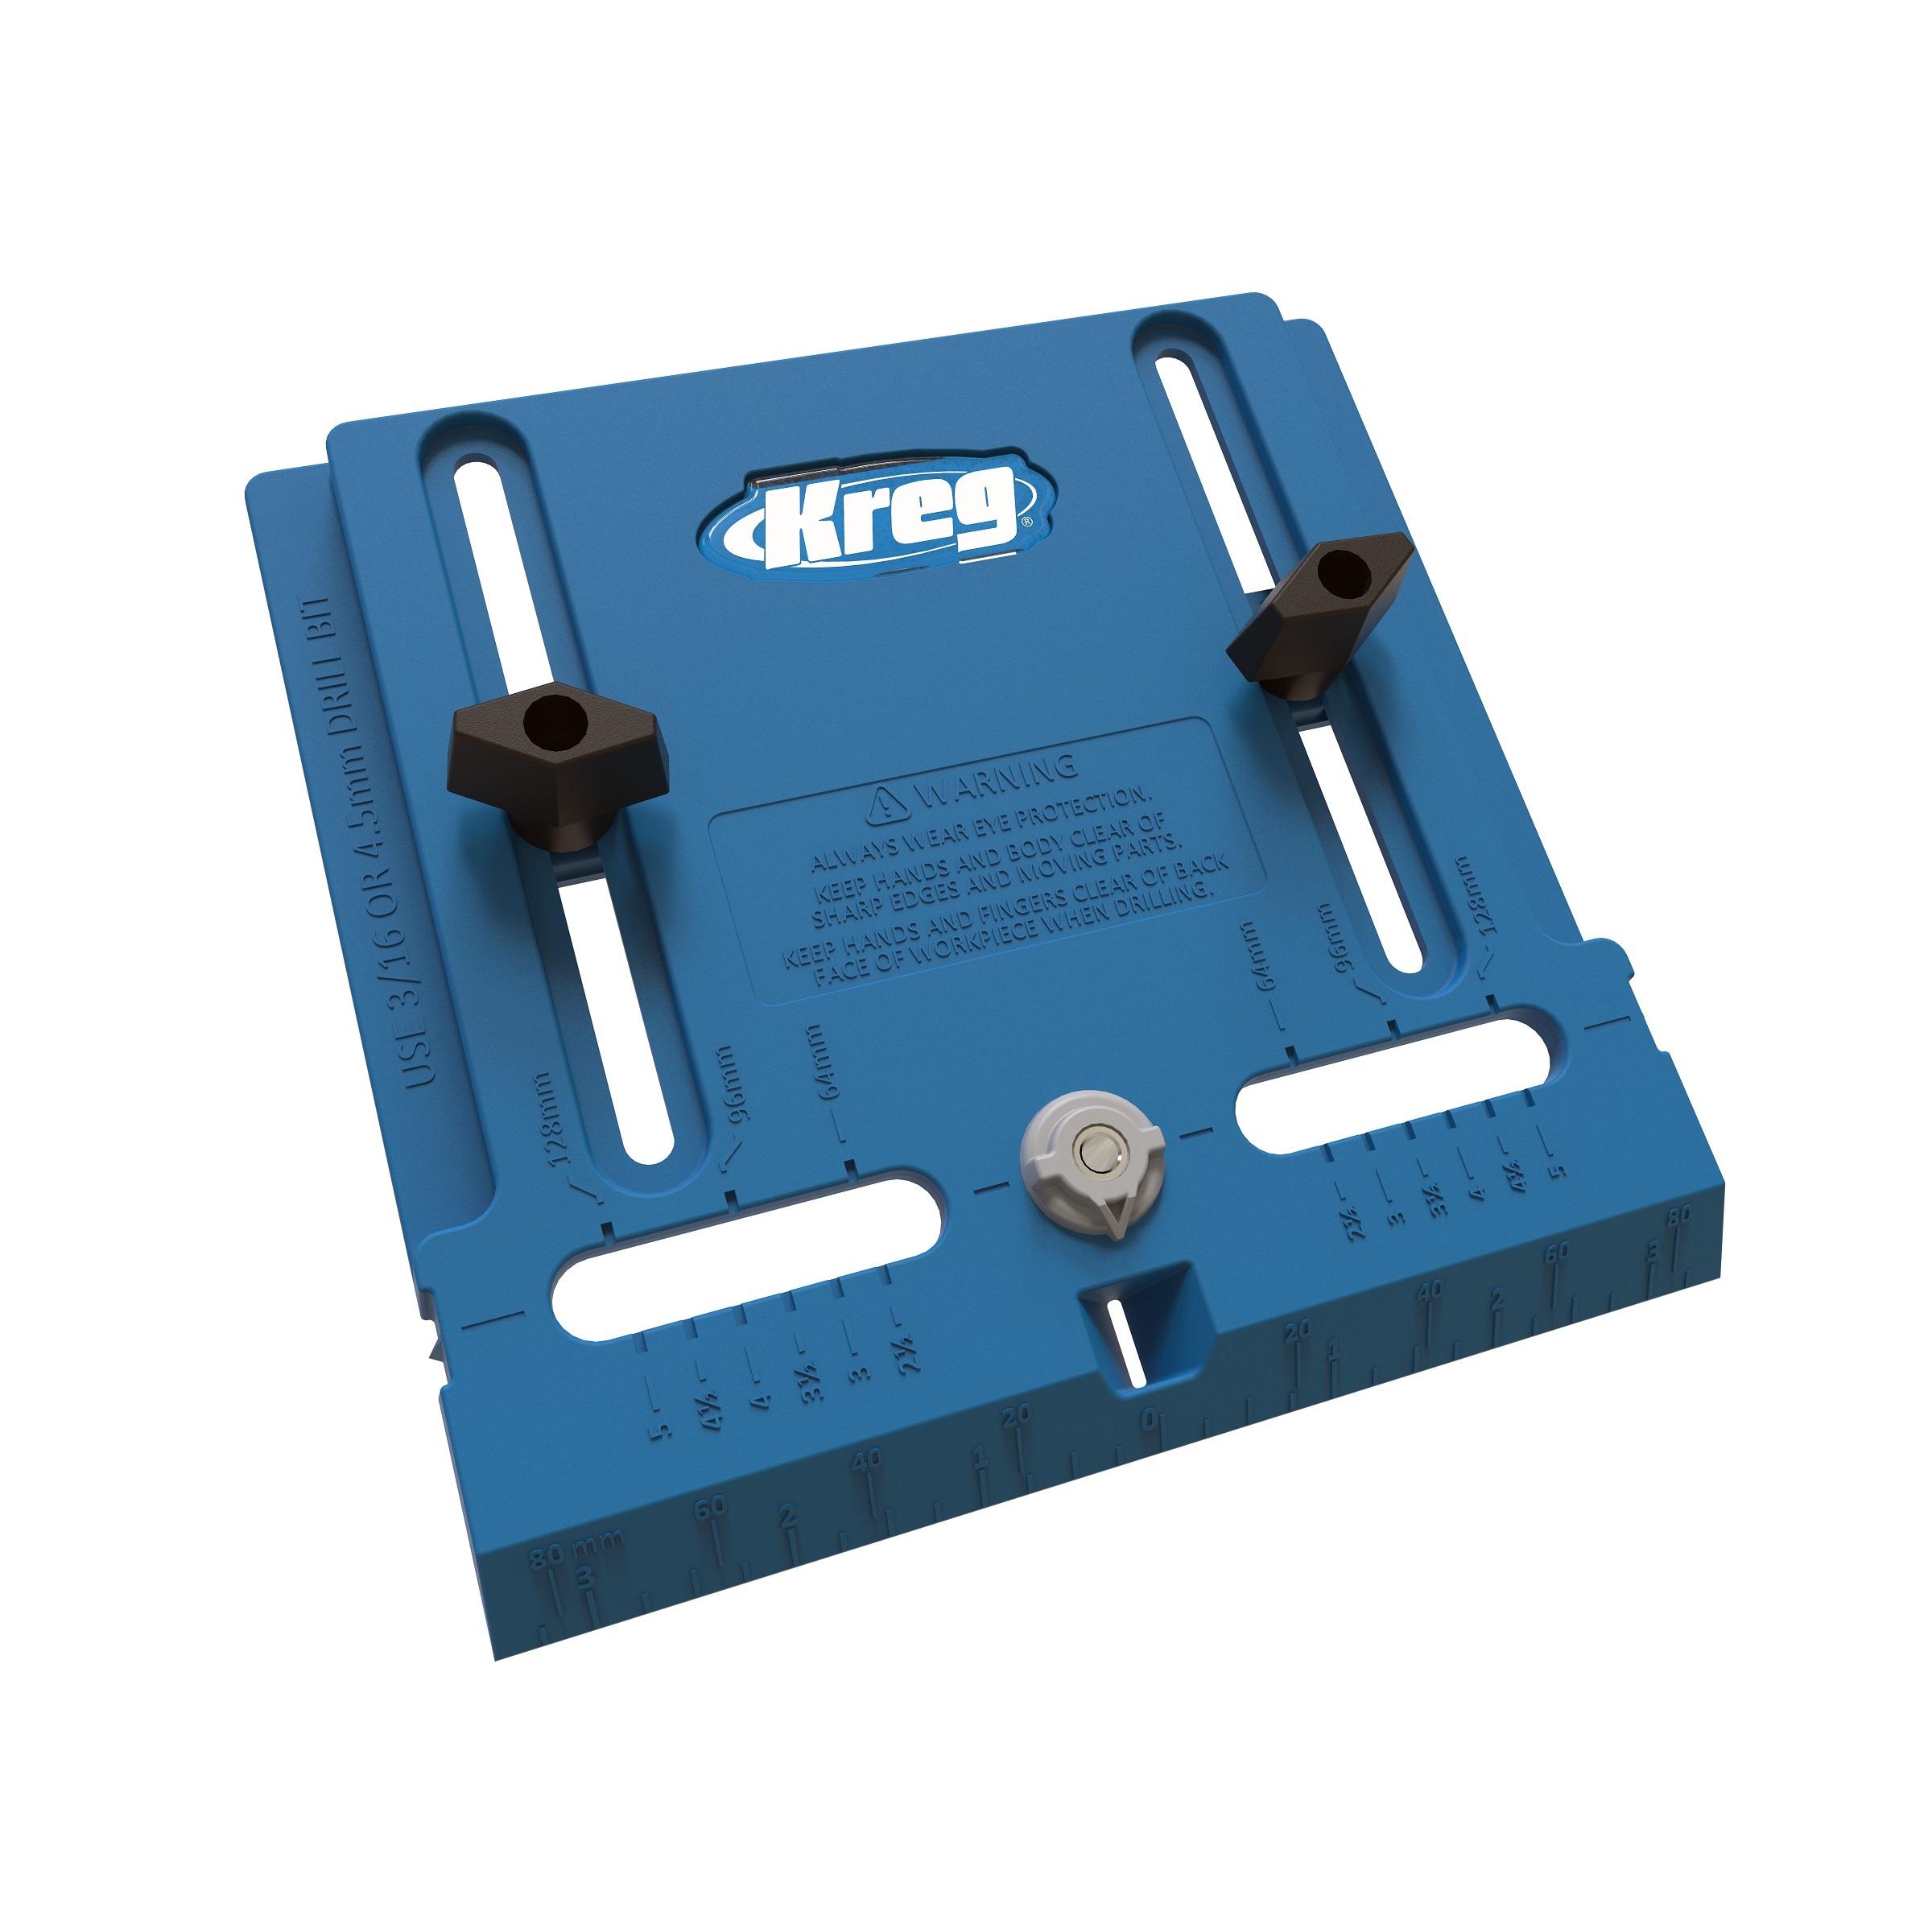
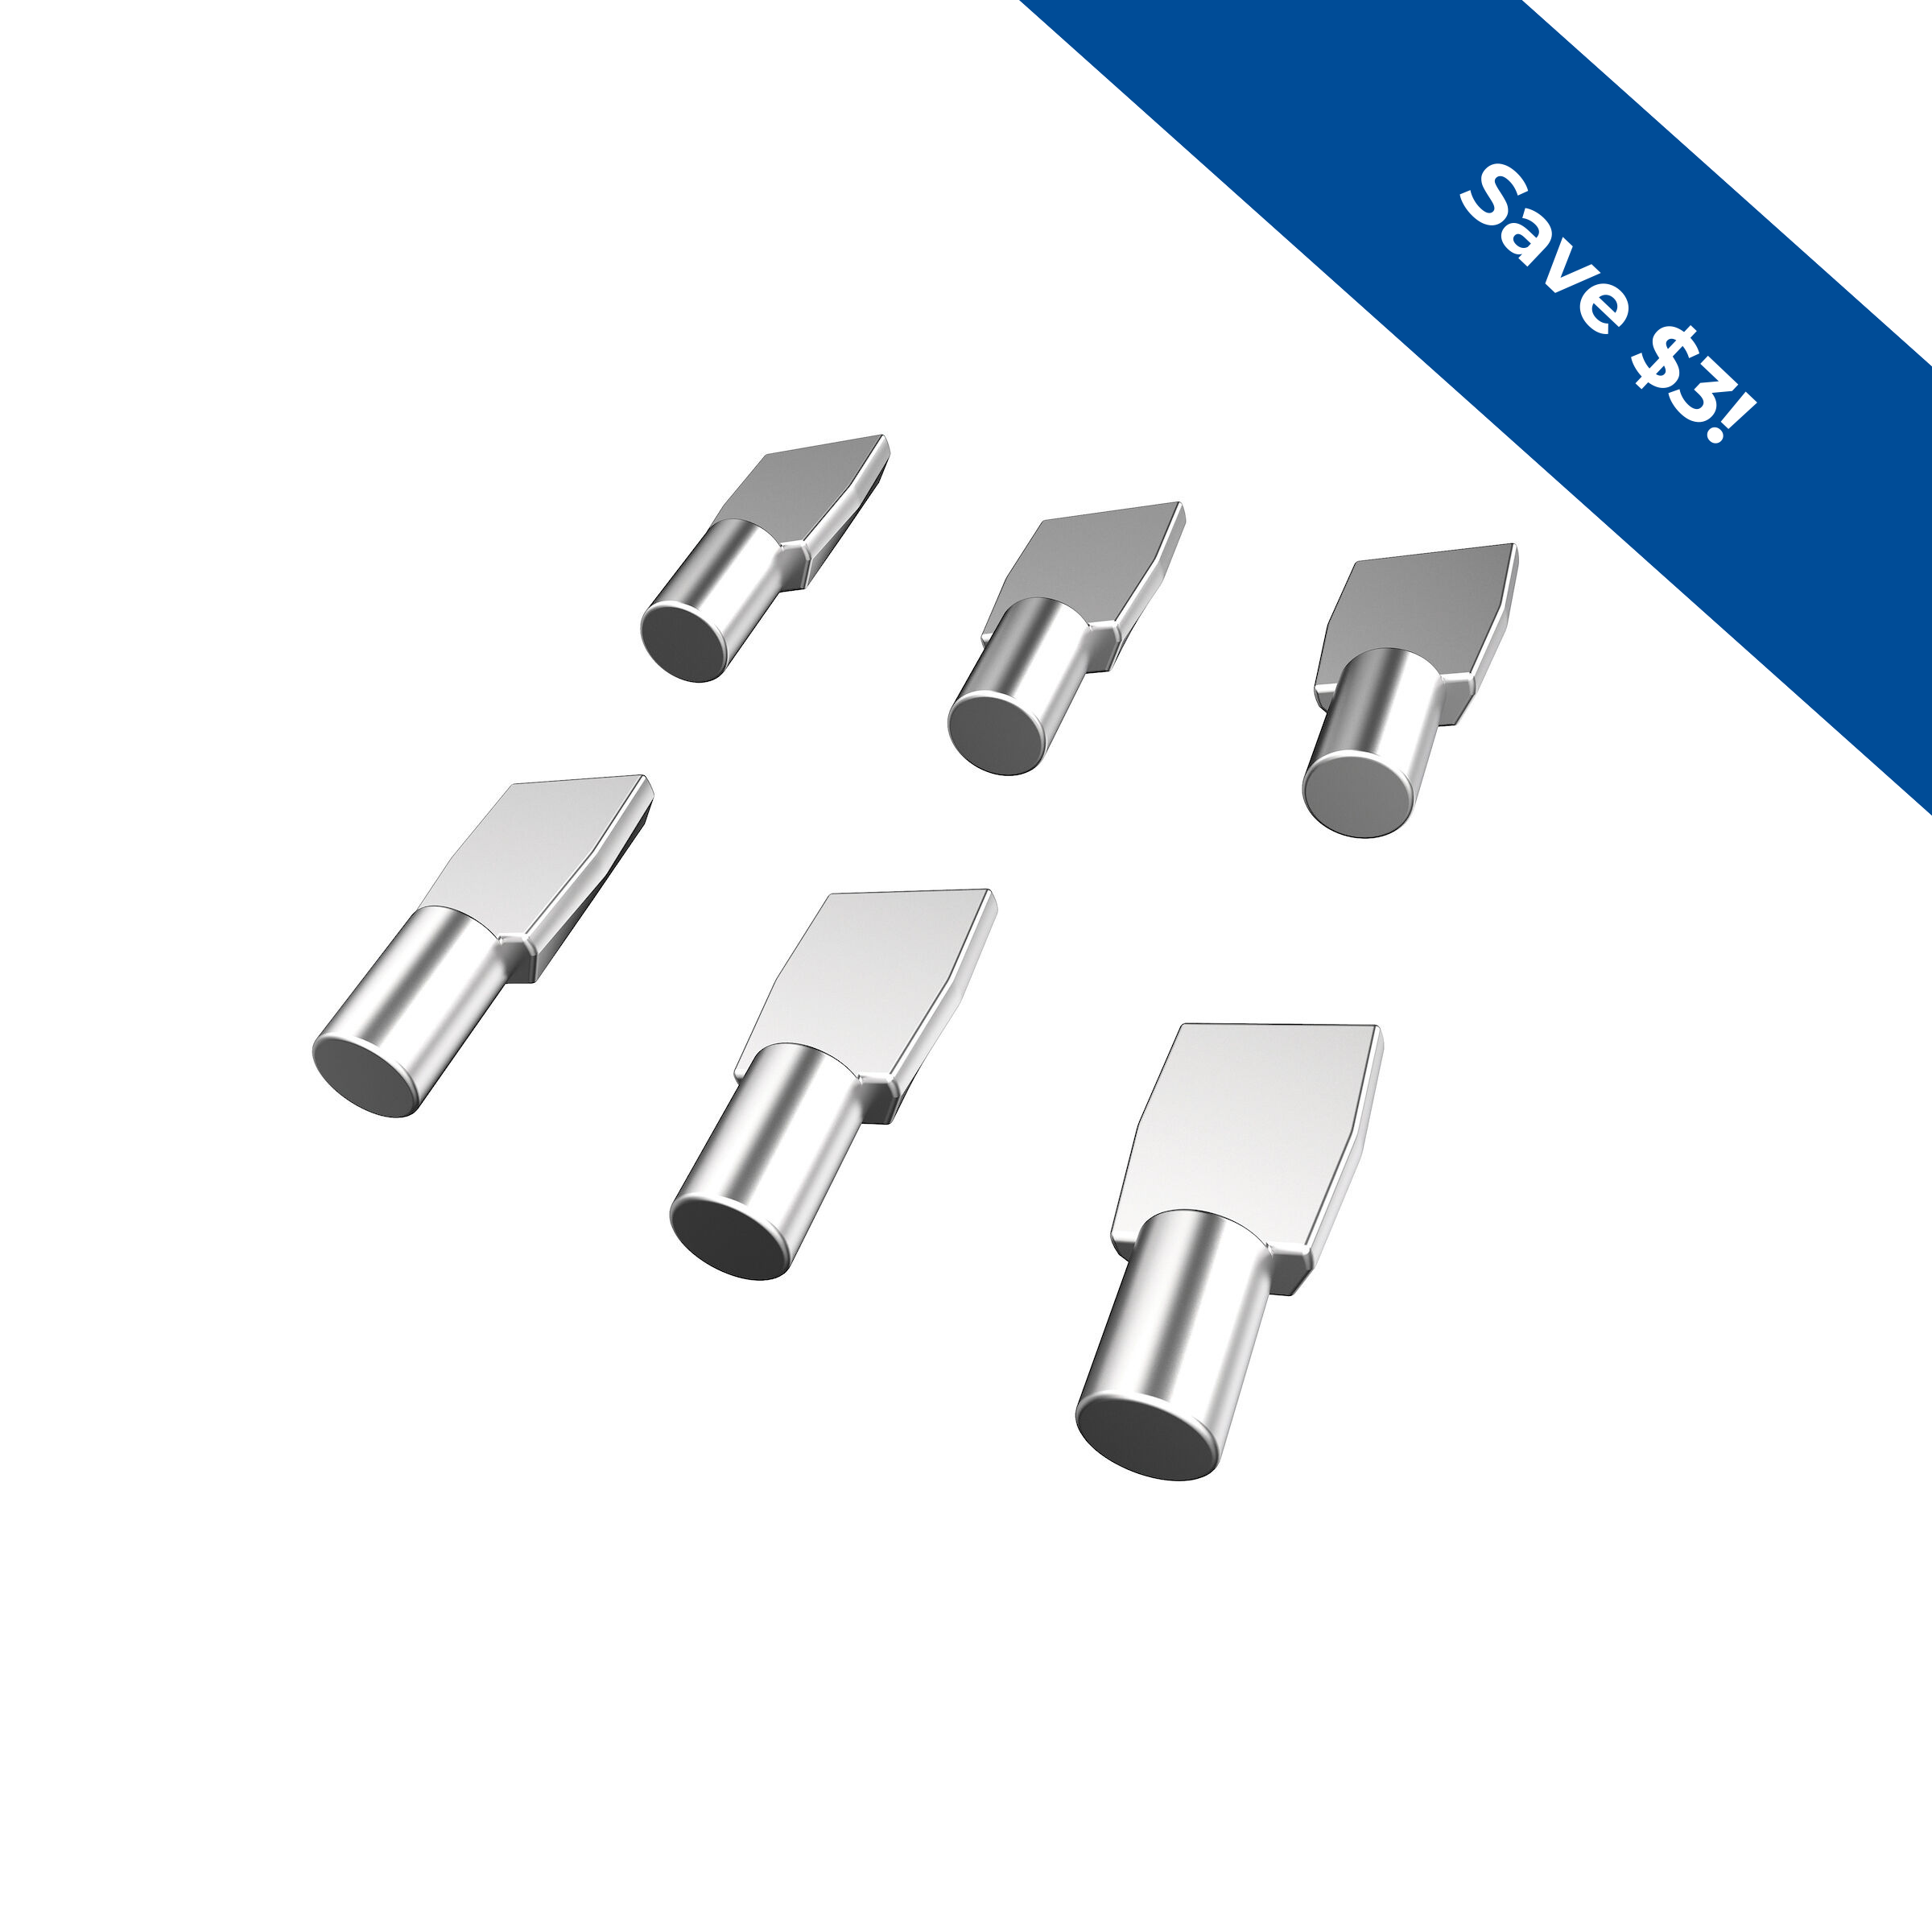
Now you can install the doors by drilling holes for concealed hinges. The Kreg Concealed Hinge Jig works great for this. Install the hinges, in the doors, and then position each in the opening. The door should overhang the opening by 1/2" at the top and bottom. To install the drawer slides, the Kreg Drawer Slide Jig makes it simple. Finally, install knobs on the drawer and doors using the Kreg Cabinet Hardware Jig. Once you have the hardware installed and everything aligned, you can remove it all to prepare for painting.
-
Finish It Up
We painted our stepback cupboard in a medium blue-grey tone that’s traditional, but that fits into a variety of styles. You could choose another color, or even stain the cupboard if that better suits your taste and decor. Once you have applied the paint or finish, you can reinstall the hardware, and put your stepback cupboard to work in your home.