

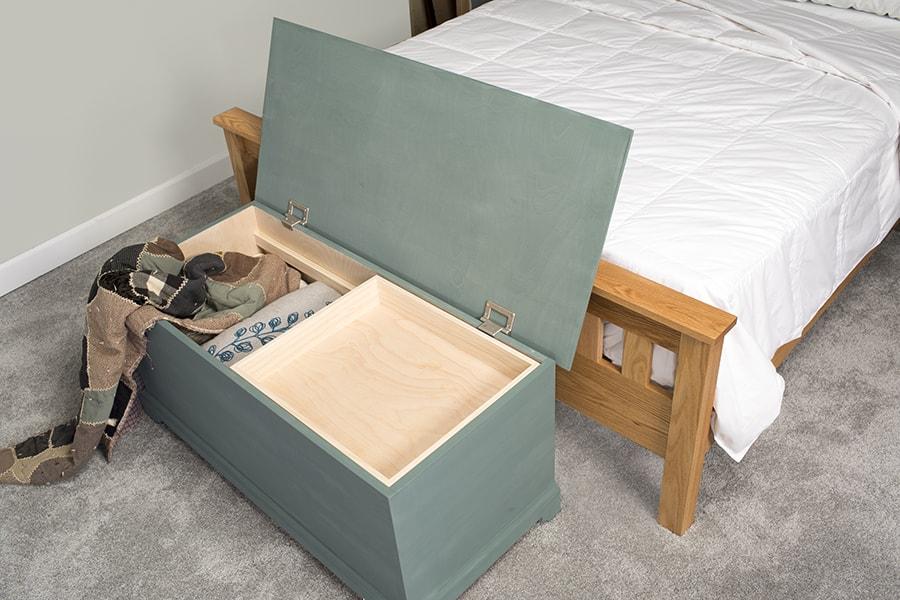
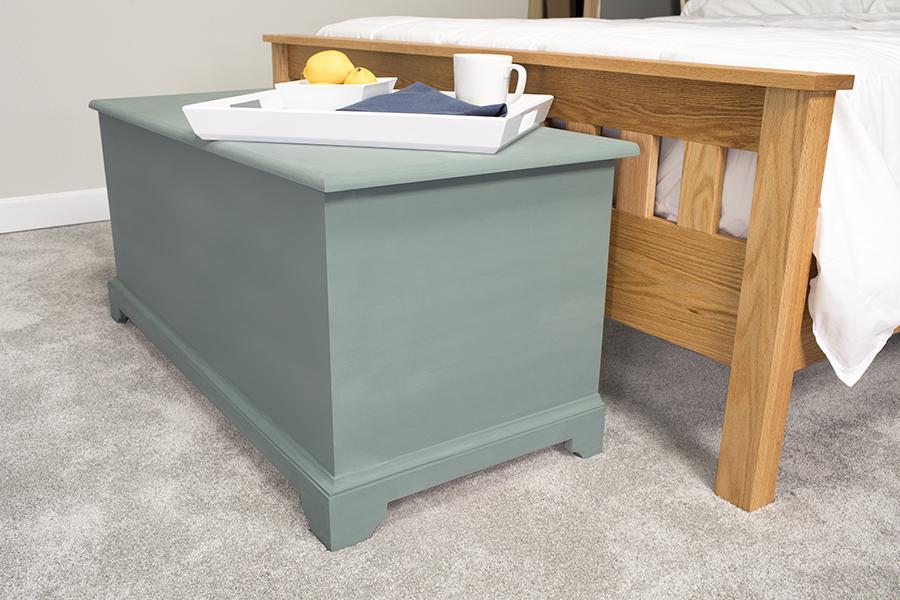


Whether you’re storing blankets or something else, this blanket chest will hold lots of stuff, and do it with style. The classic style features rounded edges on the lid, cove molding around the base, and shaped feet. It’s finished in a classic way, too, with milk paint. But it’s still easy to build.
Tools
Kreg Tools


Other Tools
-
Miter Saw

-
Square
-
Tape Measure
-
Nail Gun
-
Air Compressor
Materials
Wood Products
- 1 Plywood , 3/4" Thick , Full Sheet
- 1 Plywood , 1/2" Thick , 24" x 24"
- 1 Board , 1/2"x4 (3 1/2" actual width) , 36"
- 1 Board , 1/2"x4 (3 1/2" actual width) , 48"
- 1 Board , 1x2 , 72"
- 1 Board , 1x2 , 96"
- 1 Board , 1x4 , 24"
- 1 Cove Molding , 3/4" , 96"
- 1 Quarter Round Molding , 3/4" , 96"
Hardware & Supplies
- 46 Kreg 1 1/4" coarse-thread pocket-hole screws
- 14 Kreg 1" coarse-thread panhead (Micro) pocket-hole screws
- 50 1 1/4" brad nails
- 30 3/4" brad nails
- 1 Wood glue
- 1 Pair 40 inch-pound lid stay torsion hinges
- 1 Kreg Micro Pocket Jig
- 1 Wood filler
- 1 Quart milk paint (Soldier Blue)
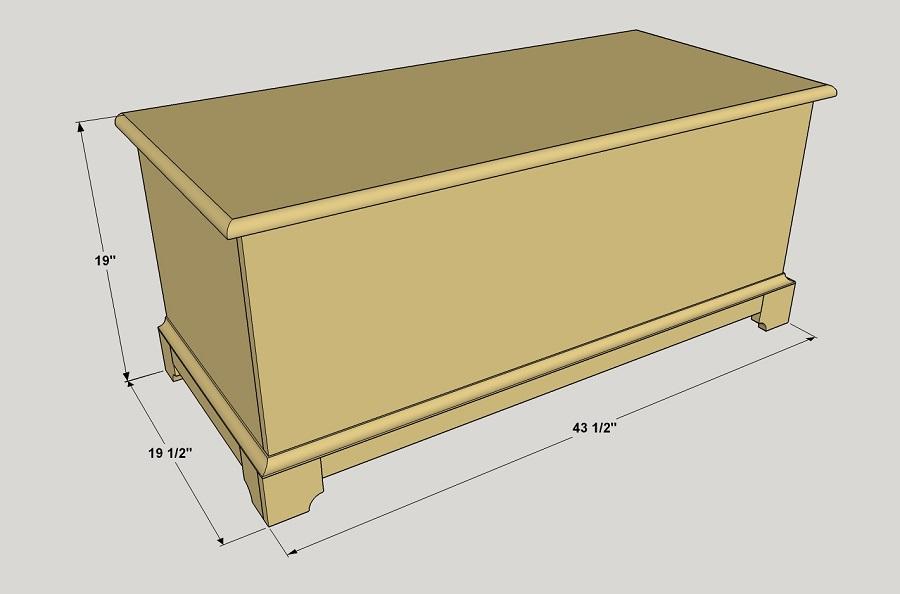
Cut List & Parts
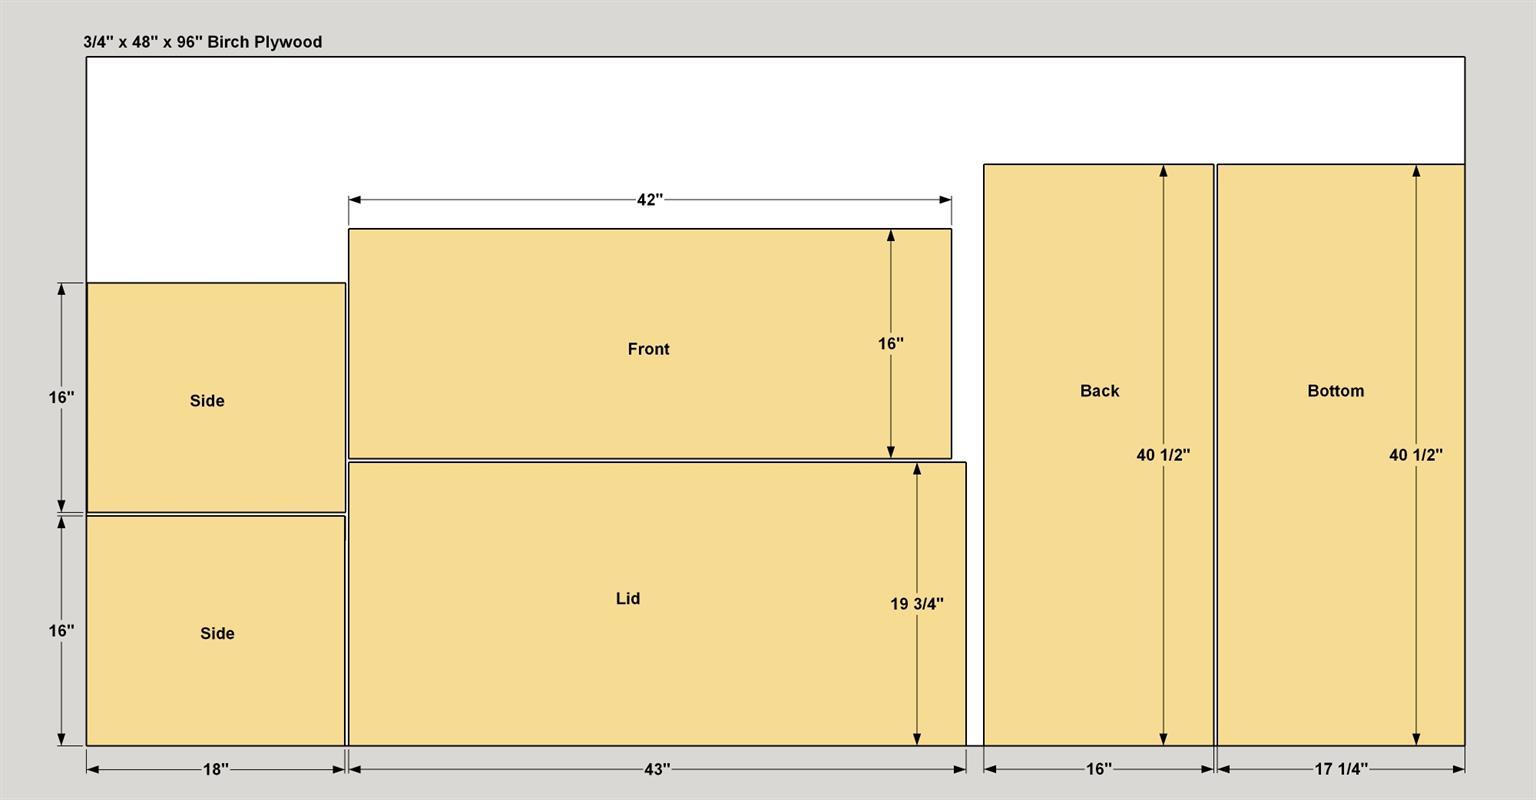
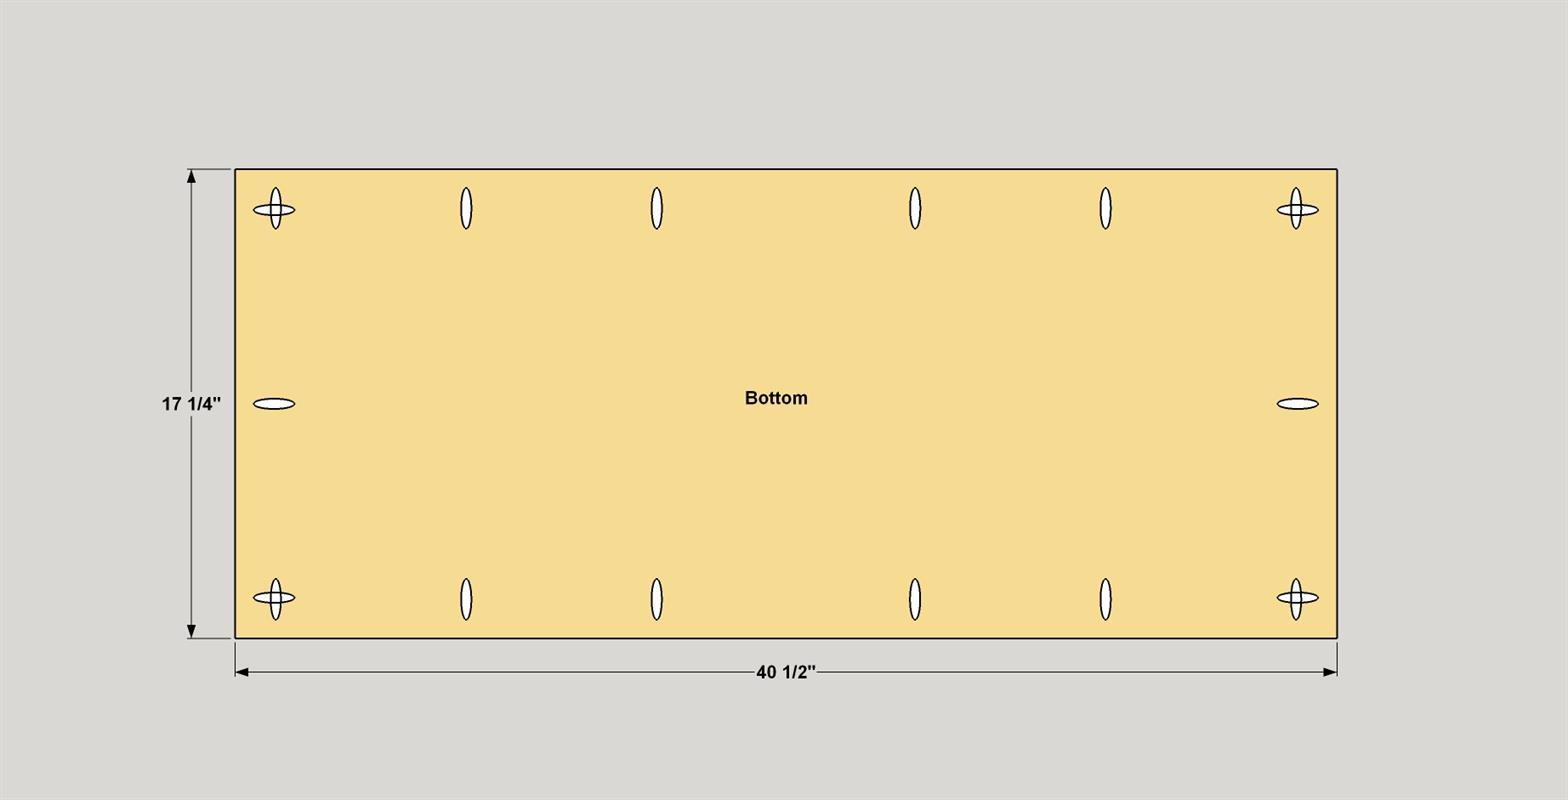
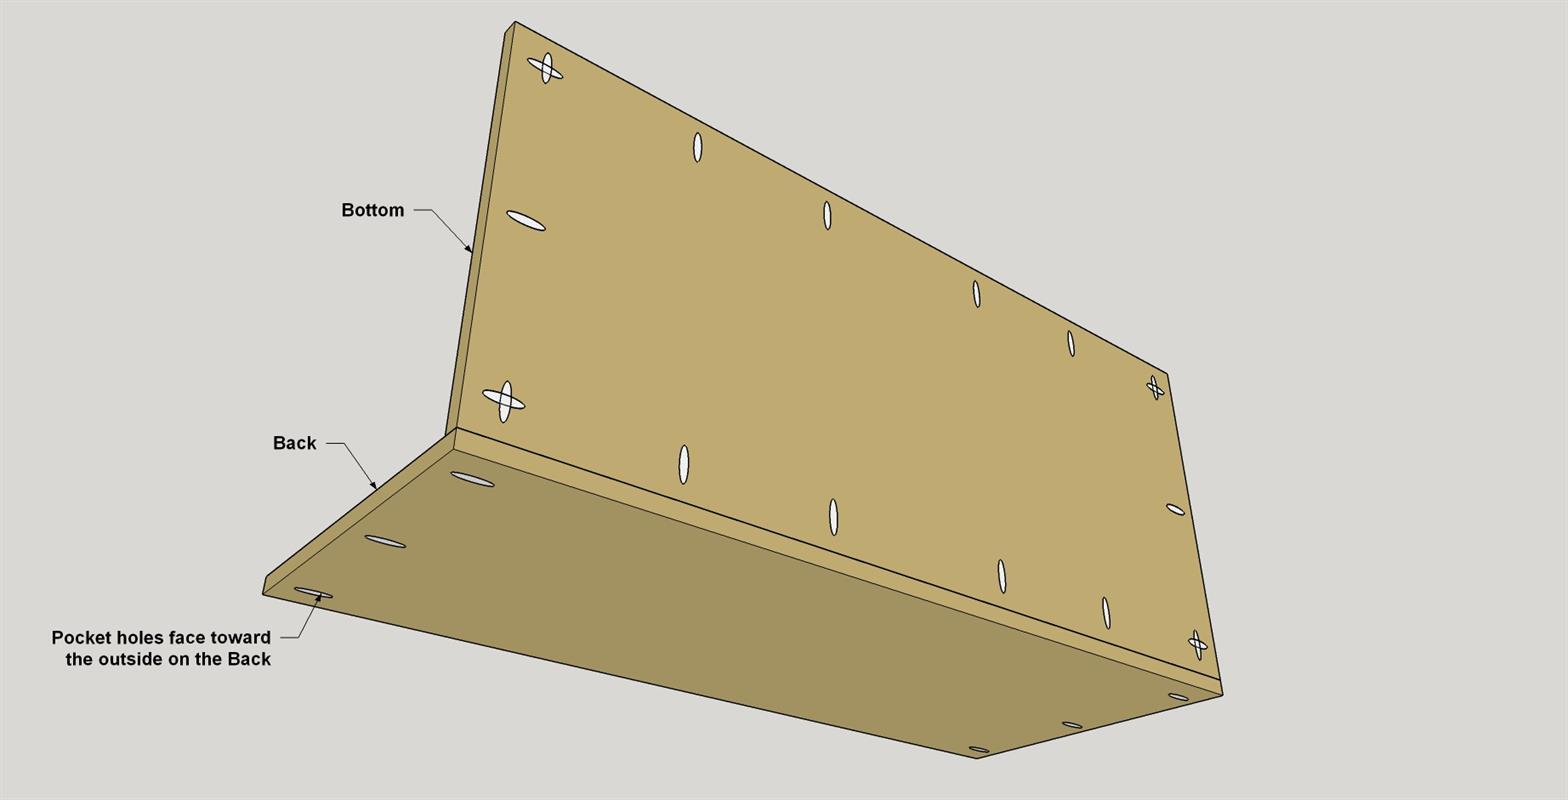
- 1 Bottom , 3/4" ply x 17 1/4" x 40 1/2"
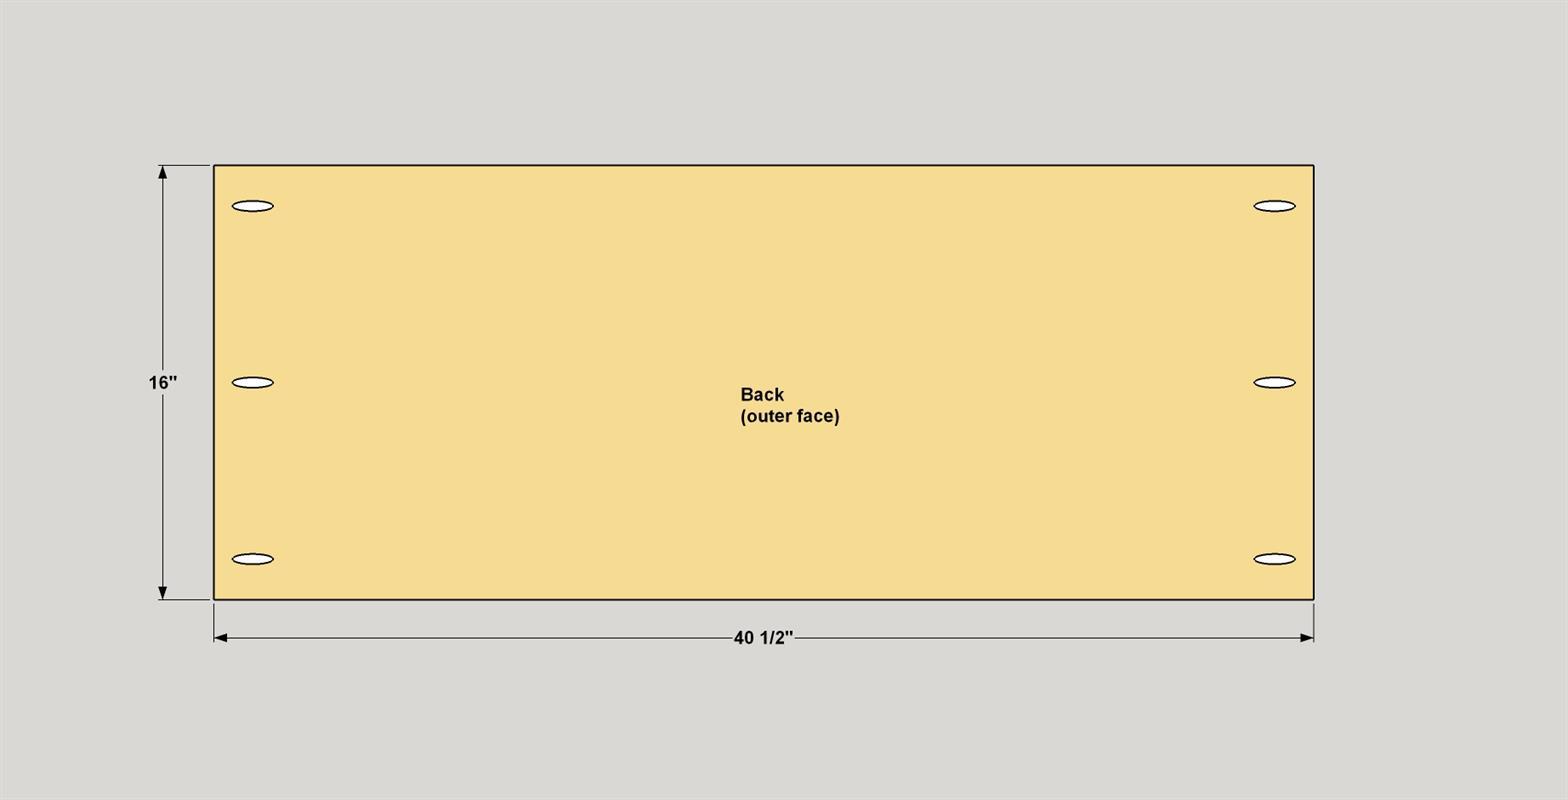
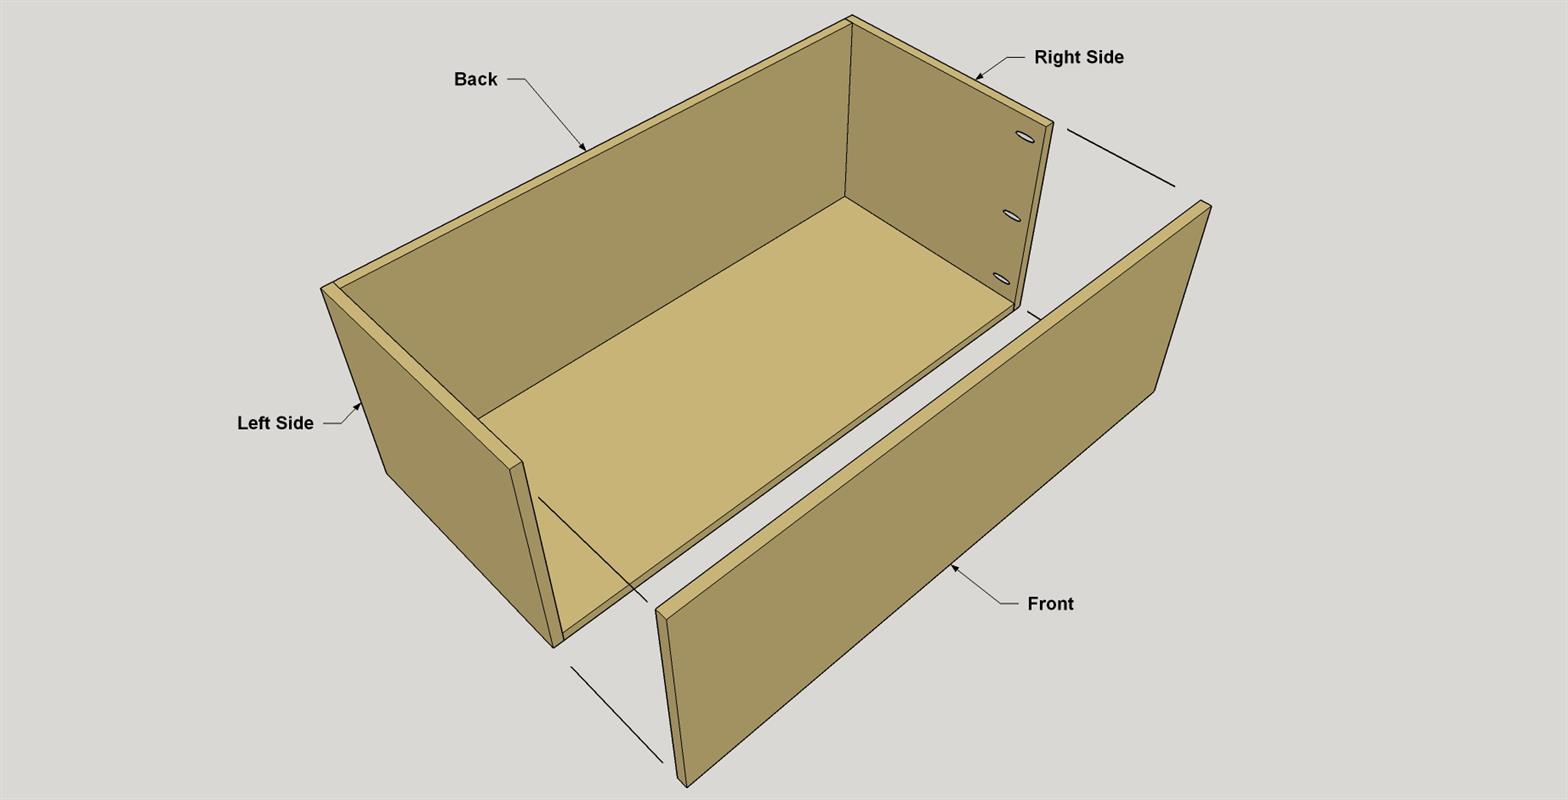
- 1 Back , 3/4" ply x 16" x 40 1/2"
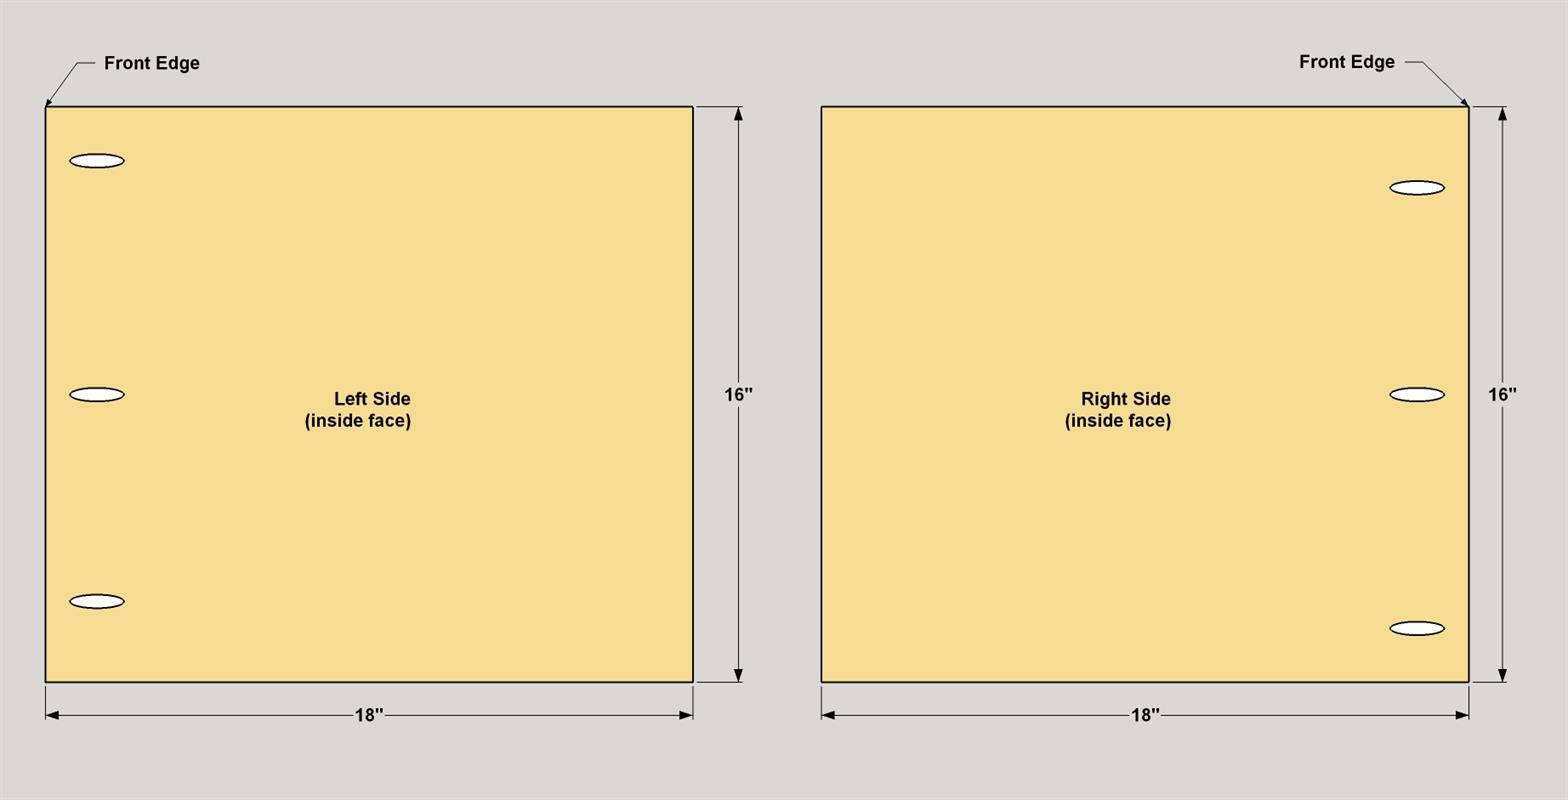
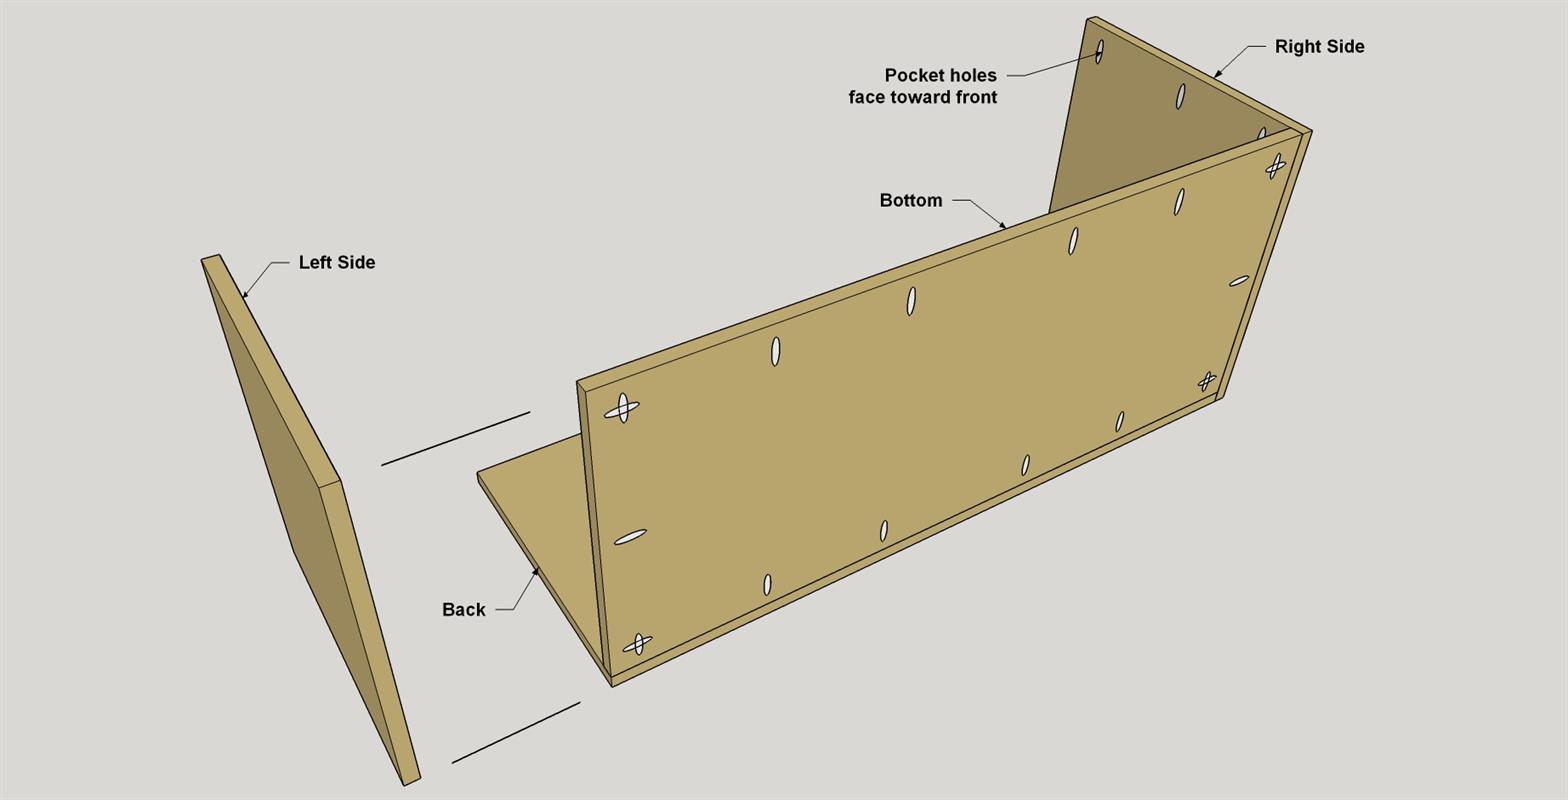
- 2 Side , 3/4" ply x 16" x 18"
- 1 Front , 3/4" ply x 16" x 42"
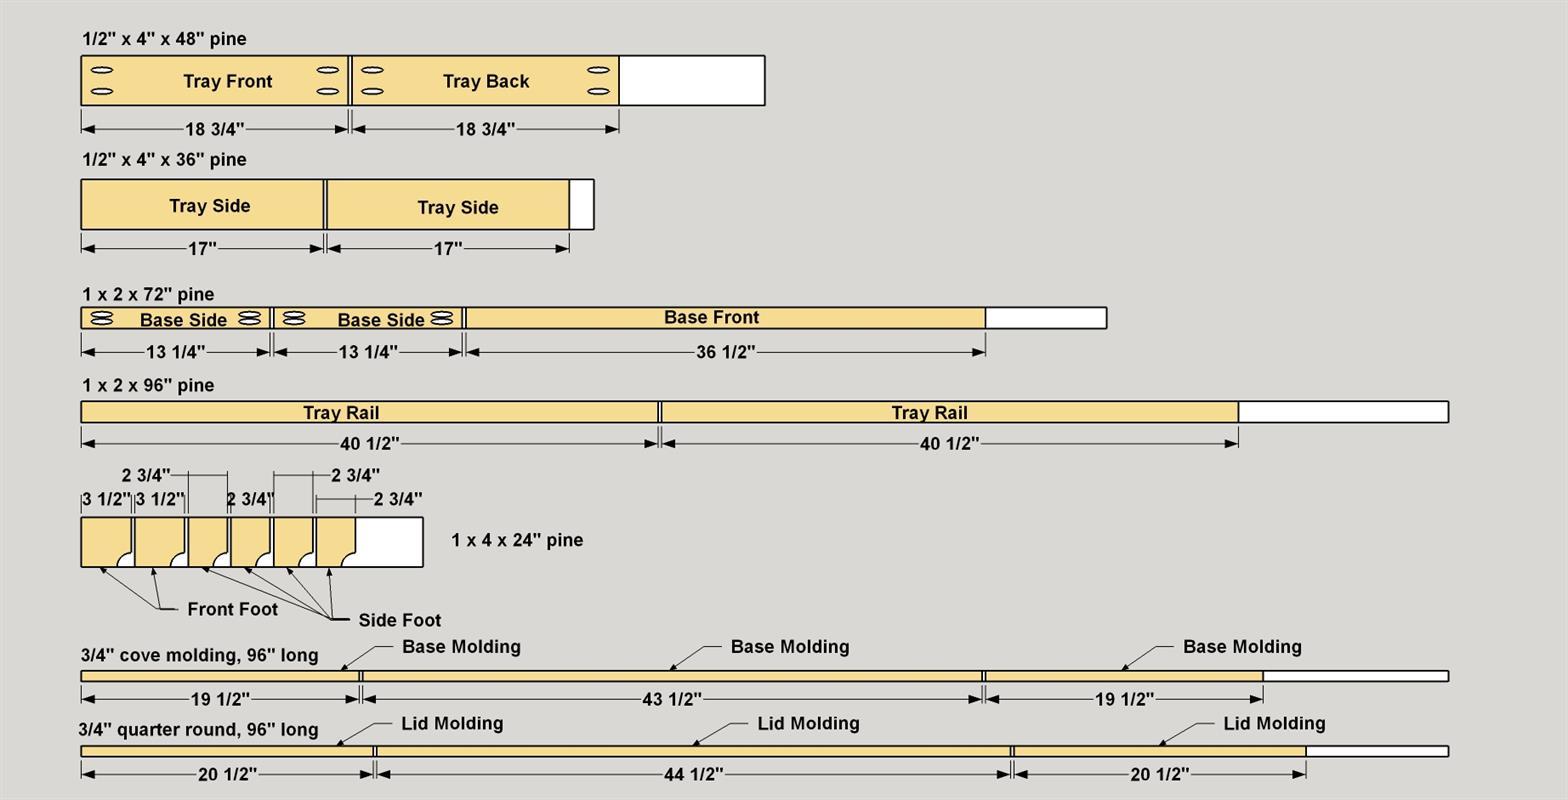
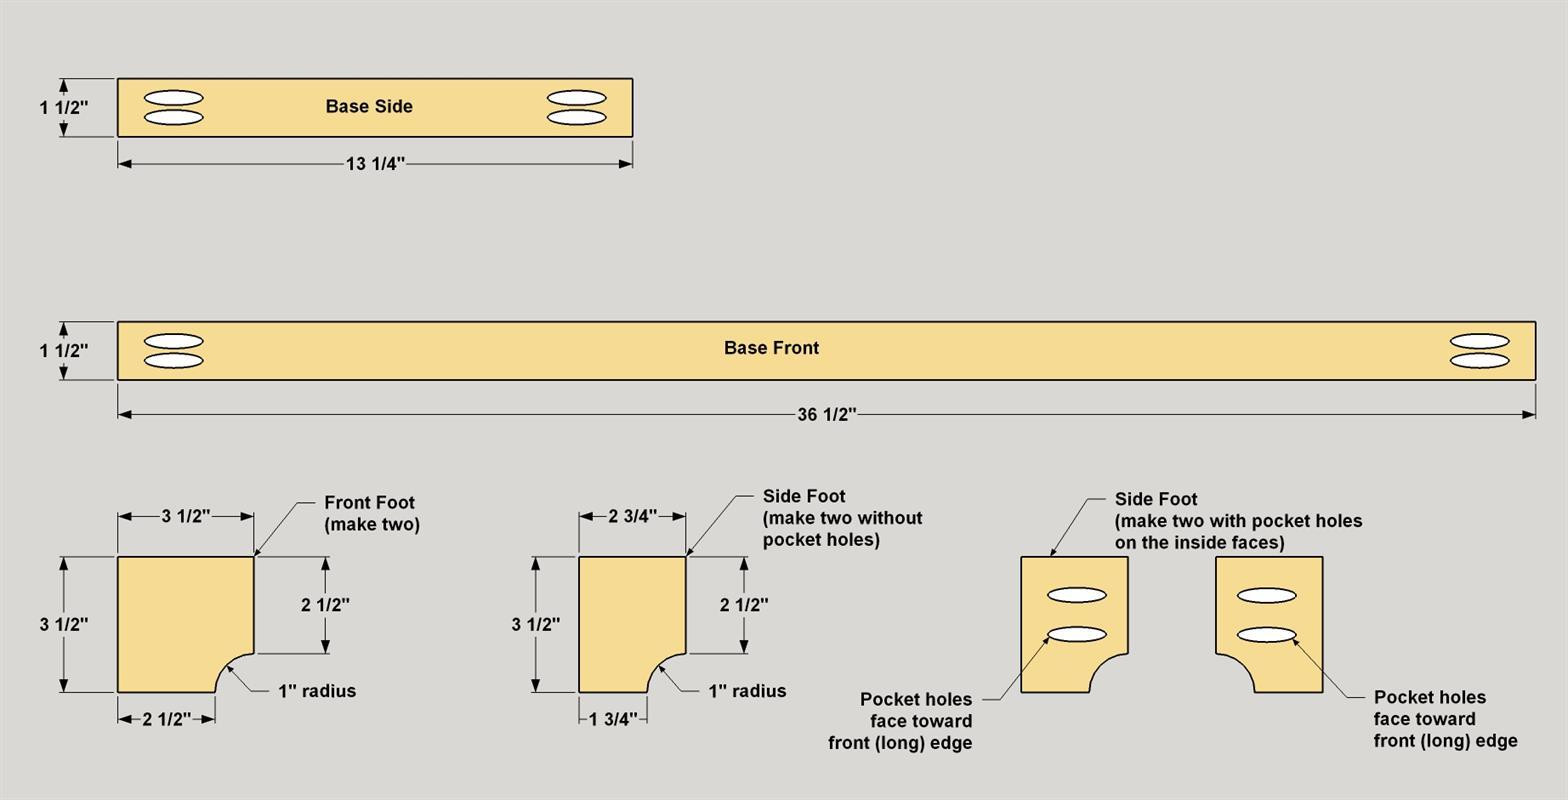
- 4 Side Foot , 3/4" x 3 1/2" x 2 3/4" pine
- 2 Front Foot , 3/4" x 3 1/2" x 3 1/2" pine
- 1 Base Front , 3/4" x 1 1/2" x 36 1/2" pine
- 2 Base Side , 3/4" x 1 1/2" x 13 1/4" pine
- 1 Lid , 3/4" ply x 19 3/4" x 43"
- 1 Lid Molding , 3/4" quarter round, cut to fit
- 1 Base Molding , 3/4" cove molding, cut to fit
- 2 Tray Front/Back , 1/2" x 3 1/2" x 18 3/4" pine
- 2 Tray Side , 1/2" x 3 1/2" x 17" pine
- 2 Tray Rail , 3/4" x 1 1/2" x 40 1/2"
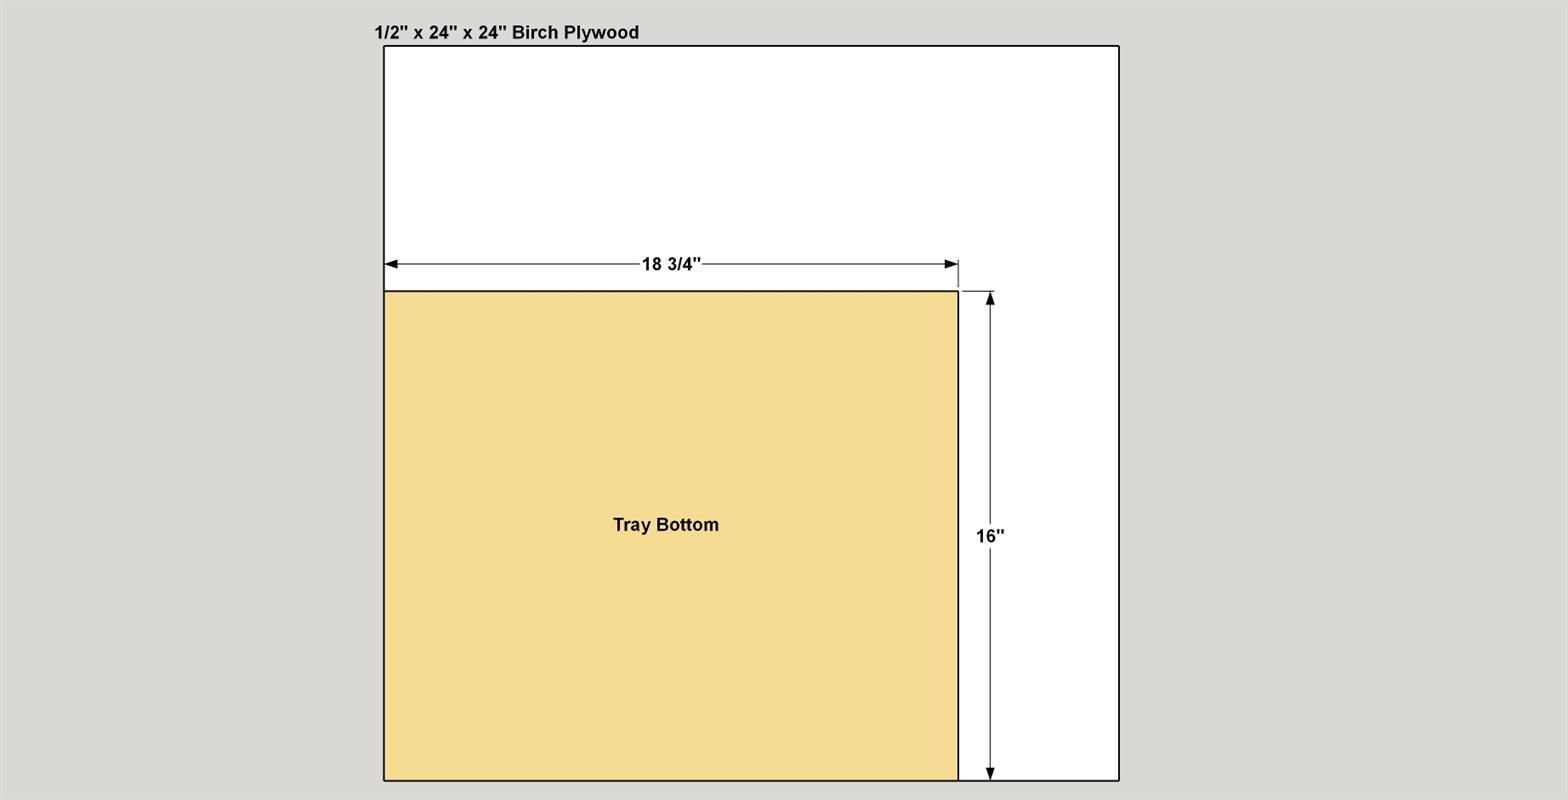
- 1 Tray Bottom , 1/2" ply x 16" x 18 3/4"
Directions
-
Make the Bottom
Cut a Bottom to size from 3/4" birch plywood, as shown in the cutting diagram. With your Kreg Jig set up for 3/4"-thick material, drill pocket holes in the underside of the Bottom as shown. Sand the faces smooth.
-
Make the Back
Cut a Back to size from 3/4" birch plywood, as shown in the cutting diagram. With your Kreg Jig set up for 3/4"-thick material, drill pocket holes in the rear (outer) face of the Back, as shown. Sand the faces smooth.
-
Assemble the Bottom and Back
Attach the Bottom Panel to the Back Panel as shown using 1 1/4" coarse-thread pocket-hole screws.
-
Make the Sides
Cut the Side Panels to size from 3/4" birch plywood, as shown in the cutting diagram. With your Kreg Jig set up for 3/4"-thick material, drill pocket holes in the inside face or each Side, as shown. Note that the holes are along he front edge of the Side, and that you’ll end up with two “mirror image” pieces. Sand the faces smooth.
-
Attach the Sides
Attach the Sides to Back and Bottom using 1 1/4" coarse-thread pocket-hole screws. Sand the faces smooth.
-
Add a Front Panel
Cut a Front to size from 3/4" birch plywood, as shown in the cutting diagram. Attach the Front with wood glue and 1 1/4" coarse-thread pocket-hole screws. With the main case done, you can fill all of the exposed edges using wood filler or spackle. You don’t need to fill the lower edges. They won’t be seen. After the filler dries, sand it smooth.
-
Make the Base Parts
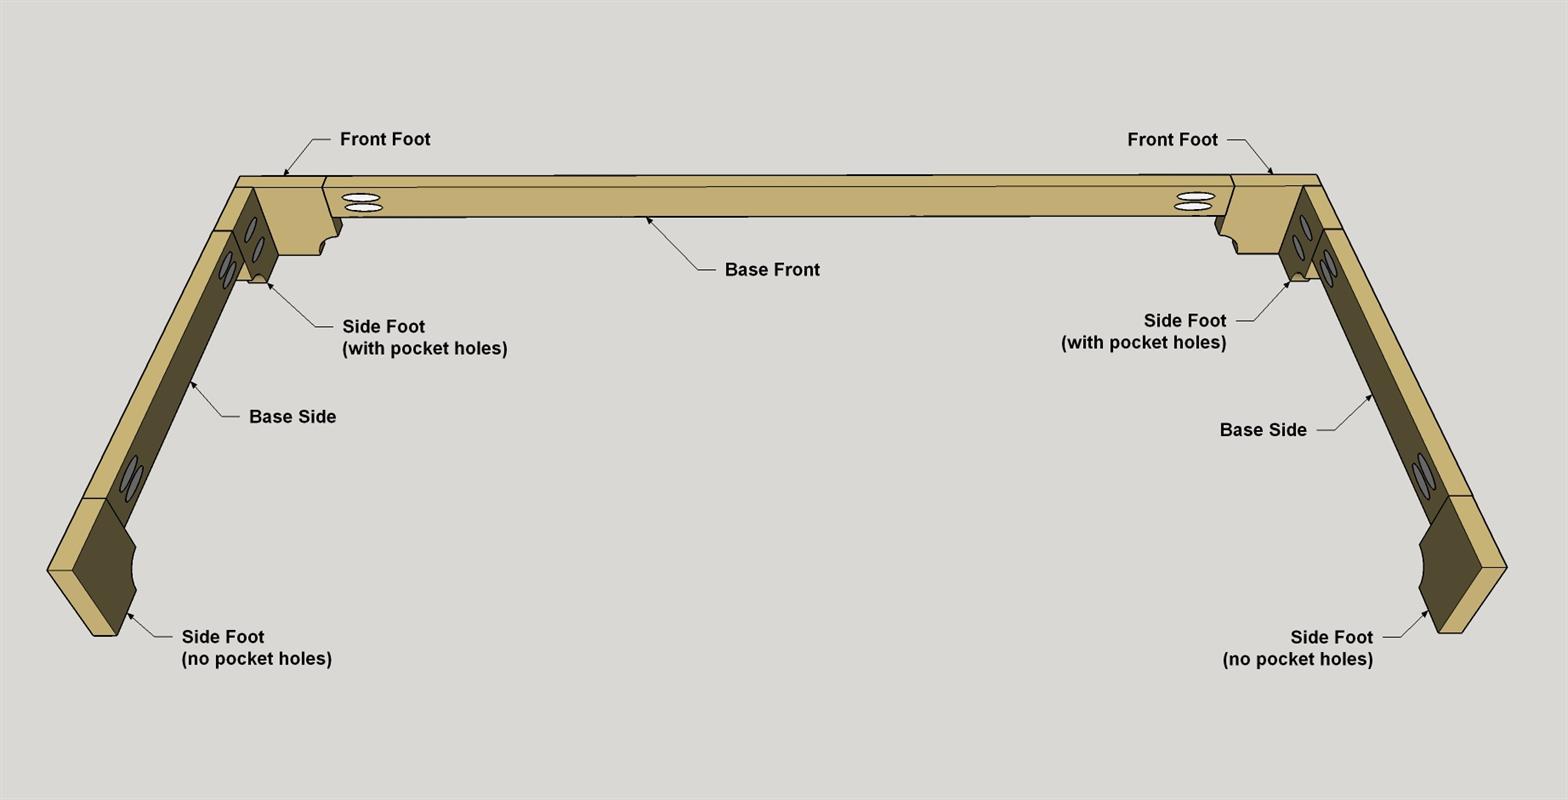
Cut the four Side Feet and two Front Feet from a 1x4 board, as shown in the cutting diagram. Using a jigsaw, cut the 1" radius on one lower corner of each Foot. Then drill pocket holes in two of the Side Feet, as shown. Next, cut two Base Sides and one base Front to size from a 1x2 board, as shown in the cutting diagram. Drill pocket holes in the Base Sides and in the base Front, as shown.
-
Assemble the Base
Assemble the base parts, as shown using glue and 1 1/4" coarse-thread pocket-hole screws.
-
Attach the Base to the Case
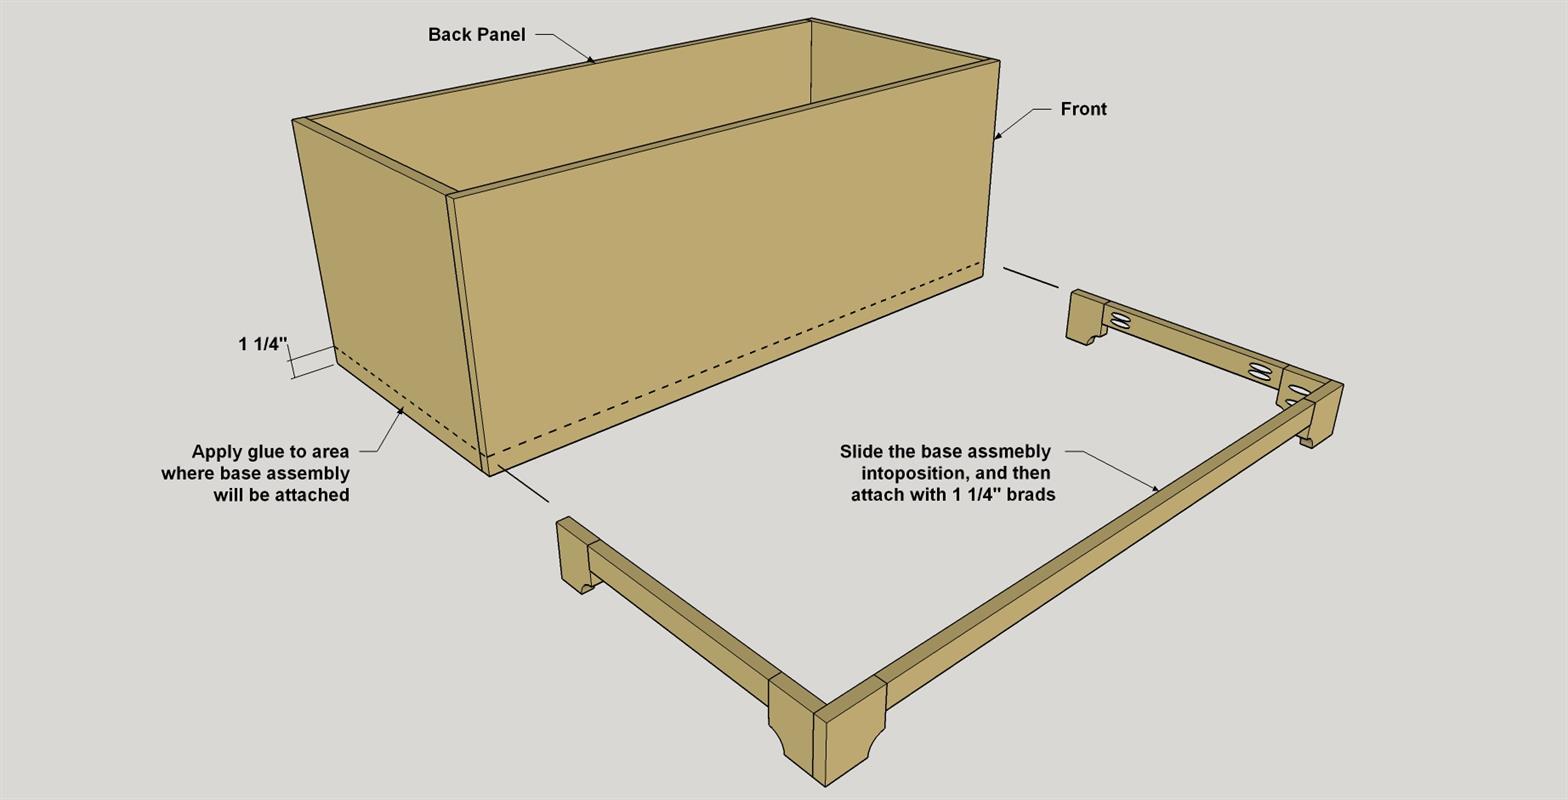
On the main case, mark a line 1 1/4" up from the bottom edge, as shown. You’ll align the base with this mark. Then spread glue below the mark, and position the base assembly. Clamp the base assembly in place, and then attach it using 1 1/4" brad nails. A nail gun works best for this because it drives the nails easily, doesn’t require pilot holes, and you don’t have to worry about banging up the wood or accidentally knocking the assembly out of position with a hammer. If you don’t have a nail gun, you can rent one. Or, you can use a hammer and nails, but you’ll want to drill pilot holes first to prevent splitting the wood.
-
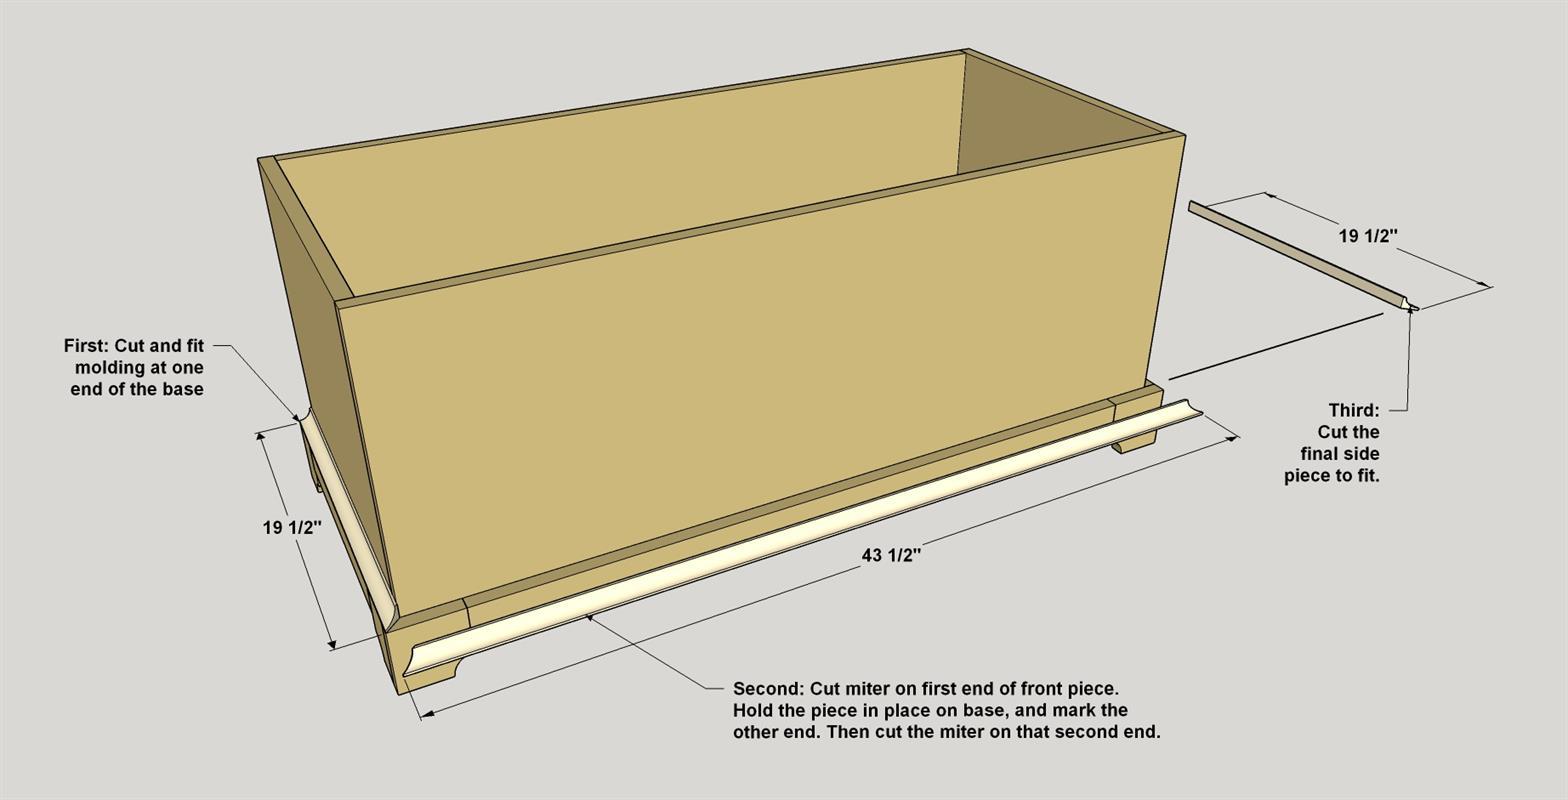
Add Cove Molding
If you want to add a decorative touch to the blanket chest, apply 3/4" cove molding above the base, as shown. When you’re adding molding, it’s best to start at one side and work your way around to get a nice tight fit at the corners. Once you have the pieces cut to fit, apply glue to the molding—especially the mitered ends—and then attach it using 3/4" brads. Fill the nail holes. After the filler dries, sand it smooth.
-
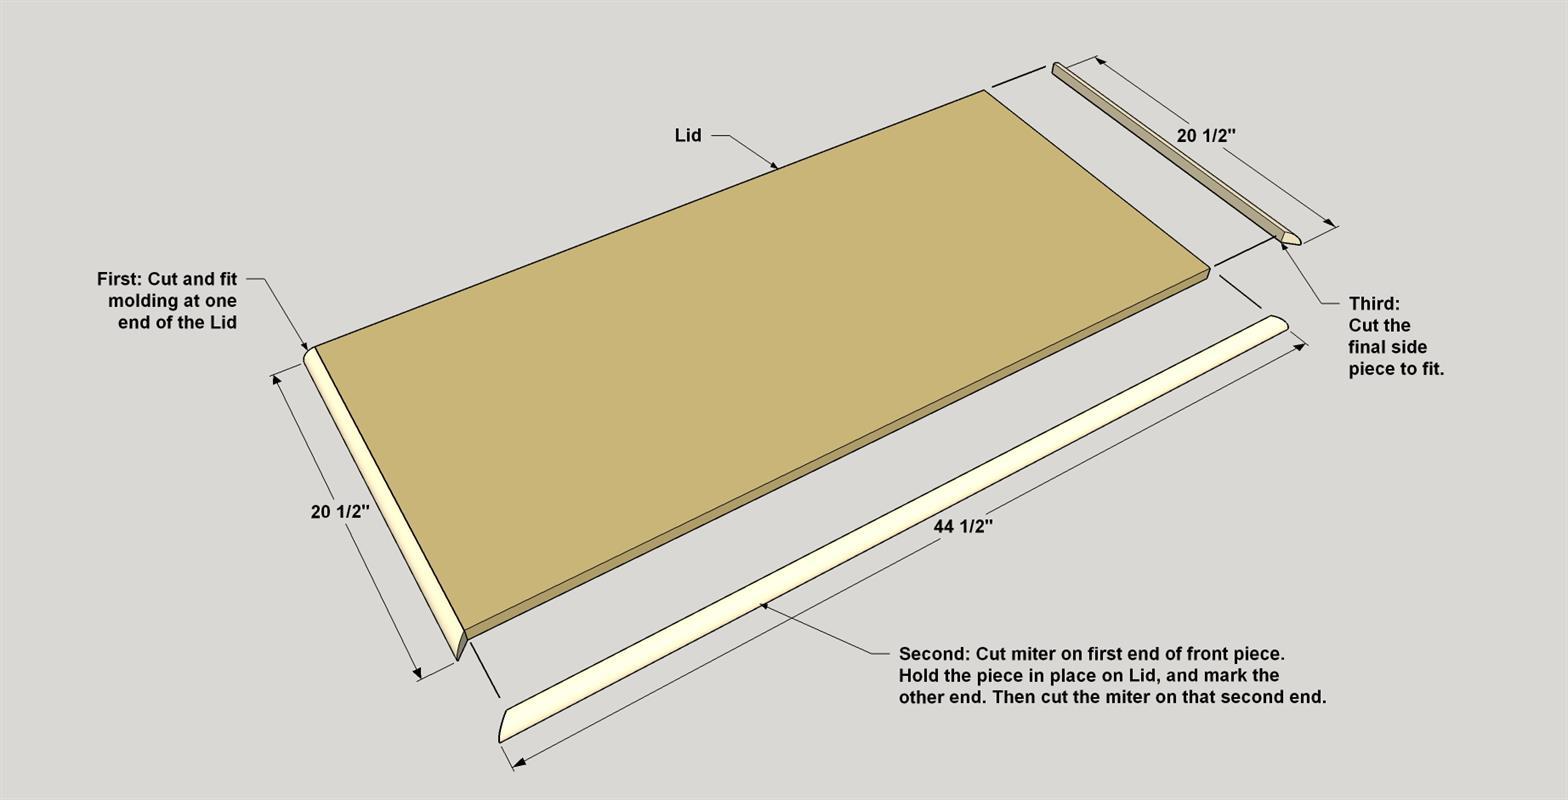
Make the Lid
Next, cut a lid to size from 3/4" birch plywood, as shown in the cutting diagram. Then, apply 3/4" quarter round to the front edge and ends, as shown. Use the same procedures you used to fit the cove molding on the base, and attach the molding with glue and 3/4" brads. Fill the back edge of the lid with filler or spackle. Also fill the nail holes in the molding. After the filler and glue dry, sand the lid assembly smooth.
-
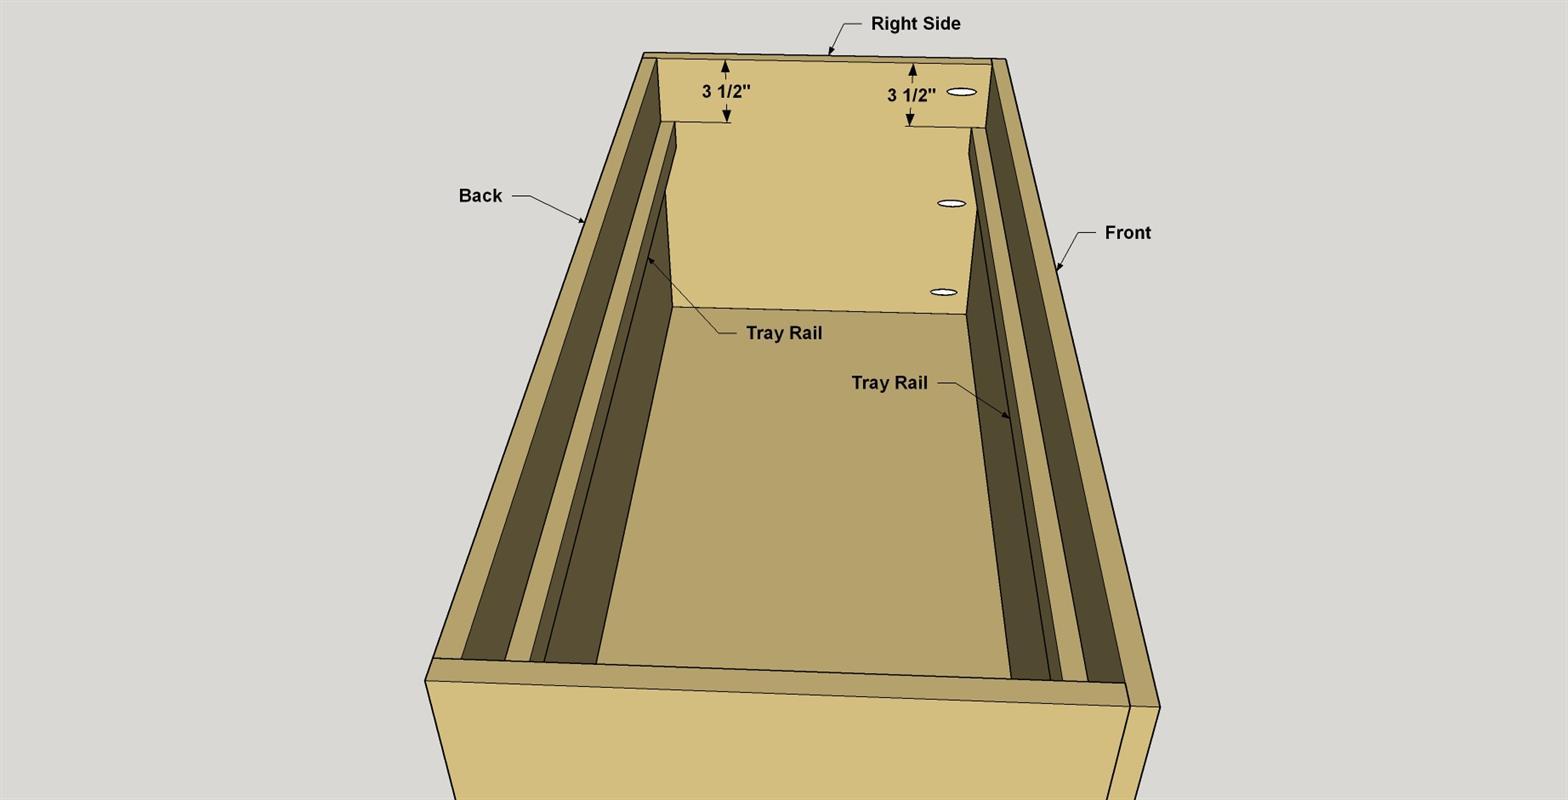
Add Tray Rails
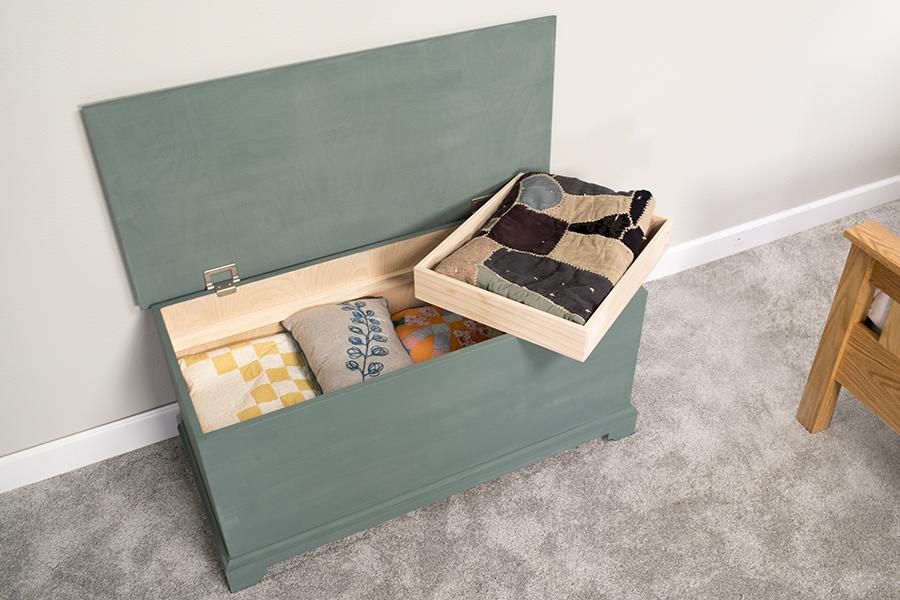
You can add a shallow tray inside the chest to hold smaller items. If you plan to do that, first cut two Tray Rails from 1x2 boards, as shown in the cutting diagram. Spread glue on the back face of each Tray Rail, position them inside the chest, as shown, and attach them using 1 1/4" brads.
-
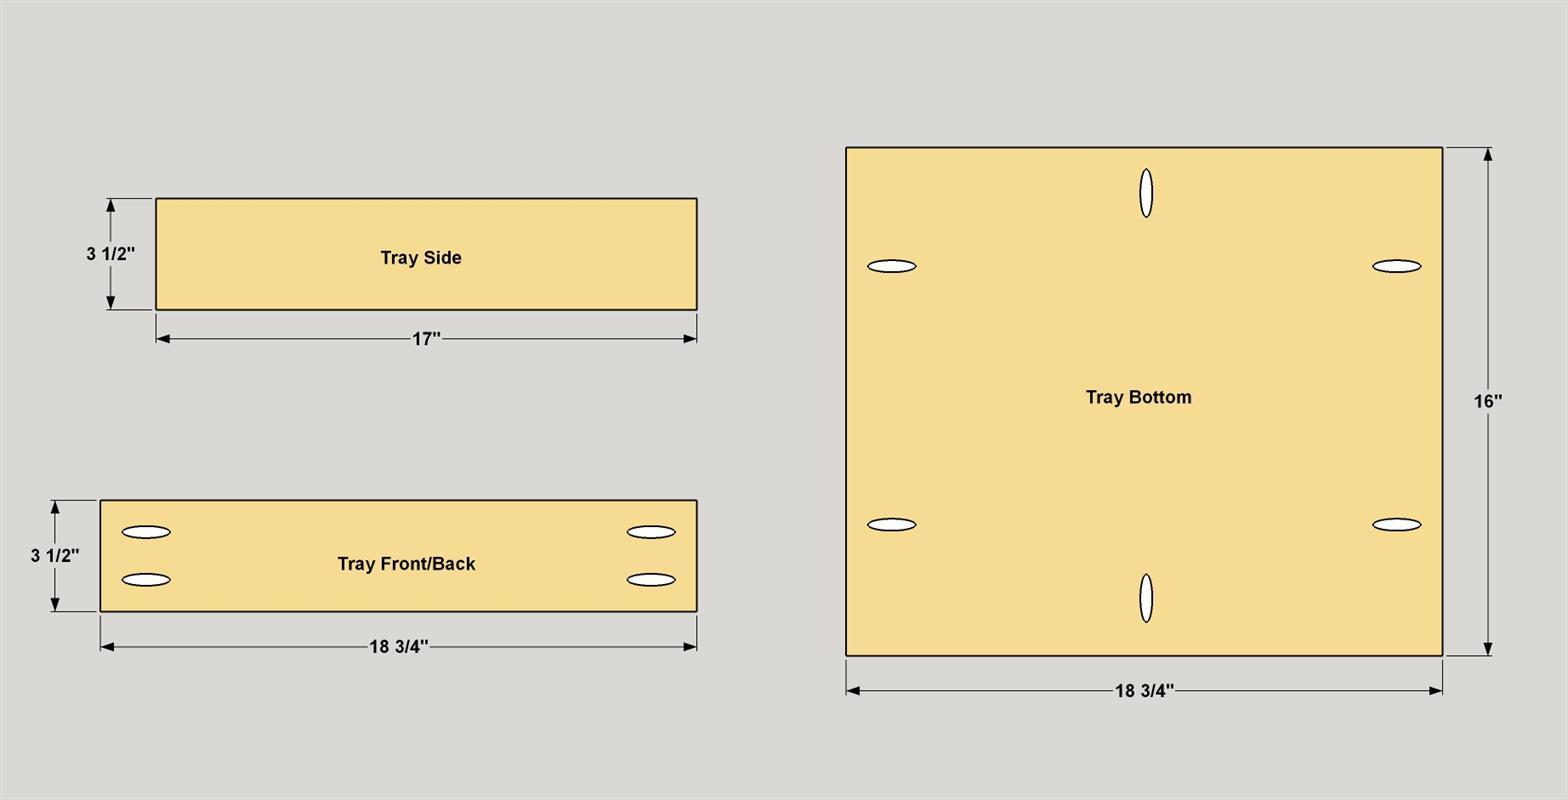
Make the Tray Parts
Cut a Tray Front, Tray Back, and two Tray Sides to size from 1/2"x4 (3 1/2" actual width) boards, as shown in the cutting diagram. Also cut a Tray Bottom from 1/2" plywood. The tray is assembled with pocket-hole screws. For it, we used the Kreg Micro-Pocket Drill Guide and screws. It creates smaller pocket holes, and uses smaller screws, making it perfect for 1/2"-thick material. Set up the Micro and bit in the jig for 1/2"-thick material, and then drill the pocket holes where shown.
-
Assemble the Tray
Assemble the stray with 1" coarse-thread panhead (Micro) pocket-hole screws, as shown.

-
Add Paint and Finish
With all of the parts done, you can apply finish to the blanket chest. On the outside, we used milk paint—in “Soldier Blue” in our case). Milk paint provides a durable, traditional finish that looks great. On the inside, you have a couple of choices. An oil or polyurethane finish on the inside can produce a smell that gets into the blankets stored inside. So, you can either leave the inside unfinished, or apply a coat of shellac. Shellac is natural, easy to apply, and dries quickly. After the paint and finish dry, you can mount the lid hinges to complete the chest. We used torsion hinges that also act as lid stays to hold the lid open and keep it from slamming shut. Click on the “Materials” tab to see more.