

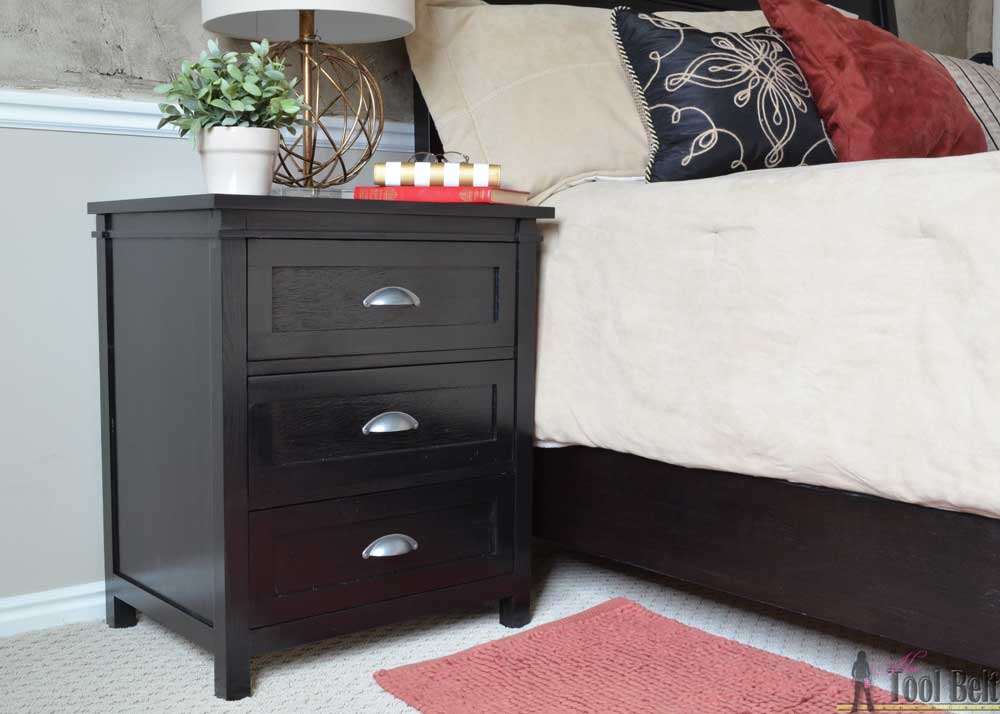
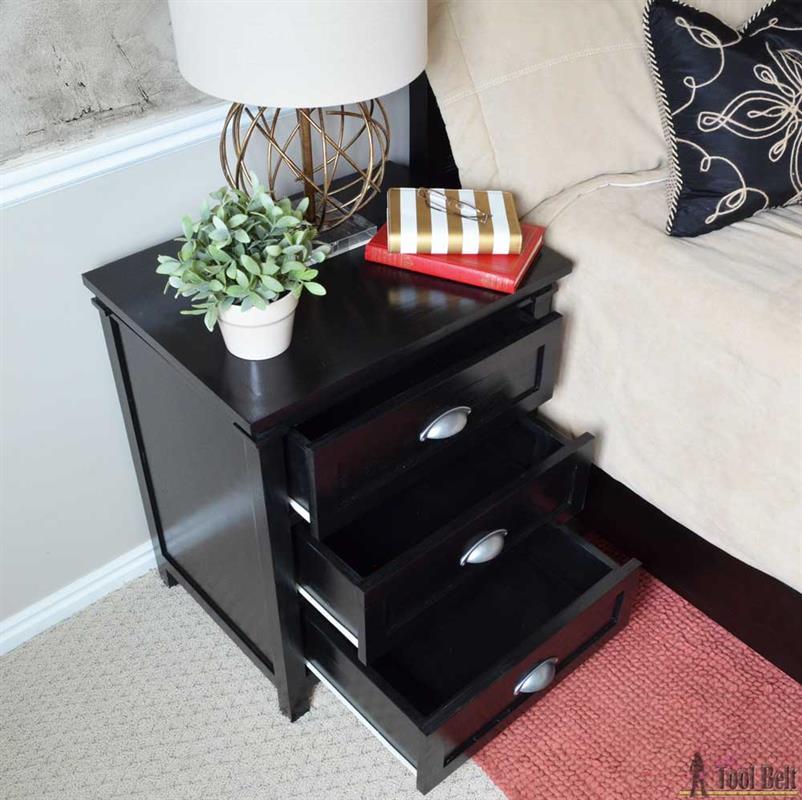
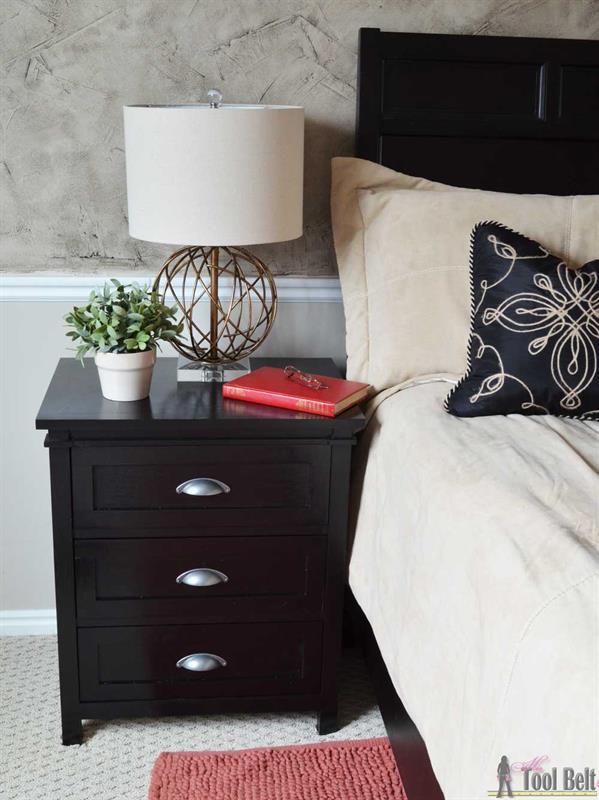
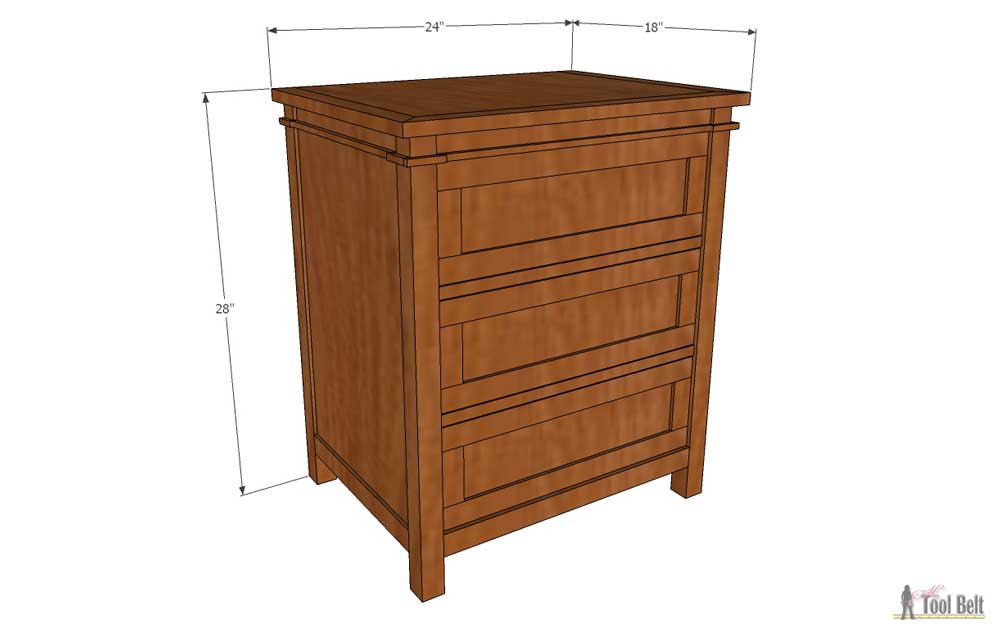


This three drawer nightstand will add lots of convenient storage to your bedside. This nightstand is on the taller side for nightstands and pairs well with tall beds.
Tools
Kreg Tools


Other Tools
-
Miter Saw

-
Table Saw
-
Tape Measure
-
Nail Gun
Materials
Wood Products
- 1 Plywood , 3/4" Thick , Full Sheet
- 1 Plywood , 1/2" Thick , Quarter Sheet
- 1 Plywood , 1/4" Thick , Quarter Sheet
- 2 Board , 2x2 , 96"
- 4 Board , 1x2 , 96"
- 2 Square dowel , 3/8" x 3/8" , 36"
Hardware & Supplies
- 3 Cup pulls
- 3 16" drawer runners
- 140 1 1/4" pocket hole screws
- 12 2 1/2" pocket hole screws
- 1 Sandpaper
- 1 Wood glue
- 1 Wood filler
- 1 Stain/paint
- 20 1" brad nails
- 30 1" pocket hole screws
Cut List & Parts
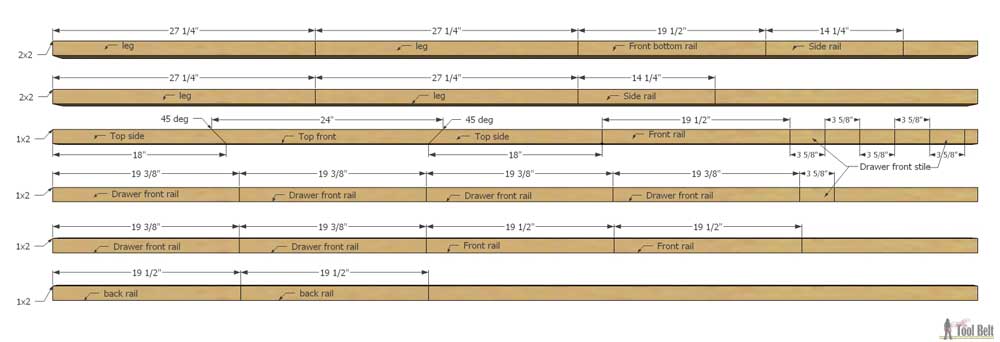
- 4 Leg , 1 1/2" x 1 1/2" x 27 1/4"
- 1 Front bottom rail , 1 1/2" x 1 1/2" x 19 1/2"
- 2 Side rail , 1 1/2" x 1 1/2" x 14 1/4"
- 2 Top side , 3/4" x 1 1/2" x 18" (45 deg miter on one end)
- 1 Top front , 3/4" x 1 1/2" x 24" (45 deg miter on both ends)
- 3 Front rail , 3/4" x 1 1/2" x 19 1/2"
- 6 Drawer front stile , 3/4" x 1 1/2" x 3 5/8"
- 6 Drawer front rail , 3/4" x 1 1/2" x 19 3/8"
- 2 Back rail , 3/4" x 1 1/2" x 19 1/2"
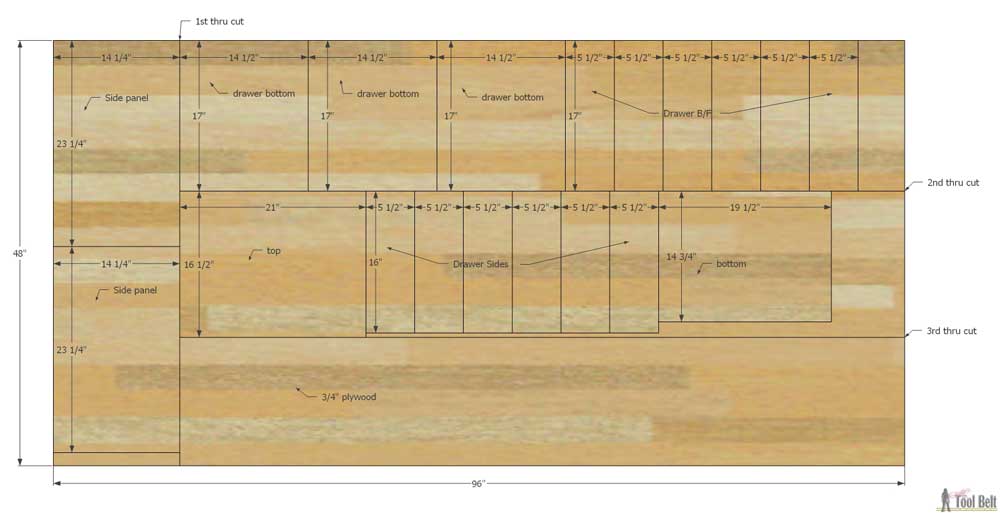
- 2 Side panel , 3/4" x 14 1/4" x 23 1/4"
- 3 Drawer bottom , 3/4" x 14 1/2" x 17"
- 1 Top , 3/4" x 16 1/2" x 21"
- 6 Drawer B/F , 3/4" x 5 1/2" x 17"
- 6 Drawer sides , 3/4" x 5 1/2" x 16"
- 1 Bottom , 3/4" x 14 3/4" x 19 1/2"
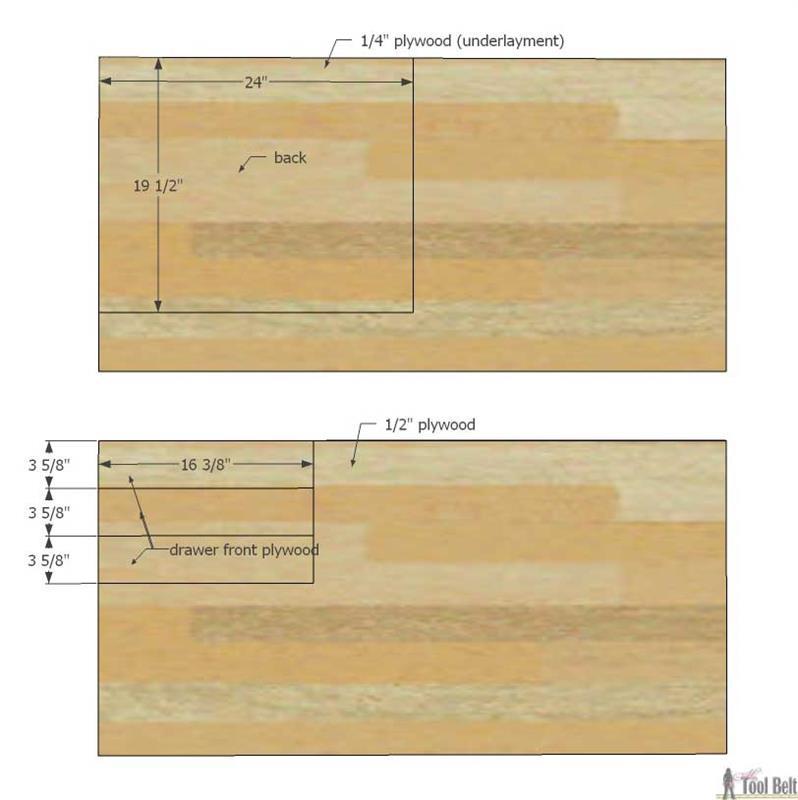
- 1 Back , 1/4" x 19 1/2" x 24"
- 3 Drawer front plywood , 1/2" x 3 5/8" x 16 3/8"
Directions
-
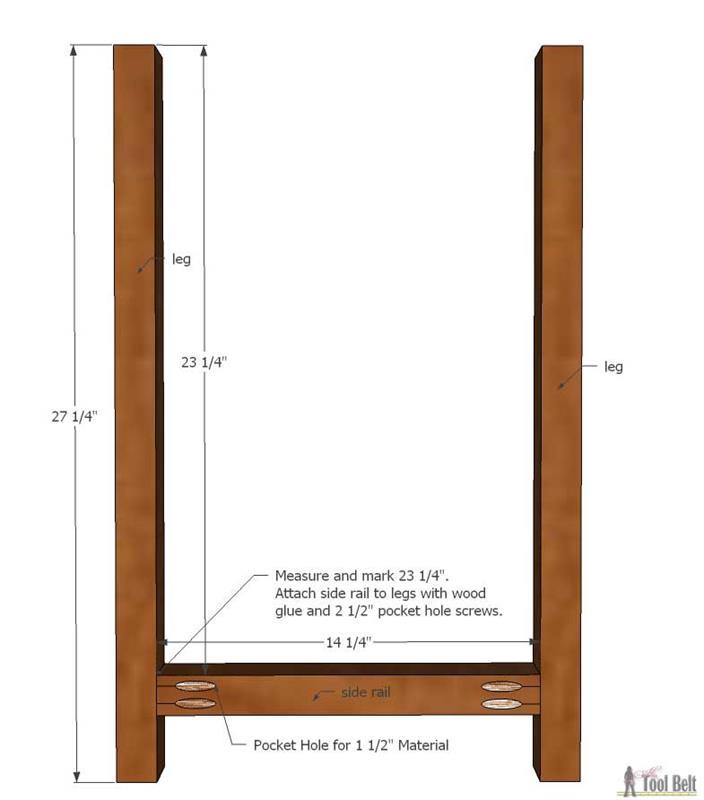
Assemble Legs
Drill pocket holes for 1 1/2" material in both ends of the side rail pieces. On the legs measure and mark 23 1/4" from the top. Use wood glue and 2 1/2" pocket hole screws to attach the side rail between two legs. Repeat for other leg set.
-
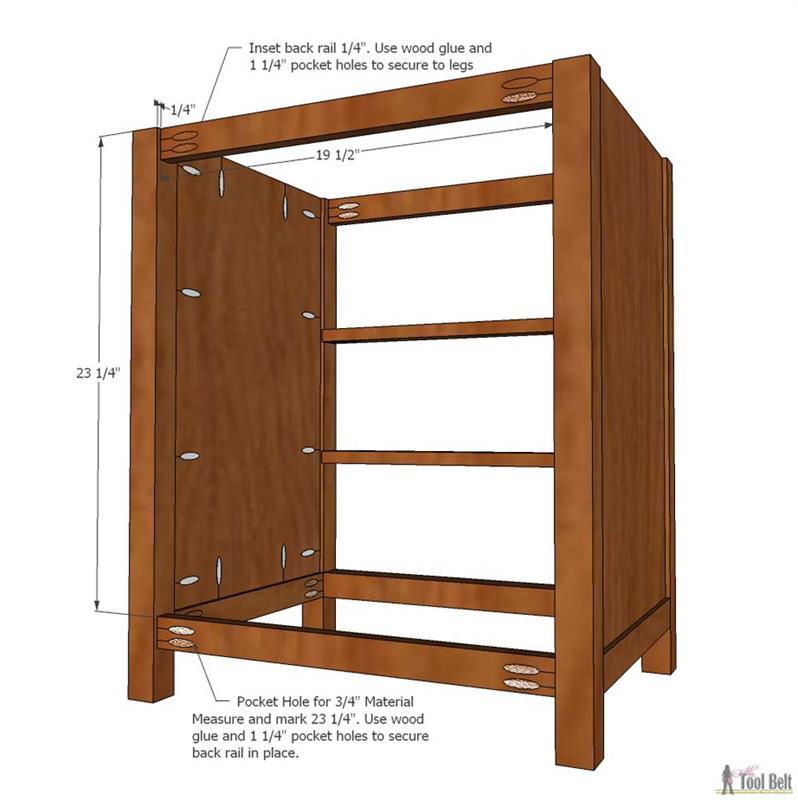
Add Side Panel
Drill pocket holes for 3/4" material around the inside of the side panel plywood. Inset the side panel plywood 1/4" from the outside face of the legs. Use wood glue and 1 1/4" pocket hole screws to secure the side panel plywood to the legs and side rail. Repeat for other side panel.
Note: it may be helpful to cut scrap pieces of wood 1/4" to help make the 1/4" offset during assembly.

-
Install Front Rails
Drill pocket holes for 1 1/2" material in both ends of the front bottom rail. Drill pocket holes for 3/4" material in both ends of the front rails.
On the front legs, measure and mark 8 1/4", 15 3/4" and 23 1/4" down from the top. Attach the front bottom rail to a front leg at the 23 1/4" mark with wood glue and 2 1/2" pocket hole screws, make it flush with the leg front. For the front rails inset them 1/4" from the front of the legs and attach as shown with wood glue and 1 1/4" pocket hole screws.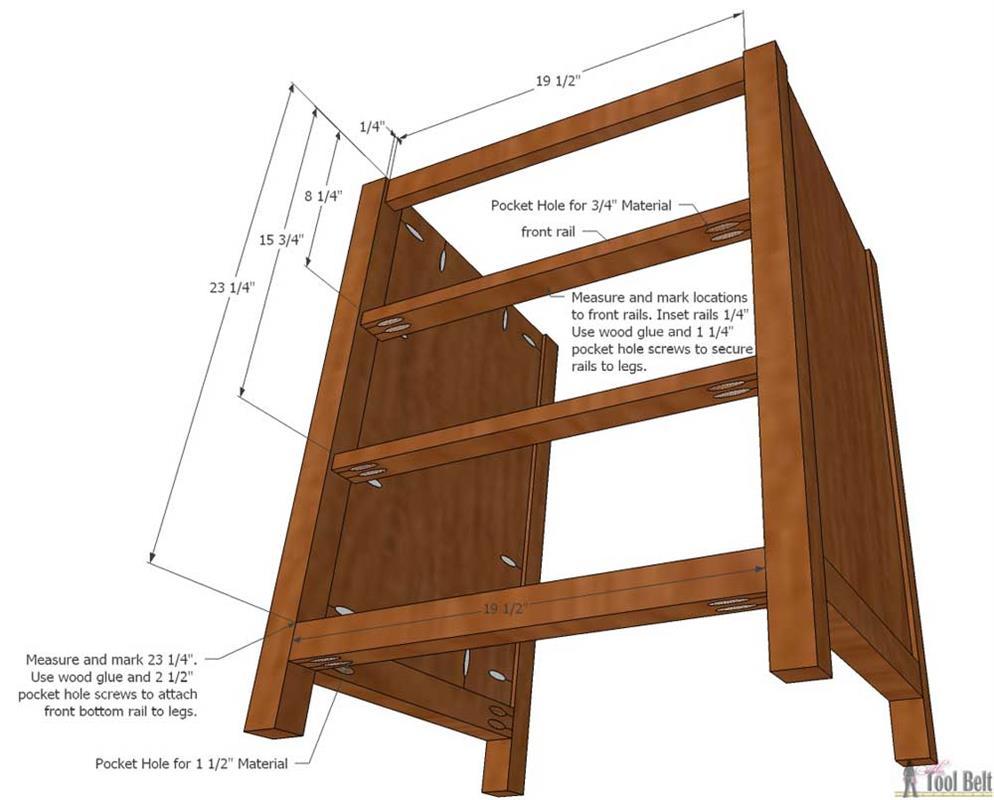
-
Install Back Rails
Drill pocket holes for 3/4" material in both ends of the back rails. Measure and mark 23 1/4" from the top of the back legs. Attach a back rail flush with the top of the legs and inset 1/4", attach another back rail at 23 1/4" down and inset 1/4". Use wood glue and 1 1/4" pocket hole screws to attach the back rails.
-
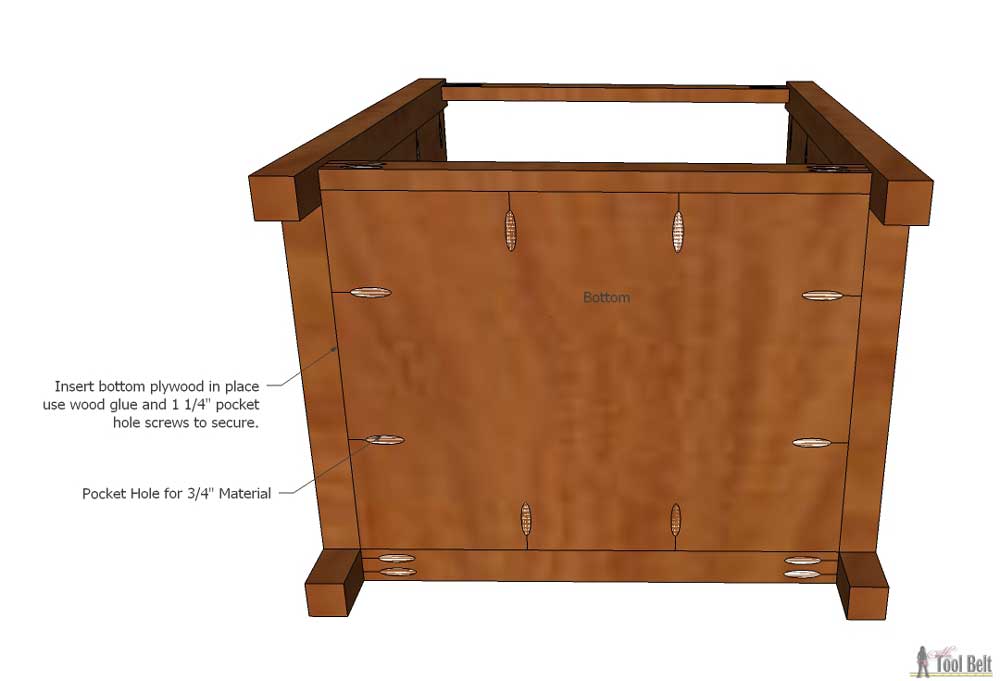
Attach Bottom
Drill pocket holes for 3/4" material around the bottom plywood piece. Place the bottom plywood piece flush with the bottom/side rails. Secure it in place with 1 1/4" pocket hole screws.
-
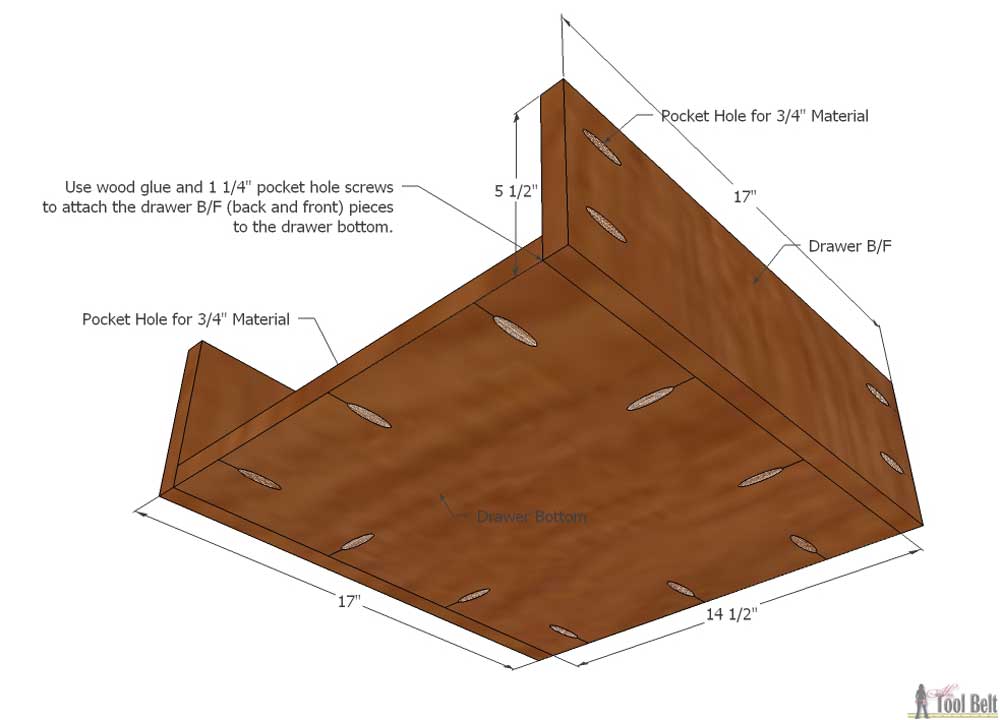
Drawer Assembly 1
Drill pocket holes for 3/4" material around the drawer bottom plywood pieces and also both ends of the drawer b/f (back and front) pieces. Use wood glue and 1 1/4" pocket hole screws to attach the drawer bottom to a drawer b/f piece on the both 17" sides. The drawer back and front pieces should be flush with the drawer bottom. Repeat for 3 drawers.
-
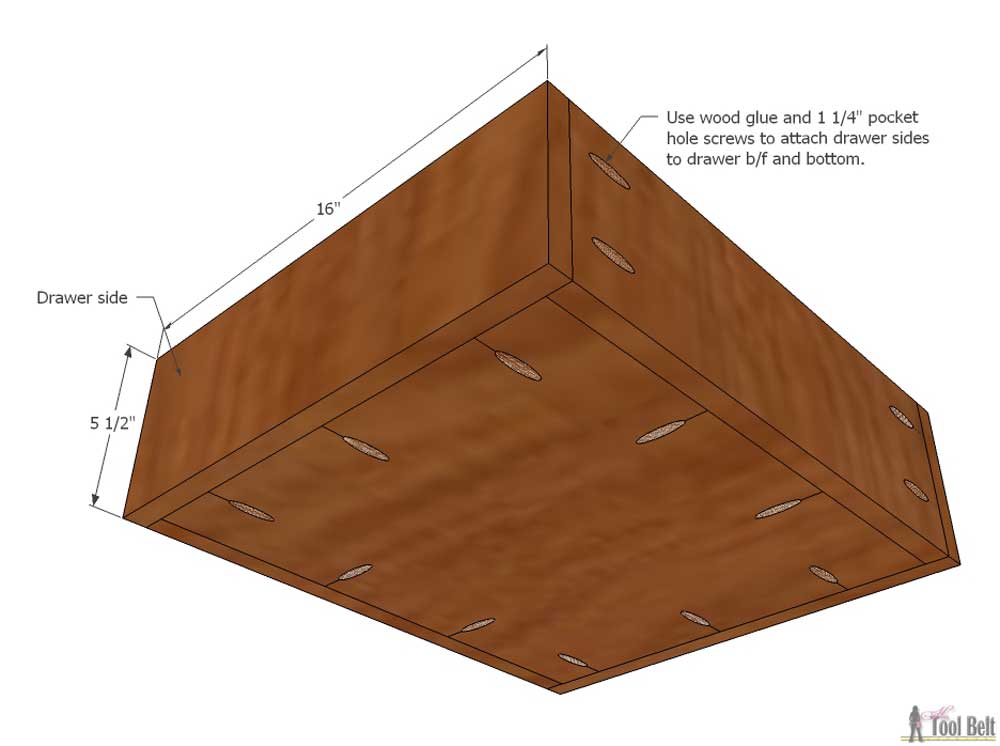
Drawer Assembly 2
Attach drawer sides to the drawer bottom and drawer b/f with wood glue and 1 1/4" pocket hole screws. Repeat for 3 drawers.
-
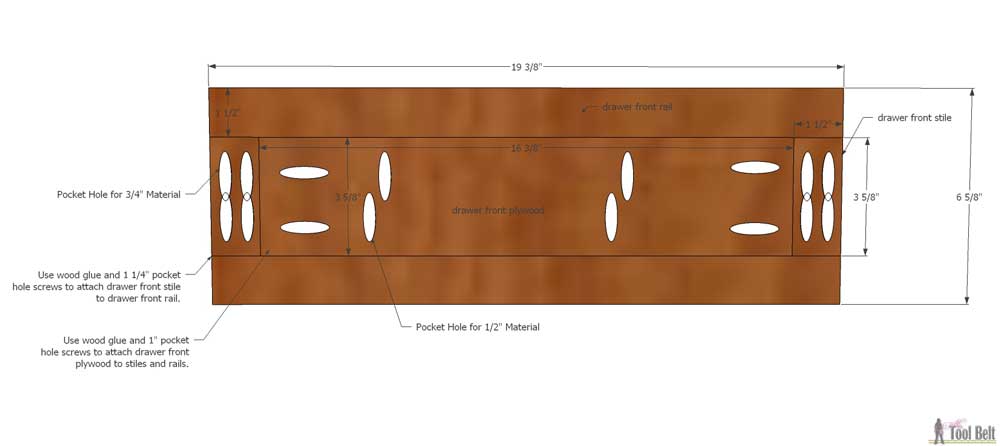
Drawer Front Assembly
Drill pocket holes for 3/4" material in both ends of the drawer front stiles. Drill pocket holes for 1/2" material in the drawer front plywood. Attach a drawer front stile to a drawer front rail with wood glue and 1 1/4" pocket hole screws. Attach a drawer front plywood to the drawer front stile and rail with wood glue and 1" pocket hole screws, the plywood needs to be flush on the back and inset 1/4" on the front. Then attach another stile to the plywood end and rail and finally the last drawer front rail. Repeat for 3 drawer fronts.
-
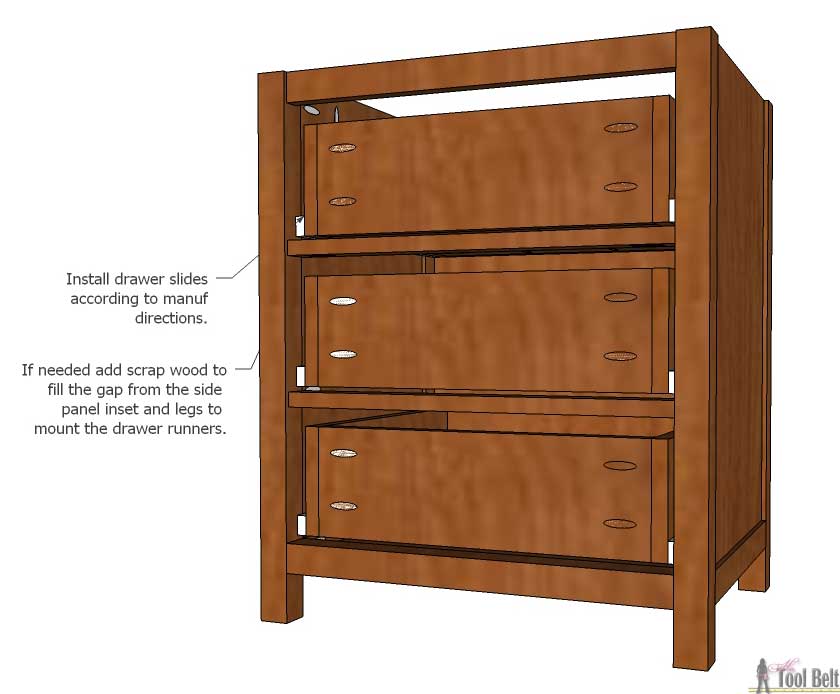
Install Drawer Runners
Install the 3 drawer runner sets on the nightstand according to manufactures directions. The drawer runners need to start about 1" in from the nightstand front (3/4" for the drawer front and 1/4" inset drawers). If needed add scrap wood (shims) to fill the gap from the side panel inset and legs to mount the drawer runners. Also if your plywood isn't 3/4" thick, you may also need to add shims to make up the difference.
-
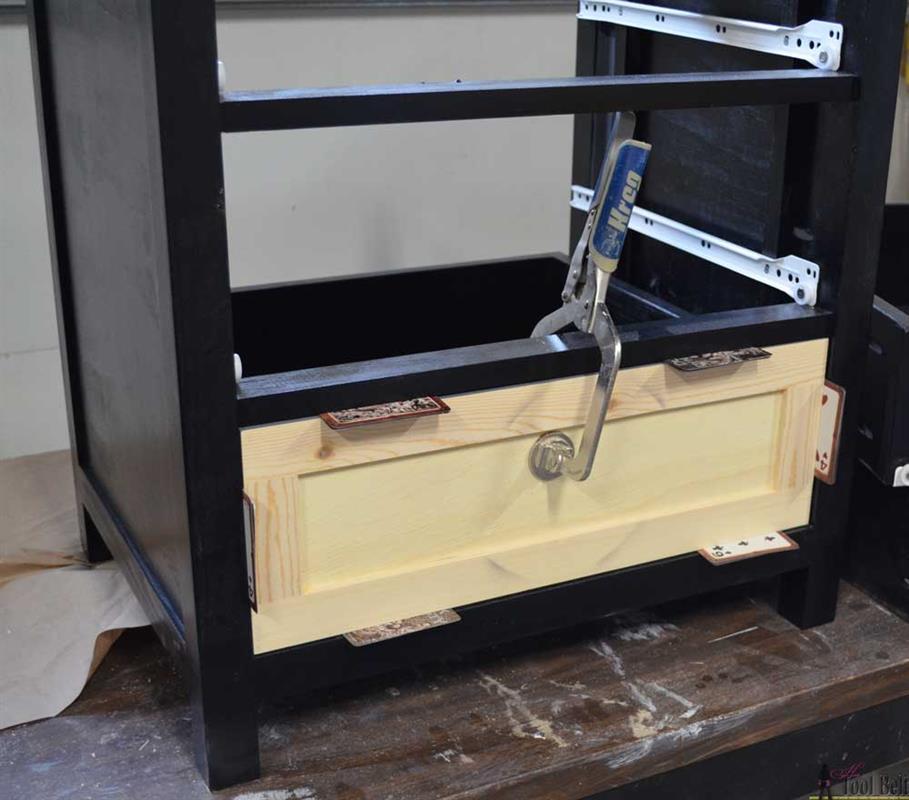
Install Drawer Fronts
Place a drawer on its drawer runners. Clamp a drawer front onto the drawer and evenly space the drawer front with the legs and front rails, about 1/16" gap around. Use a couple of 1" screws and attach the drawer front to the drawer from the back (through the drawer into the drawer front.) Repeat for each drawer.
-
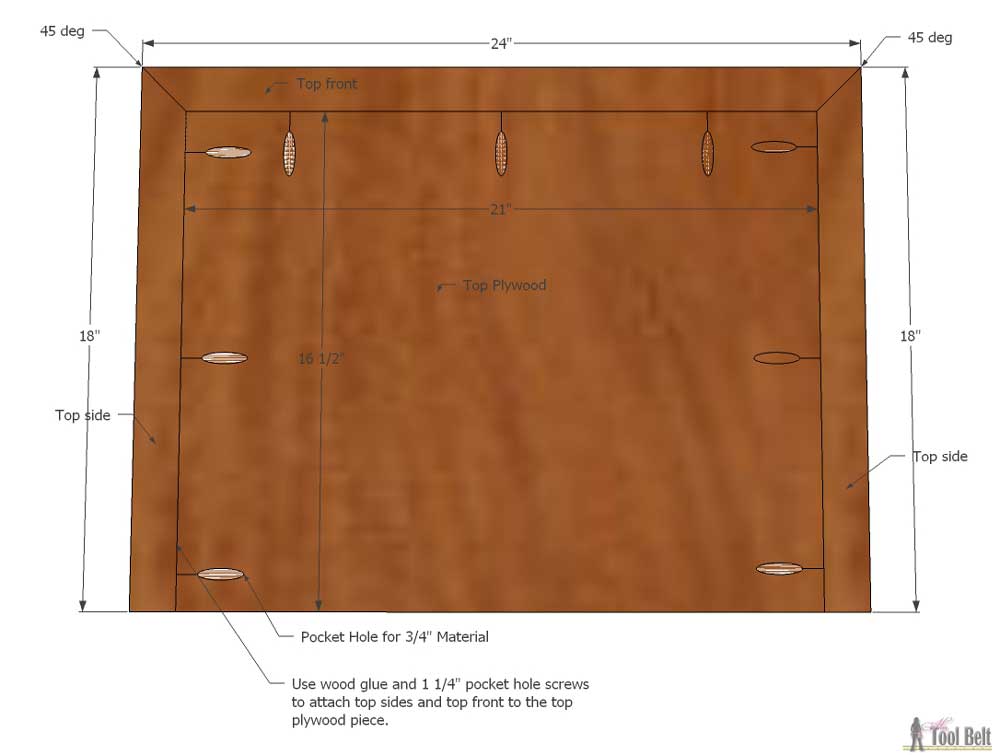
Assemble Top
Drill pocket holes for 3/4" material in 3 sides of the top plywood. Trim the top front, and top side pieces to fit the top plywood. Attach the top front and side pieces with wood glue and 1 1/4" pocket hole screws. Place the top on the nightstand, the back should be flush with the back legs and centered side to side. Use the pocket holes drilled in the side panel plywood to attach with 1 1/4" pocket hole screws.
-
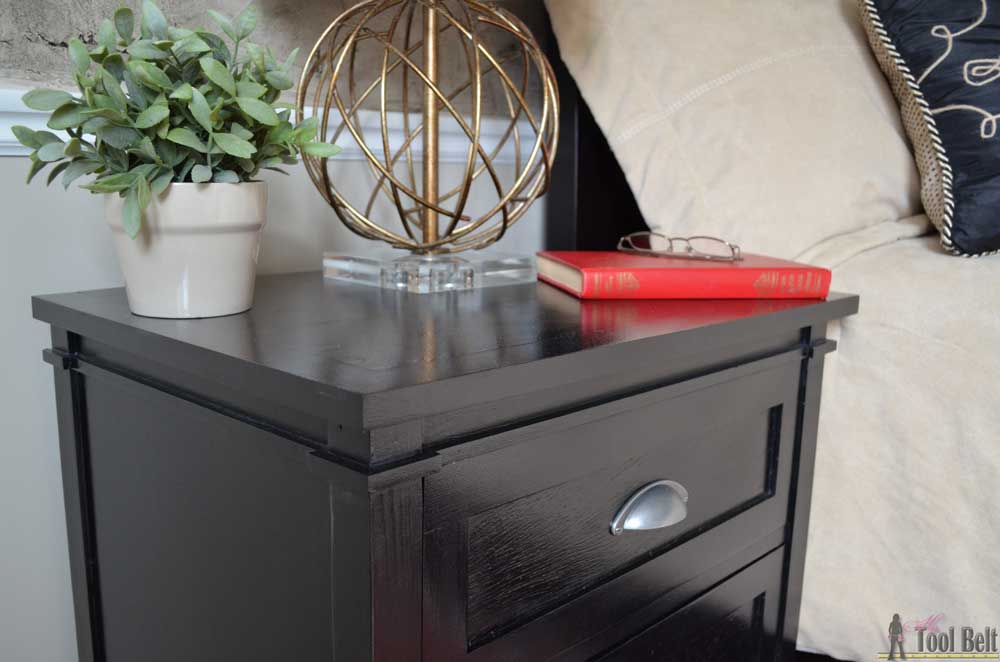
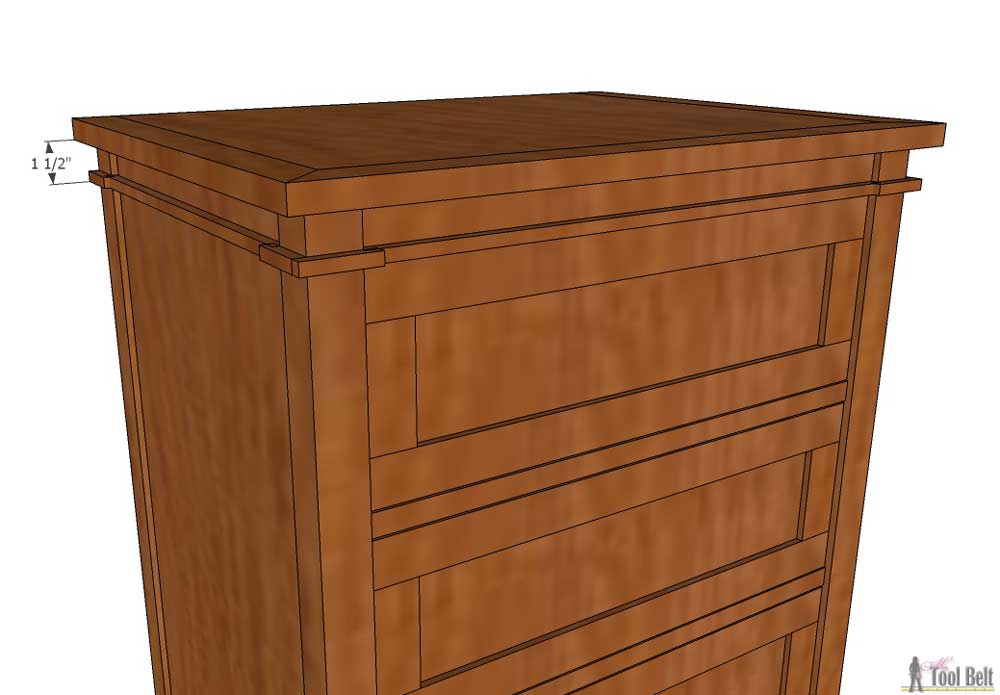
Add Trim - optional
Cut 3/8" square dowel to fit the perimeter of the nightstand. Attach the dowel with wood glue and 1" brad nails. I put the bottom of the trim about 1 1/2" from the nightstand top.
-
Sand and Finish
Sand the nightstand starting with 80 grit and finishing with 120-150 grit sandpaper in the direction of the grain. Apply paint or stain as desired. For this nightstand I sprayed Rustoleum paint primer first and allowed that to dry. I rolled on 2 coats of Rustoleum black gloss paint with a foam roller and brush as needed. Add drawer pulls as desired.