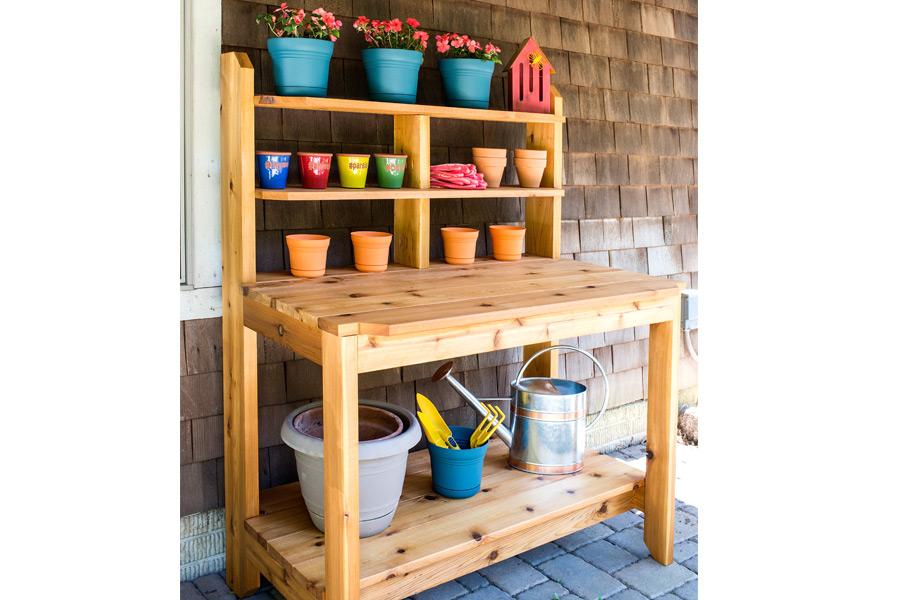
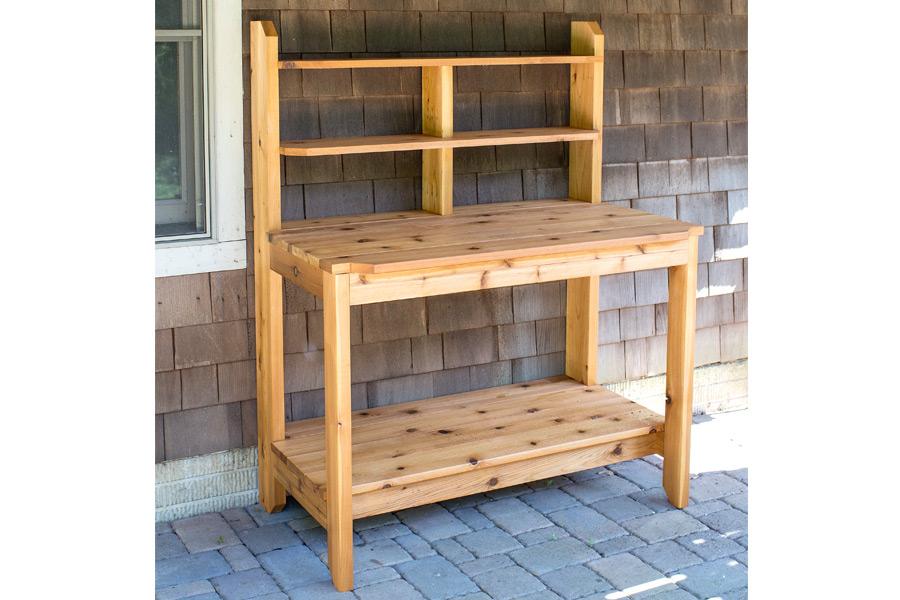
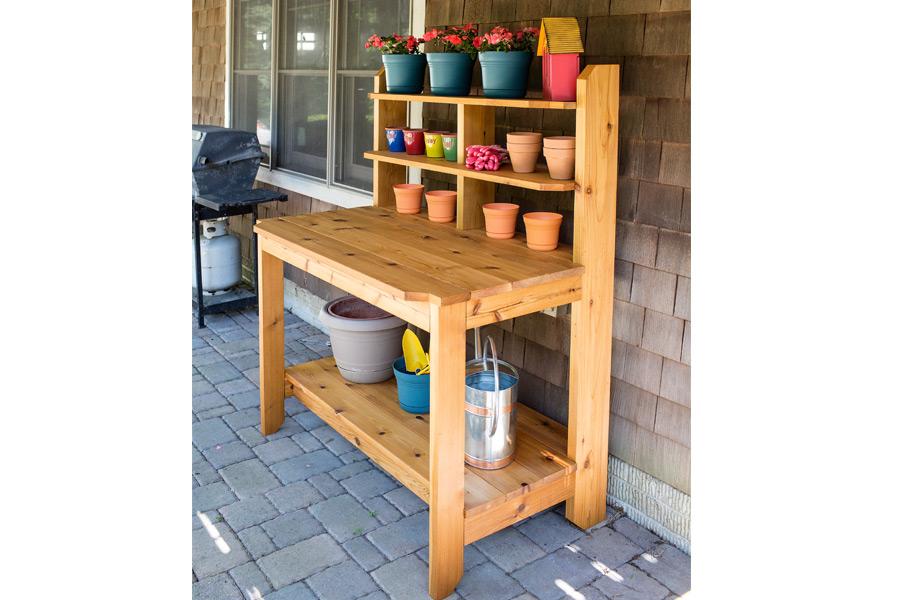
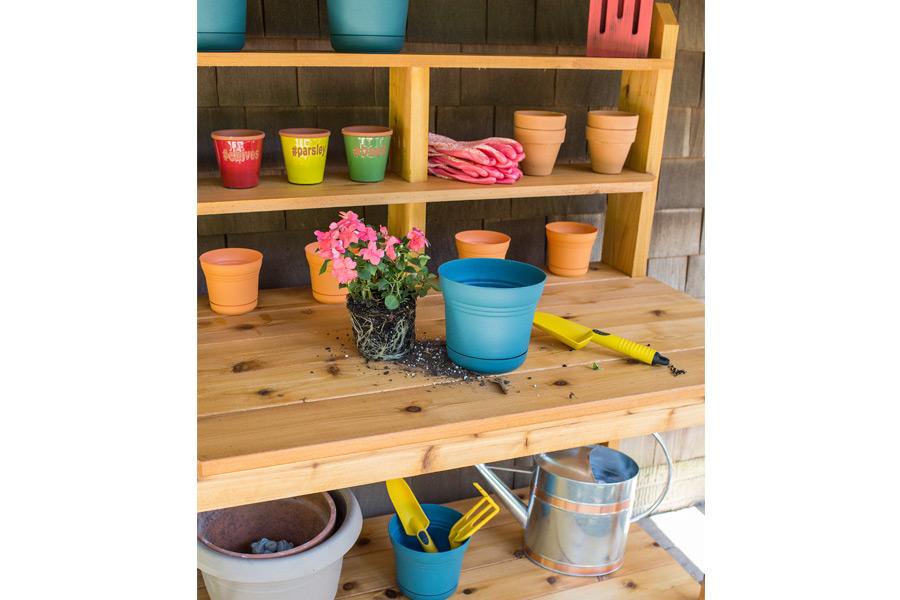


Create a great place for potting plants and gardening chores by building this tough, good-looking potting bench. This one is built from cedar to hold up to years of use outdoors. It looks so good that you might decide to use it as a serving station on your deck or patio, too.
Tools
Kreg Tools


Other Tools
-
miter saw

-
tape measure
Materials
Wood Products
- 5 Cedar board , 2x4 x 96"
- 2 Cedar board , 2x6 x 96"
- 1 Cedar board , 1x10 x 96"
- 5 Cedar board , 5/4x6 x 96"
Hardware & Supplies
- 45 2 1/2" Kreg Blue-Kote™ Pocket-Hole Screws
- 75 1 1/2" Kreg Blue-Kote™ Pocket-Hole Screws
- 12 1 1/4" Kreg Blue-Kote™ Pocket-Hole Screws
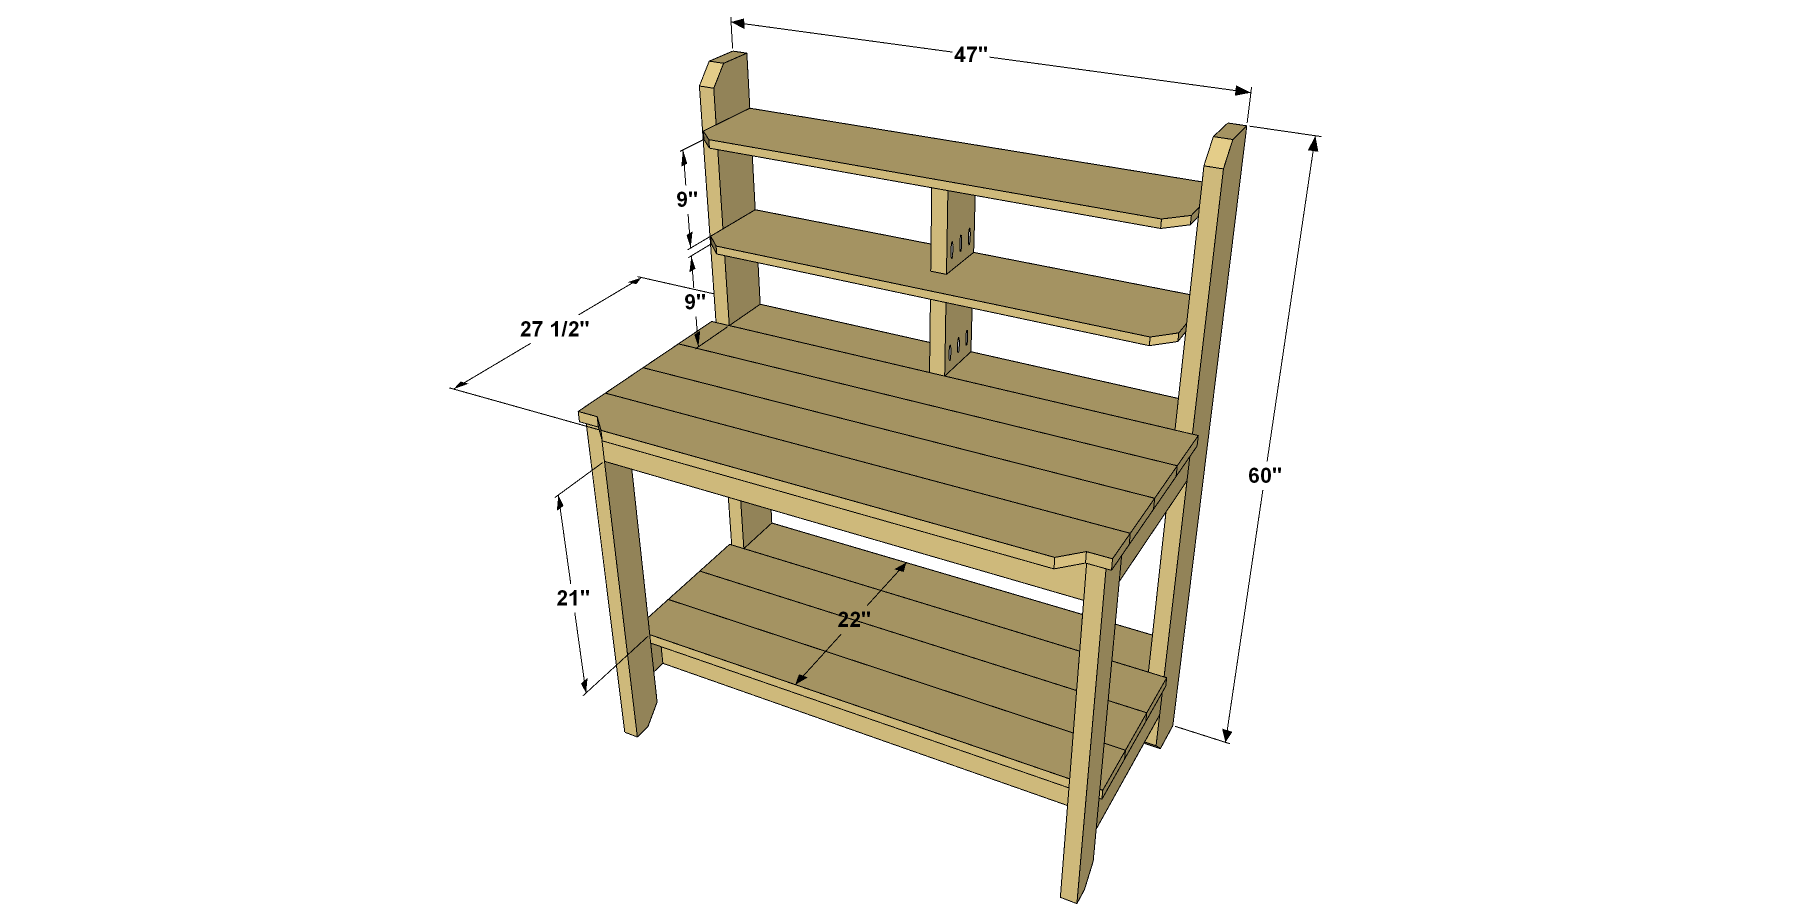
Cut List & Parts
- 2 Front Leg , 1 1/2" x 3 1/2" x 34 1/2"
- 2 Back Leg , 1 1/2" x 5 1/2" x 60"
- 2 Top End Rail , 1 1/2" x 3 1/2" x 16 1/2"
- 2 Bottom End Rail , 1 1/2" x 3 1/2" x 16 1/2"
- 4 Top/Bottom Side Rails , 1 1/2" x 3 1/2" x 44"
- 2 Top Stretcher , 1 1/2" x 3 1/2" x 22 1/2"
- 2 Bottom Stretcher , 1 1/2" x 3 1/2" x 17 1/2"
- 3 Long Top Slat , 1" x 5 1/2" x 48"
- 1 Short Top Slat , 1" x 5 1/2" x 44"
- 1 Front Top Slat , 1" x 5 1/2" x 48"
- 2 Riser , 1 1/2" x 5 1/2" x 9"
- 2 Shelf , 3/4" x 9 1/4" x 44"
Directions
-
Make the Legs
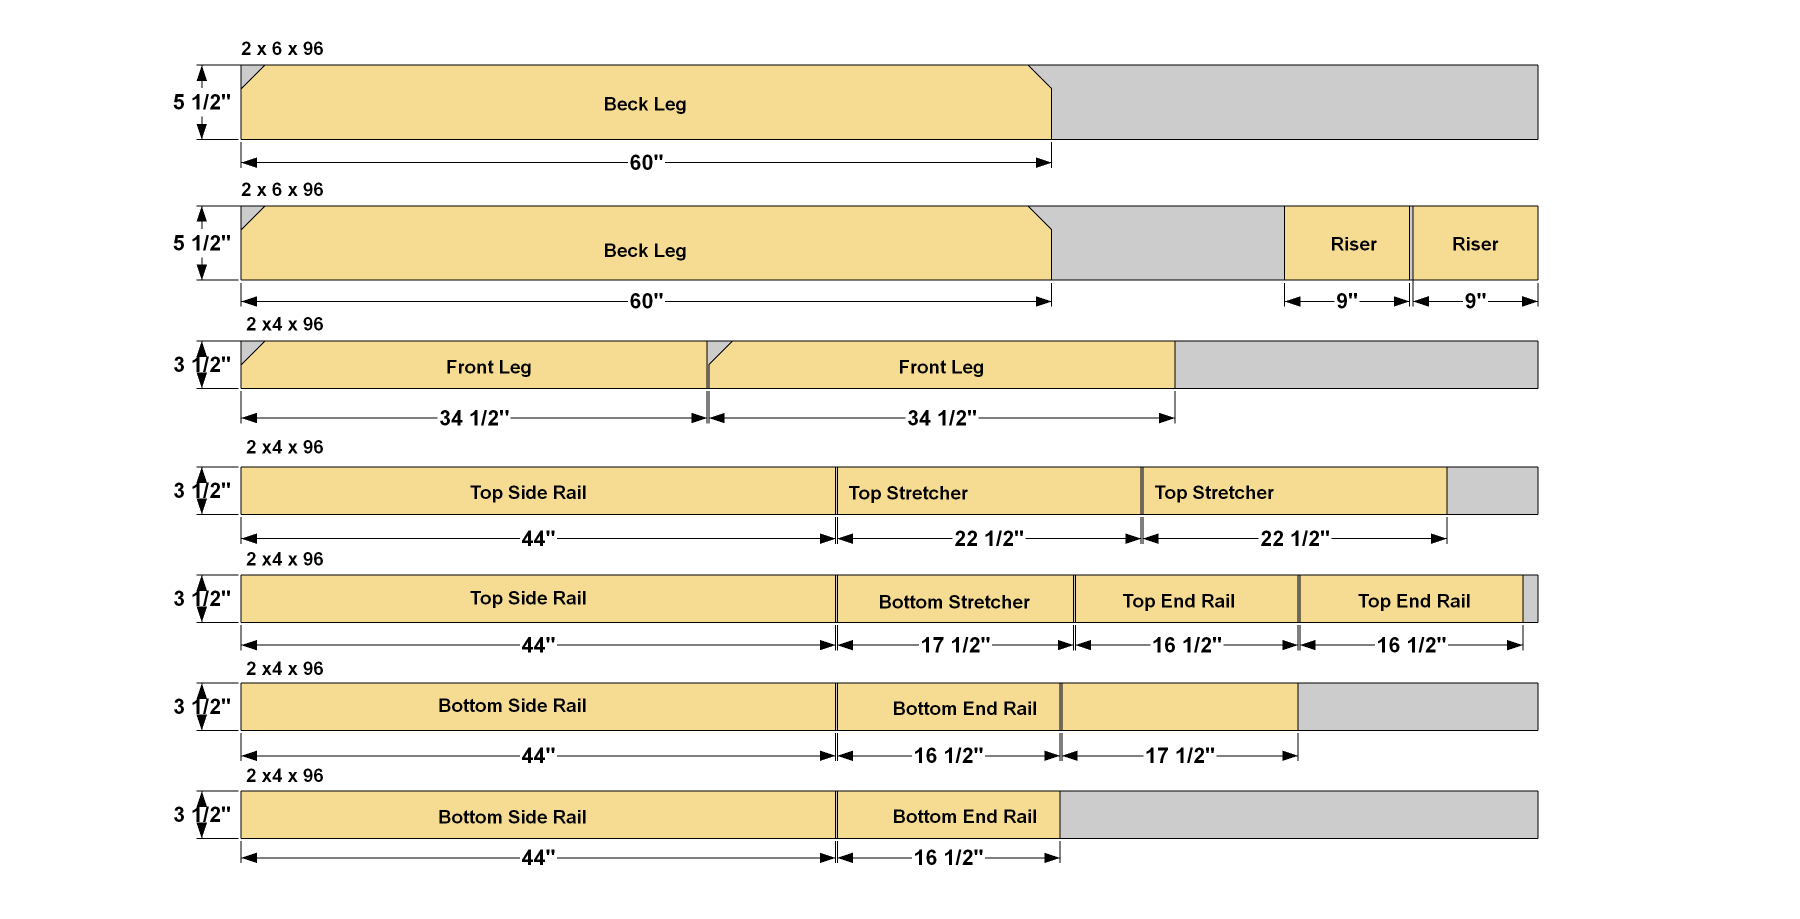
Cut two Front Legs to length from a 2x4 board (we used cedar for this bench), and cut two Back Legs to length from a 2x6 board, as shown in the cutting diagram. Then, using a miter saw of jig saw, cut the angled ends on each Leg, as shown.

-
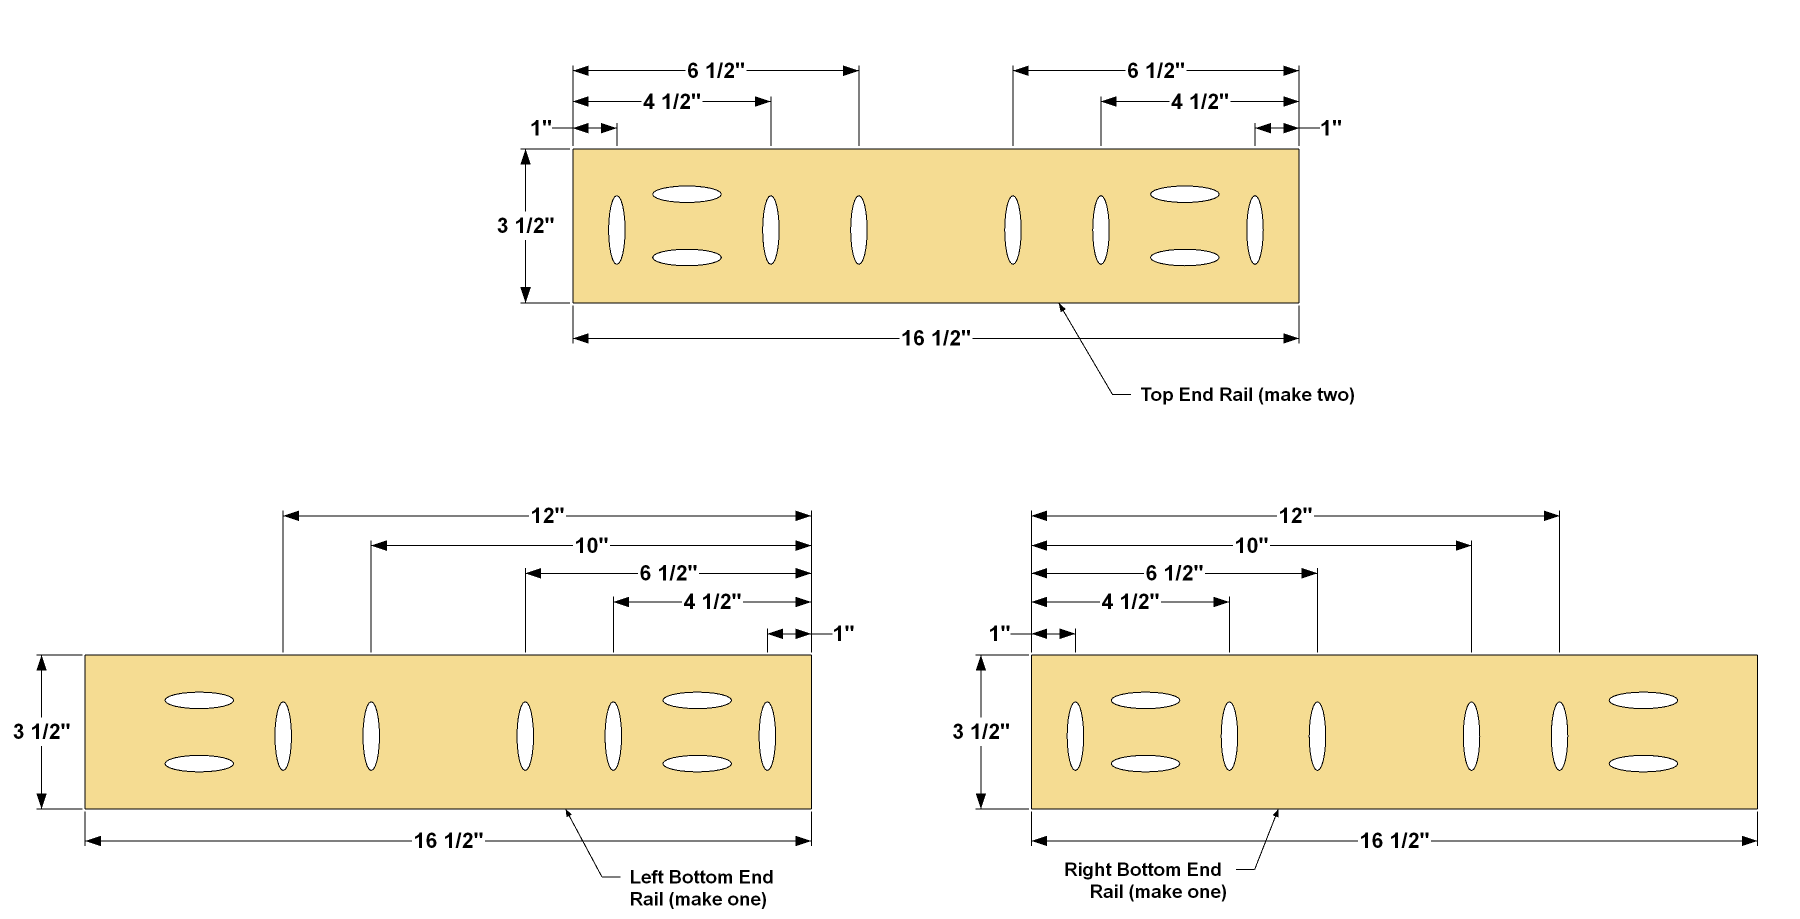
Make the End Rails
Cut four End Rails to length from 2x4 boards, as shown in the cutting diagram. With your Kreg® Pocket-Hole Jig set up for 1 1/2"-thck material, drill pocket holes in the ends of all four pieces, as shown. Now change your jig and bit setup to 1" material. Then drill holes along the edge of two pieces to make a pair of Top End Rails. Then drill pocket holes along the edge of the other two pieces to create Right and Left Bottom End Rails, as shown. Note that on the Bottom End Rails, the pocket-hole spacing id different.
-
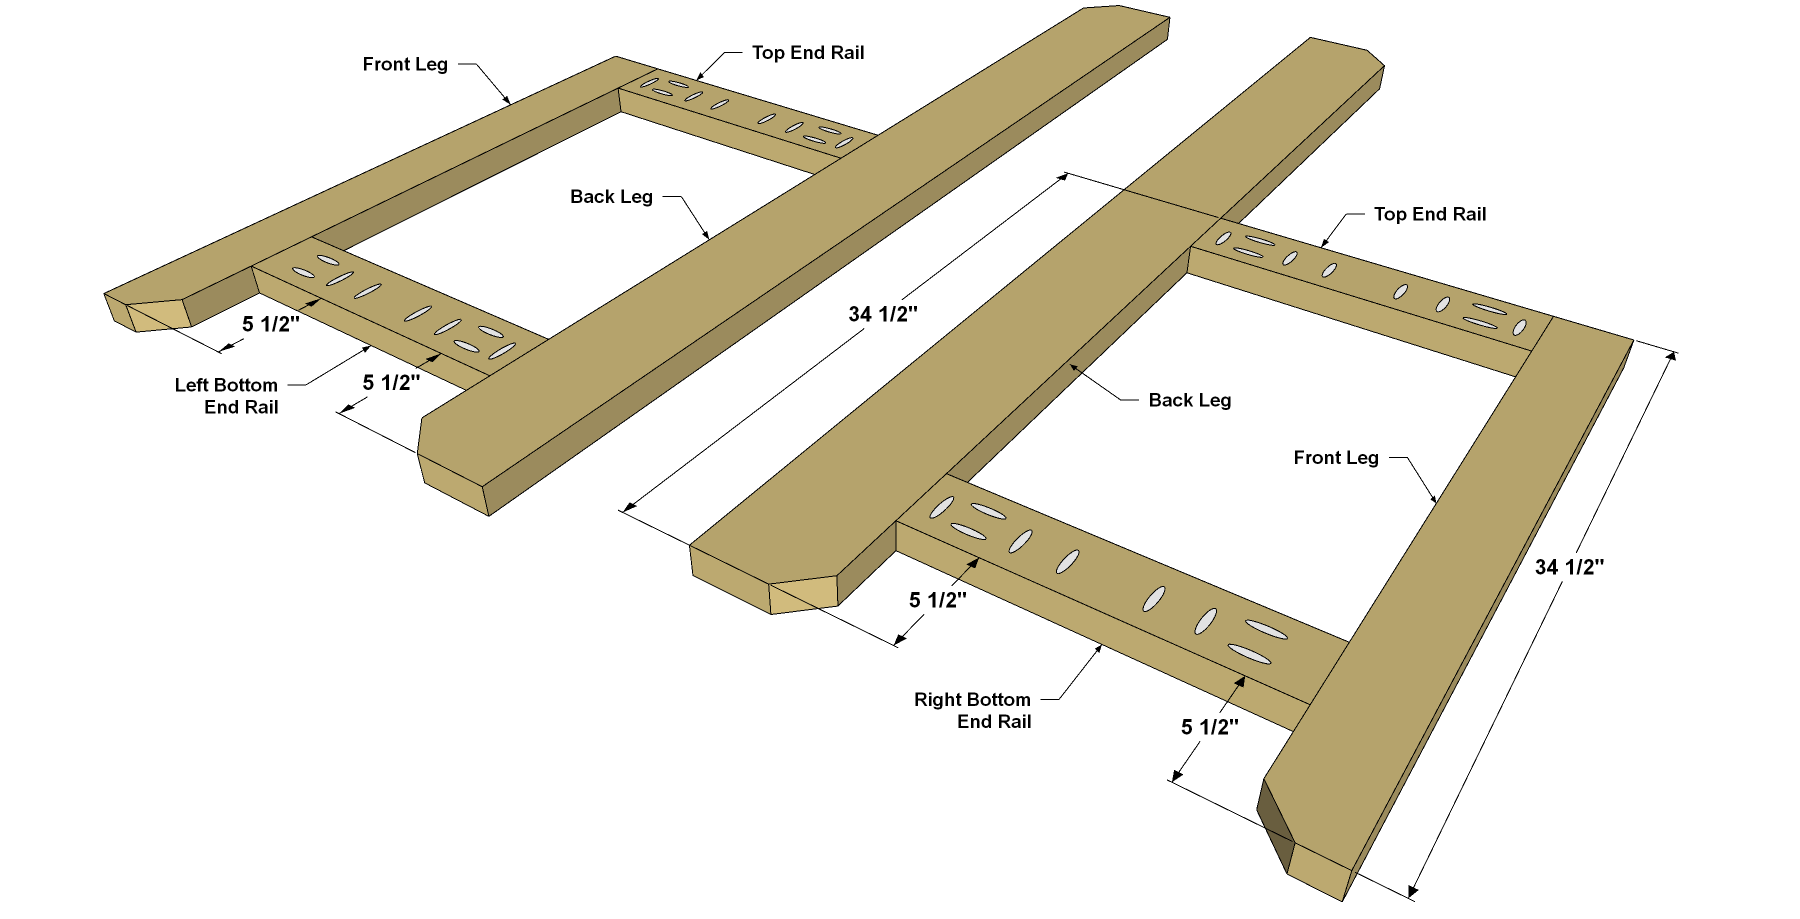
Create the Ends
Now you can attach the End Rails to the Legs using 2 1/2" Kreg Blue-Kote™ Pocket-Hole Screws. Make sure you have all of the End Rails in the proper positions, and that the pocket holes are all oriented in the same direction.
-
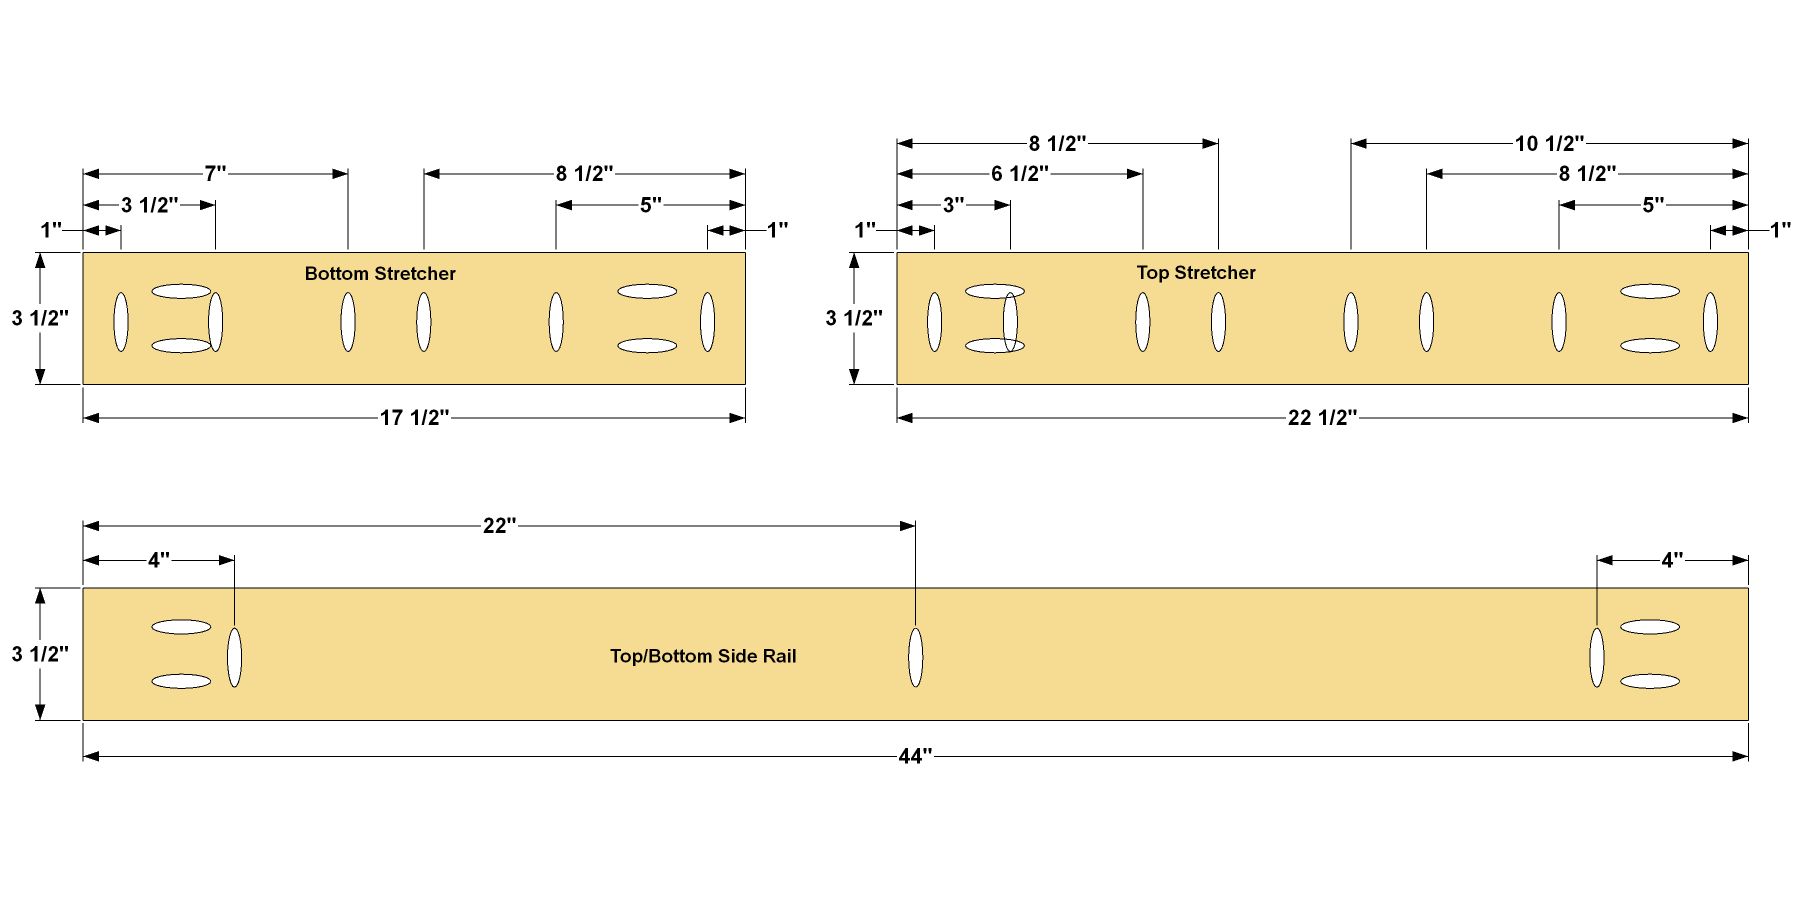
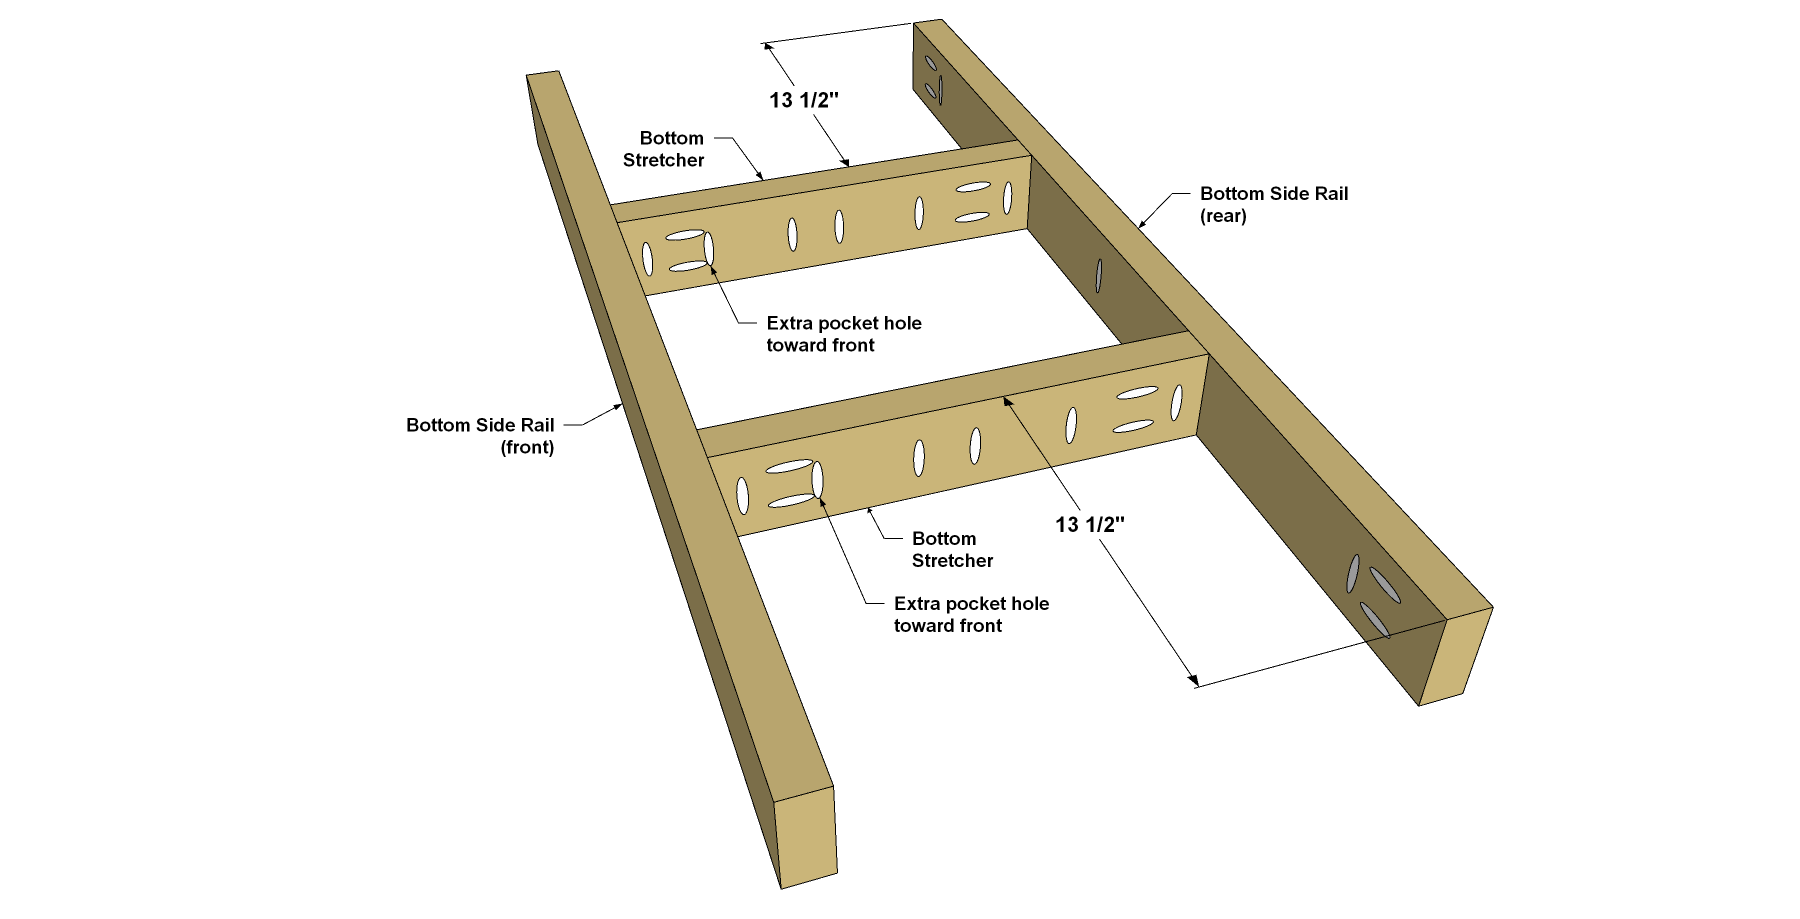
Make Side Rails and Stretchers
Cut four Side Rails, two Top Stretchers, and two Bottom Stretchers to length from 2x4 boards, as shown in the cutting diagram. With your pocket hole jig set up for 1 1/2" material, drill pocket holes in the ends of all of the pieces, as shown. Now change your jig and bit setup to 1" material. Then drill holes along the edge of all the pieces, as shown.
-
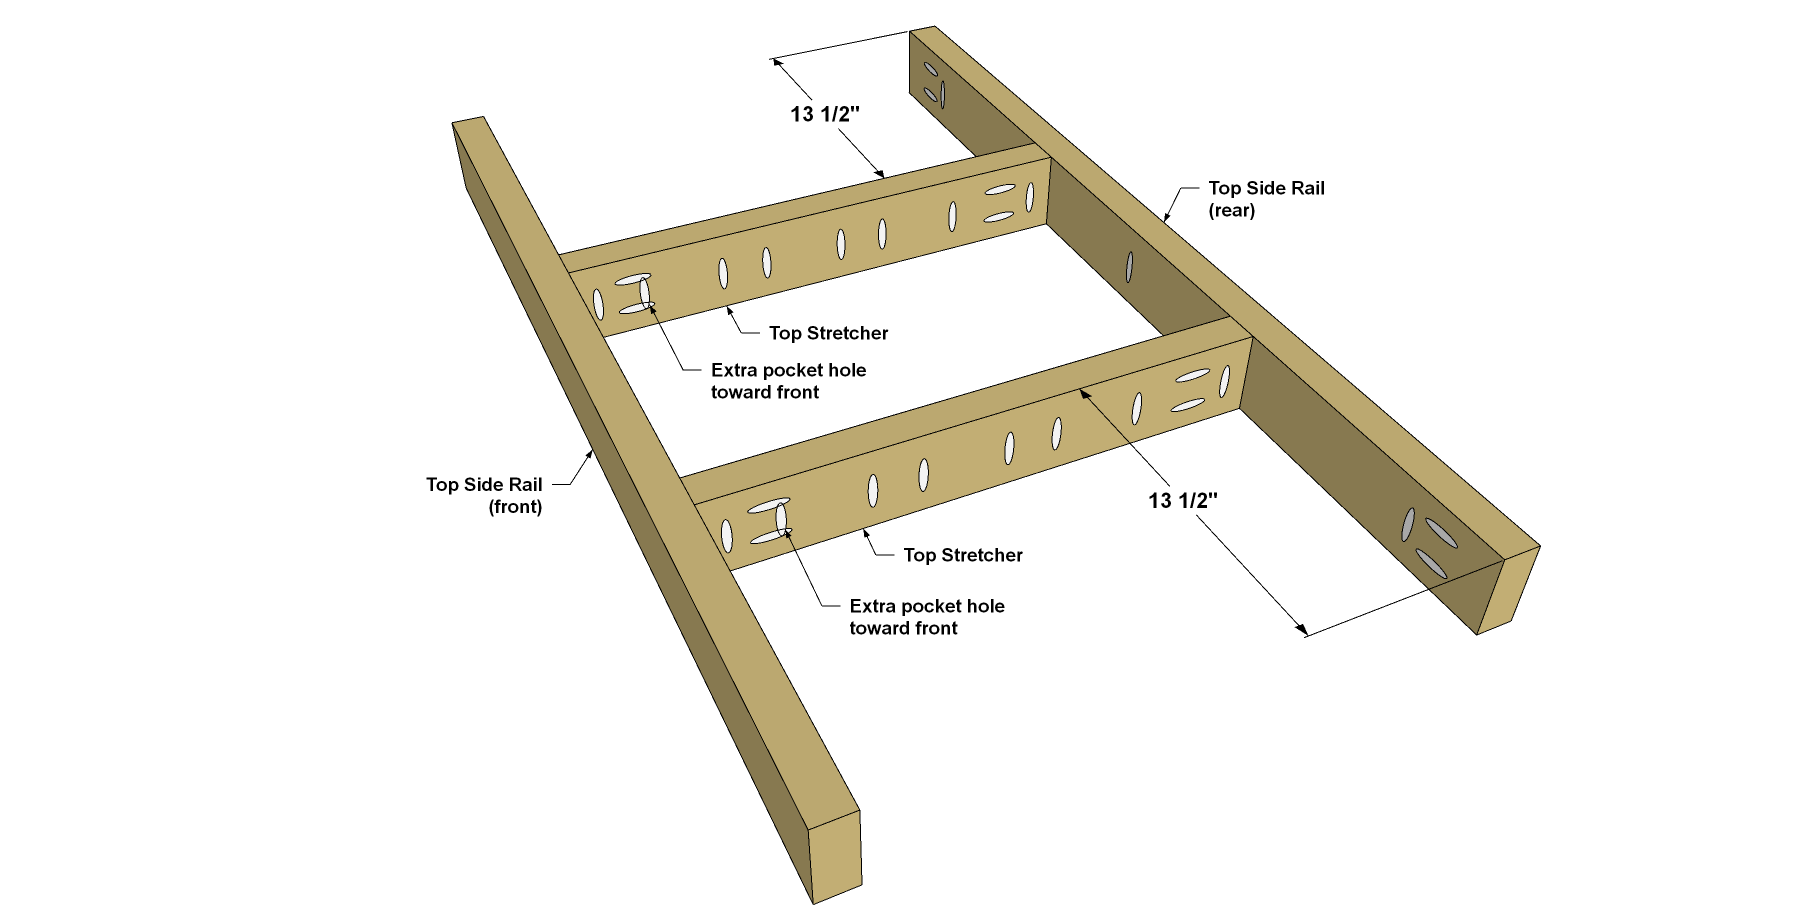
Assemble the Top Rails and Stretchers
Now you can attach the Top Stretchers to the Top Side Rails using 2 1/2" Kreg Blue-Kote™ Pocket-Hole Screws. Make sure that the pocket holes are all oriented in the same direction.
-
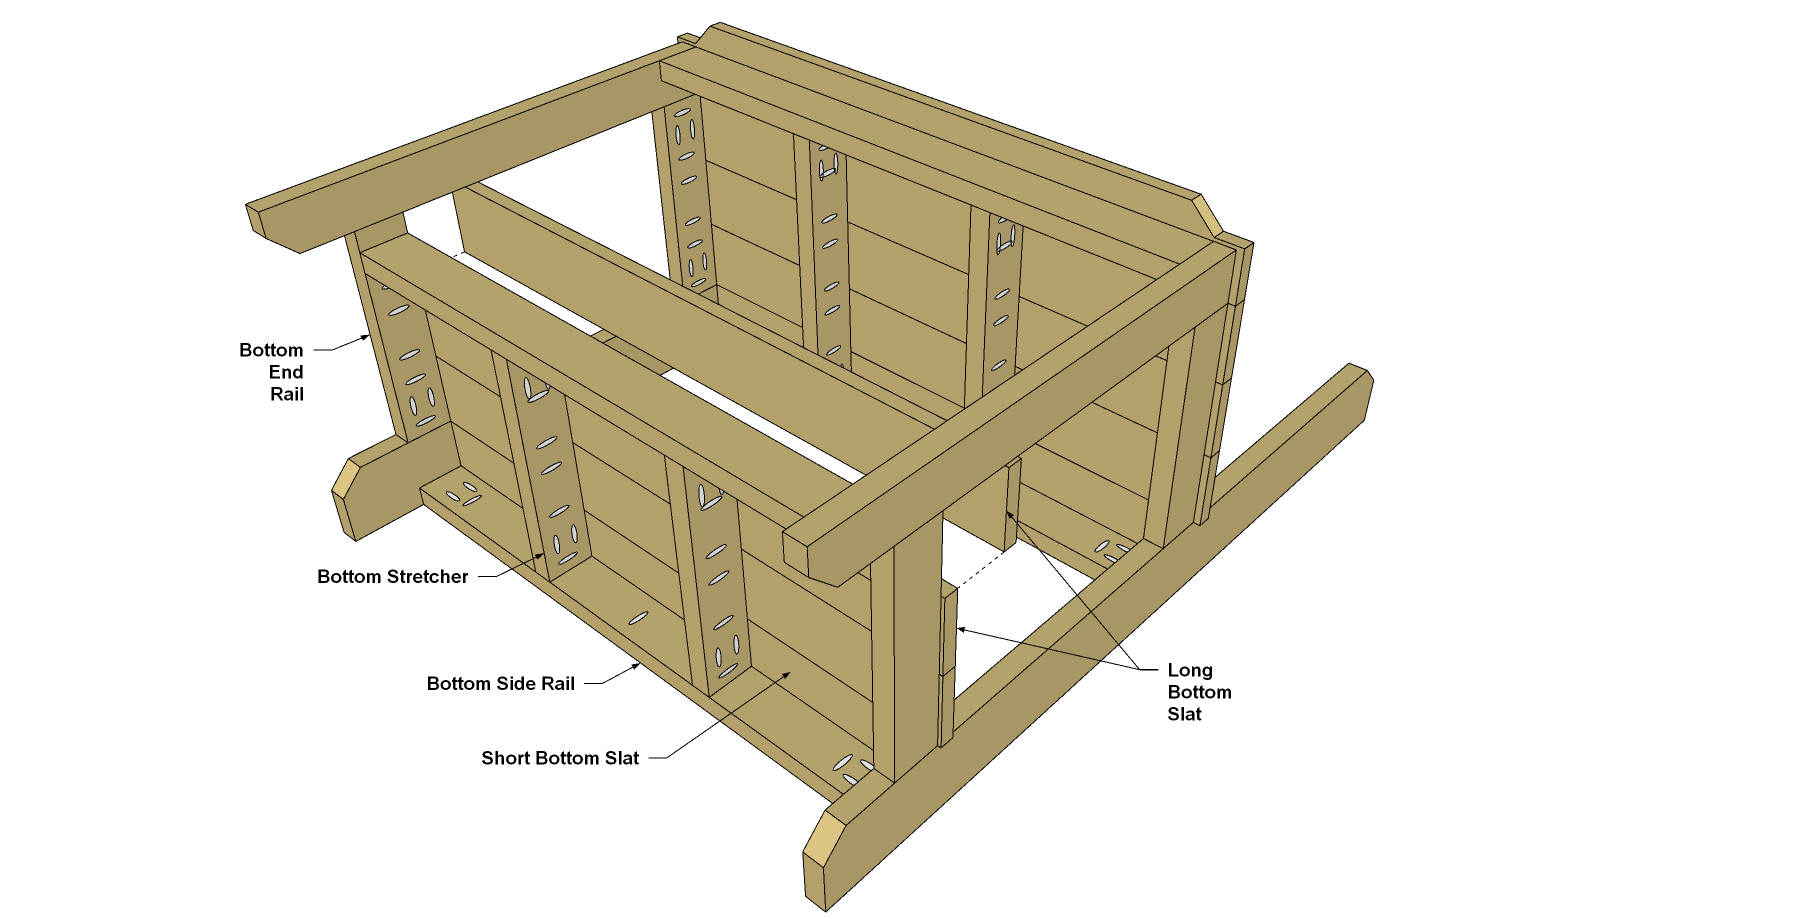
Assemble the Bottom Rails and Stretchers
Next, attach the Bottom Stretchers to the Bottom Side Rails using 2 1/2" Kreg Blue-Kote™ Pocket-Hole Screws. Make sure that the pocket holes are all oriented in the same direction.
-
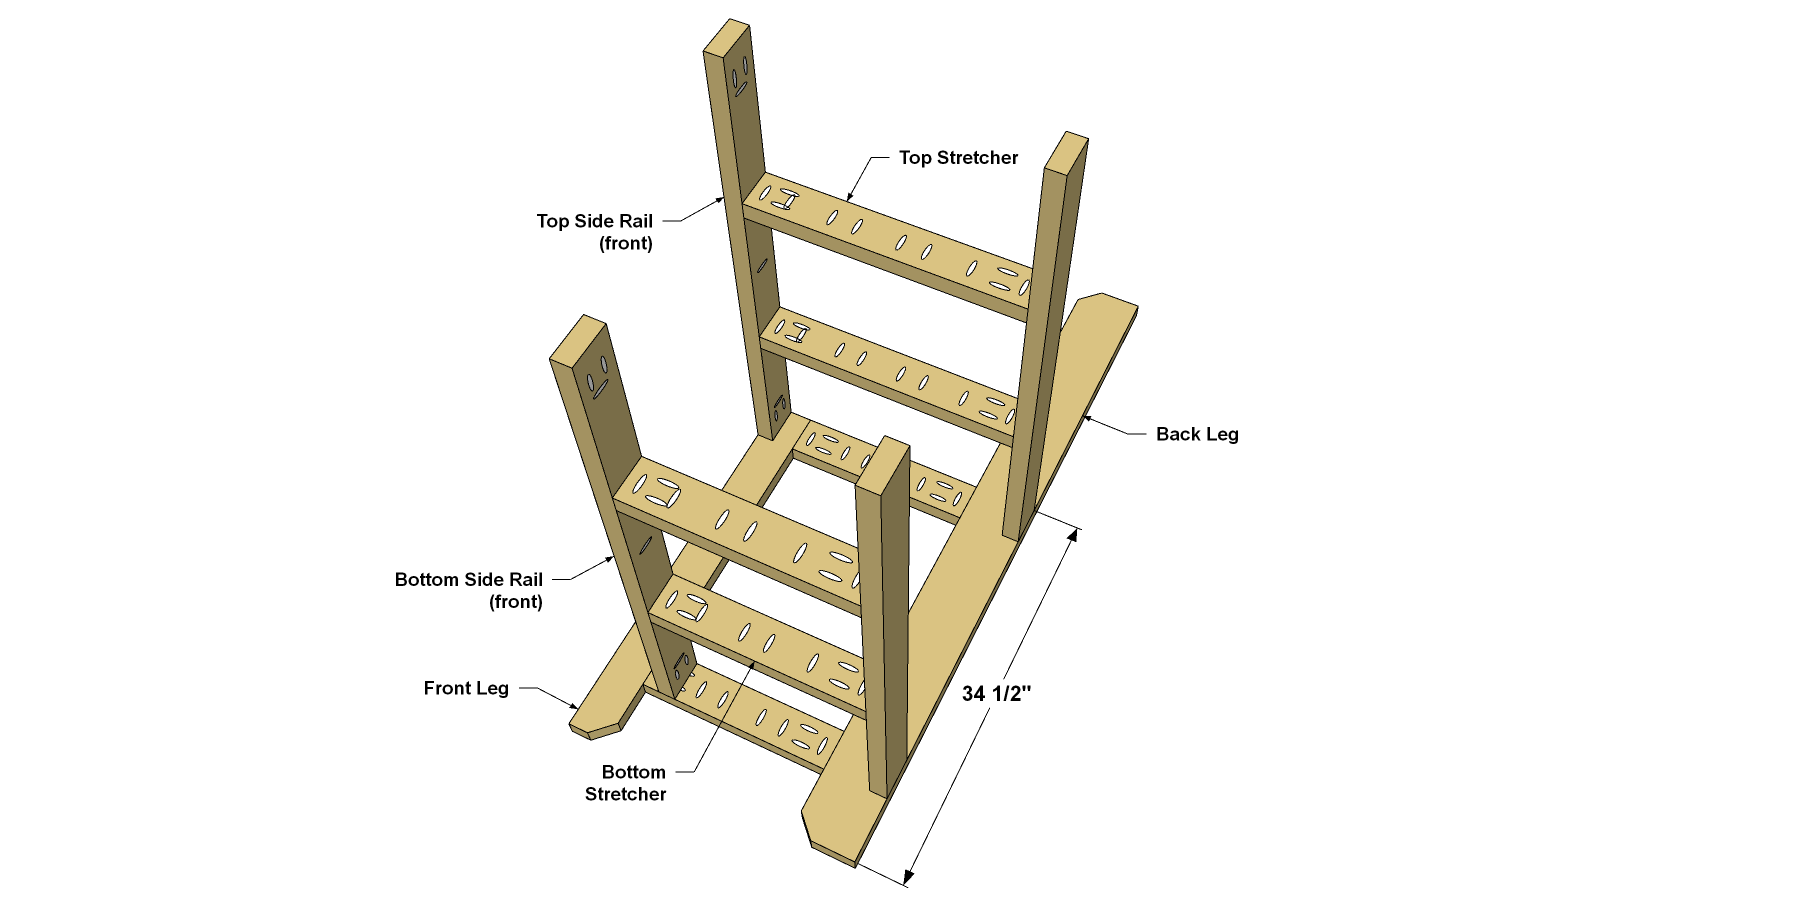
Attach the Leg Assemblies
With these Rail/Stretcher assemblies complete, you can attach them to the Leg assemblies using 2 1/2" Kreg Blue-Kote™ Pocket-Hole Screws. Attach to one Leg assembly first, and then add the other Leg Assembly. Make sure that the pocket holes in the Rails and Stretchers are oriented correctly for attaching the Slats later.
-
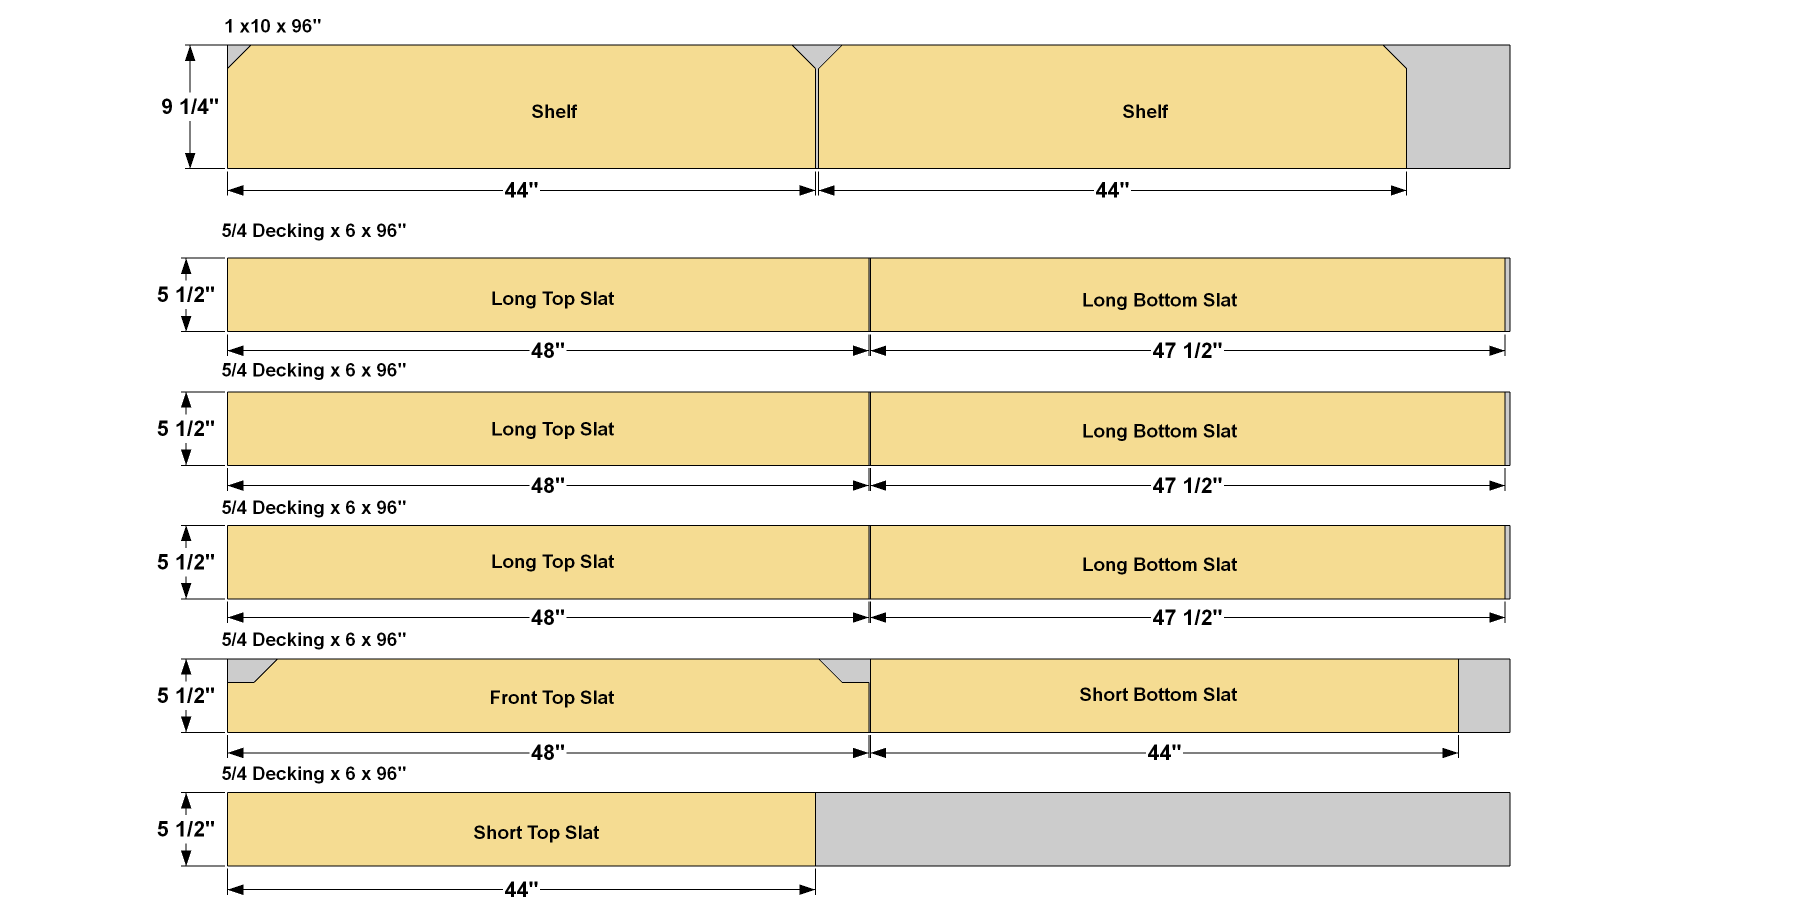
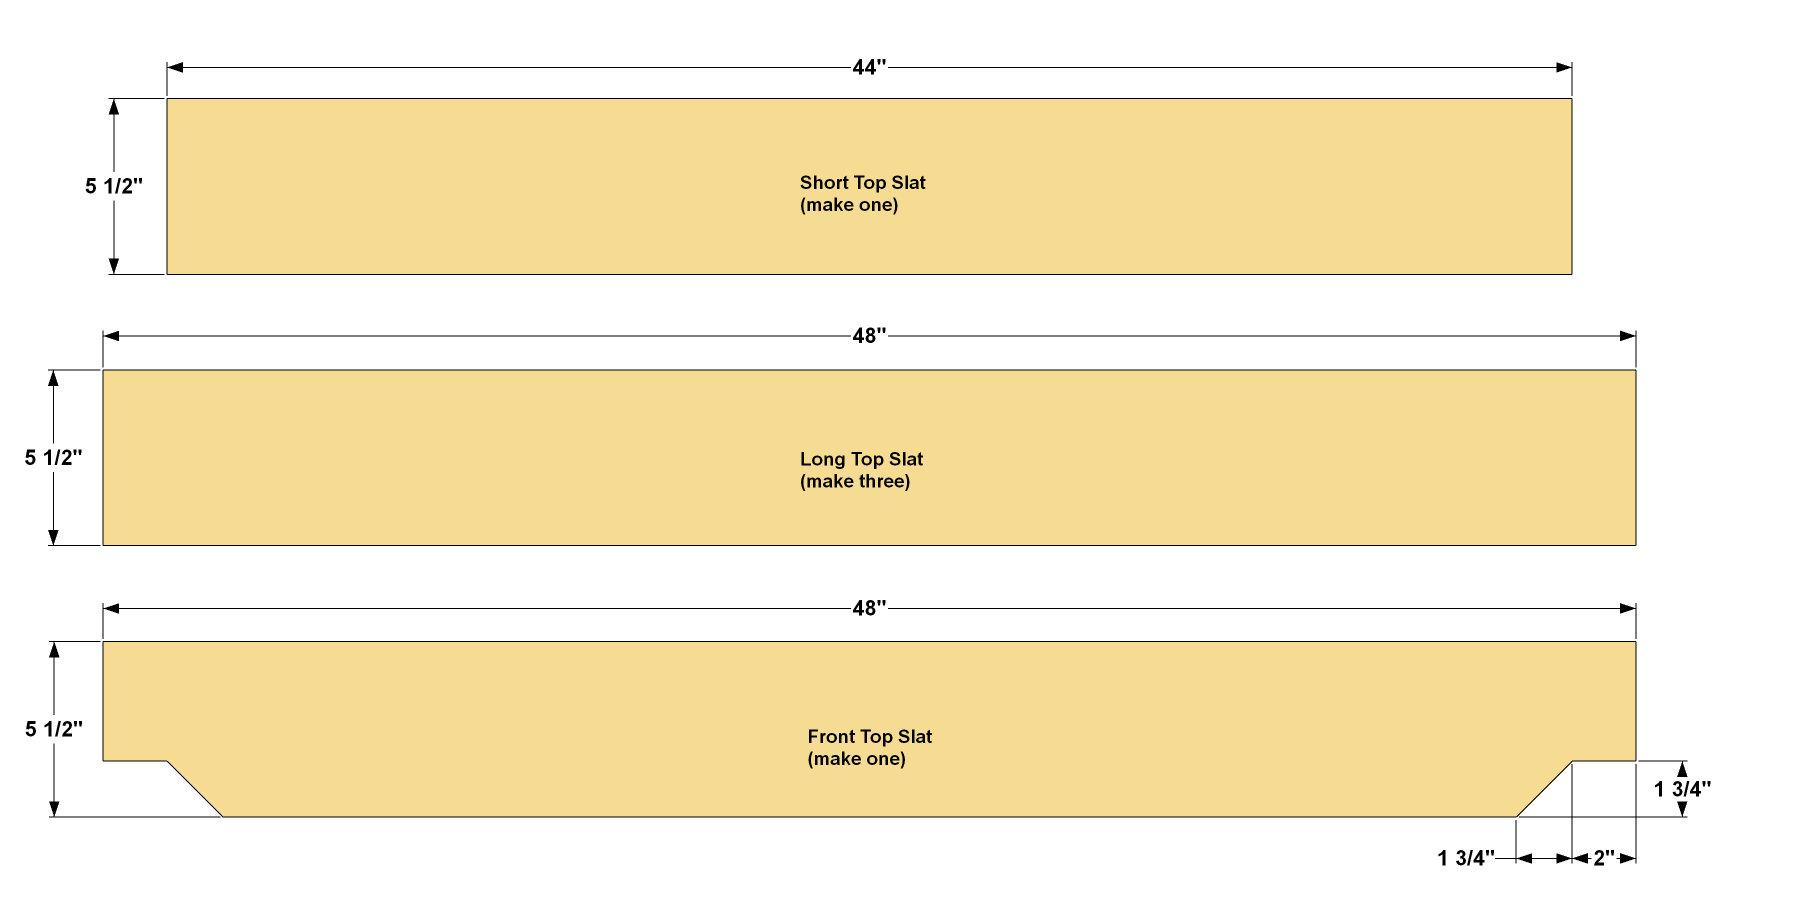
Cut Top Slats to Size
Cut three Long Top Slats, one Short Top Slat, and one Front Top Slat to size from 5/4 (1"-thick deck boards, as shown in the cutting diagram. Then cut the notches on the Front Top Slat, as shown.
-
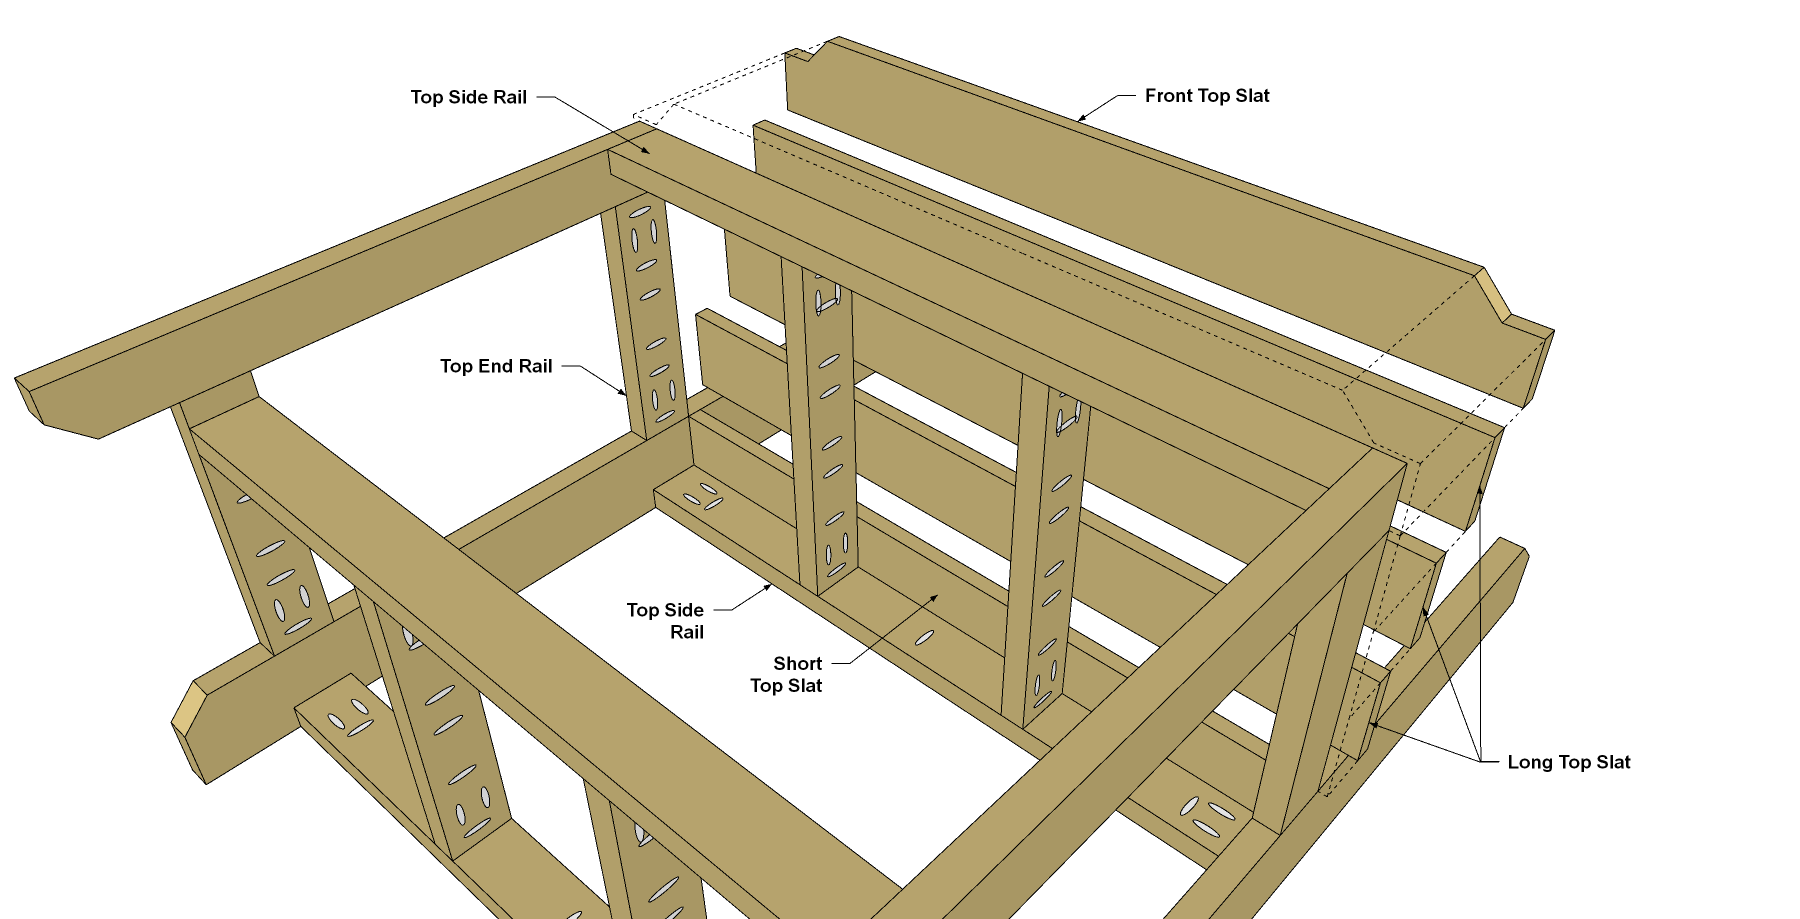
Attach the Top Slats
Next, attach the Top Slats to the base of the bench. Start by aligning the Short Top Slat with the Rear Top Side Rail. Then position the Long Top Slats so they overhang equally on each end. Finally, position the Front Top Slat. Attach them all using 1 1/2" Kreg Blue-Kote™ Pocket-Hole Screws.
-
Add the Bottom Slats
Cut three Long Bottom Slats, and one Short Bottom Slat to size from 5/4 (1"-thick) deck boards, as shown in the cutting diagram. Then attach them to the bench base using 1 1/2" 1 1/2" Blue-Kote™ pocket-hole screws. Make sure the Long Bottom Slats overhang equally at each end.
-
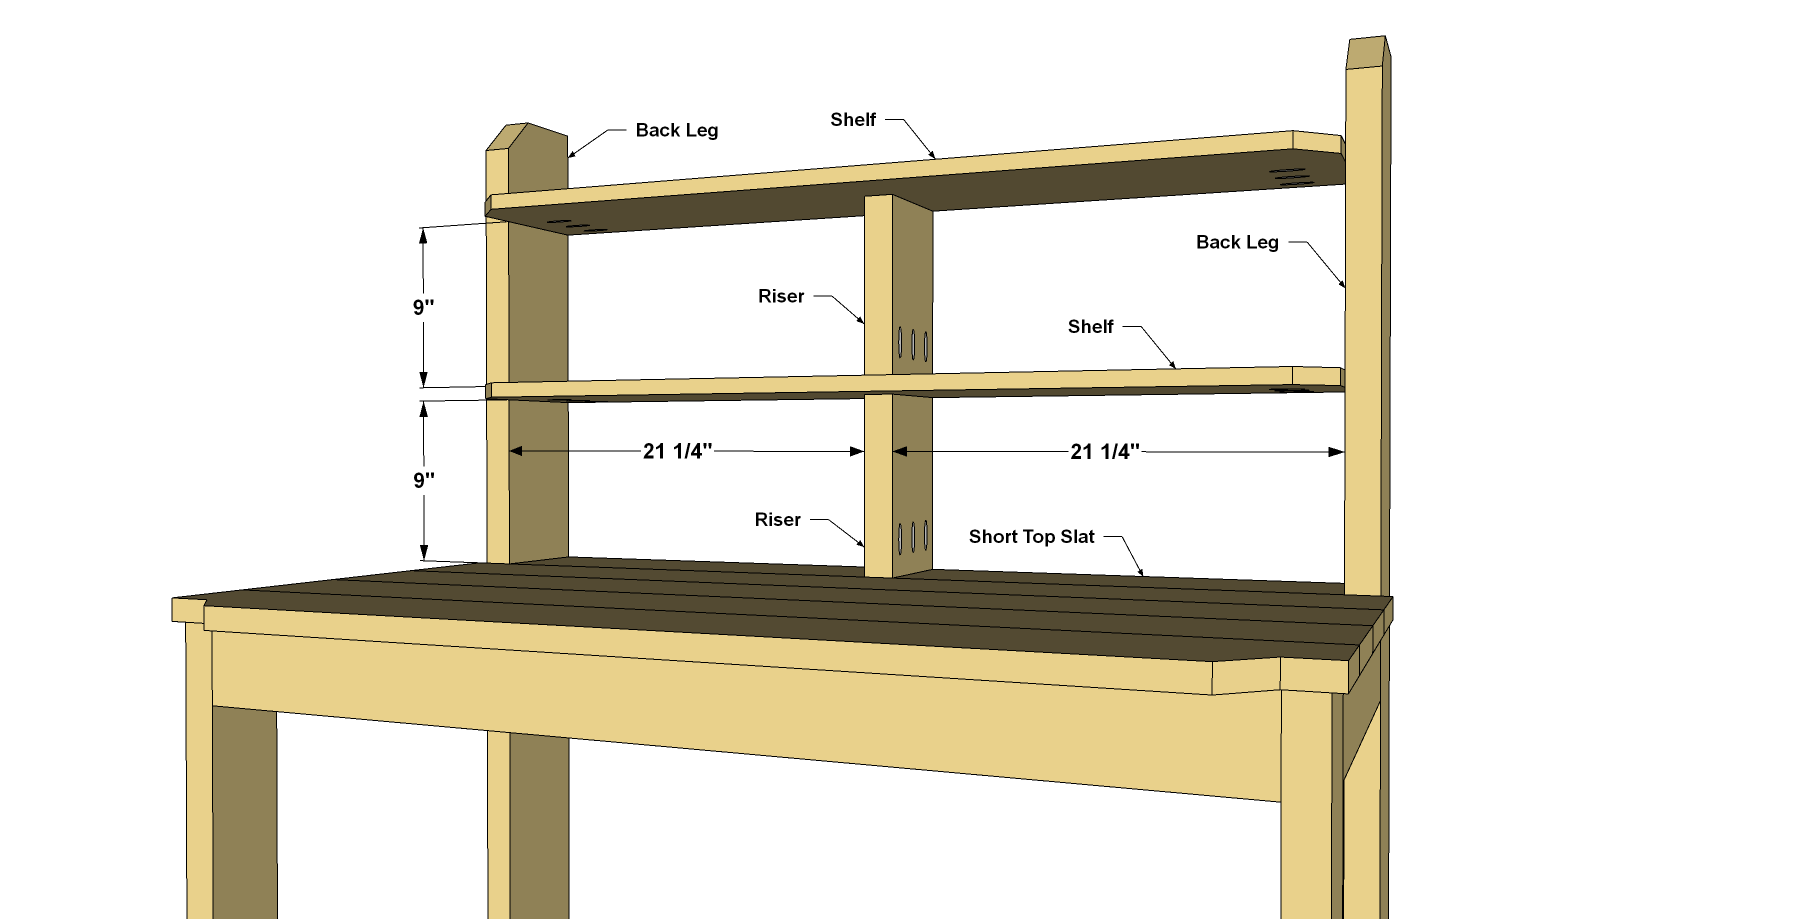
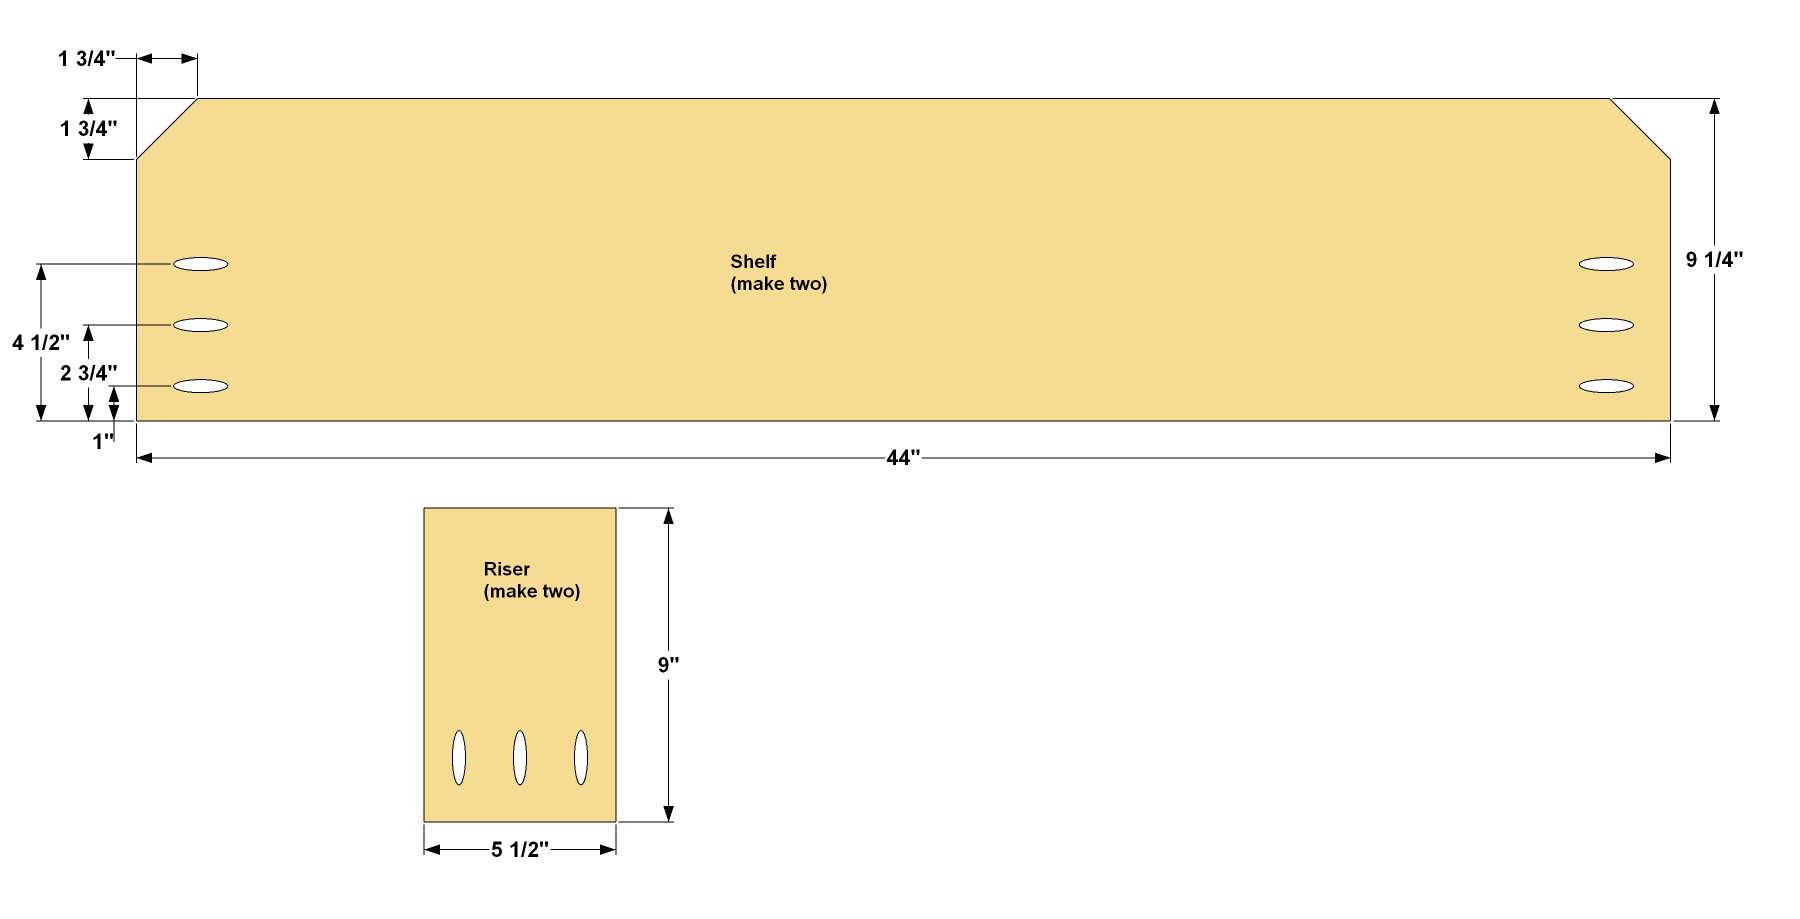
Cut the Shelves and Risers
Cut Two Shelves to length from a 1x10 board, as shown in the cutting diagram. Then cut the notches on the ends of the Shelves. With your pocket hole jig set up for 3/4"-thick material, drill pocket holes in the Shelves, as shown. Cut Two Shelf Risers to length from a 2x6 board, as shown in the cutting diagram. With your pocket hole jig set up for 1" material, drill pocket holes in the Risers, as shown.
-
Install the Shelves
Attach the Bottom Riser to the Short Top Slat using 1 1/2" Blue-Kote™ pocket-hole screws. Attach the first Shelf to the Back Legs using 1 1/2" Blue-Kote™ pocket-hole screws. Then attach the Top Riser to the Bottom Back Shelf using 1 1/2" Blue-Kote™ pocket-hole screws. Finally, add the Top Back Shelf by attaching it to the Back Legs using 1 1/2" Blue-Kote™ pocket-hole screws. Protect your potting bench with outdoor stain or exterior paint.