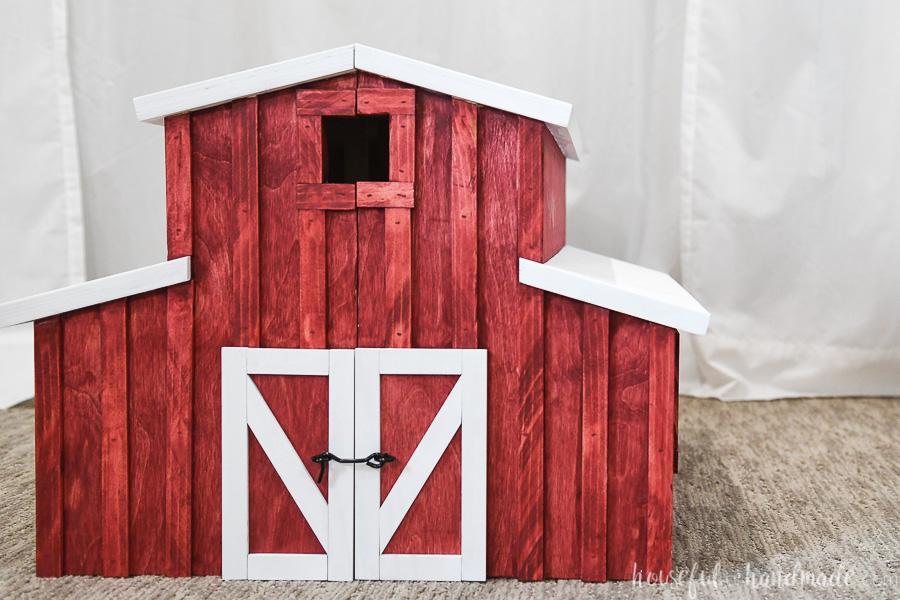
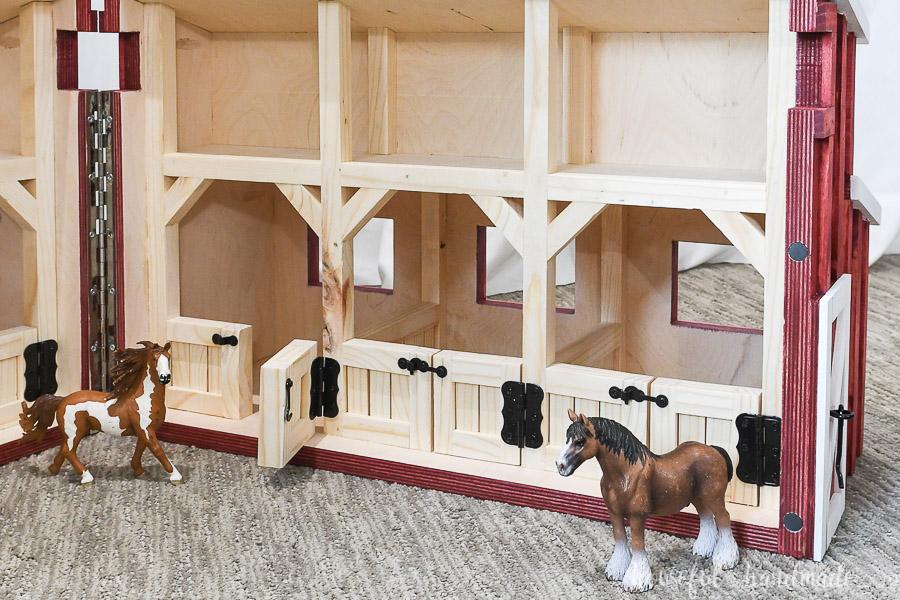


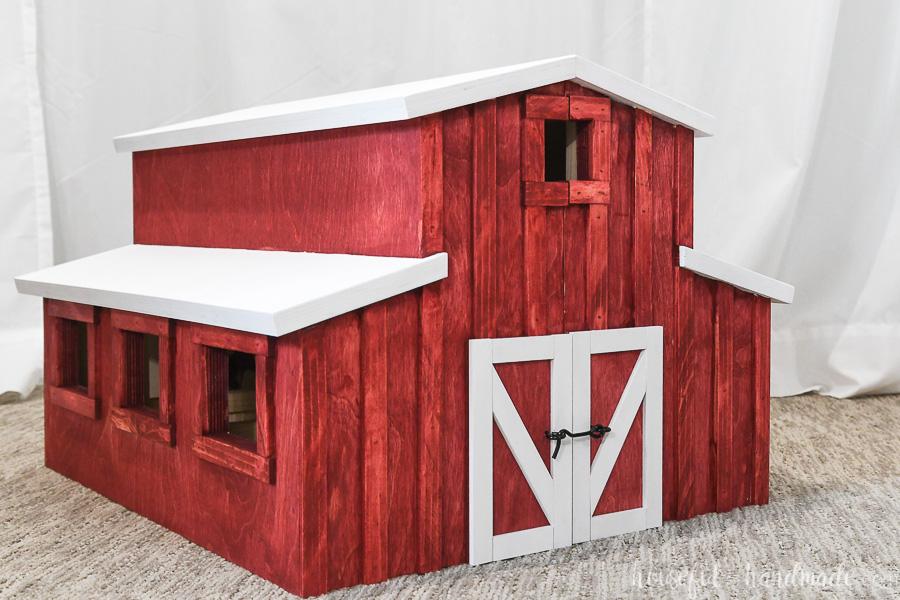
Build the perfect dollhouse for your little farmer. This barn dollhouse has realistic barn stalls with a loft for hay and tack. Made to fit 6" tall Schleich® horses. Add a fence for hours of play.
Tools
Kreg Tools


Other Tools
-
Circular Saw (corded)

-
Jigsaw
-
Miter Saw
-
Table Saw
-
Tape Measure
-
Drill (cordless)
-
Impact Driver
-
Nail Gun
-
Router
-
Sander
-
Tape Measure
Materials
Wood Products
- 1 Plywood , 3/4" Thick , Full Sheet
- 5 Board , 1x1 , 96"
- 5 Board , 1/4x3/4 , 96"
- 1 Plywood , 1/4" Thick , Quarter Sheet
Hardware & Supplies
- 40 1 1/4" pocket hole screws
- 100 1 1/4" finish nails
- 100 5/8" brad nails
- 1 Wood glue
- 6 2" decorative hinges
- 6 Mini hook & staple latches
- 1 12" piano hinge
- 6 1/2" magnets
- 1 2" hook & eye
Cut List & Parts
- 4 Front/Back , 3/4" x 15 1/2" x 9"
- 2 Bottom , 3/4" x 22 1/2" x 9"
- 2 Loft , 3/4" x 22 1/2" x 3"
- 2 Lower Roof , 3/4" x 25" x 6"
- 2 Upper Roof , 3/4" x 25" x 6 3/4"
- 2 Lower Side , 3/4" x 24" x 8"
- 2 Upper Side , 3/4" x 24" x 4 1/2"
- 8 Front Post , 3/4" x 3/4" x 14 1/2"
- 4 Lower Back Post , 3/4" x 3/4" x 7 3/4"
- 4 Loft Back Post , 3/4" x 3/4" x 3 3/4"
- 6 Loft Beams , 3/4" x 3/4" x 6 1/2"
- 12 Angled Beam , 3/4" x 3/4" x 2 1/2"
- 8 Center Fence , 3/4" x 3/4" x 6 1/4"
- 12 Front Fence , 3/4" x 3/4" x 2 3/8"
- 6 Front Fence End , 3/4" x 3/4" x 3"
- 12 Gate Top/Bottom , 3/4" x 3/4" x 1 5/8"
- 12 Gate End , 3/4" x 3/4" x 3"
- 62 Fence Slat , 1/4" x 3/4" x 1 3/4"
- 2 Barn Door , 1/4" x 7" x 4"
- 70 Outside Trim , 1/4" x 3/4" x Cut to Fit
Directions
-
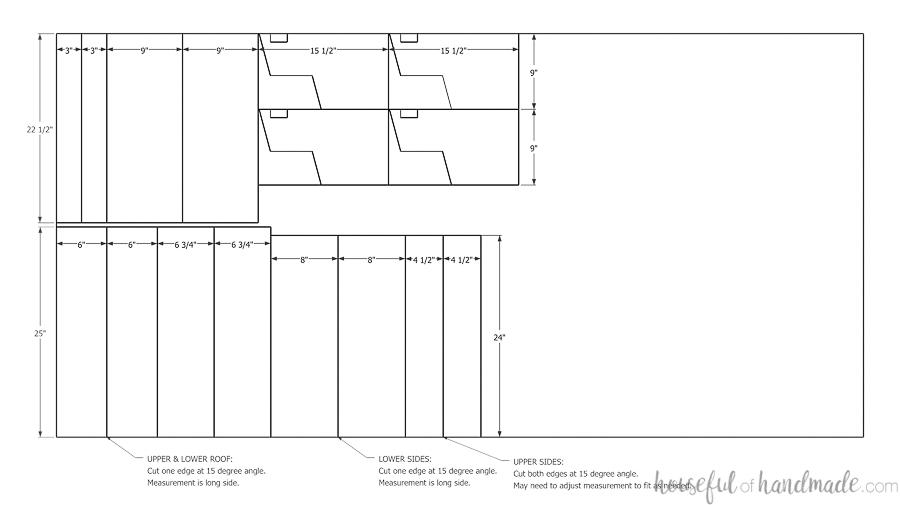
Cut Plywood
When cutting plywood, start by cutting the 22 1/2" strip. Cut the bottom, loft and front/back pieces as noted in cut diagram. Then cut the 25" strip, the rest of the plywood cuts have angles on 1 or 2 edges. Cut them as noted on the cut diagram.

-
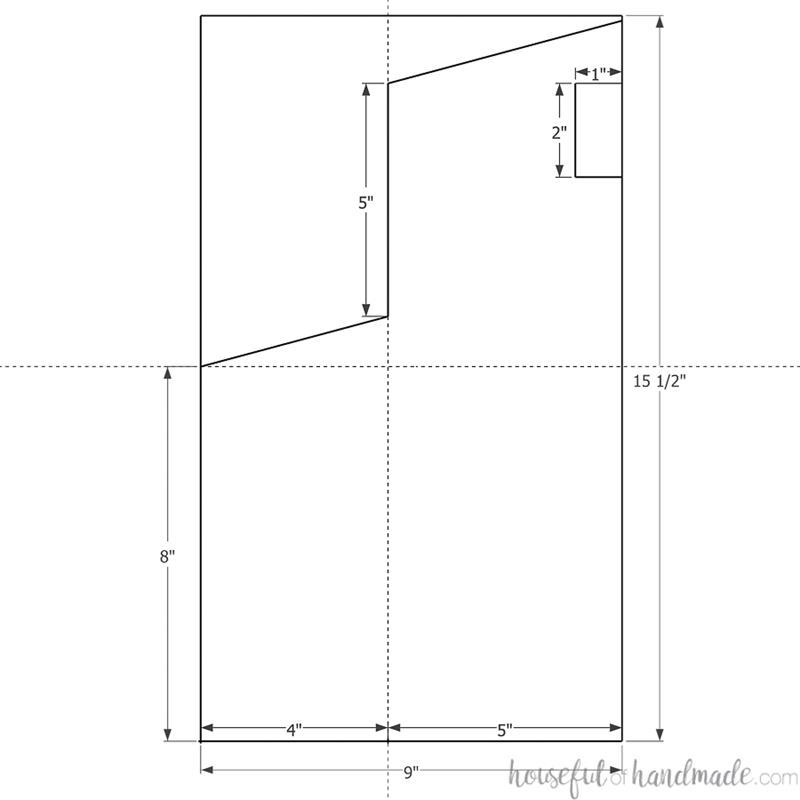
Cut the Front/Back
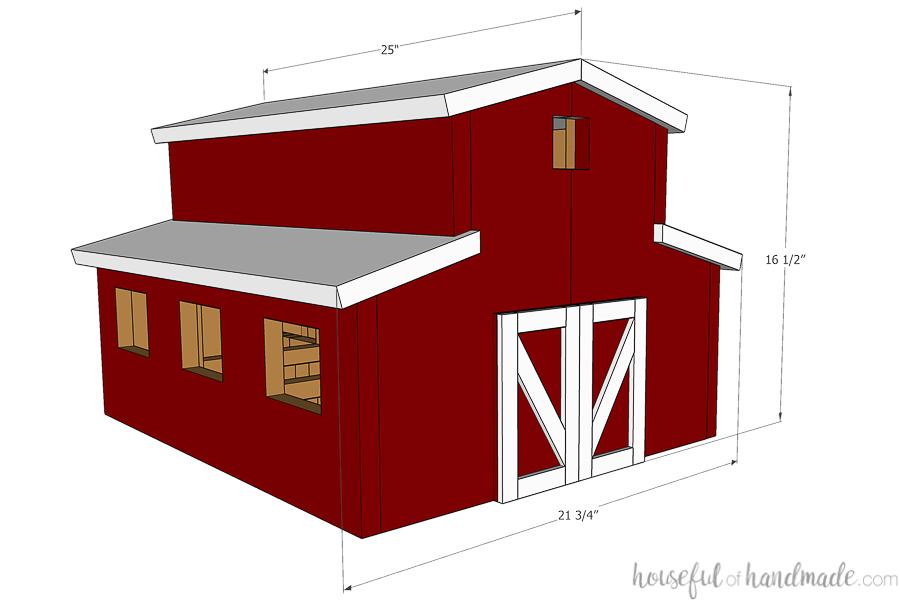
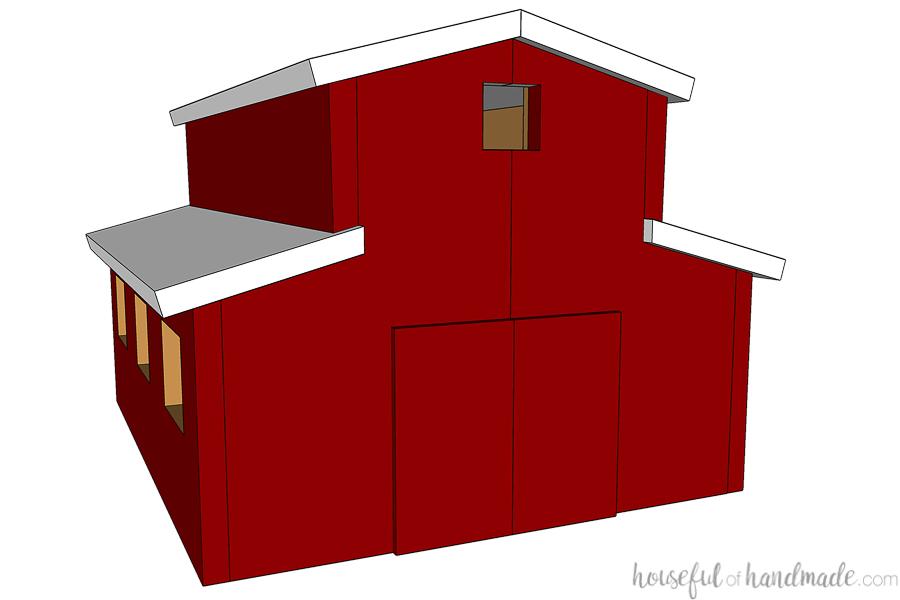
On each of the Front/Back pieces, draw a center line 4" in from the outside (5" from the inside). Then draw a line 8" up from the bottom. Using a speed square, draw a line at a 15 degree angle from the 8" line at the outside edge to the center line. Measure 5" up the center line from the drawn angled line and mark it. Draw a 15 degree angle line from that point to the inside edge. It will not go all the way to the corner. Cut out the piece along the line. Also, cut a 1" x 2" box from the top center for a window.
-
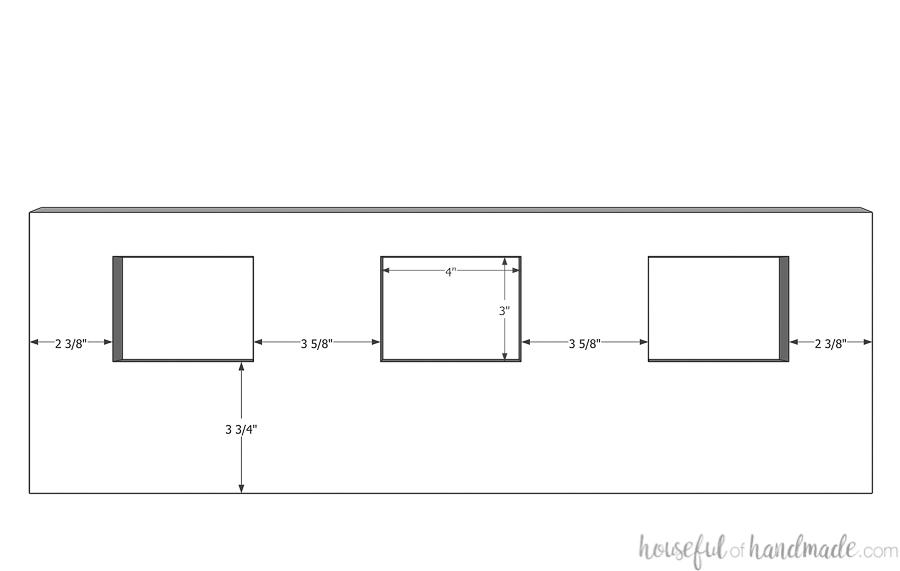
Cut the Windows
On the lower back pieces, measure up 3 3/4" from the bottom and draw a line. Measure 2 3/8" in from each side. Cut a 3" tall by 4" wide window from these points. Also, cut a 3" tall by 4" wide window from the center.
-
Attach the Front/Back
Set your pocket hole jig for 3/4" thick material. Drill pocket holes on 3 sides of the bottom boards. Attach the side boards so they are flush with the front/back and bottom using wood glue and 1 1/4" pocket hole screws. Repeat on the second side making sure to mirror the sides.
-
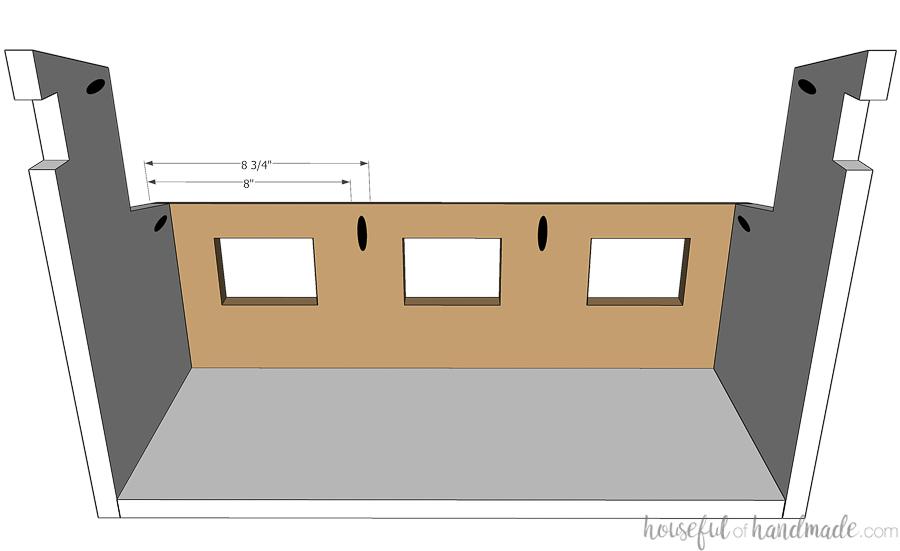
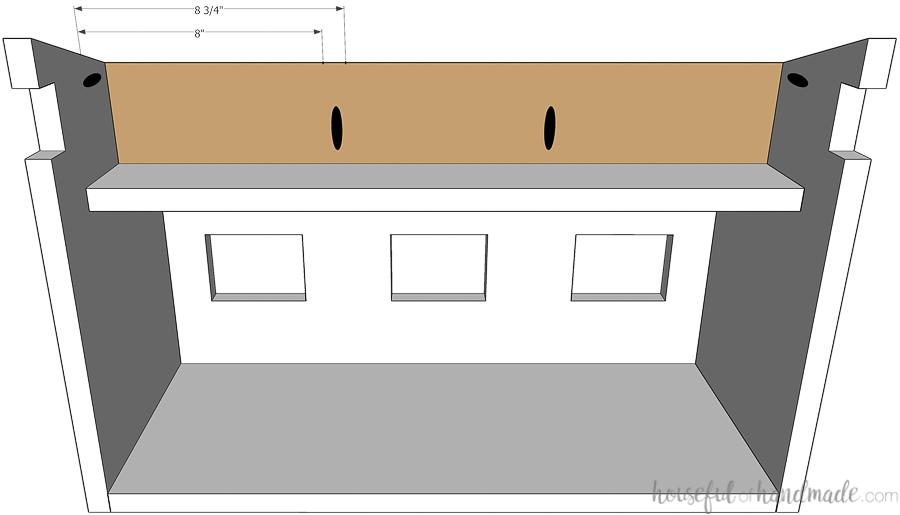
Attach the Lower Sides
Measure 8" and 8 3/4" in from each edge of the lower side boards. Drill a pocket hole in the top between these marks (they will be hidden later so it is important they are in the right spot). Also, drill pocket holes in the upper corners of the front/back pieces to help attach the sides. Attach the lower side pieces so they are flush with the front/back and bottom pieces using wood glue. Use 1 1/4" pocket hole screws in the holes on the bottom and on the front/back lower corner. Further secure the sides to the front/back with 1 1/4" finish nails.
-
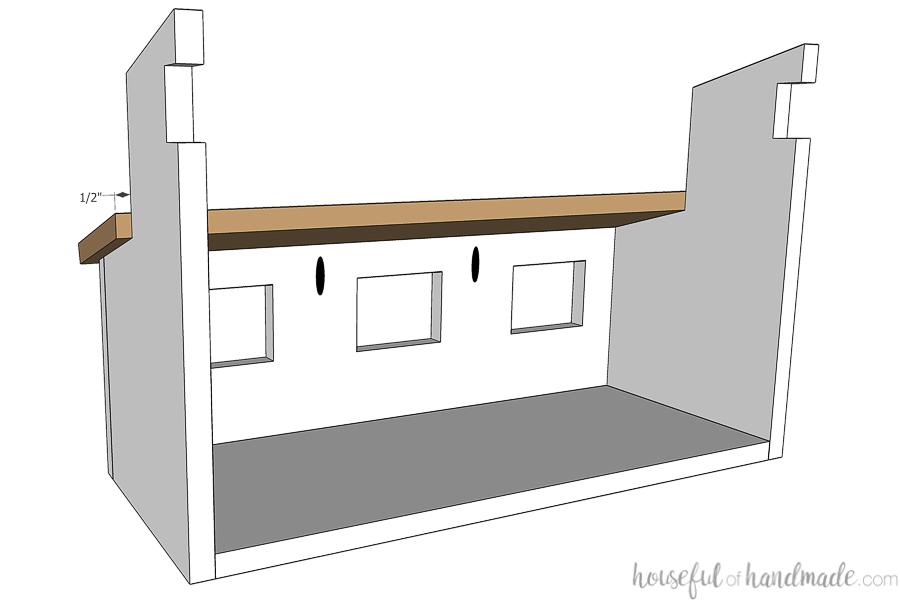
Attach the Lower Roof
Attach the lower roof piece so it hangs over 1/2" on either side and is flush to the upper section of the front/back. Secure with wood glue and 1 1/4" finish nails. Then further secure it with 1 1/4" pocket hole screws in the pocket holes on the sides.
-
Attach the Loft
Drill pocket holes for 3/4" material in each end of the loft piece. Attach it between the front/back pieces so it is flush with the top of the lower roof and parallel to the floor. Secure with wood glue and 1 1/4" pocket hole screws.

-
Attach the Upper Sides
Because of all the angles, it can be tricky to get an accurate measurement on the upper side board. Place it up against the front/back at this point and cut to fit. Make sure both edges are cut with a 15 degree angle parallel to each other. Then, measure 8" and 8 3/4" in from each edge of the upper side boards. Drill a pocket hole in the bottom between these marks (they will be hidden later so it is important they are in the right spot). Attach the upper side boards with wood glue and 1 1/4" pocket hole screws. Use a few 1 1/4" finish nails as needed to further secure it.
-
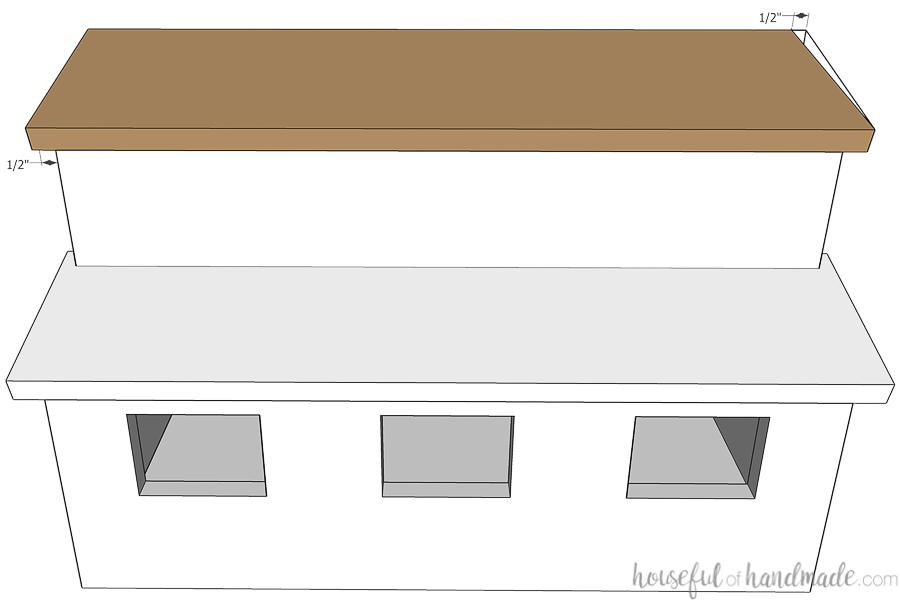
Attach the Upper Roof
For the hinge to work, the back of upper roof boards need to be cut flush with the front/back. At the back edge, measure over 1/2" on the angled edge (the peak) and then draw a line to the lower corner. Cut along the line. Attach the upper roof with wood glue and 1 1/4" finish nails so the back peak is flush with the top of the back piece and the front peak has an overhang of 1/2". The bottom of the roof section will overhang 1/2" on each side.
-
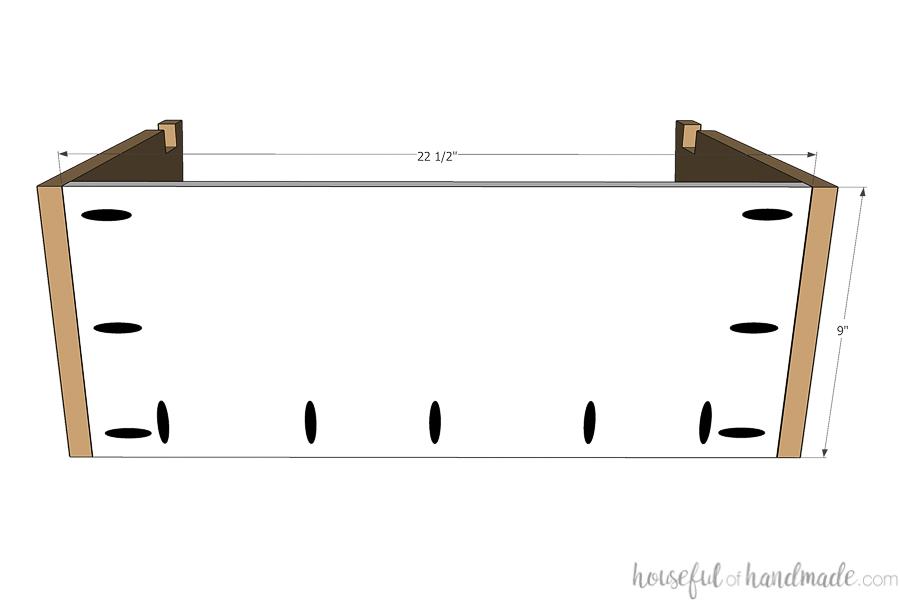
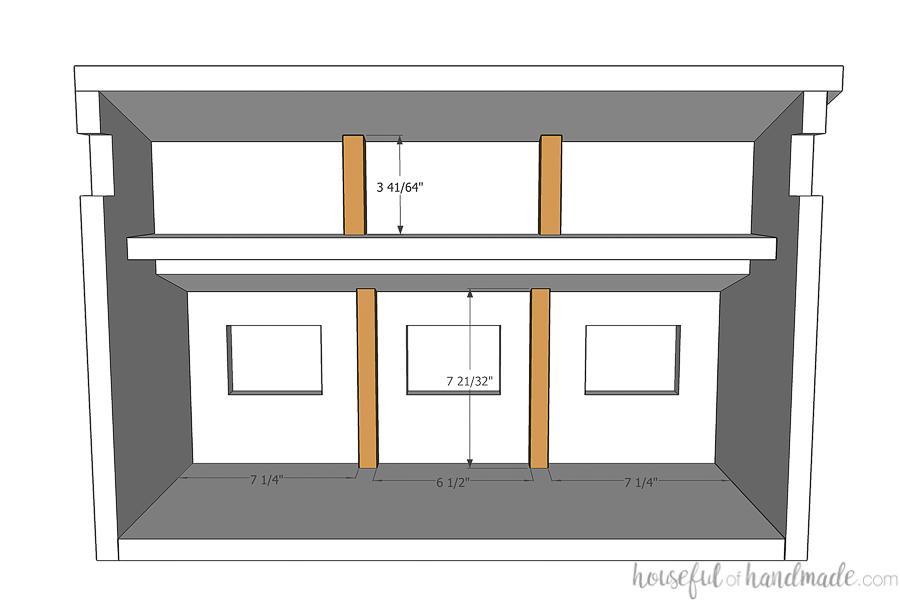
Add Back Posts
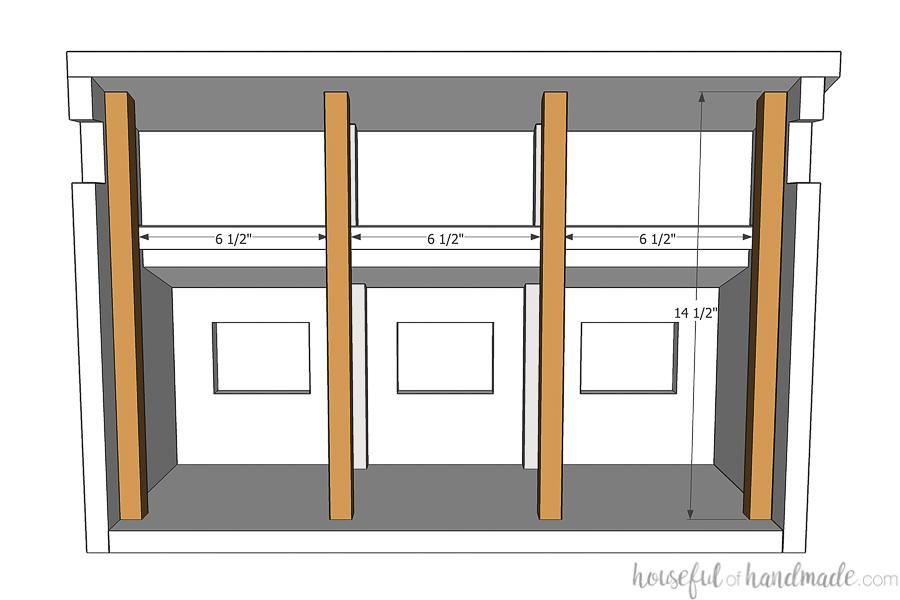
Measure the height of the inside of the walls where the pocket holes are and cut the back post and loft back post. You can use the measurements in the picture as a guide. Make sure the top is cut at a 15 degree angle. I found it was easiest to cut slightly large since the area is tricky to measure and carefully cut it down to fit. Attach with wood glue and 1 1/4" finish nails.
-
Add Front Posts
Repeat the same process for the front posts. Make sure when you attach them they are sitting back from the front the correct amount so they are parallel with the side walls. Secure with wood glue and 1 1/4" finish nails into the loft, through the roof and from the bottom (measure to make sure the nail goes in the beam).
-
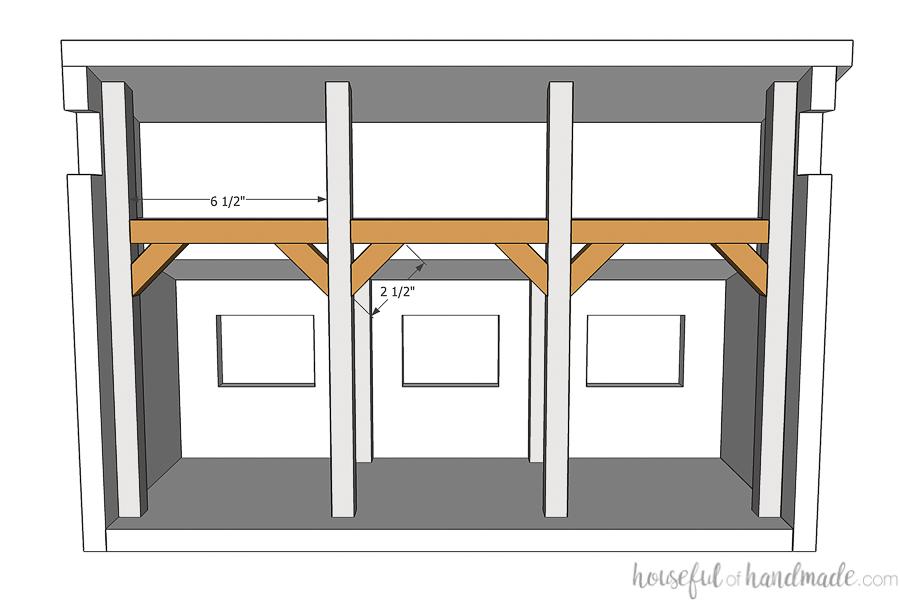
Add the Beams
Add the loft beams between the front posts so they are flush with the top of the loft board. Secure with 1 1/4" finish nails and wood glue. Cut the angled beam pieces so the ends are 45 degree angles on each end. Attach in the corners between the posts and loft beams with wood glue and 1 1/4" finishing nails.
-
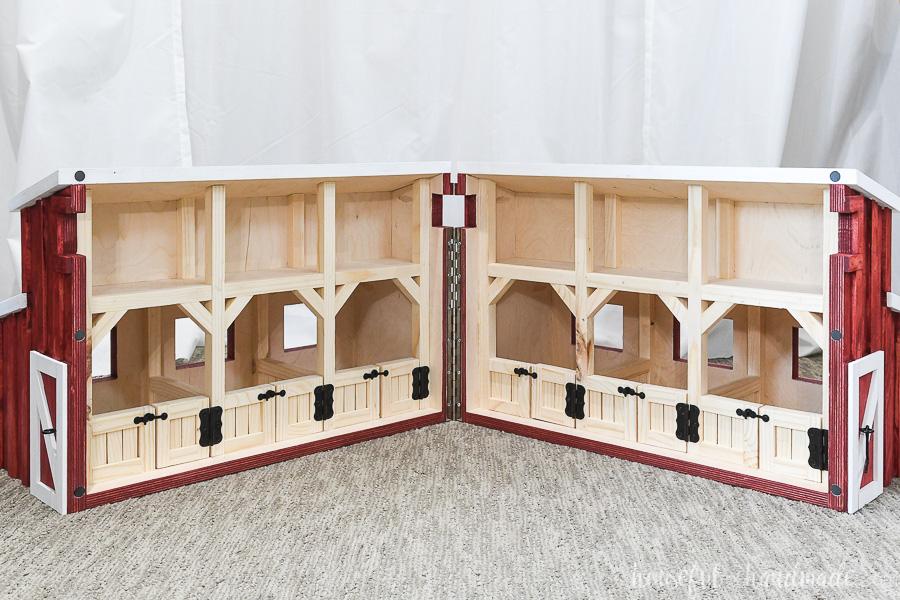
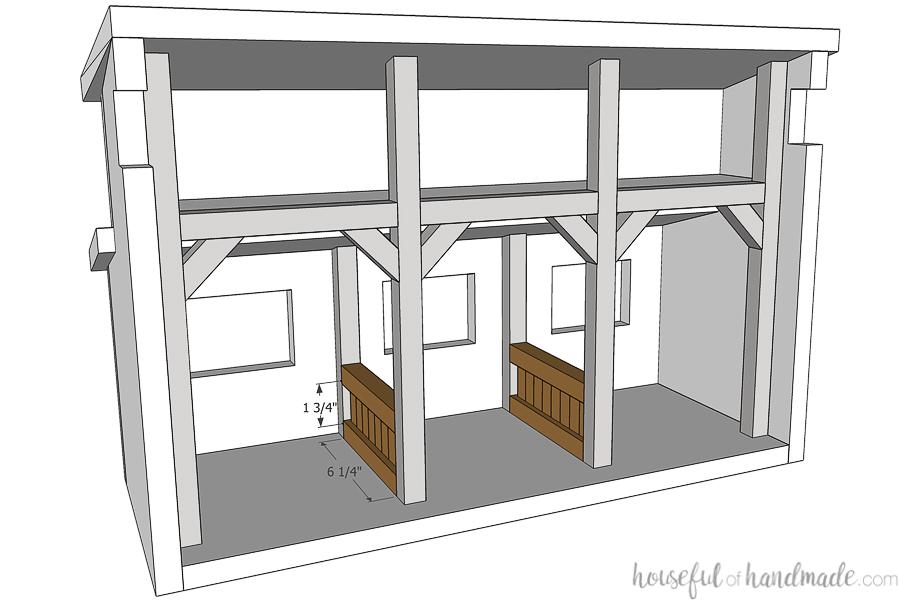
Build the Center Fences
Router a 1/4" wide groove 1/8" deep in one edge of the center fence boards. Glue 8 fence slats into the groove so they have a slight gap between them and top it with a second fence board. Glue the assembled fence between the back posts and middle front posts with wood glue.
-
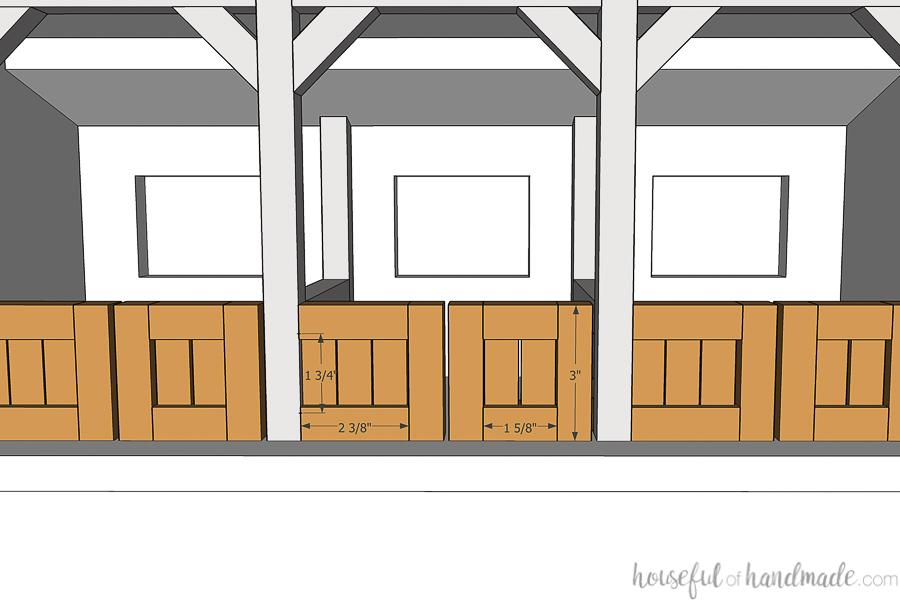
Build the Front Fences & Gates
Router a similar groove in the front fence & gate top/bottom boards. Since these boards are so small, I found it easier to router the groove in a long strip of 1x1 and then cut the fence boards to length after. Build the front fences the same as the center fences with 3 slats each. Then finish off one edge by attaching the front fence side to it with wood glue and 1 1/4" finish nails. Secure to the side of the posts with wood glue and a few finish nails up from the bottom. Build the gates the same with 2 fence slats. Finish off each side with the gate side pieces. Do not attach to the barn.
-
Add Barn Doors
Secure the 1/4" plywood to the front pieces flush with the bottom and inside for the base of the barn doors. Use wood glue and 5/8" brad nails.
-
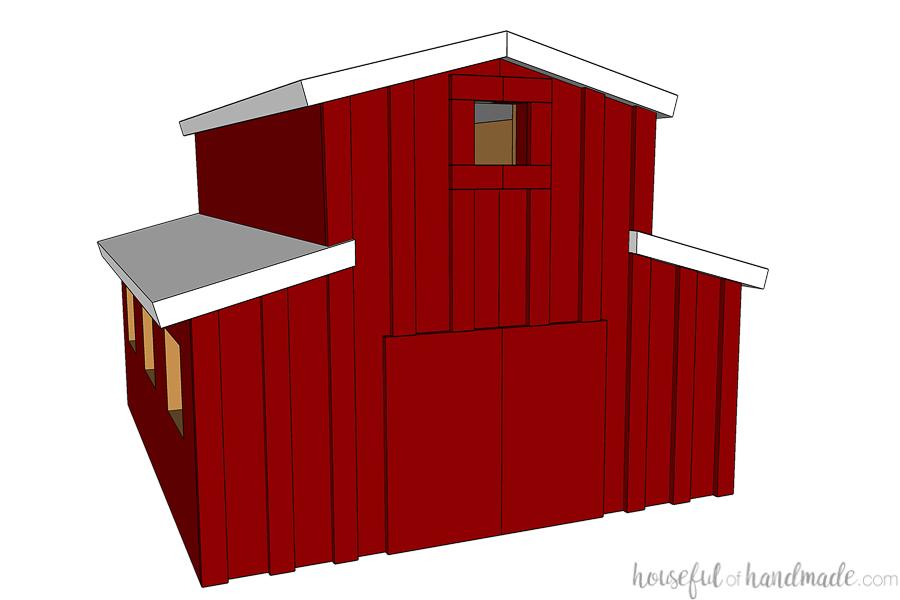
Trim Out the Front
Use the 1/4" thick boards to trim out the front and back (if desired). If trimming out the back, make sure the trim is flush with the inside edge so they hinge will work properly. Start with the edges of the front where the plywood is showing and cut the boards to fit. Secure with wood glue and 5/8" brad nails. Space the slats out 1 1/4".
-
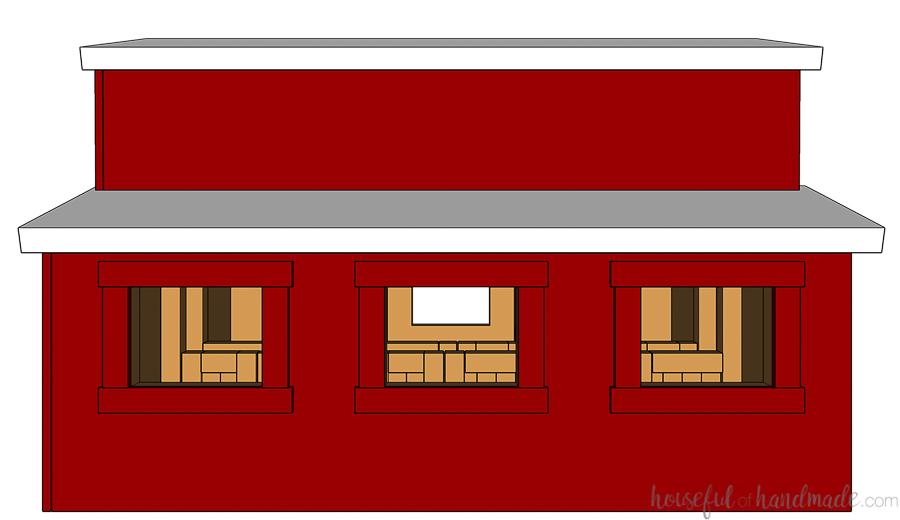
Trim Out the Windows
Trim out the windows on the sides with the 1/4" thick boards. Cut the top and bottom 1/4" larger to overhang over the edges of the side trim. Secure with wood glue and 5/8" finish nails.
-
Sand and Paint
Fill all the nail holes with wood putty and sand the dollhouse. Stain or paint as desired. Paint the boards to finish trimming out the doors before assembly to make it easier.
-
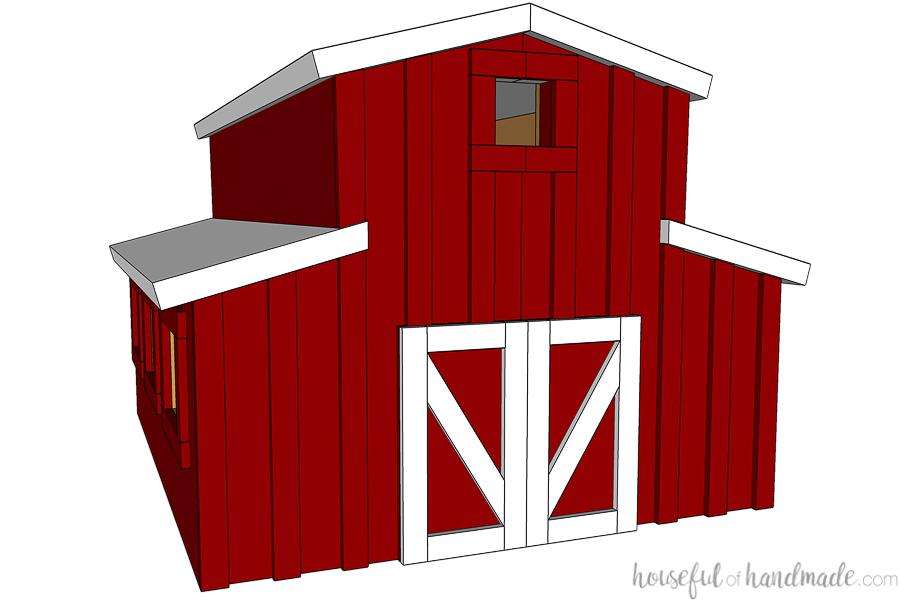
Trim out the Barn Doors
Measure and cut the painted 1/4" boards to trim out the barn door. Trim out the perimeter first. Then to measure the diagonal trim, hold it up to the attached trim and mark the angles. Attach with super glue so you do not have any nail holes to fill.
-
Finish the Barn Dollhouse
To finish off the barn, attach the gates with the 2" hinges. To keep the gate slightly off the floor, I used a couple pieces of cardstock to hold the gate up as I secured it. Add the hook & staple to the edges of the gate/front fence to secure them. Add the piano hinge to the back center to connect the two dollhouse halves. Drill 1/2" holes in the edges of the front and glue magnets into them to help hold the front closed. Add a 2" latch to the front.
-
Enjoy!
For more fun things to build, make sure to come say hi at Housefulofhandmad.com!