Few joinery techniques can match the strength and versatility of the mortise and tenon joint. This ancient method of connecting wood has been used for millennia, from the construction of Egyptian furniture to the framing of medieval European cathedrals.
Today, it remains a cornerstone of fine woodworking, prized by craftsmen for its robustness and elegance. Whether you’re a novice woodworker or a seasoned professional, understanding the intricacies of mortise and tenon joinery can elevate your projects to new heights of quality and durability.
What is a mortise and tenon joint?
A mortise and tenon joint is a simple yet ingenious way to connect two pieces of wood at an angle, typically 90 degrees. The joint consists of two primary components: the mortise and the tenon.
1. The Mortise:
Think of the mortise as a precisely cut opening within a piece of wood. This opening is typically rectangular, though it can be other shapes depending on the specific joint design and application. The mortise is cut into what woodworkers often refer to as the receiving piece, and typically has the following characteristics:
Clean, straight sides
Flat bottom (in blind mortises)
Consistent depth
2. The Tenon:
The tenon is the protruding part that fits into the mortise. It’s usually cut at the end of a board or rail and is shaped to fit snugly into the mortise. The piece of wood containing the tenon is often called the inserting piece. You can usually identify a well-made tenon by its:
Straight, parallel sides
Flat shoulders (the part that meets the face of the mortised piece)
Thickness that allows for a tight fit without splitting the mortise
Length appropriate to the depth of the mortise
How does a mortise and tenon joint work?
A mortise and tenon joint works by inserting the tenon into the mortise in another piece, creating a strong mechanical connection that resists pulling and twisting forces.
The mechanics of a mortise and tenon joint are straightforward but brilliant. The tenon slides into the mortise, creating a strong mechanical connection between the two pieces of wood. This connection resists pulling apart (tension) and twisting forces (torsion) extremely well.
The strength of the joint comes from several factors.
Surface area
The large surface area between the tenon and the inside of the mortise provides ample space for glue adhesion.
Mechanical interlock
The tenon physically prevents the joint from pulling apart or twisting.
End grain to long grain connection
The end grain of the tenon contacts the long grain inside the mortise, creating a strong glue bond.
Historically, many mortise and tenon joints were left unglued, especially in large timber-frame constructions. This allowed for easier disassembly and accommodated the natural expansion and contraction of wood with changes in humidity. However, in modern fine woodworking, most mortise and tenon joints are glued for maximum strength and durability.
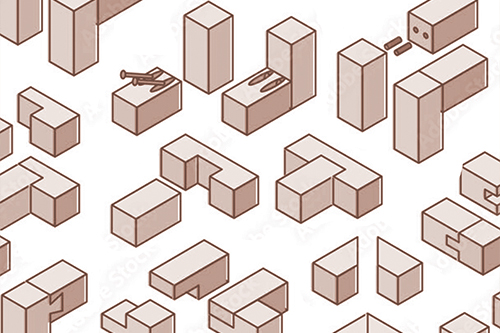
What are the four types of mortise and tenon joints?
The four main types of mortise and tenon joints are through mortise and tenon, blind mortise and tenon, wedged mortise and tenon, and haunched mortise and tenon.
While the basic concept remains the same, each is suited to different applications and aesthetic preferences.
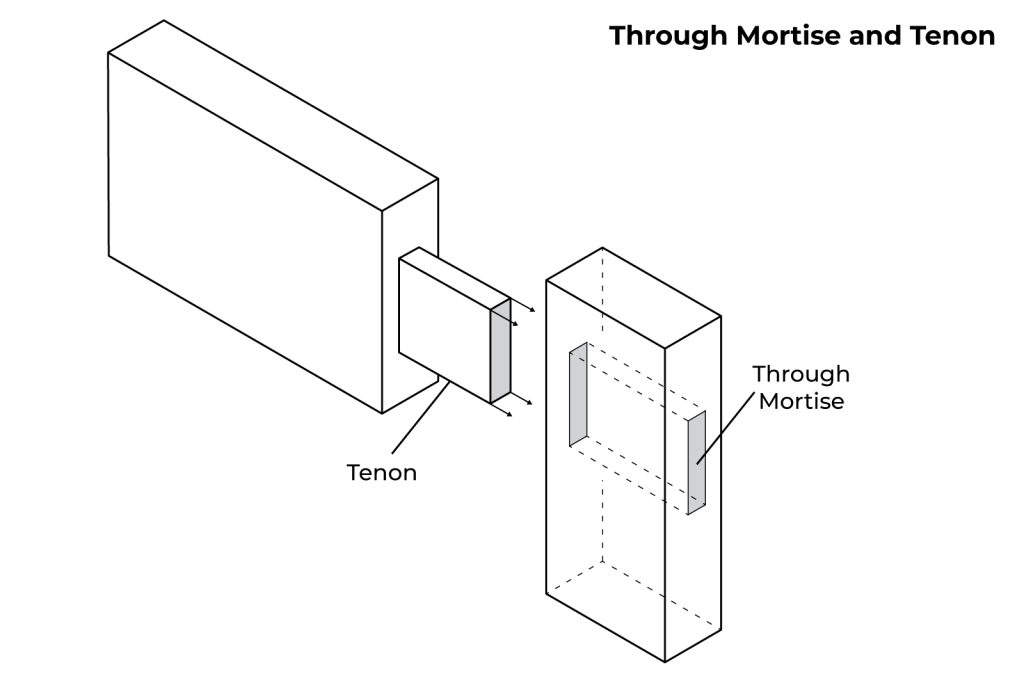
Through mortise and tenon
In this classic version, the tenon passes completely through the mortised piece and is visible on the other side. This joint is incredibly strong and was commonly used in timber framing and rustic furniture.
Advantages
Maximum strength due to full wood-to-wood contact
Can be decorative, especially when contrasting woods are used
Allows for wedging or pegging for additional strength
Disadvantages
Visible on both sides, which may not suit all designs
Requires more precise cutting to ensure a good appearance on the exit side
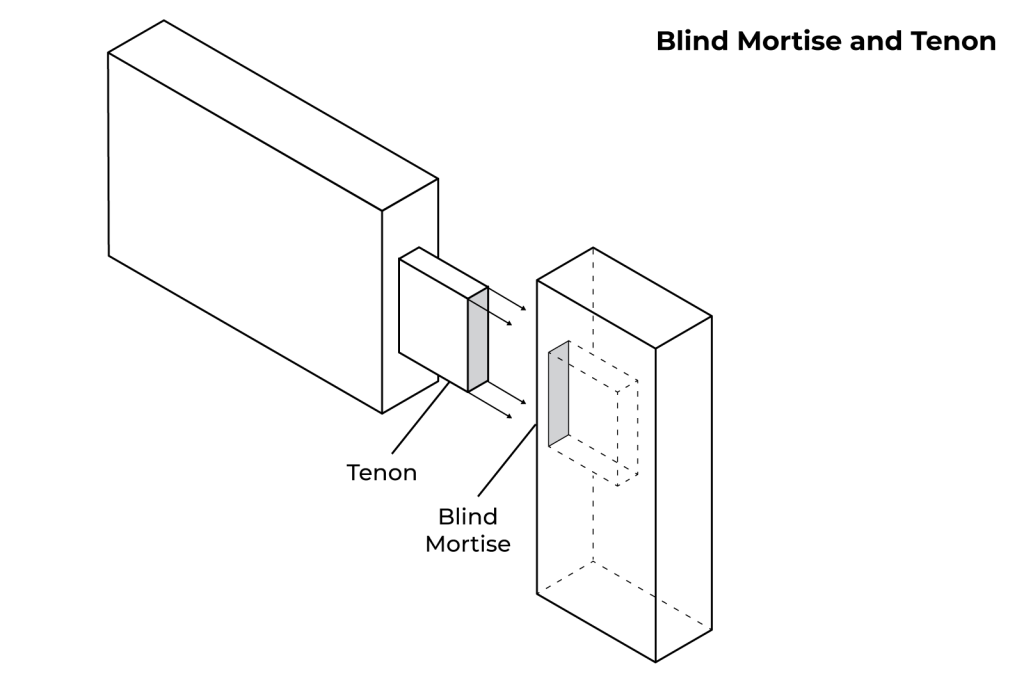
Blind mortise and tenon
Also known as a stopped mortise and tenon, this joint features a tenon that does not extend through the entire thickness of the mortised piece. It’s hidden from view, making it ideal for visible surfaces where a clean look is desired.
Advantages
Clean, invisible appearance from the outside
Suitable for situations where the back of the joint isn’t accessible
Disadvantages
Slightly less strong than a through tenon
Can be more challenging to cut accurately, as the mortise depth is critical
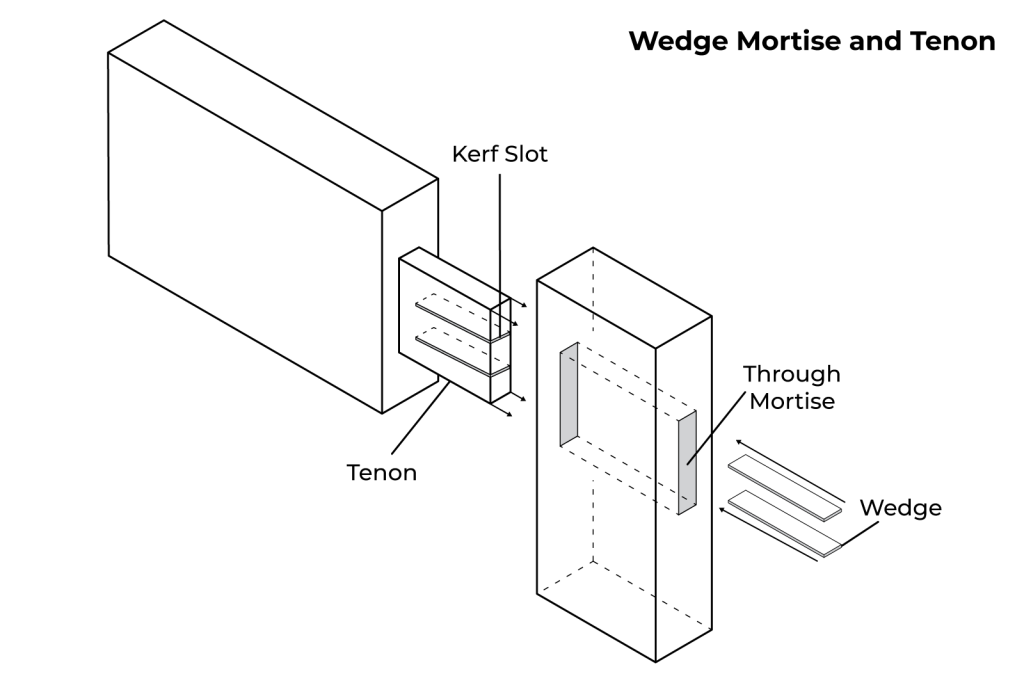
Wedged mortise and tenon
This variation involves driving a wedge into the end of the tenon after assembly, causing it to expand and lock tightly in the mortise. It can be used with both through and blind tenons.
Advantages
Extremely strong and resistant to pulling apart
Can allow for some wood movement while maintaining tightness
Decorative when used with contrasting wood for the wedge
Disadvantages
More complex to execute properly
Can be difficult or impossible to disassemble if needed
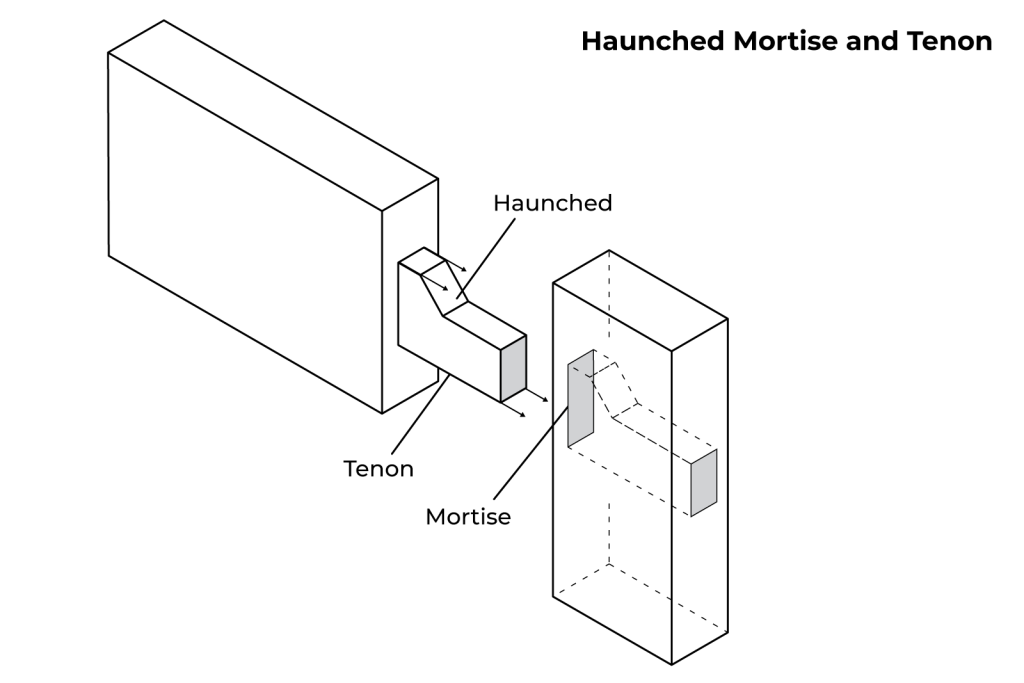
Haunched mortise and tenon
In this joint, the tenon has a small projecting part (the haunch) that fits into a corresponding notch in the mortise. This is often used in frame and panel construction.
Advantages
Provides additional resistance to twisting
Allows for a wider tenon in rail-to-stile joints without weakening the stile
Disadvantages
More complex to lay out and cut accurately
Requires careful fitting to ensure the haunch doesn’t prevent full closure of the joint
What is a mortise and tenon joint used for?
The versatility of mortise and tenon joints makes them suitable for a wide range of woodworking applications.
Furniture construction
Table legs
Chair frames
Bed frames
Door and window frames
The strength of mortise and tenon joints makes them ideal for these high-stress areas. They resist the constant opening and closing forces and help maintain square, true frames over time.
Timber framing in buildings
Traditional timber-frame construction relies heavily on large-scale mortise and tenon joinery. These joints connect massive beams and posts to create sturdy, long-lasting structures.
Cabinetry
Face frames when joining stiles and rails
Connecting stiles and rails in frame-and-panel doors
Attaching solid wood fronts to drawer boxes
Outdoor structures
Joining posts and beams on pergolas and arbors
Connecting frame members in gates
Creating durable outdoor tables and benches
What are the advantages of mortise and tenon joints?
Strength and durability
The large gluing surface and mechanical interlock of mortise and tenon joints create exceptionally strong connections. This strength comes from:
Extensive wood-to-wood contact
Resistance to pulling forces
Ability to withstand twisting and racking forces
Aesthetics
When executed well, mortise and tenon joints can be:
Nearly invisible, creating clean, seamless connections
Decorative elements in their own right, especially in through tenon designs
Indicative of high-quality, traditional craftsmanship
Versatility
These joints can be adapted to various:
Wood types, from soft pine to hard maple
Project sizes, from delicate boxes to massive timbers
Design styles, from rustic to contemporary
Longevity
Well-made mortise and tenon joints can last for centuries, as evidenced by surviving antique furniture and timber-frame buildings.
Repairability
Unlike some modern joinery methods, mortise and tenon joints can often be repaired if they eventually loosen or fail.
What are the disadvantages of a mortise and tenon joint?
The primary disadvantages of mortise and tenon joints are the precision and skill required to create them, the time-consuming nature of the process, and the potential for visible flaws in through-tenon designs.
Precision and skill required
Creating well-fitting mortise and tenon joints demands:
Accurate measurement and layout
Skilled use of tools, whether hand or power
Understanding of wood properties and movement
Time-consuming process
Compared to some modern joinery methods like pocket-holes or biscuits, mortise and tenon joints can be labor-intensive, with each joint requiring multiple steps.
Tool investment
While basic mortise and tenon joints can be cut with simple hand tools, efficiency often requires specialized tools like mortising machines or mortising attachments, tenon jigs for table saws, or router bits and jigs for mortises and tenons.
Material limitations
Mortise and tenon joints work best in solid wood. They are less suitable for plywood and other engineered woods, very thin stock, and end-grain to end-grain connections.
Potential for visible flaws
Especially with through tenons, any imperfections in the joint can be highly visible, potentially detracting from the overall appearance of the piece.
Tools for creating mortise and tenon joints
The choice between hand tools and power tools often depends on personal preference, the scale of the project, and the number of joints to be cut.
Hand tools
Chisels for cutting and cleaning up mortises
Mallets used with chisels for controlled force
Hand saws for cutting tenon cheeks and shoulders
Marking gauges for precise layout of mortises and tenons
Squares to ensure accurate, square cuts
Hand planes: For fine-tuning tenon fit
Power tools
Router with edge guide for cutting mortises
Plunge router with jig for efficient mortise creation
Table saw with tenoning jig for cutting tenons quickly and accurately
Band saw as an alternative for cutting tenons
Mortising machine dedicated to cutting square mortises
Drill press with mortising attachment for occasional mortise cutting
Step-by-step process for creating mortise and tenon joints
1. Marking and layout
Use a marking gauge to scribe the mortise location on the receiving piece
Mark the tenon dimensions on the inserting piece, accounting for desired fit (typically 1/3 to 1/2 the thickness of the mortised piece)
2. Cutting the mortise
If using hand tools, define the mortise edges with a chisel, then remove waste in layers
With a router, make multiple passes to reach full depth
Using a mortising machine, plunge to full depth in stages
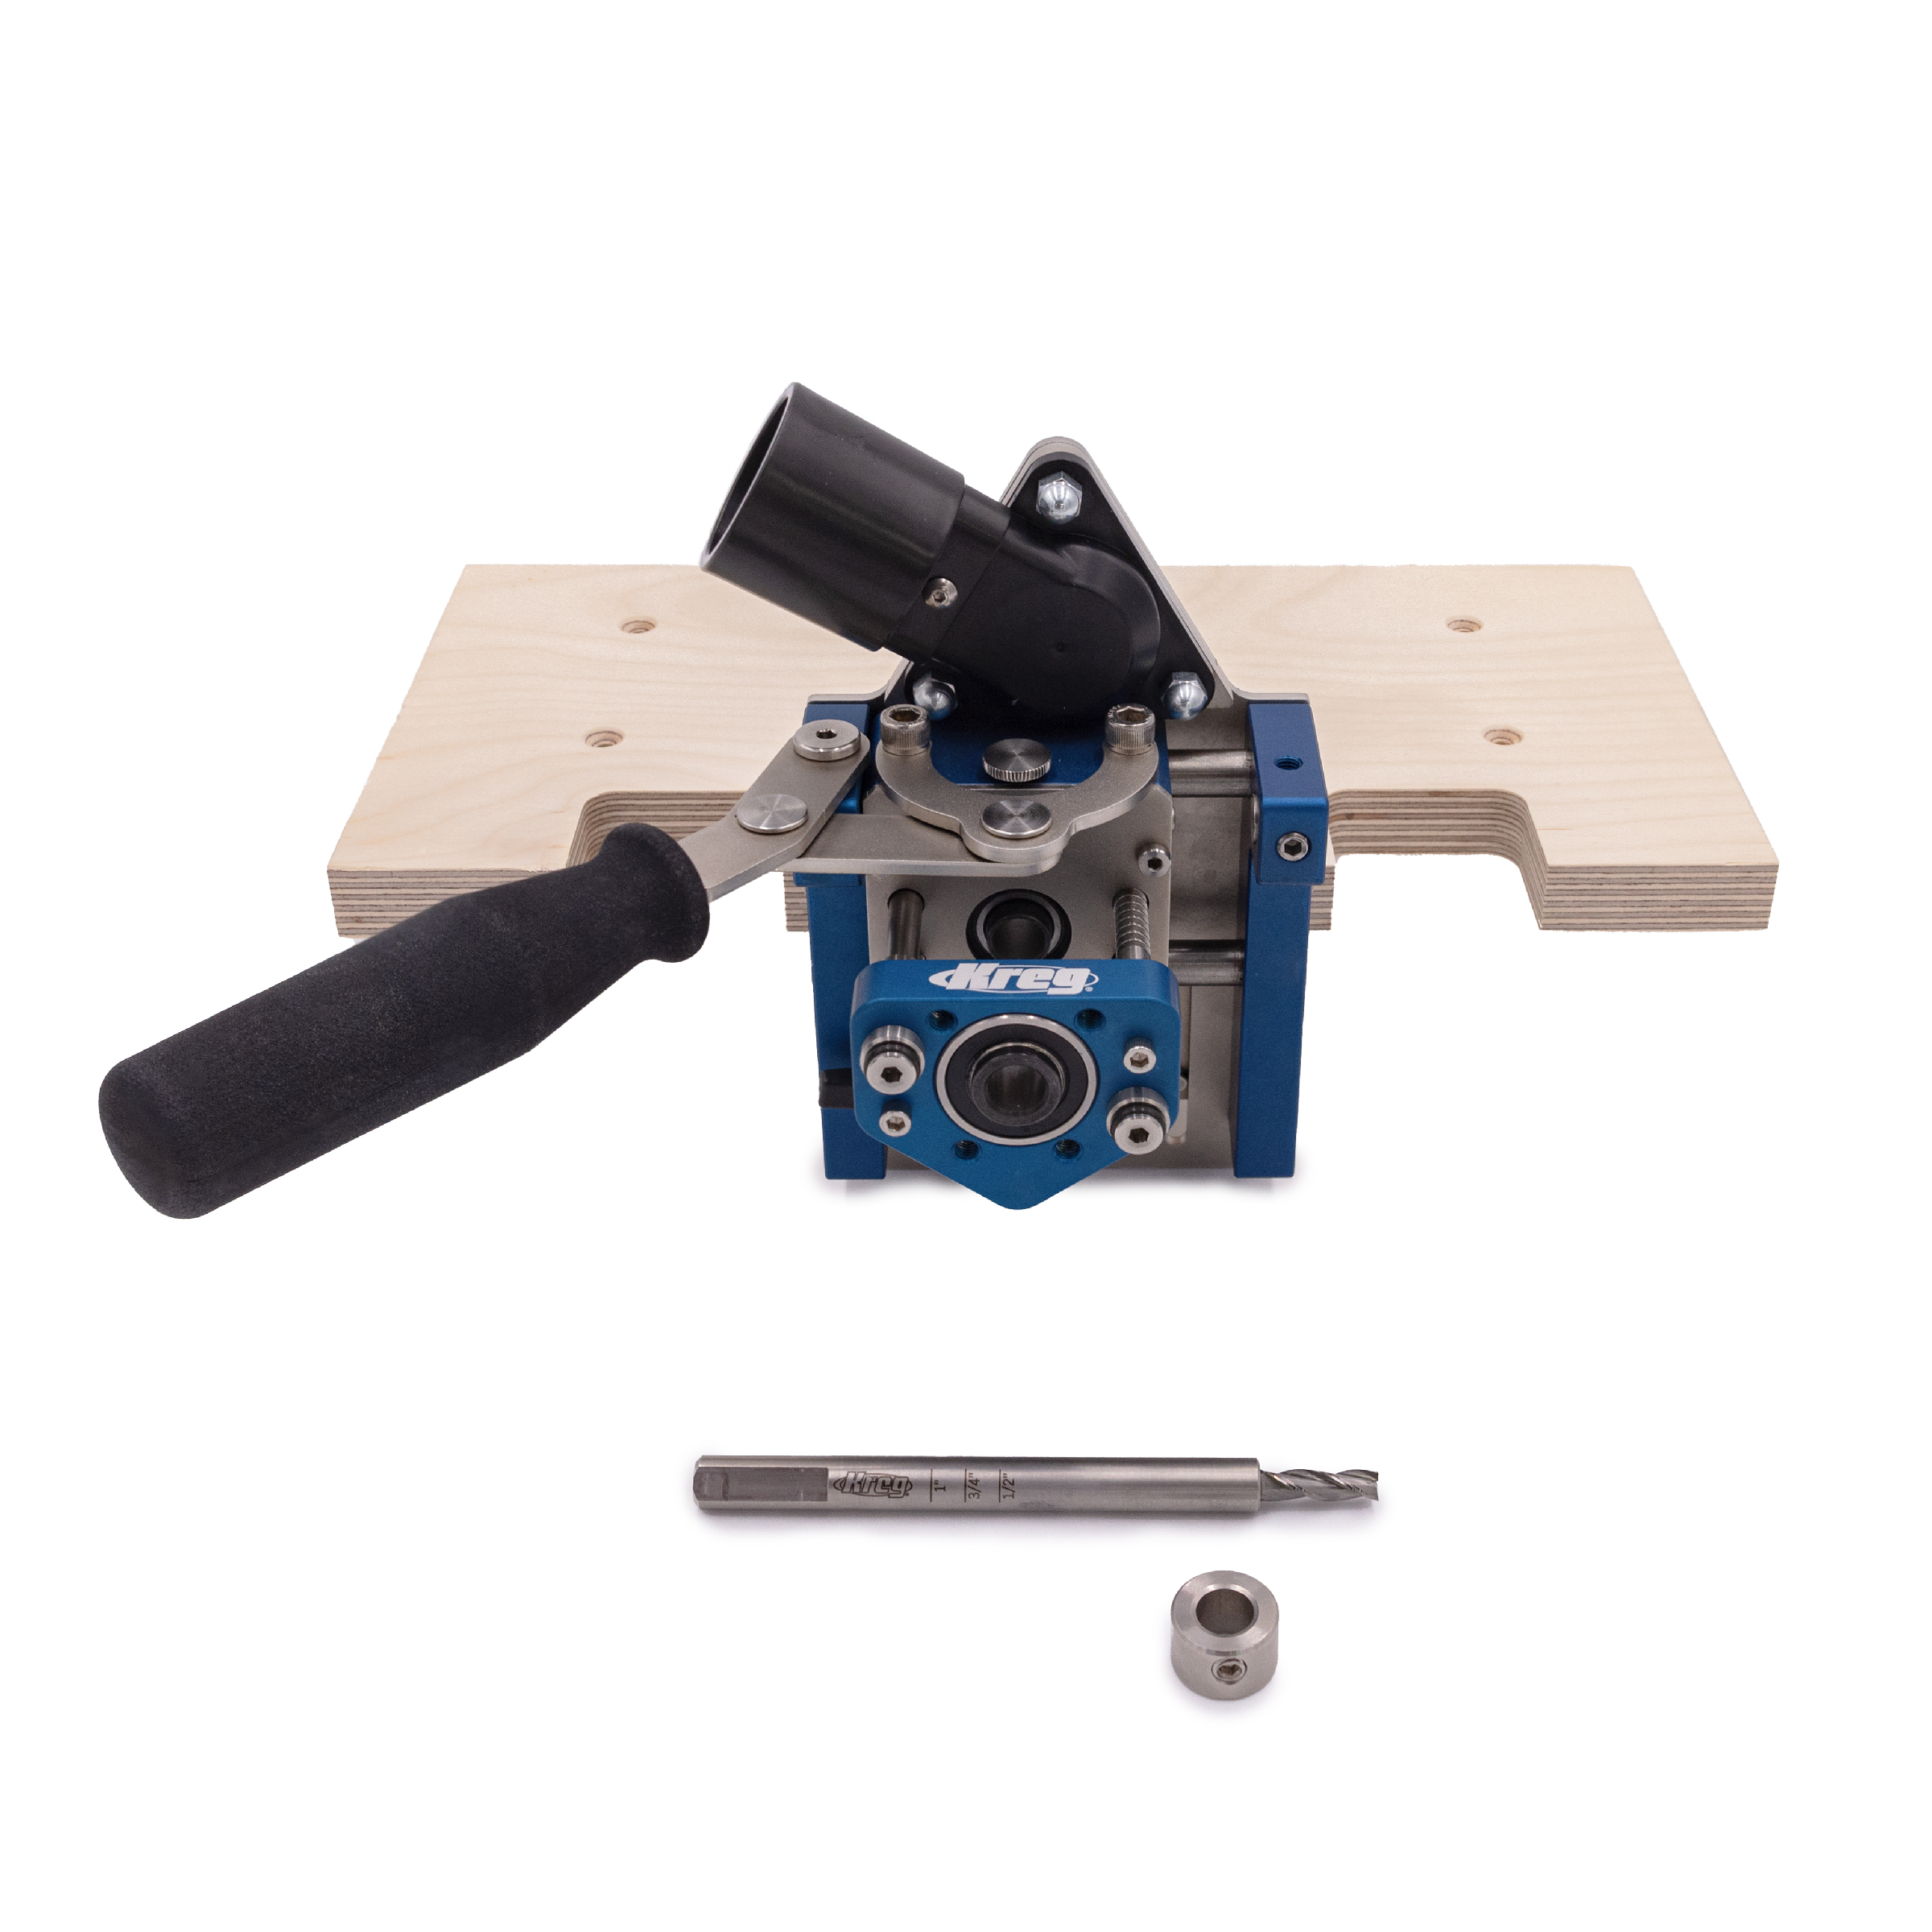
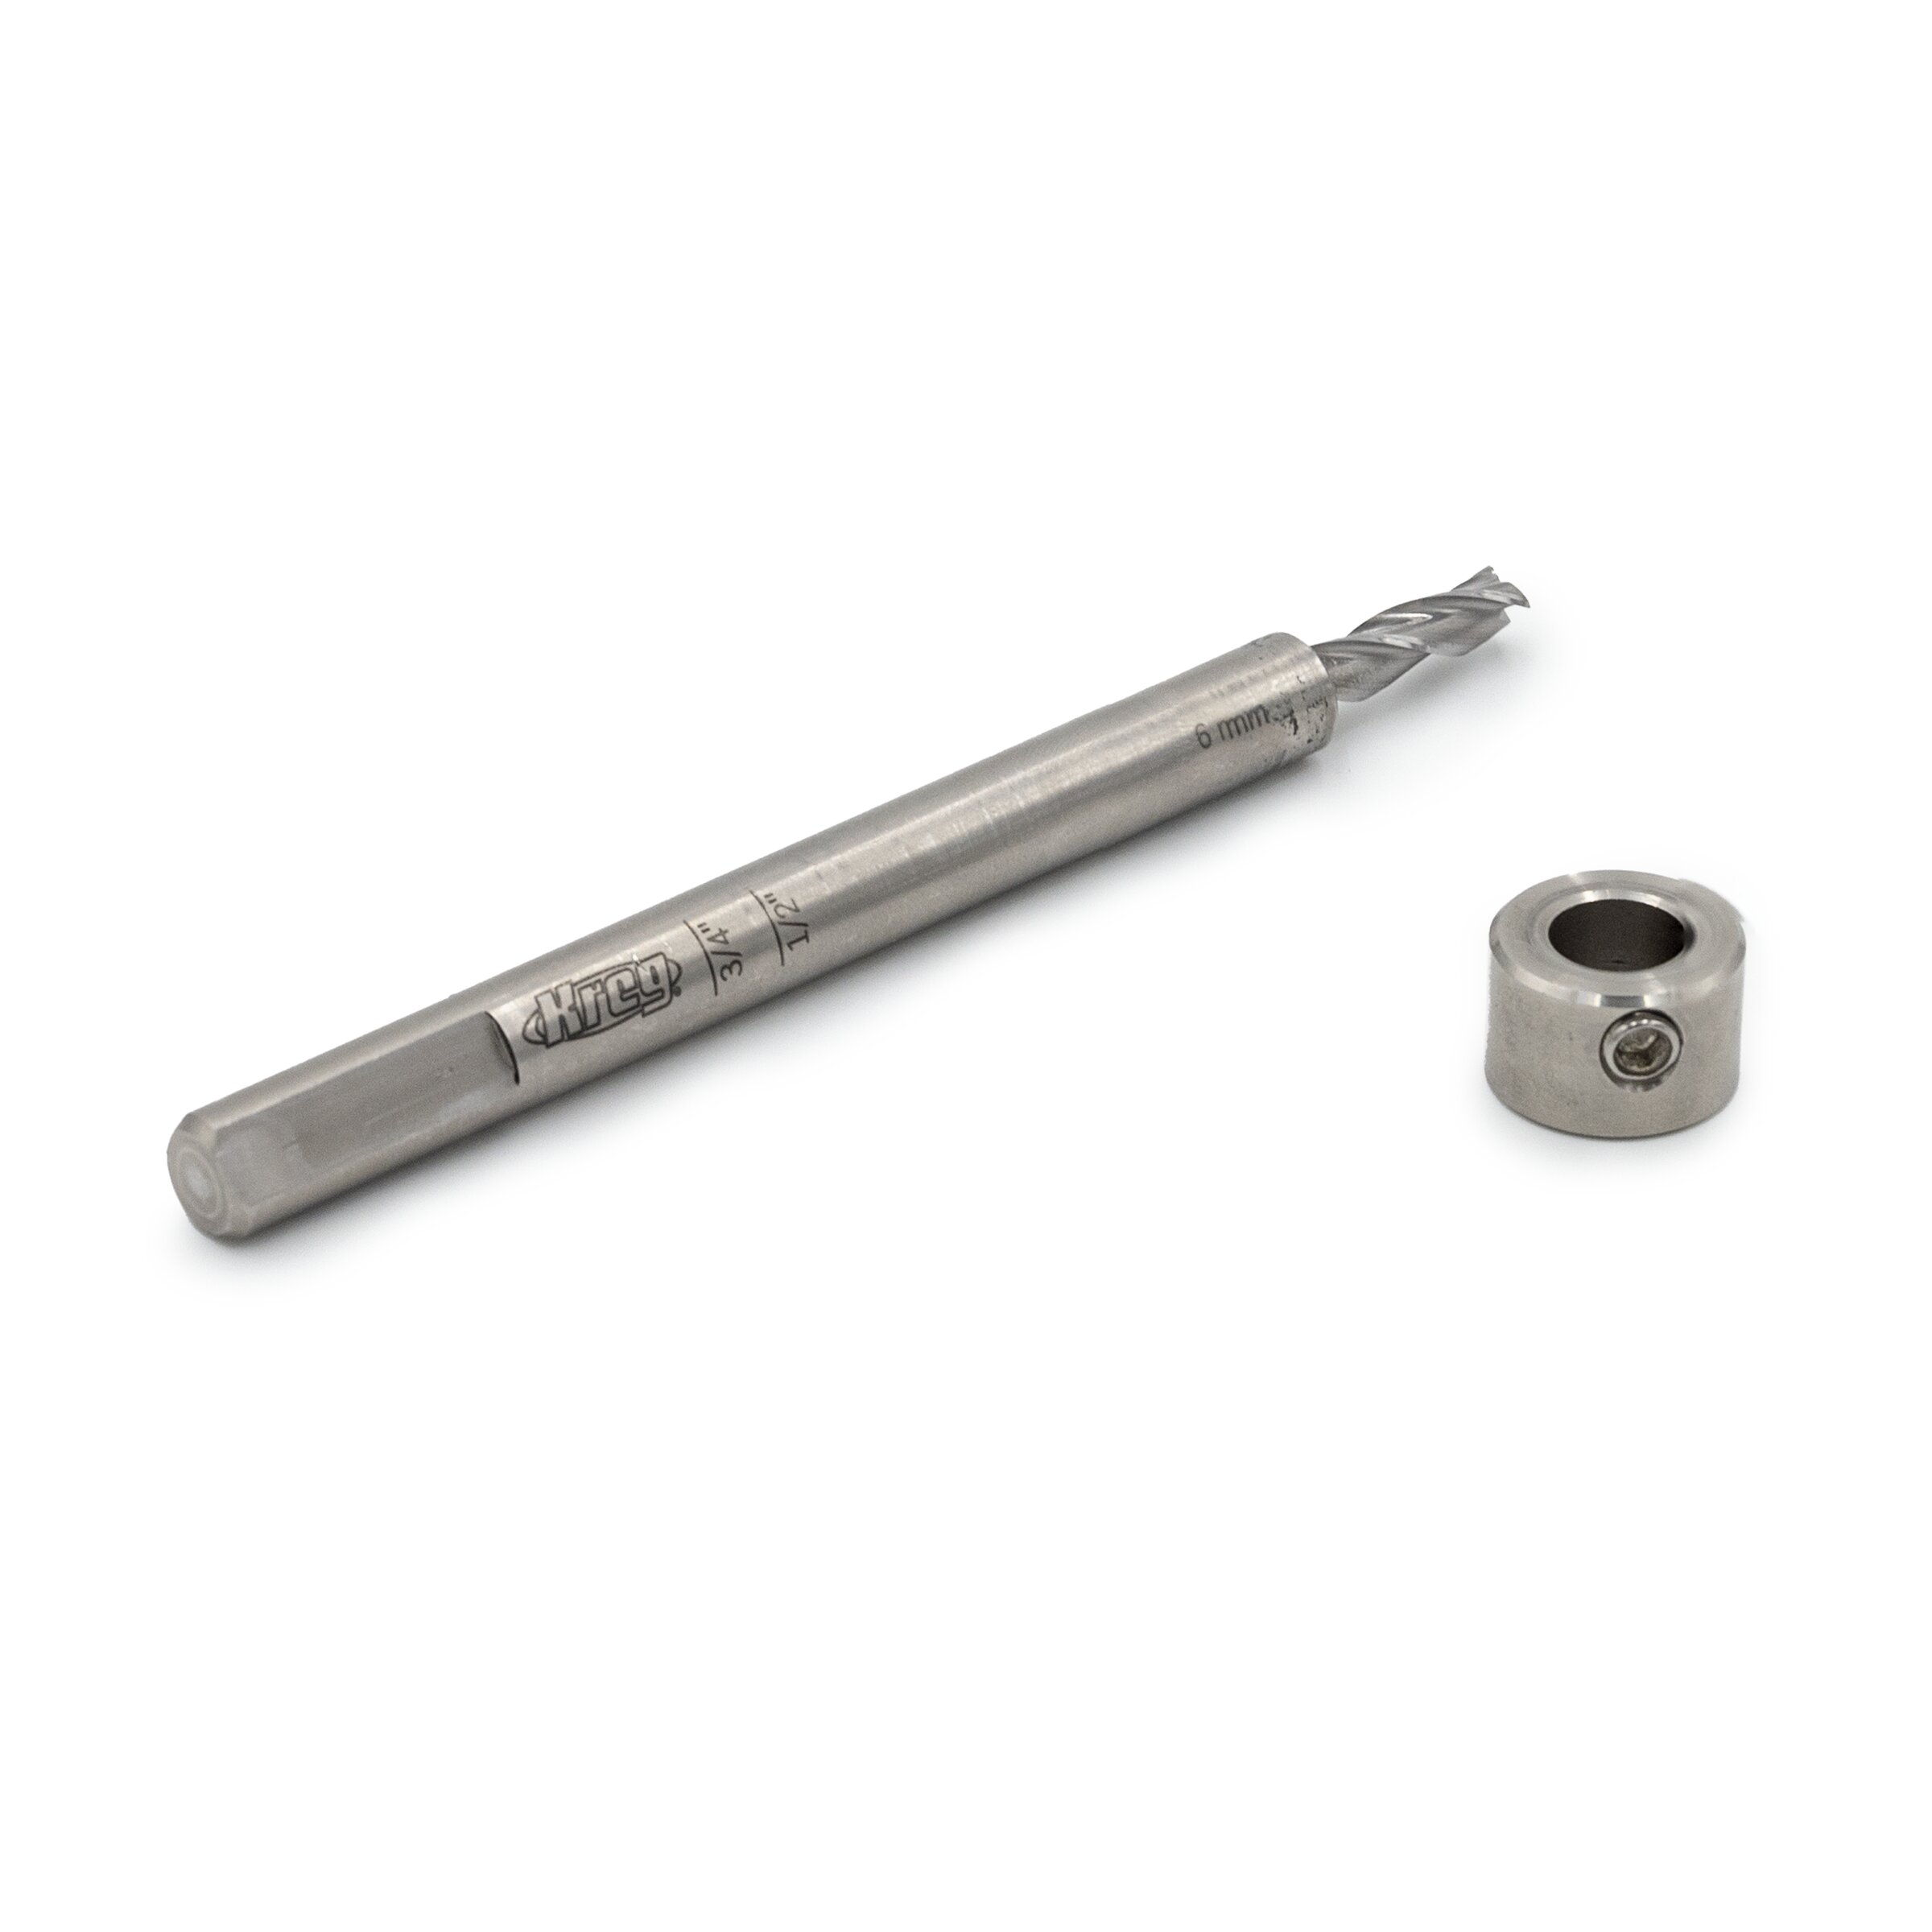
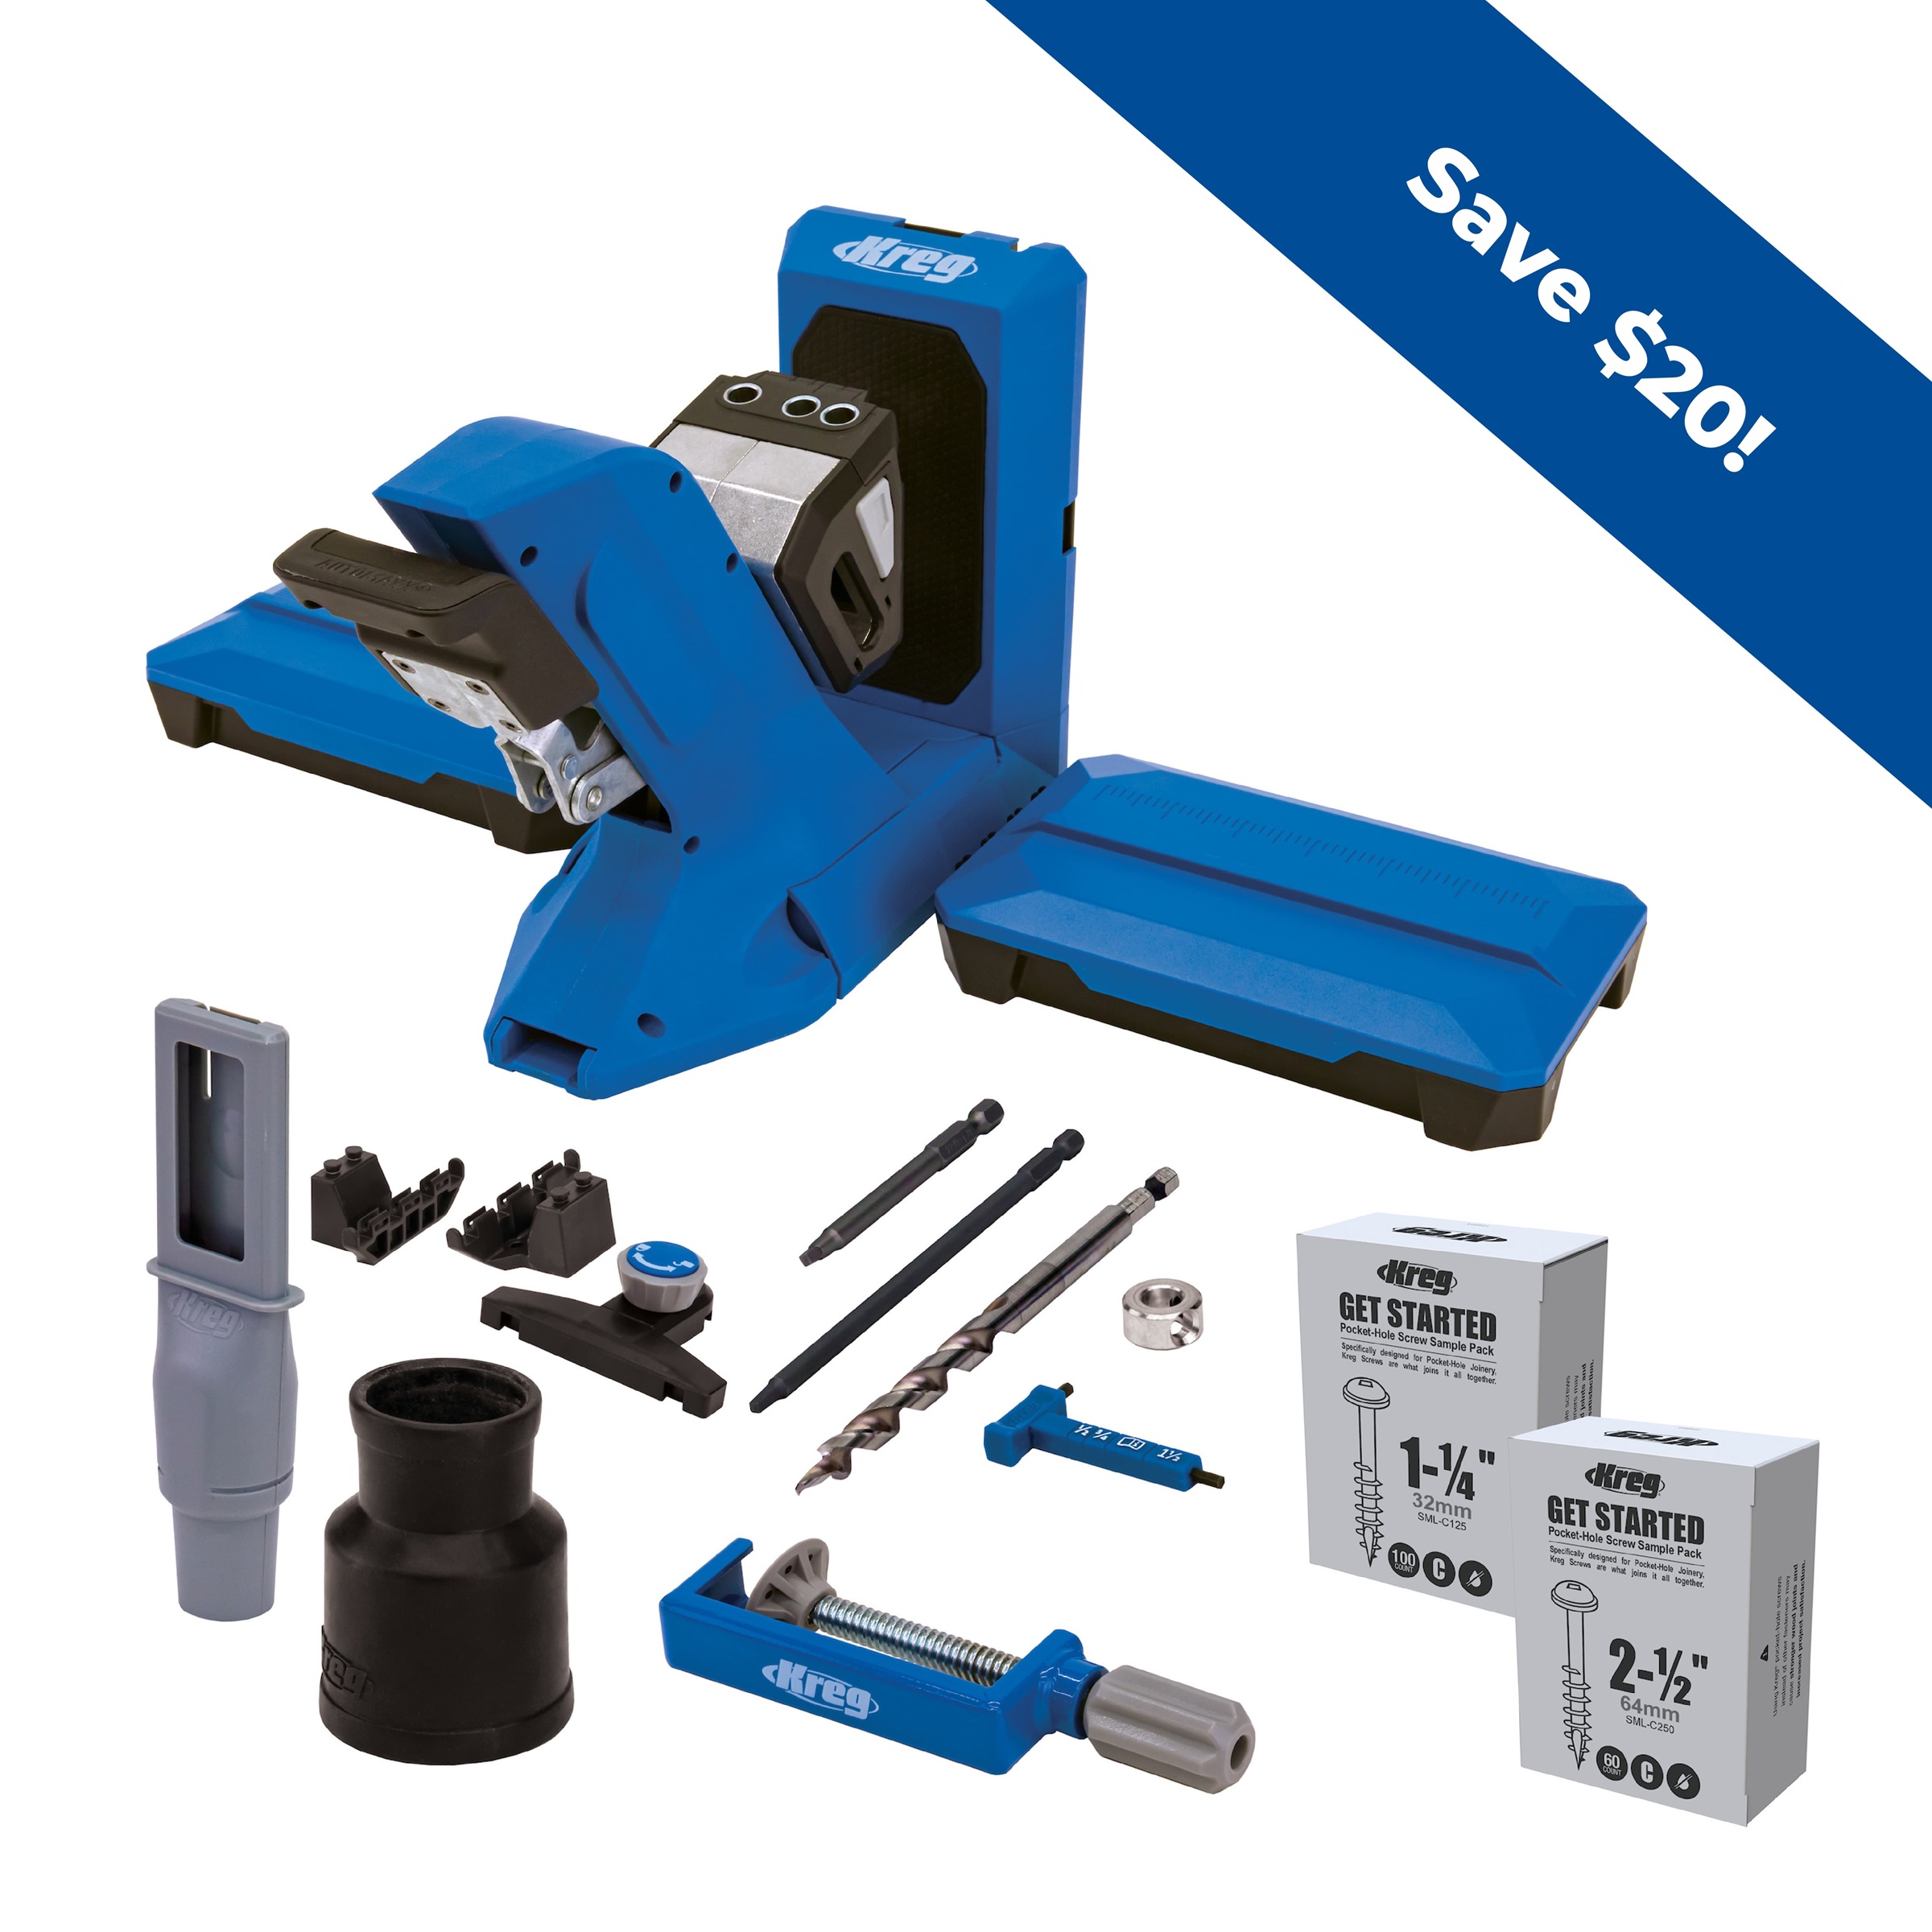
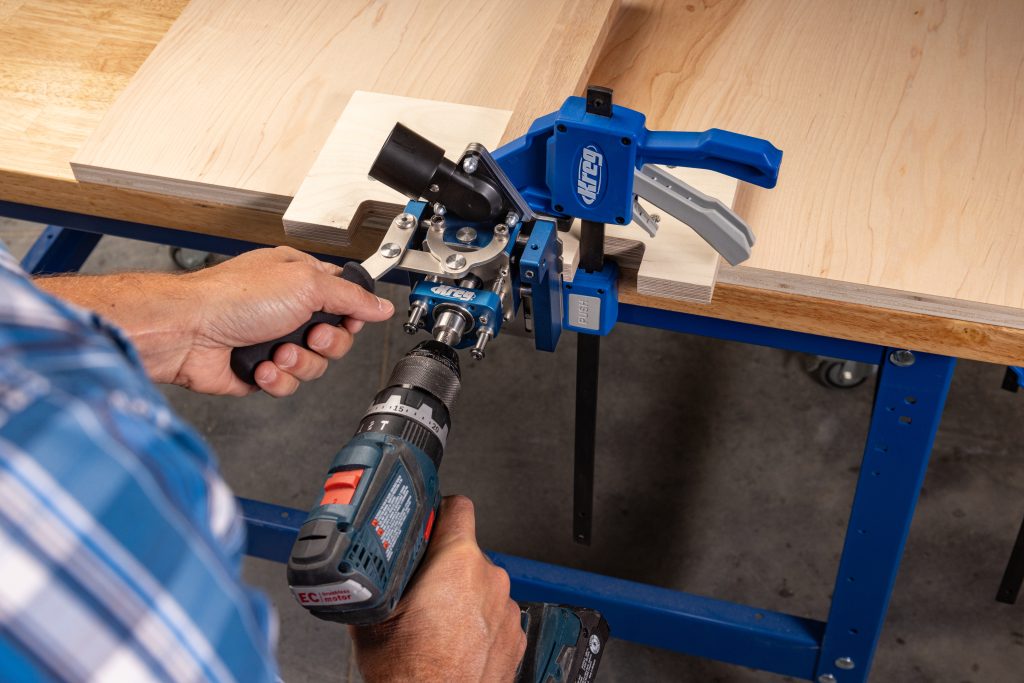
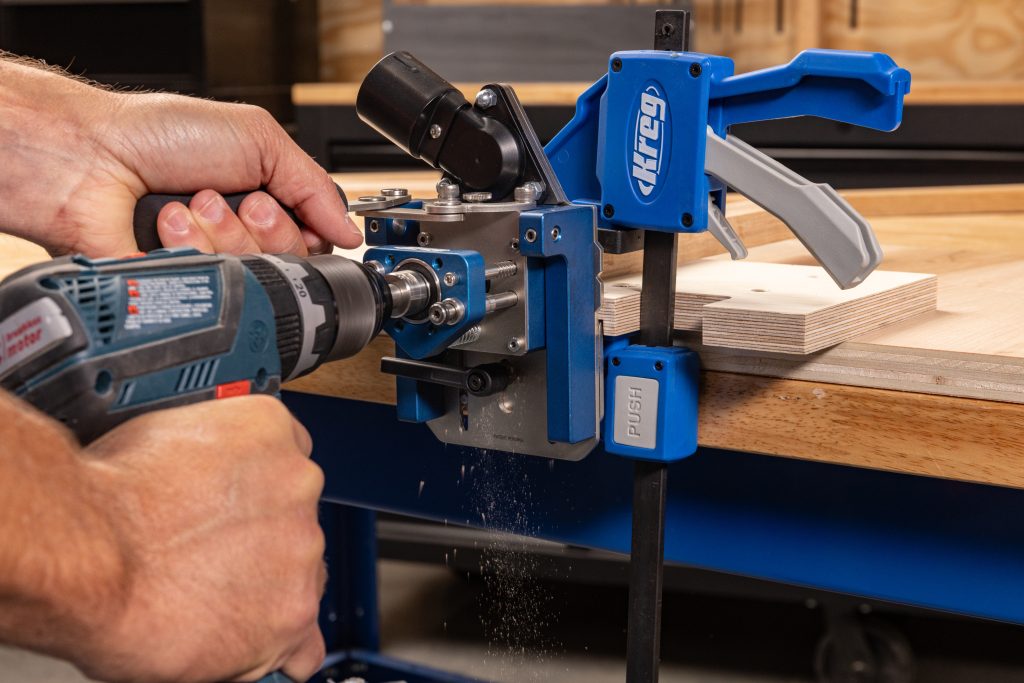
Update (November 2024): Kreg just released their latest joining tool – the MortiseMate. This tool allows you to cut mortises with just a drill – no router needed!
3. Cutting the tenon
For hand-cut tenons, saw just outside the marked lines, then clean up with a shoulder plane
On a table saw, use a tenoning jig or dado stack to cut cheeks and shoulders
Fine-tune the fit with hand tools as needed
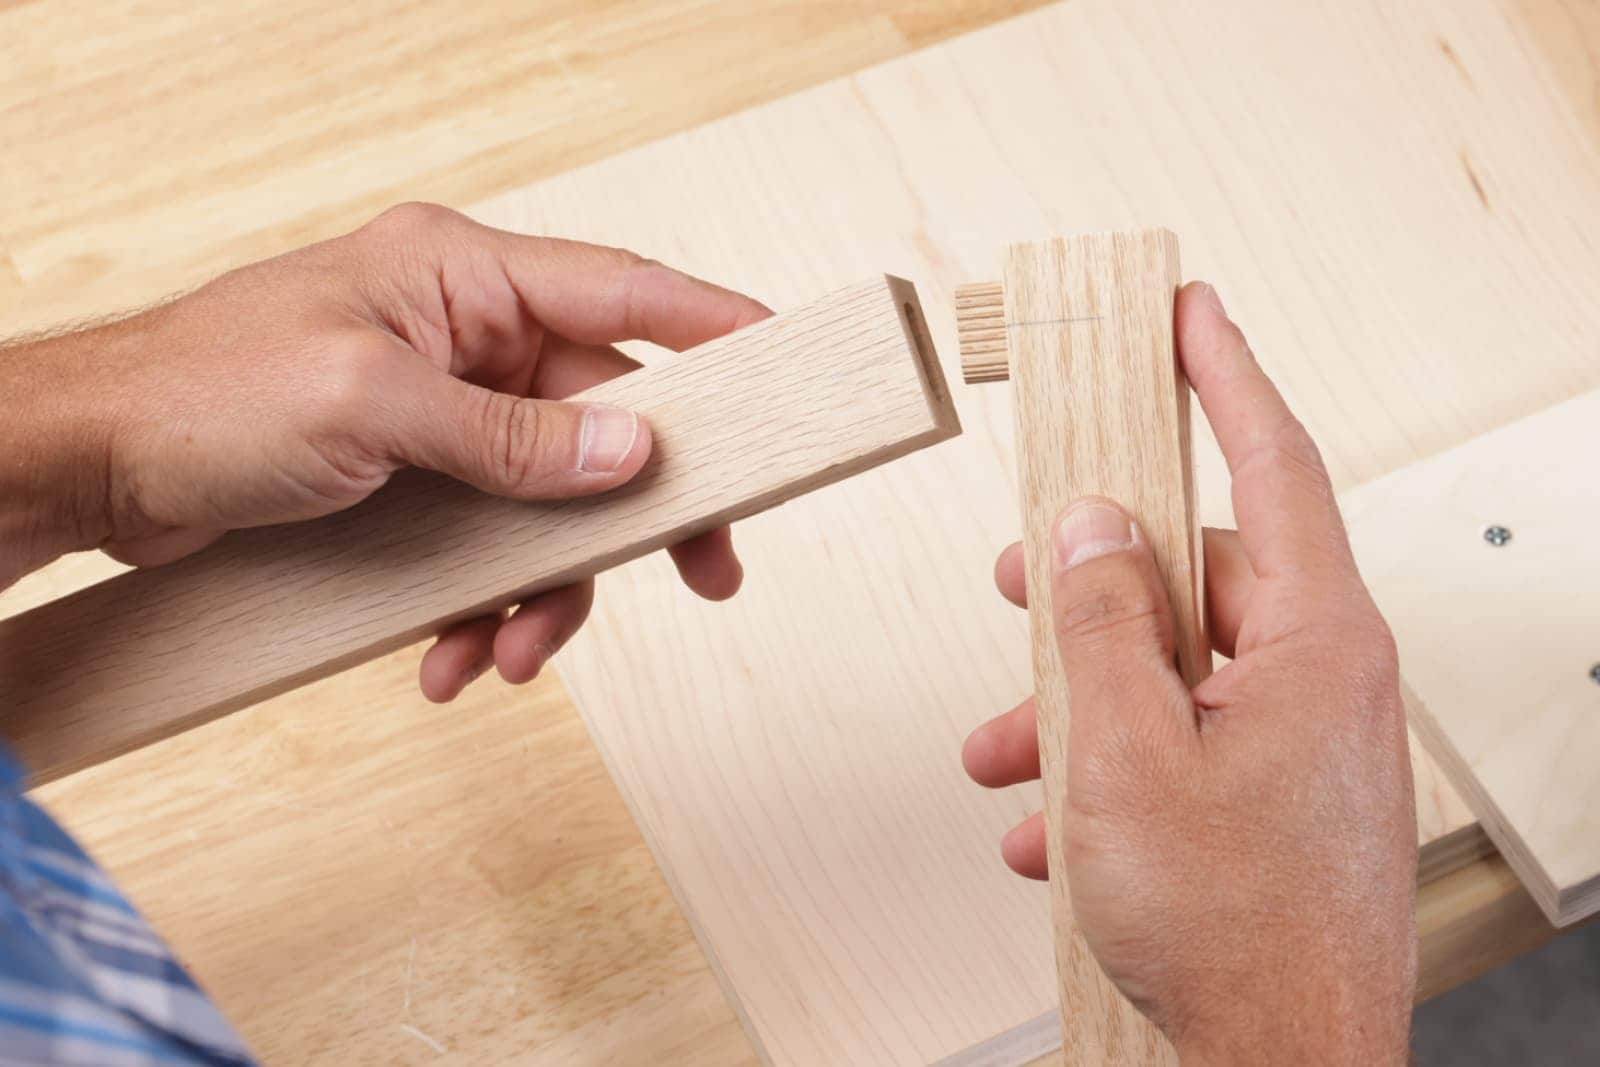
4. Test fitting
Dry fit the joint, looking for any gaps or tight spots
Adjust the tenon as necessary for a snug, even fit
5. Glue-up and assembly
Apply glue to both the mortise walls and the tenon surfaces
Assemble before the glue begins to set
Clamp and check for square; adjust as needed
Tips for perfect mortise and tenon joints
Accurate measuring and marking
Use high-quality marking tools for precise layout
Double-check all measurements before cutting
Consider making a full-scale drawing for complex joints
Ensuring a tight fit
Aim for a fit that’s snug but doesn’t require excessive force
The tenon should slide in smoothly with hand pressure
A too-tight fit can cause the mortise to split when assembled
Proper sizing
Make the tenon thickness about 1/3 to 1/2 the thickness of the mortised piece
Ensure the tenon length allows for wood movement in wide panels
Cutting sequence
Always cut the mortise first, then fit the tenon to it
This allows for easier adjustments to the tenon for a perfect fit
Practice and patience
Make test joints in scrap wood before working on your project
Take your time, especially when starting out
Consider wood movement
In wide panels, leave space at the top of the mortise for seasonal expansion
Use slight shoulder variations to accommodate movement in frame-and-panel construction
Common mistakes to avoid when creating mortise and tenon joints
- Cutting mortises too deep or tenons too long, weakening the joint
- Making joints too loose, reducing strength and potentially causing rattles
- Creating joints that are too tight, risking split wood during assembly
- Not accounting for wood movement in wide pieces
- Inconsistent layout leading to misaligned parts
Alternatives to mortise and tenon joints
While mortise and tenon joints are excellent for many applications, other joinery methods can be suitable alternatives in certain situations.
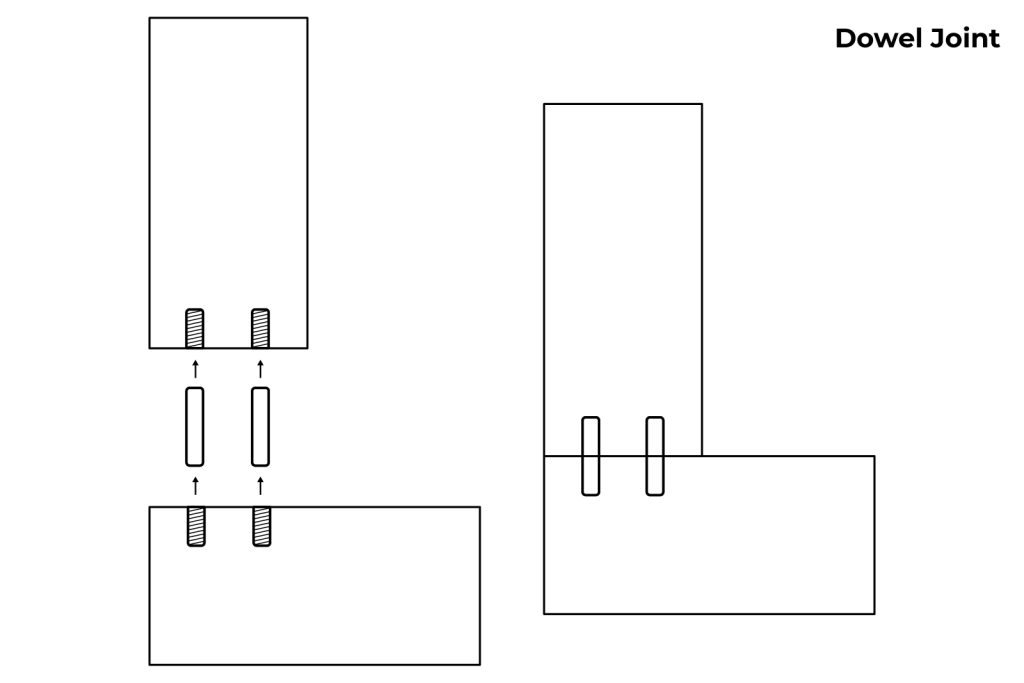
Dowel joints
Which use wooden or metal dowels to connect two pieces of wood.
Advantages
Can be faster to create, especially with jigs
Suitable for engineered woods
Provides good alignment
Disadvantages
Generally not as strong as mortise and tenon
Requires precise hole alignment
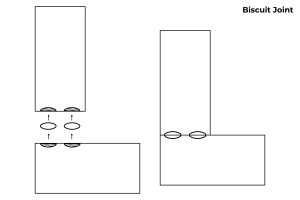
Biscuit joints
use small, football-shaped wooden inserts to join board edges or panels.
Advantages
Quick to cut with a biscuit joiner
Excellent for panel glue-ups and mitered corners
Provides good alignment
Disadvantages
Not as strong as mortise and tenon for frame construction
Limited strength in end-grain applications
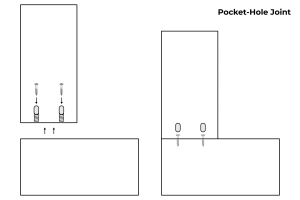
Pocket-hole joinery
is another time-tested method using angled holes and screws to create strong connections in a variety of applications.
Advantages
Very fast to create
Requires minimal specialized tools
Allows for easy disassembly if needed
Disadvantages
Not as traditional or refined in appearance
May not be suitable for fine furniture
Relies on mechanical fasteners rather than wood-to-wood contact
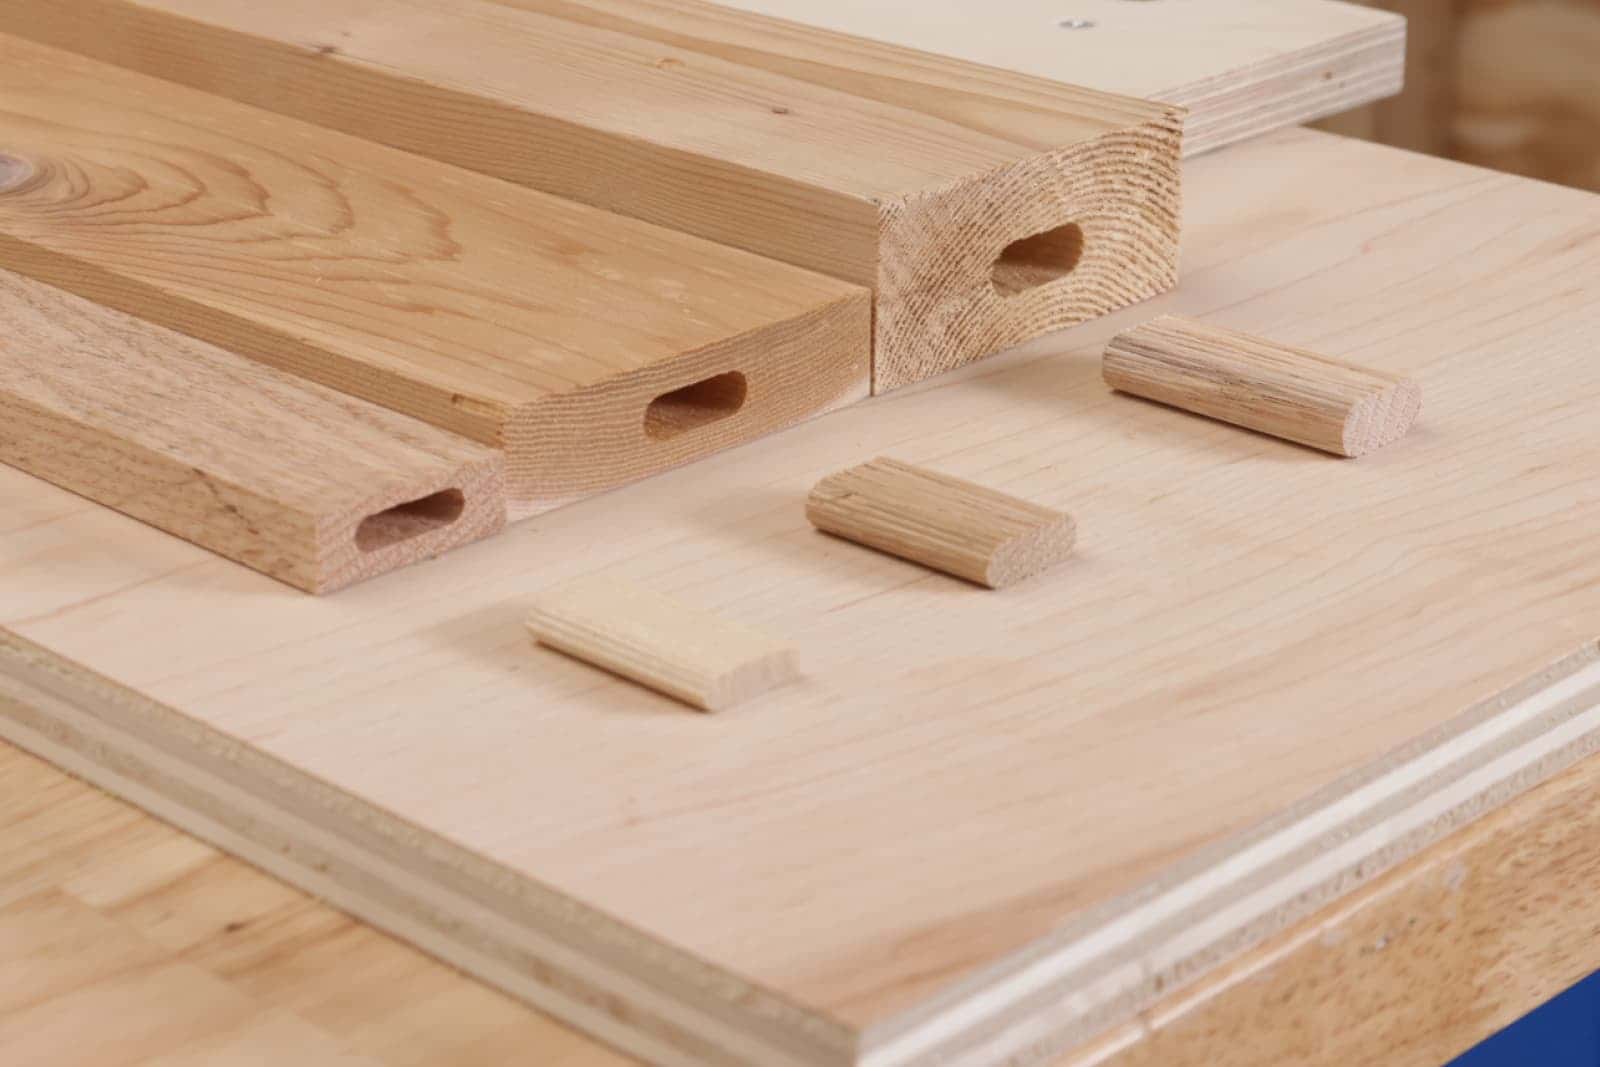
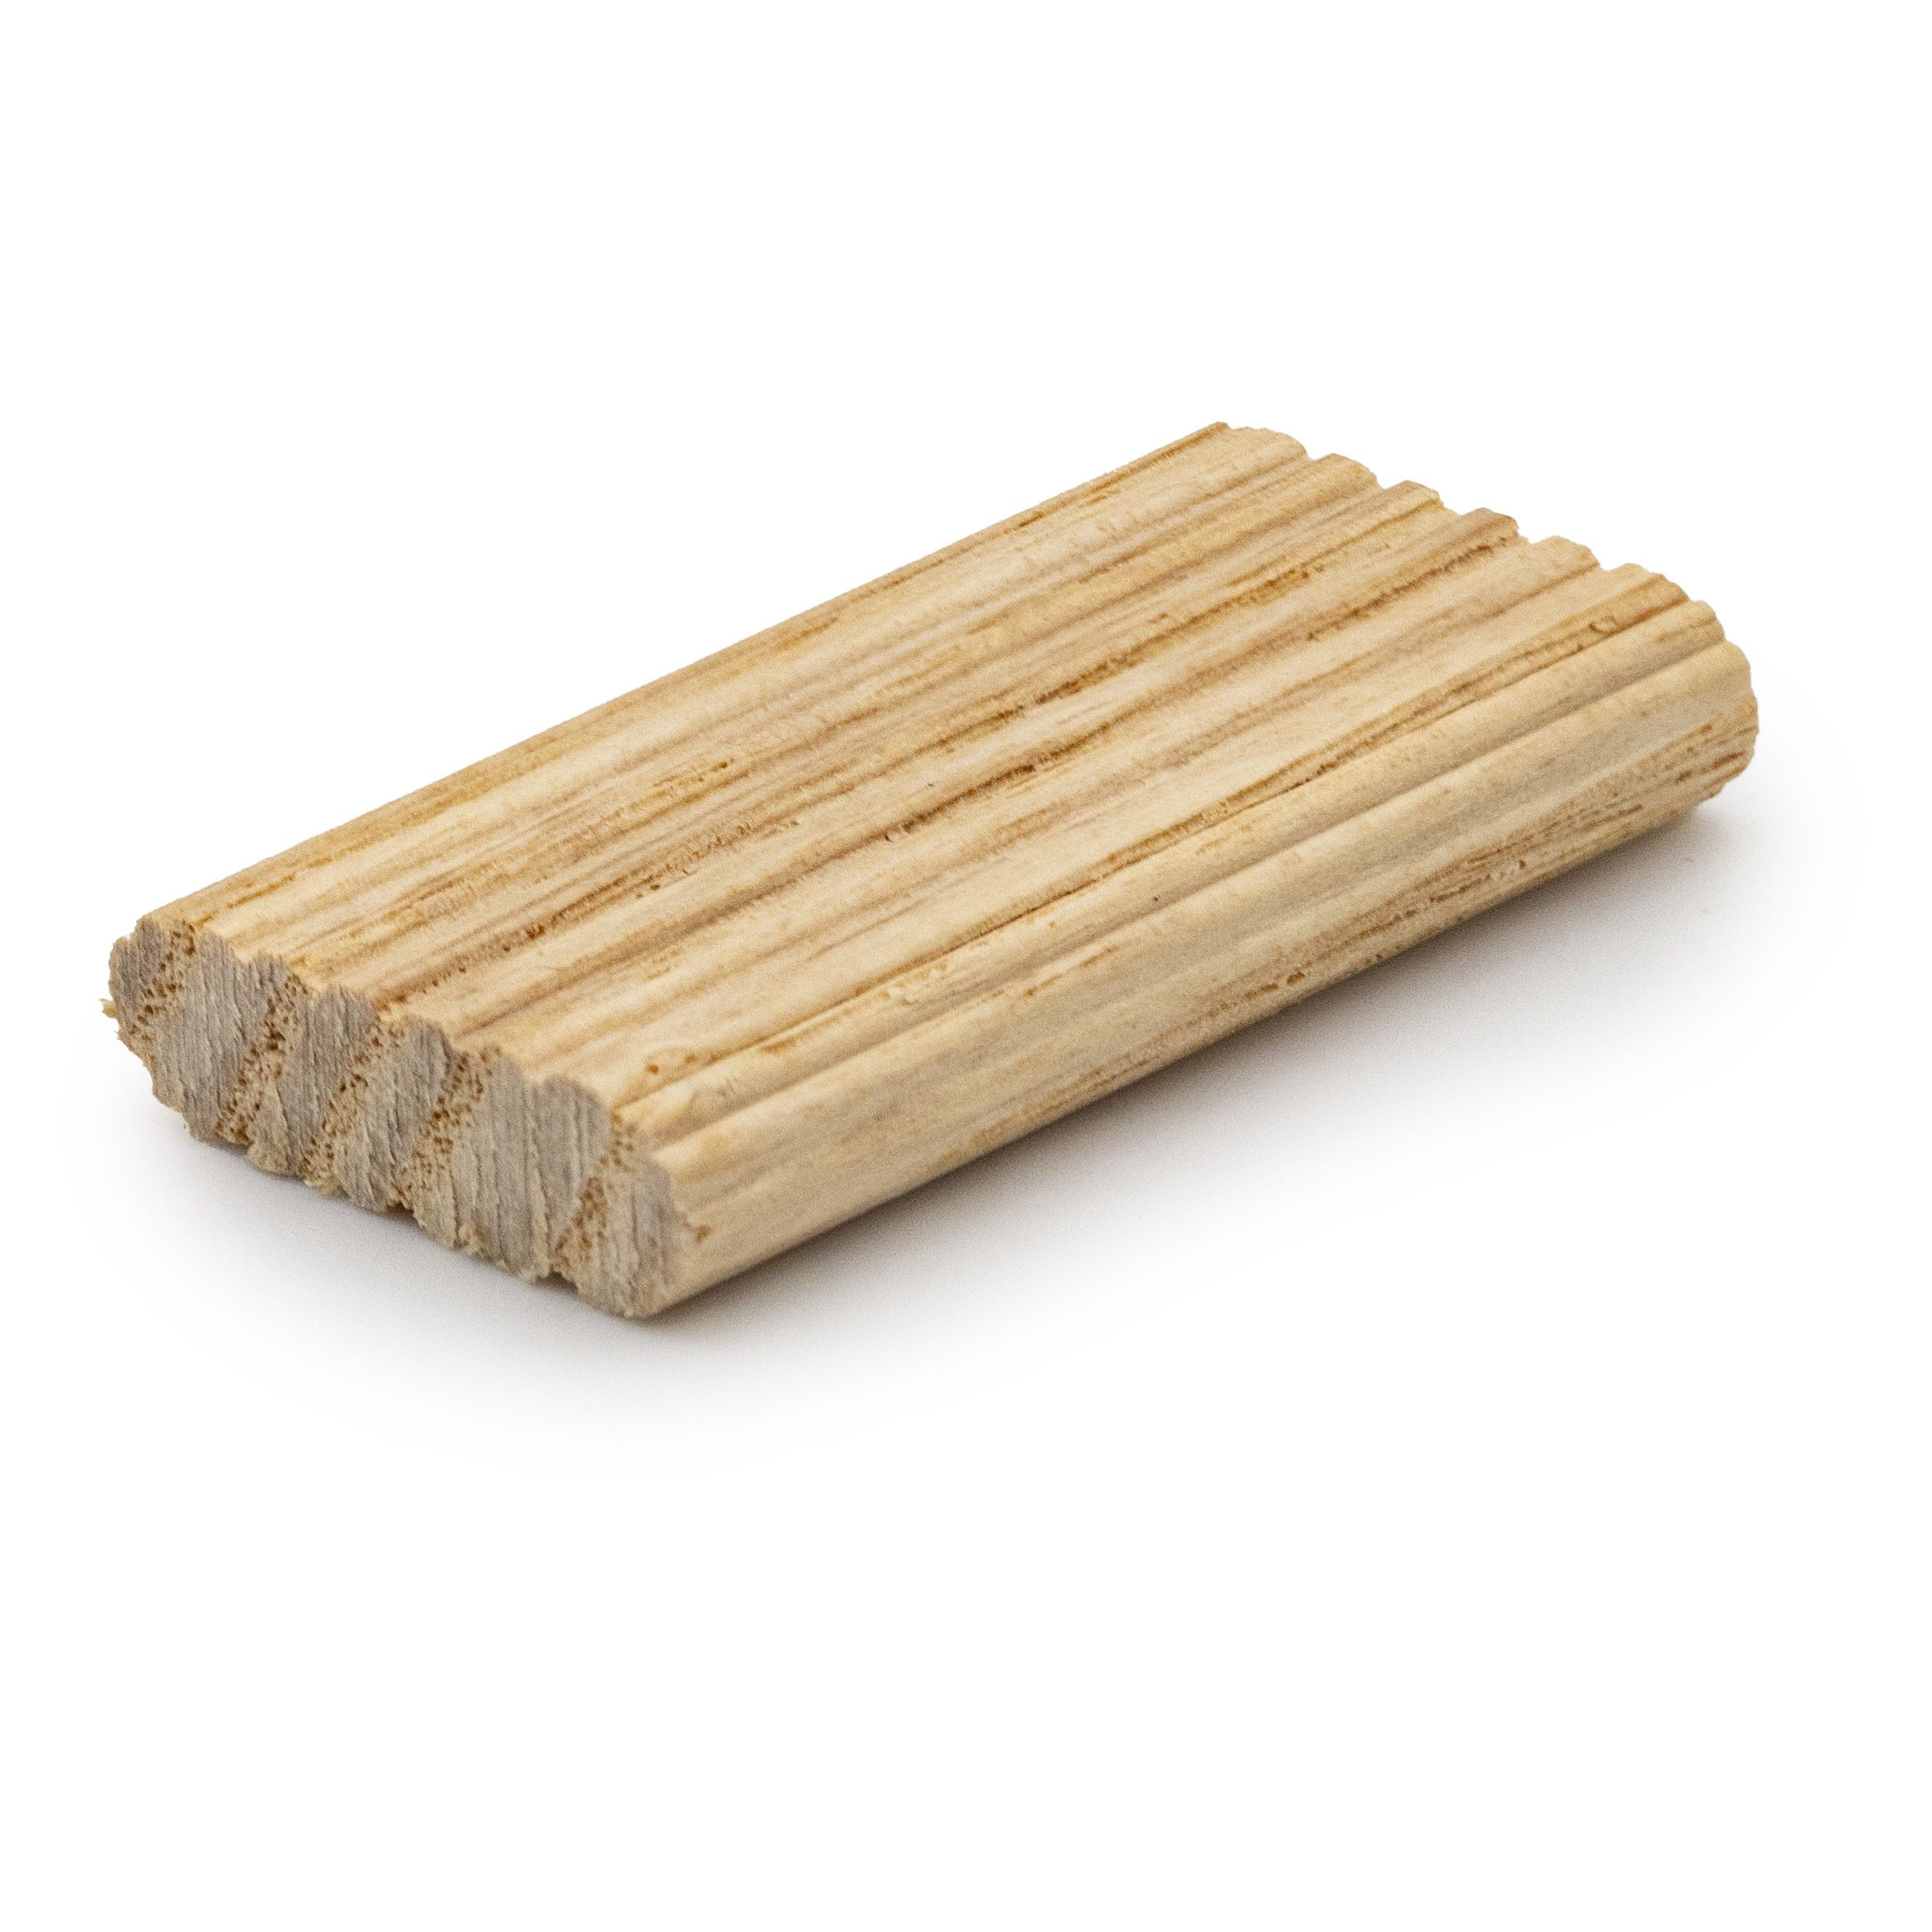
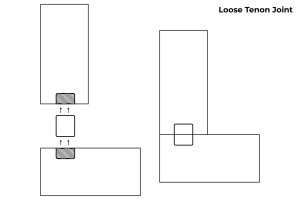
Loose (floating) tenons
provide a variation of mortise and tenon where both pieces receive mortises, connected by a separate tenon piece.
Advantages
Can be faster to produce than traditional mortise and tenon
Allows for easy creation of angled joints
Provides similar strength to traditional mortise and tenon
Disadvantages
Requires cutting mortises in both pieces
May not be suitable for very thin stock
Kreg just released their own loose tenon jig – the MortiseMate. This innovative tool allows you to create loose tenon joints with ease, combining the precision of a router with the simplicity of a drill.
FAQs about mortise and tenon joints
Do you cut the mortise or tenon first?
It’s generally recommended to cut the mortise first, then fit the tenon to it, as this allows for easier adjustments to achieve a perfect fit.
How long should a tenon be?
Generally, a tenon should be 1/3 to 1/2 the thickness of the mortised piece. For example, in a 3/4″ thick board, a tenon length of 1/4″ to 3/8″ would be appropriate.
Longer tenons don’t necessarily add strength and can actually weaken the mortised piece if done incorrectly.
Can I use mortise and tenon joints in plywood?
While it’s possible, it’s not ideal due to plywood’s layered structure. The thin layers can easily separate or crush under the stress of a tight-fitting tenon.
For engineered woods, consider alternatives like dowels, biscuits, or specially designed plywood connectors.
Do you glue mortise and tenon joints?
Not always. Some traditional designs, particularly in timber framing, rely on tight-fitting joints without glue. This allows for wood movement or future disassembly.
However, for most furniture and cabinetry applications, gluing provides maximum strength and durability.
What’s the strongest type of mortise and tenon joint?
Wedged through mortise and tenon joints are generally considered the strongest due to their mechanical locking mechanism. The wedges prevent the joint from pulling apart even if the glue fails.
Are dowels as strong as mortise and tenon?
While dowels can be strong in certain applications, they typically aren’t as strong as properly executed mortise and tenon joints, which offer larger gluing surfaces and better mechanical resistance to various forces.
To learn more about the new MortiseMate loose tenon jig, check out this video: