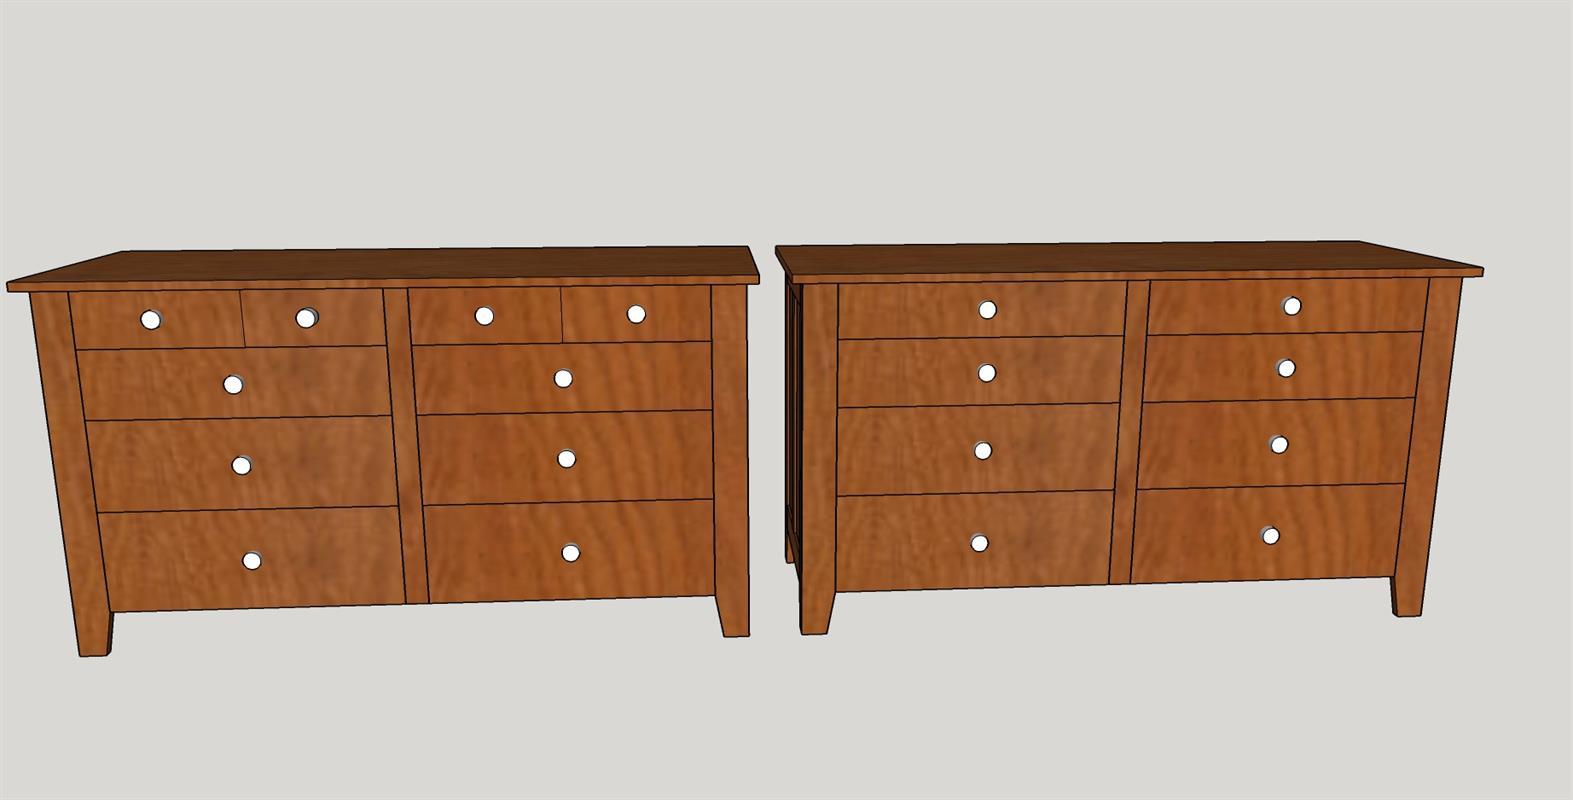
Craftsman Style Eight Drawer Dresser
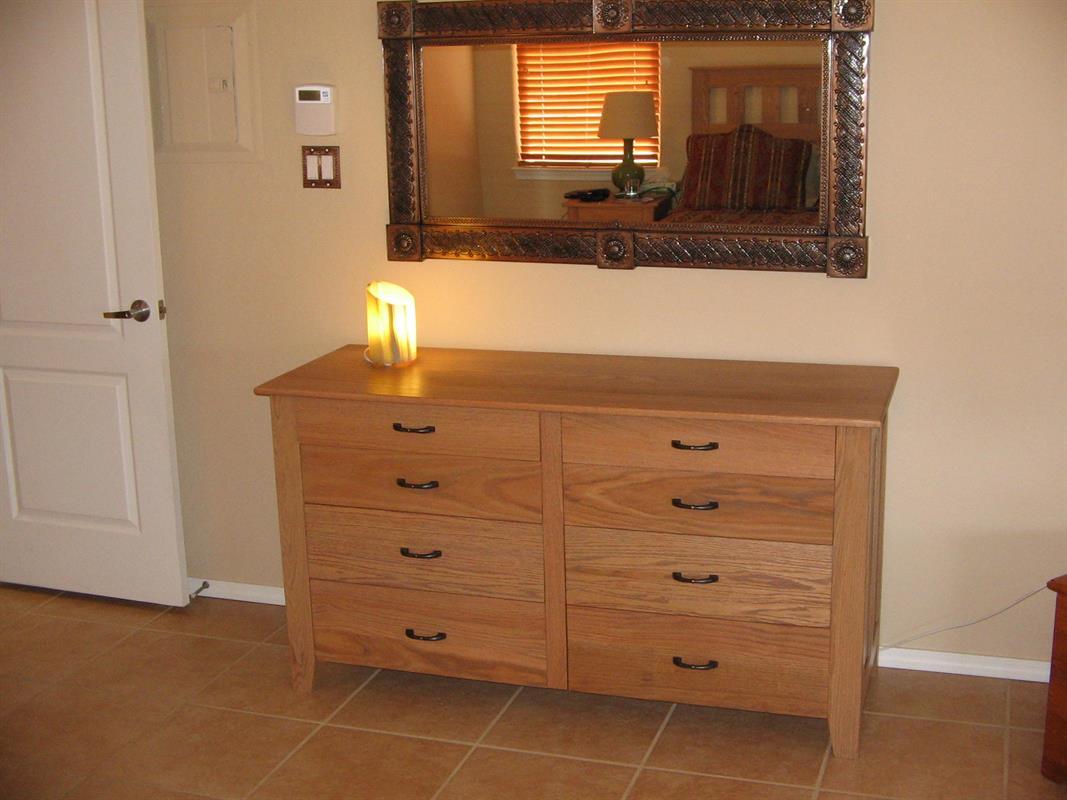
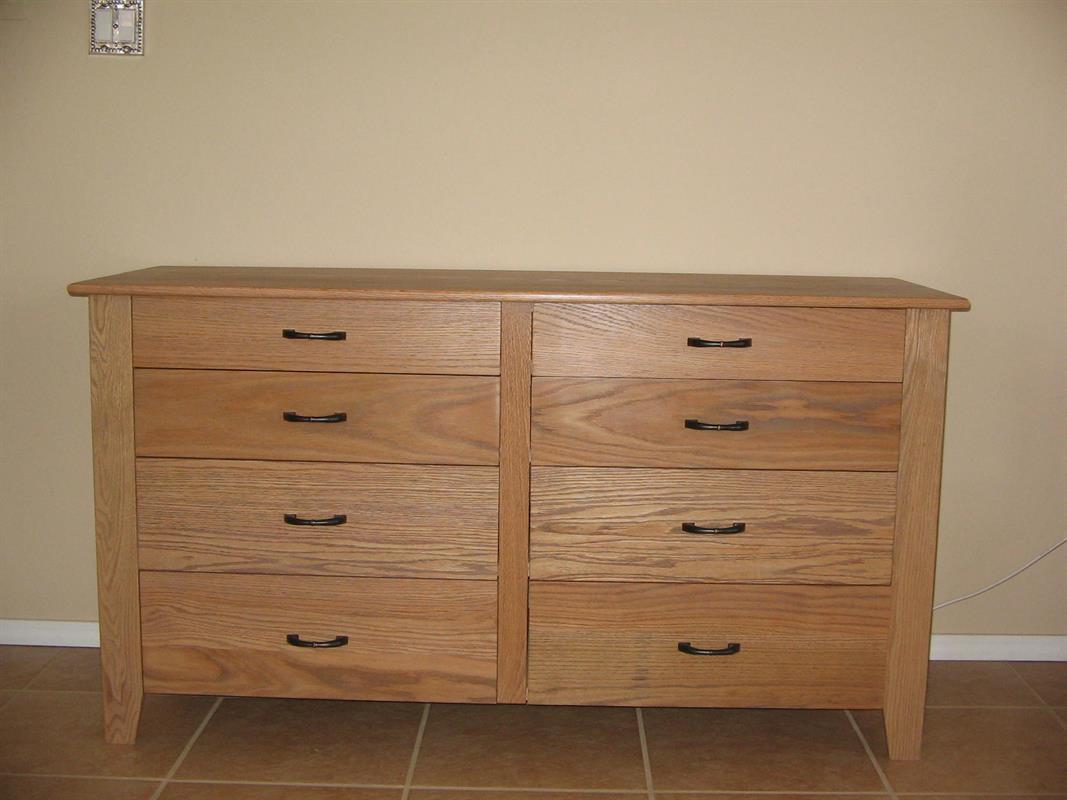
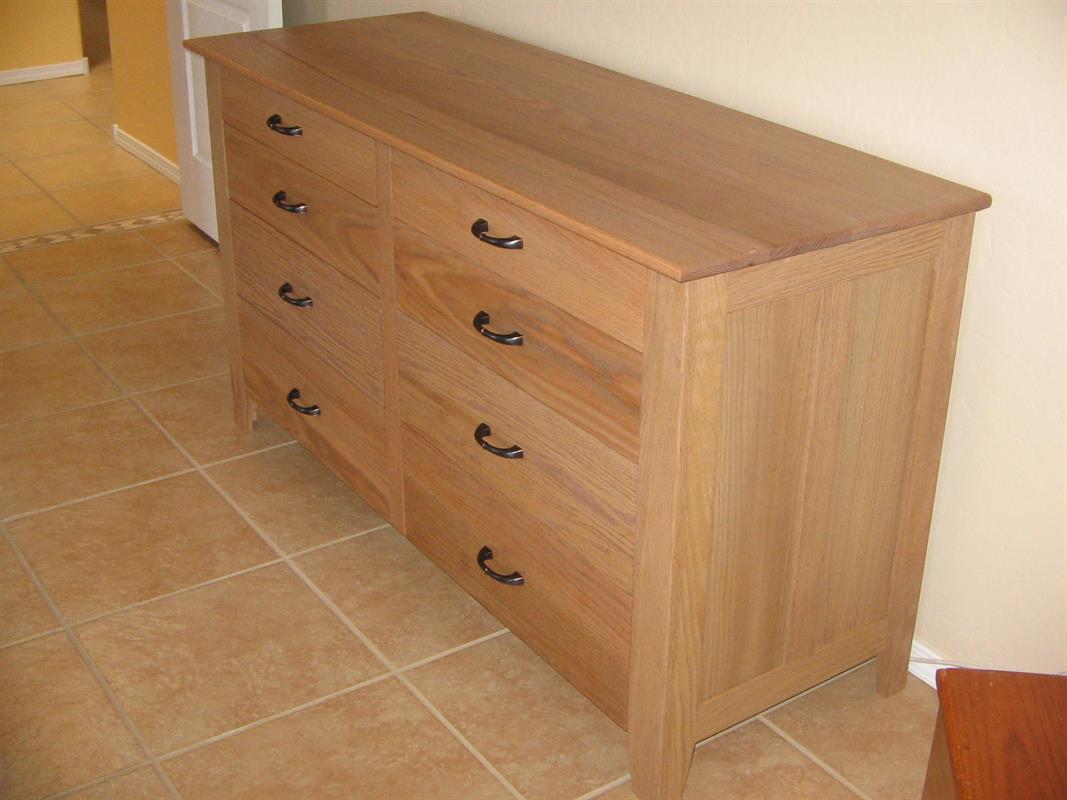
By fcbeckerCraftsman style eight drawer Dresser. Built with red oak, this Dresser makes a beautiful addition to any bedroom. This simple yet elegant design will become a family heirloom.
Directions
-
Introduction
Please be sure to read through complete instructions before you begin any work on this project. Also keep in mind that plywood may be slightly thinner than its stated thickness. So some minor adjustments to plans may be required. Another good practice to use is, after the original carcass is assembled, cut to fit all additional pieces that are needed. While every effort was made to make the cut dimensions listed as accurate as possible, cutting to fit will adjust for any slight discrepancies in your assembly.
-
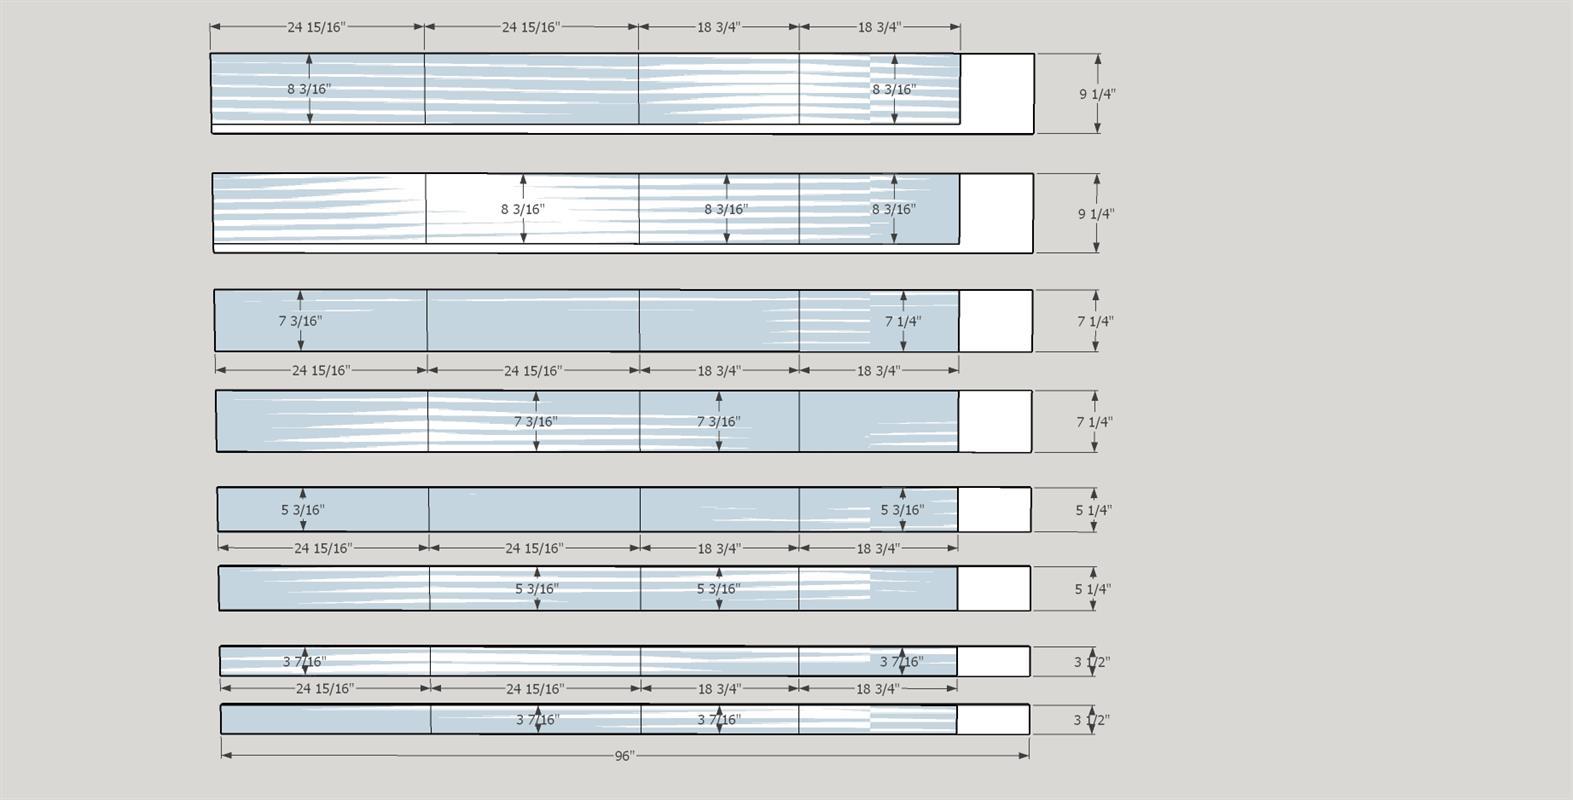
Cut 3/4" Oak pieces
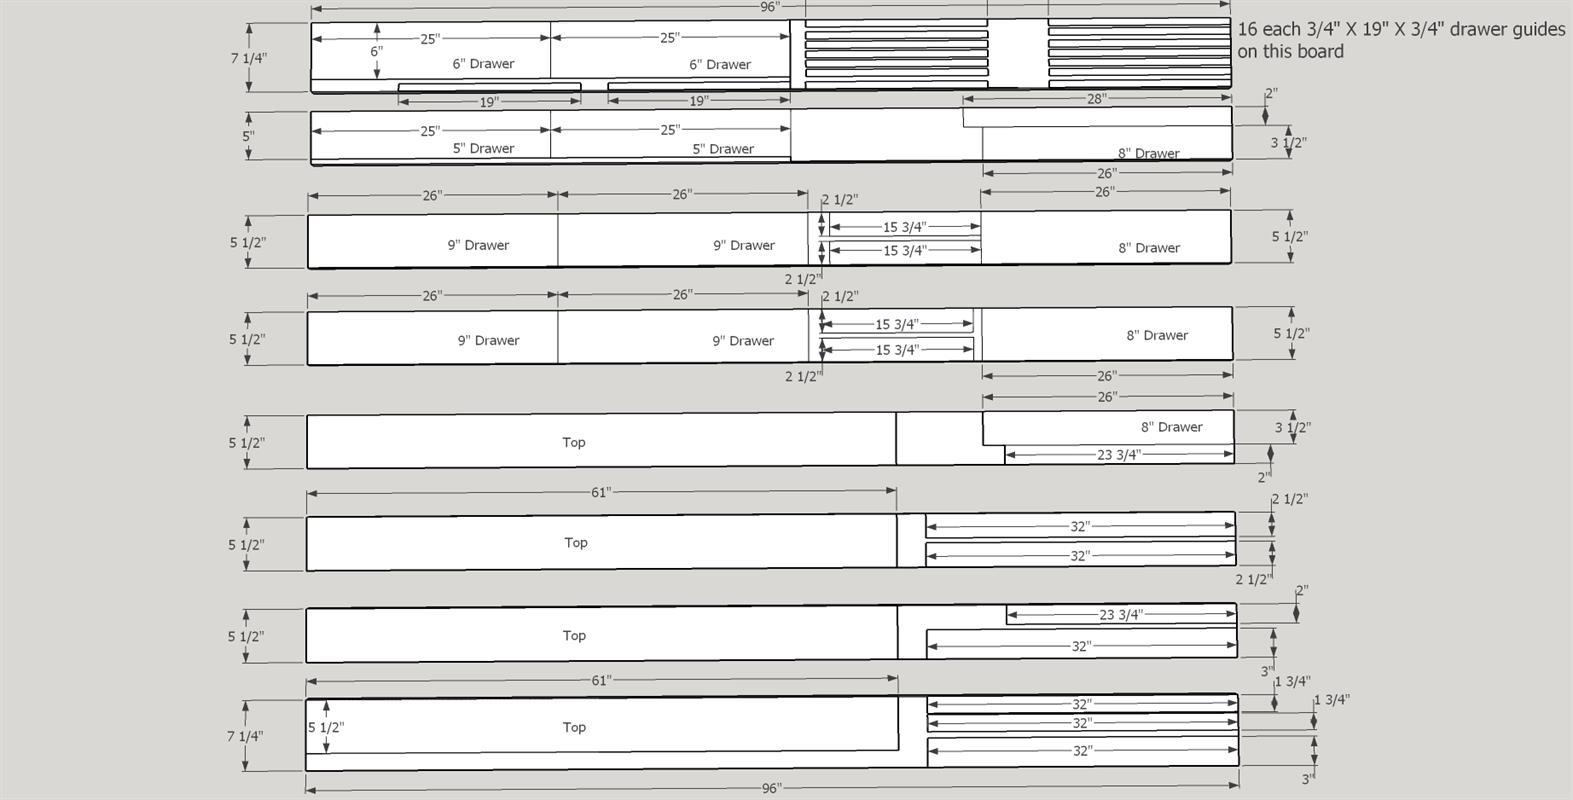
Using the dimensions in the following diagram cut the pieces required for assembly. Please note that the 8" drawer fronts, 9" drawer fronts and the top will require glueing up. Two pieces will be used for each of the drawer fronts and four pieces for the top. It is a good idea to label the individual boards that will make up the drawer fronts and top. It is also a good idea to go through the boards and select the parts of the boards that best match color and grain for the glue ups. When edge glued these individual pieces will make wide boards that are larger than the finished drawers and top. That is OK as we will eventually cut them to size. Use 100 - 150 grit sandpaper to smooth the parts.
-
Edge glueing
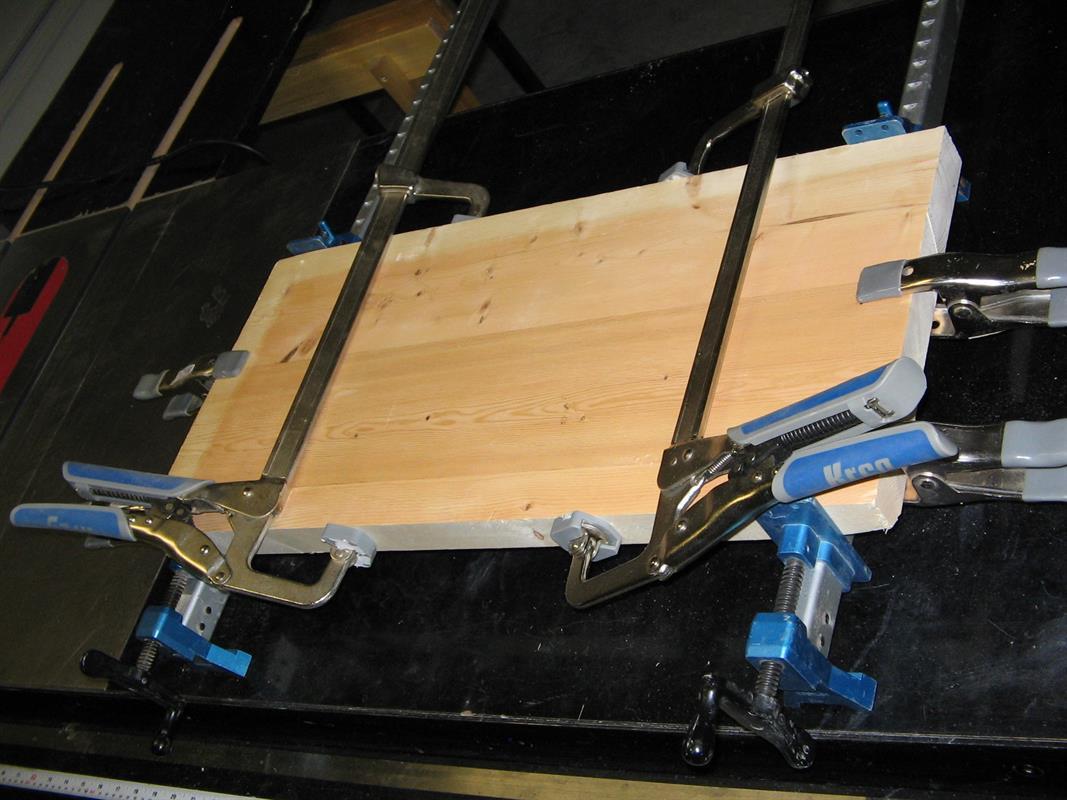
For the drawer fronts and top we will edge glue the boards labeled in step 2. If you are uncomfortable doing this I have attached one site with good information on the process. Please feel free to look at other sites. I normally use my Jet jointer to square and flatten the edges. Lay out the boards to provide the best looking grain. Use multiple clamps to bring the boards together. Make sure that the edges fit together well. Release the clamps and spread Titebond I wood glue along all of the edges to be joined. Avoid using excess glue. Realign the boards and clamp snugly. A picture of a typical clamp up follows.
-
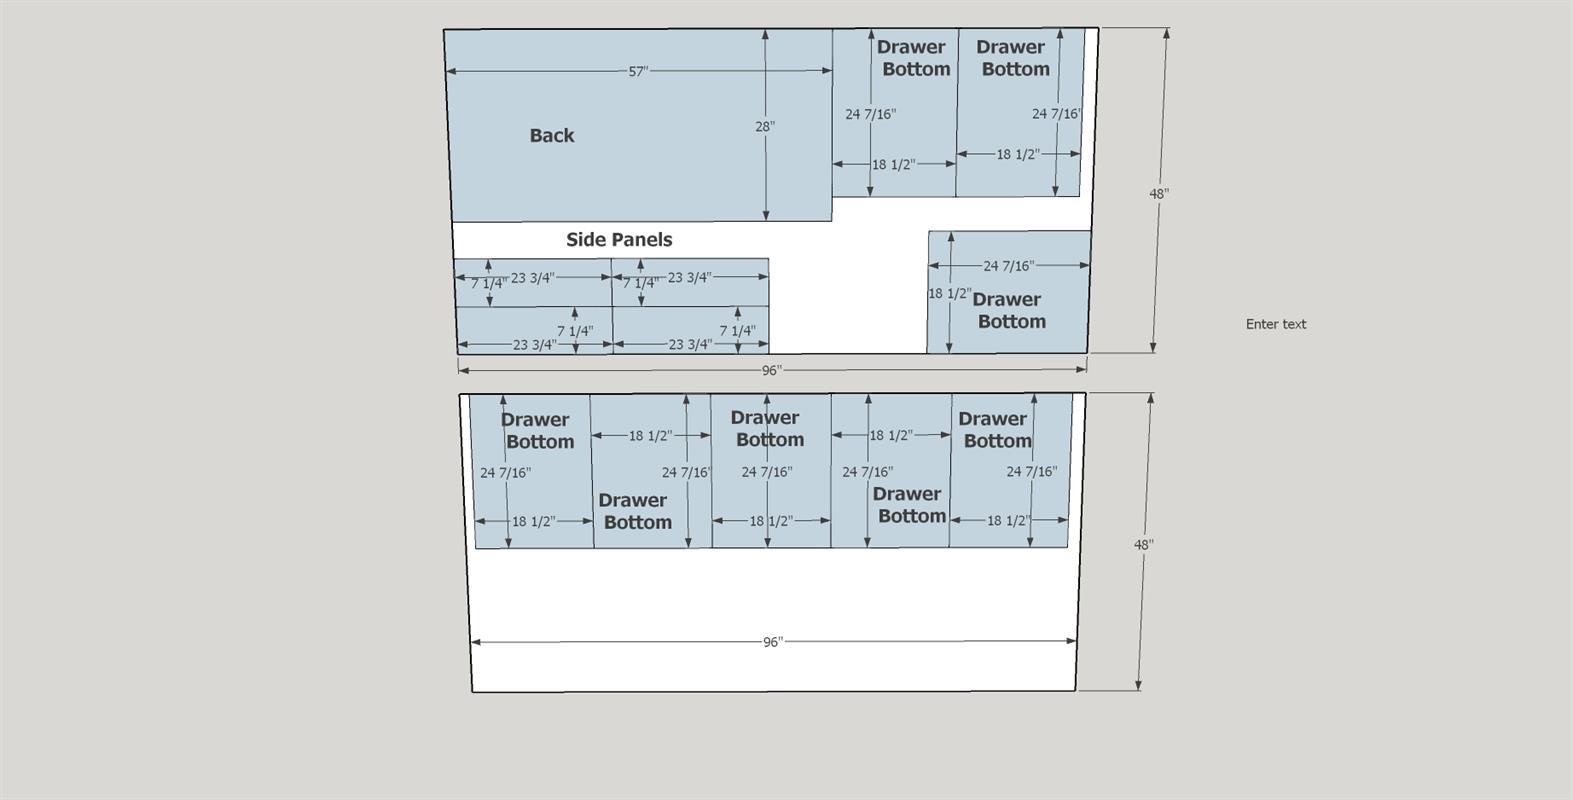
Cut 1/4" Oak plywood pieces
Cut the dresser side panels, back and drawer bottoms from the 1/4" oak plywood sheet. Use 100 - 150 grit sandpaper to smooth the parts.
-
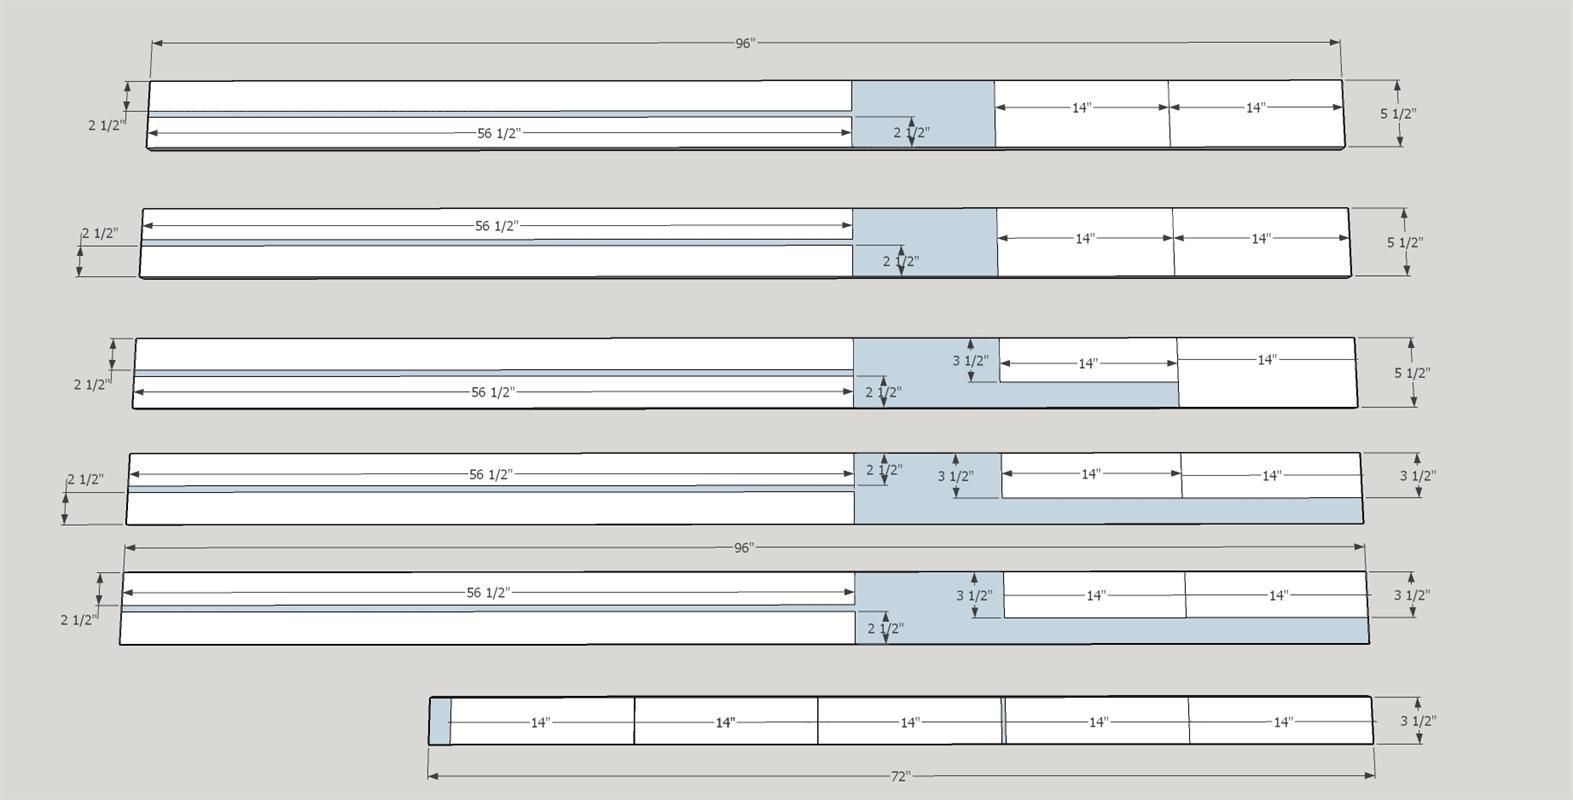
Cut 3/4" Poplar frame pieces
Cut the dresser frame pieces from the 3/4" Poplar. Use 100 - 150 grit sandpaper to smooth the parts.
-
Cut 1/2" Poplar drawer box pieces
Cut the drawer box side, front and back pieces from the 1/2" poplar. Alternatively you can use 1/2" plywood. Keep in mind that plywood might be slightly thinner than its stated 1/2" thickness. If that is the case you will need to make slight adjustments to the measurements or the drawers may be a little too loose. Use 100 - 150 grit sandpaper to smooth the parts.
-
Assemble the five dresser frames
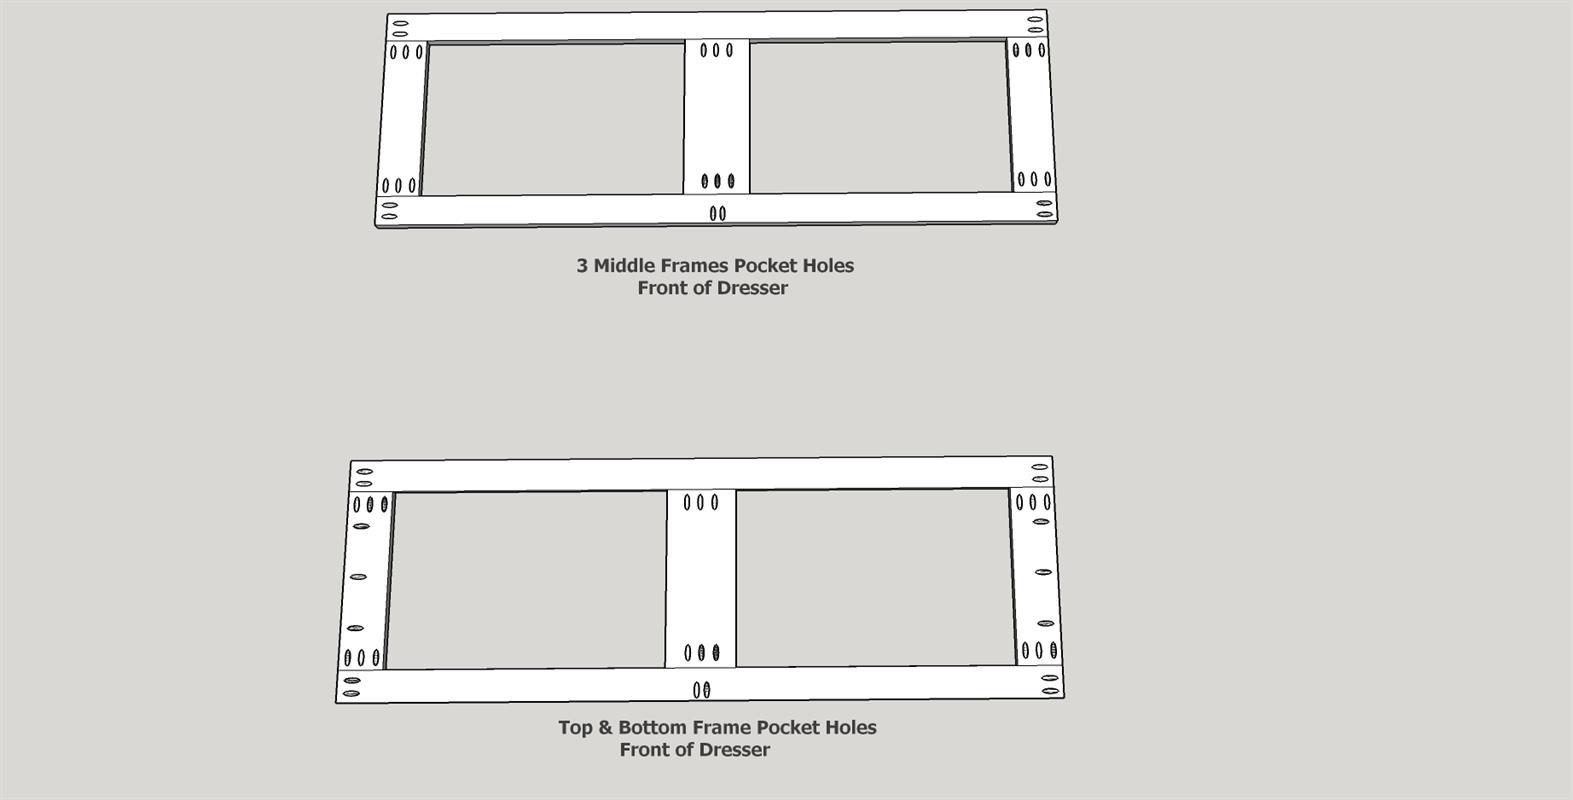
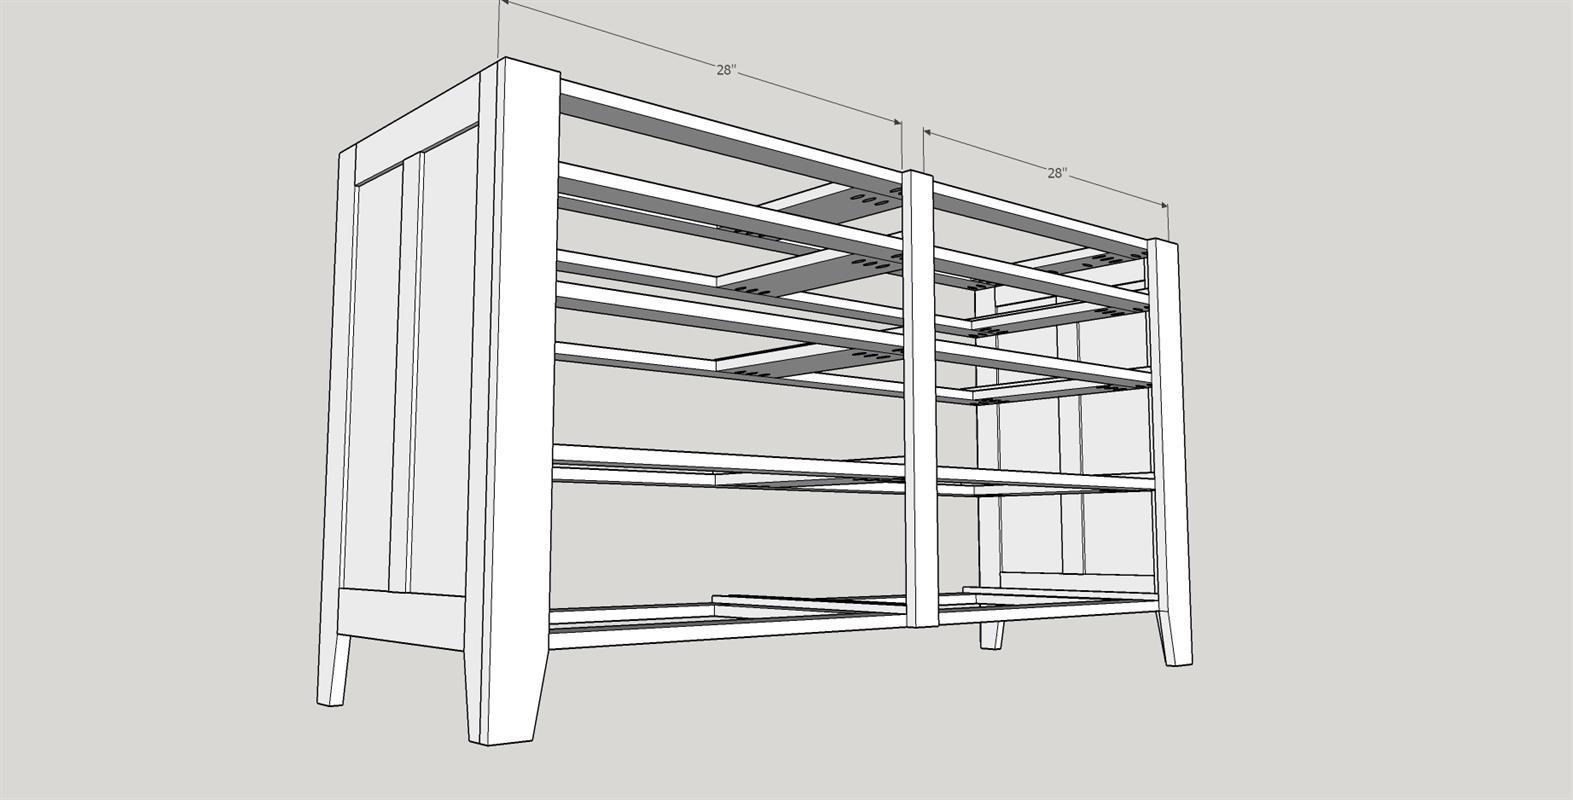
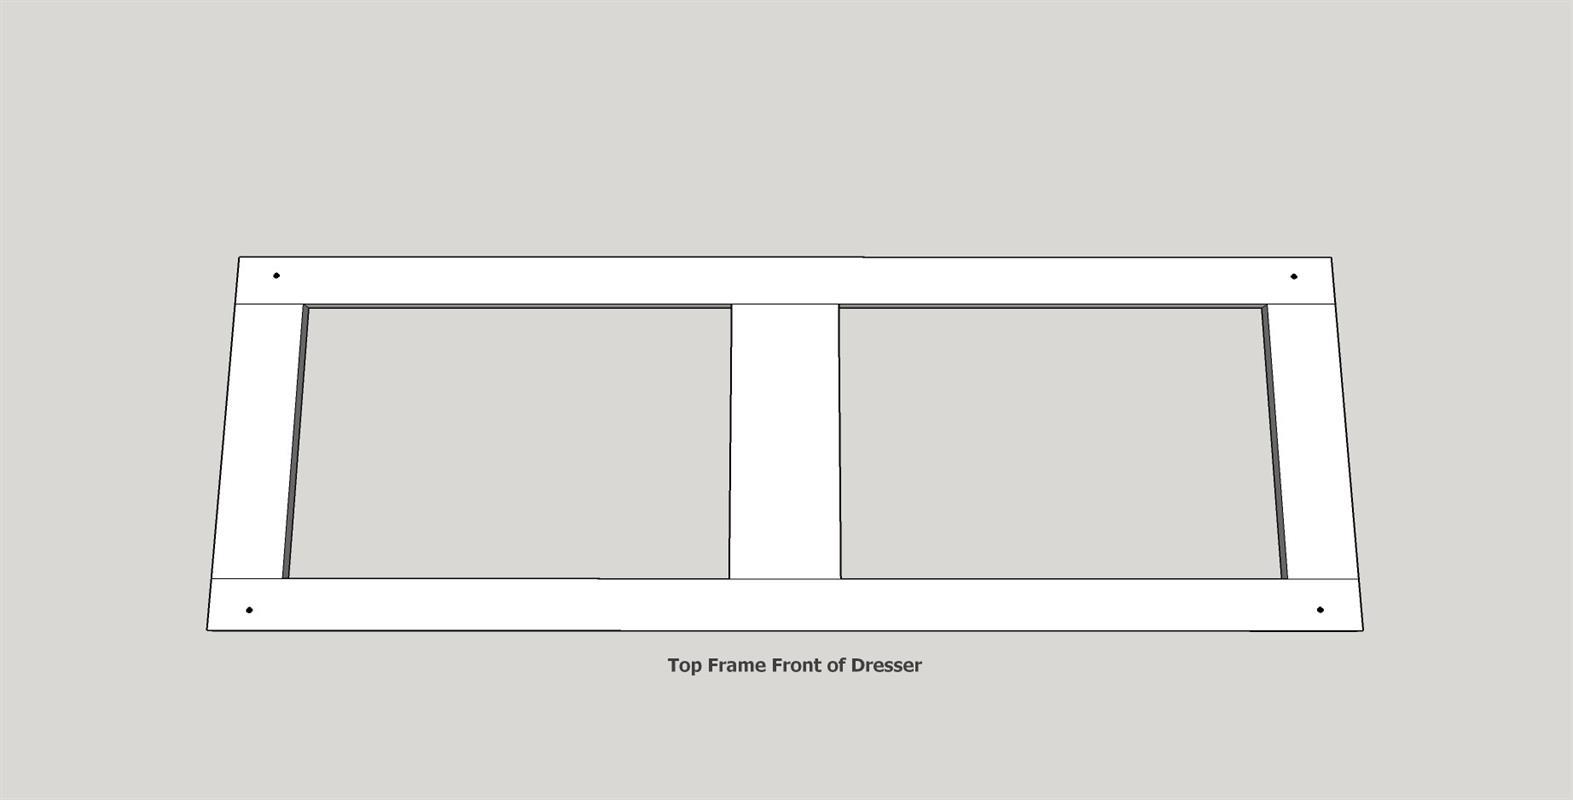
Use a Kreg pocket hole Jig (set for 3/4") to drill all of the pocket holes for the frame assemblies. The attached diagram shows the approximate location of pocket holes in the frame assemblies. Please note that the top and bottom frames have 3 extra pocket holes on each of their outside edges to attach the side rails. The middle three do not need these holes. Also note that there are two pocket holes on the front edge of all frame assemblies to attach the center front stile. As this stile is only 2" wide it is important that these two pocket holes are aligned properly and drilled closely together. Once all pocket holes are drilled, assemble the five frames using wood glue and 1 1/4" Kreg coarse pocket screws. Check square and flatness.
-
Preparing the front stiles
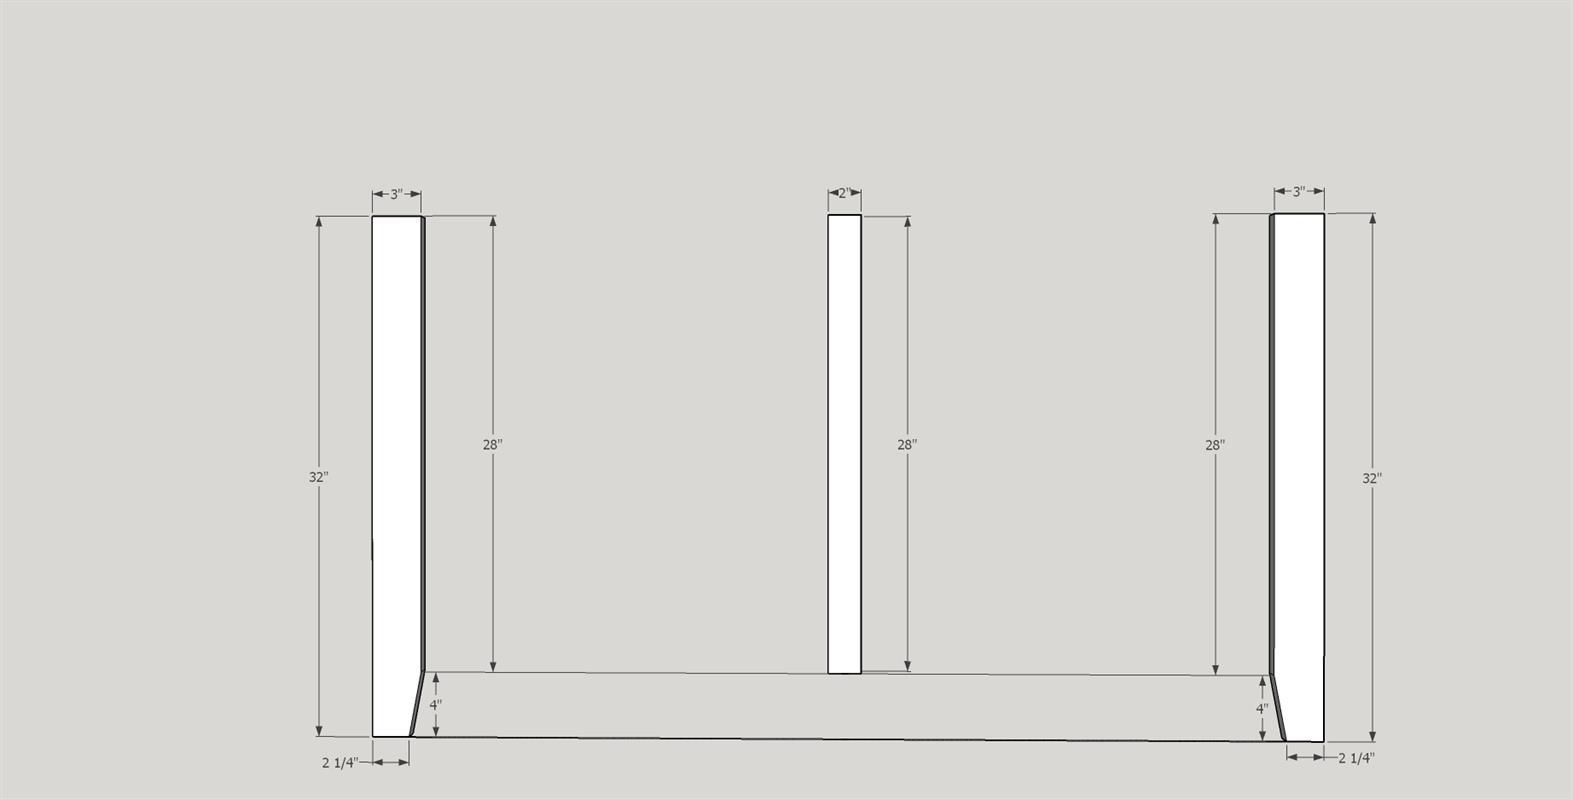
Mark the leg cuts on the two outer front stiles. Using a band saw or jig saw cut the legs. Keep in mind that you will be cutting a left and right side...so keep the best looking side out on both.
-
Preparing the side stiles
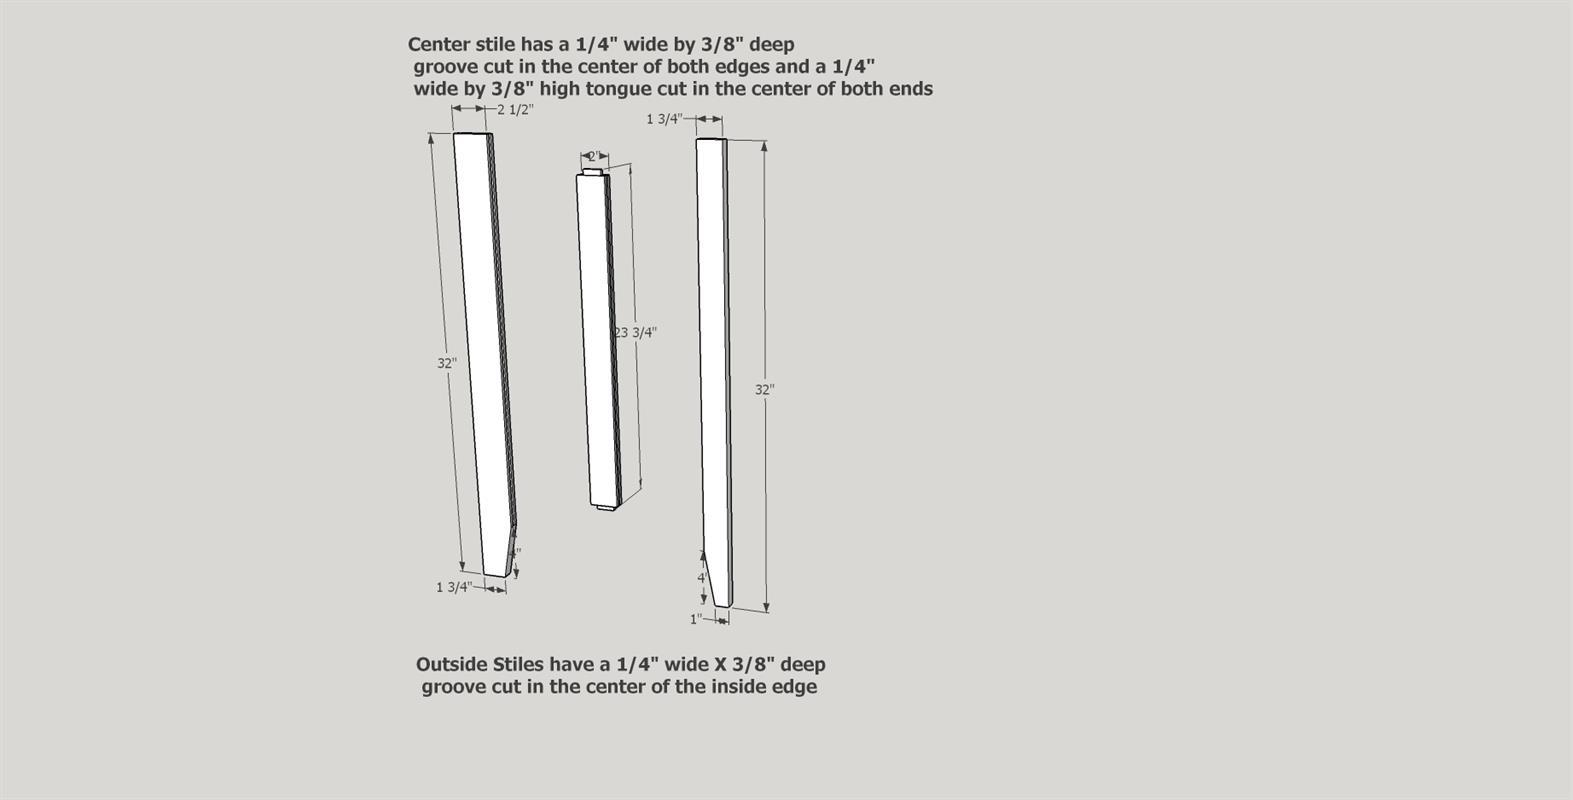
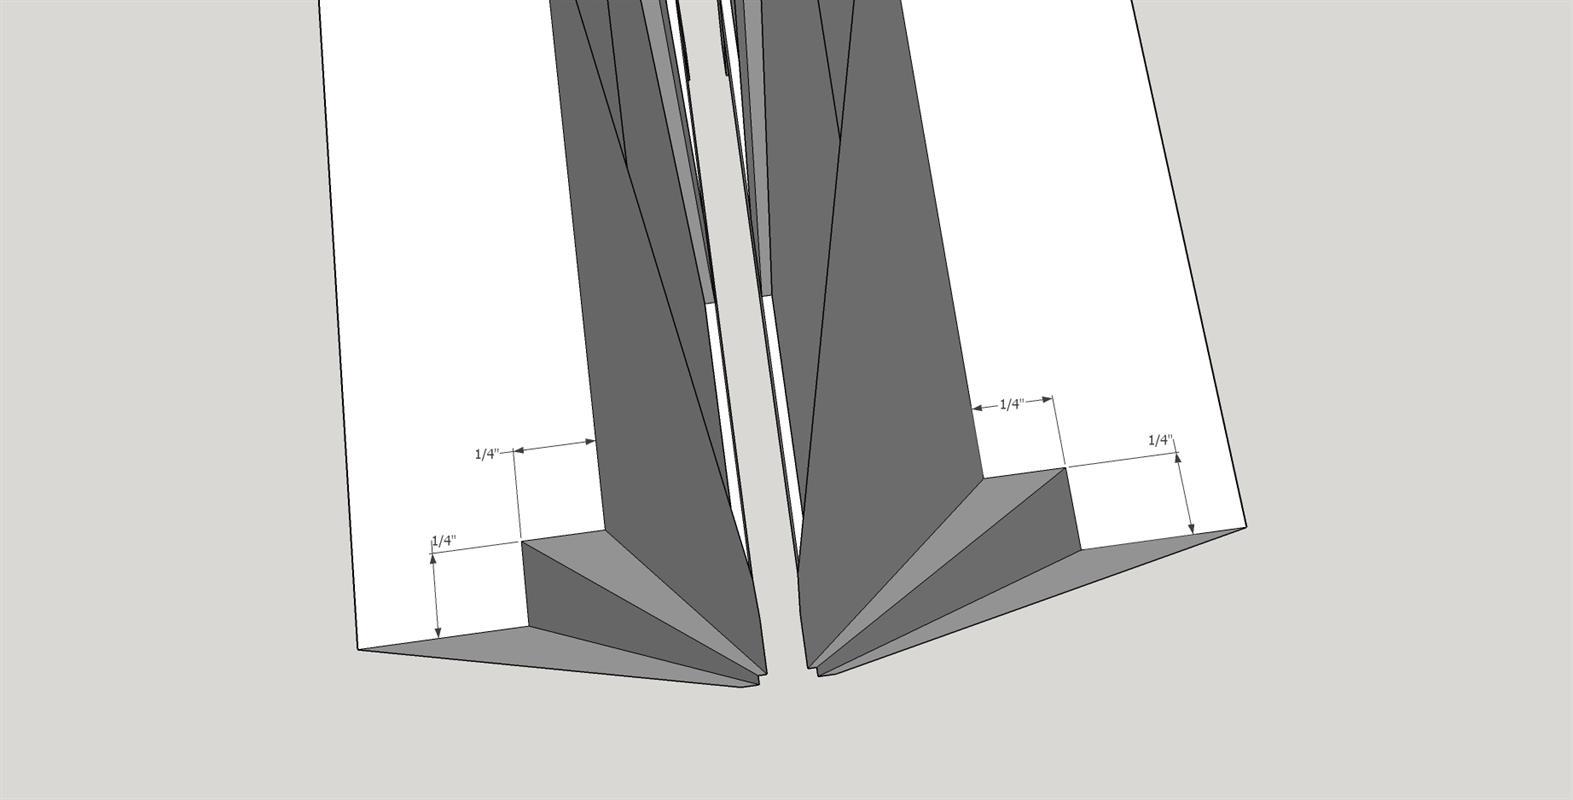
Use a Freud (99-036) Adjustable Tongue and Groove Bit set mounted in a Kreg router table to cut the tongues and grooves. The groove cutter bit is adjusted to cut 1/4" X 3/8" grooves in the center of the inside edges of the front and rear stiles as well as in both edges of the center stile. Then use the tongue cutter bit adjusted to cut 1/4" X 3/8" tongues on both ends of the center stiles. Alternatively the grooves and tongues can be cut on a table saw. Now mark the legs on the front and back stiles. Using a band saw or jig saw cut the legs.
-
Preparing the side rails.
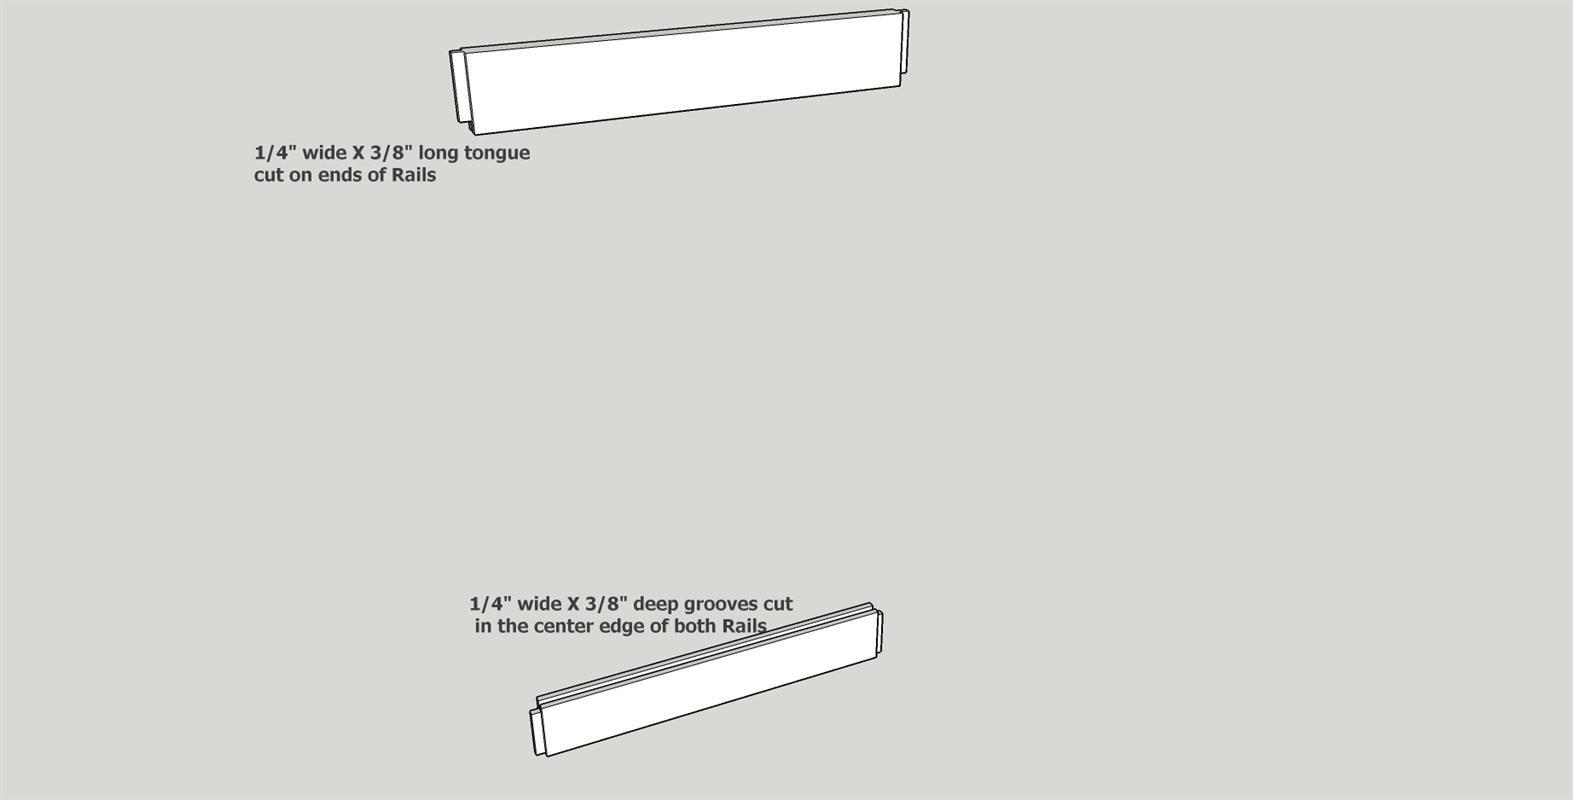
Use a Freud (99-036) Adjustable Tongue and Groove Bit set mounted in a Kreg router table to cut the tongues and grooves in the four rails. Use the groove cutter bit adjusted to cut 1/4" X 3/8" grooves in the center of the rails inside edges. Then use the tongue cutter bit adjusted to cut 1/4" X 3/8" tongues on both ends of the rails. Alternatively the grooves and tongues can be cut on a table saw.
-
Assembling the sides
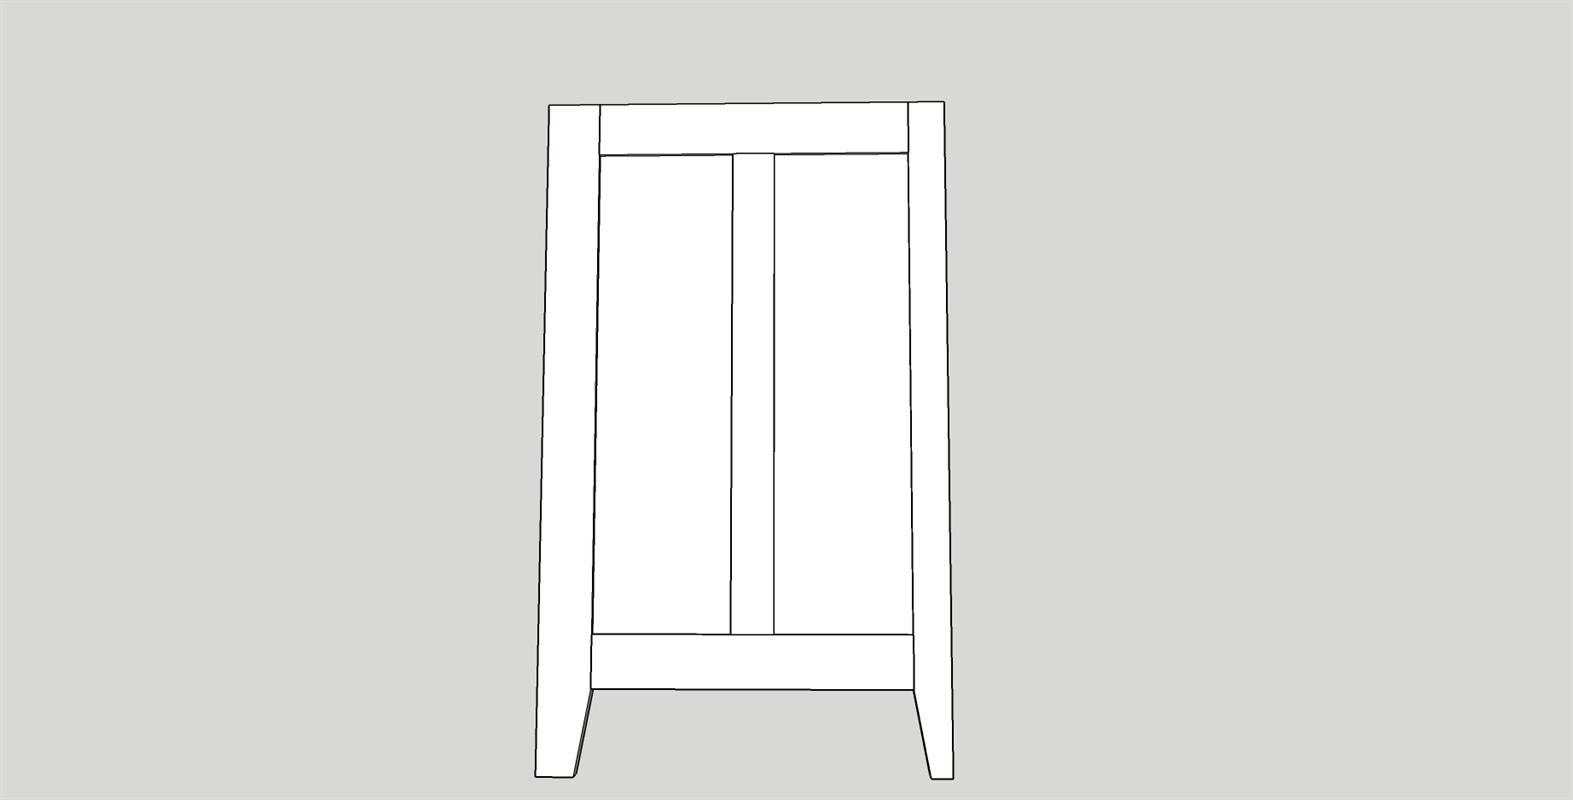
Using a side rear stile, a side center stile, a side front stile, two side rails and two side panels - assemble a side. Use wood glue on the ends of the rails, on the center stile tongues and along the edges of panels. Clean up any excess glue with a damp rag. Clamp snugly, check for square and readjust if needed.Repeat the process for the other side.
-
Cut rabbits in back of sides
To attach the 1/4" plywood back a 1/4" X 1/4" rabbit needs to be cut on the back inside edge of both sides. This can be done on a table saw by doing either several passes using a standard blade or single pass with a dado blade. Please be careful doing the rabbits as there is a left and right side and the rabbits should face inside.
-
Assemble frames and sides.
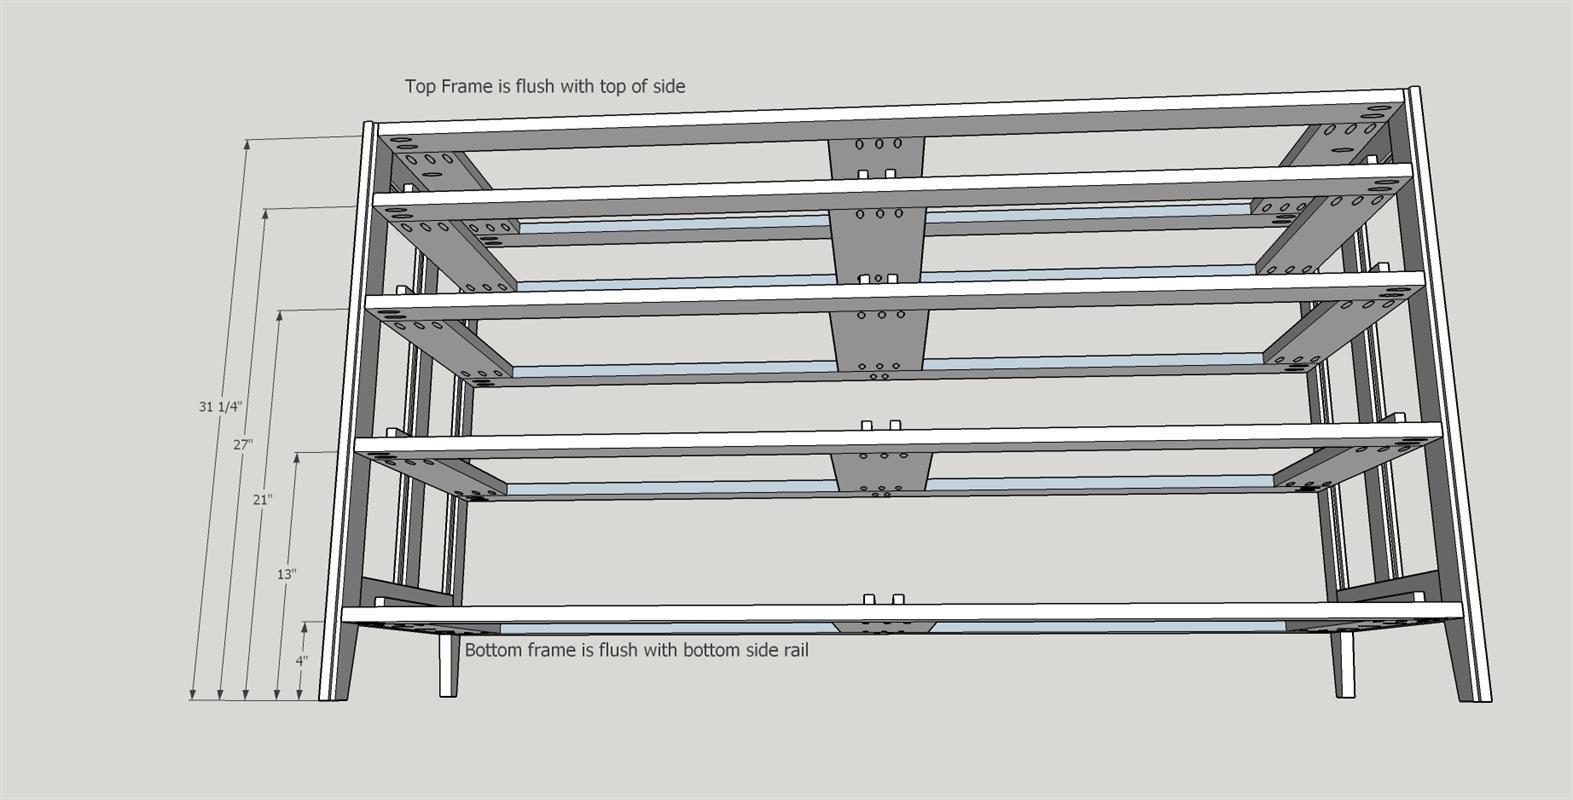
Prepare for assembly by very accurately measuring and marking the distance of the lower edge of the frames from the bottom feet. The bottom frame should be flush with the bottom side rail and the top frame should be flush with the top of the side. I assemble on my table saw as it is flat and large enough to hold the width of the dresser. Place the front of the sides and the front of the frames down as they should be flush. If you can get an extra pair of hands they could be quite helpful here. Line up each frame with its marks and attach to the side with 1 1/4" Kreg fine pocket screws. I usually attach all frames to one side then repeat the process on the other. Keep checking that the frames are going in square and parallel.
-
Add back
Use wood glue along the back side rabbits and on the back edges of the frames. Lay the 1/4" plywood (good side out) in place. It should be flush with the bottom of the bottom frame and the top of the top frame and fit inside the rabbits. Use 1" pin nails to tack in place.
-
Drawer guides
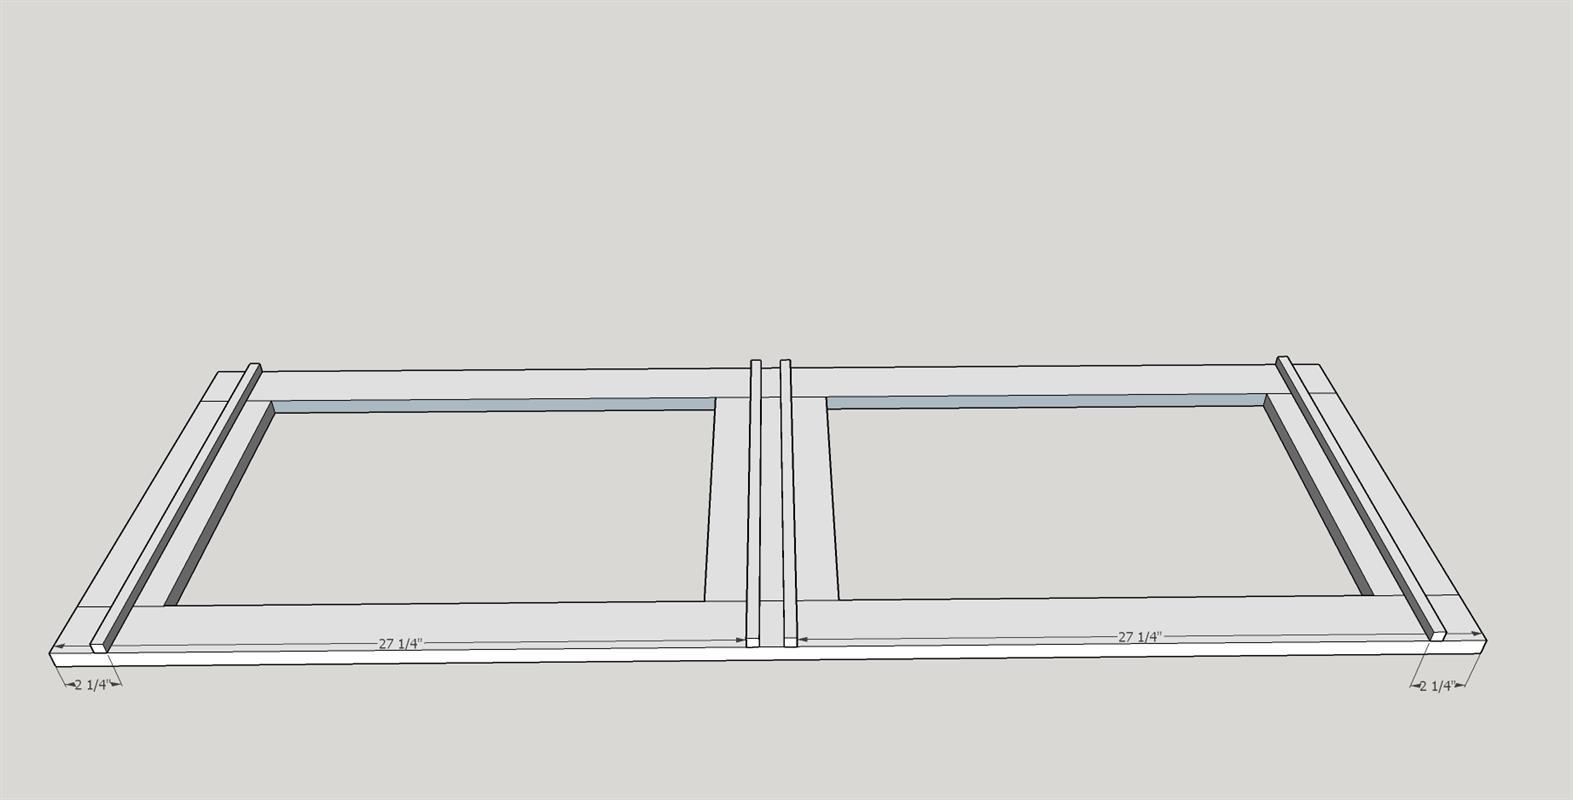
Accurately measure and mark the drawer guide placement on the bottom frame and the three middle frames. The distance between the inside of the drawer guides should be 25". Using wood glue and 1 1/4" brad nails attach four guides to the top of the four frames (total of 16 guides). The guides should be square and parallel on each frame.
-
Add front stiles
Accurately measure and mark the placement of the front middle stile. The middle stile should be flush with the bottom and top frames. This stile is held in place with glue and Kreg 1 1/4" fine pocket screws. Attach the two outside front stiles with wood glue and 1 1/4" brad nails. The stiles should be flush with the side front stiles and the top of the sides. Please be sure to attach with the feet in the correct direction.
-
Preparing the drawer boxes
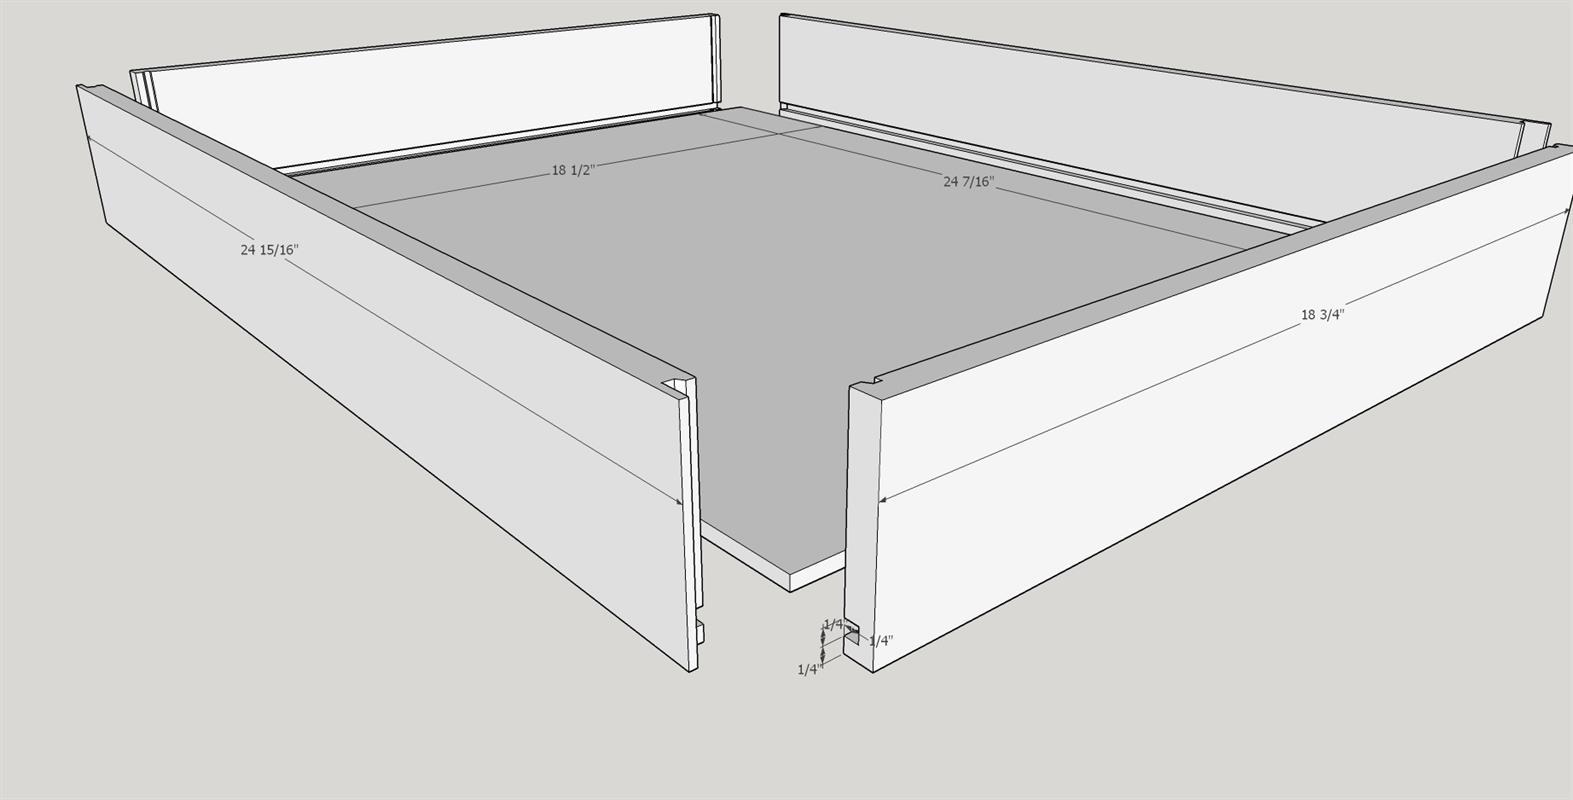
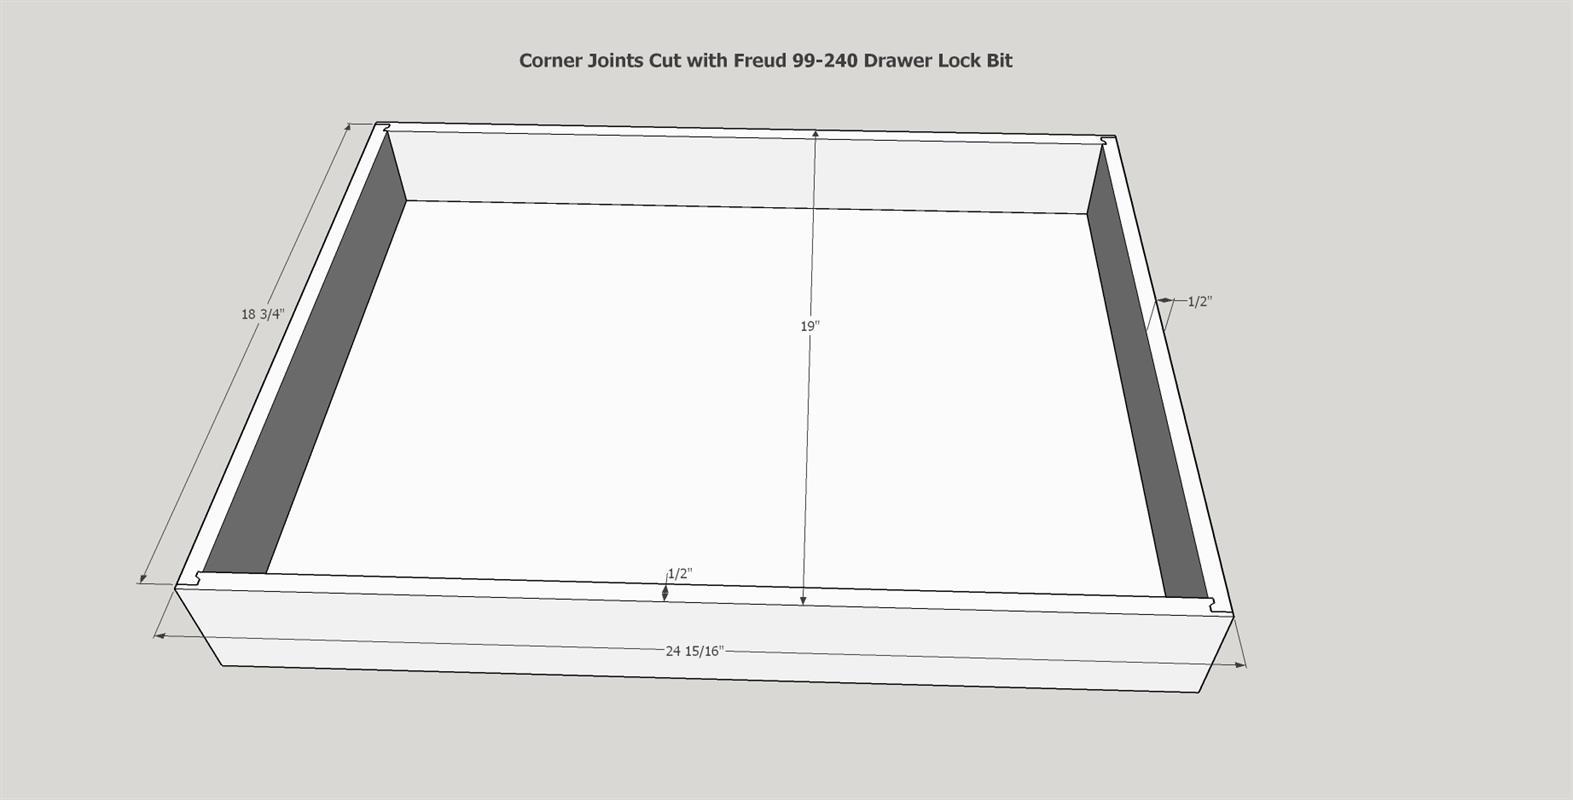
Using the 1/2" poplar drawer box sets cut in step 6 and the 1/4" plywood drawer bottoms cut in step 4 prepare the drawer assemblies. Please note that my drawer sizes are approximate and will vary depending on how you construct the box corners. I use a Freud (99-240) Drawer lock bit on my Kreg router table to cut all of the corners. I then use my table saw to cut a 1/4" deep X 1/4 inch wide dado in all sides and fronts/backs. This dado should be 1/4 inch up from the bottom of each board.
-
Assemble drawer boxes
Assemble using matching sides, back, front and a bottom. Use wood glue at each corner joint and on the edges of the plywood bottom. You can either clamp until the drawers are dry or use pin nails in each corner. Check for square and adjust if needed. Repeat this process seven more times until all drawer boxes are complete.
-
Fitting the drawer fronts
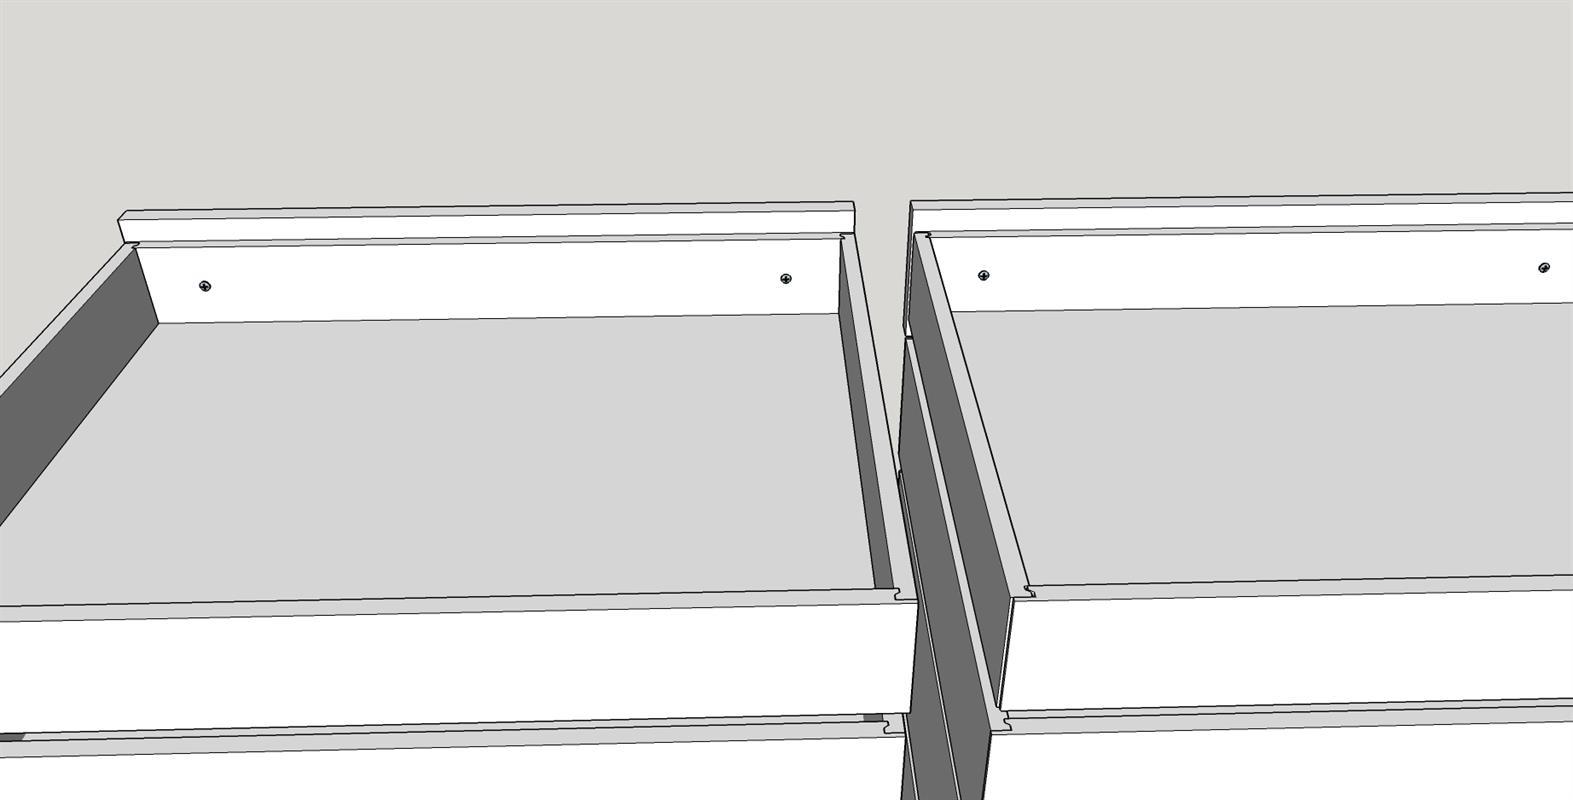
Cut the 8" and 9" drawer blanks to final dimensions. In the front of all drawer boxes drill 2 small pilot holes approx. 2 inches in from the edges and half way down from the top. Start two 1" flat headed self tapping wood screws on inside of each box. Place the bottom two drawer boxes into the dresser facing out. From the inside of the drawer box attach a 9" drawer front to each of the boxes with the two 1" screws. The bottom drawer front should be flush with the bottom frame and equally spaced left to right. I use dimes as spacers. Place the next set of drawer boxes in the dresser. Attach the two 8" drawer fronts as described for the 9" drawer. Watch bottom as well as and left/right spacing. Repeat this process with remaining drawers.
-
Add the top
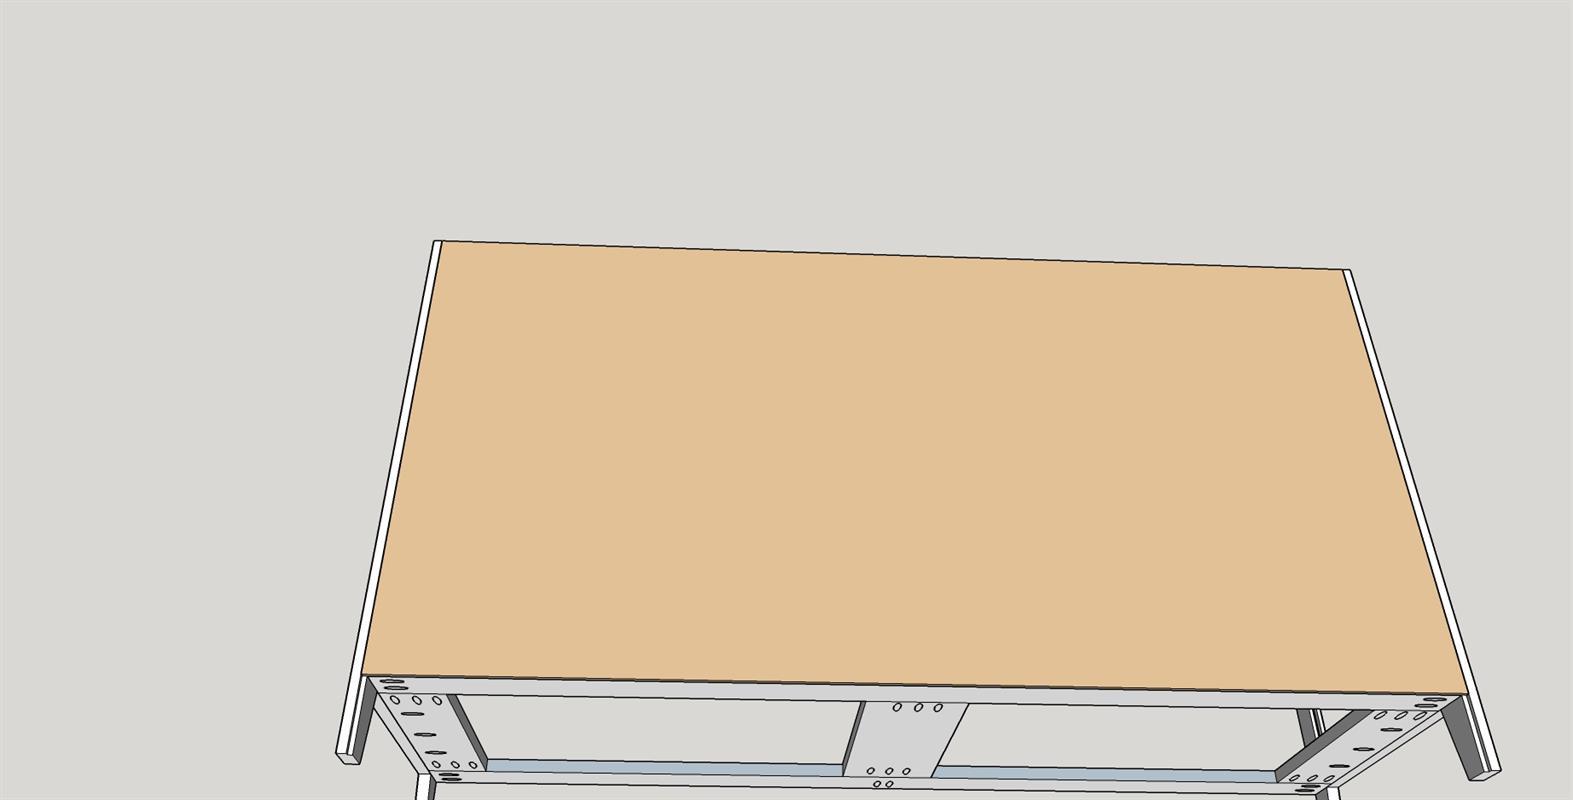
Cut the glued up top to final dimensions (60" X 21 1/4") The front and side edges of the top can be rounded over using a roundover bit and router or you can ease the edges with sandpaper...Your choice. Drill four 1/4" holes in the top frame. Place the top in position on the dresser with back flat edge flush with the back of the dresser and the top spaced evenly left to right (about 1"). From the underside of the top frame use four 1 1/4" Kreg fine pocket screws with washers to attach the top. The screws should be drawn snug but not over tight. This should hold the top in place but allow for any expansion or contraction of the top.
-
Optional Step - Small Drawer Fronts
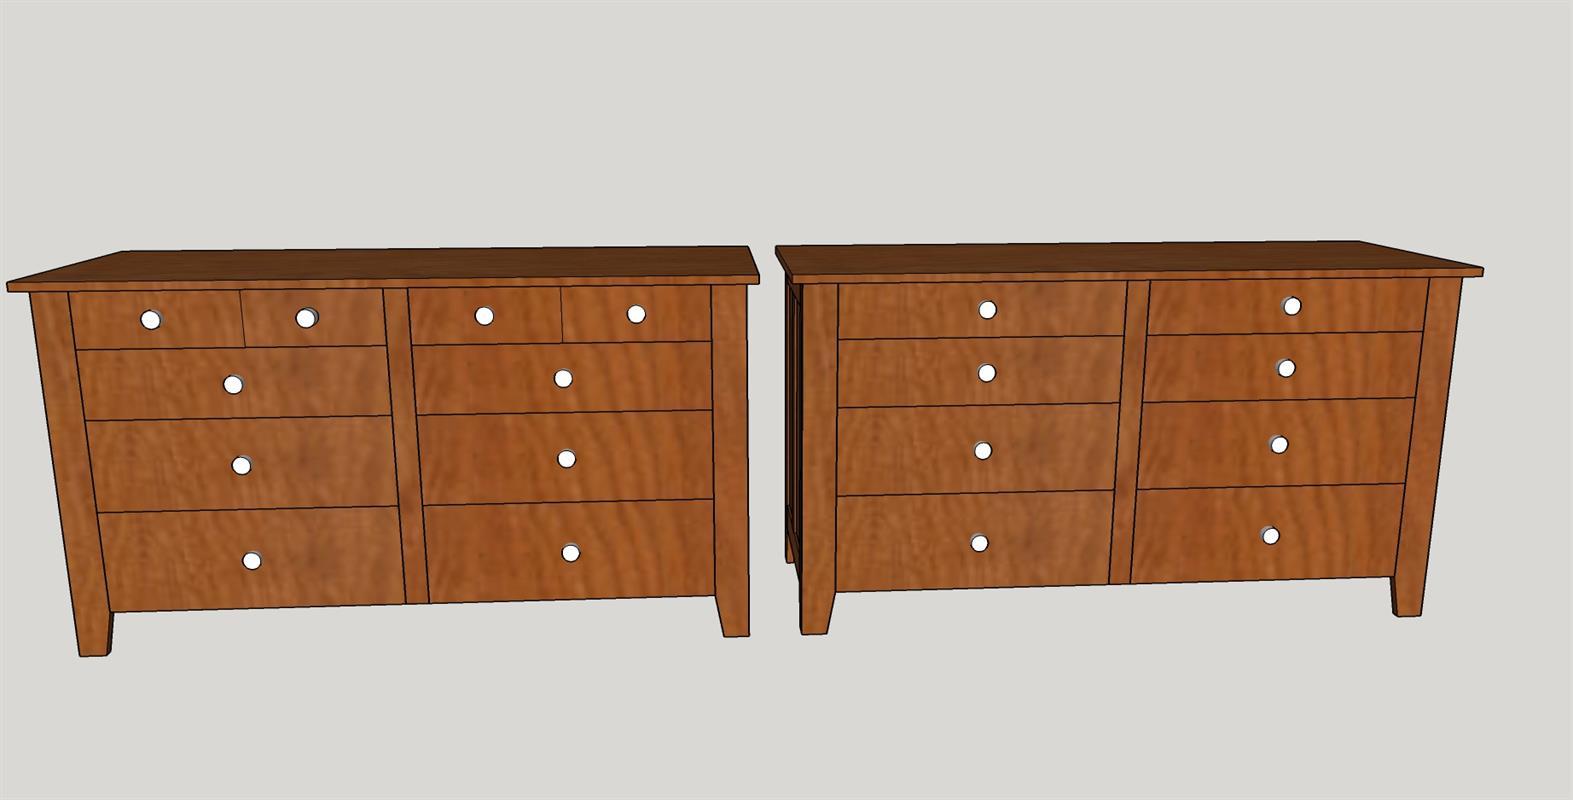
If you like the look you can make the top two small drawers appear to be four drawers. This is accomplished by using a table saw to cut a one blade width X 1/8" deep groove (top to bottom) in the center of both top drawers. Use the mitre gauge to keep the drawer square to the saw blade as you cut. Use a black Sharpie permanent marker to color in the groove.
-
Finish
Now that the build is complete fill all nail holes and other imperfections with wood putty, let it dry. Then use 100 - 220 sandpaper to do a once over on all surfaces in preparation for the finish. Clean well to remove all dust. (I use compressed air and clean dry rags). To prevent any smell in the drawer boxes use 2 or 3 coats of a water based sealant like Minwax Polycrylic Satin finish on them. As we live in an adobe style house, I chose to use Weathered Oak Minwax Stain. After the stain was dry I used Minwax Tung Oil finish. I gave the dresser three coats following manufacturers instructions. After the finish dries add the drawer pulls.


