Mission Style Open Shelf Bathroom Vanity
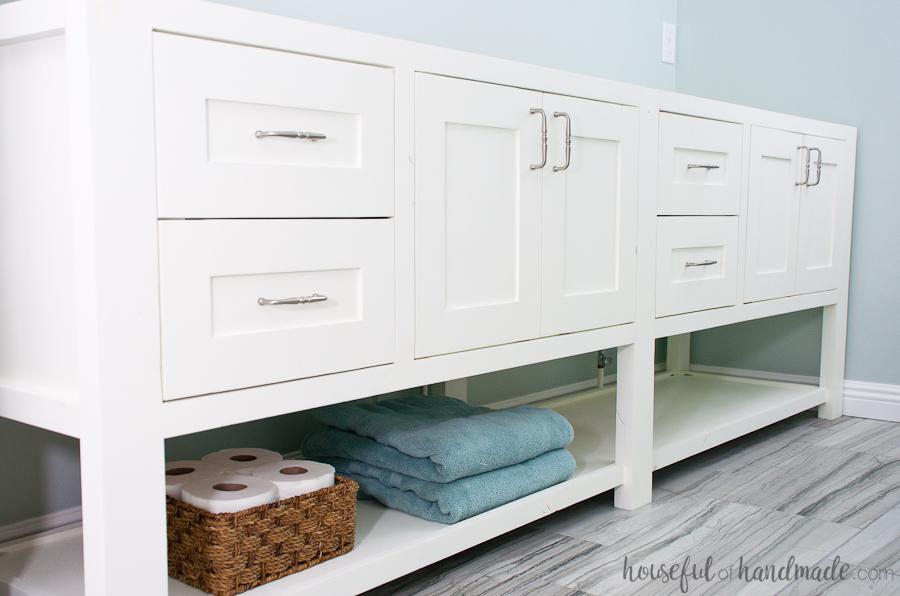
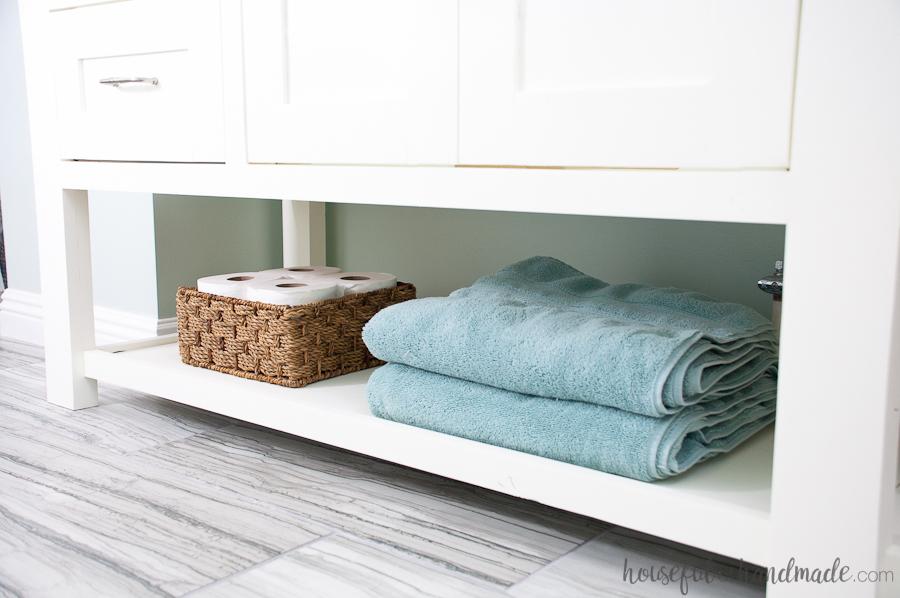
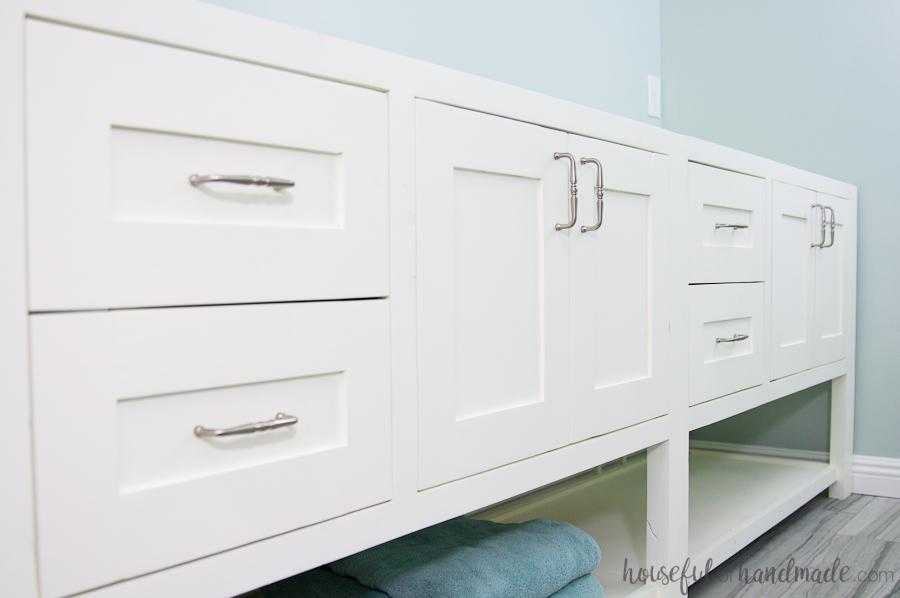
By Houseful of HandmadeAn open shelf bathroom vanity with large drawers for lots of storage. Easy to build mission style doors add farmhouse character. Plans for a single vanity, with notes to make a double vanity as well.
Directions
-
Build the Sides
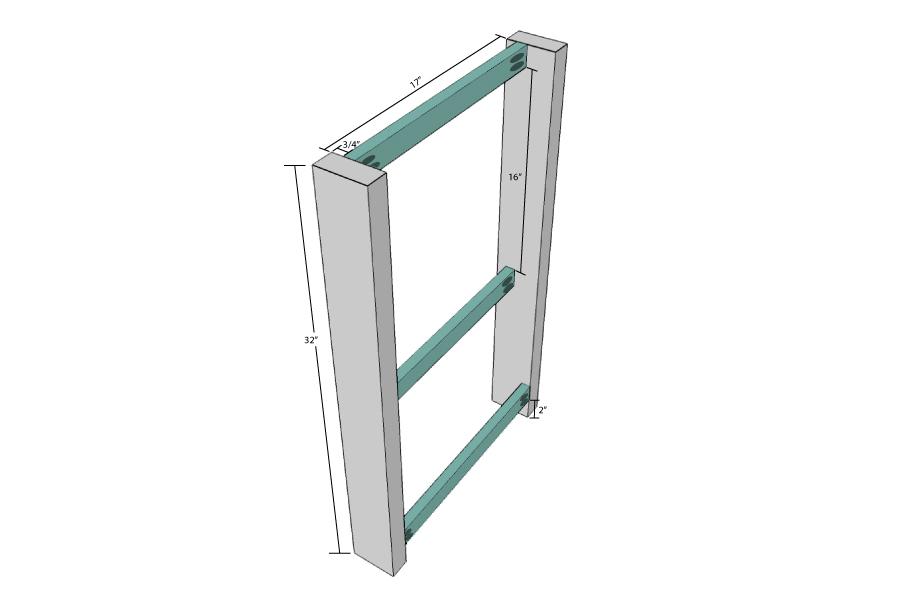
Cut 4 2x4s at 32" long for the legs and 6 1x2s at 17" long (for the side slats and side shelf edges). Assemble the sides by attaching one side slat between 2 legs at the top, 3/4" in from the outside edge using pocket holes. Then attach one side slat 16" below the top one, again 3/4" in from the outside edge using pocket holes. Attach the side shelf edge 2" up from the bottom and flush with the inside edge of the legs using pocket holes. Repeat for the other side, but make sure you mirror it.
-
Add the panel to the sides
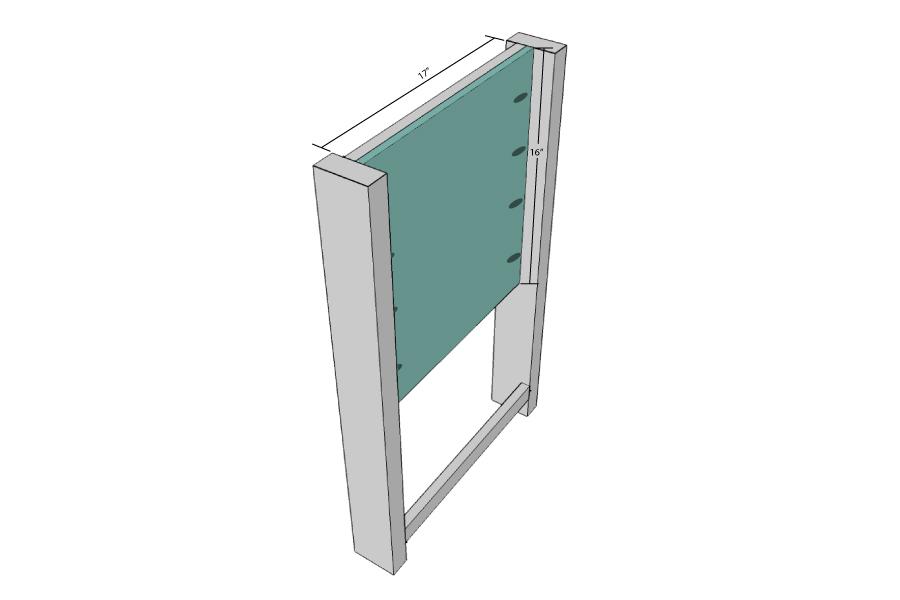
Cut 2 pieces of 1/2" plywood to 17" x 18 1/2". Attach them to the inside of the side slats so it is flush with the top one and 1/2" above the bottom side slat. Use pocket holes to secure the sides of the side panel to the legs and brad nails to secure the top and bottom to the back of the side slats.
-
Center legs for double vanity
OPTIONAL (note these items are not included in the cut list, add them if making a double vanity instead of doubling the side slats, side shelf edges, and side panels).
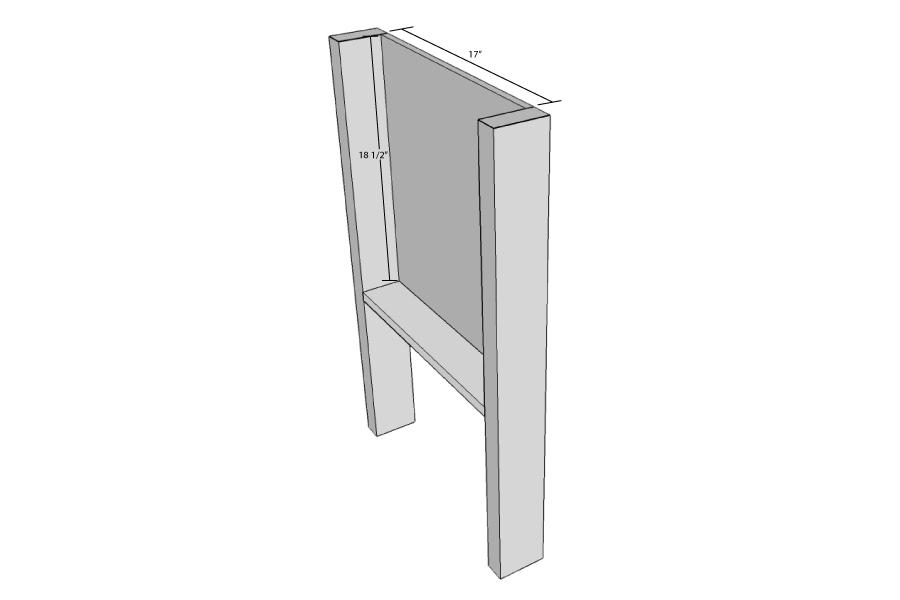
If you are making a double vanity, build the center legs. Cut 2 2x4s at 32" and 1 1x4 at 17". Attach the 1x4 between the 2x4s 18 1/2" from the top with pocket holes. Cut a piece of 1/2" plywood to 17" x 18 1/2". Attach it to the legs, flush with the top and the right side of the legs with pocket holes. Put the pocket holes on the right side of the panel so it will be on the drawer side.
-
Build the front face frame
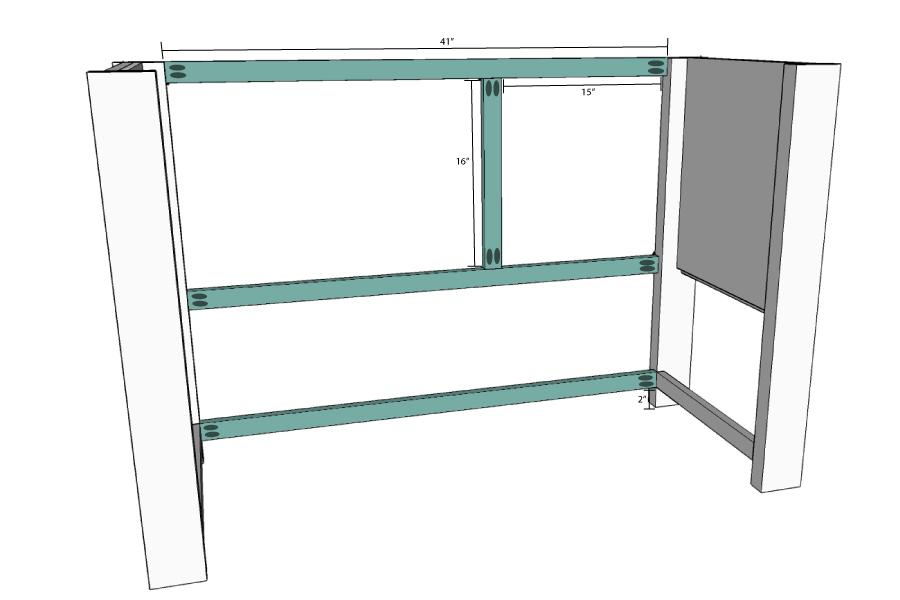
Cut 3 1x2s at 41" long (for the front frame and front shelf edge) and 1 1x2 at 16" long. Assemble the front frame of the vanity by attaching one 41" front frame between the two legs flush with the top and front of the vanity using pocket holes on the inside of the face frame. Attach another 41" front frame 16" below the first one, again flush with the front of the vanity, with pocket holes. Attach the 16" front frame between the 41" front frames 15" in from the left legs of the vanity using pocket holes. Attach the front shelf edge 2" up from the bottom of the legs, flush with the back of the legs.
-
Build the back supports
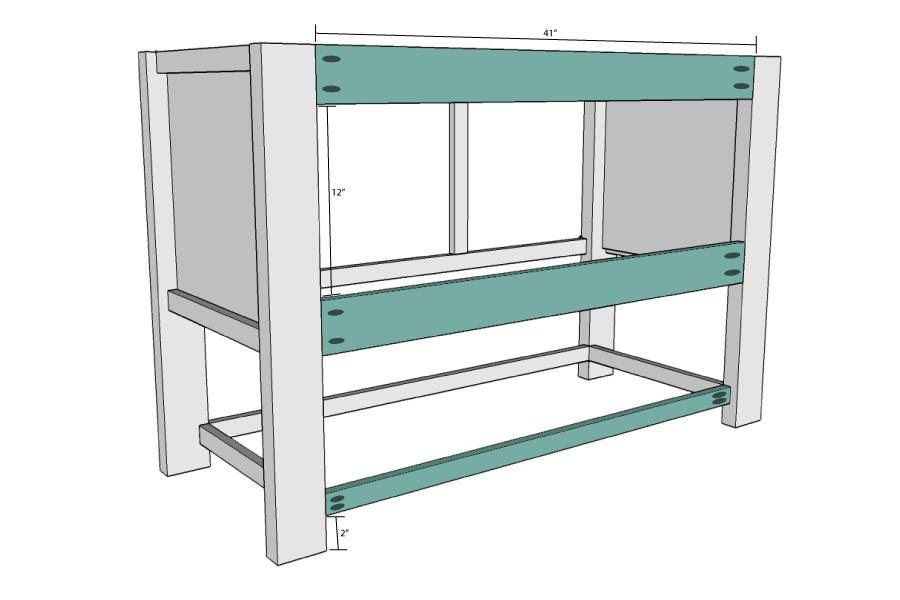
Cut 2 1x4s at 41" for the back supports and 1 1x2 at 41" for the back shelf edge. Attach one back support between the legs flush with the top and the back of the vanity using pocket holes. Place the pocket holes on the backside of the back supports. Attach the other back support 12" below the first one, again flush with the back of the vanity, using pocket holes. Attach the back shelf edge 2" up from the bottom of the vanity, between the legs, flush with the front of the legs using pocket hole screws.
-
Add the bottom shelf
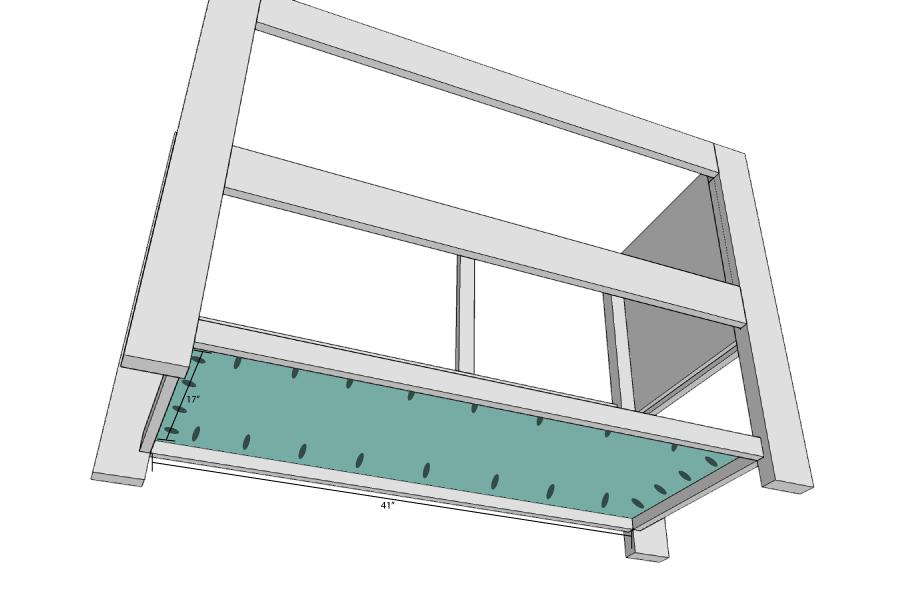
Cut a piece of 1/2" plywood 17" x 41" for the bottom shelf. Attach the plywood between the shelf edges at the bottom of the vanity using pocket holes on the underside of the shelf. Position the bottom shelf 1/2" below the top of the shelf edges.
If making a double vanity, you will need to check to see if you can get the full 92 1/2" long vanity into the bathroom in one piece. If you can, cut the bottom shelf 17" x 85.5". If you cannot get the vanity into the bathroom in one piece, cut the bottom shelf in two pieces that are 17" x 42 3/4" each. You will be able to take the vanity apart at the side of the center legs to get it into the bathroom once built.
-
Supports for the drawer glides
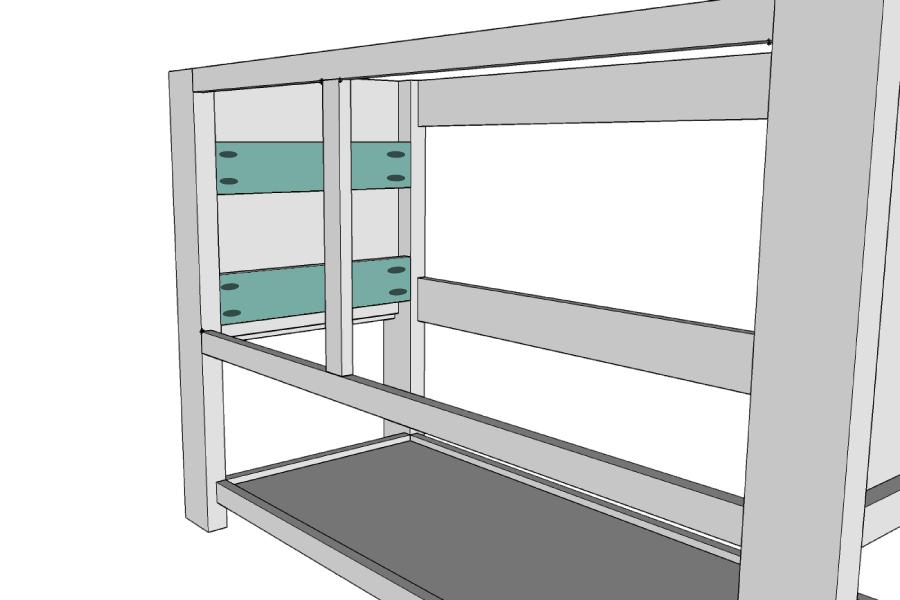
Cut 2 1x4s at 17" for the drawer glide supports. Using pocket holes, attach them to the inside of the left side of the vanity flush with the inside of the legs. Attach them so the bottom of the drawer glide supports are 8" below the drawer opening and flush with the bottom of the drawer opening. If making a double vanity, you only need to attach supports on the far left side, the center legs already have the panel flush with the right side of the legs.
-
Build the drawer boxes (part 1)
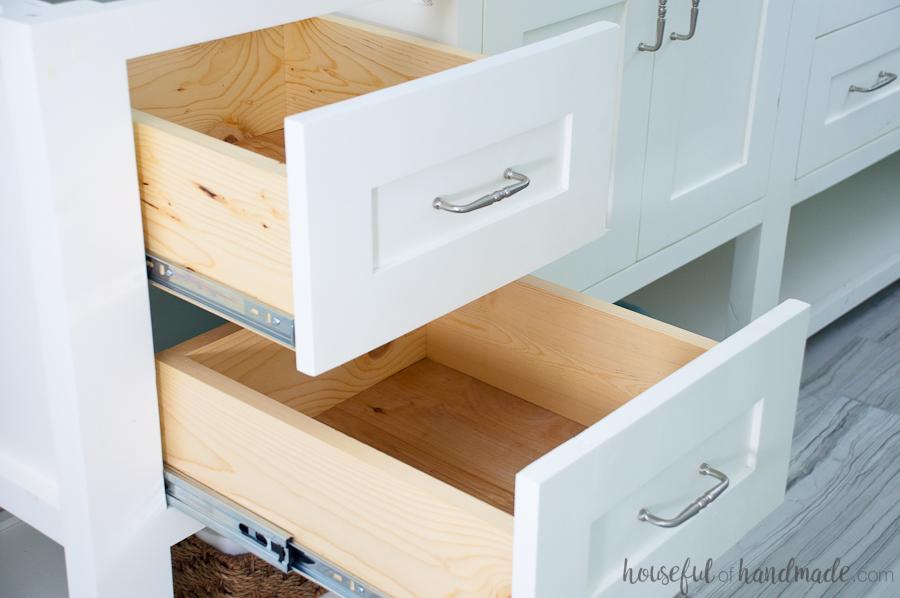
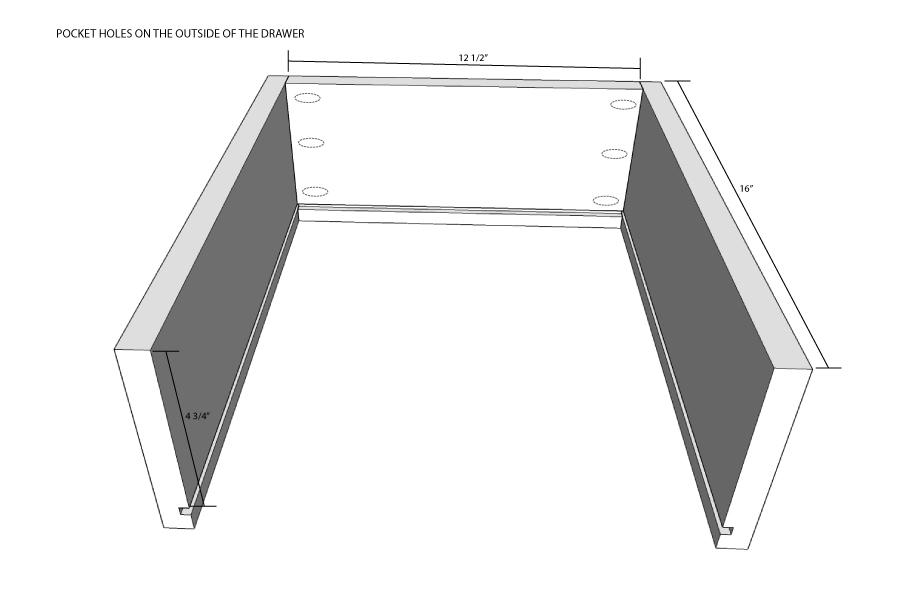
These drawers are made to allow 1/2" on either side for drawer glides. Adjust as needed for your drawer glides. Cut 4 1x6s at 12 1/2" (drawer box front/back) and 4 1x6s at 16" (drawer box sides). Using a table saw, cut 1/4" thick groove 1/2" above the bottom on all the drawer box sides and the drawer box fronts. I used my table saw to do this and just set the blade to 1/4" depth, and my fence was 1/2" away from the blade. Then run the wood through the saw. Adjust the fence to just over 1/2" away from the blade and run the wood through it again to increase the size of your groove. Check to see if the 1/4" plywood will fit inside the groove, if not, adjust the fence a little further away and run the wood through again.
-
Build the drawer boxes (part 2)
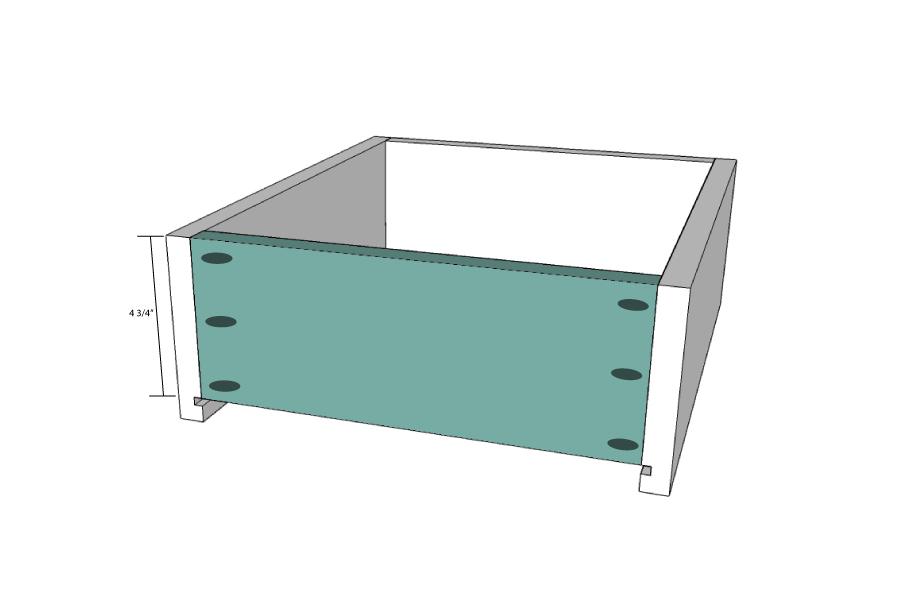
Once your grooves are all cut, adjust the blade height so it will cut through the board and cut the drawer box backs so they will be around 4 3/4" instead of 5 1/2" tall.=. Assemble the drawers using pocket holes on the outside of the drawer boxes (the front pocket holes will be hidden by the drawer fronts and the back will be behind the drawers). Make sure the drawers are square and the tops of the boards are all flush.
-
Build the drawer boxes (part 3)
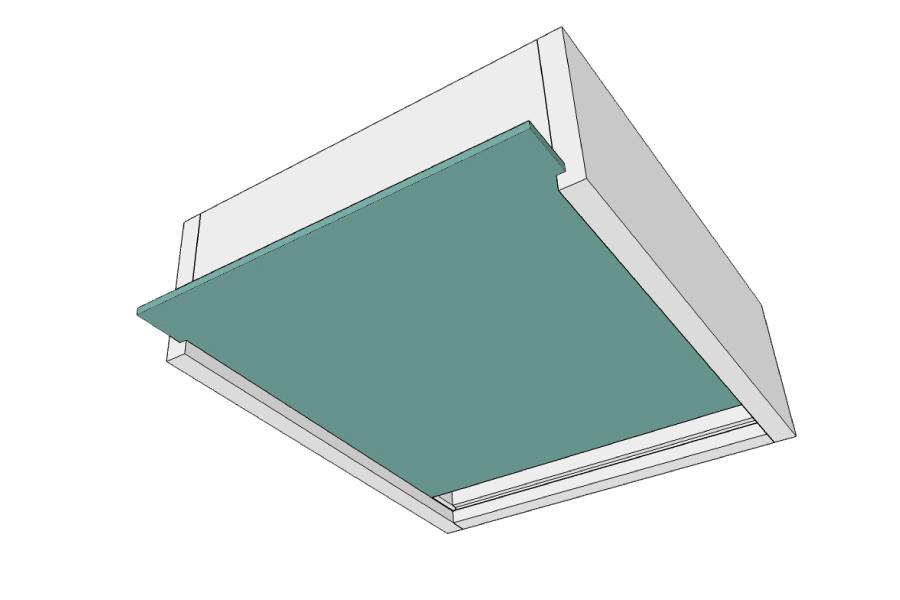
Cut 2 pieces of 1/4" plywood 13" x 15 1/5" for the drawer bottoms. Slide the plywood under the back of the drawer box and into the groove on the bottom of the sides and front of the drawer box. Carefully tap it in with a hammer if needed. Secure the back of the drawer bottom to the shorter drawer box back with screws or brad nails.
-
Build the drawer fronts (part 1)
The drawer fronts are sized for a full inset so they are flush with the front of the vanity face frame and to allow for an 1/8" reveal around each drawer front. The opening for the 2 drawers should be 15" wide by 16" tall. Double check the measurements of your openings and adjust as necessary.
-
Build the drawer fronts (part 2)
The measurements are for 1x3s that are exactly 2 1/2" wide. Adjust as necessary if your wood isn't the correct size, or buy larger and rip the pieces to the correct size.
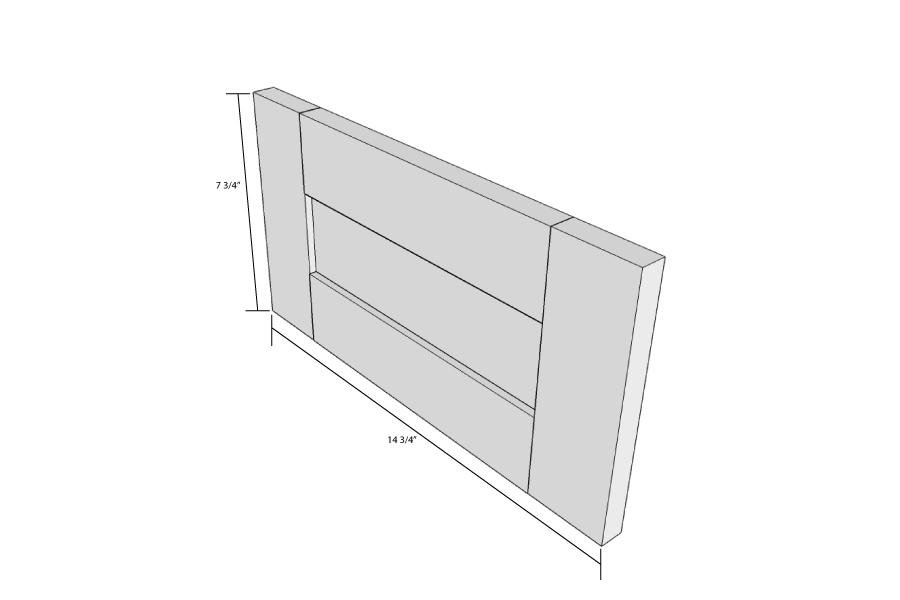
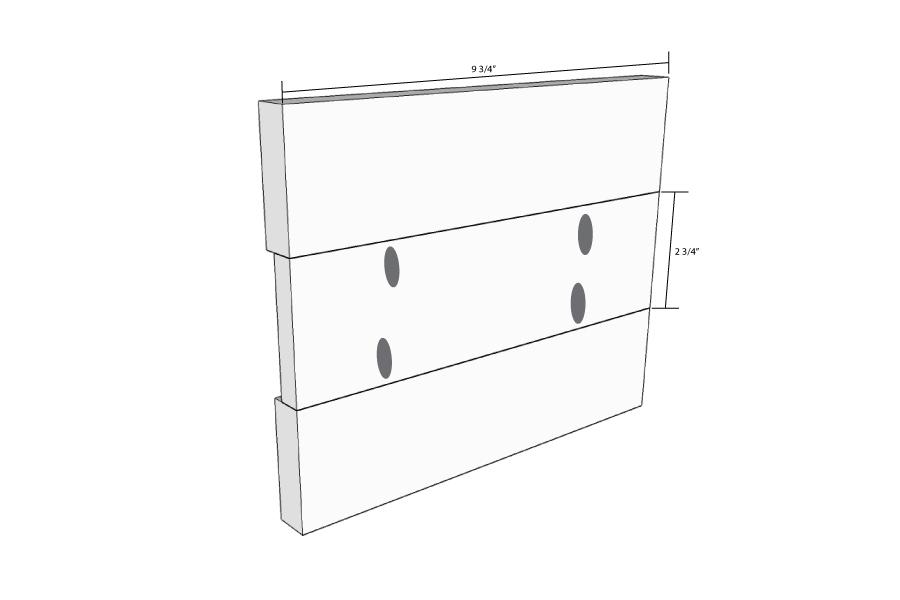
Cut 4 1x3s at 9 3/4" long for the drawer front top/bottom and 2 pieces of 1/2" plywood at 2 3/4" x 9 3/4" for the drawer front center panel. Attach the drawer front top and bottom to either side of the center panel, making sure they are all flush at the back using pocket holes.
-
Build the drawer fronts (part 3)
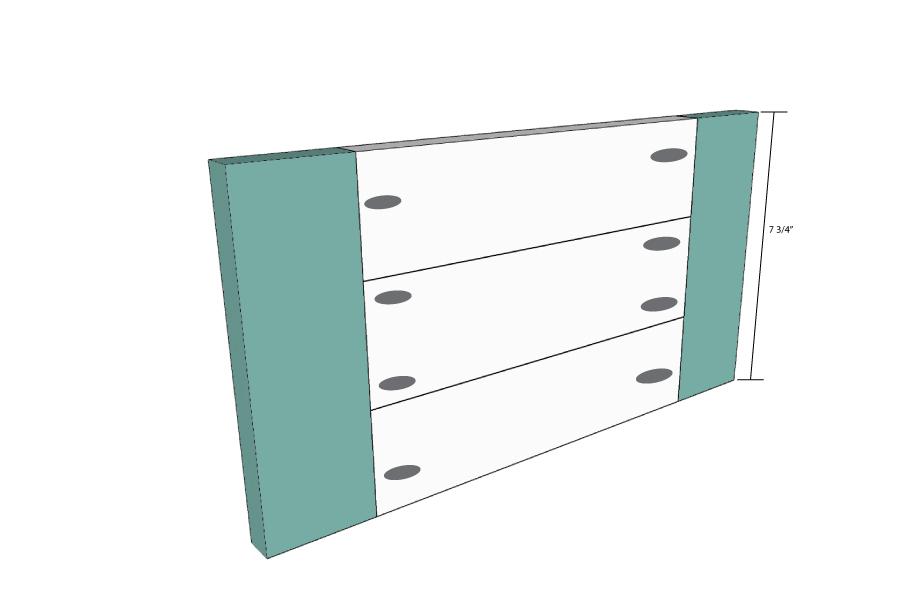
Cut 4 1x3s at 7 3/4" for the drawer front sides. Attach them to the sides of the drawer front top/bottom/center panel from the last step with pocket holes. Making sure the sides are flush with the top/bottoms.
-
Dimensions
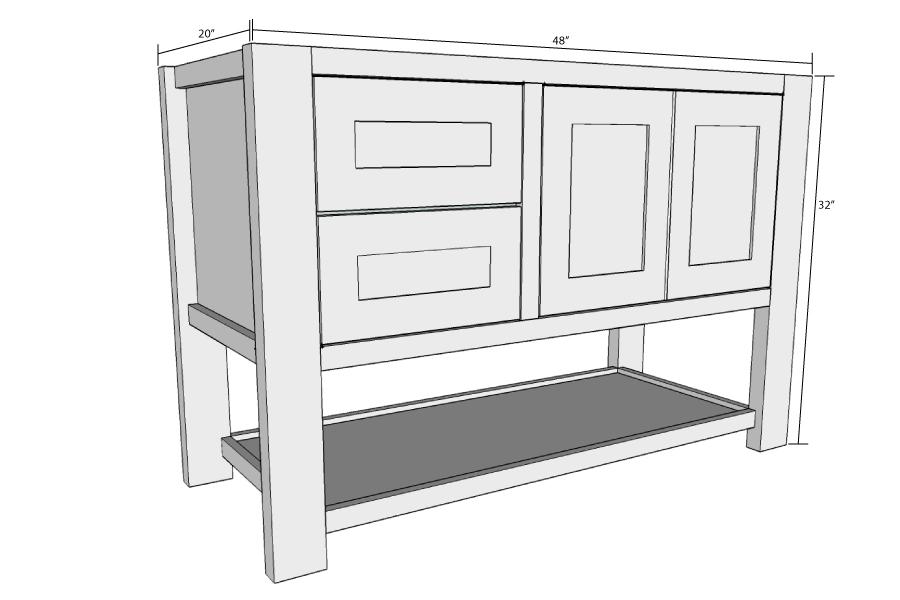
As you can see from the pictures above, I made a double bathroom vanity. Since the vanity is the same on either side, I am sharing the plans for a single vanity below with notes of how to adjust it for a double vanity. If you want to make a double vanity like I did, you will need to double all the steps except for the sides. Make two sides and then the center legs (that I am also sharing below). Also please note that the supplies list is for the single vanity so you will want to double it if making a double vanity. A double vanity will measure 92 1/2" wide.
-
Build the doors (part 1)
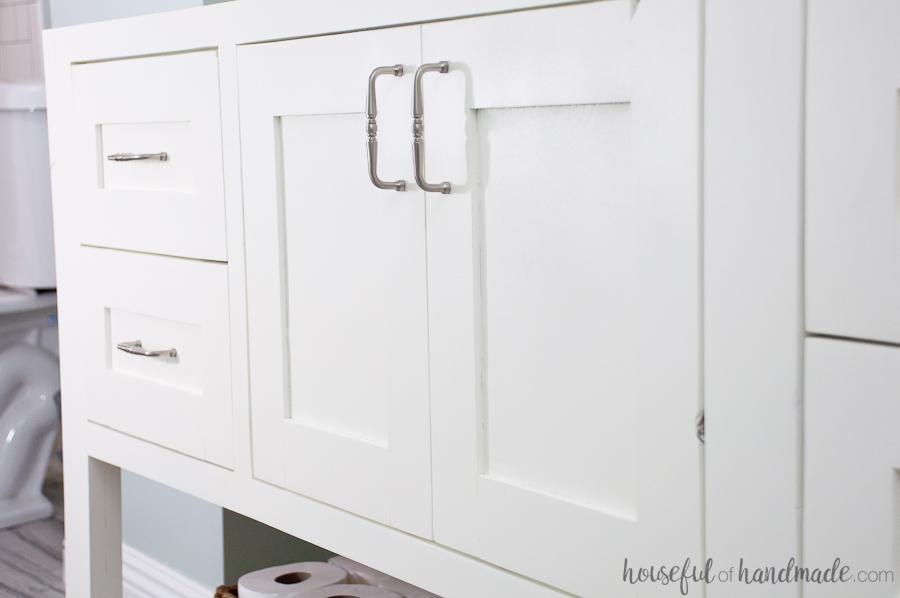
The doors are sized for a full inset so they are flush with the front of the vanity face frame and to allow for an 1/8" reveal around each door. The opening for the 2 doors should be 24 1/2" wide by 16" tall. Double check the measurements of your openings and adjust as necessary.
-
Build the doors (part 2)
The measurements are for 1x3s that are exactly 2 1/2" wide. Adjust as necessary if your wood isn't the correct size, or buy larger and rip the pieces to the correct size.
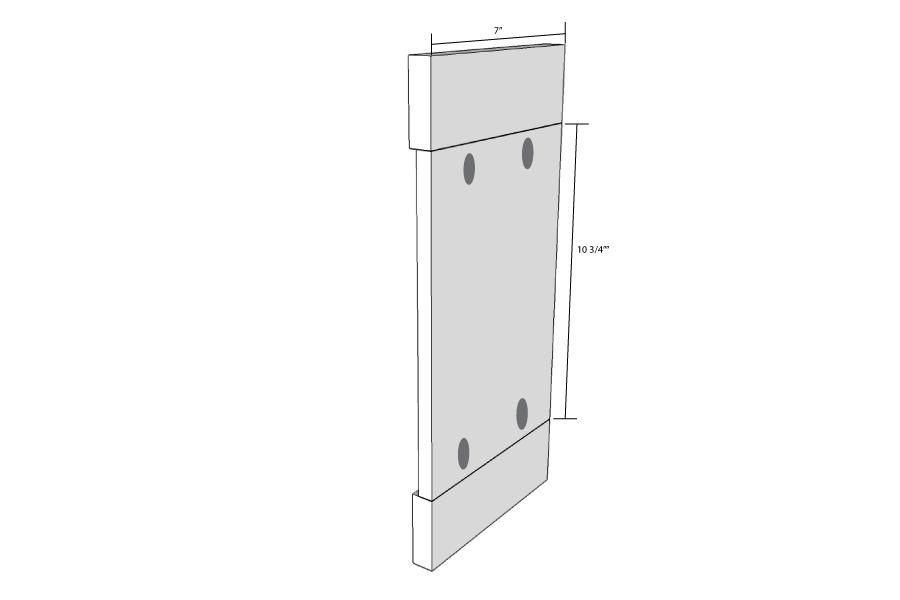
Cut 4 1x3s at 7" long for the door top/bottoms and 2 pieces of 1/2" plywood at 10 3/4" x 7" for the door center panels. Attach the top and bottom to either side of the center panel, making sure they are all flush to at the back using pocket holes.
-
Build the doors (part 3)
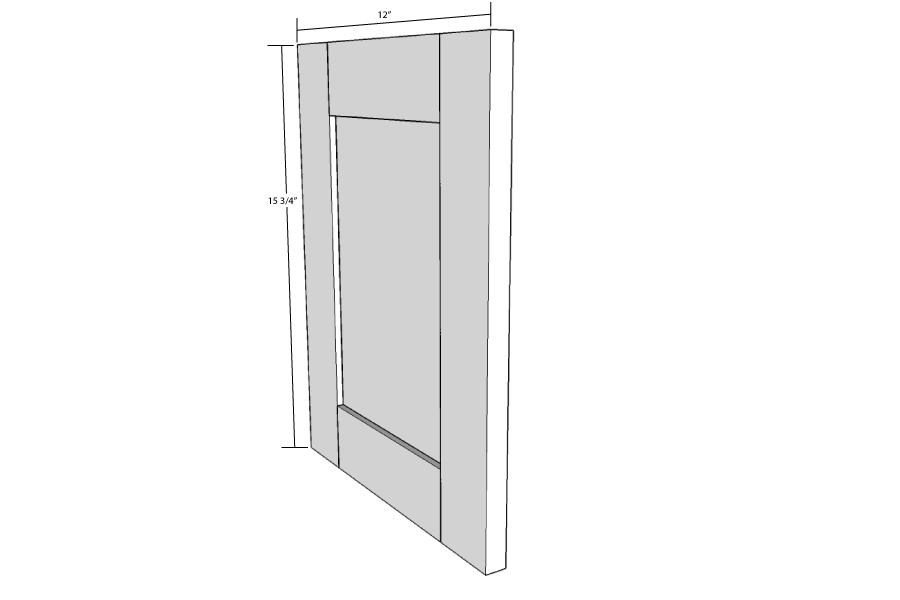
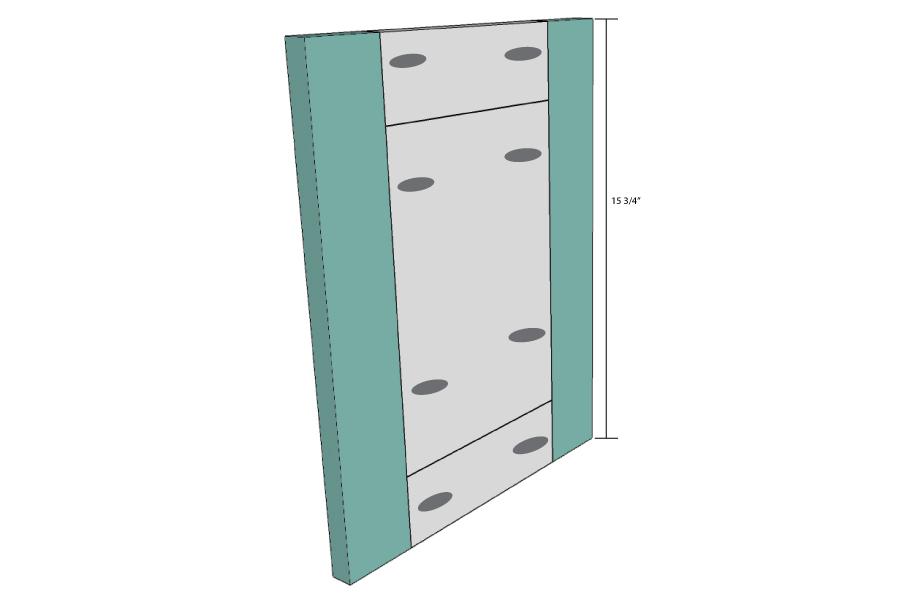
Cut 4 1x3s at 15 3/4" for the door sides. Attach them to the sides of the top/bottom/center panel from the last step with pocket holes. Making sure the sides are flush with the top/bottoms all the way around.
-
Finish
There are no visible pocket holes or nail holes, the are all hidden inside or behind the cabinet. If you wish to fill these, you can. Sand and paint or stain your vanity, the drawer boxes, drawer fronts and doors. Because it is being using in a bathroom, I would also recommend a clear protective coating. Install the drawer boxes and attach the fronts. Attach the doors with hinges made for full inset cabinets. Add knobs or pulls and you are all done! To see how I finish off our vanity and master bathroom remodel, visit my blog (in extras) where I share all my remodel updates and budget friendly home DIYs.
-
Add the cabinet bottom
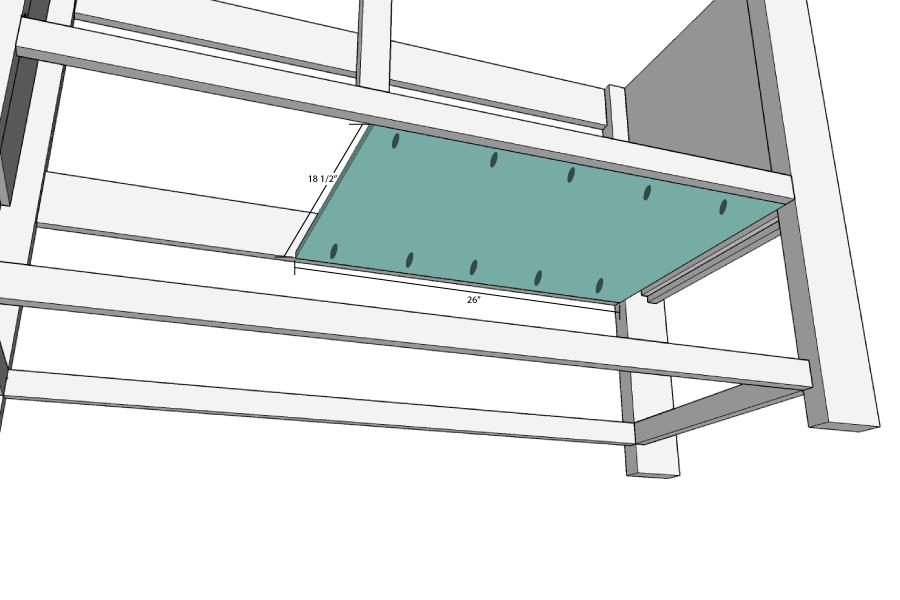
Cut a piece of 1/2" plywood to 26" x 18 1/2". Using pocket holes on the bottom of plywood, attach the cabinet bottom flush with the bottom of the frame. The cabinet bottom will not go all the way to the side panel, but will stop about 1" before it (ending flush with the legs). If you are worried about items in the cabinet falling through this small opening, you can use a scrap of 1/2" plywood to fill it (this is what I did) or cut your bottom panel 27" long and notch out the 3/4" x 1" section around the legs.
-
Add the cabinet side panel
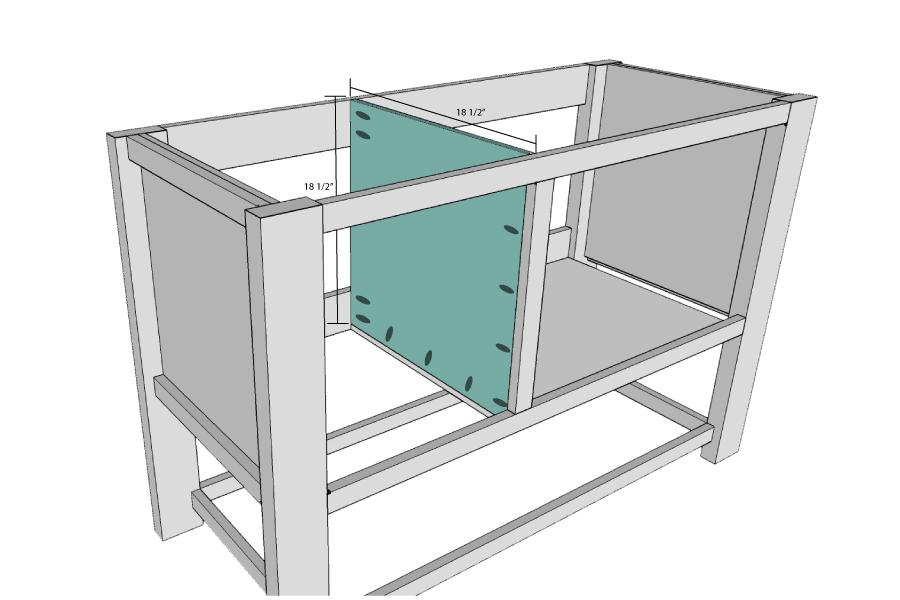
Cut a piece of 1/2" plywood to 18 1/2" x 18 1/2". Using pocket holes on the left side of the panel (the side opening toward the drawer section), attach the cabinet side panel flush with the left side of the front face frame.


