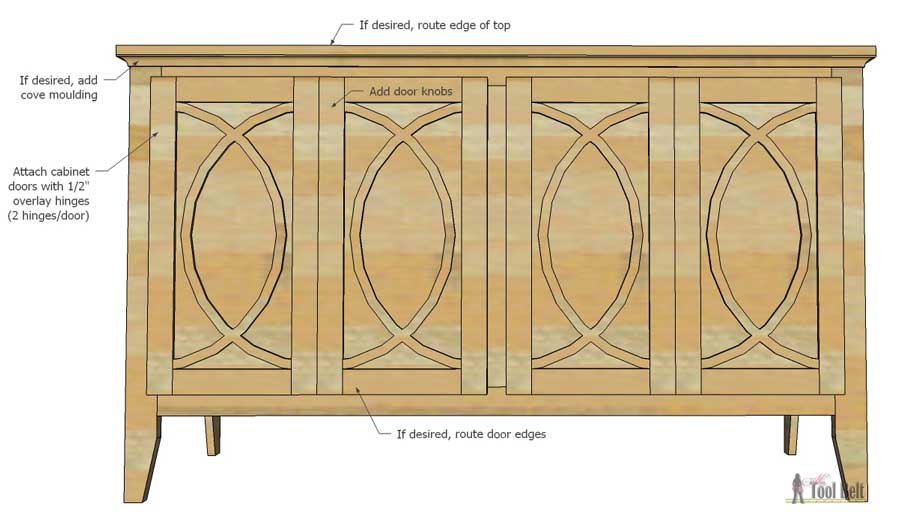
Buffet Cabinet with Circular Trim
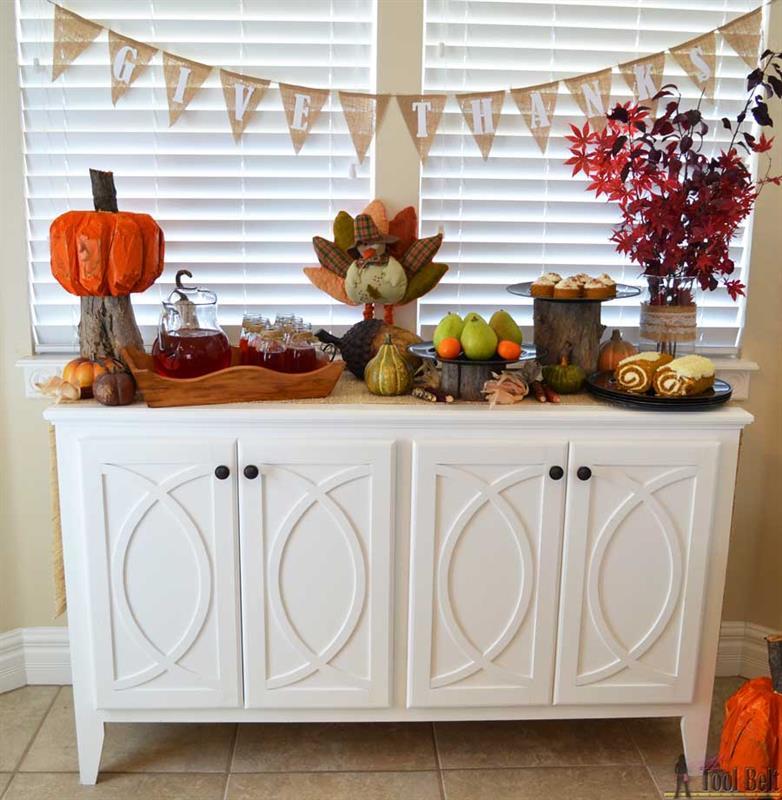
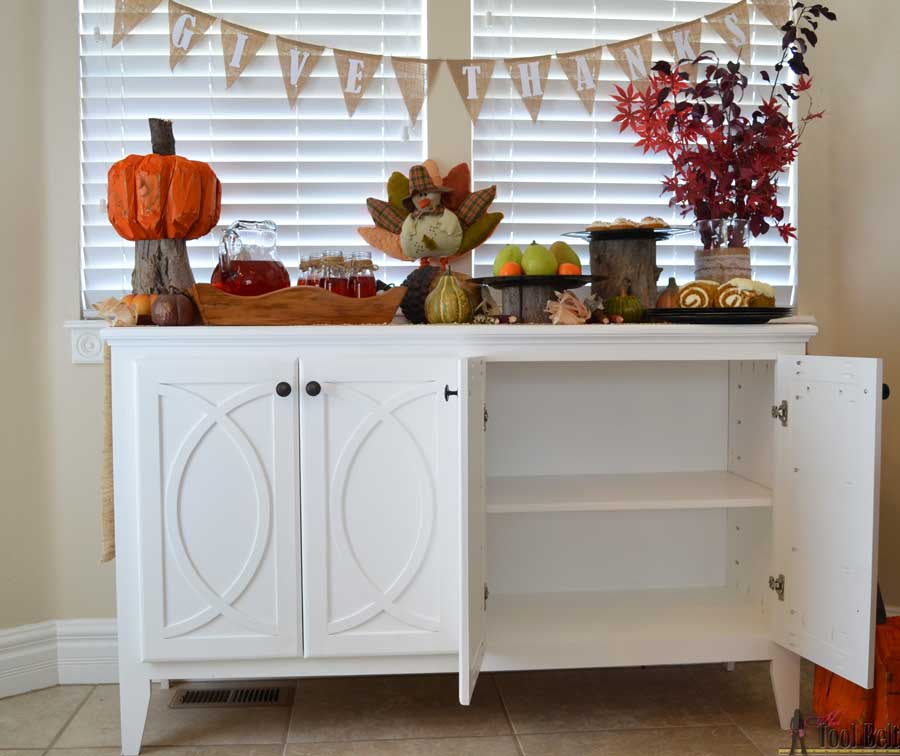
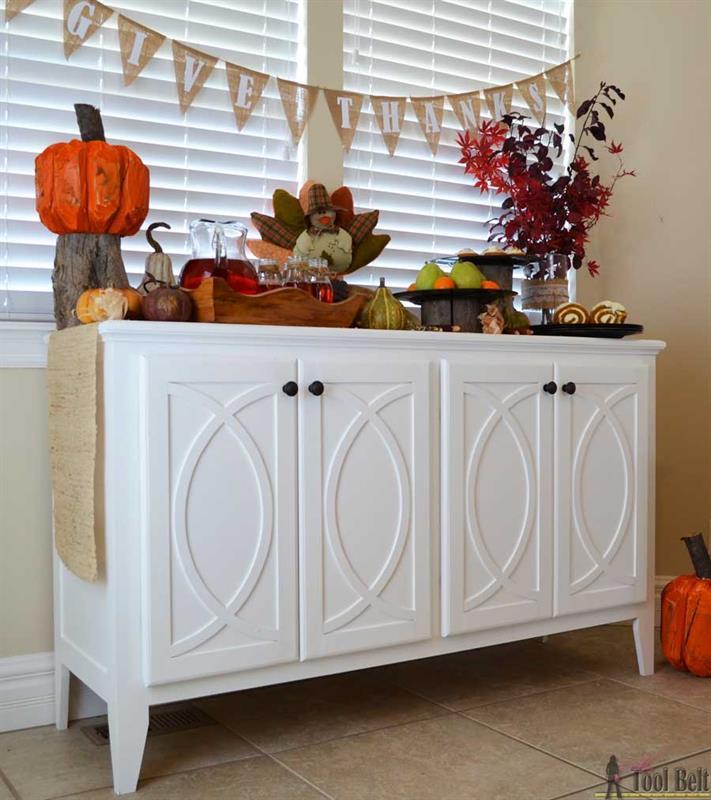
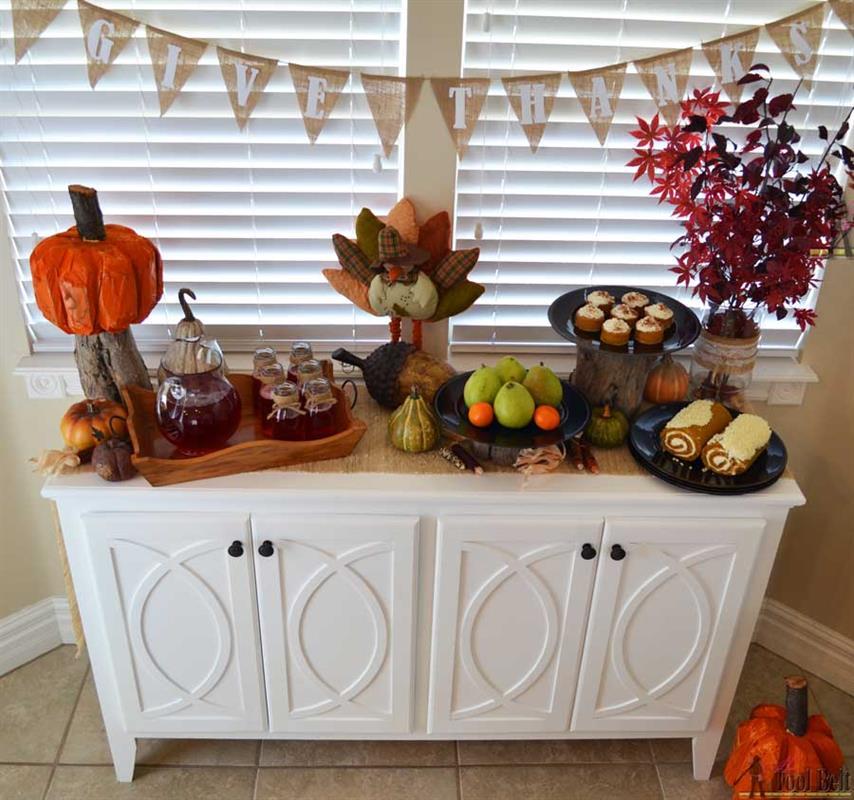
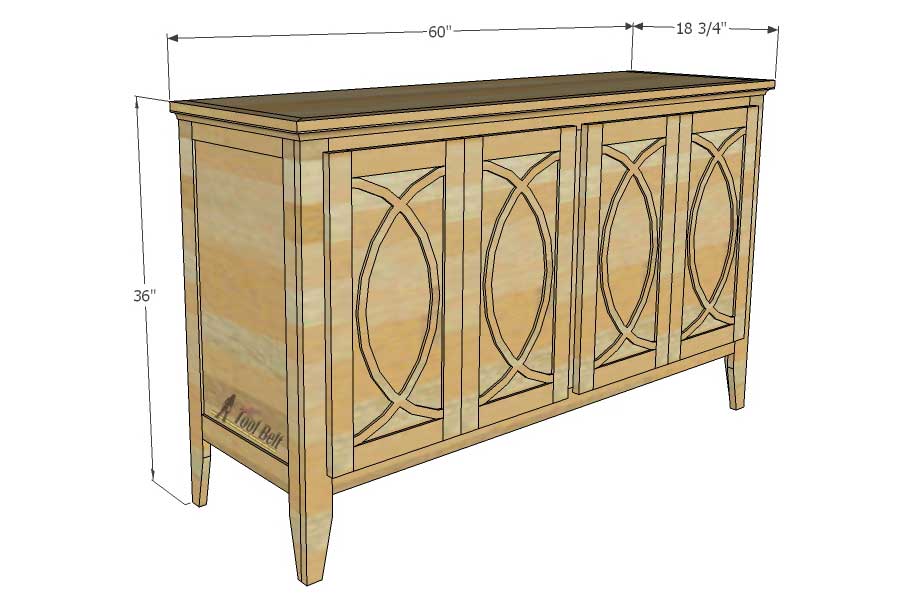
By HertoolbeltThis buffet or sideboard will generously store your dining and household goods in style. The circle trim detail on the cabinet doors adds unexpected elegance, or leave it off for a shaker style look.
Directions
-
Cut Leg Tapers
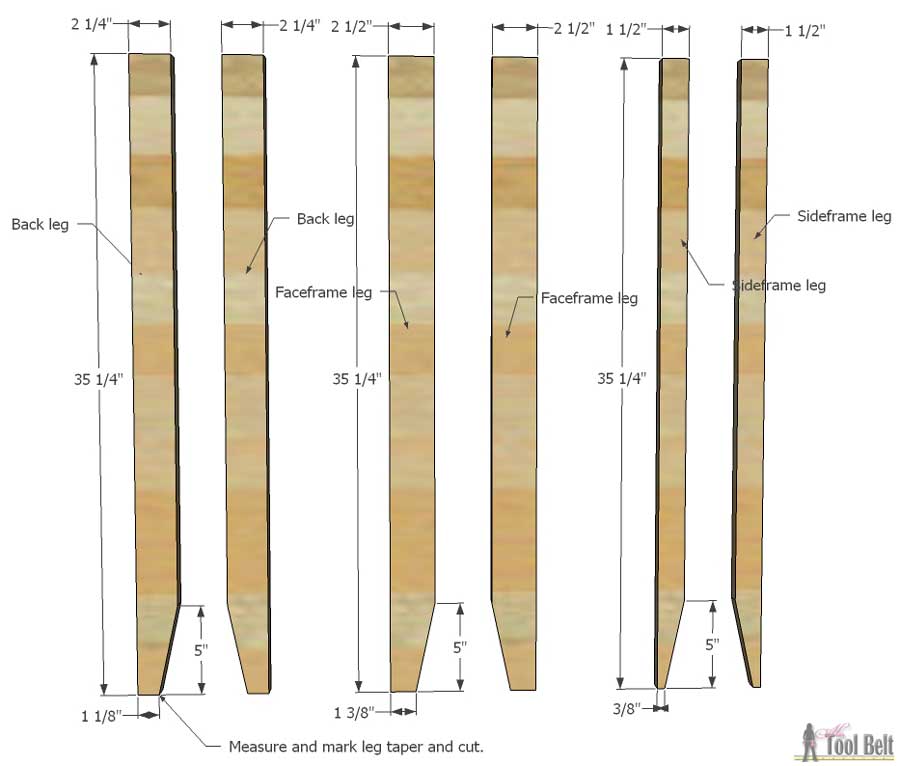
Note: the width of 1x3 boards can vary between 2 1/2" and 2 1/4". Make sure 1 of the 1x3 boards is 2 1/2" wide.
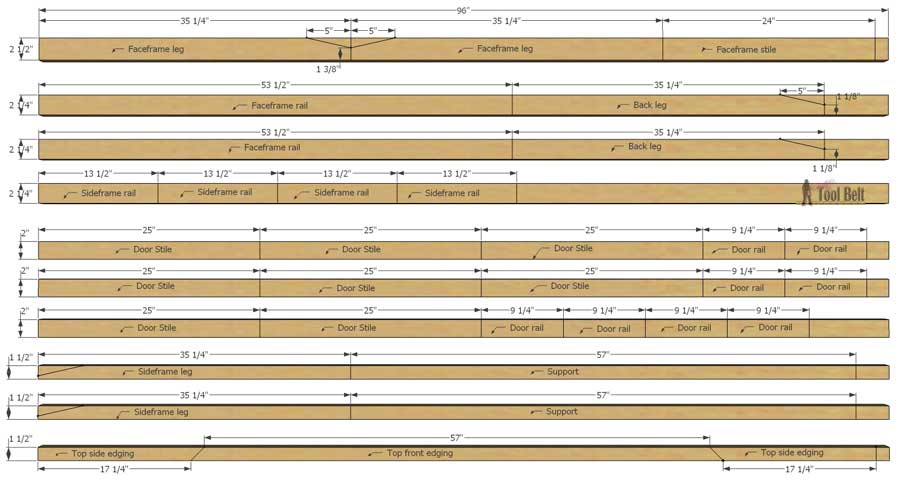
Cut the 3 sets of legs to 35 1/4" (back leg 2 1/4" wide, faceframe leg 2 1/2" wide and sideframe leg 1 1/2" wide.)
On the back legs mark one end 1 1/8" and 5" up, draw a line between the marks. On the faceframe legs mark one end 1 3/8" and 5" up, draw a line between the marks. On the sideframe legs mark one end 3/8" and 5" up, draw a line between the marks.
Use a saw (ie circular saw or jig saw) to cut the tapers on the legs. -
Assemble Faceframe
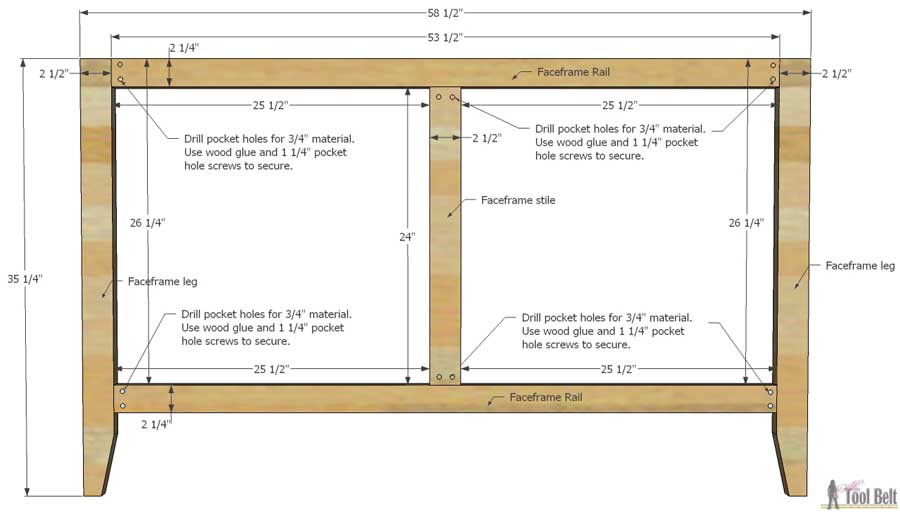
In both ends of the faceframe rails and faceframe stile, drill pocket holes for 3/4" material.
On the faceframe rail mark from the ends 25 1/2". Attach the faceframe stile between the faceframe rails and use wood glue and 1 1/4" pocket hole screws to secure in place.
On the faceframe legs, mark down from the top 26 1/4", this is the location of the lower rail. Use wood glue and 1 1/4" pocket hole screws to attach the faceframe rails to the legs. -
Assemble Sideframe
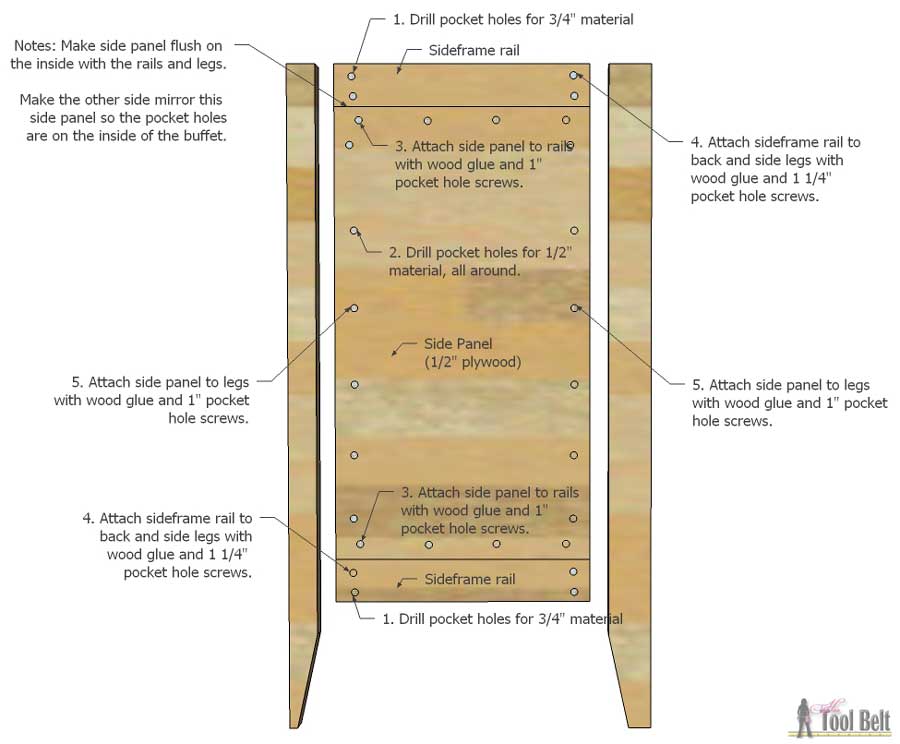
Note: The two sideframes need to be mirror image of each other. (The 1 1/2" wide sideframe legs need to be in the front of both sideframe panels to attach to the faceframe, and the pocket holes need to be on the inside of the cabinet.)
Drill pocket holes for 3/4" material in both ends of the sideframe rails.
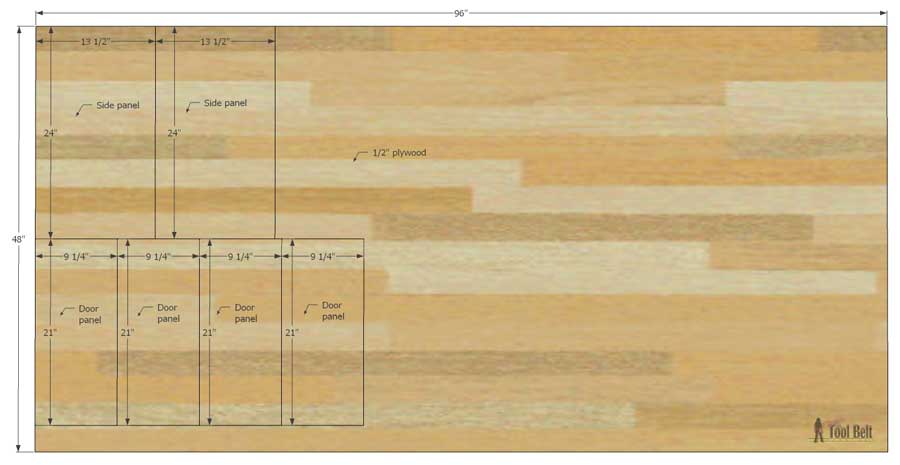
Drill pocket holes for 1/2" material all around the side panel.
Attach the side panel to the sideframe rails with wood glue and 1" pocket hole screws. Keep the boards/panel flush on the inside.
Attach the sideframe rails to the back and sideframe legs with wood glue and 1 1/4" pocket hole screws, keeping the tops flush.
Attach the side panel to the legs with wood glue and 1" pocket hole screws. -
Prep Sideframe
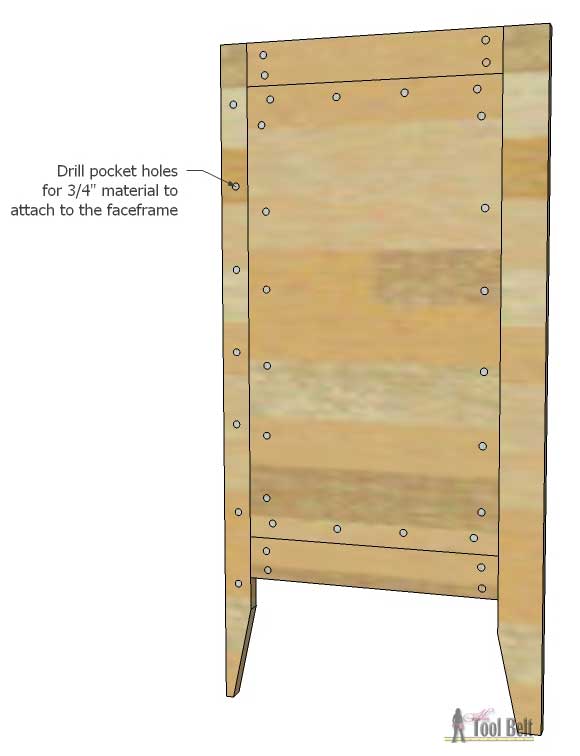
Drill pocket holes for 3/4" material down the sideframe legs to attach the sideframe to the faceframe.
-
Attach Sides
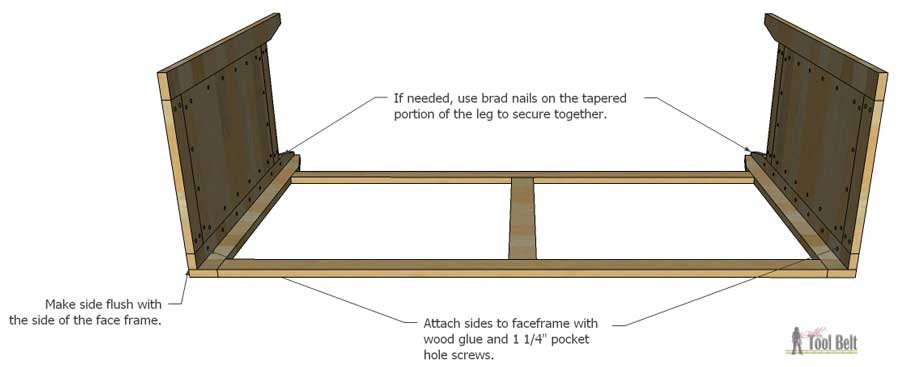
Line up the tops of the faceframe and sideframes, also line up the sideframes with the sides of the faceframe. Use wood glue and 1 1/4" pocket hole screws to attach the sideframe legs to the faceframe.
If needed, use the appropriate length brad nails to secure the tapered part of the sideframe legs. -
Attach Bottom
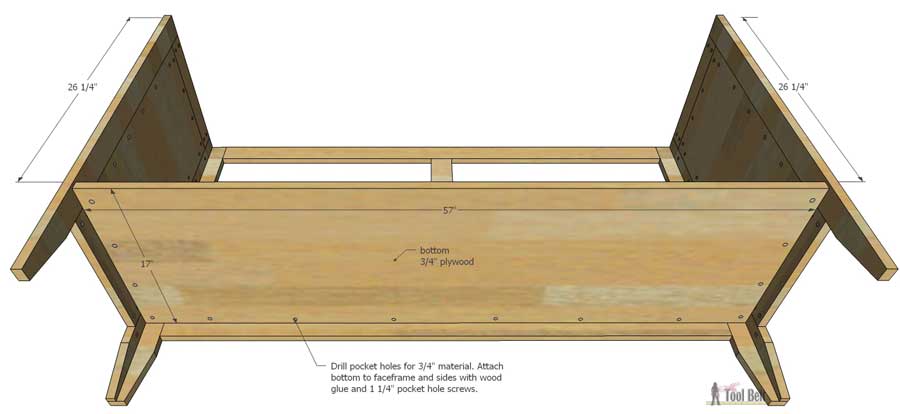
Measure and mark down 26 1/4" from the top of sides and faceframe.
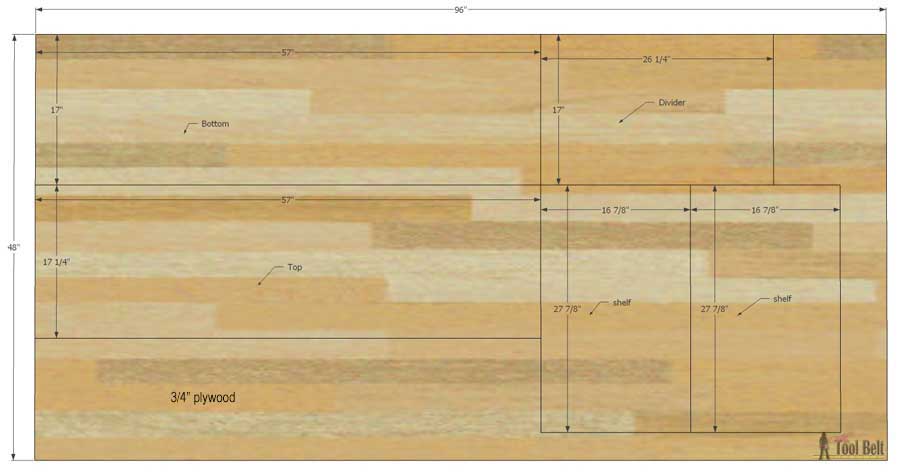
Drill pocket holes for 3/4" material in the bottom plywood. Use wood glue and 1 1/4" pocket hole screws to attach the bottom to the faceframe and sides. The top of the plywood lines up with the 26 1/4" mark. -
Prep Divider
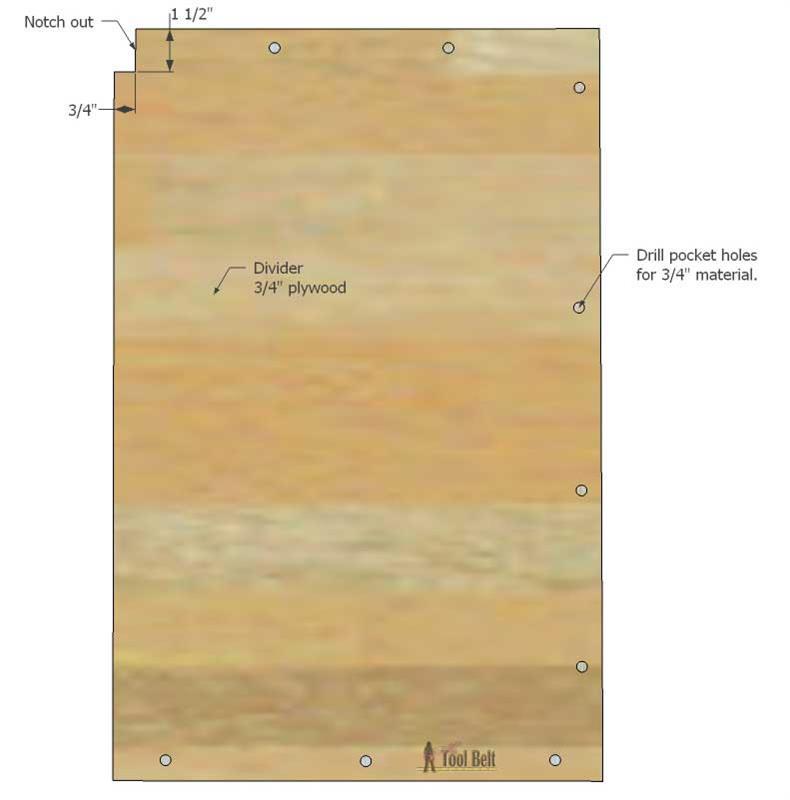
On the divider 3/4" plywood piece, mark from the top 1 1/2" and 3/4" from the side. Use a jigsaw or equivalent to cut out the 3/4" x 1 1/2" notch. In the bottom, side and top drill pocket holes for 3/4" material.
-
Add Divider and Supports
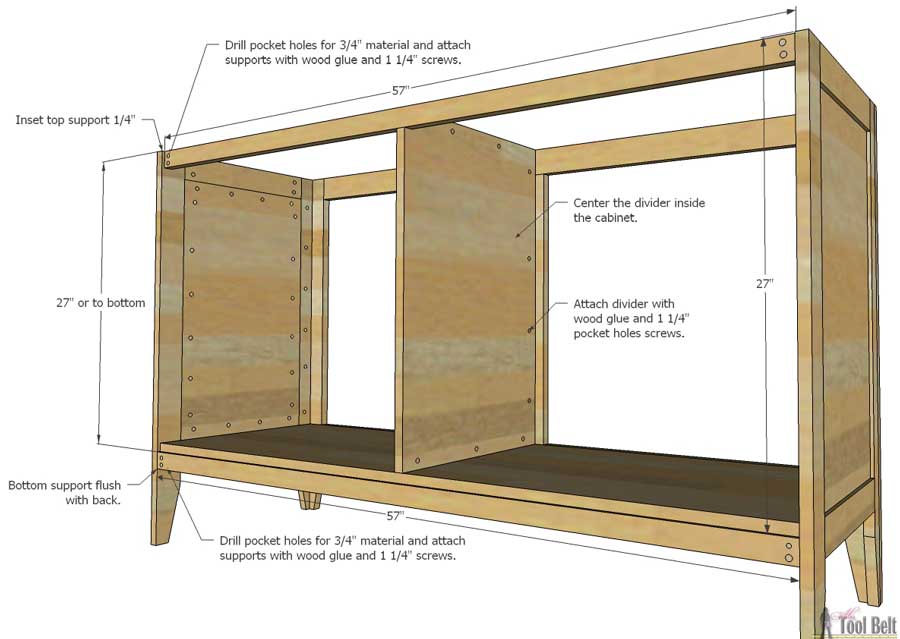
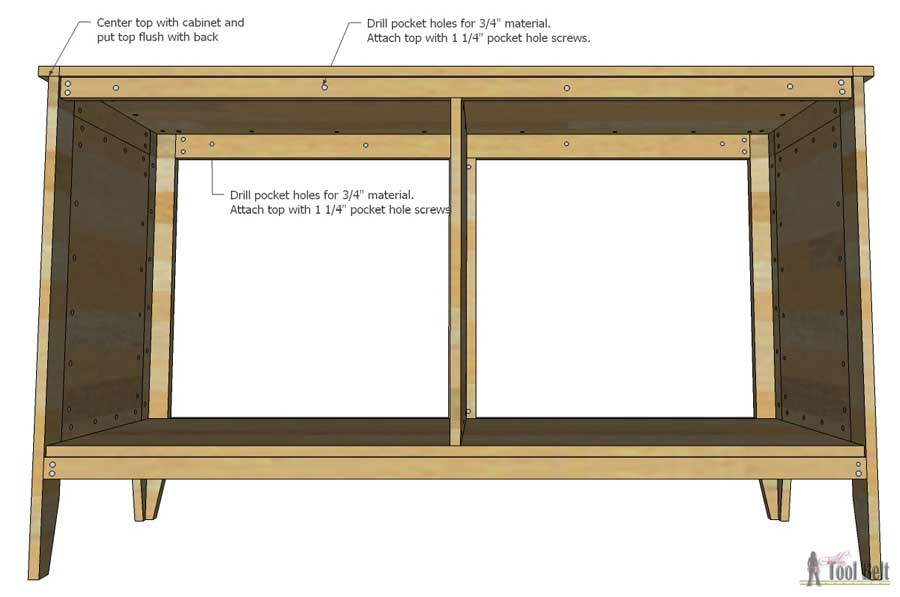
Drill pocket holes for 3/4" material in both ends of the supports. Attach the lower support under the bottom plywood and flush with the back leg. Inset the upper support 1/4" and flush with the side tops. Secure supports using wood glue and 1 1/4" pocket hole screws. Center the divider inside the cabinet, secure with wood glue and 1 1/4" pocket hole screws.
-
Shelves
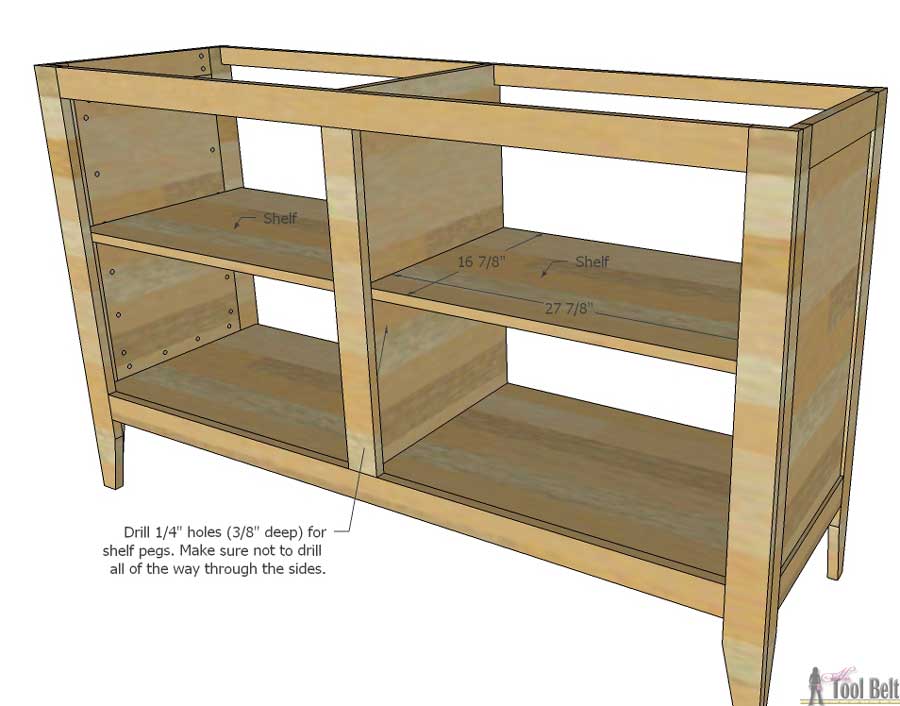
Use a shelf pin jig or 1/4" drill bit (drilling to a depth of 3/8") to place adjustable shelves where desired. Put shelf pins in place and dryfit shelves, trim shelves as needed.
-
Assemble Top
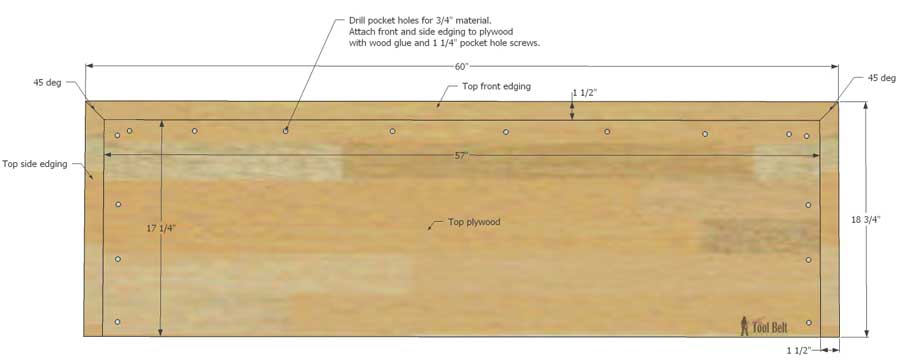
Drill pocket holes for 3/4" material on the 2 short sides and 1 long side of the top plywood. Cut the top side edging with a 45 deg miter cut on one end to fit on the plywood short sides. Cut the top front edging with 45 deg miter cuts on both ends to fit on the plywood long side. Use wood glue and 1 1/4" pocket hole screws to attach the edging pieces to the top plywood.
-
Attach Top
Drill pocket holes for 3/4" material in the upper support and upper faceframe rail to attach the top. Center the top on the cabinet (side to side) and put the top flush to the back of the cabinet. Use wood glue and 1 1/4" pocket hole screws to secure the top to the cabinet.
-
Attach Back
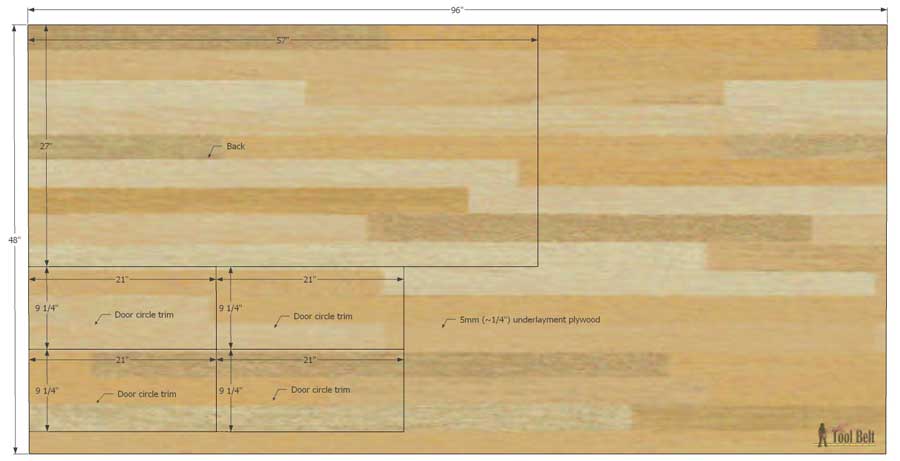
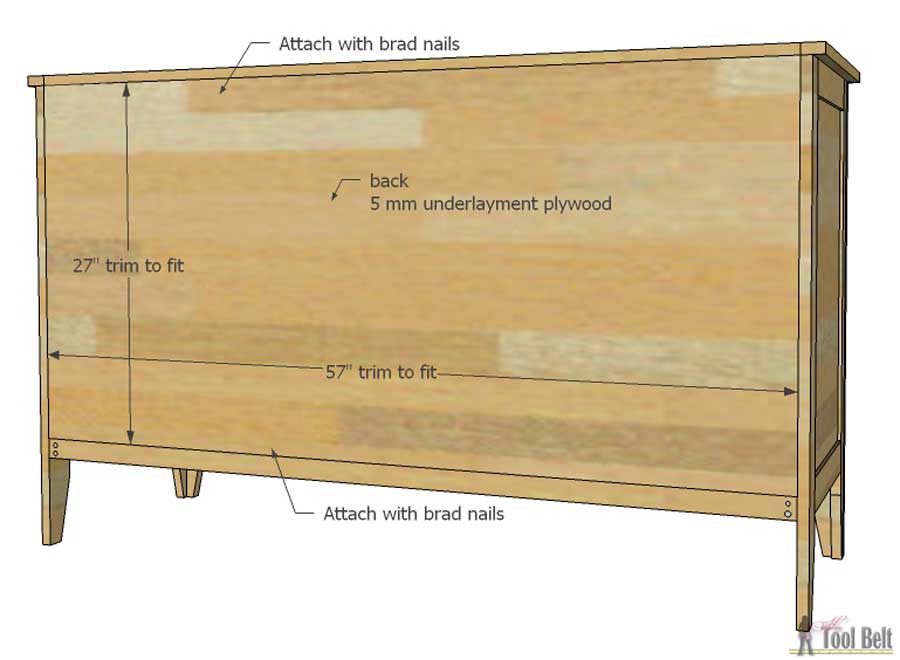
Cut the back piece from 5 mm (about 1/4") underlayment plywood, dryfit and trim as needed. Use brad nails to secure the back into place (nail into the upper support and bottom plywood).
-
Assemble Doors
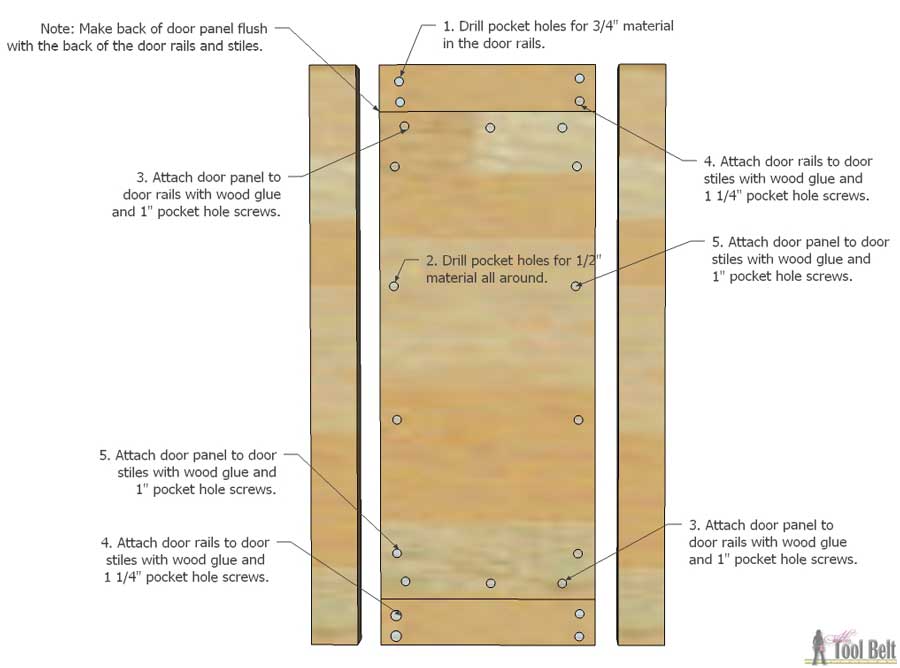
Drill pocket holes for 3/4" material in both ends of the door rails.
Drill pocket holes for 1/2" material all around the door panel.
Attach the door panel to the door rails with wood glue and 1" pocket hole screws. Keep the boards/panel flush on the door backside.
Attach the door rails to the door stiles with wood glue and 1 1/4" pocket hole screws.
Attach the door panel to the door stiles with wood glue and 1" pocket hole screws. -
Circle Trim Detail
Optional step:
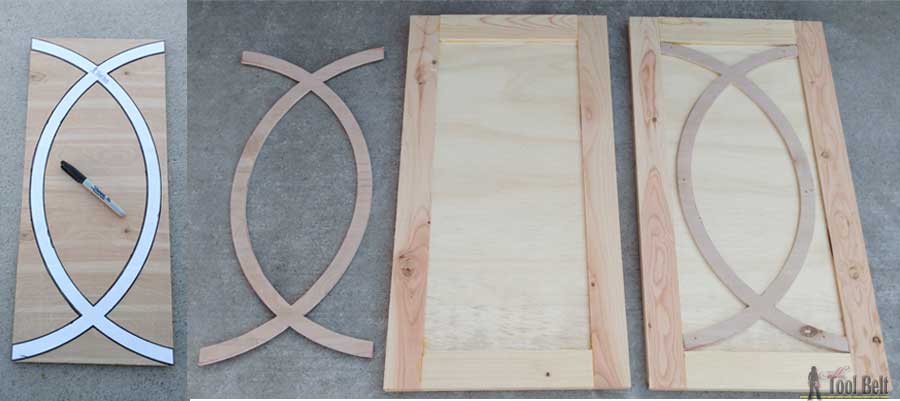
Cut 4 pieces of 5 mm underlayment plywood 9 1/4" x 21".Print out the circle door template from the extras section. Line up the pattern using guides, tape papers together and cut out circle door template. Trace circle trim pattern onto the 4 underlayment pieces. Cut out circle trim using a band saw, jigsaw or scroll saw. Sand as necessary. Dryfit the trim into the door fronts, trim as needed. Use wood glue and 1/2"-5/8" brad nails to secure the trim.
-
Buffet Finishes
If desired, add cove molding under the top hangover with wood glue and brad nails. If desired, route decorative edges on the top edging and around the outside of the doors. Fill nail holes, blemishes and cracks with wood filler. Sand buffet smooth starting with 80 grit and moving to 120 grit sandpaper. Finish the cabinet as desired. I applied paint primer followed by white latex paint. Once the cabinet is dry attach doors with 1/2" overlay hinges (traditional or European hinges). Add cabinet door knobs as desired.


